-

Qualtrics Platform -

Customer Journey Optimizer -

XM Discover -

Qualtrics Social Connect
Collaborating on Projects
About Collaborating on Projects
Our collaborate feature allows you to give other Qualtrics users access to your surveys when they log into their accounts. That way, you can work on the same project without giving out your account information. You can even choose to restrict what type of access other users have to your project. For example, if you have translators working on your project, you can make sure they can upload translation to the survey, but have no access to the data you collect.
Collaborating Inside Your Organization
You can collaborate on surveys with individual users and groups in your organization. A group is a set of Qualtrics users with access to a shared library of surveys, contacts, and other project data. If you want to create a group, contact the Brand Administrator within your organization who can create one for you.
- Within the project’s Survey tab, click Tools.
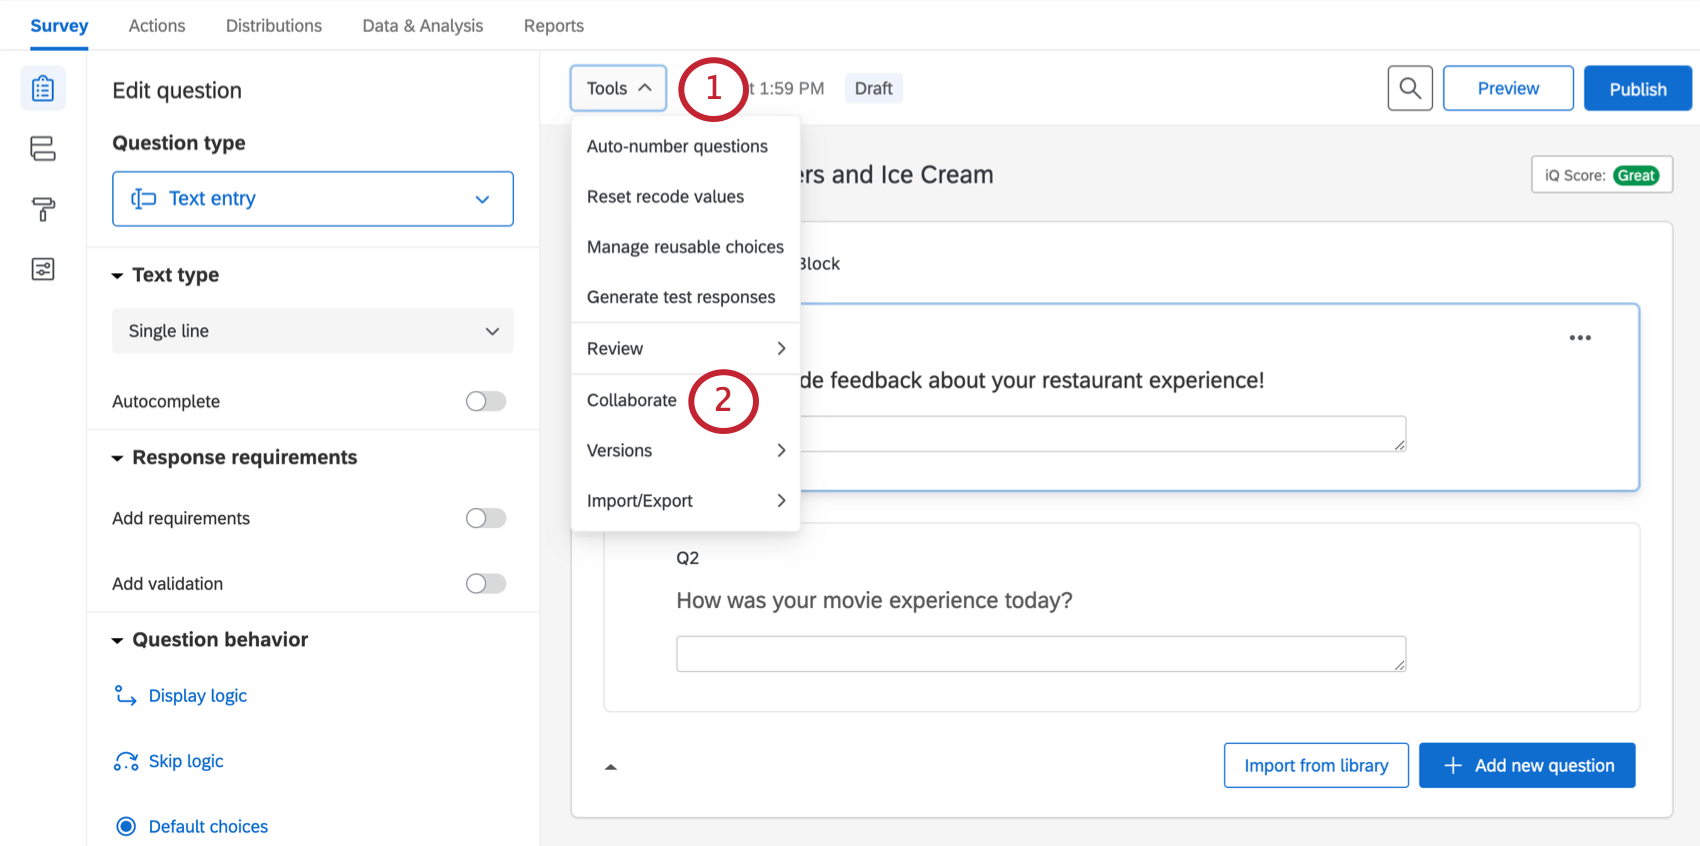
- Select Collaborate.
Qtip: Missing the Collaborate button? There are two reasons this can happen. The first is that you cannot invite someone to collaborate on a project you don’t own. To give another user access to that project, you’ll have to contact its original creator. However, if you are the survey’s owner, then chances are you’re missing the permission to collaborate inside your organization. If you belong to a Qualtrics license, contact your Brand Administrator to request this permission be turned on.
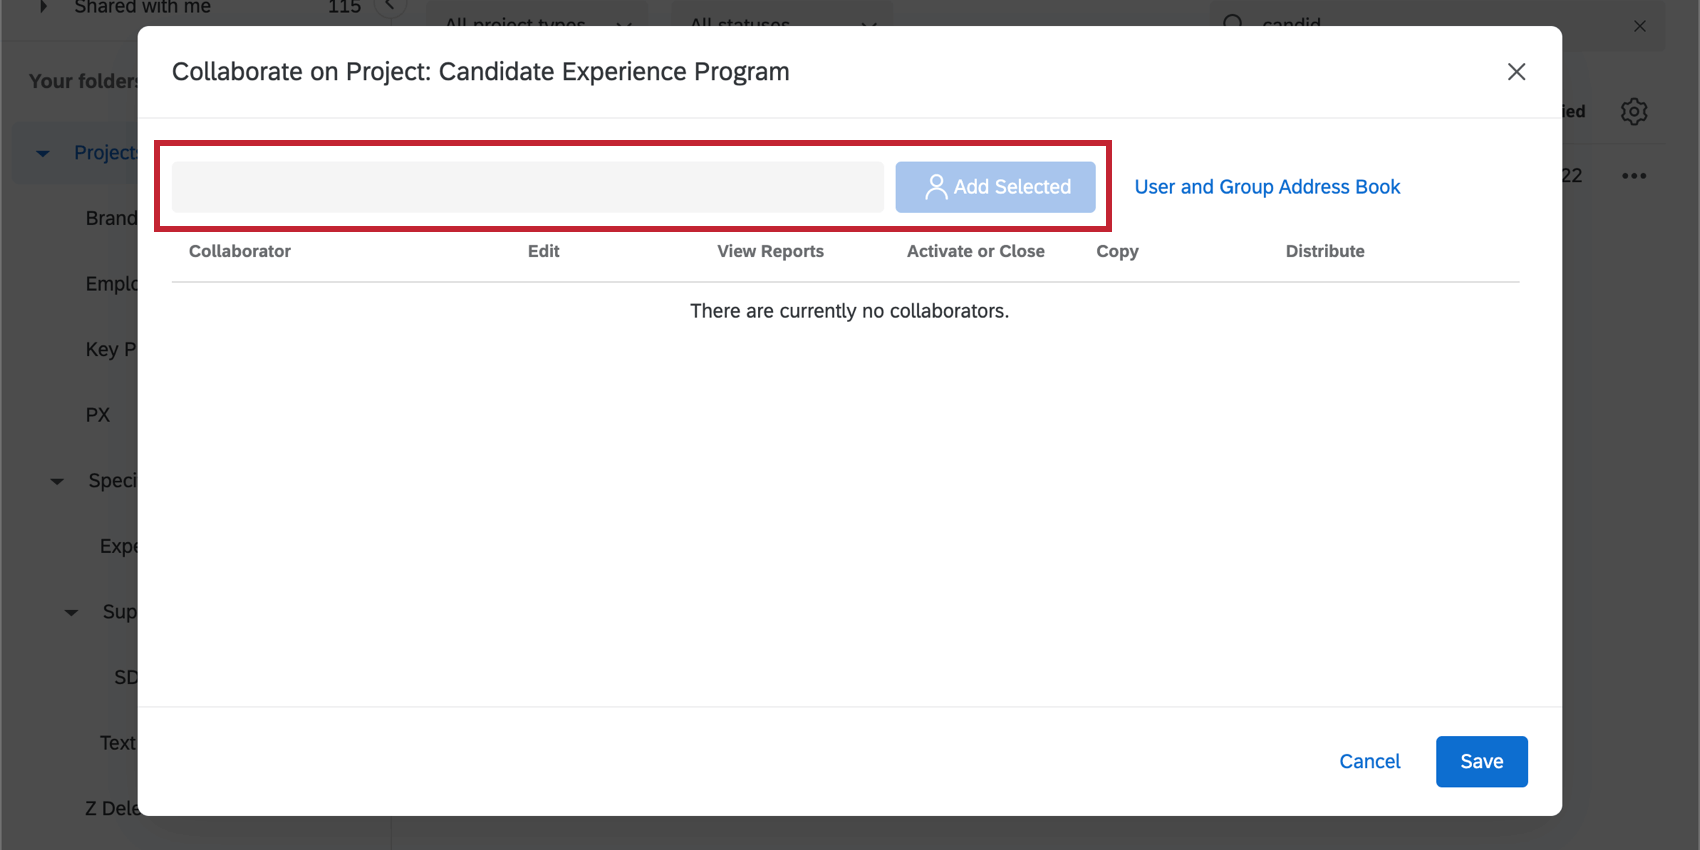
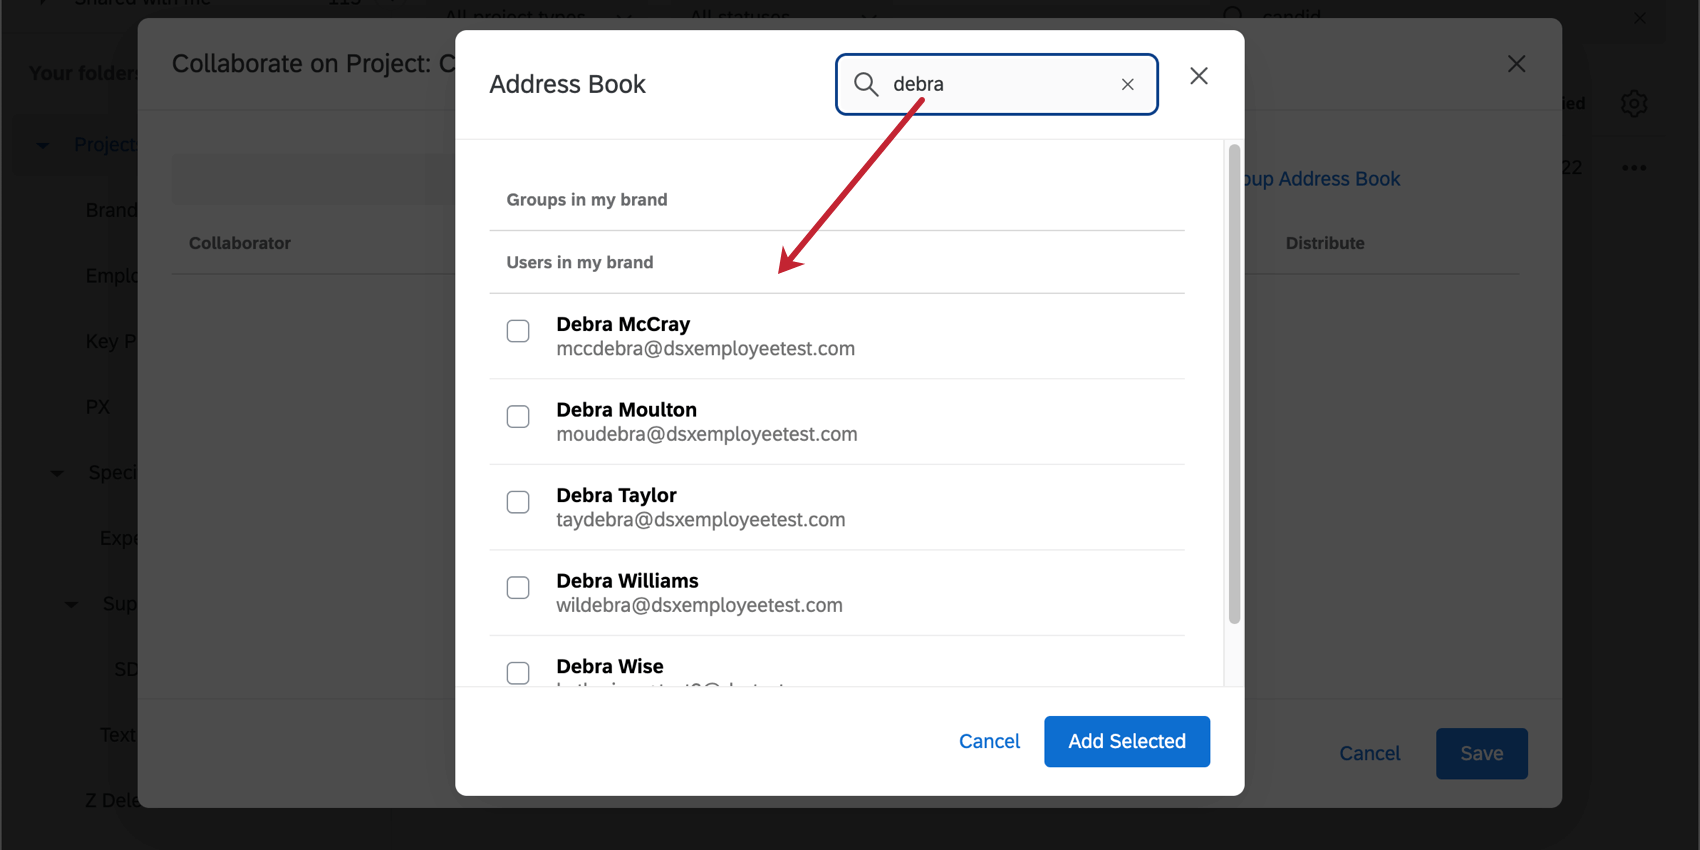
- If a user is in the same organization as you, you can type their name or email into the Type Username or Email field, or find them inside the User and Group Address Book.
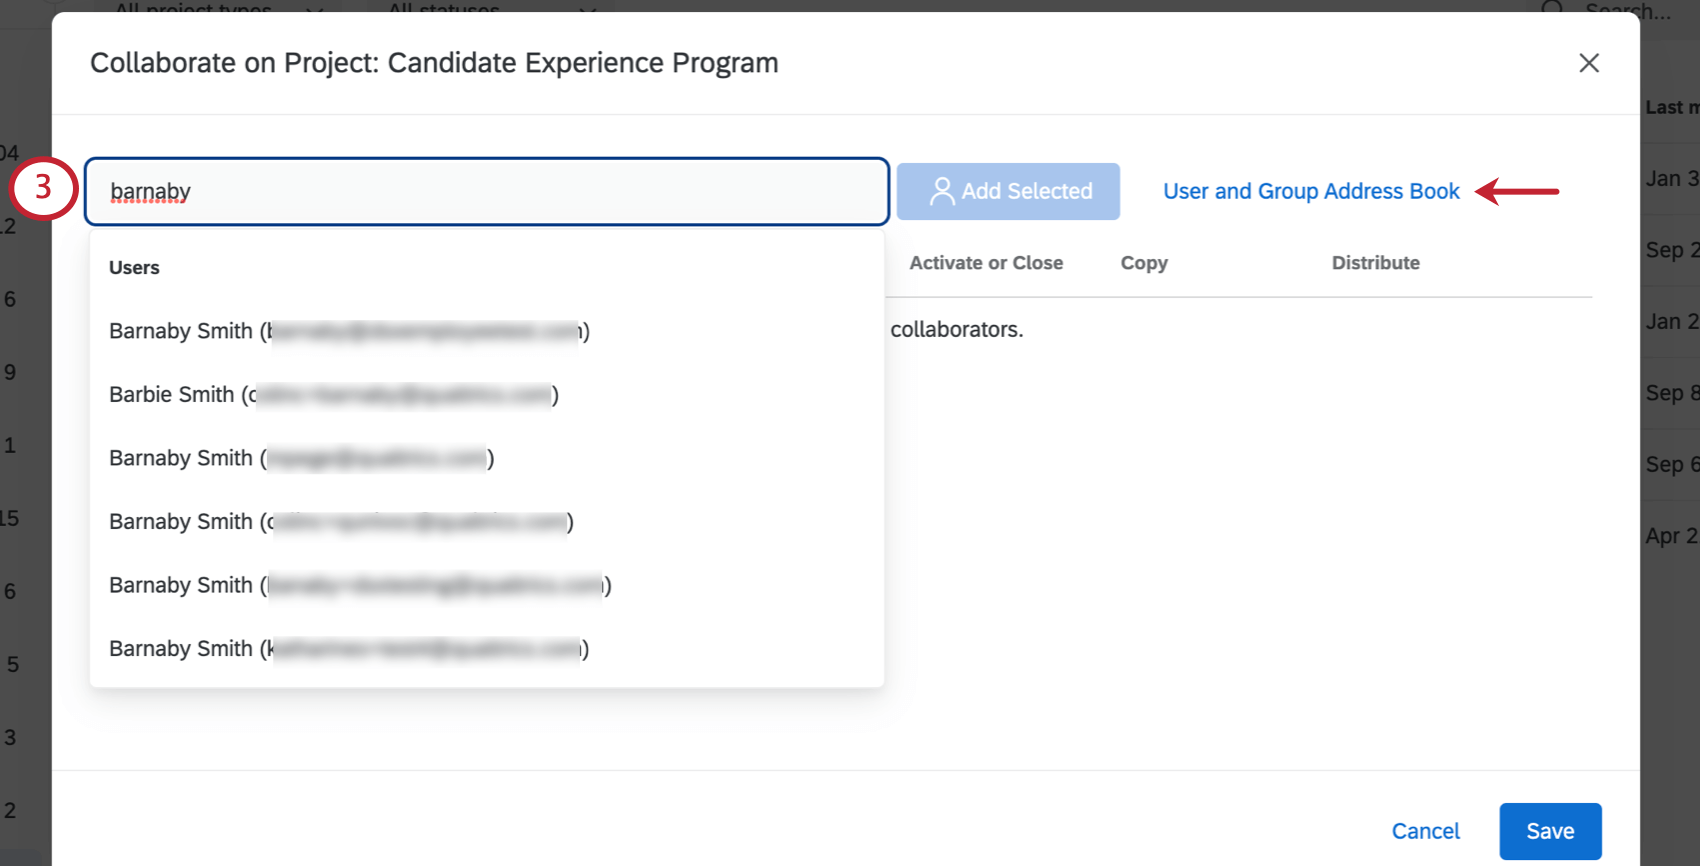 Qtip: You’ll only see groups that you belong to listed in the address book.
 - Once inside the address book, select the user or user group you want to collaborate with from the list and click Add Selected. Use the search bar in the top-right corner of the window to quickly locate your user or user group.
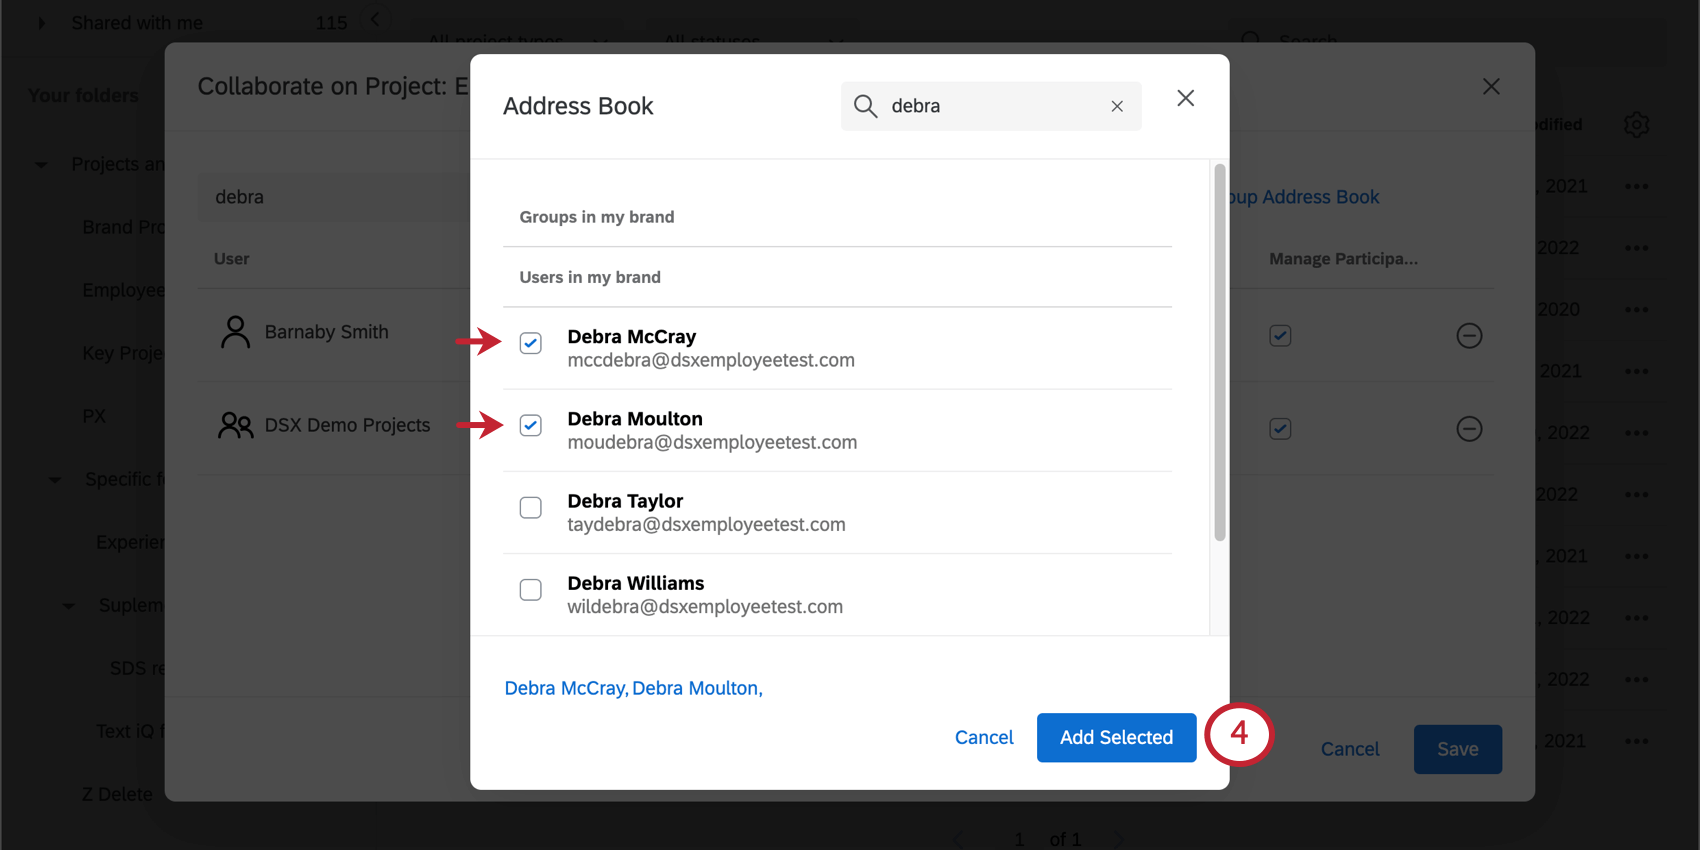 Qtip: Don’t see the person you are looking for? Make sure they have a Qualtrics account within your same license. If their account is not in the same license as yours, then their account won’t appear in your list, although you can still collaborate with these users by entering their email address into the field on the previous window. The email address you share with does not have to match their Qualtrics account.
 - Type a custom message and click Invite when you’re done. This message will be presented in an email invitation the user receives, along with the standard invitation. If you’re fine with just a standard invitation being sent, leave the box blank.
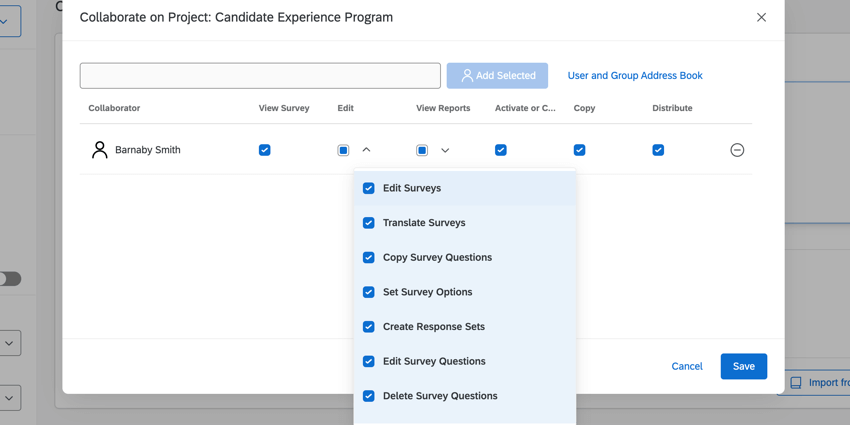
- Select the checkboxes for the permissions you want to grant each person or group you’ve added. See Collaboration Permissions for more details on each of these options.
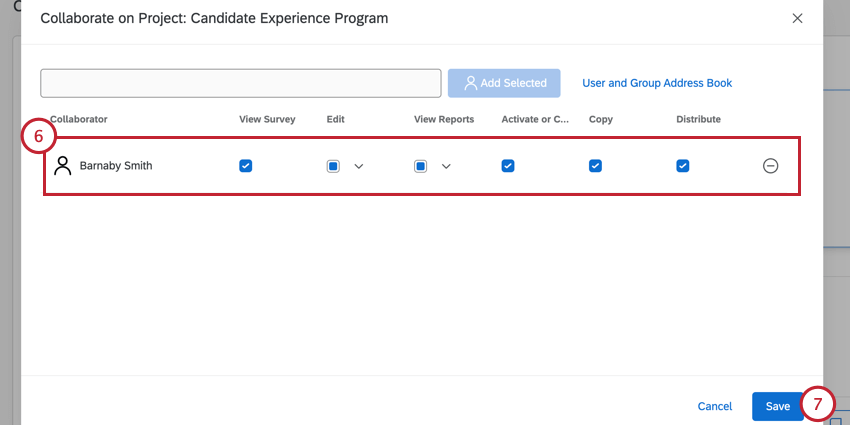 Qtip: Click arrow next to the Edit and View Reports permissions to further customize the level of access your collaborators have.
 - Click Save to send the invitation.
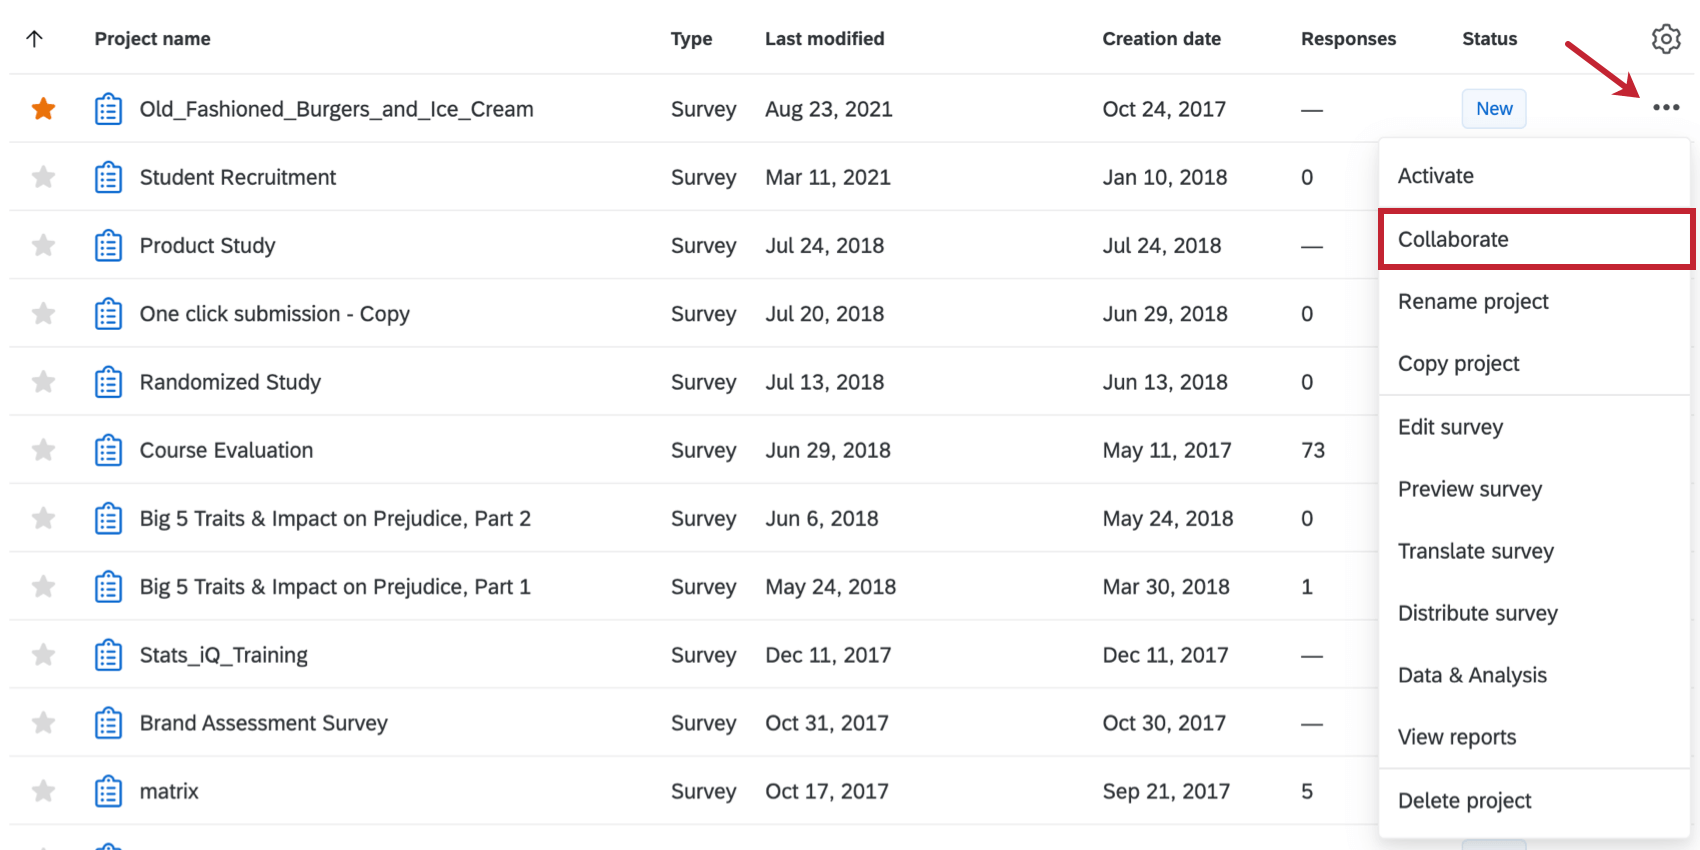
Qtip: Are you on the Projects page? You can also collaborate by navigating to your survey on the Projects page, clicking the dropdown to the right of the survey, and selecting Collaborate.
Collaborating Outside Your Organization and with New Users
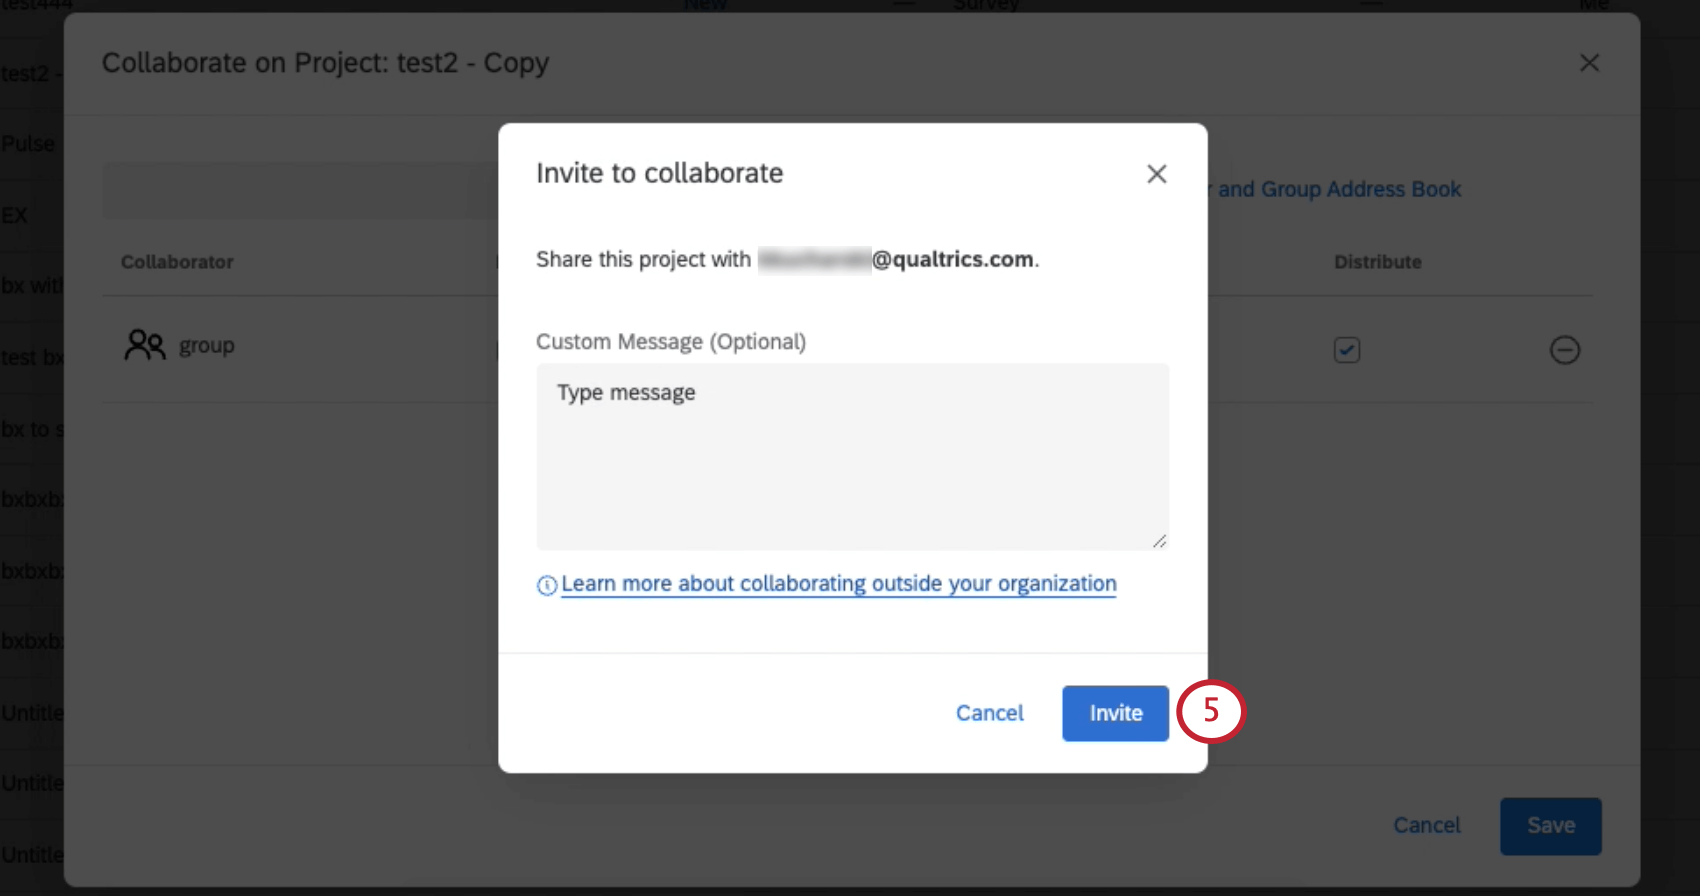
Collaborating with users outside of your organization works very similarly to collaborating within your organization. Rather than using the address book though, you’ll simply enter the email address associated with the user’s account into the text box and click the Add button. This email address does not have to match the user’s Qualtrics account.
New Users
You can also collaborate on a survey with a user who does not already have a Qualtrics account. Simply type their email address into the text box and click Add. Your collaborator will then need to make a new account. Your collaborator should do 1 of the following:
- Sign up under the Qualtrics license their organization has bought.
- Sign up for a free account using the link in the invitation they received.
Attention: Any free account can collaborate on surveys. Users without accounts or access to a Qualtrics license can create a free account that is capable of collaborating on projects by either using the link in the email, or the free account sign-up on the Qualtrics website. Note that because this account is free, it will still have certain limitations in its access to the Qualtrics platform.
Users with More than One Account
Sometimes, users have more than 1 Qualtrics account associated with the same email address. That’s ok! The user will be emailed a code when you invite them to collaborate on the survey. The user can then log into any of their accounts and enter this code to get access to your survey. To learn more about collaboration codes, see the Accessing Shared Surveys section.
Users with SSO Accounts
If the person you’re collaborating with has SSO and is not a member of your organization, you should still be able to collaborate with them. Enter their email address into the field and click Add. For more considerations with SSO users, see the Collaborating with SSO Users section.
Considerations for Cross Brand Collaboration
Attention: When collaborating with users outside of your brand, be careful of the information you are sharing with these users. Sharing a survey outside your organization can give external users access to brand-wide content, including brand-wide surveys, libraries, and contact lists. This is true even if the survey you are sharing is not brand-wide. This gives the person you are collaborating with access to the following:
- Brand-Wide Surveys: Any surveys shared with a brand-wide group will be accessible to users outside of your organization with whom you’ve shared surveys. This applies even if the survey you are sharing outside your organization is not a brand-wide one.
- Brand-Wide Libraries: Any libraries (and contents saved within) that are shared with a brand-wide group will be accessible to users outside of your organization with whom you’ve shared surveys. This applies even if the survey you are sharing outside your organization is not a brand-wide one.
- Brand-Wide Contacts: Any contact lists shared with a brand-wide group will be accessible to users outside of your organization with whom you’ve shared surveys. This applies even if the survey you are sharing outside your organization is not a brand-wide one.
If you are a Brand Administrator, the organizational libraries referred to in this section are brand-wide groups with whom contacts, messages, and surveys can be shared. When these groups were created, they were marked Yes under the Available to All Users field.
Collaborating with SSO Users
Users who access their Qualtrics accounts through single sign-on (SSO) will have some extra considerations when collaborating on surveys. This is especially true if you and your collaborator belong to different organizations.
Qtip: If you are unsure whether you or your colleague’s account has SSO, there are two ways to tell:
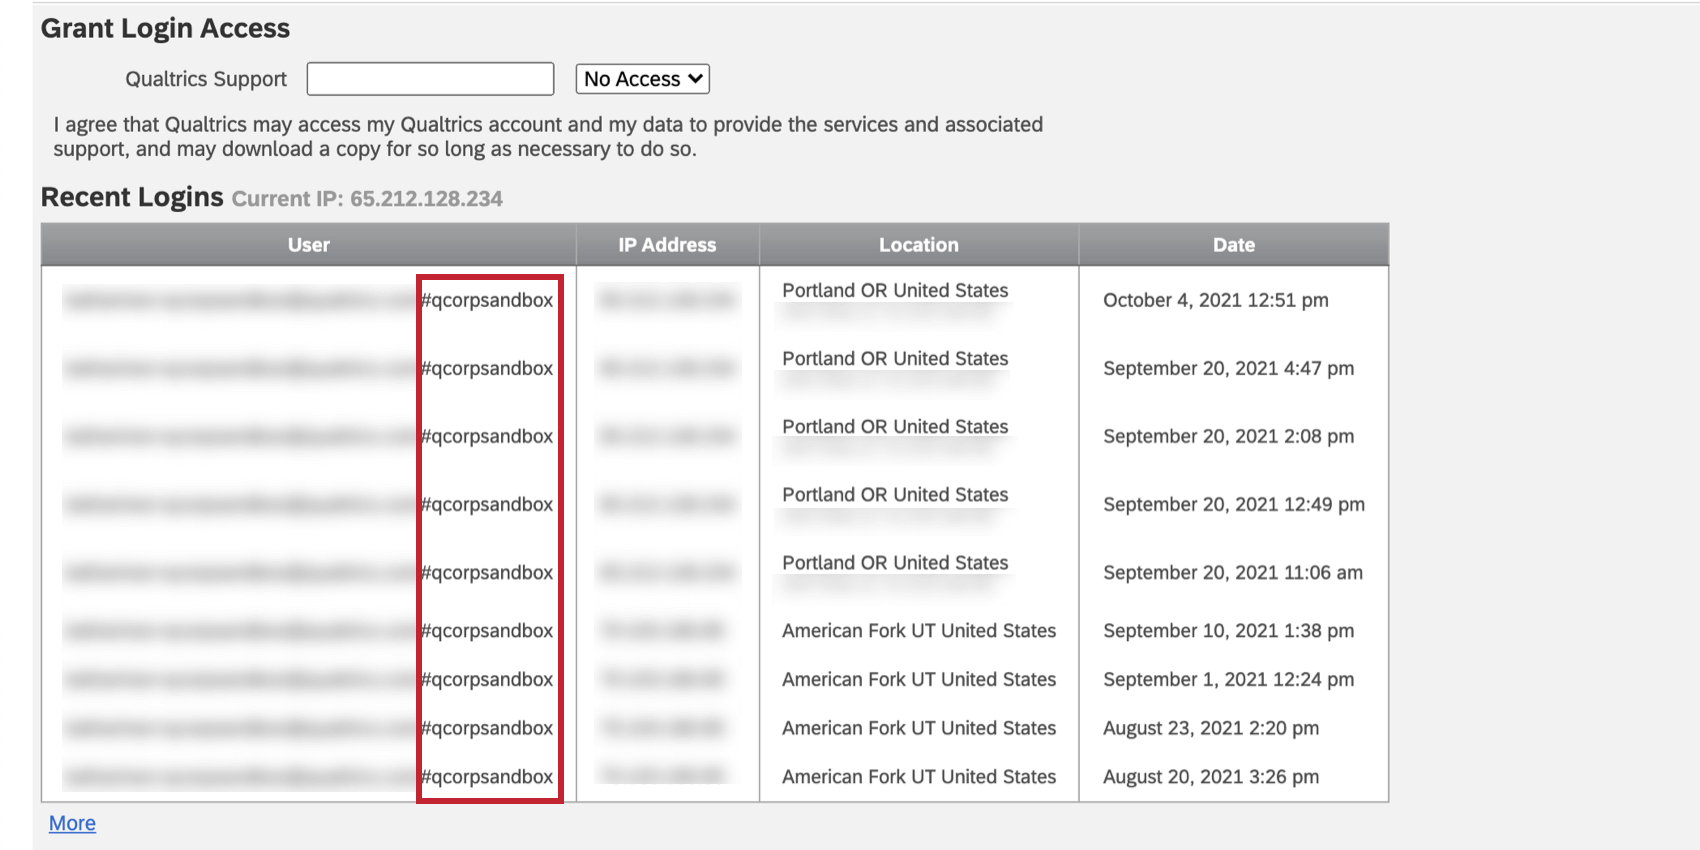
- When you log into Qualtrics, you log in using your organization’s login portal, not a standard Qualtrics login page.
- Go to Account Settings and scroll down to the Recent Logins section. You will see your username. If there is a hashtag (#) in it, your organization uses SSO.
Collaborating with the correct person
If you’re sharing with someone in the same organization, it’s easier to type the user’s name into the user or group address book, and then click on that person when they appear in the list. The account that appears will always be the one officially affiliated with your organization.
If you are collaborating with someone with SSO from outside of your organization, then you can share with any email address that user has access to. They will receive a secure collaboration code, log into the Qualtrics account of their choice, and enter the code. See the Accessing Shared Surveys section for more details on collaboration codes.
ignoring links in the invitation
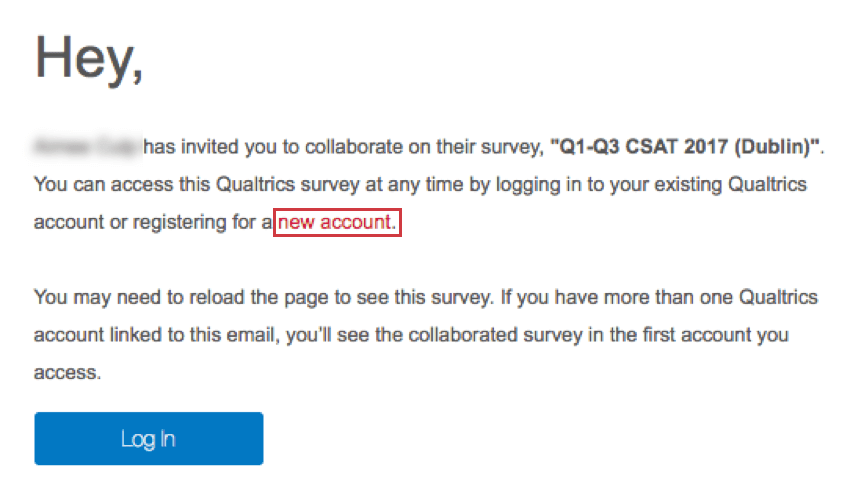
When someone invites you to collaborate on a survey, you will receive this invite:
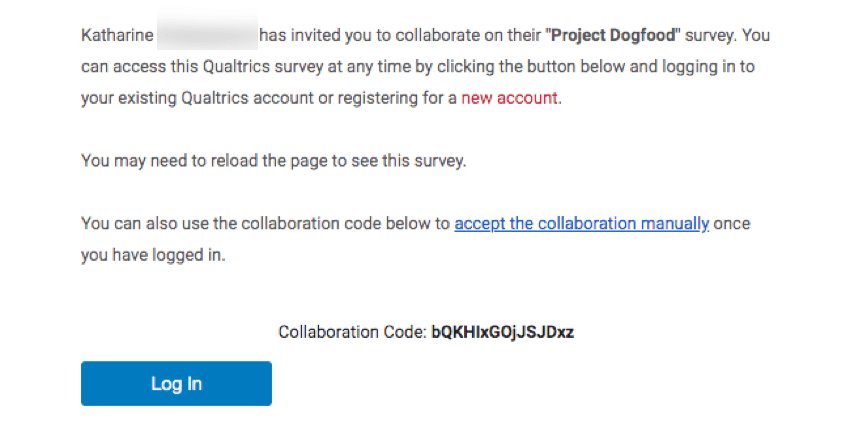
Do not click on “new account”. Even if you do not have an account through your organization yet, do not use this link. To create a new account, go to the special URL your organization has set up for Qualtrics. If you do not know this URL, you can search it online, ask a colleague, or call support.
To access the survey you have been invited to collaborate on, log into your Qualtrics account as you normally would. Then follow the steps in Accessing Shared Surveys to gain access to your survey.
Accessing Shared Surveys
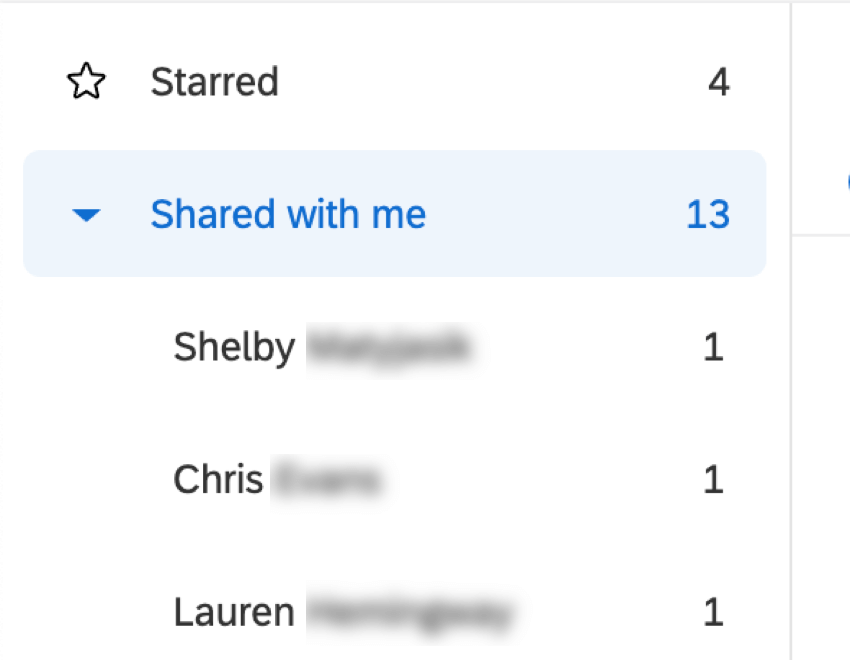
Once users have been invited to collaborate on a project, the collaborators receive an email notifying them, and they will be able to see it listed in their Shared with me folder the next time they log in.
To access this folder:
- Navigate to the Projects page.
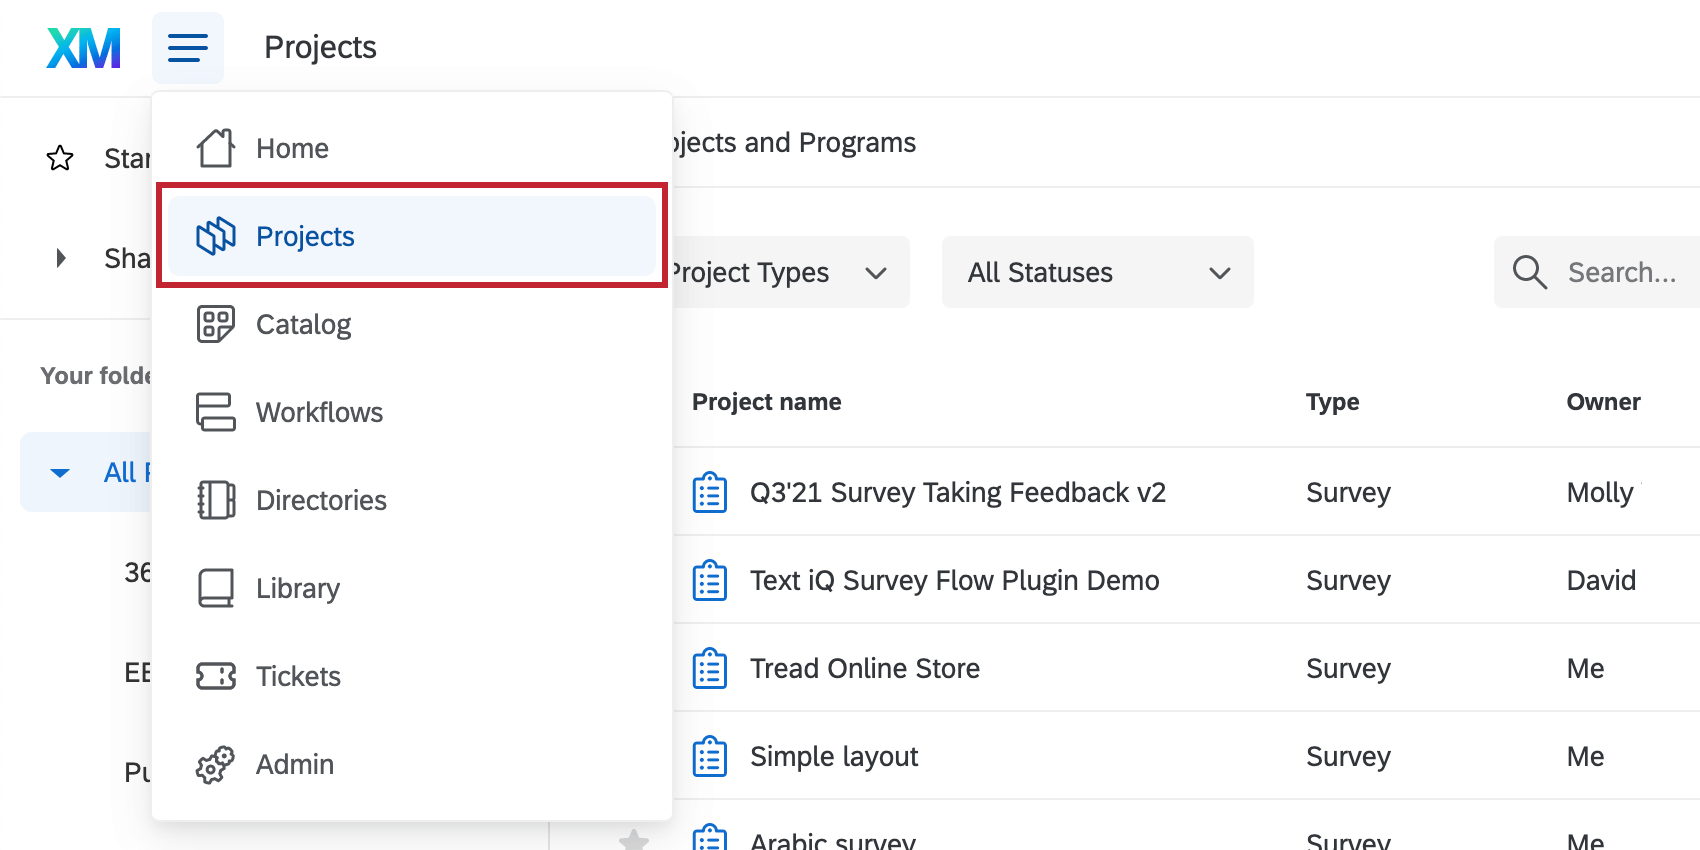
- Select Shared with me.
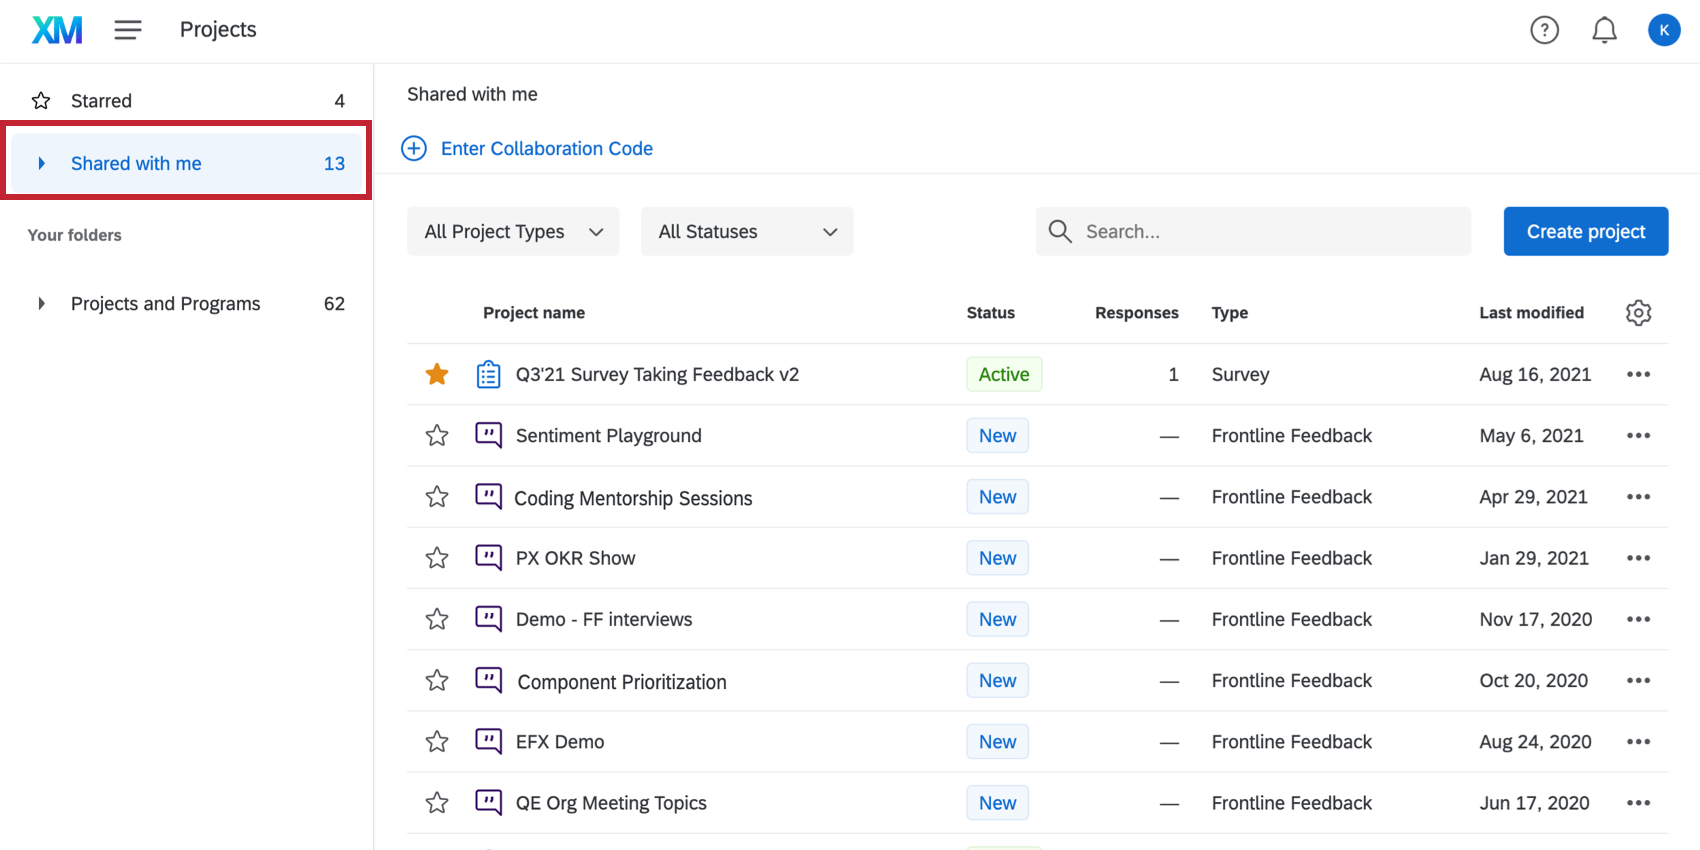 Qtip: Expand the folder dropdown to see a list of colleagues who have shared projects with you. You can also see the owner of each survey in the Shared with me folder if you display the Owner column.
Enter Collaboration Code
Some users may find that when a survey is shared with them, the invitation they receive contains a special code. This is an extra security measure that confirms cross-brand collaborations and other special cases.
- Look in your email for a survey collaboration invite. Copy the code.
- Log into the account you want to be able to access the survey from.
- Go to your Shared with me folder.
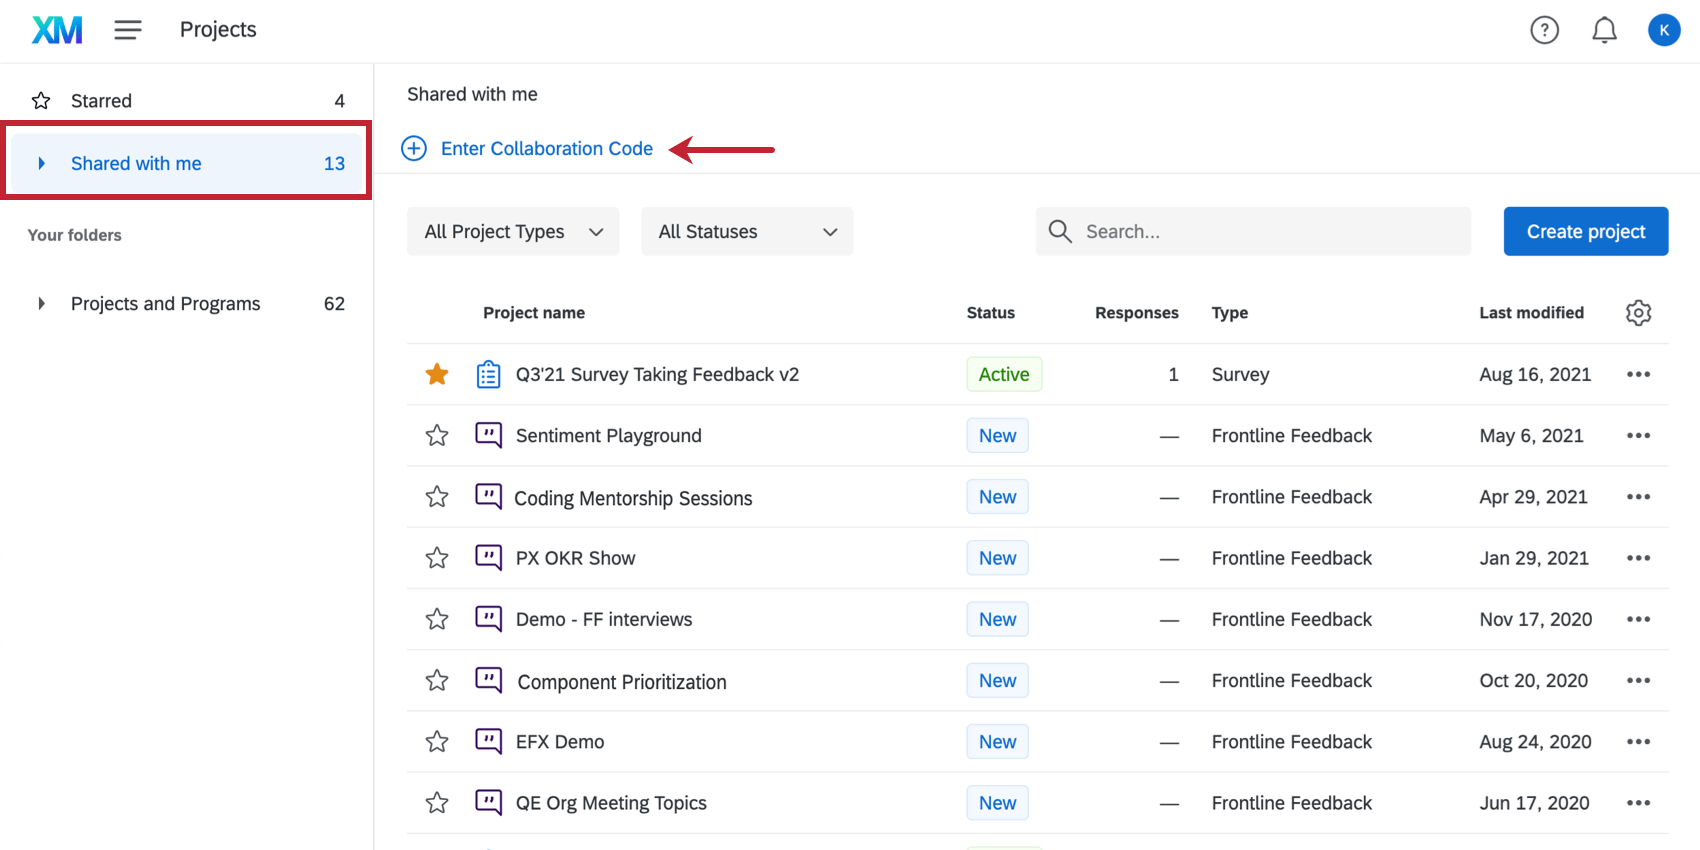 Qtip: The Enter Collaboration Code button only appears in your Shared with Me folder. It will not appear in any of your other project folders.
 - Click Enter Collaboration Code.
- Paste the code in the field.
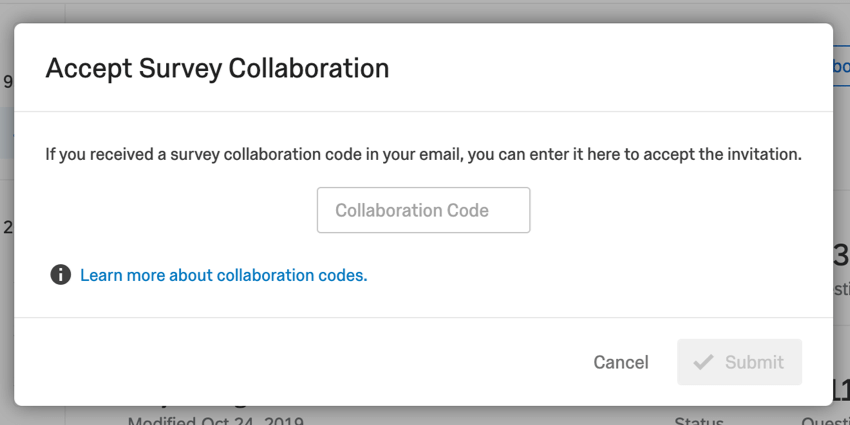
- Click Submit.
Qtip: There are 3 scenarios where you will need to use the Enter Collaboration Code button:
- The user who invited you to collaborate is from outside of your organization or Qualtrics license. (Remember: some organizations may have more than one license with Qualtrics. For example, a university’s Psychology department and its Registrar may have purchased their own brands.)
- The user who invited you to collaborate only just created their Qualtrics account.
- The user who invited you to collaborate is in your organization, but they didn’t click your name to select you from the address book. Instead, they typed in your email address and submitted the change before selecting your specific account.
Managing Surveys Shared with You
In your Shared with me folder are subfolders named for each collaborator. Use these to find surveys by the owner.
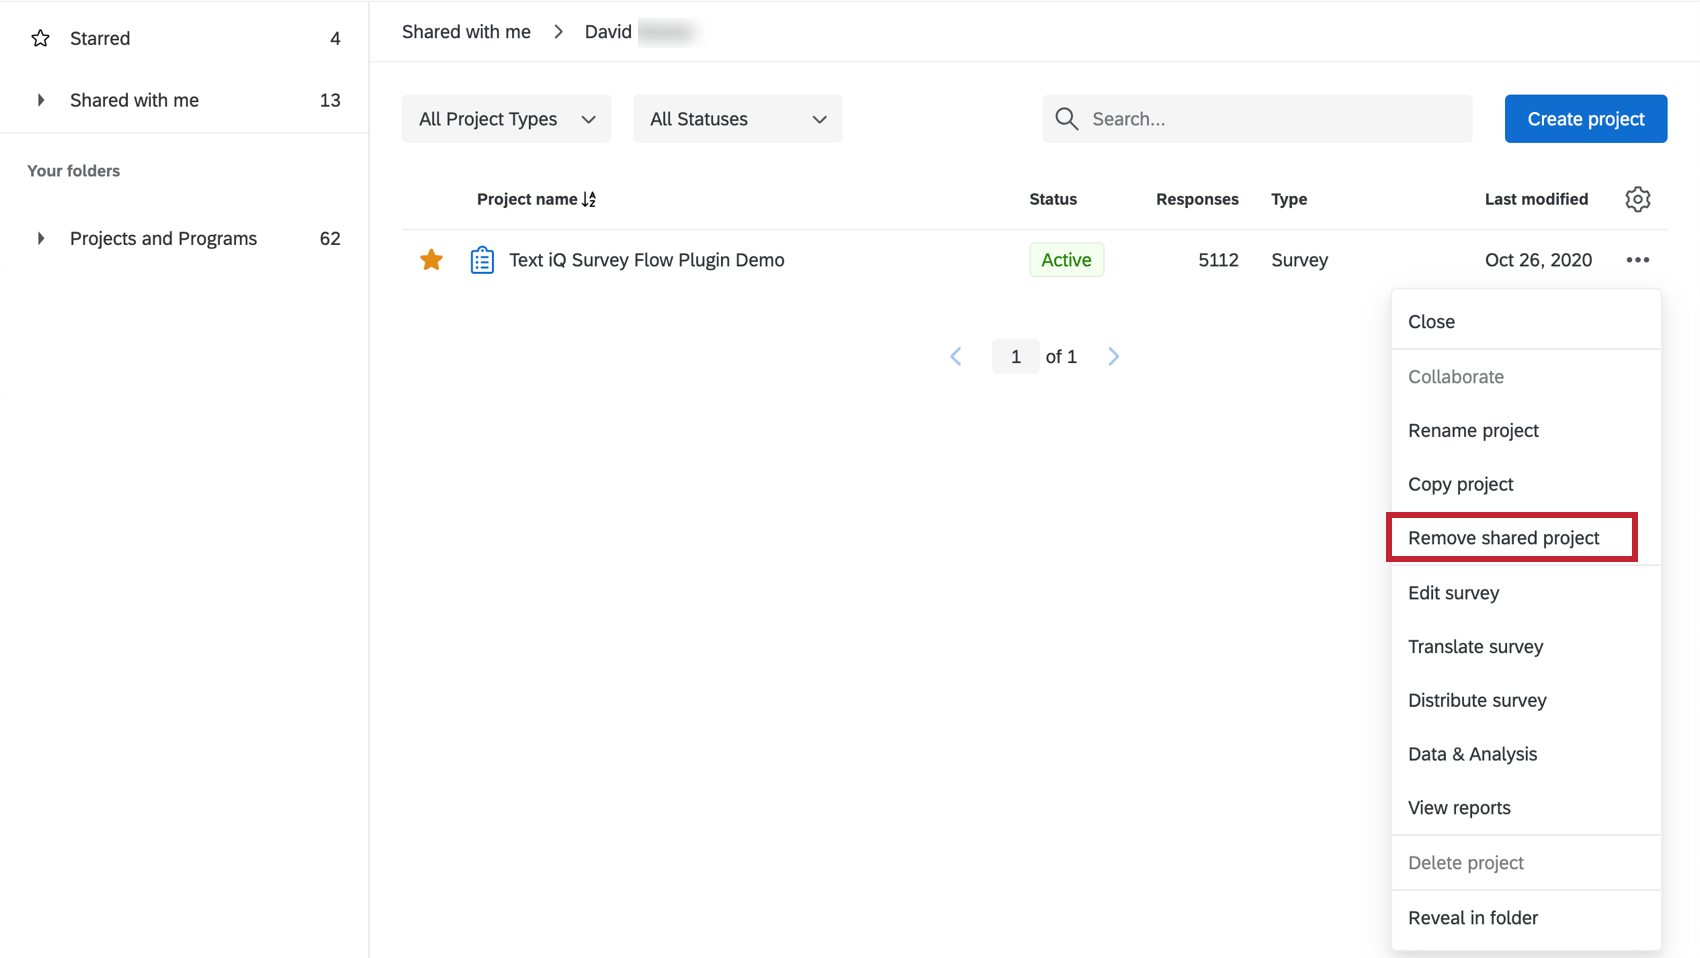
If you decide you no longer want to be involved in a project, you can remove your access to it by clicking the dropdown next to the project and clicking Remove shared project. Don’t worry – this option doesn’t delete anything. It simply removes your ability to access the project.
Collaboration Permissions
When you collaborate on a project with someone, you don’t have to give them full access. You can restrict the content they can view or edit in your project.
- View Survey: Enabling this permission gives the collaborator view-only access to features in the Survey tab (such as survey flow, survey options, survey questions, and survey look & feel).
Attention: If you want to give view-only access, make sure the Edit permission is also disabled.
- Edit: Disabling this permission removes access to the entire Survey tab, where survey edits take place. The collaborator will also be unable to rename the survey or translate it. However, if you only want to disable some editing permissions, click the dropdown next to the permission, and edit the permissions detailed below instead.
- Edit Surveys: Disabling this permission removes access to the Survey tab and to survey renaming. Collaborators can still translate the survey.
Warning: In order to enable any of the editing permissions described below, you must also enable Edit Surveys!Qtip: Your collaborators will need access to this permission to access the Workflows tab.
- Copy Survey Questions: Disabling this permission prevents the user from copying questions within the survey. However, your collaborator can still copy questions and blocks to the library.
- Create Response Sets: Response sets are a feature that is no longer used.
- Delete Survey Questions: Disabling this permission prevents collaborators from deleting questions and page breaks from the survey builder.
Qtip: You don’t have to worry about collaborators deleting the entire project. No matter what permissions are enabled, collaborators cannot delete a project they are collaborators on. Only the owner can delete the project.
- Use Text Analysis: Disabling this permission prevents collaborators from performing text analysis in Text iQ. Collaborators can still view (but not edit) your text analysis if they have the View Text Analysis permission found in the View Reports permission details.
- Use Conjoint: Disabling this permission prevents collaborators from using conjoint analysis.
- Allow Tallying Screened Out Responses: Disabling this permission means that you cannot use the Screen-out Response option to customize an end of survey element in the survey flow. You may not see this option if you haven’t purchased access to this feature, which allows you to keep a tally of screen-outs in one easy screen. When enabled, this permission must be combined with Edit Survey Flow.
- Use Table of Contents: This option will only appear if you have access to the table of contents feature. Disabling this permissions means your collaborator won’t be able to add a Table of Contents in the survey flow.
- Translate Surveys: When disabled, the user cannot translate the survey.
- Set Survey Options: When disabled, the user cannot edit the survey options.
- Edit Survey Questions: When disabled, the user cannot edit questions, including question behavior. The only question editing allowed is the ability to add a page break.
- Edit Survey Flow: Disabling this permission removes the user’s ability to edit the survey flow.
Qtip: If you have the permission for Edit Survey Flow checked, but the permission Edit Survey Questions is unchecked the user will not be able to edit embedded data elements in the Survey Flow.
- Use Blocks: Disabling this permission prevents collaborators from deleting, moving, adding, renaming or copying blocks within the survey. However, collaborators can still use the block options unrelated to these tasks, such as loop and merge, question randomization, and copying a block to a library.
- Use Triggers: Disabling this permission removes the user’s ability to use contact list triggers and email triggers.
- Use Advanced Quotas: This permission will only appear if you have access to Advanced Quotas. When disabled, the collaborator cannot use cross logic quotas, multiple match handling, or the public quota dashboard. When this permission is disabled, users will still have access to basic Quota features, including the ability to create, edit, and delete them.
- Use Reference Blocks: When enabled, allows the user to add reference blocks to the survey using material in their account.
- Edit Surveys: Disabling this permission removes access to the Survey tab and to survey renaming. Collaborators can still translate the survey.
- View Reports: If you do not choose to specify permissions, turning this permission on gives your collaborator full access to the Data tab. However, if you only want to disable some results permissions, click the dropdown next to the permission, and edit the permissions detailed below instead.
- Edit Survey Responses: Disabling this permission stops your collaborator from deleting data or using the response editing feature. Also, while you can still generate a retake survey as new response link, you cannot generate a regular retake link. This permission, when disabled, allows collaborators to add data, but not modify existing data in any way.
- View Survey Results: Disabling this permission removes the Data & Analysis tab and the Reports tab.
Warning: In order to enable any of the results permissions described in this section, you MUST also enable View Survey Results!
- Filter Survey Results: When enabled, this permission allows the user to filter the collected responses on the Data & Analysis and Reports tabs.
- View Restricted Data: Disabling this permission censors the standard contact fields, IP address, location latitude, and location longitude information in the Data & Analysis tab and in all exports.
- Download Survey Results: Allows the user to export data from the Data & Analysis tab. When disabled, collaborators can no longer export from the Data & Analysis tab, but they can still export reports.
- Use Crosstabs: Gives the user the ability to analyze the results with the crosstabs feature.
- View Response ID: When enabled, this permission allows the user to view the Response ID, a unique ID assigned to every individual response.
- View Text Analysis: When enabled, the collaborator has view access to text analysis performed in Text iQ. The collaborator will not be able to edit the details of your text analysis without the Use Text Analysis permission found in the Edit permission details.
- Activate/Deactivate: When selected, this permission gives the user the ability to activate, pause, or resume the survey’s response collection.
- Copy: When disabled, the collaborator cannot copy project or create a project from a copy of the collaborated survey. Collaborators can still copy questions and blocks within the same project, or copy the survey to the library.
- Distribute: Determines whether the collaborator has access to the Distributions tab, and thus whether they can distribute the survey.
If you ever need to edit these settings, navigate to the Collaborate on Project menu as normal, make your changes, and click Save.
Troubleshooting
Account Setup Issues / Multiple Qualtrics Accounts
If your organization has a Qualtrics license, you need to carefully follow the steps on the Creating an Account page before you make an account and start collaborating. Specifically, you need to make sure you signed up for Qualtrics from the correct URL.
If you chose “Free Account” on the Qualtrics homepage when you signed up, you have a free account. Free accounts created before October 4, 2019, cannot collaborate; all free accounts created after this date can collaborate. If you made an older free account and your organization does not have a Qualtrics license, you will need to create a new free account before you can collaborate. However, if you signed up this way as a mistake and your organization does have a Qualtrics license, check out our User Moves page for several solutions that will allow you to move your account to the correct license and collaborate on projects.
If you signed up for an account using the link in the collaboration invite, you will be able to collaborate on surveys without any issues. However, you are not signed up for Qualtrics with a specific organization, which may mean you don’t have access to other features your organization paid for (e.g., file upload questions, the offline app). If you ever need to move your account to a different organization, check out our User Moves page for details.
If you are 100% sure you signed up for Qualtrics with the correct URL and are having trouble collaborating, contact your Brand Administrator to make sure you have the right permissions enabled.
Cannot Find Collaboration Email
If you did not receive the collaboration email, please try the following:
- Check the junk and spam folders of your email.
- Make sure the survey owner shared with the correct account.
Qtip: If the survey owner is sharing directly with an email address, remember that this only has to be an email you have access to, and does not have to be the one on the account. This applies to SSO users, too.
- If 1 and 2 don’t work, ask the survey owner to remove you, save, and collaborate again.
Project Won’t Appear in Account
If the project won’t appear in your Shared with Me folder, please try the following:
- Make sure you entered the collaboration code.
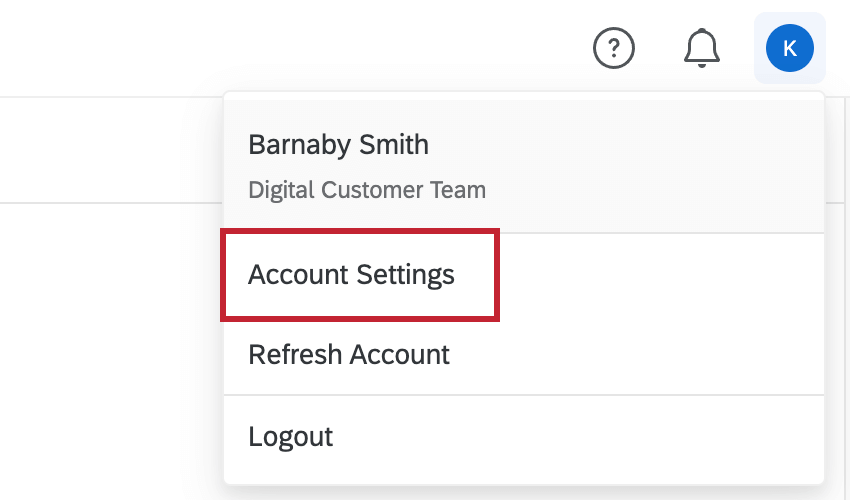
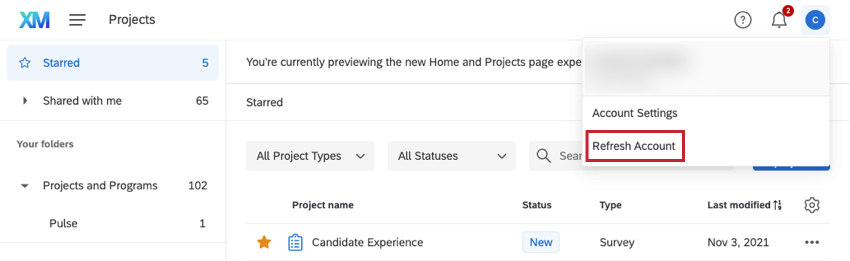
- If you have already entered the collaboration code, then click the Account Settings icon on the top-right corner of the screen and select Refresh Account.
- Ask the survey owner to remove you, save, and collaborate again.
Alternatives to Collaboration
Collaboration is meant to give multiple users the power to edit and distribute a survey, edit the survey’s data and export it as needed, and create reports. With collaboration permissions, you can even pick and choose which of these functions you want the user to have access to.
However, collaboration is not always the best solution for your goals. Below, we cover some similar needs and how best to accomplish them:
- If you want someone to look at the survey but not edit it, try sending them a preview link or a Word doc of the survey.
- If you want someone to see reports but not edit them, try sharing the advanced-reports / sharing the results-reports.
- If you want someone to look at the raw data but not be able to edit it, try exporting the data and sending them the file.
- If you are leaving your organization soon and would like someone else to own your survey and its data, contact your Brand Administrator and ask them to transfer the survey.
- If you just want someone to have a copy of your survey (without the data), try exporting a QSF copy of the survey and sending the file to your colleague instead.