-

Qualtrics Platform -

Customer Journey Optimizer -

XM Discover -

Qualtrics Social Connect
Step 5: Closing Your Project & Preparing for Next Year’s Project
Closing Your Project
Once you are ready to stop collecting responses for your Employee Engagement project, you can close the project. You can close the survey either before or after the dashboards have been launched, giving you flexibility to determine the right workflow for your organization. Closing the project only closes access to the project itself. As the administrator, you can continue building and launching dashboards, making adjustments to the hierarchy, and adjusting dashboard access.
To close a project, follow the steps under Changing the Status and choose Close project.
Once you have selected Close project, you will have two additional options to select from before you confirm your changes:
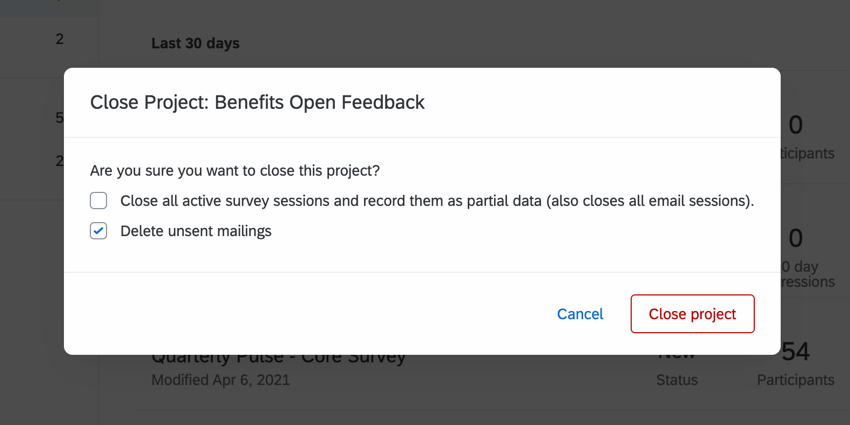
- Close all active survey sessions and record them as partial data (also closes all email sessions): Select this setting to force all participants whose responses are still in progress to record their responses and to cancel unsent email distributions. Deselect this setting to allow the participants to finish within the timeframe specified by your incomplete response settings.
Attention: If a response in progress meets both of the following conditions, then it will be deleted regardless of your incomplete response settings:
- The response in progress is for a participant in your project who has already submitted a response.
- Your project does not have the multiple responses settings enabled.
Qtip: The amount of time it takes to close responses is directly proportional to the number of responses in progress. While the responses are queued, they can still be accessed by respondents. - Delete unsent mailings: Select this setting to cancel future emails you have set up for this project. Deselect this setting to allow these mailings to send.
Qtip: If you have dashboard invitations scheduled to go out after the survey is closed, you might want to consider deselecting this setting. Otherwise the users you want to invite to the dashboard won’t get those emails!
Copying a Project/Running Your Next Project
The Employee Experience Platform makes running your next project simple and fast. Copying your existing project will allow you to easily compare your results from project to project.
When a project is copied, survey content, survey options, email message options, email messages, and dashboards are duplicated. Duplicating the project will not copy over participant lists, roles, or hierarchies. For more instructions on updating dashboards or creating roles, see here; to learn more about uploading your participants list, see here.
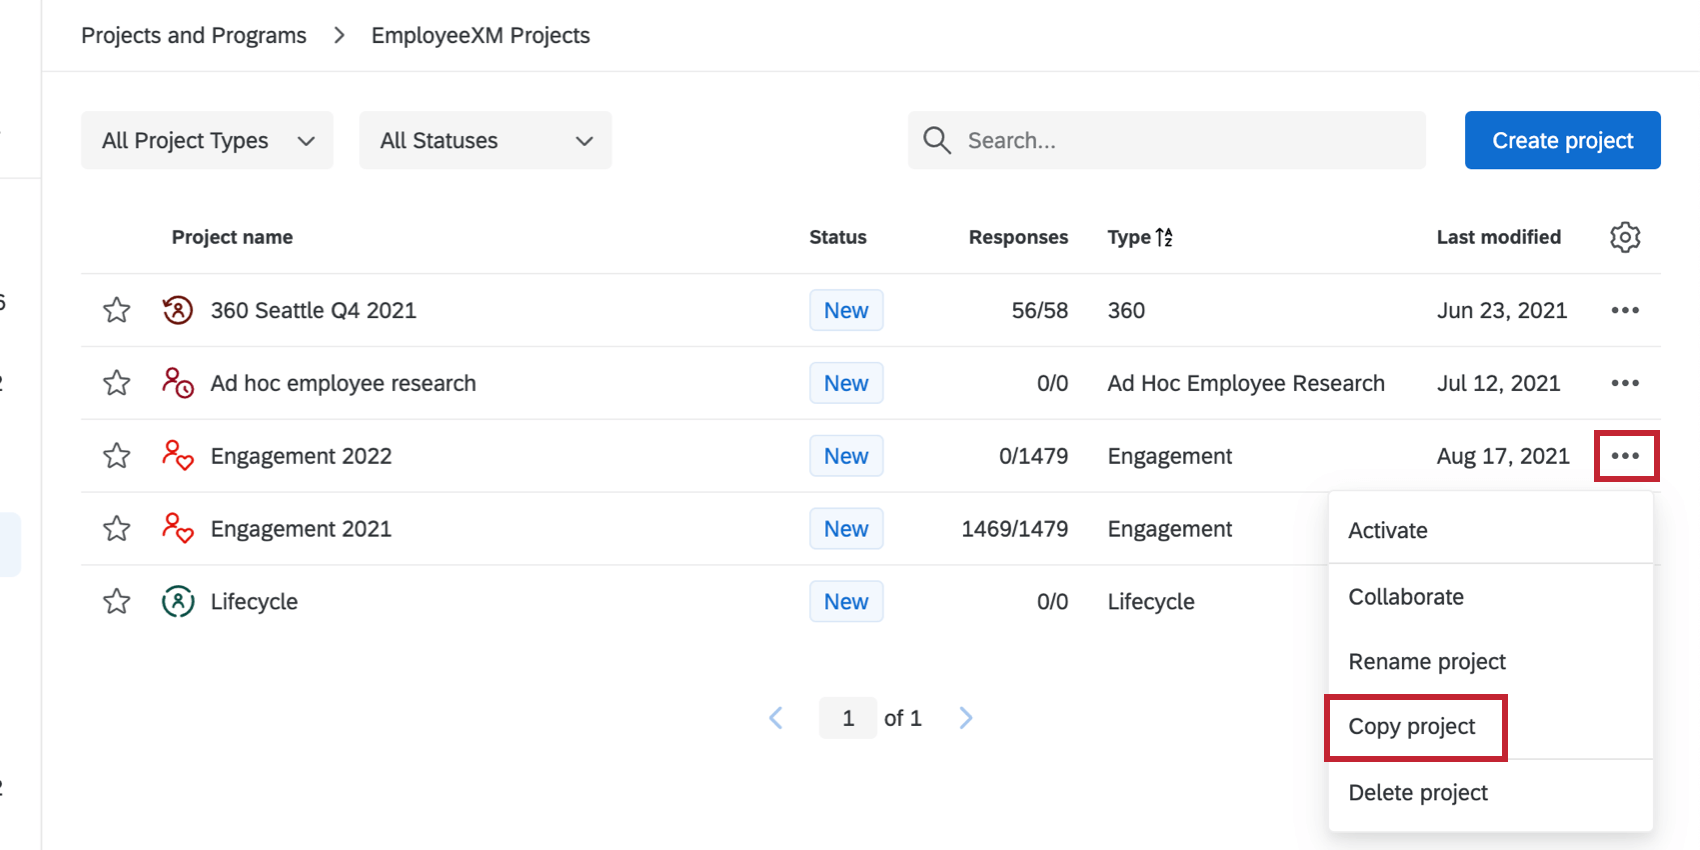
To copy a project, navigate to the Projects page. Use the dropdown menu on the right hand side of the project and select Copy project. Once the project has been copied, you can open the project and edit the survey, upload participants, edit messages, and/or build a dashboard.
After you have copied your project, start working on your participant file. Click here to review how to format your hierarchy.
Running Your Next Employee Engagement Project
- Copy the existing project by following the steps here.
- Make any necessary adjustments to the survey content.
- Create a new participant file with all the information you need to build a hierarchy.
- Upload your project participant file.
- Generate a hierarchy for the new project by following the steps here.
- Map the new hierarchy to the old hierarchy.
- If you have multiple surveys with historical data, repeat the above step until all historical hierarchies you want represented in the dashboard have been mapped.
- Edit your project invitation and reminder messages by following the steps here.
- Launch your project by sending out invitations.
- Add the previous survey as a source in the Dashboard Data. See Adding Additional Sources.
- Set up your dashboard roles.
- Launch your dashboards by sending out invites.