-

Qualtrics Platform -

Customer Journey Optimizer -

XM Discover -

Qualtrics Social Connect
Adobe Analytics Extension
About Adobe Analytics
Adobe Analytics is a powerful tool that reports on web visitor data such as page views, time spent on a page, user’s tracking history, and more. The extension between Qualtrics and Adobe Analytics provides the ability to augment data you have stored for website visitors with data collected through a Qualtrics survey – for example, by passing satisfaction data collected in Qualtrics over to Adobe, you can create reports on the difference in web behavior between deeply satisfied and not-so-satisfied customers. Additionally, you are able to integrate Website Feedback with Adobe Analytics to base visitor-targeting logic on your Adobe Analytics variables and pass variable values over to Qualtrics datasets.
Using Adobe Analytics Variables in Visitor-Targeting Logic
Use Adobe Analytics data to determine when you present certain creatives to your website visitors. This section shows how to create action set logic and intercept logic based on Adobe Analytics variables.
- On either the intercept level or the action set level, add logic.
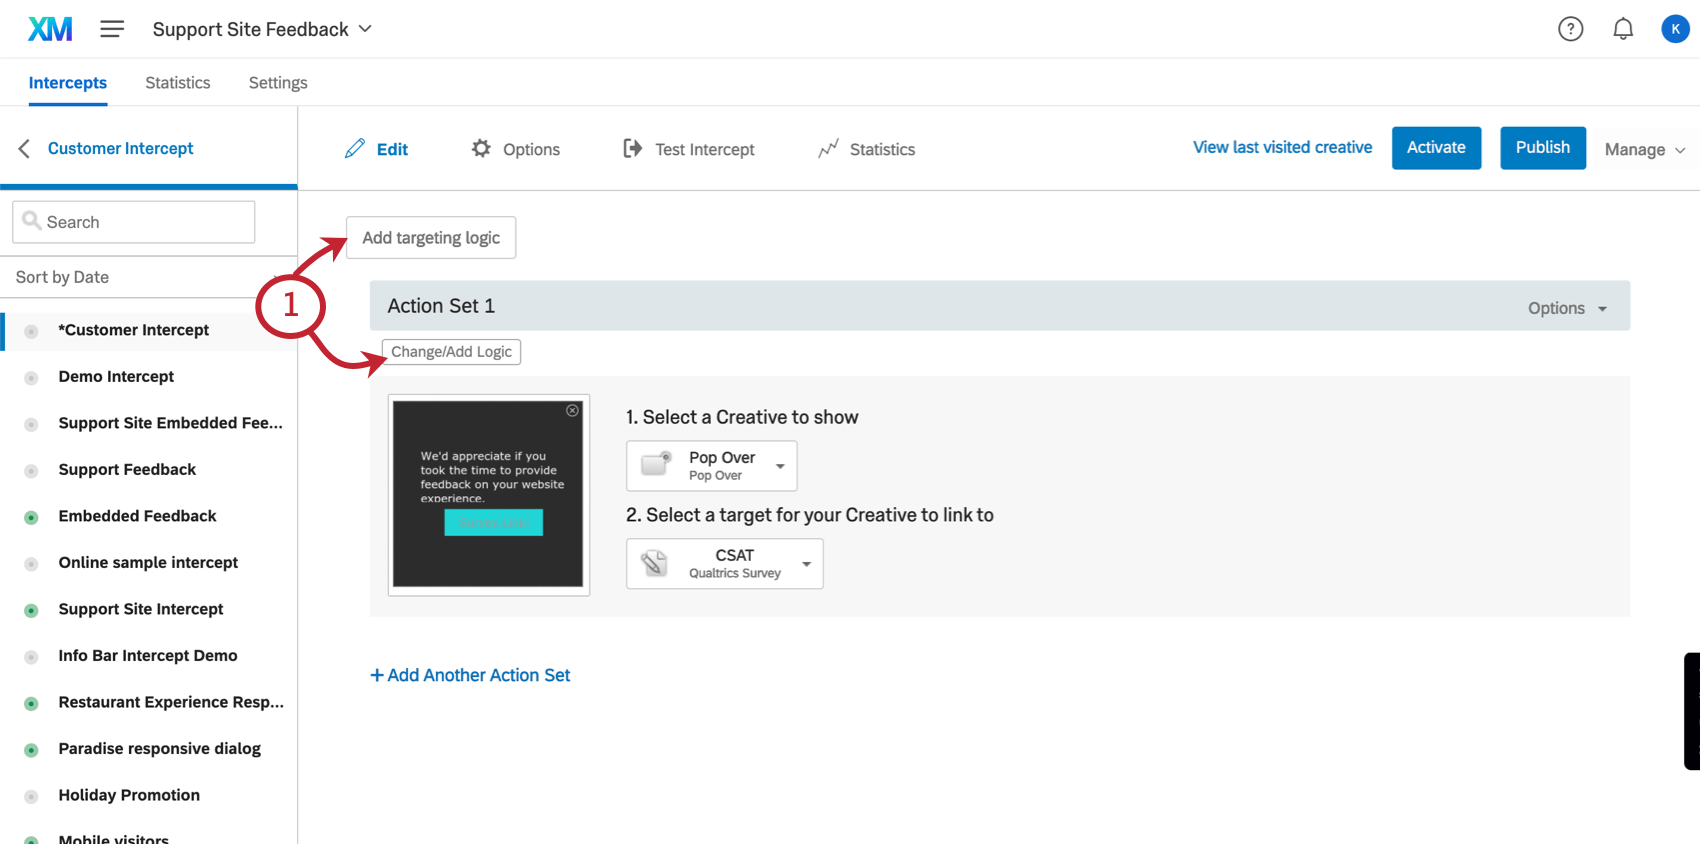
Qtip: Clicking Add Intercept Display Logic adds the logic to the entire Intercept, so you don’t have to add the logic to each individual action set.
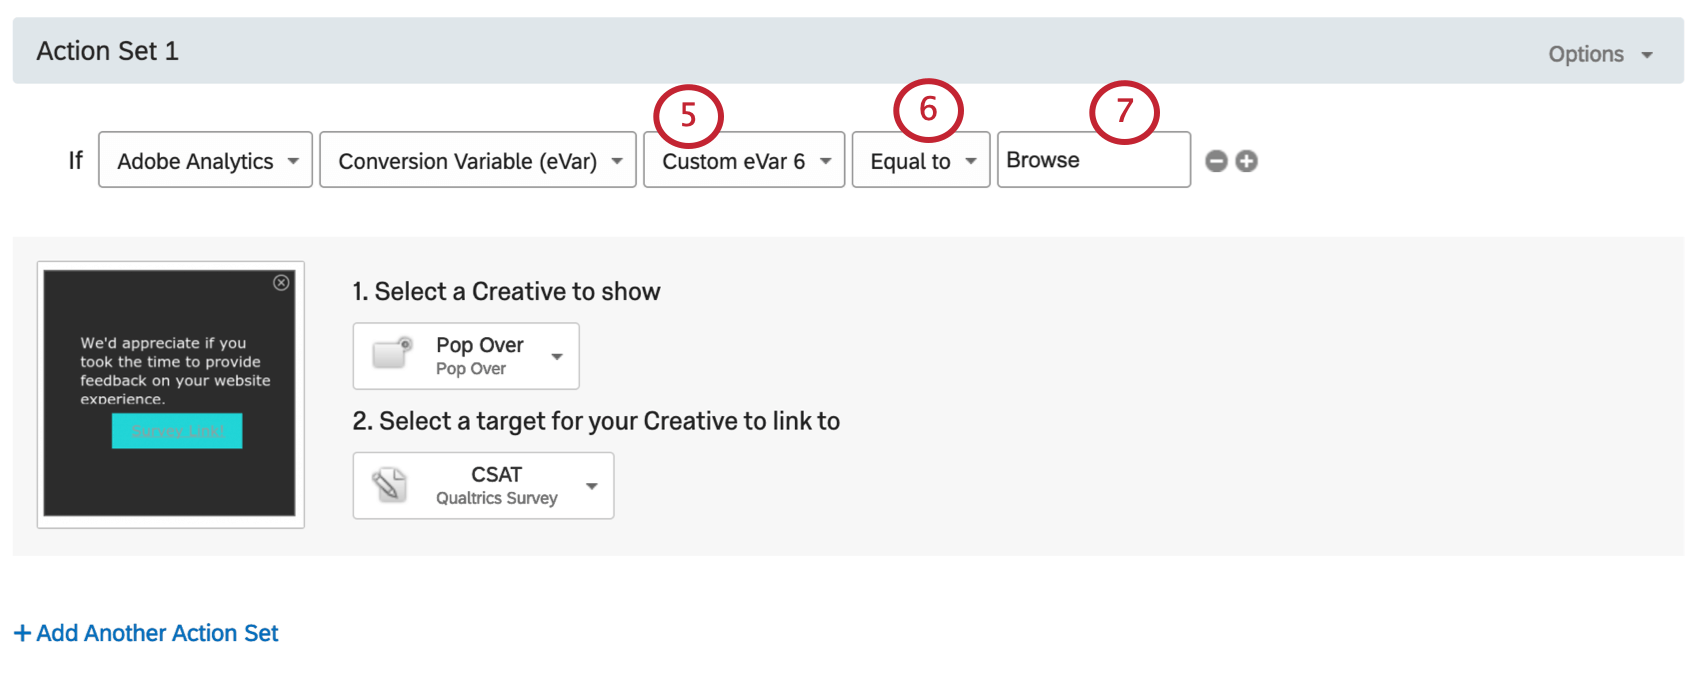
- In the first dropdown field, select Website.
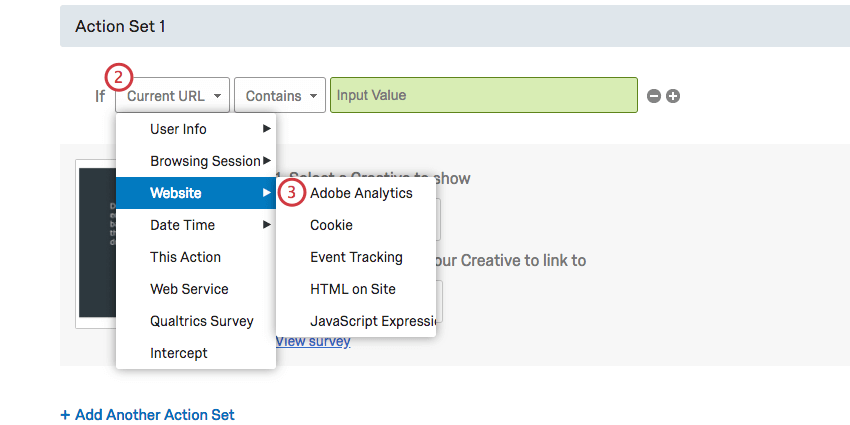
- Select Adobe Analytics.
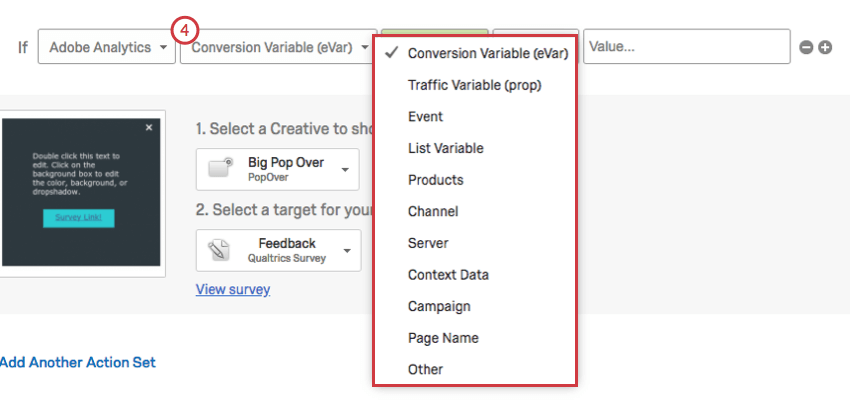
- Select the Adobe Analytics variable type you will be targeting from the dropdown (eVar, s.prop, etc.).
Qtip: For a guide on Adobe Analytics’ variables, see the following documentation:
- Variables Overview
- eVars
- Configuration Variables (Some of the most common analytic variables)
- Select the variable you will target. If you are using the paid extension, you can select the Data Connector that you have created.
 Qtip: Is this dropdown missing? You probably don’t have the Adobe Analytics permission turned on. Contact your Brand Administrator to get it enabled.
 - Indicate whether you are targeting visitors whose value is Equal To or Not Equal To the value specified in the next step.
- Enter the value of the variable.
Passing Adobe Analytics Variables to Qualtrics
Embedded data can capture the values of Adobe Analytics variables from your site and add them to your Qualtrics dataset.
- On any action, click Options.
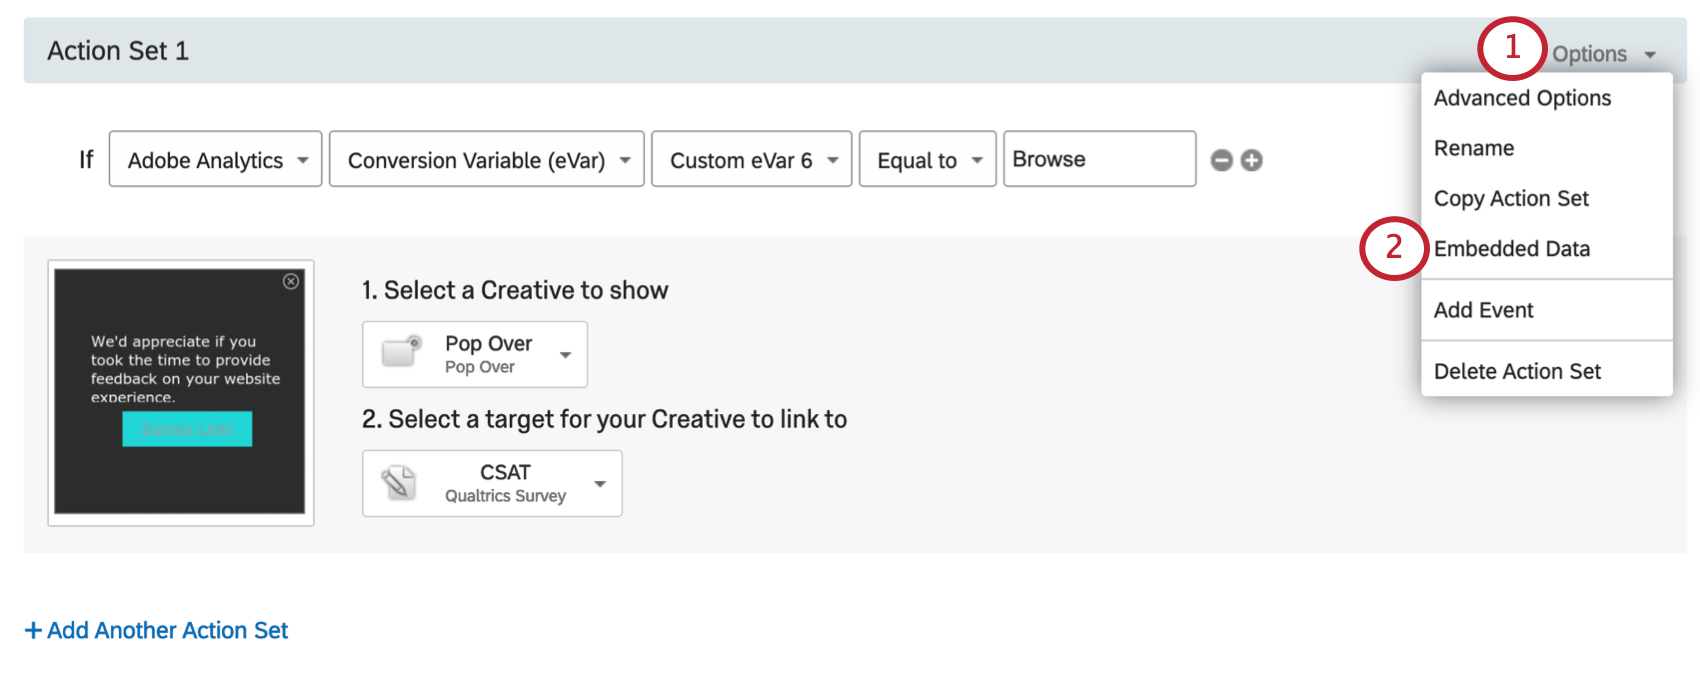
- Select Embedded Data.
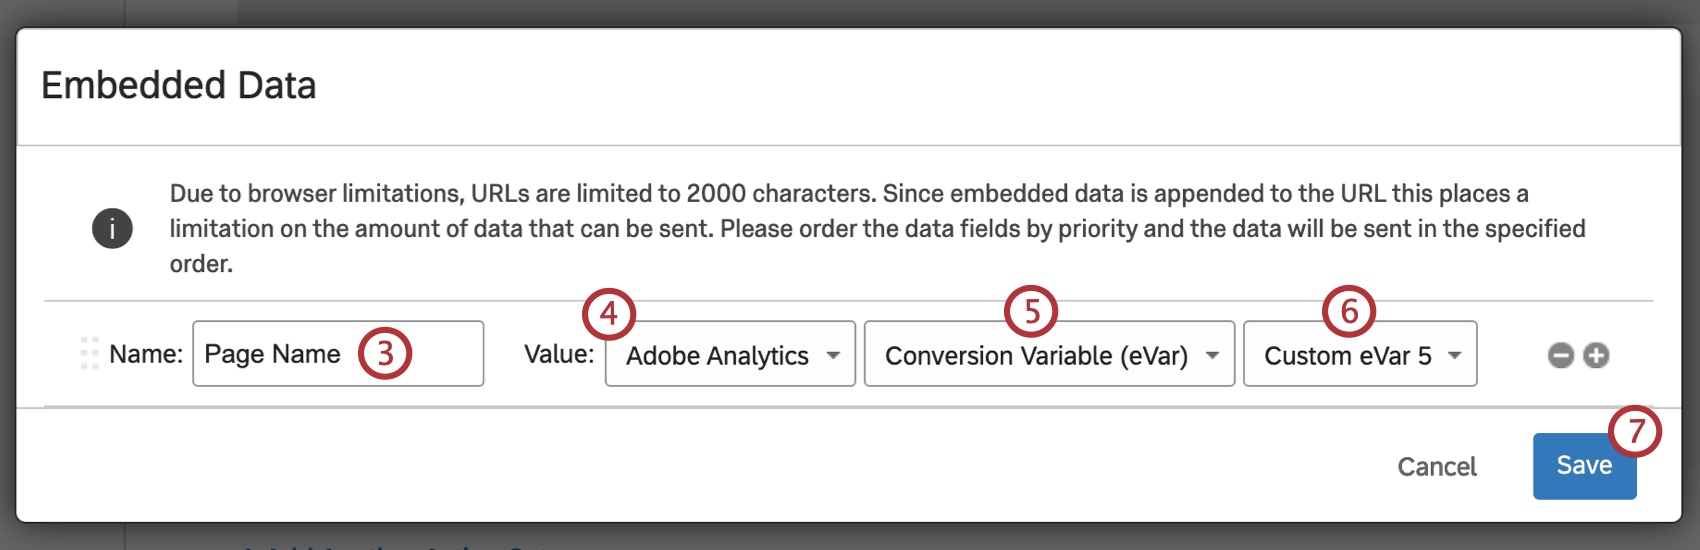
- Type in a variable name of your choosing. This variable name will appear as the name of the field in your Qualtrics survey data.
 Qtip: If you have already added embedded data values, click the plus sign ( + ) to add another value.
 - Select Adobe Analytics as the value.
- Select an Adobe Analytics variable type.
Qtip: If you’re unsure what to choose, see Adobe Analytics’ documentation on variables.
- Select a specific variable.
- Click Save.
- Select View Survey.
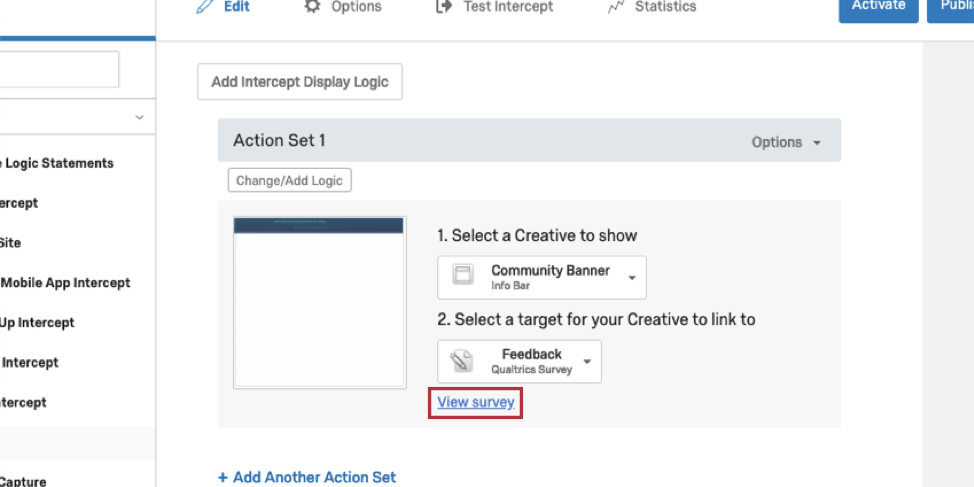
- You will be taken to the intercept’s target survey.
- Open the Survey flow.
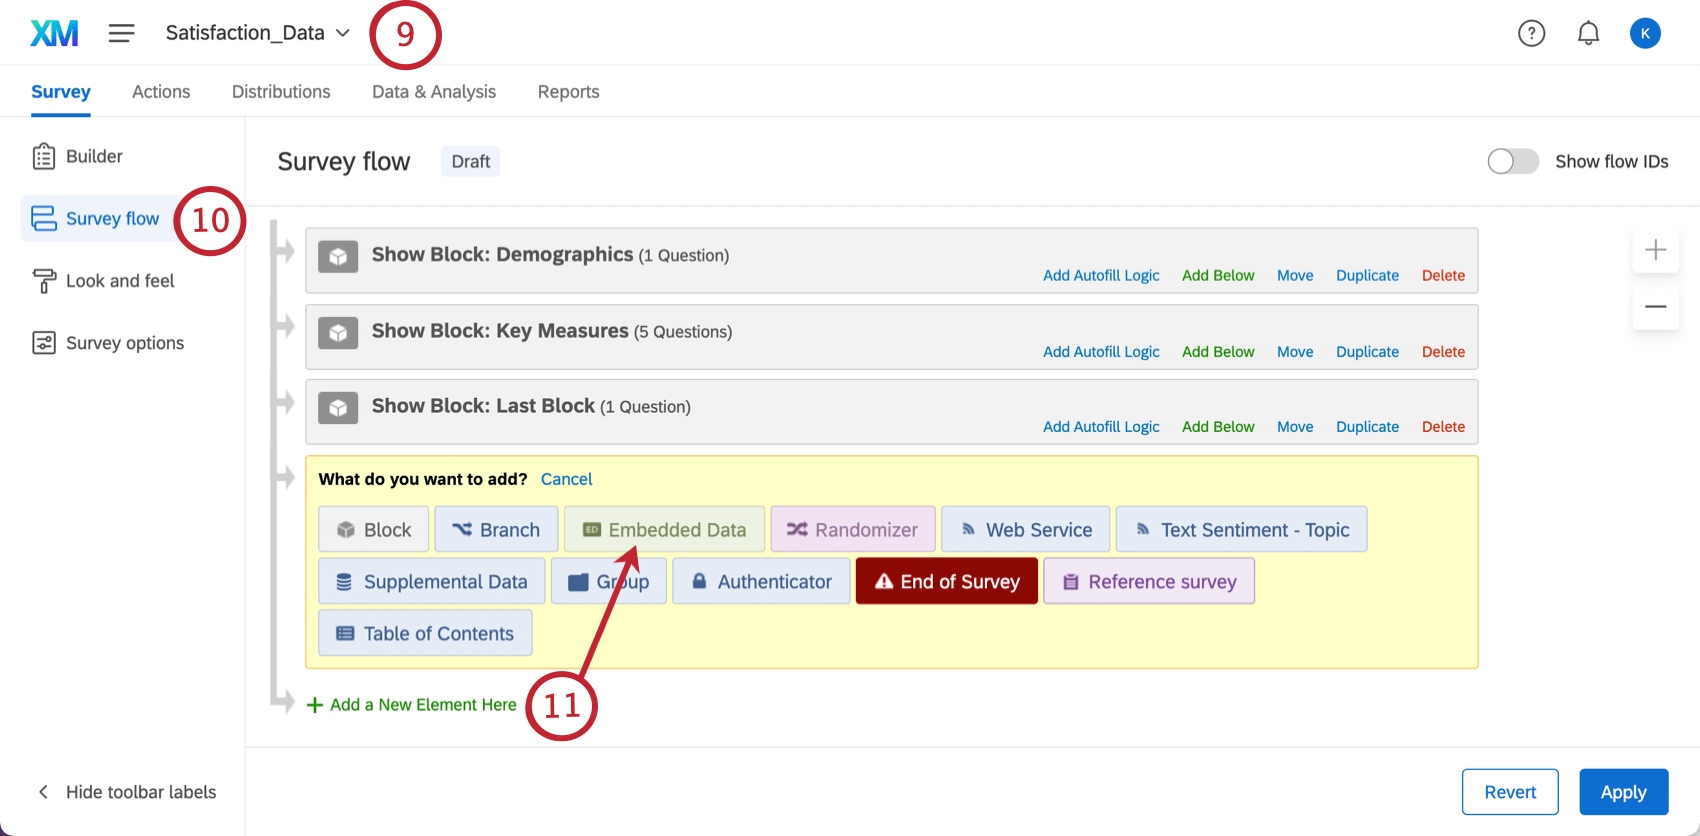
- Click Add a New Element and select Embedded Data.
- For the field name, enter in the name you chose in Step 4. Make sure that all formatting of the field name is identical here to the name you set in the intercept options.
- Click and hold down Move to drag the element to the top of the Survey Flow.
- Click Apply.
Once this is set up, you will have a field in your survey data that stores the information captured from the Intercept. You can use this field when reporting within Qualtrics and it will be present when you export your survey’s data.
Passing Qualtrics Data to Adobe Analytics
The extension between Adobe Analytics and the Qualtrics Survey Platform allows the ability to pass survey data collected by Qualtrics directly to your Adobe Analytics instance.
PREREQUISITES
- Must have Adobe Analytics permission enabled in Qualtrics.
- Must have access to an Adobe Analytics “Product” admin user account.
- Must have 1 eVar variable and 1 List Variable to use.
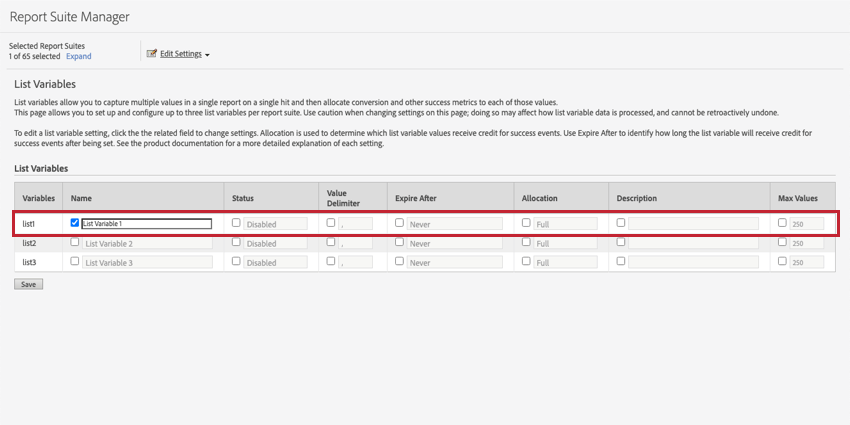
ADDING CONVERSION CLASSIFICATIONS TO ADOBE REPORT SUITE
You will need to add conversion classifications to your list variable in your Adobe report suite in order to correctly pull in Qualtrics response data.
- Login to your Adobe Analytics account.
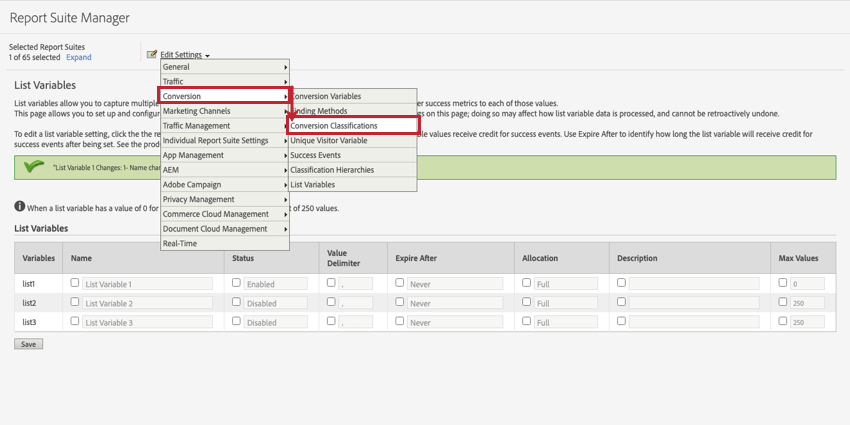
- Go to your Admin tab and select Report suites.
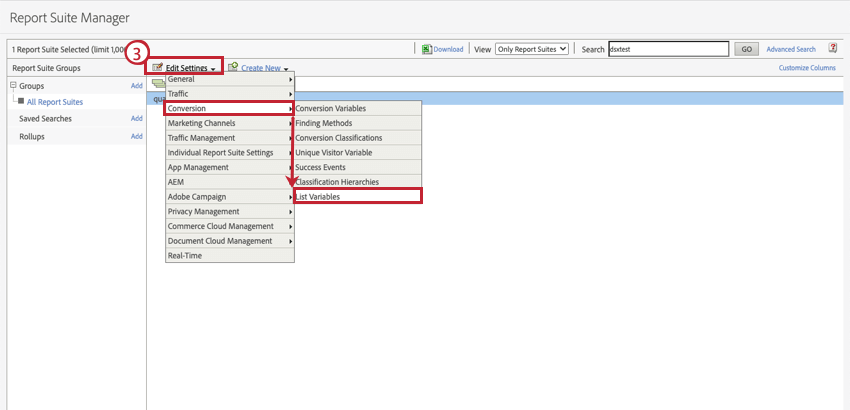
- Select your new report suite, then click Edit Settings, then Conversion, and then List Variables.
- Create and enable a List Variable, then click Save.
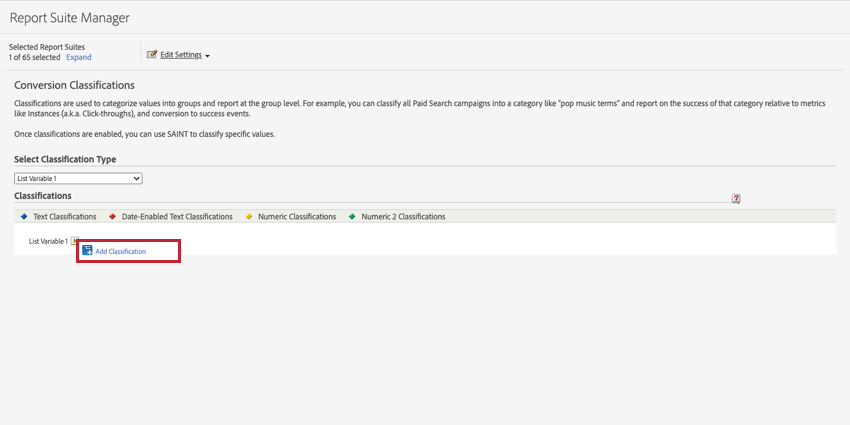
- Click Edit Settings, then Conversion, and then Conversion Classifications.
- Hover over your list variable and click Add Classification.
- Enter “Survey” into the the name of the text classification.
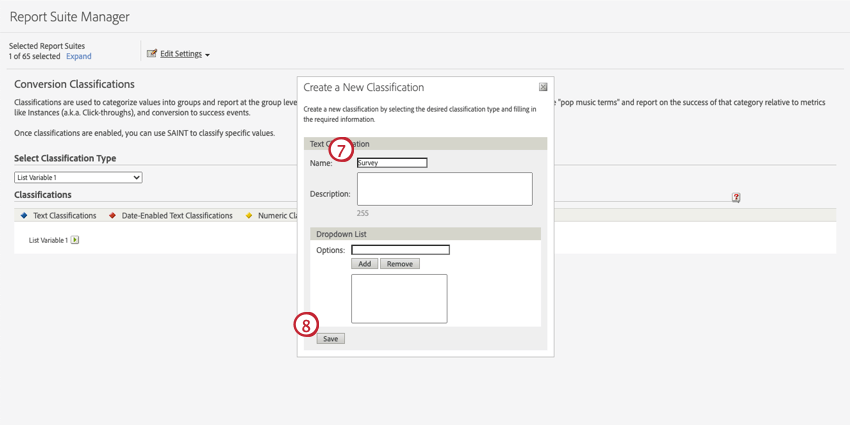
- Click Save.
- Repeat steps 6-8 to create classifications with the following names:
“Question“
“Response“
“Survey > Question > Response”
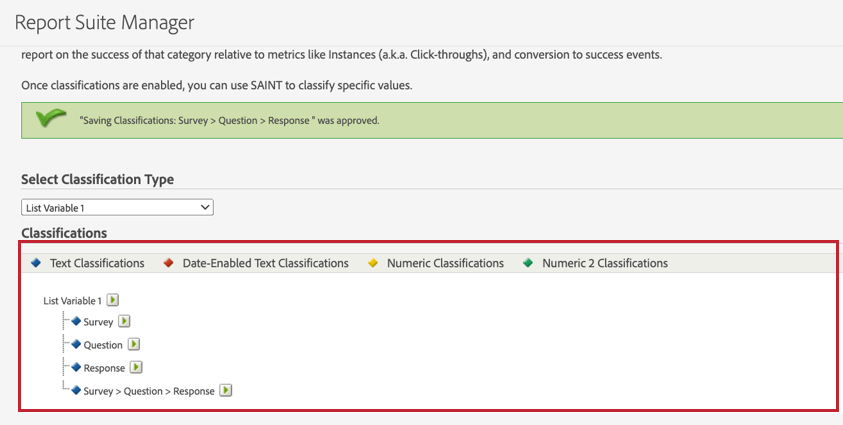 Attention: You must use the exact classification names specified in Step 9 in order for Qualtrics survey response data to show up correctly within Adobe Analytics.
GETTING ADOBE AUTHENTICATION SECRETS
You will need to provide the following credentials to allow Qualtrics to authenticate to Adobe Analytics report suite. These credentials will be used within Qualtrics when you set up your Adobe workflows and create an account to interact with Adobe Analytics.
- Client ID: The Client ID provided in the Adobe console as part of the Credential details.
- Client Secret: The Client Secret provided in the Adobe console as part of the Credential details.
- Technical Account ID: The Technical Account ID provided in the Adobe console as part of the Credential details.
- Organization ID: The organization ID provided in the Adobe console as part of the Credential details. This ID is a 24-character alphanumeric string, followed by @AdobeOrg.
- Private Key: The key that corresponds to the public key attached to your service account connection.
To obtain the credentials, follow these steps in Adobe Analytics:
- Navigate to the Adobe Developer console.
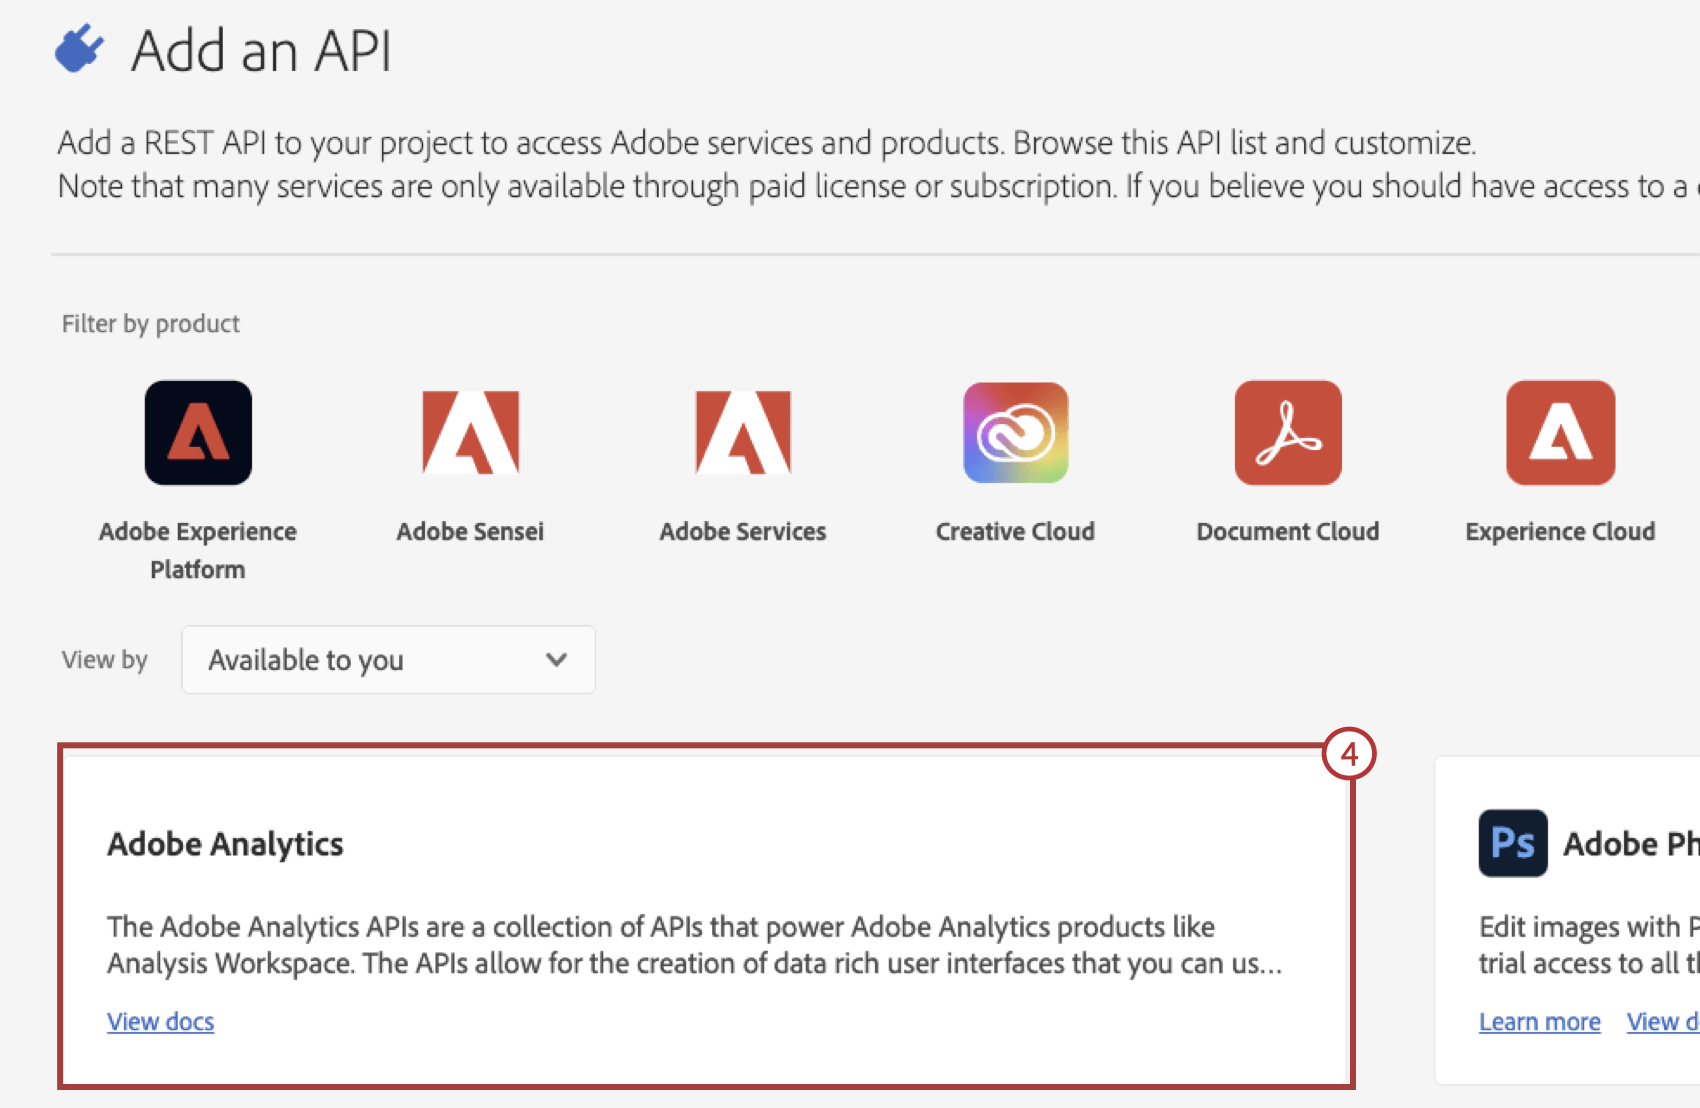
- Navigate to the project that is set up with Adobe Analytics. A project that can be integrated with Qualtrics Website Feedback will need a “Service Account (JWT)” under the Credentials section and “Adobe Analytics” in the APIs section. If these are missing, you will need to create a new project.
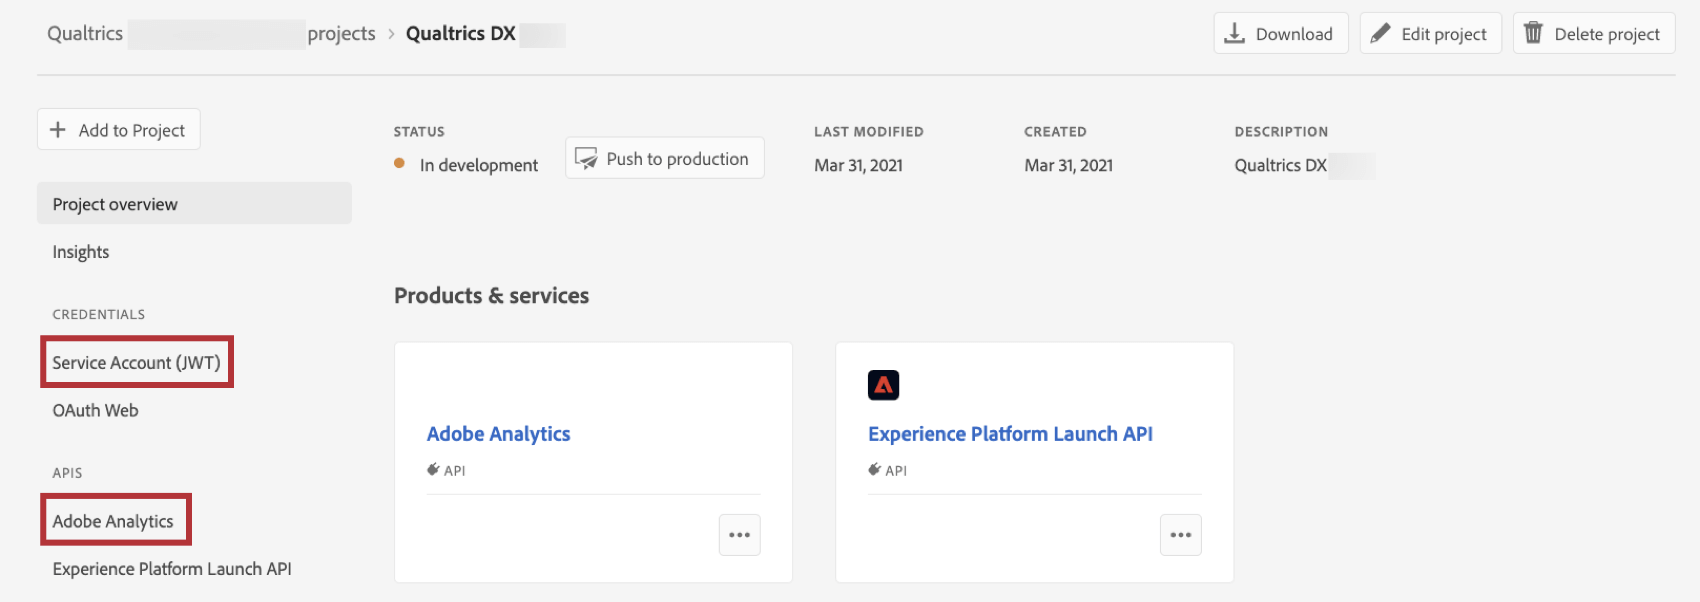
- Click on Adobe Analytics in the APIs section and scroll to the Service account (JWT) section.
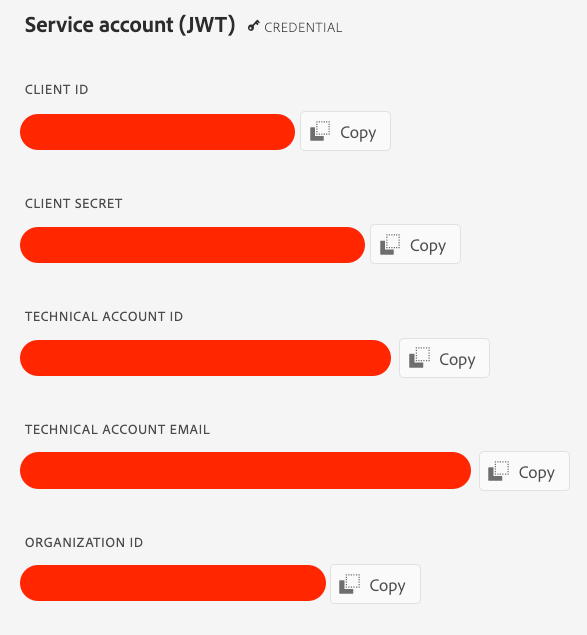
- Copy these fields for use when adding a user account to set up the Adobe Analytics workflow in Qualtrics.
- You will also need a Private Key, which was either downloaded as a ZIP file when you created the Service Account or was created before. Keep this key safe as it is the only copy of it.
Qtip: Unzip the ZIP file to find a file called “private.key”. This file can be opened using any text editor. When you use this file in later steps, make sure to use the entire contents of the file including the “—–BEGIN PRIVATE KEY—–” and “—–END PRIVATE KEY—–” sections.
CREATING ADOBE AUTHENTICATION SECRETS
If you don’t already have authentication secrets, follow these steps to create them. Visit Adobe’s support documentation for more information.
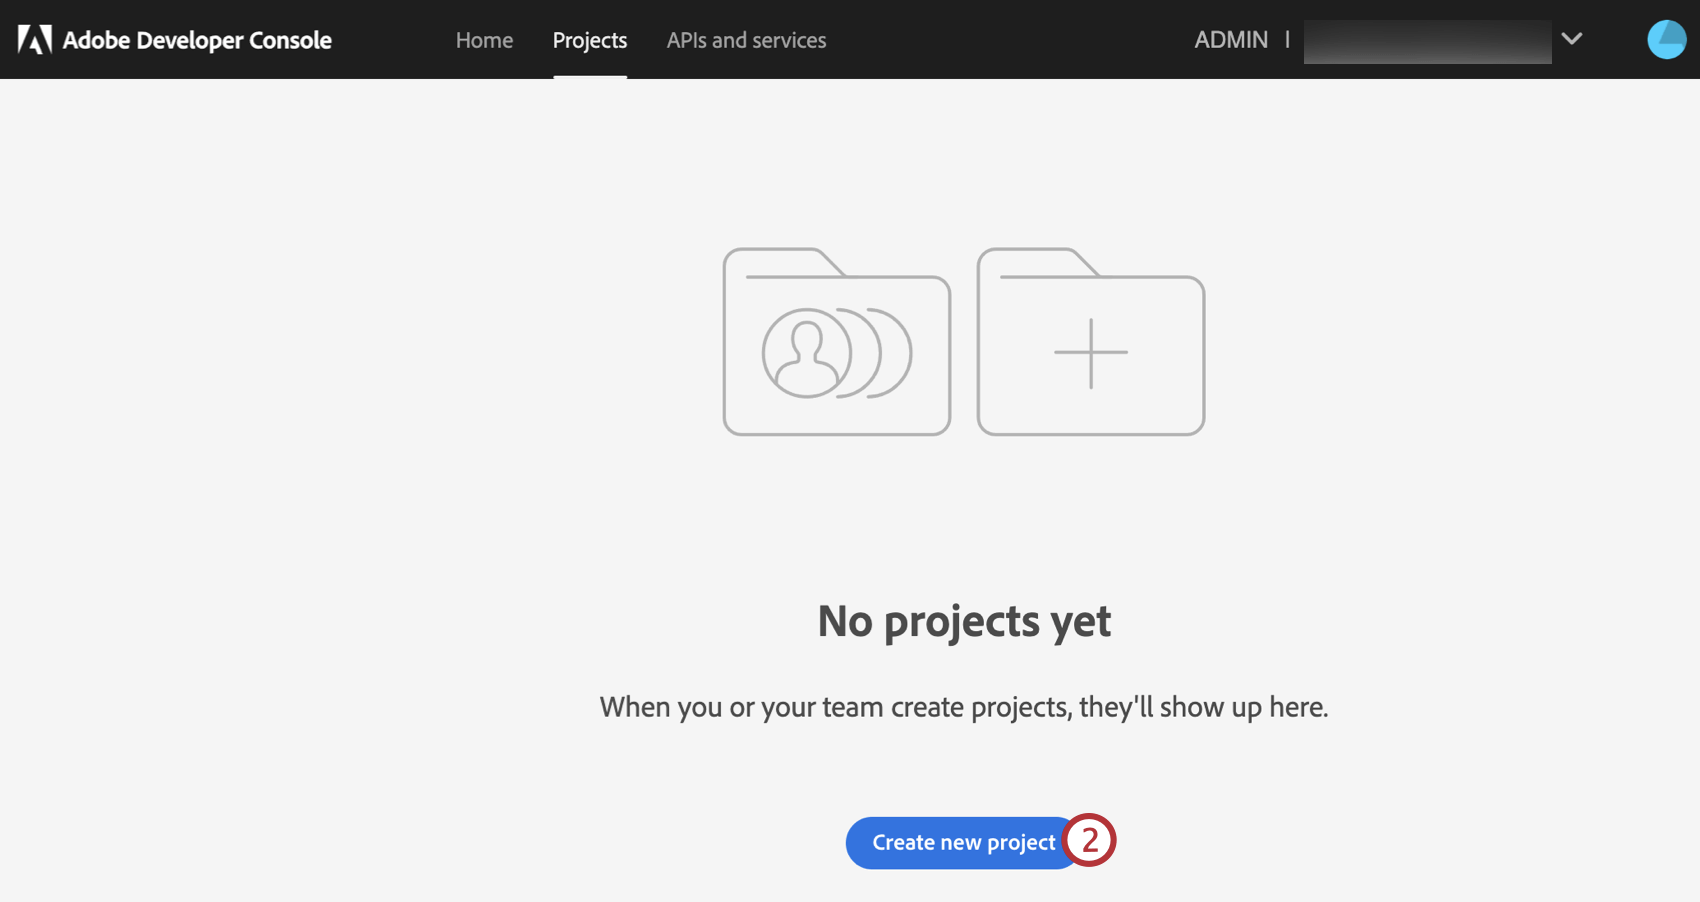
- Navigate to the projects page of your Adobe account.
- Click Create new project.
- Click Add API.
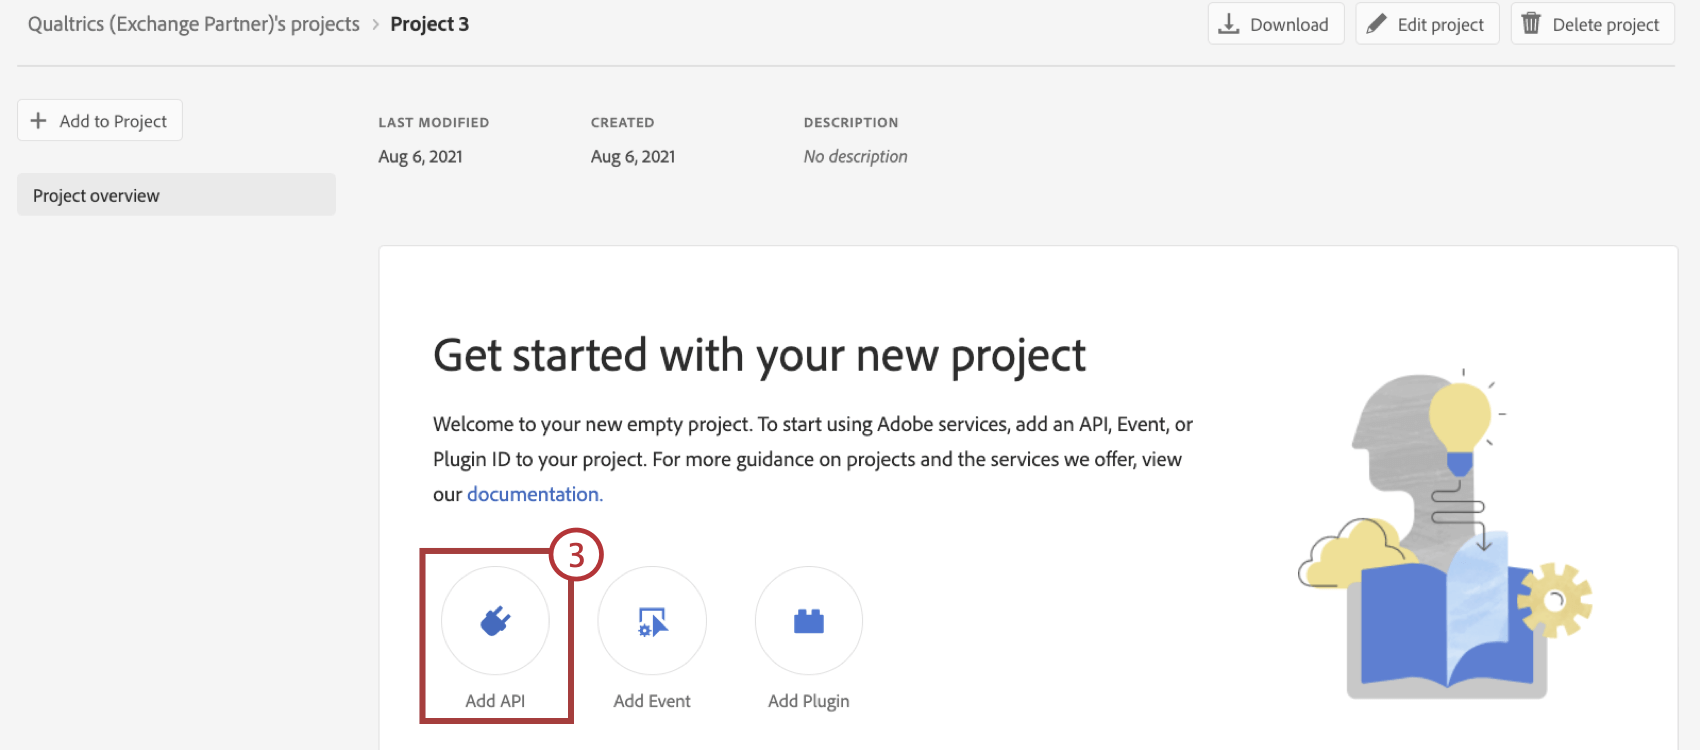
- Select “Adobe Analytics”.
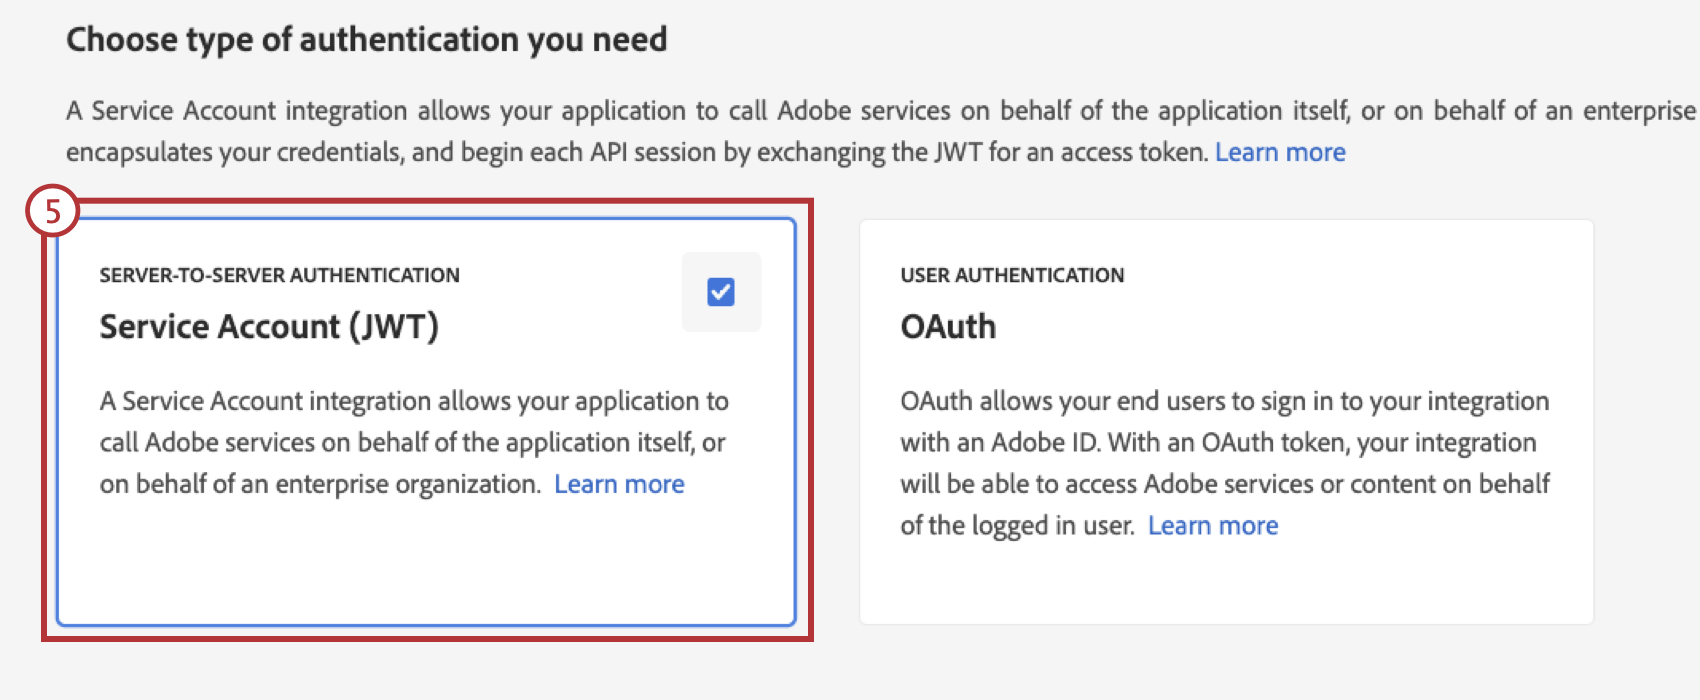
- Choose Service Account (JWT) as the authentication method.
- Click Next.
- Choose if you want Adobe to generate a key pair for you, or if you want to upload your public key.
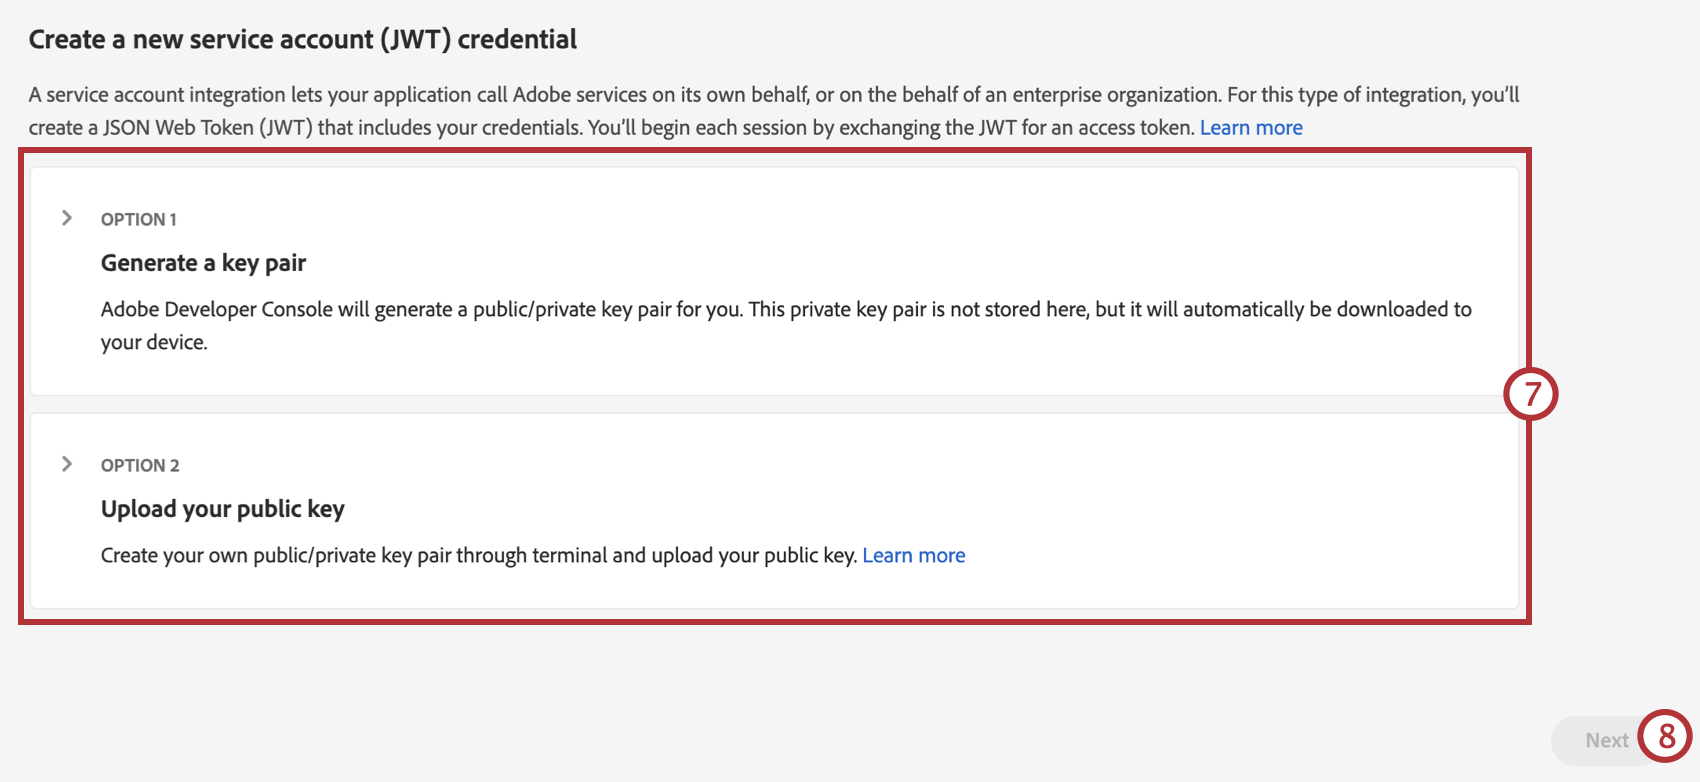 Qtip: If you have Adobe generate a key pair for you, keep that private key in a safe place to use when setting up the Adobe Analytics workflow in Qualtrics.
 - Click Next.
- Select a product profile that has been configured for Adobe Analytics permissions. For the Qualtrics integration to work, the product profile you select will need permissions for the following features:
- Analytics Tools: Web Services and either Analysis Workspace Access or Reports & Analytics Access.
- Report Suite Tools: Classifications.
- Save your API.
SETTING UP THE ADOBE ANALYTICS WORKFLOW IN QUALTRICS
- Navigate to the Workflows page.
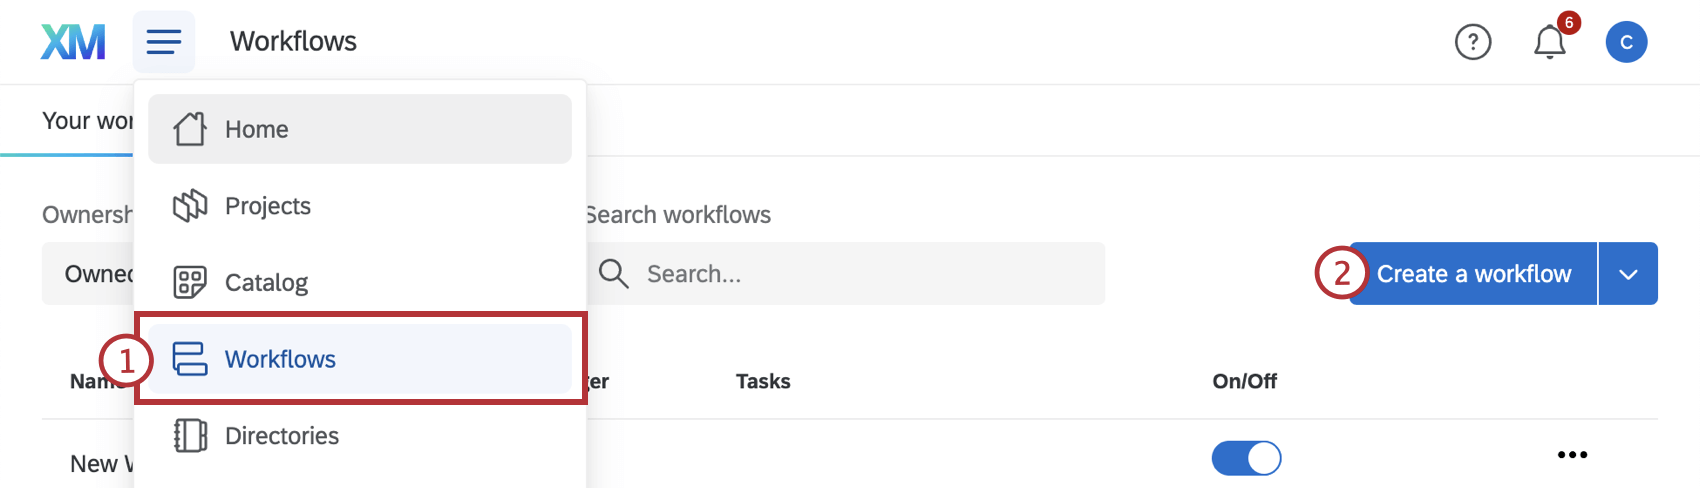
- Click Create a workflow.
- Select the Send Qualtrics data to your Adobe Analytics Report Suite template.
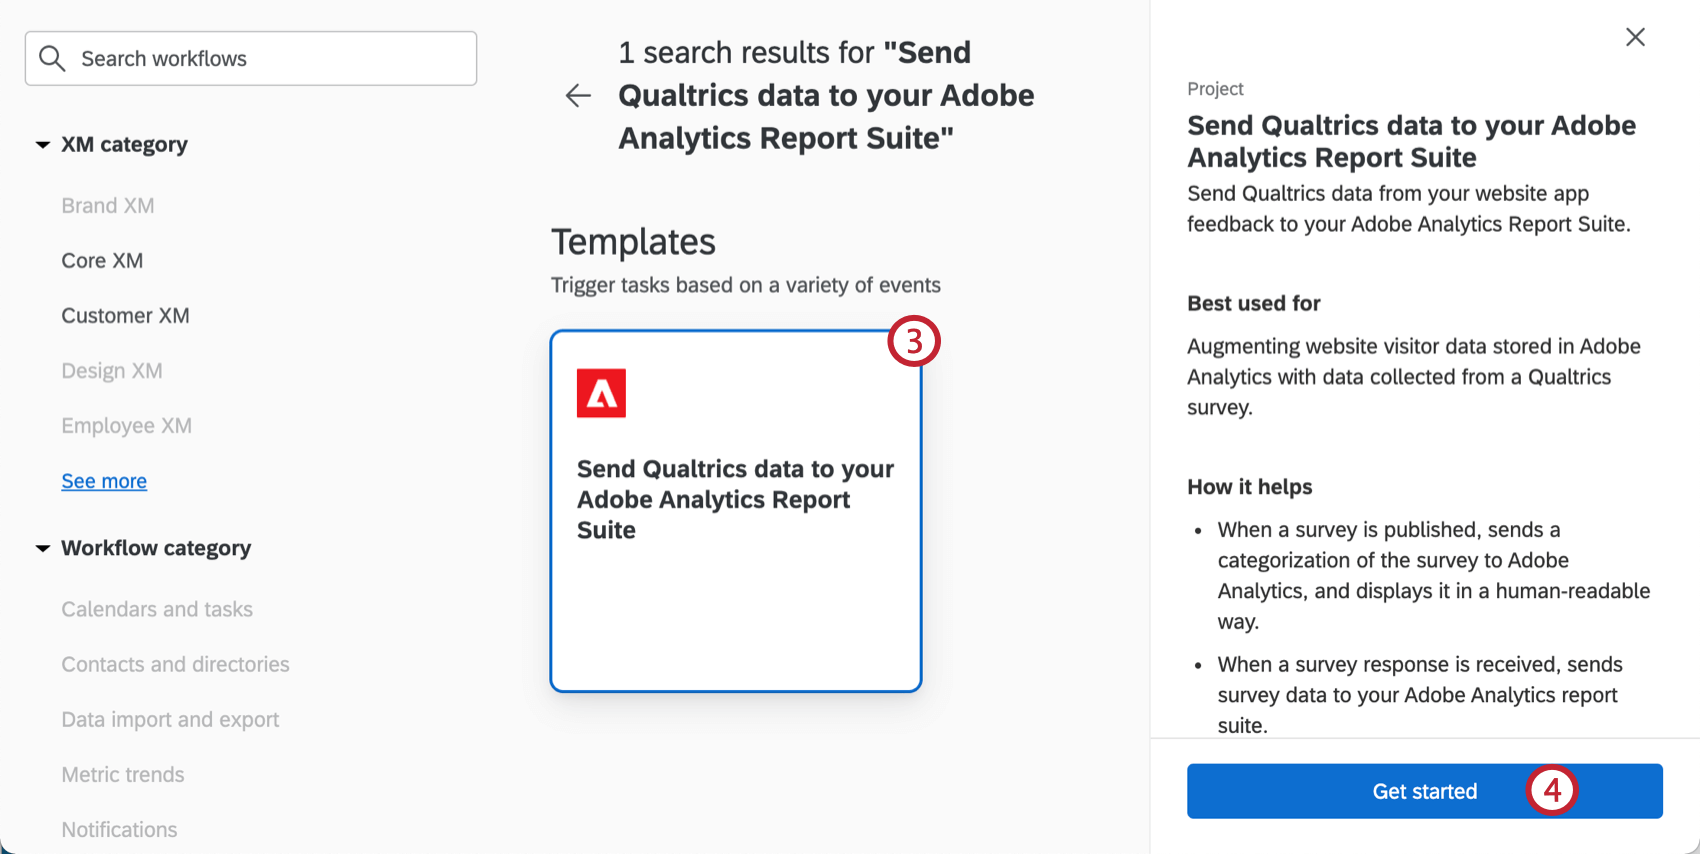 Qtip: This can be found under the “Strategic Research” or “CustomerXM” sections, or you can use the search bar to search for Adobe Analytics.
 - Click Get started.
- In the Name field, type in a name to identify the workflow.
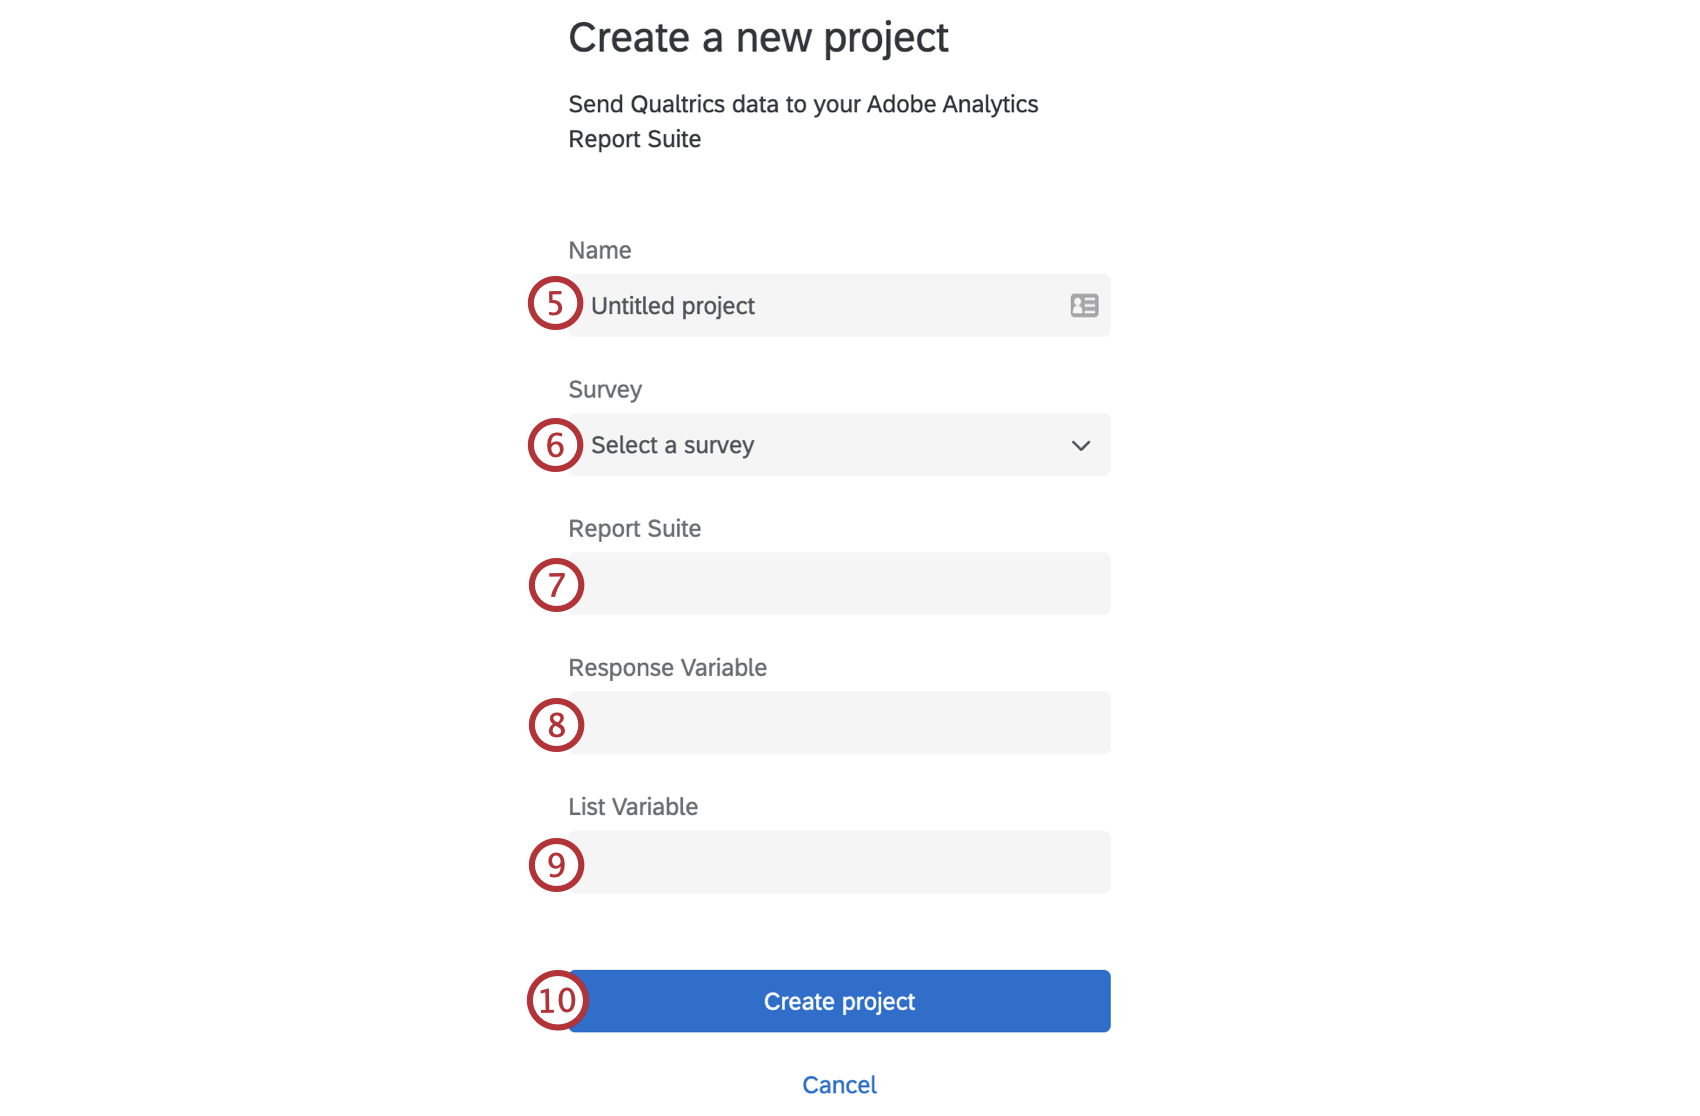
- In the Survey dropdown, select the survey that you would like to upload classifications and survey responses from.
- In the Report Suite field, enter the report suite ID from Adobe Analytics that you would like to upload classifications and surveys responses to.
- In the Response Variable field, enter the Adobe Analytics conversion variable. It will be formatted like “evar#” where the “#” is the evar number.
- In the List Variable field, enter the Adobe Analytics list variable. It will be formatted like “list#” where the “#” is the list var number.
- Click Create project.
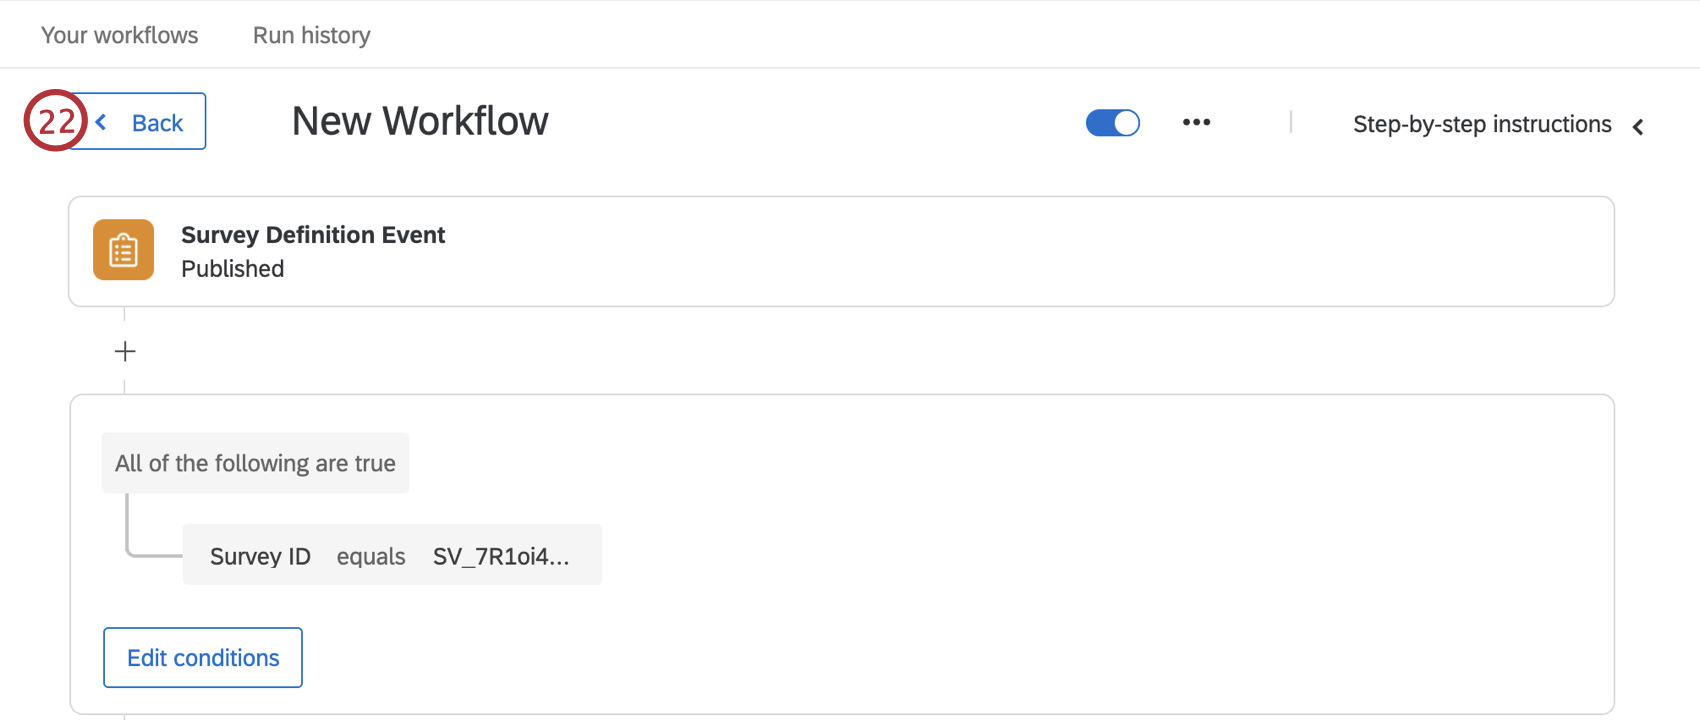
- Once your workflow is created, click on the Survey Definition Event.
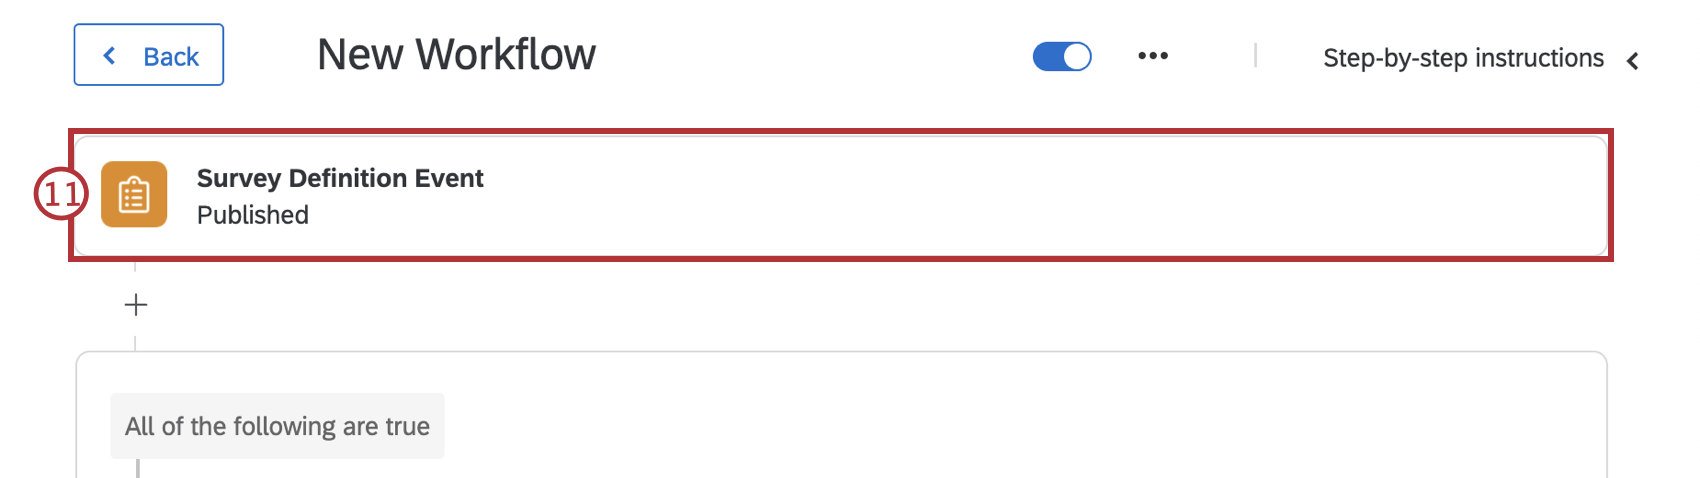 Qtip: Click Step-by-step instructions in the top-right corner to view these instructions while creating your workflow.
 - Choose whether to start the workflow when the survey is Activated, Closed, or Published.
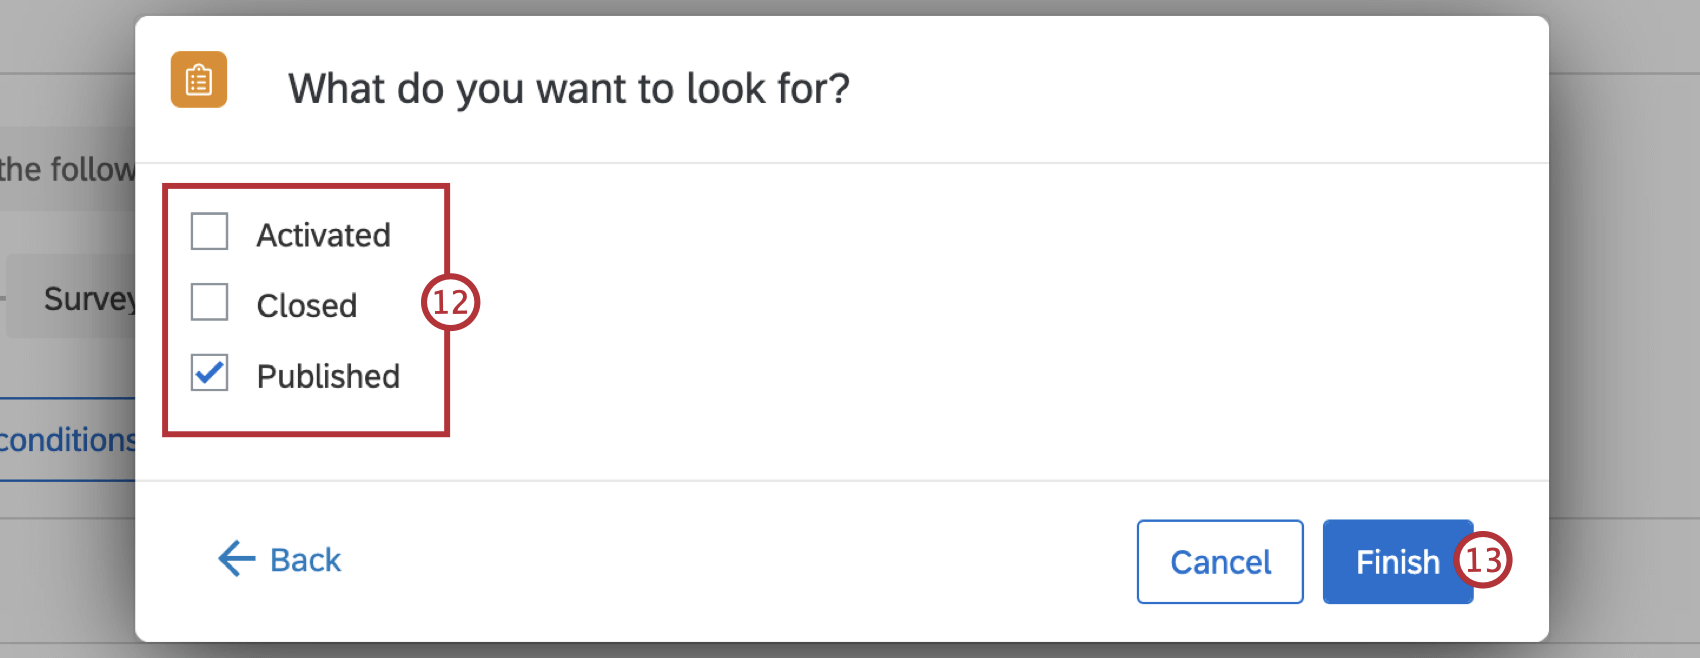 Qtip: Qualtrics recommends starting this workflow only when the survey is published.
 - Click Finish.
- Click Edit conditions to adjust the conditions so the workflow starts only when the Survey ID equals the correct survey project. See Creating Conditions for more about creating and adjusting conditions.
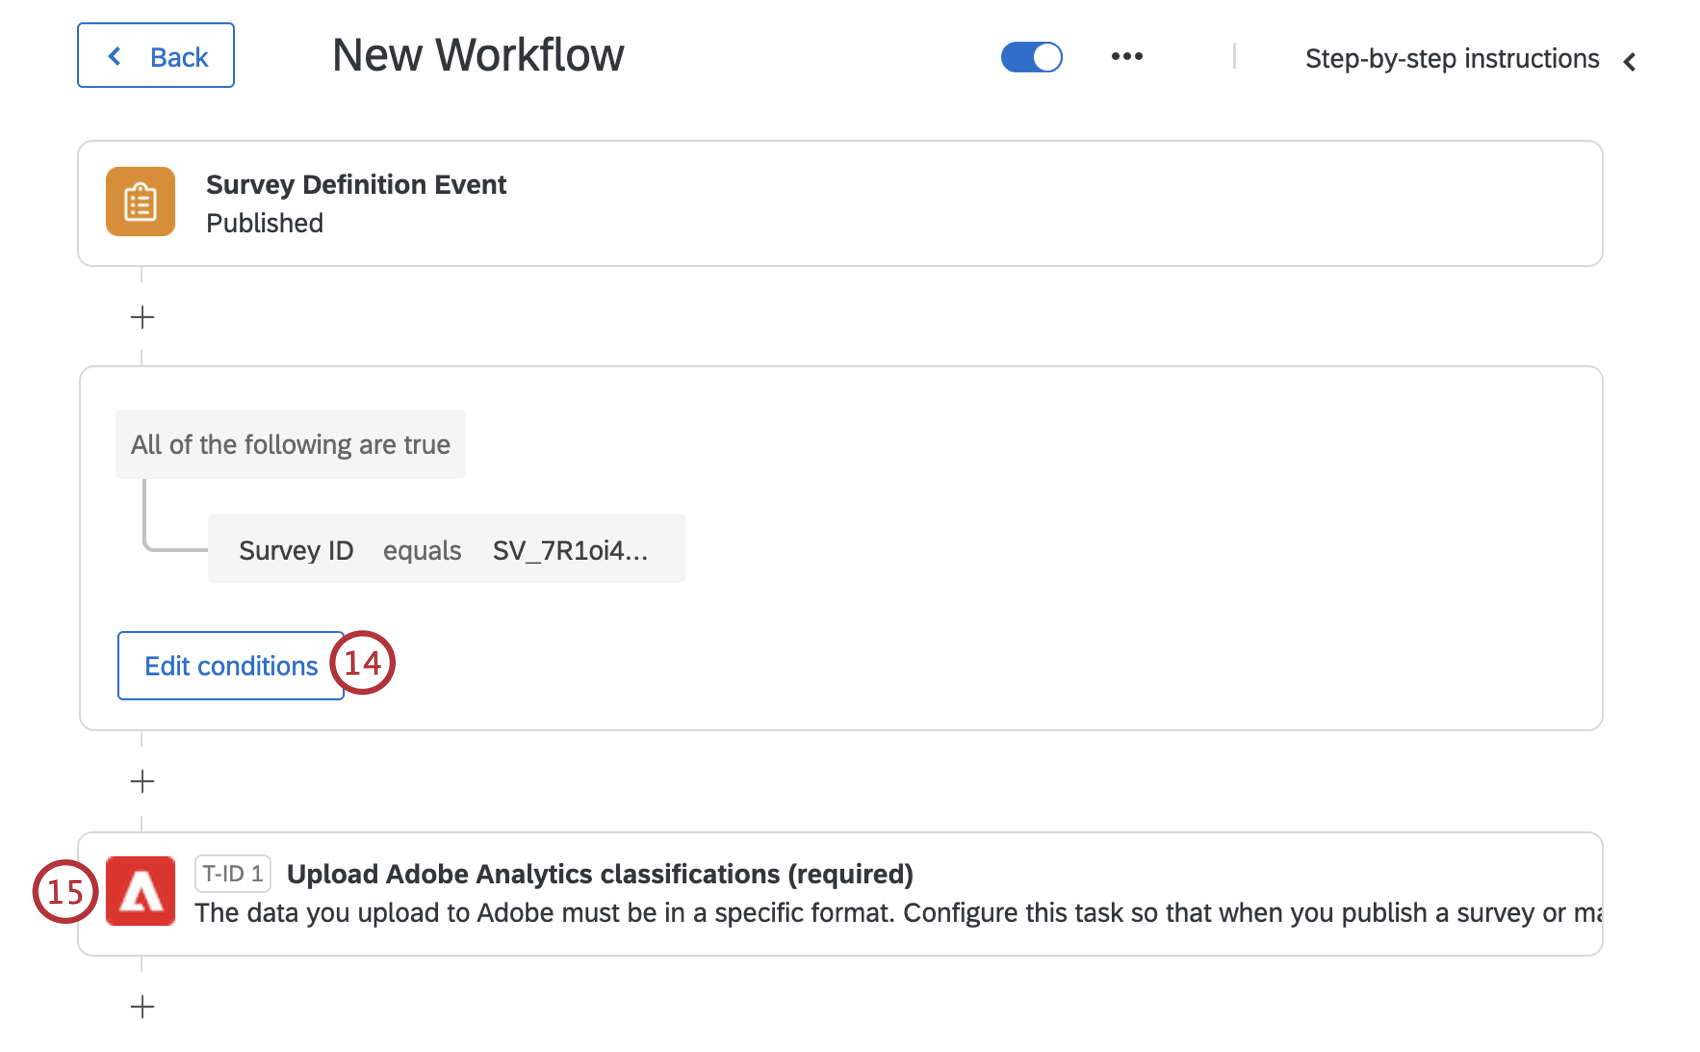
- Select the Upload Adobe Analytics classifications task.
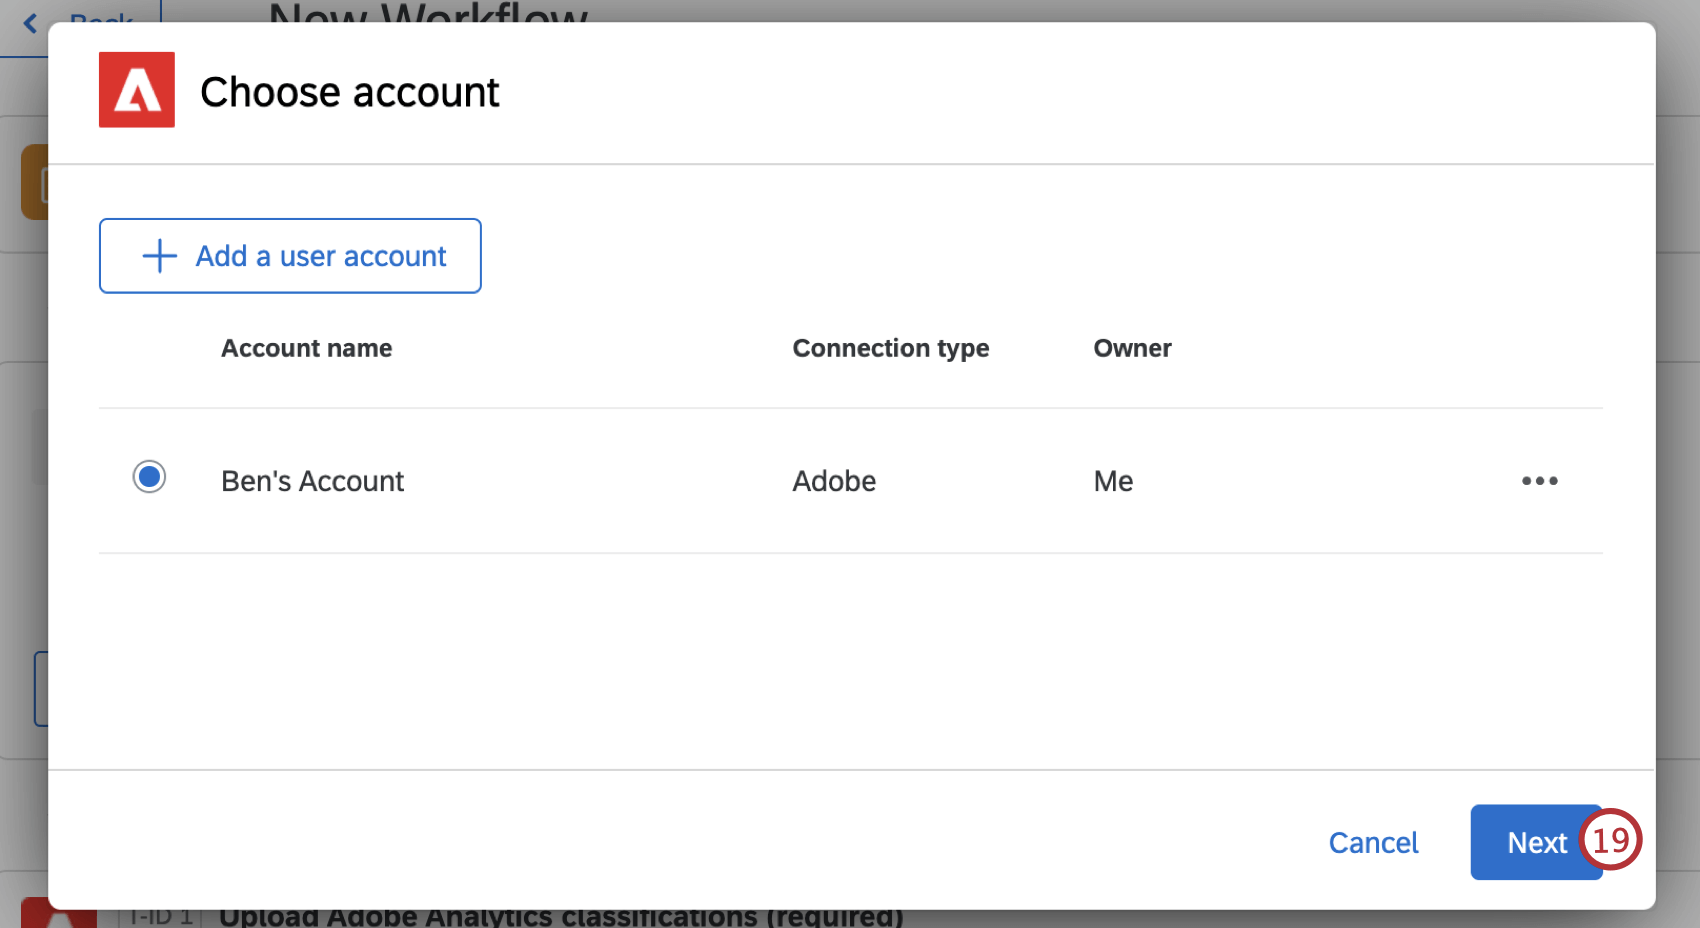
- Select your account, or click Add a user account if you have not already added an Adobe account.
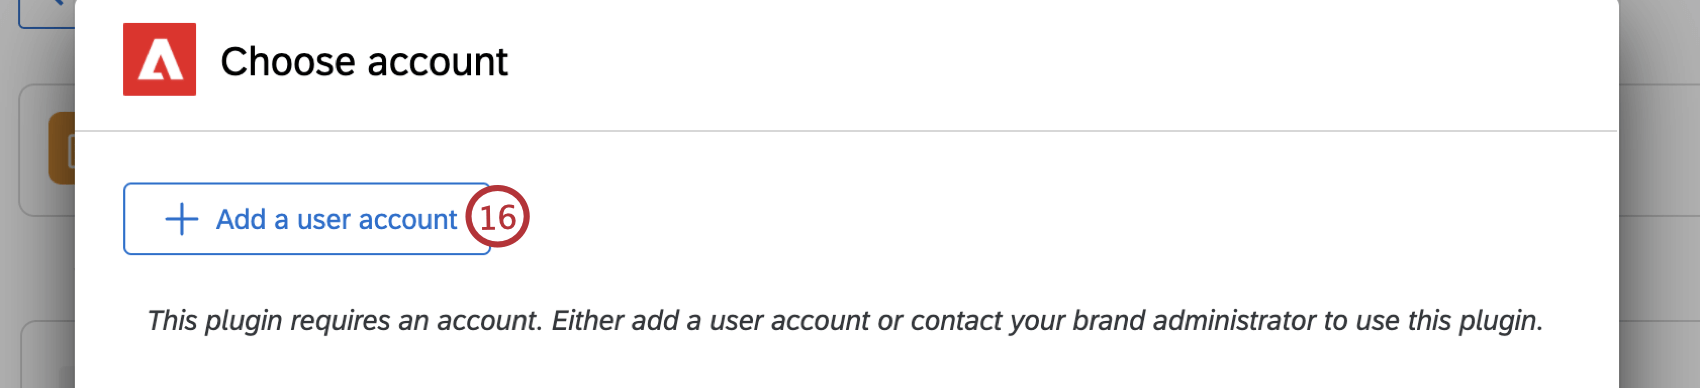 Attention: If you haven’t previously created an account to authenticate to Adobe, you will be asked to provide the Adobe credentials that you obtained when getting your Adobe authentication secrets.
 - Enter your Adobe account details.
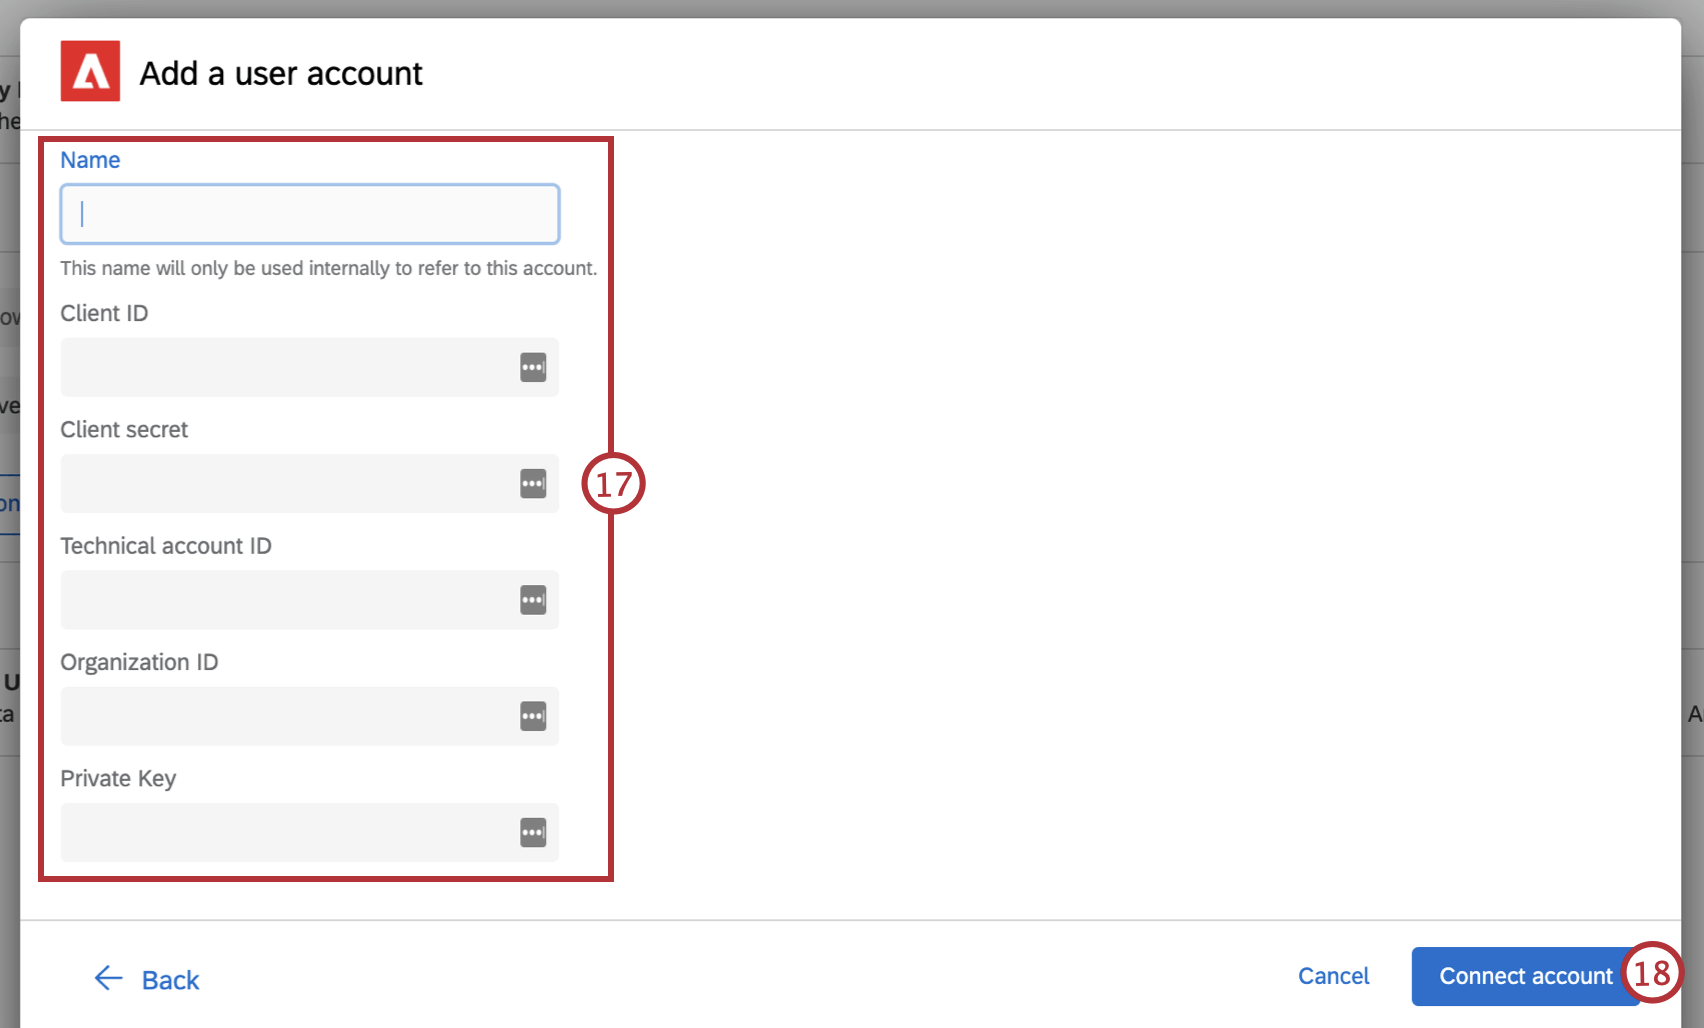
- Select Connect account.
- Once your account is selected, click Next.
- Verify that the Report suite ID and Response list variable are correct and match what you see in your Adobe account.
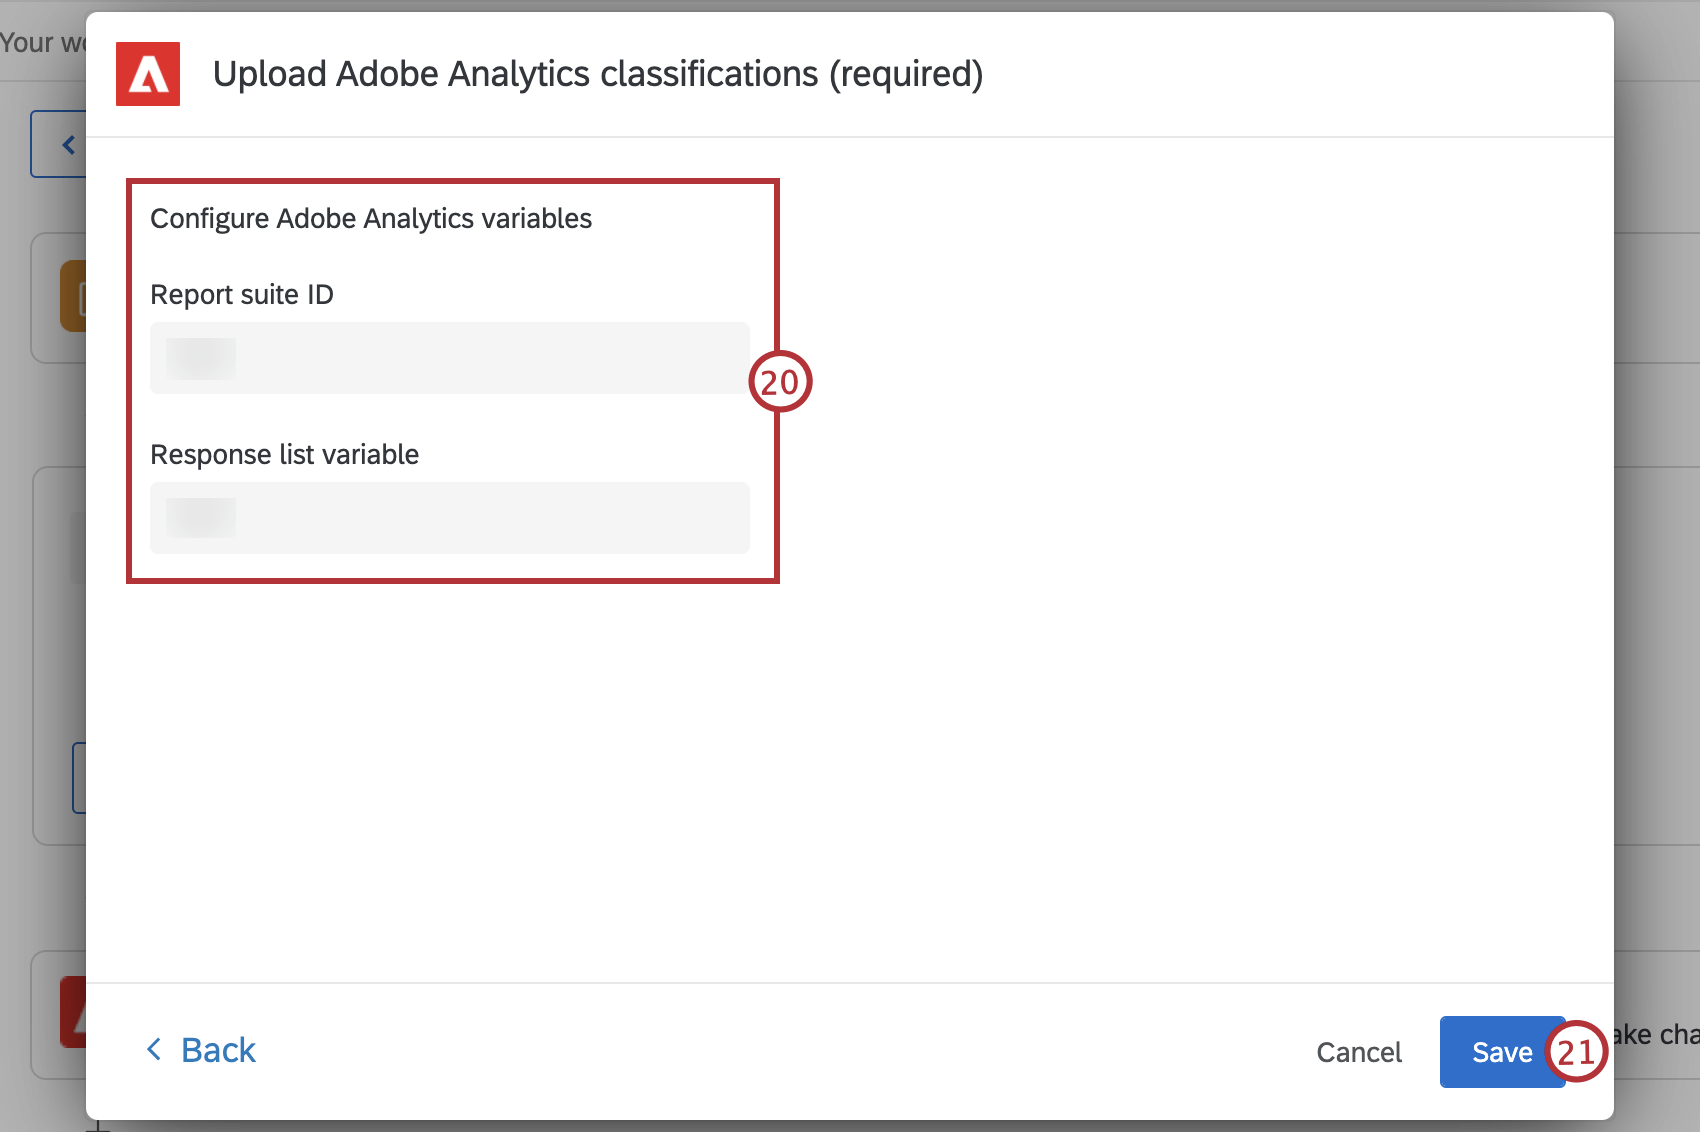
- Click Save.
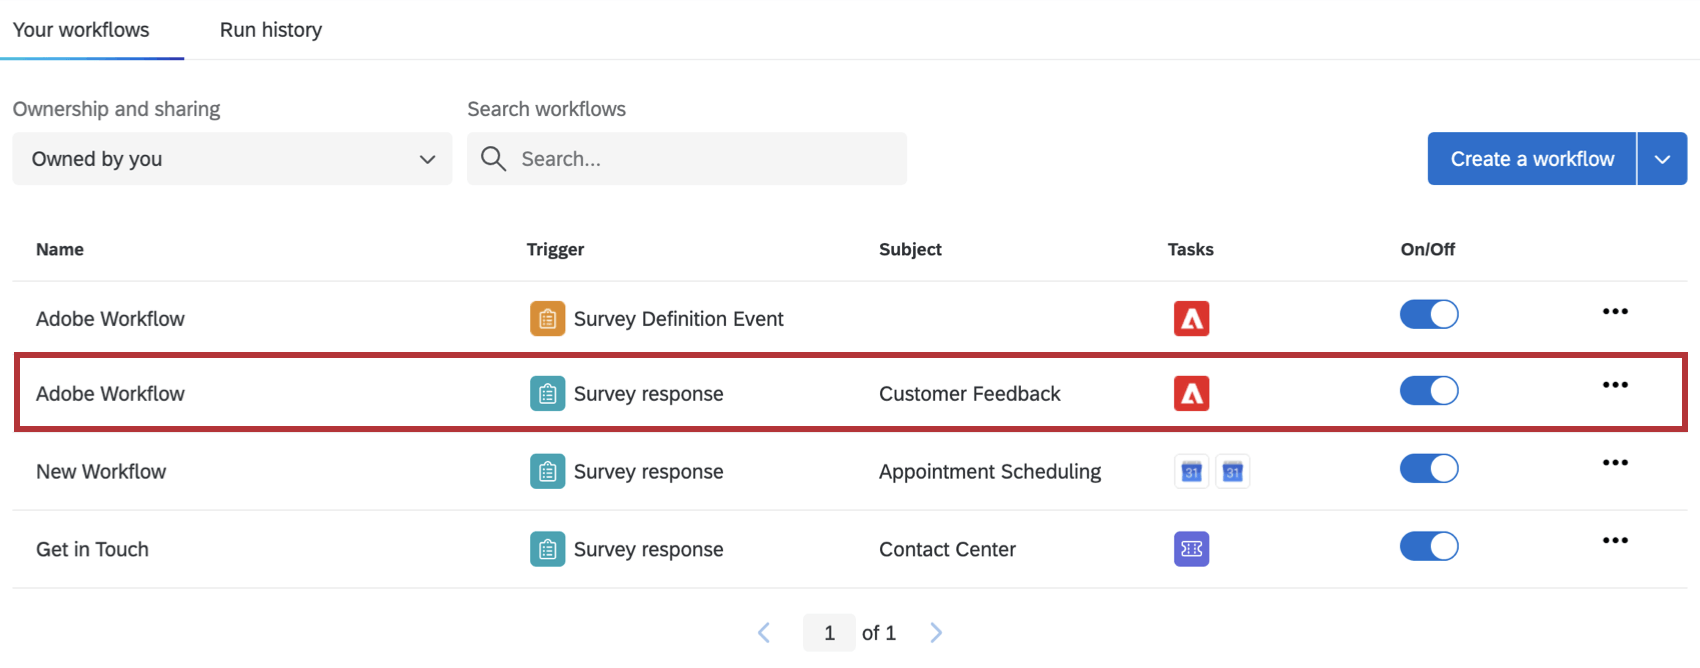
- Once your workflow is saved, click Back.
- Select the task that you named in Step 5. This task will have a “Survey response” trigger.
- Select Survey response.
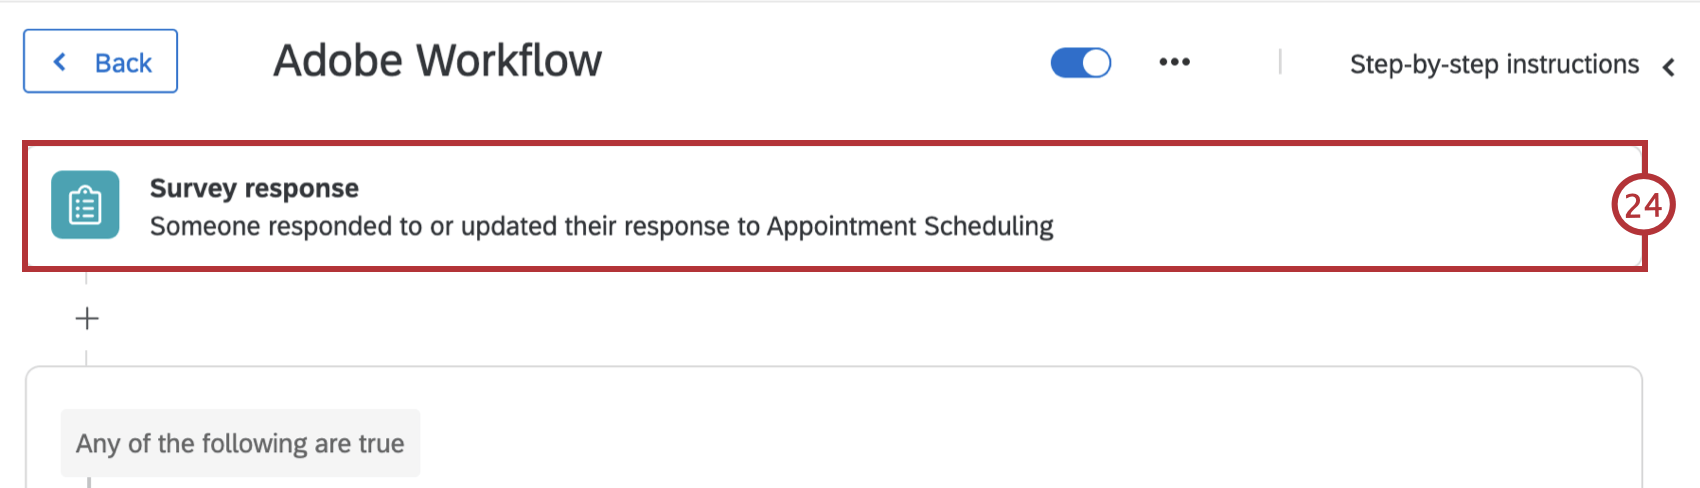
- Confirm you have selected the correct survey project from the dropdown.
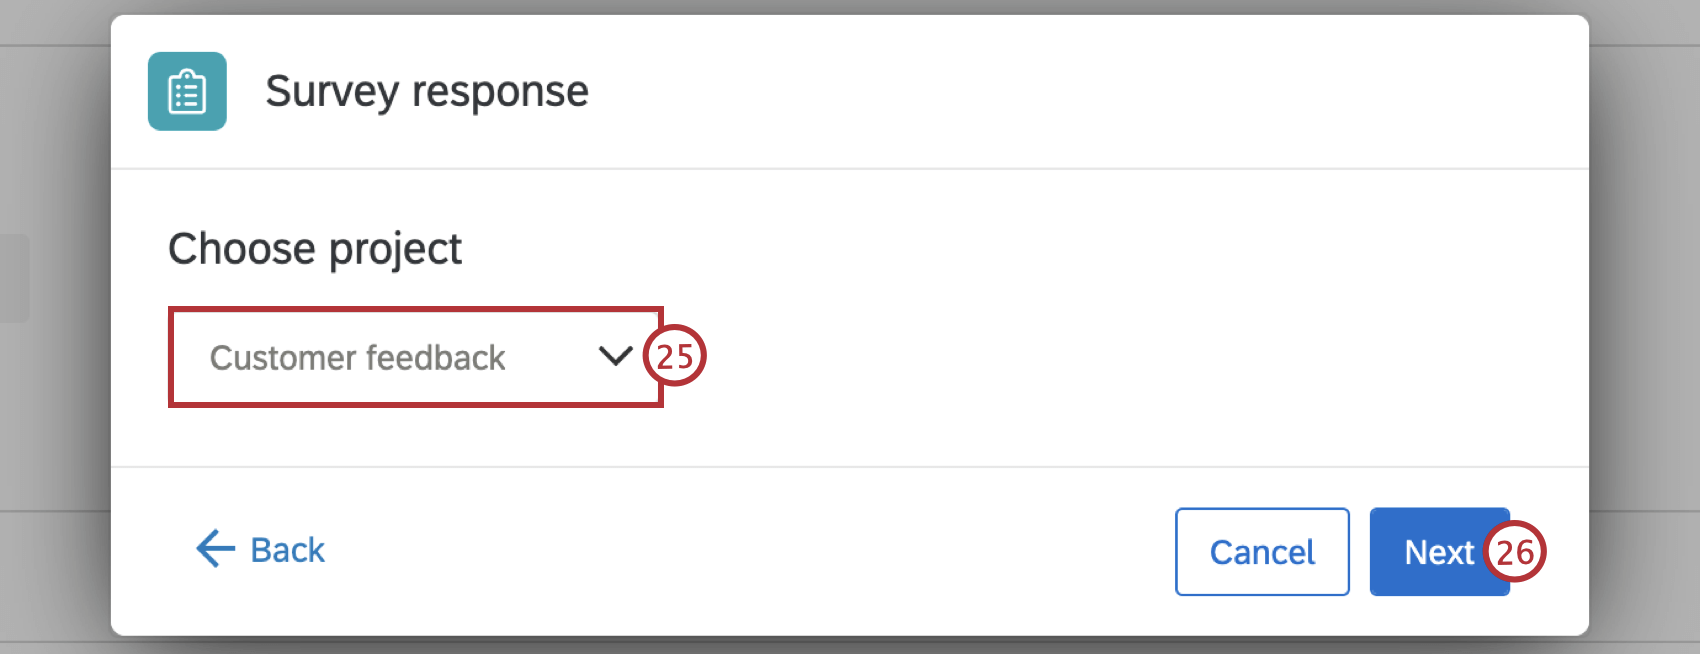
- Click Next.
- Choose whether to start the workflow when a new survey response is created, an existing response is updated via API, or both.
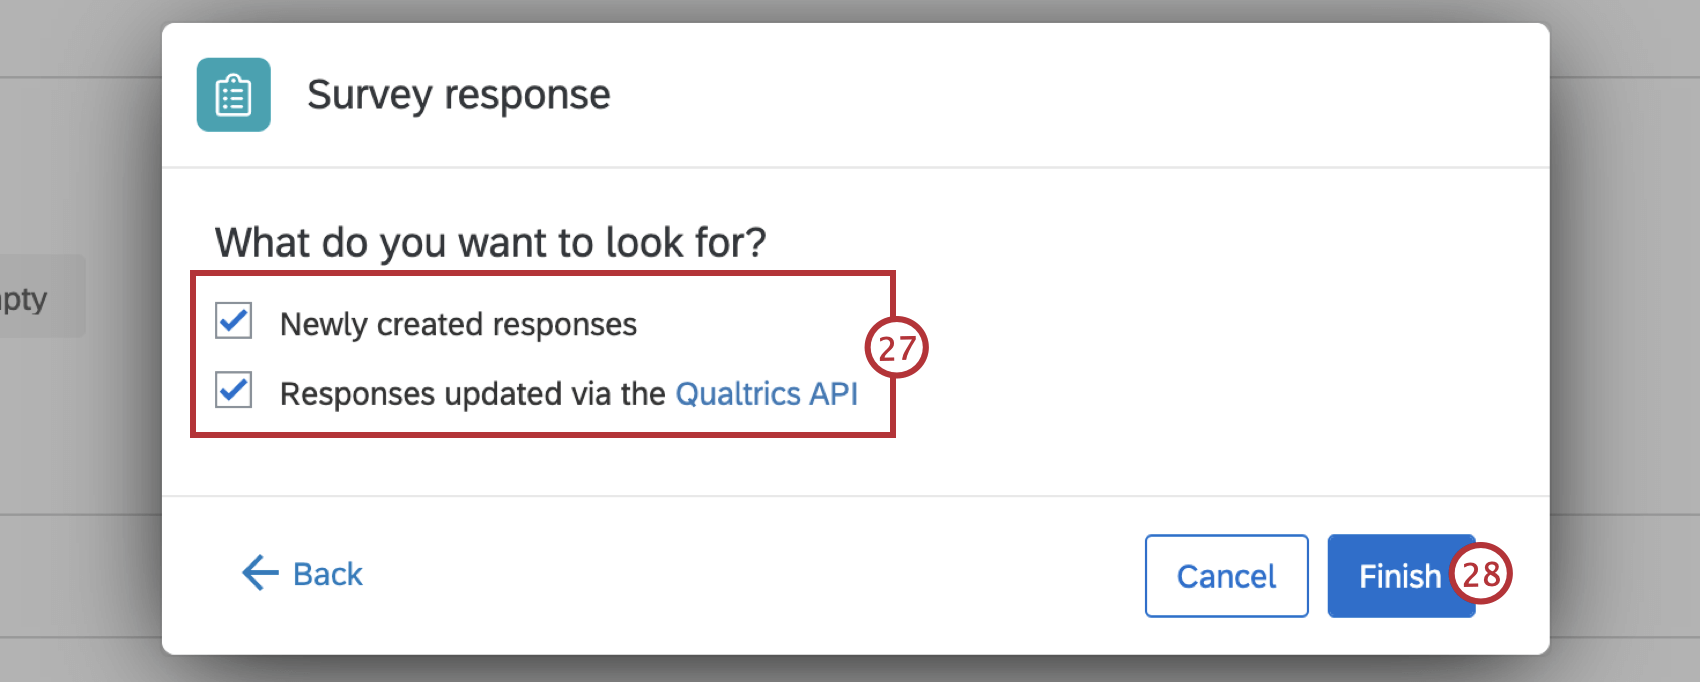
- Click Finish.
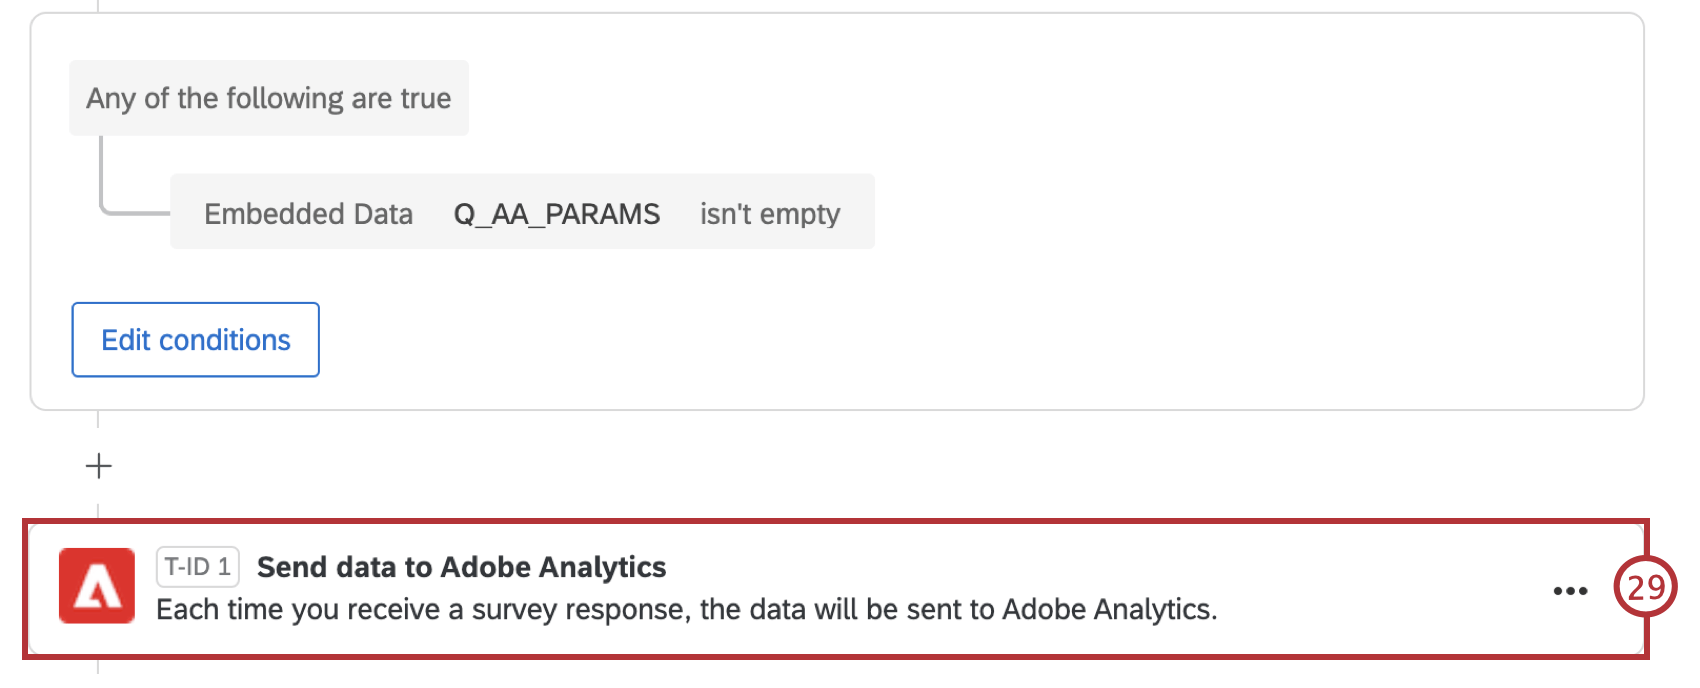
- Select the Send data to Adobe Analytics task.
- Select your account, or click Add a user account if you have not already added an Adobe account. Follow steps 17-18 to connect a new user account.
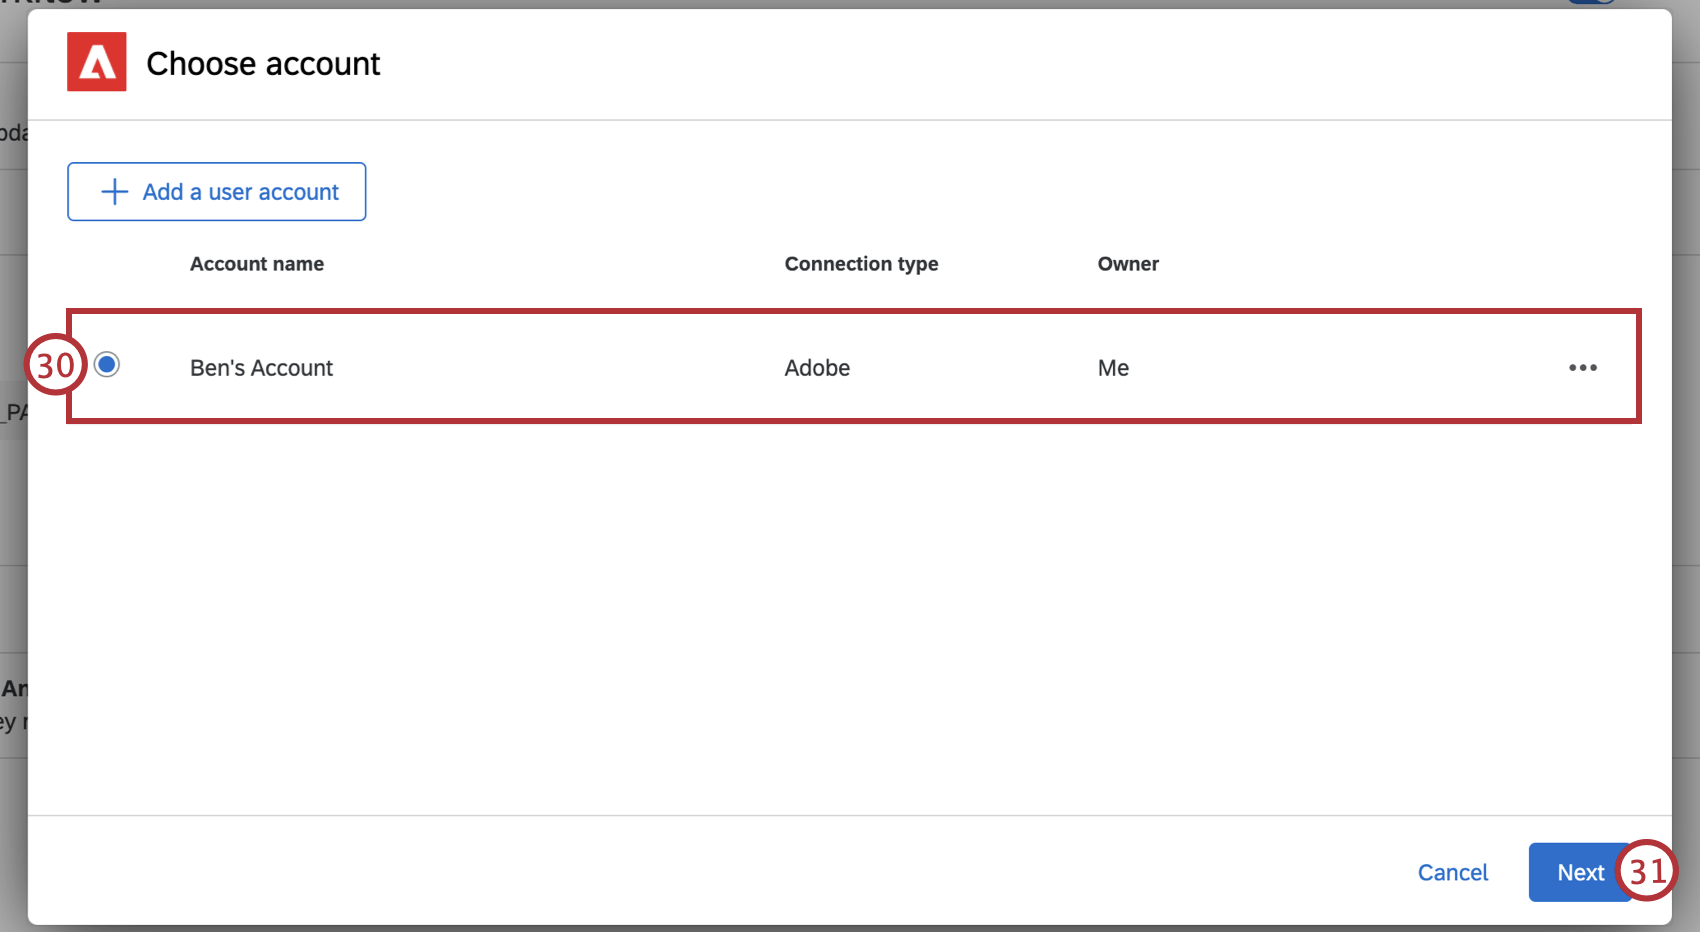
- Click Next.
- Verify that the Report suite ID, Response list variable, and Response ID variable are correct and match what you see in your Adobe account.
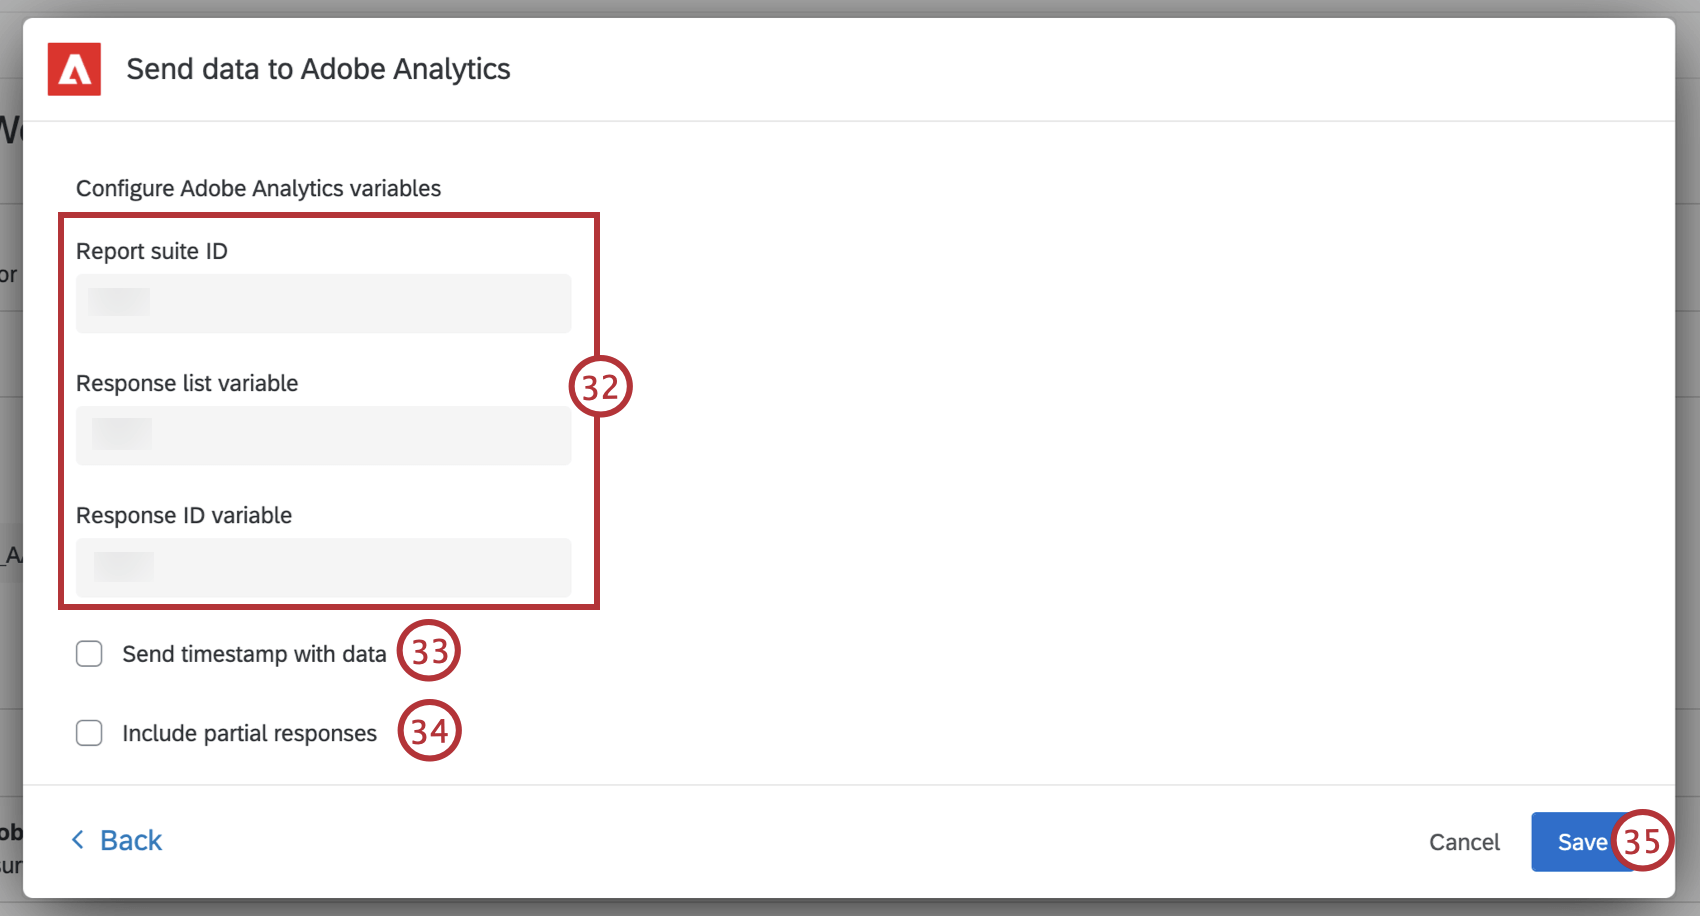
- Check Send timestamp with data if your report suite has the “Timestamps required” setting enabled. You can check these settings within your Adobe account. For more information see the Adobe timestamp documentation.
- Check Include partial responses if you want partial responses to be sent to your report suite. See survey response events to learn about starting a workflow for incomplete responses.
- Click Save.
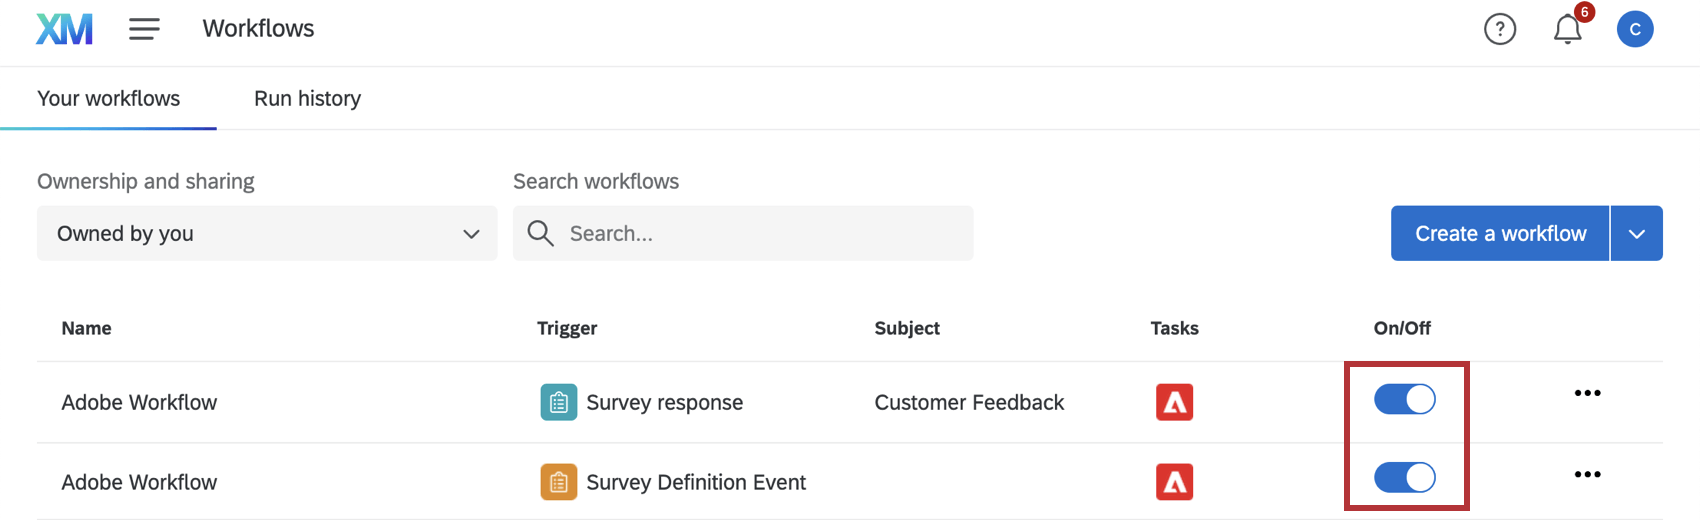
Attention: Make sure both of the workflows you created are switched On.
ADDING EMBEDDED DATA
If you are creating a new survey and intercept to pass data to Adobe, you will need to add embedded data to both your survey and the intercept. Once this embedded data is added, you should be able to successfully set up Adobe workflows using the survey you made.
If you are creating an intercept using a guided setup:
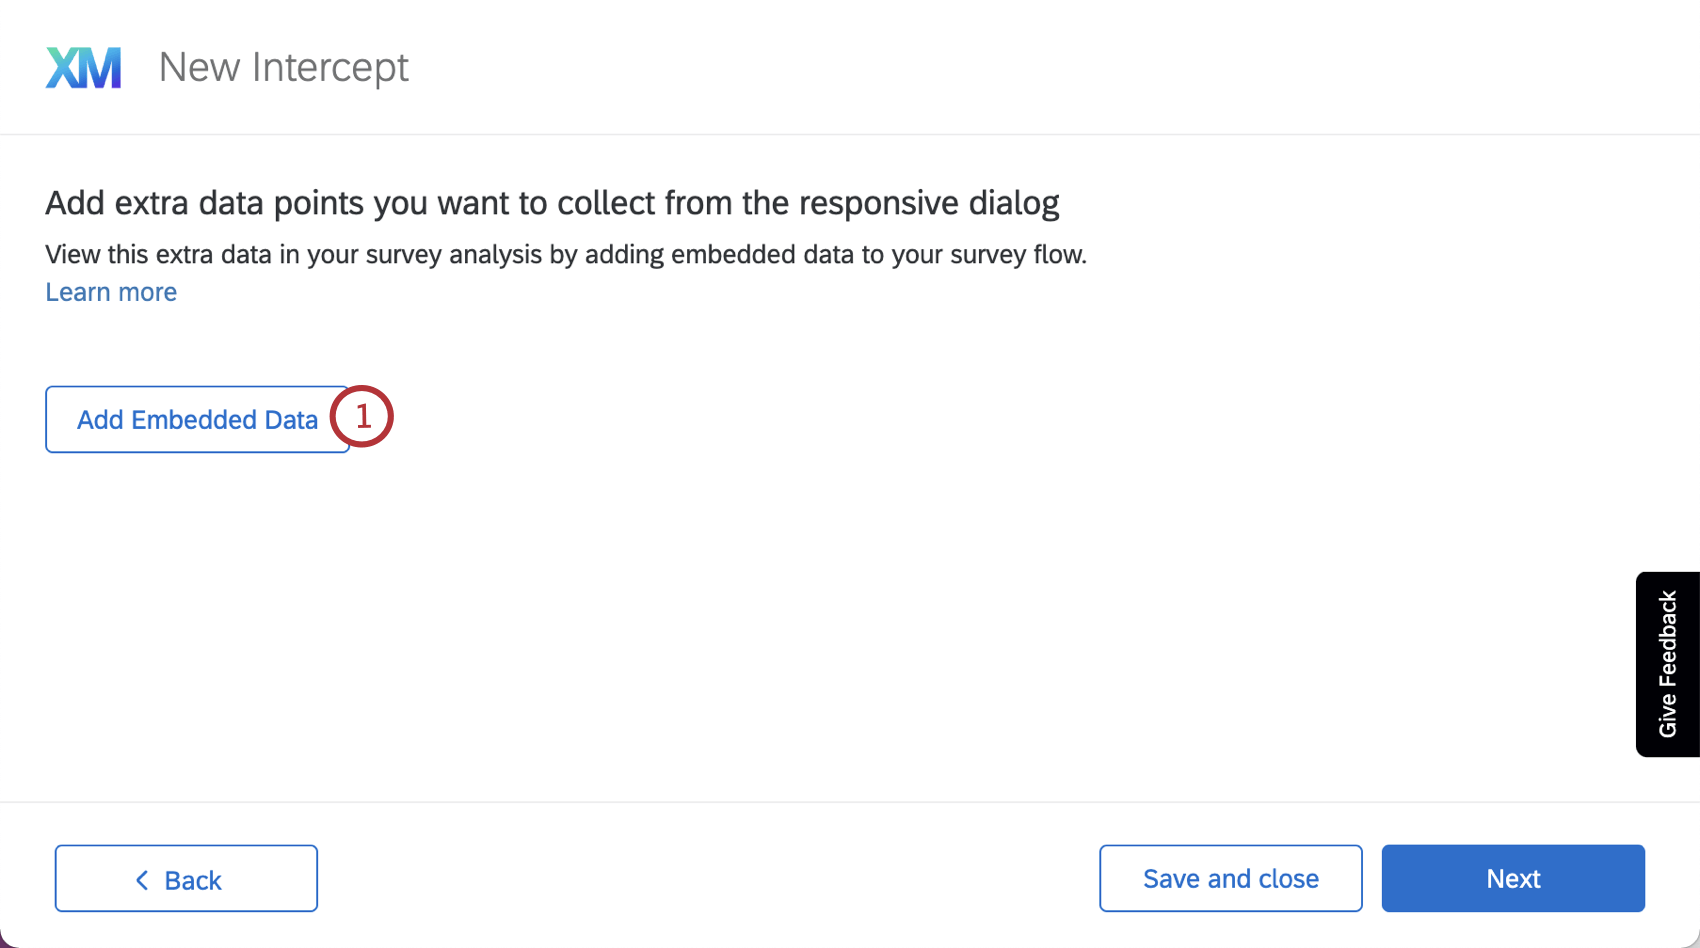
- Click Add Embedded Data when you get to the “Add extra data points you want to collect” step while creating your intercept.
- In the “Select data” dropdown, select Adobe Experience ID.
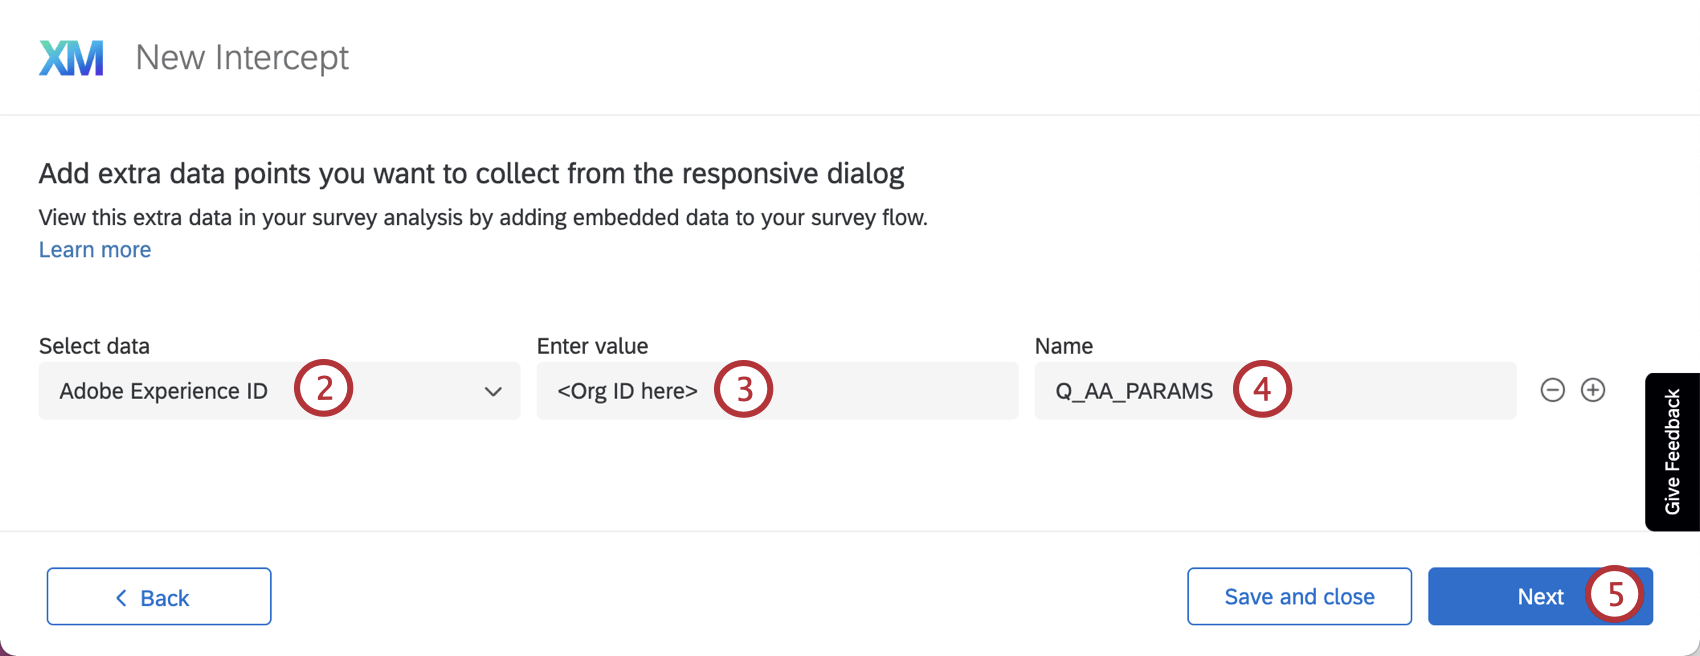
- In the “Enter value” field, type in your Adobe organization ID. You can find this value in the Adobe project you set up to get Adobe authentication secrets.
- In the “Name” field, type in “Q_AA_PARAMS”.
- Click Next.
If you are creating an intercept using a non-guided setup:
- Select the embedded data menu for each action set included in the intercept. See Embedded Data in Website Feedback for step-by-step instructions.
- For the “Name” field, type in “Q_AA_PARAMS”.
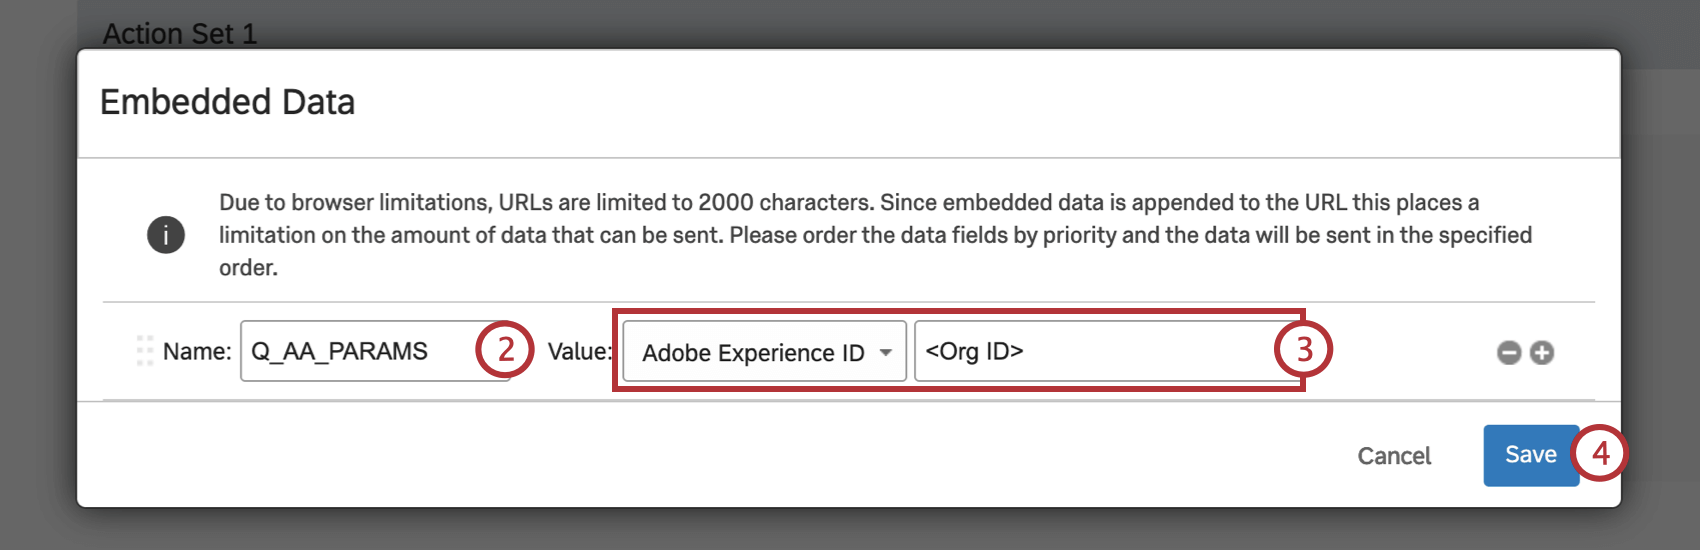
- For “Value”, select Adobe Experience ID from the dropdown, and type in your Organization ID.
- Click Save.
Once embedded data has been set up in your intercept, follow these steps to add it to your survey:
- Navigate to the survey you will be using with your intercept.
- Go to Survey flow.
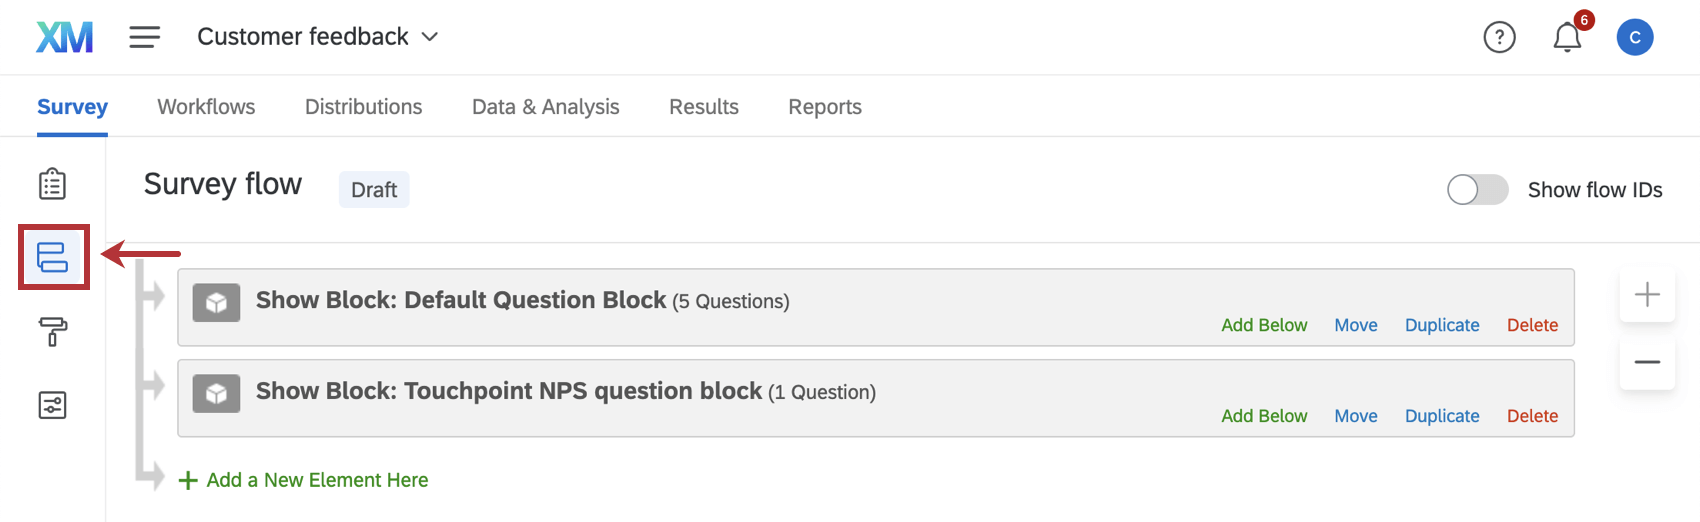
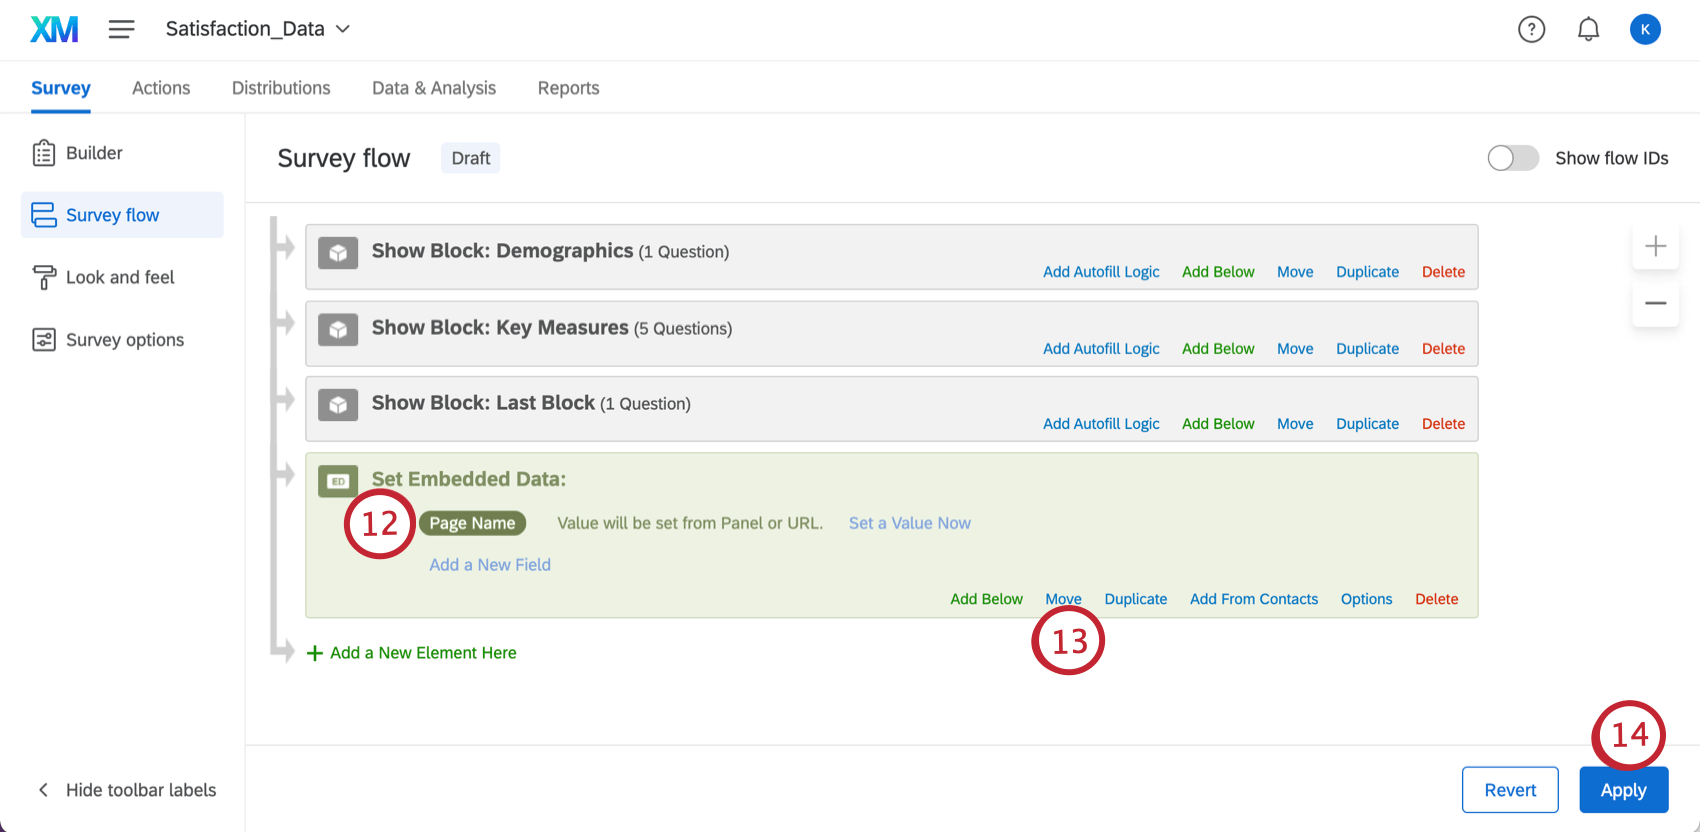
- Click Add a New Element Here.
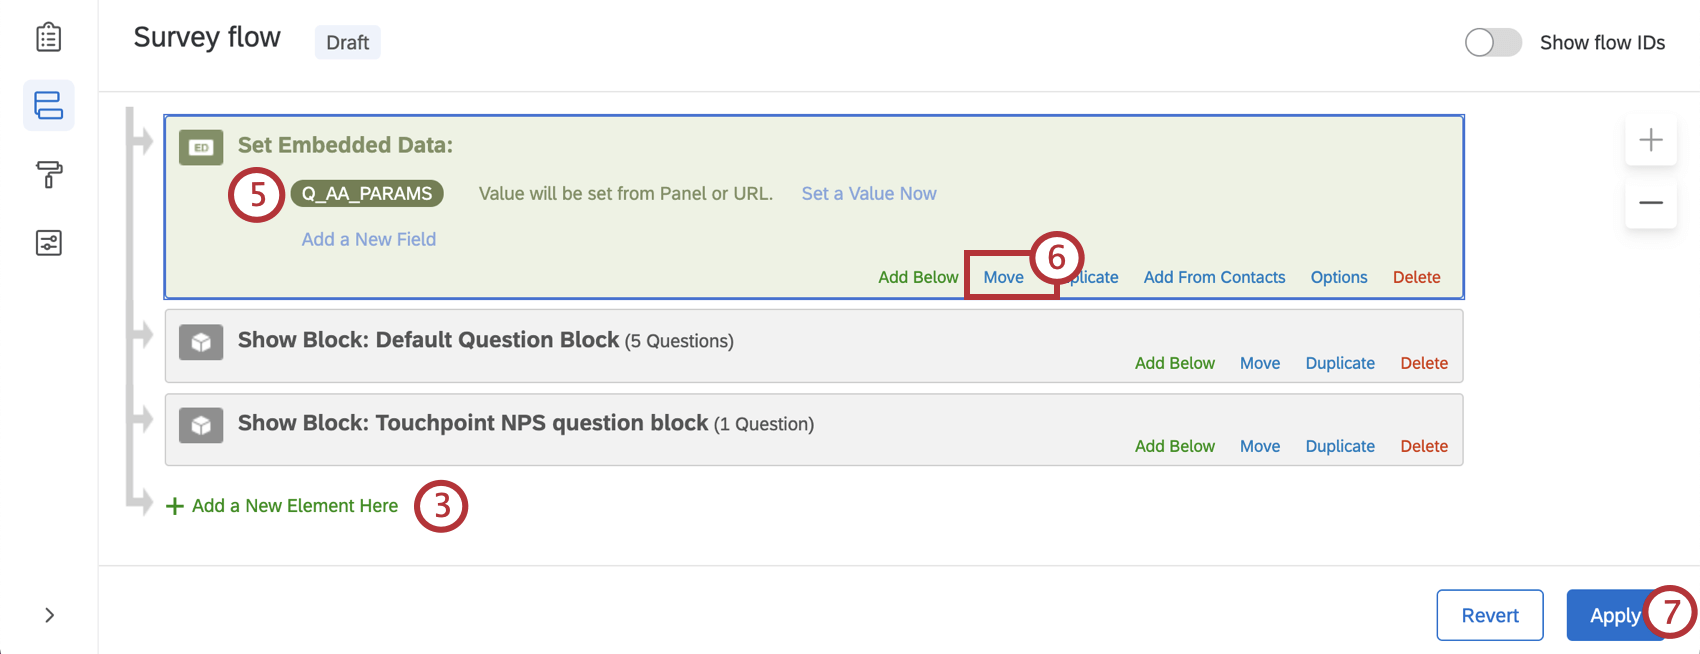
- Select Embedded Data.
- Click “Create New Field or Choose From Dropdown…” and type in “Q_AA_PARAMS” as the field name. Leave the value blank.
- Click Move and move the embedded data element to the top of the survey flow.
- Click Apply to save your changes.
Troubleshooting Passing Qualtrics Data to Adobe Analytics
There are a couple of common errors that can take place with the Qualtrics-Adobe Analytics extension. Consider the below tips if you run into an issue.
DELAYS IN DATA CONSUMPTION
In general, it takes about 24 hours for data to appear in the Adobe Analytics platform. This means that even if you have turned on the extension for one of your surveys, you will not see any results populated in the Adobe Analytics platform for at least a day. The survey results you have collected with Qualtrics will appear within the Qualtrics interface immediately.
Certain Data Not Appearing in Adobe Analytics
The Qualtrics-Adobe Analytics extension passes survey response information over to Adobe Analytics in the form of a list variable. However, only specific kinds of data are passed:
- Any data that can be expressed as a recode value or embedded data value will be passed through the Data Connector, but no other data can be.
- Responses to survey elements like multiple choice questions and likert matrix tables will be included.
- Information like responses to text entry questions will not be included.
- The first 60 embedded data fields will come in as “context data” to Adobe Analytics. You will then need to use Adobe’s “Processing Rules” to map that context data to an Adobe Analytics variable. Once you go through these steps, you can create graphs and reports based on the embedded data passed to Adobe Analytics.
Follow the below steps to test your integration and review the embedded data fields being passed into Adobe:
- Add embedded data to a response. This can happen via embedded data on the contact in a contact list, survey flow, etc.
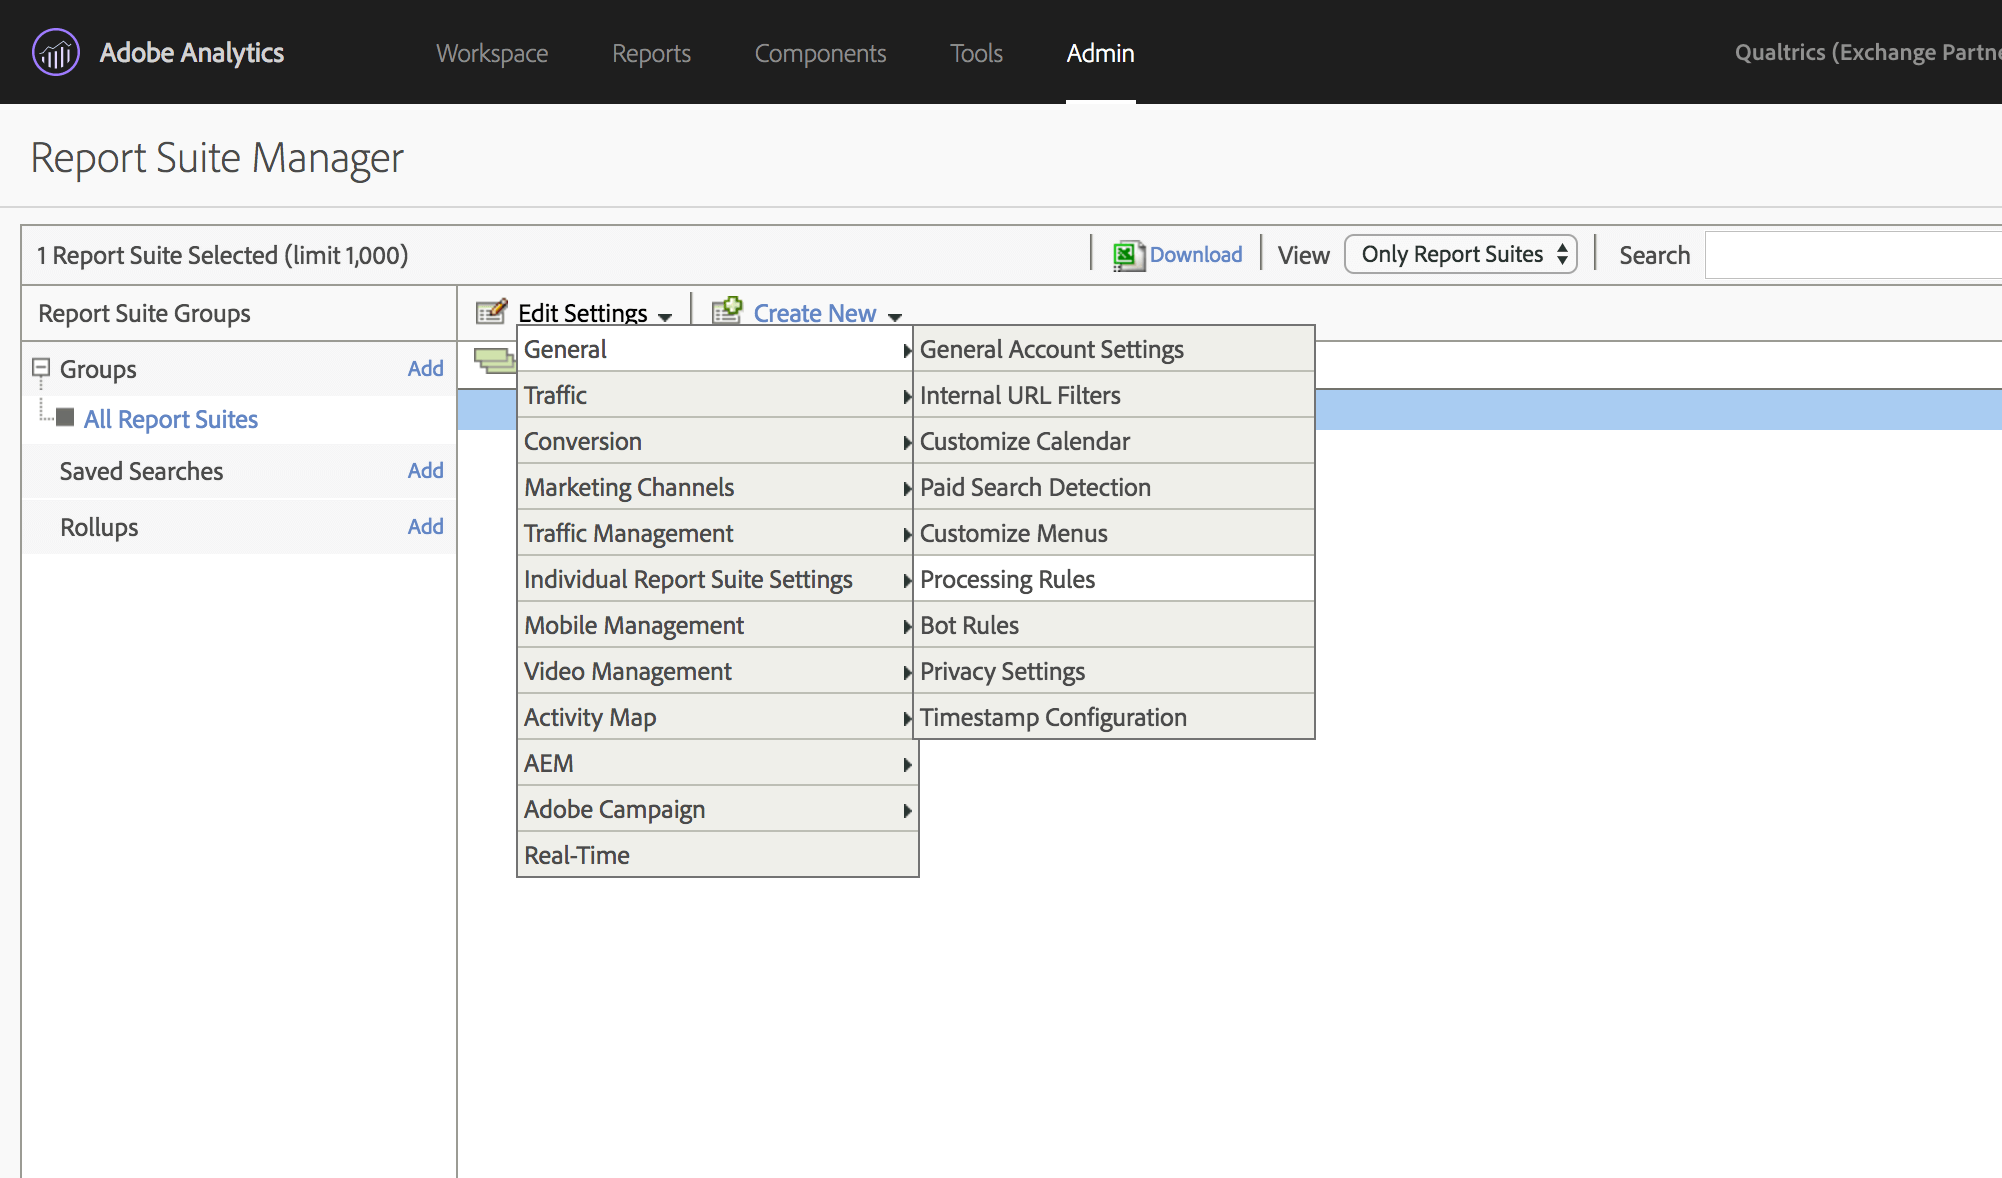
- Pick the embedded data fields that you want to generate reports and graphs on in Adobe Analytics. Once you’ve decided which embedded data fields to use, open up the “Admin -> Report Suites” section of Adobe Analytics.
Qtip: You can only pass 60 embedded data fields to Adobe Analytics. In addition, embedded data keys and values will be “truncated” at 255 characters due to an Adobe Analytics limitation.
- Within the Report Suite Manager section, navigate to “Edit Settings -> General -> Processing Rules.”
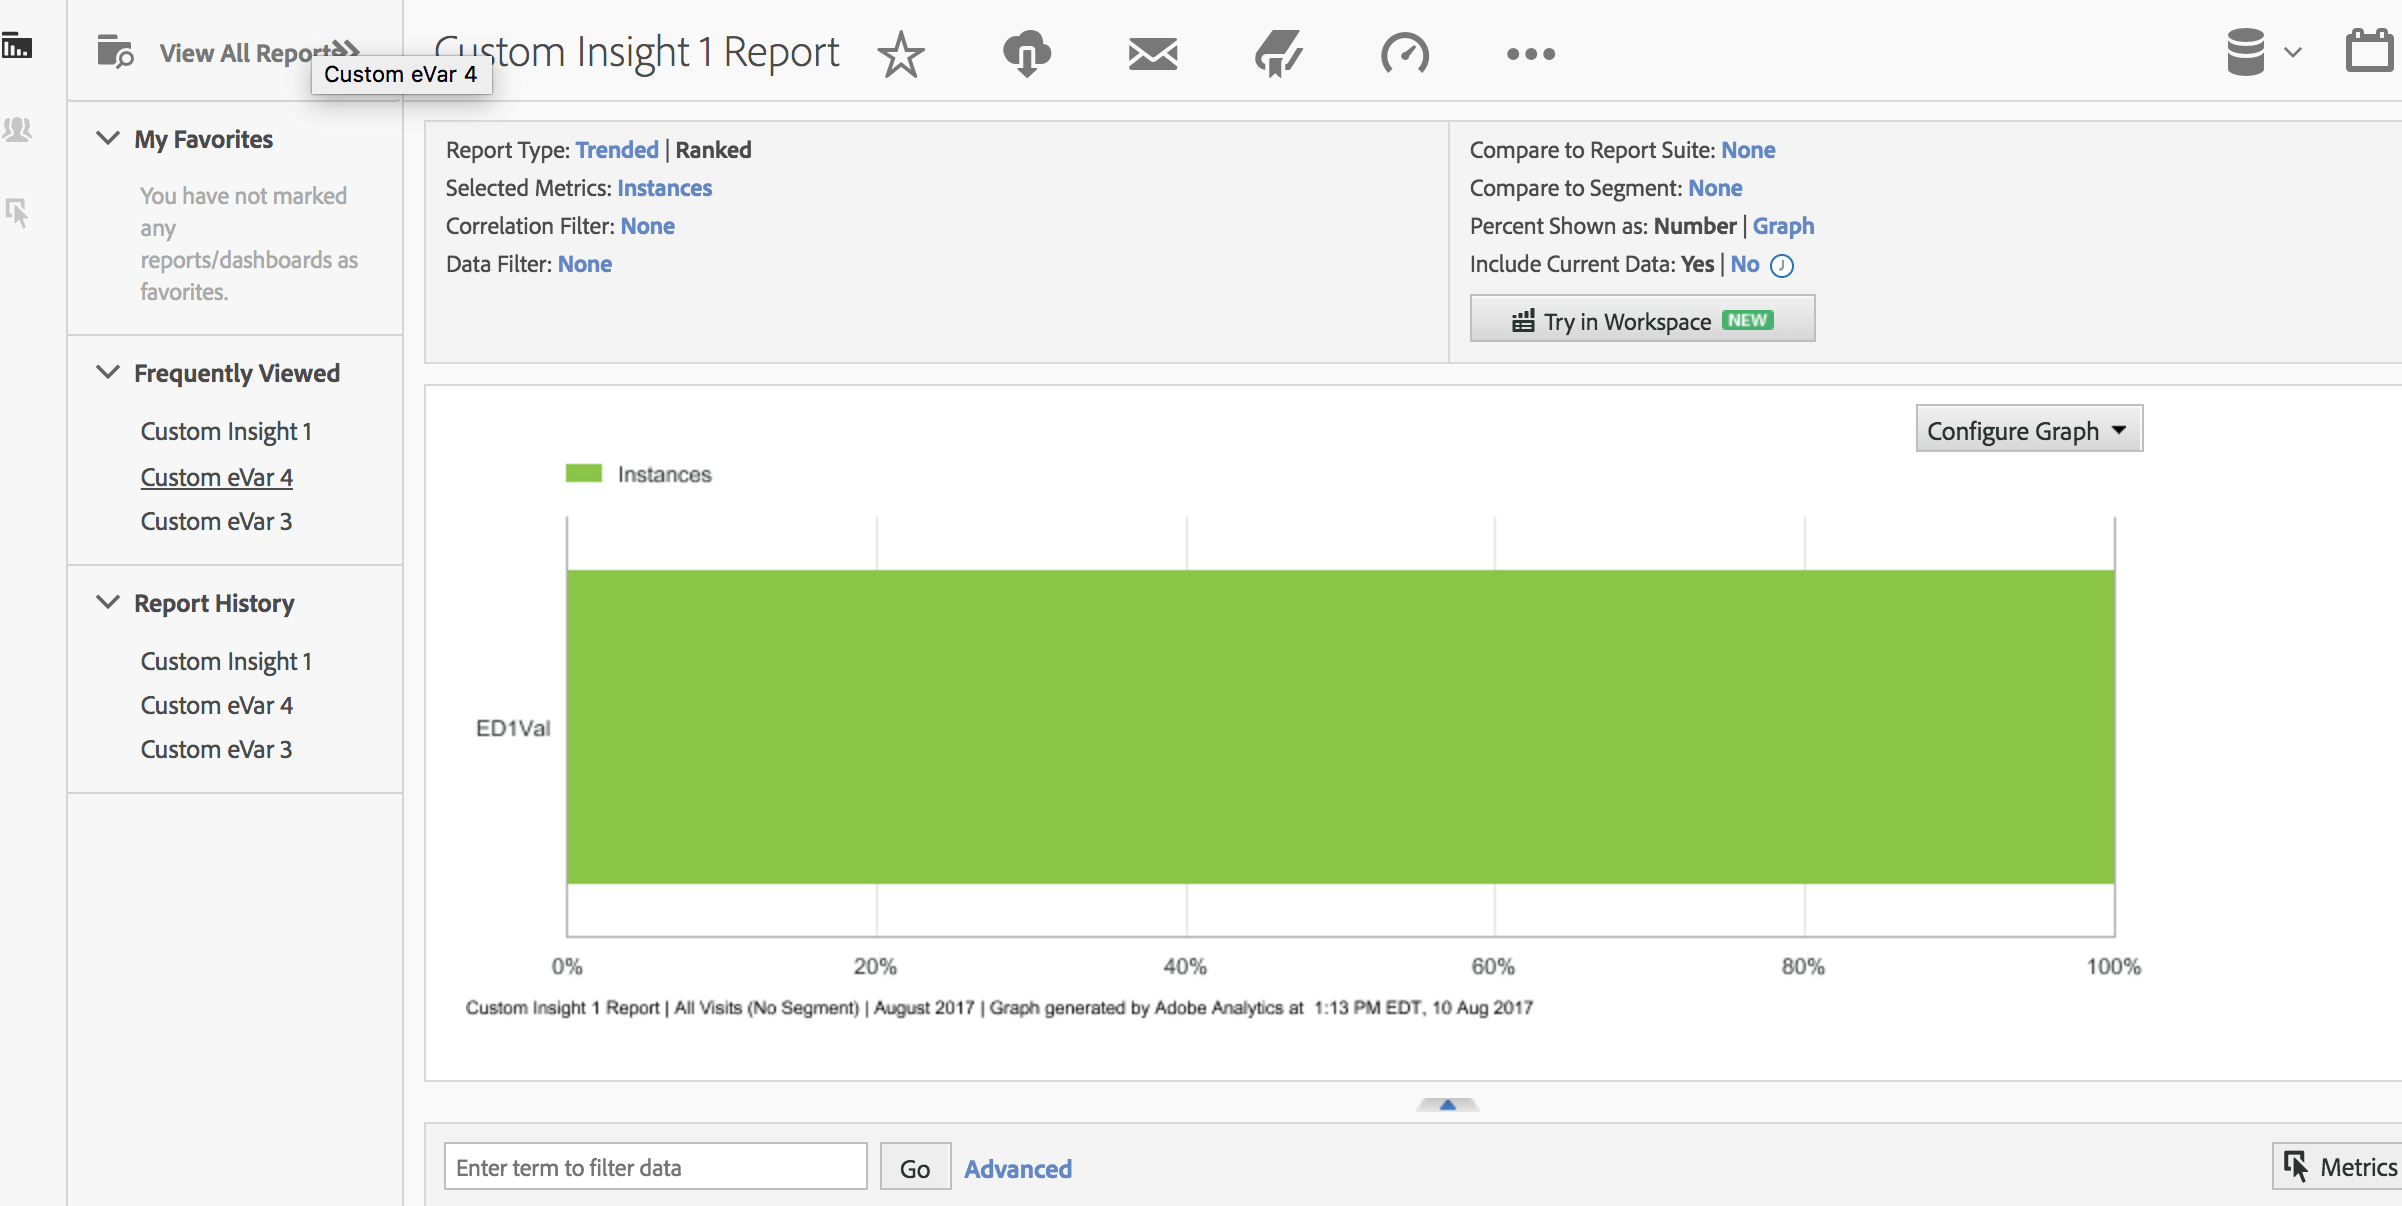
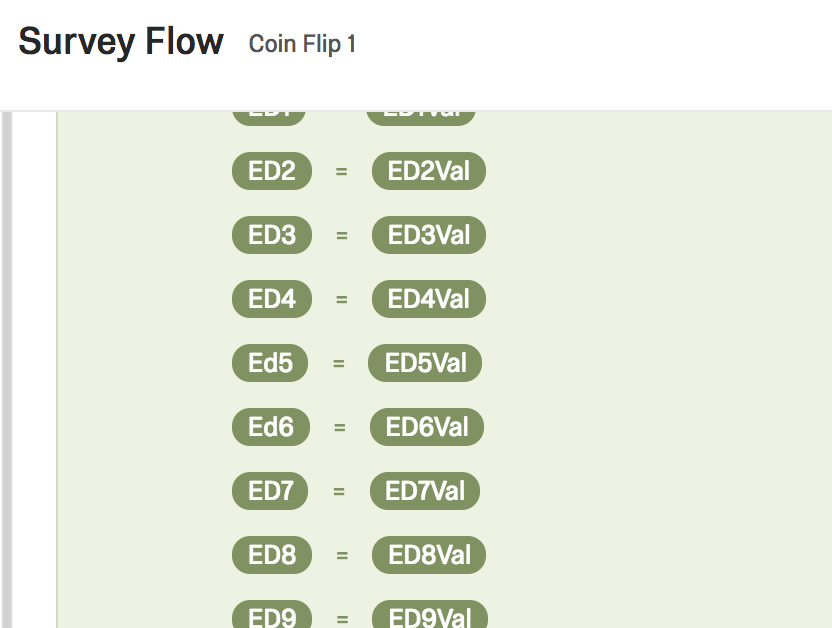
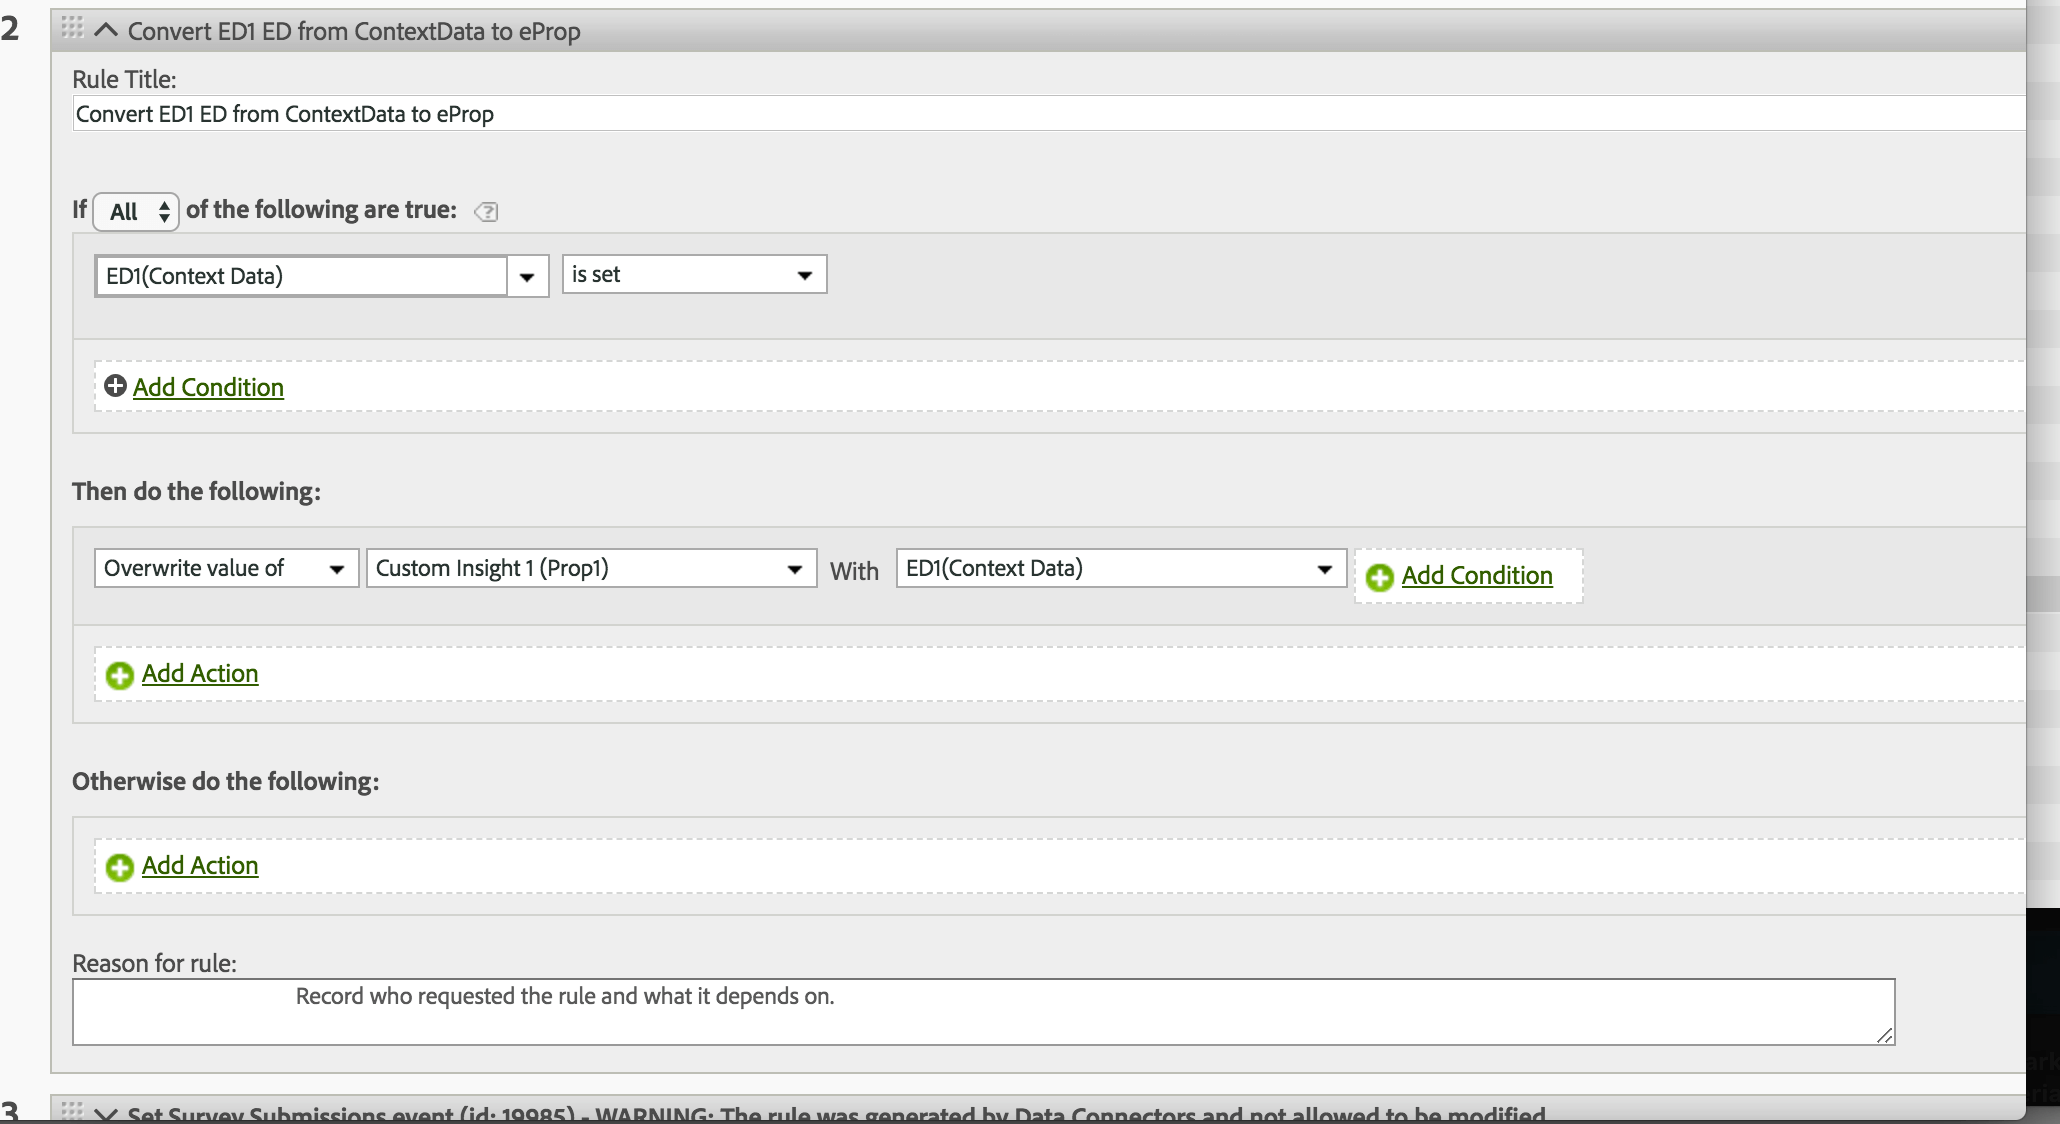
- Create a new condition that maps ED1 (hit Enter on your keyboard and “Context Data” will automatically be added) to an eProp or eVar variable. Do not use a list var since that will overwrite the survey response. In the below example, the embedded data field is being mapped to the “Prop1” variable in Adobe Analytics.
- Fill out an example response using an anonymous link.
 Qtip: Preview Survey does not send results to Adobe Analytics.
 - If everything is set up properly, you can go to the “Reports” section of Adobe Analytics and click “Custom Traffic -> Custom Traffic 1-10 -> Custom Insight 1” to view the report for the prop1 variable (use “Custom Conversion -> Custom Conversion 1-10” if you used an eVar instead). Upon doing this, you should be presented with a graph like the one below.