-

Qualtrics Platform -

Customer Journey Optimizer -

XM Discover -

Qualtrics Social Connect
Extract Data from Google Drive Task
About the Extract Data from Google Drive Task
You can import data from your Google Drive account to Qualtrics so it can then be used to automatically add XM Directory users, employees, or CX Dashboard users. Depending on your needs, this import can be done on a scheduled basis, or even just one time.
This feature is available to any Qualtrics customer with access to Workflows and a Google Drive account.
Before You Get Started
Before you get started importing data from Google Drive to Qualtrics, take into account the following considerations:
- What do you want to do with your Google Drive data once it’s in Qualtrics? Take a look at the available loader tasks for a list of options.
- What Google Drive account will you use? Make sure the files you want to import to Qualtrics are owned or shared by this account. Keep in mind you will need ownership of the files if you want to delete or move them after they’re processed.
- Where are the files you’d like to import? Make sure they are in a distinct folder and not just under “My Drive.”
- Are you looking to import a specific file, or multiple files on a scheduled basis? If you’re importing just one file, you can proceed to set up. Otherwise, consider the following.
- Do your files fit a consistent format? For example, files you hope to import in the same workflow should have the same headers / columns / fields, even if the values differ.
Example: You set up a workflow to regularly upload contacts from Google Drive to your XM Directory. Every file has columns for Firstname, Lastname, Email, Phone, UniqueID, and Location.
- Are there special naming conventions for files you’d like to import? This is not required, but encouraged, if you’d just like to clearly distinguish files for import, especially if they live in the same file as non-processed files.
- What do you want to do with a file once it’s processed? This is not just for identifying the Google Drive files that have already been uploaded to Qualtrics, but for preventing them from being uploaded again if there are no changes. For example, do you want the processed file’s name to be edited? If so, think if there is a prefix you want to be added to the name. Do you want the file to be moved to a different folder? In that case, make sure to create the new folder.
Connecting a Google Drive Account
Before you can use the Extract data from Google Drive task, you must connect a Google Drive account for Qualtrics to extract data from. Accounts may be added by Brand Administrators for other users in the brand to use, or by individual users for their personal use.
The connection for the Extract data from Google Drive task is separate from the connections for other Google extensions, such as Google Calendar and Google Sheets.
Adding an account as a brand administrator
If you are a Brand Administrator, you can add a Google Drive account for some or all users in your license to use.
- First, find and install the app. Make sure to choose Extract data from Google Drive, not any of the other Google options.
- Then add an account.
For more on managing which users have access to this account, see Determining Who Can Use an Extension Account.
Adding an account as an individual user
Follow the steps in this section to add a Google Drive account for your personal use. Only you will be able to use the account that you connect.
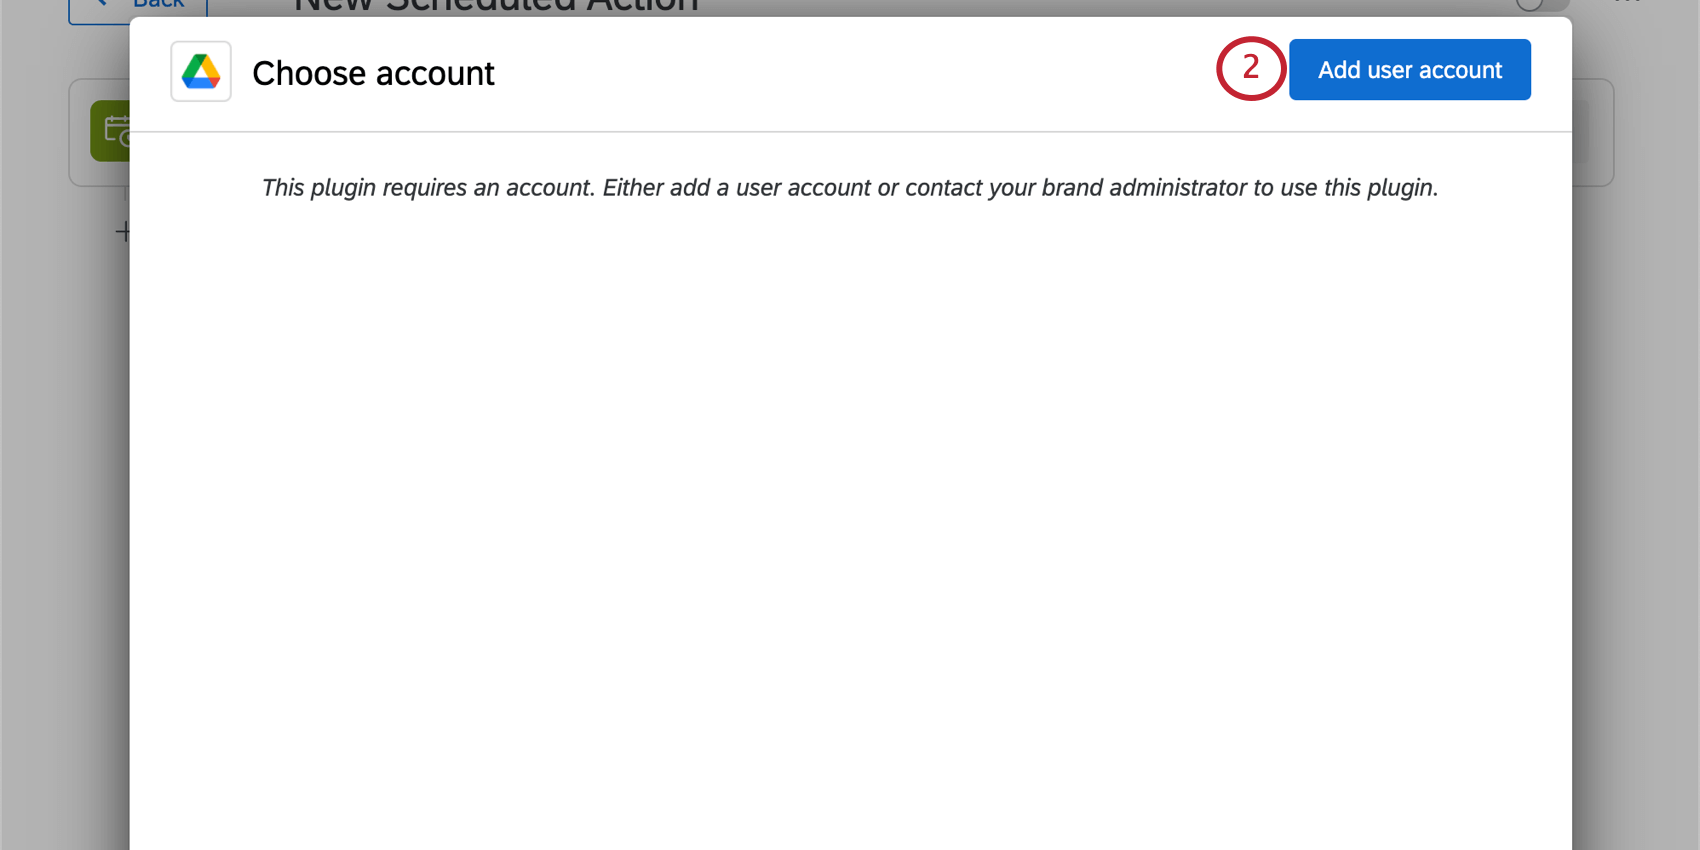
- Follow the steps in Setting Up an Extract Data from Google Drive Task until you get to the step where you select an account to use.
- Click Add user account.
- Give the account a name. This name is used for organizational purposes and to identify the account.
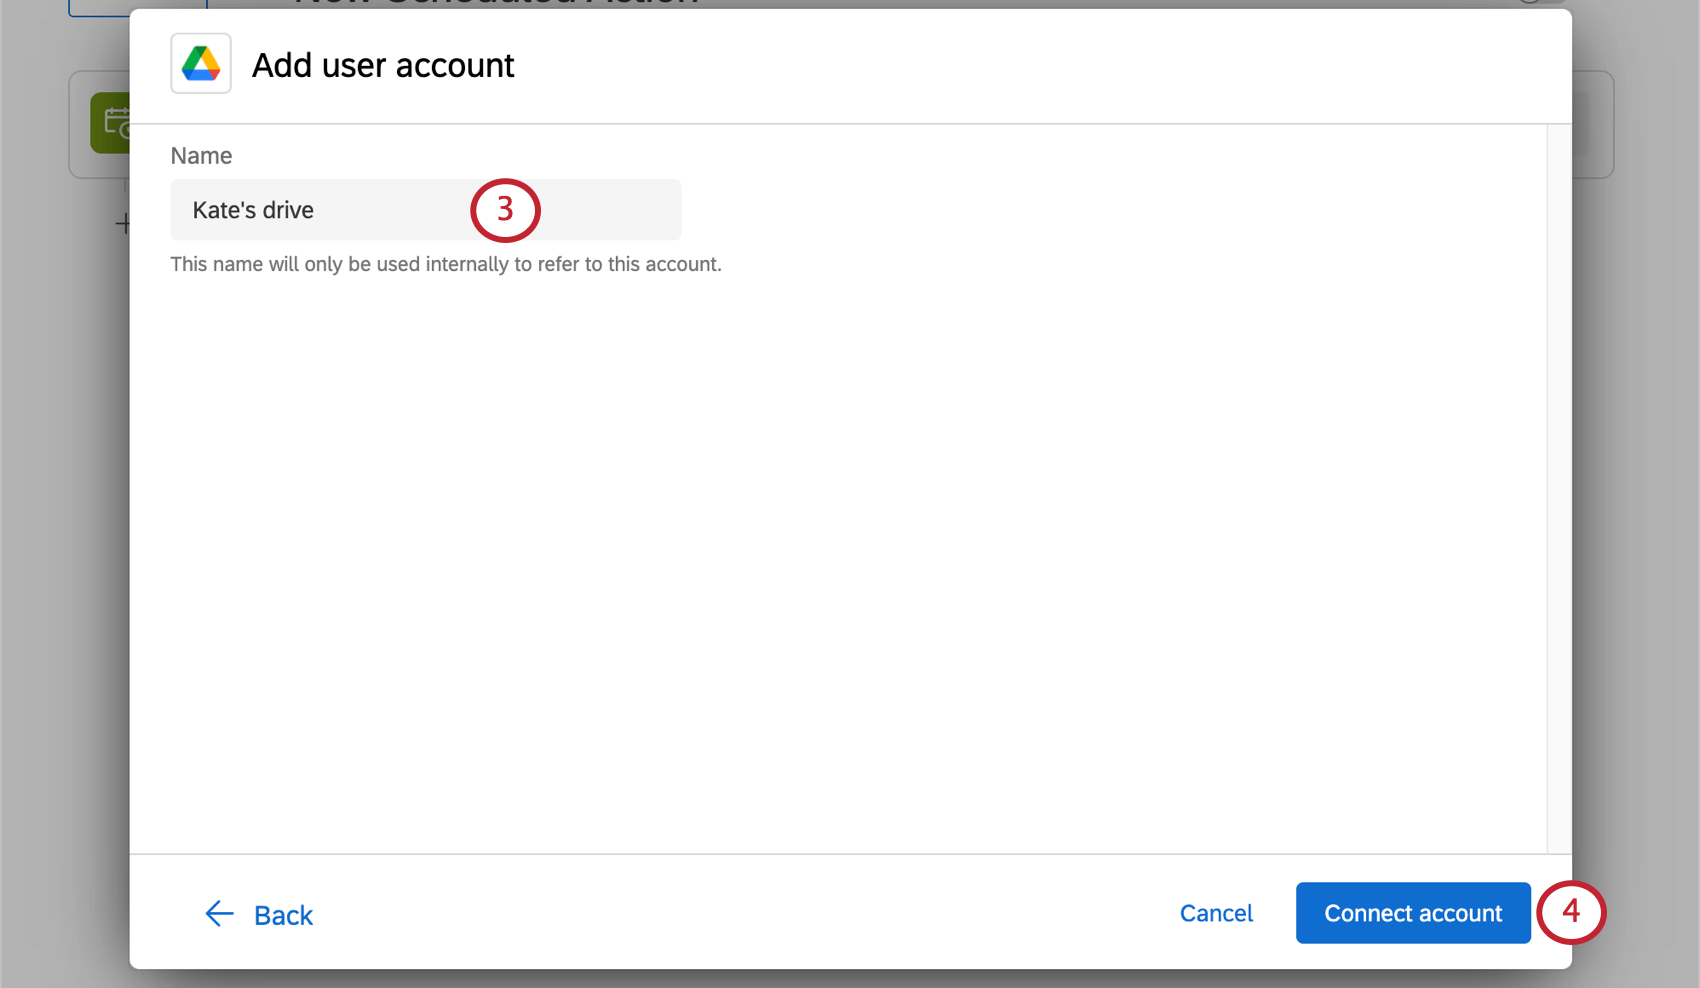
- Click Connect account.
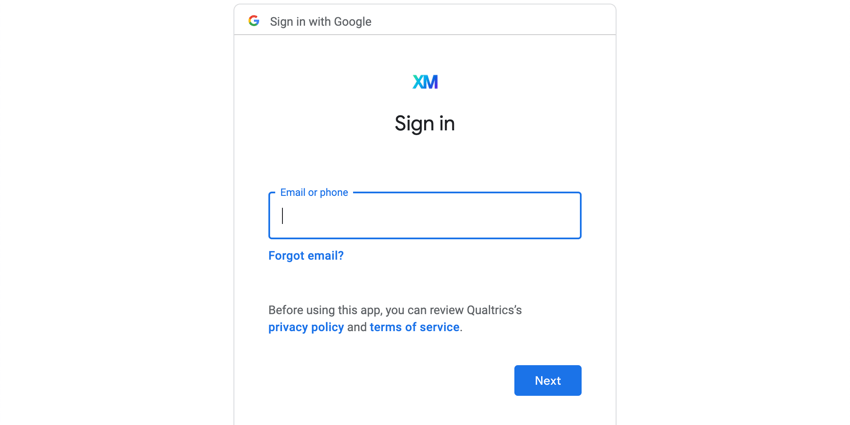
- Log into your Google account.
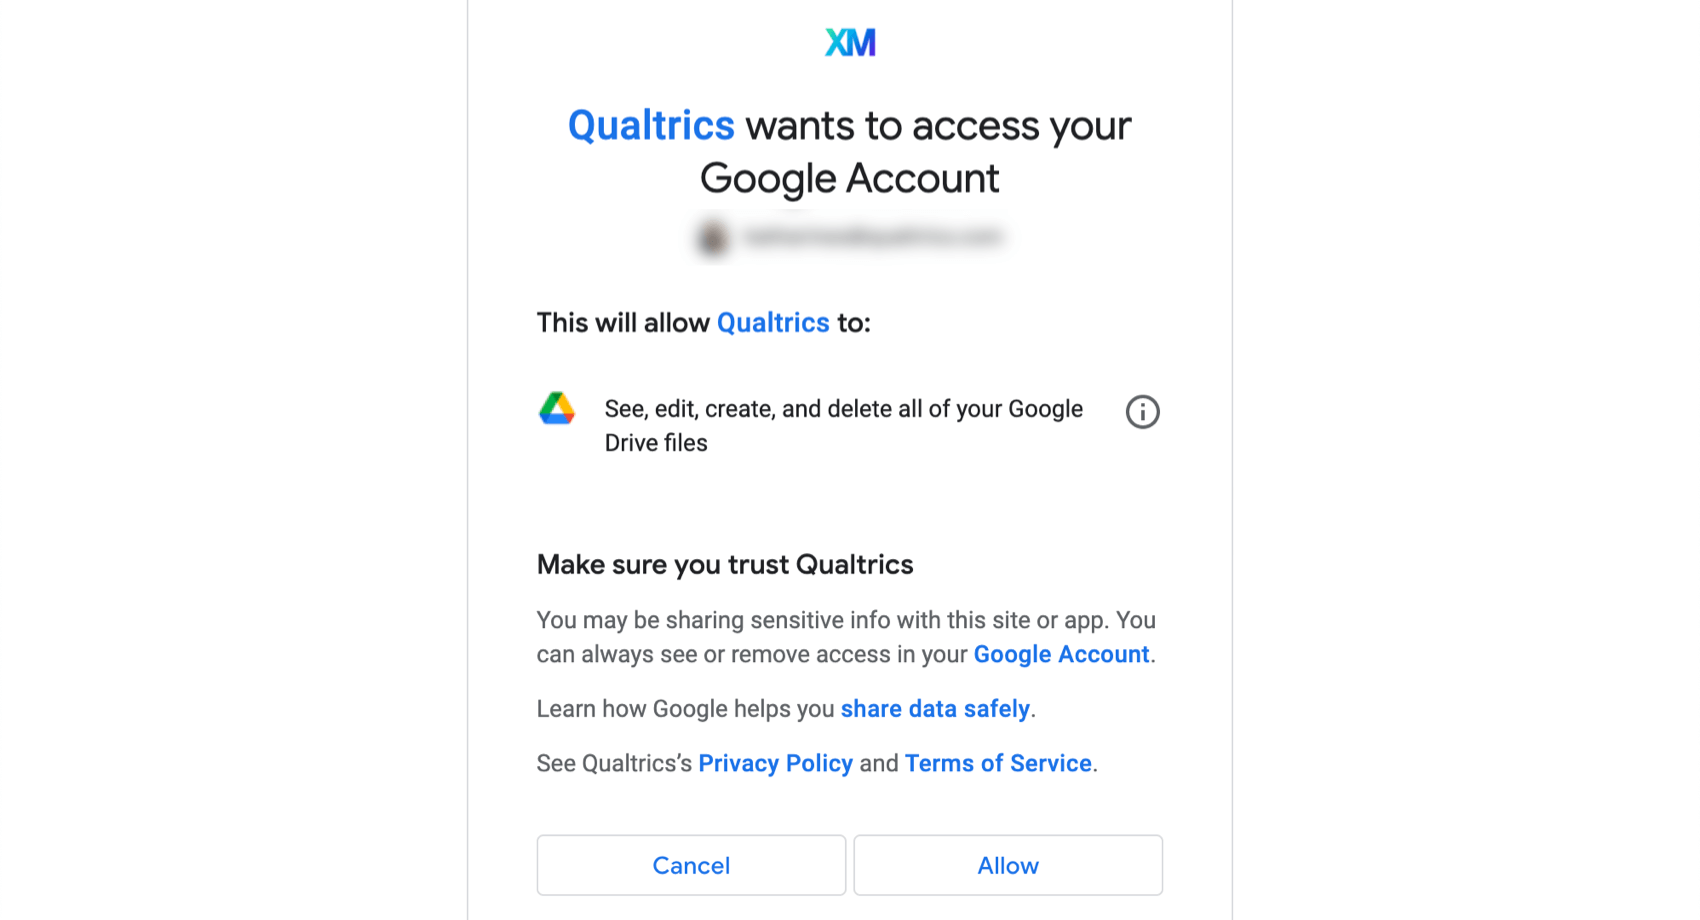
- Then you will be redirected to the Google consent screen, which will summarize the authorization we need to access files in your Google Drive account. Read the description and click Allow.
Setting up an Extract Data from Google Drive Task
- Click the navigation menu in the top left.

- Choose Workflows.
- Click Create a workflow.
- Select Started at a specific time.
- If desired, rename your workflow.
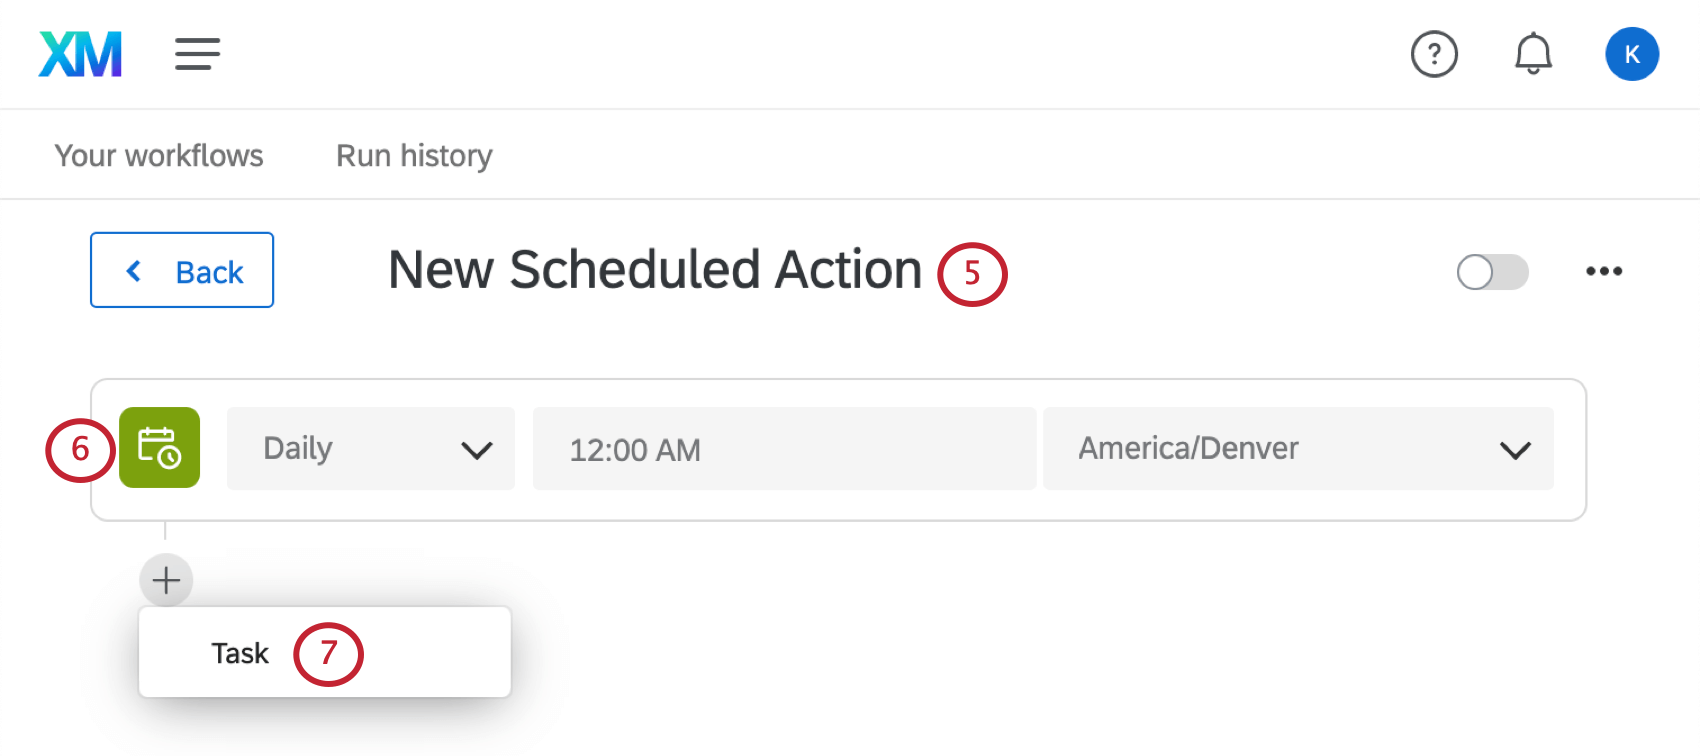
- Determine when the scheduled workflow fires. See scheduled workflows for more information about setting up scheduled workflows.
- Click the plus sign ( + ) and select Task.
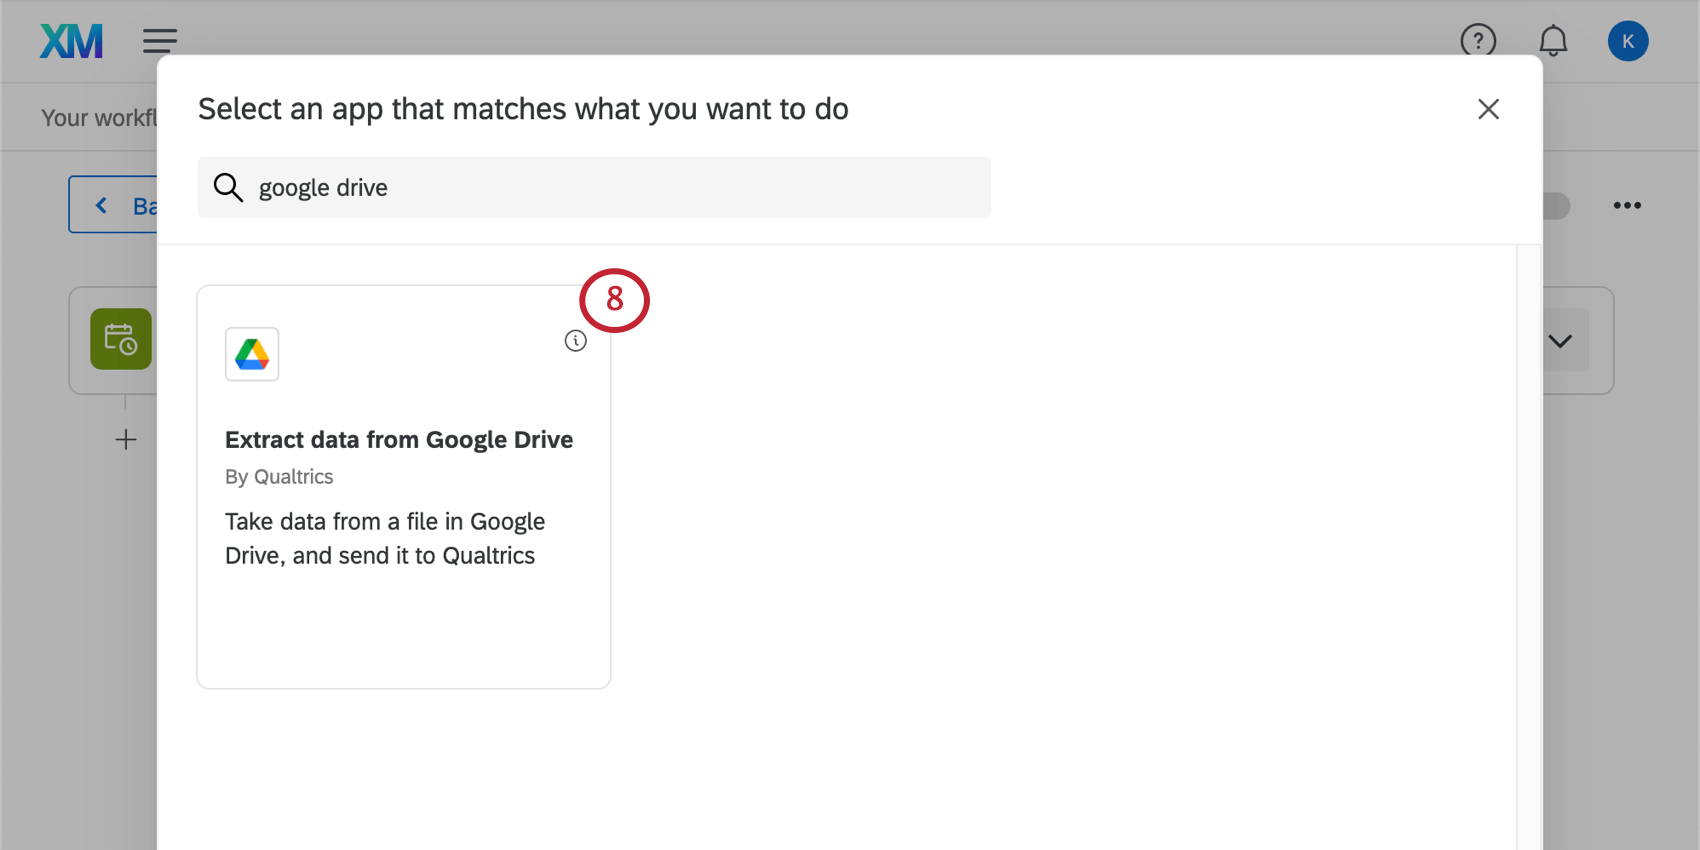
- Search and select Extract data from Google Drive.
- Choose the Google Drive account to extract files from. Any accounts added by Brand Administrators, as well as accounts you’ve added yourself, will be listed here.
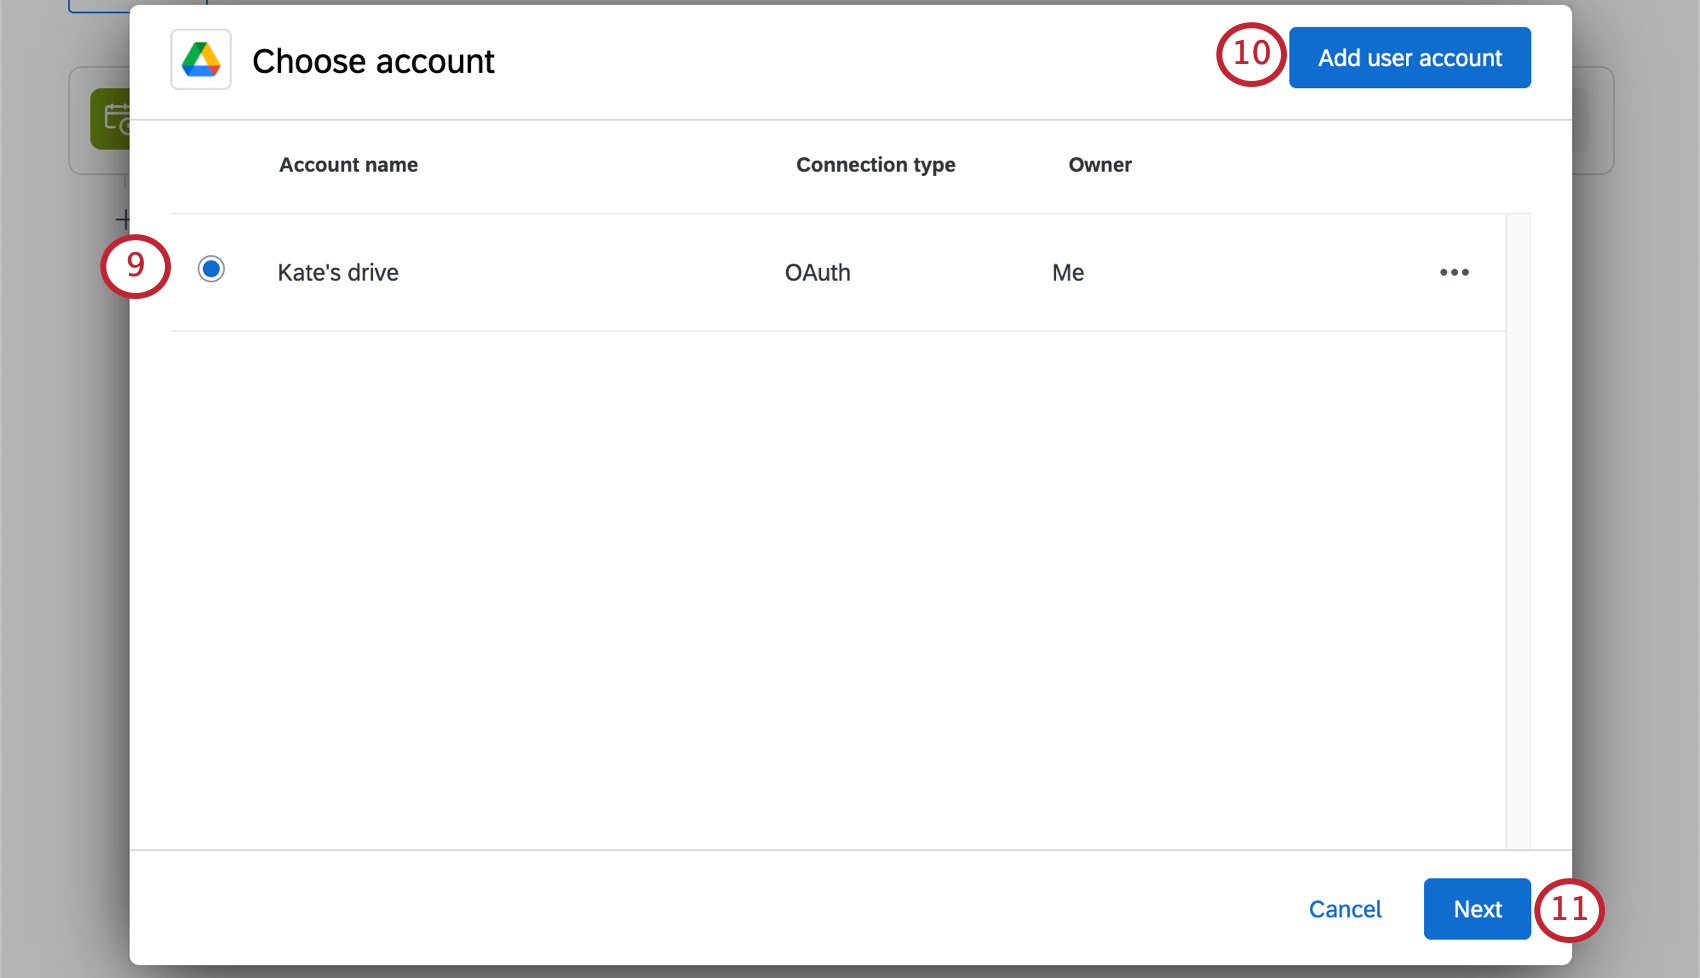
- If you want to add new Google Drive account credentials, click Add user account and follow the steps in the Connecting a Google Drive account section.
- Click Next.
- Choose the Google Drive folder where Qualtrics will look for files to import. There are two ways to select a folder:
- Paste direct link to folder: In Google Drive, navigate to the folder you want to select. Copy the full URL from your browser. Then, back in Qualtrics, paste the link in the field.
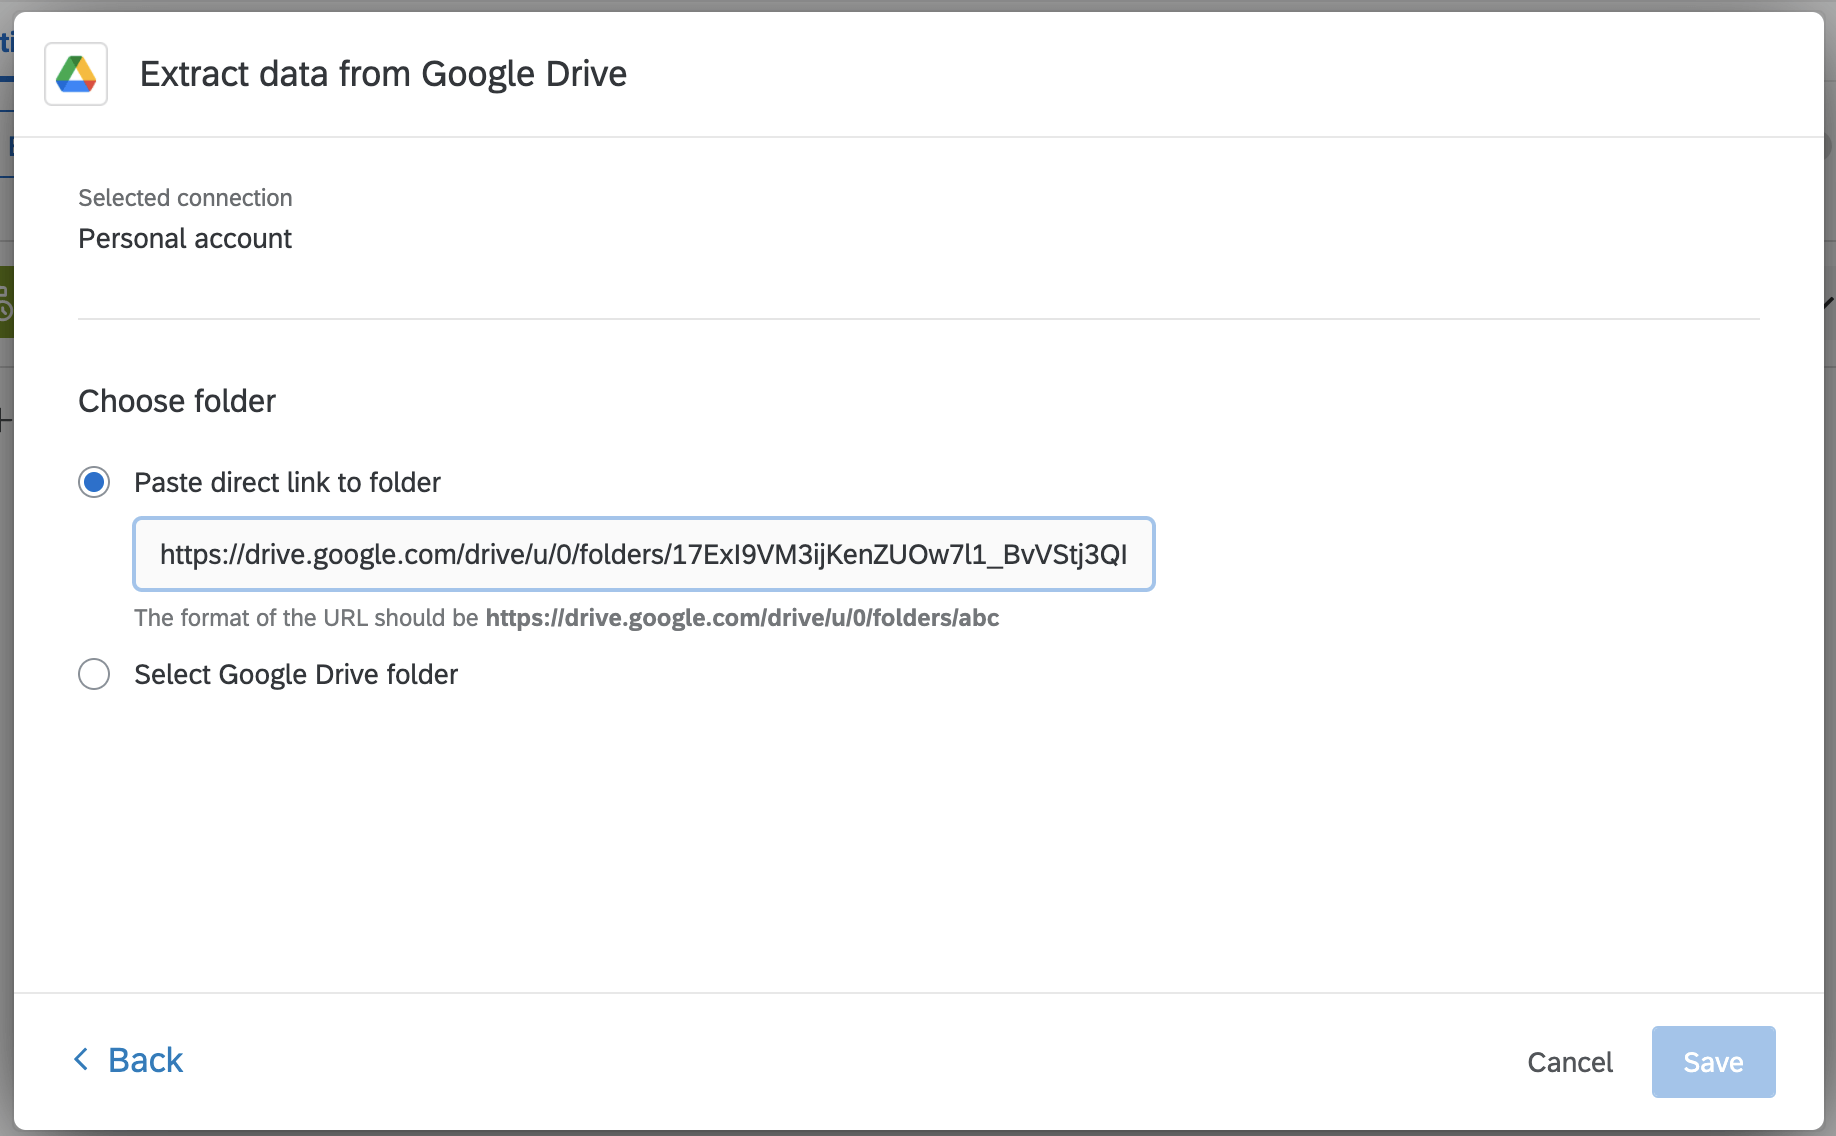
- Select Google Drive folder: A dropdown menu will appear, listing the folders in your Google Drive. You can type the name of your folder to find it.
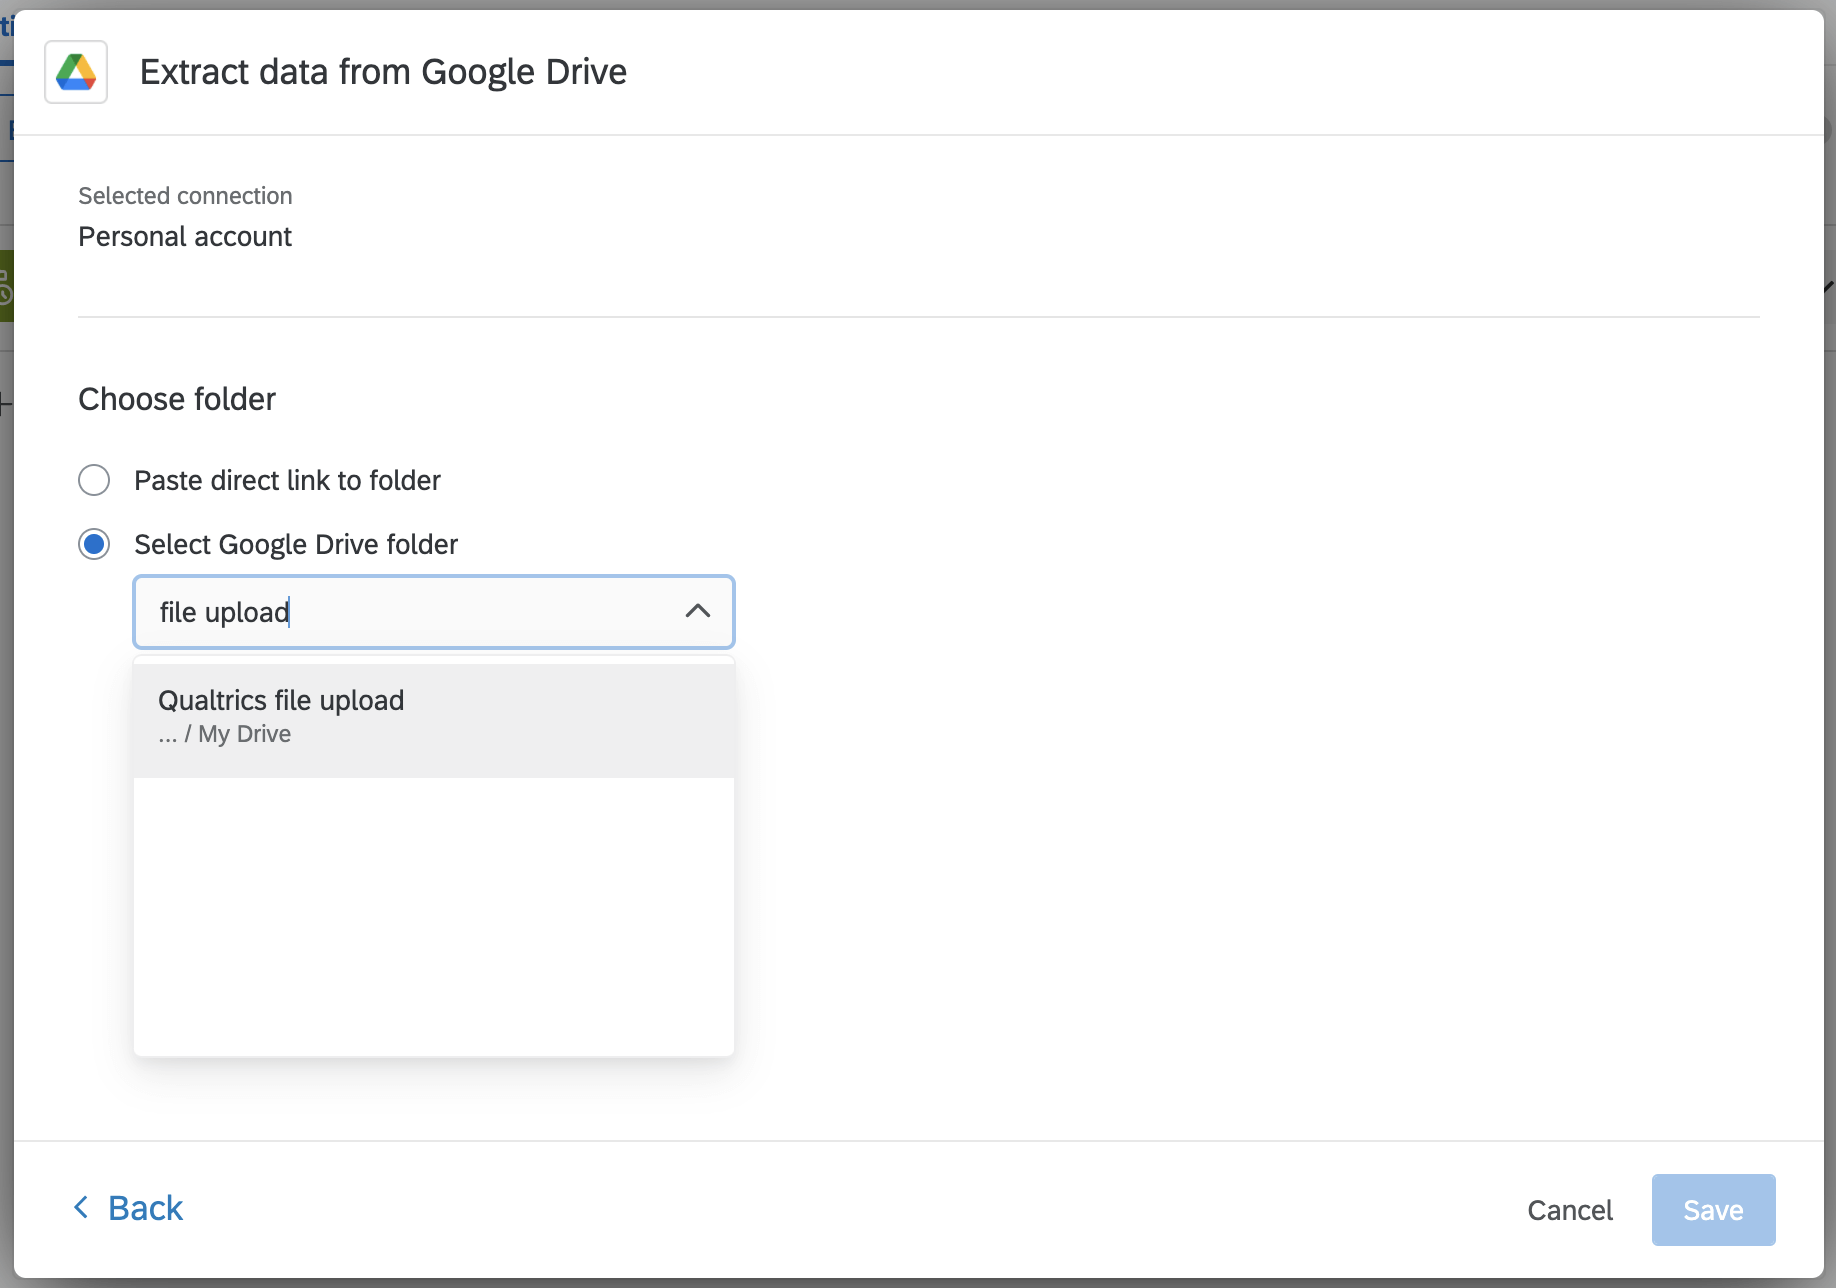
- Paste direct link to folder: In Google Drive, navigate to the folder you want to select. Copy the full URL from your browser. Then, back in Qualtrics, paste the link in the field.
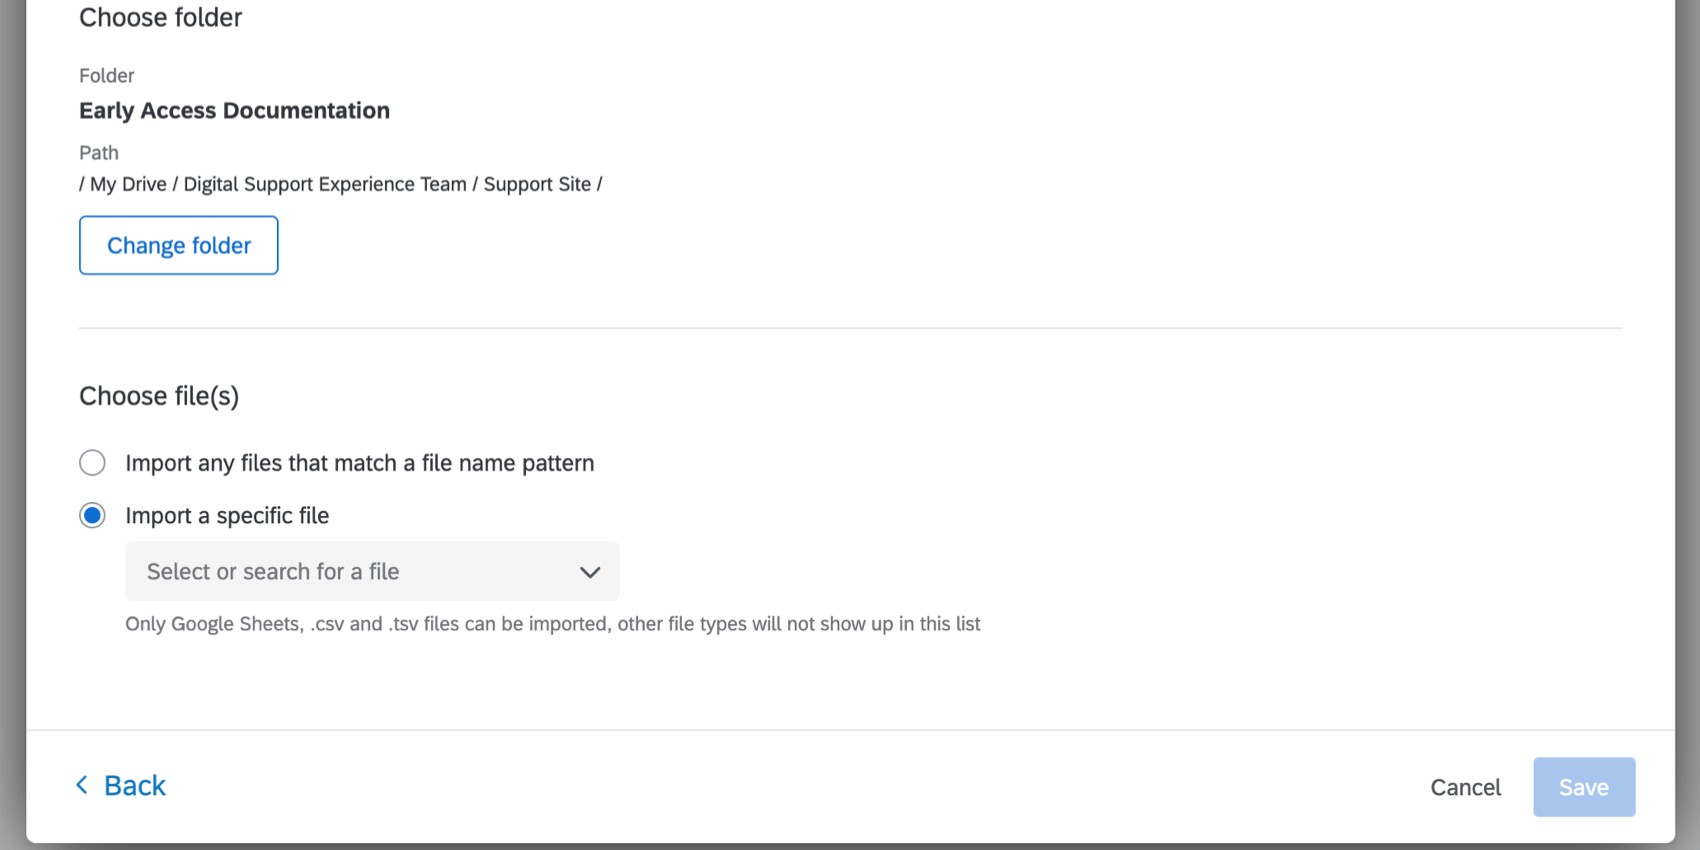
- Review the selected folder to be sure it is the correct one.
 Qtip: If you want to select a different folder, click Change folder.
 - Choose which file(s) will be imported to Qualtrics. There are two ways to configure these files:
- Import any files that match a file name pattern: This is the best option for imports you want to happen on a scheduled basis. Providing a part of a file name is a great way to identify only related files, while ignoring any others that may be in the folder. You can also leave this field blank if all files added to your chosen folder are eligible for upload. Once you’ve decided your file name, then choose a file type. You can choose between CSV, TSV, and Google Sheets.
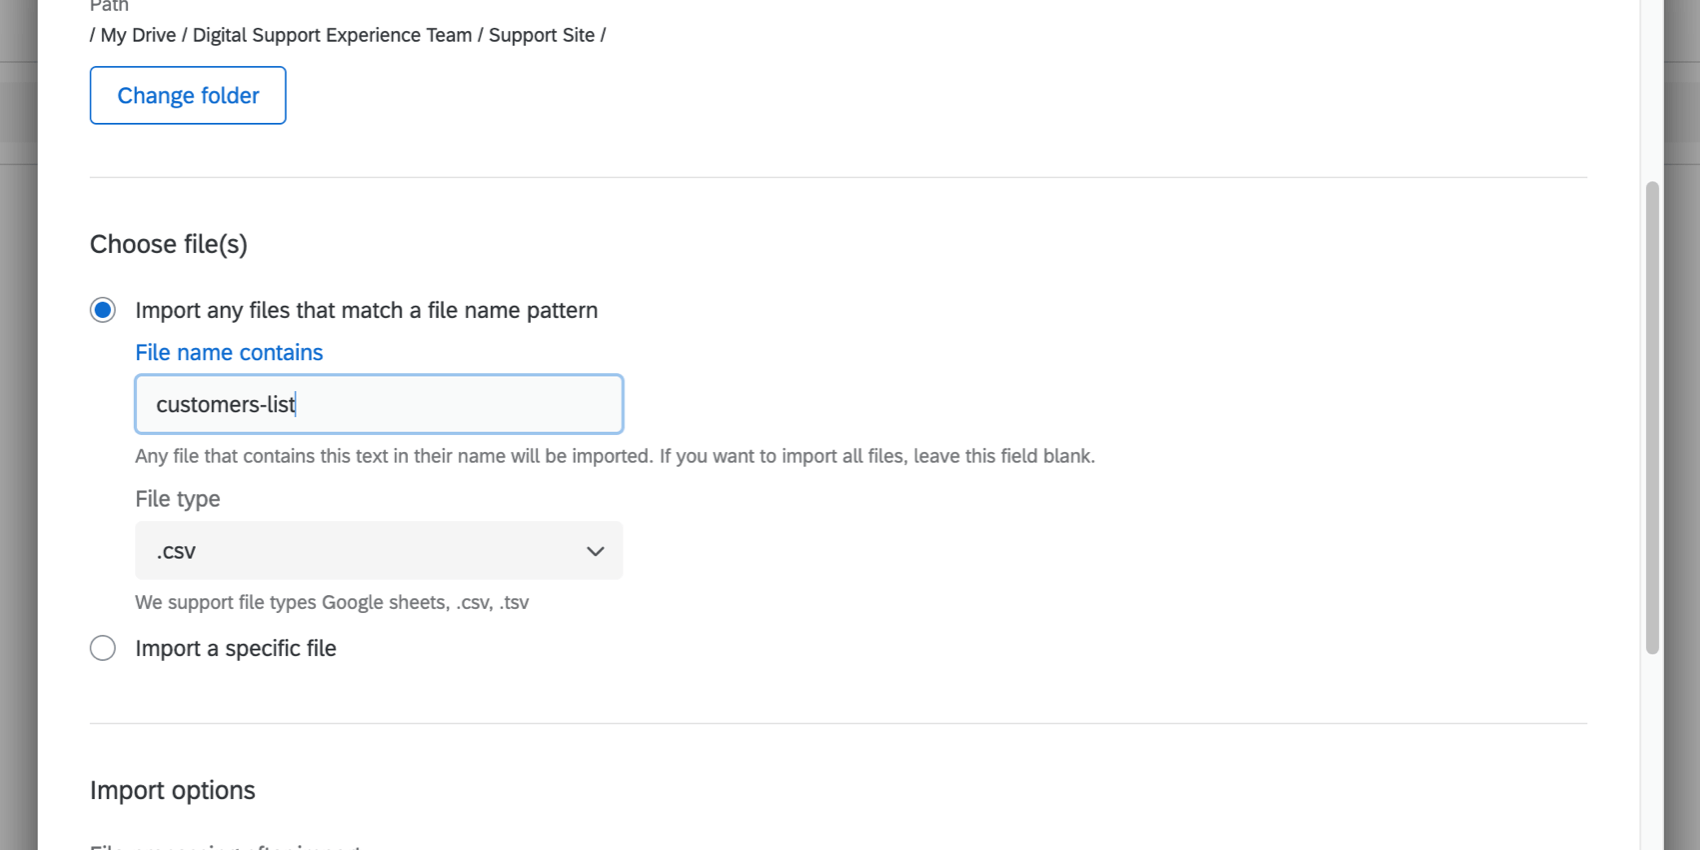 Example:
You are importing contacts on a regular basis. All your contacts files have “contacts” as the prefix and then a date, so they’re easily identifiable. - Import a specific file: Select a specific file in the source folder. This is a good way to run a one-time import, rather than a regular, scheduled import. Only CSV, TSV, and Google Sheets files will be available for import. You can search a file by name.
- Import any files that match a file name pattern: This is the best option for imports you want to happen on a scheduled basis. Providing a part of a file name is a great way to identify only related files, while ignoring any others that may be in the folder. You can also leave this field blank if all files added to your chosen folder are eligible for upload. Once you’ve decided your file name, then choose a file type. You can choose between CSV, TSV, and Google Sheets.
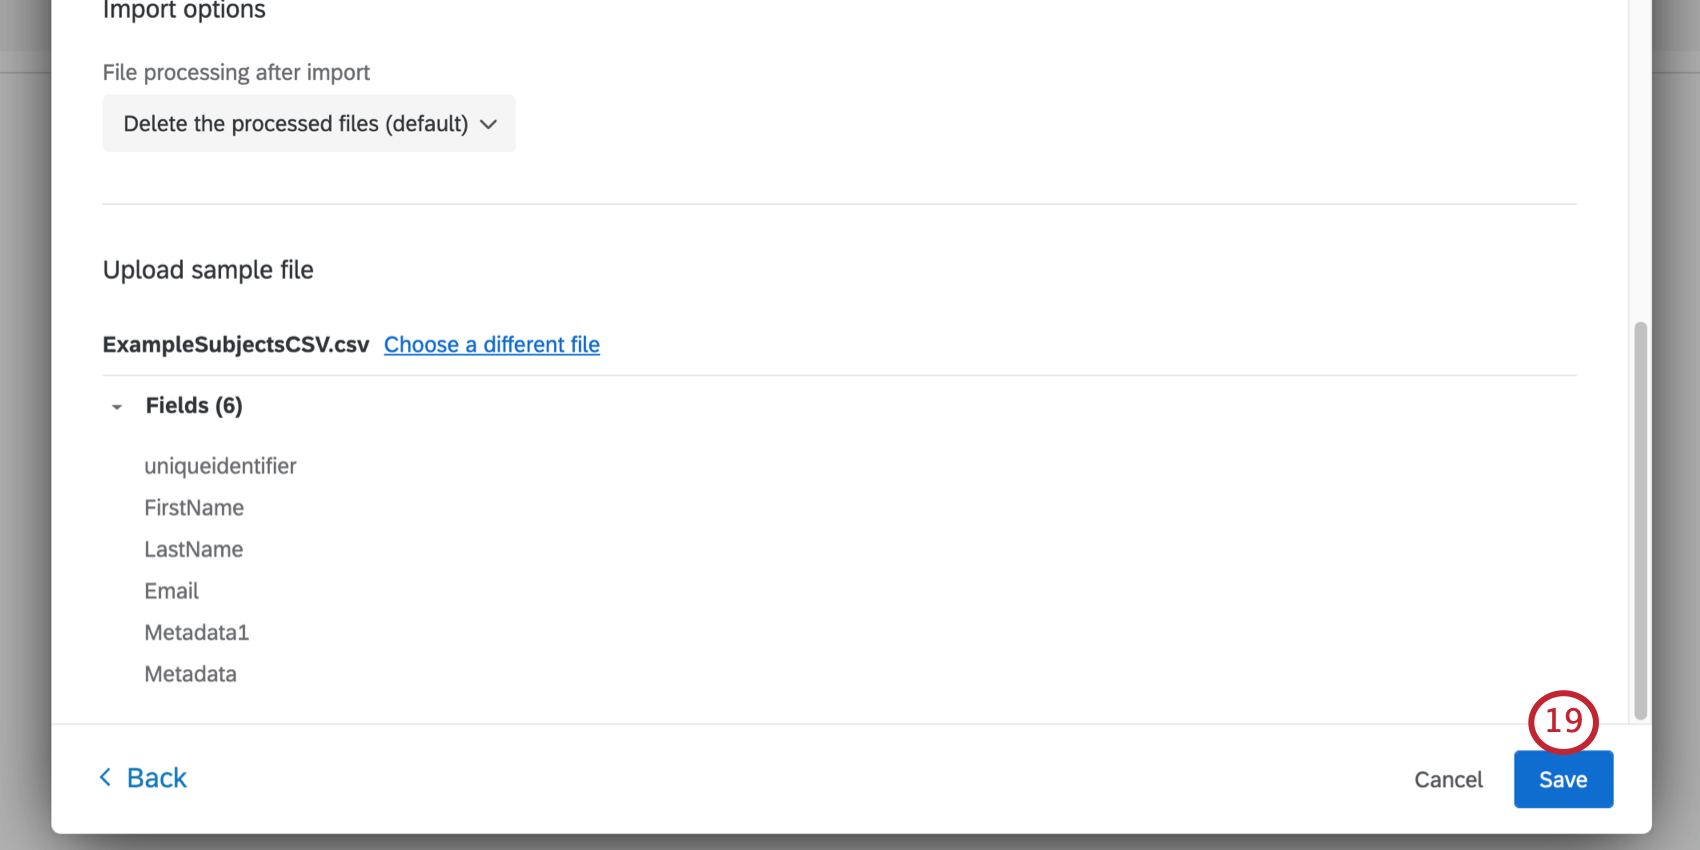
- Under Import options, decide what happens to files after they’re processed by this Google Drive workflow. You have a few options:
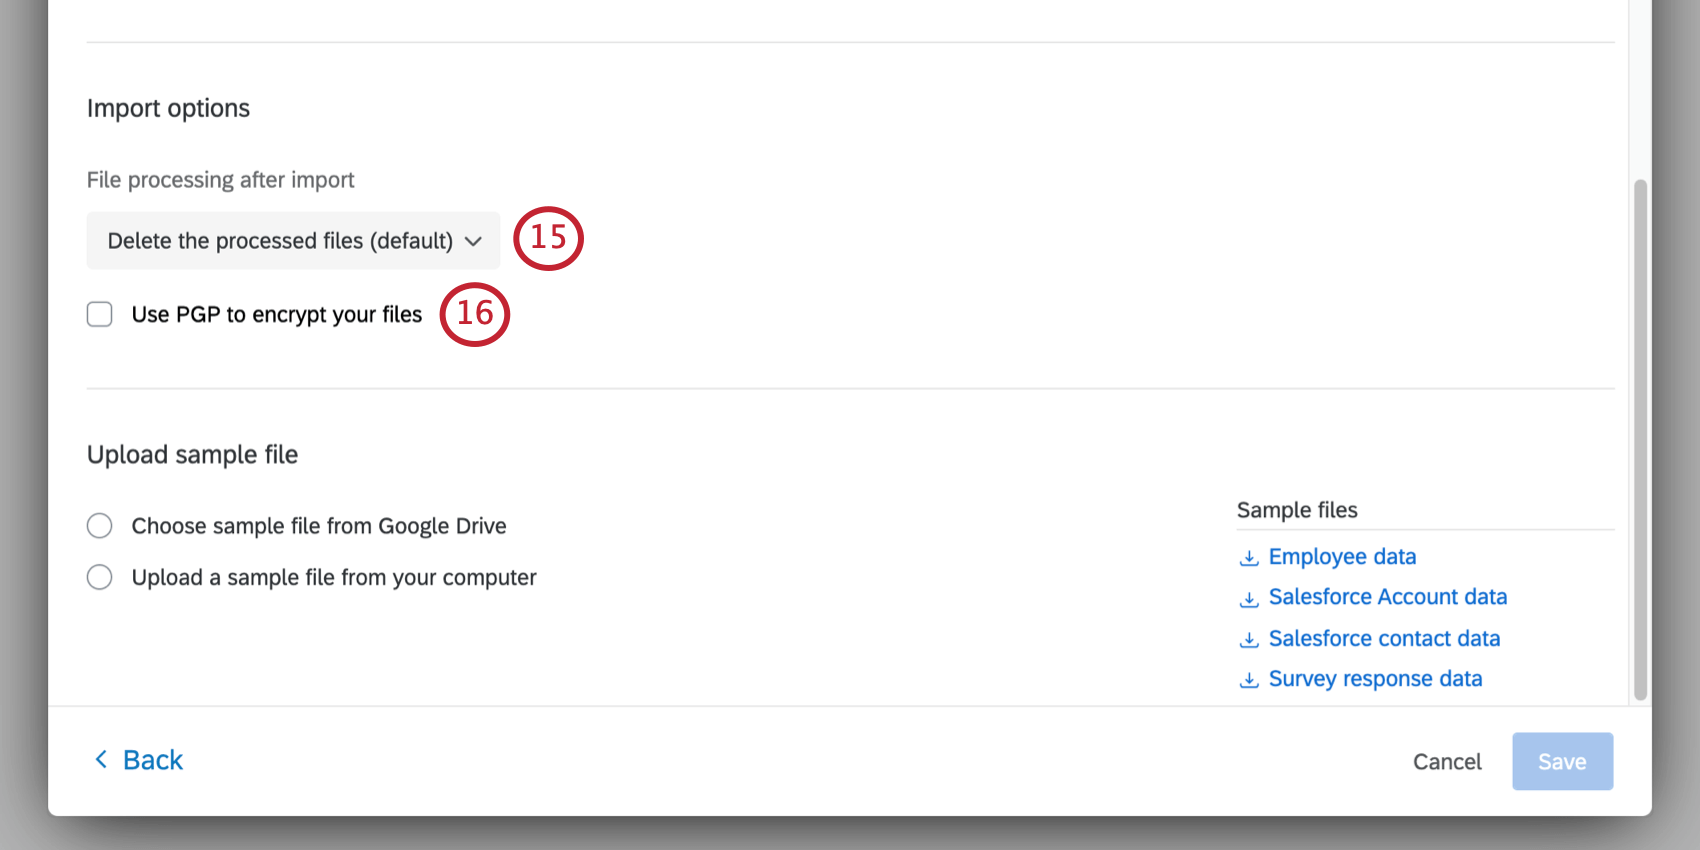
- Delete the processed files. This is the default choice. Once the file is imported to Qualtrics, it is deleted from Google Drive.
- Keep processed files and rename them. Instead of deleting the files, they will be renamed. Specify a file prefix that will be added to the files’ names when they are processed. We will also add the time when the file was processed to the name, to avoid any duplicates.
Example: If the prefix is “processed-” then a file named employee-data will be renamed processed-employee-data_2021-06-09_093039.
- Keep processed files and move them to a different folder. Move the processed file to another folder. You can select the destination folder the same way you selected the source folder, either by pasting in a link or selecting it from the dropdown.
- Keep processed files. Once imported, the file will remain in its original folder. Make sure that between workflow run cycles its content is updated, or the same file will be imported all over again.
- If desired, select Use PGP to encrypt your files. To learn more about this extra means of encryption and data protection, see PGP Encryption.
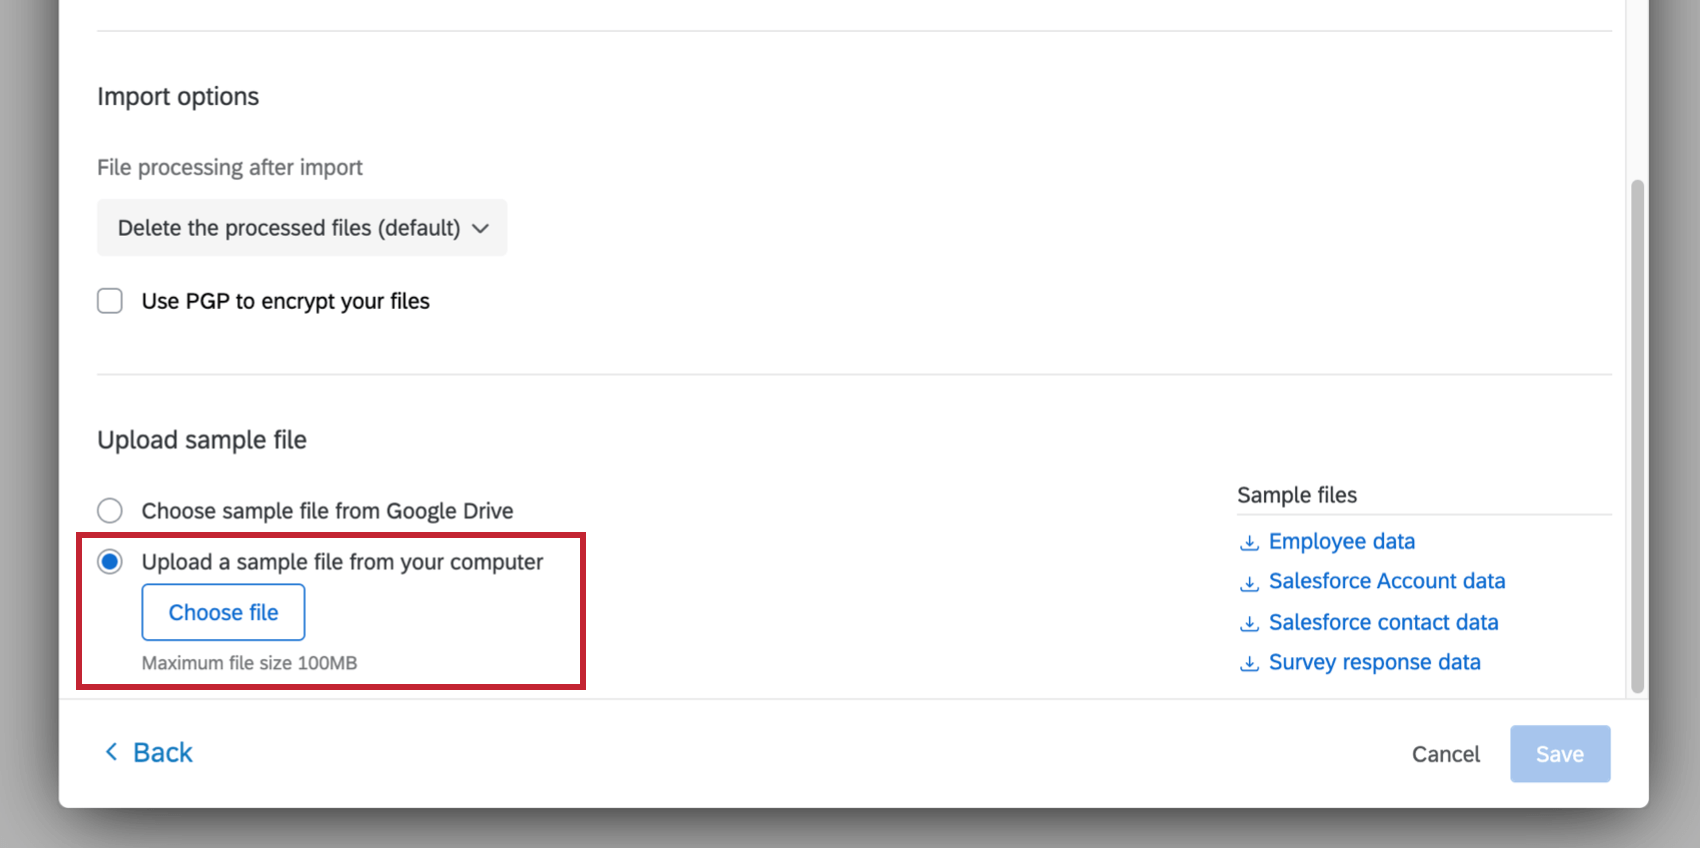
- Under Upload sample file, you need to import a sample file that will have the same structure as the files that will be processed whenever the workflow runs. There are two ways to set this sample file:
- Choose sample file from Google Drive: Choose a sample file directly from Google Drive. Only CSVs, TSVs, and Google Sheets will appear here; the maximum file size is 100MB for CSV and TSV, 10 MB for Google sheets. Before you can submit the file format, you need to click Verify fields to ensure the doc looks correct.
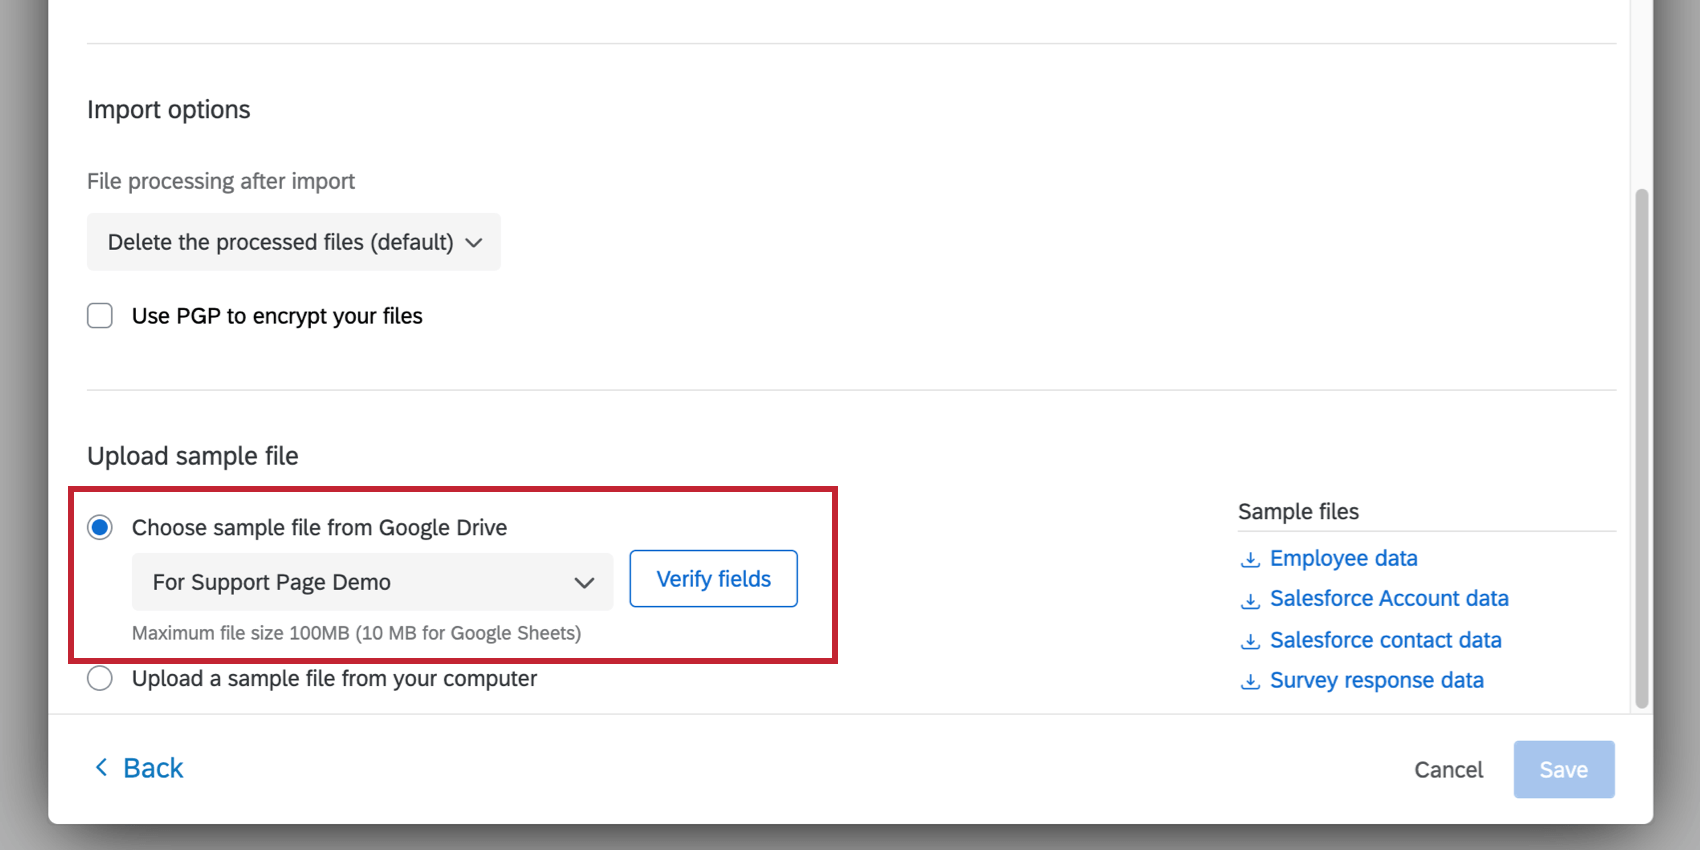 Qtip: Are you uploading one specific file? Select this file again for your sample file.
 - Upload a sample file from your computer: Upload a CSV or TSV (max size 100MB) from your computer.
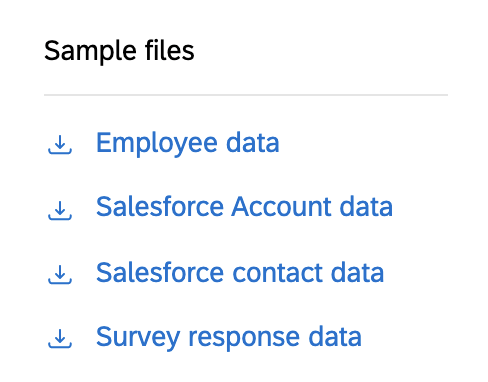
 Qtip: If you’d like, you can download the sample files in the task, or download the files in the Example Files section. The only supported file encoding format is UTF-8. Some spreadsheet softwares save files as Unicode UTF-8, which is different from UTF-8, if you are getting unexpected errors. Please ensure that you are exporting in UTF-8 format and not Unicode UTF-8.
- Choose sample file from Google Drive: Choose a sample file directly from Google Drive. Only CSVs, TSVs, and Google Sheets will appear here; the maximum file size is 100MB for CSV and TSV, 10 MB for Google sheets. Before you can submit the file format, you need to click Verify fields to ensure the doc looks correct.
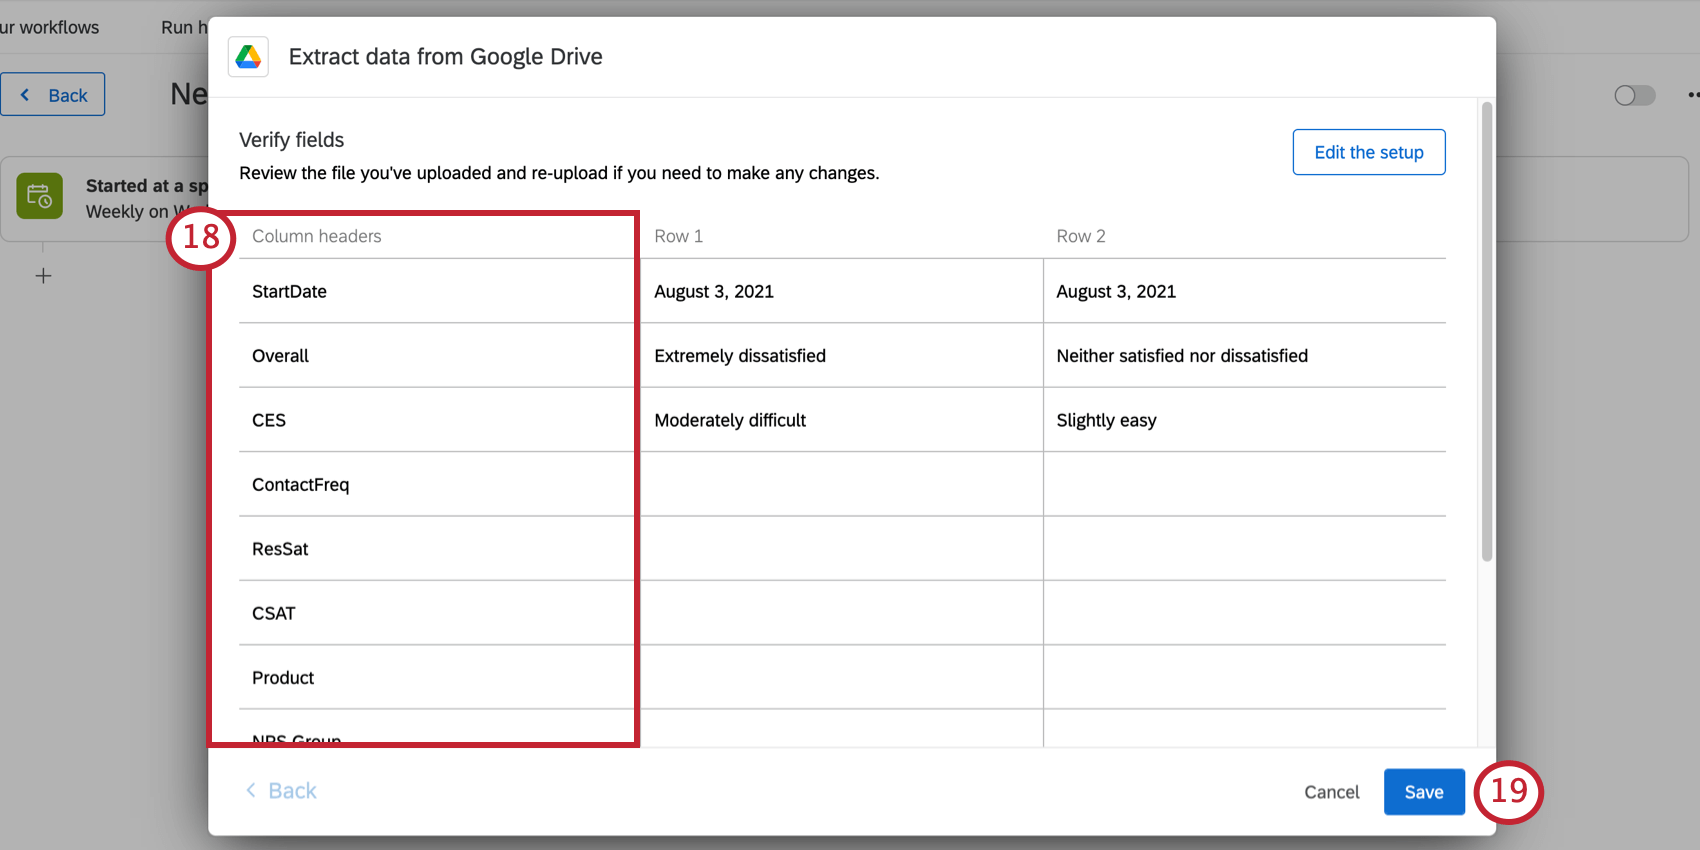
- Verify fields in the file. The table will display the column headers (which represent the individual fields) and their values for the first two rows of data.
- Double-check your settings. If you’re ready to complete the Google Drive setup, click Save.
- Click the plus sign ( + ) and select Task to set up the task that should follow your Google Drive data extraction. This should be a data loader task. See available loader tasks for a list of options.
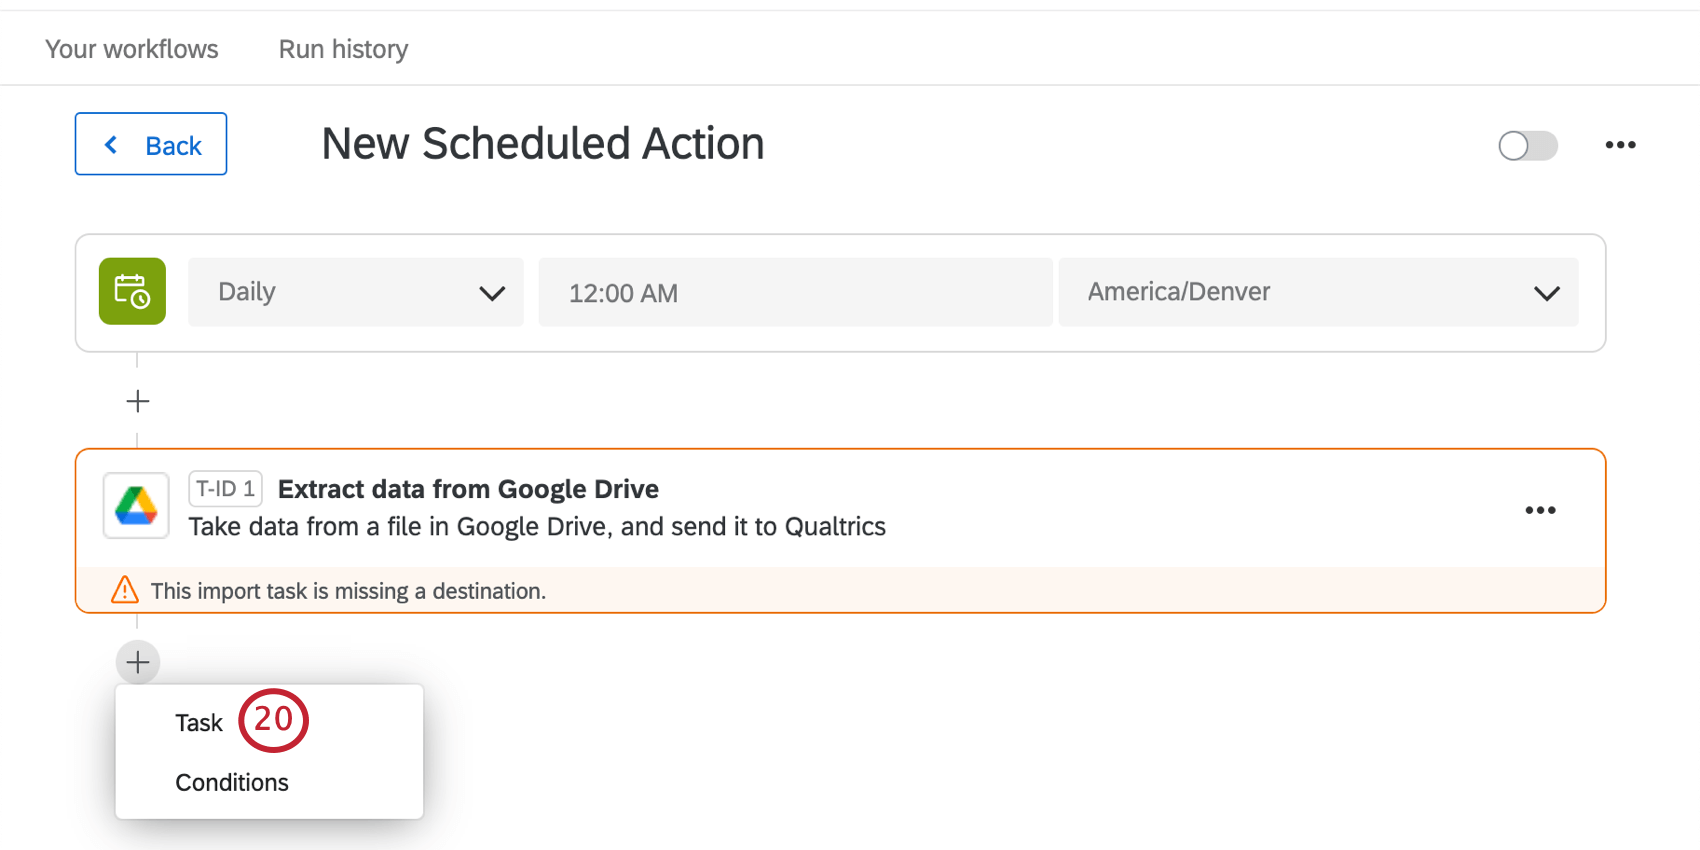
Conditions Based on Data Extracted
Once you have finished setting up your Google Drive task, you can set conditions based on the data extracted. This allows you to be specific about what happens next in your workflow.
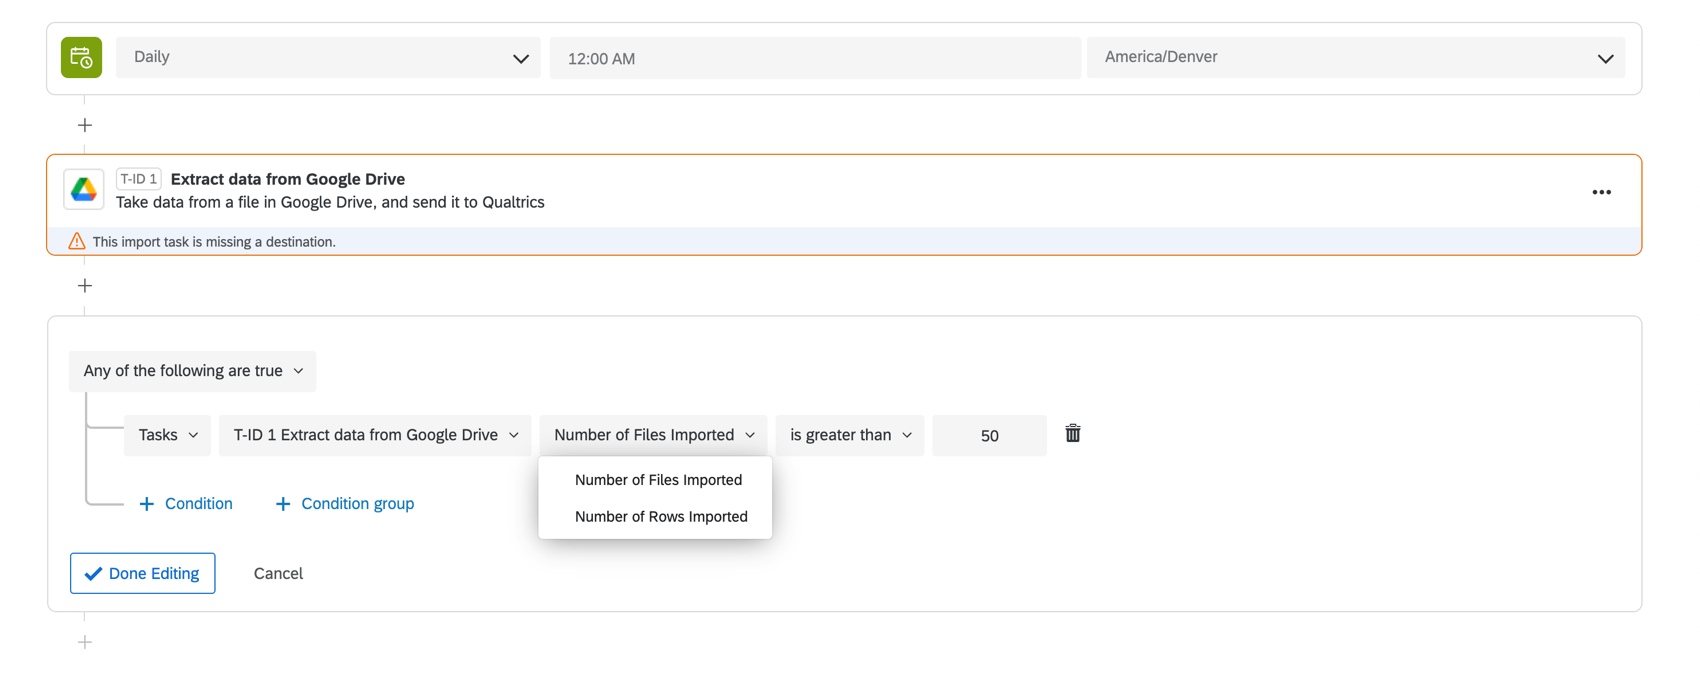
The following is a list of types of conditions you can add to a workflow after an “Extract data from Google Drive” task.
- Number of files imported
- Number of rows imported
You can then specify an exact number or a range (greater than, less than, etc.). For example, you can say that files will only be uploaded to the CX directory if there are less than 100 rows.