-

Qualtrics Platform -

Customer Journey Optimizer -

XM Discover -

Qualtrics Social Connect
Load into a Data Project Task
About the Load into a Data Project Task
The Load into a data project task allows you to take data that’s been previously imported by a data extractor task, and save that data into a Qualtrics imported data project. You can use this task to add new data records and update existing ones.
Once you’ve loaded your data into an imported data project, you can analyze your data using Stats iQ or a dashboard.
Setting Up a Load into a Data Project Task
- Click the navigation menu in the top-left corner.

- Choose Workflows.
- Click Create a workflow.
- Choose Started at a specific time.
Qtip: You can also use the “started when an event is received” option, although we recommend using a scheduled workflow for this task. See scheduled workflows vs. event-based workflows for more information about each option.
- If desired, rename your workflow.
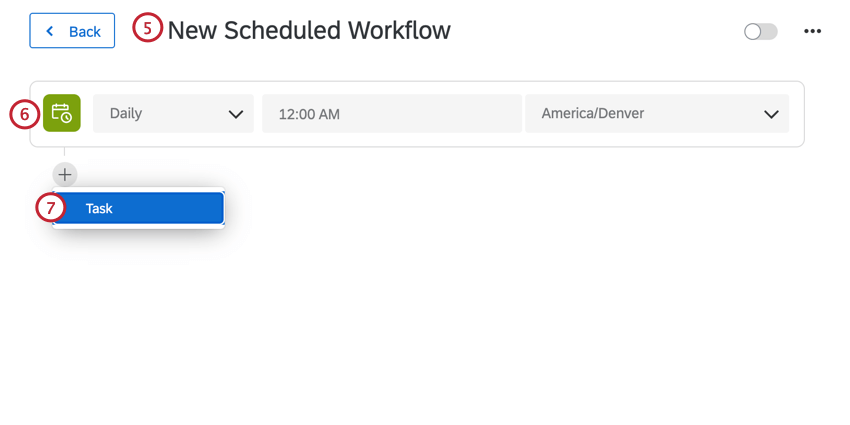
- Determine when the workflow runs. See scheduled workflows for more information.
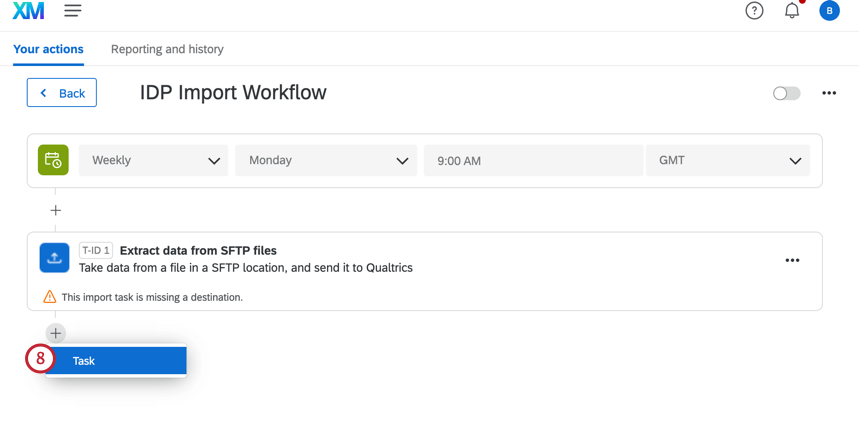
- Click the plus sign ( + ) and select Task to set up your data extractor task. The extractor task imports data from one location so you can save it somewhere else. See available data extractor tasks for the options available to you.
- Click the plus sign ( + ) and select Task.

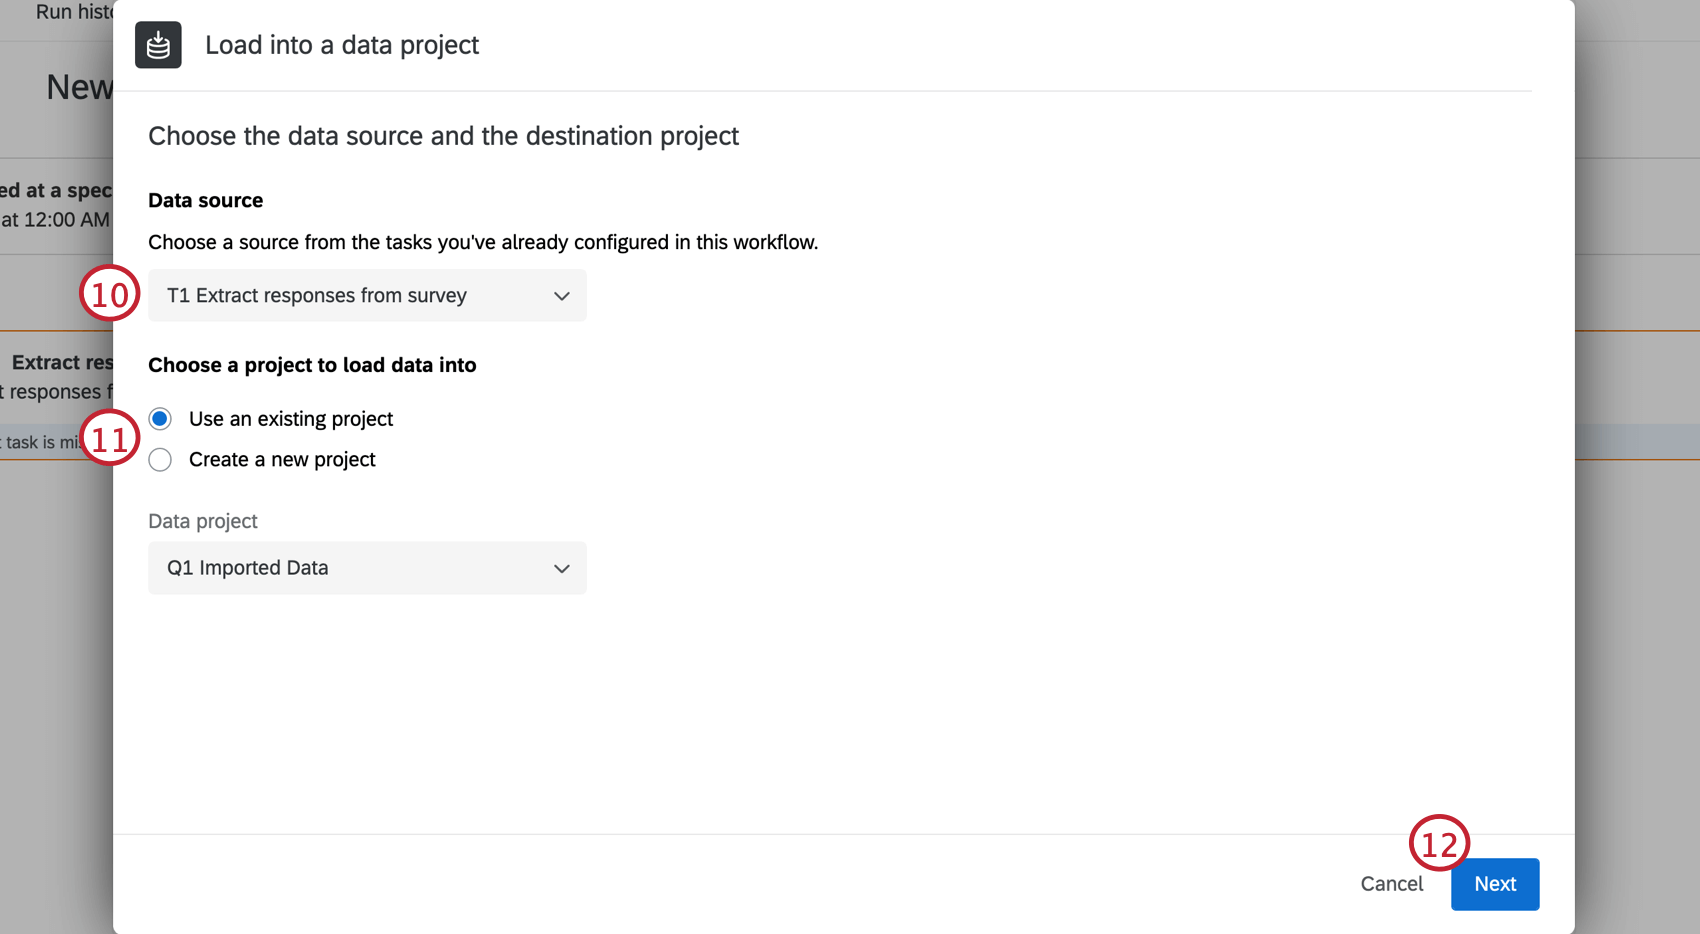
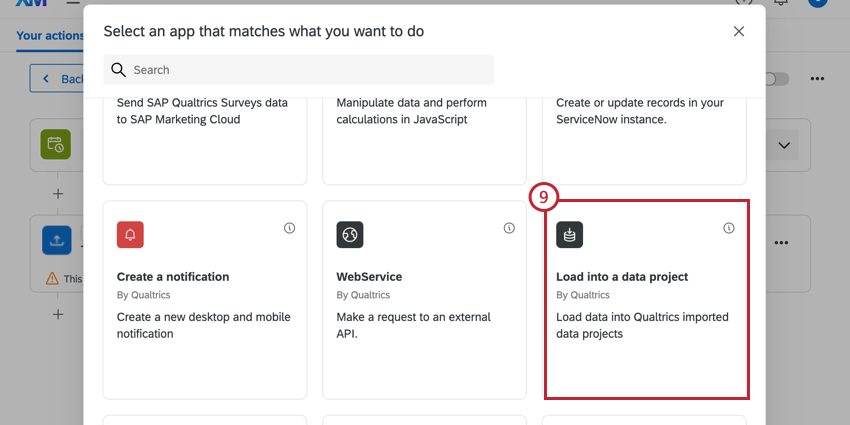
- Select the Load into a data project task.

- Choose the source extract data task that contains your data.
 Qtip: The maximum file size for the file in the data extractor task is 1 GB.
 - Choose a project to save the data into, or create a new project from scratch.
- Click Next.
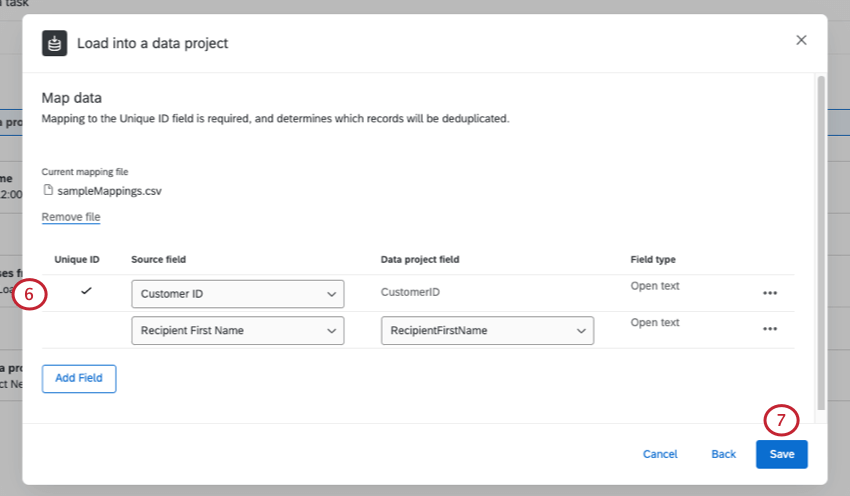
- Now you’ll map your Source fields to your Data project fields. The source field is how the field appears in your data extractor task, while the data project field is how the field appears in your imported data project. For detailed steps, see Mapping Source Fields to Data Project Fields.
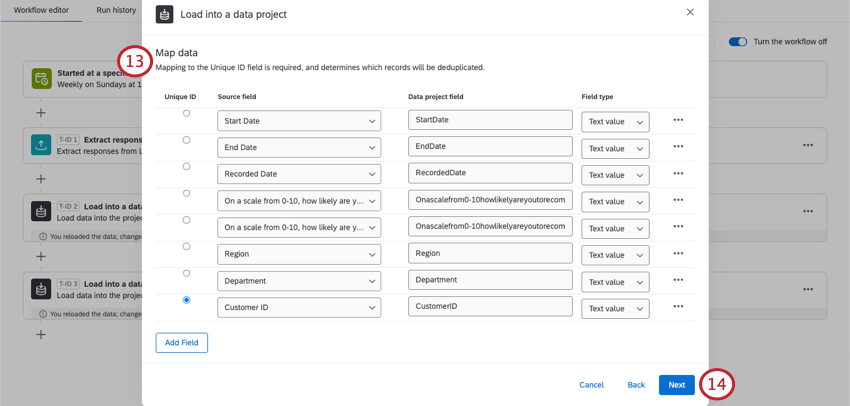
- Click Save when you’ve finished setting up your mapping.
If you’d like to visualize your imported data project in a dashboard, see importing data as a CX dashboard source.
Mapping Source Fields to Data Project Fields
The source is the data pulled from your data extractor task. The data project is the existing or new imported data project you’re uploading the data to.
Mapping to an Existing Project
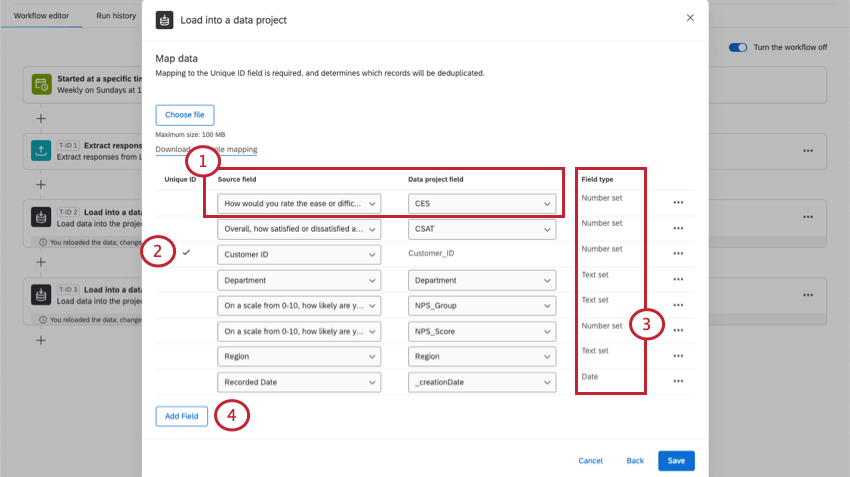
- In this setup, you match existing columns in your data source to existing columns in the imported data project.
- Check that the correct Unique ID field is checked for the imported data project. Match it to the Unique ID field in your source.
- You can see each field’s type. You can’t edit field types.
- Click Add Field to add more fields to your mapping.

Mapping to a New Project
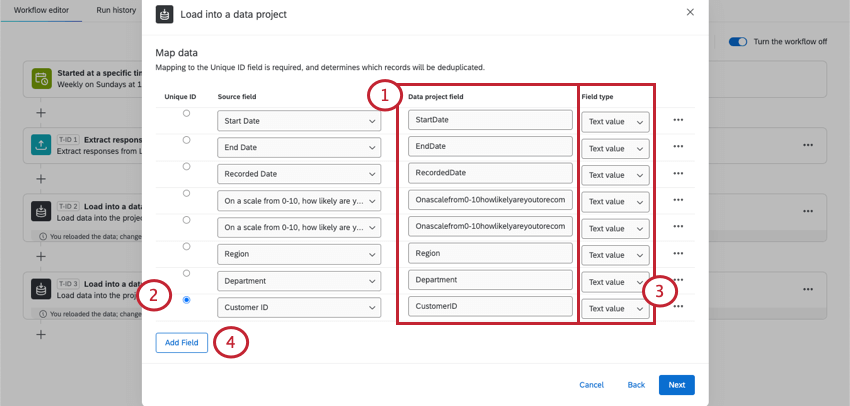
- Because you’re creating a new imported data project, you get to name the columns whatever you want.
- Select the Unique ID field.
- Choose the field type for each field.
- Click Add Field to add more fields to your mapping.
Once you complete this step for the first time, your project will be created immediately. That means that when you edit this task, you will be able to edit mappings, but you won’t be able to rename columns or choose different field types or assign a new Unique ID. To rename columns and change field types, you can find the project on the Projects page and edit it directly.
Uploading Field Mappings
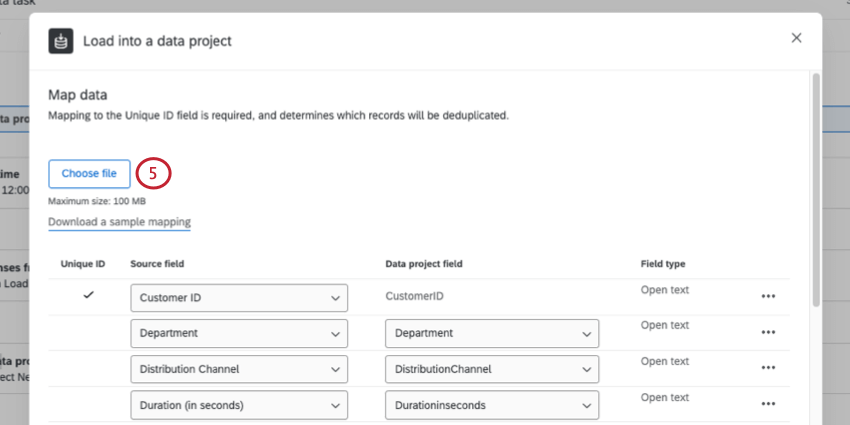
For new or existing projects, you can choose to upload field mappings instead.
- Click Download a sample mapping.

- Look at the field names listed in the mapper. Use these exact names in your file. IF you’re unsure how to name a field, click the drop-down and find it in the list.
- Row 1 of your file should contain the names of all of your source fields.

- Row 2 should contain the names of all the imported data project fields.
Qtip: Make sure columns match the same fields together. Exclude columns of data you don’t want to include in the imported data project.
- Click Choose file to upload your CSV.
- You can make edits to your fields, such as changing mappings or adding more fields, before you save your changes.
- Save your changes.
Mapping Field Values
In addition to mapping fields to each other, you can also map individual values.
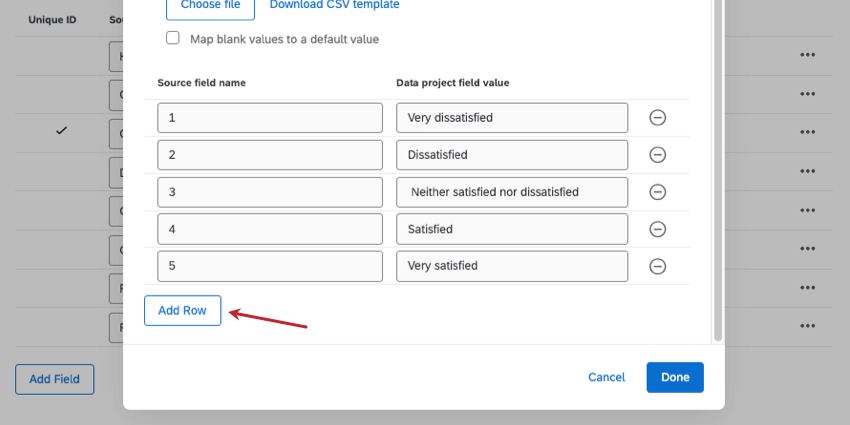
- 1 should become Very dissatisfied
- 2 should become Dissatisfied
- 3 should become Neither satisfied nor dissatisfied
- 4 should become Satisfied
- 5 should become Very satisfied
- On the Map data window, click the 3 dots next to the field you want to map field values for.
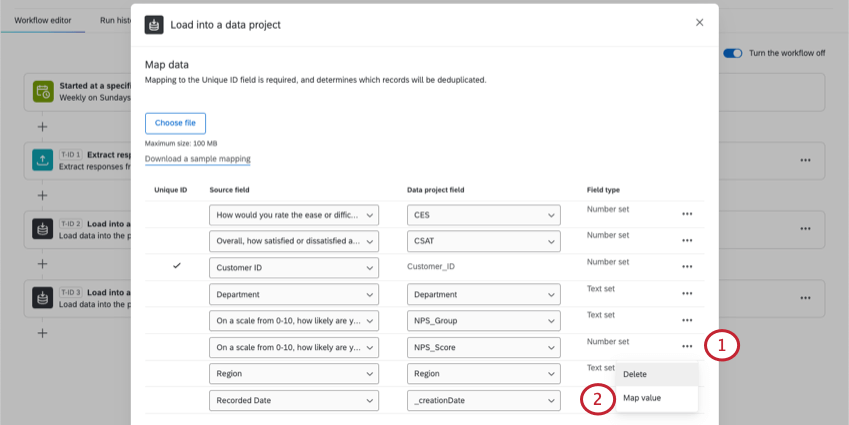
- Select Map value.
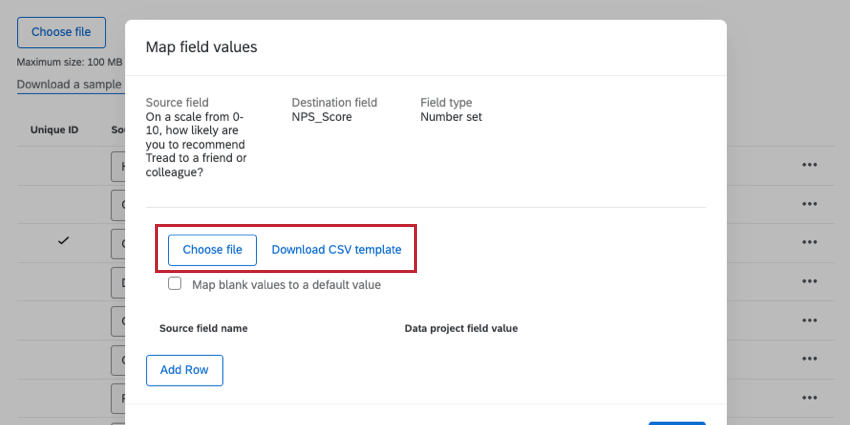
- You can map your values by doing one of the following:
- Upload values: You can upload a spreadsheet of all the values you want to map. Click Download CSV Template. The left column (from) should be the original value in the source, and the right column (to) should be the final value you want to appear in the imported data project. Upload this file when you’re finished.
 Qtip: Make sure to save your changes in a UTF-8 encoded CSV.
 - Manually input values: Click Add Row to input each value. The left should be the original value in the source, and the right should be the final value you want to appear in the imported data project.
- Upload values: You can upload a spreadsheet of all the values you want to map. Click Download CSV Template. The left column (from) should be the original value in the source, and the right column (to) should be the final value you want to appear in the imported data project. Upload this file when you’re finished.
- If you want to set a value for empty fields, select Map blank fields to a default value. Enter the value.
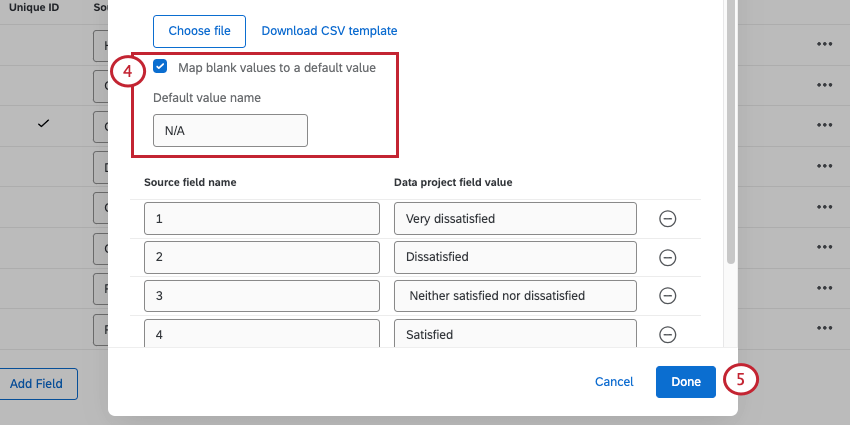
- Click Done.
- Save your task.