-

Qualtrics Platform -

Customer Journey Optimizer -

XM Discover -

Qualtrics Social Connect
Displaying Messages Based on Scoring
About Displaying Messages Based on Scoring
The scoring feature allows you to use Qualtrics to create tests, measure respondents’ skills, and assess people in a myriad of ways. But when it comes to assessments, we want to communicate different things to people based on how they performed. We can congratulate people who scored 100%, but we might want to provide guidance and study guides to those who scored below a 75%. Maybe we’re running a personality assessment, and want to tell the respondent what profile matches their results.
This page details how to give different end of survey messages to respondents based on their scores.
Scoring
Before you proceed, make sure you set up scoring in your survey. See our Scoring support page for more details on this process.
Make sure you figure out your scoring brackets ahead of time, since everyone’s set up is a little different. For example, let’s say the maximum number of points you can gain in a category is 35. You might want to look at people who scored 1-15, 16-20, and 21-35.
You will also want to make sure that you do not automatically show respondents their scores at the end of the survey. This setting will interfere with the message we want to create, which can also include the score.

- Go to Scoring Options.
- Make sure At the End of the Survey is not selected.
Qtip: It is ok to have After Each Question selected!
- Use the dropdown to make sure none of your categories have this selected.
- Click Save.
Survey Setup
In this example, we have a survey whose All Items scoring category has a maximum of 100 points. We are interested in creating messages for four different scoring brackets: 0-50, 50-75, 75-88, and 88-100.
- Make sure your scoring is set up as described in this section.
- In your survey editor, navigate to the Survey flow.
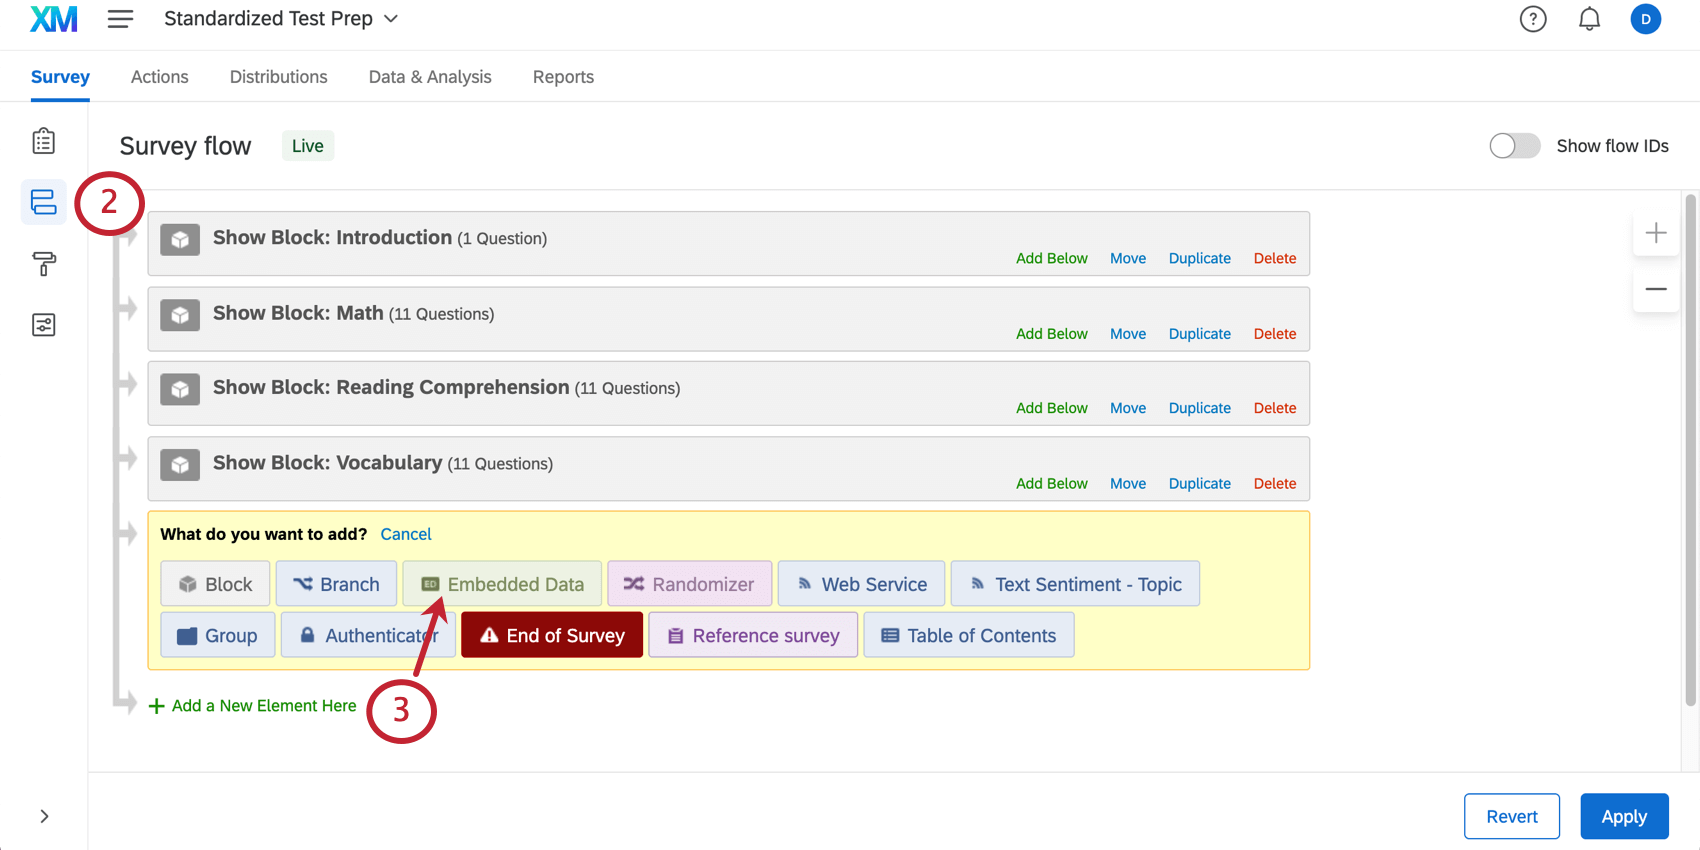
- Click Add a New Element Here and select Embedded Data.
- Name your score. For example, here we just call it Score.
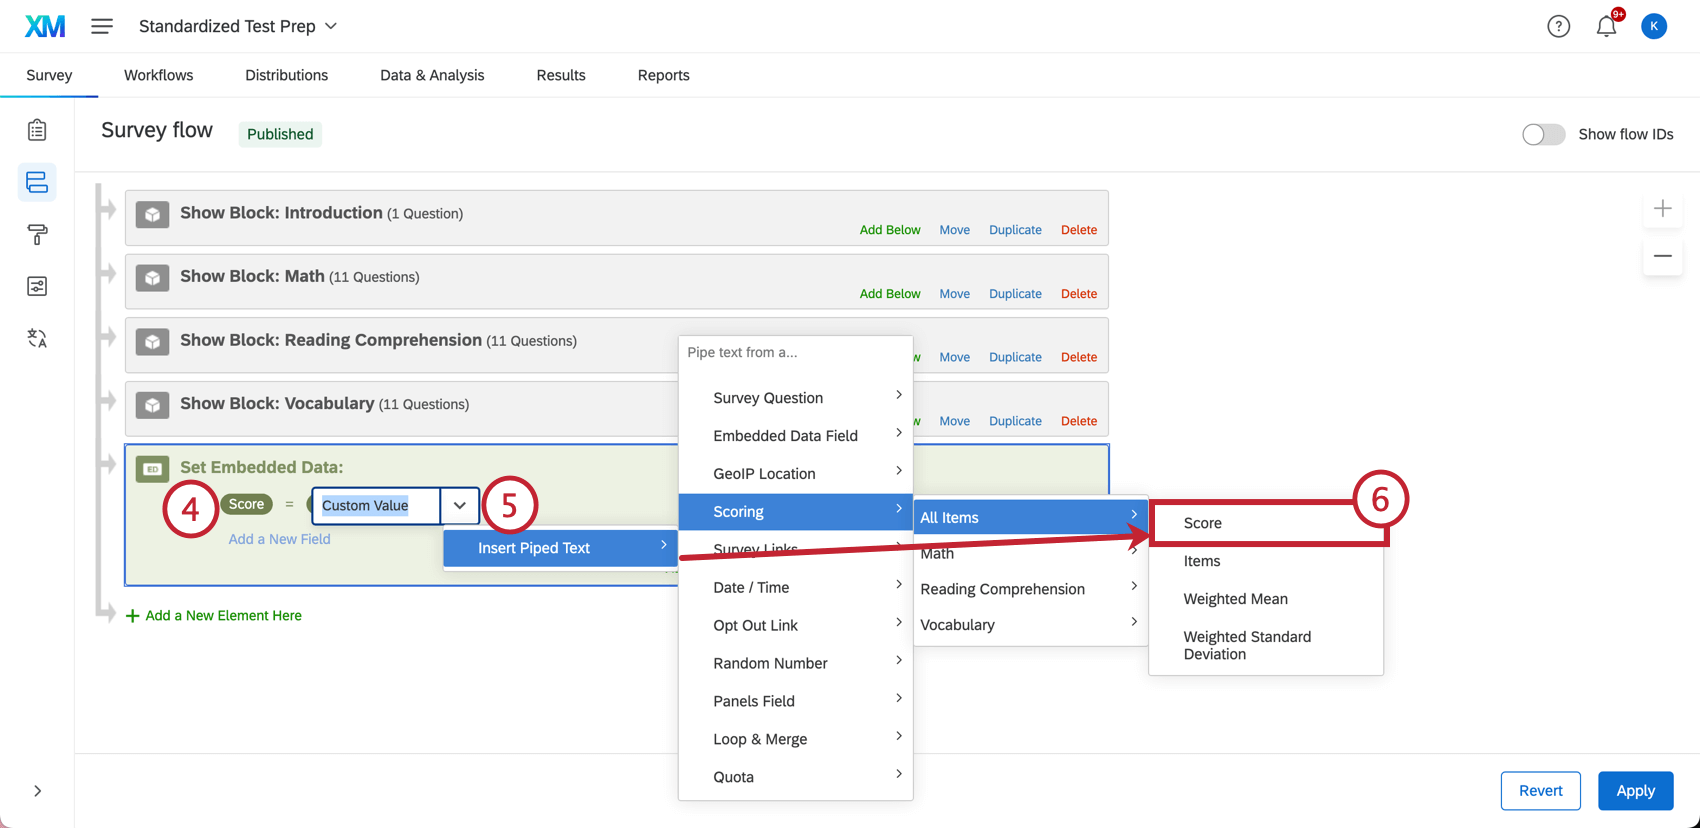
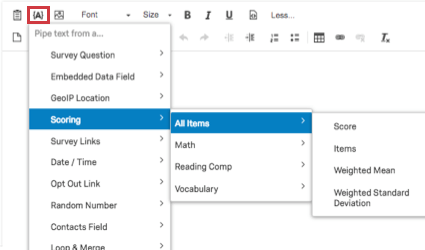
- Click Set a value now. Click the dropdown and highlight Insert Piped Text. Then highlight Scoring and select the category whose score you want to display. Here, we called the category All Items.
- Click Score.
- Your value will now be piped text. This is code surrounded by French brackets ( { a } ).
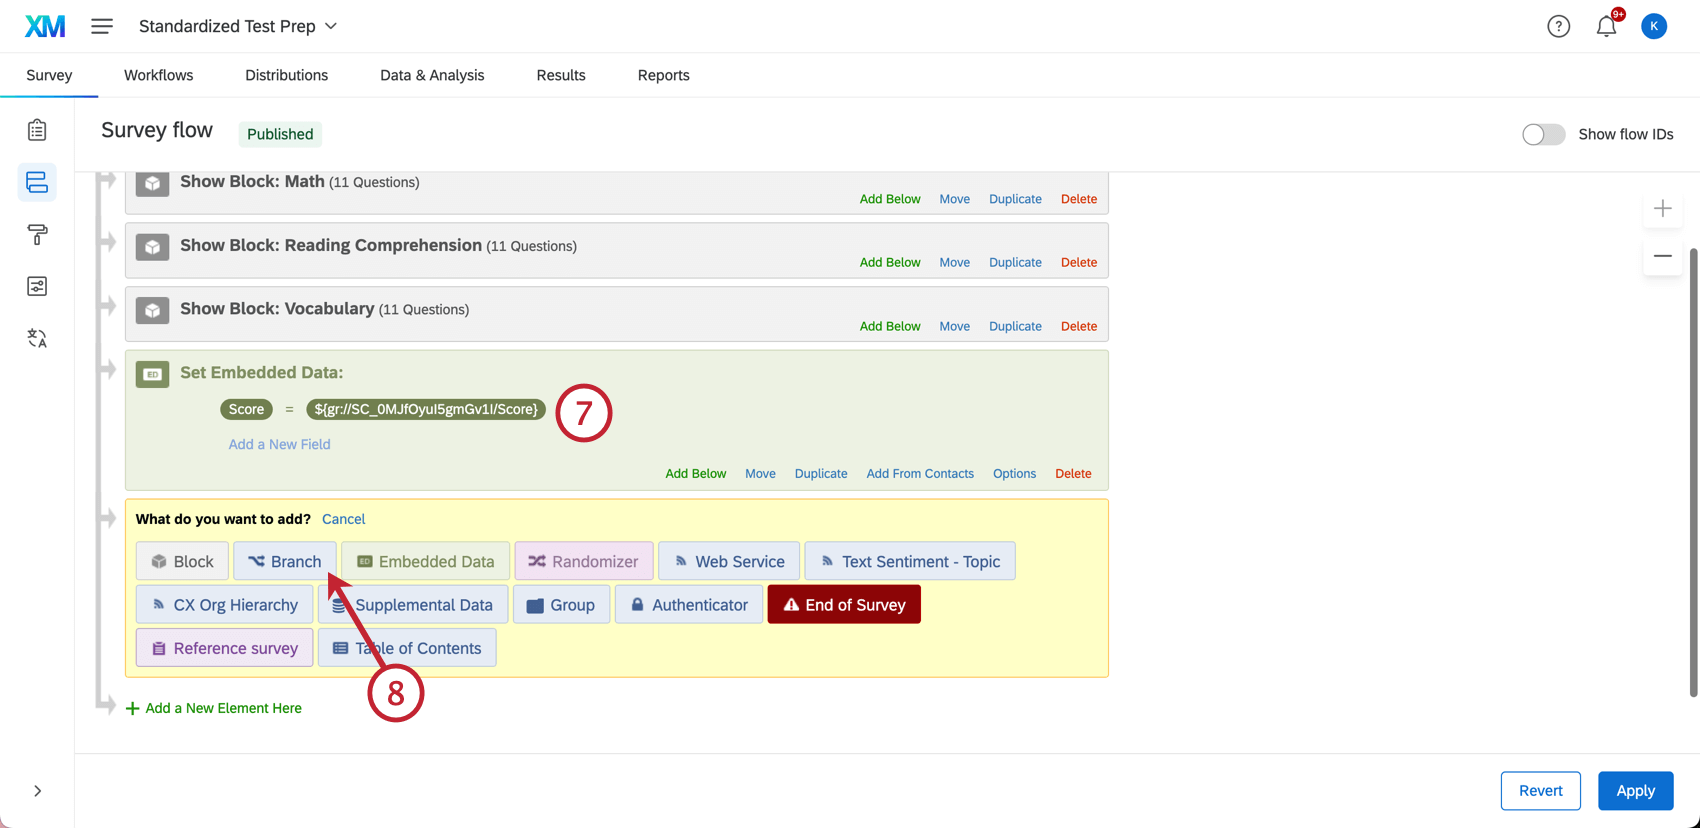
- Click Add a New Element Here and select Branch.
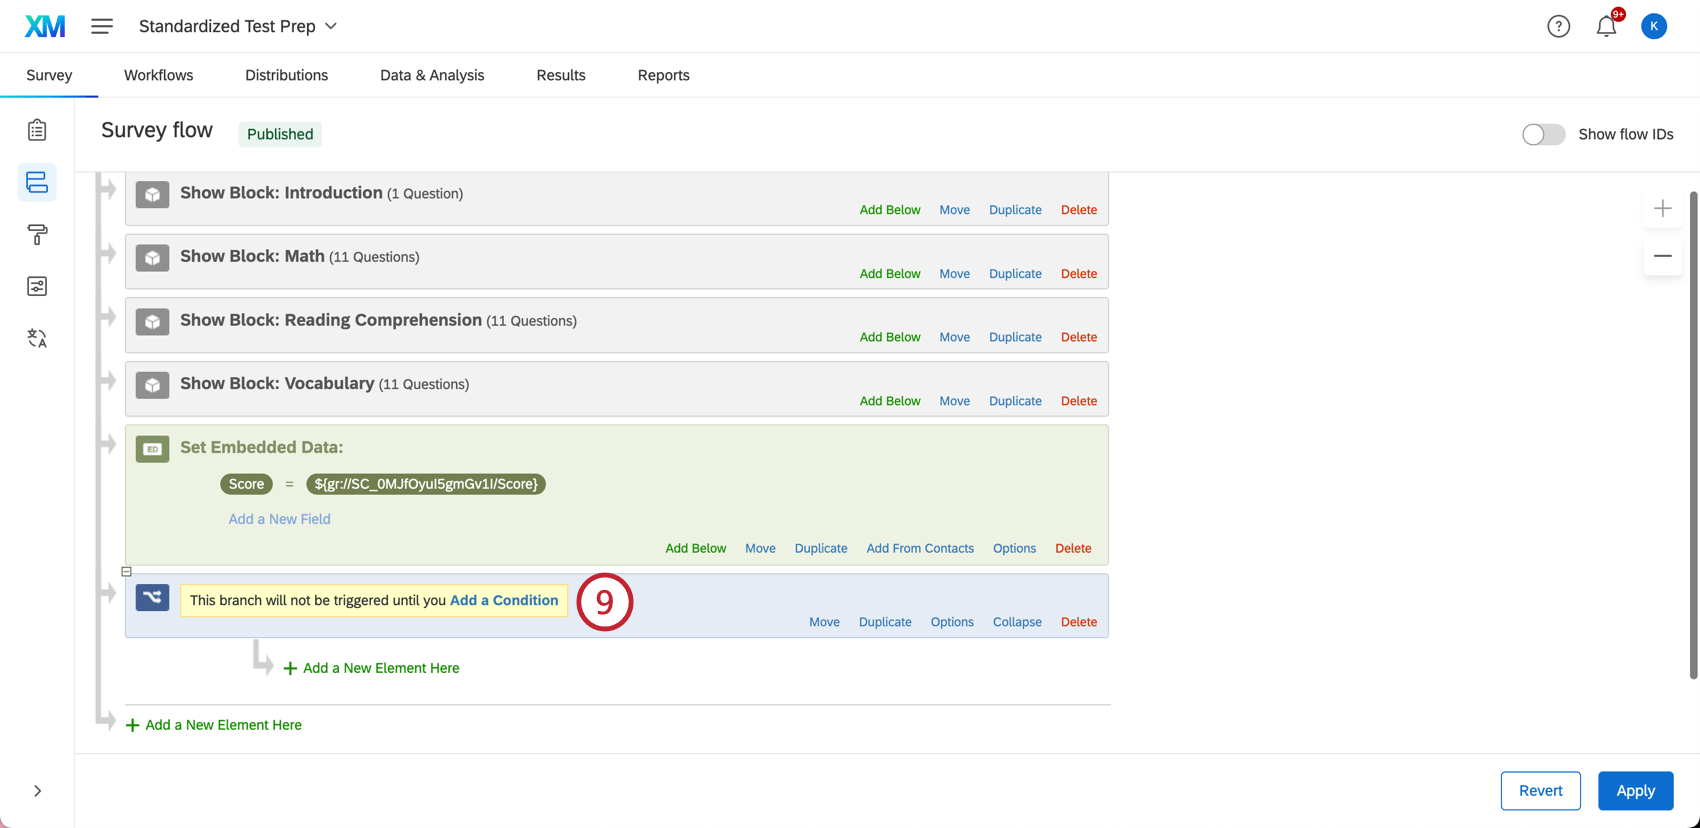
- Click Add a Condition.
- Select Embedded Data from the first dropdown.
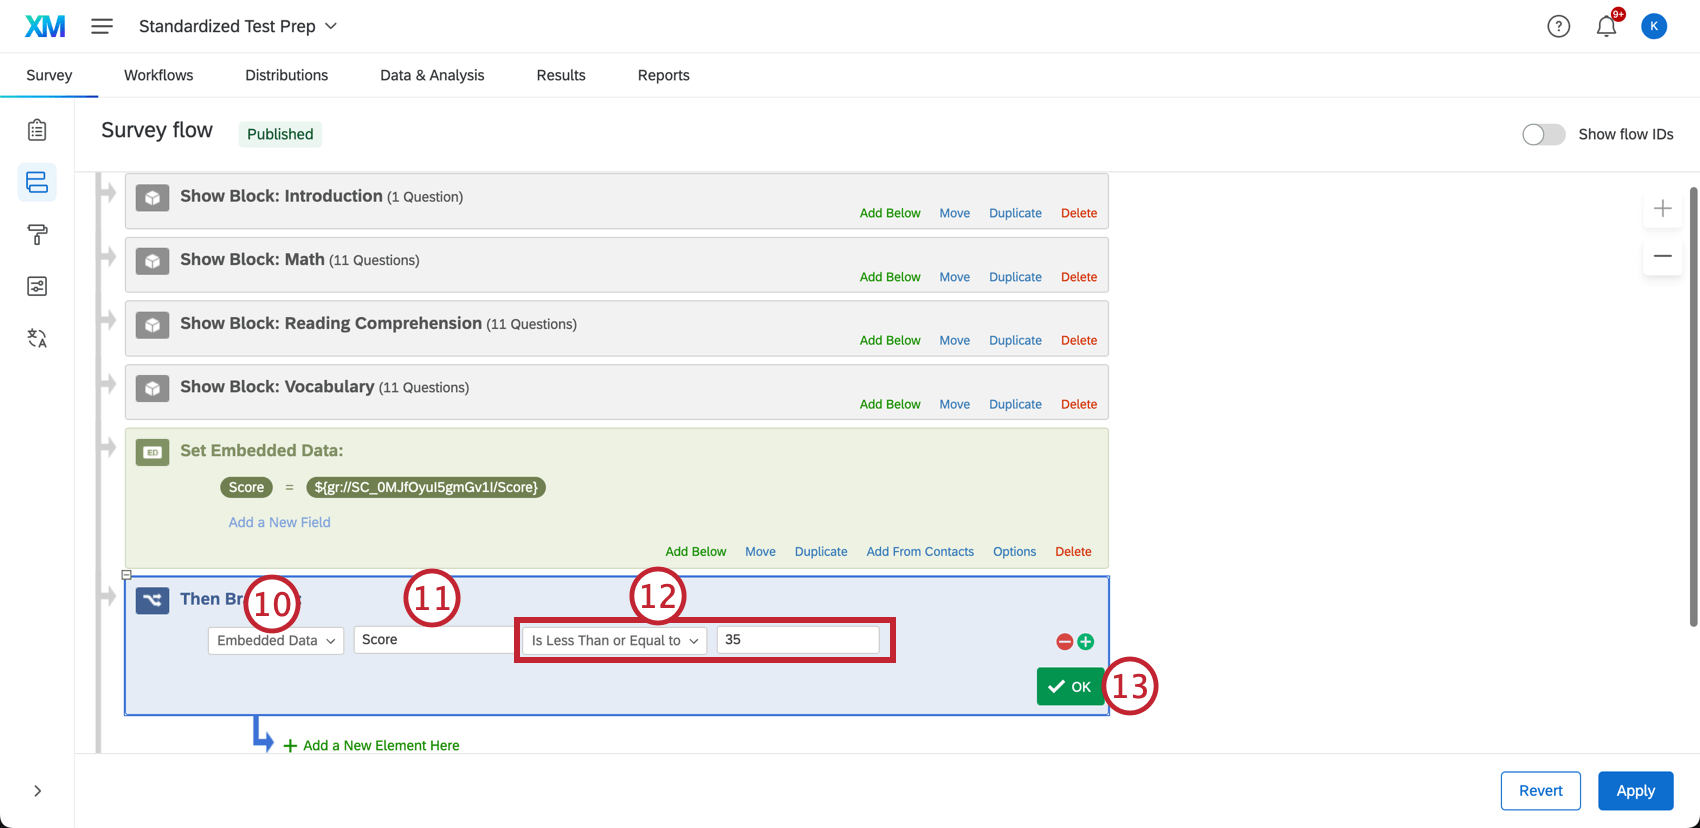
- Type the name of your new Embedded Data. Here, it’s Score.
Qtip: Don’t move your Embedded Data element! It needs to be after the blocks, but before the branches we will create. That will make sure the survey knows the full score before sending people down certain branches.
- Type a value, and choose whether this is less than, greater than, equal to, etc. Here, we set it up to be “Less Than or Equal to 35.”
- Click OK.
- Indented under the branch, click Add a New Element Here and select End of Survey.
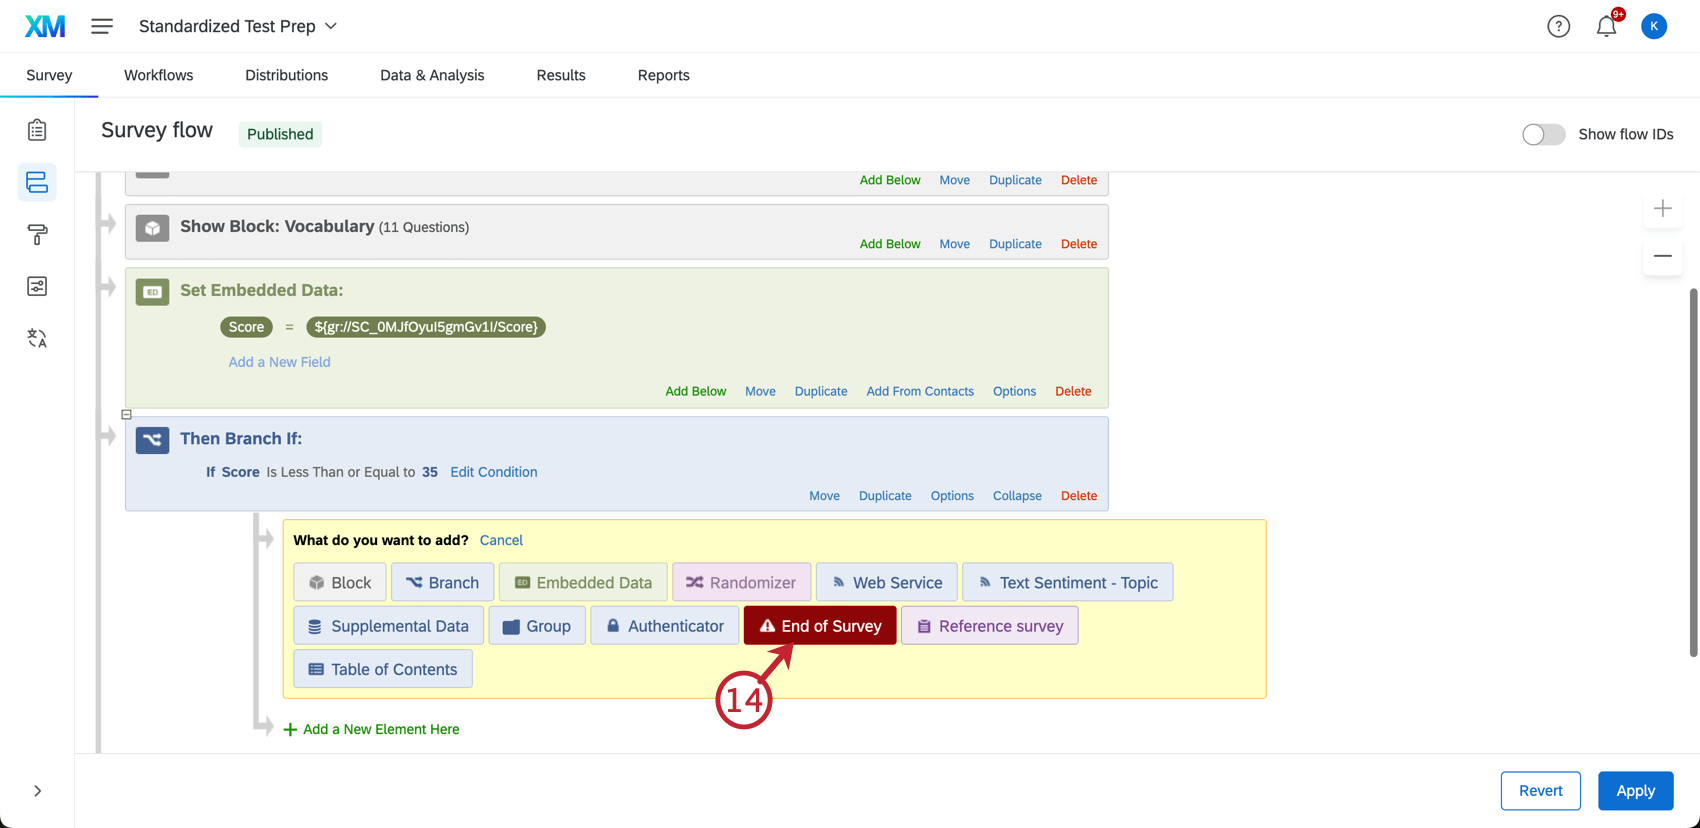 Qtip: It is very important that you click the link indented under the branch! We want this element to only be shown to respondents if they pass the branch! Move the element if you create it in the wrong spot.
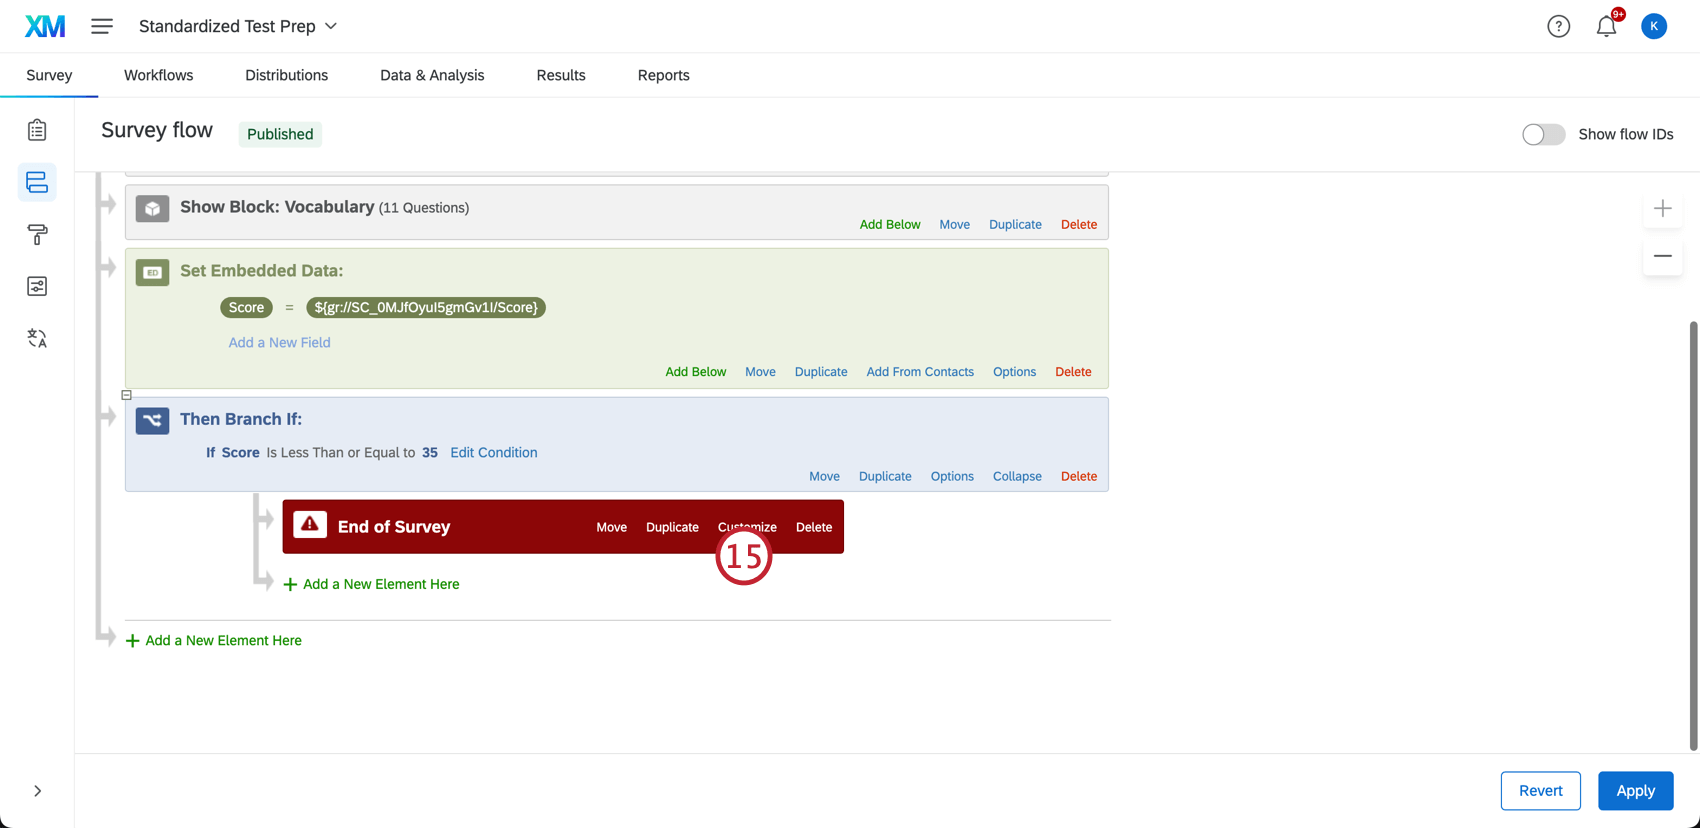
 - Click Customize.
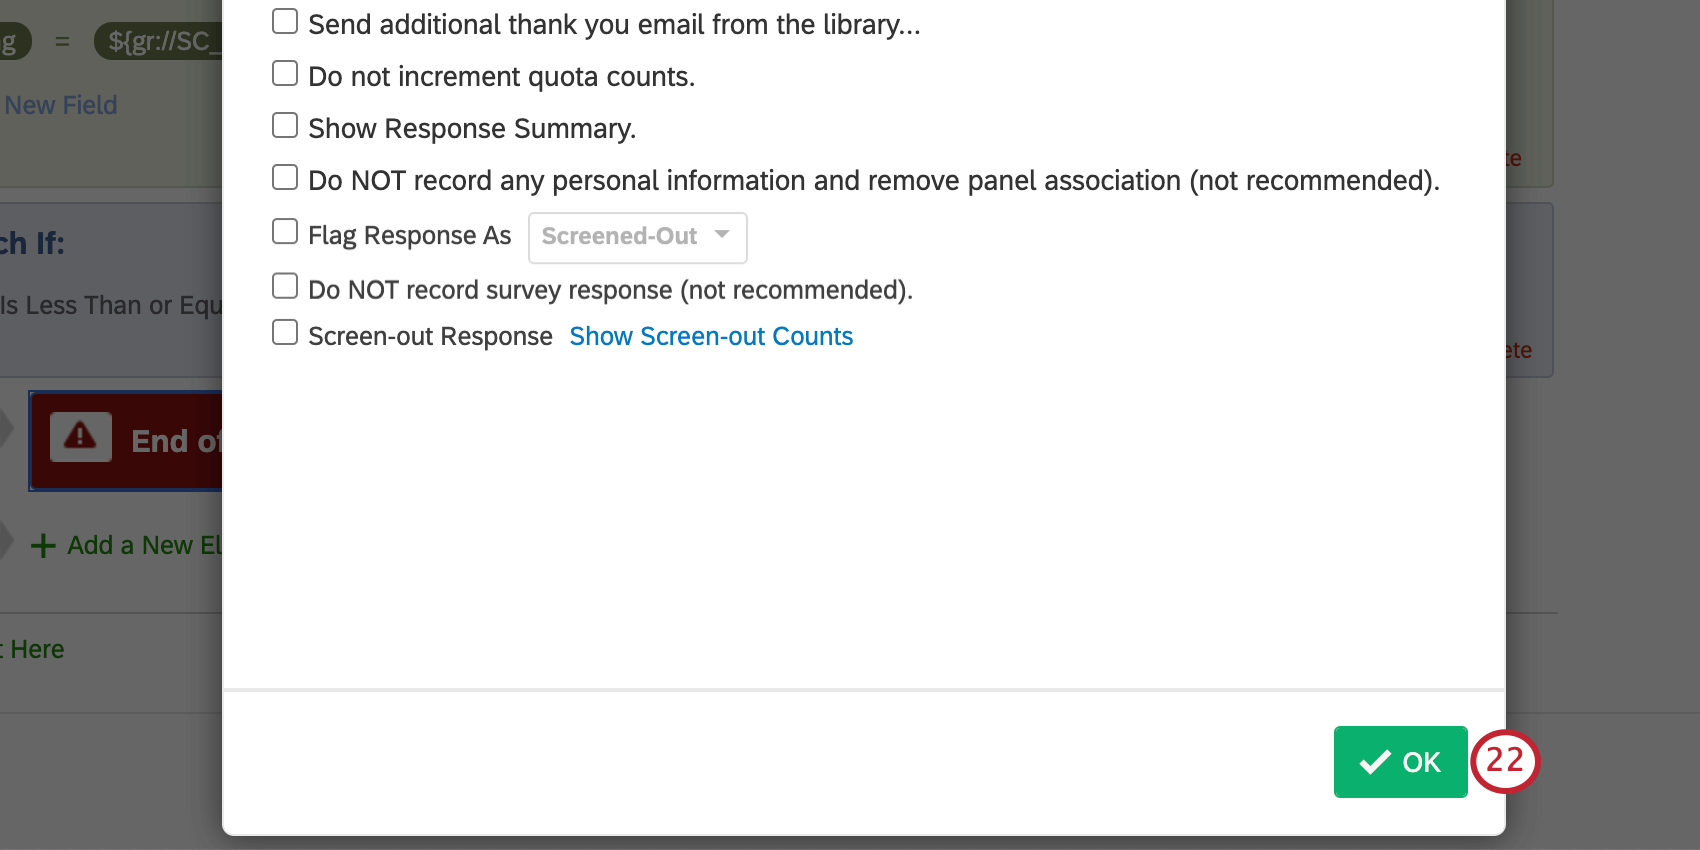
- Select Override Survey Options.
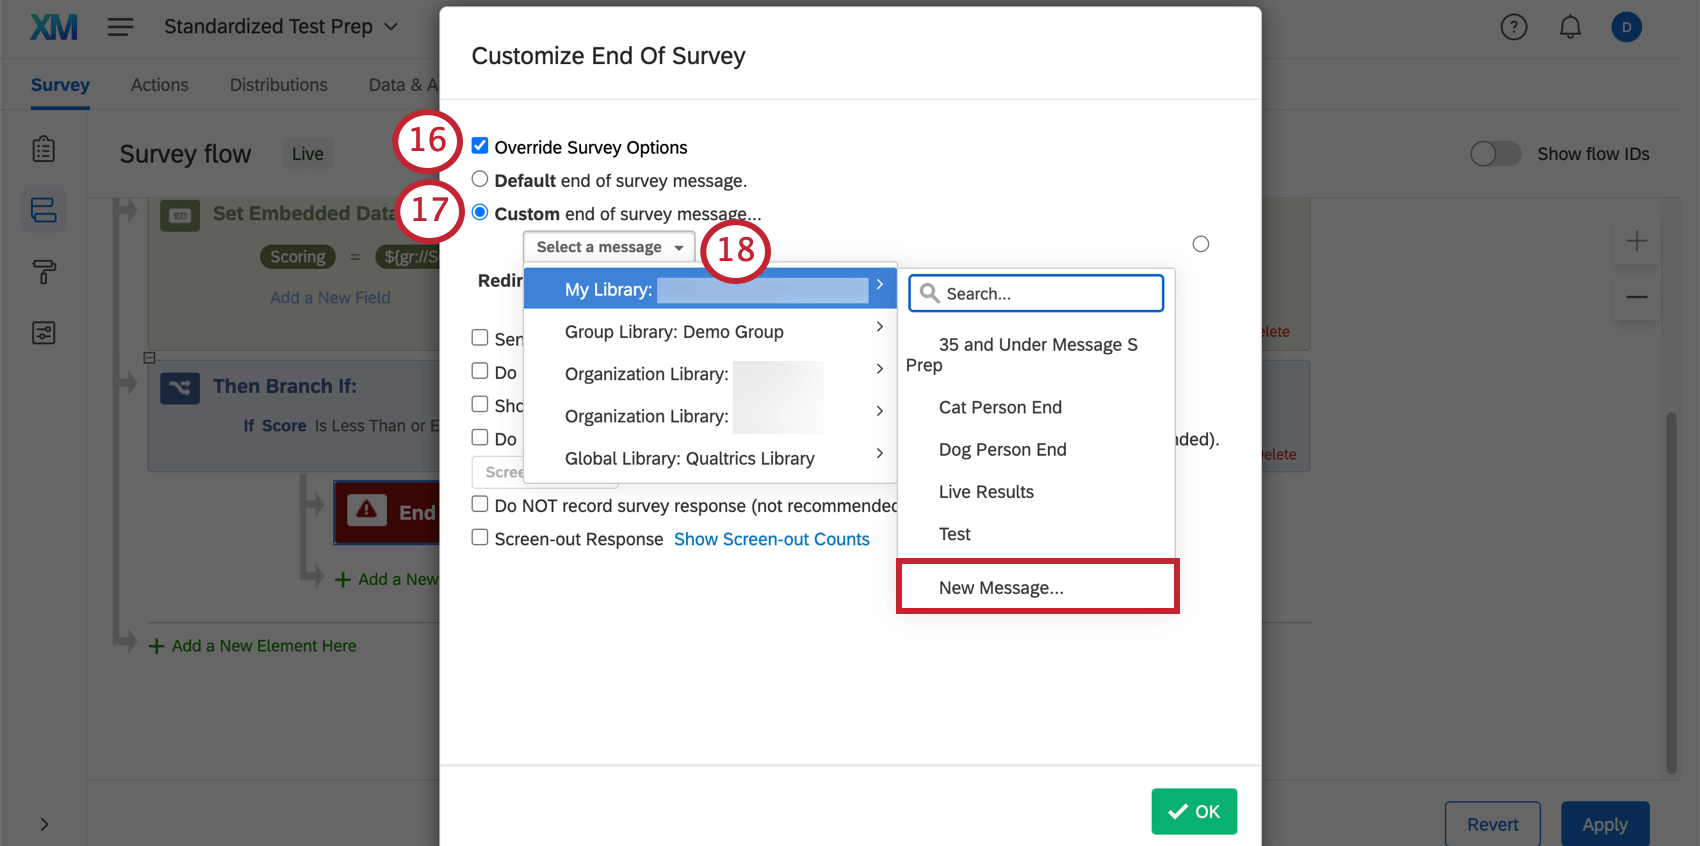
- Select Custom end of survey message.
- Click Select a message, then hover over your library, then click New Message.
- Create a message in the field. Here are some general guidelines:
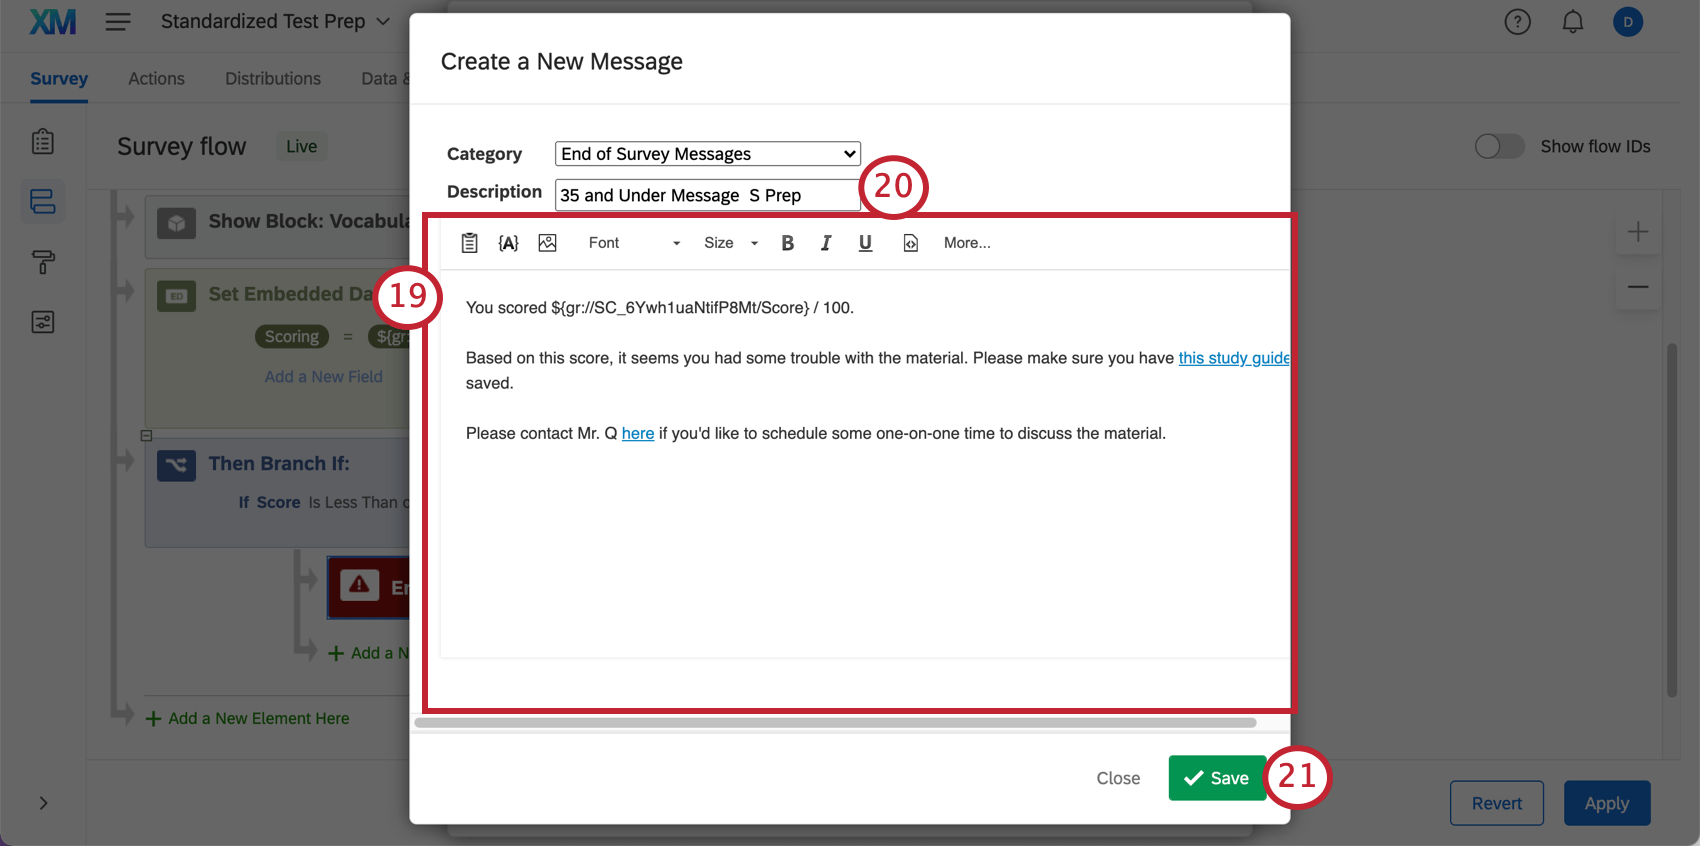
- Use the Piped Text button ( {a} ) to display the respondent’s score.
- If you want to give the maximum score (eg., you scored X/100), you will have to manually type this value.
- To learn more about adding font effects and images using the Rich Content Editor, see the linked support page.
- If you want to use similar messages in different surveys, make sure you adjust the Piped Text.
- Add a Description. This is the name that appears in the library. Try to give a name that will help you remember what the message contains – for example, adding the score range it’s for, as well as the survey it’s for.
- Click Save.
- Click OK.
- Repeat steps 8-22 for every one of your scoring brackets.
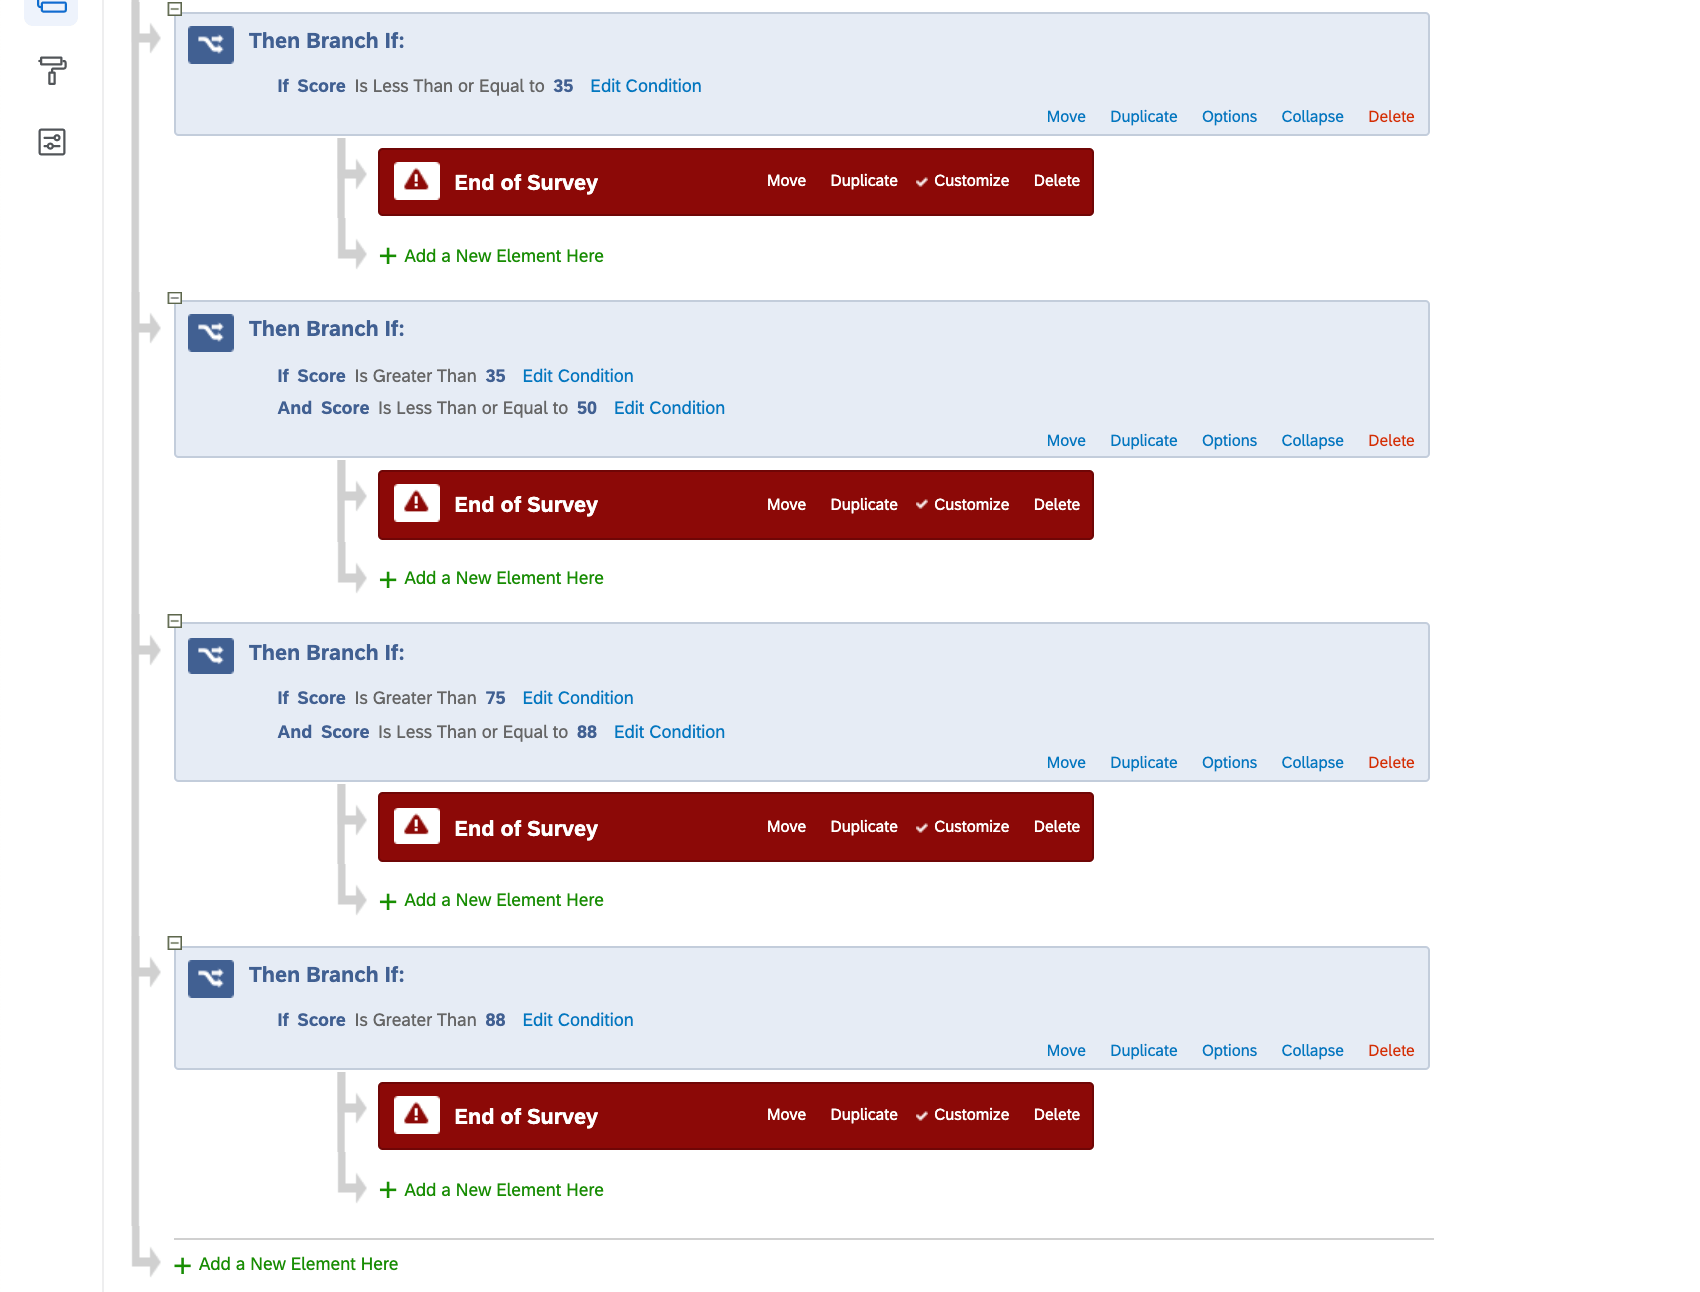
Example: For the second branch, we made the branch say “Greater Than 35” AND “Less Than or Equal to 50.” Since the first branch includes scores equal to 35, we say “greater than” (not “greater than or equal to”) to make sure there’s no overlap.

We also make sure the two conditions are joined by And because both must be true – otherwise, everyone with a score greater than 35 OR less than 75 will be included. That means that people with scores less than 35 will be included, which we are trying to avoid! - Once you are finished, click Apply.
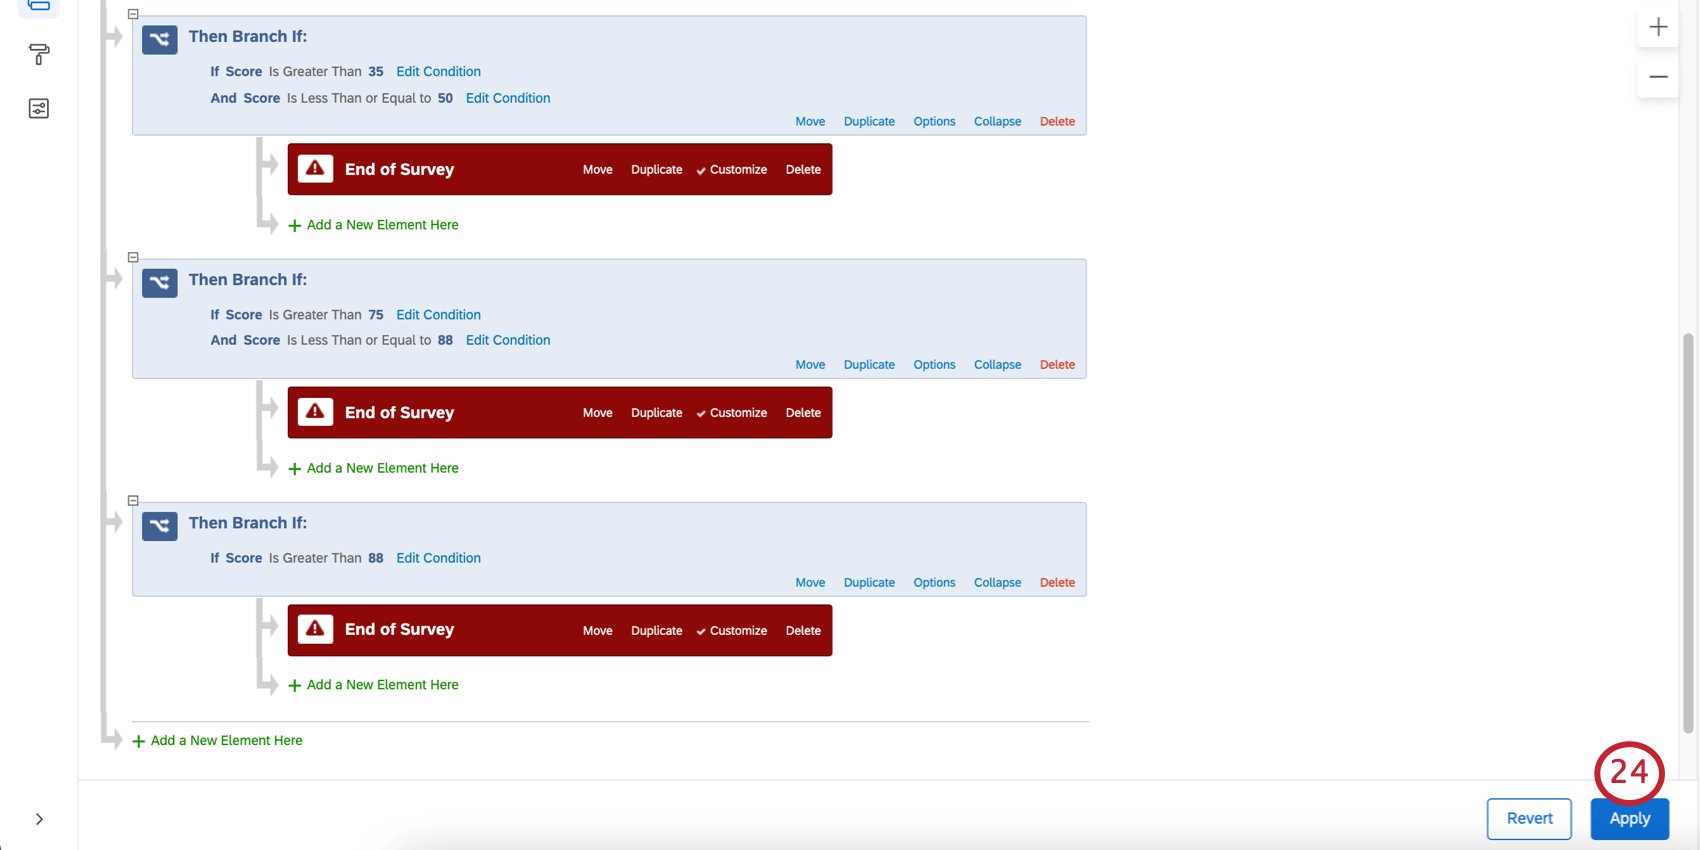
Here are what our scoring brackets look like, as an example:
Multiple Messages for Multiple Categories
There can only be one end of survey message for each respondent. This message can contain whatever you want, including multiple scoring categories, or additional information saved in the survey.
However, let’s say you have 3 categories: Math, Vocabulary, and Reading Comp. Respondents can perform well in one and not the other – for example, maybe I struggled with Vocabulary and Reading Comprehension, but did well on Math. I might need different resources, or to speak to different teachers depending on how I performed.
If you want messages that reflect different messages for ranges within each scoring category, follow the steps below.
- Make sure each of your scoring categories is set up.
- In your survey editor, navigate to the Survey options.
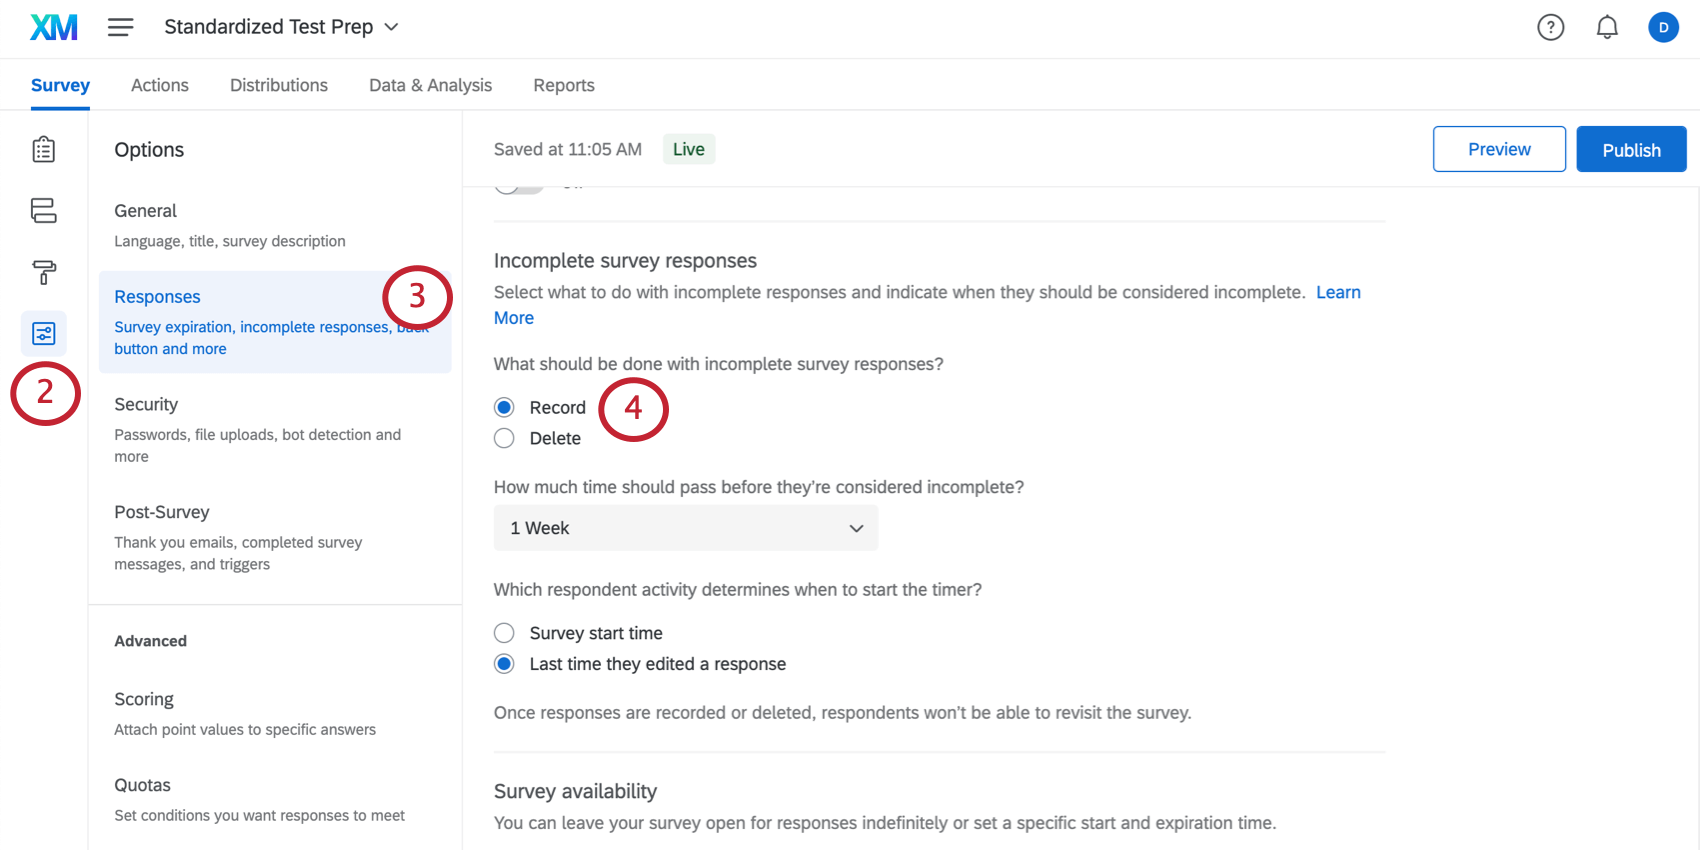
- Go to Responses.
- Under Incomplete survey responses, make sure it’s set to Record. You may set any time limit and other settings you want to include.
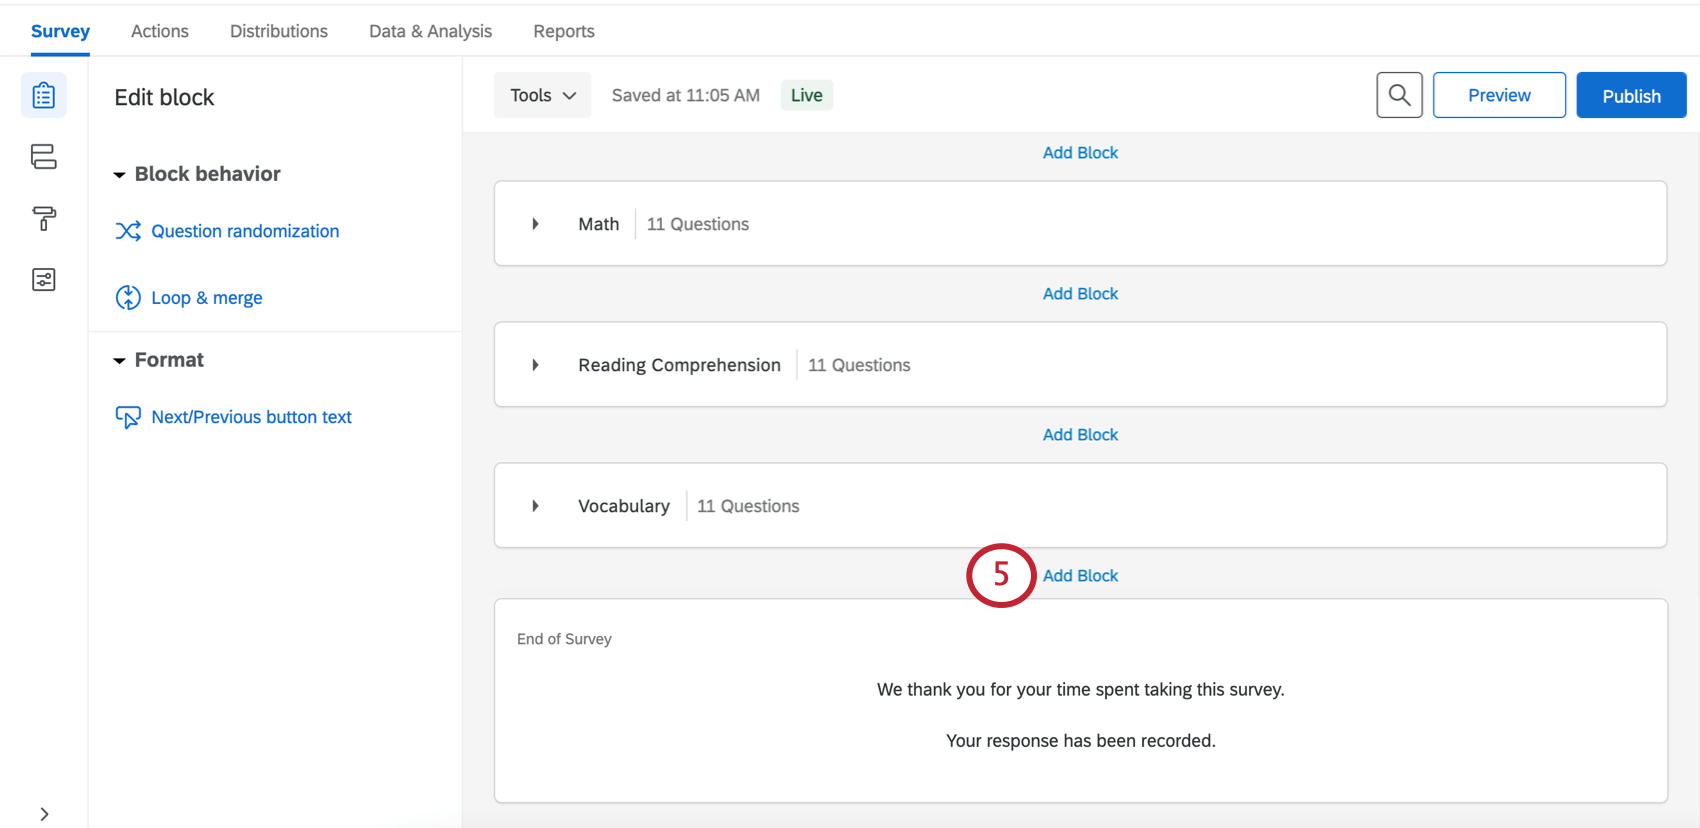
- In the survey builder, scroll to the bottom and click Add Block. This is where we will create all the end of survey messages.
- Go to the Survey Flow.

- On your second to last block, click Add Below.
- Select Embedded Data.
- Name this embedded data after one of your scoring categories. For example, here it’s “Reading Comp.”
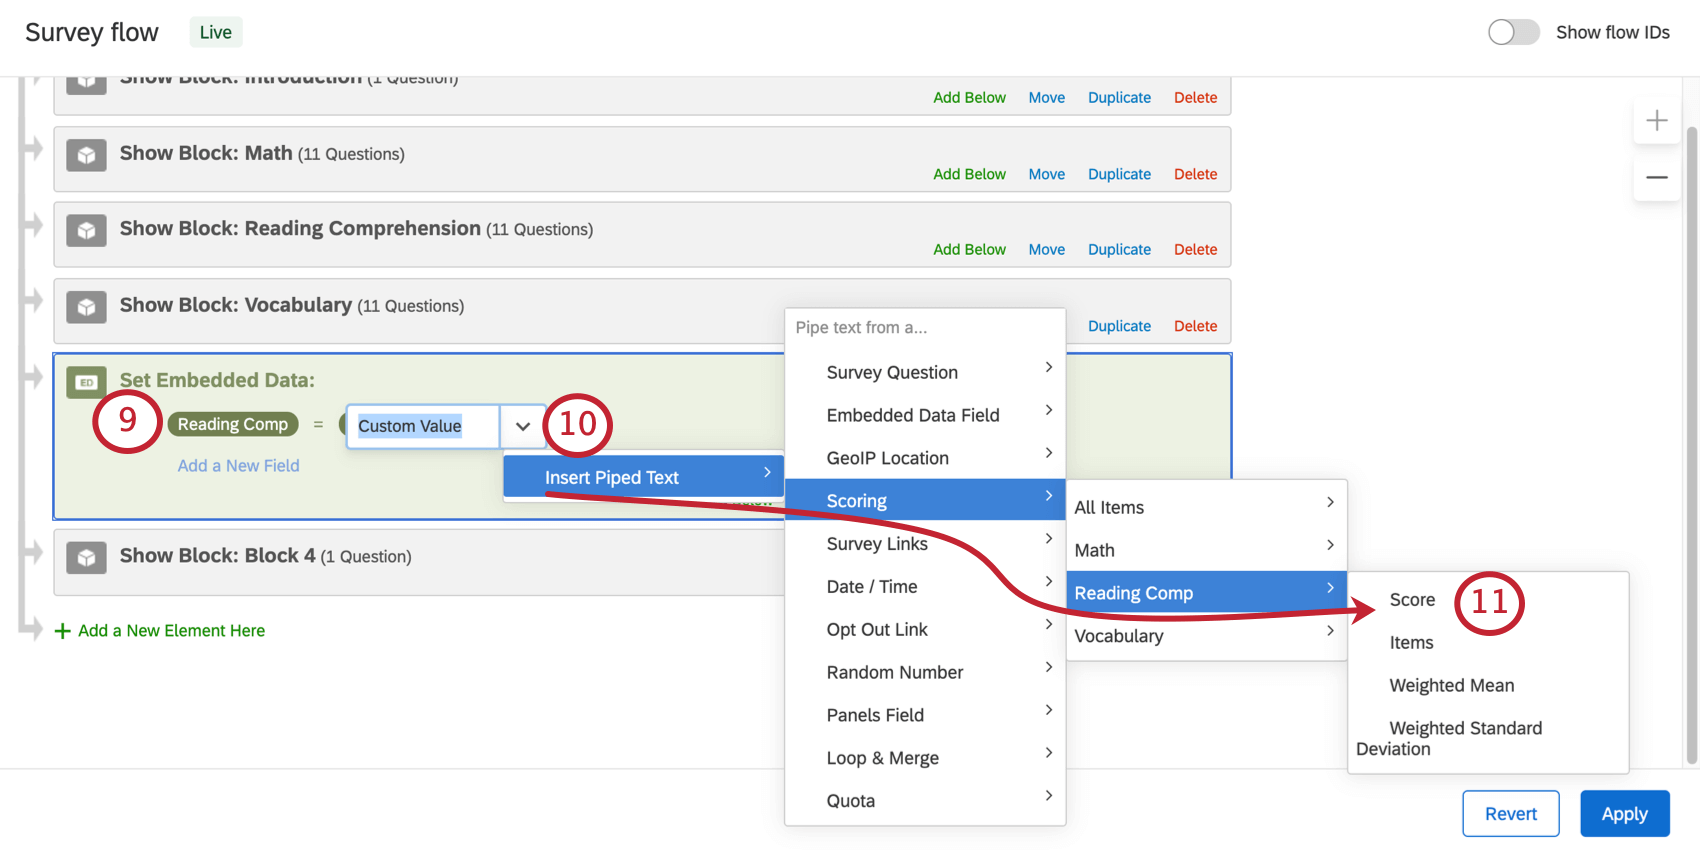
- Click Set a value now. Click the dropdown and highlight Insert Piped Text. Then highlight Scoring and select the category of the same name. Here, it’s “Reading Comp.”
- Click Score.
- Your value will now be piped text. This is code surrounded by French brackets ( { a } ).
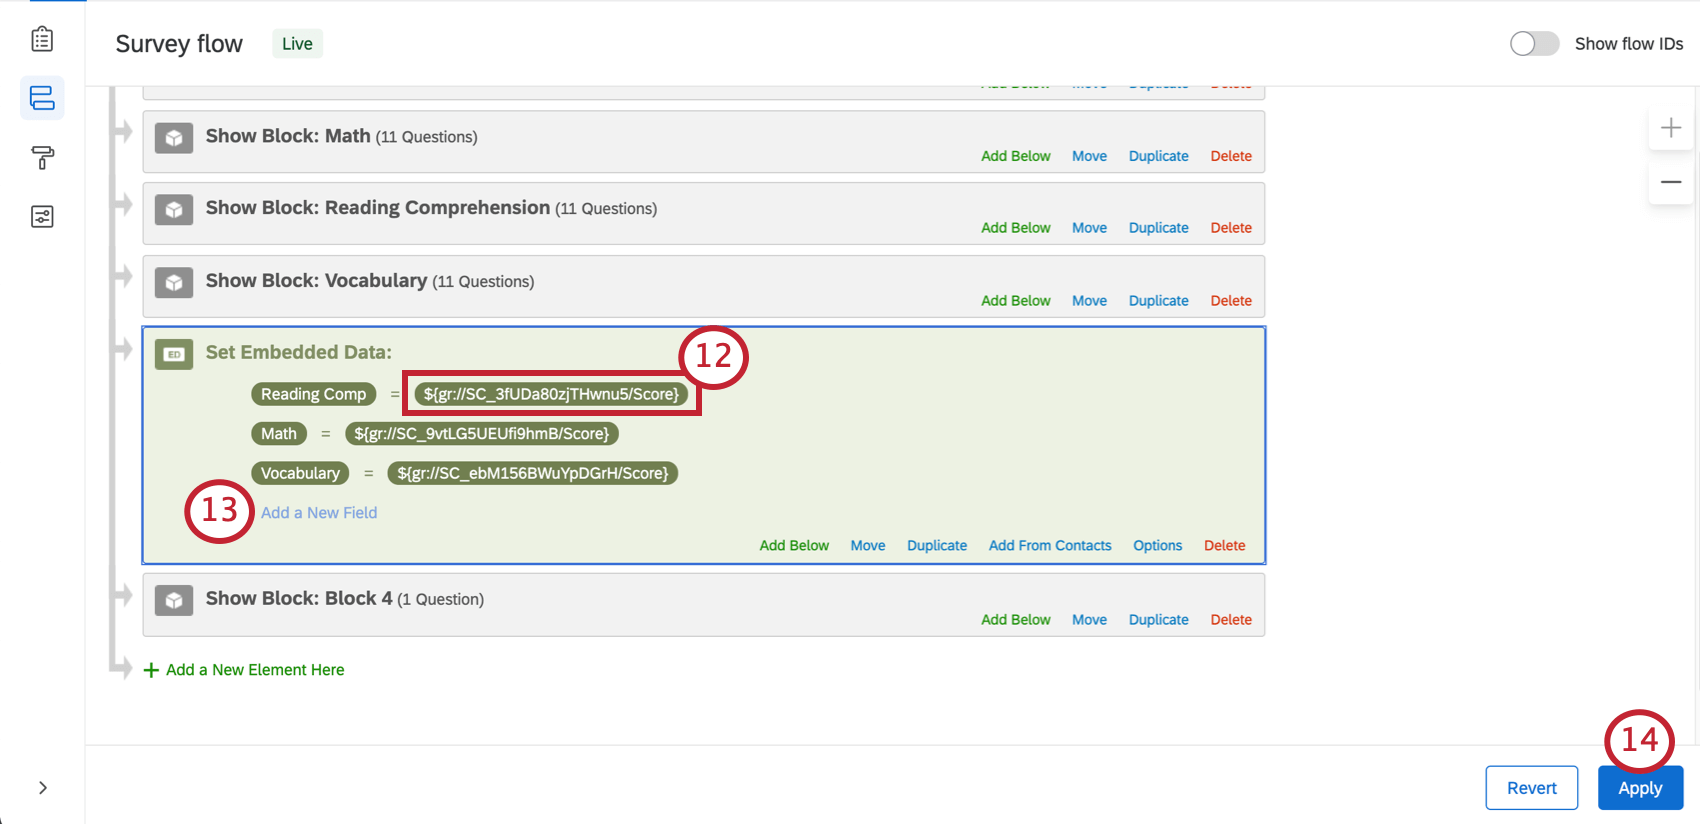
- Click Add a New Field. Repeat steps 9-13 for each scoring category you have.
- Click Apply when you’re done.
- In your new, final block, click the Add a new question button.

- Choose Text / Graphic.
- Click on the text / graphic’s content.
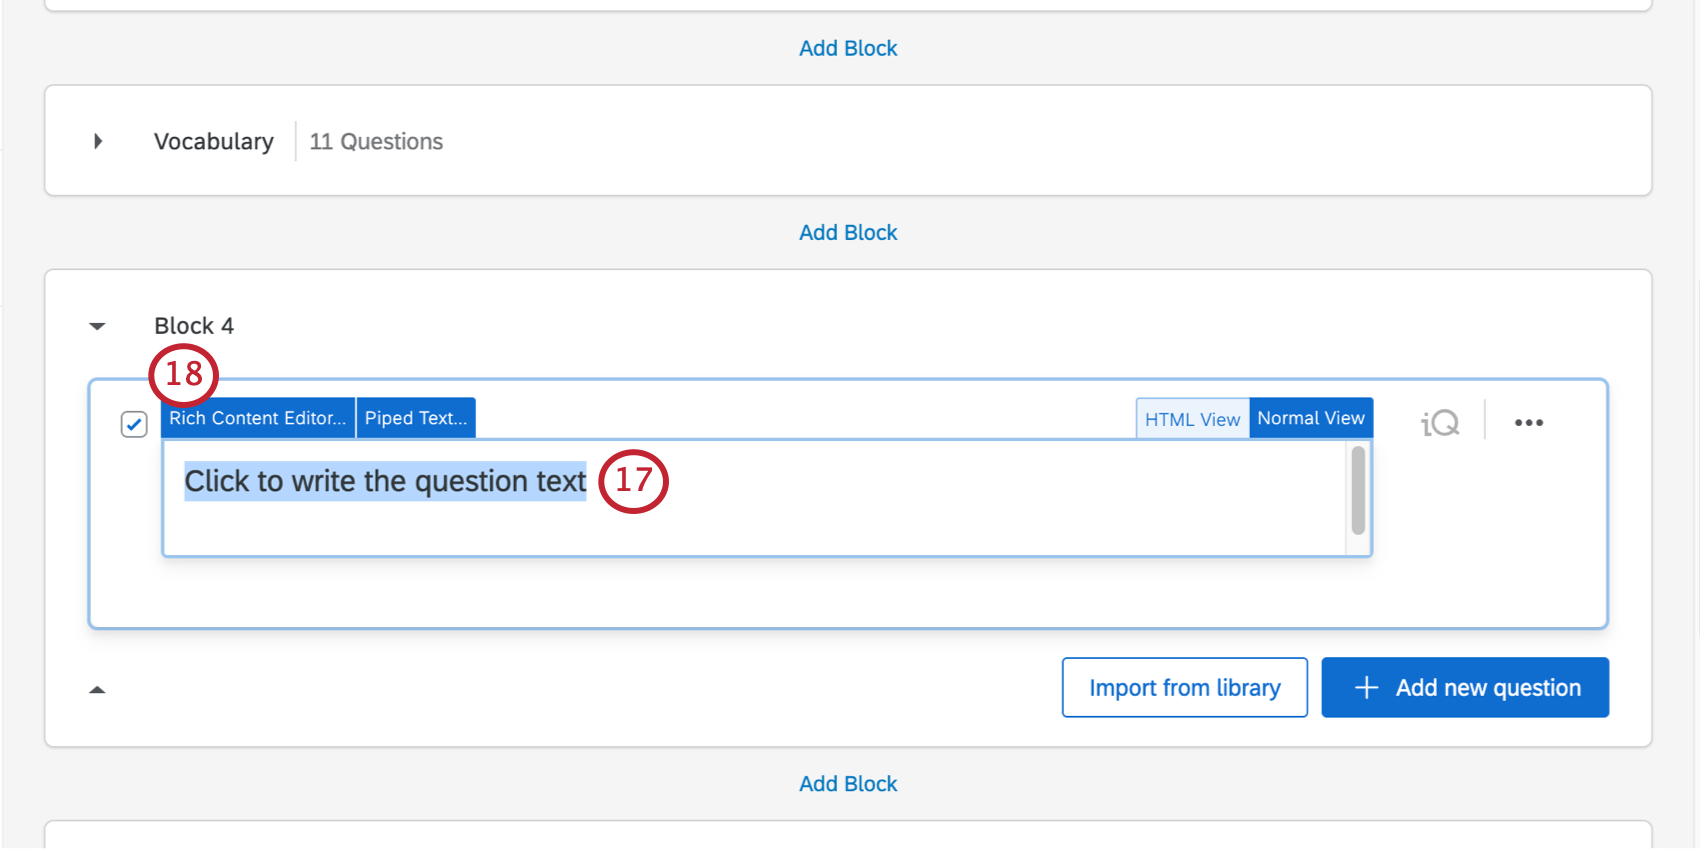
- Click Rich Content Editor.
- Write your first message here.
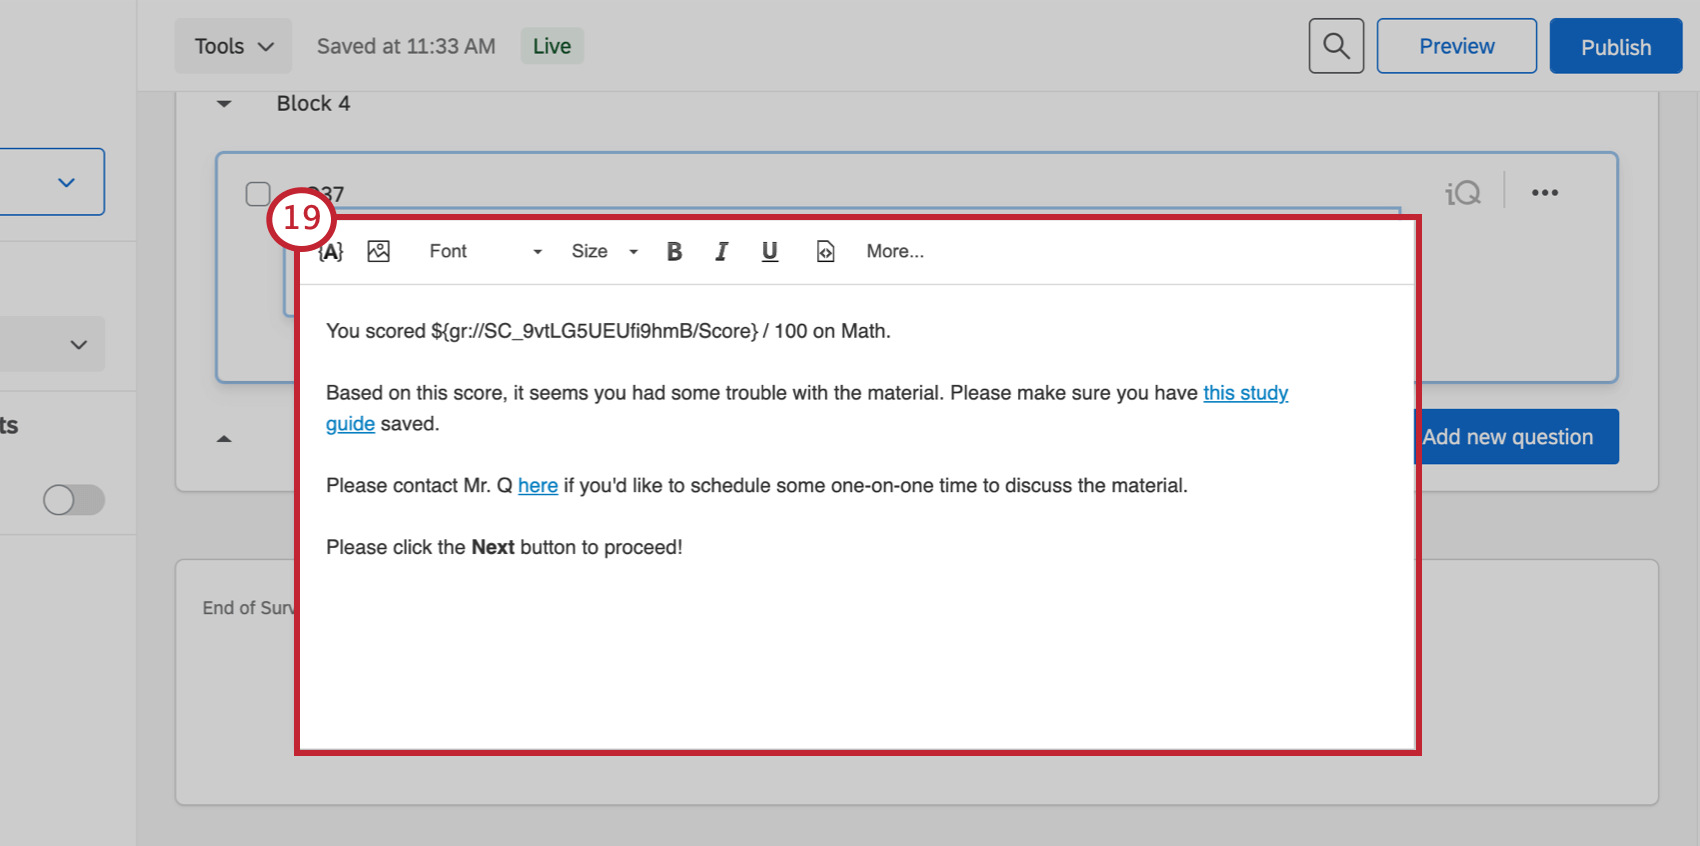 Here are some general guidelines:
- Use the piped text button ( {a} ) to display the respondent’s score.
- If you want to give the maximum score (eg., you scored X/100), you will have to manually type this value.
- To learn more about adding font effects and images using the Rich Content Editor, see the linked support page.
- If you want to use similar messages in different surveys, make sure you adjust the Piped Text.
- You must instruct the students to click the “Next” button.
- Select Display logic.
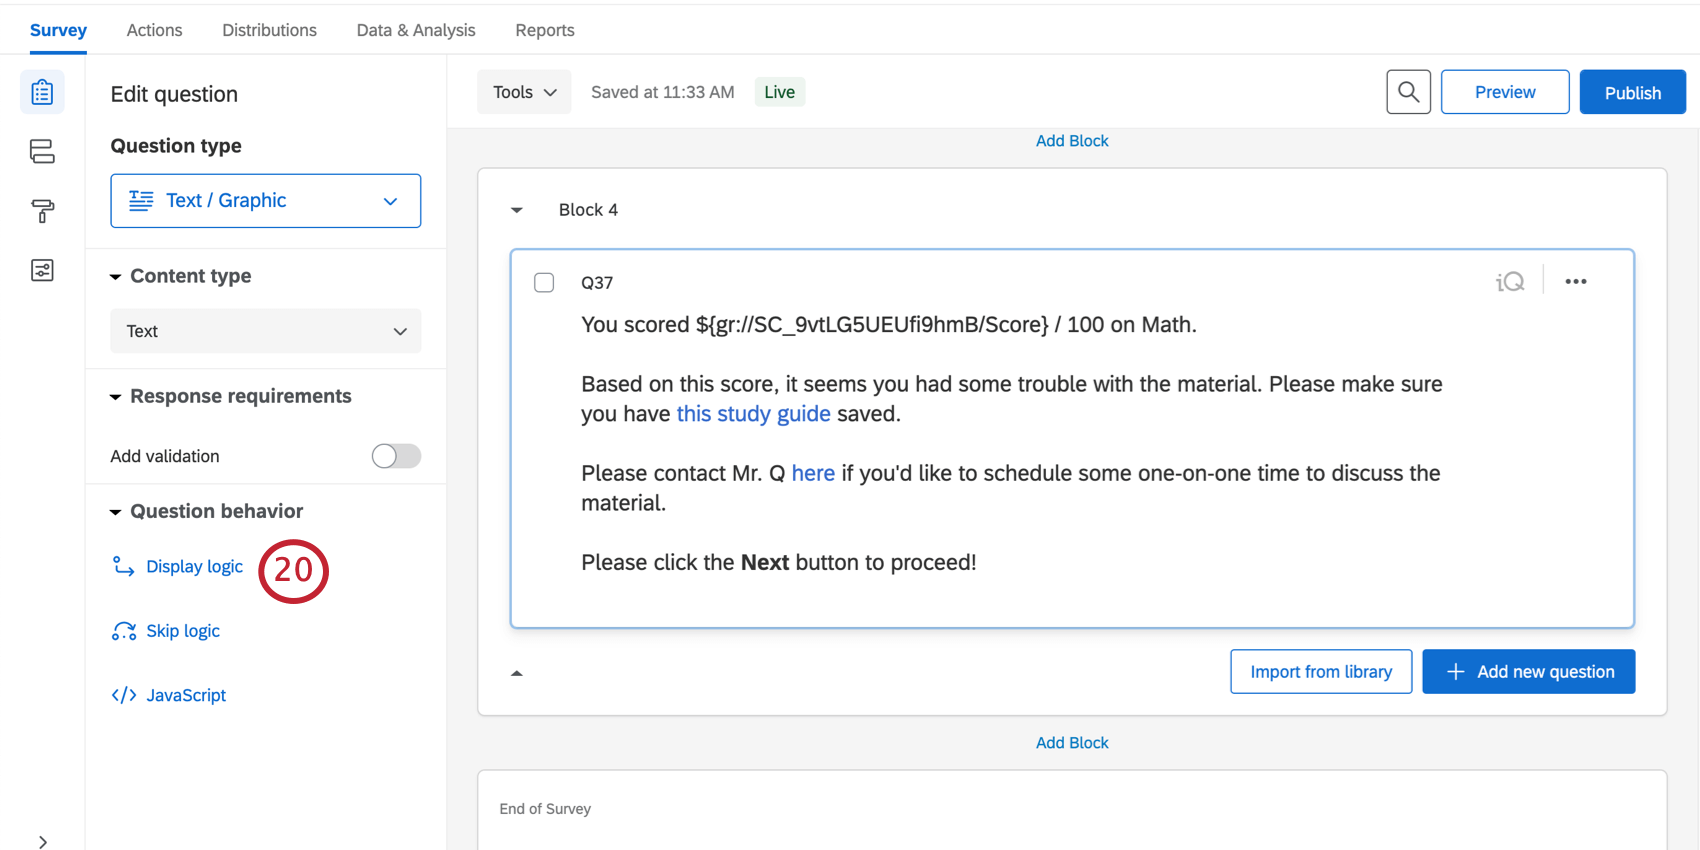
- Select Embedded Data from the first dropdown.
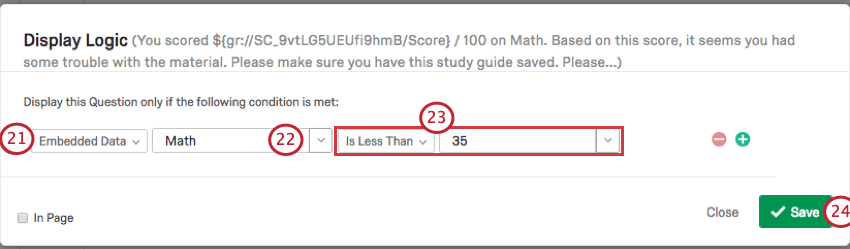
- Enter the name of the category (eg., Math) the message is for. You may use the dropdown arrow.
- Type a value, and choose whether this is less than, greater than, equal to, etc. Here, we set it up to be “Less Than or Equal to 35.”
- Click Save.
- Repeats steps 16-25 for every category and every scoring range you’d like to create a special message for.
Respondents will only see messages relevant to them. For example, if I score well on math and vocabulary, but poorly on reading comprehension, I will see three different messages, one for each category.
Respondents’ scoring messages will be on separate pages, and the respondent will have to click Next to read each score and submit the survey.