-

Qualtrics Platform -

Customer Journey Optimizer -

XM Discover -

Qualtrics Social Connect
Pulling Data Into a Second Survey (Longitudinal Surveys)
About Pulling Data into a Second Survey
Longitudinal research can involve following up with the same respondents later, in addition to retaining previously provided data about the same respondents. For example, you can use randomly generated IDs to link responses in an anonymous study. As another example, you can carry over certain information respondents have already filled out, such as an email address; the email will be presented to them in the second half of the study, and they can either leave it alone, or change it, if their email has updated.
This support page will explain how to connect data in two different surveys, so that the second survey prepopulates with certain information for the same respondent. You must follow the directions in every section of this support page to successfully complete your project.
Listing Your Fields
This project involves two different surveys and lots of different features. One thing that can help you stay organized is a list of the data you want to transfer from one survey to another. It’s important to think of short, intuitive names for each of these fields, because you will be using these shorthand names throughout the project. You also need to make sure spelling and capitalization stays the same throughout.
For example, let’s say you want to carry over someone’s employee identification number, the office where they work, and the department they work for. Your list might look like this:
- EmployeeNumber
- Office
- Department
You would then want to use these same names throughout. For example, you can’t use “Employee Number” and “EmployeeNumber” interchangeably. Choose one you prefer and stick with it.
First Survey Setup
- Create your first survey.
- Add all the desired questions.
- Go to the Survey flow.
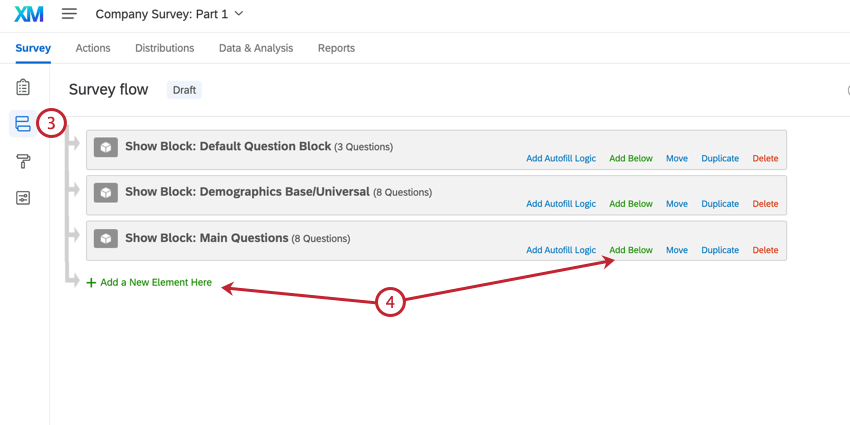
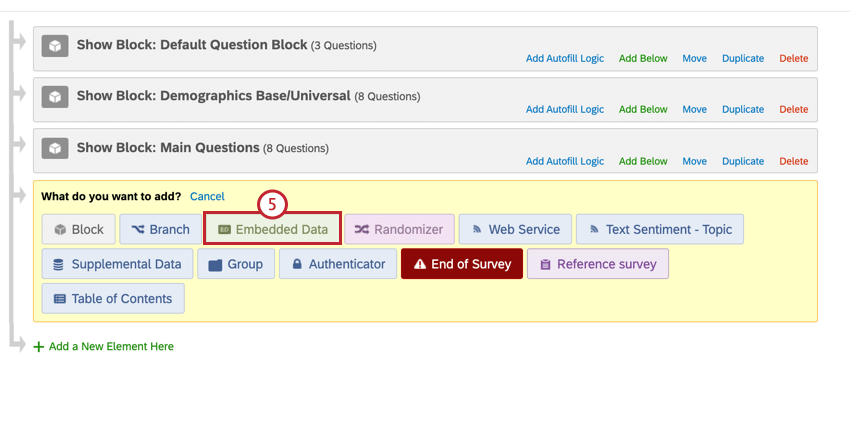
- Click Add a New Element Here or Add Below.
- Select Embedded Data.
- Click Move and drag this element to the top of the Survey Flow.

- Name this element Login ID. This is going to be the key to linking the two surveys.
- Click Set a Value Now
- Set the Login ID equal to a random number by selecting Insert Piped Text, Random Number, entering the range, then clicking Insert.
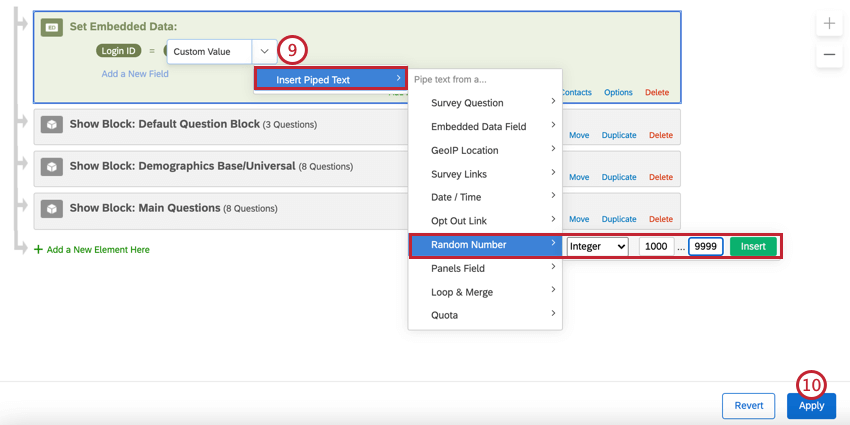 Qtip: The best random number ID is 5 characters or more, decreasing the chance respondents can be randomly assigned the same ID. To learn more about generating random IDs, see Assigning Randomized IDs to Respondents.
 - Click Apply.
- Go to the Workflows tab.
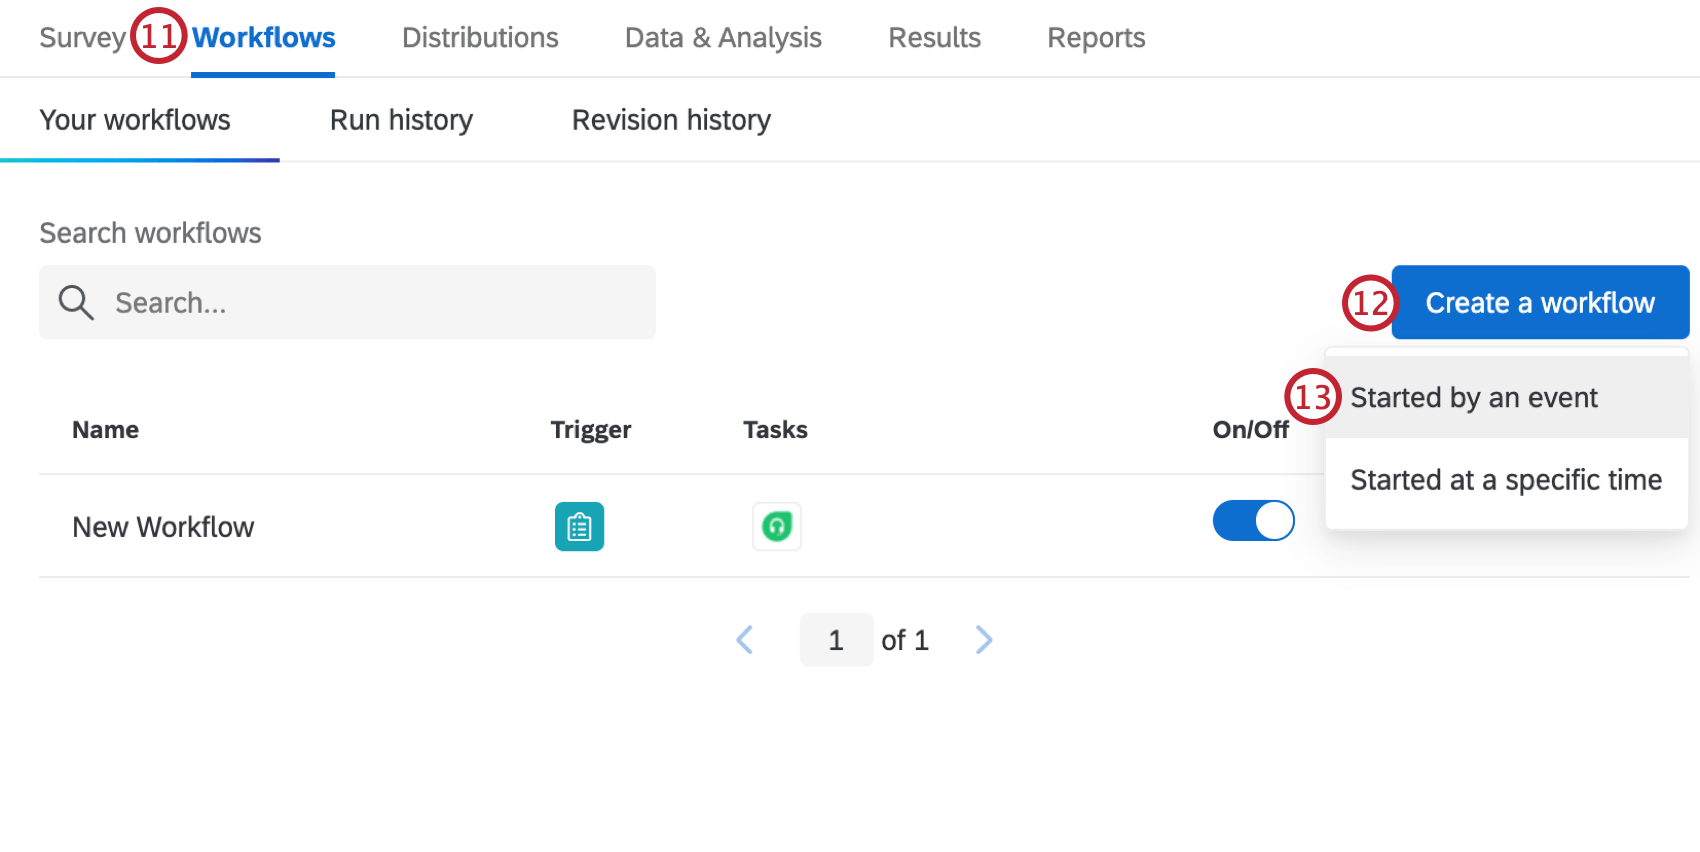
- Click Create a workflow.
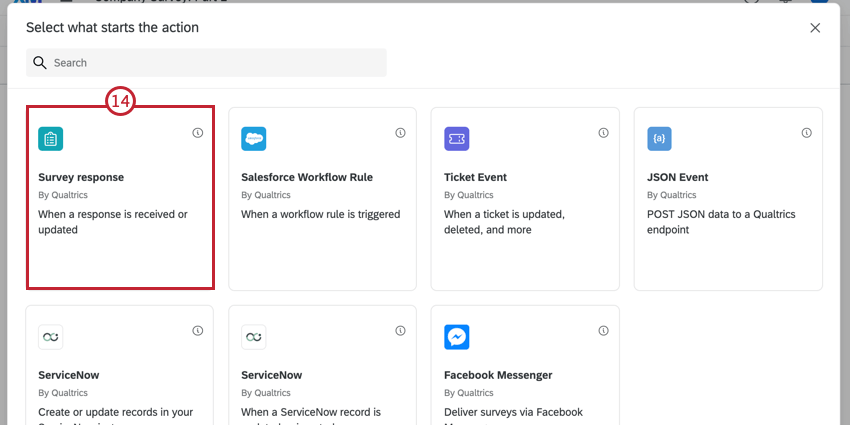
- Choose Started by an event.
- Select the Survey response.

- Choose Newly created responses.
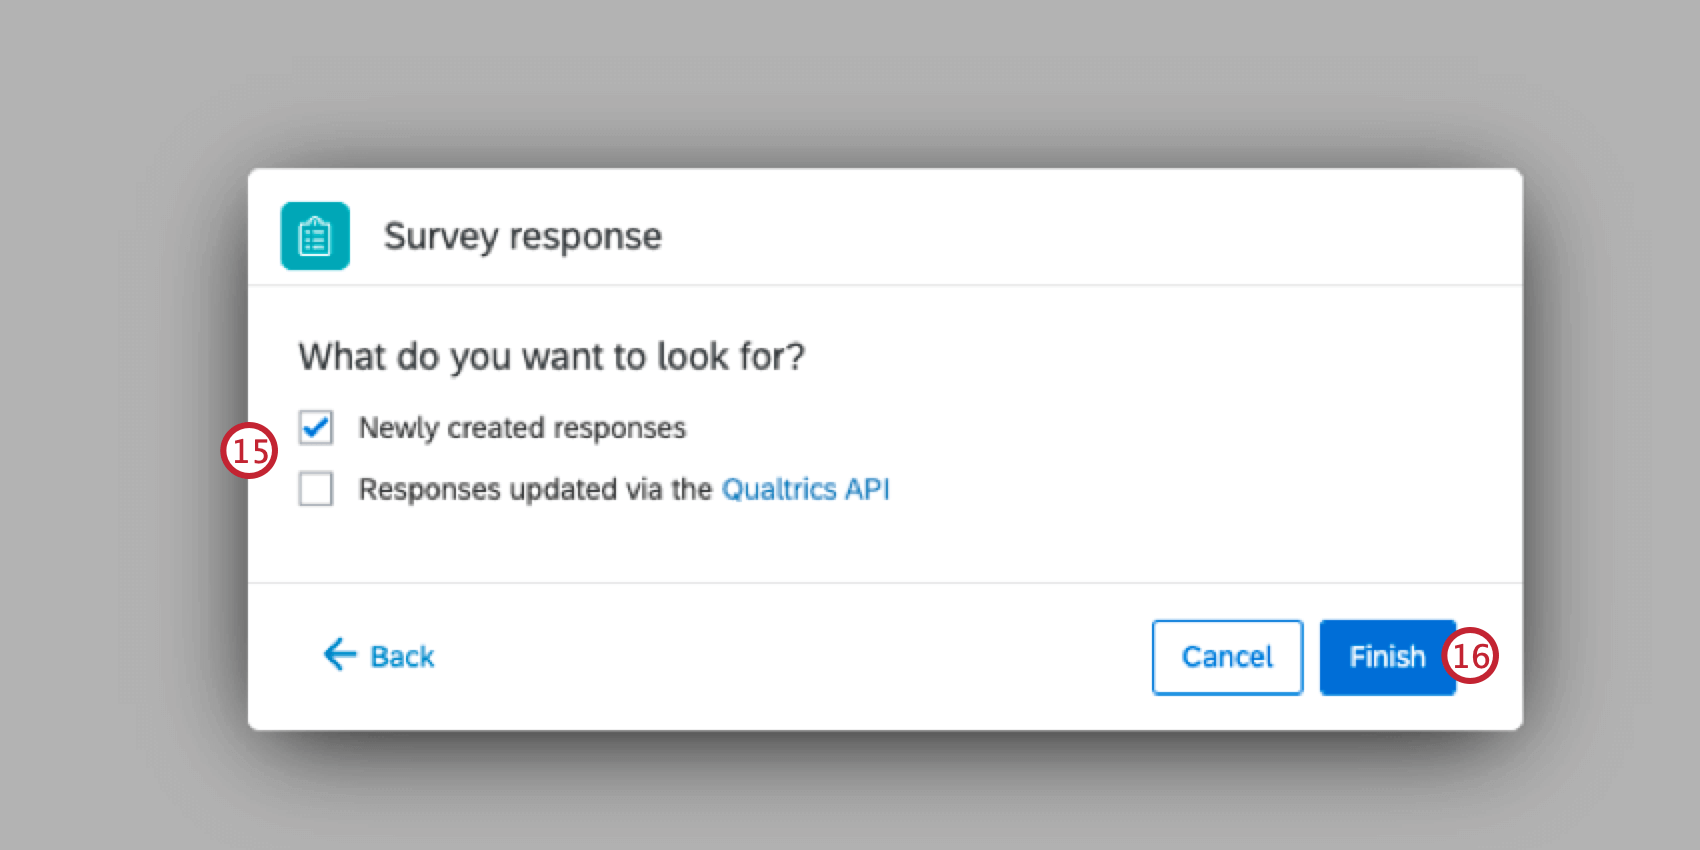
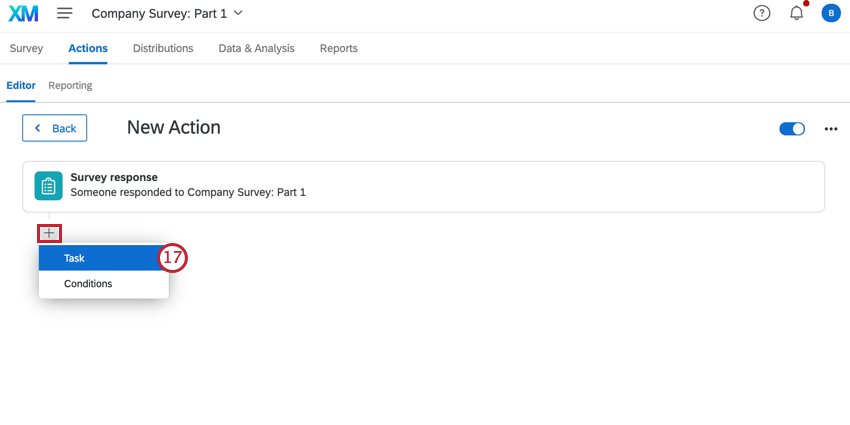
- Click Finish
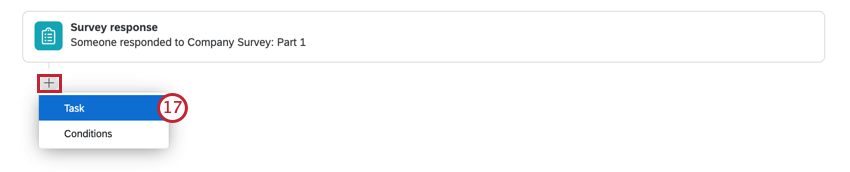
- Click the plus sign (+) and then Task.
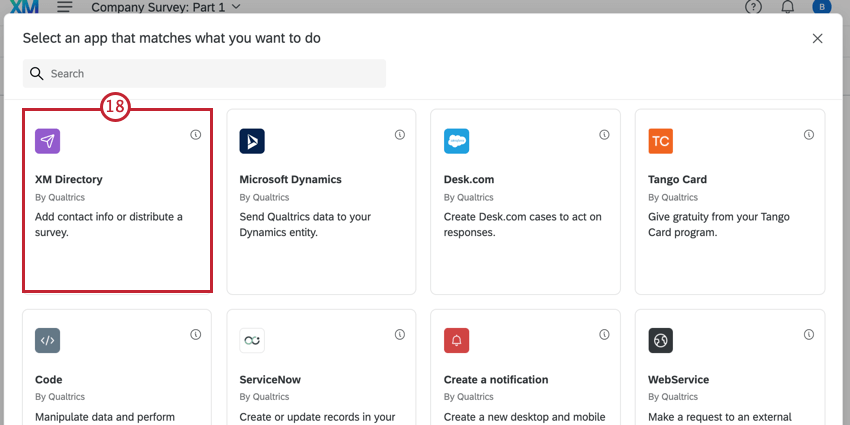
- Choose XM Directory.
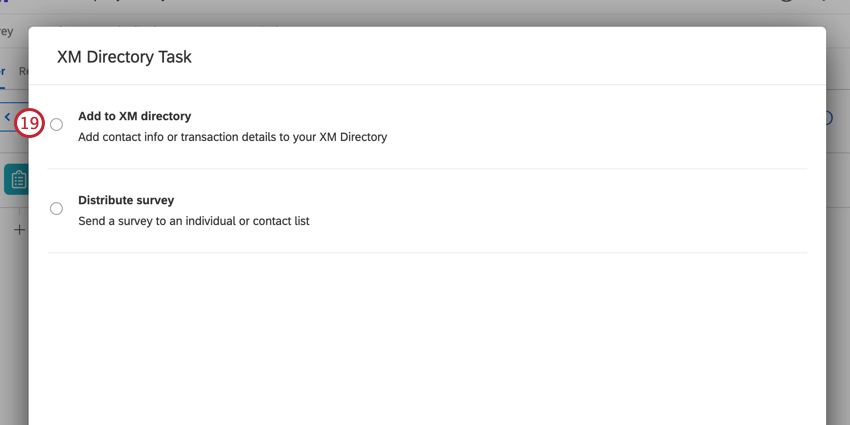
- Select Add to XM Directory.
- From the contact list dropdown, select the library with your name or your collaborating group’s name on it.

- Select New Contact List at the top.
- Name the contact list something you will remember later.

- Click Save.
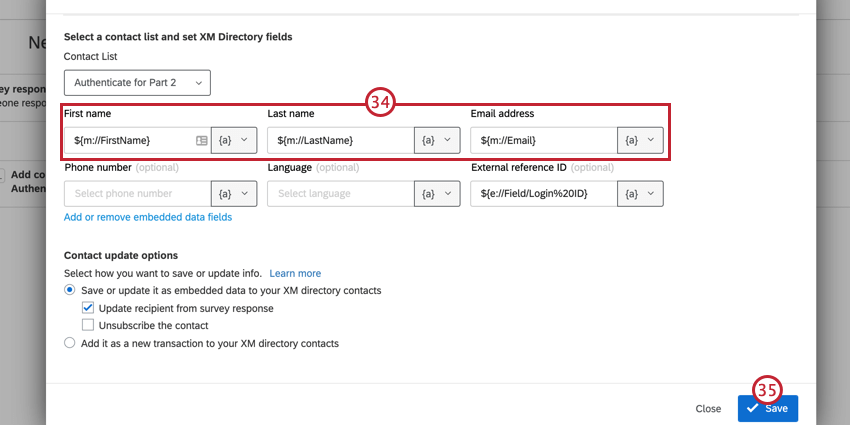
- Next to External Data Reference, click the Piped Text button ( {a} ) and select Embedded Data.
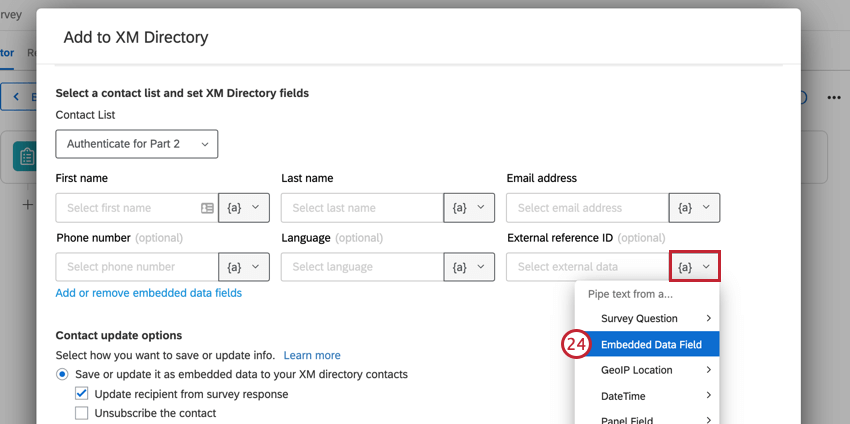
- Type in Login ID.
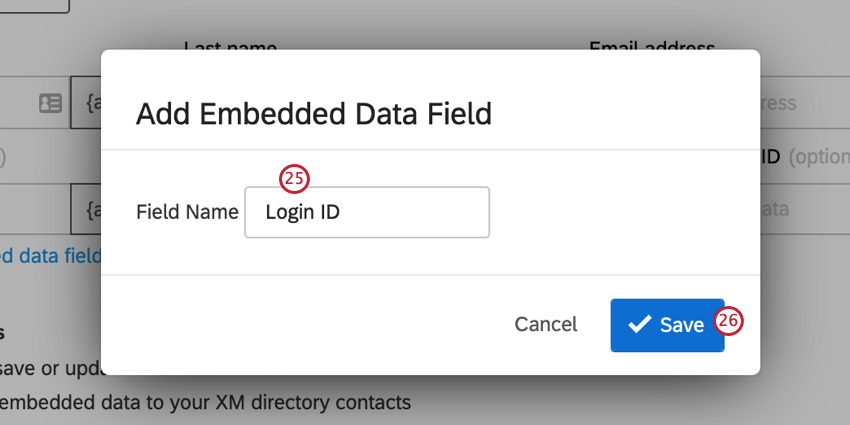
- Click Save.
- Click Add or remove Embedded Data fields.
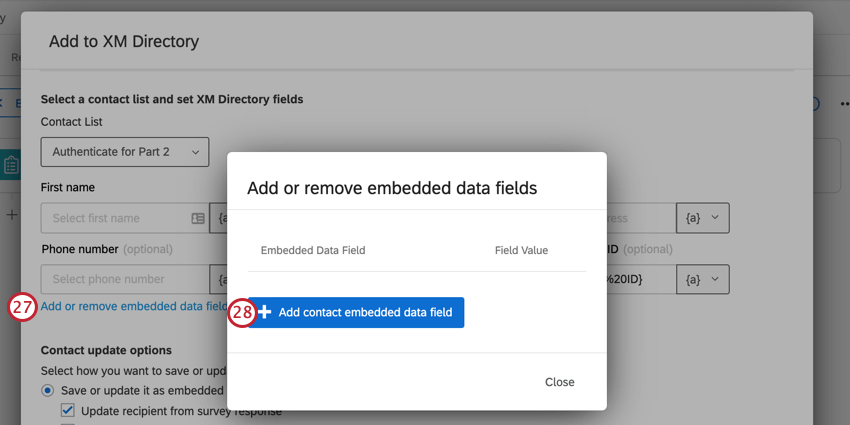
- Click Add contact Embedded Data field.
- Name one of the fields you are looking to move from survey one to survey two. In this example, we want to save the respondent’s Office.
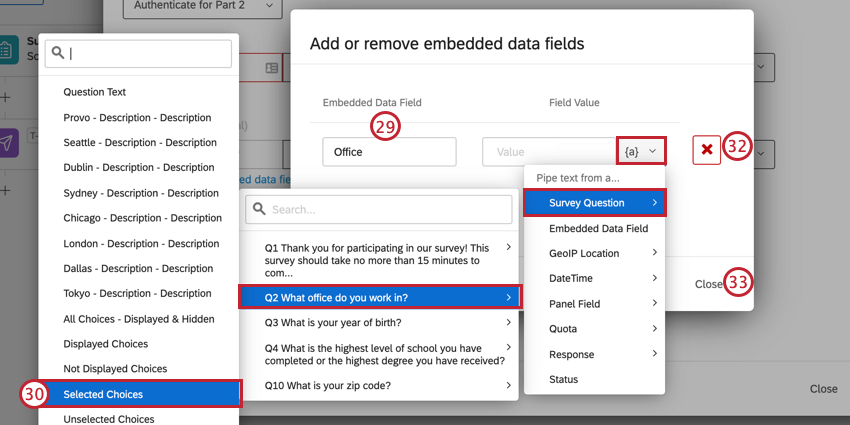
- Under the Field Value, click the Piped Text button ( {a}), hover over Survey Question, hover over the question where the respondent provides this information, and then choose Selected Choices if the respondent selected their answer, or the verbatim question text if it was an open-ended question where they typed a response.
- If needed, repeat steps 28-30 for any additional fields you want to move from one survey to the other.
- If you need to remove a field, click the red X.
- When you’re done adding these fields, click Close.
- If your survey is not anonymized, you can use the {a} button to specify where in the survey or contact list you will retrieve the respondent’s First Name, Last Name, and Email.
 Qtip: For more help on using XM Directory Task, see the linked support page.
 - Click Save when you’re finished.
Displaying the Login ID to User
Although the setup described on this support page doesn’t require that you show the respondent what their Login ID is, you may still want them to know this information, just in case. Using Piped Text for the “Login ID” embedded data field, you can show the Login ID to the respondent in several parts of the survey, including:
- An email task that triggers to the respondent after they complete the survey.
Qtip: You must already know or ask a respondent to provide their email address to use this option.
- An end of survey message.
- A question.
For more on displaying this information to respondents, see Assigning Randomized IDs to Respondents.
Second Survey Setup
- Create your second survey.
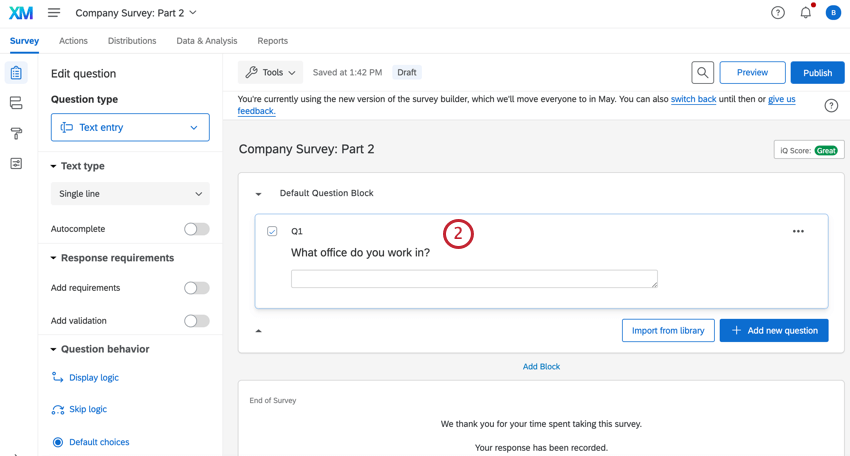
- Create a text entry question for each data point you want to bring over.
- Go to your Survey flow.
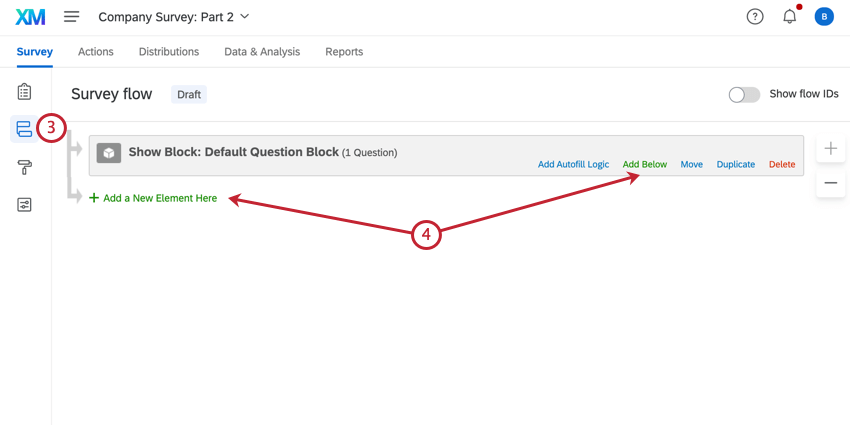
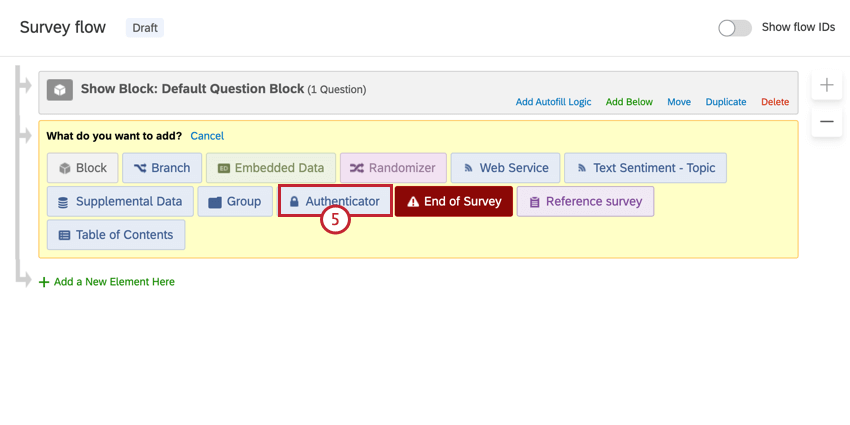
- Click Add a New Element Here or Add Below.
- Choose Authenticator.
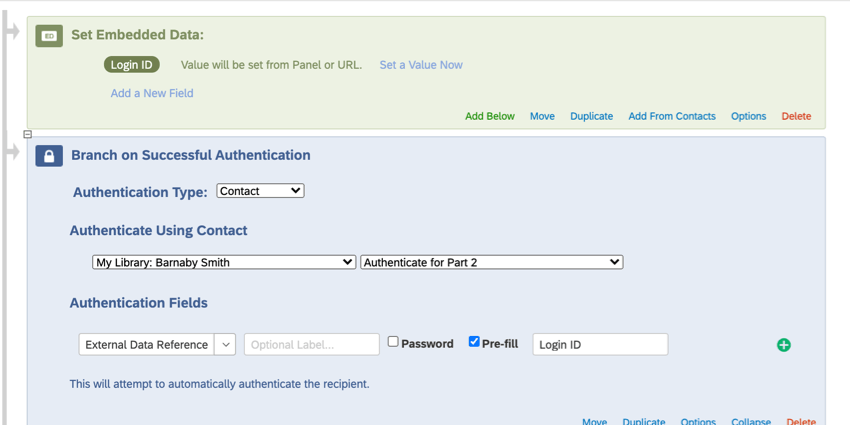
- Click Move on each element to drag it under the authenticator. If you have multiple blocks or branches in your survey, make sure they are in order.
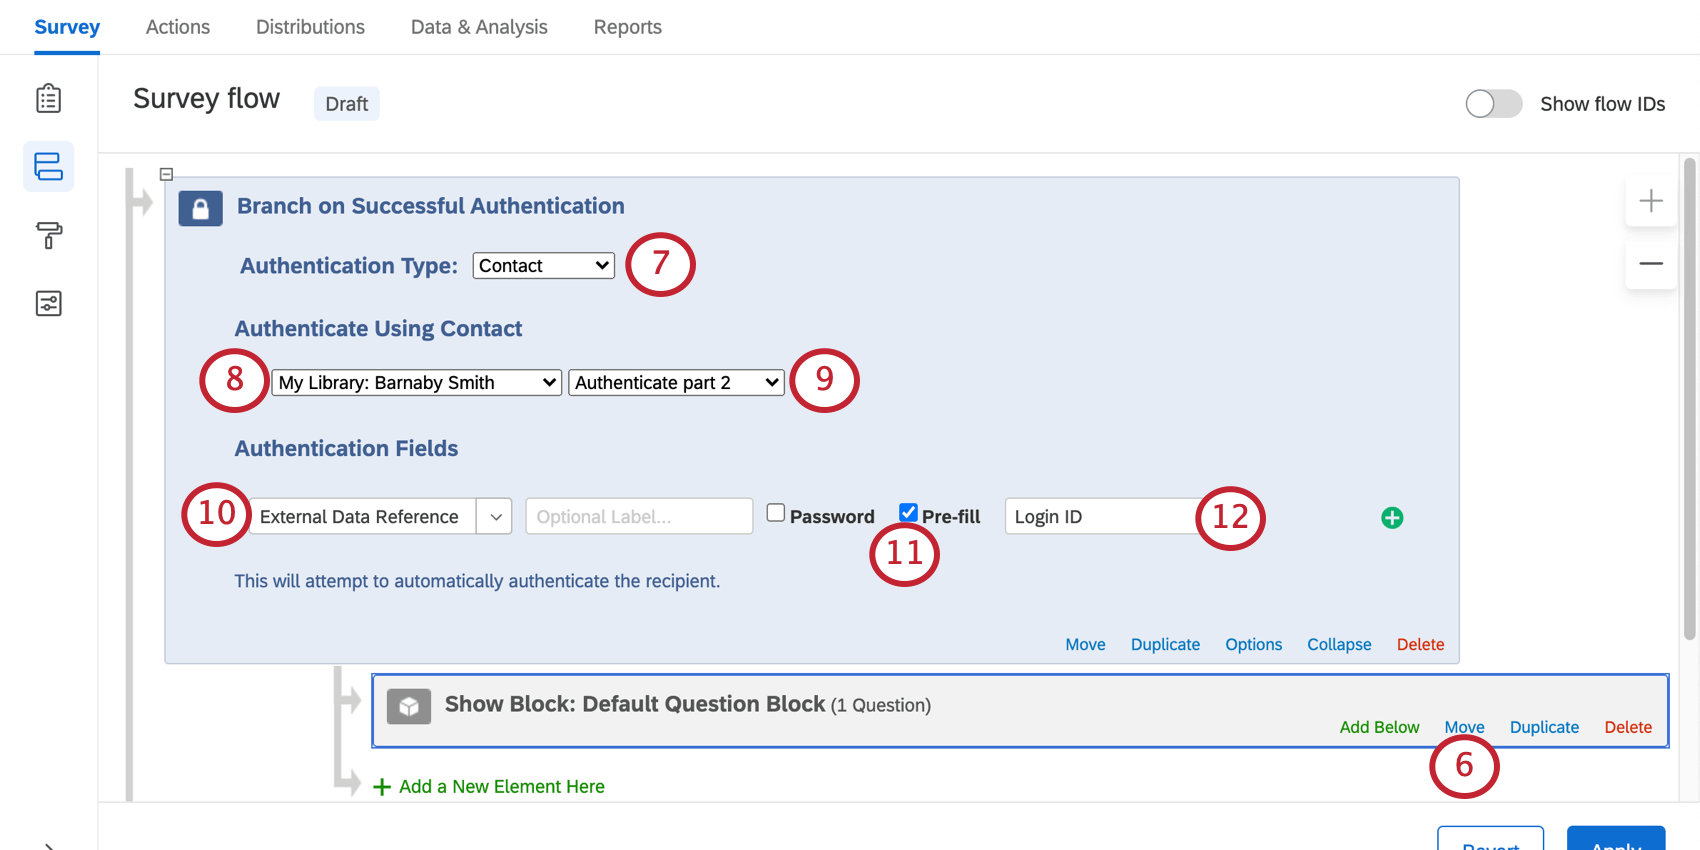
- Set the Authentication Type to Contact
- Select the library where you saved the contact list in the first survey.
- Select the same contact list you created for the contact list trigger. In this example, it is “Authenticate for Part 2.”
- Choose to authenticate by External Data Reference.
- Select Pre-fill.
Qtip: If a respondent uses the correct link to access a survey, this option assures they are automatically logged into the survey without having to remember or type their Login ID in.
- Type “Login ID.”
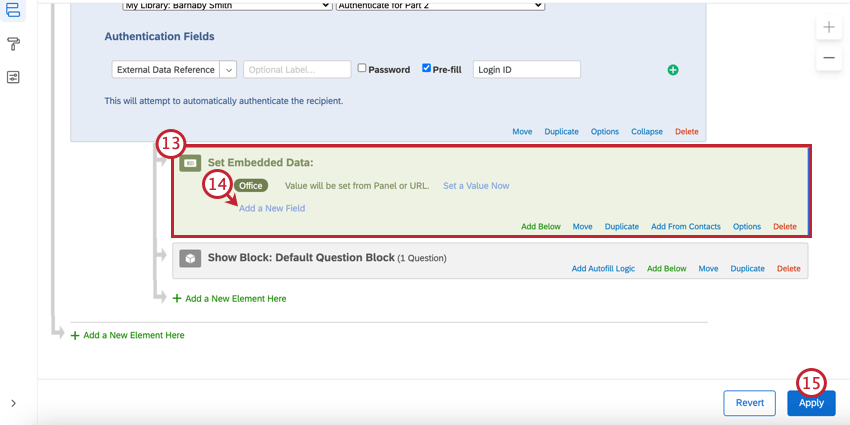
- Add an embedded data element nested under the authenticator. Make sure it is before other elements under the authenticator.
Qtip: You’ll also need to make sure you have an embedded data element before your authenticator to capture the Login ID field.
- Click Add a New Field and add each of the fields you are trying to move over. For example, we said we wanted to carry over everyone’s “Office,” so we have an “Office” field in the screenshot.
- Click Apply
- Navigate to the Survey builder.
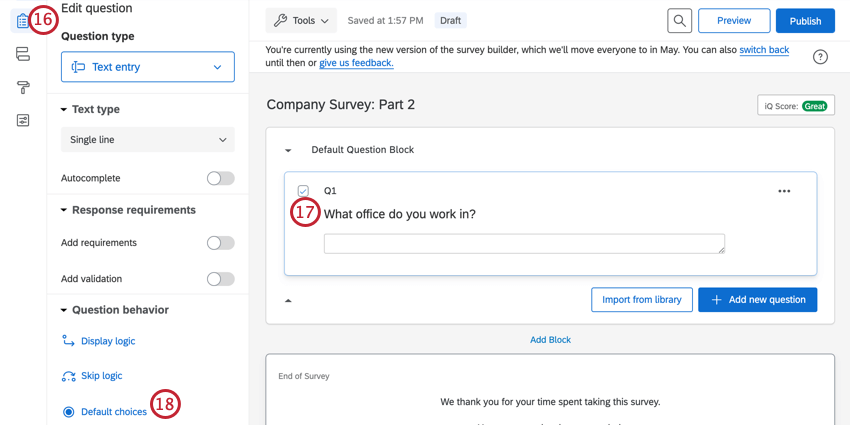
- Select your text entry question.
- Click Default choices.
- Click the dropdown arrow.
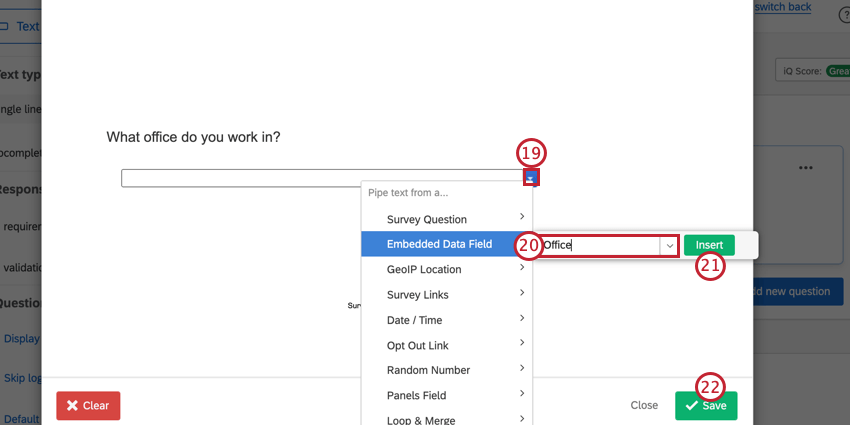
- Select Embedded Data and enter the name of your embedded data field in the box. You can also use the dropdown menu to select a field from a list of available fields.
- Click Insert.
- Click Save.
- Repeat Steps 17-22 as needed.
Distributing the Second Survey
In order to connect the data from your first survey to your second survey, you need to do two things: build the right link using query strings, and distribute the second survey directly from the first.
Building the Survey Link
- In your second survey, navigate to the Distributions tab.
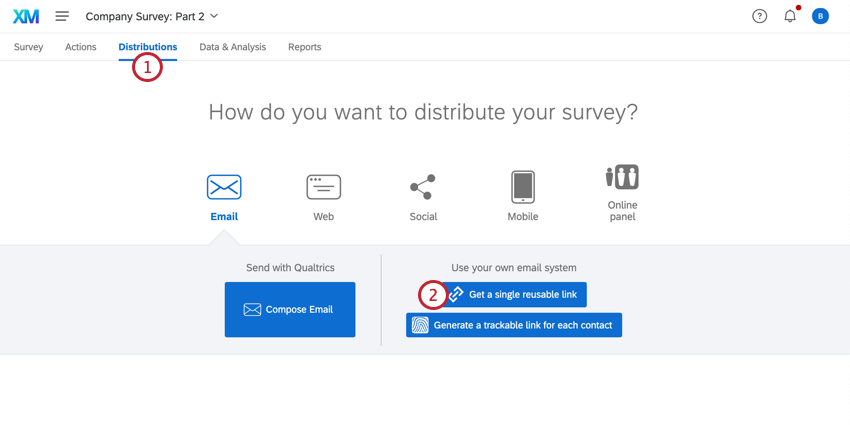
- Select Get a single reusable link.
- Copy the link from the anonymous survey link section.
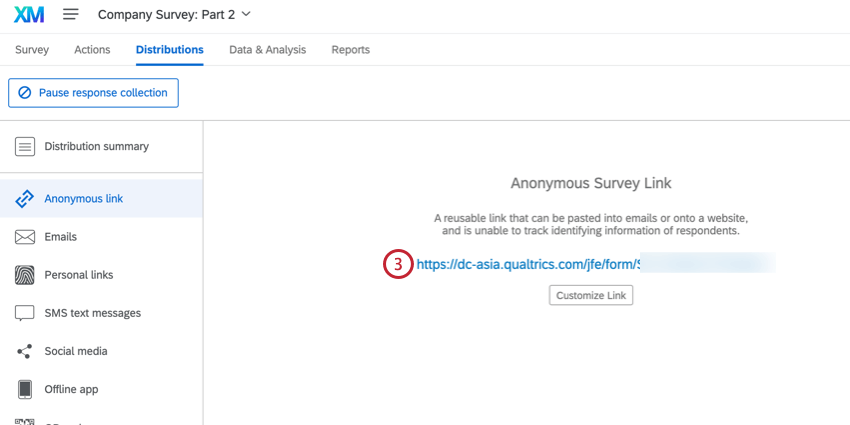
- Paste the link into a Word document, Google Doc, Notepad, or other app where you can make some quick edits. It should look like this:
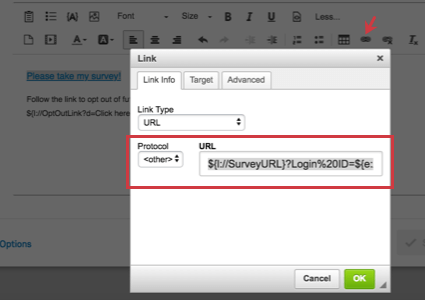
https://survey.xx1.qualtrics.com/jfe/form/SV_XXXXXXXXXXXXXXX - At the end of the link, add a question mark ( ? ).
- Add the following (bolded):
https://survey.xx1.qualtrics.com/jfe/form/SV_XXXXXXXXXXXXXXX?Login%20ID=${e://Field/Login%20ID}
Qtip: If your survey has been translated into multiple languages, it’s possible to specify which language a respondent gets when they open the survey using query strings. You can add the language field onto the end of the link, using the below text:
&Q_Language=XX
Instead of XX, add your language code of choice.
Connecting the Surveys
Using the link you created above, you have several options for distributing your second survey.
- Email task: Distribute the second half of a study to the participant based on hours / days since they finished the first half. Remember, although you’re linking to the second survey, you must add the email task to the first survey!
- XM Directory task: Distribute the second half of a study to the participant based on days / months since they finished the first half. Remember, although you’re linking to the second survey, you must add the XM Directory task to the first survey!
Qtip: XM Directory tasks won’t let you save them if you don’t have special piped text in them. For your link to the second survey, you will need to copy your query string and put it on the end of the “Survey URL” piped text to link to the survey, like this:
${l://SurveyURL}?Login%20ID=${e://Field/Login%20ID}You can also copy this exact piped text and use it as a hyperlink in your XM Directory task.
- Redirect to URL at End of Survey: When your respondents finish the first survey, they will be immediately redirected to the second survey. Remember, although you’re linking to the second survey, you must add the redirect to the end of the first survey!
Qtip: This feature is not available for free accounts.
- Posting Your Link: Did you display the Login ID to the participant? Do you expect them to remember this ID? After the first part of the study is complete, you can paste the second survey’s link to a website, send it to an email group, or post it wherever you know the participants will see it. Respondents can then use their Login ID to “log into” the second survey.