-

Qualtrics Platform -

Customer Journey Optimizer -

XM Discover -

Qualtrics Social Connect
Recoding Data Mapper Fields (CX)
About Recoding Dashboard Fields in the Data Mapper
CX Dashboards allows dashboard editors to recode Text Set, Multi-Answer Text Set, and Number Set data under the Dashboard Settings. Recoding allows you to group data or change how it appears in CX Dashboards widgets – for example, by conveniently shortening how choices are labeled, and changing text to numbers.
Recoding Fields
Qtip: The default Recode Editor appears for the following field configurations:
- Text Sets that did not originate as open-ended fields (e.g., no Text Entry questions).
- Number Sets that did not originate as open-ended fields (e.g., no Text Entry questions).
- Multi-Answer Text Sets that did not originate as open-ended fields (e.g., a Multi-Answer Multiple Choice question).
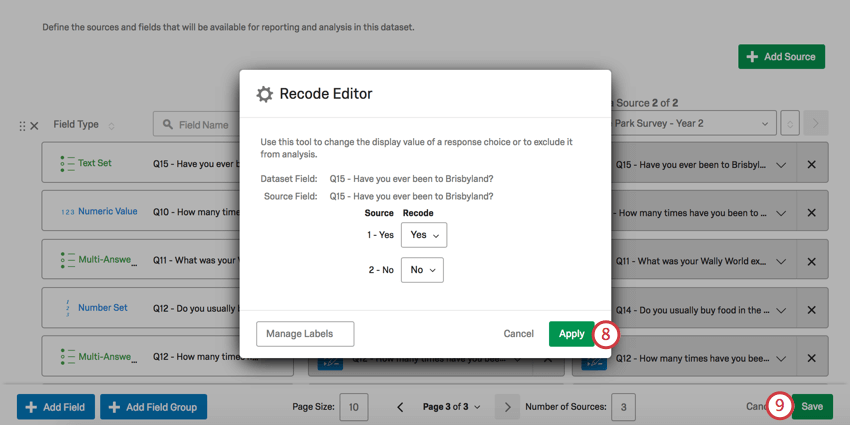
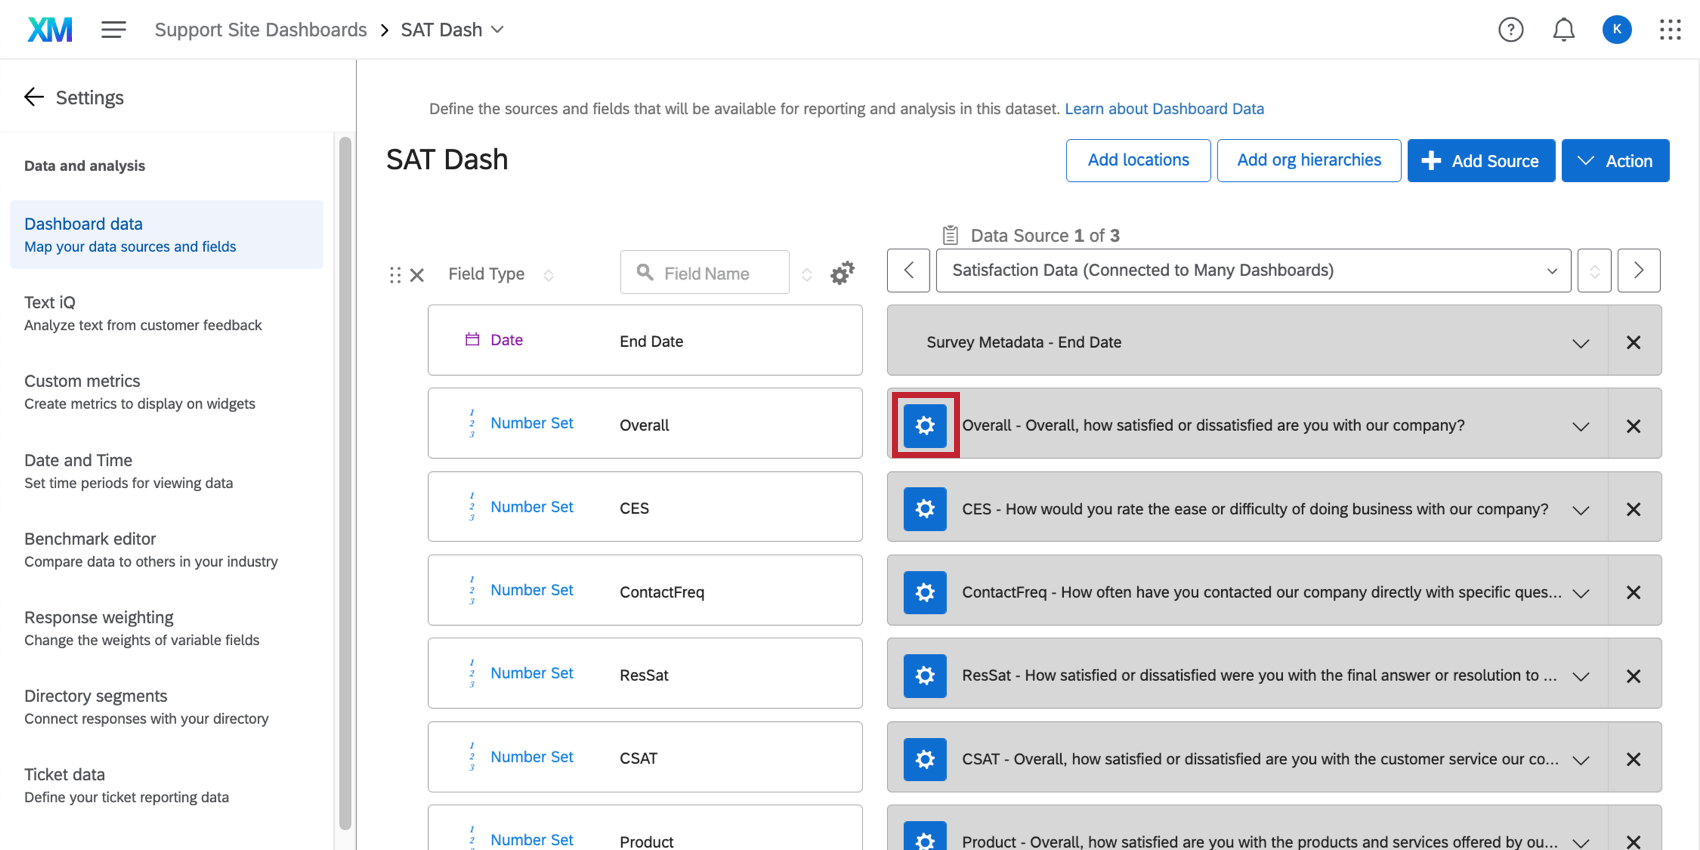
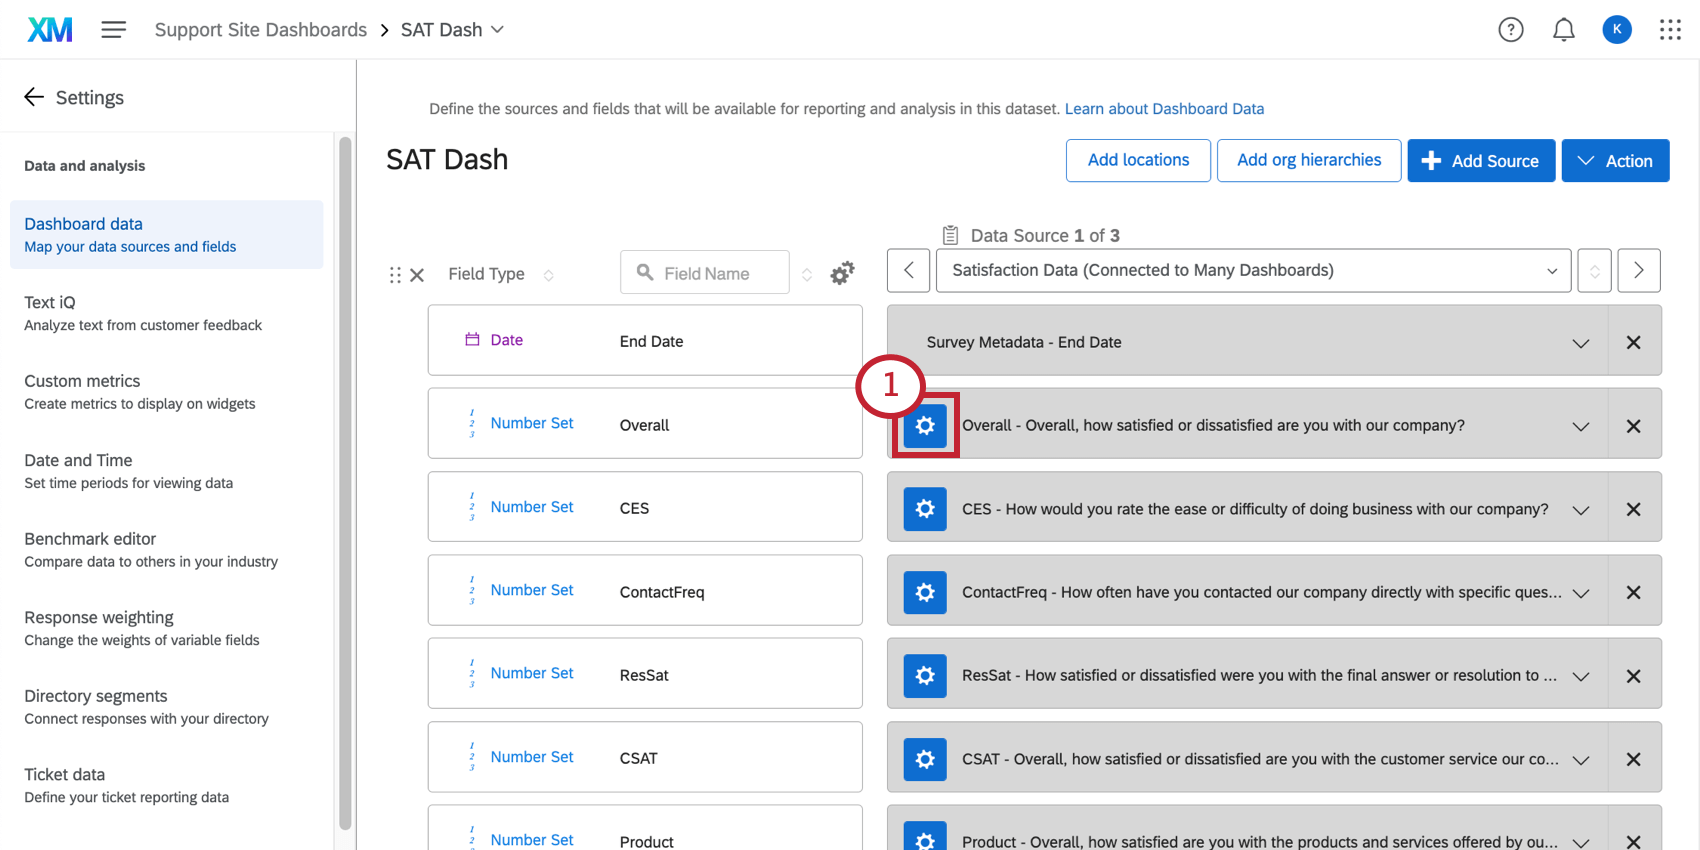
- In your Dashboard Data settings, click on the recode value gear.
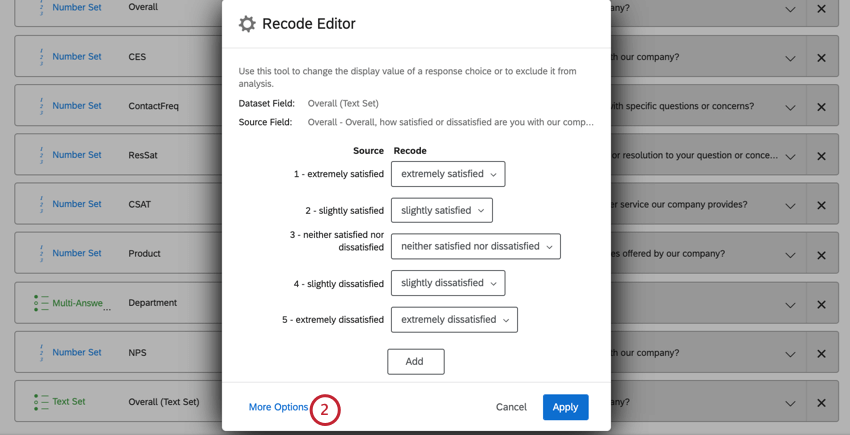
- Use the Recode dropdown to make sure the right answers are aligned, or to exclude the option from analysis. If an option is excluded from analysis, it will be hidden and ignored in the dashboard. For example, marking a field as exclude from analysis will remove the field from metric calculations, dashboard exports, widgets, etc. This option does not remove the entire associated response from the dashboard — it only hides the selected field value.
 Qtip: Note that the recode values are limited to the Field Type that you have designated. For example, if you want to recode NPS scores to NPS groups, the Field Type must be Text Set instead of a Number Set because the Recoded Values will be text instead of numbers.Attention: When recoding Text Sets or importing recode values for Text Sets, you will see numeric values. These values are choice IDs, or internal IDs given to each answer choice when it was created. These IDs are assigned chronologically and aren’t reset when an answer choice is deleted, so there may be gaps in the choice ID numbering for a question.
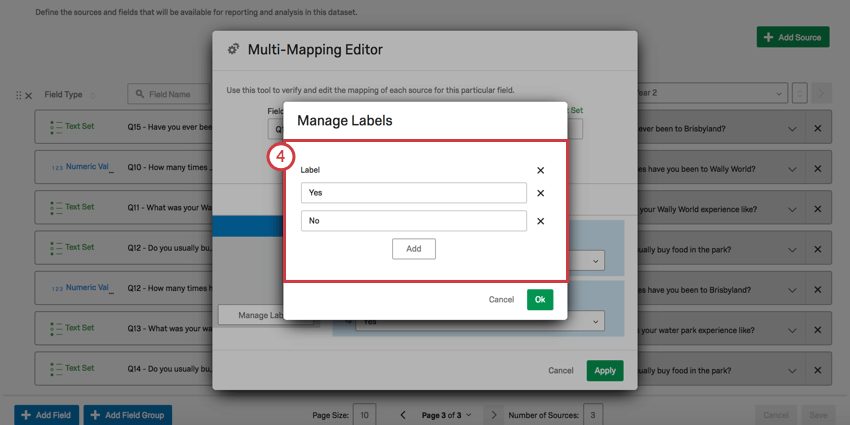
 - Click Manage Labels.
- Here, you can change the spelling and wording of options’ labels.
- Click Add to add a new option and label it.
- Click the X next to an option to remove it.
- Click OK.
- Click Apply to finish recoding.
- Click Save.
Qtip: Only Text Sets, Multiple-Answer Text Sets, and Number Sets can be recoded.
Recoding Open-Ended fields as Text Sets or Number Sets
When you’re mapping an open-ended field to a Text Set or Number Set, you will not see the recode editor described above. Instead, you will see two columns.
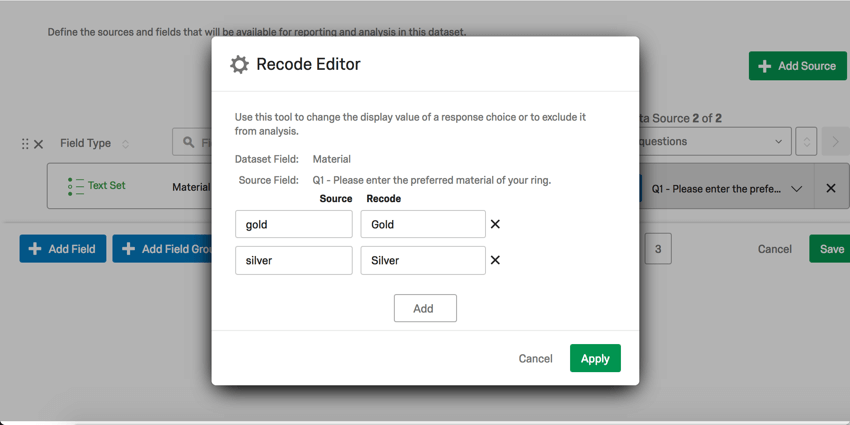
- The Source column refers to the exact text of answers provided in the data. For example, if this was a question asking people what material they want their jewelry to be, answers might include “Gold” or “Silver.”
- The Recode column refers to how you want this data to be labeled when it appears in dashboard widgets.
Managing Delimiters
When you’re mapping an open-ended field (such as a Text Entry question or an Embedded Data field) to a Multi-Answer Text Set, you have the option to define a delimiter in the Recode Editor. A delimiter is meant to determine the division between different answers entered into an open-ended field. For example, if you’ve asked respondents to list the names of their children separated by commas, then the delimiter would be a comma.
- In Dashboard Data, click the gear icon.
- Click the pencil icon to choose a delimiter.
- Use the dropdown menu to select a delimiter.
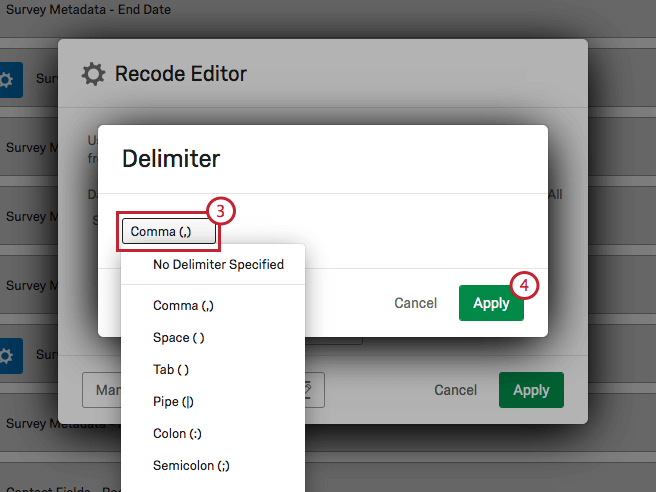
- Click Apply to save your changes.
Importing Recode Values
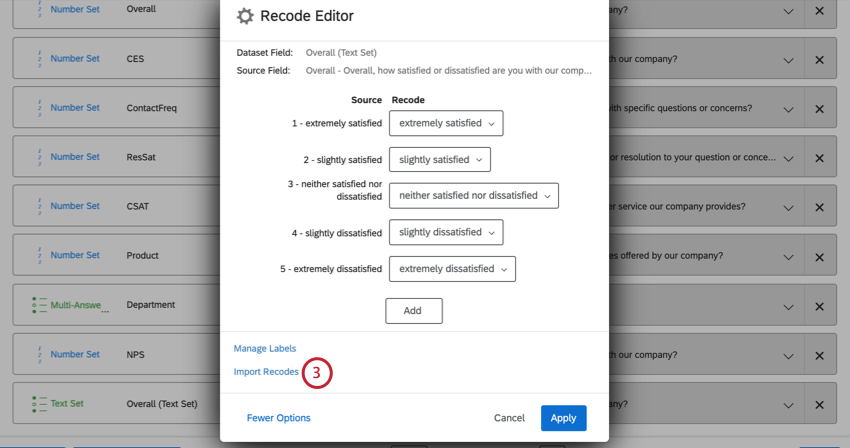
The Recode Editor allows you to import recode values into your mapped fields. This is useful if you have many values you’d like to recode, or if you’re recoding the same field across multiple data sources.
- In your Dashboard Data settings, click the recode value gear.
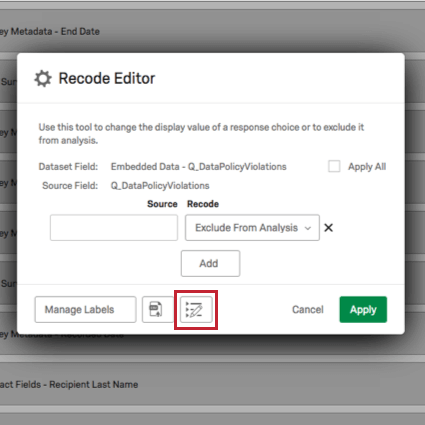
- Click More Options.
- Click Import Recodes.
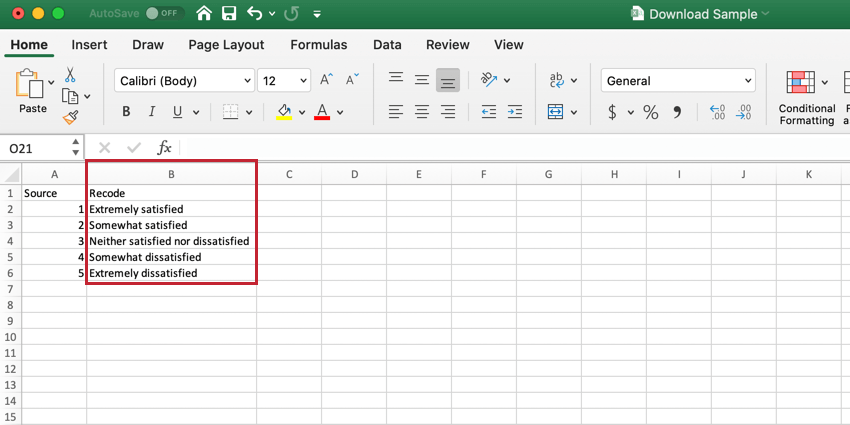
- Download the Example CSV file. This file contains the current recode values for your field.

- Open the CSV file on your computer and define your recode values.
 Qtip: If you leave a recode value blank, the answer choice will recode as Exclude From Analysis.
 - Click Browse files and select the CSV file.
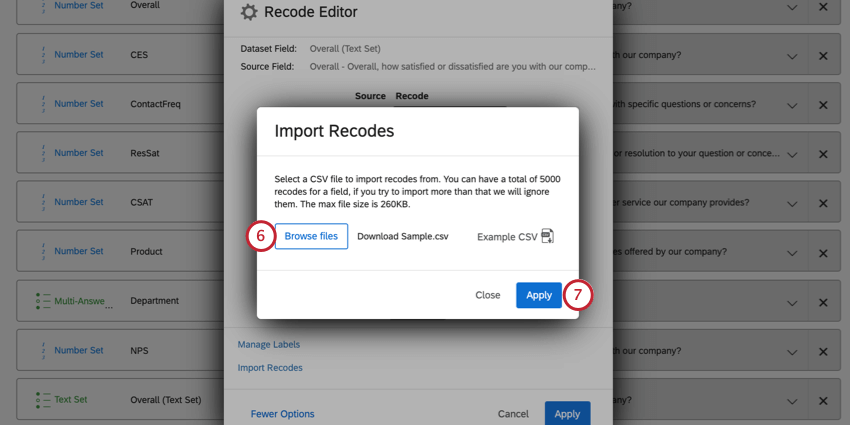
- Click Apply.
- Double check that your fields are recoded properly.
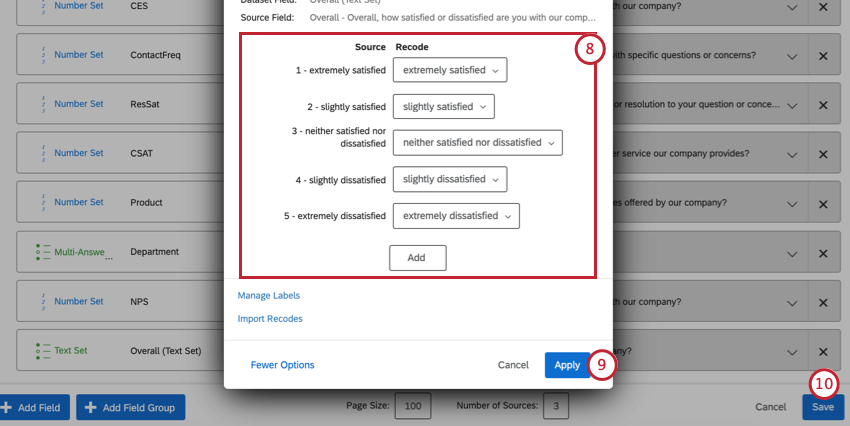
- Click Apply to finish recoding.
- Save your changes.
Grouping Fields
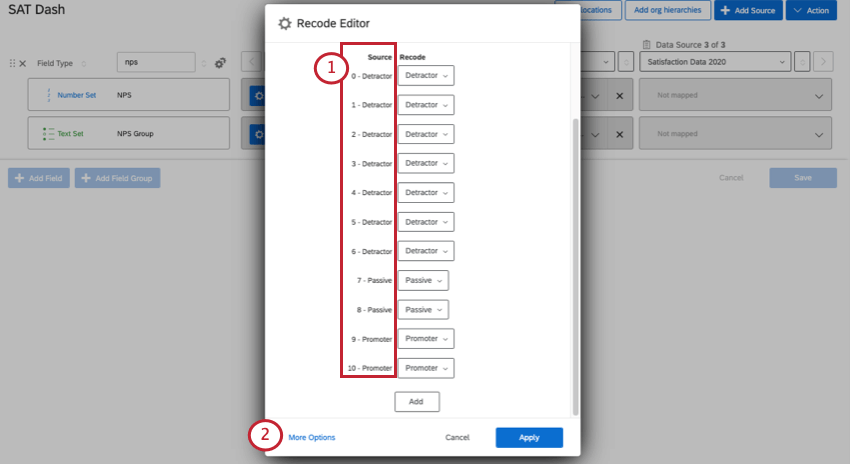
One of the most common use cases for recoding values is to group similar choice options together. For example, all NPS questions are rated on a scale from 0-10, and from this scale respondents are grouped into Detractors, Passive, and Promoter customers.
Below, we’ll go through the steps of how to implement a similar example.
- There is a source for each of the scale points, from 0 to 10.
- Click More Options.
- Click Manage Labels.
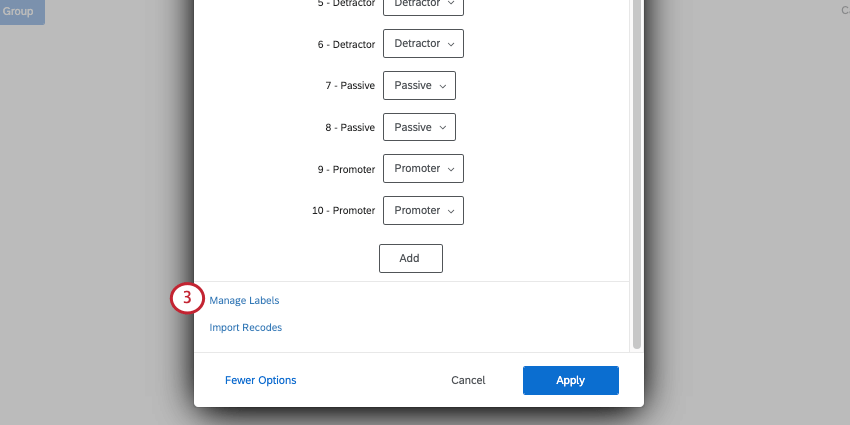
- There are three labels listed here because there are only three customer groups we want to focus on (Detractor, Passive, Promoter).
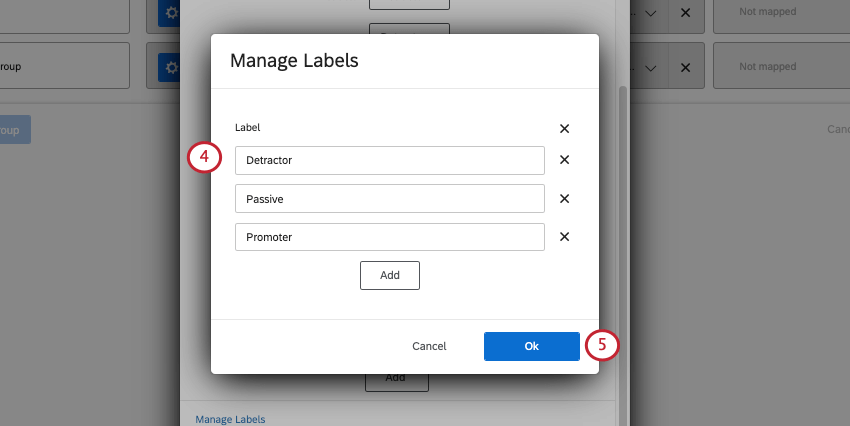 Qtip: Remember that if needed, you can click Add to add another field, or X to remove one.
 - Click OK.
- Select groups for the scale points.

- Click Apply to finish.
Cleaning Up Data
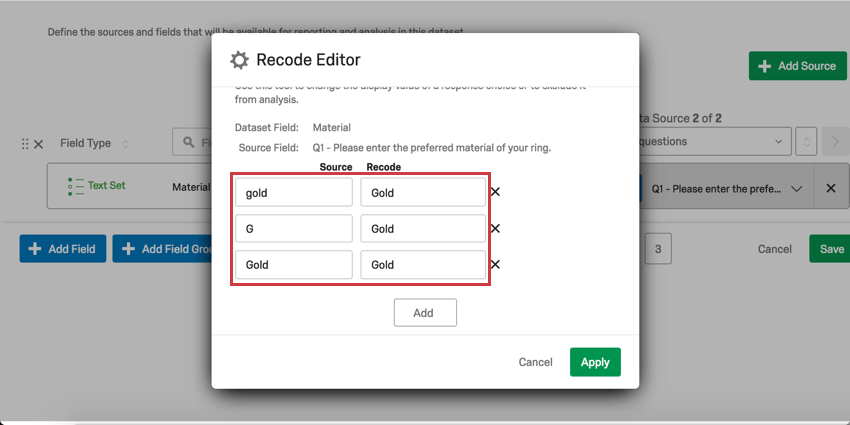
Another use case for recoding values is for cleaning up and consolidating inconsistent data. For example, if some of your values for a single embedded data field are “G” and some are “Gold” and some are “gold,” CX Dashboards will interpret these as 3 different values. You can correct or group these inconsistent values by recoding them all to “Gold.”
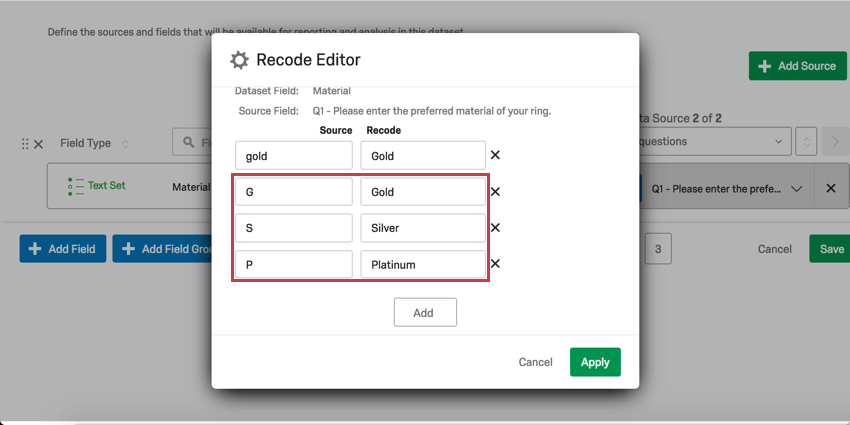
Alternatively, if your embedded data field had values of “G,” “S,” and “P,” you may want to recode them to be “Gold,” “Silver,” and “Platinum” to make them clearer to users.
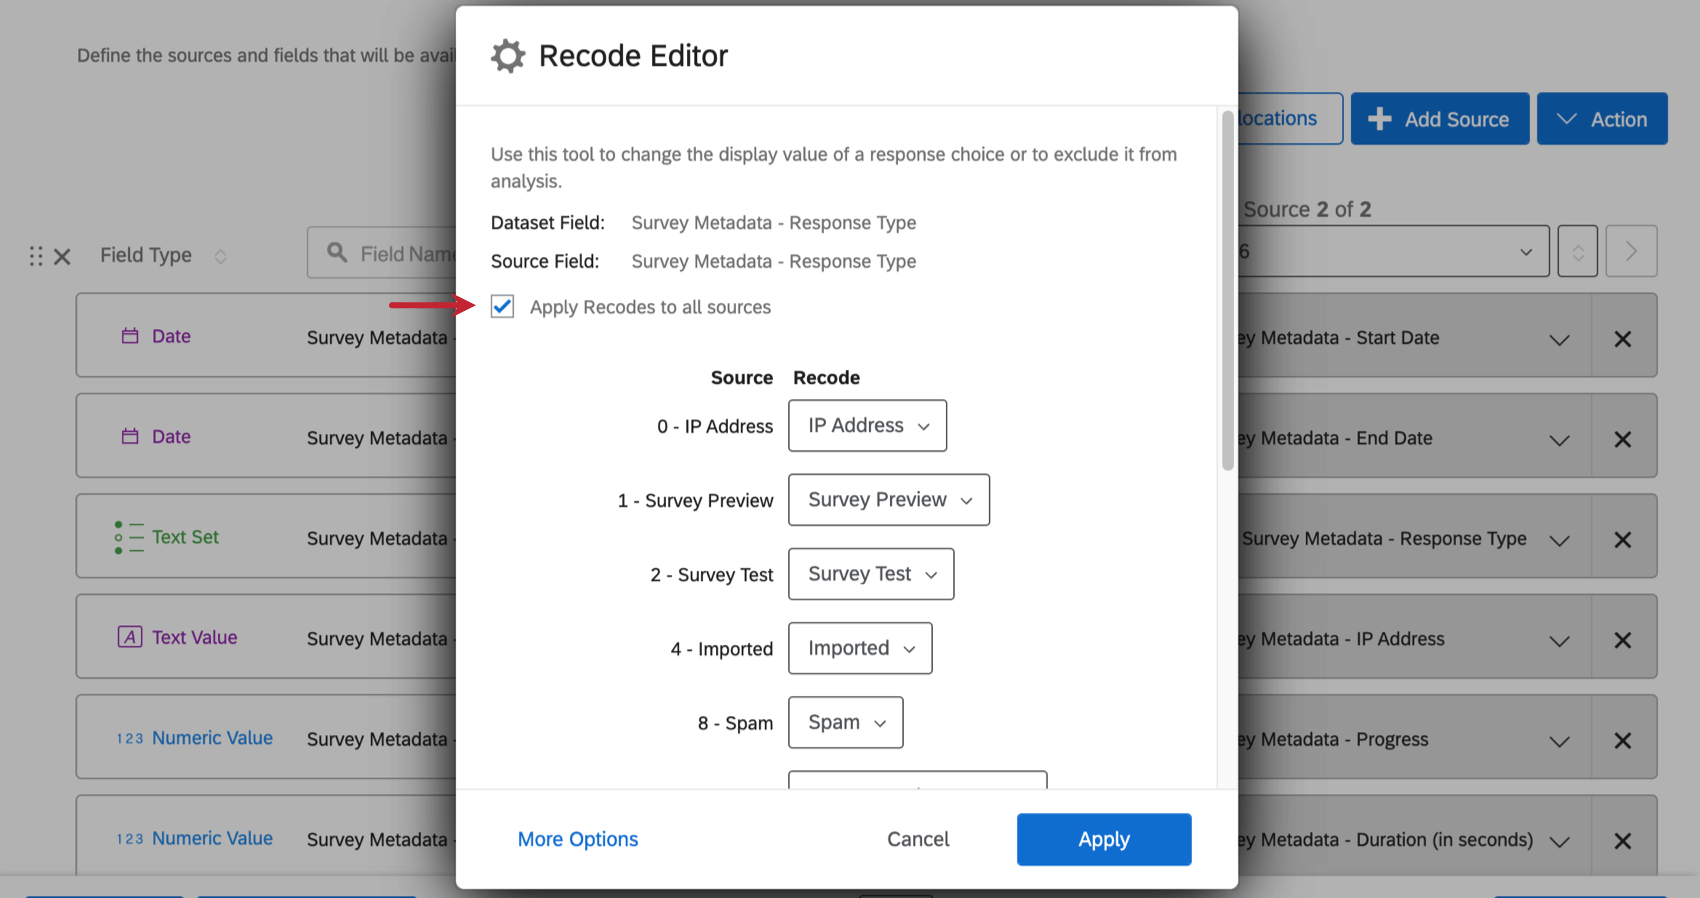
Apply Recodes to All Sources
When you’re editing the recode values of an type of field and you have added multiple sources to your dashboard, you can easily apply the changes you’re making to the same field across all of your sources. Select Apply recodes to all sources before you save your changes.
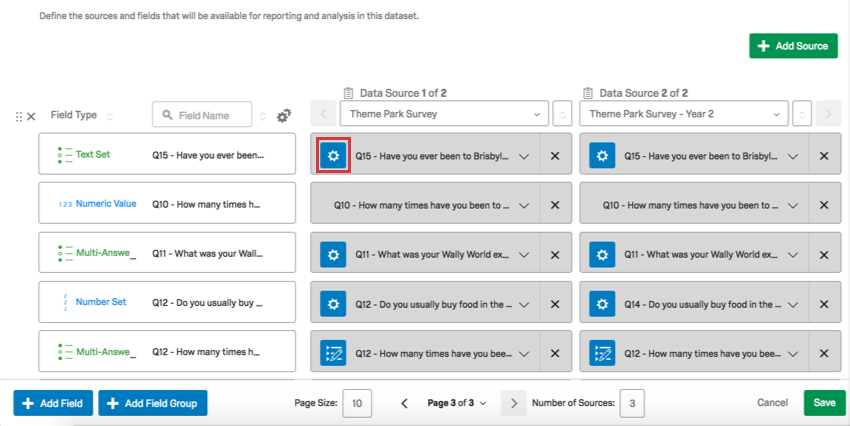
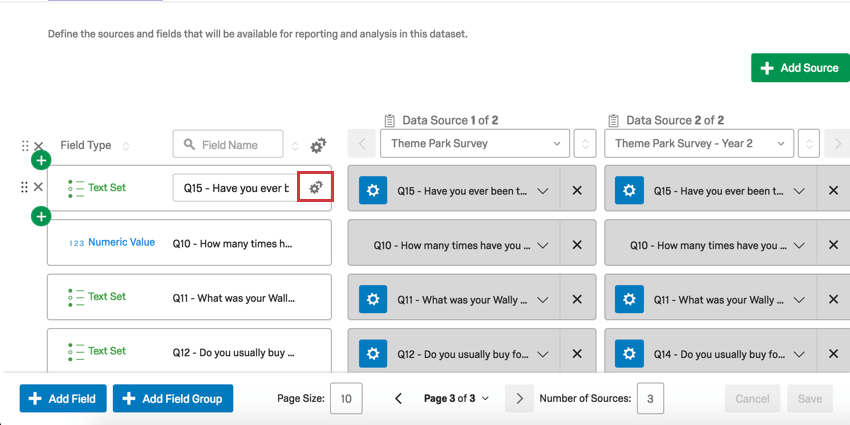
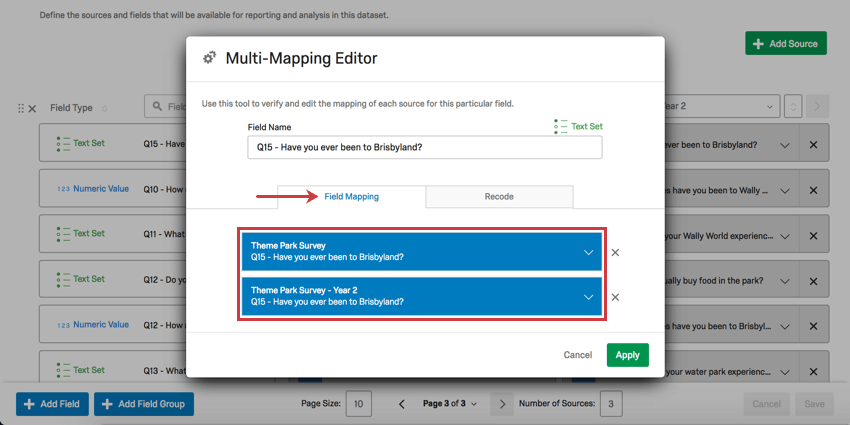
Multi-Mapping Editor
When you’ve added multiple sources to your dashboard, there is an additional recode editor that makes mapping the same fields across multiple sources much easier.
Field Mapping Tab
Using the blue dropdowns, you can choose the field from each source that should correspond to the same dashboard field.
Recode Tab
Here, you can ensure the recode values are the same for each field being mapped together.
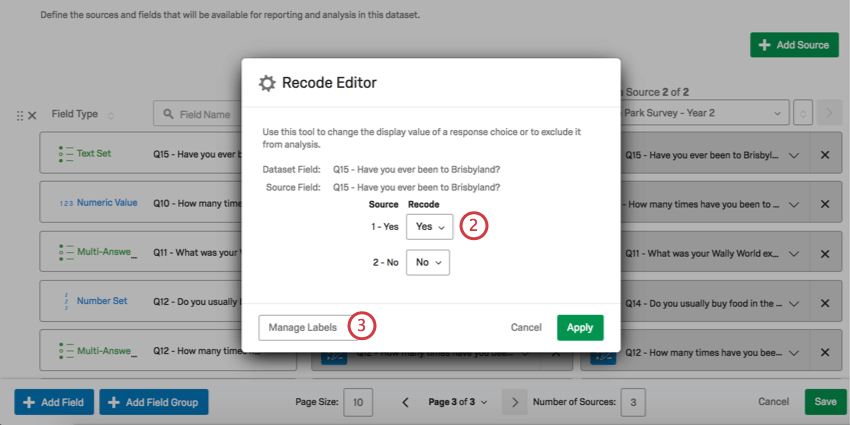
- Choose the option you want to edit from the Source section. This is the field value or survey question choice.
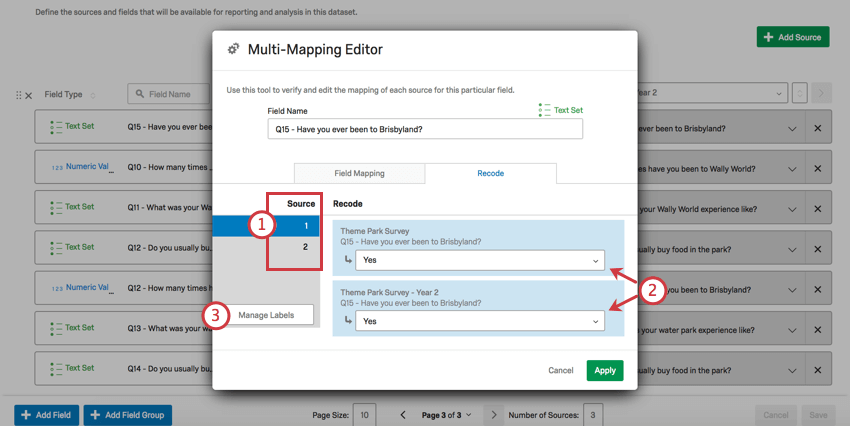
- For each source, either select the corresponding value, or choose to exclude from analysis.
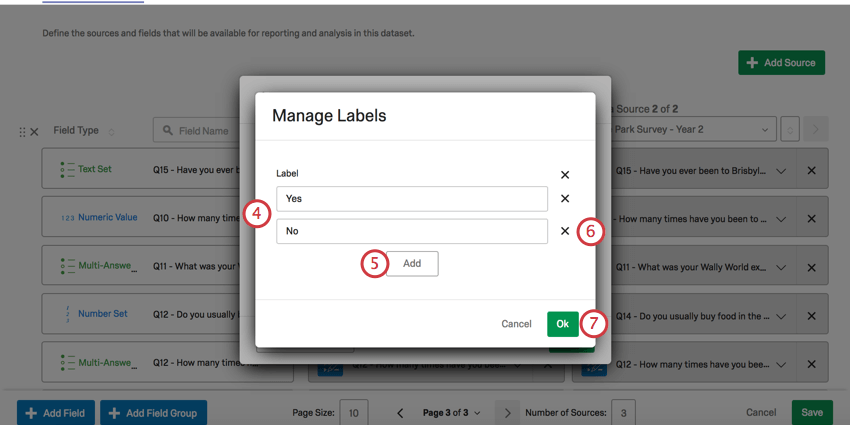
- Click Manage Labels.
- Change what the label should be for each available option, or add more labels that can be mapped across your sources.