-

Qualtrics Platform -

Customer Journey Optimizer -

XM Discover -

Qualtrics Social Connect
Advanced Dashboard Filters
About Advanced Dashboard Filters
The way standard dashboard filters (CX|EX) work is that every new field is joined by “and,” but multiple values of the same field are joined by “or.” For example, if I filter for two marital statuses (married, single) and one employment status (unemployed), all the results must include respondents who are unemployed, but they can be married or single.
However, sometimes you will want to filter your data in ways that are more complicated that this. Advanced filters are a great way to narrow down your data to the most specific requirement.
Like all filters, advanced filters are on the page level.
Types of Compatible Dashboards
Qualtrics has a few types of dashboards available. This feature can be found in the following dashboards:
- Dashboard projects (i.e., CX Dashboards)
- Results Dashboards
- Employee Engagement
- Lifecycle
- 360
- Pulse
- Ad Hoc Employee Research
- Employee Journey Analytics
- Brand Experience
Please note that not all licenses include this feature or all of these types of dashboards.
Adding Advanced Filters
- Click Edit to put the dashboard in edit mode.
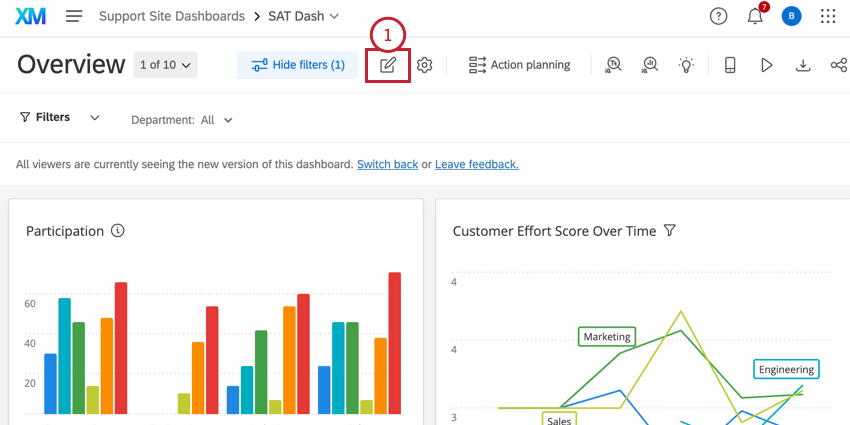
- Click the plus sign ( + ) in the Filters section.
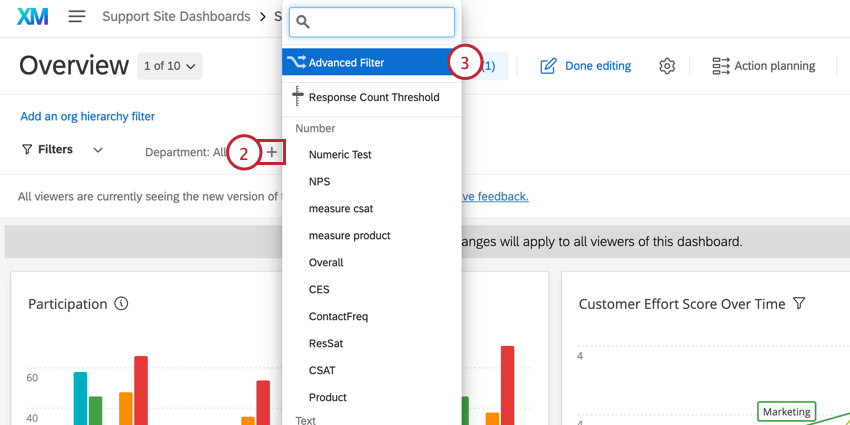
- Select Advanced Filter.
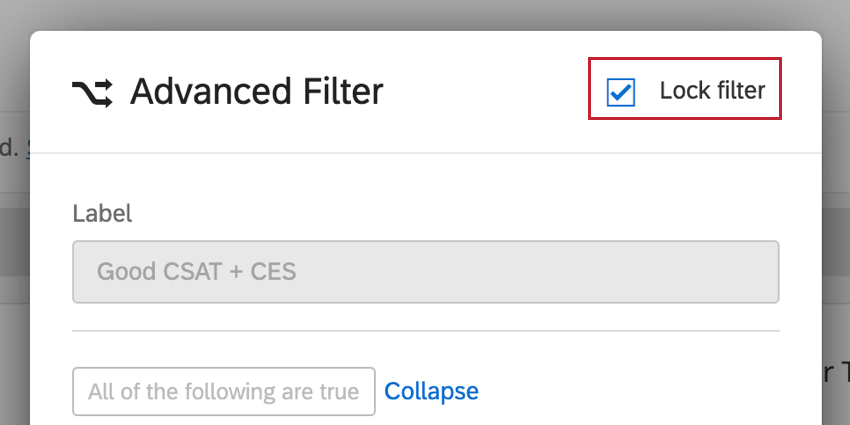
- Label the filter. If you do not fill out this field, the filter will become a combination of all the fields included.
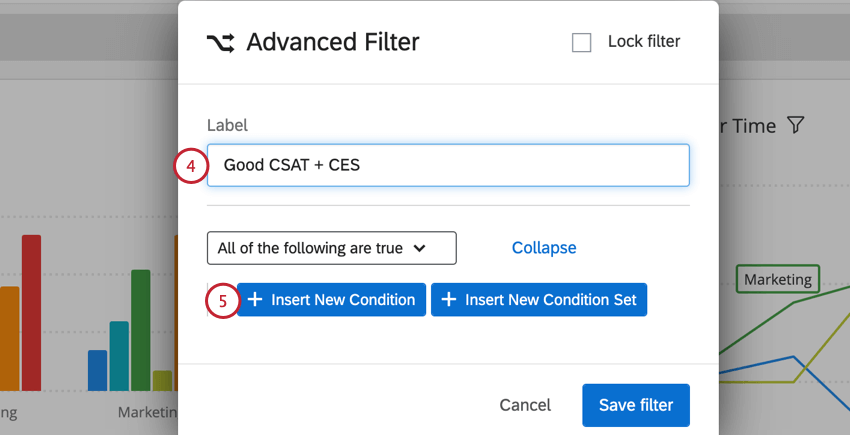
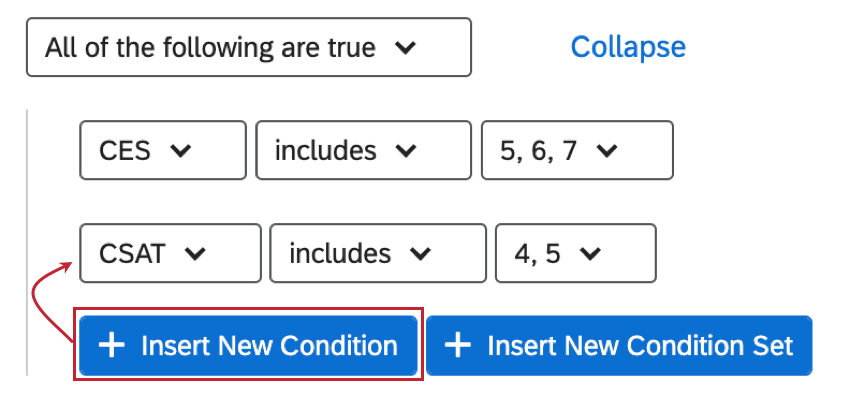
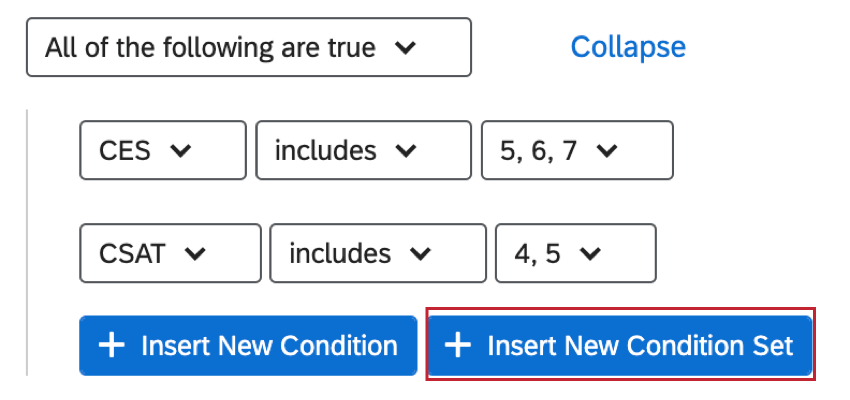
- Click Insert New Condition to start defining the conditions under which data is included in the dashboard page.
- In the first field, decide what kind of information you’d like to filter by.
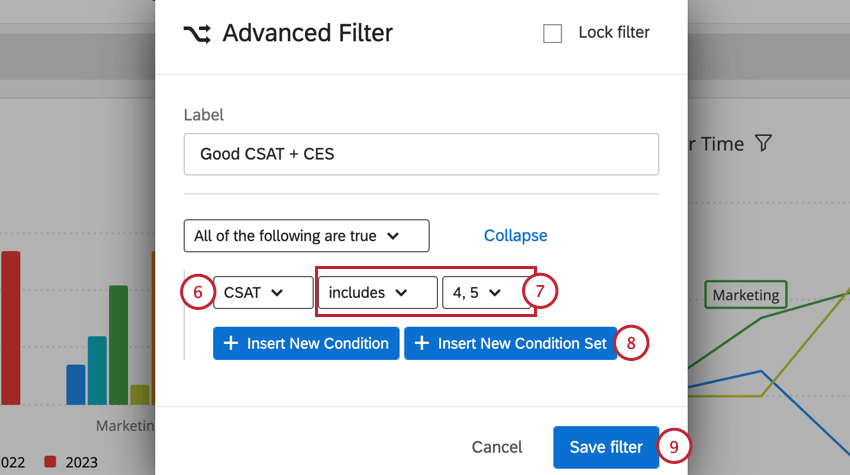
- Fill out the following fields according to your desired filter.
- If desired, click Insert New Condition Set to nest a new filter beneath the first one.
Qtip: Read the All & Any Sets and Condition Sets sections for more details.
- When you’re done, click Save filter.
Fields You Can Filter By
Every field type interacts a little differently with advanced filters.
- Free Form Text: Open Text fields. You can compare a value by “doesn’t / equal(s),” “doesn’t / contain(s),” and “is / is not empty.”
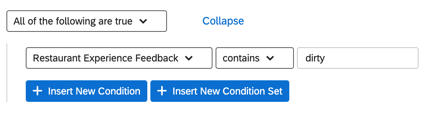
When filling out a value in the open-ended field:- All terms in the field will be found. For example, typing “All” will also return answers containing “Tall” and “Tally.”
- Do not use quotes.
- Spaces after the last word are ignored, but spaces between words will not be ignored.
- GenericValue: Text Value fields. You can compare a value by “doesn’t / equal(s),” “doesn’t / contain(s),” and “is / is not empty.”
When filling out a value in the open-ended field:- All terms in the field will be found. For example, typing “All” will also return answers containing “Tall” and “Tally.”
- Do not use quotes.
- Spaces after the last word are ignored, but spaces between words will not be ignored.
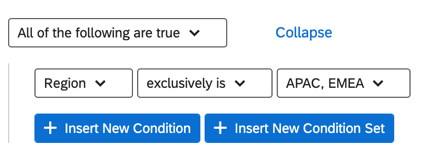
- EnumerableValue: Text Set fields. You can specify a value by whether it “is / is not,” “is / is not empty,” and whether it “includes / doesn’t include” the selected values.
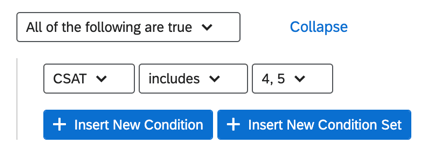
- Values can “include” multiple choices that will be treated as if joined by “or.” (E.g., “includes married, single” will return both married and single results.)
- “Doesn’t include” searches joins results by an “and.” E.g., “doesn’t include married, single” with exclude married results AND single results.
- EnumerableValueSet: Multi-Answer Text Set fields. You can specify a value by whether it “is / is not empty,” whether it “includes / doesn’t include” the selected values, or whether it “exclusively is” the selected value. If you use “exclusively is” and have more than one value selected, the data must contain BOTH values to be included. This is useful for filtering multiple select questions.
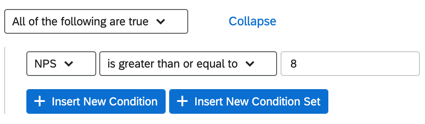
- EnumerableScalarValue: Number Set fields. Use numeric comparisons like “greater than,” “less than,” equal to,” etc.
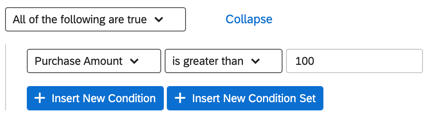
- ScalarValue: Numeric fields. Use numeric comparisons like “greater than,” “less than,” equal to,” etc.
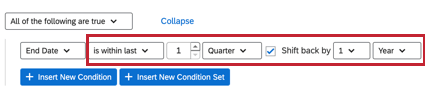
- DateTime: Date fields. Select from a series of time conventions, such as “before” a date, “after,” “between,” or from within a dynamic, preset amount of time. For example, “Last 14 Days” will adjust so as to always be the last 14 days’ worth of data, not 14 days from the time of adding the filter.
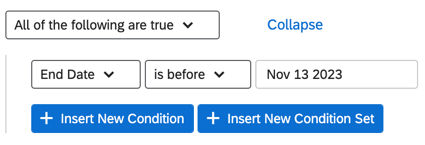
You can also filter “within the last” amount of days, weeks, months, quarters, or years. From there you can “Shift back” (CX|EX) the date range.
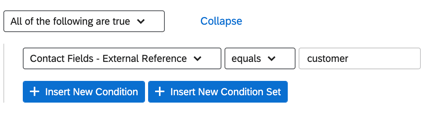
- Id: The dataset source. Here, you can specify a value by whether it “is / is not,” “is / is not empty,” and whether it “includes / doesn’t include” the selected values.
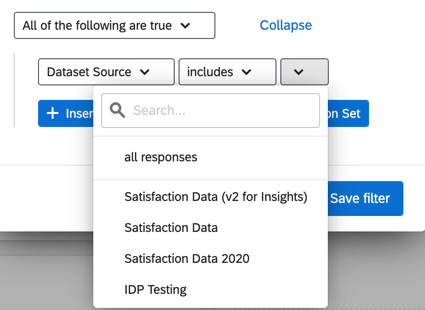
Values include:- All responses
- Specific sources that are mapped. For example, if you have three surveys mapped, you can select data from just the one instead.
All & Any Sets
You add statements to your condition by clicking Insert New Condition.
Whenever you have more than one condition, you’ll need to decide how the conditions are connected to each other. Do both conditions need to be met (e.g., a response must be from a particular month AND for a specific manager to be included)? Or does only one of the conditions need to be true (e.g., data may be included in the report if it was collected either in the Northeast OR the Southeast)?
Conditions linked by an AND conjunction are called ALL condition sets (i.e., “only show data where ALL of these conditions are true”). Conditions linked by an OR conjunction are called ANY condition sets (i.e., “only show data where ANY of these conditions are true”).
Condition Sets
Conditions within the same Condition Set are all indented the same amount and are beneath the same ALL/ANY header.
You can create new condition groups by clicking Insert New Condition Set. This will nest a new condition set under the condition set you’re currently working on.
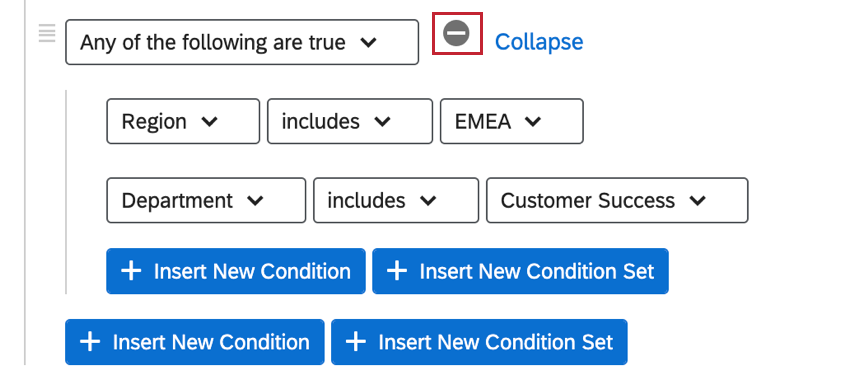
At any point, you can delete an entire condition set by hovering over the ANY/ALL header and clicking the minus sign (–). Note that this deletes all conditions nested underneath, including additional condition sets!
Nesting Logic
Nesting condition sets allows you to create more advanced criteria to filter your data by.
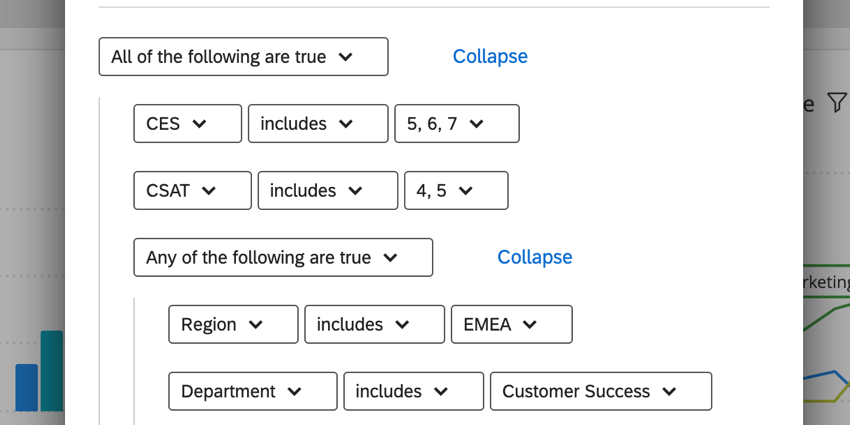
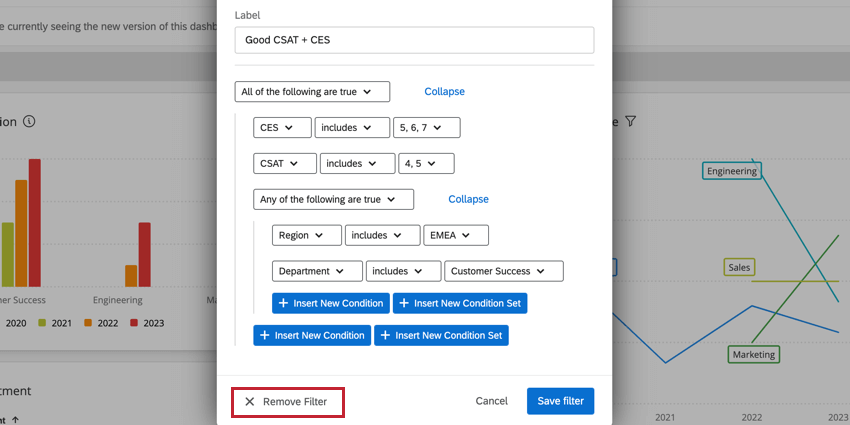
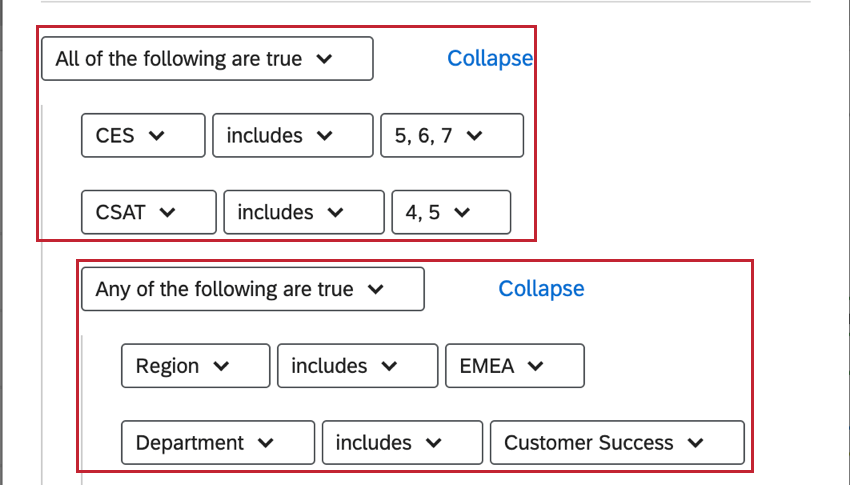
This report will only include responses from people who have high scores for CES and CSAT. Additionally, responses will only be included if they’re either from the EMEA region or the department they worked with is “Customer Success”
In the above example, the very outermost group is an ALL group. People must meet both criteria to be included. Nested within that ALL group is an ANY group:
- Respondents who took the survey from the EMEA region
- Respondents who worked with an employee from the “Customer Success” department.
Essentially, you’ll make a new condition set every time you want to switch from an ANY to an ALL (and vice versa).
With this structure, it is therefore very important to consider which type of group (ALL or ANY) is your very outermost group before you start adding conditions and nesting. The question to ask is whether, at the highest level, you are looking for responses that meet all necessary conditions (ALL group) or are you looking for responses that meet one or more of possible conditions (ANY group).
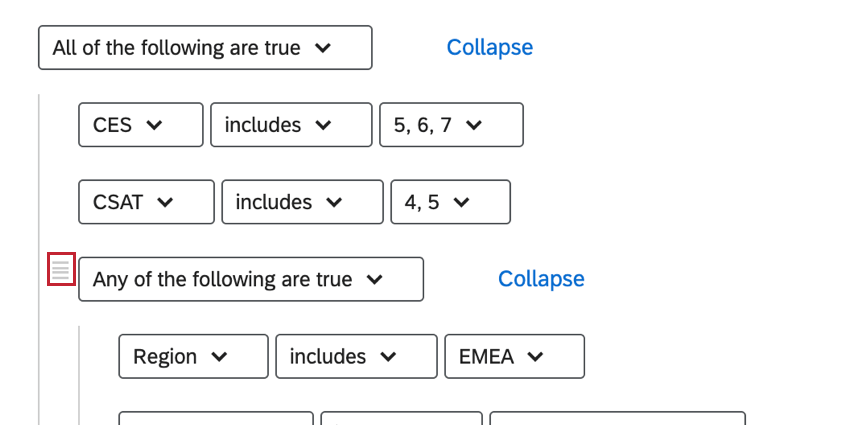
To change the order in which conditions or groups appear, hover over that condition or group, click the icon, and drag. Note that you can only reorder items nested on the same level – you cannot use this function to nest items differently!
Nesting Basics
- Clicking New Condition will add a new statement within the same condition set.
- Clicking New Condition Set will nest a new condition set under the one you’re working on.
- Click the minus sign (–) next to a condition or condition set to delete it.
- Clicking the minus sign (–) to the right of a condition set’s header will delete the whole group and everything inside it, so be careful!
- You cannot add items a level above. You can only add them a level below and reorder within a level.
Using Advanced Filters
Once you add an advanced filter to the dashboard, all users will have it available to them.
Users are allowed to change how the filter appears to them, only, by adding new conditions and condition sets.
Qtip: You can prevent users from modifying the filter at all by selecting Lock filter when you create it.
Removing Advanced Filters
If you have editing access to filters, you can remove the advanced filter by clicking it and selecting Remove Filter.