-

Qualtrics Platform -

Customer Journey Optimizer -

XM Discover -

Qualtrics Social Connect
Triggering & Emailing Surveys in Salesforce or Updating Contacts in Qualtrics
About Triggering & Emailing Surveys in Salesforce or Updating Contacts in Qualtrics
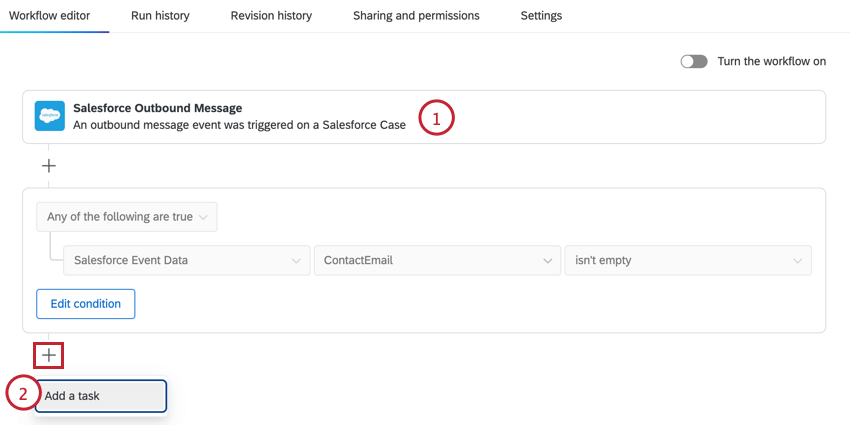
In the Workflows tab, you can set up tasks to trigger workflows within Qualtrics based on Salesforce Flows. The criteria for the Flow in Salesforce might be an event such as a case being closed or an opportunity being won. Once this Flow is met in Salesforce, Qualtrics can take action, such as updating contact information and sending a survey.
In addition, there are other methods of sending surveys as a part of your Salesforce extension. For these additional options, check out our page on Other Salesforce Distribution Methods. Qualtrics can also map survey responses back to Salesforce; for more information, view our Salesforce Response Mapping page.
Setting up a Salesforce Triggered Survey
The Salesforce outbound message event allows you to trigger and email survey invitations to respondents as soon as their corresponding object meets qualifying criteria in Salesforce
- Follow the instructions on the Salesforce outbound message event page to set up a Salesforce outbound message event in a new Qualtrics workflow.
- Make sure you copy the event’s URL as you’ll need it to set up the integration in Salesforce.
- In your workflow, click the plus sign ( + ) and then Add a task.
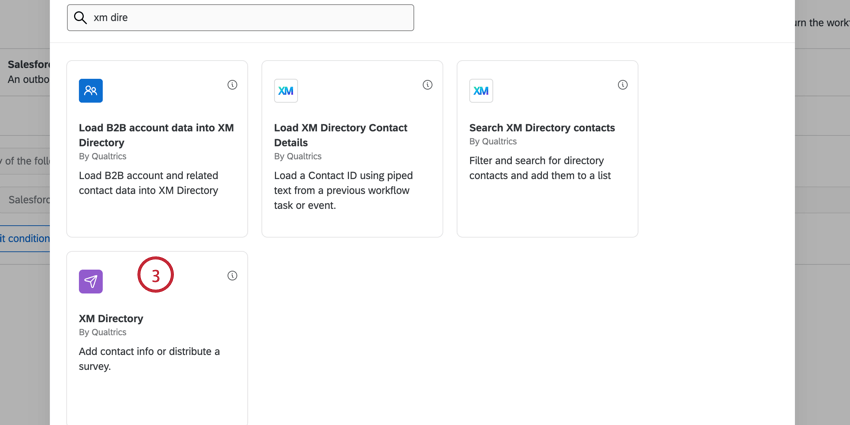
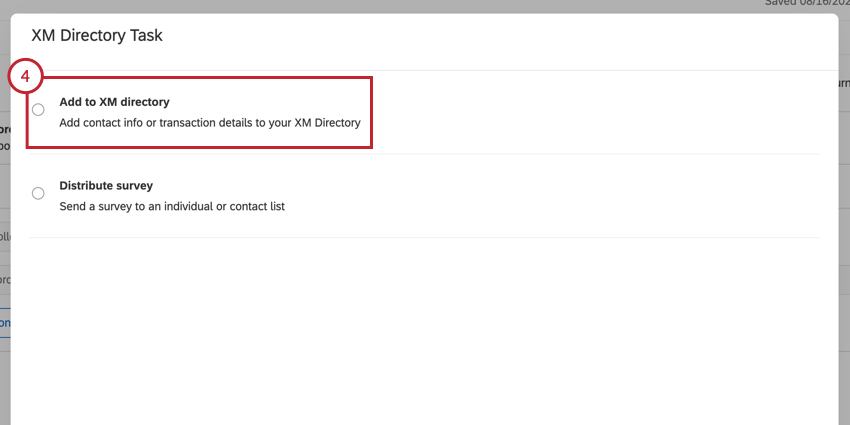
- Select the XM Directory task.
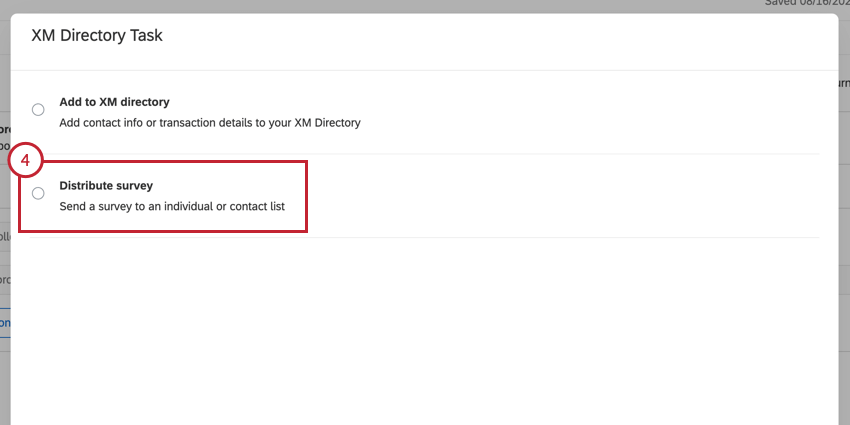
- Choose Distribute survey.
- Complete setting up the XM Directory task with your desired distribution method. You can send an email invitation, an SMS invitation, or a 2-way SMS survey by using piped text to bring in the Salesforce contact information. See the XM Directory task support page for step by step instructions for each distribution method.
 Qtip: Don’t want to send a survey? You can save Salesforce data to a mailing list instead. See Saving Record Changes in Salesforce as Contact Information for more information.
 - Navigate to Salesforce and create a Flow on the object you selected in your Salesforce outbound message event. For example, if you selected “Lead” in your workflow event, you’ll choose “Lead” as the object for your Salesforce Flow. You can find more information about this in the Setting Up a Salesforce Flow section below.
- Create an Outbound Message and add it as an action in your Flow in Salesforce.
- After publishing your survey, test your setup by fulfilling the conditions of your Flow in Salesforce. This should carry the Salesforce fields to Qualtrics, save them as a contact in the specified mailing list, and then distribute the survey to the contact’s email.
Qtip: See the Testing and Troubleshooting section for help troubleshooting your workflow.
Saving Record Changes in Salesforce as Contact Information
Let’s say you have an opportunity in Salesforce that is won and you’d like to include this information in the opportunity’s contact entry in Qualtrics. You can use the Salesforce Workflow Rule event to push changes from Salesforce to Qualtrics. The updated contact information can be saved as embedded data or transactional data. If this is a new contact, the Salesforce Workflow Rule event can also be used to create new contacts within Qualtrics.
- Follow the instructions on the Salesforce outbound message event page to set up a Salesforce outbound message event in a new Qualtrics workflow.
- Make sure you copy the event’s URL as you’ll need it to set up the integration in Salesforce.
- In your workflow, click the plus sign ( + ) and then Add a task.
- Select the XM Directory task.
- Choose Add to XM directory.
- Complete setting up the XM Directory task to save contact information. Visit the linked page for more information.
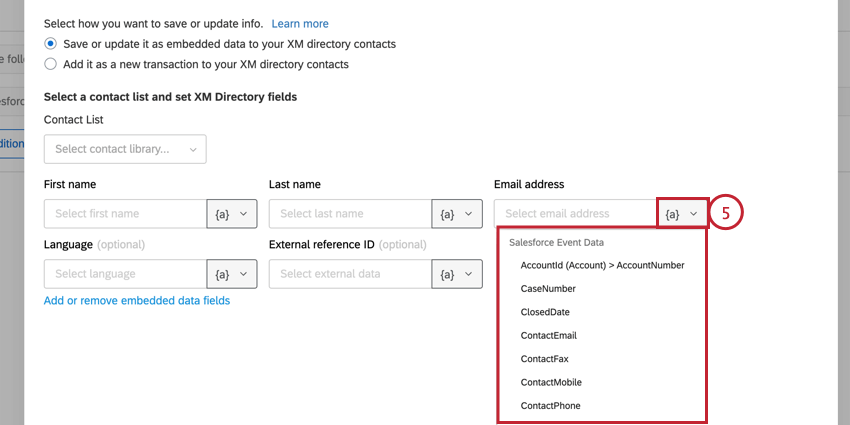
- The First name, Last name, and Email address fields are required. All other fields are optional. Use the piped text menu, {a}, to fill in values for these fields based on your fields from Salesforce.
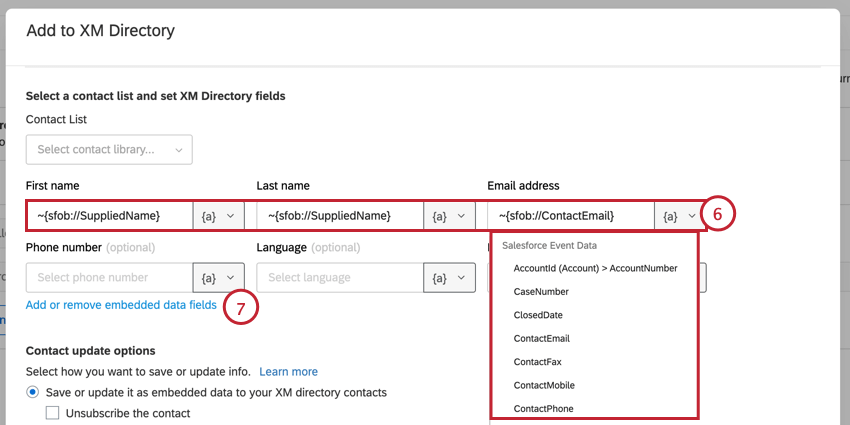
- To add additional fields, click Add or remove embedded data fields.
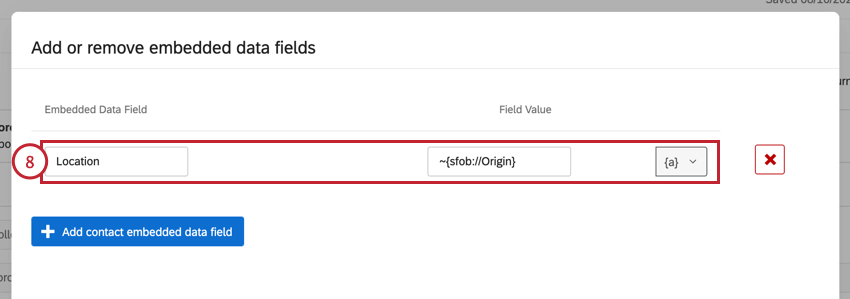
- In the window that appears, add your fields. On the left, name the embedded data fields under Embedded Data Field. On the right, populate them with Salesforce field values under Field Value using the piped text menu, {a}.
- Choose how you’d like to save contact information:
- Save or update embedded data: This option will save the contact information as embedded data. This is the option that should be selected for creating new contacts.
- Add as a transaction to the contact info: This option will save the contact information as transactional data in an existing contact.
Example: Let’s say I have a field called Location that is saved with my contact and does not change much overtime. It would be useful to save this field as contact embedded data. Therefore, I can see where this contact is located when viewing the contact. However, let’s say I want to create a new transaction each time a Salesforce case is closed for the contact. I can save a Store field as transaction data in order to see the store that this particular case is associated with in the contact’s touchpoint timeline.
- Save the task.
- Navigate to Salesforce and create a Flow on the object you selected in your Salesforce outbound message event. For example, if you selected “Lead” in your workflow event, you’ll choose “Lead” as the object for your Salesforce Flow. You can find more information about this in the Setting Up a Salesforce Flow section below.
- Create an Outbound Message and add it as an action in your Flow in Salesforce.
- After publishing your survey, test your setup by fulfilling the conditions of your Flow in Salesforce. This should carry the Salesforce fields to Qualtrics, save them as a contact in the specified mailing list.
Qtip: See the Testing and Troubleshooting section for help troubleshooting your workflow.
Saving Salesforce Fields as Embedded Data
Information from Salesforce is saved in your contact list, but is not automatically recorded in survey responses. But it is quick and easy to add them if you follow these simple steps:
- Make sure you’ve followed the steps to trigger and email a survey using Salesforce.
Qtip: Make note of the spelling and capitalization you used when setting up your contact embedded data in your XM Directory task. Spelling and capitalization matter!
- Go to the Survey tab.
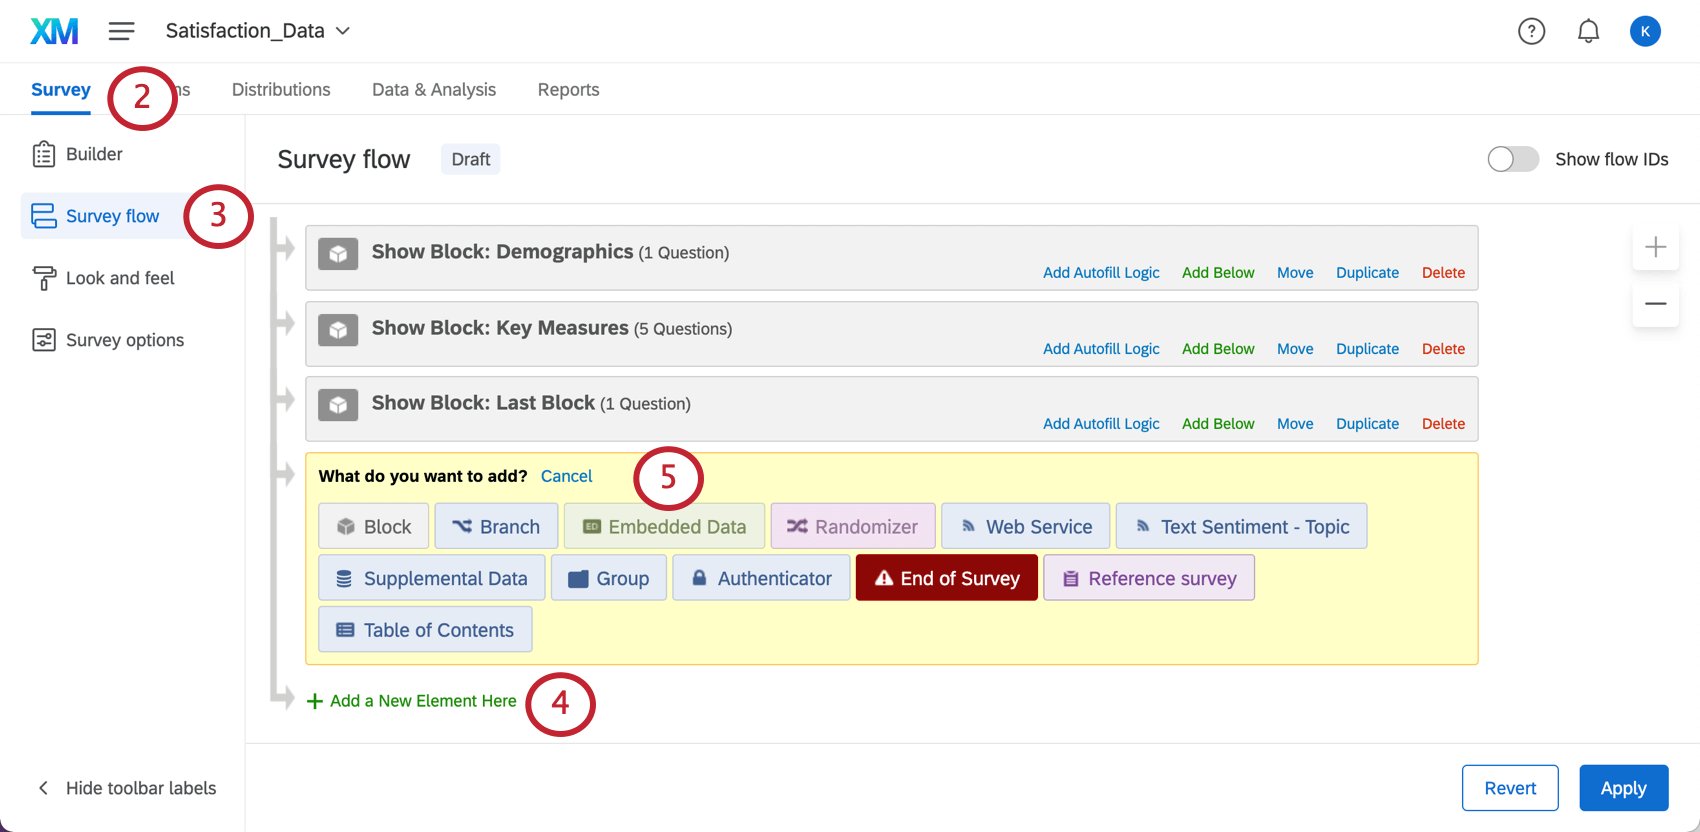
- Select Survey flow.
- Click Add a New Element Here.
- Select Embedded Data.
- Type in the name of the contact embedded data field saved from Salesforce. The name of the embedded data field in the survey flow must be the same as in your contact (including capitalization, punctuation, spacing, and special characters). You do not need to set its value to anything, as its value will flow from the contact’s embedded data field.
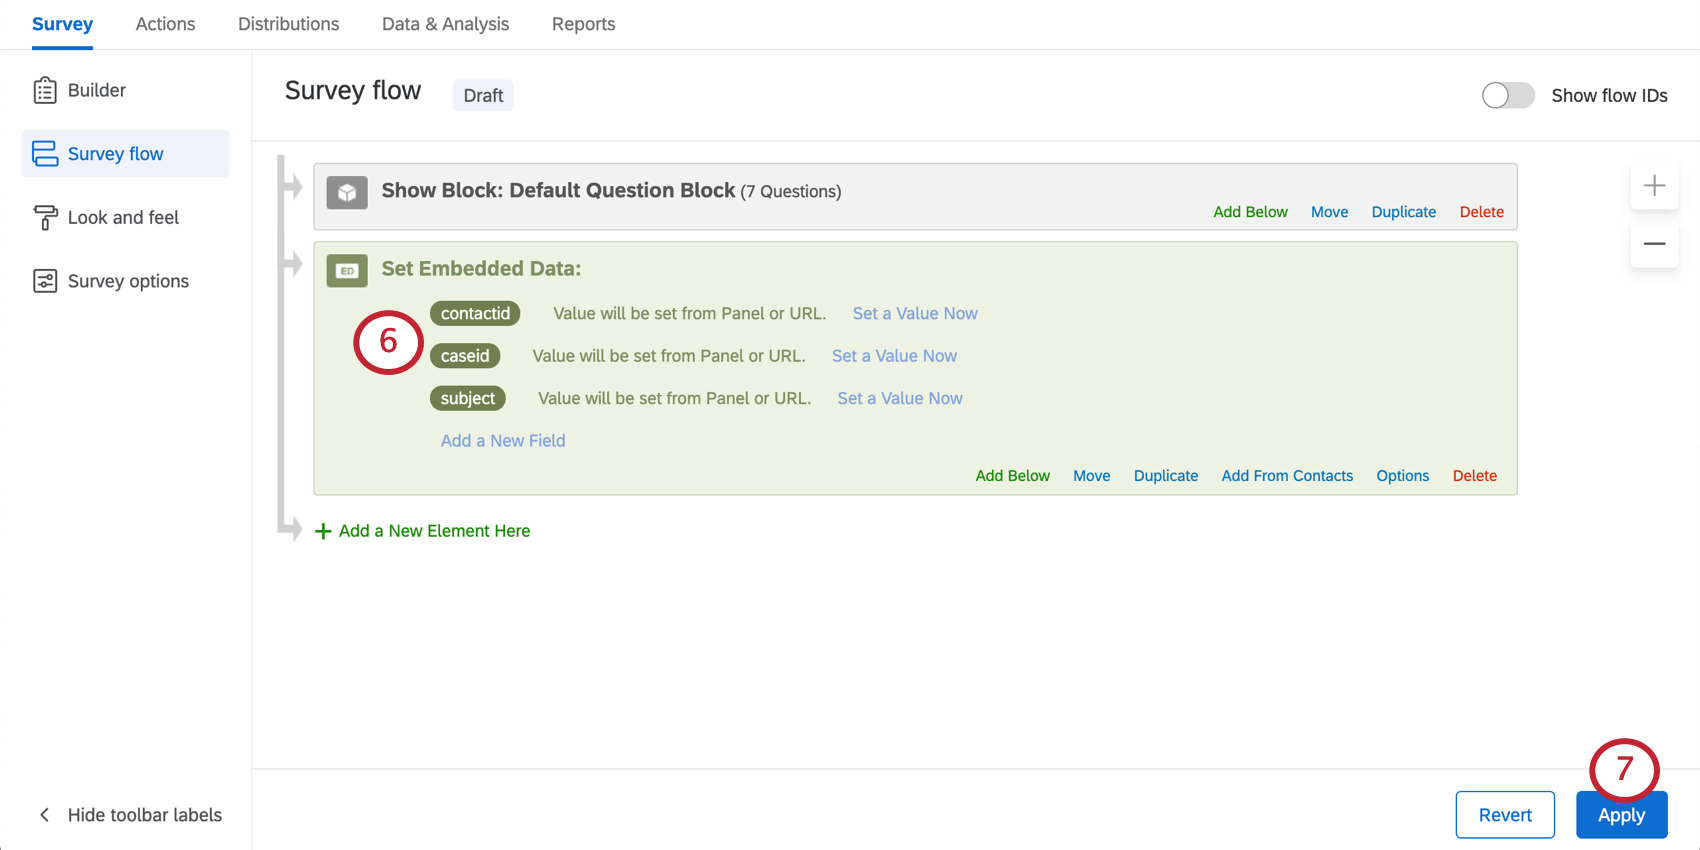
- When finished, click Apply.
Qtip: Do you want to include Salesforce fields in your email or your survey? Follow the steps above to save these fields as embedded data. Then generate piped text for the embedded data you want to include.
Creating the Outbound Message
To set up your Flow properly, you’ll need to create an Outbound Message in Salesforce.
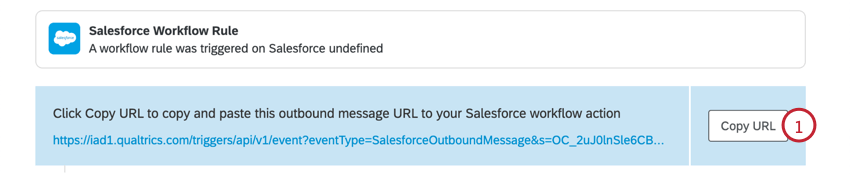
- In Qualtrics, click Copy URL next to your Salesforce Workflow Rule Event.
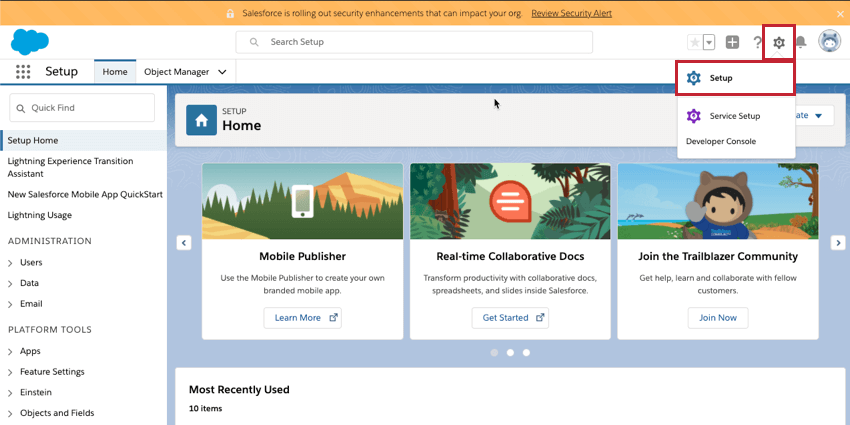
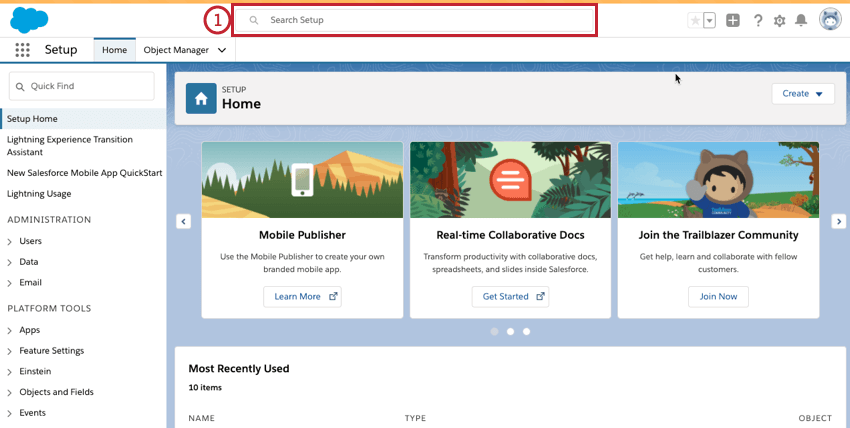
- Click Setup in Salesforce.
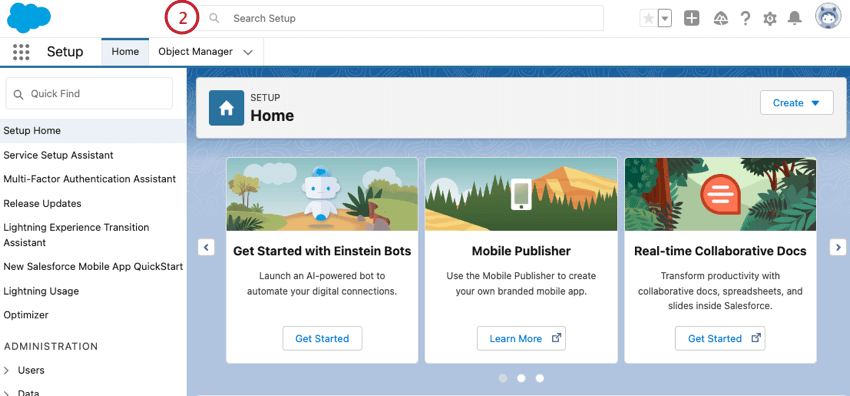 Qtip: If you are not on the Home page, you can navigate there by clicking on the gear icon on the top right corner and choosing Setup.
- Select Outbound Messages – Process Automation > Workflow Actions.
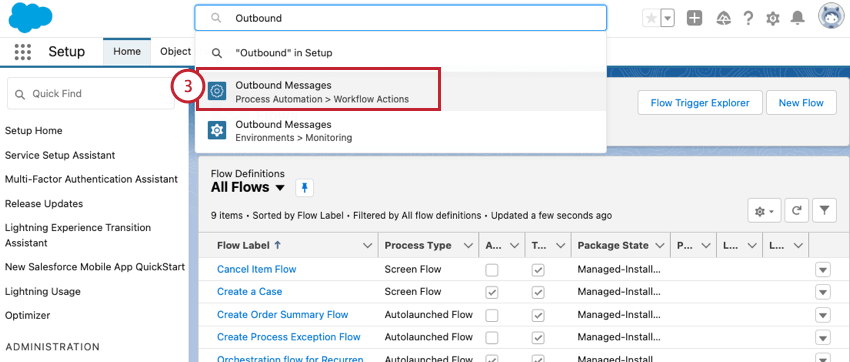
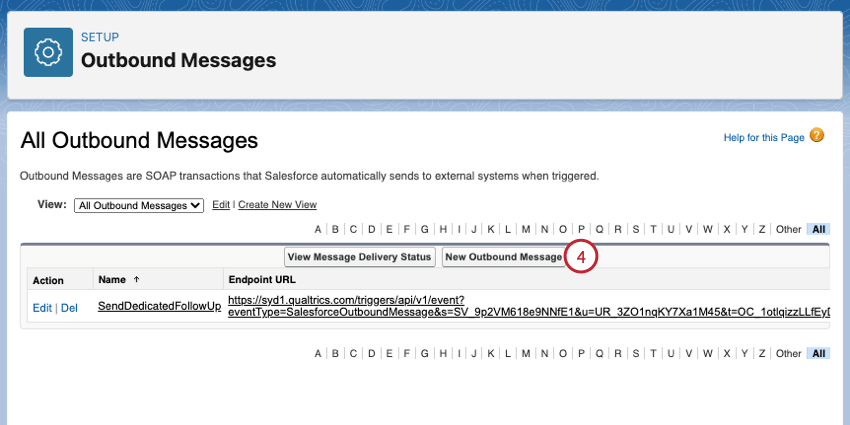
- Click New Outbound Message.
- Select the Salesforce Object to use in the message. This should be the same object that triggers your Flow. For example, if you want the Flow to be triggered when a Case is closed, you would choose Case here.
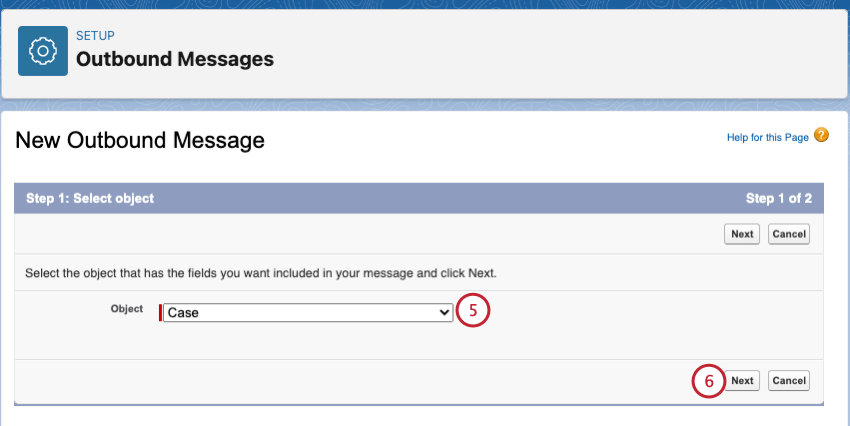
- Click Next.
- In the Name section, name your message. You may also provide a brief description if desired.
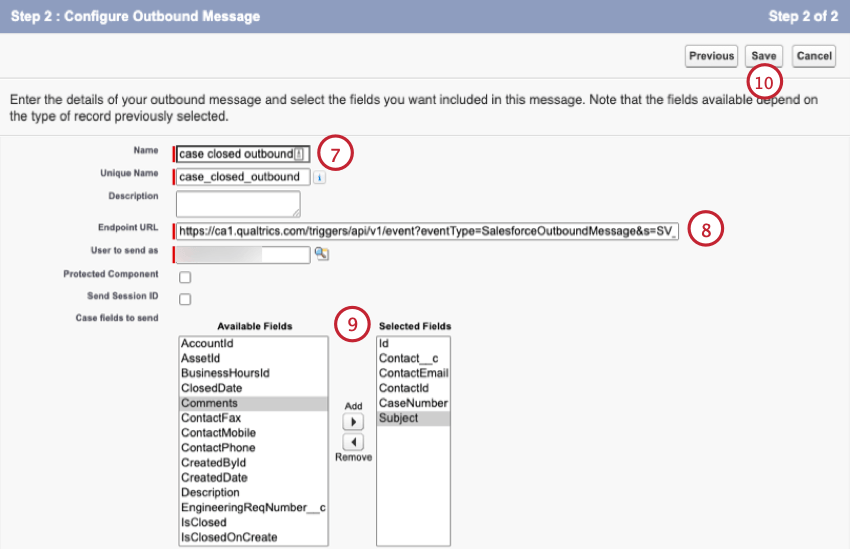
- Paste the Outbound Message URL from Qualtrics into the Endpoint URL field in Salesforce.
- Highlight any fields you would like to pass through the Outbound Message into Qualtrics and use the Add button to move them to the Selected Fields section.
- Click Save.
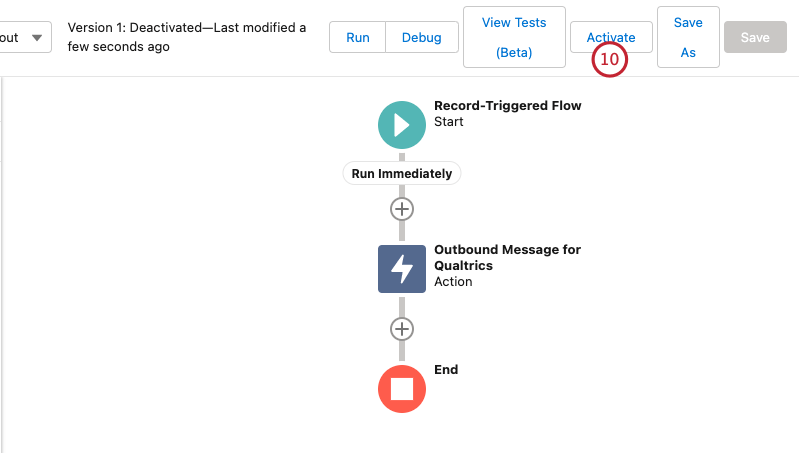
Setting up a Salesforce Flow
A Flow is a set of criteria created in Salesforce. When the criteria have been met, a workflow can be triggered. For example, the criteria might be that a case is marked as closed, and the workflow would be to have Qualtrics send a support feedback survey.
TO SET UP A SALESFORCE FLOW (Salesforce Lightning)
- Click Setup in Salesforce.
 Qtip: If you are not on the Home page, you can navigate there by clicking on the gear icon on the top right corner and choosing Setup.
- Select Flows – Process Automation from the search results.
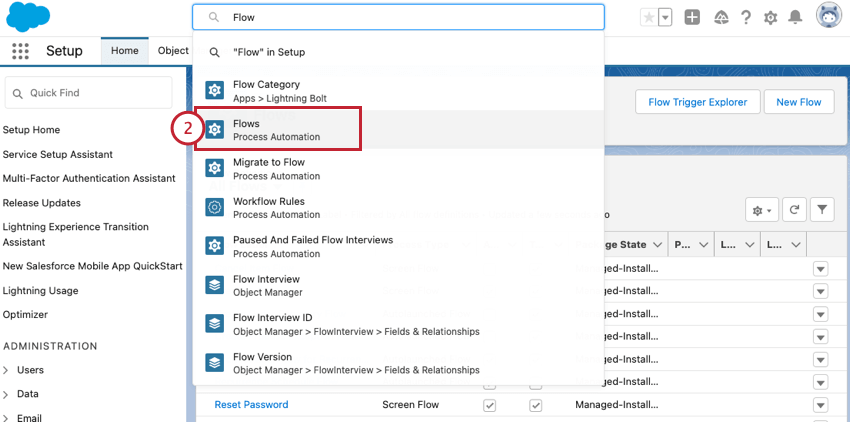
- Choose New Flow to create a new Flow in Salesforce.
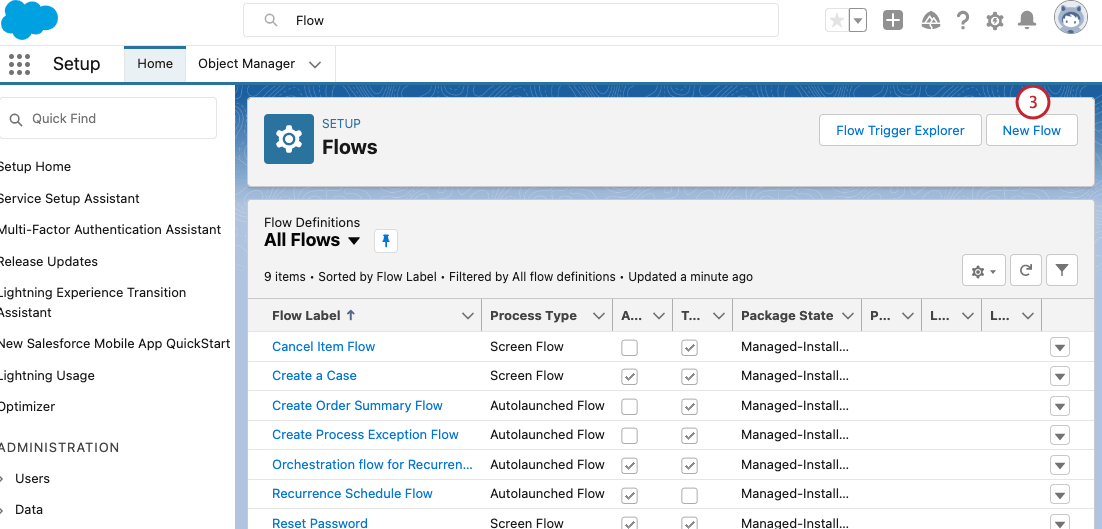
- Choose how your Flow will be triggered. The most common is Record-Triggered Flow, which triggers the flow when a record is created, updated, or deleted.
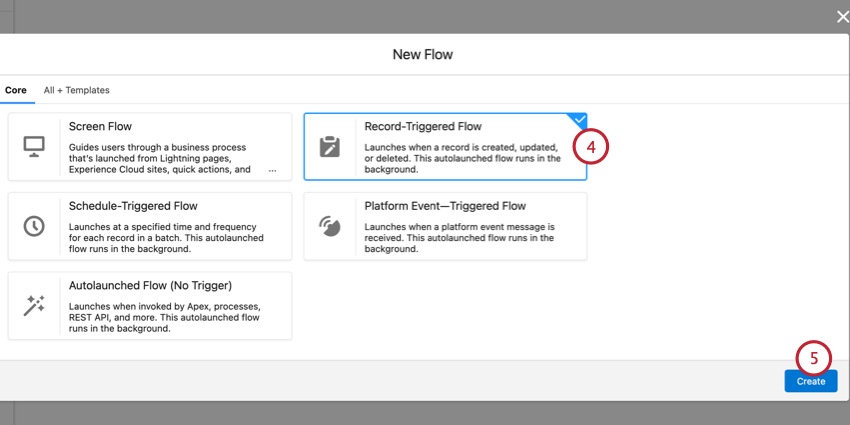
- Click Create.
- Select the Salesforce Object to which the Flow will apply in the Object dropdown. For example, if you want the Flow to be triggered when a Case is closed, you would choose Case here.
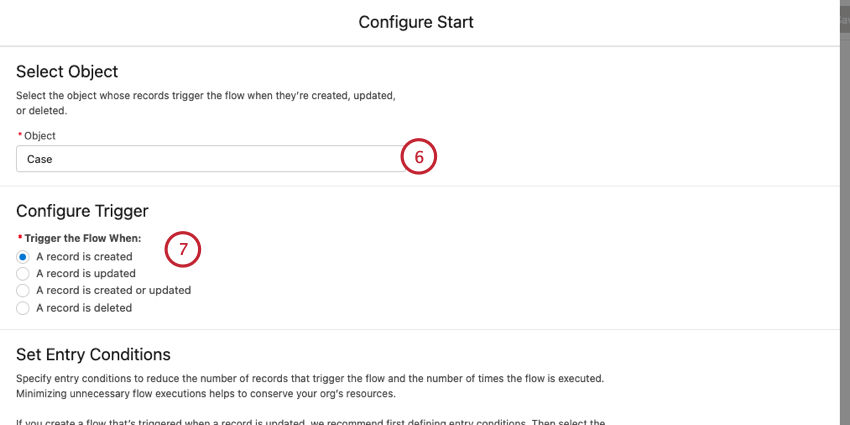
- Choose what type of record changes should cause the Flow to trigger.
- Under Entry Conditions, set the criteria that must be met for the Flow to trigger. You can find more information on the options in this section on this Salesforce support page.
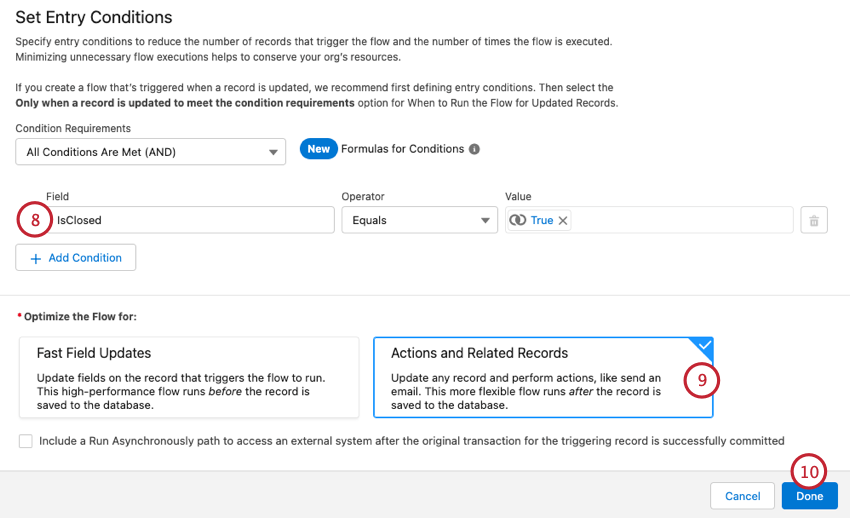 Example: If you want the Flow to be triggered when a Case is closed, you would set the Field to IsClosed and the Value to True. You can add multiple conditions for your Flow here as well.
 - Choose Actions and Related Records.
- Select Done.
Adding the Flow Action
This action tells Salesforce what to do once the Flow criteria is met. For example, the action might be for Qualtrics to send a survey invitation.
Setting Up A Flow Action (Salesforce Lightning)
- For your newly created Flow, click the plus sign ( + ) below your Flow trigger.
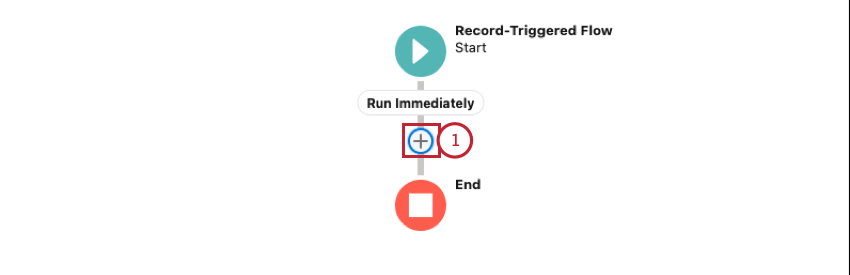
- Select Action.
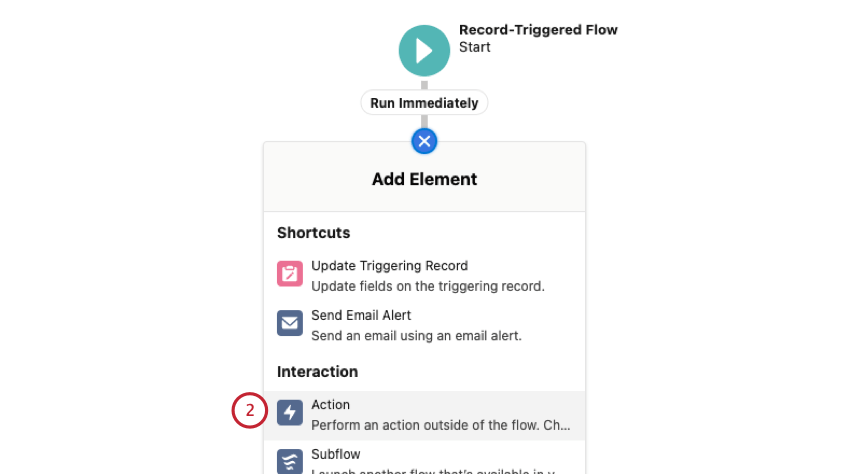
- Choose Outbound Message.
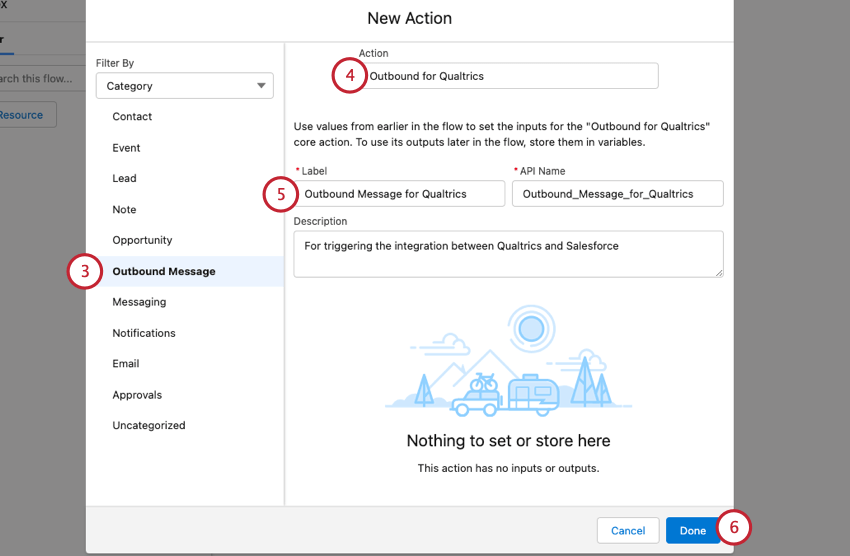
- Use the dropdown to select the Outbound Message you created earlier.
- Give your action a label and description.
- Click Done.
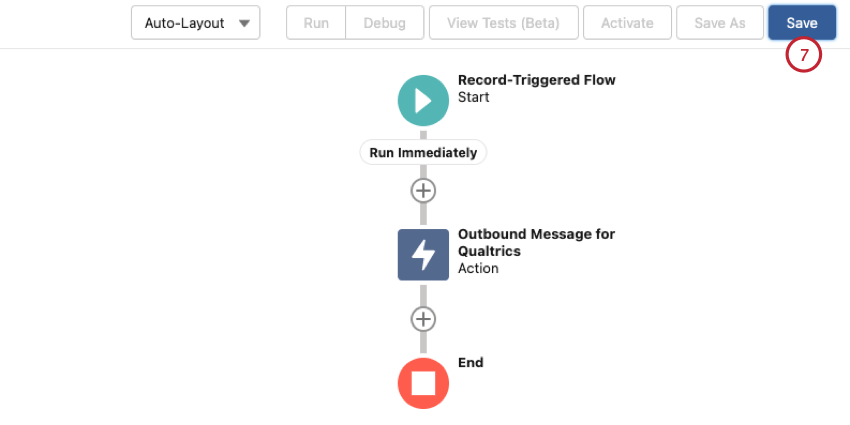
- Make sure to Save your flow.
- Give your Flow a name and description.
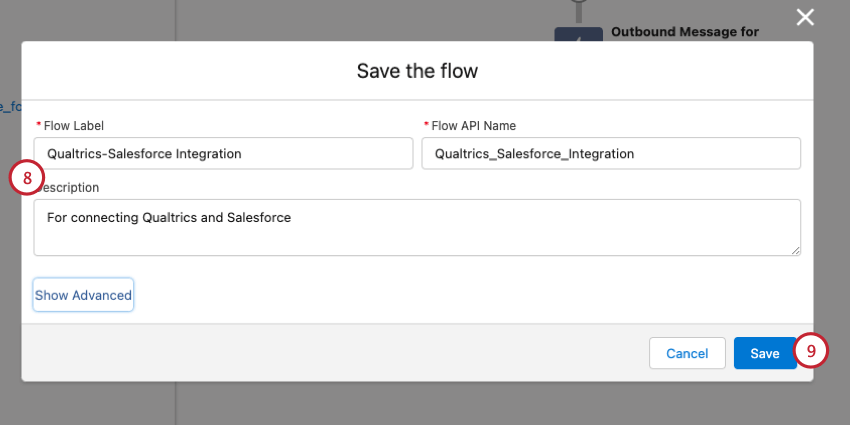
- Click Save.
- Activate the Flow.
Testing and Troubleshooting
Once you have set up the Salesforce Flow, Salesforce Action, and XM Directory task, your survey is ready to go. Each time that the Flow criteria is met in Salesforce, the Salesforce data will be passed over into a new Qualtrics contact.
TROUBLESHOOTING IN QUALTRICS
- Workflows Reporting: If you set up your Workflow in the Workflows tab, you can check the Workflows Reporting tab. Here, you can filter your workflows by status as well as view the payload for each workflow to determine what caused it to fail. The Input Payload contains the fields being utilized in the workflow, and the Task Output contains the error message for the failed workflow.
- Survey Activation: Qualtrics can’t send a survey until that survey has been activated. Your survey is activated as soon as you publish and select a distribution method for your survey. Make sure your survey has been published and activated before troubleshooting. You can see your project’s status as well as activate it from the Projects page.
- Survey owner linked to Salesforce: When connecting with Salesforce, Qualtrics always checks the Salesforce credentials of the original survey owner. If you are setting up the Salesforce Extension and the survey has been shared with you, make sure the original survey owner also links their Qualtrics account to your Salesforce instance when building the workflow in Qualtrics.
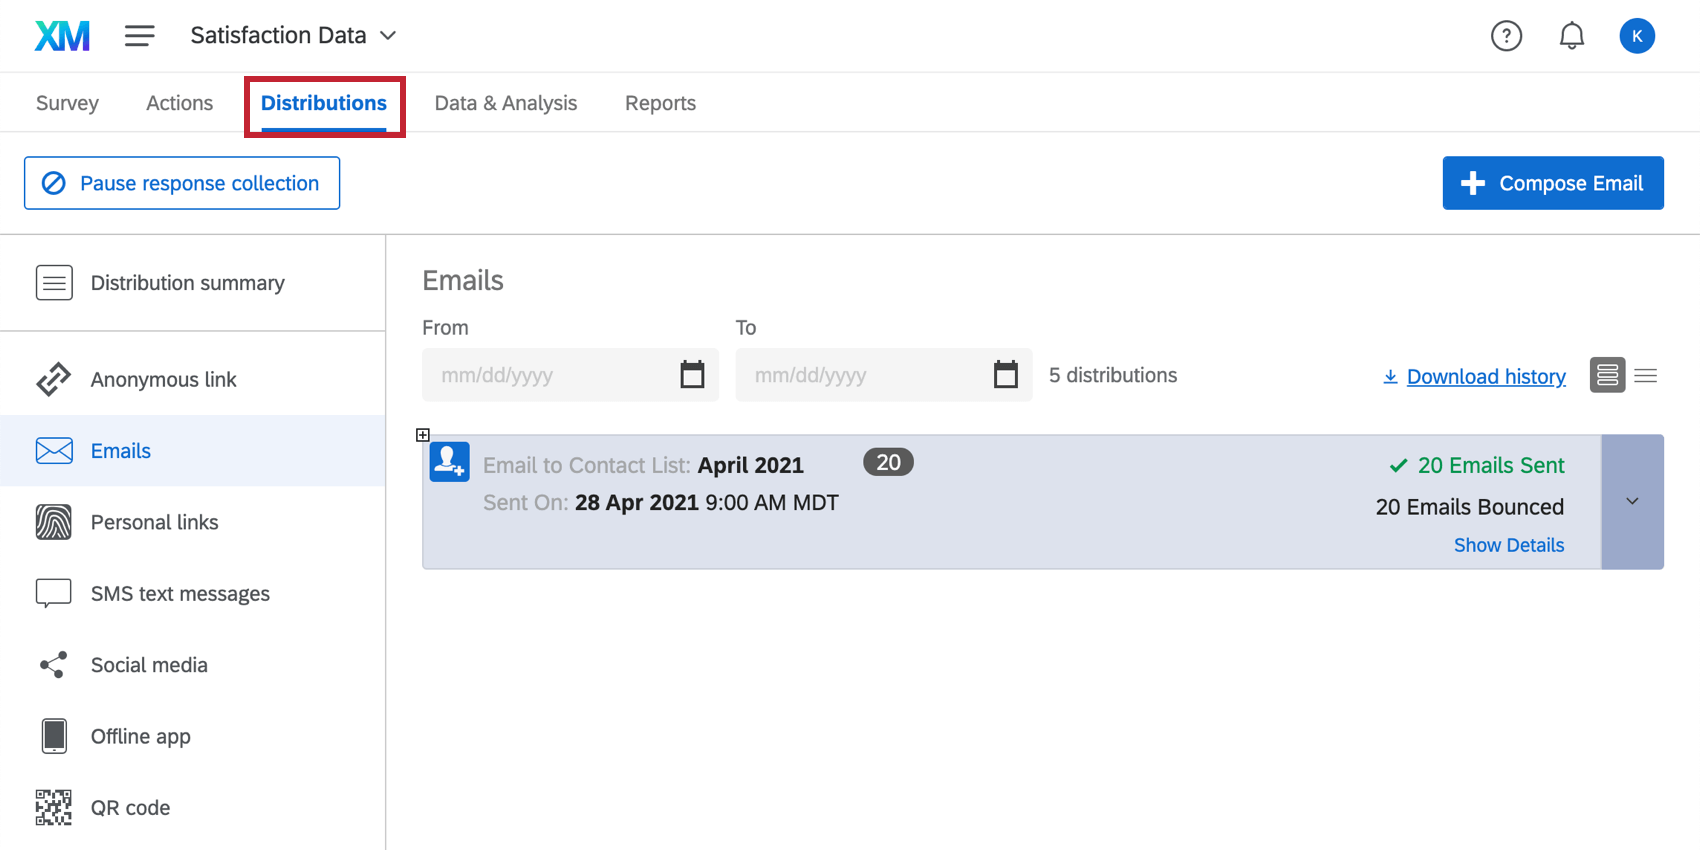
- Storing participants in a contact list: If you’re successfully saving recipients to a contact list but the distributions aren’t going out, check the Distributions tab, as each distribution to an individual contact will be visible there. Here, you can download the Distribution History to track the distributions status.
- Email sent, but not received: If the distribution was sent, there may be an issue with email deliverability. Visit our page on Custom From Addresses to get some tips on improving email deliverability. If your emails are being marked as spam, you can also visit our page on how to Avoid Being Marked as Spam.
- Email not sent: If the distribution was not sent, has the survey been shared with you?
- If the survey has been shared, check with the original survey owner to ensure that they have given you permission to distribute the survey. To see where the original survey owner can give you this permission, visit our Sharing a Project
- If the survey has not been shared, the issue may be due to an error in Salesforce and the troubleshooting items in the Troubleshooting in Salesforce section should be reviewed.
- Verify that you are using verified or accepted From addresses and Reply To addresses are valid, per our Custom From Addresses.
- If your emails are failing or bouncing in the Distributions tab, refer to our Email Distribution Error Messages page for more information on these errors.
TROUBLESHOOTING IN SALESFORCE
- Email: Is Qualtrics looking at the correct field to find the email address? Qualtrics can only send a survey if it can find an email address as specified in the steps above.
- Flow activation: Just like surveys have to be active to collect responses, a Flow has to be active before it will send survey requests to Qualtrics. For information about how a Flow is activated, view the steps above.
- Workflow Flow fires: Set up another simple action in the same Salesforce Flow and see what happens when the Flow criteria met. Does this other workflow fire properly?
- If the Workflow fires, check the Task Output in the Workflows Reporting tab and continue troubleshooting below.
- If the Workflow doesn’t fire, there is an issue with your Flow criteria. Check these conditions to ensure they are correct.
- Outbound URL: Ensure that the appropriate Outbound URL has been successfully pasted into the Workflow, as shown in the steps above. If this link is missing or is incorrect, Qualtrics won’t know to send surveys when the Flow is met. Note that you should be using the survey owner’s outbound message URL. If an incorrect Outbound URL is connected to the Flow you are triggering, you will not see the workflow being triggered in Workflows Reporting despite meeting the Flow’s conditions.
- Pending Messages: Go to the “Monitor” section under “Setup” within Salesforce. There is a section to monitor “Outbound Messages.” If you see any pending messages there, then Salesforce is more than likely the issue. However, if you see the outbound message there for an extended period of time (e,g., more than five minutes), contact Qualtrics Support.
- Salesforce Permissions: Your Salesforce account needs permission to trigger Outbound Messages. This permission is available in your Salesforce account by navigating through Profile -> System Permissions -> Send Outbound Messages.