
Embedded Data
What's on this page
About Embedded Data
Embedded data is any extra information you would like recorded in your survey data in addition to the question responses. It can be used to store information such as:
- Demographics and other information you knew about respondents beforehand and saved in the contact list.
- The social media site a respondent came from.
- The condition a respondent was assigned to in a research study.
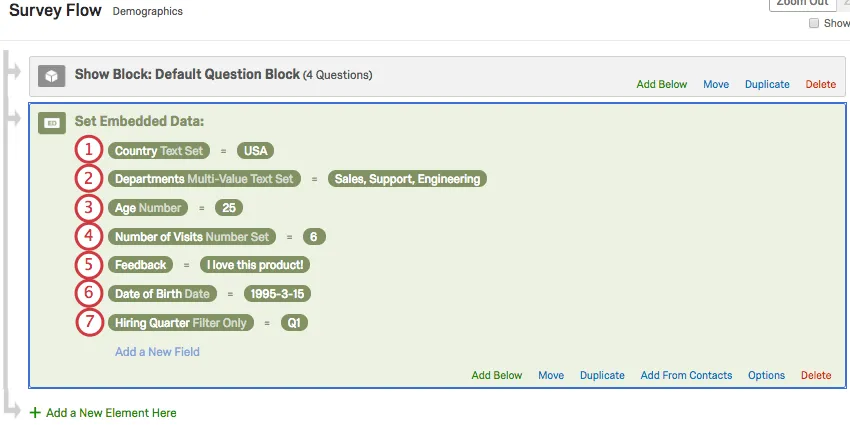
Embedded data consists of a field and a value. The field is the name of your variable (e.g., Gender, State, Age). The value is what your field will be set to in your data. Just as one question can have multiple possible answers, an embedded data field can have multiple possible values (e.g., a field called Country might have a value of United States, Mexico, or Canada).
The value for your embedded data field can be pulled from data that you have uploaded into a contact list, information appended to the respondent’s survey link, built-in fields provided by Qualtrics, or values set in the survey flow.
Warning: All embedded data field names were previously case-sensitive. For a vast majority of users, embedded data field names are no longercase-sensitive, meaning “test” and “Test” would be treated as the same field. However, we still advise matching cases as a best practice, since there is a small portion of accounts where this change has not been made. Please note that embedded data fields within surveys and workflows are always case-sensitive.
Using Embedded Data in Your Survey
Once embedded data has been added to your survey, it can be used in a number of ways, including:
- Piped text to display embedded data in your survey questions.
- Branch logic to determine what sections of a survey your respondent should take.
- Display logic to determine whether a respondent should see a question.
- Quotas to determine whether someone meets the conditions required to increment them.
- Email tasks to determine whether an email should be automatically sent upon completion of a survey.
- Salesforce extension to help the system decide what to communicate with Salesforce.
- Data & Analysis and Reports as part of your analysis.
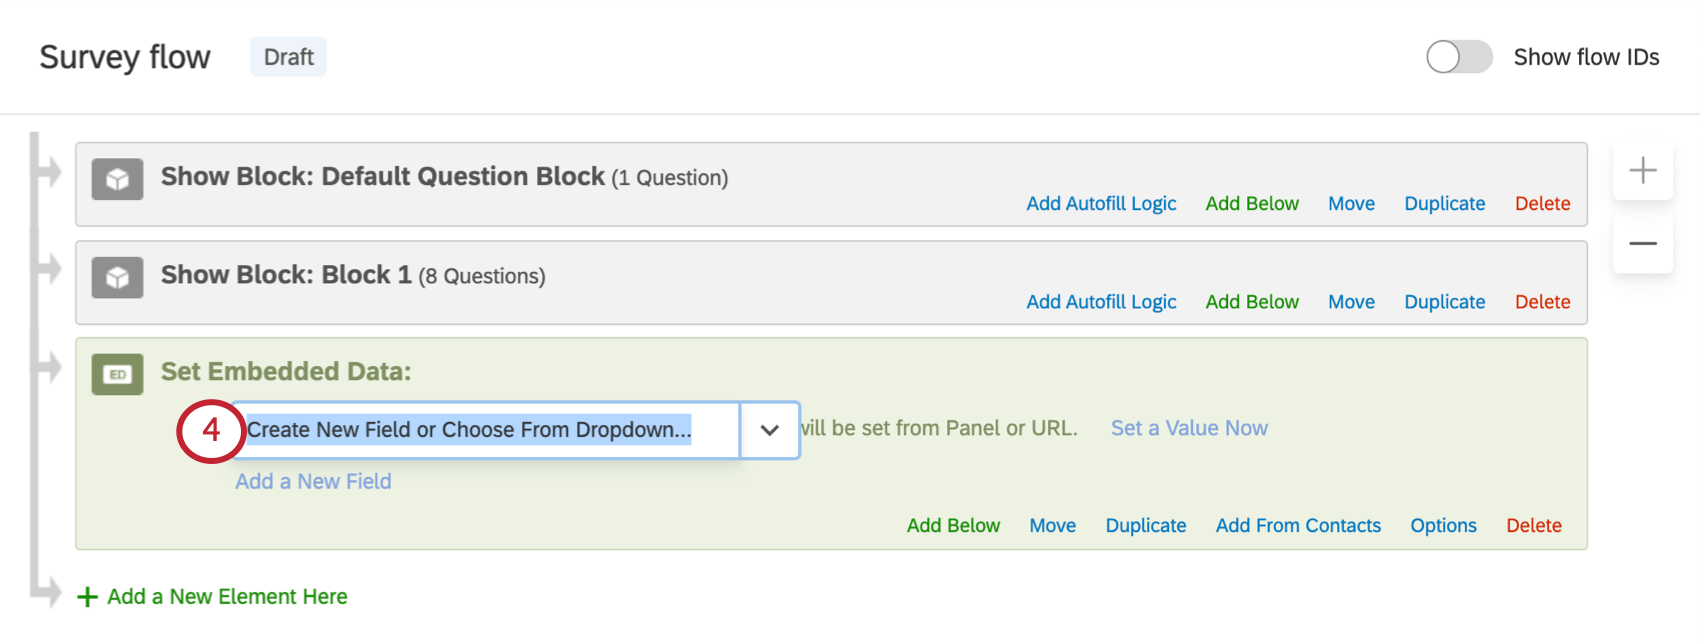
Creating an Embedded Data Element
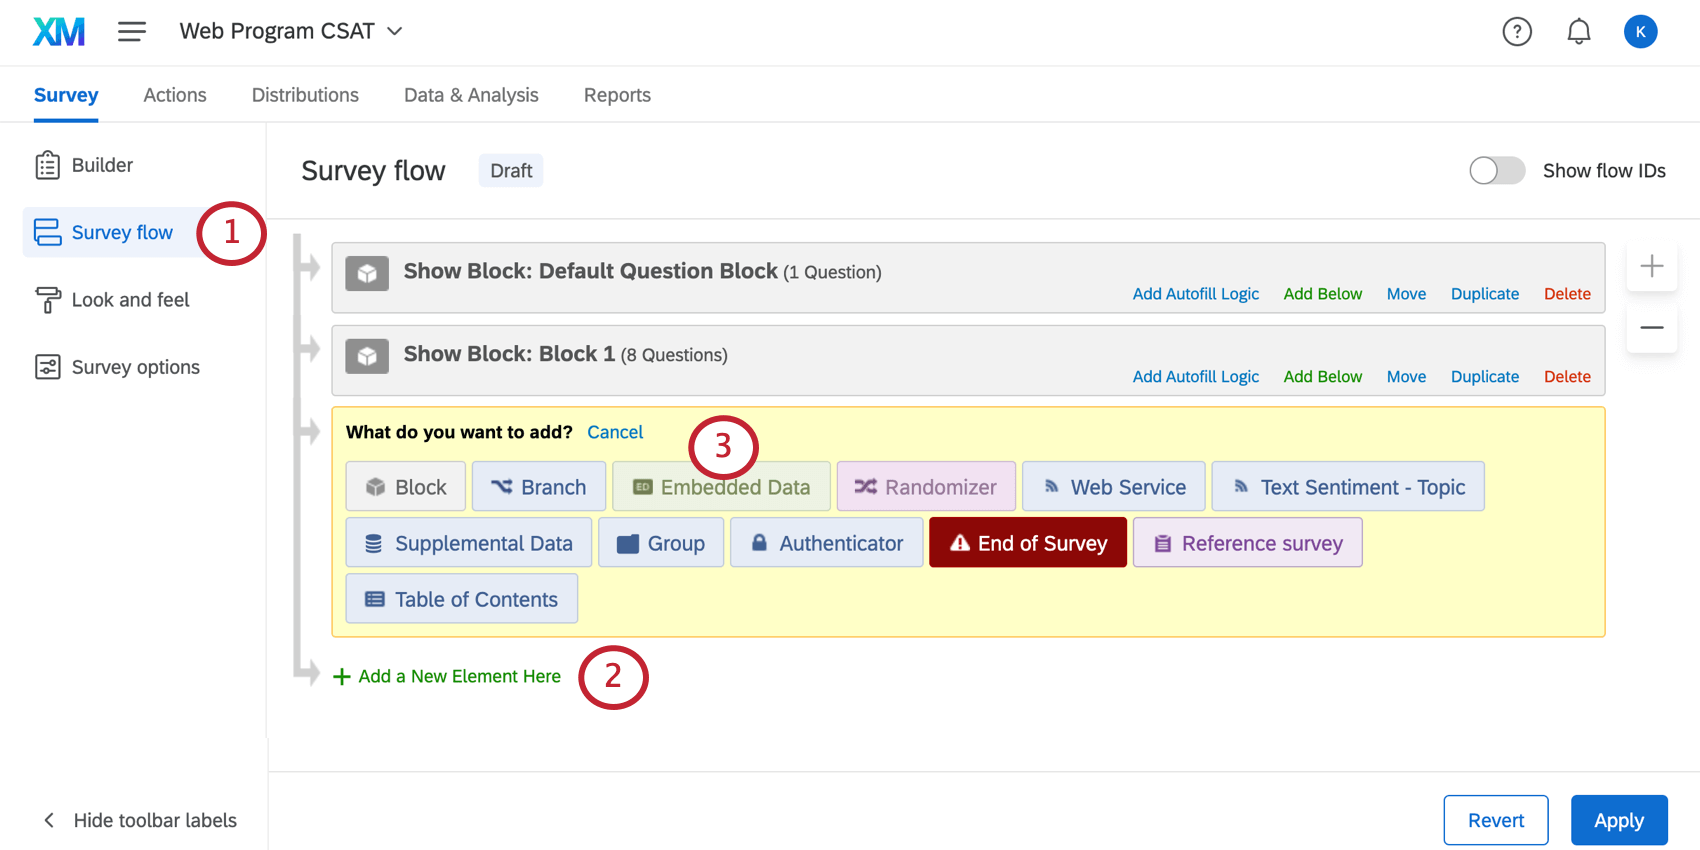
Qtip: Is there an element you want to place your embedded data under? Click Add Below on that element.
Qtip: Try to avoid special characters like emojis, periods (.), and hashtags (#) when naming your embedded data. In addition, the field name RID(or rid) is a reserved Qualtrics field used for back-end platform processes; you should never give any of your embedded data fields this name.
Qtip: If you’re not happy with where your embedded data element is, click Move and hold it to drag the element somewhere else in the flow.
Choose From Dropdown
When naming embedded data, click the blue dropdown arrow to see additional built-in options.
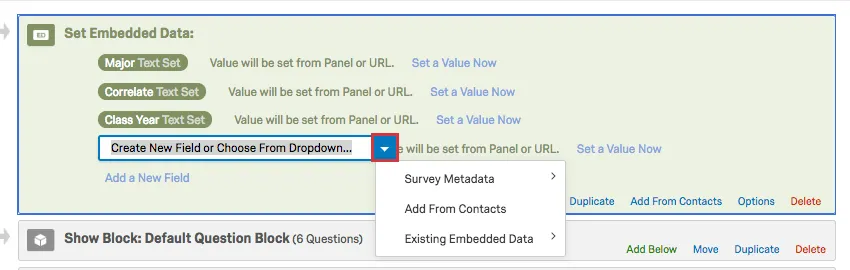
- Survey Metadata: This option includes a number of embedded data built into Qualtrics. See the linked section for more details on what this includes.
- Add from Contacts: Add one of the embedded data that you have saved in your contact list. See this section to learn how to pull in every one of those embedded data at the same time.
- Existing Embedded Data: This allows you to select embedded data that’s already in your survey flow. For example, if two different branches gets two different values of the same embedded data. This is incredibly useful for avoiding typos, and thus making sure all the data is saved in the same field.
Attention: When you create embedded data, make sure you follow these best practice guidelines! There are certain names and characters you cannot use with embedded data.
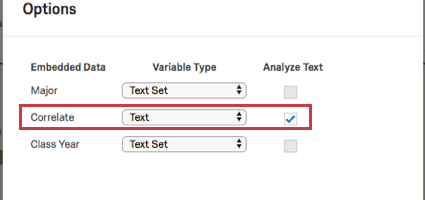
Embedded Data Options
Embedded data options allow you to determine which embedded data are eligible for text analysis, as well as change each embedded data’s variable type.
If you’re interested in breaking out your reports by participant age or you need to assign multiple departments to one person based on an embedded data variable, you may have to change the variable type. Changing the variable type of your embedded data can allow for more flexible ways to record your data.
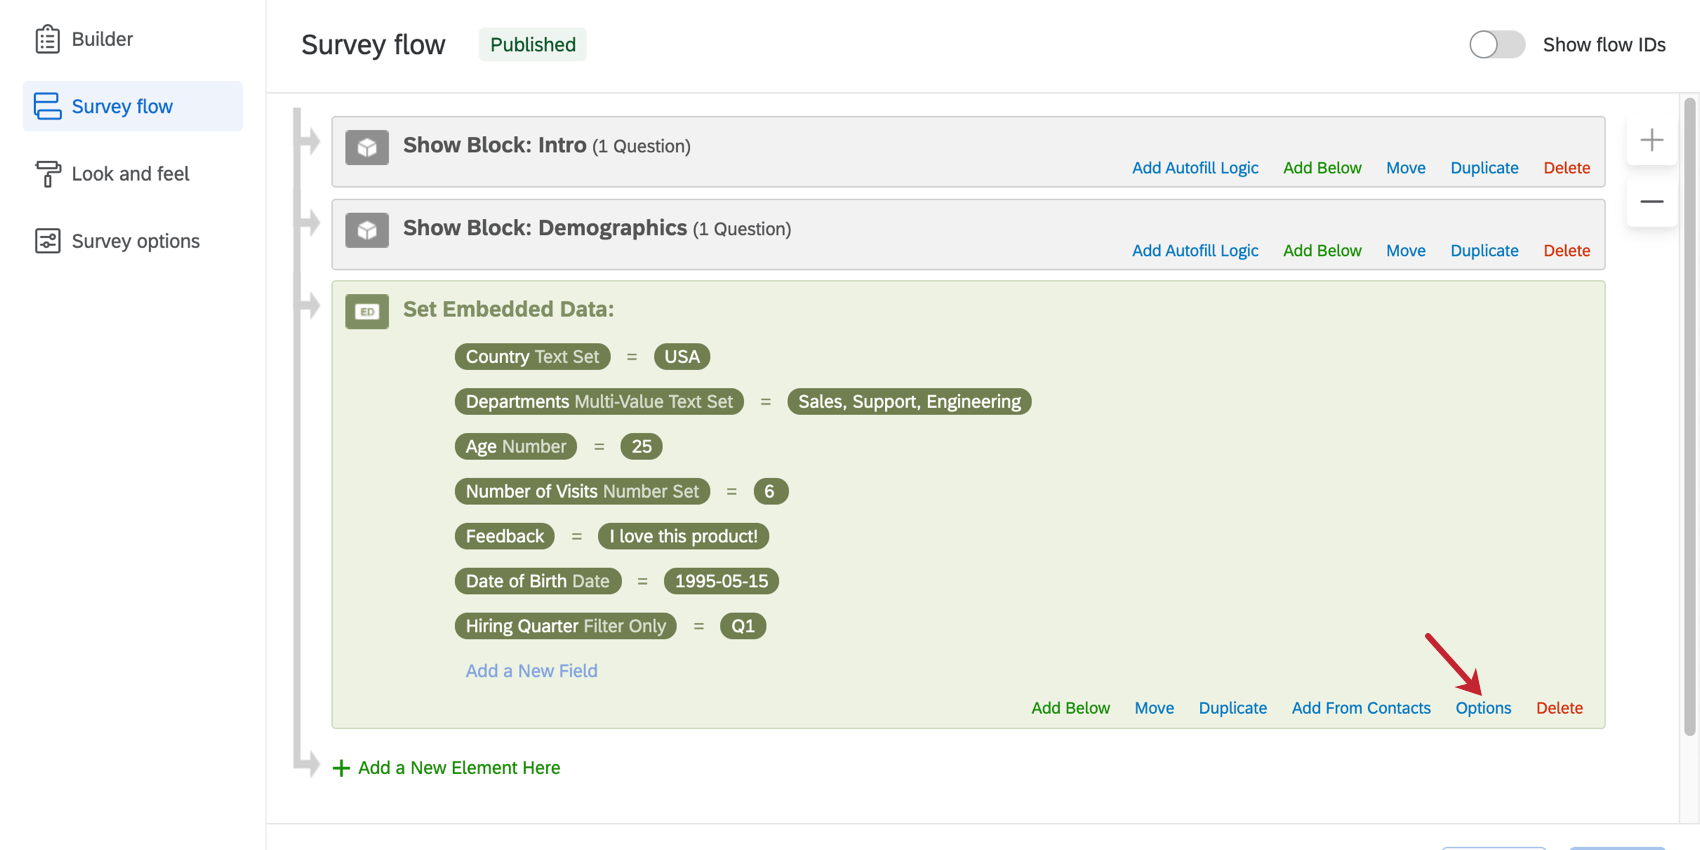
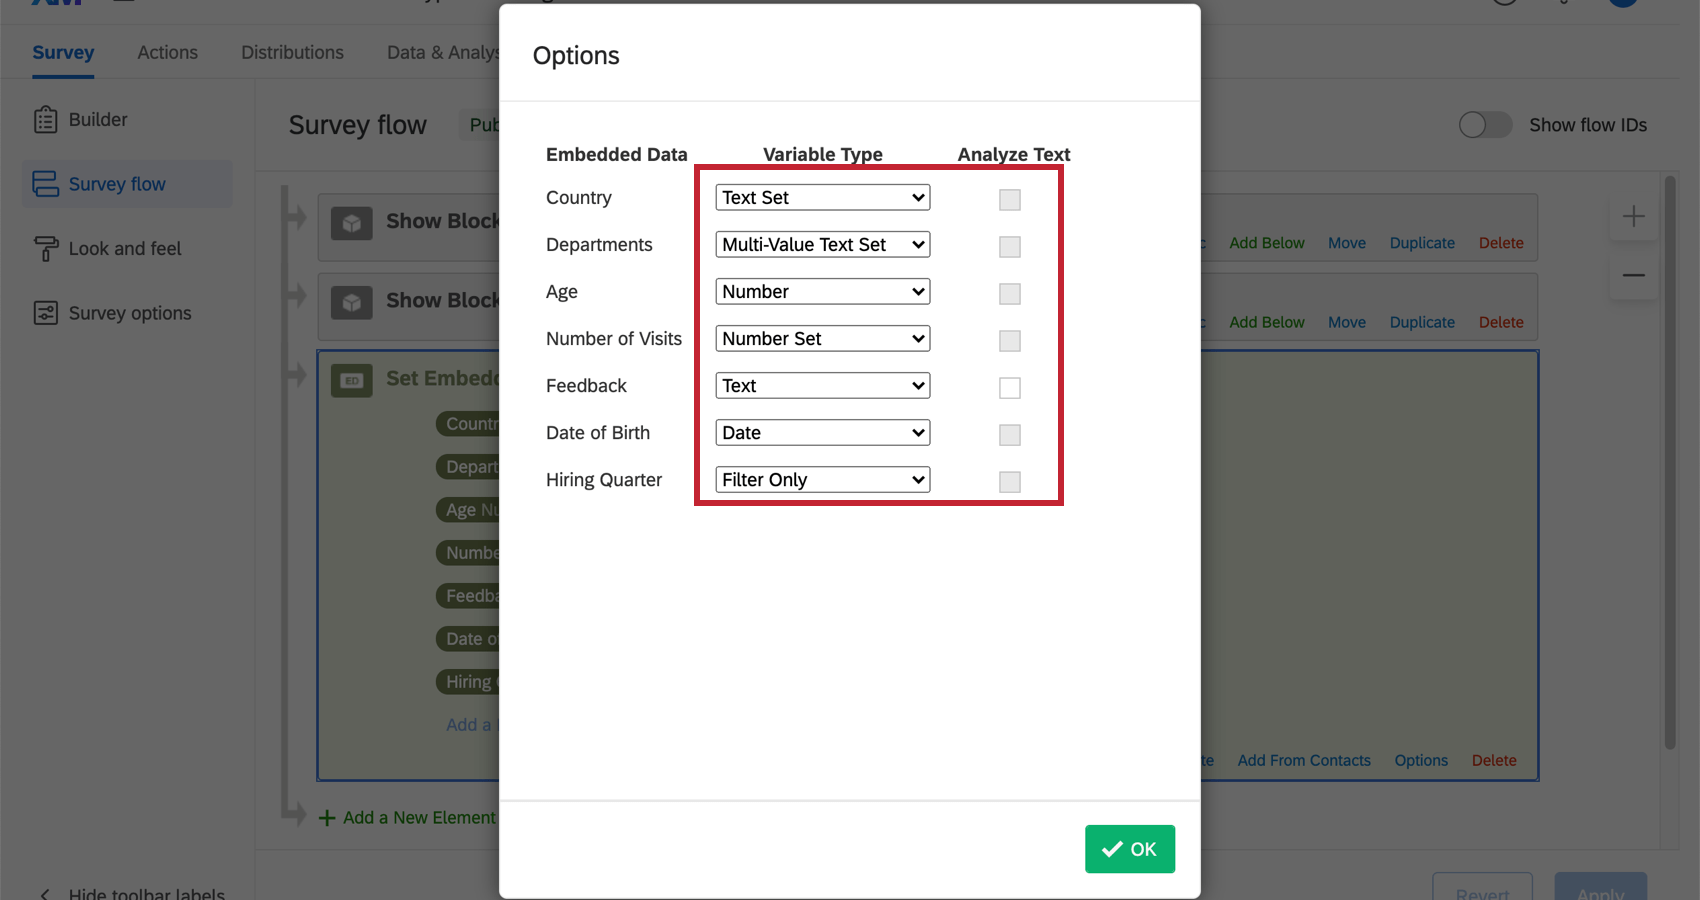
Qtip: Forgot to set your variable types before data collection? No worries! These settings can be changed retroactively.
Embedded Data Variable Types
Qtip: In order for the date to properly display when using the Date embedded data field, be sure the date is in one of the following formats:
- YYYY-MM-DD
- YYYYMMDD
- YYYYMMDD:HHMMSS
- YYYY-MM-DD HH:MM:SS
- YYYY-MM-DD’T’HH:MM:SS.sss’Z’
Qtip: If your data is not displaying, make sure it is compatible with the Embedded Data variable type. For example, text data will not display for a field set to the Number variable type.
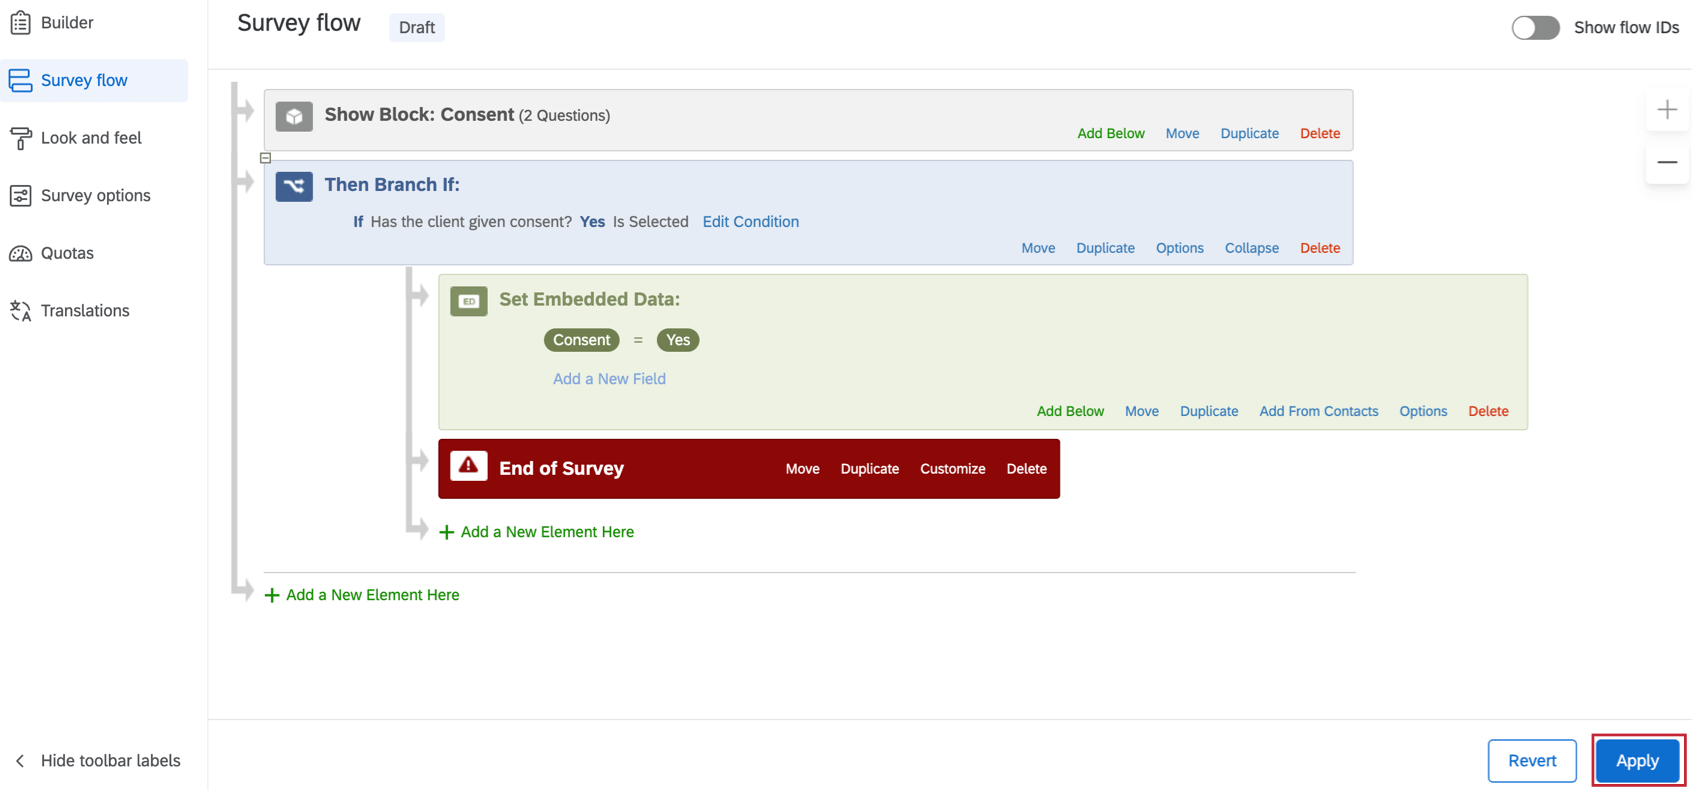
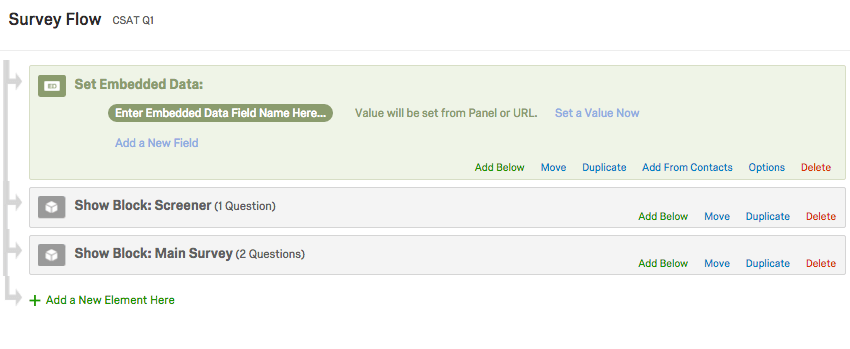
Setting Values in the Survey Flow
Often the value of your embedded data is stored outside the survey, such as in a contacts list or appended to the end of the respondent’s survey link. However, you can also set the value manually in the survey flow.

To set a value in the Survey Flow
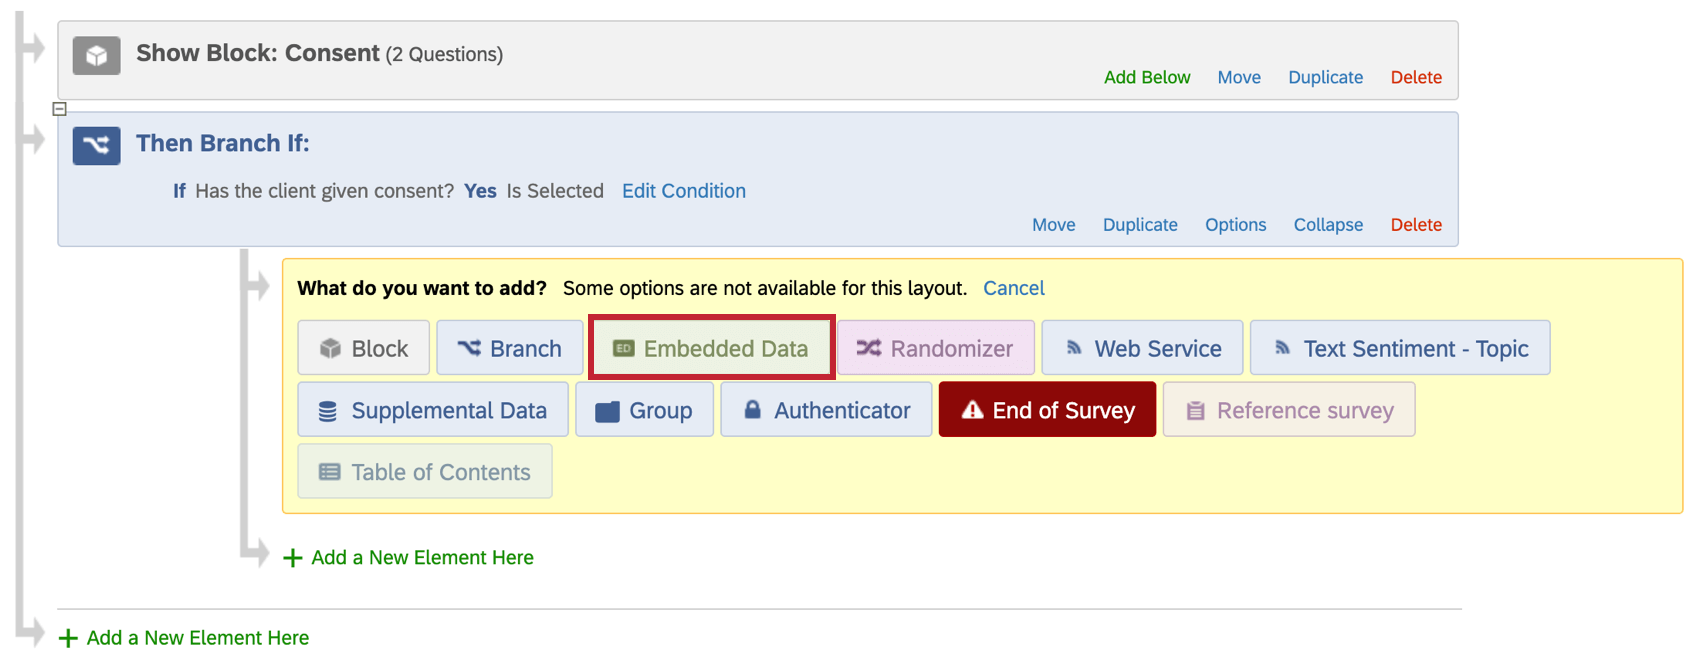
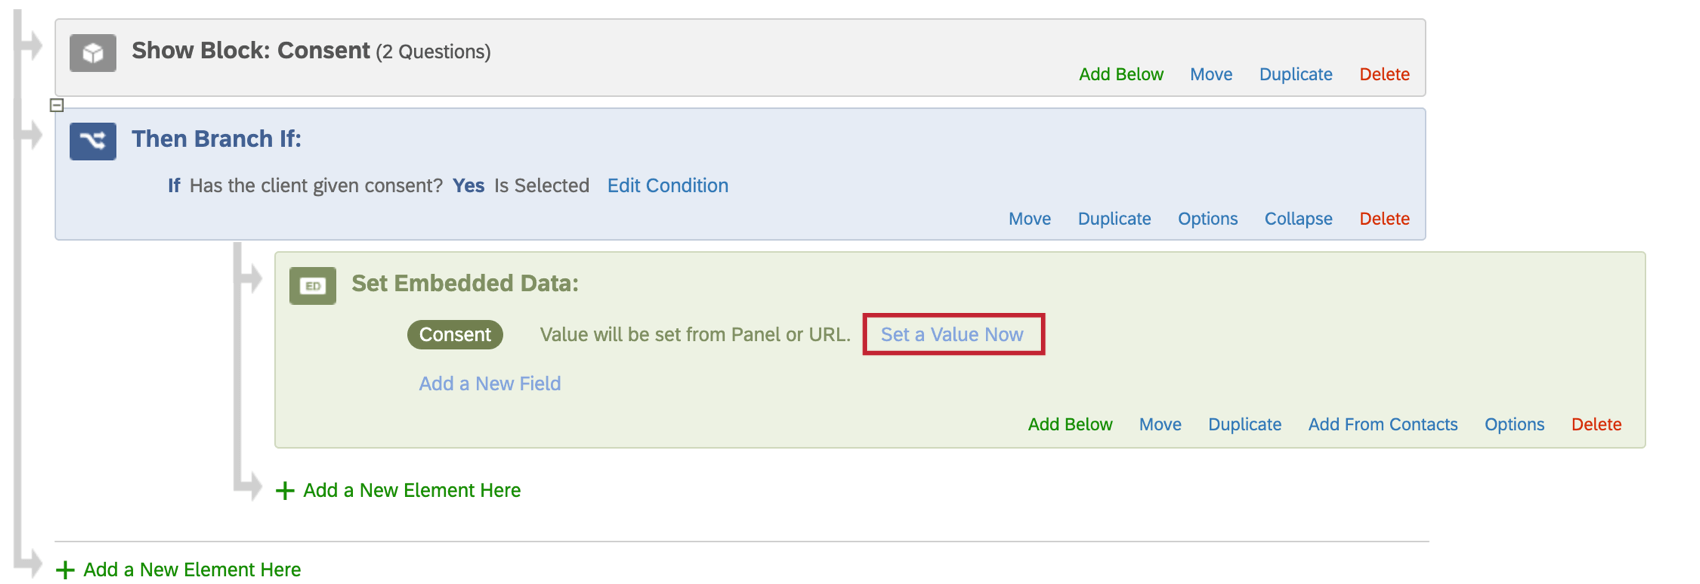
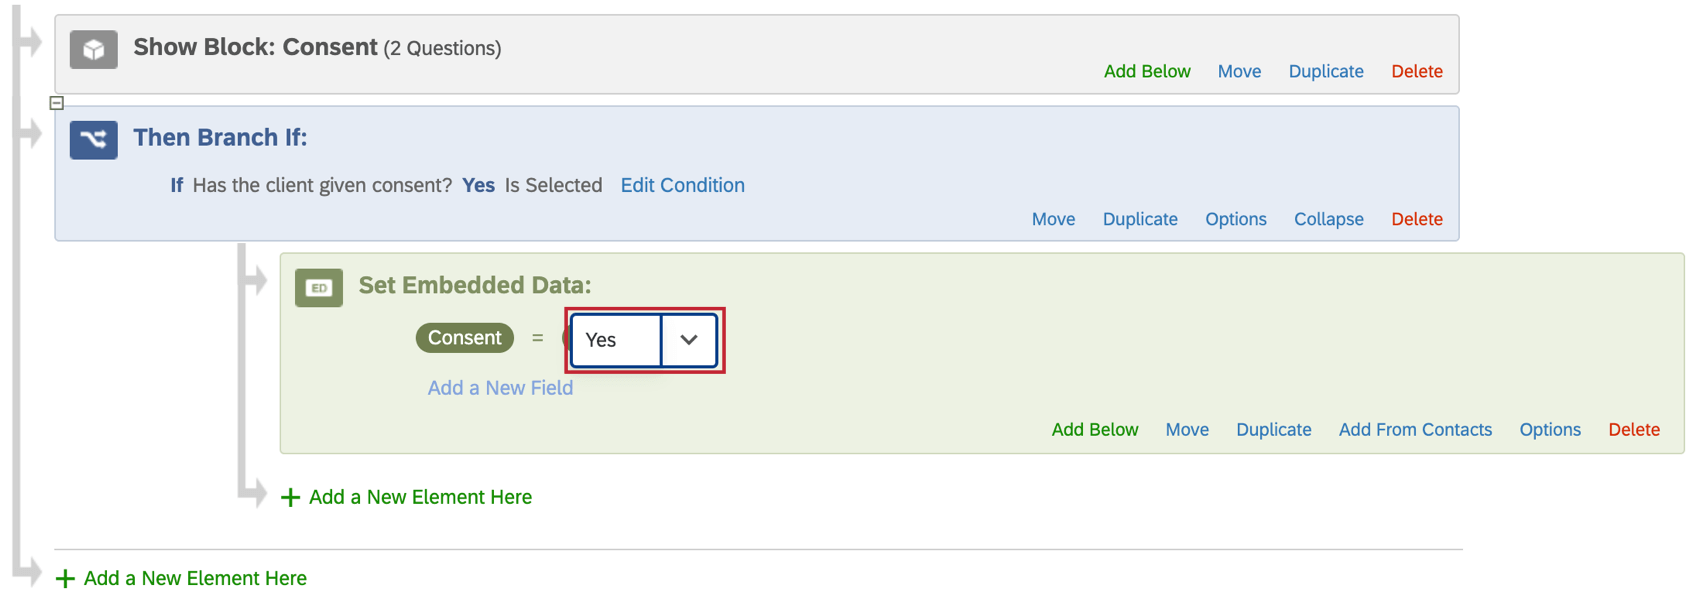
Qtip: Using piped text as your embedded data value allows that value to dynamically change for each respondent based on their question responses or other criteria.
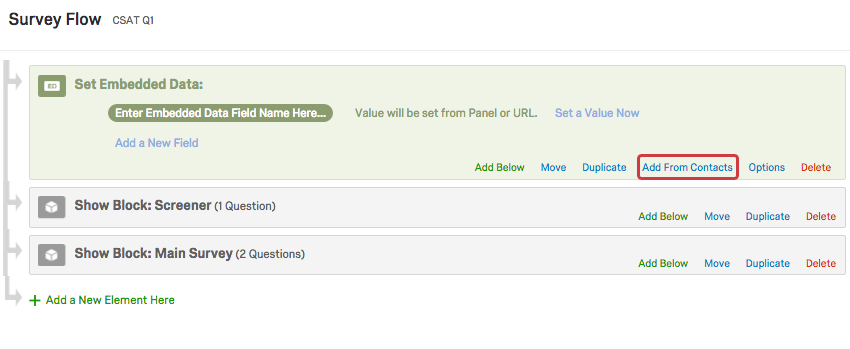
Setting Values from a Mailing List
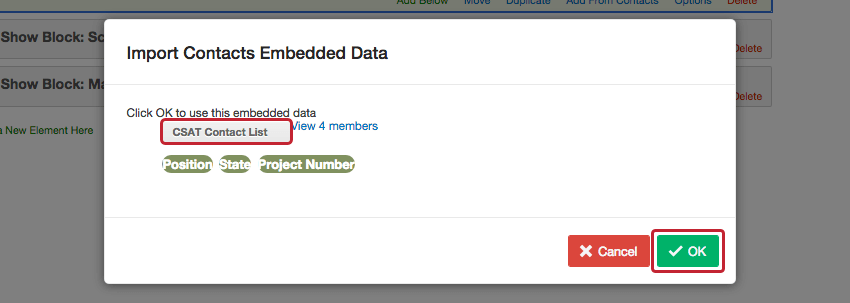
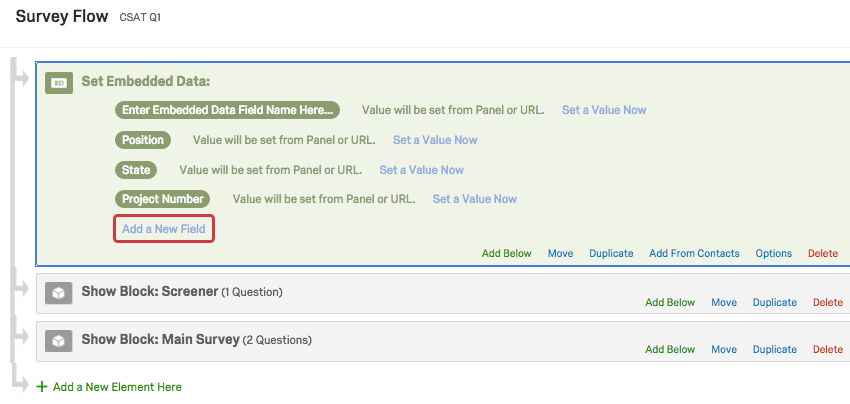
A mailing list is a mailing list used for distributing surveys many ways on Qualtrics, including email, personal links, and SMS distributions (text messages). In addition to including names and email addresses for each recipient on this list, you can include any demographic or unique data you’d like in a mailing list. For example, in addition to name and email, the mailing list in the screenshot below includes the embedded data fields Position, State, and Project Number. All we had to do to include this information in the contact list was add those columns of data to our contact file before we imported it.

However, just because the embedded data is in our contact list doesn’t mean it’s automatically included in the survey data. By adding an embedded data element in your survey flow, you can have this information saved in your results for use in your analysis.
Qtip: Although you need an embedded data survey flow element to add embedded data to your recorded results, you do not need this element to use embedded data in piped text, branches, or display logic.
To include information from your contact list in your survey data
Qtip: Though this element can be placed anywhere in the survey flow, it is best practice to put these embedded data elements at the beginning of your survey.
Qtip: Forgot to follow these steps before launching your study? No worries! If there was embedded data in the contact list that you distributed the survey to, you can retroactively add fields to the survey flow after the survey is finished. Note that only embedded data that existed in the contact list at the time of response creation can be retroactively added to the survey flow. Embedded data added to the contact list after response collection cannot be added retroactively to the survey flow and pulled into your dataset.
Setting Values from the Survey URL
If you’re not distributing your survey to a contact list, you can still bring embedded data into the survey for each respondent by adding your embedded data field names and values to the end of the survey link.

Let’s pretend we are preparing two versions of our anonymous link: one that indicates the respondent’s source is Facebook and one that indicates the source is Twitter. These anonymous links will take respondents to the same survey – the only difference is the social media “Source” added to the end. When ready to distribute, we’d only post the Facebook link on Facebook and the Twitter link on Twitter. When a respondent accesses the survey link, Qualtrics will read their survey link and know which “Source” the respondent came from.
Embedded data can be added to any kind of survey link, and you can add many different embedded data to one link. To learn more with step-by-step instructions, see the Passing Information via Query Strings support page.
Warning: Do not pass personal data such as passwords and other sensitive information in the survey URL. Anyone with access to the URL will have access to the personal data contained in the URL’s query strings. If you’d like to pass along personal data to a survey, add the personal data to a contact and then save that contact information as embedded data in your survey flow.
Setting Values with Built-in Embedded Data Fields
In addition to creating your own embedded data variables or pulling them in from other sources, you also have access to some built-in variables that Qualtrics records for every response. These elements can be added to the survey flow before or after you have collected responses by using the steps described in the Creating an Embedded Data Element section. You won’t need to set a value when you use these fields, because each one performs a special function in the responses (described below) and uses this to determine the value. Note that because of this, you will be unable to set custom values for these fields in the survey flow.
The following built-in embedded data fields can be added to your survey:
| Field Name | Description |
|---|---|
| AnonymizeResponse | This element is set from the system to tell if the response was anonymized or not. 1 = anonymized, 0 = not anonymized. |
| ContactID | This element provides you with the contact ID associated with the respondent who took your survey. Note that this field will be empty if you distribute via an anonymous distribution method. |
| ContactSegmentIDs | This element provides you with the Contact’s Segment IDs, which identify all the segments the respondent is a member of at the time the survey was taken. See this page for more information on using segments in XM Directory. This field will be empty if you distribute via an anonymous distribution method. |
| DeviceIdentifier | When using the offline app, this element will record which device was used to record the response. This field must be set in your Offline App and can be updated at any time by clicking the cog in the top-right corner of the app, but it will only affect the DeviceIdentifier for future responses. For more information, visit the Setting Up the Offline App support page. |
| ExternalDataReference | This element allows you to see the External Data Reference field from the contact list. This can be useful if the contact list has been deleted. |
| Finished | Surveys respondents finished all the way to clicking the last Next button are TRUE. Responses in progress that were never submitted and eventually became recorded or closed are FALSE. |
| PanelID | This element will give you the ID of the contact list (a.k.a. panel) to which each respondent belongs. Matching Panel IDs can be found in the Qualtrics IDs section of Account Settings. |
| PanelMemberID | This element provides you with the Panel Member ID (same as RID) associated with the respondent who took your survey. Note that this field will be empty if you distribute via an anonymous distribution method. |
| Preview | This element is set from the system to identify if the response was a preview or not. Survey = preview, 0 = not preview. A blank value means it was a test response. |
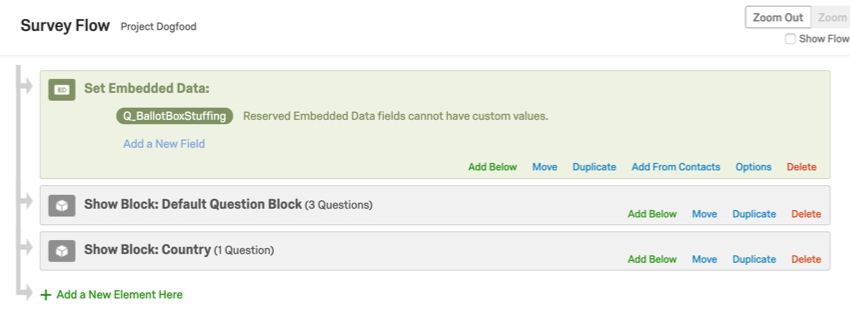
| Q_BallotBoxStuffing | Fraud Detection field that records when prevent multiple submissions is set to continue survey and set an embedded data field. A True/False field where True means the respondent is a duplicate. |
| Q_CHL | This element gives you the distribution channel that the response came from. This is a useful tool to diagnose how the respondent accessed the survey. |
| Q_DataPolicyError | A True/False field associated with sensitive data policy settings. Set to true if there was an error checking this response for private data violations. |
| Q_DataPolicyViolations | Comma separated multi-text field associated with sensitive data policy. List of private data policies violated in the response, such as “Social Security Number, Credit Card Number, Date of Birth, Profanity.” |
| Q_DL | This distribution link element is what links the response to the contact list. It is formatted by the distribution id, survey id, and contact lookup id. |
| Q_EED | This element set in your survey flow allows you to pass encoded information through Query Strings. |
| Q_EMD | This element allows you to see the email, personal link, or SMS distribution ID that the survey link was sent in. |
| Q_FILE_NAME | This element records the name of the source file when surveys are distributed via automations. |
| Q_Language | This element allows you to track which language a respondent takes the survey in. This information is reported in the survey data using a two letter language code as discussed in the Available Language Codes section of the Translate Survey page. |
| Q_LastModified | Pulls the Unix epoch time in UTC for the survey version that the response was taken in. |
| Q_PopulateResponse | This can be used as a URL parameter to pre-populate survey responses. For example, if you wanted to have a survey question asked within an email, the image associated with each answer choice would pass a different value and when the respondent lands on the full survey, the value would already be answered, ready for the respondent to change or submit that response and continue with the rest of the survey. For more information, see How to Use Q_PopulateResponse. |
| Q_Preview | This element is set from the system to identify if the response was a preview or not. 1 = preview, blank = not preview |
| Q_R | This element records the original Response ID when using a retake link. |
| Q_RD | This element is the Distribution Reminder ID included in a reminder link sent to a recipient to remind them to take a survey. |
| Q_R_DEL | This element is set from the system to tell if the original response from the retake link was deleted or not. 1 = deleted, blank = not deleted. |
| Q_RecaptchaScore | Fraud Detection field that records when bot detection is enabled. Score returned using reCaptcha v3 technology. A score of 0.0 means the respondent is likely a bot. Score of 1.0 means they are likely human. |
| Q_RecipientPhoneNumber | This embedded data captures the phone number of a person taking an inbound SMS survey. Q_RecipientPhoneNumber is retroactive. |
| Q_DuplicateRespondent | Fraud Detection field that records when duplicate detection is enabled and set to flag responses. A true/false field where “true” means the response is likely a duplicate. |
| Q_SMSAccessCode | Captures which access code was used to enter an SMS survey. |
| Q_SurveyVersionID | This element will give you the version ID of the survey that a preview response came from. |
| Q_TerminateFlag | Flag responses as either Screened or QuotaMet. See the Flag Response Option page for more details. |
| Q_TotalDuration | This element allows you to see the total duration (in seconds) of the survey response. This includes time with the survey open, and time spent away from the survey if the user closes out of the survey and returns. This was implemented on July 16, 2012, and is not available for responses recorded before that date. At this point in time, Q_TotalDuration does not work with the offline app. |
| Q_URL | This element allows you to view the URL first used to access the survey. Note that it omits the base URL, showing only the path and extra URL data. This is a useful tool for diagnosing issues where URL parameters are not recorded as expected. |
| Q(State/City)_ExportTag_suffix | When you use zip code content validation on a question with a text entry field, you can use Q(State/City)_ExportTag_suffix as embedded data to record the city or state indicated by a zipcode. For example, if your second question asks for the zip code, and you want the state, you’d call the embedded data QState_Q2. If Q2 is a form asking for name, phone number, and lastly zip code, it would be QState_Q2_3, since zip code is the third text field. For more information, see the step-by-step on the Validation support page. |
| RecipientEmail | This element allows you to see the PrimaryEmail field from the contact list. This can be useful if the contact list has been deleted. |
| RecipientFirstName | This element allows you to see the FirstName field from the contact list. This can be useful if the contact list has been deleted. |
| RecipientID | This element allows you to see the recipient ID of the contact from its associated panel. |
| RecipientLanguage | Adding this embedded data element in the survey flow will return the language associated with the respondent’s contact in XM Directory. Unlike Q_Language and Q_lang, this does not necessarily reflect the language in which the survey was completed. |
| RecipientLastName | This element allows you to see the LastName field from the contact list. This can be useful if the contact list has been deleted. |
| RecipientPhone | Adding this field to the Survey Flow in an account with XM Directory will capture the value of the reserved Phone Number field in the mailing list. |
| Referer | This element shows the page the respondent was on when they clicked the survey link. For most emailed surveys, you will see a URL for the email provider. If the survey is linked to with an automatic redirect, such as a URL redirect at the end of another survey, no value is recorded. |
| ResponseID | This element will give you the response ID that Qualtrics assigned for that response. This ID can be used in Web Services, API calls, and other applications. This field is not available for imported responses. However, imported responses are still assigned a responseID when imported, and this ID is available in the respondent information section of your dataset. |
| SessionID | The ID associated with a response in progress before it is submitted and assigned a response ID. This field is used in API calls. |
| SurveyID | This element will give you the survey ID that Qualtrics assigned for that survey that the individual responded to. This ID can be used in web services, API calls, and other applications. There is a similar embedded data field named sid or SID, which does not pull in the survey ID until after the survey session ends. |
| UserAgent | This element provides information about the respondent’s operating system and browser. For an easier-to-read version of this, consider adding a hidden meta info question to your survey. |
Warning: A metadata field entitled “Password” will not load metadata in Employee Experience projects or the employee directory.
Setting Values from Other Sources
In addition to using embedded data from a contact list or in the survey link URL, you can also pull embedded data from other sources.
Embedded Data in a Web Service
A web service allows you to pull data from an external website into your survey. For example, you might want to pull in today’s top headline from CNN or customer details from your own internal database. Information drawn from a web service is saved as embedded data. For an in-depth look at using a web service to draw embedded data from another website, refer to our Web Service page.
Embedded Data with Salesforce
If your Qualtrics account includes the Salesforce extension, you can pull embedded data into your survey from Salesforce using the trigger and email Survey feature.
Embedded Data in Website Feedback
See Embedded Data with Website Feedback.
Embedded Data in XM Directory
The behavior of embedded data in XM Directory is almost exactly the same as what’s described on this page. One of the key differences, though, is the ability to manage embedded data on a directory level. See Manage Embedded Data for more details.
Qtip: XM Directory is not the same as XM Directory Lite. If you do not have access to a brand-wide directory of contacts, you do not need to read the support page on managing embedded data.
Transactional Data
Transactions allow you to record interaction data about events associated with your contacts by representing a specific interaction at a specific moment in time. You can set survey embedded data based on transaction data.
Qtip: Though this element can be placed anywhere in the survey flow, it is best practice to put these embedded data elements at the beginning of your survey.
Qtip: You may not be able to select this field from the list of existing fields. Make sure you type the name of the field exactly the same way it appears in your directory, including the same spelling, spacing, punctuation, and capitalization.
Qtip: In order to pull transactional data into a survey response, you need to make sure the response is connected to a transaction. That means you need to send the survey to a transaction group, a transaction batch created via API, or a transaction batch created by a workflow where the transactional data field is set.
Removing Embedded Data
In this section, we will cover several ways to remove embedded data. Please pay careful attention to the warnings associated with each of the following instructions.
Removing Embedded Data Fields
Warning: If you delete an embedded data field after you have collected data, then you will no longer be able to report on that field. Best practice is to avoid removing fields once response collection has started.
You can delete entire embedded data fields inside the survey flow. This means removing the field itself and all data associated with it.
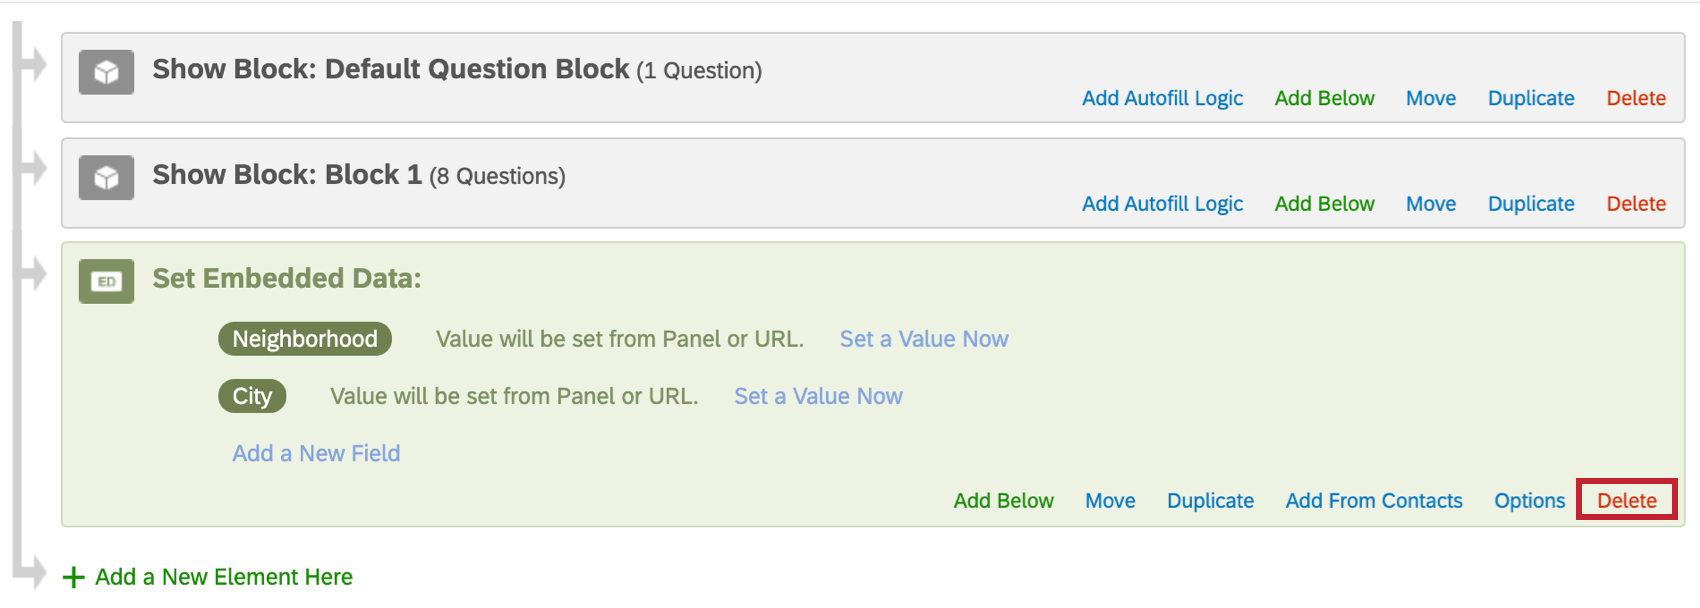
To delete all embedded data in an element, click Delete in the lower-right of an element.

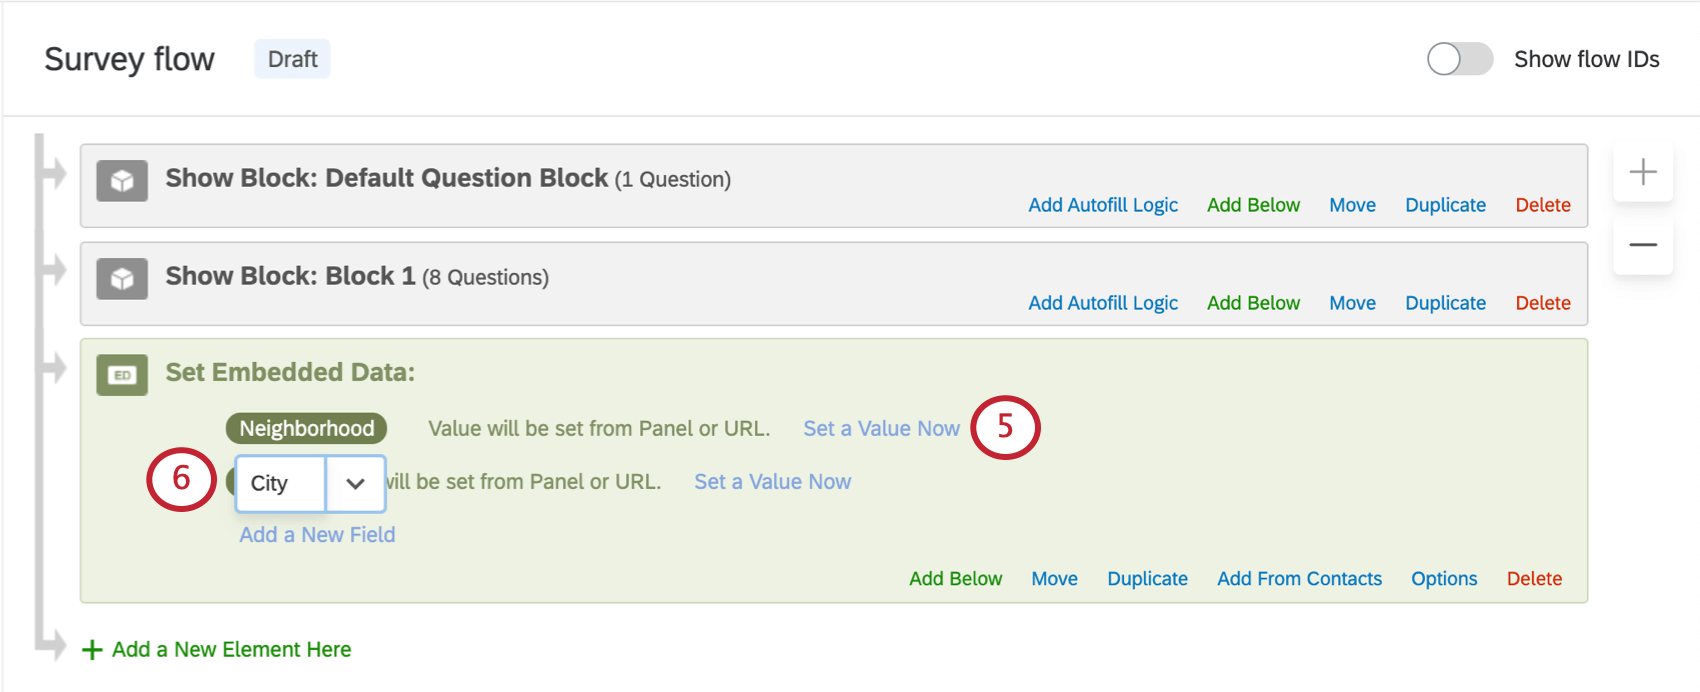
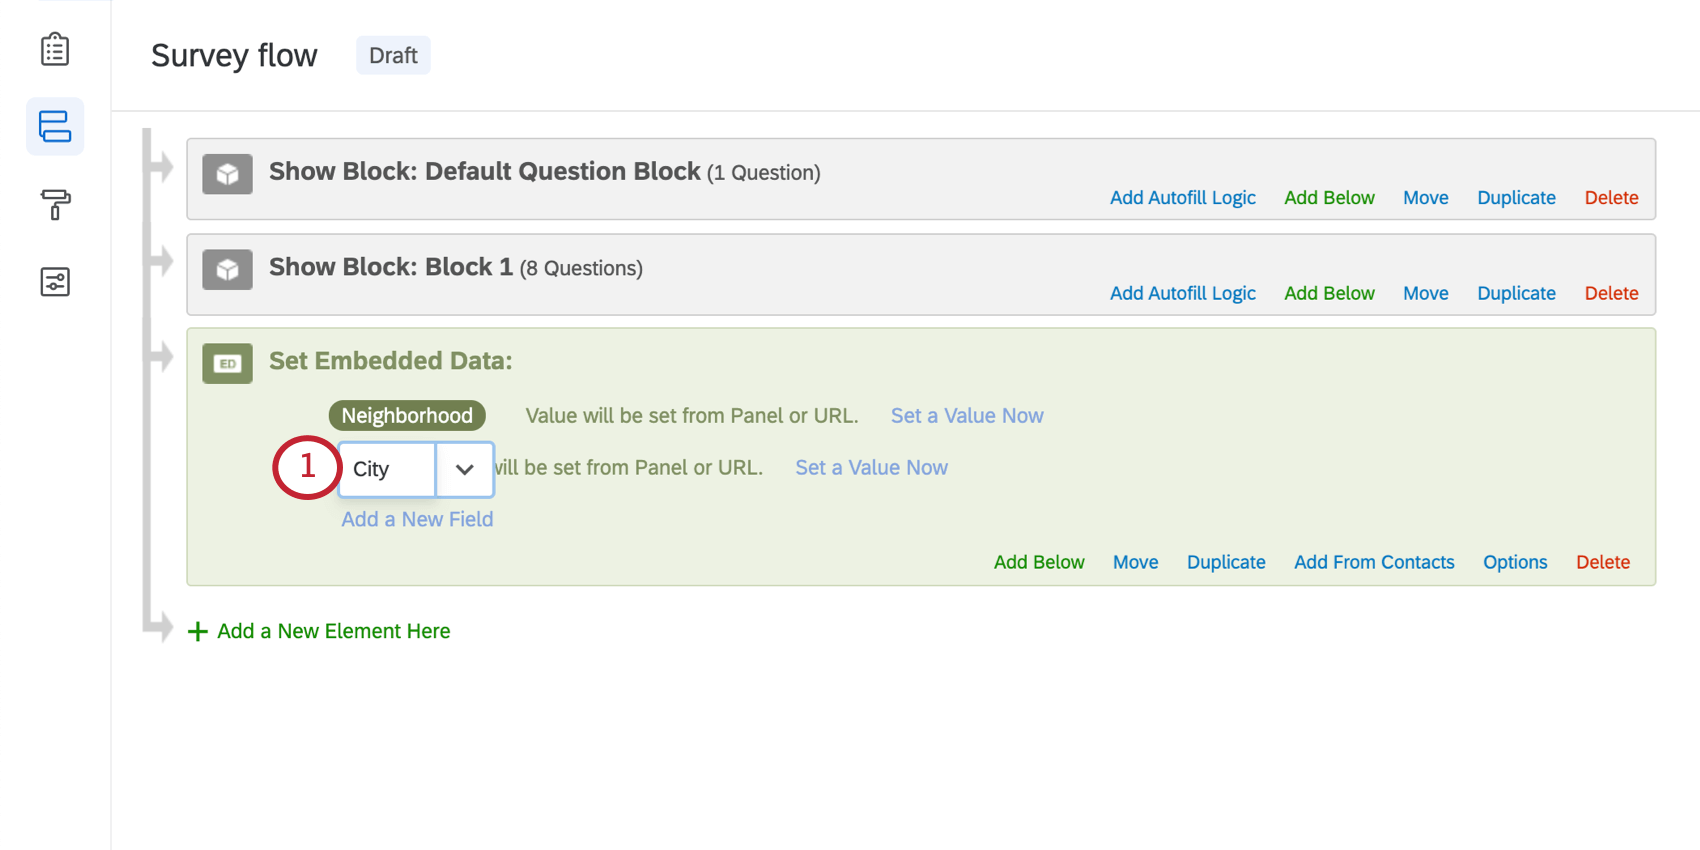
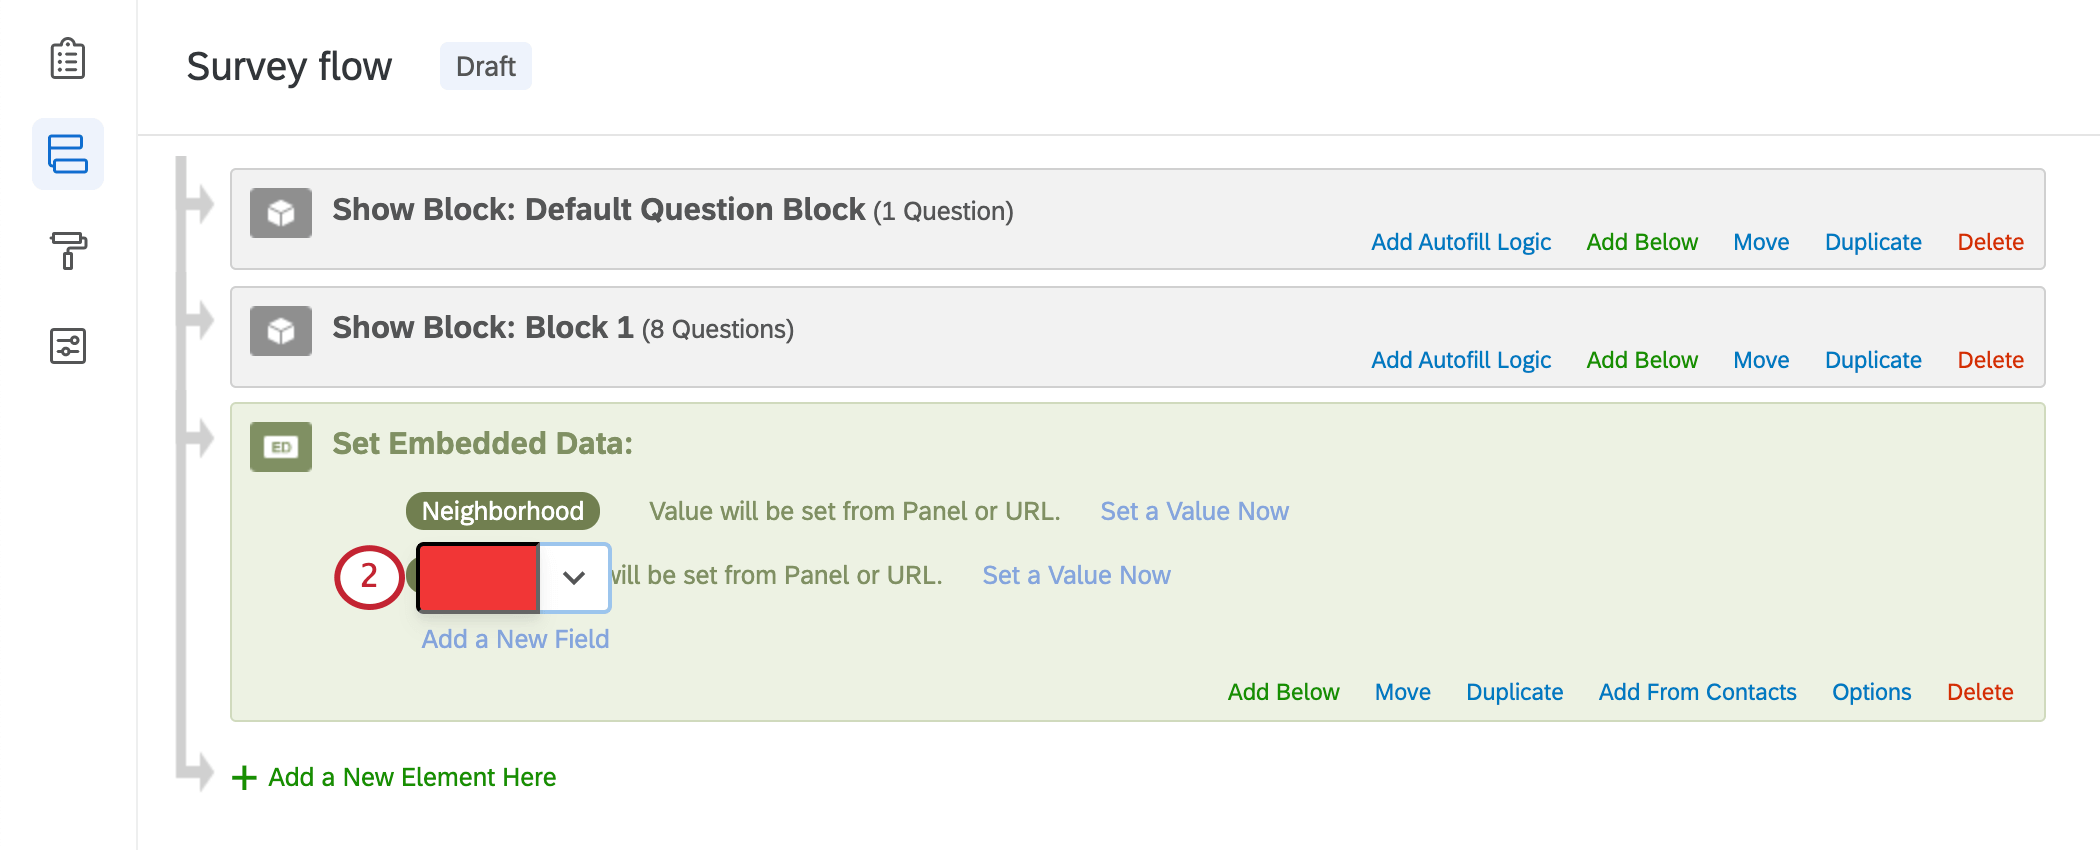
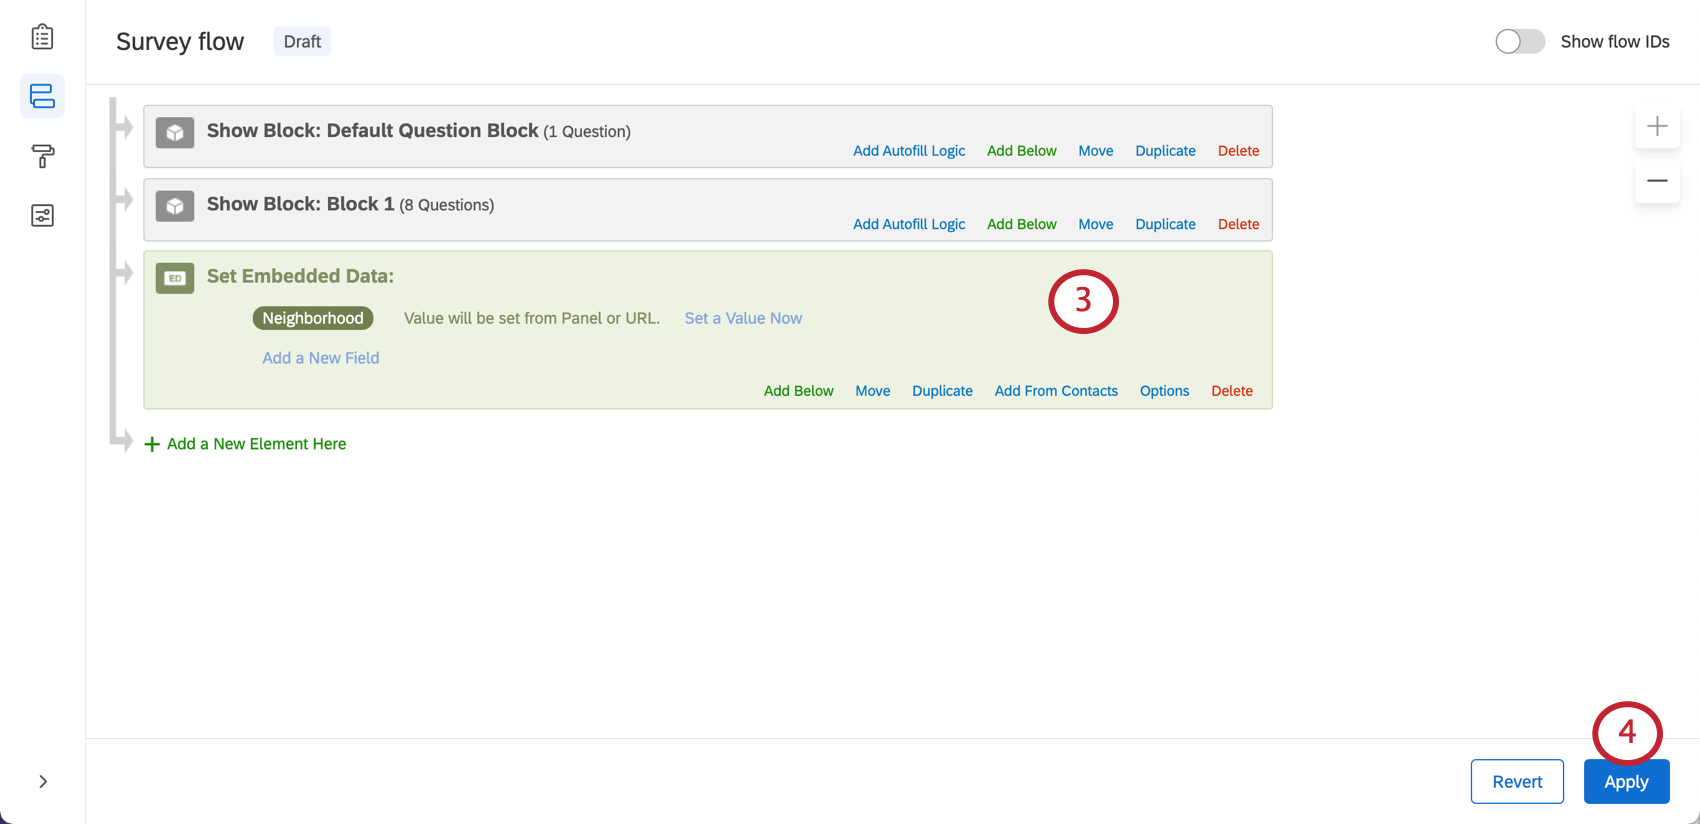
You can also delete one field from an element at a time. In the example below, we want to delete City, but not Neighborhood.
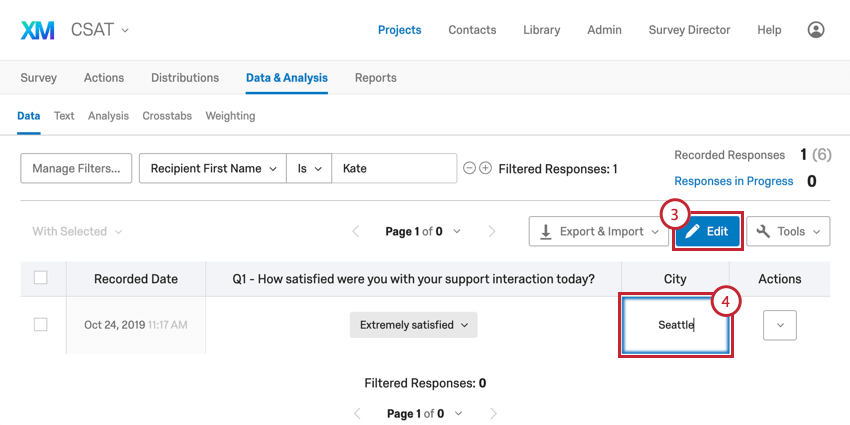
Removing One Respondent’s Embedded Data
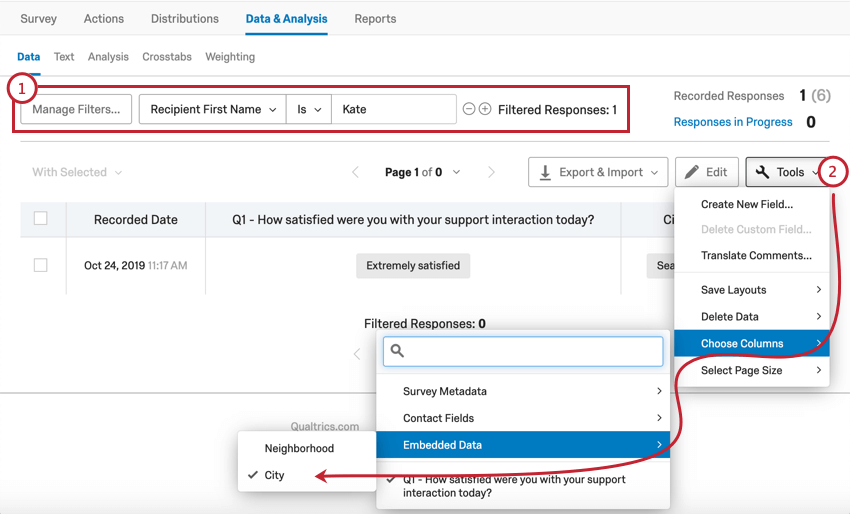
If you need to remove just one respondent’s embedded data value (or replace it with a new value), you should edit the response in Data & Analysis.
Best Practices and Troubleshooting Embedded Data
Naming Fields
- Names should never exceed 200 characters.
- Avoid special characters like emojis, periods (.), dollar signs ($), and hashtags (#) when naming your embedded data .
- When referring back to the same field, make sure you use the same spelling, capitalization, spacing, and special characters throughout Qualtrics. For example, if you build the contact list using Home Address as the embedded data that stores your contacts’ address, don’t use HomeAddress or just Address in the survey flow.
- If you plan on using query strings, either remove spaces in the names and values of the embedded data you use, or use underscores to prevent yourself from needing to encode spaces in the URL. For example, StoreID and Store_ID can be easier to use with a query string than Store ID. Qtip: If your field names or values do have spaces, make sure to use a URL encoder, like this one.

- If your list of embedded data gets long or involves a complex naming system, keep a document somewhere with a list of all your embedded data and what they’re for. That way you can always double-check for spelling, capitalization, and spaces, in addition to the purpose of the field. These documents can also help you, any colleagues you are working with, and any customer support representative you work with troubleshoot when you have questions.
- Don’t name your fields after the following:
- SID
- RID
- Auditable
- EndDate
- IPAddress
- RecordedDate
- StartDate
- Status
- RecipientPoints
- Other reserved field names
Setting Values
- Each value of an embedded data field should never exceed 20KB (20,000 bytes). The amount of bytes in a given character depends on the character. For example, characters in English are 1 byte, while characters in other languages such as Chinese or Hebrew can take up multiple bytes per character. If you are unsure if you may hit this limit, use a byte counter to see how many bytes make up your embedded data value.
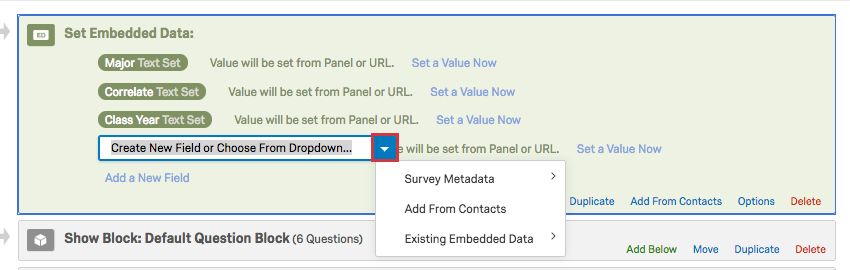
- If you are using built-in embedded data fields, you can save the fields in a survey flow embedded data element, as shown below. However, you cannot set values for these fields, because the way respondents complete the survey will determine those fields’ values.

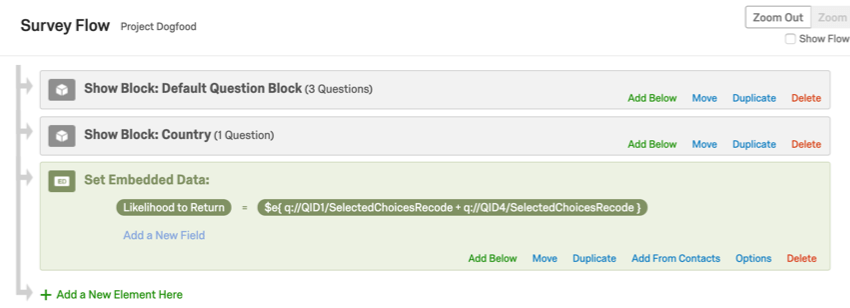
- If you are using math operations in your survey, set them in an embedded data field so the results are saved with your survey data, like this:

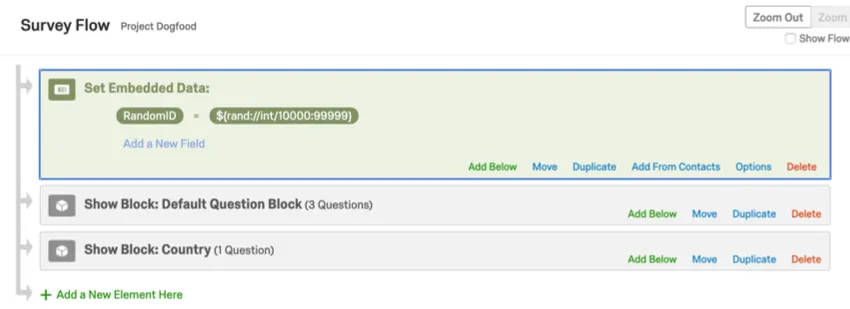
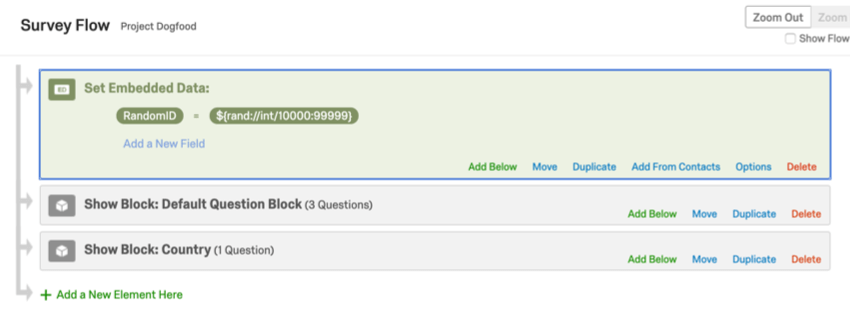
- If you are using Piped Text to present a random number to a respondent, set this in an embedded data field so the results are saved with your survey data. See the Assigning Randomized IDs to Respondents support page.
Example: Counters
Let’s say that you would like to append values to track certain users. This is called a counter. Counters are often used when you have many branches that respondents can enter. To count the total number of branches through which a respondent passes, each branch has a counter underneath it. Ensure that all counters have the same field name for this setup to properly work. If you have [field name] = [field name] + 1, and that value is set multiple times in your survey flow using math operations, your value won’t be overwritten. In this case, the field will actually increment or grow during the course of the survey.
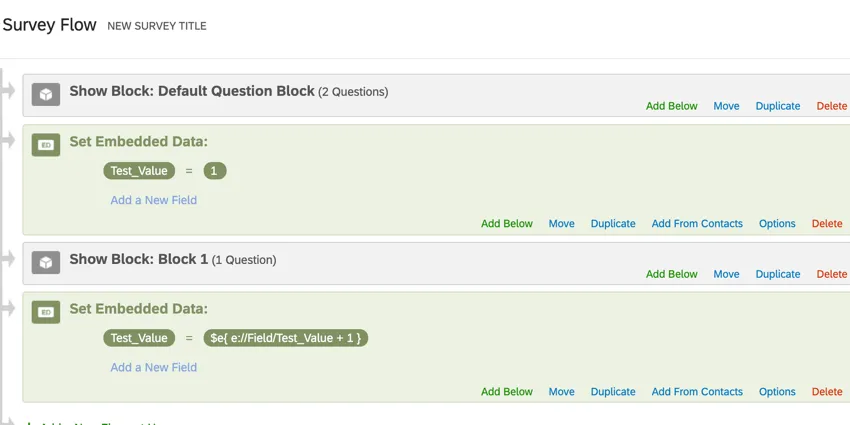
In this example, “Test_Value” will equal 2 when the respondent submits the survey because we used a Counter, the math operation of $e{ e://Field/Test_Value + 1 }, to increment “Test_Value” up by 1.
Arranging Elements in the Survey Flow
Do you ever wonder where your embedded data element is supposed to be in the survey flow? Here are some tips:
- Does the value of the embedded data field rely on the respondent answering certain questions? Make sure the embedded data element comes after the block that contains those questions.
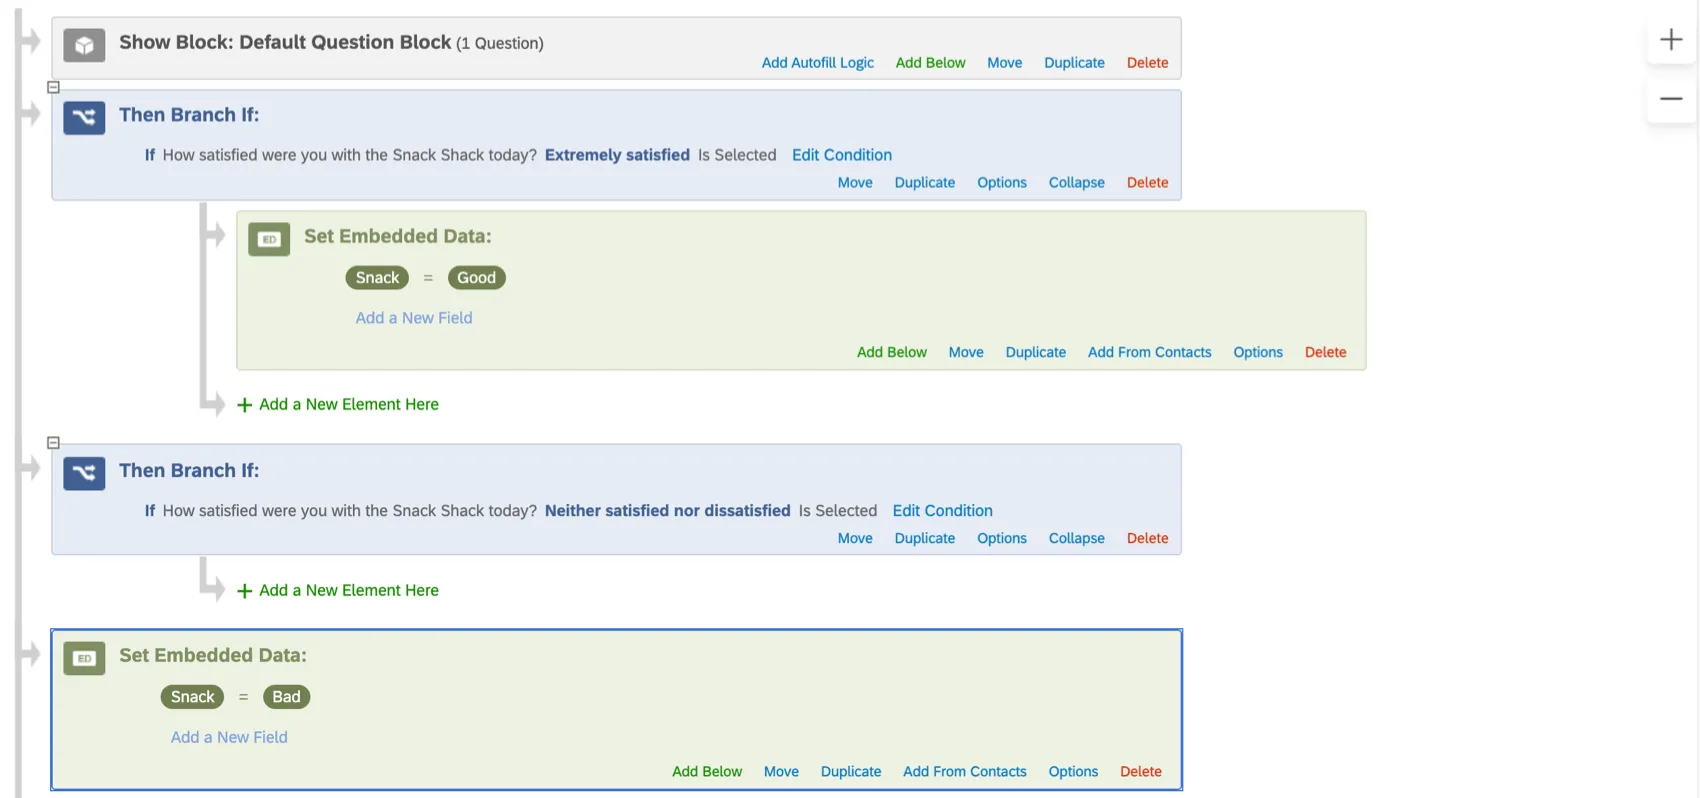
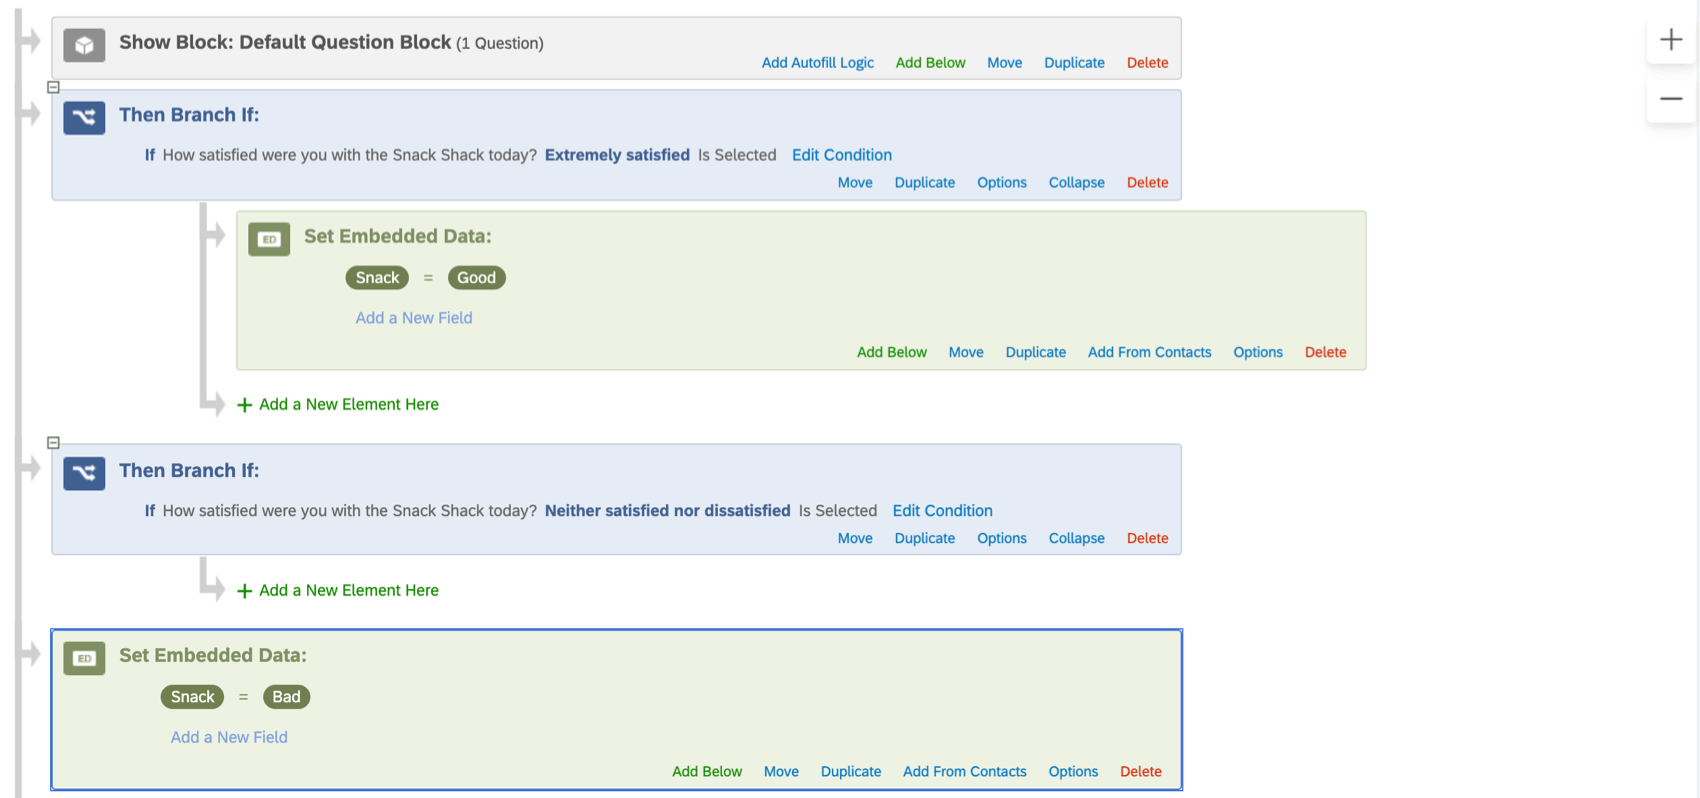
- Are you setting different values for your embedded data depending on different conditions in your survey flow? If so, make sure that you pay attention to whether fields are indented properly to ensure that your values won’t overwrite each other. Example: For example, in this survey flow, even if a respondent has a Snack embedded data field that is initially set to Good, the value will be overwritten as Bad because the second embedded data is not nested under the branch logic correctly.

- Does the value of the embedded data change display or branch logic in the survey? (In other words, is the respondent’s survey content reliant on the value of this embedded data?) Make sure the embedded data element appears above the blocks where different paths take place.
Example:
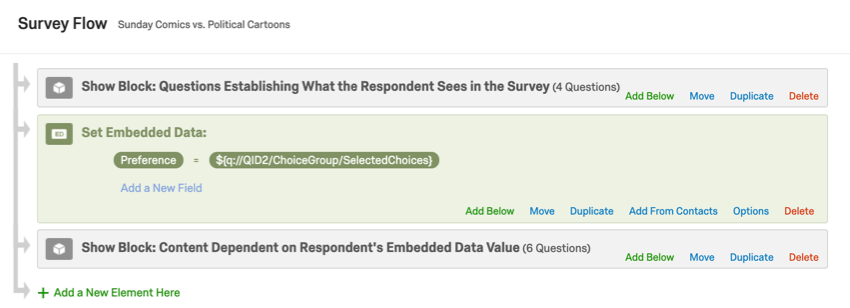
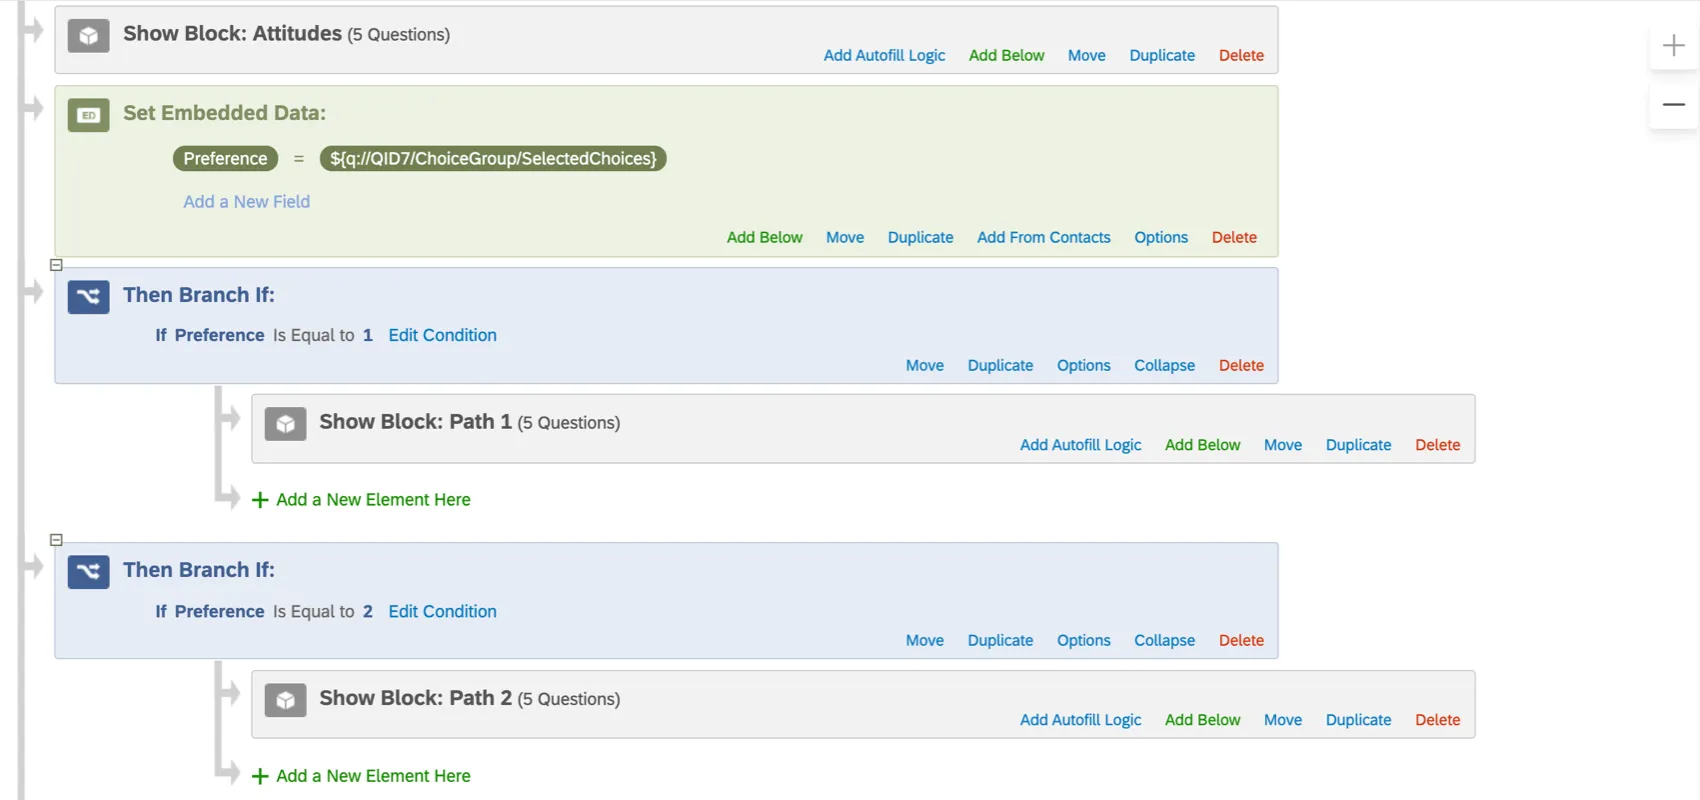
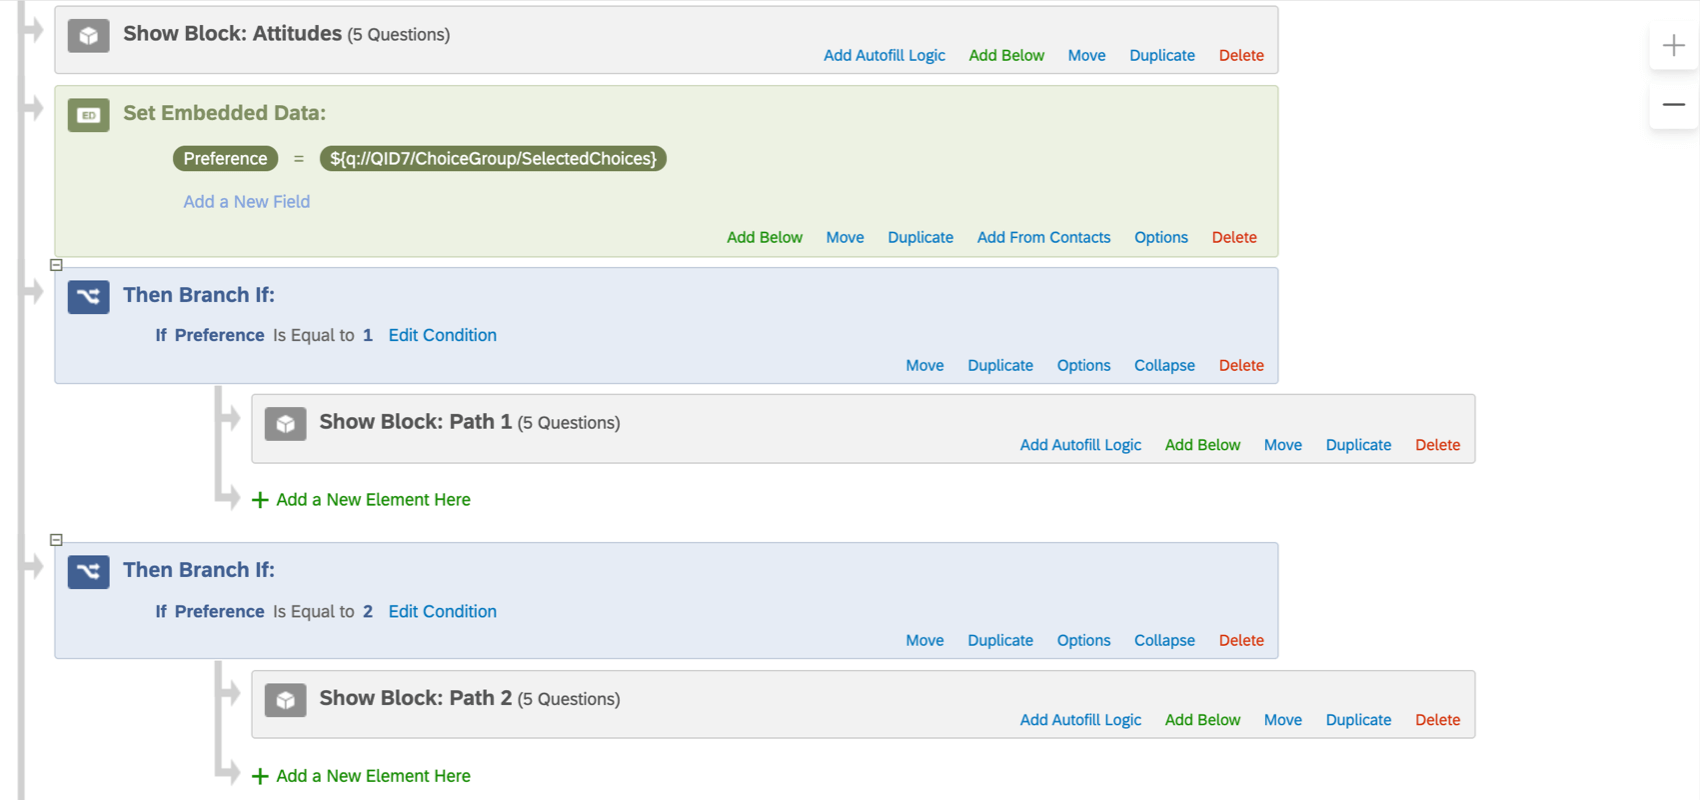
In this example, the embedded data field “Preference” saves the respondent’s answer to a question. We’ll then use this embedded data field to pipe in question text in the next set of questions, which are in the “Content Dependent on Respondent’s Embedded Data Value” block.

Example:
In this example, the embedded data field “Preference” saves the respondent’s answer to a question. Depending on the respondent’s answer, they are sent down different branching paths of the survey.
Qtip: Make sure you’re breaking your questions into multiple blocks, so it’s easier to rearrange your survey flow.
FAQs
Why is my contact list information not appearing in the downloaded data?
Why is my contact list information not appearing in the downloaded data?
If you forgot to put Embedded Data in the Survey Flow, you can add it to your data retroactively, so long as there are values in the contact list. See the Embedded Data support page for further instruction.
Note that if the contact list information you’re trying to download was not included in the contact list at the time the members took the survey, retroactively adding the Embedded Data fields to the Survey Flow will not add that information to the downloaded data later.
I want to hide or show questions for different respondents based on their answers or Embedded Data. How can I do this?
I want to hide or show questions for different respondents based on their answers or Embedded Data. How can I do this?
How do I pull Embedded Data from my Contact List into my survey?
How do I pull Embedded Data from my Contact List into my survey?
How do I pass my Embedded Data from my survey to another survey or webpage?
How do I pass my Embedded Data from my survey to another survey or webpage?
Does Qualtrics set the value of the "Referer" field?
Does Qualtrics set the value of the "Referer" field?
As of August 25, 2020, Chrome has changed the default behavior around the referrer field. Previously Chrome defaulted to no-referrer-when-downgrade as the value for Referrer-Policy. Now the default value is strict-origin-when-cross-origin. What that means is that if the customer hasn't specified their own policy on their page, it will default to this policy. This policy affects requests that are cross origin, meaning the parent page is on a different domain that the link (i.e., my webpage is example.com and my survey is on the base URL test.qualtrics.com). In a cross origin request, only the origin will be passed. That means that if my page is actually at the URL qualtrics.com/support-center, the Referer is going to be qualtrics.com. Changing this behavior has to be done by the owner of the parent page.
That's great! Thank you for your feedback!
Thank you for your feedback!