Zendeskタスク
このページの内容
ヒント:この拡張機能の購入にご興味がある場合は、XM Marketplaceでご確認ください。
Zendeskタスクについて
クアルトリクスでトリガーされたワークフローで、Zendeskチケットを作成できます。低いNPS評価をカスタマーサクセスチームにフラグ付けしたり、サポートチームに連絡できるクアルトリクスのアンケートを作成したりすることに興味があるかもしれません。アンケートの「ワークフロー」タブを使用すると、これらすべてを実行できます。
この拡張機能はZendesk Supportに対応しています。また、より大規模なオムニチャネルリスニング機能の一環として、Zendesk Chatとの連携も可能です。現在、Zendesk TalkまたはZendesk Sellとの連携には対応していません。
ヒント:このページでは、クアルトリクスを使用してZendeskチケットを作成および更新する方法について説明します。Zendesk側で設定するプロセスの詳細については、Zendeskのサポートポータルを参照してください。
Zendeskタスクの設定
プロジェクトの[ワークフロー]タブ、またはスタンドアロンの[ワークフロー]ページに移動します。
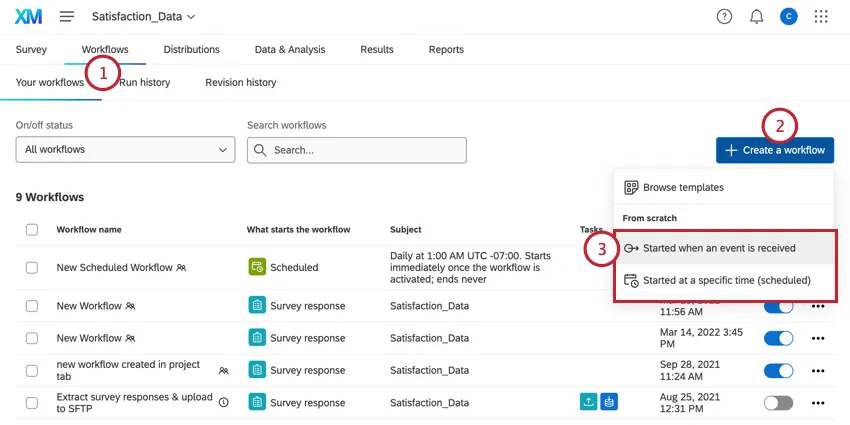
ワークフローを作成するをクリックします。
ワークフローをスケジュールベースにするか、イベントベースにするかを選択します。「スケジュール設定されたワークフローと」を参照してください。イベントベースのワークフローで、各オプションの詳細を確認してください。
ワークフローのイベントを設定するか(イベントベースの場合)、スケジュールを決定します(スケジュール設定されている場合)。
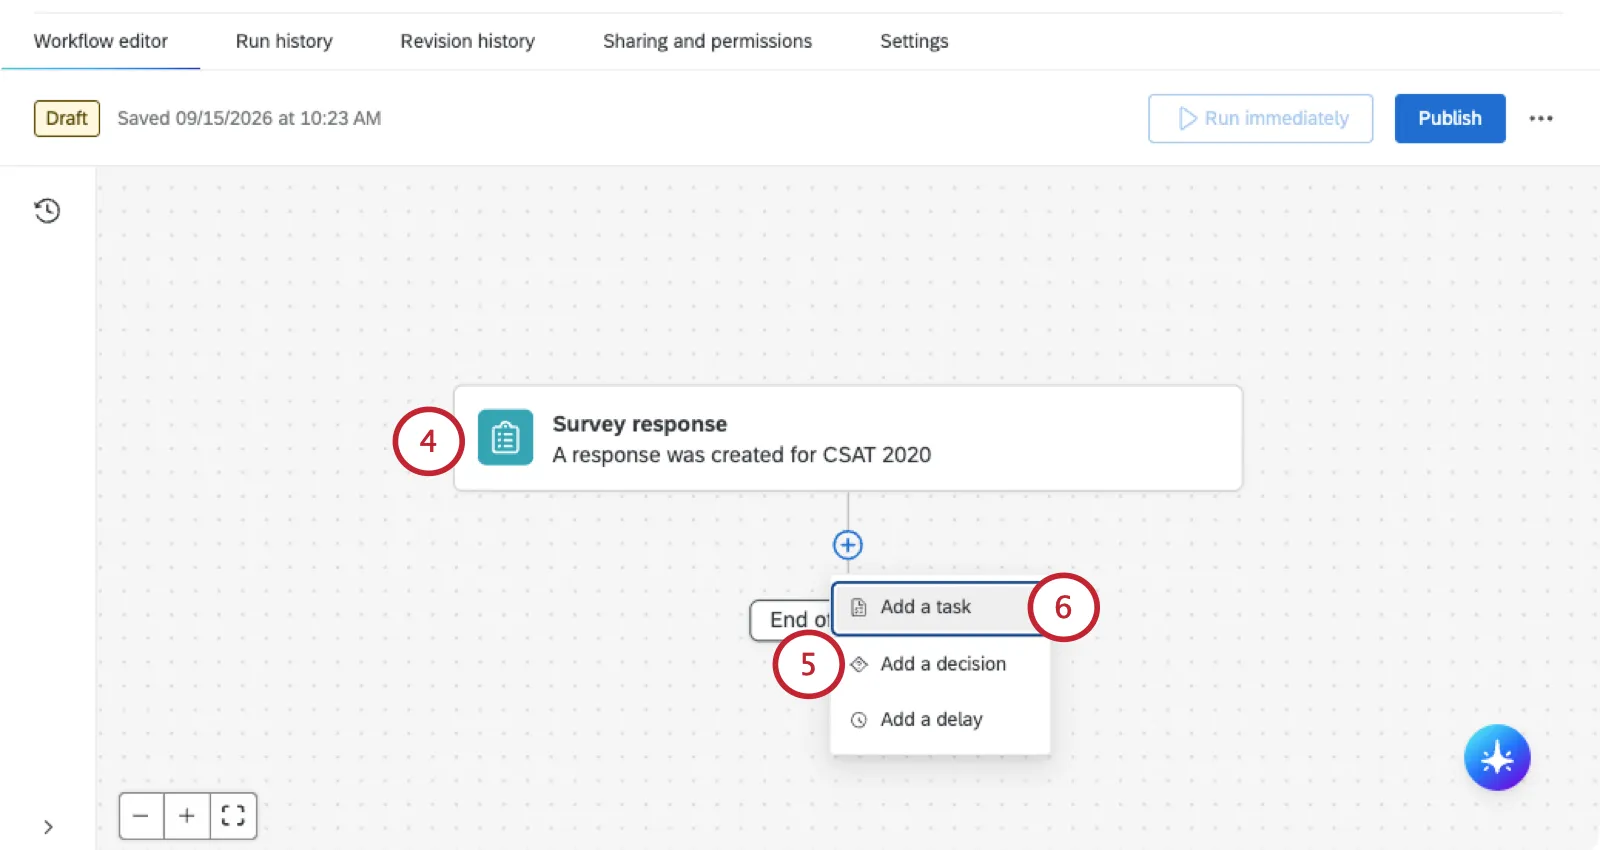
プラス記号( + )をクリックし、[ 決定を追加]して、ワークフローを実行する条件を決定します。詳細については、条件の作成を参照してください。
プラス記号( + )をクリックし、[ タスクを追加]をクリックします。
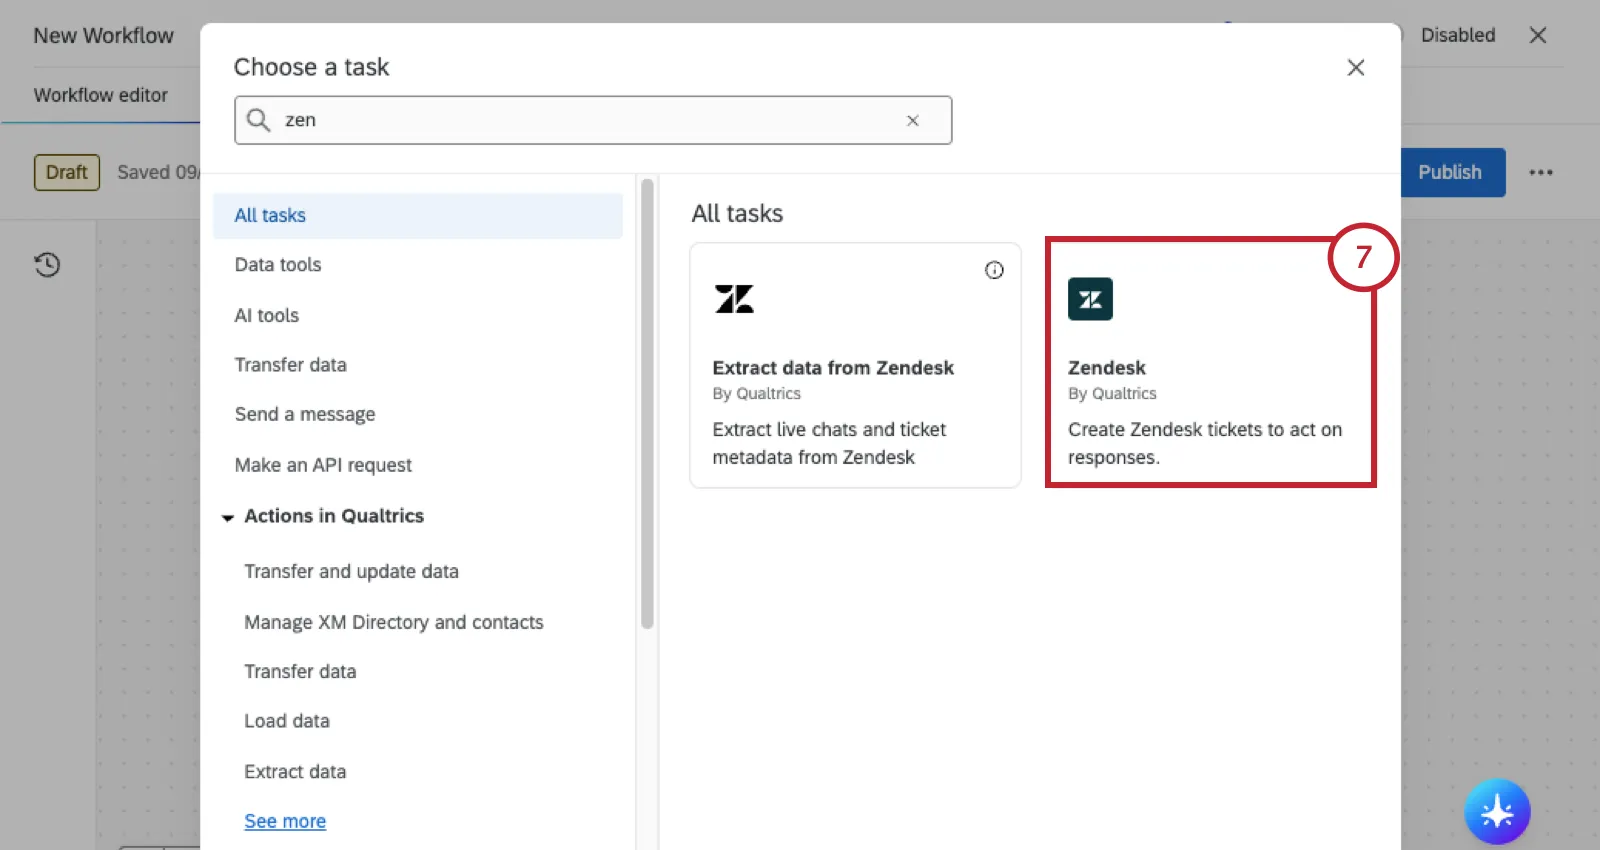
Zendesk を選択します。
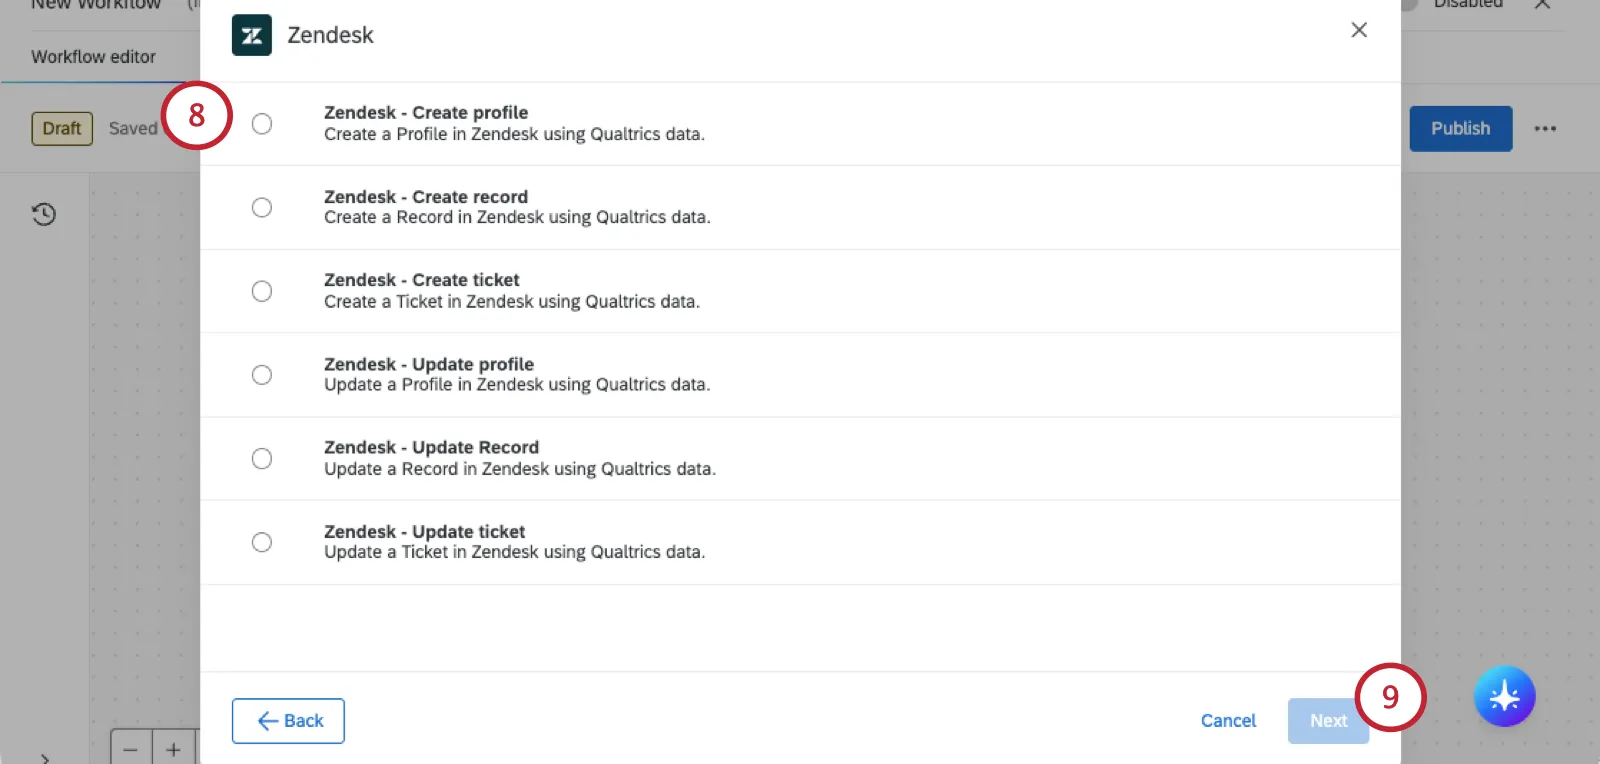
次へをクリックします。
使用するZendesk接続を選択します。
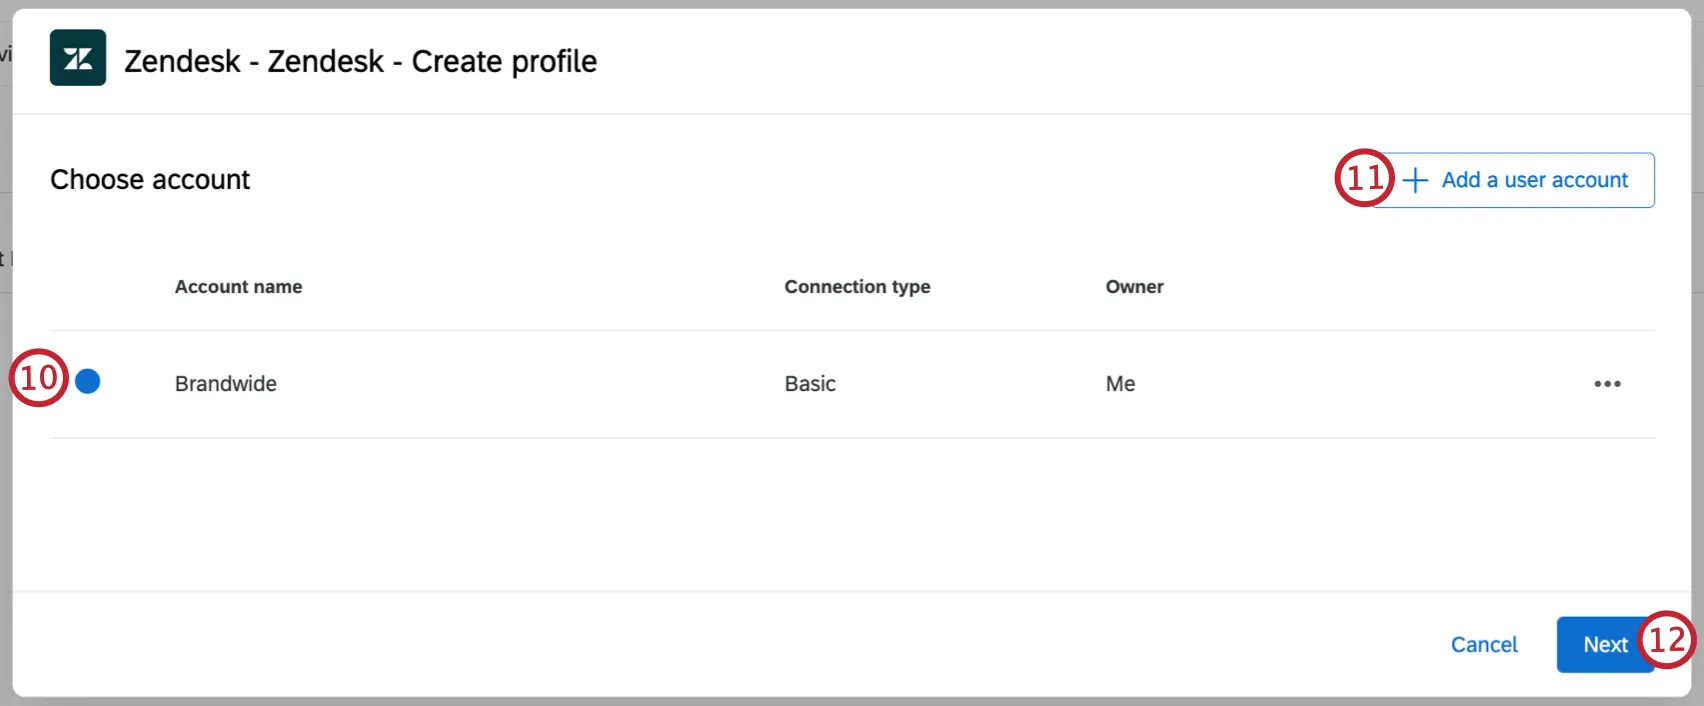
新しいZendeskアカウントに接続する場合は、ユーザーアカウントを追加をクリックします。
ヒント:OAuth経由でZendeskに接続できます。詳しい手順については、リンク先のセクションにアクセスしてください。
[ 次へ]をクリックします。
Zendeskタスクの設定を完了します。次のステップは、ステップ8で選択した内容によって異なります。詳細な手順については、次のセクションを参照してください。
Zendeskプロファイルの作成
ソースを入力してください。これはプロファイルに関連付けられている製品です。
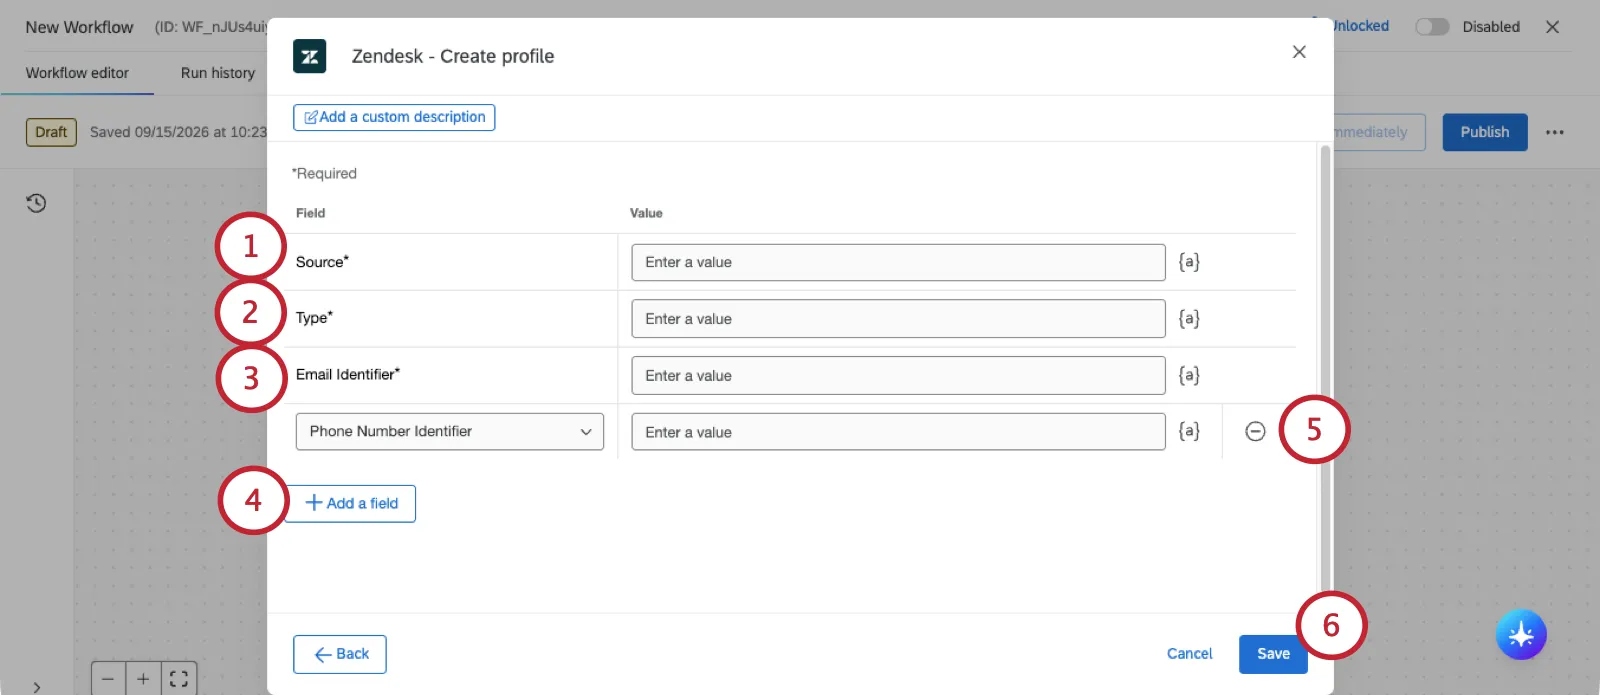
ヒント:{a}アイコンをクリックすると、フィールド値にテキストの差し込みを挿入できます。タスクのきっかけとなったアンケート回答に、チケットで使用する情報が含まれている場合に便利です。
プロファイルのタイプ(例:顧客、訪問者など)を指定します。
メール識別子を入力します。これは、プロフィールに関連付けられているメールアドレスです。
フィールドを追加をクリックして、フィールドを追加します。オプションは次のとおりです。
- 名前:プロファイルの対象となる人物の名前です。
- 電話番号識別子:プロフィールに関連付けられている電話番号です。
- Facebook識別子:プロフィールに関連付けられているFacebookのユーザー名。
- Twitter ID:プロフィールに関連付けられている Twitter のユーザー名です。
- 属性名:プロファイルのカスタム属性です。カスタム属性の名前と値を入力します。属性を複数追加できます。
フィールドの横にあるマイナス記号(–)をクリックすると、そのフィールドを削除できます。
[保存]をクリックします。
Zendeskレコードの作成
レコードタイプを入力します。これは、カスタムオブジェクトが作成されたときの名前です。
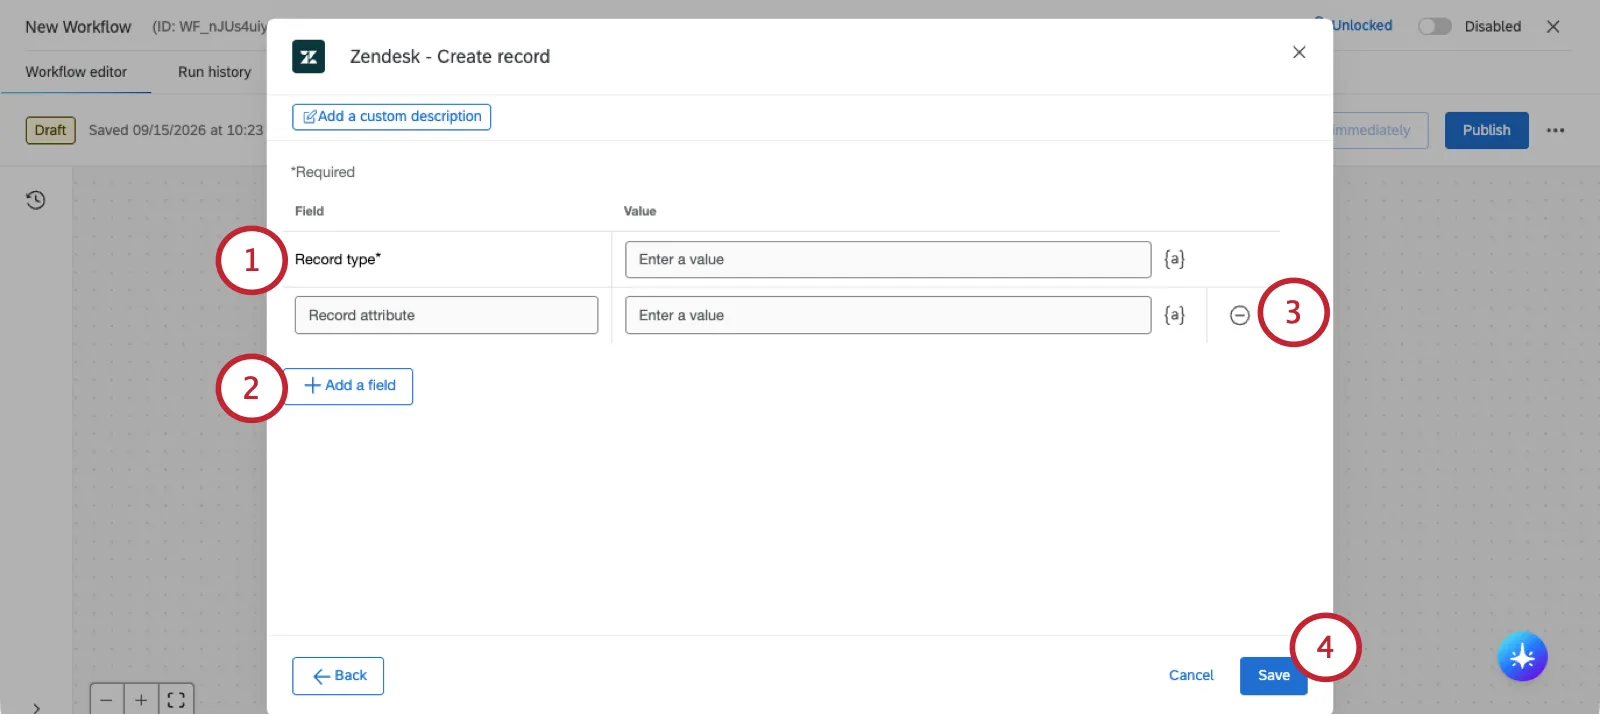
ヒント:{a}アイコンをクリックすると、フィールド値にテキストの差し込みを挿入できます。タスクのきっかけとなったアンケート回答に、チケットで使用する情報が含まれている場合に便利です。
フィールドを追加をクリックして、以下を追加します。
- レコード属性: レコードのカスタムフィールドです。属性の名前と属性の値を入力します。カスタムレコード属性を複数追加できます。
フィールドの横にあるマイナス記号(–)をクリックすると、そのフィールドを削除できます。
[保存]をクリックします。
Zendeskチケットの作成
チケットの本文に入力されるコメント本文を入力します。Zendeskインスタンスのすべてのカスタムチケットフィールドがここに表示されます。
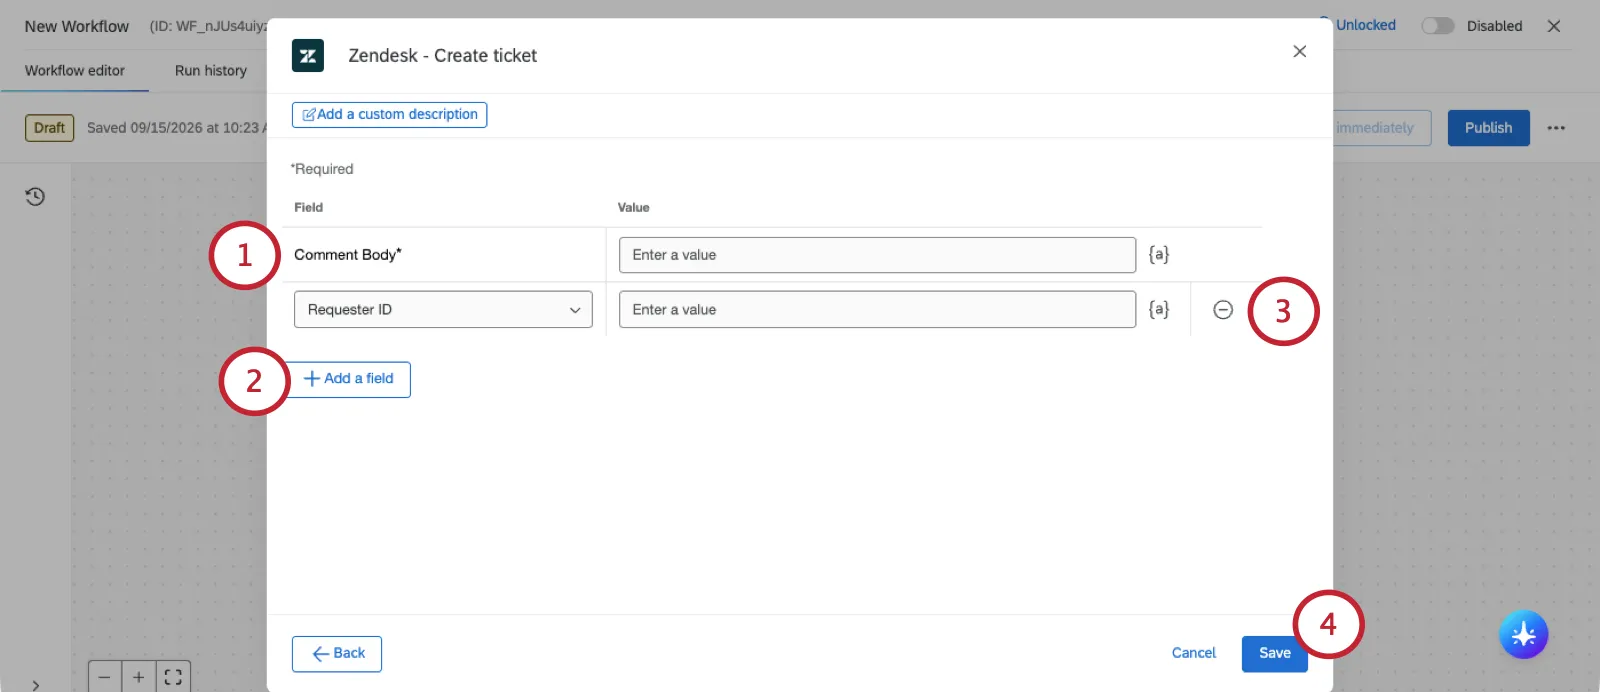
ヒント:{a}アイコンをクリックすると、フィールド値にテキストの差し込みを挿入できます。タスクのきっかけとなったアンケート回答に、チケットで使用する情報が含まれている場合に便利です。
フィールドを追加をクリックして、フィールドを追加します。オプションは次のとおりです。
リクエスター ID: チケットのリクエスターとして設定するユーザーの ID。

ヒント:IDの検索についてサポートが必要な場合は、Zendeskサポートにお問い合わせください。
- 公開:コメントを公開する場合は「True」、非公開にする場合は「False」を選択します。
- タグ:タグを使用すると、Zendeskで利用するチケットに追加情報を付加できます。タグを引用符で囲み、カンマ区切りのリストとして入力します。例:「Salesforce」、「360」
- 担当者のメールアドレス: チケットの担当者のメールアドレス
- 担当者 ID: チケットの担当者として設定するユーザーの ID。
- 優先度: チケットの優先度。値には、「低」、「標準」、「高」、「緊急」があります。
- ステータス:チケットのステータス。値には、新規、オープン、保留中、待機、解決済み、クローズが含まれます
- 件名:チケットの件名です。通常、サポートリクエストの件名になります。
- 説明:チケットに記載する説明を入力します。通常、これはサポートリクエストのテキストです。
- カスタムフィールド:Zendeskで作成したカスタムフィールドです。カスタムフィールドを複数追加できます。フィールドの数値 ID を入力する必要があります。
フィールドの横にあるマイナス記号(–)をクリックすると、そのフィールドを削除できます。
[保存]をクリックします。
Zendeskプロフィールの更新
ソースを入力してください。This is the product associated with the profile.
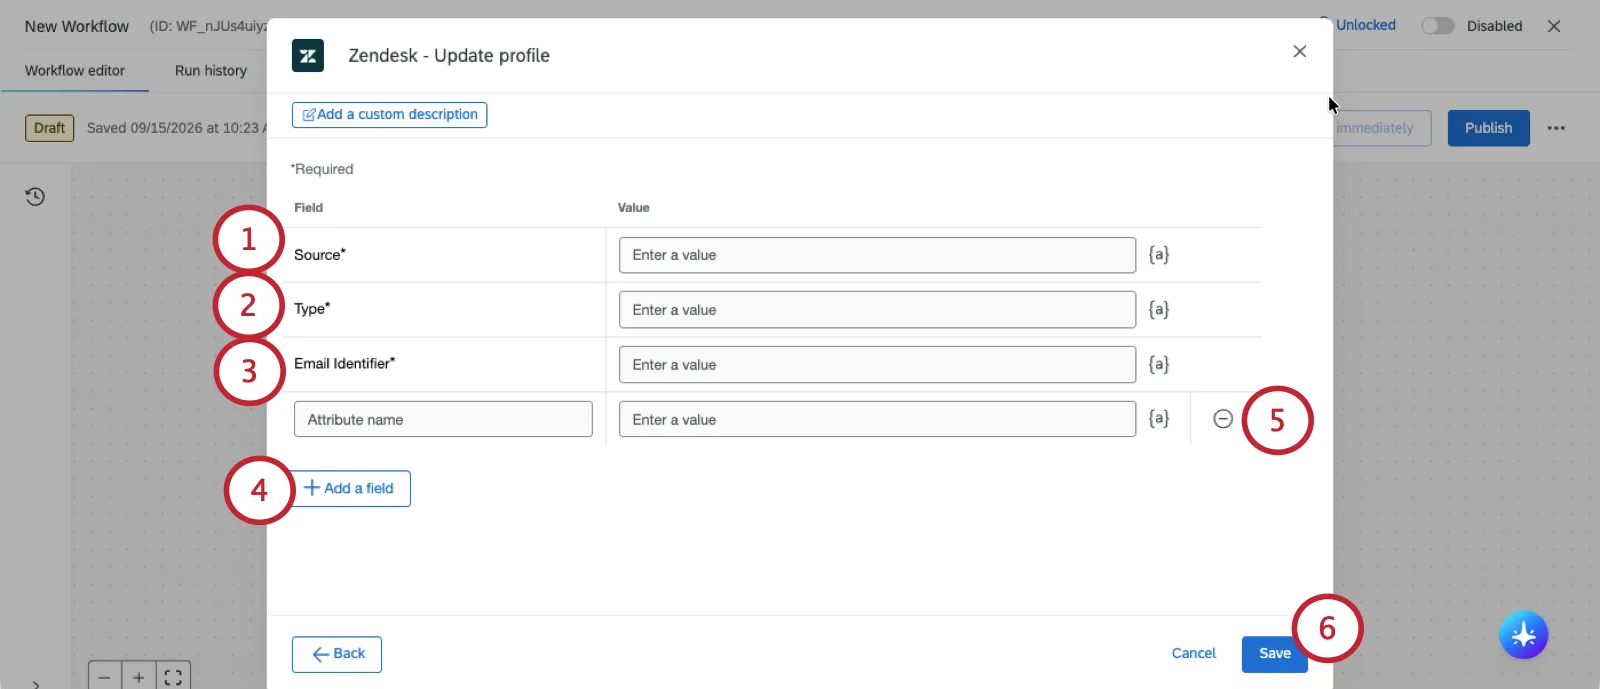
ヒント:{a}アイコンをクリックすると、フィールド値にテキストの差し込みを挿入できます。タスクのきっかけとなったアンケート回答に、チケットで使用する情報が含まれている場合に便利です。
プロファイルのタイプ(例:顧客、訪問者など)を指定します。
メール識別子を入力します。これは、プロフィールに関連付けられているメールアドレスです。
フィールドを追加をクリックして、フィールドを追加します。オプションは次のとおりです。
- 名前:プロファイルの対象となる人物の名前です。
- 電話番号識別子:プロフィールに関連付けられている電話番号です。
- Facebook識別子:プロフィールに関連付けられているFacebookのユーザー名。
- Twitter ID:プロフィールに関連付けられている Twitter のユーザー名です。
- 属性名:プロファイルのカスタム属性です。カスタム属性の名前と値を入力します。属性を複数追加できます。
フィールドの横にあるマイナス記号(–)をクリックすると、そのフィールドを削除できます。
[保存]をクリックします。
Zendeskレコードの更新
レコード ID を入力します。これは、カスタムオブジェクトが最初に作成されたときの値の1つです。
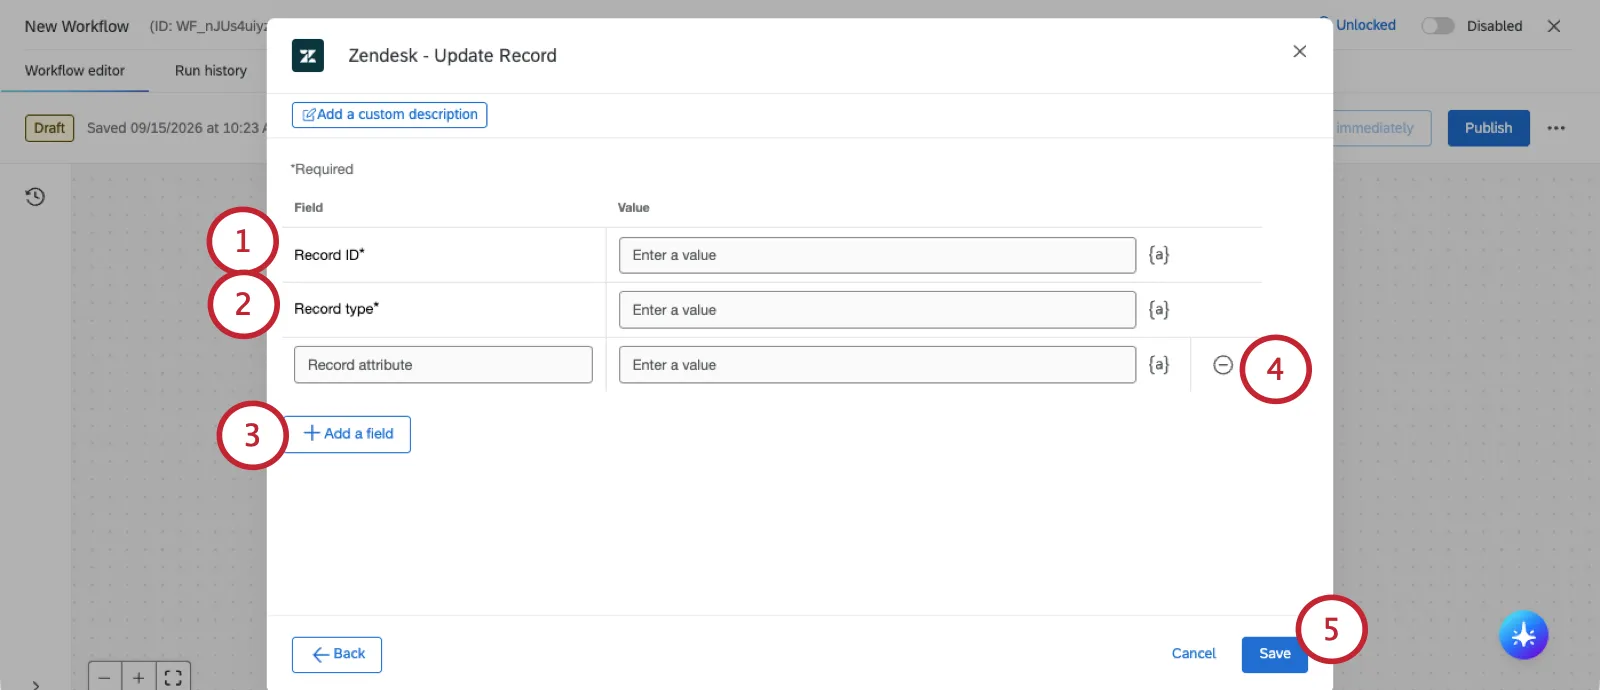
ヒント:IDの検索についてサポートが必要な場合は、Zendeskサポートにお問い合わせください。
レコードタイプを入力します。これは、カスタムオブジェクトが作成されたときの名前です。
ヒント: フィールド値にテキストを差し込むには、{a}アイコンをクリックします。タスクのきっかけとなったアンケート回答に、チケットで使用する情報が含まれている場合に便利です。
[フィールドを追加]をクリックして、フィールドを追加します。以下を追加できます。
- レコード属性: レコードのカスタムフィールドです。属性の名前と属性の値を入力します。You can add multiple custom record attributes.
フィールドの横にあるマイナス記号(–)をクリックすると、そのフィールドを削除できます。
[保存]をクリックします。
Zendeskチケットの更新
更新するチケットのチケット ID を入力してください。
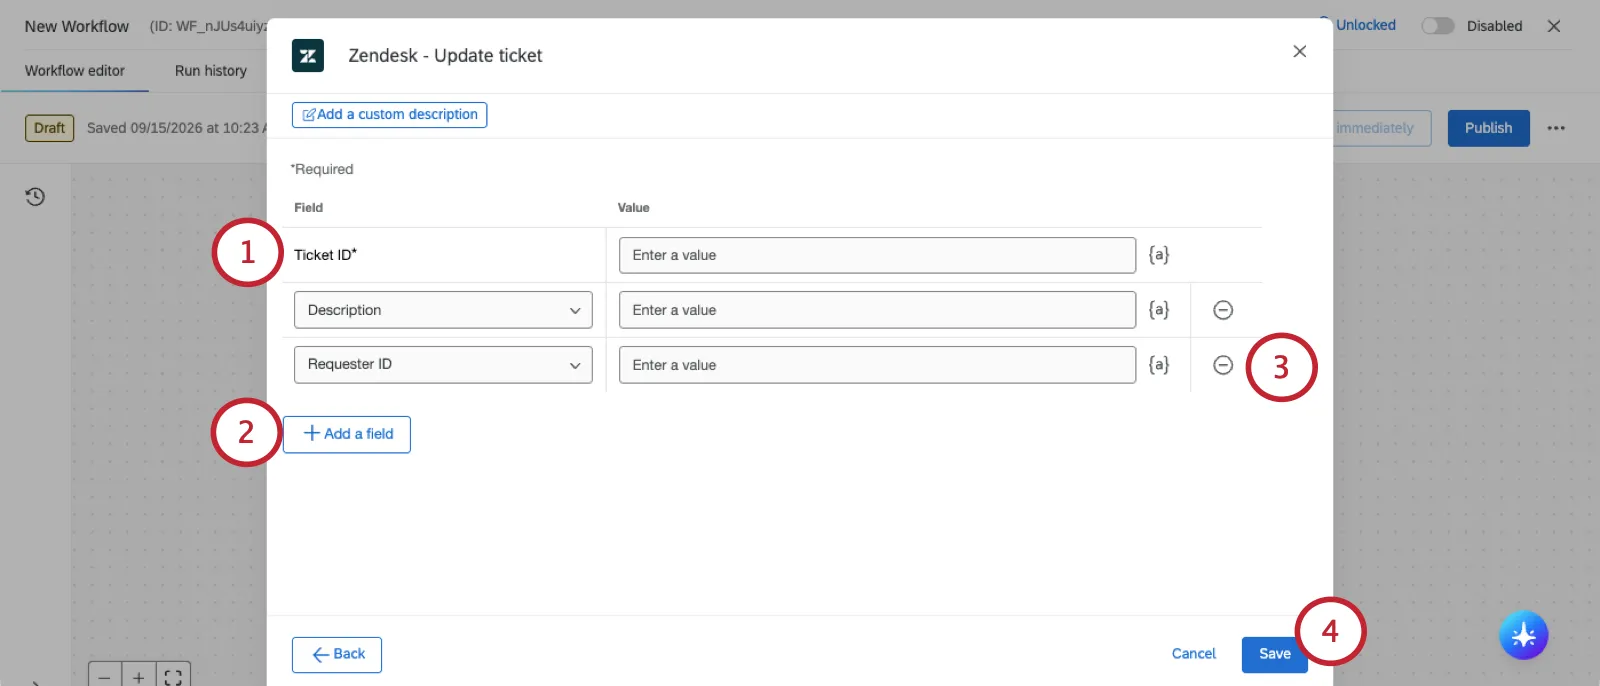
ヒント:IDの検索についてサポートが必要な場合は、Zendeskサポートにお問い合わせください。
フィールドを追加をクリックして、フィールドを追加します。オプションは次のとおりです。
コメント本文:チケットの本文です。
ヒント:{a}アイコンをクリックすると、フィールド値にテキストの差し込みを挿入できます。タスクのきっかけとなったアンケート回答に、チケットで使用する情報が含まれている場合に便利です。
- リクエスター ID: チケットのリクエスターとして設定するユーザーの ID。
- 公開:コメントを公開する場合は「True」、非公開にする場合は「False」を選択します。
- タグ:タグを使用すると、Zendeskで利用するチケットに追加情報を付加できます。タグを引用符で囲み、カンマ区切りのリストとして入力します。例:「Salesforce」、「360」
- 担当者のメールアドレス: チケットの担当者のメールアドレス
- 担当者 ID: チケットの担当者として設定するユーザーの ID。優先度: チケットの優先度。値には、「低」、「標準」、「高」、「緊急」があります。
- ステータス:チケットのステータス。値には、新規、オープン、保留中、待機、解決済み、クローズが含まれます
- 件名:チケットの件名です。通常、サポートリクエストの件名になります。
- 説明:チケットに記載する説明を入力します。通常、これはサポートリクエストのテキストです。
- カスタムフィールド:Zendeskで作成したカスタムフィールドです。カスタムフィールドを複数追加できます。フィールドの数値 ID を入力する必要があります。
フィールドの横にあるマイナス記号(–)をクリックすると、そのフィールドを削除できます。
[保存]をクリックします。
FAQs
ファーストパーティエクステンションとサードパーティエクステンションは、どのように見分けることができますか?どちらの種類のサポートについても、どこに問い合わせればよいですか?
ファーストパーティエクステンションとサードパーティエクステンションは、どのように見分けることができますか?どちらの種類のサポートについても、どこに問い合わせればよいですか?
クアルトリクスアカウントで拡張機能を追加または削除するにはどうすればよいですか?
クアルトリクスアカウントで拡張機能を追加または削除するにはどうすればよいですか?
素晴らしい! フィードバックありがとうございます!
フィードバックありがとうございます!