
Workflows Basic Overview
What's on this page
About Workflows
Workflows allow you to trigger tasks based on various events. Examples include creating a ticket when someone opts-out of your XM Directory, sending a follow-up email to a customer after a low satisfaction score. For both the inciting event and the resulting task, you have a lot of options, most of which are inside the Qualtrics platform and some of which are outside.
You can create workflows in 2 different places: in the Workflows tab of a project or in the the stand-alone Workflows page or in XM Directory. The Workflows tab is available in survey, Engagement, Lifecycle, Ad Hoc Employee Research, and 360 project types. Unless the triggering event of your workflow relates directly to a survey, we recommend creating a stand-alone workflow.
This page covers the main concepts for workflows and how to manage workflows after they’ve been built. See Building Workflows for instructions on how to build a workflow.

Qtip: This support page will cover information that can be applied to both the stand-alone and survey-specific workflows. We will indicate where there are differences.
Attention: Collaborators do not have access to workflows in an EX project. Only the EX project owner can utilize this functionality.
Attention: This feature is completely separate from action planning. To learn about action plans, read the Action Planning Basic Overview page.
Workflows in a Project vs. Stand-alone Workflows
You can create workflows in multiple places in Qualtrics. Workflows function the same no matter where they are created. This section will cover how to access the different product areas where you can create a workflow.
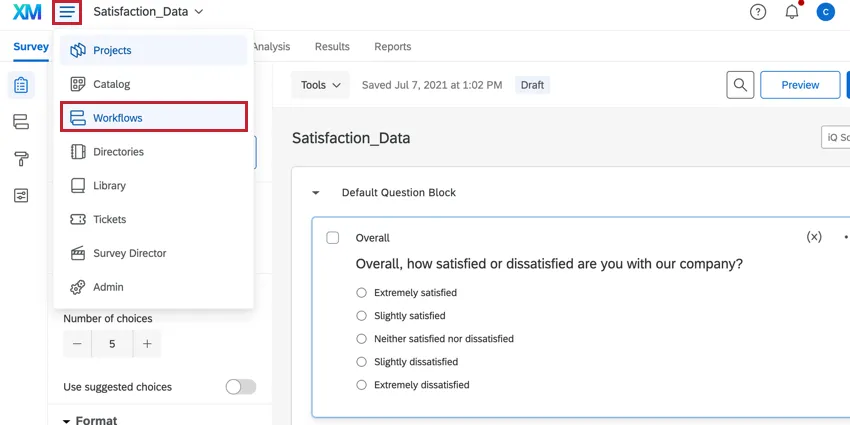
The Workflows tab within a project: Most projects allow you to add workflows to them. To create a workflow, go to the Workflows tab within the project. Workflows created in a project are only accessible via the project.

The stand-alone Workflows page: You can create a workflow that is not connected to a project by going to the stand-alone Workflows page.

Once there, click the Create a workflow button to get started.


Qtip: If you create a workflow triggered by a survey response within the stand-alone Workflows page, you will be prompted to move the workflow into your survey project.
Qtip: Response import & export automations are also displayed in the stand-alone workflows table, but they are created and managed in the data & analysis tab of your survey.
Attention: You can create up to 100 workflows per project (e.g., survey, imported data project, etc.). You can create up to 500 workflows in stand-alone workflows (the Global workflows page).
Workflow Components
A workflow has 3 main components:
Qtip: Conditions are also called decisions in the new workflow editor.
See Building Workflows for step-by-step instructions on how to create your workflow.
Scheduled Workflows vs. Event-Based Workflows
Workflows can be scheduled, or they can be tied to a specific event. Scheduled workflows are useful when you want a task to occur on a regular basis. Events are most useful if you want to base a task on something specific happening in Qualtrics – e.g., sending an email or making a ticket based on how a respondent filled out a survey. In that example, the survey submission would be the event, and the email or the ticket would be the task carried out.

Examples of Scheduled Workflows
- I want to get an email every month on the 1st, reminding me to log in and check my survey.
- I have a survey where I ask employees to tell their manager how they’re doing and flag issues they need help with. I want this to go out to my employee list every Wednesday.
Qtip: Scheduled workflows are not for sending reports or data on a regular basis. If you’re looking to set up a recurring report email, see the options for sharing results, sharing reports, and sharing dashboards (if applicable).
Examples of Event-Based Workflows
- I want to create a ticket for my support team whenever a respondent fills out our support survey.
- I want to send an email to the sales team whenever a survey respondent selects that they’re interested in learning more about our products.
- I want to send a survey distribution whenever a ticket is resolved in Freshdesk.
The Order of Tasks in a Workflow
Every workflow can have up to 20 tasks. The order that these tasks occur in the editor is important, depending on the needs of your workflow. When your workflow is triggered, tasks will be executed from top to bottom.
Qtip: In this section, we are talking about the order of tasks in the same workflow. When it comes to the order in which separate workflows are executed, there is no fixed order. There is no way to impose an order on separate workflows – when the criteria for the event or the schedule are met, the workflow will be triggered.
Task & Condition Order
When building your workflow, click the plus sign ( + ) to insert a task or condition in that exact position in the workflow.

If needed, you can rearrange the tasks and conditions in the workflow by selecting either Move up or Move down in the options menu.

Attention: You may invalidate your workflow’s data dependencies if you move a task or condition that is dependent on a different component of your workflow. Qualtrics will warn you if your change is breaking data dependencies and tell you which tasks or conditions will become invalidated. You can click on a task to learn more about what specifically will be affected.
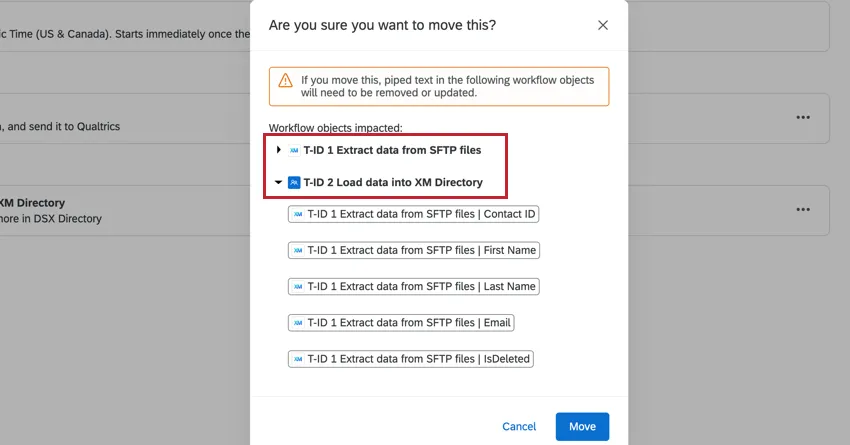
If you proceed with the move, an error message will also appear in the workflow editor letting you know that your dependencies need to be updated (for example, you may need to update the piped text in a workflow task).
Task IDs
As tasks are created, they are assigned IDs in the format T-ID-#. The ID of a task is set to the order in which it was created.
The ID of a task never changes, and is merely an internal ID to help identify a task. It does not necessarily reflect the order in which a task will be triggered compared to other tasks in the same workflow.
Passing information between workflow components
You can use piped text to pass data between your workflow event and tasks. Piped text is accessed via the {a} menu when editing a task. Please note that each event and task has unique piped text fields available for them (for example, survey response events allow you to pipe in various data fields about the survey response that triggered the workflow). Visit the support documentation a specific event or task to learn more about the piped text fields available.

When selecting piped text from a preceding task, take note of the task ID (T-ID-#). This determines which task you’re pulling information from.
Example: After receiving a survey response, I want to create a ticket in Freshdesk, and then send an email to my customer service representative letting them know a new ticket has been created. I can use piped text to save response data to the newly created Freshdesk ticket, and then use piped text to pass the Freshdesk ticket ID into the email that is sent to my customer service representative.

ETL Workflows
The Qualtrics Workflows platform contains a series of tasks to assist in importing data from third-party destinations into Qualtrics or exporting data from Qualtrics to third-party destinations. These tasks follow the Extract, Transform, Load (ETL) framework. Using ETL tasks, you can create automated and scheduled workflows to bring data from third-party sources into Qualtrics as well as export data from Qualtrics to third-party destinations.
The order of tasks in a workflow is important when using workflow tasks to set up ETL workflows. See the linked support page for more guidance on this specific use case.
Calculating Metrics
The calculate metric task in Workflows allows you to trigger a response to aggregate metrics observed in a dataset over a period of time. In other words, it provides a way to set up automated workflows based on trends or events you observe in experience data. The results of your calculate metric task can be used to trigger other tasks within your workflow.
The order of tasks in a workflow is important when calculating aggregate metrics. See the linked support page for more guidance on this specific use case.
Delay Controls
The order of tasks in your workflow is also important if you’re using task delays (also called delay controls). When a task is listed above a delay control, it’s not affected by the delay. When a task is under a delay control, it is subject to that delay control.
To learn more about delay controls, see Adding Delays to Tasks.
Navigating Workflows
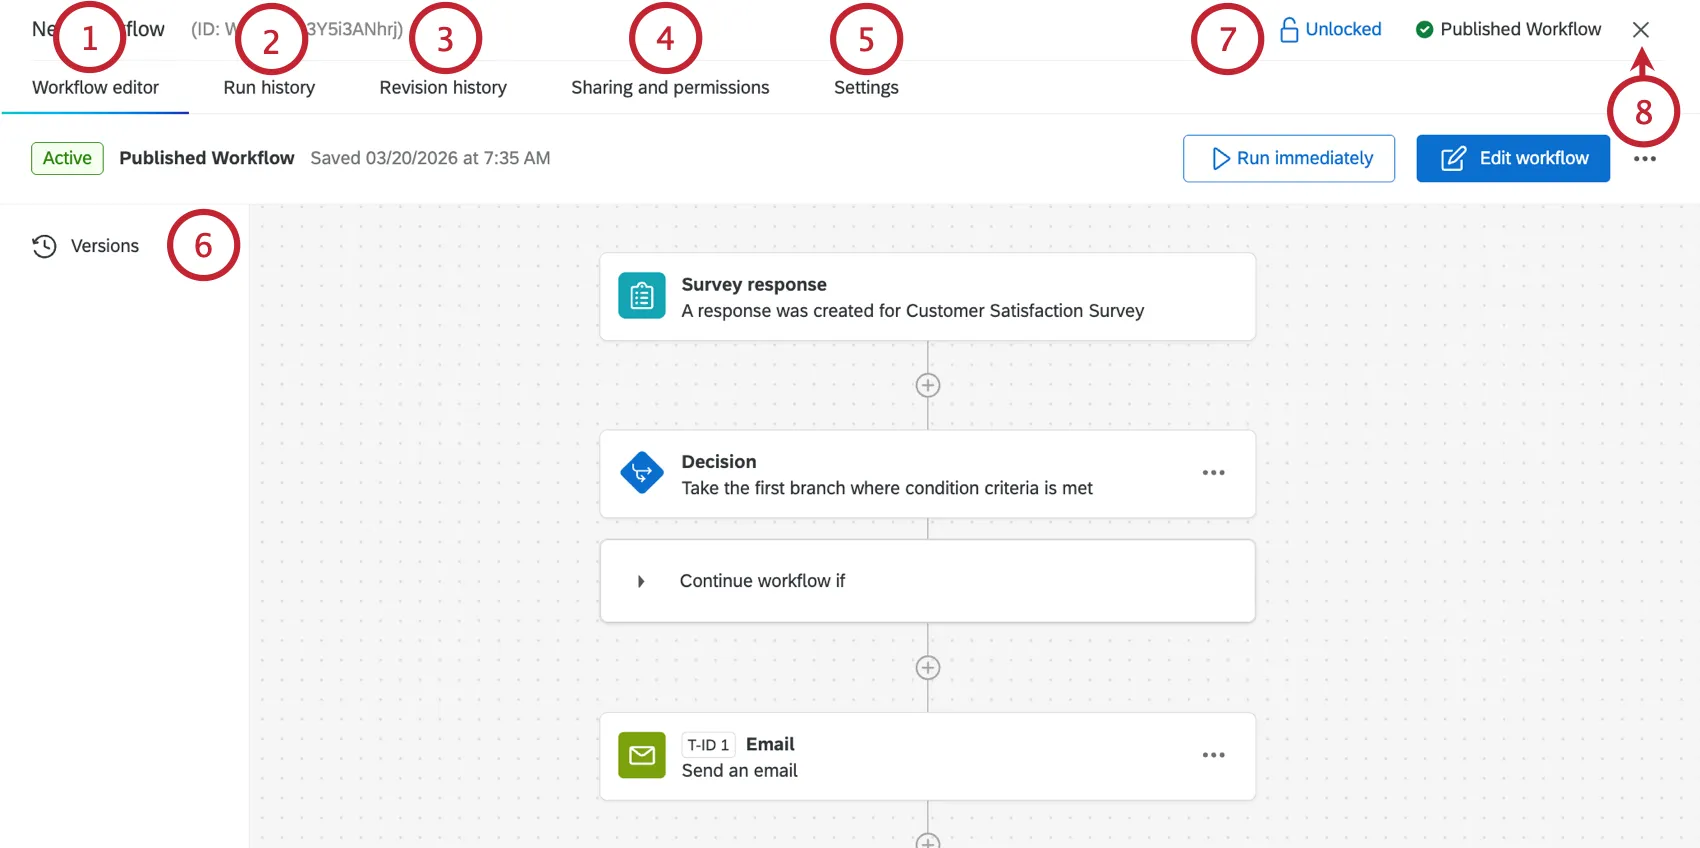
While editing a workflow, a toolbar will appear at the top to help you navigate every aspect of your workflow.
Managing Existing Workflows
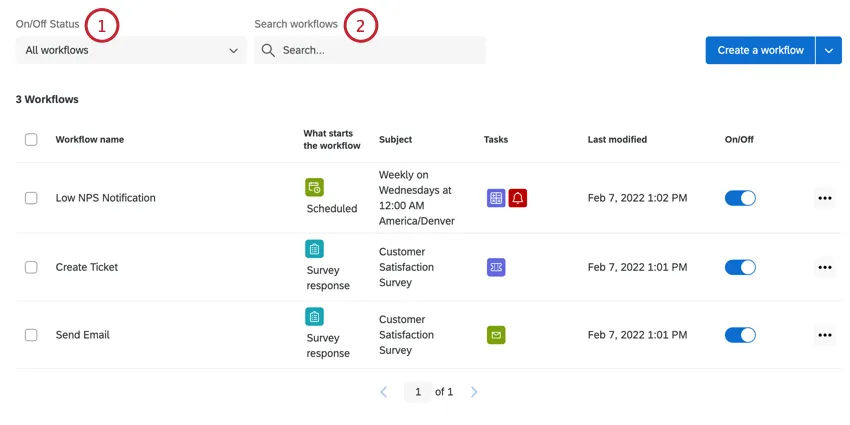
All workflows in your project are listed in the Your workflows section. From here, you can search workflows by specific properties, disable and enable workflows, and copy and delete workflows.

Workflows Table
The table shown in this section displays key information about your workflows:
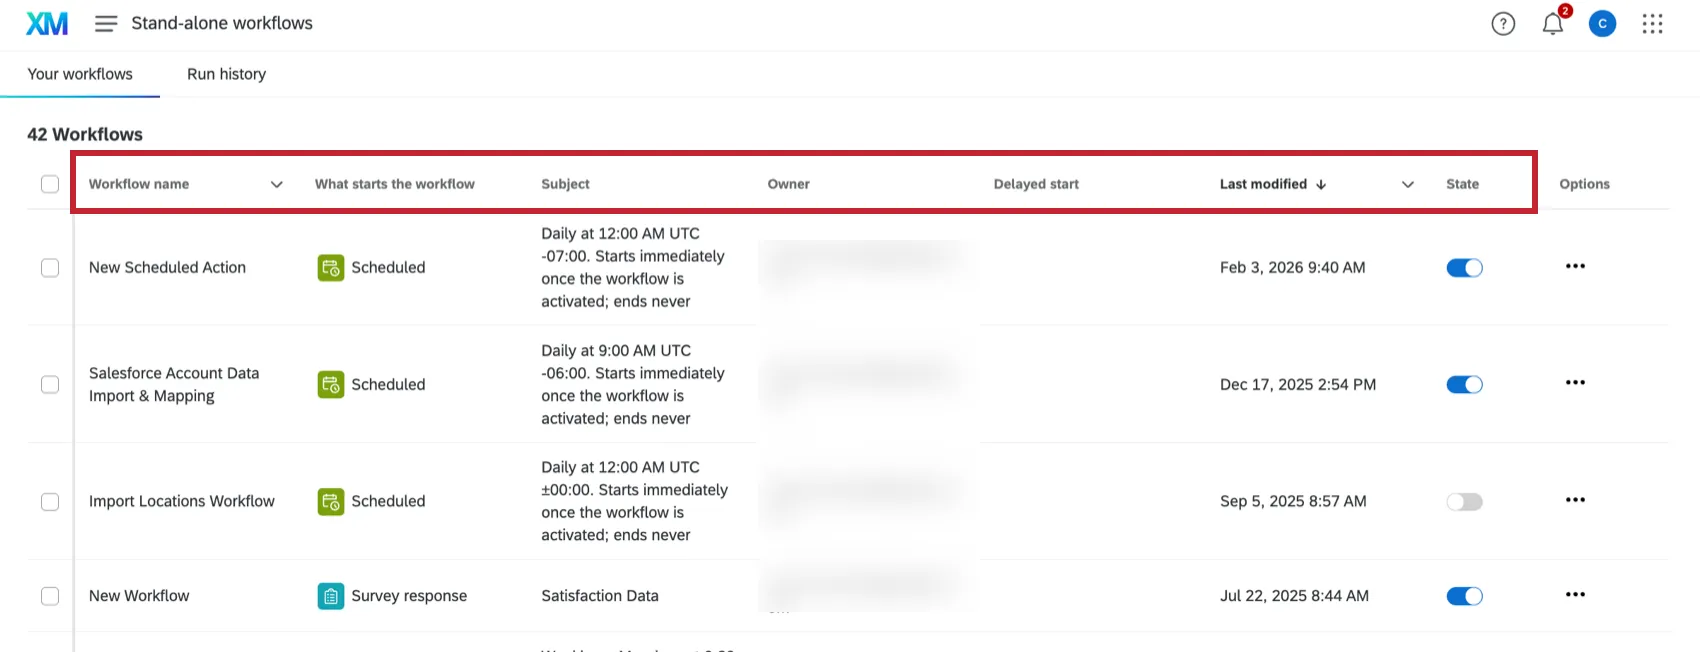
- Workflow name: The name of the workflow.
- What starts the workflow: The event that starts the workflow. Alternatively, the workflow can be set to run on a schedule.
Subject: The survey that the workflow is based on. Alternatively, if the workflow is a scheduled workflow, then the subject will list the workflow’s schedule.
Qtip: This value may be blank as not all workflows need to be connected to a survey.
- Owner: What user owns the workflow.
- Delayed start: If the workflow doesn’t have a delayed start, this field will be blank. Otherwise, you may see the following:
- Inactive: Delayed start settings are applied, but the workflow is currently running, because it’s not the delayed time period.
- Active: The workflow is currently in its delayed start time period.
- Last modified: Contains the date and time that the workflow was last edited.
State: Determines if the workflow is on (enabled) or off (disabled). You can use the toggle to change the state.
Qtip: When you enable or disable a workflow it may take a few minutes for this change to register.
Qtip: If you do not see all of these columns, then you need to resize your browser so it is larger and all columns can be displayed.
Searching Workflows
The top of the Your workflows section has a search bar and filters for searching workflows.
Managing a specific workflow
You can edit, rename, copy, delete, and manage settings for a given workflow.
Toggle your workflow on or off.
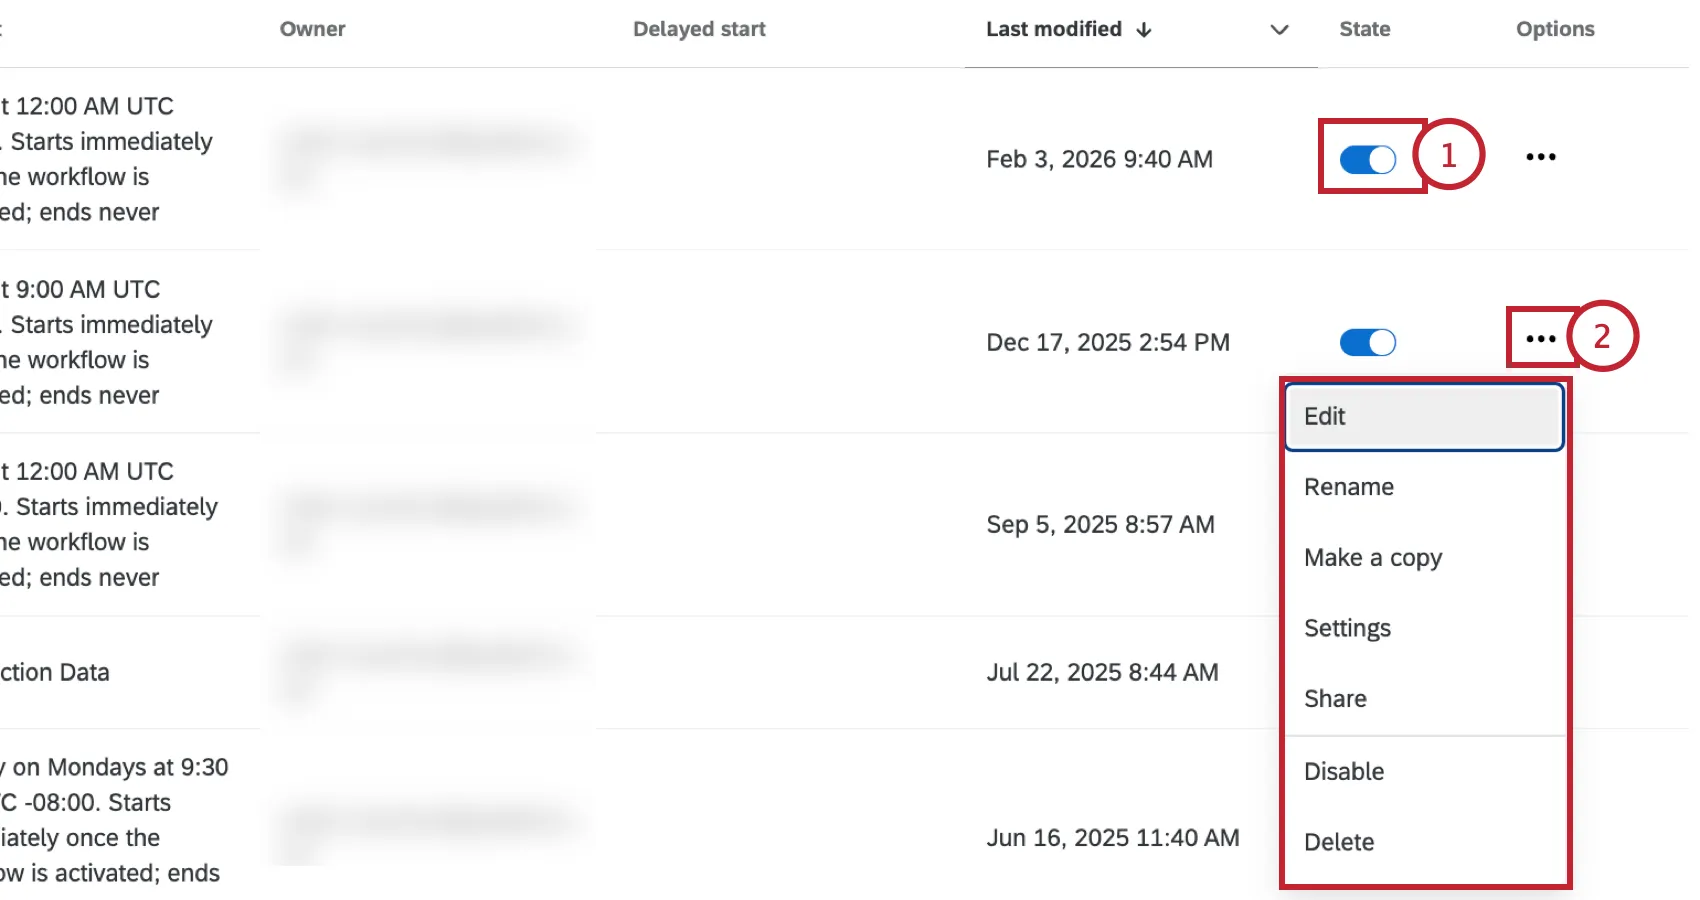
Click the 3 dot menu to see more options for your workflow:
Edit: Edit your workflows’ trigger, conditions, and tasks.
Qtip: Edits to your workflow will not affect any workflows that have already been triggered.
- Rename: Change your workflow’s name.
- Make a copy: Create a copy of your workflow.
- Settings: Manage your workflow’s settings, which includes setting up workflow notifications, choosing how the workflow operates if a component fails, and delaying your workflow’s start time.
Share: You cannot share individual workflows within a project. Instead, sharing the project with another user will give them access to the project’s workflows.
Qtip: Workflows created from the stand-alone Workflows tab can be shared directly with other users. See Sharing Workflows for more information.
- Activate/Disable: Activate or disable the workflow.
- Delete: Delete the workflow. This action is irreversible!
Qtip: If the options in your 3 dot menu cannot be clicked, make sure that your workflow is unlocked. For more information, see Navigating Workflows.
Managing Multiple Workflows
You can enable, disable, or delete workflows in bulk.
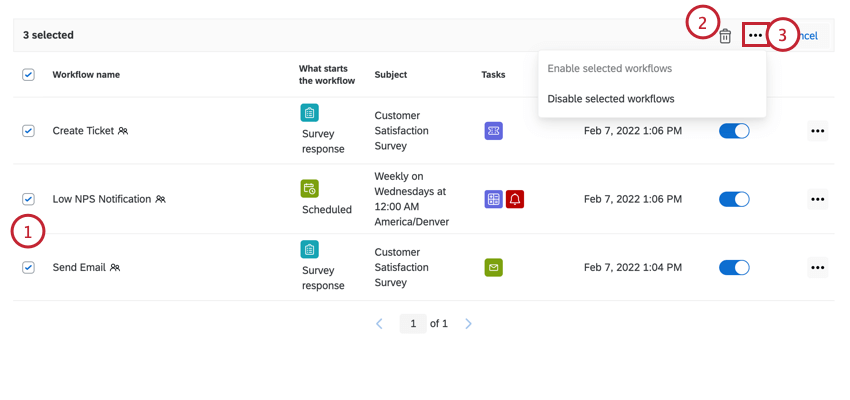
Qtip: Sometimes you may see one of these options is grayed-out. This happens when all of your selected workflows have the same status.
Run Immediately
Once you’ve built a workflow, you can click the Run immediately button to run it instantly without waiting for them to be triggered by an event or schedule. This works for both scheduled and event-based workflows, and can be useful for testing how a workflow will execute.
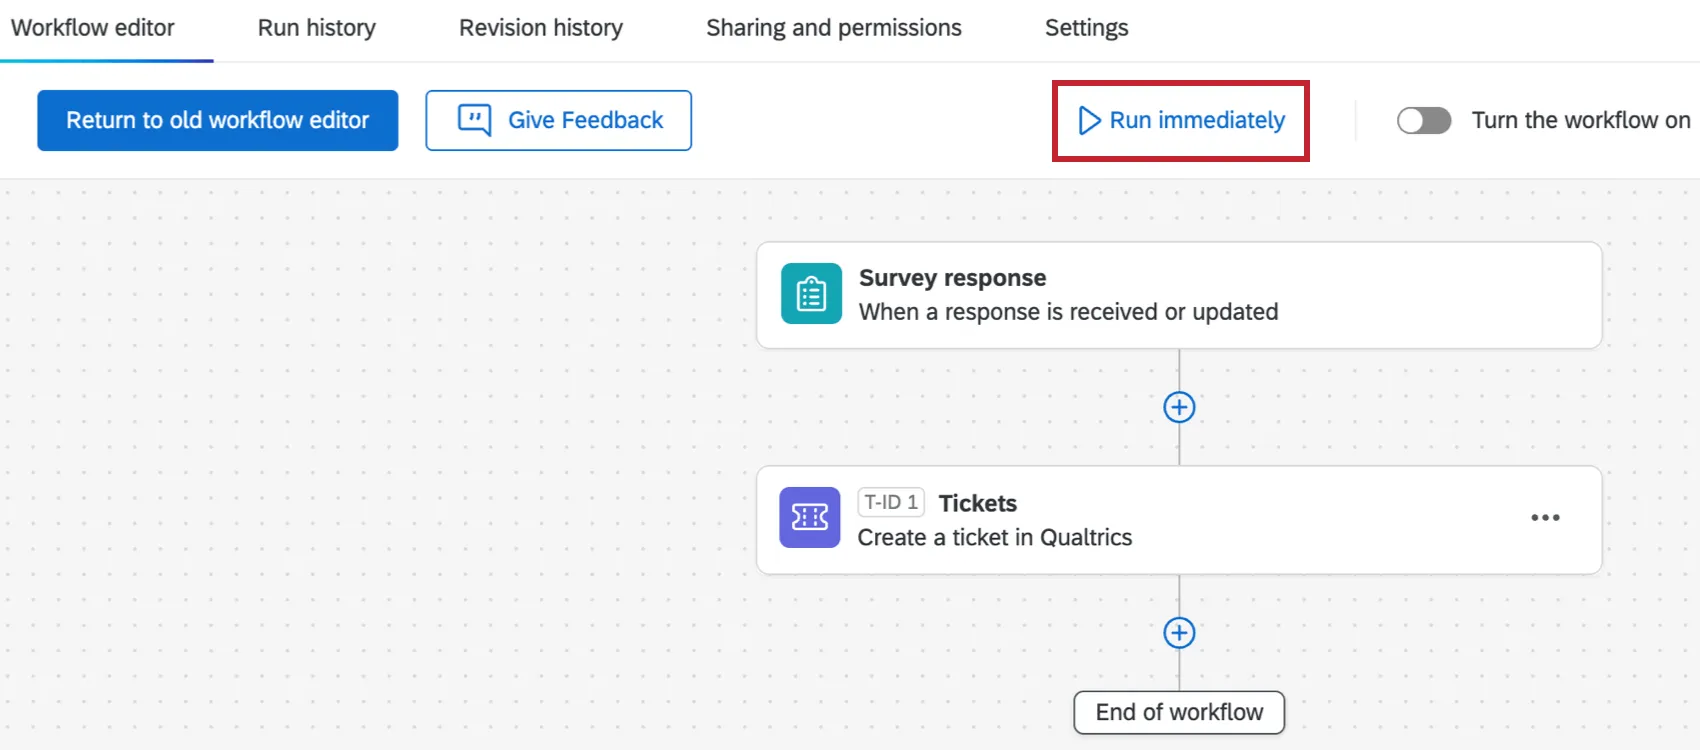
When you run an event-based workflow immediately, you can enter your own sample data or select Generate sample data to automatically generate the event-specific data that the task will use.
Attention: When you enter sample data for the workflow it needs to be accurate/valid for the workflow to run successfully.
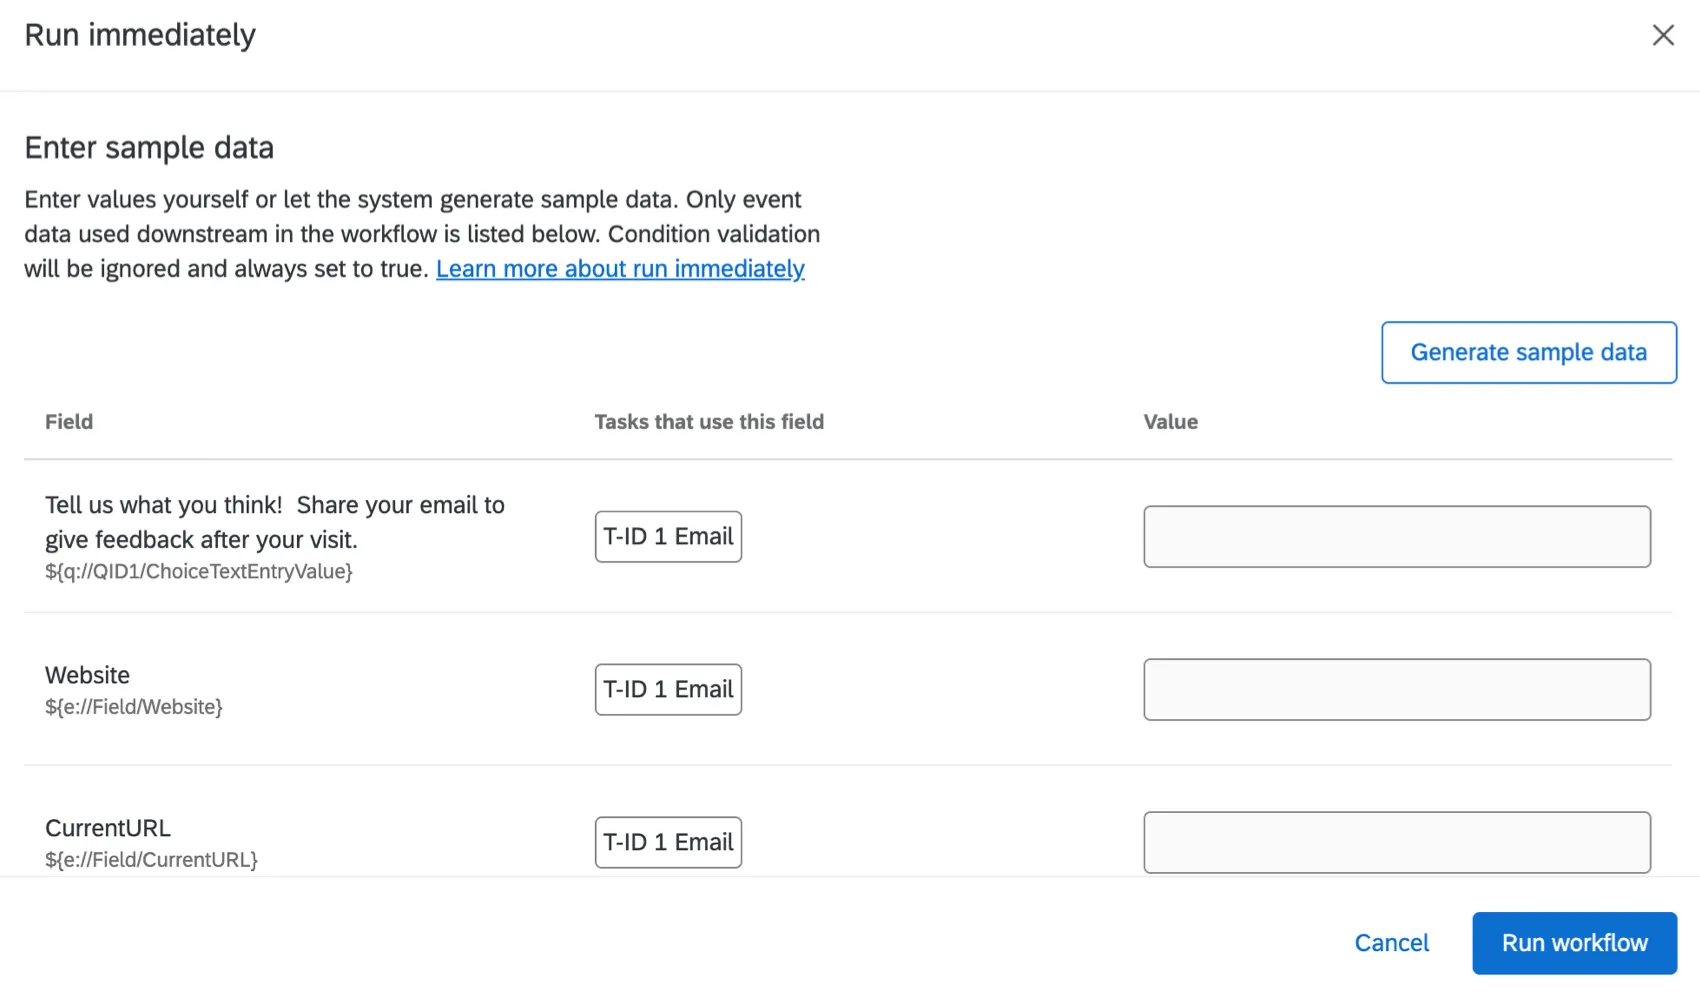
Qtip: Condition validation will be ignored and always set to true.
Advanced Settings
When you run a workflow immediately, you may notice Advanced settings.
- Run workflow with custom date range: This option is only available for certain ETL workflows. See Extracting Data from a Specified Date Range for more details.
Run History
By navigating to the Run history section of the Workflows tab, you can quickly ascertain the status of all your workflows or filter them by status, so you can look at all workflows that have completed, failed, or timed out. Once you click on a failed task, you’ll see more details that can help you troubleshoot the source of the issue.

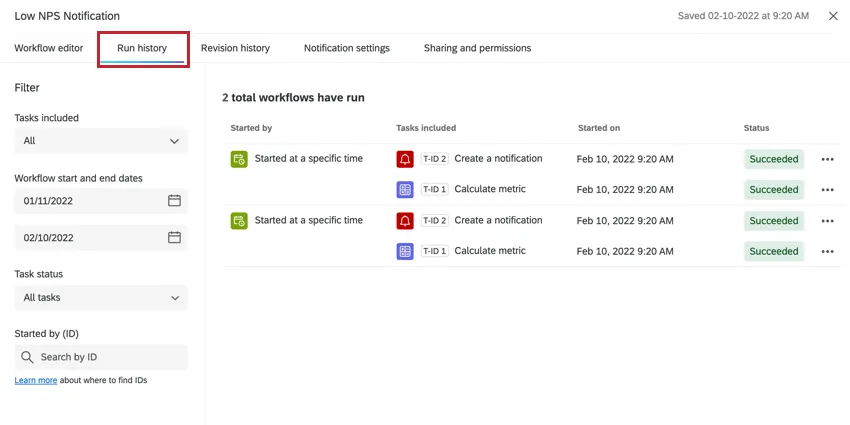
Note that there are 2 different Run history tabs: one on the main workflow page, and one when you are editing a specific workflow. The Run history tab on the main workflow page aggregates all workflow run data within your project. To view the Run history for a single workflow, click into the workflow and navigate to the Run history tab within that workflow.
For more information on using this section, see Workflows Run and Revision Histories.
Revision History
While editing a workflow, you can go to the Revision history tab to see a log of every change that has been made to your workflow.
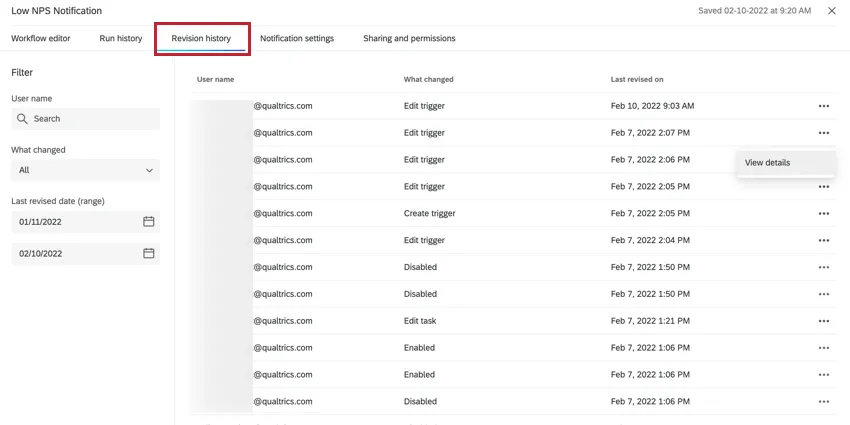
For more information about using revision history, see Workflows Run & Revision Histories.
Settings
The Settings tab allows you to set up alerts for when a specific workflow fails, and allows you to delay when your workflows start to accommodate for holidays and other downtime. For scheduled workflows, you can also set up a notification for when the workflow succeeds.
See Workflow Notifications and Workflow Settings for more information.

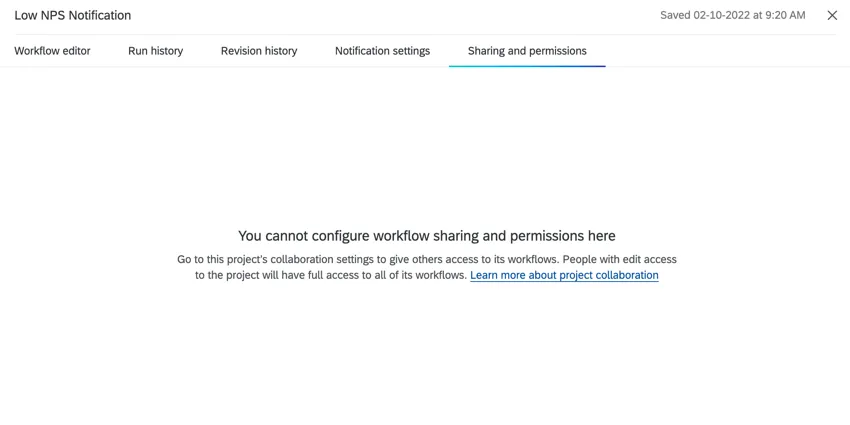
Sharing and Permissions
The Sharing and permissions tab allows you to manage who has access to your workflow.
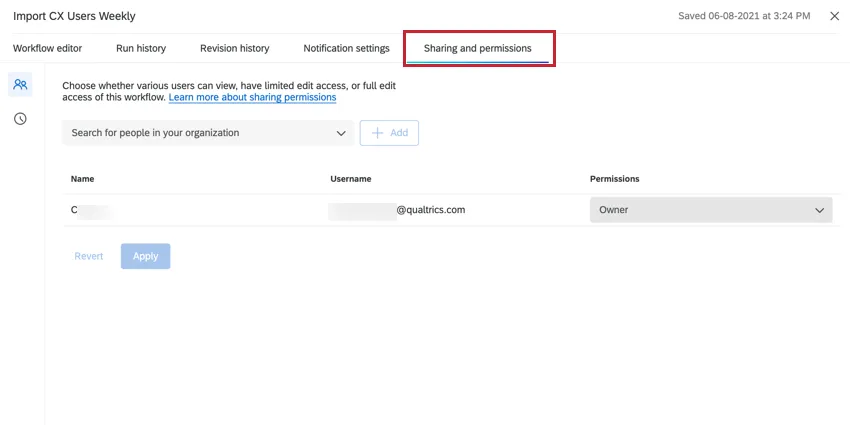
Attention: You cannot share individual workflows within a project. Instead, you can share the project with other users in your license to give them access to workflows in that project. If you go to the Sharing and permissions tab for a workflow within a project, you will see the below message.
For more information on sharing workflows with other users, see Sharing Workflows.
XM Directory Workflows
The Workflows tab of the XM directory is where you can create, edit, and manage XM Directory workflows. XM Directory workflows allow you to save, edit, and update contact information and transactional data in your XM Directory. They can also help you distribute surveys to contact lists from your XM directory.
For more information, see Workflows in XM Directory.
FAQs
I don’t see a template that fits my business goals. Will more templates be coming in the future?
I don’t see a template that fits my business goals. Will more templates be coming in the future?
Yes! This is a growing library of workflow templates built by our in house subject matter experts. We will add new scenarios and use cases over time.
Do I have access to all extensions available through the Workflows templates?
Do I have access to all extensions available through the Workflows templates?
How do I use 3rd-party extensions within Workflows templates?
How do I use 3rd-party extensions within Workflows templates?
Can I request a template be built for my organization?
Can I request a template be built for my organization?
Is there a link to all Workflows events and tasks?
Is there a link to all Workflows events and tasks?
What are Workflows templates?
What are Workflows templates?
What are the different major types of Workflows templates?
What are the different major types of Workflows templates?
- Experience metric trend visibility and reporting
- Survey follow-up management
- Ticket management
- Team communication & collaboration
- Data management (ETL)
What are workflows? / Where are actions?
What are workflows? / Where are actions?
There are no changes to workflow functionality as part of this update.
How quickly can I expect workflows to run?
How quickly can I expect workflows to run?
Is there a maximum size workflows can be?
Is there a maximum size workflows can be?
This task is marked as “Preview.” What does that mean?
This task is marked as “Preview.” What does that mean?
If I have two workflows sent at the same time, in what order will they run?
If I have two workflows sent at the same time, in what order will they run?
What’s the difference between Delay Control in the workflow editor and Delayed Start in the workflow settings?
What’s the difference between Delay Control in the workflow editor and Delayed Start in the workflow settings?
- Task delays: Delay control is set up in the workflow editor. These delays only affect the individual tasks you see below the delay. The starting event/schedule and the tasks above the delay aren’t affected.
- Delayed start: Delayed start is set up in the workflow settings. The entire start of the workflow is delayed according to this setting. From there, tasks execute immediately unless there are task delays specified in the workflow editor.
That's great! Thank you for your feedback!
Thank you for your feedback!