
Exporting Data from CX Dashboards
What's on this page
About Exporting Data from CX Dashboards
CX Dashboards allow users to export data for use outside of the dashboard. Data can be exported or emailed in many formats. See each section for the available export types.
Qtip: Which of these export and email options your dashboard users have access to are controlled by user and / or role permissions. See how to share dashboards with individuals or with entire roles.
Qtip: The dates displayed in dashboard data and the dates used to determine when emails are scheduled correspond to the dashboard’s set time zone.
Qtip: To print dashboard reports, export a page or a widget to PDF. From there, you can open the file on your computer to print it.
Enabling Dashboard Data Exports
If you are a CX Dashboard editor (e.g., a CX Administrator) and would like to enable dashboard data exports, you can control which users can export dashboard data.
For individual dashboard users and roles, the minimum permissions needed are either Allow export (Images) or Allow export (All) permission. See Dashboard Permissions for more details on the file types each of these settings enable.
There are also additional CSV, TSV, and XLSX settings you can add; see Dashboard Themes for more details.
Qtip: Regardless of user permissions, dashboards can only be emailed in the following file formats: PDF, JPG, CSV, and TSV.
Downloading Dashboard Pages
Dashboard exports generally respect the default filters set for the dashboard, unless you have adjusted the filters. The page you export will respect any filters you currently have applied instead of the filters set as the default. If you are exporting multiple pages of the dashboard, only the page you’re currently on will respect filters you currently have applied; otherwise, the additional pages of the export will revert to the default filters for the page.
Example: Your dashboard administrator added filters so that every page of your dashboard shows the last week’s worth of data by default. While looking at the data, you filter the Summary and the Demographics page to show today’s data. On the Summary page, you decide to export the data. In the export, the Summary page show’s today’s data, but the Demographics page shows the last week’s data.
Qtip: For PDF and JPG export formats, we recommend designing your dashboard to display your widgets in a grid layout. If your widgets aren’t configured in a grid format, your export will have extra white space surrounding your widgets. For more information about how to rearrange the widgets in your dashboard, read the Resizing & Positioning Widgets section.
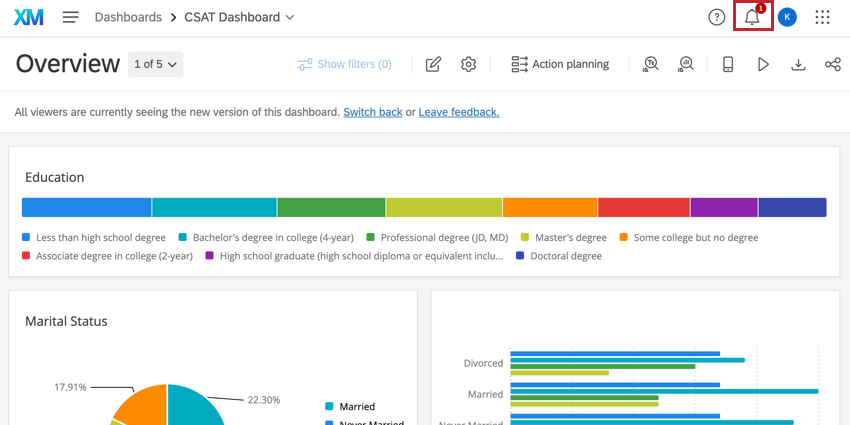
Export Notification
Once you export a dashboard, you can leave the page to work elsewhere in Qualtrics while the export processes.
Qtip: You can have up to 4 concurrent exports per data source.
Depending on your export options, 1 of 2 things will happen when your export is complete:
Qtip: If you’re having trouble finding the file, check the downloads folder on your computer or the downloads section of your web browser.
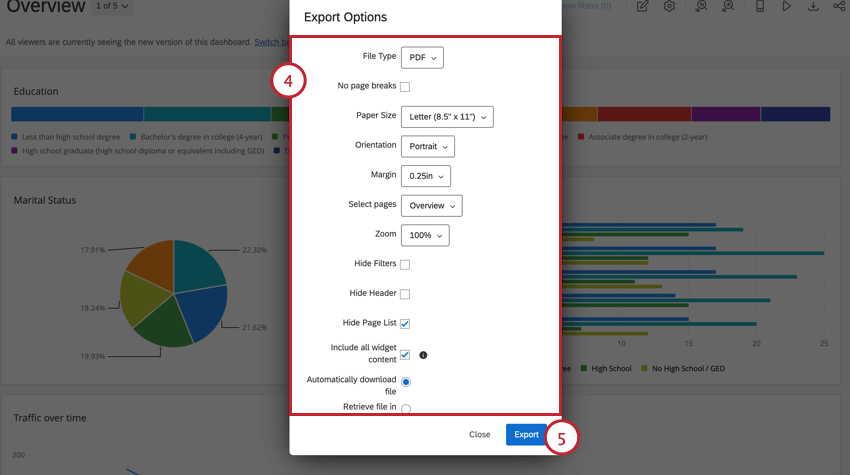
Export Options
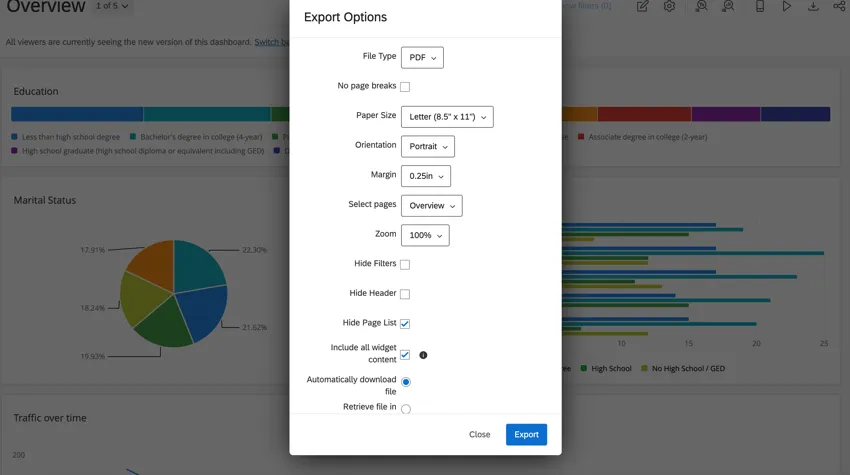
The export options available to you depend on your selected file type.
File Type: Can be PDF, JPG, PPTX, DOCX, CSV, TSV, or XLSX.

Qtip: The formats available to you are dependent on the dashboard export settings.
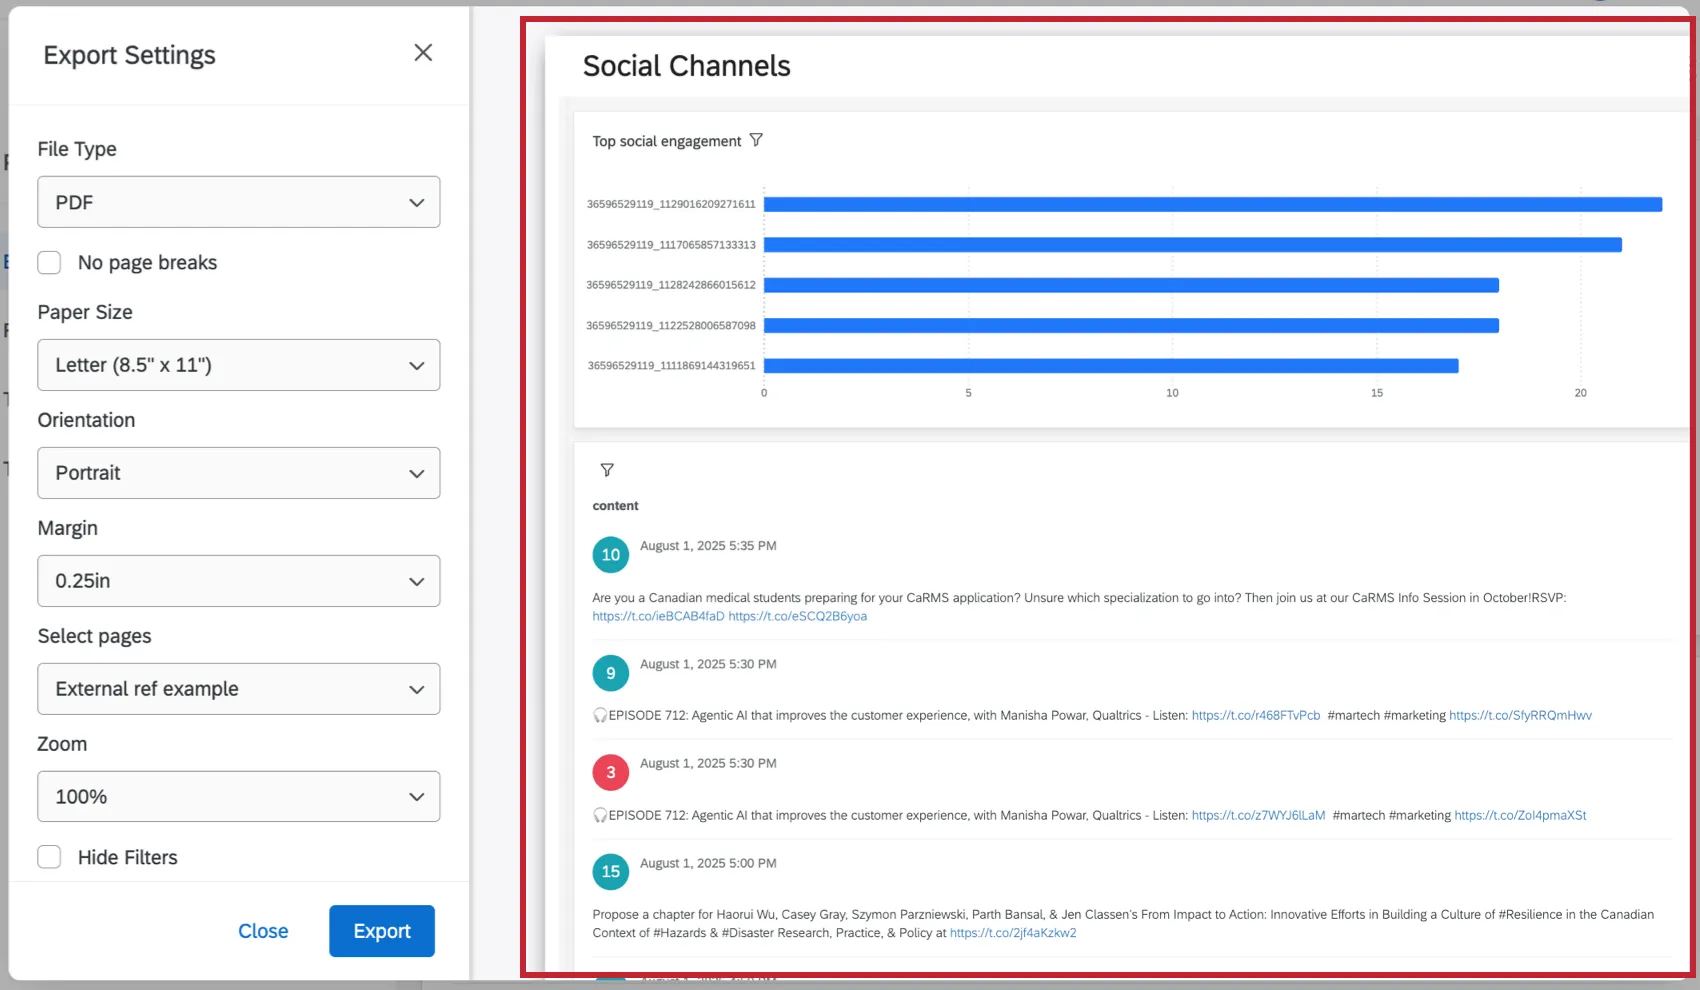
Export Preview
When exporting to PDF or JPG, you can view a preview of the expected content and layout for your export. Changes you make to the export settings will be reflected in your preview.
PDF-Exclusive Export Options
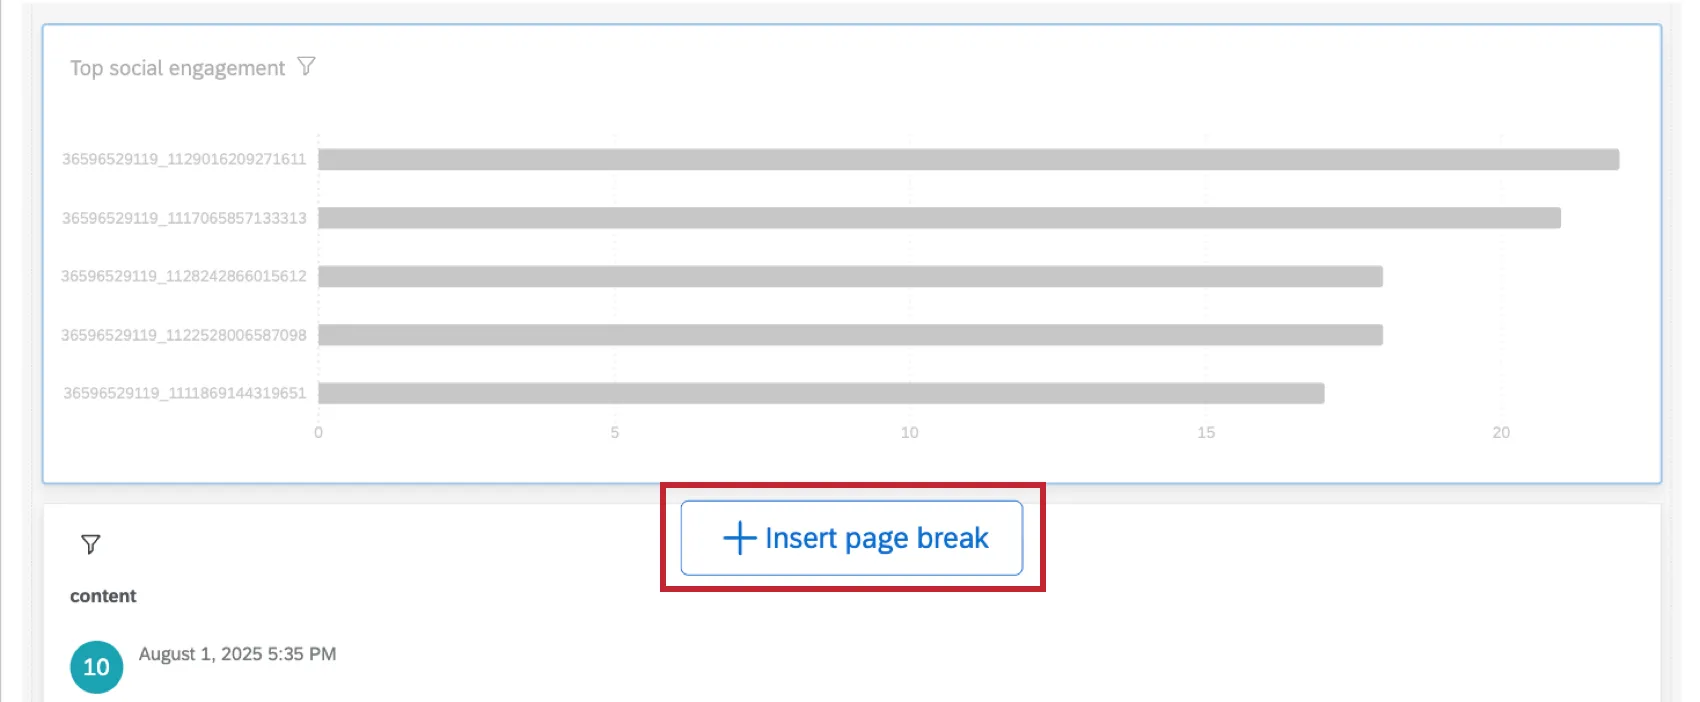
Add Manual Page Breaks: Hover over a specific widget in the preview and select Insert page break to add a page break below it. Any page breaks added here will be automatically saved for future dashboard exports.
Qtip: Only dashboard editors can add or delete page breaks. Dashboard viewers can view them, but cannot edit them.
- No Page Breaks: Eliminate page breaks in your PDF. This removes paper size and orientation settings.
- Paper Size: In inches. Standard printer paper sizes included.
- Margin: In inches.
- Select Pages: Select the specific pages of the dashboard that you want to export. By default, only the page you’re on is selected.
Qtip: If you select more than one dashboard page to export, no export preview will be shown.
- Zoom: Can select from a list of preset options, or Custom to set a custom percentage. The minimum zoom you can set is 50% and the maximum is 150%.
PDF and JPG Export Options
JPG exports only show the selected dashboard page.
- Hide Filters: Select to hide filters from the export. This doesn’t remove filter effects from the data in the export; instead it hides the filters being used from the top of the exported page.
- Hide Header: When deselected, you will see the name of the dashboard at the top.
- Hide Page List: When selected, exports the dashboard page without the name of the page. When deselected, shows the name of the dashboard page in the selected orientation (either to the left or top).
- Include all widget content: Some widgets contain so much data that dashboard viewers must scroll or navigate widget pages to see it all. If you select this option, all of the widget’s data is included in the export. This setting only works for table, response ticker, and record table widgets.
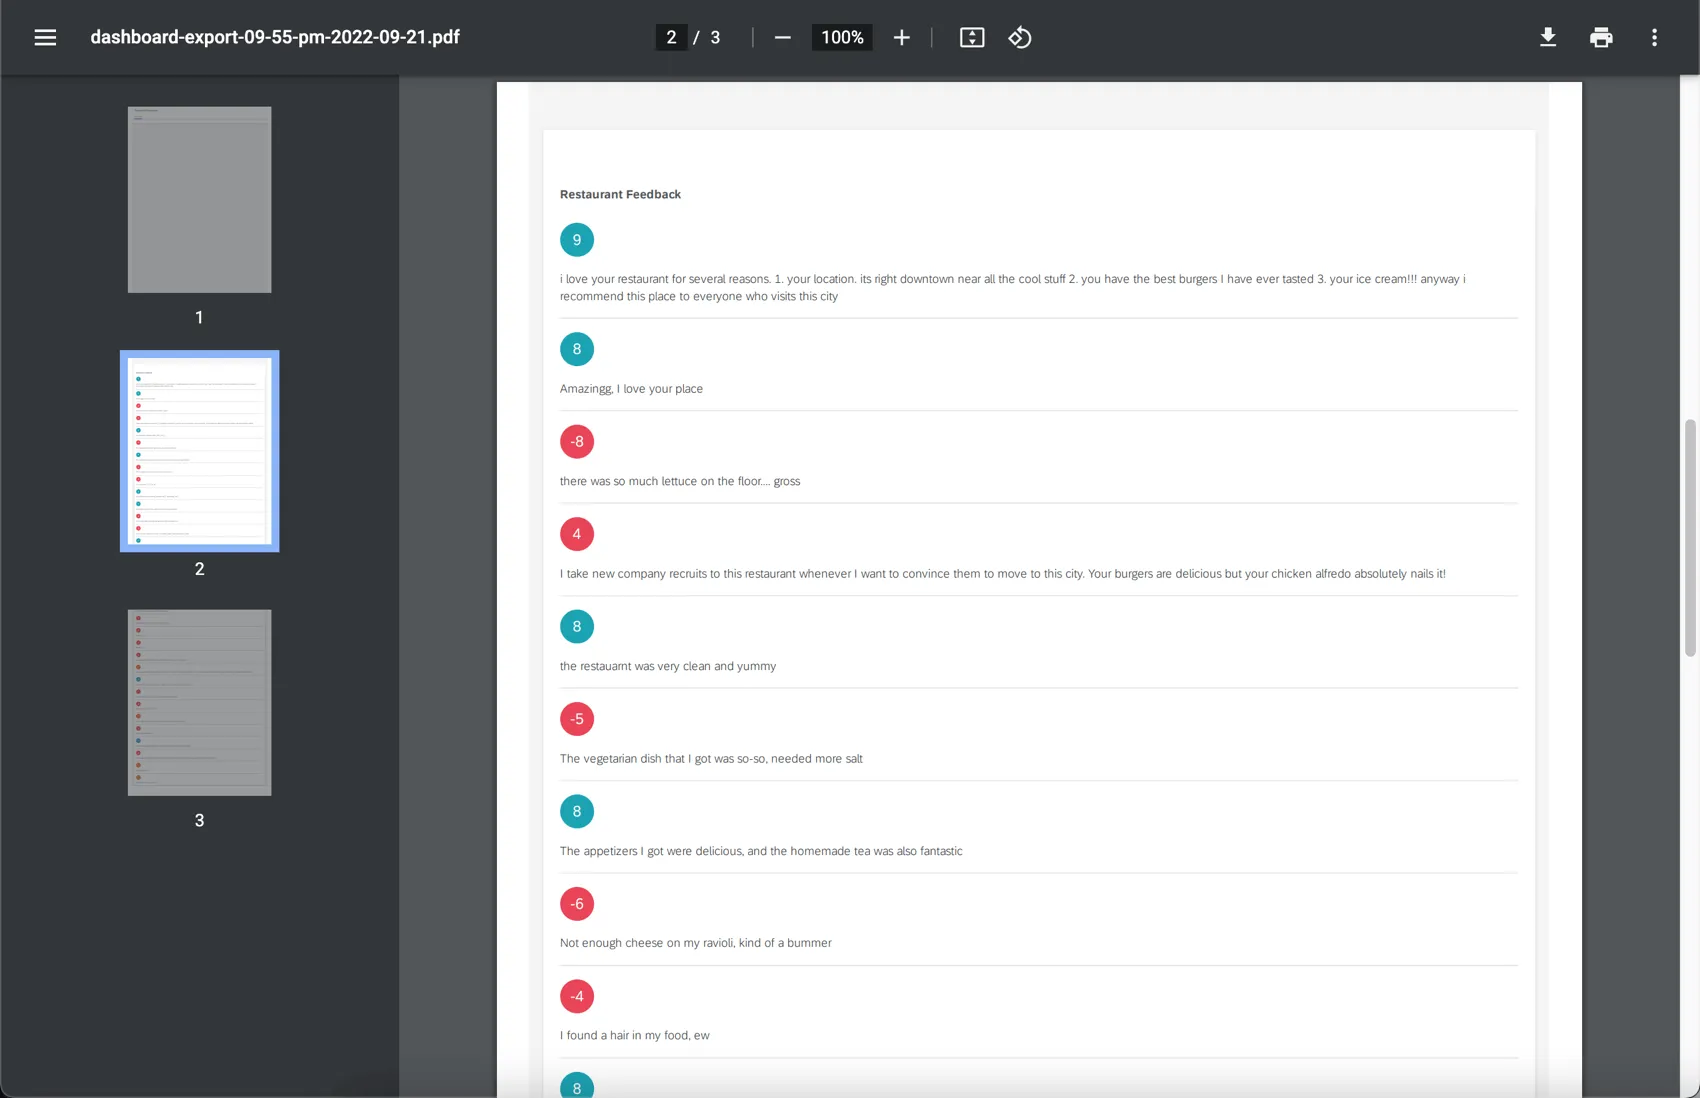
Example: The following widget, which is cut off in the dashboard:
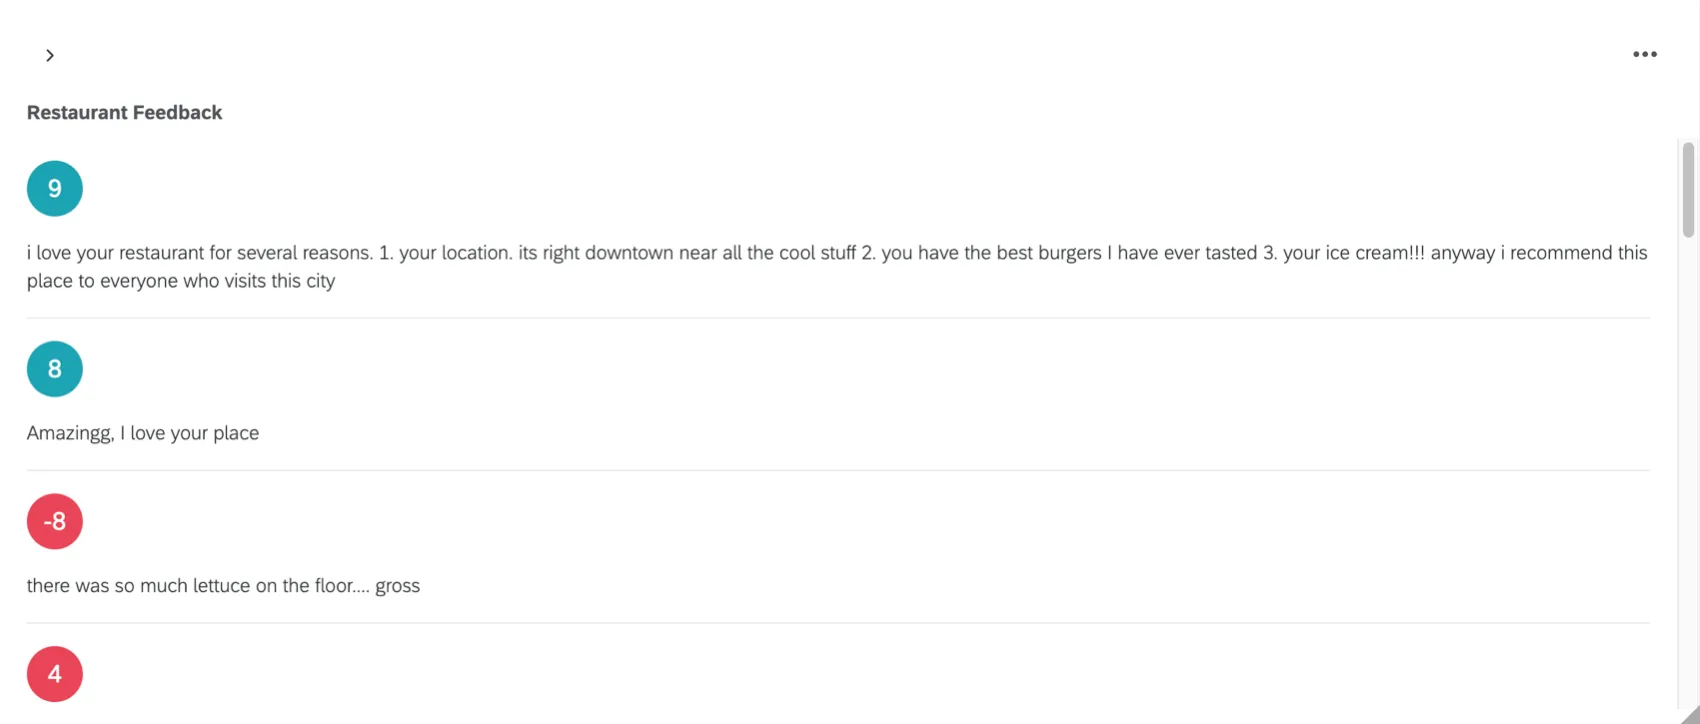
Would export to this multi-page file:
CSV, TSV, and XLSX Export Options
CSV, TSV, and XLSX exports contain data for fields mapped in the dashboard, and are only filtered by role restrictions.
- Data: Determine whether you want to export all the survey data mapped to the dashboard, the ticket data, or the action planning data. This field only appears if you have multiple of these types of sources mapped.
- Export Type: Choose between visualized and raw data formats for TSV and CSV. See more on Dashboard Export Permissions.
- Select Pages: Only available for visualized data. Select the specific pages of the dashboard that you want to export. By default, only the page you’re on is selected.
- Limit Results: Only available for raw data and XLSX. Limit how many responses should be included in the data. By default, this will be the total number of responses in the dashboard. If you choose a smaller value, the results will be limited to the newest data.
- Remove Line Breaks: Only available for raw data and XLSX. Remove line breaks from open text data.
- Include Filter Selection: Adds another header above the columns of data that specifies the filter selection used in the dashboard.
PDF and PPTX Export Options
- Orientation: Portrait or landscape.
All export formats
These export options are available for all file types. You can choose 1 of the following:
- Automatically download file: When the export is complete, the file will automatically download to your computer.
- Retrieve file in notification center: When the export is complete, the file will be available in your notifications.
Email Dashboards
You can email static versions of your dashboards to other people, regardless of whether they have a Qualtrics account or not. These emails can go out on a recurring schedule or just once, and will contain the version of your dashboard that existed at the time the email was sent.
Qtip: Recipients can unsubscribe from scheduled dashboard emails using the opt-out link in the email. Recipients can also resubscribe by using the same link.
Qtip: To send a dynamic version of your dashboard that updates as new data is collected, try sharing your dashboard instead.
Emailing Dashboard Pages
Attention: If the Allowed email domains setting is enabled, the dashboard can only be sent to email addresses that are included in that allowed list.
Qtip: For any exports over 14MB, the email will contain a link to download the dashboard instead of including it as an attachment in the email.
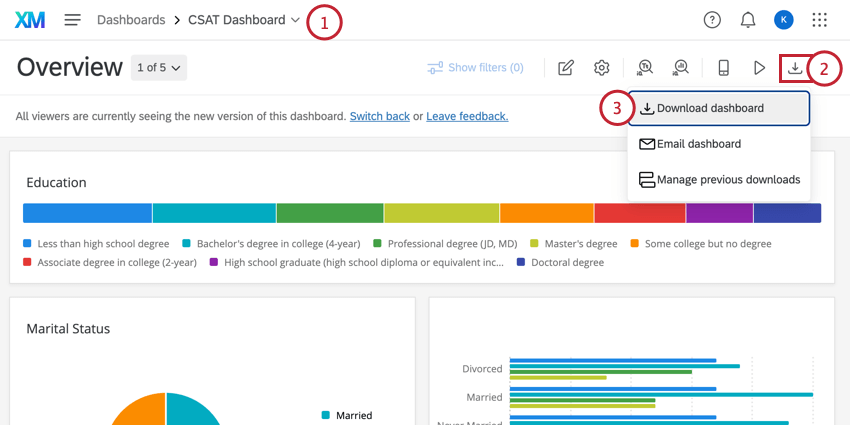
Open the dashboard.
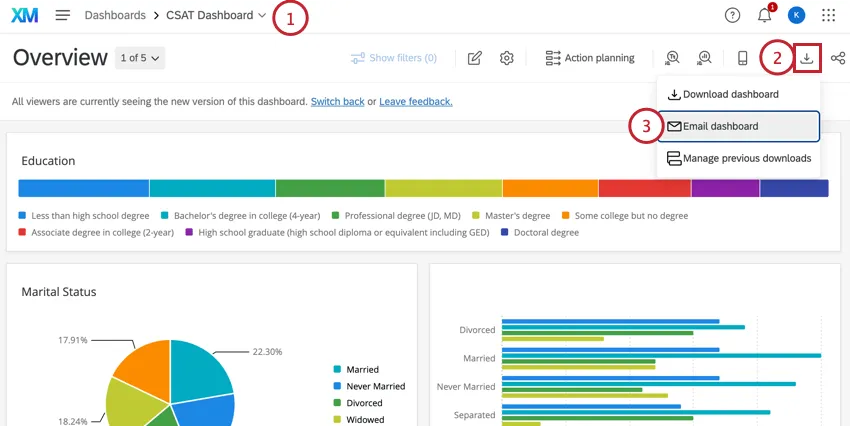
Attention: We recommend opening the specific dashboard page you want to include in your email, then clicking export from there.
Click on the Export button.
Select Email dashboard.
Click Create new email or New email.

Select recipients. Click to choose from a list of existing users and roles, or select New Email(s) to add email addresses that aren’t connected to an account.

Attention: When a dashboard is emailed to an existing user or role, the dashboard data will reflect the permissions of the recipient.
When a dashboard is emailed to a new email without access to the dashboard, the dashboard data will reflect the permissions of the sender.
You can change the From name to anything you ‘d like.
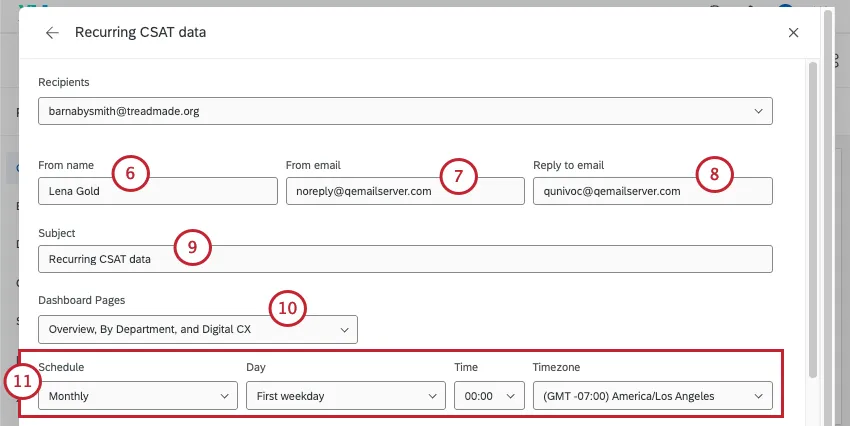
You can change the From email to another standard Qualtrics email address. Depending on your license, you may also be able to use a custom from address. For more information, see Using a Custom From Address.
Change the Reply to email to whatever email address you want to receive replies respondents write to the dashboard email.
Qtip: To prevent emails being blocked as spam, make sure you’ve allowlisted the Qualtrics Servers.
Enter a Subject.
Choose the dashboard page (or multiple pages) you wish to share.
Qtip: The order you select the dashboard pages while composing your email is the order they will be sent in. The page you were on when you started configuring your scheduled email will be first.
Attention: Ticket Reporting pages cannot be exported to CSV format in recurring emails.
Choose a schedule for when the dashboard should be sent.
Qtip: Depending on traffic on your datacenter, it may take a few hours for emails to send. Scheduled emails are generally sent out within 24 hours, so if you’re receiving emails later than expected, we recommend setting an earlier delivery time.
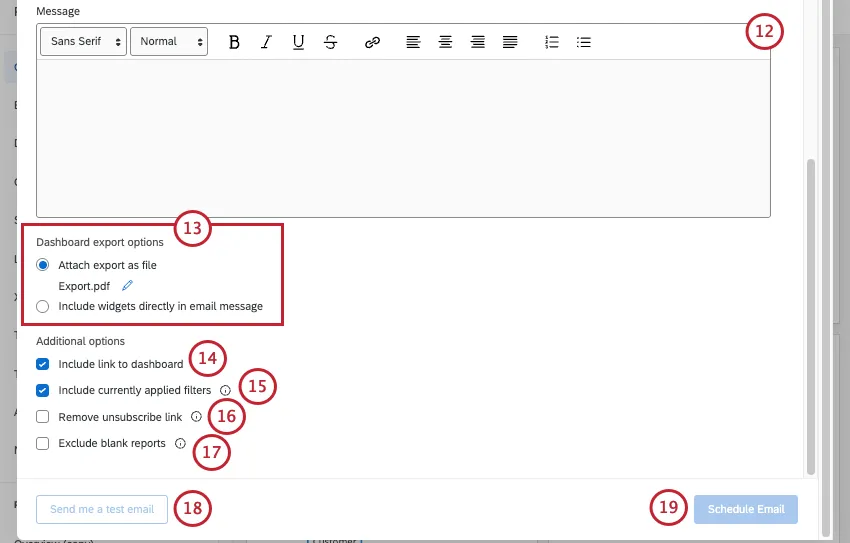
Add a message to your email, if desired.
Attention: You cannot include any links or linkable text in messages to external recipients. This includes URLs and inserted hyperlinks. If your message contains links, you will see the error message "Links cannot be included in emails sent to external recipients. Please remove the URL or external recipients" and you will not be able to save your email until you remove the disallowed content. This security policy is in place to improve email deliverability and protect against phishing.
Choose between the following Dashboard export options:
- Attach report: Attach a report to the email rather than including it in the body of the email. Click Export.pdf to change the format of the report. You have the export options shown here to choose from. Note that the report will only contain data for the page you’ve shared.
- Include widgets directly in email body: This option includes the widgets as JPG images in the body of the email.
If Include link to dashboard is selected, the email will include a link to the dashboard Qualtrics users can click to log in and see the live data.
Qtip: If the respondent has not been given access to the dashboard, then the email will not contain a dashboard link.
If Include currently applied filters is selected, any filter you currently have applied to the dashboard at the time the scheduled distribution is created will be applied to the emailed data. To ensure any filters with the “set default value from user attribute” are correctly applied, make sure those filters are locked. If this option is deselected, the data will export with whatever default filters are applied. Default filters are filters that are applied by dashboard Admins when editing the dashboard, and they are automatically applied for all dashboard users. See Adding Filters for more information about default filters.
Attention: If you are exporting multiple pages of the dashboard, only the page you’re currently on will respect filters you currently have applied; otherwise, the additional pages of the export will revert to the default filters for the page.
If you don’t want recipients to be able to subscribe and unsubscribe with the link, select Remove unsubscribe link.
If you want the email to skip being sent when all widgets are empty, select Exclude blank reports. If this is enabled, at least 1 widget needs to have data before the email is sent.
If you want to test the email, click Send me a test email. This will only send the email to the address associated with your account.
Click Send Email or Schedule Email.
Qtip: Non-scheduled dashboard emails (test emails and emails sent out immediately) will not include an unsubscribe link.
Qtip: The Reply-To Email address must be an approved address for your organization. If you attempt to use an unauthorized email, you will not be able to save your scheduled email, and it will not send. If you encounter any issues with your Reply-To Email, please reach out to your organization’s Brand Administrator.
Adding, Removing, and Updating Scheduled Emails
Attention: Any filters applied to your dashboard at the time the recurring email is first scheduled will apply every time the recurring email sends. If you want to change the dashboard filters being used in a recurring email export, you will need to open your recurring email and click Update.
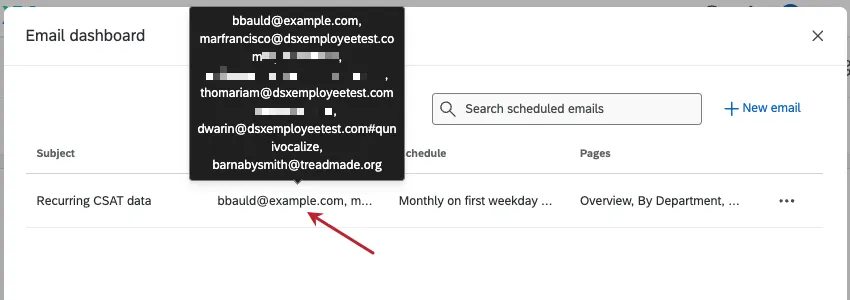
You can manage existing recurring emails from the Email Dashboard window.


Qtip: When you open the Email dashboard page, you'll see a list of all scheduled emails you've created. Hover over recipients for to see the full list of email addresses for that message.
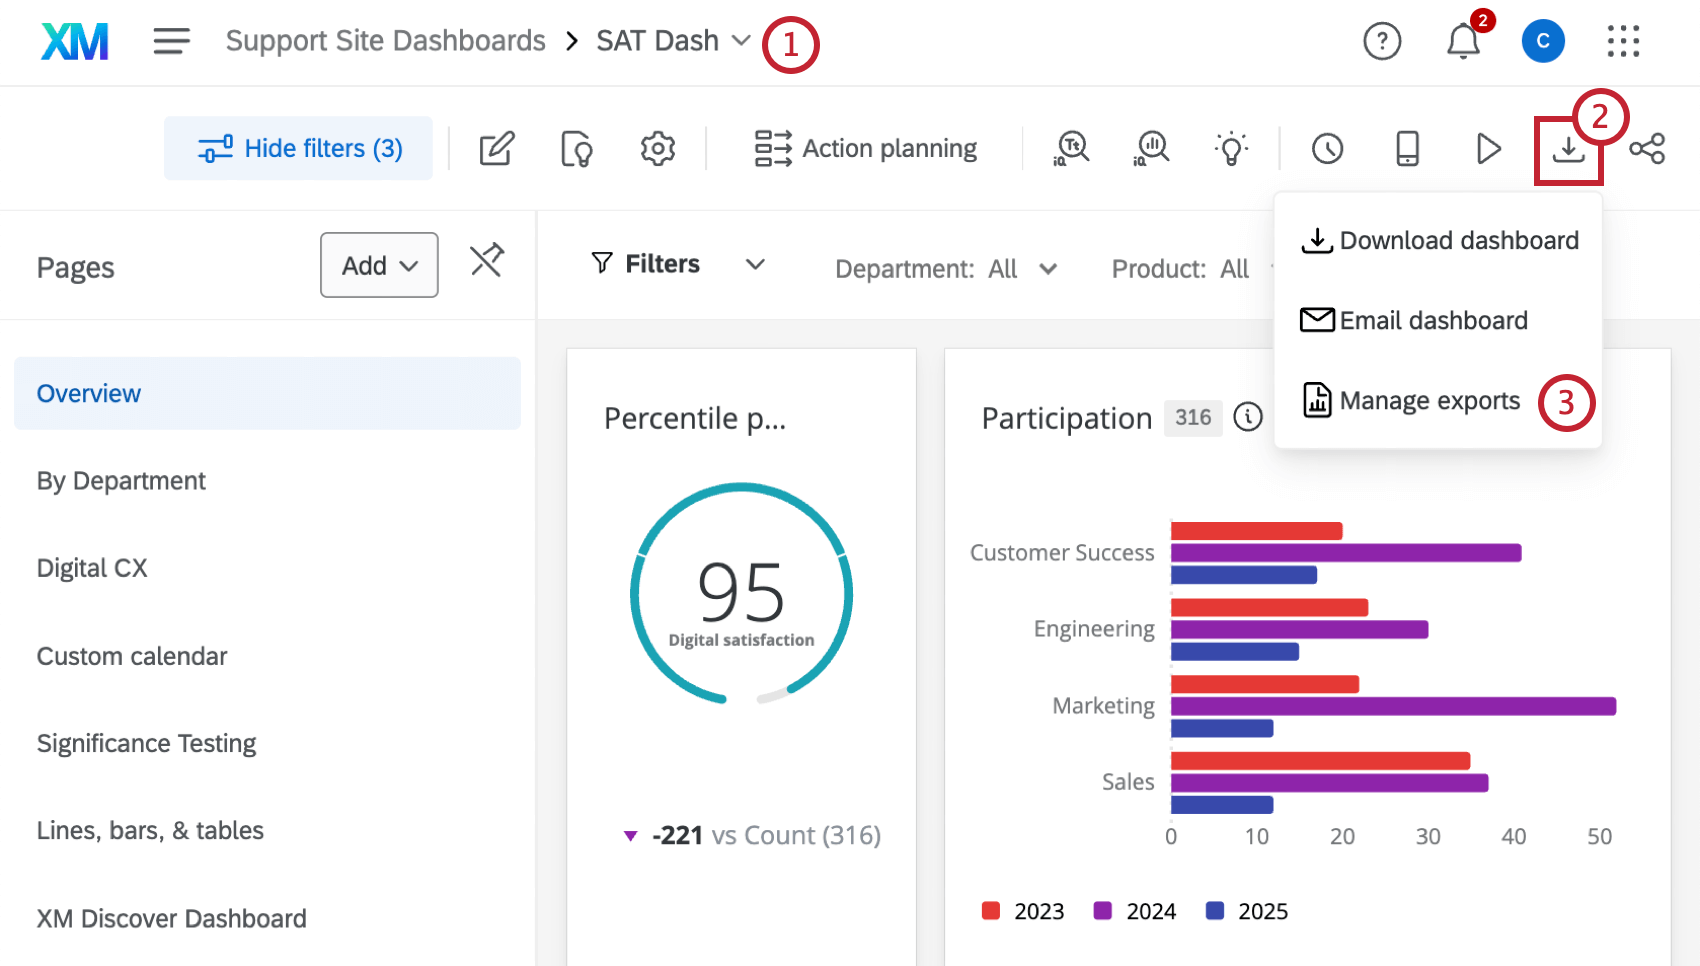
Manage Exports
Within the Manage exports hub you can view the downloads and recent email activity for your dashboard in a single place. To access your exports, follow these steps:
Downloads
After you’ve downloaded your dashboard, you can view a record of past exports within the downloads tab.
The table displays all past exports. In addition to viewing information about the export, you can click Download to re-download your previously generated exports. This will download the same version of the dashboard at the time you originally clicked Download dashboard, not the current version of the dashboard.
Email Exports
In the Email exports tab you can view the email activity for your dashboard for the past 7 days. Here you can view in progress and sent emails, allowing you to track delivery and view metrics all in one place.
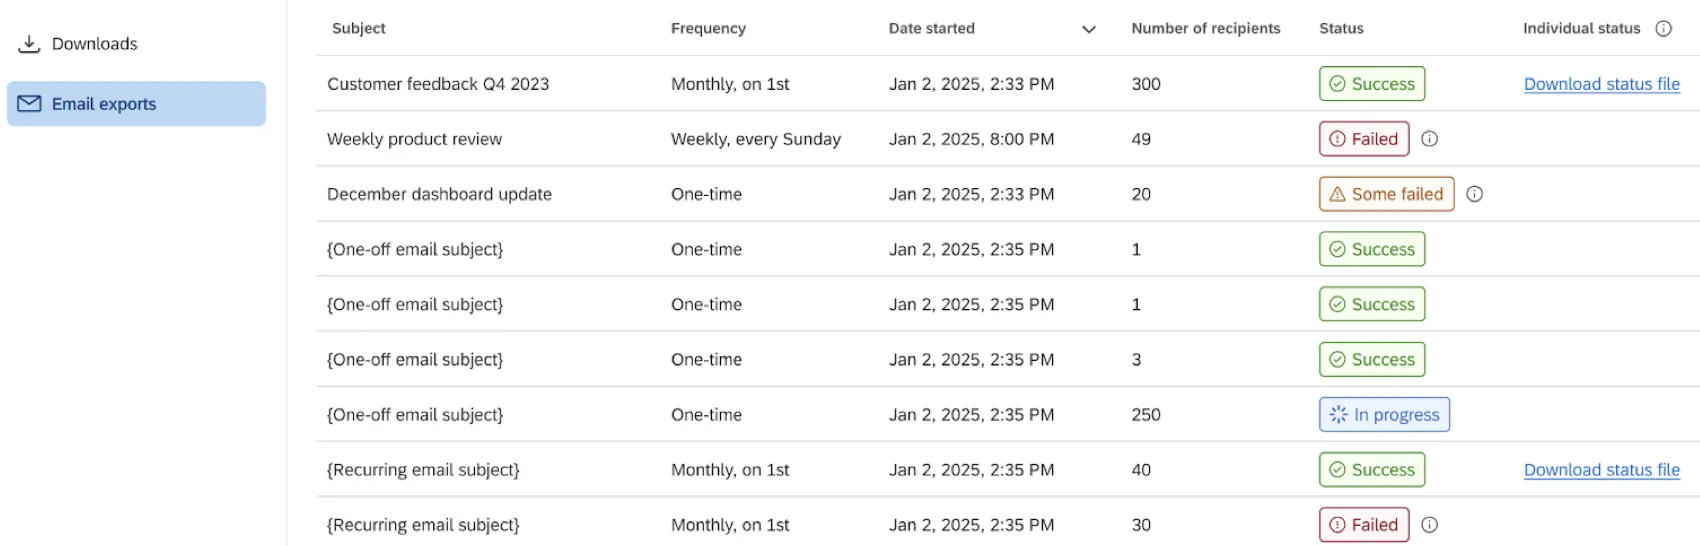
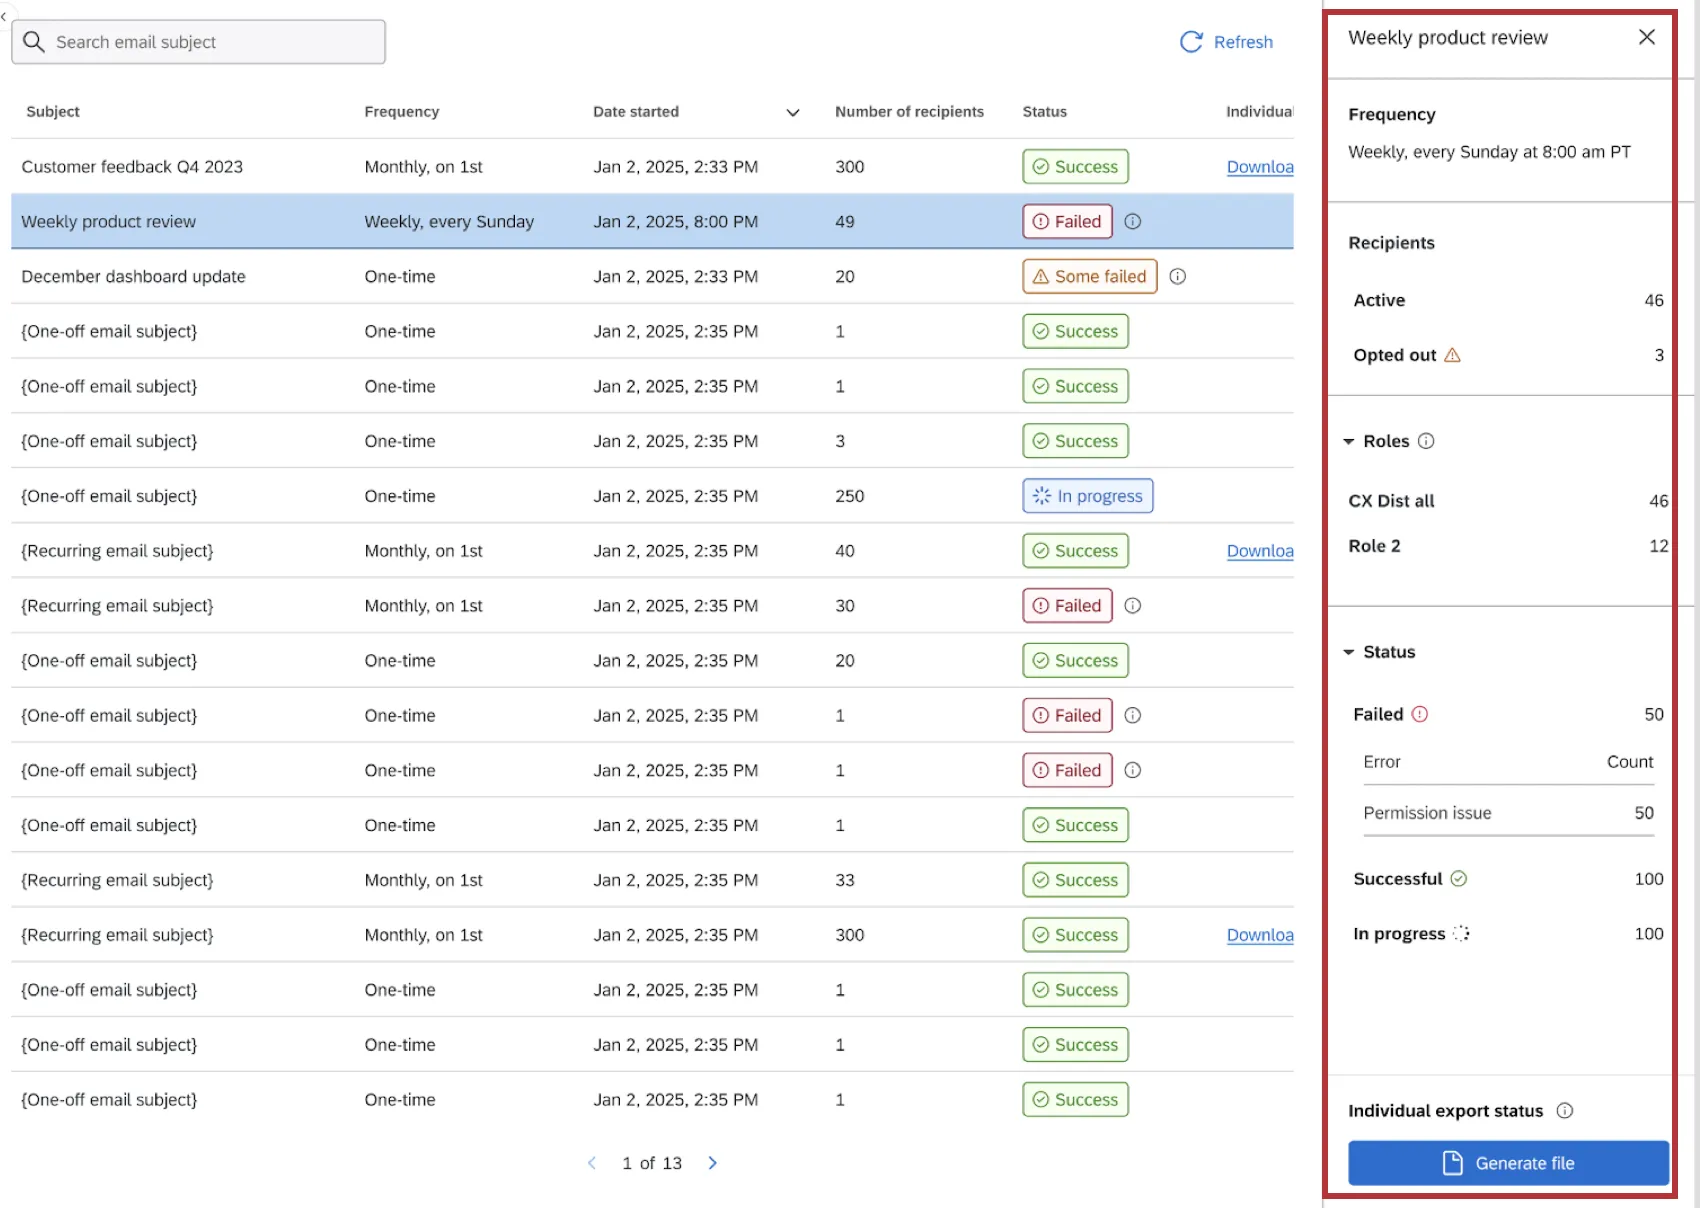
The table contains information such as email subject, frequency, status, and more. Click a specific email to open a side panel with more information, including error diagnostics. You can also download a status file with information on the delivery outcome for each email recipient.
Exporting Widgets
So far, we’ve discussed how to export your entire dashboard. You can also export individual widgets into a variety of formats, including JPG, PDF, and file types compatible with spreadsheet software like Microsoft Excel.
For details on file types available and steps to export, see Exporting Widgets as JPG, PDF, CSV, XLSX, or TSV.
That's great! Thank you for your feedback!
Thank you for your feedback!