Loading...
Skip to article
  • Qualtrics Platform
    Qualtrics Platform
  • Customer Journey Optimizer
    Customer Journey Optimizer
  • XM Discover
    XM Discover
  • Qualtrics Social Connect
    Qualtrics Social Connect

Navigating Dashboards Using Explorer (Studio)


Was this helpful?


This site is protected by reCAPTCHA and the Google Privacy Policy and Terms of Service apply.

The feedback you submit here is used only to help improve this page.

That’s great! Thank you for your feedback!

Thank you for your feedback!


About Dashboard Explorer

Dashboard Explorer is where you view and manage all dashboards and books you own or that other users have shared with you.

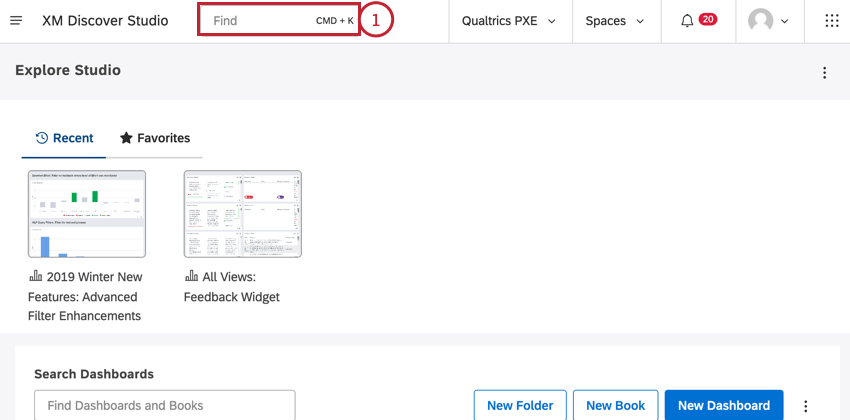
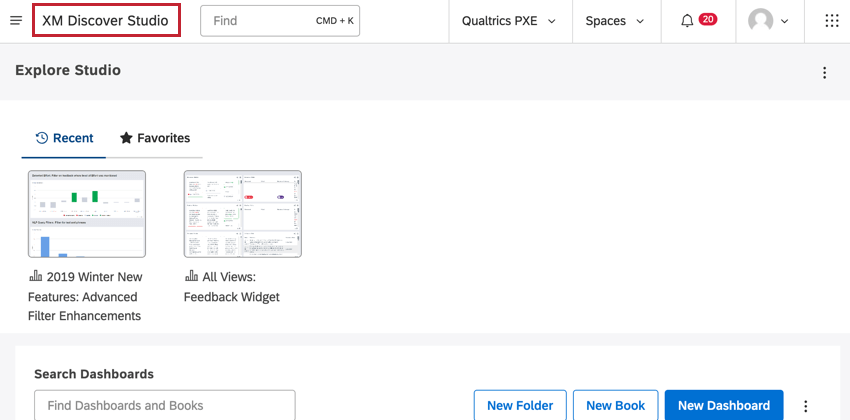
Opening Dashboard Explorer

Click the logo in the upper-left corner. If there is no logo, click the XM Discover Studio title in the upper-left corner.

Dashboard Explorer Basic Overview

  1. XM Discover Search, an intelligent search assistant that helps you to explore and investigate insights.
    XM Discover Search, an intelligent search assistant that helps you to explore and investigate insights.
  2. The name of your current homepage.
    The name of your current homepage.
  3. Select a homepage to display.
  4. When configuring a homepage, you have the option to switch on the following:
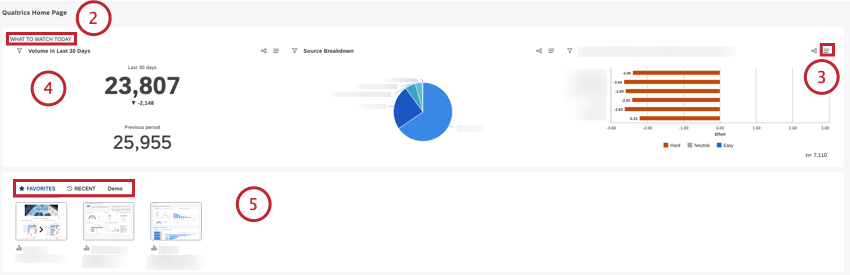
  • What to Watch Insights: display two, three, or four widgets with key insights defined in the Layout Options section.
  • Show Quick Insights: display XM Discover Search, an intelligent search assistant that helps you to explore and investigate insights.
  • Dashboard Carousel: display the thumbnail carousel of books and dashboards.
    Qtip: For more information on creating and configuring a homepage, please see Creating a Homepage in Studio.
  1. The Thumbnail carousel contains tabs that provide quick access to dashboards and books:
  • RECENT: Shows dashboards and books you viewed recently (sorted left to right from most to least recent).
  • FAVORITES: Displays dashboards and books you marked as favorites.
  • Custom tabs: Shows custom tabs that display dashboards and books based on their labels.
    Type labels to only see dashboards and books that have labels. Create a dashboard. Create a book. Create a folder for dashboards and books.

    Qtip: See Dashboard Explorer Carousel Settings for information on how to add custom tabs and manage the carousel.
  1. Find dashboards and books by name or by labels. Use these search keywords to quickly filter your objects:
  • Type dashboards to only see dashboards.
  • Type books to only see books.
  • Type labels to only see dashboards and books that have labels.
  1. Create a dashboard.
  2. Create a book.
  3. Create a folder for dashboards and books.
  4. Select which of the optional columns to display in the table or switch the visibility of hidden items in dashboard explorer on and off. These settings are user-specific.
    Select which of the optional columns to display in the table or switch the visibility of hidden items in Dashboard Explorer on and off. Depending on the current selection, the topmost check box lets you select all items, clear all items or clear current selected items. The label icon next to a dashboard or a book indicates it has labels.
  5. Depending on the current selection, the topmost check box lets you select all items, clear all items or clear current selected items.
    Qtip: Selections do not apply for items that are hidden and invisible or filtered out by a search query.
  6. The label icon next to a dashboard or a book indicates it has labels.
  7. The check boxes next to dashboards and books let you select multiple items and perform bulk actions. Multiple selections share the same actions menu.
    The check boxes next to dashboards and books let you select multiple items and perform bulk actions. The actions menu lets you manage dashboards, books, and folders. Mark dashboards and books as favorites for quick access in the FAVORITES tab.

    Qtip: Use shift-click to select multiple items at once.
  8. The actions menu lets you manage dashboards, books, and folders.
    Qtip: Multiple selections share the same actions menu.
  9. Mark dashboards and books as favorites for quick access in the FAVORITES tab.
  10. The clock icon is shown for dashboards with active schedules. Hover your mouse over the icon to see how many actions are scheduled.

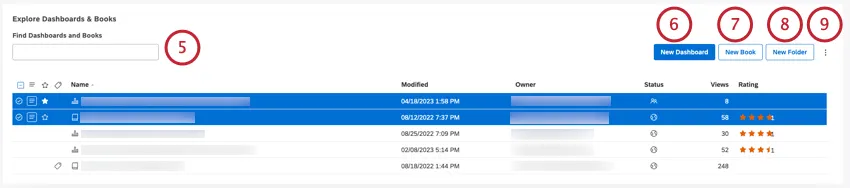
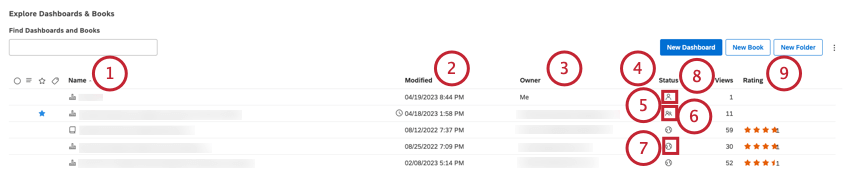
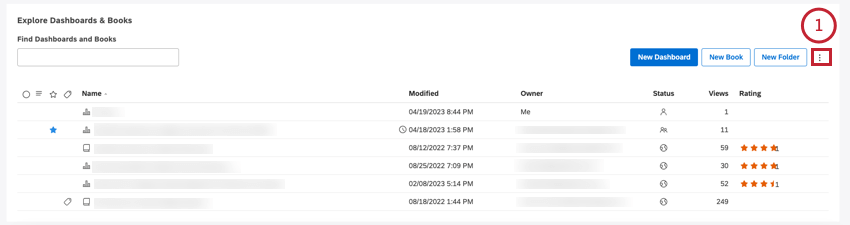
Dashboards and Books Table

The Dashboards and Books table provides the following information:

  1. Name: The name of a dashboard or a book.
    Name: The name of a dashboard or a book. Modified: The date and time the object was last modified. Owner: The current owner of a dashboard or a book ("Me" for items owned by the current user). Status: Object's sharing status: Private is only visible to the owner. Shared is accessible to select users and groups. Public is accessible to all Studio users within the Master Account. Views: Object's view count. Rating: Object's rating.
  2. Modified: The date and time the object was last modified.
  3. Owner: The current owner of a dashboard or a book (“Me” for items owned by the current user).
  4. Status: Object’s sharing status:
  5. Private is only visible to the owner.
  6. Shared is accessible to select users and groups.
  7. Public is accessible to all Studio users within the Master Account.
  8. Views: Object’s view count.
  9. Rating: Object’s rating.

Finding Dashboards and Books

When in dashboard explorer, you can find a particular dashboard or book using any of the following methods:

  • Look through the dashboards and books you viewed recently under the RECENT tab.
  • Quickly access your favorite dashboards and books under the FAVORITES tab.
  • Find dashboards and books by name or by label using the search field on top of the dashboards and books table.
    Qtip: Type the word dashboards into the Search box to display just the dashboards to which you have access (regardless of whether the word “dashboards” is in their name). Type the word books to display just the books. Type the word labels to display dashboards and books that have labels.
  • Sort objects by name, date modified, author, or view count by clicking the corresponding column headers. Click a header several times to switch between ascending and descending sorting.

Hiding Dashboards and Books

If you do not want certain dashboards or books to appear in dashboard explorer, you can hide them.

Here’s how it works:

  • Hiding a dashboard or book only affects its visibility in your dashboard explorer.
  • Hidden items will still appear in the RECENT and FAVORITES tabs in your thumbnail carousel.
  • You can access hidden dashboards and books by switching their visibility on, as well as unhide them altogether.
Qtip: Alternatively, you can organize dashboards and books into folders but folders cannot be hidden.

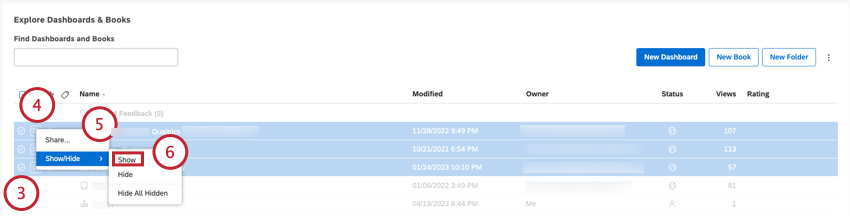
Hiding dashboards and books is a two-step process: first, you mark selected items as hidden, then you switch their visibility on or off.

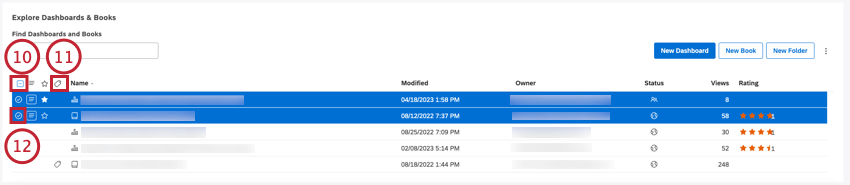
Switch Hidden Items Visibility On or Off

  1. Expand the options menu in the top right corner of the dashboards and books table.
    Expand the options menu in the top right corner of the dashboards and books table.
  2. Select visibility mode:
    • Show All Hidden (visibility is off). Indicates that hidden items are currently not shown. Click to show them.
      Show All Hidden (visibility is off). Indicates that hidden items are currently not shown.
    • Hide All Hidden (visibility is on). Indicates that hidden items are currently shown. Click to hide them.
      Hide All Hidden (visibility is on). Indicates that hidden items are currently shown.

Mark an Item as Hidden

  1. Open Dashboard Explorer and locate the dashboard or book you wish to hide.
  2. If you need to hide several items, select them using the check boxes on the left. Multiple selections share the same actions menu.
    If you need to hide several items, select them using the check boxes on the left.
  3. Expand the actions menu next to the item and select Show/Hide and then select Hide.
  4. Switch hidden items visibility off.

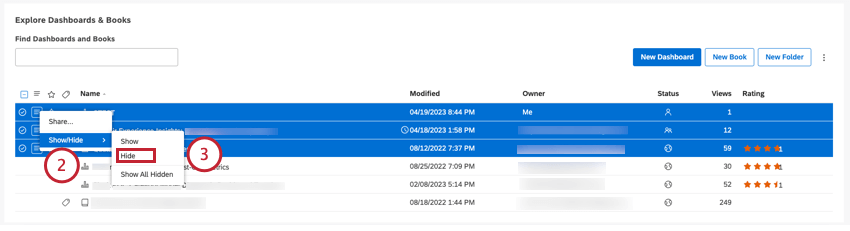
Hidden items will no longer be shown in Dashboard Explorer unless their visibility is switched back on.

Mark an Item as Not Hidden

Once a dashboard or book is hidden, you can unhide it.

  1. Make sure hidden items visibility is switched on.
  2. Locate the item you wish to unhide.
    Qtip: Hidden items are displayed using lighter colors.
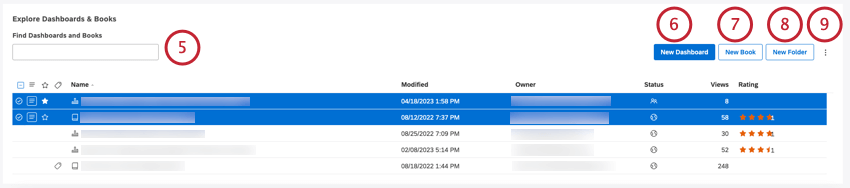
  3. If you need to unhide several items, select them using the check boxes on the left. Multiple selections share the same actions menu.
    If you need to unhide several items, select them using the check boxes on the left. Multiple selections share the same actions menu. Expand the actions menu next to the item. Select Show/Hide. Select Show.
  4. Expand the actions menu next to the item.
  5. Select Show/Hide.
  6. Select Show.

Creating a Folder

You can use folders to organize dashboards and books in Dashboard Explorer. Folders are always displayed at the top, followed by dashboards and books in alphabetical order.

  1. Open Dashboard Explorer. Click the logo in the upper-left corner. If there is no logo, click the XM Discover Studio title in the upper-left corner.
  2. Once in Dashboard Explorer, click the New Folder button on top of the dashboards and books table.
    Click the New Folder button on top of the dashboards and books table.
  3. In the Folder Properties window, enter a folder name into the Folder Title box.
    In the Folder Properties window, enter a folder name into the Folder Title box.
  4. Enter a folder description into the Folder Description box.
  5. Click Save.
    Attention: Folder name must be unique per user.

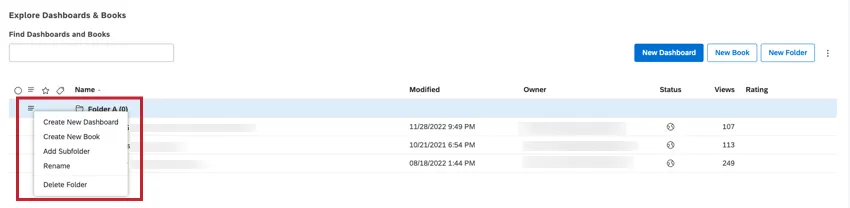
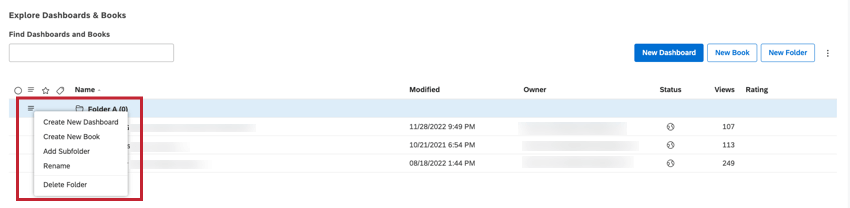
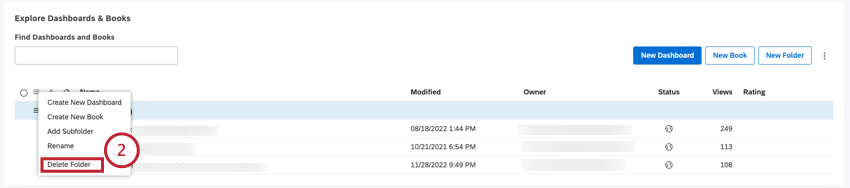
Once a folder is created, you can expand the actions menu next to it and perform the following actions:

  • Create New Dashboard: Create a dashboard inside this folder.
  • Create New Book: Create a new book inside this folder.
  • Add Subfolder. Create a nested folder (up to 5 levels deep).
  • Rename. Change folder name or description.
  • Delete Folder. Delete a folder (without dashboards). See Deleting a Folder.
  • Delete Subfolder (for nested folders). Delete a subfolder (without dashboards).
    Once a folder is created, you can expand the actions menu next to it and perform several actions

You can also move objects to this folder.

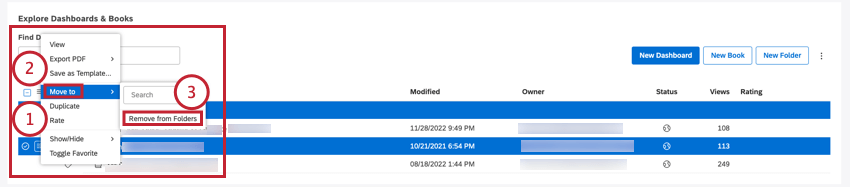
Moving Items to a Folder

After you have created a folder, you can move your dashboards and books to that folder.

Qtip: When a folder is deleted, the dashboards and books that were in it are moved to the root folder.
  1. Open Dashboard Explorer and click the logo in the upper-left corner. If there is no logo, click the XM Discover Studio title in the upper-left corner.
  2. Expand the actions menu next to the item you wish to move, select Move to and then select the folder name.
    Expand the actions menu next to the item you wish to move, select Move to and then select the folder name.

    Qtip: If you need to move several items, select them using the check boxes on the left. Multiple selections share the same actions menu.
  3. The item is moved to the selected folder, which you can open by clicking its title.

Move an Item to the Root Folder

  1. Select the item and expand the actions menu next to the item.
    Select the item and expand the actions menu next to the item. Select Move to. Select Remove from Folders.
  2. Select Move to.
  3. Select Remove from Folders.

Create a Dashboard Inside a Folder

  1. Expand the actions menu next to the folder.
  2. Select Create New Dashboard.

Deleting a Folder

You can delete folders in Dashboard Explorer.

Qtip: If you choose to delete a folder that contains dashboards or books, they will be moved to that folder’s immediate parent (or root folder for top-level folders).
  1. Open Dashboard Explorer and locate the folder you wish to delete.
  2. Expand the actions menu next to the folder and select Delete Folder.
    Expand the actions menu next to the folder and select Delete Folder.
  3. Confirm your action, and the folder will be deleted.

Adding Dashboards and Books to Favorites

Studio provides several ways to quickly access your favorite dashboards and books. You can mark any number of dashboards or books as your favorites to have them handy in the FAVORITES tab of Dashboard Explorer. You can also set one dashboard or book as your homepage to go straight to it when you sign in to Studio.

Marking Dashboards or Books as Favorites

  1. Open Dashboard Explorer and locate the dashboard or book you wish to mark as favorite.
  2. Hover your mouse over the item so that an outline of a star becomes visible next to its name.
    Hover your mouse over the item so that an outline of a star becomes visible next to its name. Click the star icon so that the star becomes dark.
  3. Click the star icon so that the star becomes dark.

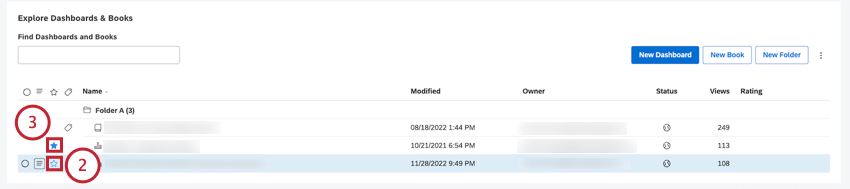
Items marked as favorites become available in the FAVORITES tab of Dashboard Explorer.