
Managing Users (Discover)
What's on this page
About Managing Users
Qtip: Only registered users can access Studio and its dashboards.
Studio enables you to separately control the tasks that users can perform and the data they can access.
User Permissions
You can assign a set of permissions to each user account that determines which actions the user can perform within Studio. The range of permissions available to a user is defined by a license. For example, a user with the permission to create dashboards also needs to have access to a content provider that serves as a source of XM data so that they can add data to a dashboard.
User Data Access
At the most basic level, a registered user can view any dashboard that is shared with that user by the dashboard owner.
Qtip: Dashboard personalization enables dashboard owners to implement security filtering and control which segments off the data individual Studio users can access.
To create your own reports that can be shared with others on your behalf, you need to have access to data from a corresponding content provider. This is achieved by linking your user account to a content provider and granting you access to its projects.
A user with a Configuration Analyst or Report Creator license and a linked account can switch between Studio and Designer applications using a single sign-on. For more information about managing data access, see Managing Data Access.
Power Users
In addition to System Administrators, Studio supports several types of power users who can perform a limited set of administrative functions and access additional reports on Studio usage. For more information, see Power Users.
Groups
Users in Studio may be organized into groups for more convenient dashboard sharing and permissions management. Instead of sharing a dashboard or a filter with individual users, you can share it with a group. Likewise, permissions may be granted to a group and passed on to all group members as long as they stay in that group. Groups are also the only way a user can be subscribed to alerts.
User Management Tasks
Every user in Studio can perform the following tasks:
- Adjust user preferences, including changing their password.
- Change the picture associated with their user account.
- View their login history to make sure their account is protected.
Advanced users can perform the following user management tasks:
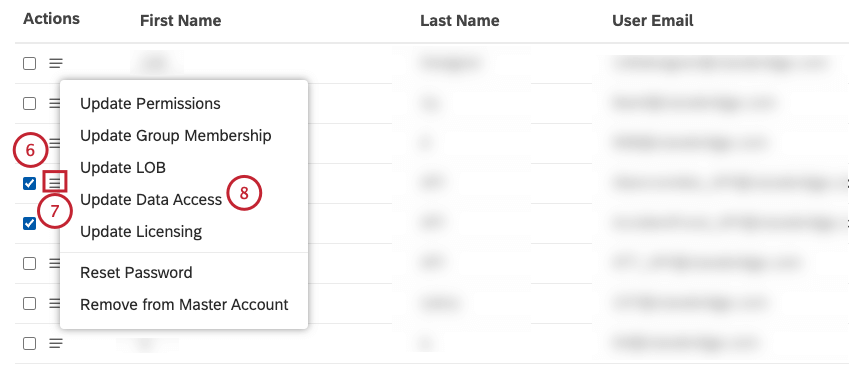
- Register users in XM Discover via Studio.
- Edit user account properties, permissions, or data access.
- Add or remove permissions for users and groups.
- Apply a new license type to multiple users.
- Give a user access to data from a content provider.
- Request a password reset on behalf of another user.
- Remove a user from a Master Account.
Group Management Tasks
Advanced users can perform the following group management tasks:
- Create a group to easily manage multiple users.
- Add selected users to a group or cancel their group membership.
- Delete a group (not users).
For more information about managing user and group permissions and data access, see Groups (Discover).
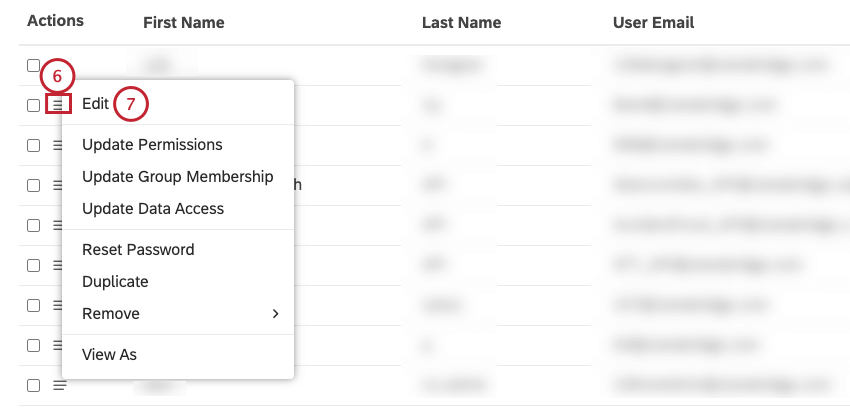
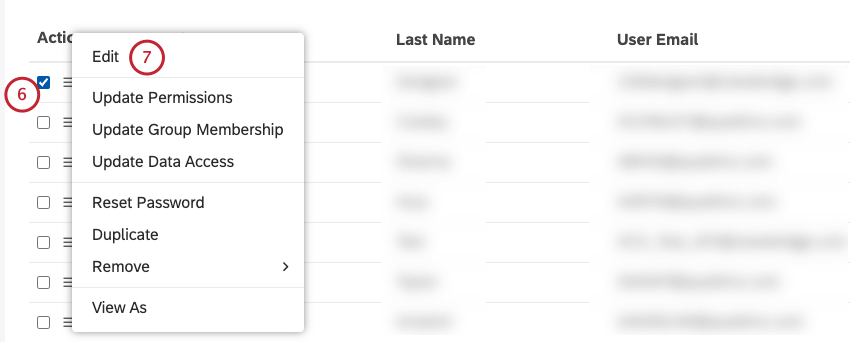
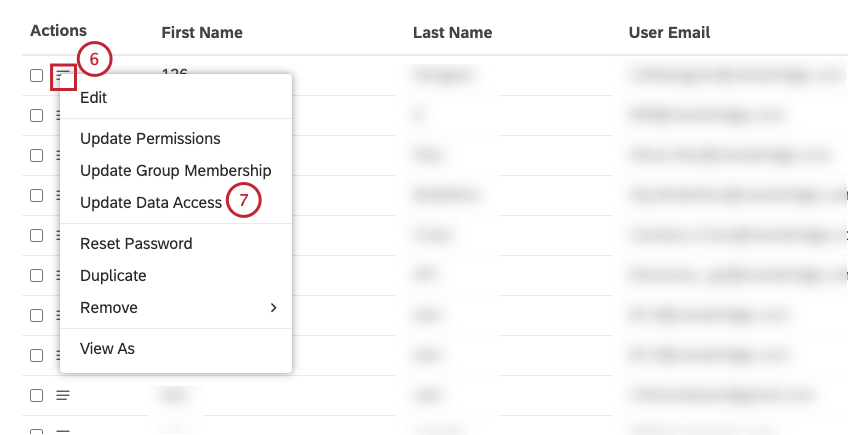
Editing a User Account
Qtip: This action requires a Manage Users permission.
After a user account is registered, you can change its properties, permissions, and group membership, as well as link it to content providers.

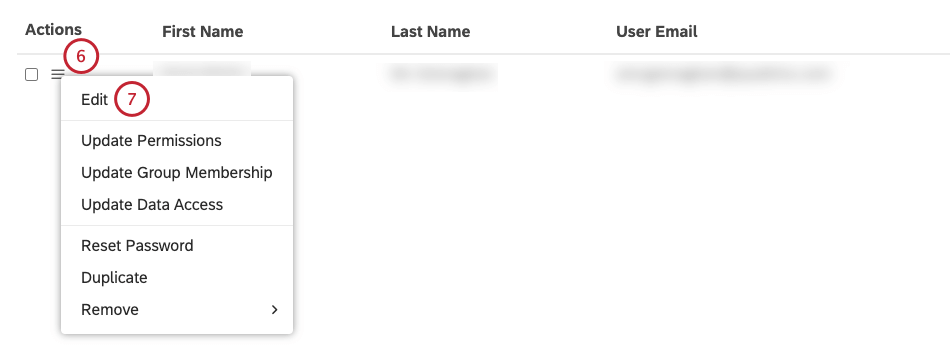
- Modify user account properties in the Properties tab.
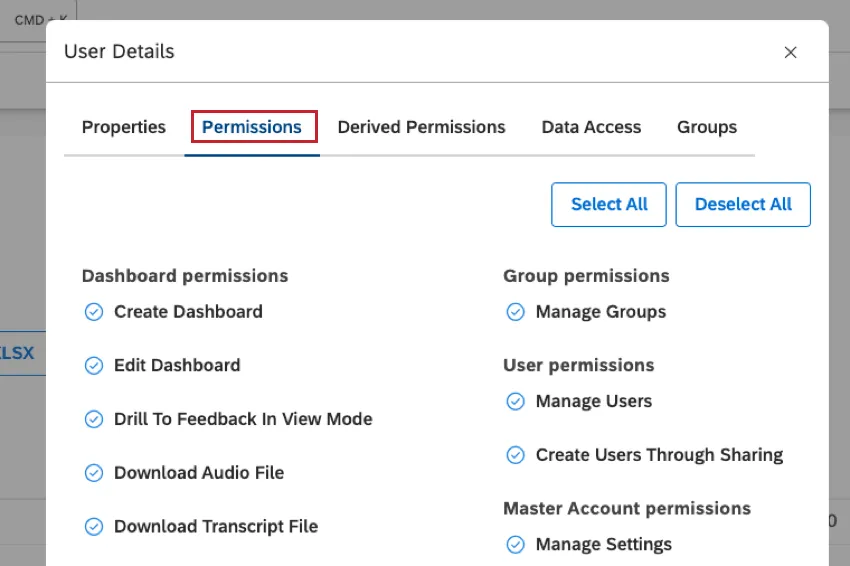
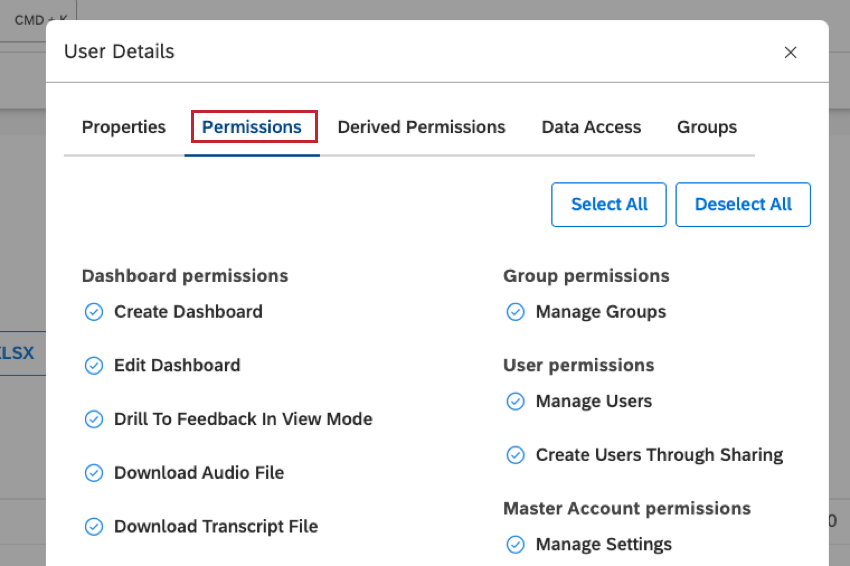
- Grant permissions in the Permissions tab.
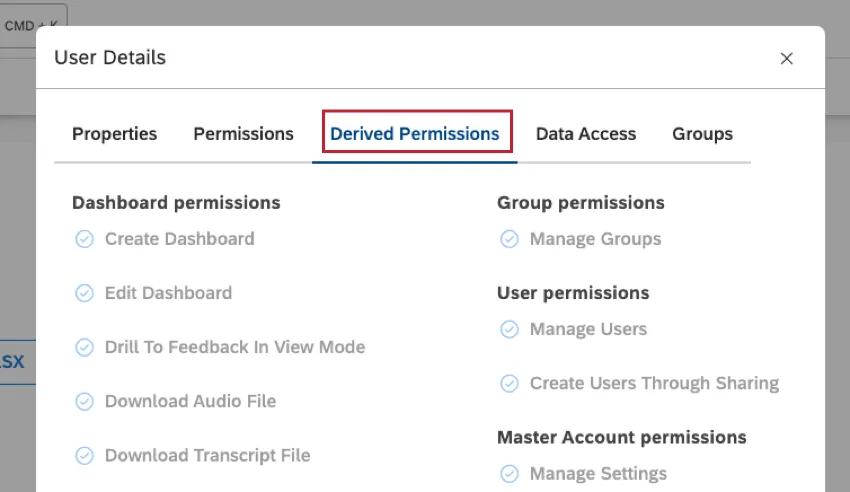
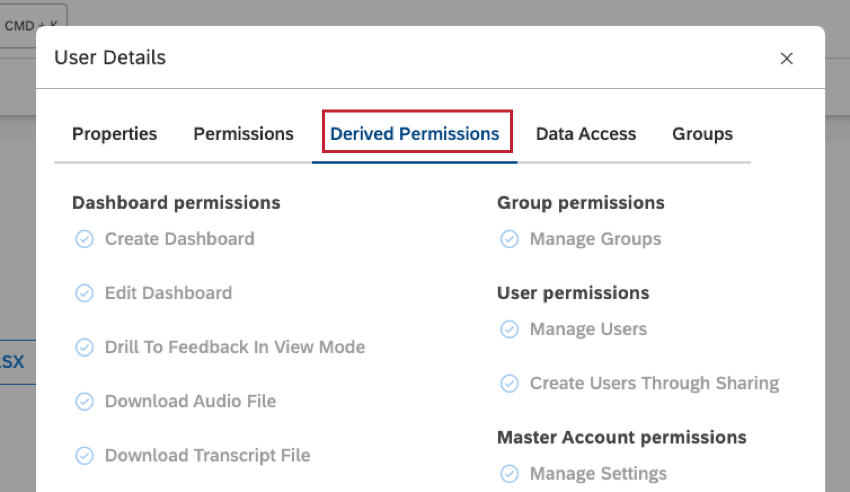
- View the sum of all permissions granted to the user and the groups the user is a member of in the Derived Permissions tab.
- Define user’s data access for linked content providers in the Data Access tab.
- Modify the user’s group membership in the Groups tab.
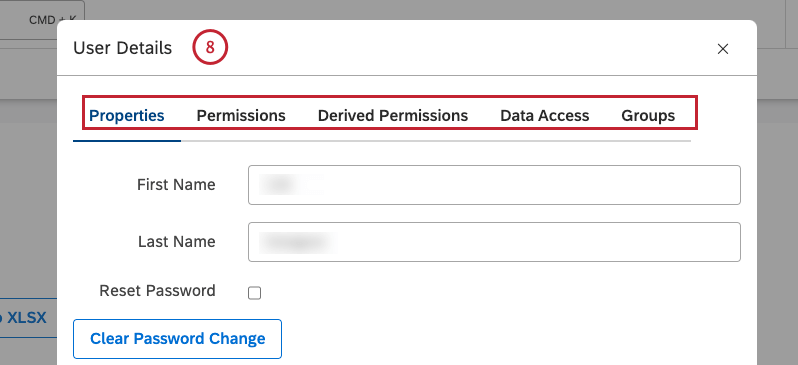
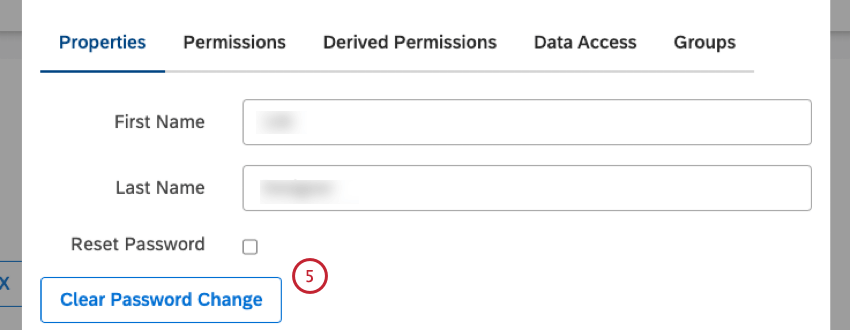
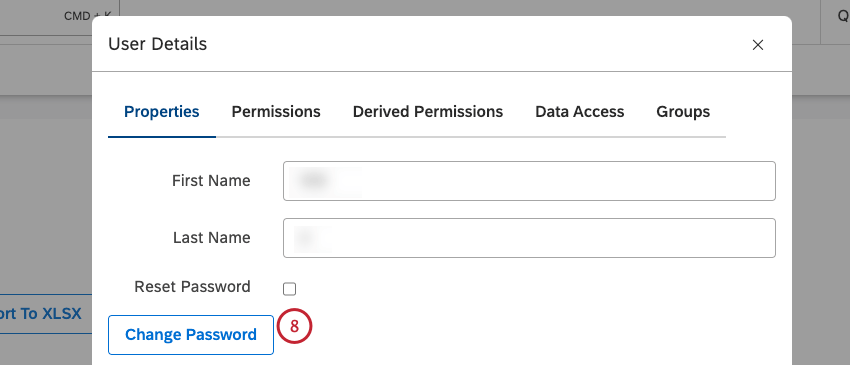
Properties Tab Overview
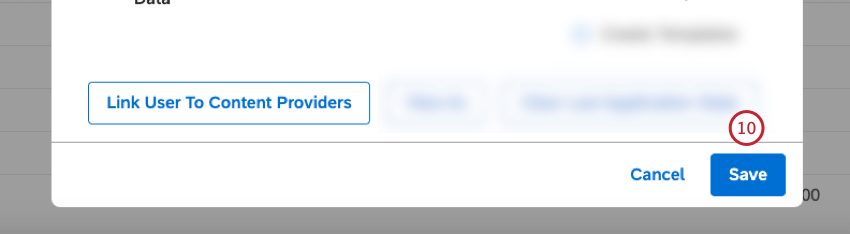
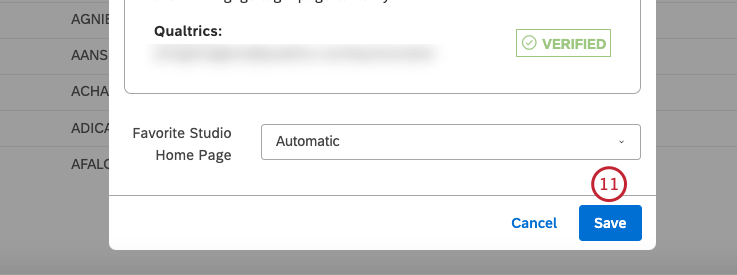
Qtip: Click Save at the bottom-right to save your changes.
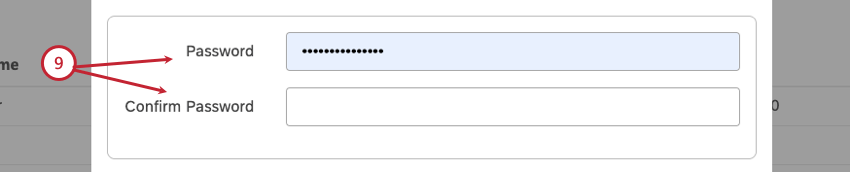
In the Properties tab, you can modify the user’s name, password, location, and license, as well as link the user to content providers.


Permissions Tab
You can grant permissions to the user in the Permissions tab.
Derived Permissions Tab
In the Derived Permissions tab, you can view the sum of all permissions granted to the user and the groups the user is a member of.
Data Access Tab
You can define user’s data access for linked content providers in the Data Access tab.
For more information, see the Managing Data Access section.
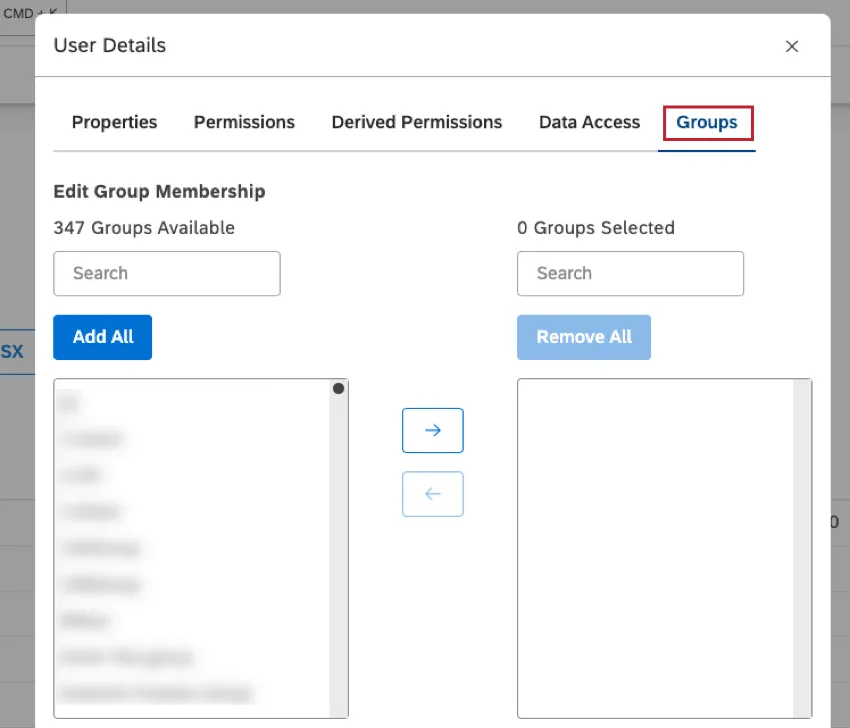
Groups Tab
You can make changes to the user’s group membership in the Groups tab.
Custom Property in User Accounts
Qtip: Only Account Owners can add custom properties. Reach out to your Discover account team if you would like to add an extra property. If you don’t have your Discover representative’s contact information, you can contact the Discover Support Team instead.
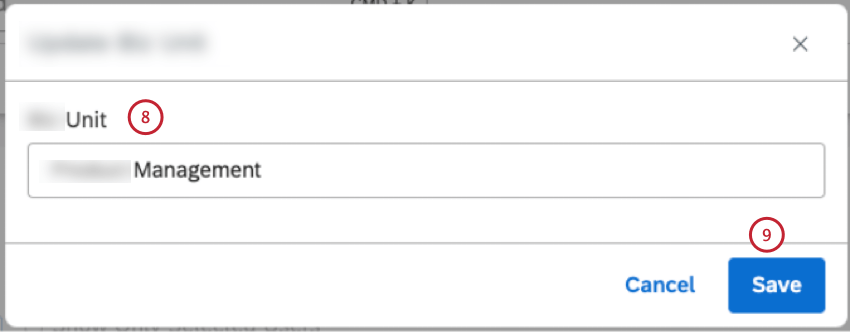
In Studio, you can add 1 custom property to standard user account properties. You can use this extra property to group users in the Users tab. For example, you may want to group users by team or by function for bulk operations.
Qtip: Only Account Owners can modify the name of the custom property. Users with the Manage Settings permission are able to populate and change the values of this extra property.
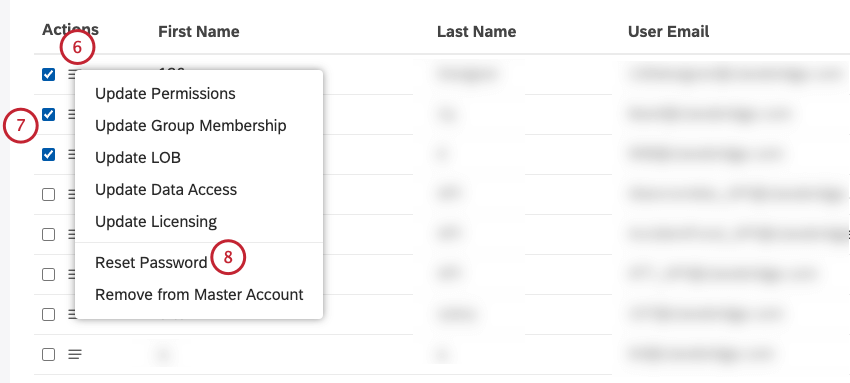
Bulk Updating a Custom Property
Attention: This action will overwrite any previous custom property values for selected users.
Qtip: This action requires a Manage Users permission.
![Select the checkbox next to each of the user accounts. Click the actions menus next to 1 of the selected user accounts.Select Update [custom property].](https://www.qualtrics.com/m/assets/support/wp-content/uploads//2023/09/manusers_updatebizunit_5_6_7-1.png)
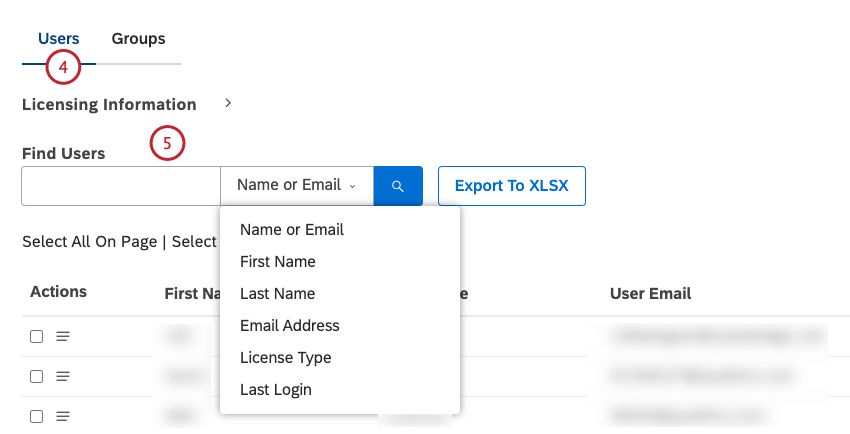
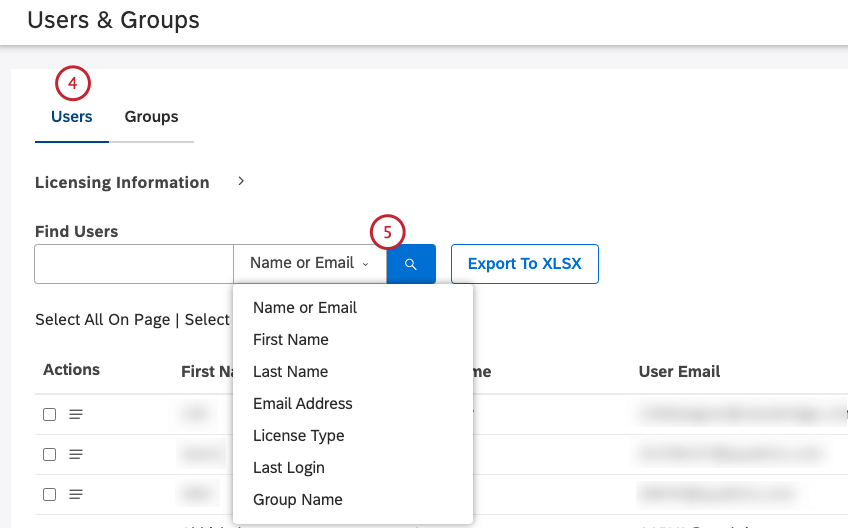
Exporting Users to Microsoft Excel
Qtip: This action requires a Manage Users permission.
You can export Studio users’ details to Microsoft Excel. For information about exporting groups to Microsoft Excel, see Exporting Groups to Microsoft Excel.

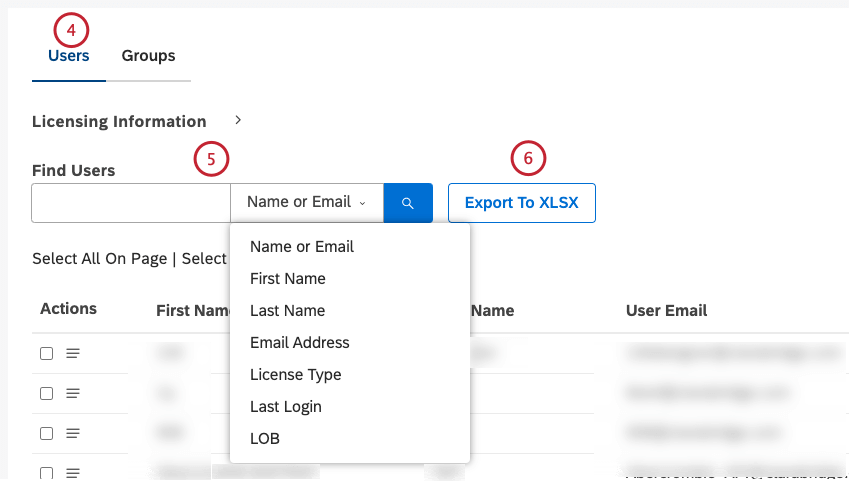
- Name or Email (default)
- First Name
- Last Name
- Email Address
- License Type
- Last Login
- The content of the custom field created by an Account Owner. Qtip: If no filter is applied, all users are exported.

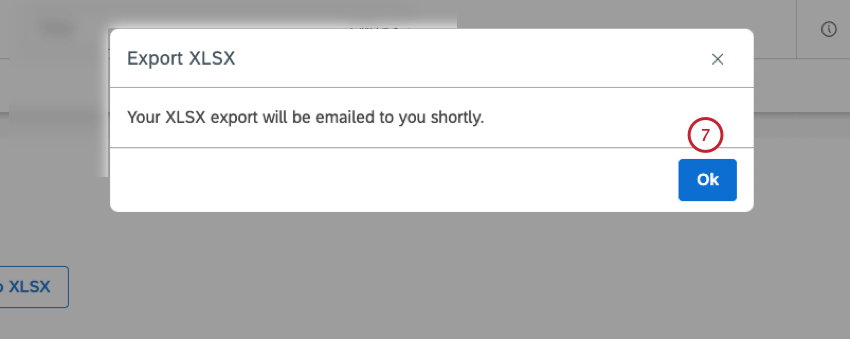
- Filters: Shows search and column filters that are applied to exported users. If no filters are applied, this section is empty.
- First Name: User’s first name
- Last Name: User’s last name
- User Email: User’s email address
- License Type: User’s license
- Lite Admin: Shows whether the user is an Account Administrator (YES) or not (NO)
- Linked to CP: Shows whether the user is linked to a content provider (TRUE) or not (FALSE)
- Last Login Date: User’s most recent sign-in date
- Creation Date: User account’s creation date
- Custom field: Content of an optional custom field
- Location: User’s location. This can be detected automatically based on the user’s sign-in details, or adjusted manually. For more information, see the Editing a User Account section.
- XM Account ID: Shows the user’s XM Account Identifier that is used for linking Engage and Discover accounts. To see this field in the export, you must be an Account Owner or Account Administrator.
- In addition, the Unique User Identifier (user’s ID) is shown in the export file for accounts with SAML enabled.
Resetting a Password
In Studio, you can change your password if you forget it or if you’re experiencing sign-in issues for any of the XM Discover apps. Studio Administrators can help you reset or change your password.
Qtip: SSO users should always reset their passwords in their organization’s portal, not in Studio.
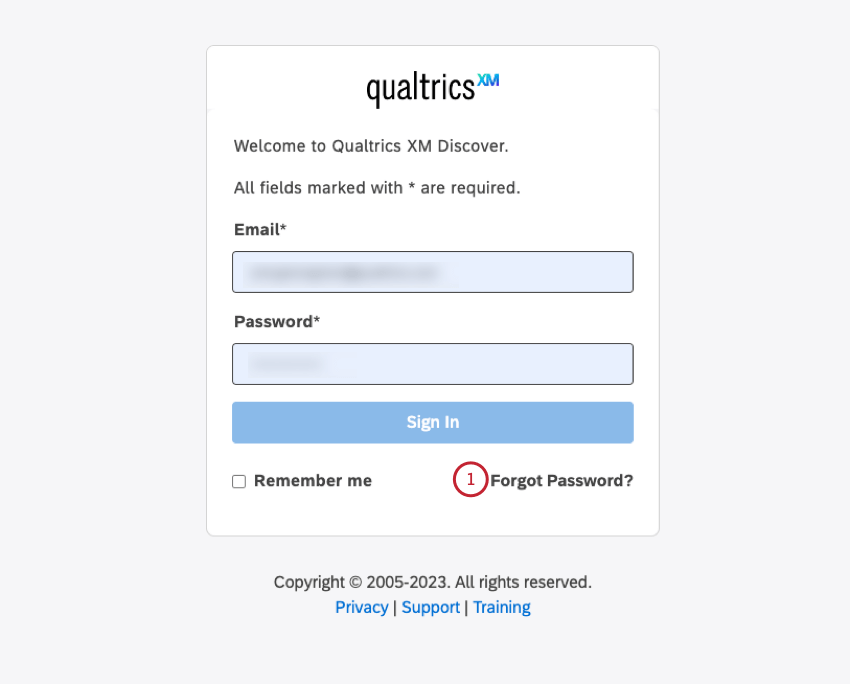
Resetting Your Own Password
All Studio users can reset their password on the Studio sign-in page.
Qtip: If you know your password and want to change it, you can change your password while logged into your account.
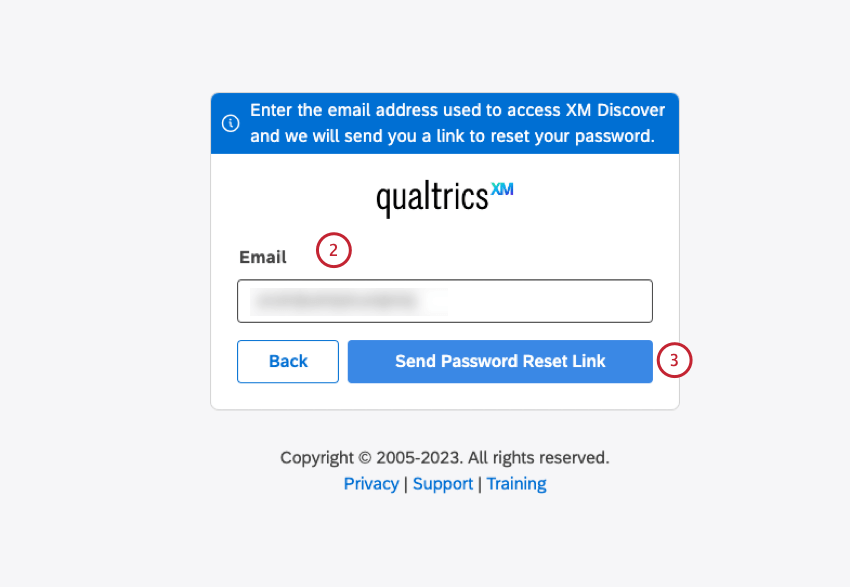
You will get an email with instructions on resetting your password. If it doesn’t arrive, be sure to check your spam folder.
Resetting Another User’s Password
Qtip: This action requires the Manage Users permission.
Administrators can request a password reset on behalf of other users while troubleshooting sign-in issues.


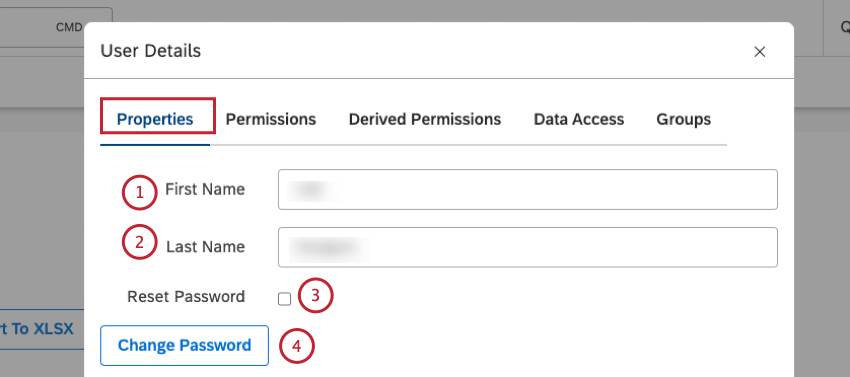
Changing Another User’s Password
Qtip: This action requires the Manage Users permission.
Administrators can change another user’s password while troubleshooting sign-in issues.


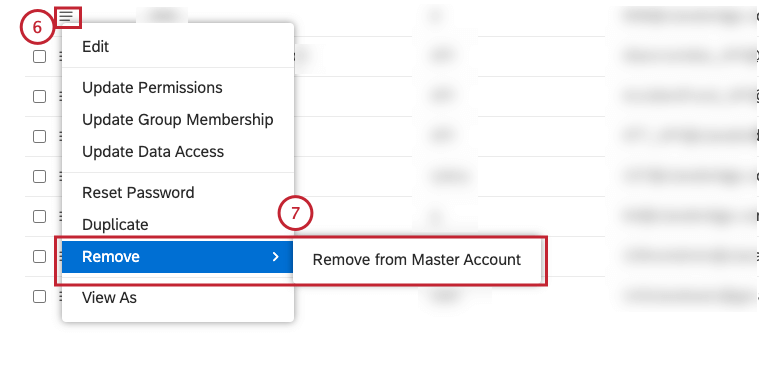
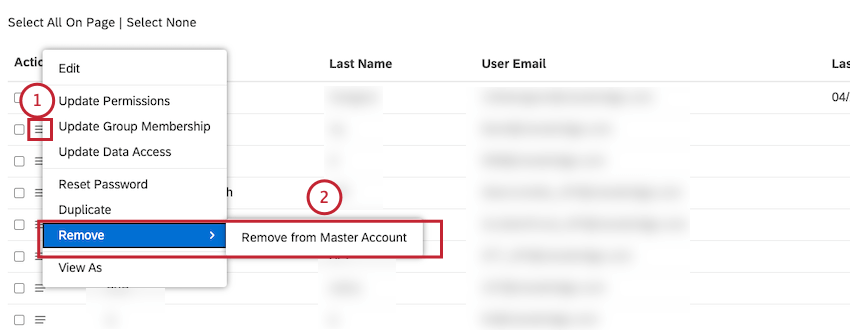
Removing a User Account
Qtip: This action requires a Manage Users permission.
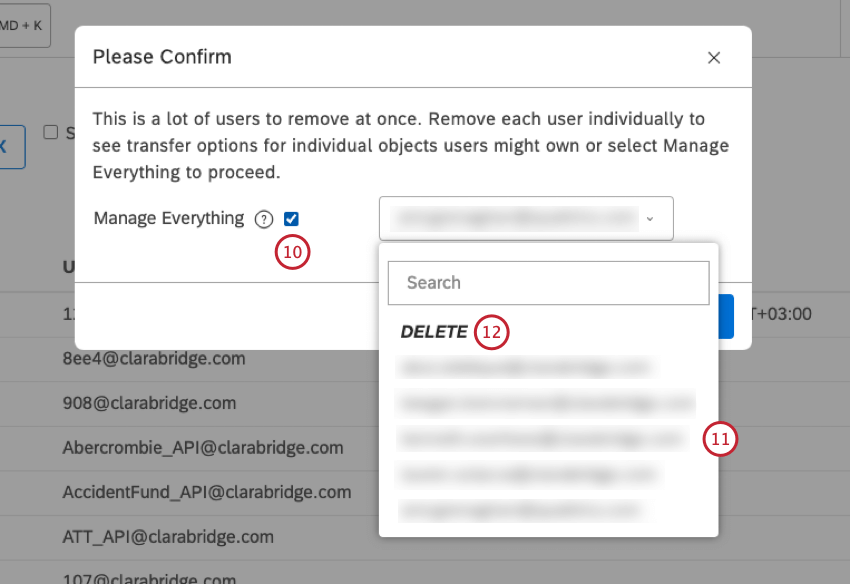
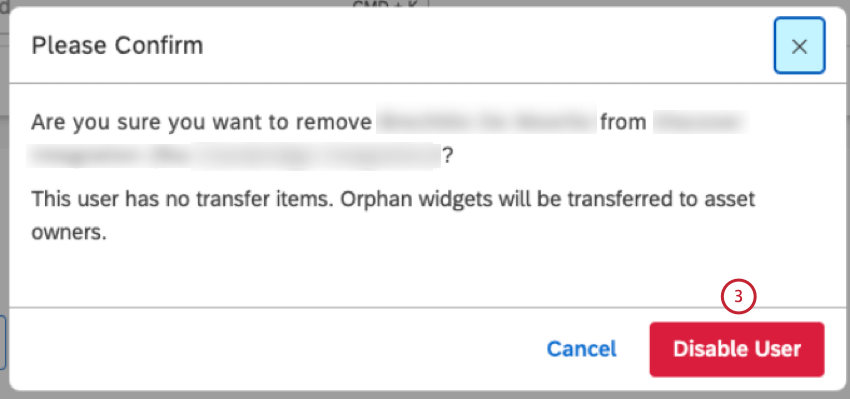
You can remove users from your Master Account if they no longer need to access it. When removing a user who owns dashboards, books, filters, metrics, or other objects, you will be asked to either transfer these assets to new owners or delete them.
Removing a user from a Master Account does the following:
- Removes user’s access to your Master Account.
- Removes user’s access to Studio (unless they have access to another Master Account).
- Releases that user’s license seat.
Qtip: The removed user account remains in the system in an inactive state and can be restored later by registering a user with the same email address. Only System Administrators can permanently delete users from Studio.


Qtip: When selecting multiple users, expand the Licensing Information section to see how many users are currently selected.
Managing Objects Individually
Qtip: Transfer options for individual objects are only available when removing users individually.
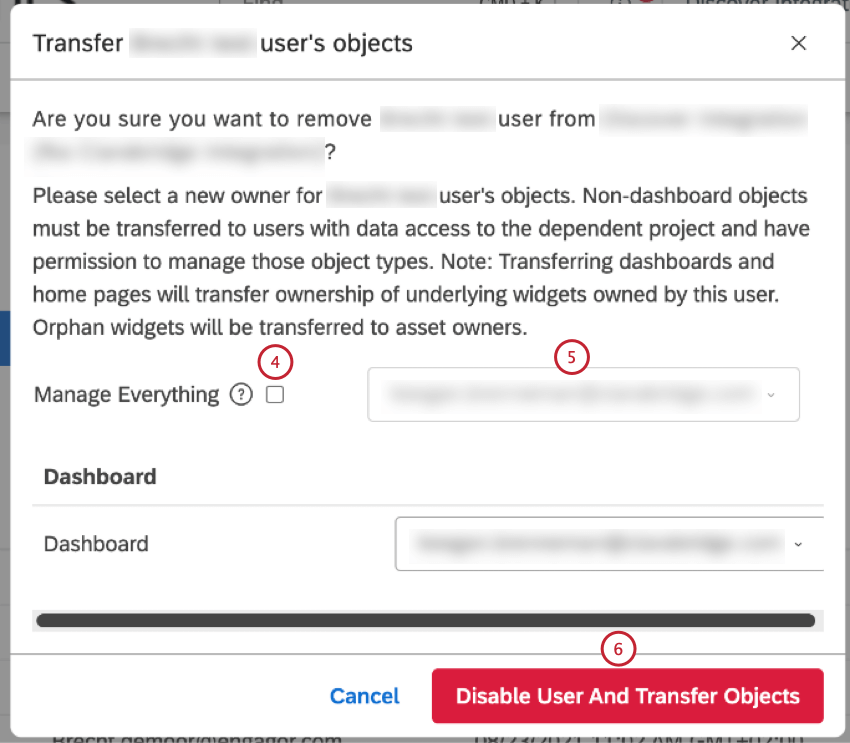
Qtip: All dashboard widgets owned by this user will also be transferred to the new dashboard owners. This includes widgets created by this user in dashboards owned by others. Widgets owned by other users will not be changed. When transferring dashboards, the dashboard schedules are transferred as well.
Qtip: When transferring objects, keep in mind that the new owners need to meet transfer requirements.
Transferring Objects Requirements
When transferring objects, new owners need to meet these requirements:
- Dashboards and books: Dashboard and book ownership can only be transferred to users who have Edit Dashboard permission and data access to the corresponding project.
- Drivers: Driver ownership can only be transferred to users who have Create and Manage Drivers permission and data access to the corresponding project.
- Filters: Filter ownership can only be transferred to users who have Create Filter permission and data access to the corresponding project. Date filter ownership can only be transferred to users who have Manage Date Filter permission and data access to the corresponding project.
- Homepages: Home page ownership can only be transferred to users who have Manage Settings permission and data access to the corresponding project.
- Metric Alerts: Metric alert ownership can only be transferred to users who have Create and Manage Metric Alerts permission and data access to the corresponding project.
- Metrics: Metric ownership can only be transferred to users who have Create Metric permission and data access to the corresponding project.
- Mobile App Configurations: Mobile app configuration ownership can only be transferred to users who have Manage Settings permission and data access to the corresponding project.
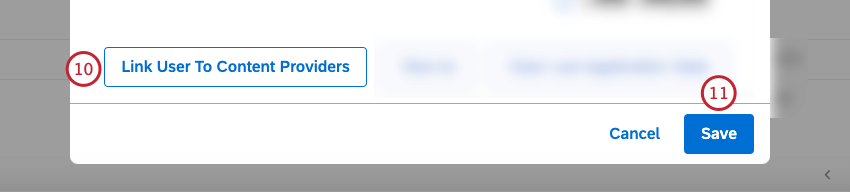
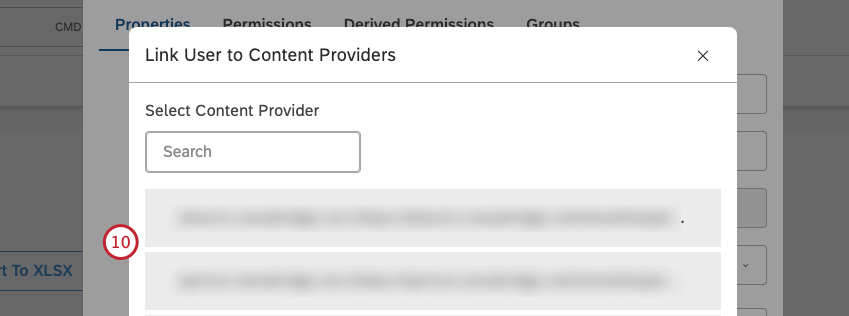
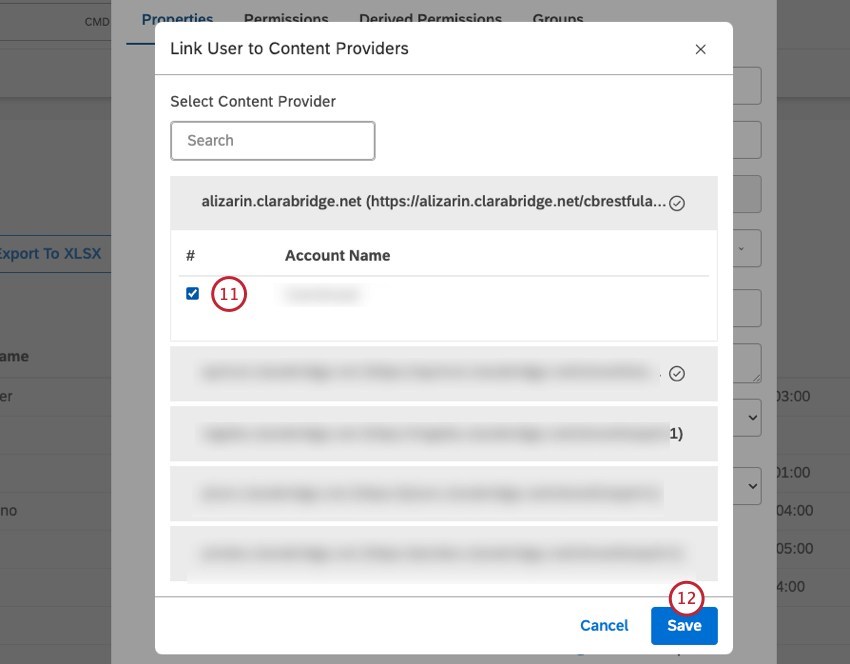
Linking a User to a Content Provider
You can link Studio users to their content provider so they can use Designer data in their reporting widgets. Account linking is done in 2 stages:
Qtip: Report widgets display data on behalf of the user who created them. This means that you do not need a linked account if you wish to simply view the reports.
A user with a Configuration Analyst license and a linked account can switch between the Studio and Designer applications using the same login credentials. Switching to Designer allows uploading data, setting up topics (classification models), and tuning sentiment. For more information, see Navigating XM Discover.
Account linking is based on the user’s email address:
- If a user with the same email address does not exist in the selected account of the content provider, the user will be created automatically. The access level of a user in Designer depends on the license and data access defined in Studio.
- If a user with the same email address is already registered in the content provider, the Designer user account and the Studio user account will become linked.
How to Link a User Account to a Content Provider
Qtip: A Manage Users permission and access to a corresponding content provider are required to perform this action.


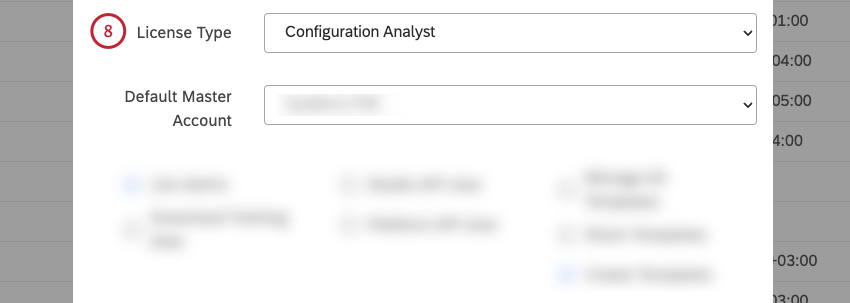
- Configuration Analyst: Users with this license type can be granted access to Designer reporting data and access to the Designer application.
- Report Creator: Users with this license type can be granted access to Designer reporting data.
- Report Consumer: Users with this license type cannot be linked to Designer.

You then need to define project-level data access for the user. For more information, see Managing Data Access.
Managing Data Access
Data access controls enable you to determine account and project-level permissions in the Designer application for a user with a Configuration Analyst or Report Creator license who is linked to a content provider in Designer.
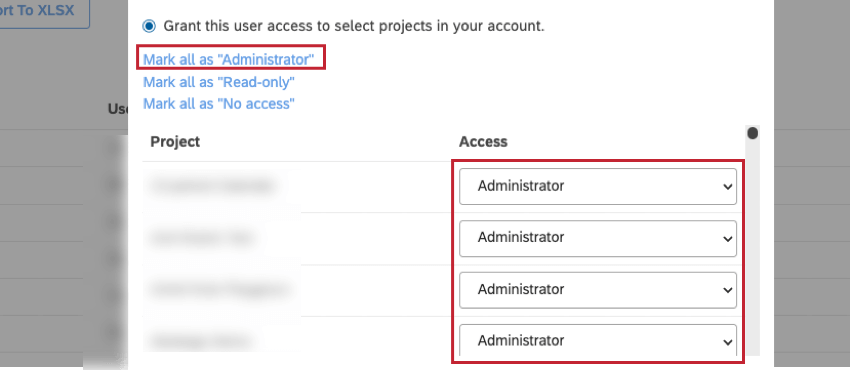
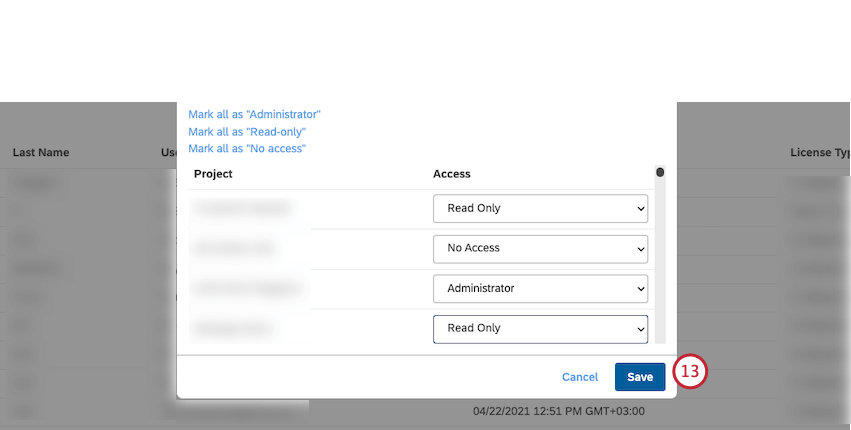
Updating Data Access for a Single User
Qtip: This action requires a Manage Users permission and a Configuration Analyst license.

Qtip: Account Administrators can perform all administrative functions within an account.
- Mark all as “Administrator” to grant Administrator access to the user for all projects.
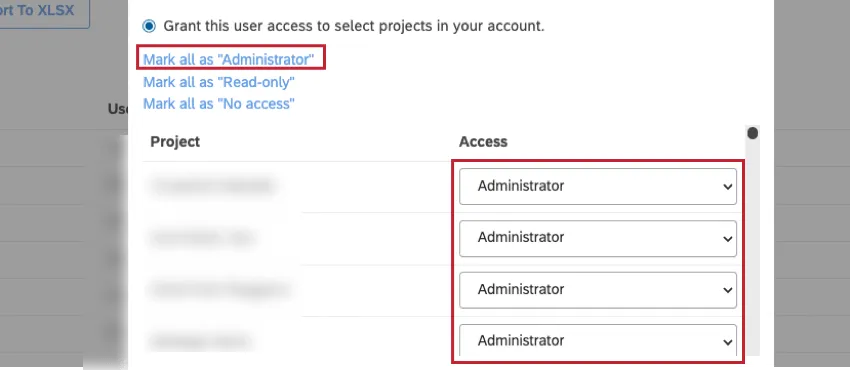
- Mark all as “Read-only” to grant read-only access to the user for all projects.
- Mark all as “No access” to disable access to all projects for the user.
- Administrator (requires a Configuration Analyst license): Make the user a Project Manager. Project Managers can perform all administrative functions within a project.
- Read Only (requires a Configuration Analyst license): Make the user a Category Viewer. Category Viewers can run Designer reports, create personal filters, view classification models (but not change them), and view sentiment settings (but not change them).
- Read Only (requires a Report Creator license): Make the user a Navigator Act User. Navigator Act Users can access dashboard reports and create personal filters. Other Designer tabs are unavailable to them.
- No Access: Disable access to a project. The user will not be able to use that project in any Studio report widget or filter.
- Custom:. This option is shown if project permissions are explicitly defined in Designer and cannot be modified in Studio. Qtip: Assigning bulk permissions using the Mark all as… links does not impact Custom access levels.Qtip: You can only grant others users access up to your own level. Having a Customaccess level for a project means you can only grant No access level to others for that project.
Updating Data Access for Multiple Users
Qtip: This action requires a Manage Users permission.
Users are only granted access rights up to what is available for their license type. If a user is not linked to a Content Provider for which you grant data access, they will be linked to it automatically. Account Administrators (users who were individually granted full administrative rights to data) are immune to bulk data access changes.


Qtip: If at least 1 of the selected users has a Report Consumer license, the bulk option to update data access will be unavailable.

- Administrator: Make the user a Project Manager. Project Managers can perform all administrative functions within a project. This only applies to users with a Configuration Analyst license.
- Read Only: Depending on the user’s license, the following data access is provided:
- Configuration Analyst license: Make the user a Category Viewer. Category Viewers can run Designer reports, create personal filters, view classification models (but not change them), and view sentiment settings (but not change them).
- Report Creator license: Make the user a Navigator Act User. Navigator Act Users can access Dashboard reports and create personal filters. Other Designer tabs are unavailable to them.
- No Access: Disable access to a project. The user will not be able to use that project in any Studio report widget or filter.
- Disable access to a project: The user will not be able to use that project in any Studio report widget or filter.
- No Change (default): Make no changes to this project. Qtip: You can only grant others users access up to your own level. Having a Custom access level for a project means you can only grant No access level to others for that project.
Designer User Roles
See User Roles and Permissions (Designer) for an overview of roles in Designer.
Bulk User Updates
Qtip: You must be an Account Owner or an Account Administrator with the Manage Users and Manage Groups permissions to carry out this action.
Qtip: Parts of this workflow are part of the Refreshed Bulk User Upload beta. For information about this feature or to request that it be enabled, please contact your Discover account team. If you don’t have your Discover representative’s contact information, you can contact the Discover Support Team instead.
You can update up to 500 users at a time. For more information on linking XM user accounts via bulk user upload, see Bulk Uploading Users.
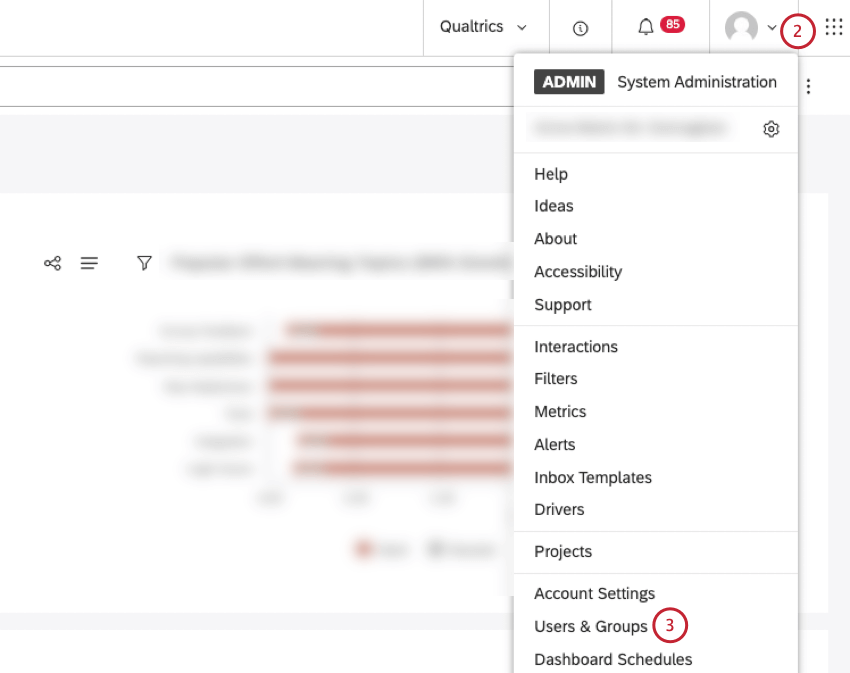
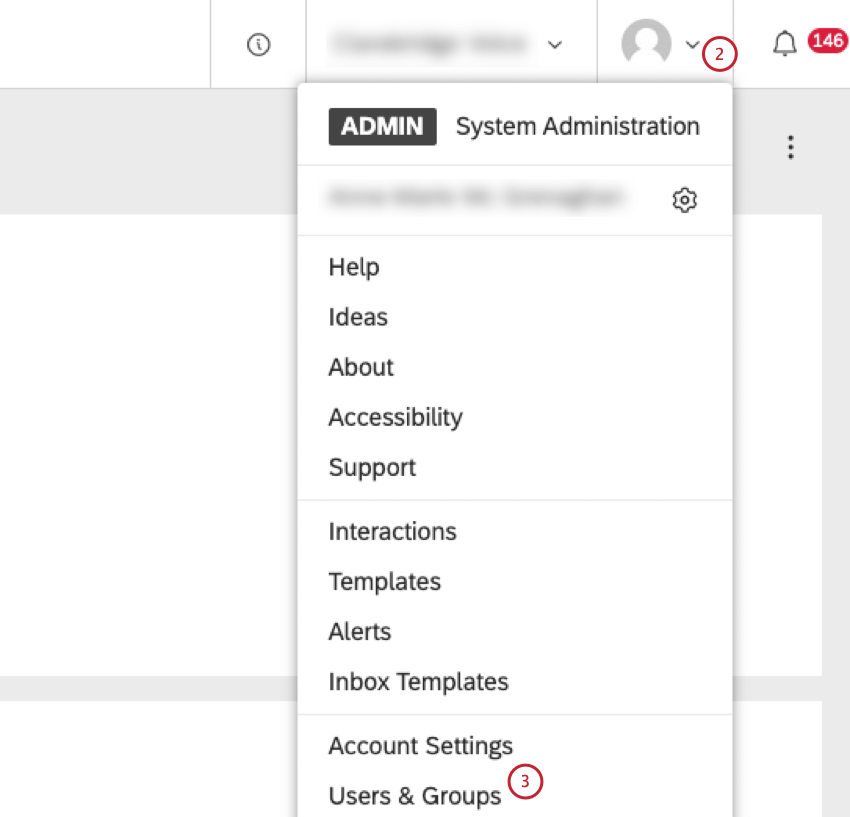
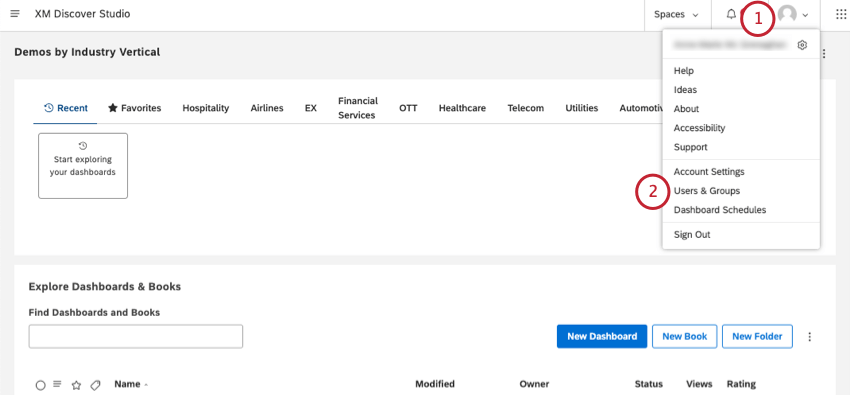
Sign in to Studio.
Expand the user avatar menu in the top navigation area.

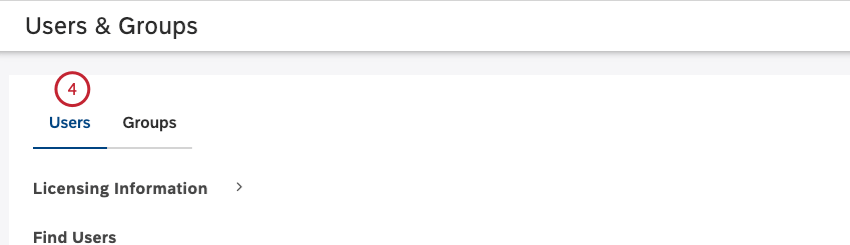
Select Users & Groups.
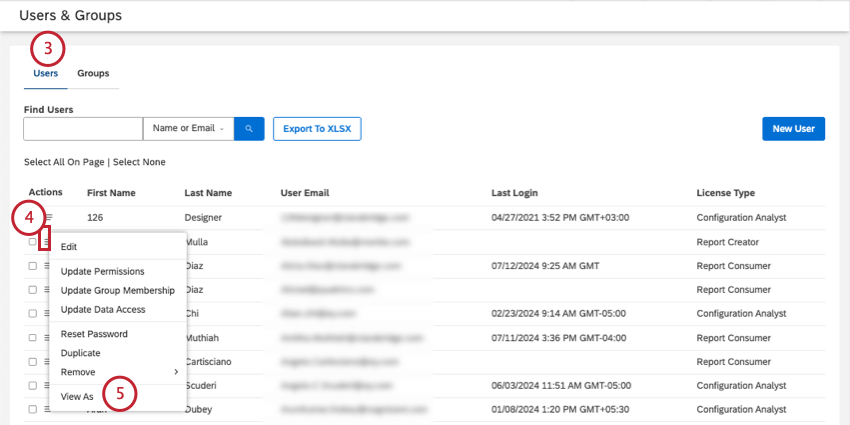
Click the down arrow icon.
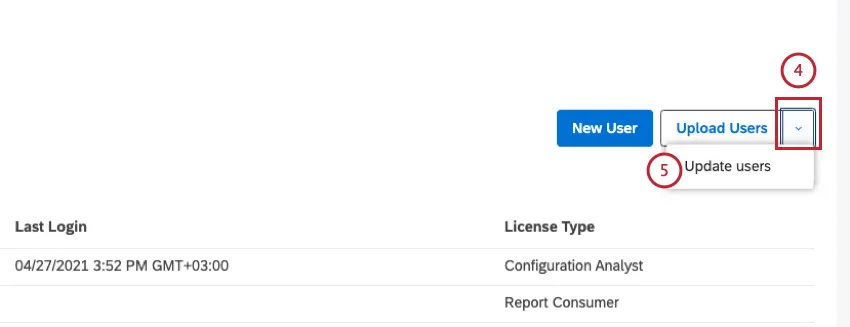
Qtip: If you have user sync enabled, you won’t see a dropdown arrow and can directly click Upload Users.
Click the Update Users button.
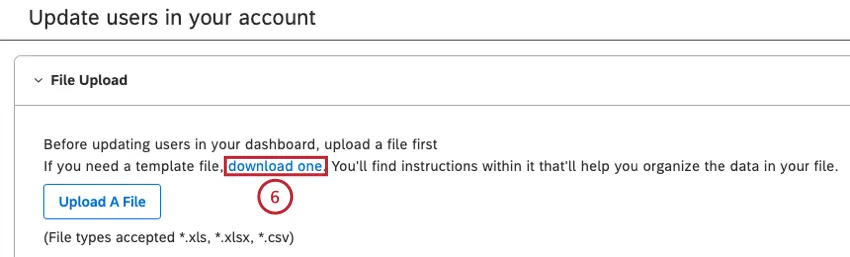
If you have not already downloaded the Microsoft Excel template file in .xls or .xlsx format, click the download one link in the File Upload section to download the template.
Select a template option:
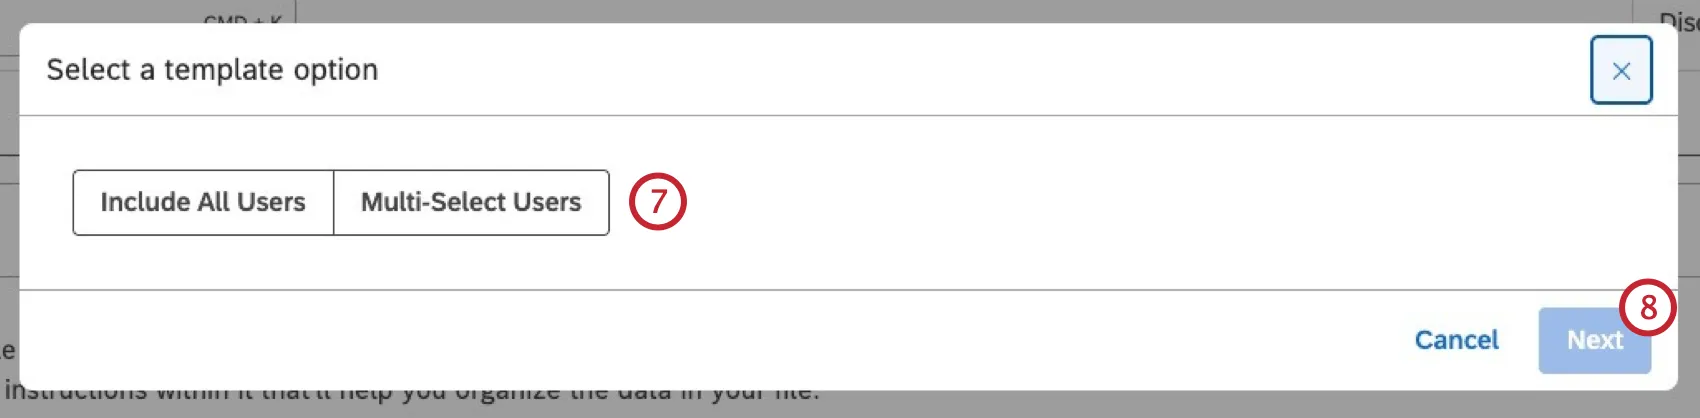
Include All Users: Up to 5000 users will be displayed in the Users sheet in the Microsoft Excel file. If you wish to update a user that is not listed in the Users sheet, paste that user’s email address in a separate cell in the Email Address column in the Updates sheet.

Attention: This is a requirement so that updates can be correctly associated with existing accounts. The email address cannot be changed.
- Multi-Select Users: Input a list of users to generate a template for just those users. You can paste a comma-separated list of users you wish to update using user email (most common) or a unique user identifier.
Click Next.
If you selected Multi-Select Users for your upload, select a value type for the data you are inputting.
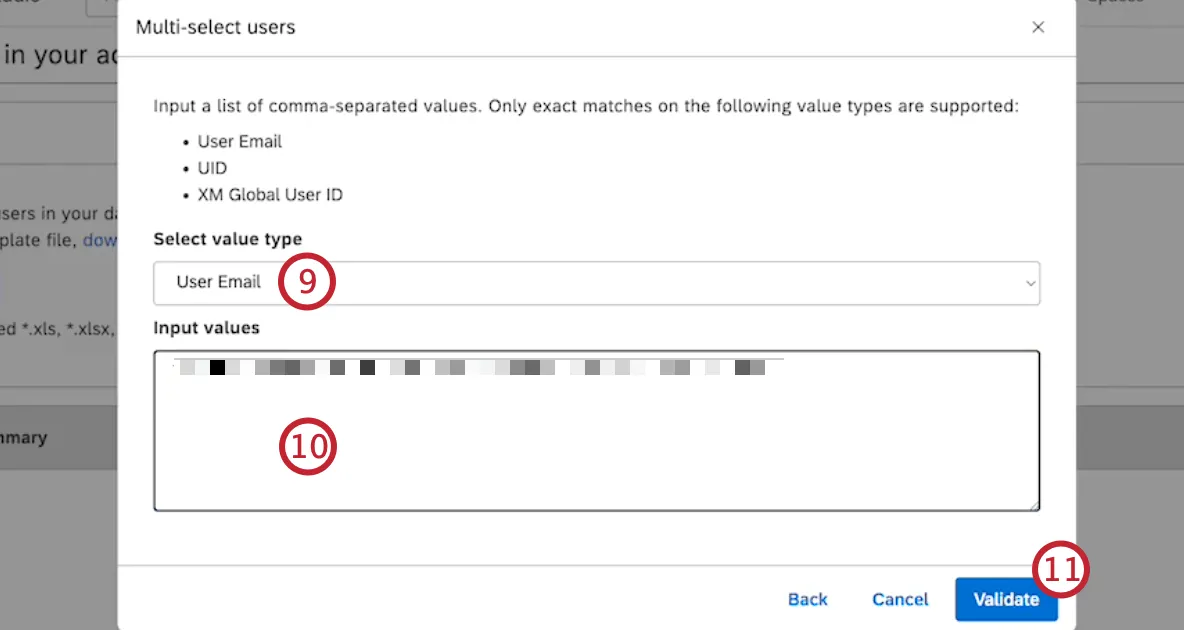
If you selected Multi-Select Users for your upload, input a comma-separated list of values.
Qtip: If you are pasting a list of users from a column in a file, make sure the column is first converted to a comma-separated list.
Qtip: You can multi-select up to 500 users. If you input more than 500 users, only the first 500 will be included in the template file. You will be shown a list of the skipped users that you can copy and use to generate additional files.
Click Validate.
Review any invalid values.
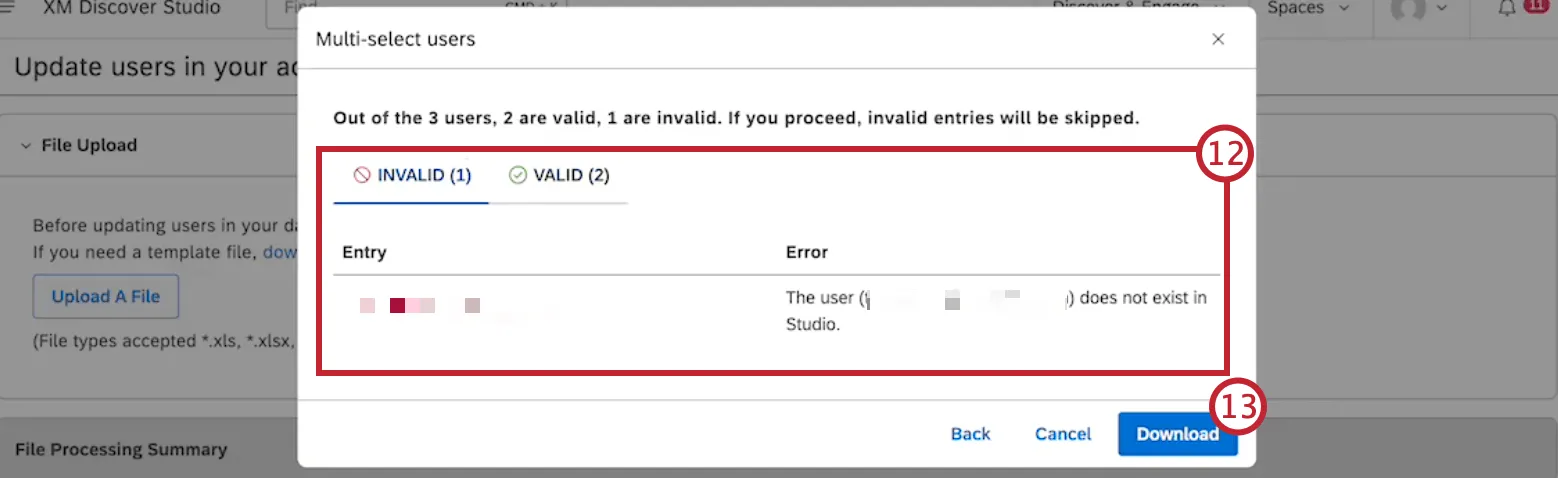
Attention: Any invalid entries will be skipped in the template. If you want to make any edits, click Back before downloading your file. For more information, see Error Messages.
Click Download.
If necessary, you can update the following details in the Updates sheet:
- The user’s first name in a separate cell in the First Name column.
The user’s last name in a separate cell in the Last Name column.
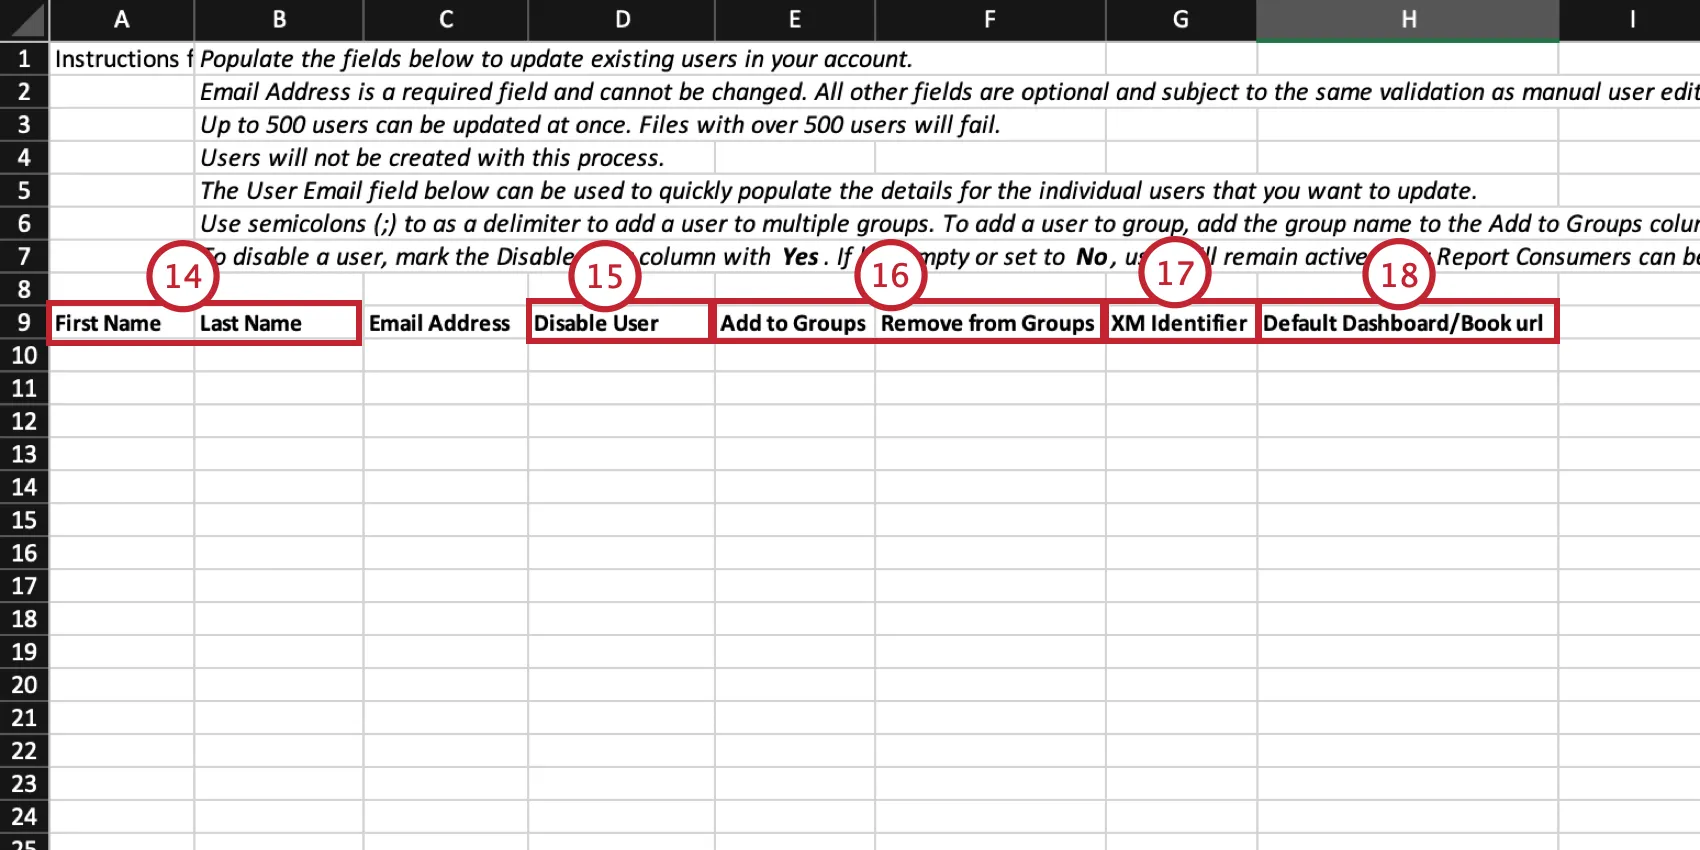
If you wish, you can disable users in bulk. In the Disable User column, enter Yes for any user that you wish to remove from the Master Account.
Qtip: If it is their last Master Account, the user will also be disabled in Studio.
Qtip: If you enter "No" or leave the cell blank, then the user's access will not change.
Qtip: Users may only be disabled if their license type is Report Consumer. If a user attempts to disable a user who is not a Report Consumer, the request will be skipped in the update file and an error message will be shown in the Invalidtab.
If you wish, you can add or remove users from groups in bulk. To add a user to a group, add the group name to the Add to Groups column. To remove a user from a group, add the group name to the Remove from Groups column. Use semicolons (;) as a delimiter to add or remove a user from multiple groups.
Attention: Groups derived from an organization hierarchy cannot be modified via Bulk User Update. You can update group membership directly from the organization hierarchy.
If you wish, you can update the XM Account ID for each user by entering the XM identifier for each user in the XM Identifier column.
If desired, you can set a default dashboard or book to open for the user when they log into Studio. Add the dashboard's or book's URL in the Default dashboard/book url column. The user can later adjust this setting in their user preferences.
Qtip: Make sure the dashboard or book has been shared with the user. If the user does not have permission to access the dashboard/book, then this setting will be skipped for them when updating their user account.
Save the Microsoft Excel file to your computer.
Click Upload A File to update the Microsoft Excel file in the File Upload section.
When you upload the Microsoft Excel file, it will be validated:
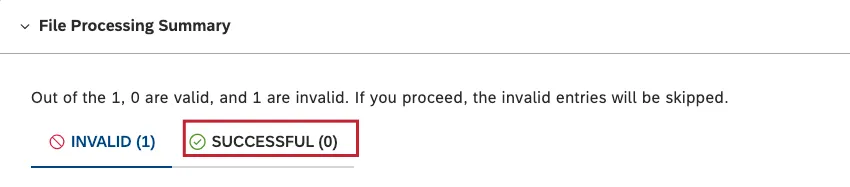
The number of invalid entries will be displayed in the INVALID tab in the File Processing Summary section and details about each invalid entry will be displayed in the Details column.
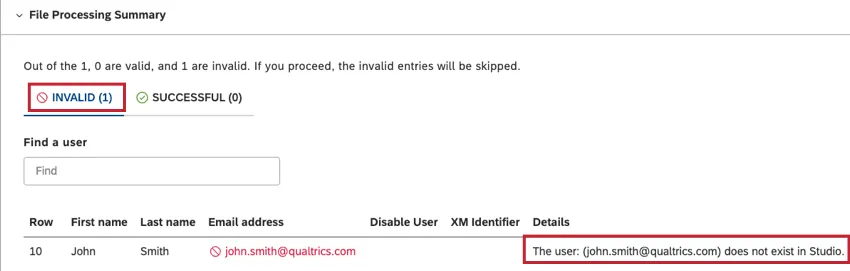
The number of successful entries will be displayed in the SUCCESSFUL tab.
- If there are invalid entries, return to the Microsoft Excel file, add the necessary information, and save the changes to the file. For details of possible errors that may be identified and how to fix these errors, see Error Messages.
- Click Update a File to upload the amended Microsoft Excel file in the File Update section.
When all entries are validated correctly, you will see all entries shown in the SUCCESSFUL tab in the File Processing Summary section.
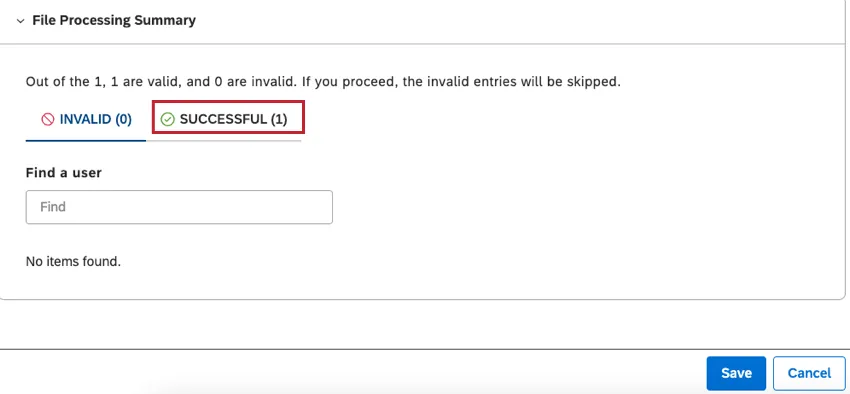
Once all entries are validated correctly, click Save.
Error Messages
Errors that may be identified when you upload a Microsoft Excel file when carrying out a bulk user upload, together with ways of fixing them are listed below:
- This user already exists in Studio: Remove the user from the bulk upload template.
- The group: (group name) does not exist in Studio: Either create a missing group in Studio or remove it from the bulk upload template.
- All users must have a valid License Type populated: Select a valid license for each user.
- Users with email domain (email domain) are not allowed in this account: Either use a different email domain or add the domain you want to use to the list of allowed domains.
- Email Address must be unique for each user being uploaded: Use unique emails for each user.
- Users cannot be added to Organization Hierarchy derived groups: Remove the derived groups from the bulk upload template.
- The domain: (domain) is not allowed in this account: Provide a different email address or add the domain to the list of allowed email domains.
Errors that may be identified when you carry out a bulk user upload or a bulk user update, together with ways of fixing them are listed below:
- You do not have sufficient (license type) licenses available: Either free up some license seats in your Master Account or use a different license.
- All users must have a valid Email Address populated: Either provide a valid email for each user or remove users without emails.
- Please provide valid Email Addresses: Make sure user emails match the requirements.
- First Name must not exceed 40 characters: Trim the first name to 40 characters.
- Last Name must not exceed 40 characters: Trim the last name to 40 characters.
- (Number of users with the same Unique User Identifier) have the same Unique User Identifier: Use unique IDs for each user or remove duplicate user entries.
- (Unique User Identifier value) already exists in the system: Use unique IDs for each user.
- Unique User Identifier is a required field: Provide a unique ID for each user if your account uses SAML authentication.
- This user was re-enabled with the information provided: This means that an inactive user account was activated 1 more time.
Viewing Studio as Another User
Attention: You must contact your Discover account team to get “View As” functionality enabled for your XM Discover license. A Discover representative acting as administrator can open the Master Account Properties and give access to all Account Owners and / or give access to all Account Administrators.
Qtip: You cannot “view as” another user that has higher-level permissions than you.
Account owners and account administrators can view all of Studio from the point of view of another user. This functionality is also often called “proxying” or “proxy logging in” to another person’s account.
“View As” only gives access to Studio and all connected functionality. Designer and Connectors are not included.

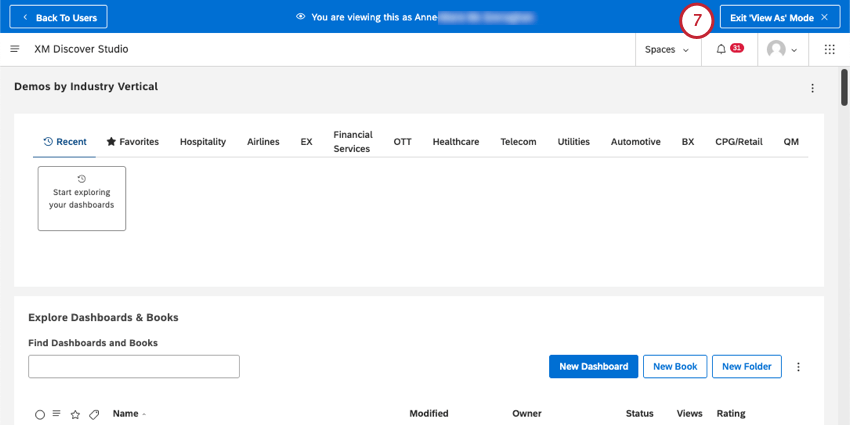
Qtip: Any actions you take while acting as another user will be logged in the Security Audit in account settings.
FAQs
What is XM Engage?
What is XM Engage?
That's great! Thank you for your feedback!
Thank you for your feedback!