
Adding Directory Contacts
What's on this page
About Adding Directory Contacts
The Directory contacts tab contains all the contacts added to your organization’s directory. Any contacts added to a mailing list are added to this directory automatically, but you can also add people straight to the directory itself by using the Add contacts button.

Qtip: Contacts added to the directory are visible to every user in the organization with access to the directory.
Qtip: While adding any new contacts, be sure to check out your settings for merging duplicates, which will be visible in the import window. These settings determine how duplicates are identified and combined; these settings can be modified by directory admins.
Projects That Can Use XM Directory Contacts
Qtip: The features discussed in this section are not necessarily included with every license. If you’re interested in getting access, please reach out to your Account Executive.
You can use XM Directory to build contact lists and send invitations for several types of Qualtrics projects. However, not every Qualtrics project type is compatible with XM Directory.
XM Directory can be used to send the following:
- Survey projects
- Conjoint / MaxDiff
- Certain non-EX XM Solutions
Qtip: You can also send emails without a link to any survey.
However, XM Directory contact data is completely separate from the employee / participant information saved in the Employee Directory. That means that data edited in one directory will never affect the other. XM Directory cannot be used to distribute any Employee Experience (EX) projects, including Engagement, Pulse, 360, and more.
Available Contact Fields
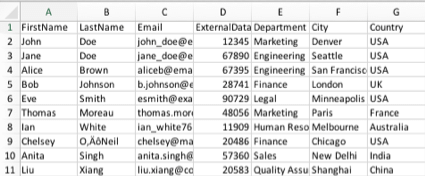
Whether you’re uploading a CSV or TSV of contacts or manually typing them out, there is certain information you must include for your contacts.
Qtip: Depending on how your directory merges duplicates, FirstName, LastName, Email, and / or ExternalDataReference may be a required field.
- FirstName: The contact’s first name.
- LastName: The contact’s last name.
- Email: The contact’s email address. It’s recommended that you merge duplicates off this field.
- ExternalDataReference: Extra information about the contact. This is most often used to store data such as an employee or student ID. It can be used to log into authenticators and configure how the directory merges duplicates.
Embedded data: Embedded data are additional fields containing whatever field you want. These do not have to follow a particular naming convention. In the screenshot above, Department, City, and Country are all embedded data.

Qtip: Embedded data names have a maximum of 200 characters. Values should be a maximum of 1024 characters each.

Warning: All embedded data fields were previously case-sensitive. For a vast majority of users, embedded data is no longer case-sensitive, meaning “test” and “Test” would be treated as the same field. However, we still advise matching cases as a best practice, since there is a small portion of accounts where this change has not been made.
Warning: Do not use Points as an embedded data field, as it is a reserved field in the XM Directory. Additionally, do not use any of the other Qualtrics default fields.
- Language: An optional column that identifies the contact’s language using language codes.
- Phone: An optional column that identifies the contact’s phone number. See the SMS Distributions support page for accepted phone number formats.
Qtip: If you are including these fields in your file, your column titles must perfectly match these names in capitalization and spacing. The only exception is that embedded data is not case-sensitive.
Attention: Do not change the values in the ContactID column! This field is used to identify the existing contacts. You cannot use ContactID to create new contacts. It may only be used to update existing contacts.
Date and Time Data
If you have embedded data saved in a date format, you can use a filter to search for future dates or dates that happened recently. To search by date, the date field must be in ISO-8601 format, with times in UTC. (I.e., YYYY-MM-DDT-HH:mm:ss+ZZZZ . More information about these symbols can be found on the Date Format Syntax support page).
Example: Let’s say our date is March 31, 2021 at 9:00:00AM EDT (UTC-4). This date in ISO-8601 format is 2021-03-21T13:00:00.000Z. Note how the time has been converted from EDT to UTC.
Upload a File of Directory Contacts
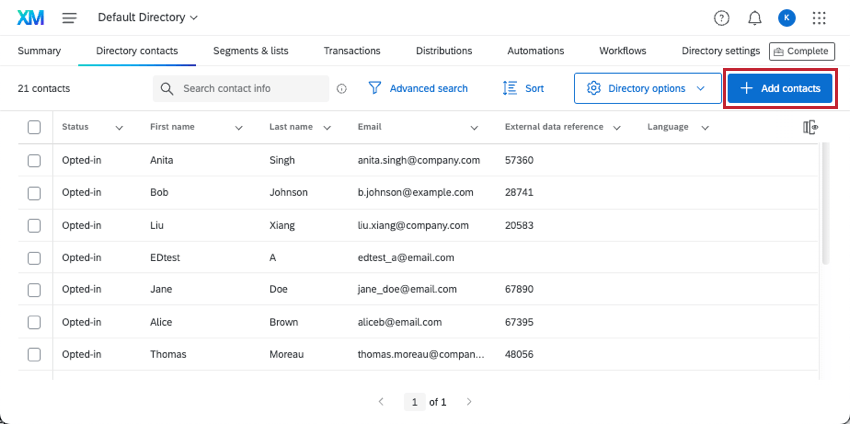
Make sure you start out in the Directory contacts tab.
Click Add directory contacts.

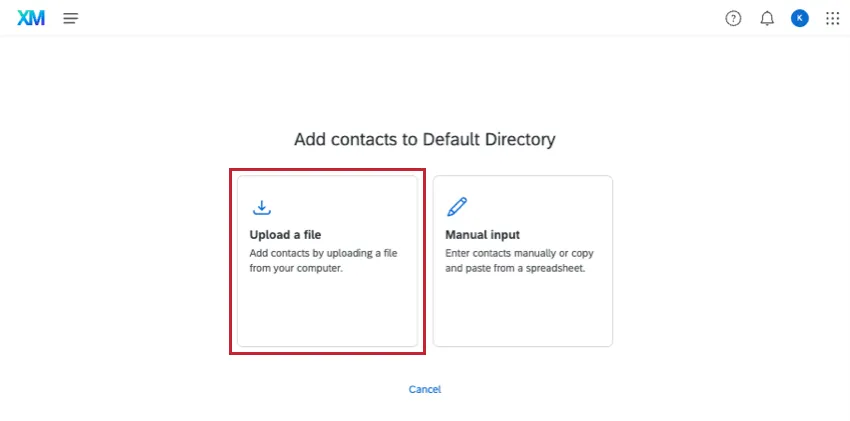
Click Upload a file.
In Excel, create a document with the required fields and save it as a CSV or TSV. Or, click Download a sample template, fill out the appropriate columns, add any desired embedded data, and save the file.
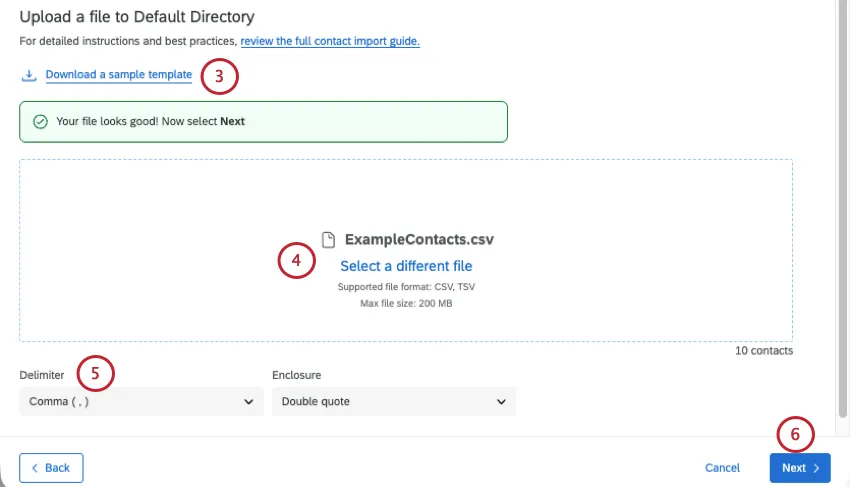
When the file is ready, drag and drop the file into the space provided, or click Select a file and select the file from your folder.
Qtip: The uploader will check your file for issues so you can fix them before anything is uploaded.
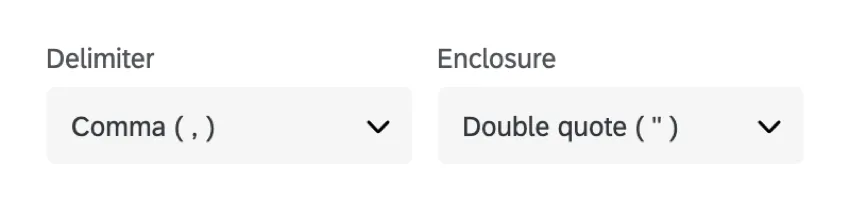
If desired, adjust your Delimiter and Enclosure.
Click Next.
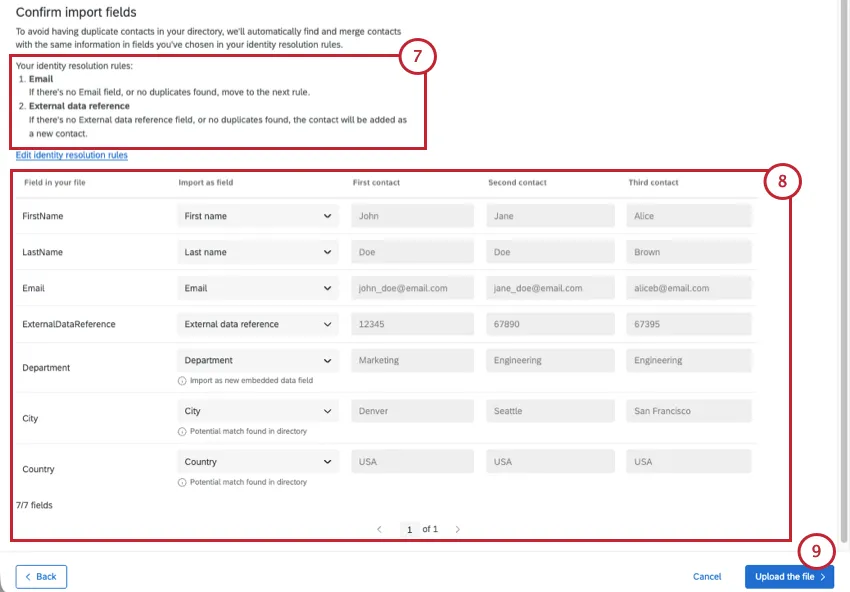
Review the rules for contact upload. Any directory-wide rules for merging duplicate contacts and importing blank values will show up here. These rules are set up in directory settings, and will apply to the contacts in your file.
Qtip: Access to the Directory Settings tab requires the Manage Directory permission. Talk to your Brand Administrator if you’re interested in getting access to this setting.
Review the fields in your file to make sure the information looks right. If a field has not been properly recognized, click on the field name to view a dropdown of options and select the correct field.
Qtip: If the data is not formatted correctly in the preview (e.g., bunched up instead of divided into columns), your data may not be separating (or “delimiting”) correctly. To fix this, choose a different Delimiter and/or Enclosure.
Qtip: If a contact is uploaded with an empty embedded field that already has a value stored in that field, whether or not that field is overwritten or left the same is dependent on directory settings.
Qtip: Qualtrics will flag import fields that are similar to embedded data fields in the directory to prevent creating unnecessary duplicate fields. Fields are flagged based on spelling or meaning. For example, if the import file includes a field labeled “Zip”, it will be flagged as similar to an existing directory field labeled “Zip Code”.
Click Upload the file to upload the contacts to your directory.
Qtip: Excel interprets non-ASCII characters (e.g., 是 or ñ) in a unique fashion that makes them difficult for Qualtrics to upload. If you are importing names with special characters, you might need to save your contact list info to a text-editor application (e.g., Text-edit for Mac, Notepad for PC) before you upload the file into Qualtrics. See the Special Character Issues on our CSV/TSV Upload Issues page for additional instructions.
Troubleshooting Contact File Imports
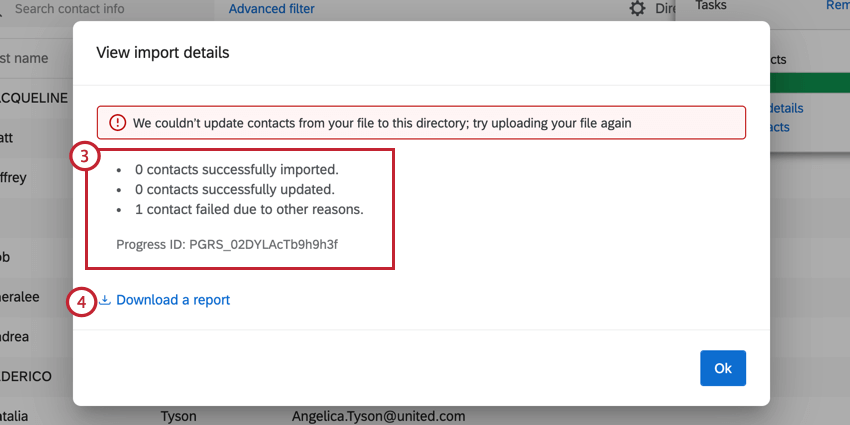
Qualtrics makes it easy to check on the status of your contact imports and fix any errors that may have occurred. During the upload process, you might receive a notice if your file is set up incorrectly. You’ll be given a solution and prevented from uploading the file until it’s fixed, keeping your directory data clean and accurate.
Example: In the screenshot below, the file was blocked because the External data reference was over 100 characters long. If we correct this, we can upload our file again.

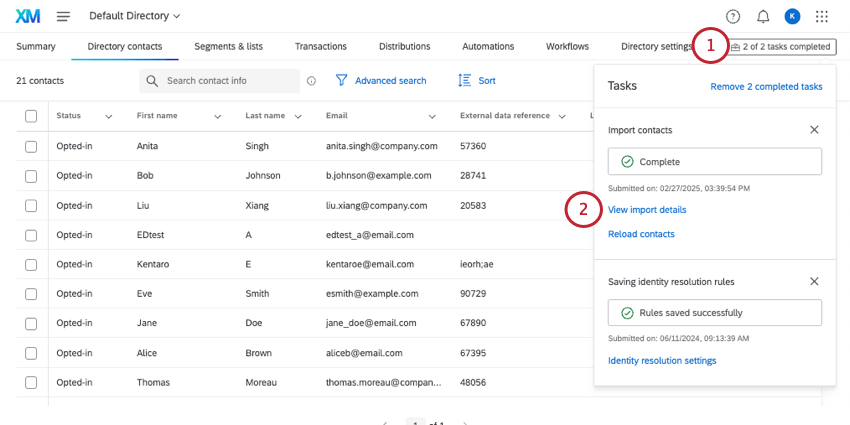
Downloading an Import’s Status Report
We provide a line by line file of each contact and information about whether it was imported correctly. This serves as a reference so that if your contacts fail to import, you can identify what the issue was, fix the file, and try again.
Qtip: If importing contacts to a specific mailing list, you can click the toolbox from inside the mailing list, too.
Qtip: Depending on the size of your upload, it may take a few moments for the report to generate.
Below is a description of each field in the error report:
- SourceIndexId: The index, or row ID, of the contact in the import file.
- Email: The email address associated with the contact.
- ContactId: The ID of the contact in your directory.
- ImportStatus: The import status for the contact. Values include: Added, Updated, and Failed.
- ImportStatusCode: The status code for the import. See the next section for a list of codes and their meanings.
TransactionId: If applicable, the Transaction ID of the contact upload or update.
Qtip: You can set up transactions when using a contact import workflow, or when adding contacts via API.
- TransactionStatus: If applicable, the status for the transaction. Values include: Added, Updated, and Failed.
- TransactionStatusCode: The status code for the transaction. See the next section for a list of codes and their meanings.
- ImportStatusDescription: The description of the issue detected. See the next section for a list of codes that go with each description.
- ContactListContactId: If adding contacts to a mailing list or creating a new list, the ID of the contact in the specific mailing list.
- ContactListContactStatus: If adding contacts to a mailing list or creating a new list, the status of the addition or update. Values include: Added, Updated, and Failed.
- ContactListContactStatusCode: The status code for the contact in the mailing list. See the next section for a list of codes and their meanings.
Common File Errors and Their Status Codes
Below is a list of possible status codes and their descriptions.
Qtip: If contacting support for help, have your troubleshooting file handy.
| Status Code | Description |
|---|---|
| 0 | An unknown error occurred; please retry the import. |
| 1 | An unknown error occurred; please retry the import. |
| 10 | The contact FirstName is empty or invalid; please enter a valid first name. |
| 11 | The contact LastName is empty or invalid; please enter a valid last name. |
| 12 | The contact value for ExternalDataReference is empty or invalid; please enter a valid ExternalDataReference value. |
| 13 | The contact Phone is empty or invalid; please enter a valid phone number. |
| 14 | The contact Email is invalid; please enter a valid email address. |
| 15 | Contact invalid due to embedded data field key being more than 200 characters. |
| 16 | Contact invalid due to embedded data field value being more than 1024 characters. |
| 18 | The contact has a ContactID that exists in a different directory than the one being imported into; please clear the value. |
| 19 | The contact Language is invalid; please enter a language code that is less than 20 characters. |
| 20 | The contact was not created because it contains executable code in either the contact info or embedded data. |
| 40 | The contact was created successfully. |
| 41 | The contact was updated successfully. |
| 42 | The contact wasn’t created; please retry the import. |
| 43 | The contact wasn’t created; please retry the import. |
| 44 | The contact wasn’t created; please retry the import. |
| 45 | The contact wasn’t created; please retry the import. |
| 46 | The contact wasn’t created; please retry the import. |
| 47 | The contact wasn’t created; please retry the import. |
| 49 | An internal error occurred; please retry the failed row. If the error persists, contact Qualtrics for support. |
| 60 | The contact was added to the mailing list successfully. |
| 61 | The contact was updated in the mailing list successfully. |
| 62 | The contact wasn’t added to the mailing list; please retry the import. |
| 63 | Contact was not added to the list because the contact creation failed |
| 70 | The transaction was created successfully. |
| 71 | The transaction import failed – there was no valid contact associated with the transaction; please provide valid contact information. |
| 72 | The transaction wasn’t created; please retry the import. |
| 73 | The transaction creation failed because ContactId or ContactListContactId wasn’t found in the directory; please enter a valid ContactId and ContactListContactId. |
| 74 | The transaction creation failed due to missing TransactionDate; please enter a valid transaction date. |
| 75 | An unknown error occurred; please retry the import. |
| 76 | Transaction invalid due to transaction data field key being more than 200 characters. |
| 77 | Transaction invalid due to transaction data field value being more than 1024 characters. |
| 78 | The transaction wasn’t created because the associated contact creation failed. |
Other Troubleshooting Tips
- Header spelling: Make sure you have all of the relevant headers. Capitalization, spelling, and spacing do matter. See a list of default fields.
- Missing headers: All columns must have headers.
- Character limits: Your file may have a field or multiple fields that exceed the character limit. Review the character limits below:
- Language: 20
- First name: 100
- Last name: 100
- Email address: 254
- Phone number: 20
- External data reference: 100
- Embedded data field: 200
- Embedded data value: 1,024
- Blank values: Keep in mind that directory settings can affect how blank values are treated. If you’re trying to update a contact and don’t get the result you expect, that may be due to a setting an admin configured. See Importing Blank Values in XM Directory.
- File Format Issues: If the tips in this section haven’t resolved your issue, see also the CSV and TSV Upload Issues page.
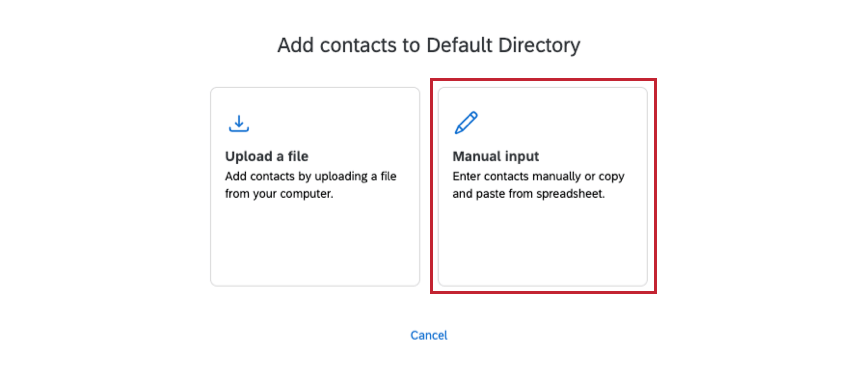
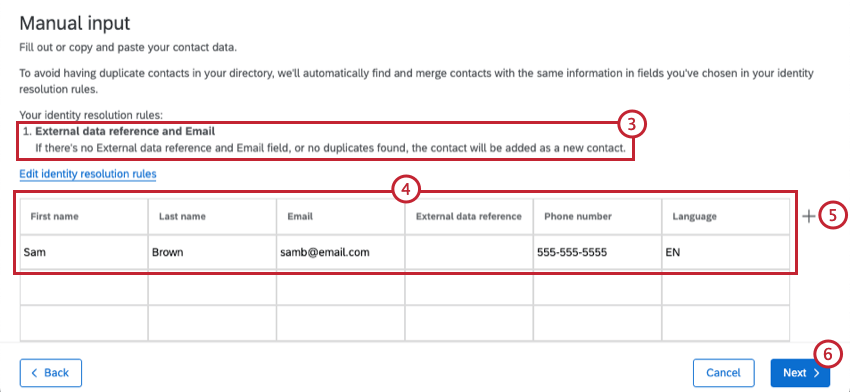
Manually Inputting Directory Contacts
Make sure you start out in the Directory contacts tab.
Adding Contacts from Digital Intercepts
You can automatically add contacts into your XM Directory from any digital intercepts you may have created. More information on how to set up automatic contact creation in Website / App Feedback projects can be found on the XM Directory Integration with Digital Intercepts support page.
Automatically Pulling Contacts from Another Platform
You can set it up so that contacts are automatically pulled from another service you use (such as an SFTP, Qualtrics File Service, Google Drive, or more) into Qualtrics. Choose the schedule that works best for you and your team, then leave it to run on its own.
See this XM Directory Workflows page for more information.
FAQs
My file looks like it uploaded, but I don't see any contacts in my list in XM Directory. What happened?
My file looks like it uploaded, but I don't see any contacts in my list in XM Directory. What happened?
If you cannot see the Directory Settings tab, consult your Brand Administrator.
My mailing list/directory contacts file won't upload at all in XM Directory. What's happening?
My mailing list/directory contacts file won't upload at all in XM Directory. What's happening?
How do I add contacts that are already in XM Directory to a Mailing List?
How do I add contacts that are already in XM Directory to a Mailing List?
What’s XM Directory? / Where’s Target Audience?
What’s XM Directory? / Where’s Target Audience?
When you import updates to existing contacts, how are empty / blank fields treated?
When you import updates to existing contacts, how are empty / blank fields treated?
When updating contacts via a file upload, blank contact fields (such as FirstName, LastName, and ExternalDataReference) will overwrite existing values for contacts in the directory.
However, directory embedded data fields will not have their data overwritten by default. You can choose which embedded data fields should allow blank values to overwrite existing ones by adjusting your directory settings. See Importing Blank Values in XM Directory for more information.
That's great! Thank you for your feedback!
Thank you for your feedback!