
Participant Roles (EX)
What's on this page
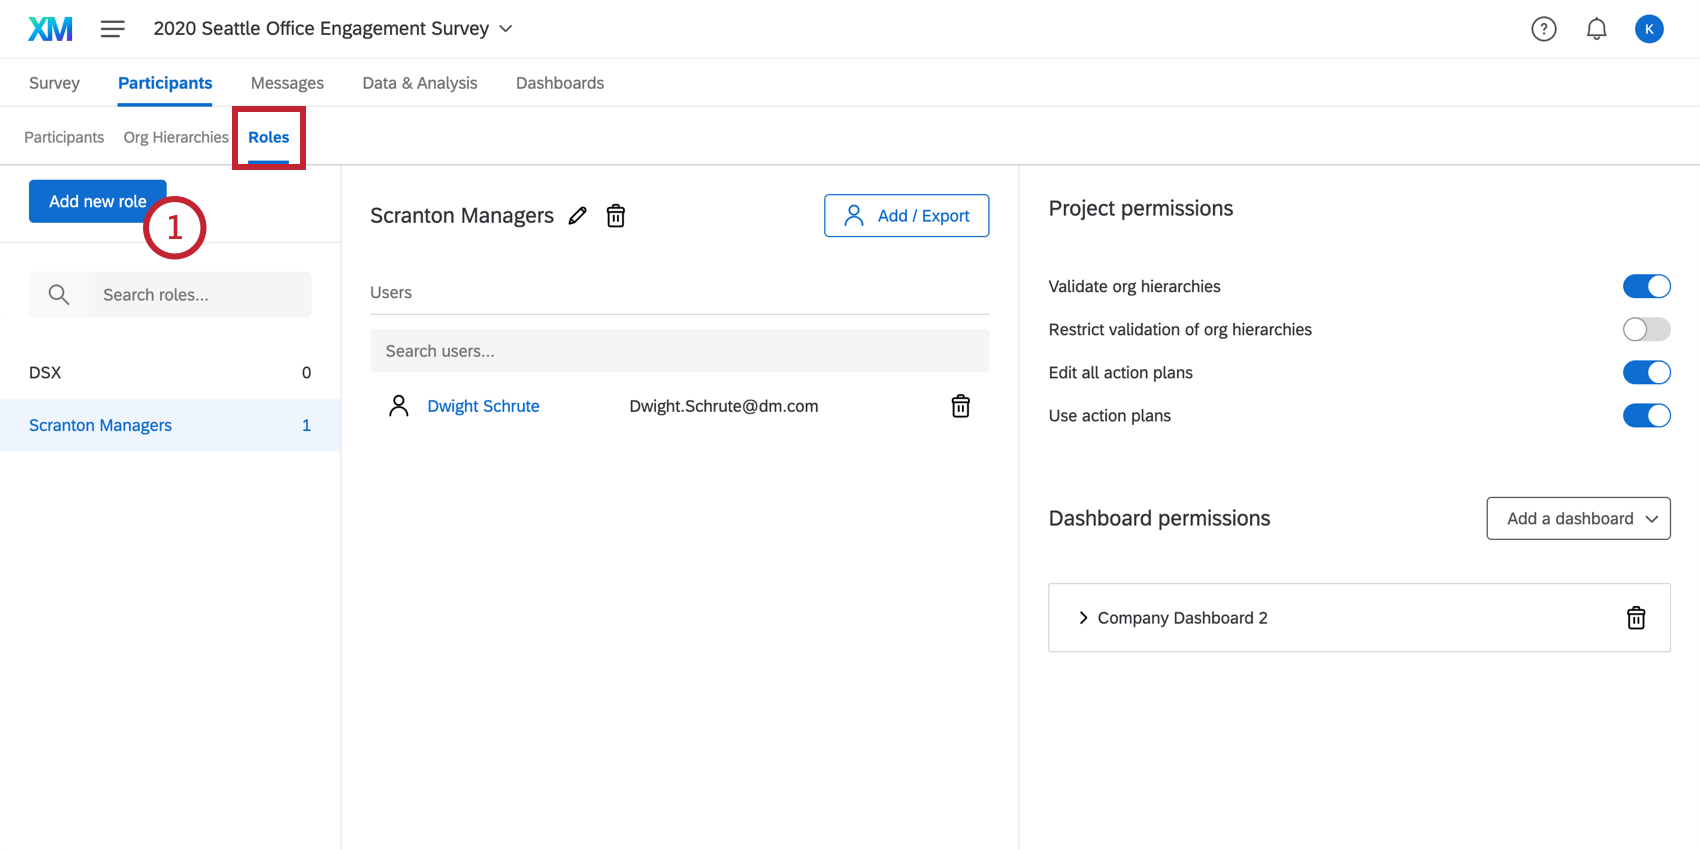
About Participant Roles
Participant roles are used to control access to the dashboards and org hierarchies. Roles are the best way to manage permissions for large groups of participants. Set up a role and assign multiple participants to it to save time by not assigning permissions one by one.
Types of Dashboards with Roles
Roles are configured per each individual project. The roles described on this page are for Employee Experience projects, including:
- Employee Engagement
- Lifecycle
- 360

Qtip: See unique Pulse role permissions here.
- Ad Hoc Employee Research
- Employee Journey Analytics
Any dashboards not listed above are not covered on this support page. While other Qualtrics dashboard products may have similar features included, this support page only details functionality found in the types of dashboards listed above.
Qtip: Only Engagement and Pulse projects have hierarchies.
Creating a Role
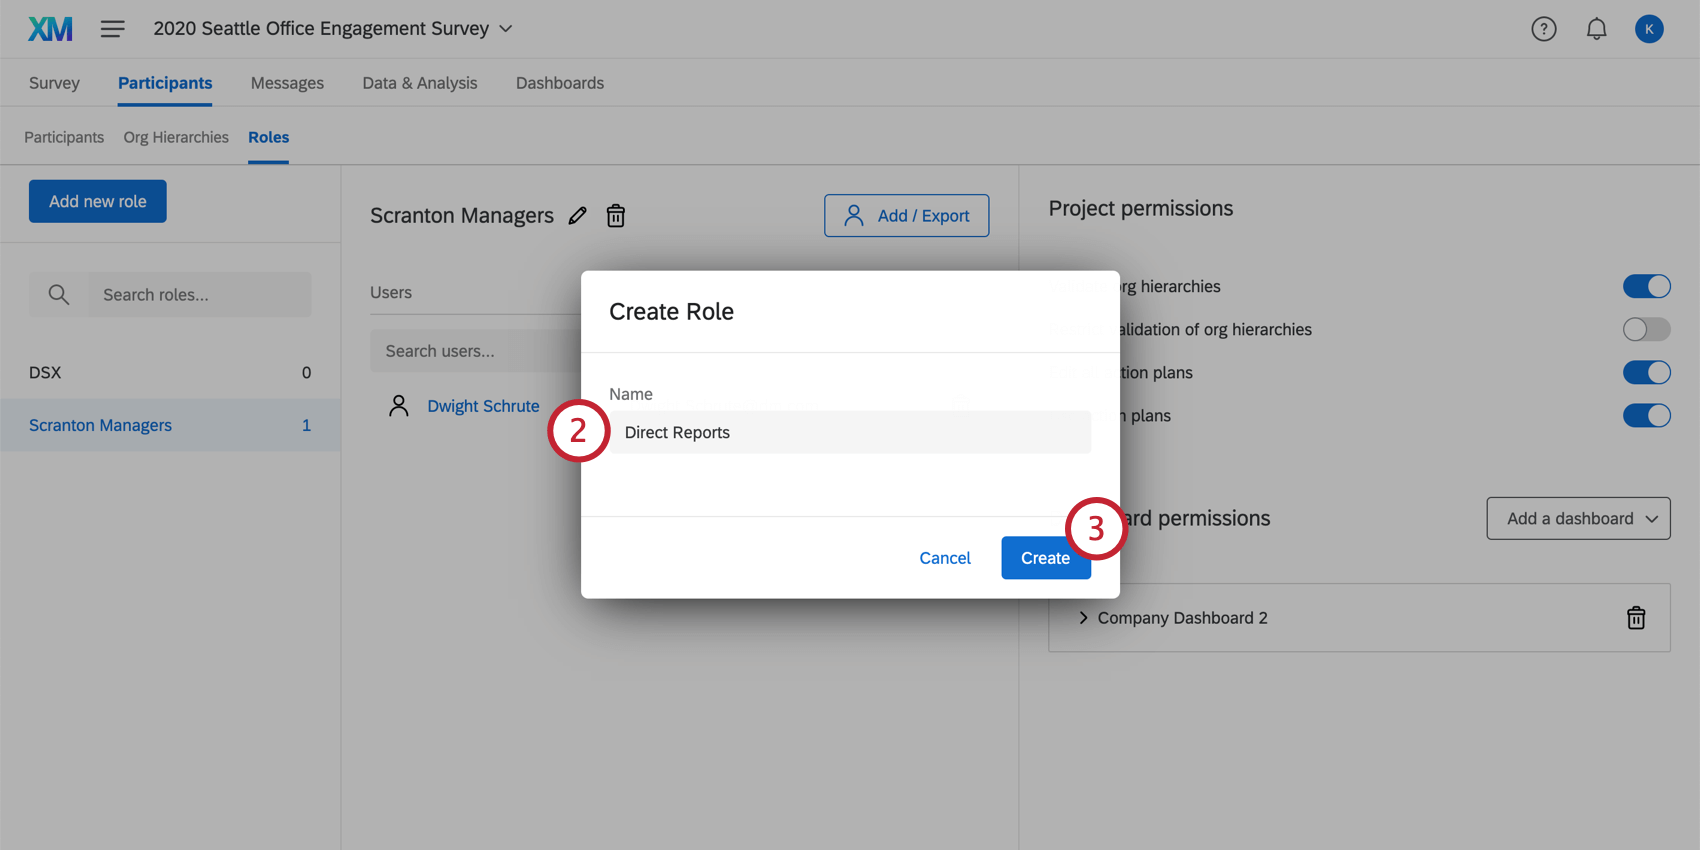
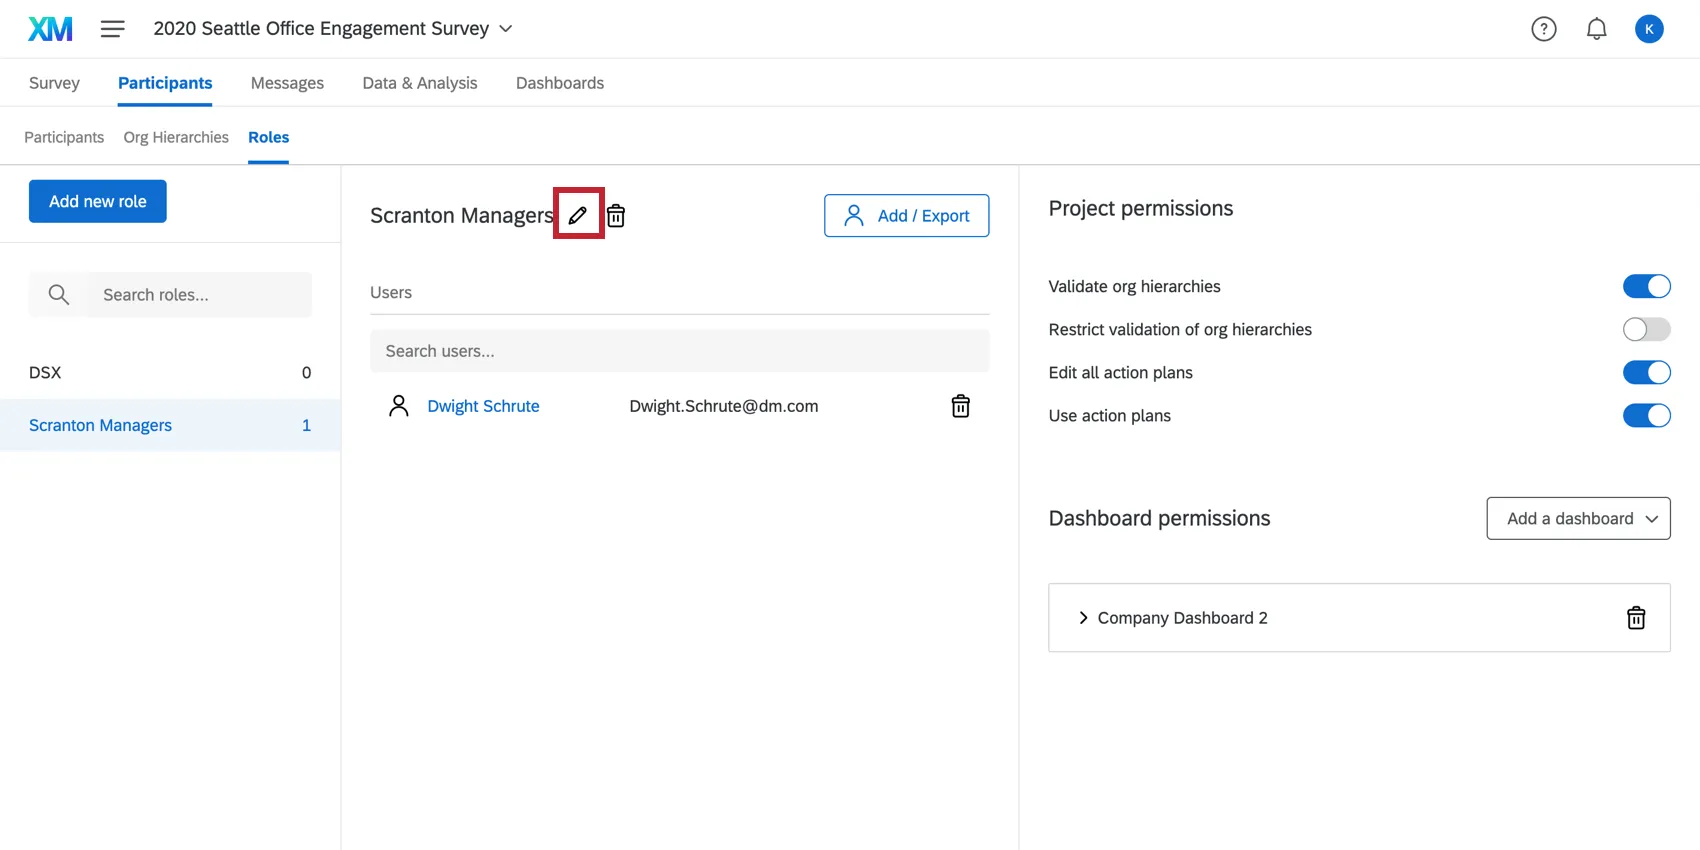
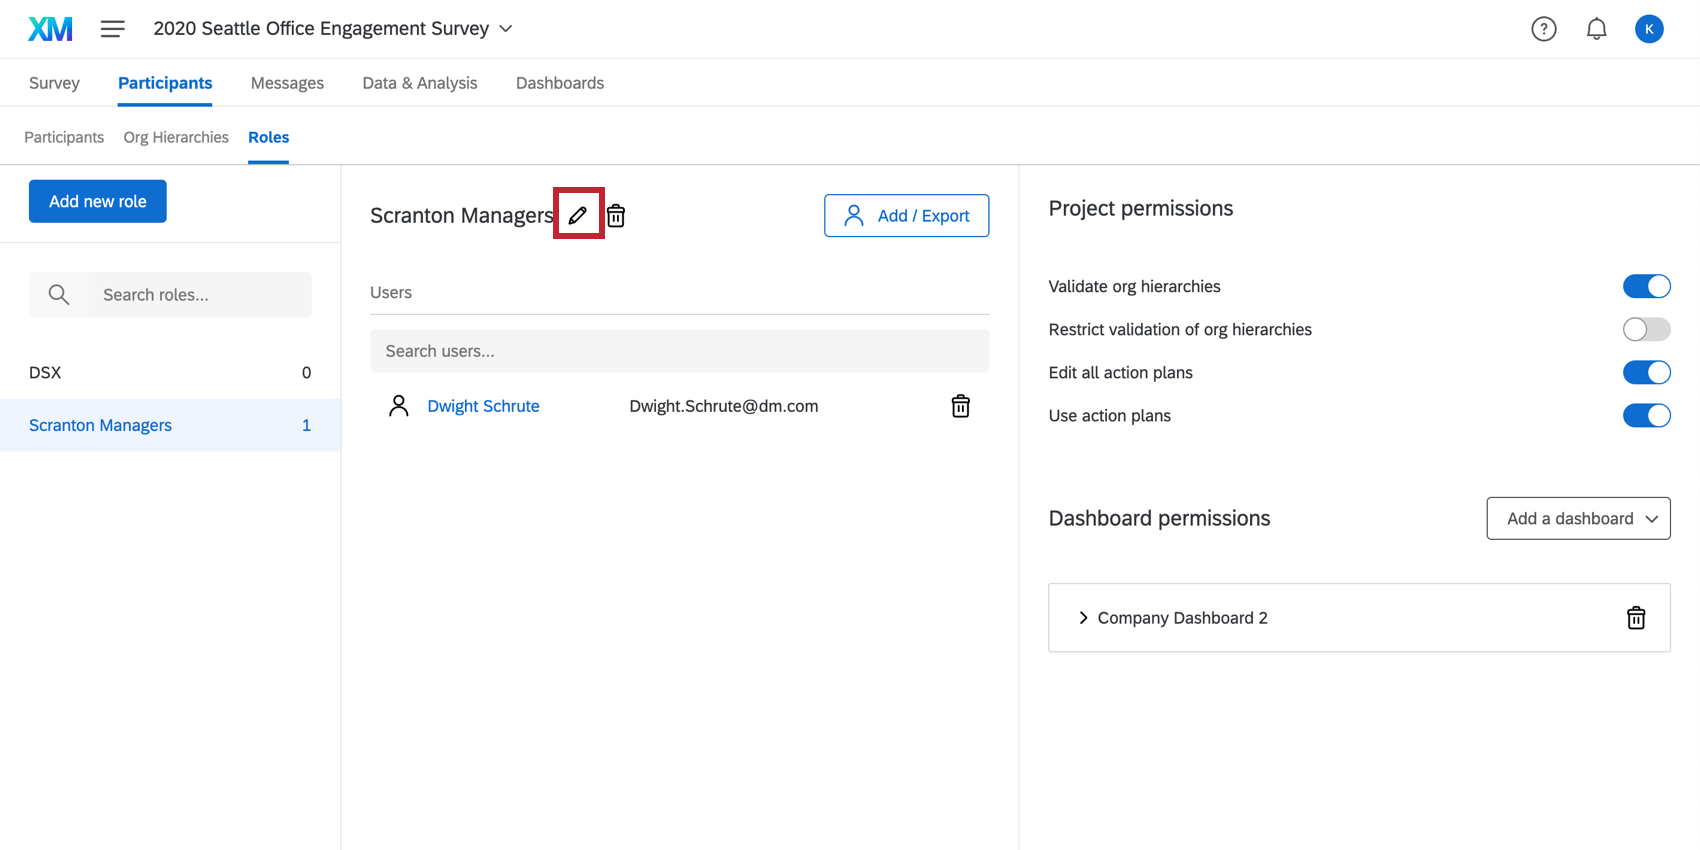
Qtip: You can always later rename your role by clicking on the pencil icon to the right of the role name.
Role Permissions
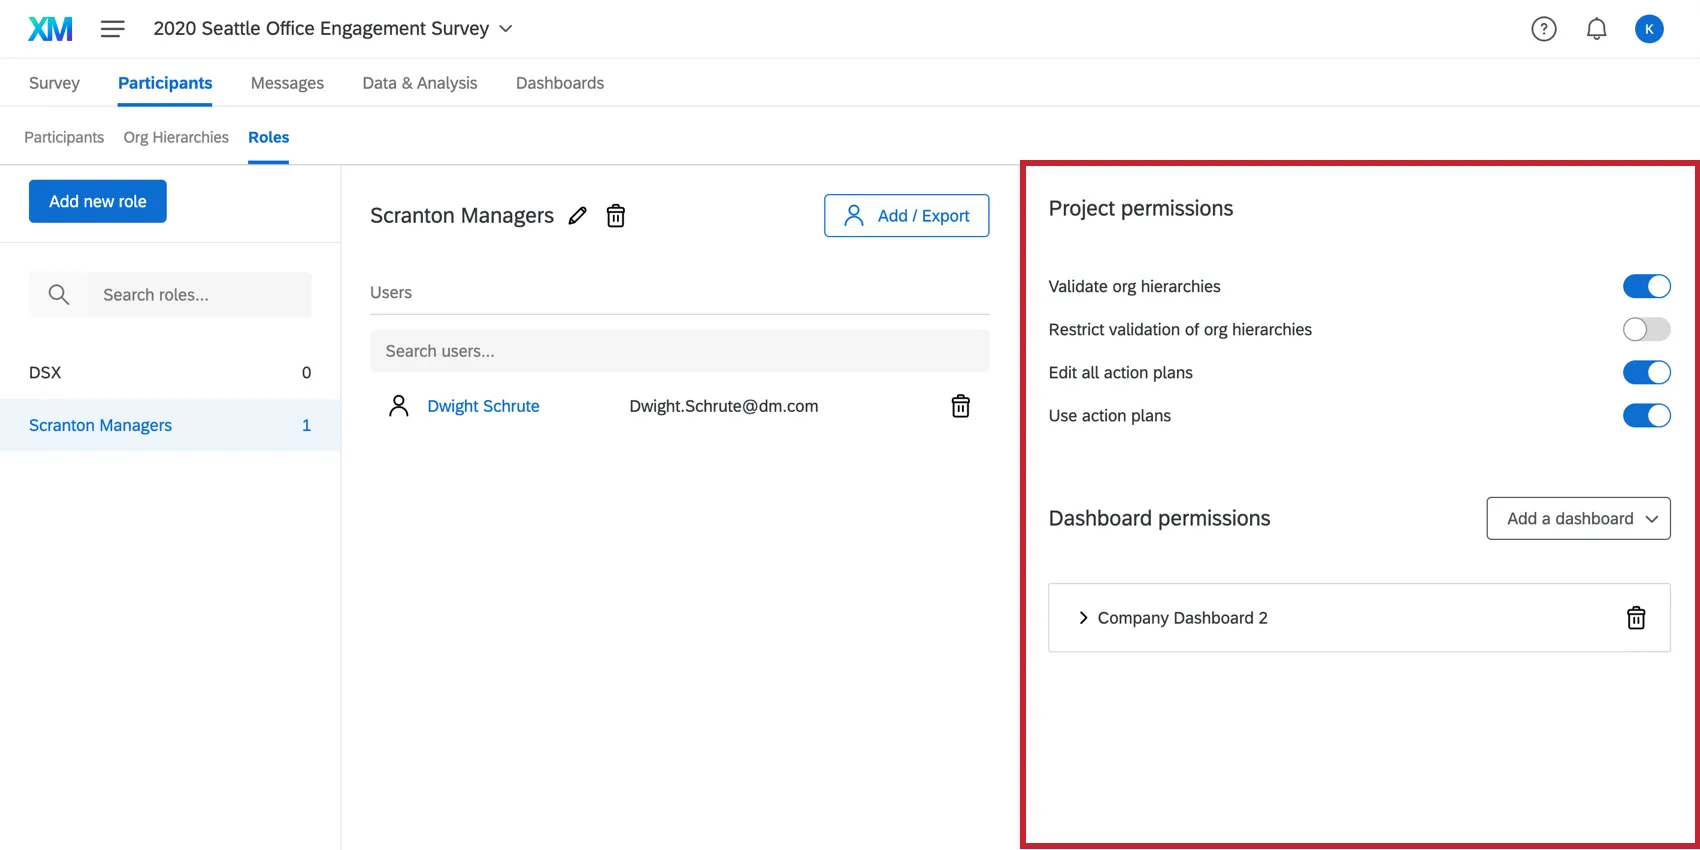
There are various permissions that can be enabled or disabled for a role. See:
- Project Permissions which also includes Action Planning Permissions
- Dashboard Permissions
You can also change participant permissions on an individual level by clicking on a participant’s name or email. This will then open the participant information window where you can make changes on an individual level.
Qtip: If a participant is given a permission on an individual level, that permission will be marked as User Defined and will not update based on any roles they are in.
Permissions Interactions Between Multiple Roles
-
If a participant is assigned to multiple roles, and both those roles restrict data by metadata, then the participant will be given the most lenient access. For example, if one role allows them to see the US office’s data, while the other role allows them to see the Australian office’s data, they will see both the US and Australian offices’ data.
Qtip: However, if the participant is assigned to multiple roles, and one role restricts data, but another has View All Data set, the data will not be restricted. Qualtrics will apply the more liberal set of data restrictions.
- If a participant is assigned to two roles, and both those roles restrict data by org hierarchy, then the participant will be given access to both restrictions. For example, if one role allows them to see responses in Unit 1, while the other role allows them to see responses in Unit 2, they will see both Unit 1 and Unit 2’s data.
- If a participant is assigned to two roles that restrict data, one with restrictions based on metadata and one with restrictions based on org hierarchy, then participant will have access to data matching both the metadata restriction and the org hierarchy restriction. For example, if one role allows them to see the US office’s data, while the other role allows them to see responses in the org hierarchy Unit 1, they will have access to all responses in the US office (metadata restriction) in addition to all responses in Unit 1 (org hierarchy restriction).
Qtip: Within a single role, restrictions for the same fields are always joined with an “OR.” In contrast, restrictions for different fields within a single role are joined via “AND.” Different roles are then joined together with “OR”.
Org-hierarchy restrictions behave in the same way as fields, except in the case where one role has a restriction and the other does not and there is an Org hierarchy filter on the dashboard, in that case, the Org-Hierarchy filter is restricted by the hierarchy value.
Adding & Removing Participants
To add participants to a role, follow the steps below.
Attention: Users that were manually added to a role will not be removed if their metadata changes. Users will only be automatically removed from a role if they were added with automatic role assignment.
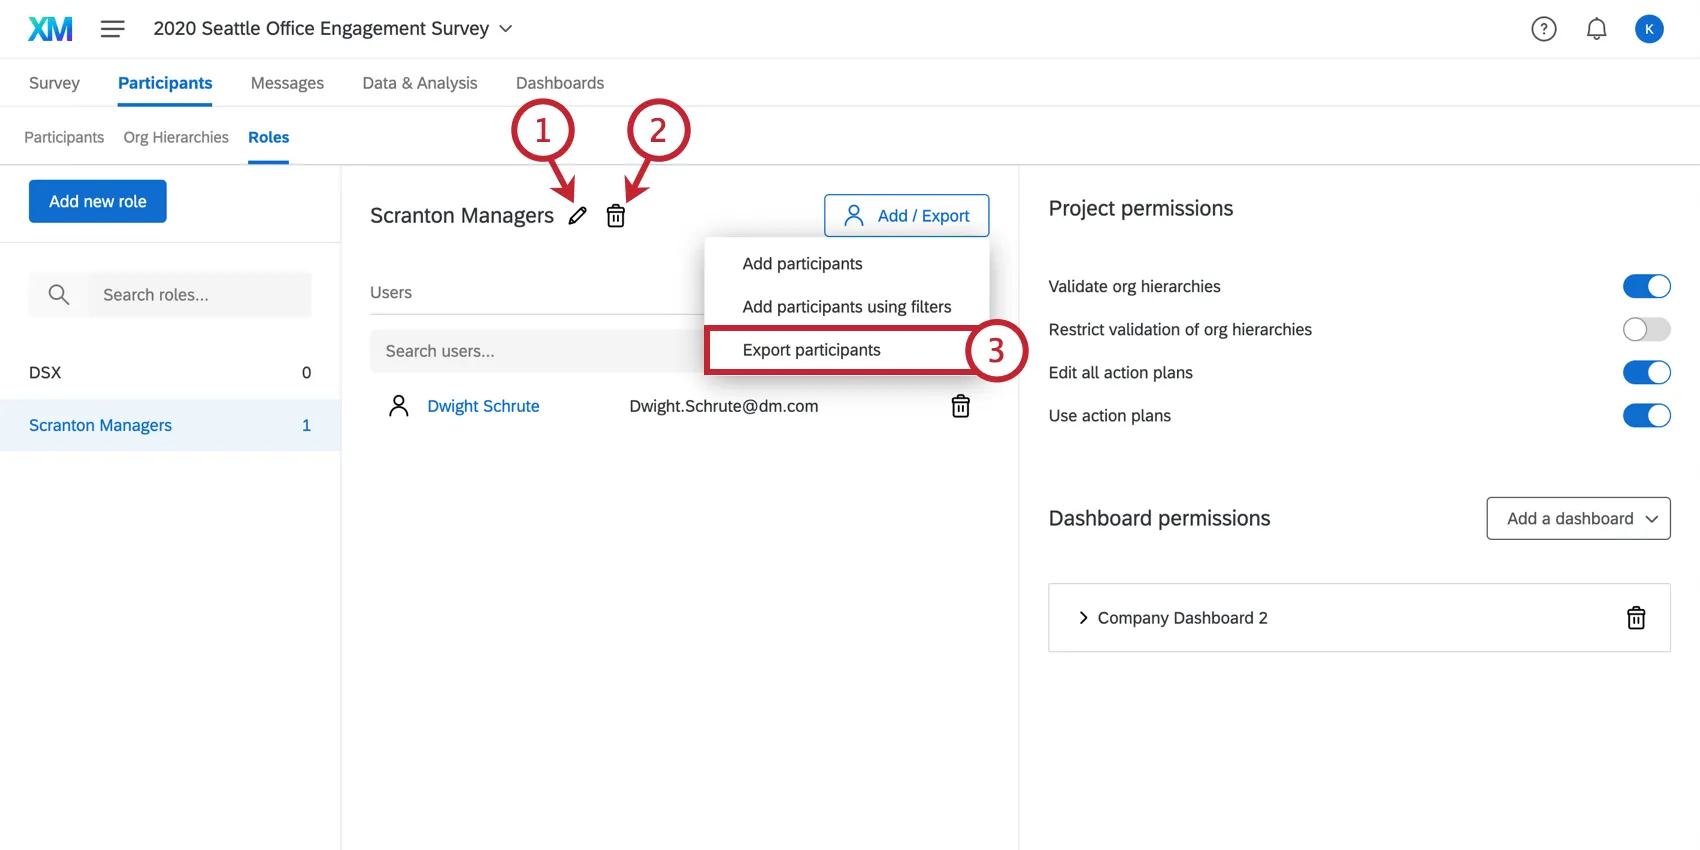
Select Add / Export.
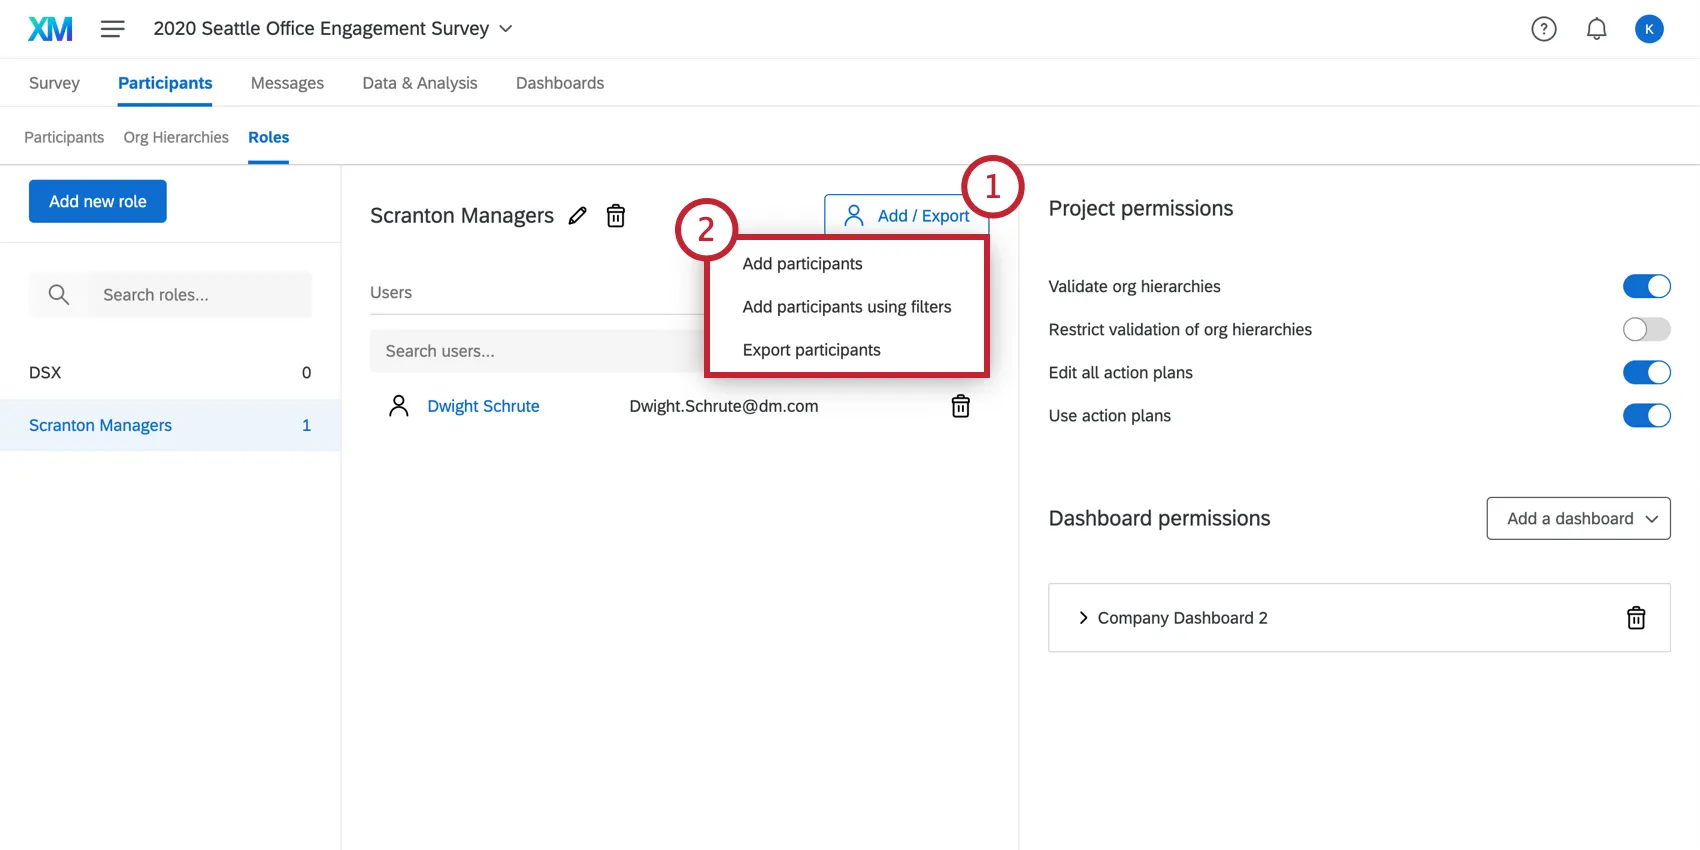
Choose to Add participants or Add participants using filters.
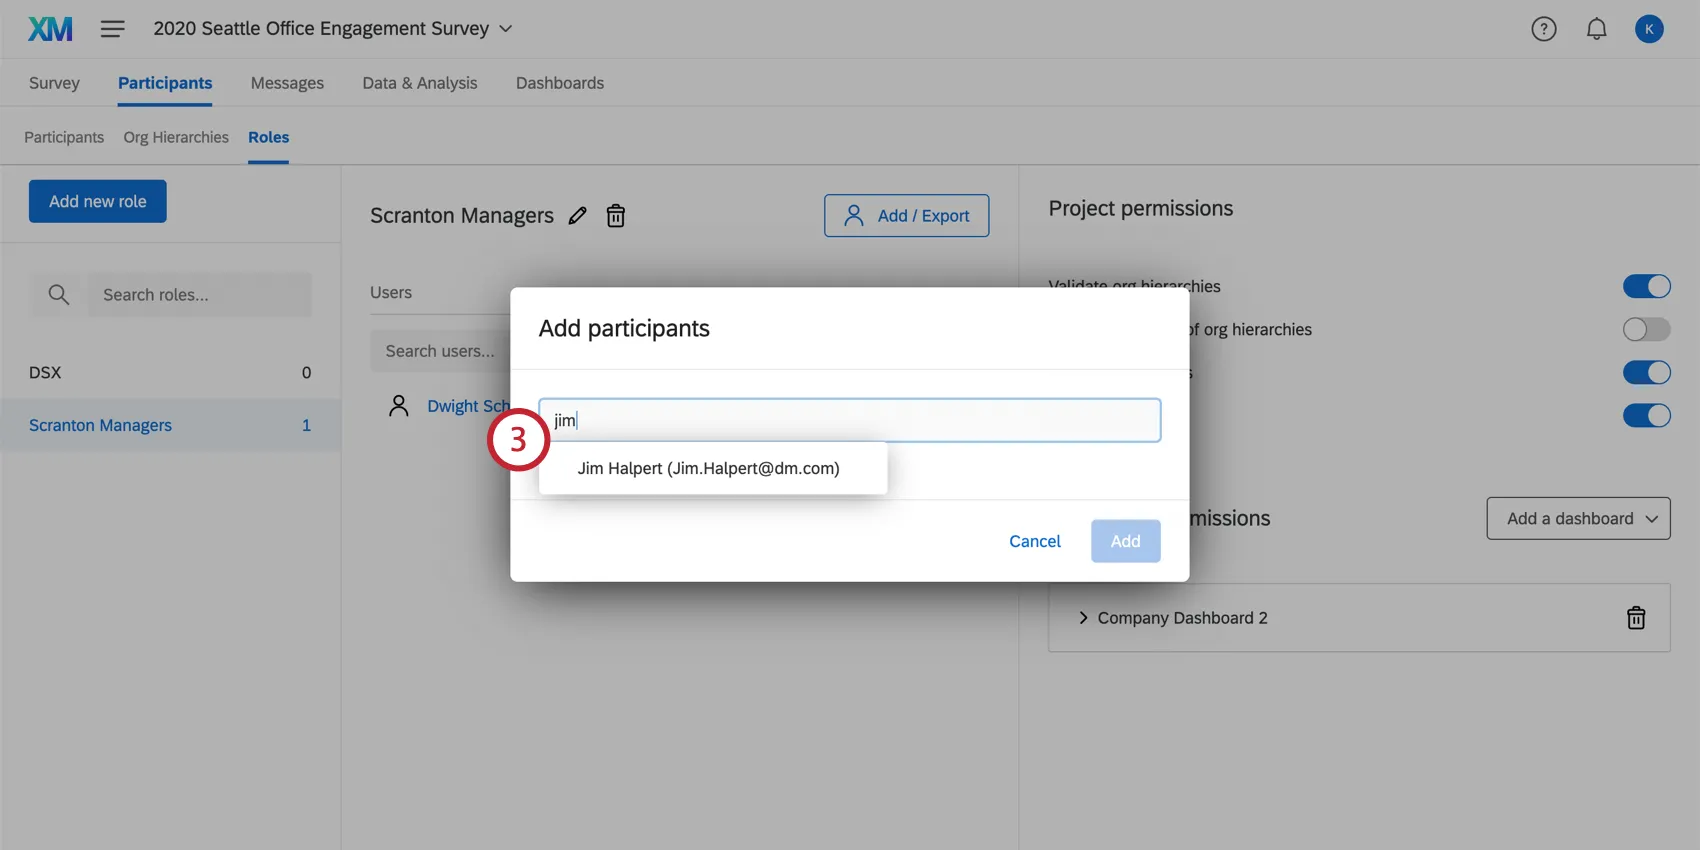
If you chose Add participants, search for the individual using their name or email address and select the participant from the list. Note that you can select multiple people.
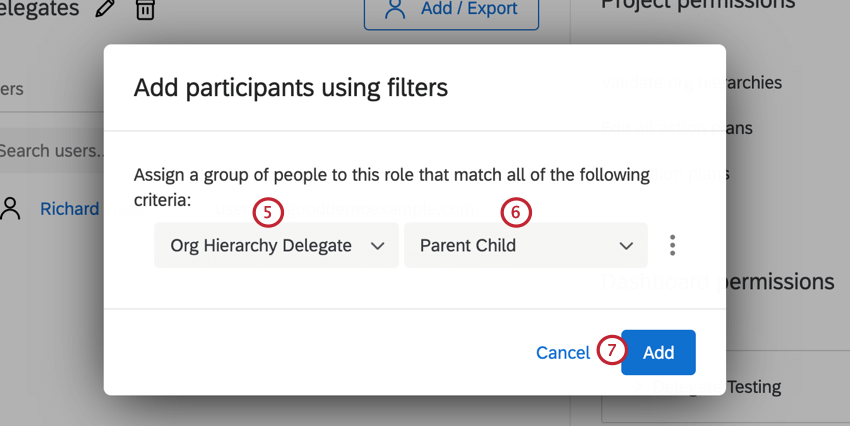
If you chose Add participants using filters, you will need to set the conditions under which participants will be added to a role.
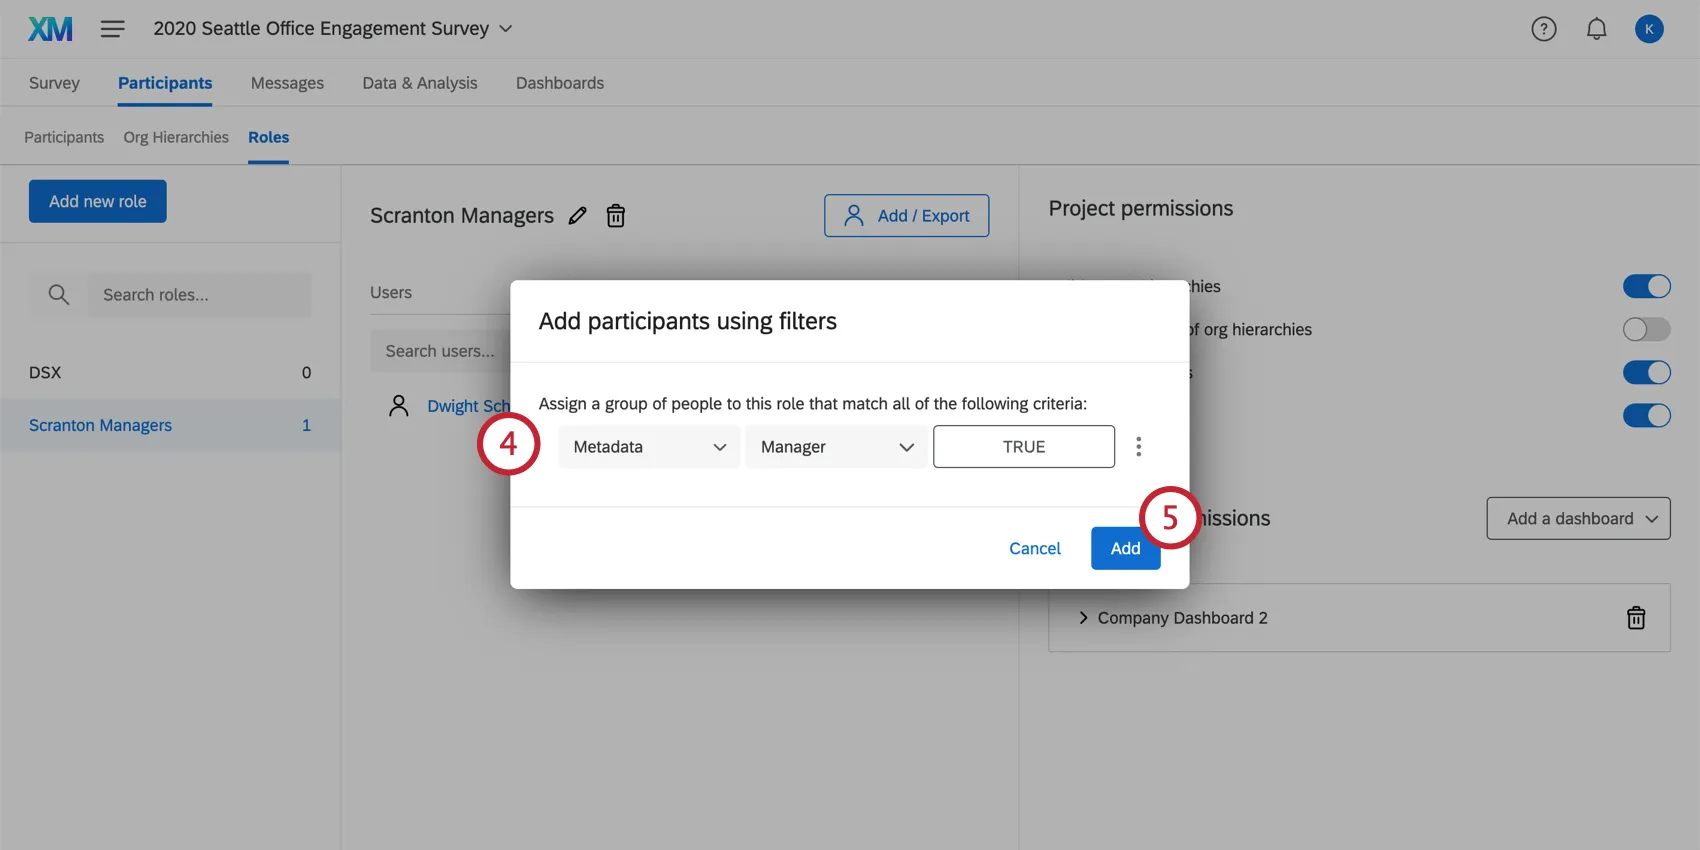
Your conditions can be based on:
- Metadata: Assign the user if they have a certain metadata value.
Qtip: You can use any metadata field from your Employee Directory here, including Org Hiearchy metadata fields.
- Email address: Assign the user based on their email address.
- Org hierarchy manager / delegate: Assign the user if they are a manager or delegate in an org hierarchy.
Qtip: You can add multiple conditions by clicking the three dots on the right and selecting Insert condition below.
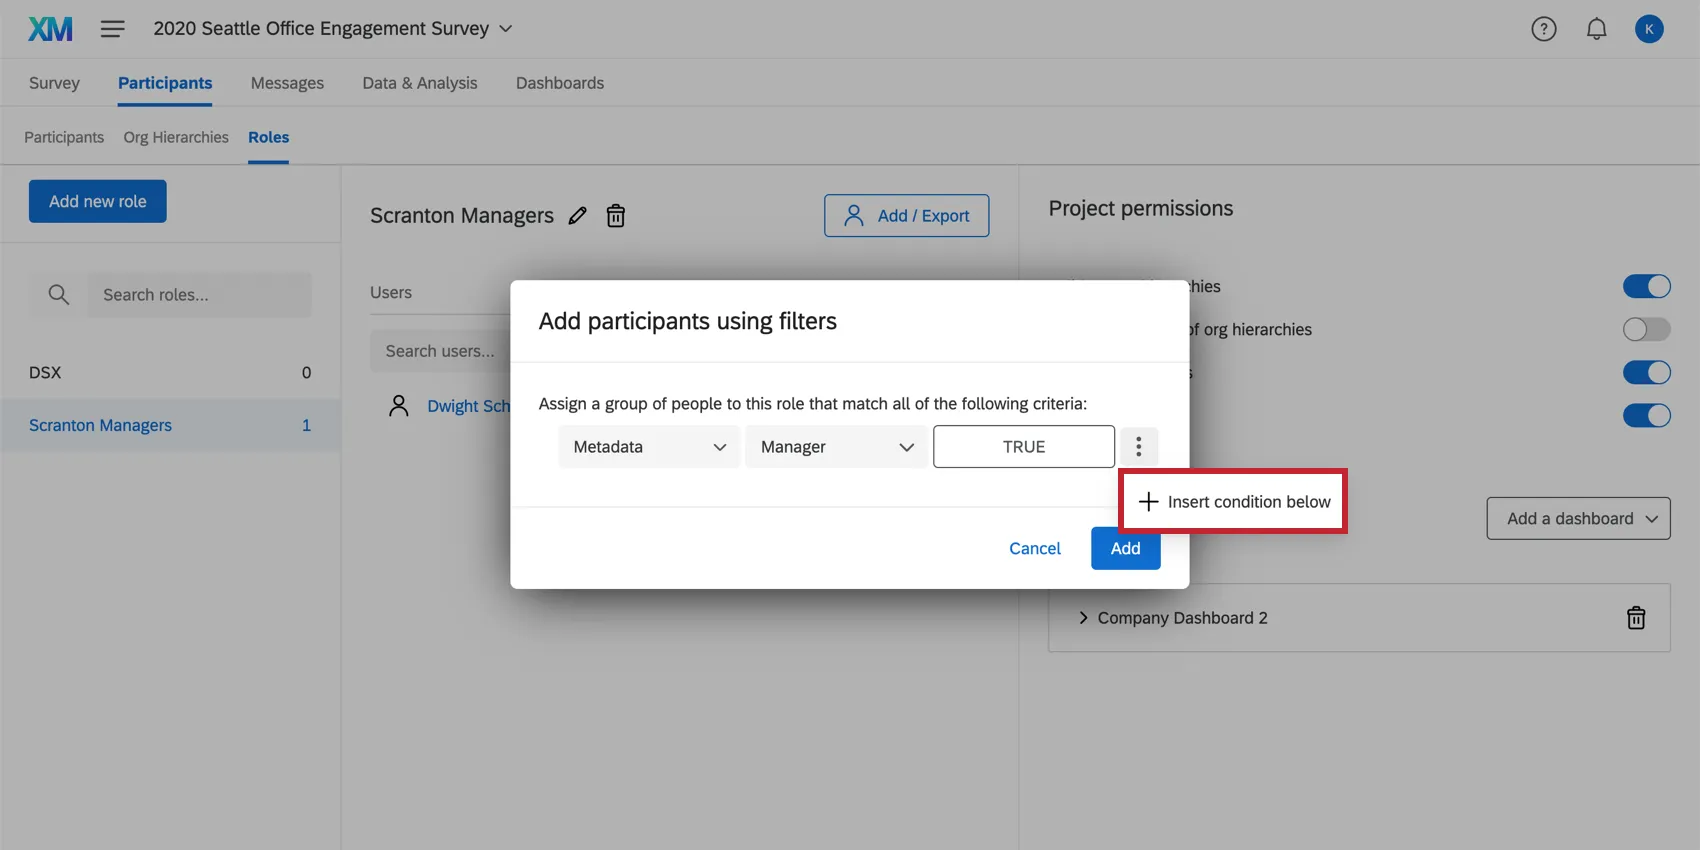
Click Add.
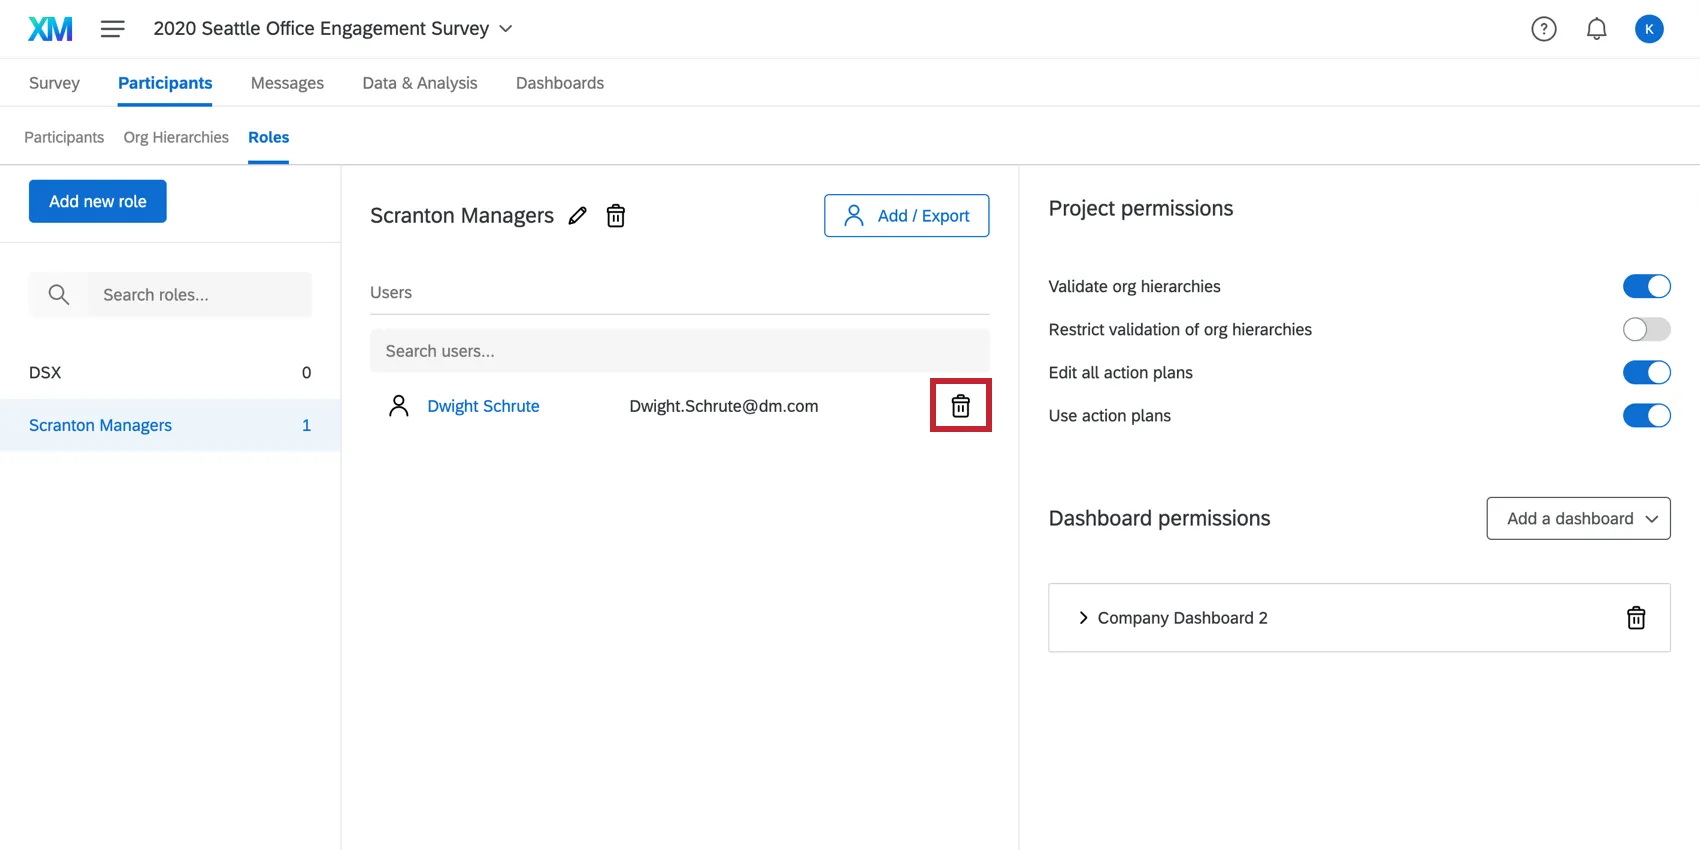
To remove participants from a role, hover over the individual and select the trashcan icon on the right-hand side.
Adding Delegates to Roles
If you have added delegates to your Engagement project, you can use roles to quickly assign your delegates’ permissions in bulk.
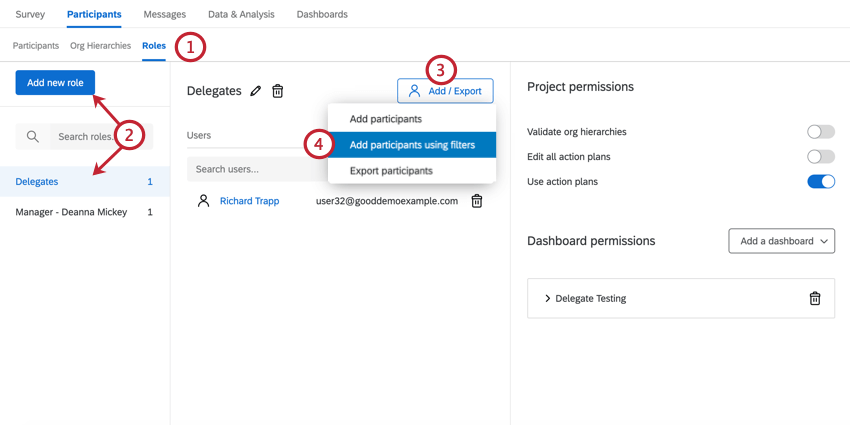
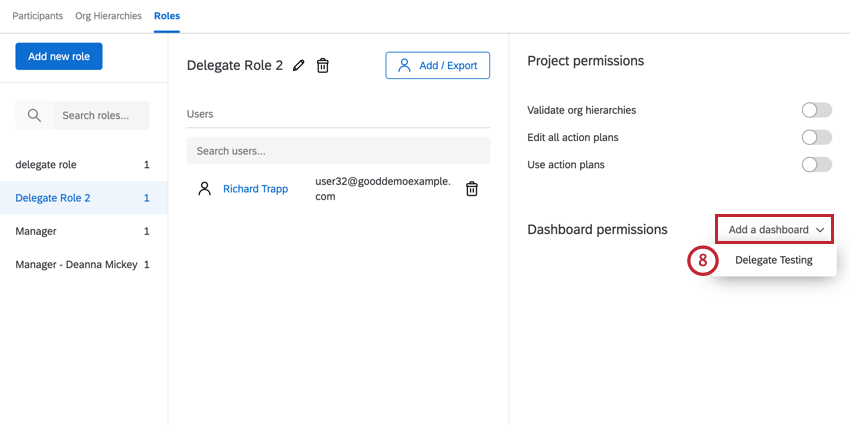

After adding delegates to a role and granting them access to your dashboard, delegates will now have access to the dashboard of interest based on the delegated position in the org hierarchy.
Automatic Role Assignment
Qtip: This feature is only available for Engagement, Lifecycle, and Pulse projects. Learn more about the different types of Employee Experience projects.
Automatic role assignment enables you to automatically add users to roles based on their metadata, or if they are a manager or delegate in your org hierarchy.
Example: There is a role for everyone whose department is “Support.” Barnaby changes departments from Support to Operations. He is removed from the support role.
Click Add users.
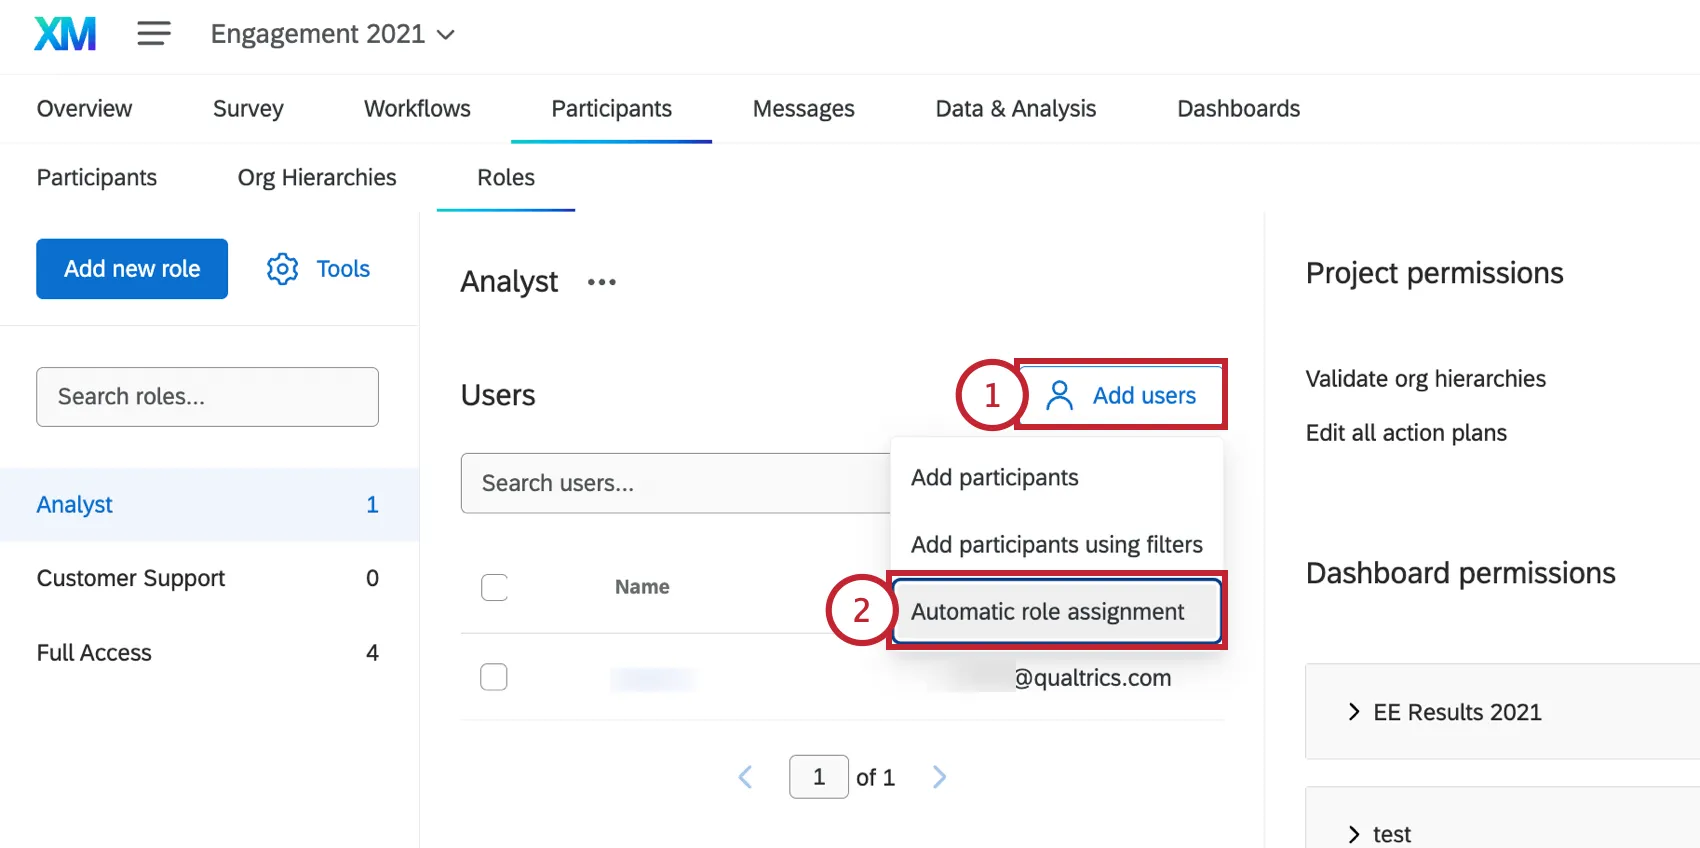
Select Automatic role assignment.
Choose what you’d like to base the role on:
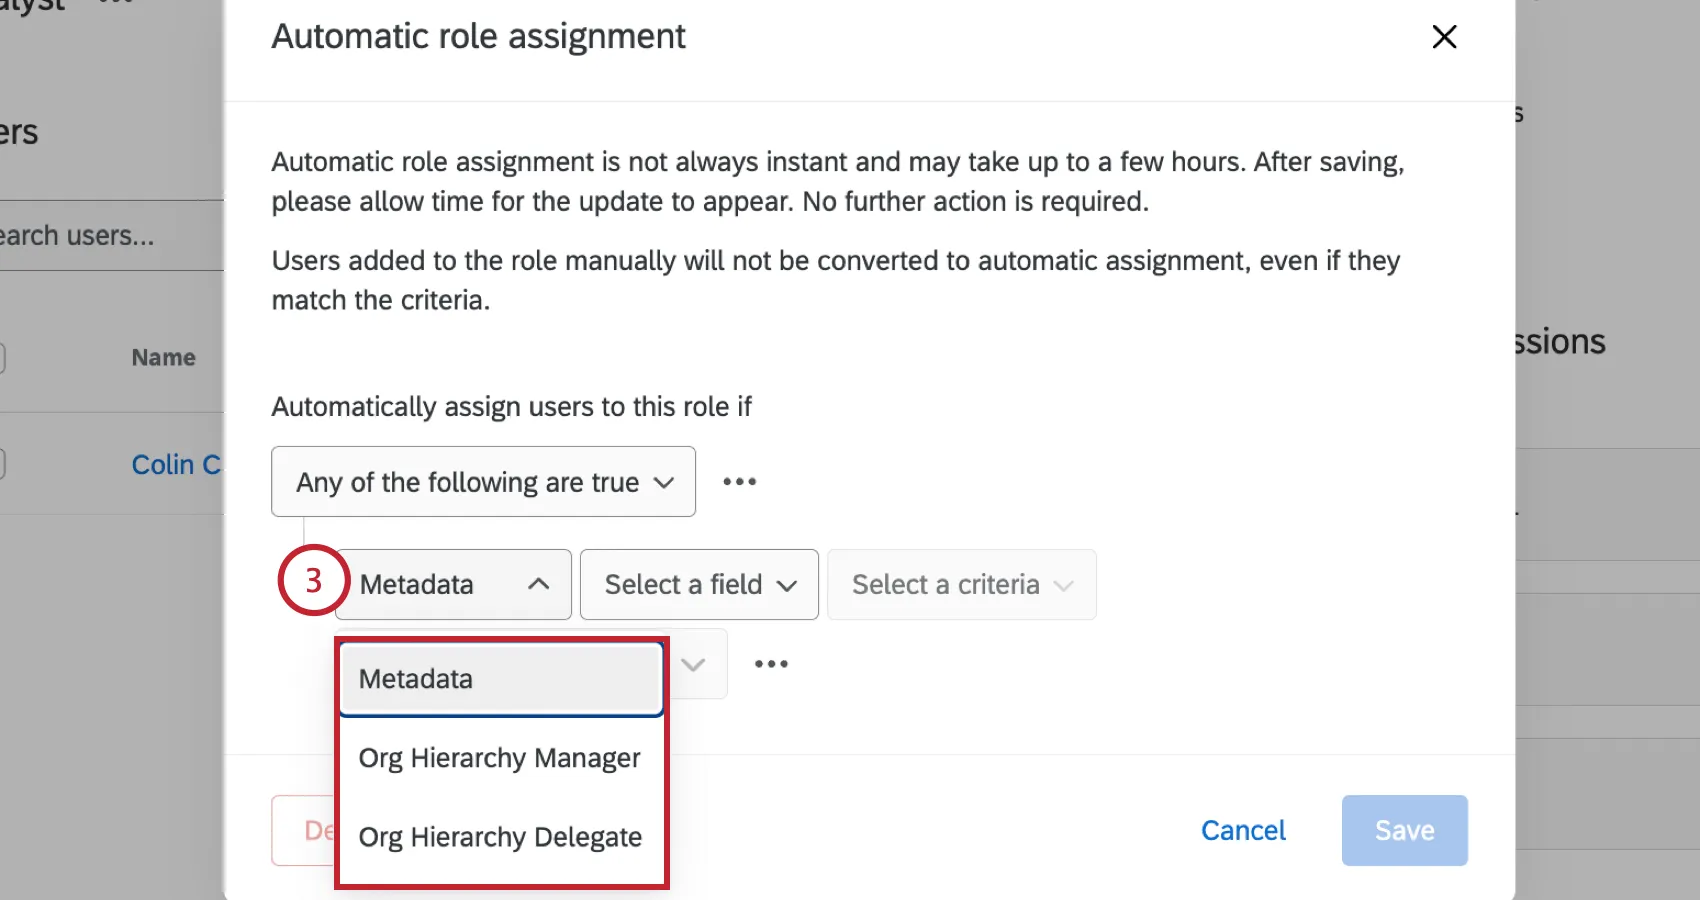
- Metadata: Assign the user if they have a certain metadata value.
- Org Hierarchy Manager: Assign the user if they are a manager in an org hierarchy.
Org Hierarchy Delegate: Assign the user if they are a delegate in an org hierarchy.
Qtip: Lifecycle projects do not contain org hierarchies. Only metadata fields can be used to build Lifecycle automations.
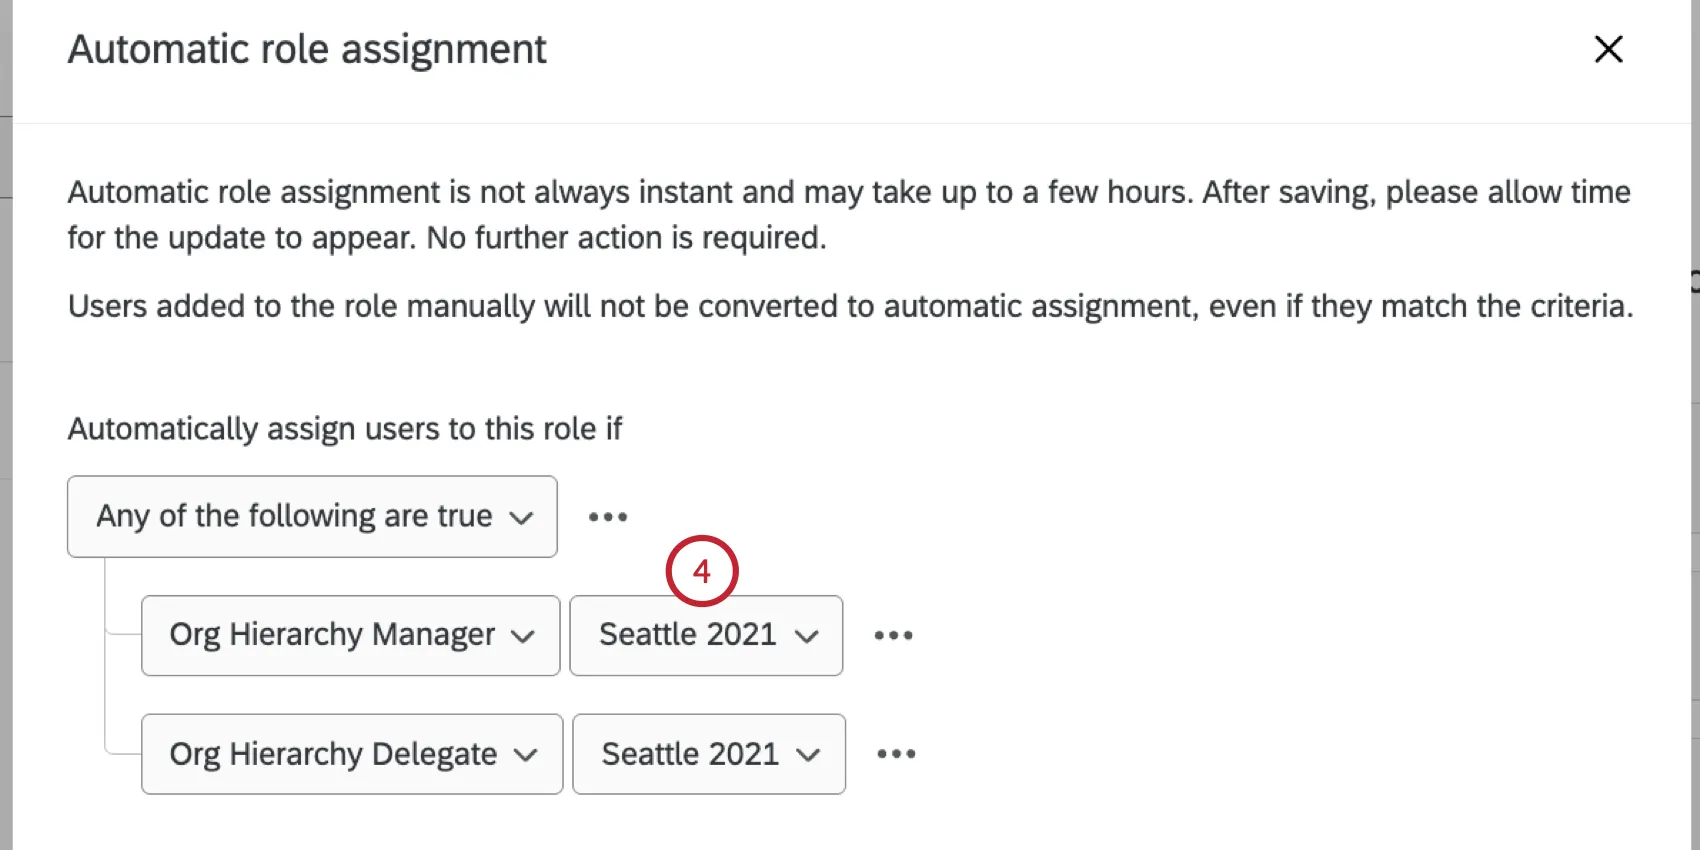
For conditions based on Org Hierarchy Manager or Org Hierarchy Delegate, select the org hierarchy that the user must be in.
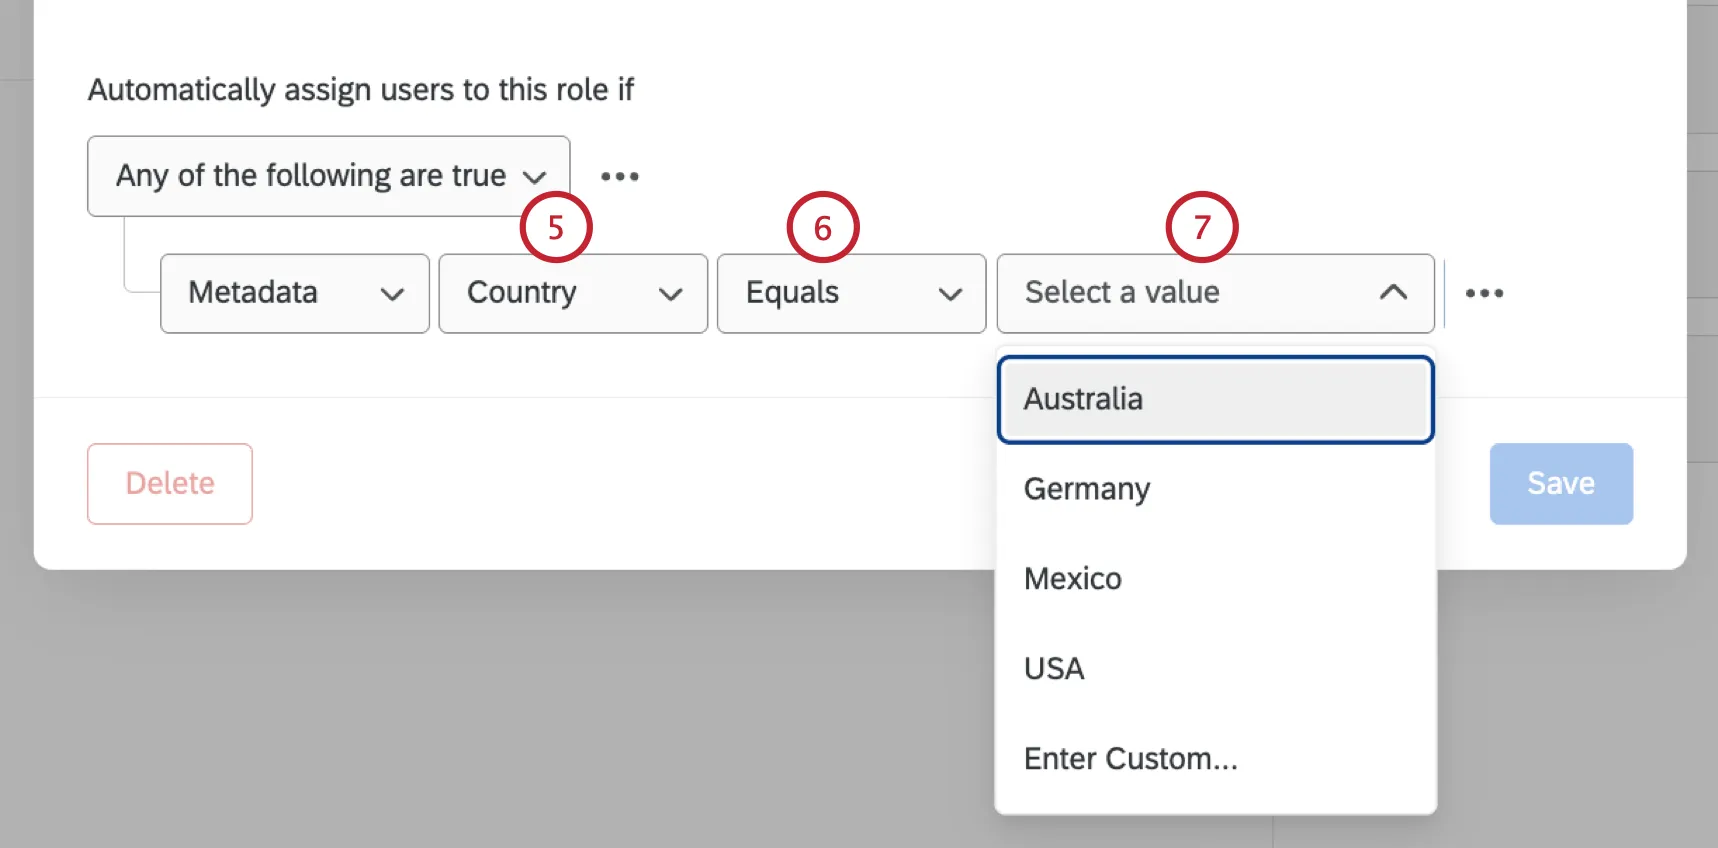
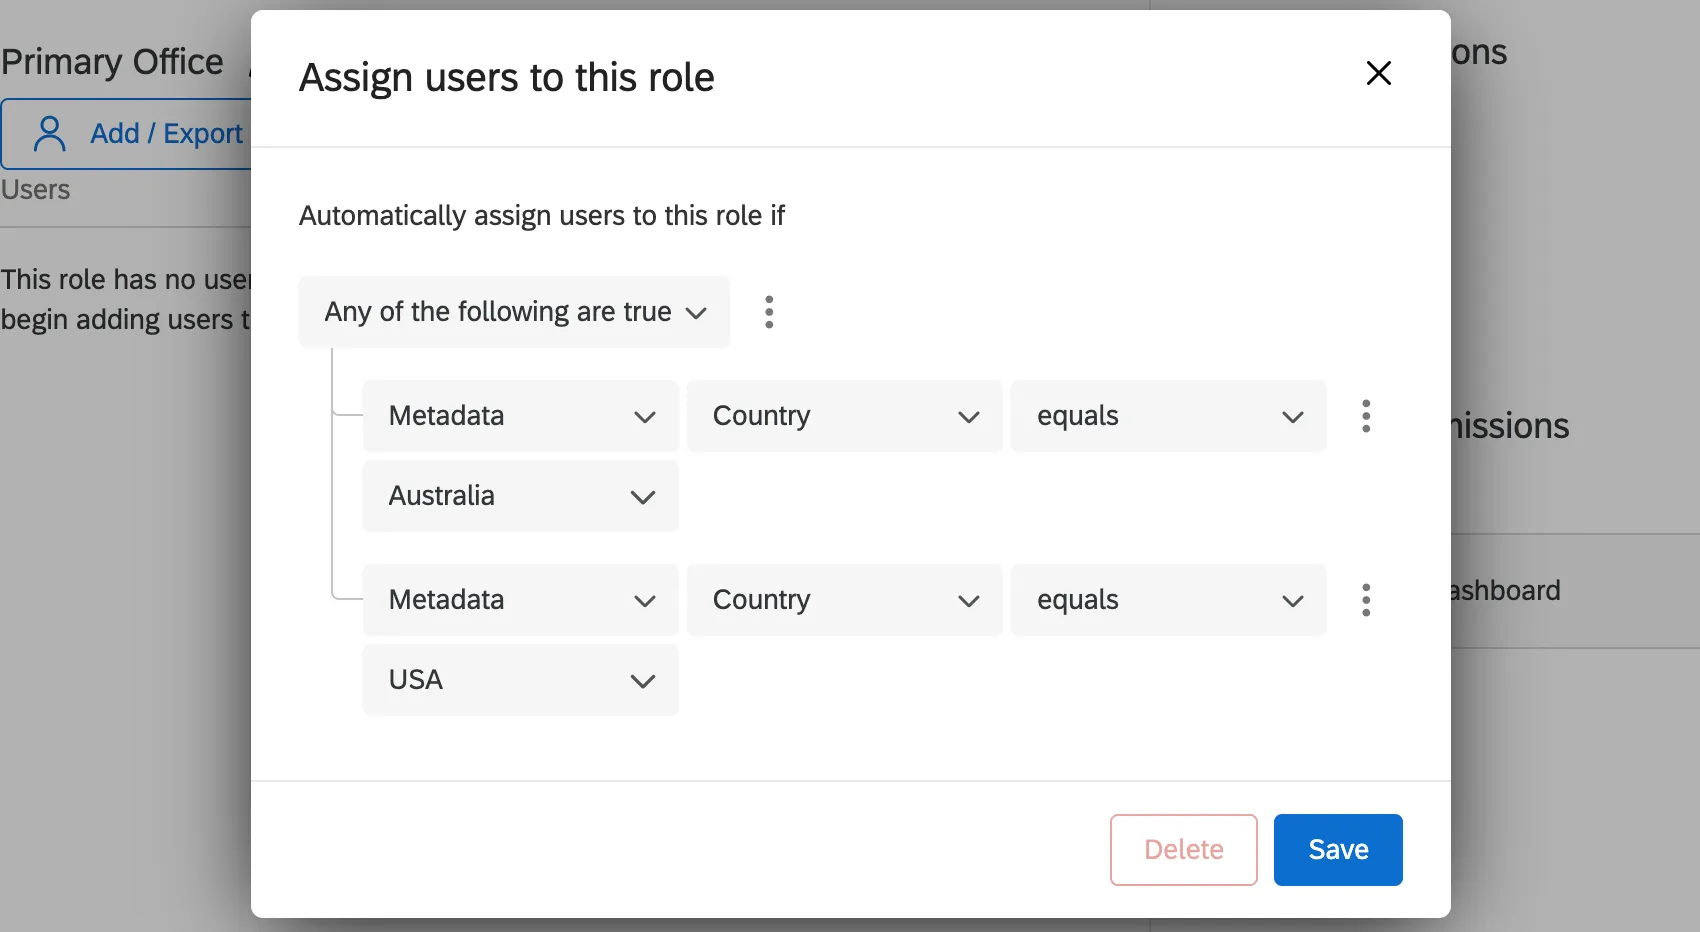
The next few steps cover building conditions for metadata attributes. First, choose the metadata field.
Qtip: The list of available metadata fields is based on the metadata of participants in your project. You will only be able to select fields that exist for participants currently in the project. If you’d like to create automatic role assignment before uploading your actual participant list, you will need to add test participants that contain the metadata fields you want to use in the automation.
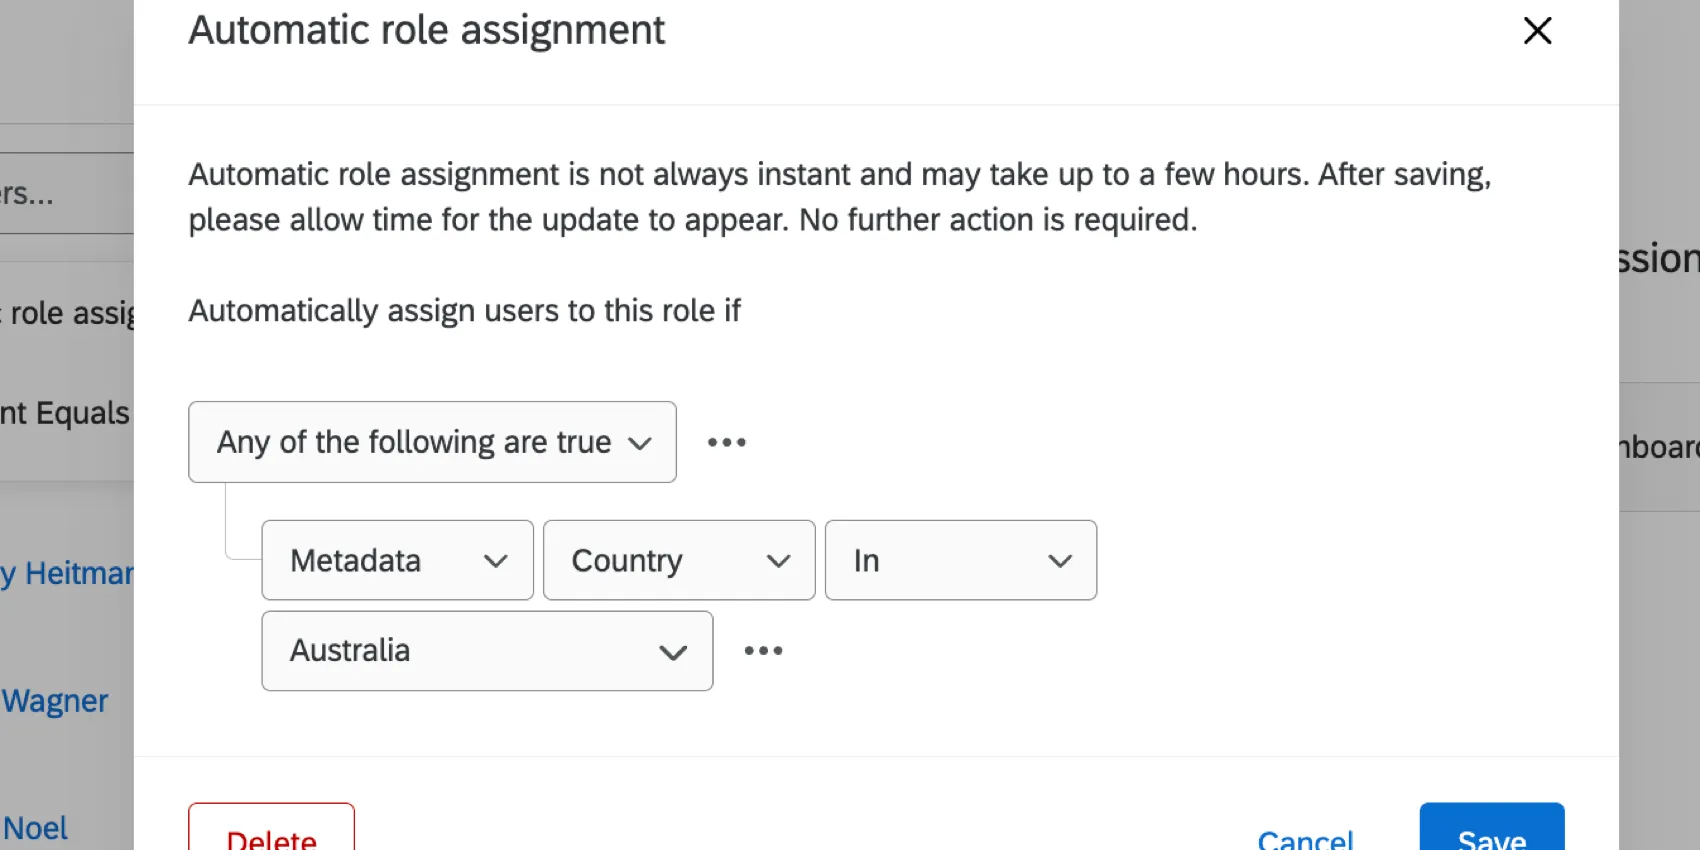
Choose your operator:
- Equals: This is what you should choose most of the time. This ensures an exact match. Make sure values are case sensitive.
- In: This option is ideal if your metadata has multiple values, such as those separated by colons (e.g., a participant’s value for their “City” field is “Seattle::Provo”). Using “In” lets you account for these colon-separated values.
Select the metadata value that must match for users to be added to this role. You’ll be able to select from a list of existing values or select Enter Custom to type in a new value.
Qtip: You can type to search values in this field.
You can click the dots and then Insert condition below to add another condition to the automatic role assignment.
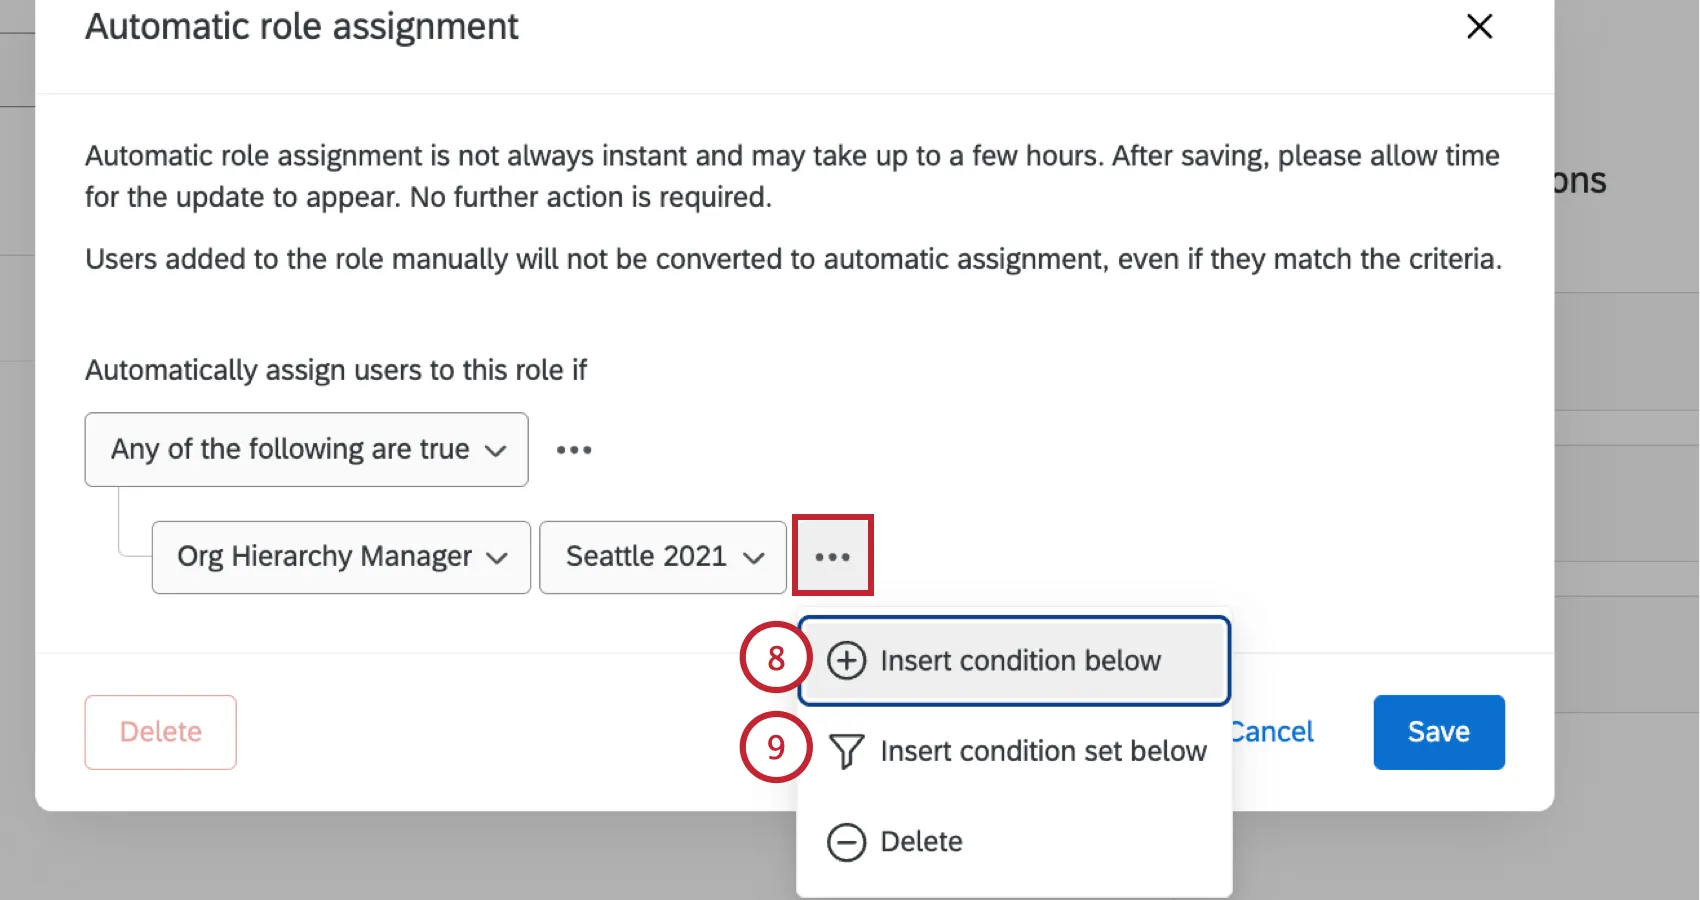
If you’d like to add a whole new condition set, select Insert condition set below.
To change how multiple conditions are joined, adjust the Any / All dropdown.
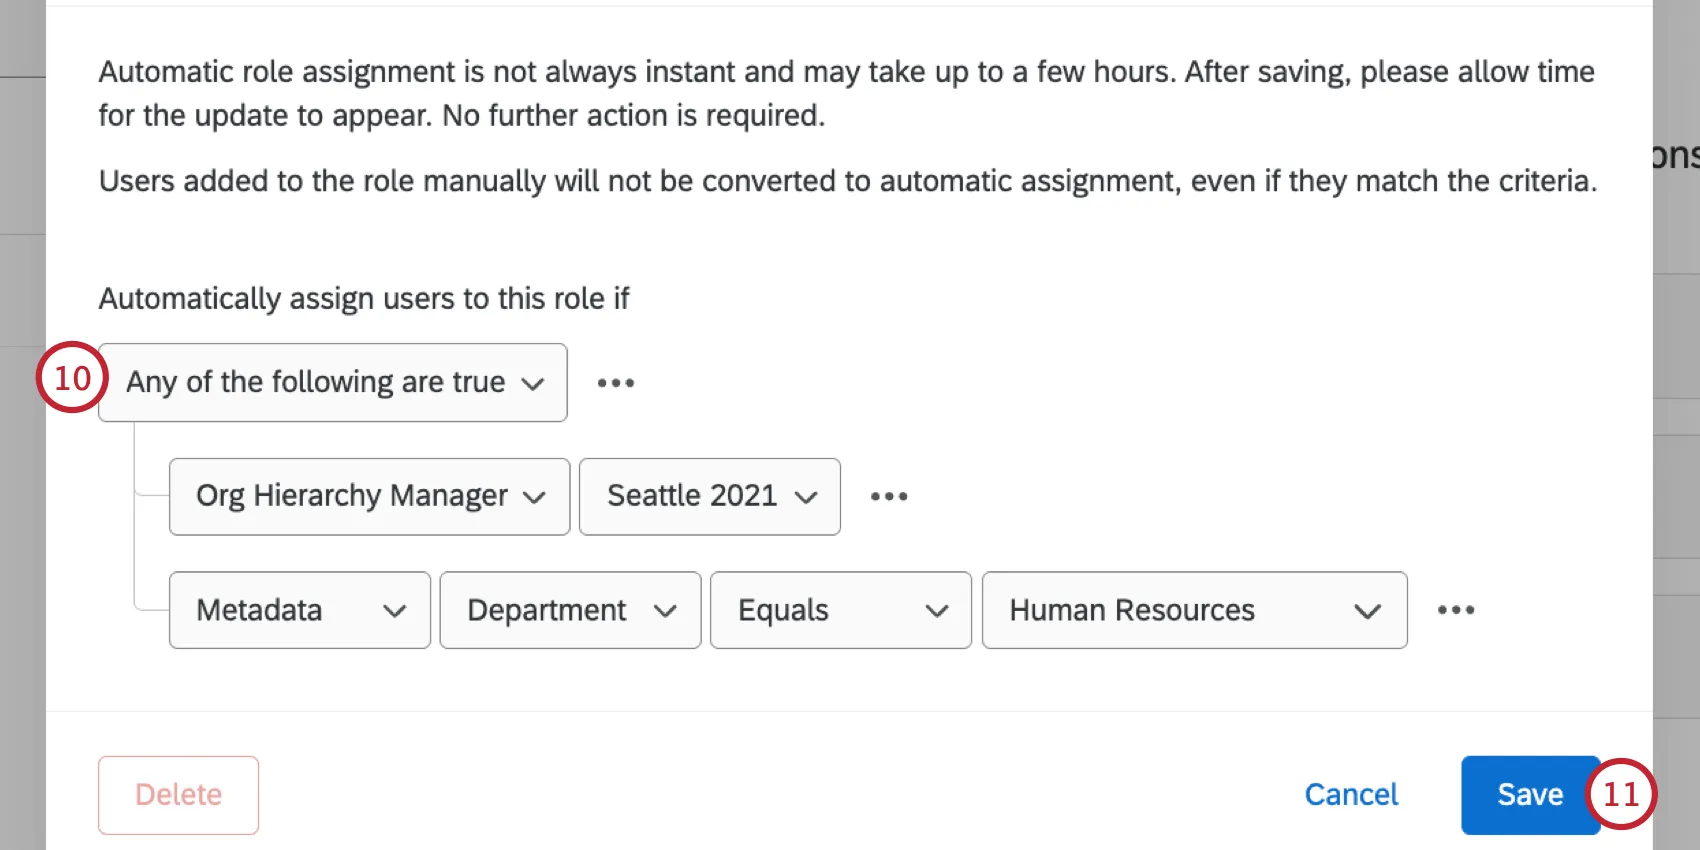
When you’re finished, click Save.
You can edit your automation by clicking Edit automation. If there have been changes to your project or participants that have invalidated your automation (for example, deleting the selected hierarchy), then you will see a warning that your automation requires attention.
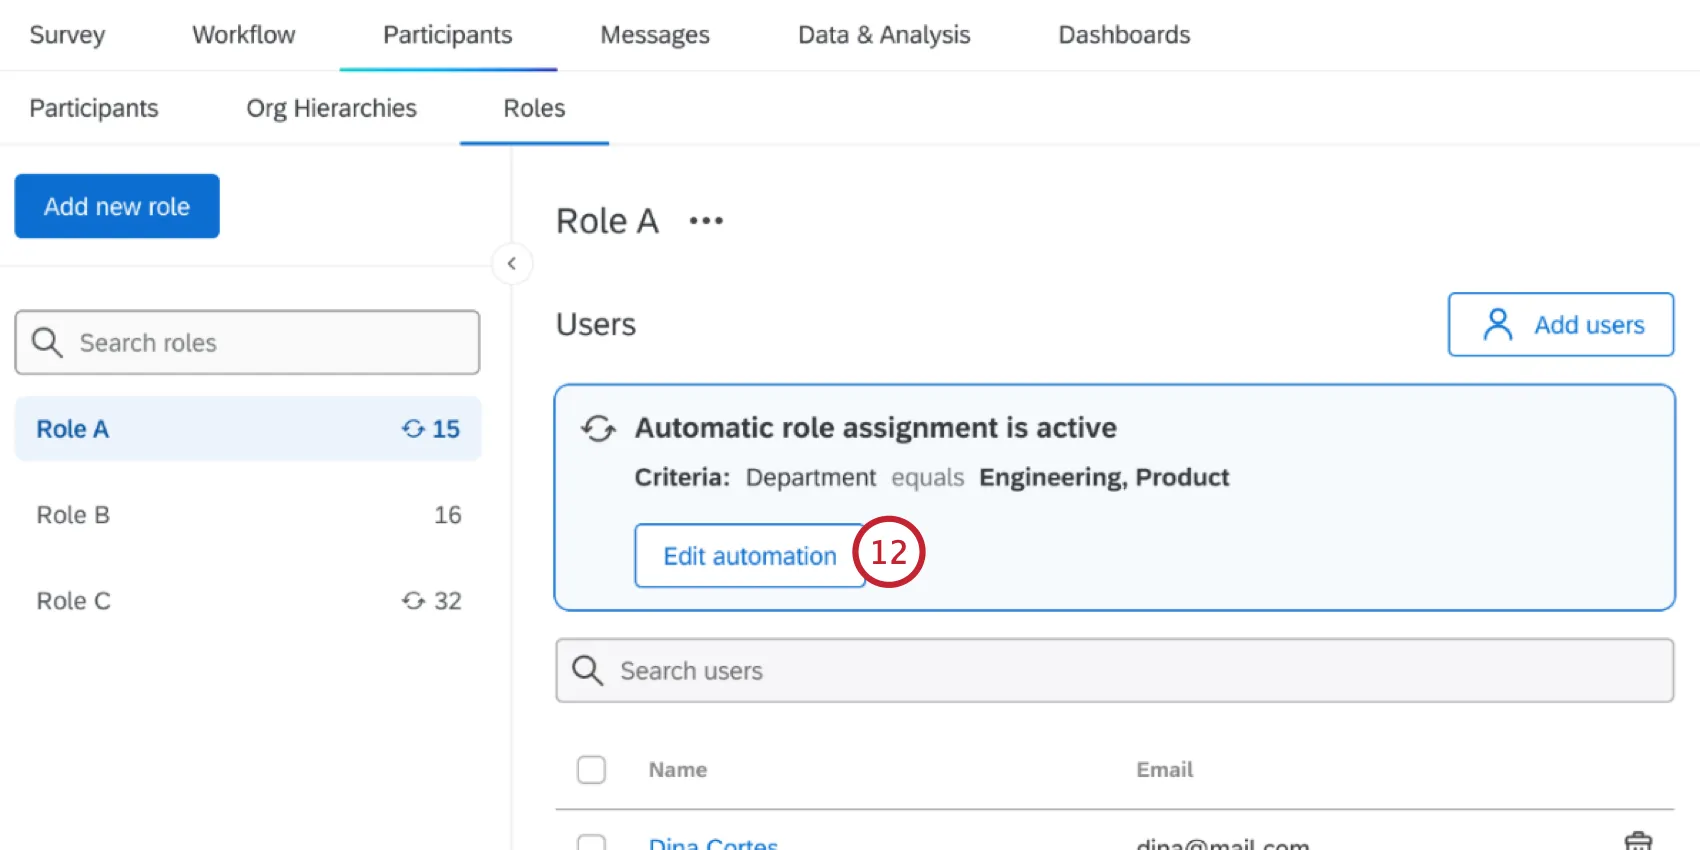
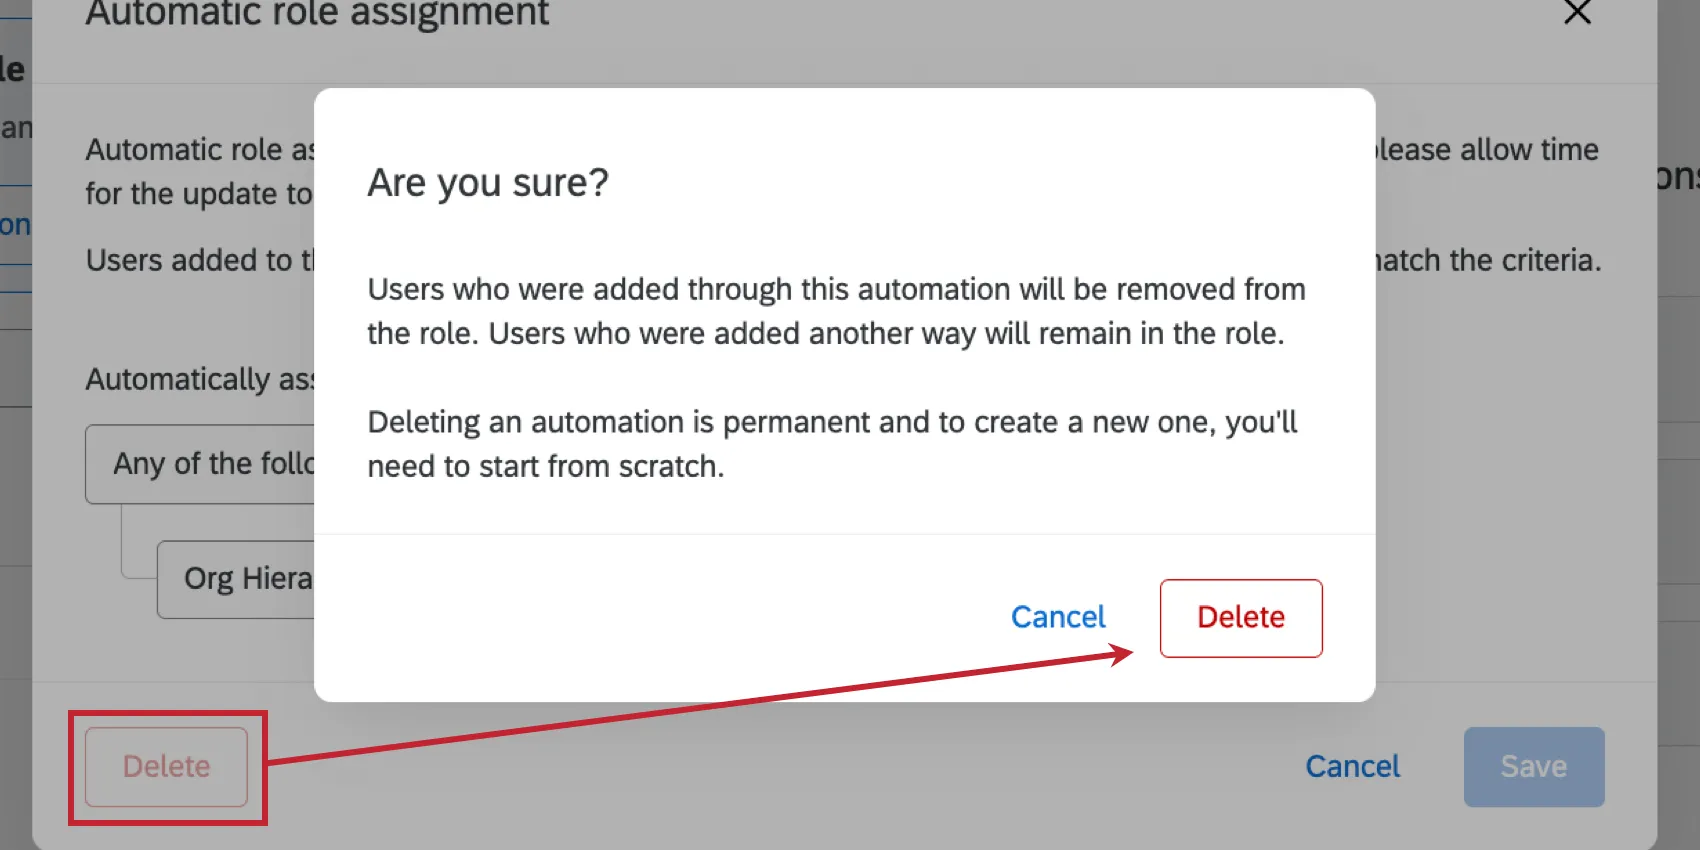
Qtip: While editing the automation, you can delete it by clicking the Delete button. Any participants who were added via the automation will be removed from the role.
Qtip: For Lifecycle projects, pair automatic role assignment with a dashboard user automation, which automatically adds dashboard users to your project from the employee directory. Using both features at once allows you to give permissions to your Lifecycle dashboards automatically based on changes in your organization.
Example: All Human Resource Business Partners (HRBPs) in your organization see onboarding dashboards. You can set up the dashboard participant automation to pull in HRBPs from your employee directory based on a metadata field, such as Role = HRBP. You can then setup an automatic role assignment to pull in all HRBPs into a dashboard role, based on Role = HRBP. When new HRBPs come into your organization, they will automatically be pulled into the lifecycle project and be assigned a dashboard role, which gives them access to the onboarding dashboard.
How automatic role assignment works when the metadata for a single user has multiple values
Some metadata (CX | EX) have multiple values. For example, your Customer Experience team may operate out of several offices. If a metadata attribute has multiple values, it changes how it works with automatic role assignment.
Example: Let’s say you wanted the users listed below to appear in the same ticket group:
- User 1: Country = Australia
- User 2: Country = USA
You can add 2 conditions to your ticket group joined by “Any” to add these users to the same group.
You can also create multiple ticket groups, so that a user with multiple values is assigned a different ticket group for each value. In this case, you would create an Australia ticket group and a USA ticket group.
Let’s say your users are:
- User 1: Country = Australia::USA
User 2: Country = Australia
If you created an Australia ticket group, you would use in instead of "equals" to make sure both users are included. On the other hand, if you made the ticket group’s condition “Country equals Australia,” then User 1 would not be added to the ticket group because their Country value is “Australia::USA,” not just Australia.
Additional resources for creating auto-enrollment conditions
For more information on how to create and combine conditions, see the following resources:
Role Options
Searching a Role
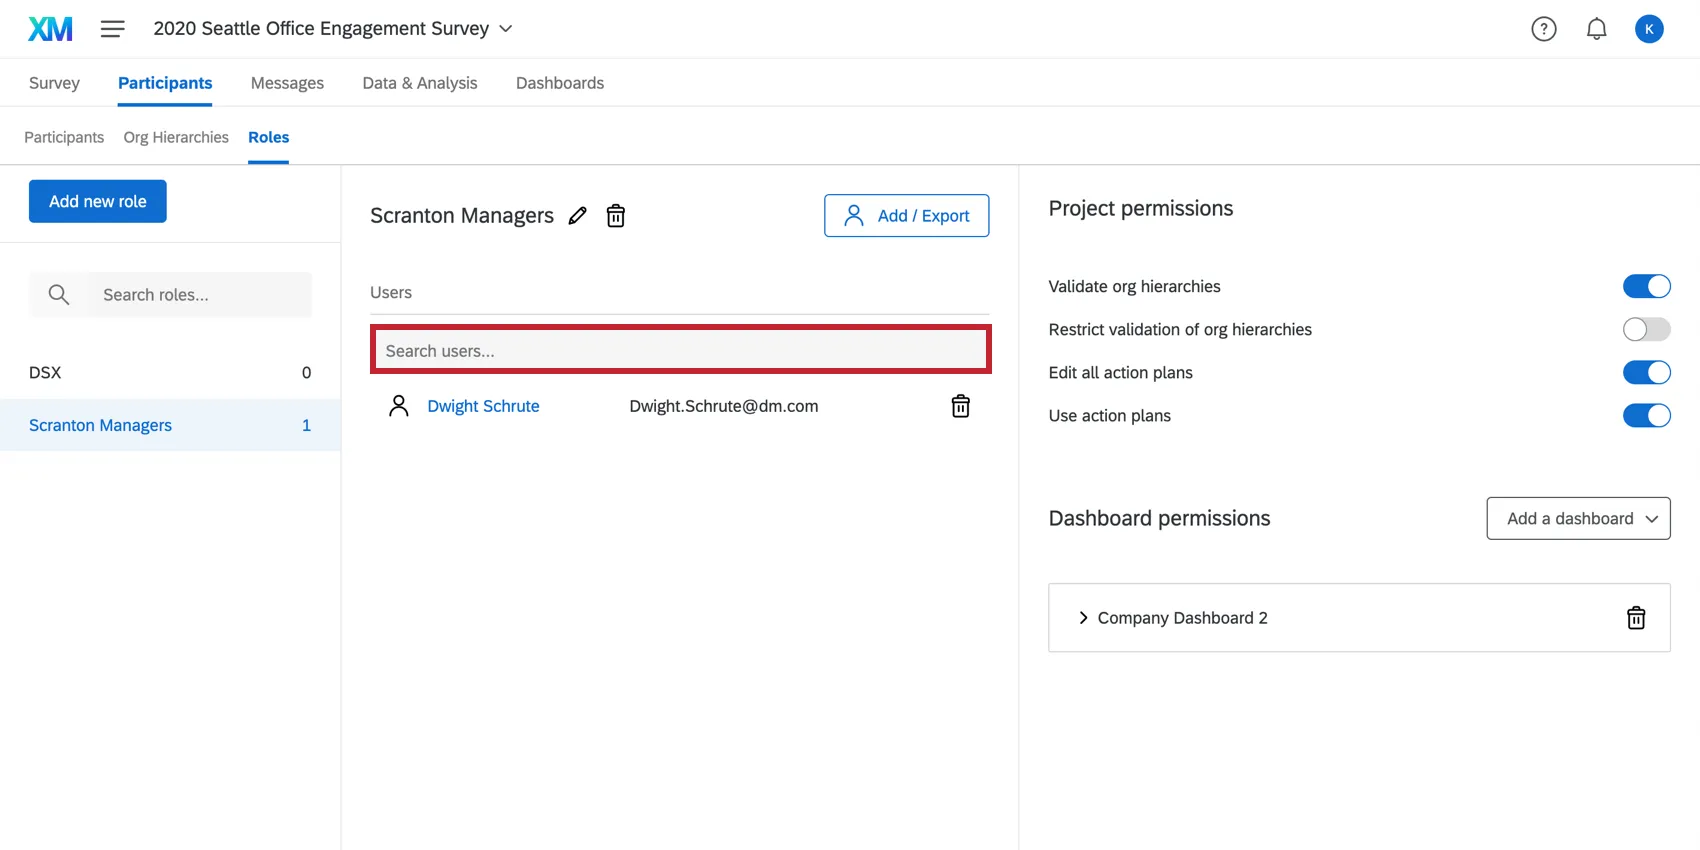
If your role contains many participants, you can use the Search bar above a role to search for a participant within the role. You will only be able to search by the participant’s name or email.
That's great! Thank you for your feedback!
Thank you for your feedback!