
Project Settings (Designer)
What's on this page
About Project Settings
Project settings allow you to modify different aspects of your project, such as project details, attributes, user permissions, and more. To customize project settings, follow these steps:
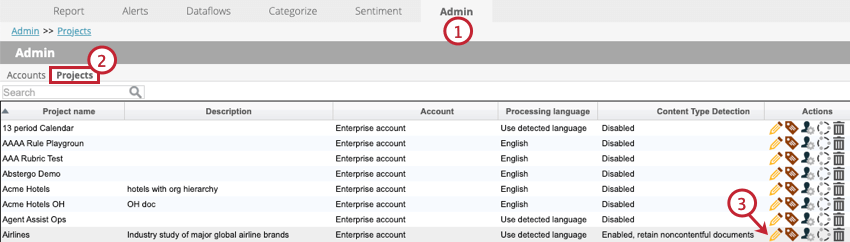
After making any changes to project settings, make sure to press the Save button to save and apply your changes.
Details
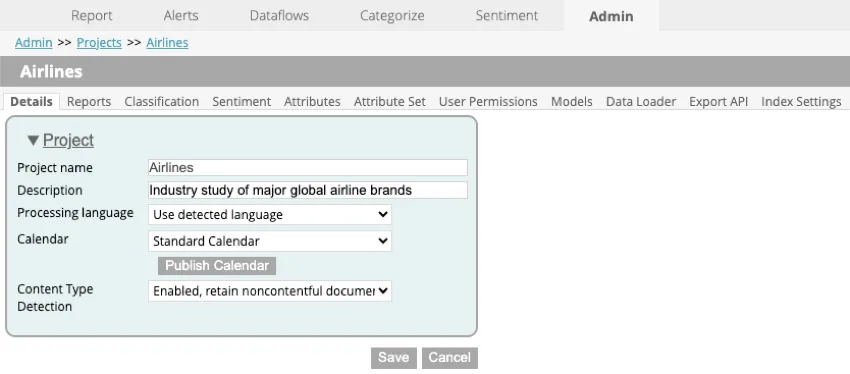
The Details tab lets you configure the following basic project settings:
- Project name: The name of the project. This cannot be changed.
- Description: The description of the project. Click into the textbox to add or edit the description.
- Processing language: The language that will be used while processing the data in your file.
- Use detected language: Select this option if the dataset contains data in multiple languages. Discover will automatically detect the correct language for parsing.
- Specific language: Select a specific language to apply the corresponding syntactical and linguistic rules to the dataset.
- Other: Select this option if the dataset contains data in a language other than the support ones, or contains highly technical text.
- Calendar: The calendar type used for project reports and alerts. To use a custom calendar, select it from the drop-down and click Publish Calendar. See Custom Calendars for more information.
- Content Type Detection: The type of content type detection you want to use. See Content Type Detection for more information and available options.
Attention: The Enable project-wide ad hoc upload has been deprecated.
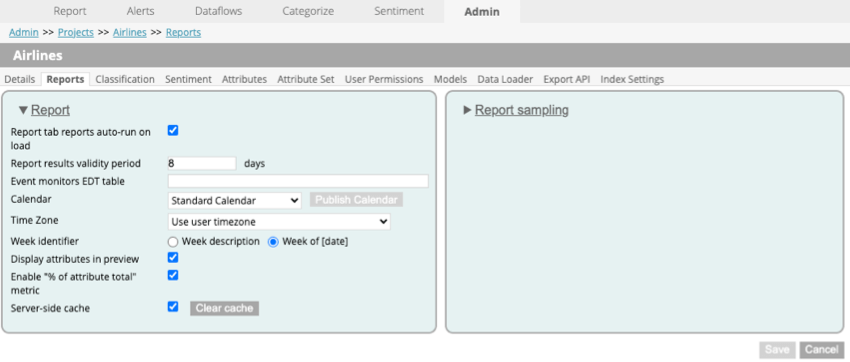
Reports
The Reports tab lets you configure the following reporting parameters:
- Report tab reports auto-run on load: How reports are run when you open the Report tab. Check the box to automatically run reports when you open the Report tab. Qtip: We recommend disabling this option for projects with a large volume of data.

- Report results validity period: The time period after which cached reports results are invalidated and no longer used. See Report Caching for more information.
- Event monitors EDT table: This option has been deprecated.
- Calendar: The calendar type used for project reports and alerts. To use a custom calendar, select it from the drop-down and click Publish Calendar. See Custom Calendars for more information.
- Time Zone: The time zone used for reports. See Time Zone Settings for more information.
- Week identifier: The format in which weeks should be displayed in reports.
- Week description: Select this option if you want weeks to be identified by their description. Example: When using the standard calendar, the week of September 16, 2012, will be identified as W38 2012.

- Week of [date]: Select this option if you want weeks to be identified by their date. Example: The week of September 16, 2012, will be identified as Week of 9/16/12.
- Week description: Select this option if you want weeks to be identified by their description.
- Display attributes in preview: How the attributes panel is displayed. Check the box if you want the panel to be displayed in Source Highlighter. If this option is not checked, the panel will be hidden.
- Enable “% of attribute total” metric: An additional metric. Check the box if you want to see an additional column in reports.
- Server-side cache: How reports are cached. Check the box to cache frequently used reports. This will optimize reports performance. Click Clear cache to clear the application server cache for your project. See Report Caching for more information.
Attention: Report sampling has been deprecated.
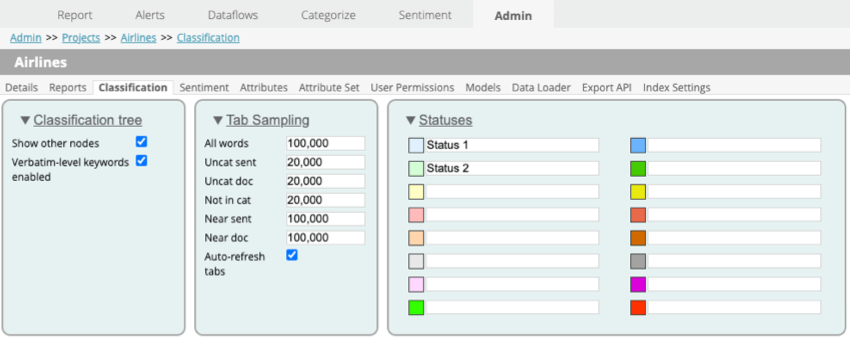
Classification
The Classification tab lets you configure categorization settings.

Classification Tree Settings
In this section you can edit settings for category trees.
- Show other nodes: How other nodes are displayed in category trees. Check the box if you want Local Other and Global Other buckets to be displayed in a category tree. See Uncategorized Data for more information.
- Verbatim-level keywords enabled: The ability to use verbatim-level keywords. Check the box to use verbatim-level keywords in your rules. For more information see Verbatim-Specific Rules.
Tab Sampling Settings
In this section you can set the number of sentences for each word tab used in category rules. Type a number into the text box next to each type of tab to set the number.
Check Auto-refresh tabs to force the automatic refresh of Uncat doc, Near sent, and Near doc tabs. When this setting is applied you do not need to manually refresh these tabs.
Statuses
In this section you can add custom titles for node statuses. Click the text box next to a status to add or update the title. For information on how these status titles will be shown in category trees, see Editing Category Models.
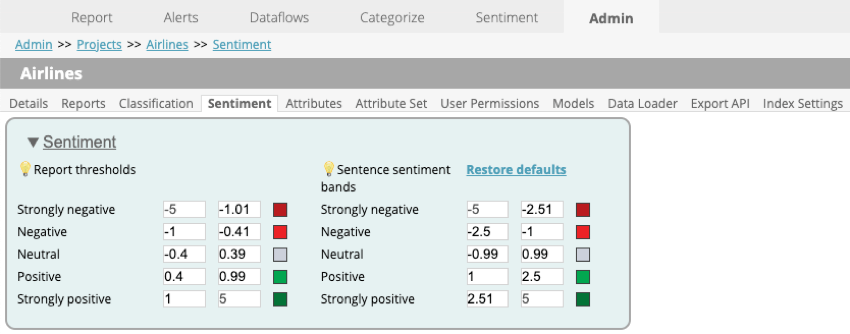
Sentiment
The Sentiment tab lets you configure sentiment settings. Click into the text box next to a sentiment and enter a numeric value to change the threshold. To restore default values, click Restore defaults.
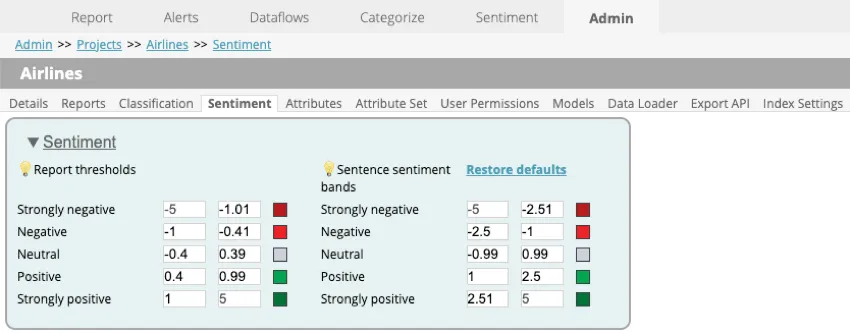
Attention: As of August 14, 2019, changes to sentiment thresholds made in Designer are no longer reflected in Studio widgets. To change sentiment bands, edit the sentiment metric in Studio instead of within Designer project settings.
- Report thresholds: Define sentiment breakdown thresholds for report measurement units such as topics, attributes, or words displayed in reports.
- Strongly negative: The default values are from –5 to –1.01
- Negative: The default values are from –1 to –0.41.
- Neutral: The default values are from –0.4 to 0.39.
- Positive: The default values are from 0.4 to 0.99.
- Strongly positive: The default values are from 1 to 5.
- Sentence sentiment bands: Define sentiment breakdown thresholds for words and sentences displayed in preview.
- Strongly negative: The default values are from –5 to –2.51.
- Negative: The default values are from –2.5 to –1.
- Neutral: The default values are from –0.99 to 0.99.
- Positive: The default values are from 1 to 2.5.
- Strongly positive: The default values are from 2.51 to 5.
Attributes
The Attributes tab lets you manage structured attributes for a project. See the linked pages below for more information on managing attributes.
Attribute Set
The Attribute Set tab lets you manage attribute sets within projects. In this tab you can create, edit, and delete attribute sets. For more information, see Managing Custom Attributes.
User Permissions
The User Permissions tab lets you manage permissions for users. For more information and instructions on assigning roles and permissions, see User Roles & Permissions.
Models
The Models tab lets you manage user permissions for category models. For more information, see User Roles & Permissions.
Data Loader
The Data Loader tab lets you configure settings for the data mapper. For more information, see Data Loader.
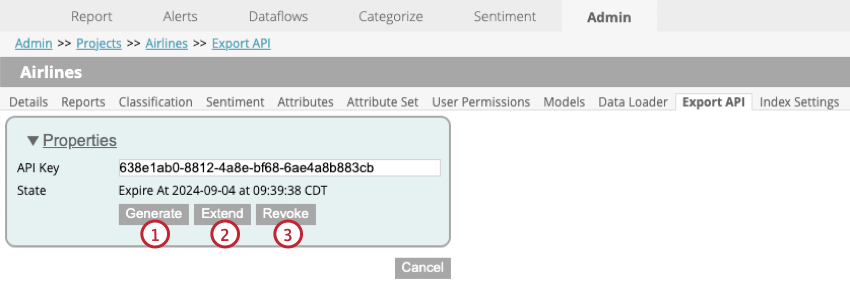
Export API
The Export API tab lets you manage the Export API key required for authentication. You can view the current API key, if there is one, as well as its expiration date.
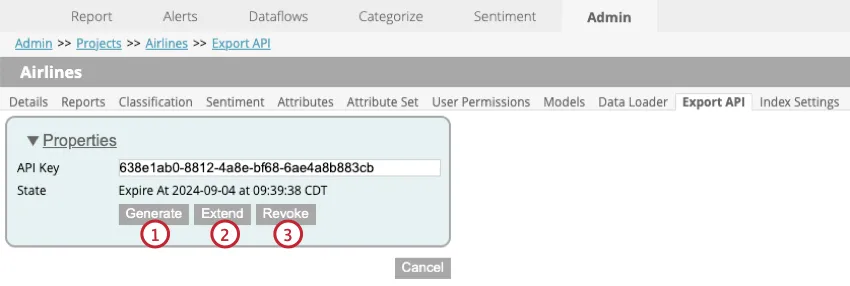
In this tab you can perform the following actions:
Qtip: This will extend the expiration by 1 year. The farthest away an expiration date can be is 1 year from the current date and time.
Attention: Revoking the current key can take several minutes.
For more information, see the API documentation.
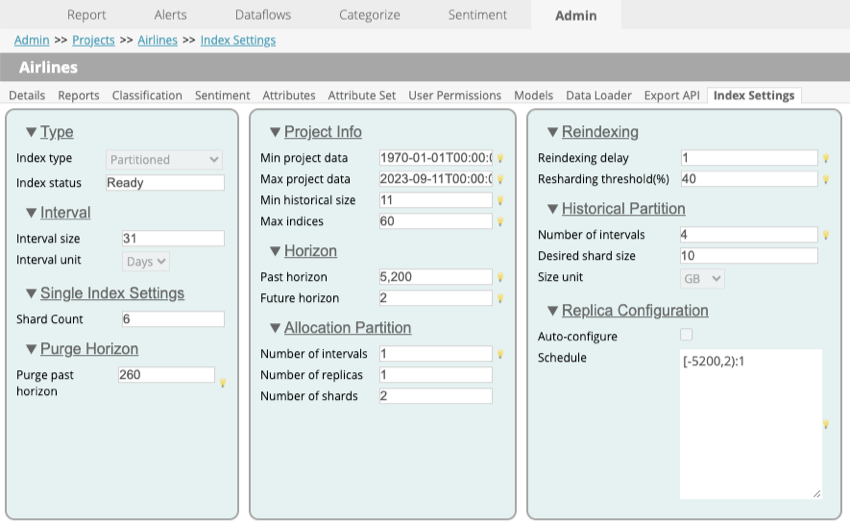
Index Settings
Attention: Adjusting index settings will only affect reporting in Studio.
Attention: To enable partitioned index, please reach out to your account owner.
Indexes can be enabled for your project data to speed up reporting in Studio. When partitioned index is enabled, separate index partitions are automatically created based on the defined interval. This allows Studio to retrieve data from a smaller, more robust index based on widgets’ date ranges.
That's great! Thank you for your feedback!
Thank you for your feedback!