
Transform Task
What's on this page
About the Transform Task
The Transform task allows you to edit and validate your raw data into a compatible, simplified document. Data transformation can help unify your datasets automatically in order to export into the format that you’d like to send to your partners and teams.
Qtip: This task is formerly known as the "Basic Transform" task.
Setting Up a Transform Task
Qtip: This task is only compatible with ETL workflows. For information on general limits that apply to ETL workflows, see Workflow Limits. For any task-specific limits, refer to the information on this page.
Follow these steps to set up a Transform task:
Click the navigation menu in the top left.
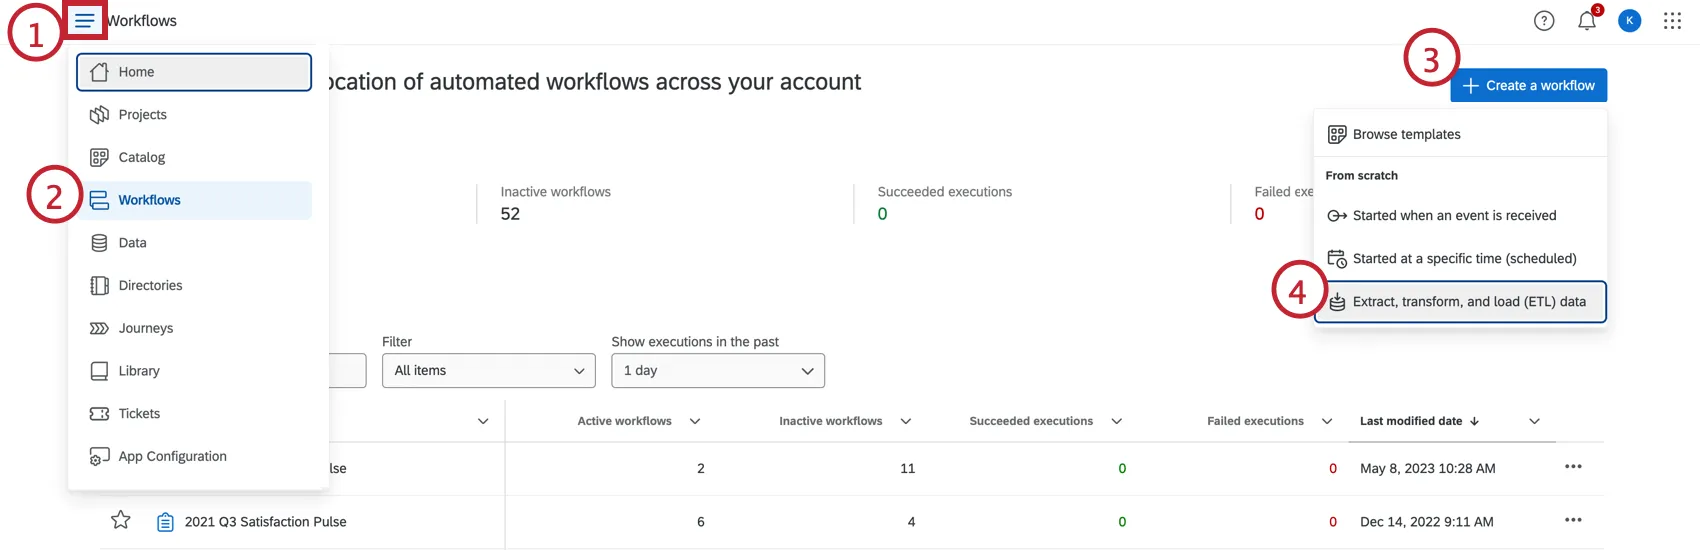
Choose Workflows.
Click Create a workflow.
Click Extract, transform, and load (ETL) data.
If desired, rename your workflow by clicking the workflow name at the top.
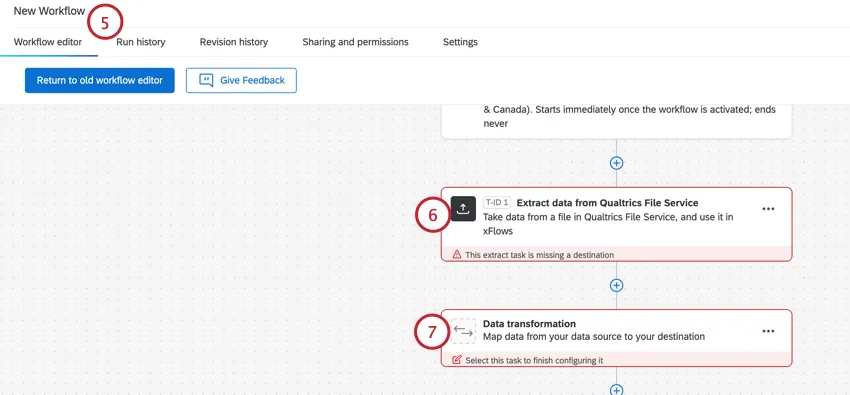
Setup your extractor task. This task will provide the data that will be transformed in this workflow. For instructions on setting up extractor tasks, see Building ETL Workflows.
Click Data transformation.
Select the Transform task.

Choose the data source from the dropdown.
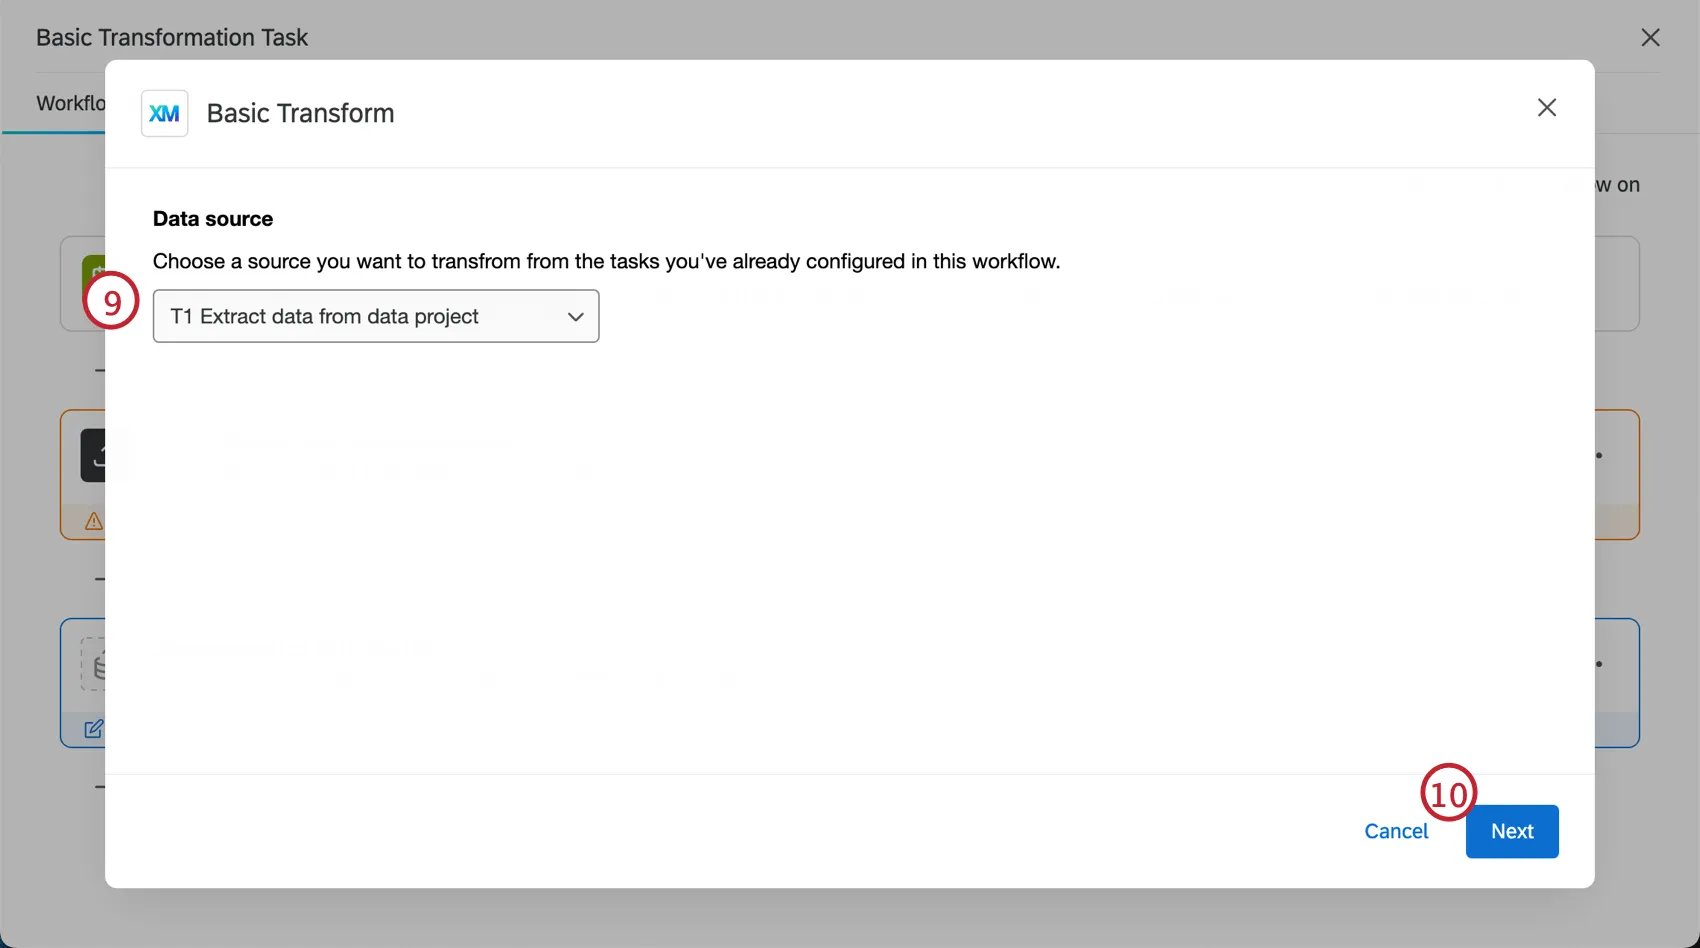
Click Next.
Edit the fields from your extractor task. There are four main elements for each field:
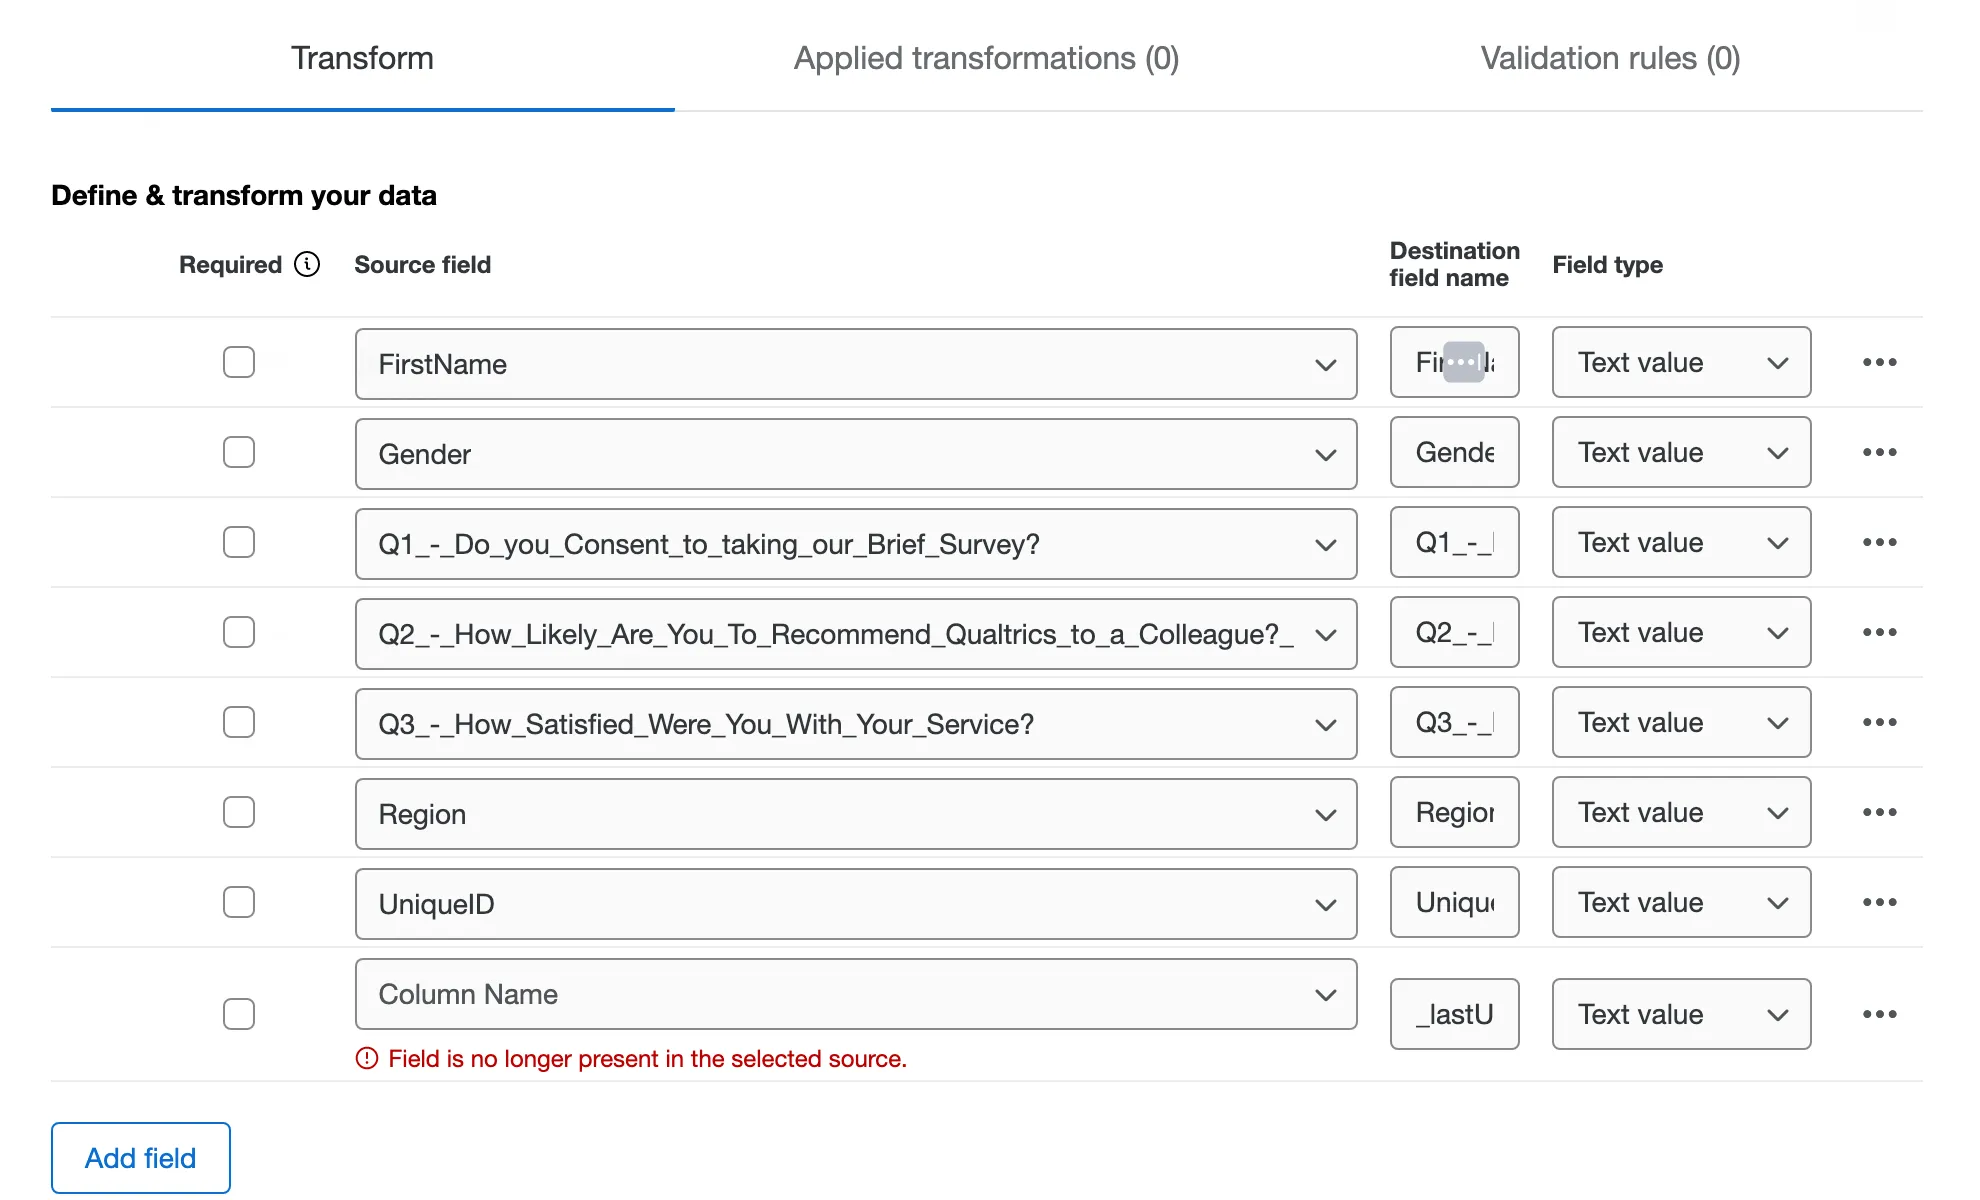
- Required: Select the checkbox next to the field if data is required. If the field is checked and there is no data in that field, it will be skipped.
- Source field: All of the fields from the file in the extractor task. When you add a new field, select which column to pull the data from via the dropdown.
Destination field name: How the field names will look in the transformed dataset. If you would like to rename fields from the source file, edit the name in this column.

Attention: Destination field names have a limit of 100 characters.
- Field type: How the extracted data will be interpreted in the transformed dataset. The field type determines which transformations operations are available.
Attention: When your extractor task extracts conversation data, there will be a source field called “transcriptContent” with a Qualtrics Conversational Format field type. Any fields with this field type cannot be transformed.
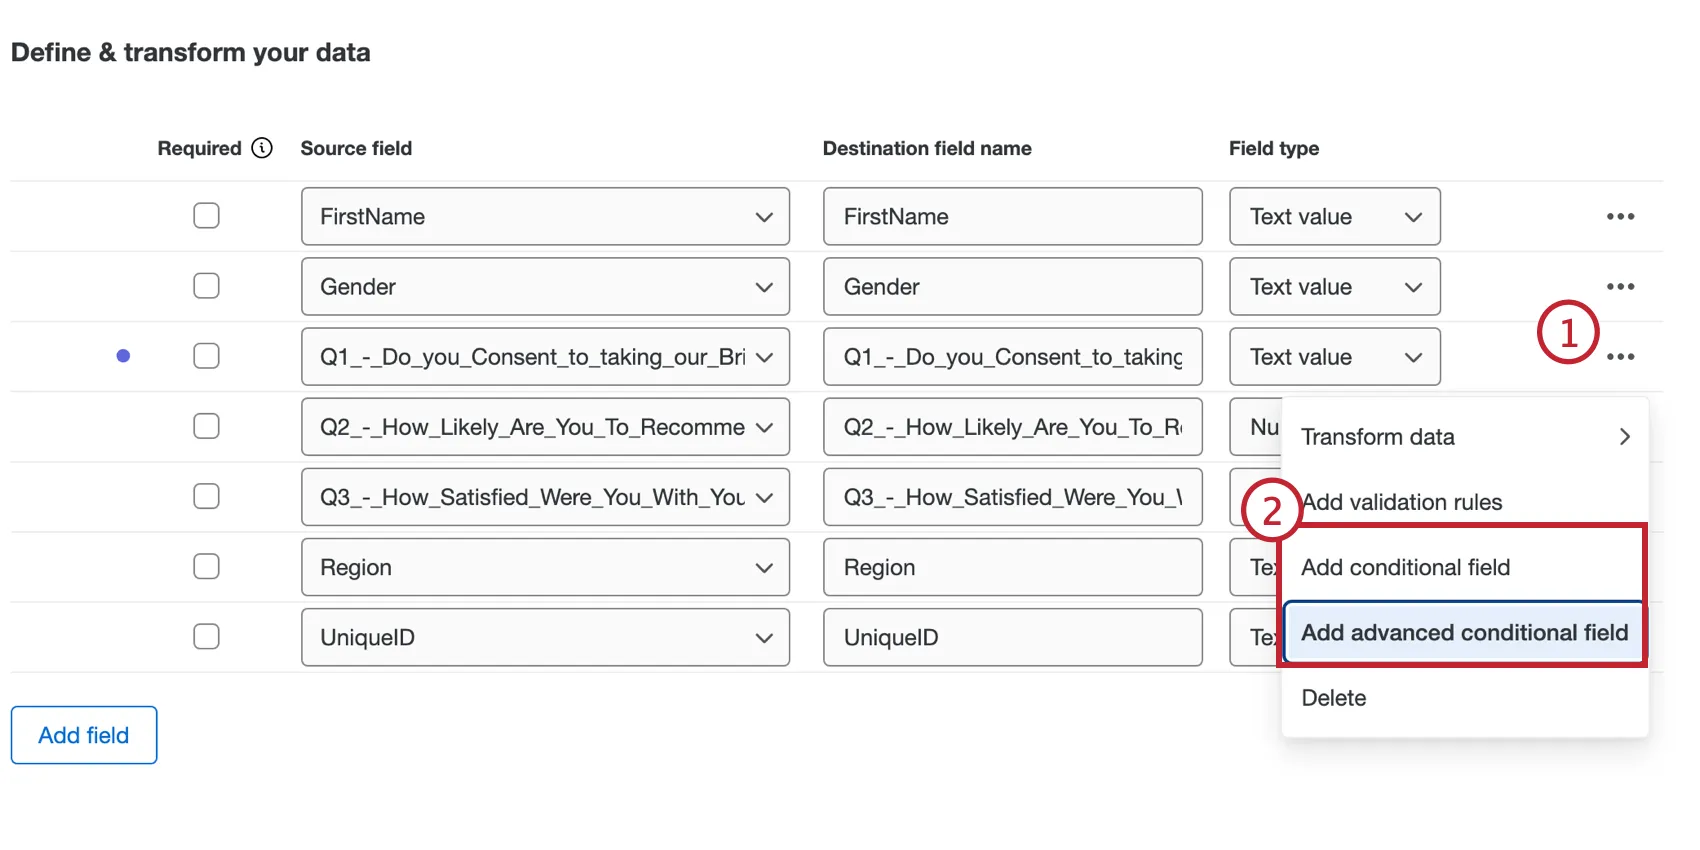
Click the three dot menu on the right to transform your data, add validation rules, add conditional fields, or delete that field from the dataset. For more information on these options, see the sections below.
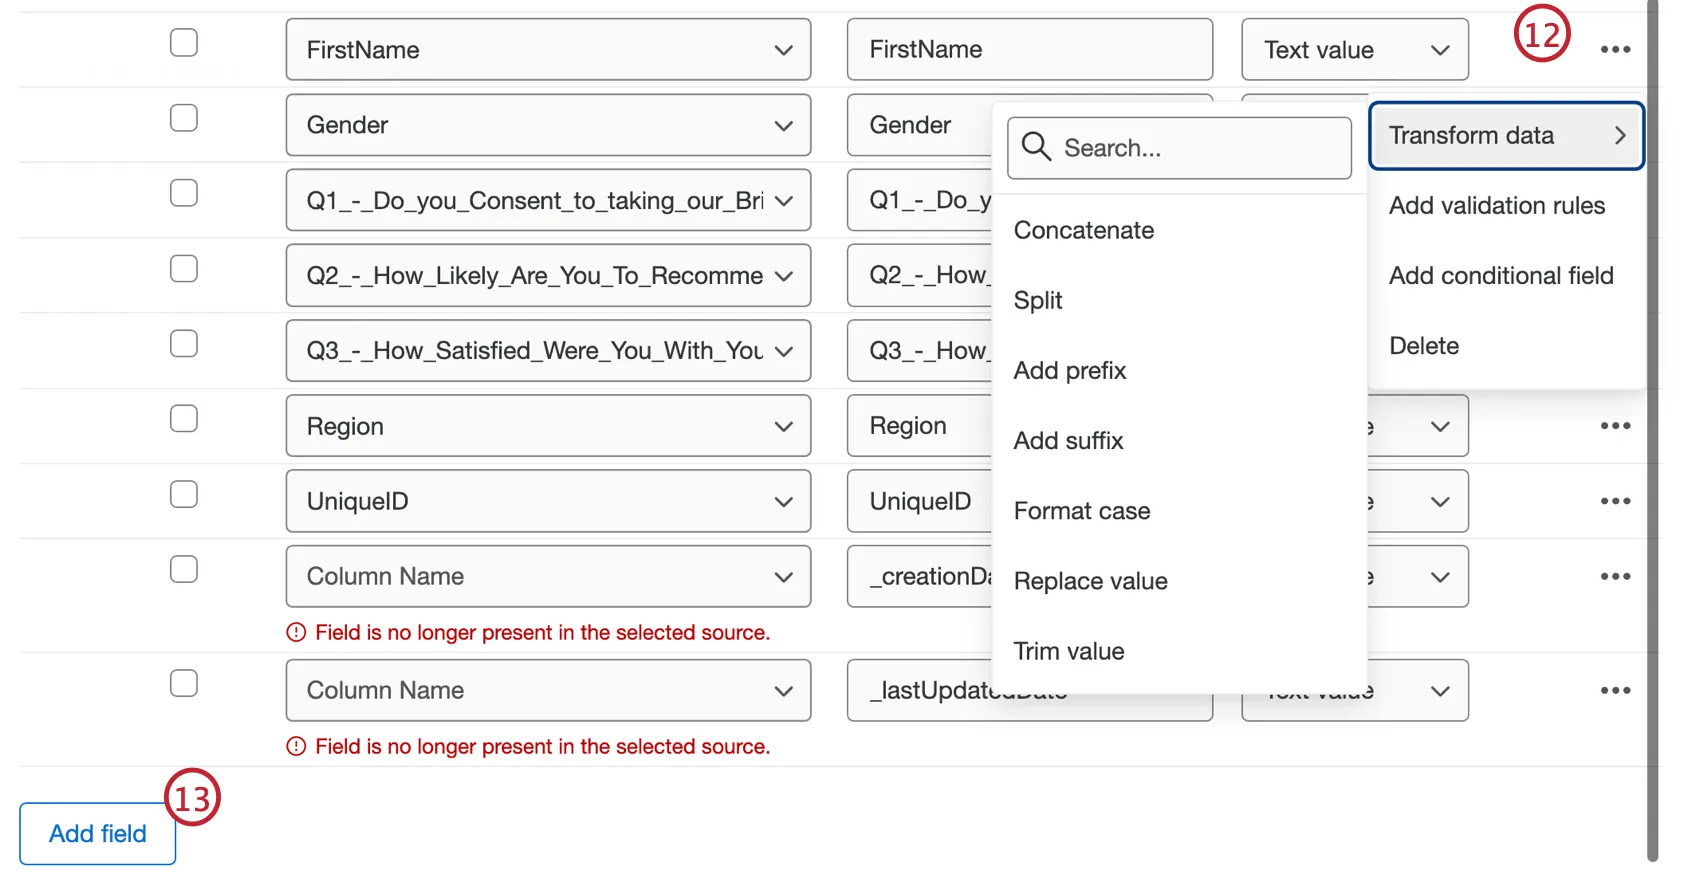
If you would like to add an additional field to the dataset, click Add field.
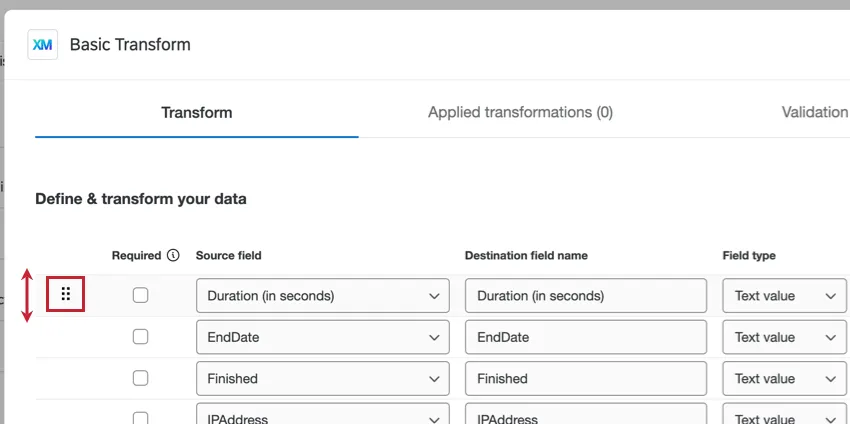
Qtip: You can reorder your fields by hovering your mouse to the left of the field’s name, clicking the icon that appears, and then dragging the field. Reordering fields with the Transform task is the only way to guarantee the order of fields in ETL workflows.
Review all of your transformations in the Applied transformations tab. For more information on each transformation, click on a transformation. Click the three dot menu to edit or delete.
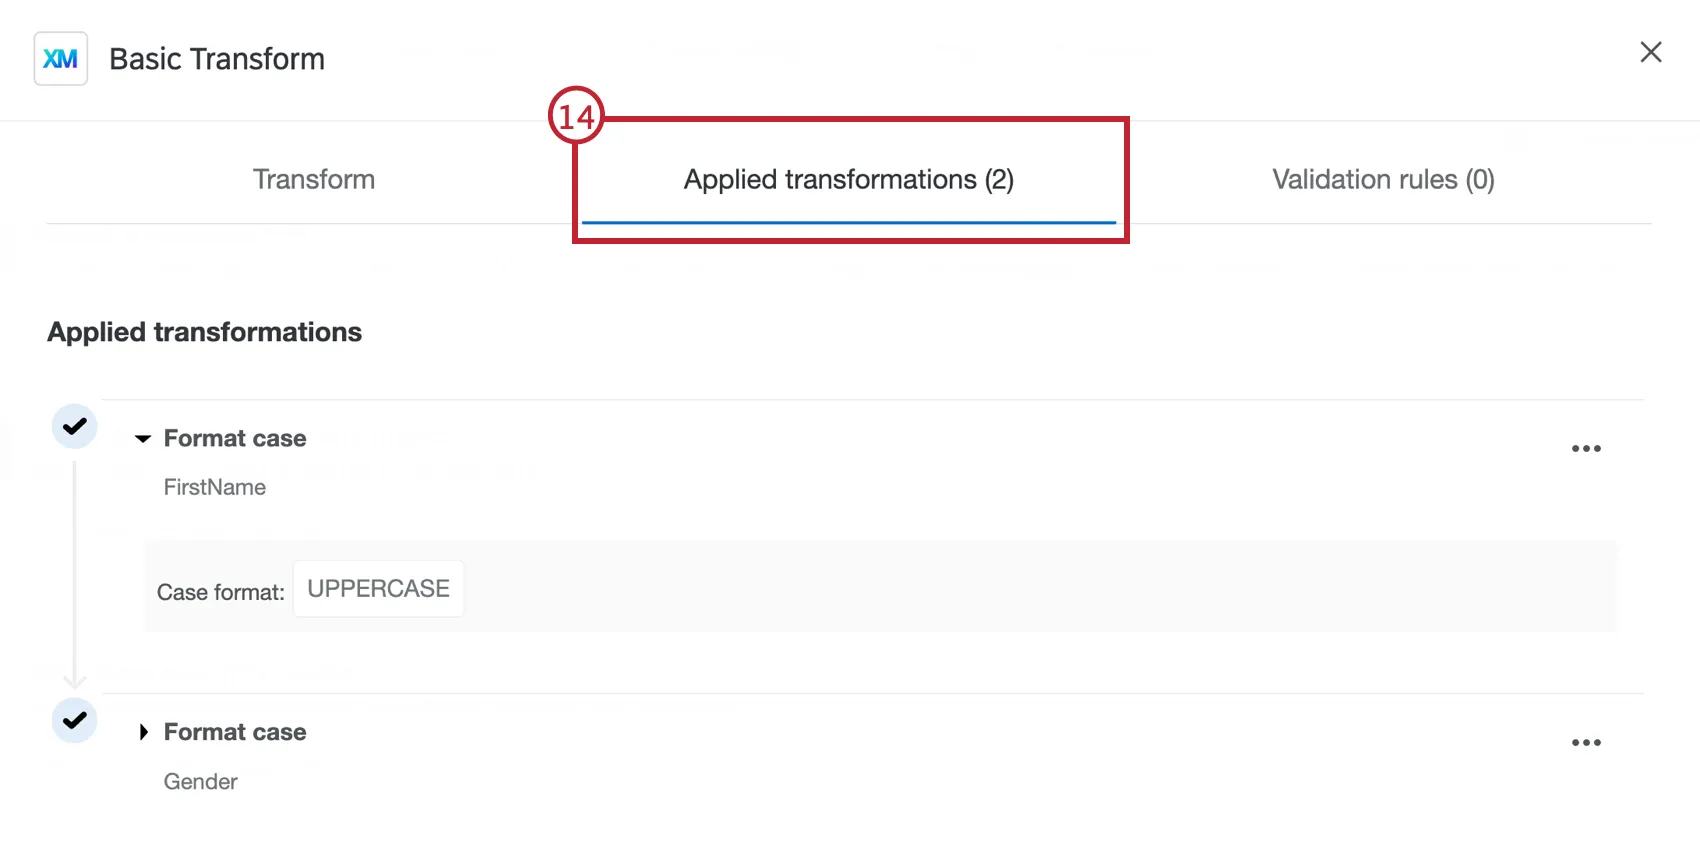
Qtip: The operations are carried out in the order that they appear in the applied transformations tab, which is the order in which they are configured. If multiple operations are set up on the same field, subsequent operations will be calculated on the results of previous ones.
Review all of your validation rules in the Validation rules tab. For more information on each validation rule, click on a validation rule. Click the three dot menu to edit or delete.
Click Next.
Review the summary of your transformations and validations. Click Save when ready.
Qtip: If the transformation encounters an error (like invalid formatting for a field), then all subsequent operations in that row will be skipped.
Data Transformation
The transformation operations available for your field depends on the destination field type.
The following transformations are available for text value, text set, and open text fields:
- Add prefix: Add text to the front of each value.
- Add suffix. Add text to the end of each value.
- Concatenate: Combine values from multiple fields together.
- Format case: Apply a case format (e.g. UPPERCASE) to all values in the field.
- Map Value: Map input values to specified outputs based on matches, with an optional default for unmatched values.
- Replace value: Find and replace values in the field.
- Split: Split the original field into multiple fields that are separated by a delimiter.
- Split by number of characters: Split the text into two fields by specifying the number of characters from the beginning or end.
- Substring transformation: Create a substring of the text in the field by specifying the start and end indexes.
- Trim value: Remove specified strings or whitespace from the beginning, end, or both ends of the text in the field.
The following transformations are available for multi-valued text set fields:
- Add prefix: Add text to the front of each value.
- Add suffix: Add text to the end of each value.
- Concatenate: Combine values from multiple fields together.
- Format case: Apply a case format (e.g. UPPERCASE) to all values in the field.
- Replace value: Find and replace values in the field.
- Split: Split the original field into multiple fields that are separated by a delimiter
Qtip: Transformations on multi-valued text set fields are only compatible with CSV files, which use commas as delimiters. If the multi-value field contains a comma, it must include a backslash ( \ ) to maintain the correct format. For example, if you have 2 fields of data that contain commas (e.g. Doe, John and Doe, Jane), this would be interpreted as 4 separate fields with transformations added to each (e.g. Doe, John, Doe, Jane). By adding a backslash to the comma in each value, the data isn’t separated and transformations are added to 2 fields (e.g. Doe\,John and Doe\,Jane).
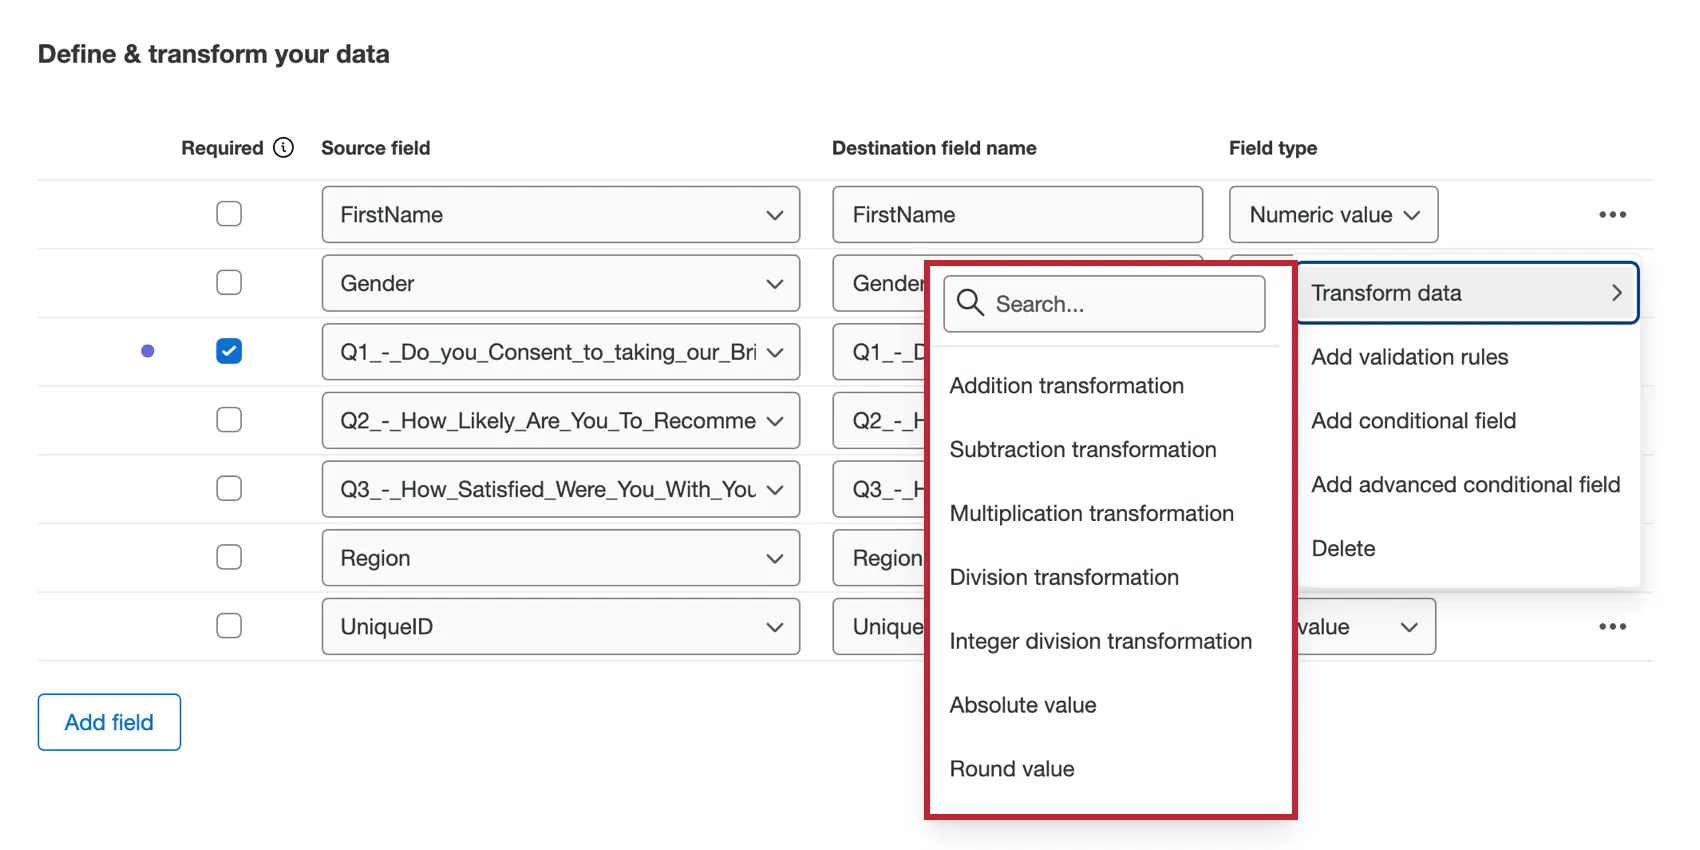
The following transformations are available for number value and number set fields:
- Absolute value: Get the absolute value of each value in the field.
- Addition transformation: Add a value to each number in the field or add two fields together.
- Average of values: Take the average of values in selected fields for each response.
- Division transformation: Divide each number in the field by a value or divide one field from another.
- Integer division transformation: Divide each number in the field by a value or divide one field from another. Only returns the whole number (integer).
- Maximum of values: Take the maximum of values in selected fields for each response.
- Median of values: Take the median of values in selected fields for each response.
- Minimum of values: Take the minimum of values in selected fields for each response.
- Multiplication transformation: Multiply a value to each number in the field or multiply two fields together.
- Round value: Round all values in the field either up or down.
- Subtraction transformation: Subtract a value to each number in the field or subtract one field from another.
- Sum of values: Take the sum of values in selected fields for each response.
The following transformations are available for date fields:
- Date calculation: Returns how much time has passed between current source date and another date.
- Day of the week transformation: Determine the day of the week from the current source date.
- Date/time offset: Offset date/time with a specified time value. For example, you could could provide the date for 5 days after an interaction.
Qtip: When using offset, 1 day in the future and 1 day in the past are both considered to be today.
Qtip: Our system uses the UTC time zone. All date calculations and offsets will be based on UTC.
When entering a custom date / time format, these are your formatting options:
- Year: yy, yyyy
- Month: M, MM, MMM, MMMM
- Day: d, dd
- Day of year: DDD
- Hour of half day: K, KK
- Hour of day: HH
- Minute: m, mm
- Second: s, ss
- Fractional second: S, SS, SSS
- Time zone offset: ZZZZ, ZZ:ZZ (can include +/-)
- Half day of day: a
- Day of week: E, EE
- Time zone format: z
Qtip: A month is treated as 30 days.
Data Validation
Adding validation rules allows you to create criteria and conditions that ensure the data in your fields has the same format. For example, you may want to eliminate any records with an invalid email address.

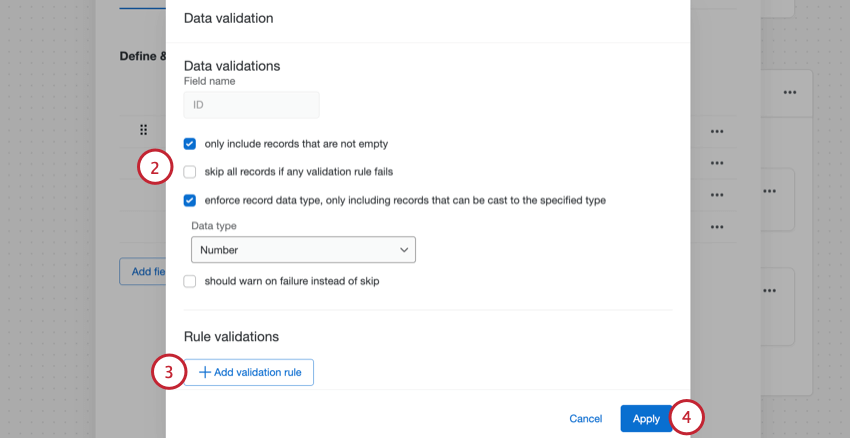
- Only include records that are not empty: Enable this option if you would like to omit the response if the selected field is empty. This setting does the same thing as the Required column in the transform table.
- Skip all records if any validation rule fails: If any data validation rules fail, then all records will be skipped.
- Enforce record data type, only including records that can be cast to the specified type: Only include records that have a specific data format. For example, for a text value, you can select if that data should be a number or text format. If you enable this option, a second option becomes available:
- Should warn on failure instead of skip: Enabling this option will include records that do not meet the validation criteria in the dataset. A warning will be displayed in the row report indicating that the response failed this rule. Leaving this unchecked will skip the record so that it is not included in the new dataset. You cannot select this option if you also enabled “skip all records if any validation rule fails.”
VALIDATION RULES
You can add validation rules to conditionally validate the data in your field. For more information on building conditions, see Basics of Building Conditions.
Select what will happen to the record upon condition failure. You can choose to either skip the record so that it is not included in the dataset or include it with a warning.
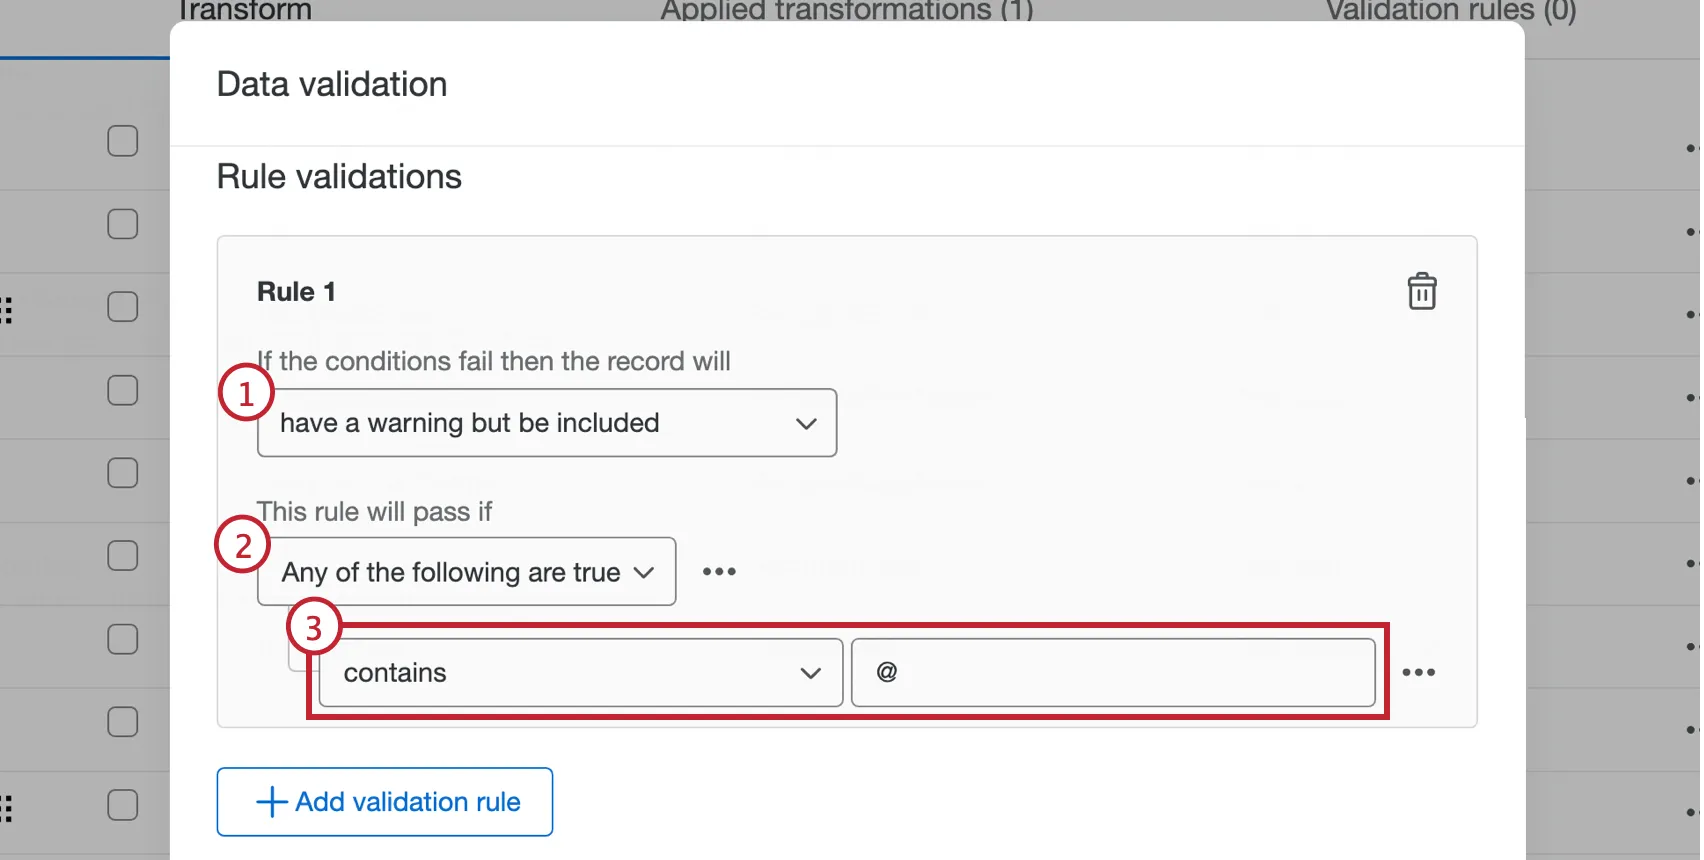
Indicate whether all or any of the rules need to be true in order to validate the condition.
Create your condition using the operator dropdown and textbox. This determines what the record in this field needs to satisfy in order for the condition to pass.
Qtip: To create another condition or delete an existing condition, click the three dot menu on the right.
Add another validation rule, if you’d like.
Qtip: Click the trash can to delete a validation rule.
Click Apply.
Conditional Fields
Conditional fields are created by setting up logic conditions that use other fields to determine how the field is created. Add a conditional field from the 3 dot menu to the right of the source fields. For more information on building conditions, see Basics of Building Conditions.
CONDITIONAL FIELD
A conditional field creates a new field based on a single logic condition.
Example: Let’s say you want to create a field for “Consenter” or “Non Consenter” based on how respondents answer the question: “Do you consent to taking this survey?” You can create conditional field with the logic: If “Yes” is selected, then the value is “Consenter”.
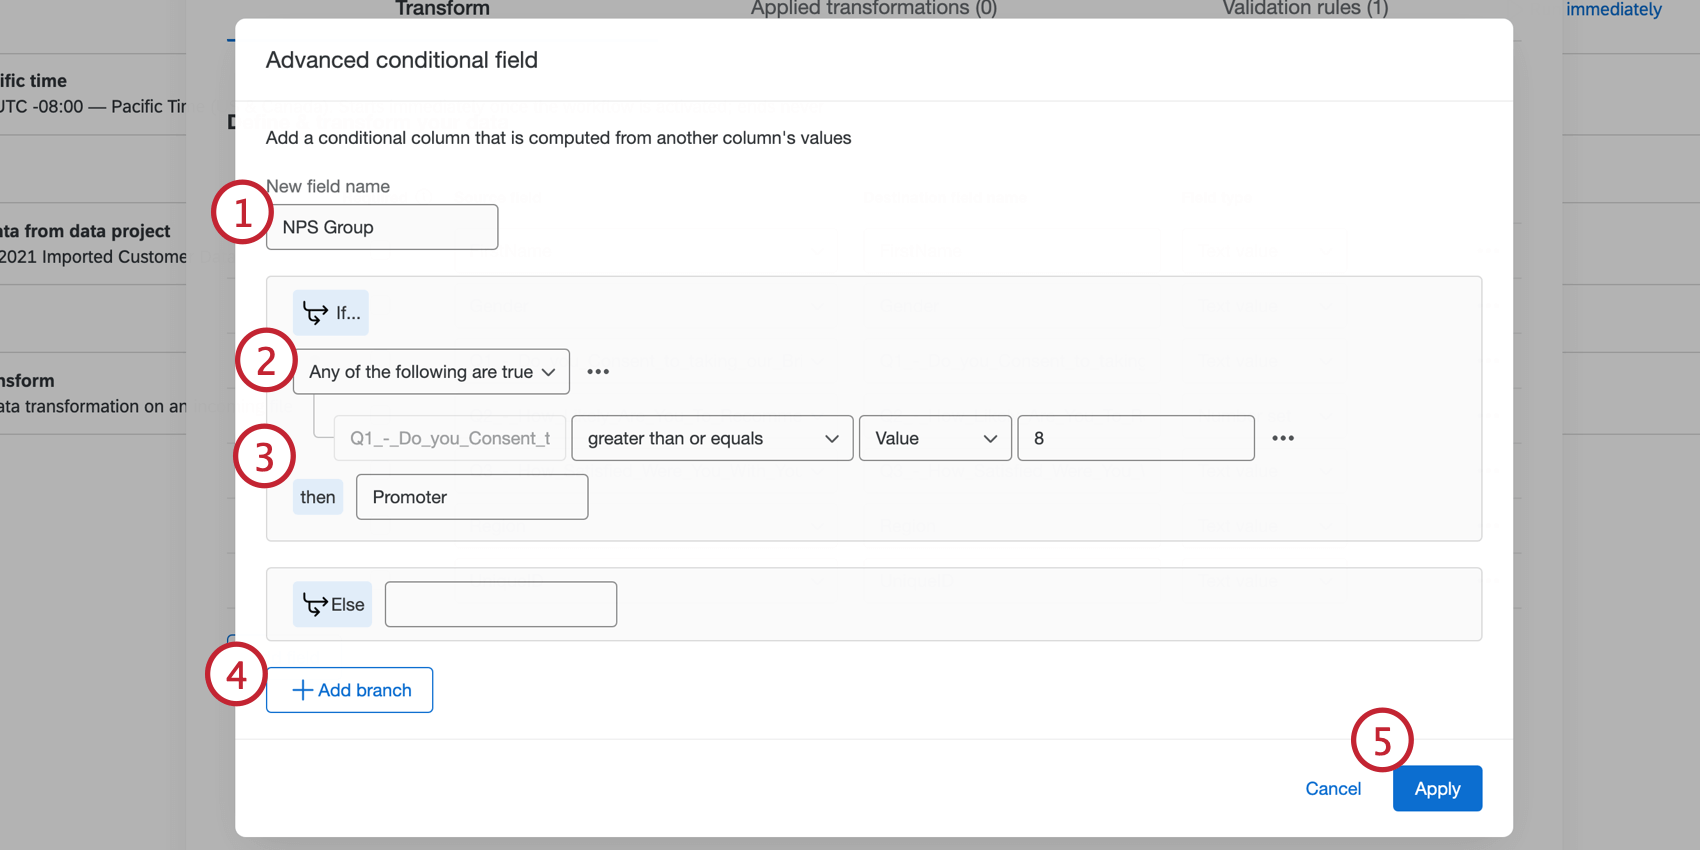
Enter the New field name.
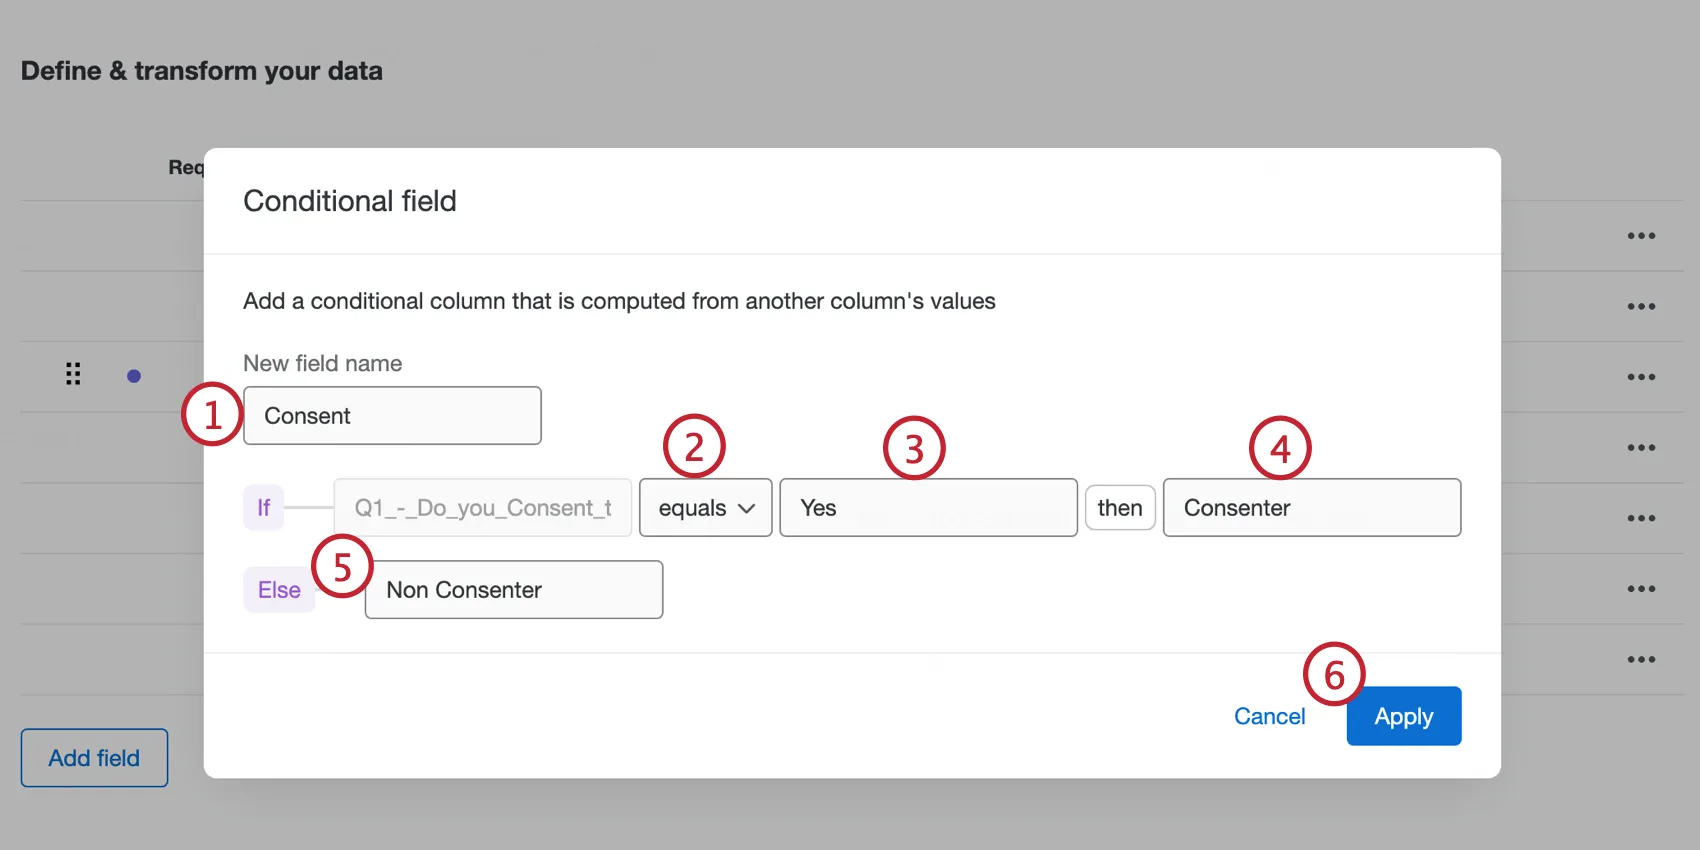
Choose an operator for your condition.
Enter the value to determine how the condition is met.
Enter what will be returned if the rule created in steps 2 and 3 is true.
Enter what will be returned if the rule created in steps 2 and 3 is false (otherwise known as the "Else" value).
Click Apply when finished.
Qtip: The "Contains" operator will always produce the "Else" value if the provided value and input fields are both numbers. If you'd like these values to be treated as text, then use an Advanced Conditional field instead.
ADVANCED CONDITIONAL FIELD
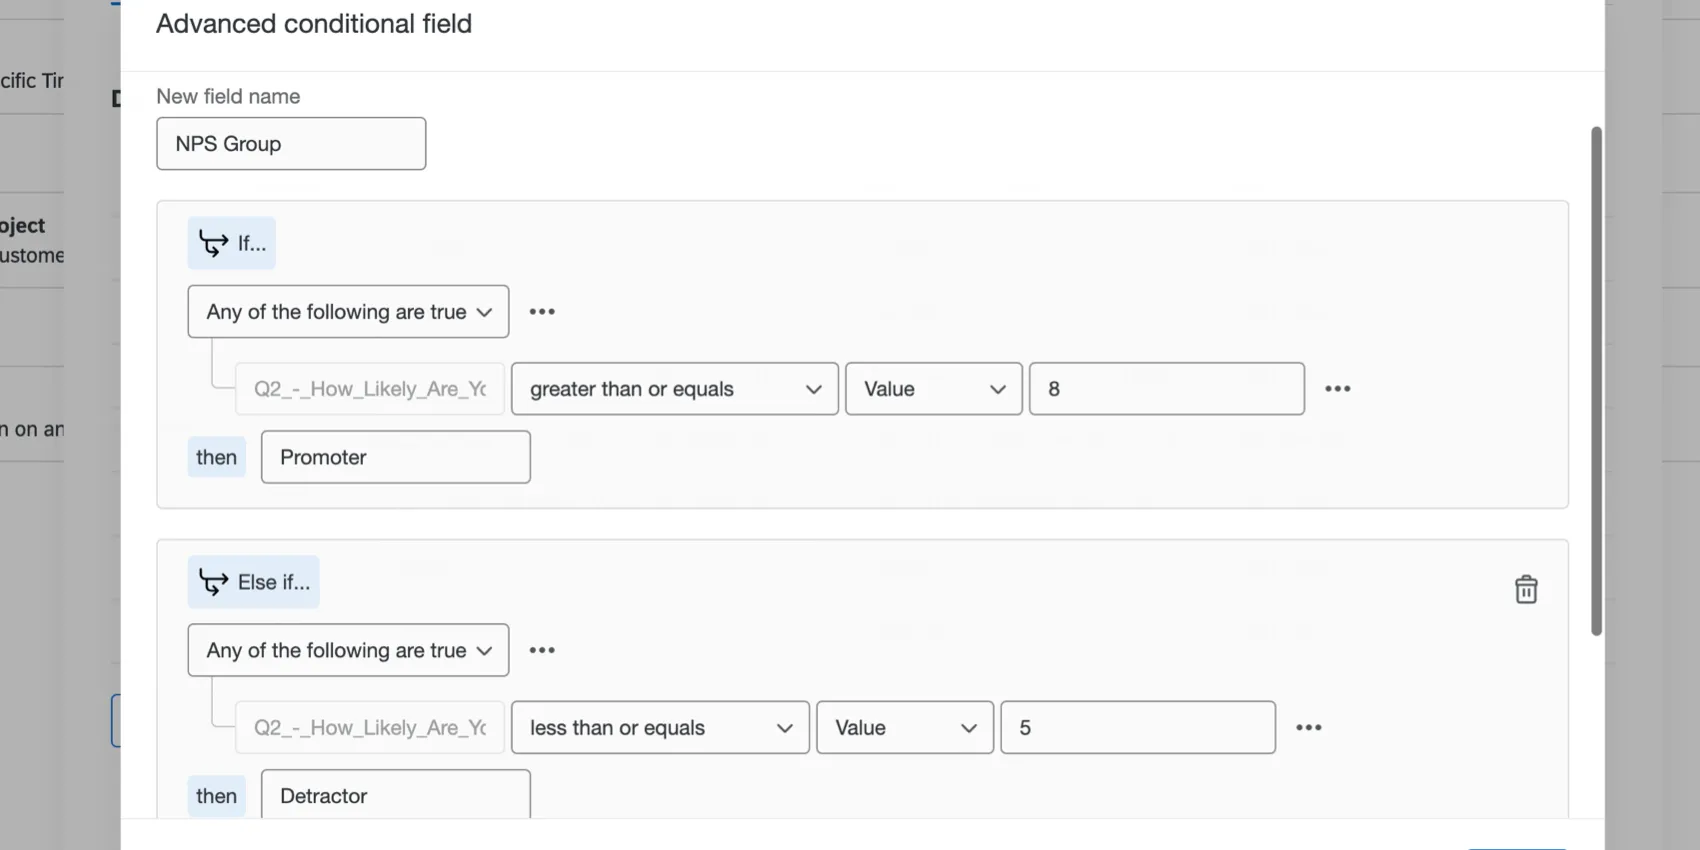
An advanced conditional field creates a new field based on multiple logic conditions or condition sets.
Qtip: There is a limit of 15 branches.
Example: Let’s say you want to create a field for “Promoters” or “Detractors” based on how respondents answer your 10 point satisfaction question. Create an advanced conditional field with the logic: If Q2 is “greater than or equal to 8” then the value is “Promoter”, but if Q2 is “less than or equal to 5” then the value is “Detractor”.
Transformed File and Reports
The Transform task generates the transformed file along with 2 reports to help you understand your transformed dataset. In the Run History tab of your Workflow editor, click the Transform task within the workflow run to see the files on the right side. These files can be exported by clicking the download icon to their right.
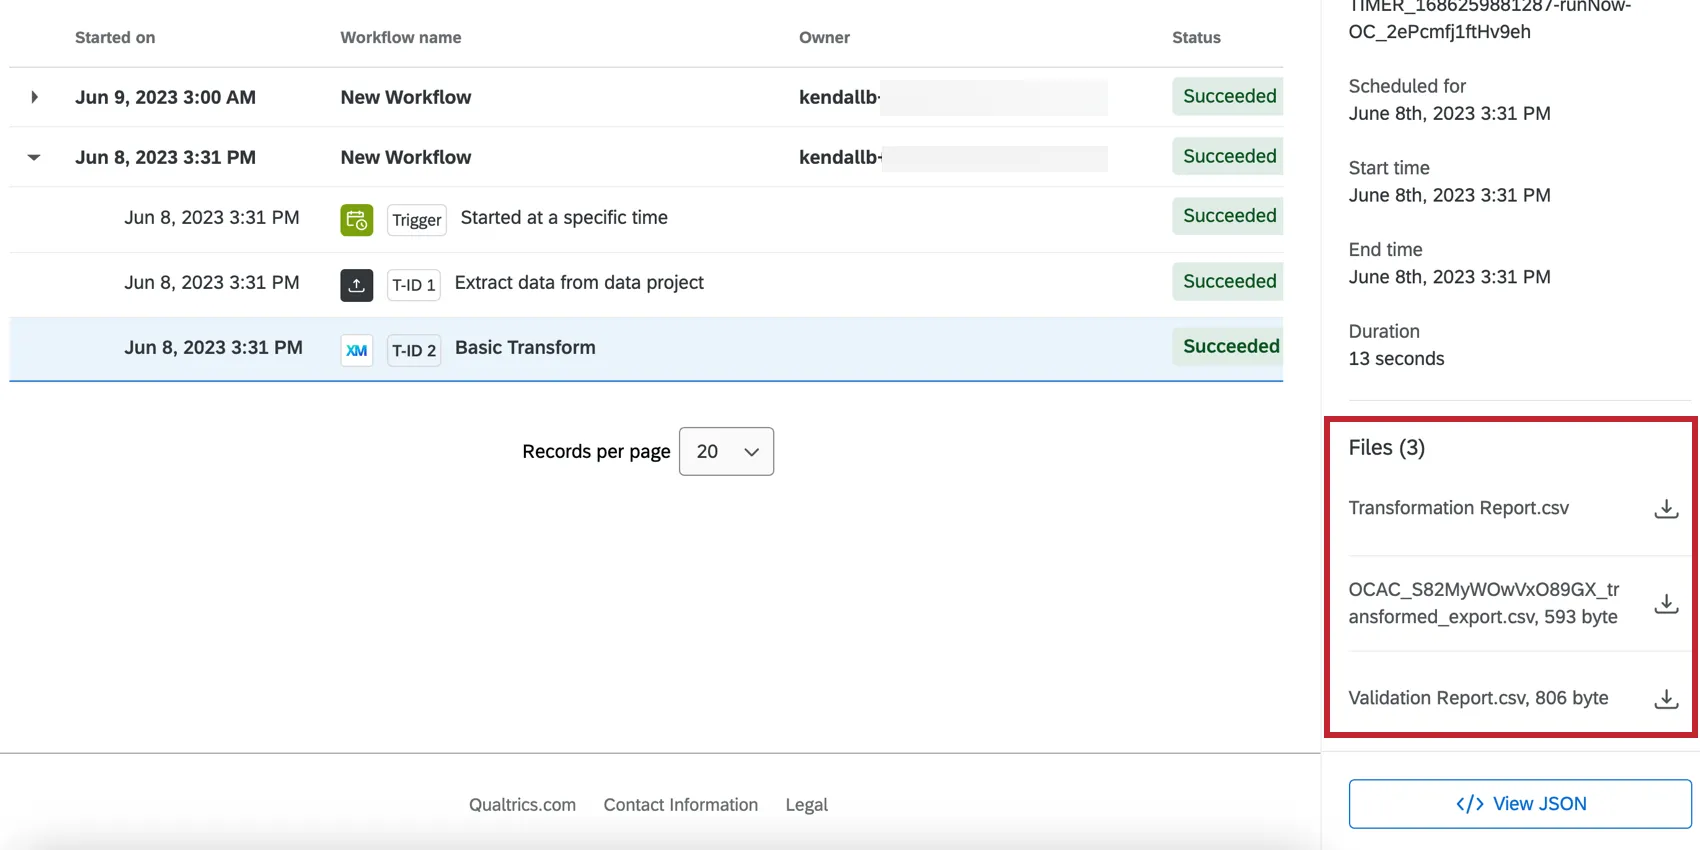
- Transformation Report: All of the transformations that were carried out on records in the source file and other details such as their name, row number, status, failure reason, and more.
- Transformed File: The result of the data transformation containing the new dataset with all of the transformations and validations applied.
- Validation Report: Report of any validations that were performed, including whether the record was excluded and the validation that it failed.
Attention: Transformation reports and validation reports are incompatible with for-each loops in workflows.
Troubleshooting
- File size limits: If the file produced by the transform task is bigger than 1GB, the workflow will fail.
- Transformations increasing file sizes: Depending on how you choose to transform your data, the transform task can add more data to your file. If the file you’re extracting is already close to the 1GB limit, keep in mind that your transformations can make your file too large to process.
- Missing survey fields: You may notice a missing survey field if your ETL starts with an Extract responses from a survey task before the transform task. This is because if you add new fields for your survey, you need to save your extraction task again, then add the field to your transform task. To resolve this:
- Open the Extract responses from a survey task.
- Under Survey columns, select your new field. (If you have “download all fields” selected, skip to the next step, where you save your task.)
- Save your task with all of the other same settings.
- Open your Transform task.
- The field should pull through.
- Make sure to also check your data loader task to make sure this new field is included.
- “EOF unexpectedly hit:” While looking at your workflow’s run history, you may see a message that reads, “EOF unexpectedly hit when reading file. Add data to the file or remove it from the data source.” In this case, we recommend making sure you set your workflow to automatically retry task failures.
That's great! Thank you for your feedback!
Thank you for your feedback!