
Audio & Video Editor
What's on this page
About the Audio & Video Editor
If your survey contains a video response question or interview selector question, you can view and edit the audio and video responses within the Audio & Video tab in Data & Analysis. From here, you can view transcripts, make clips from audio and video responses, and assemble them into highlight reels. You can also leverage AI-driven insights to identify themes in your video responses.
Qtip: To upload historical audio or videos for analysis, use the Imported Video and Audio project type.
Attention: Audio and video transcripts will have personally identifiable information automatically redacted per AWS’s redaction rules. Please note this redaction only applies to the transcription itself, not the audio or video.
Video Walkthrough
Need help getting started with video analysis? Check out this 2-minute video walkthrough:
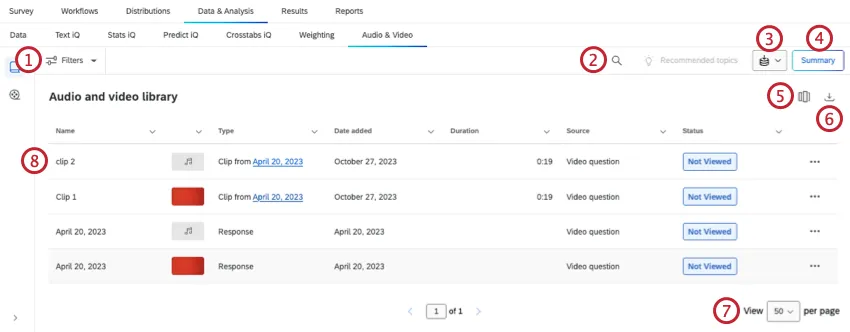
Navigating the Audio and Video Library
To view your audio and video responses, go to the Audio & Video section of Data & Analysis. All of your available videos will be in the Audio and video library section.
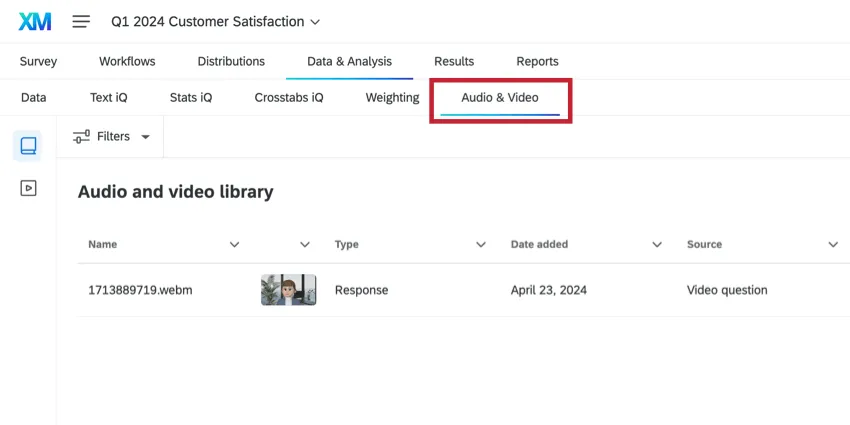
The audio and video library contains a data table with all of your audio and video responses. From this table, you can view different columns of metadata to analyze and summarize your responses.
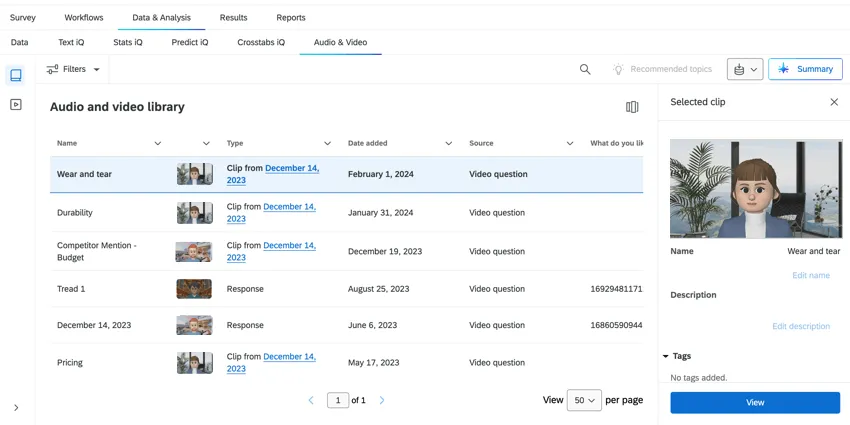
Viewing a Single Video Response
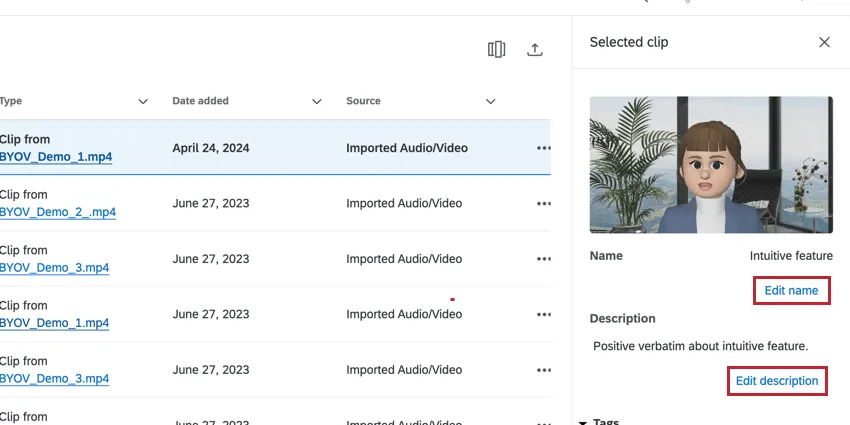
Select the response that you would like to view, then click View at the bottom of the preview window.
Qtip: To edit the response details, such as the name or description, click the buttons underneath those fields.
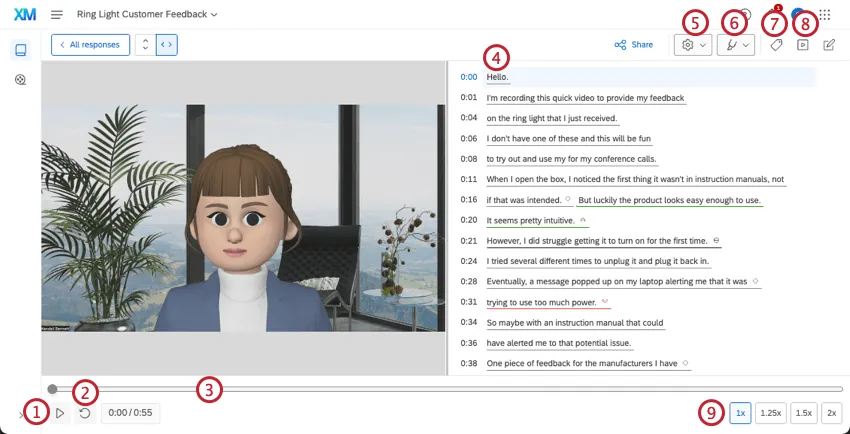
You can do the following when viewing a recording in the editor:
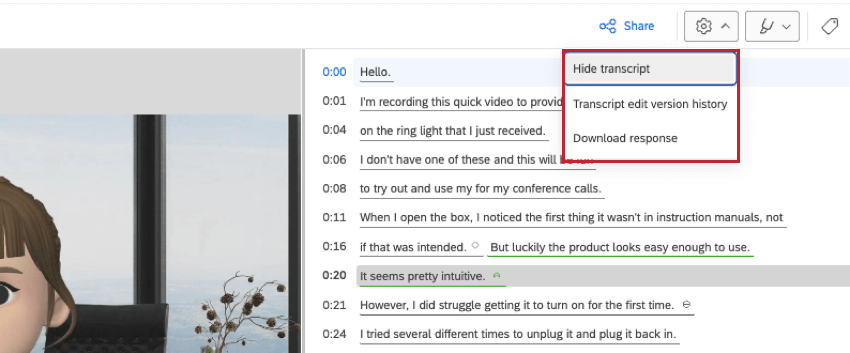
- Hide transcript: Hide the transcript from the interface.
- Transcript edit version history: View the version history of edits made to the transcript. For more information, see Video Transcript & Sentiment.
- Download response: Download the response.
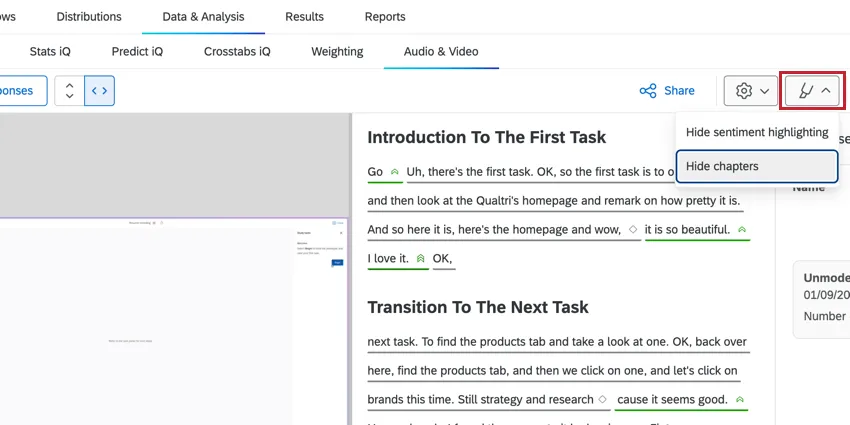
- Hide sentiment highlighting: Hide the sentiment highlights in the transcript.
- Hide chapters: Hide the AI-generated chapters in the response.
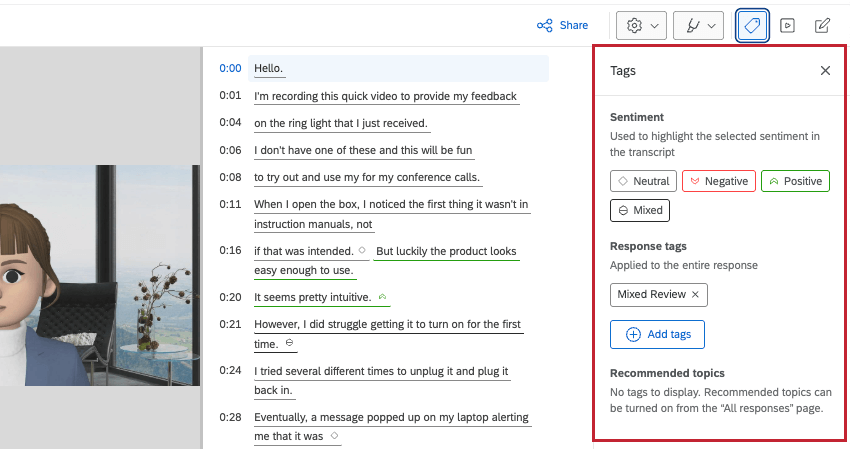
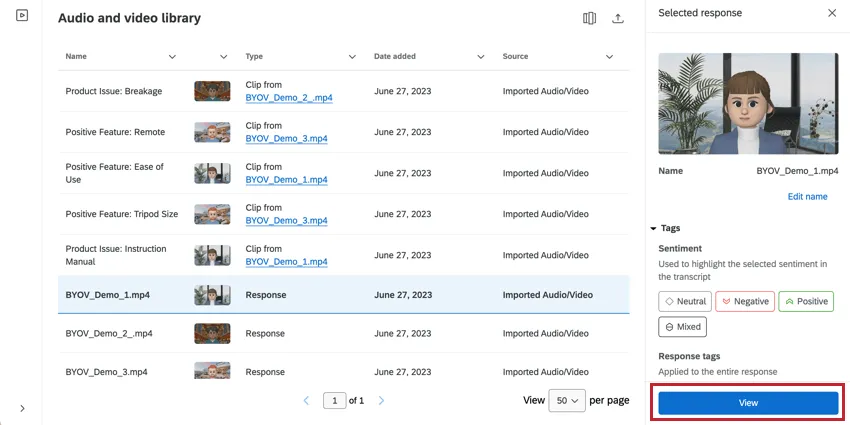
- Sentiment: By default, all the sentiments that appear in the recording will be automatically tagged to the response. Qtip: Click on a sentiment tag to highlight that sentiment in the transcript.

- Response tags: To add additional tags, click Add tags and type in the tag. You can add multiple tags by separating them with a comma. To delete a tag from this section, click the X next to the tag.
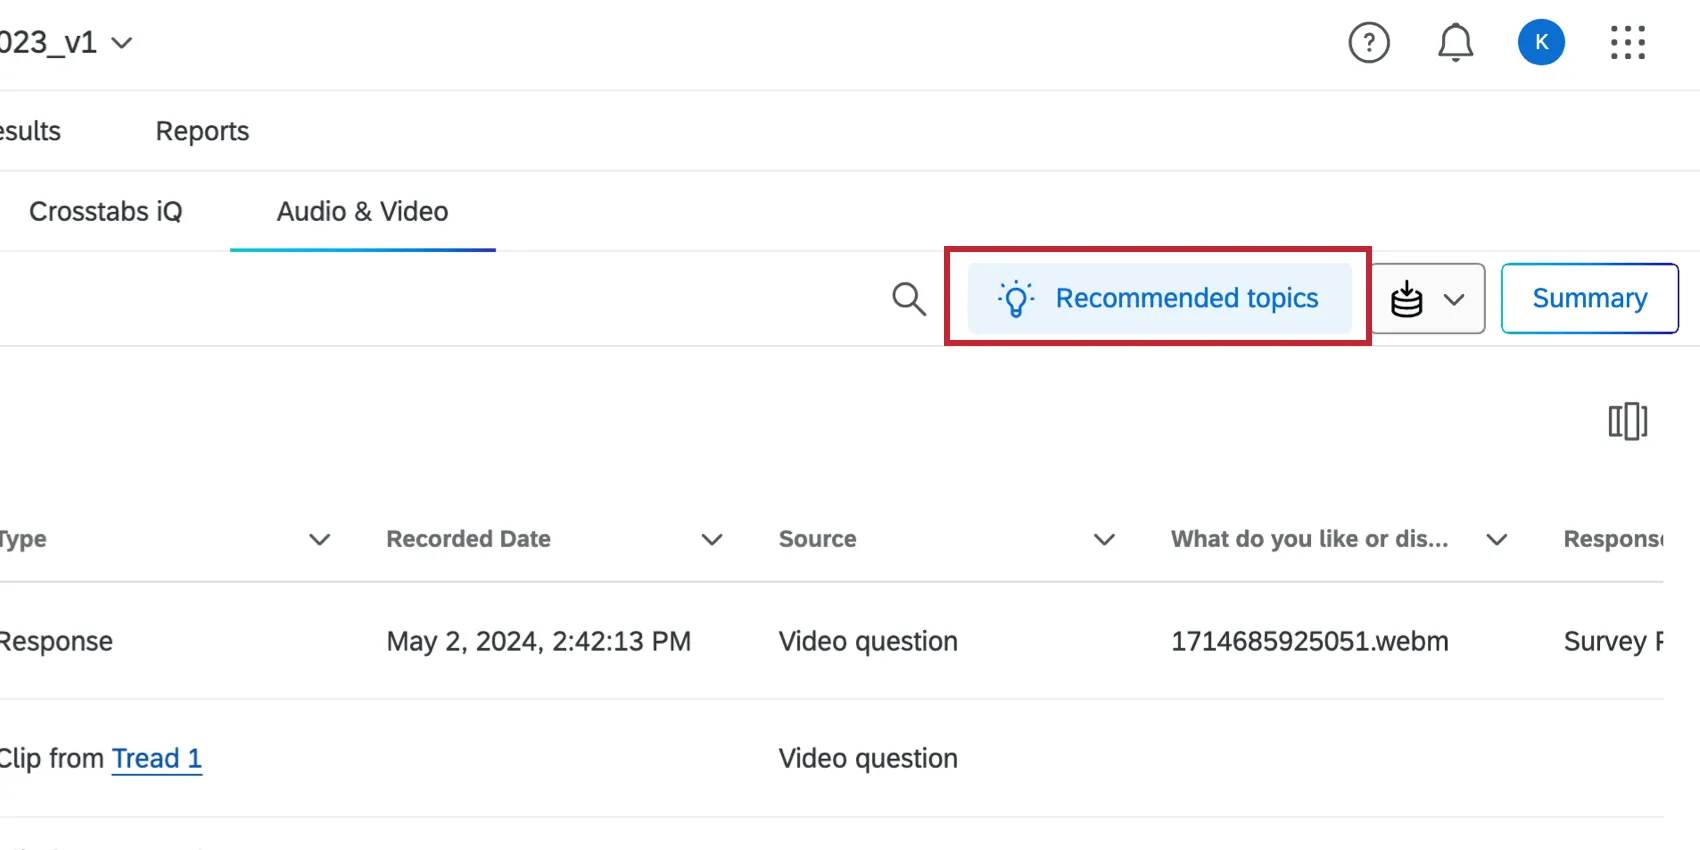
- Recommended topics: If you’ve collected at least 5 responses, the Topic recommendations will automatically activate. Those topics will be shown in this section of the tags menu. For more information, see Video Topic Recommendations.
Filtering Responses
You can filter your audio and video recordings so that you can easily find a specific response.
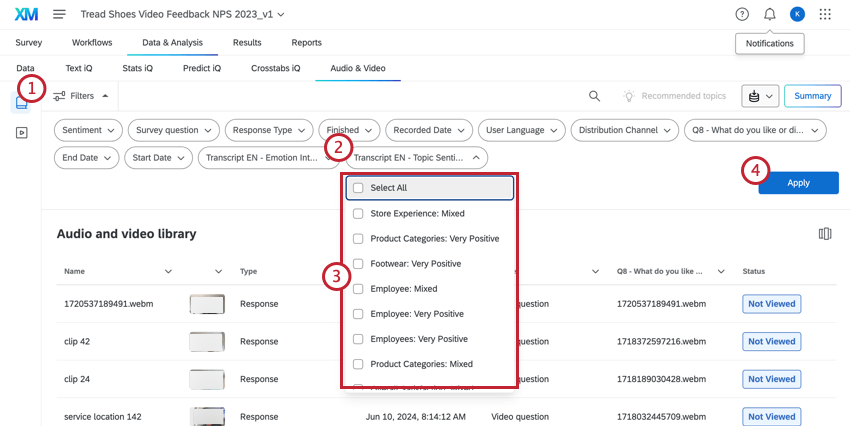
Attention: Imported audio and video projects and unmoderated user testing questions can only filter by sentiment, question, and topics.
Qtip: You can filter based on the topics applied to your recordings, but this option will not appear until you have topics tagged. See Video Topic Recommendations for more information.
Video Transcript & Sentiment
If a recording contains sufficient talking, then a transcript will be automatically generated. This transcript contains sentiment data, allowing you to pinpoint how your respondent felt at different moments in time.
Qtip: While the Audio Video Editor uses the same sentiment model, this feature is separate from sentiment in Text iQ. Sentiment from the Audio Video Editor is not available for use in Text iQ, the data tab, or dashboard widgets.
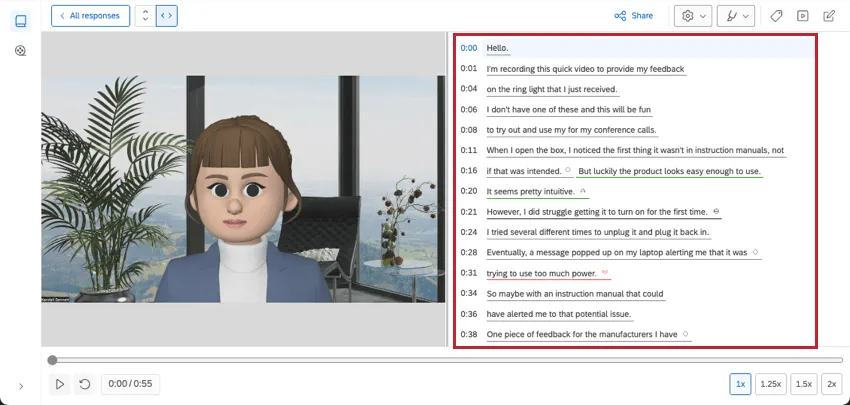
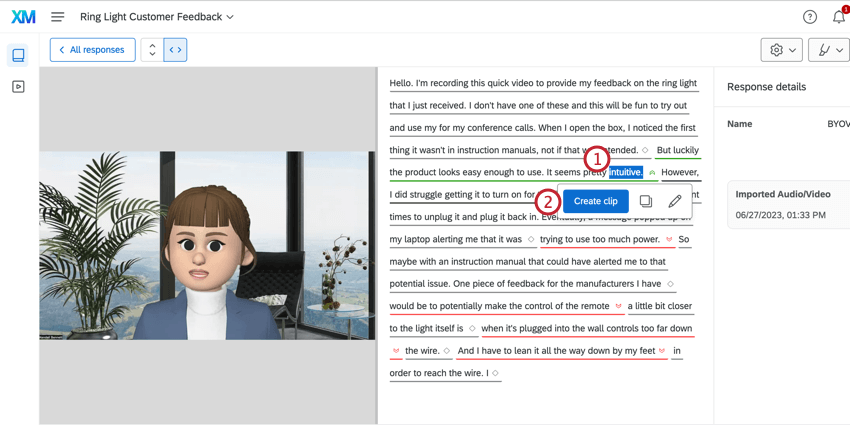
As you watch the recording, the transcript will highlight the word that the respondent is currently saying. Click on a specific word in the transcript to interact with it:
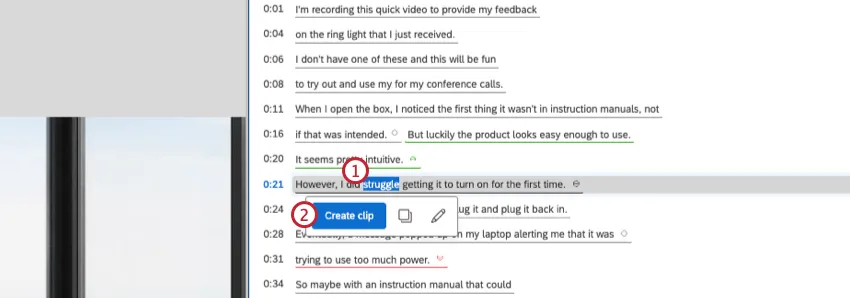
- Create clip: Create a clip from this response. For more information, see Creating a Video Clip.
- Copy to clipboard: Copy the word to your clipboard.
- Edit selected text: Change the sentiment tag for the selected word or edit the text that appears in the transcript.
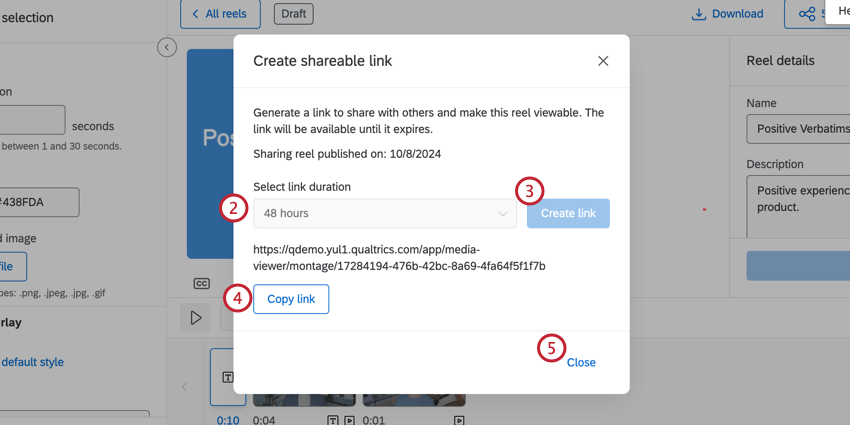
To share a clip and its associated transcript, click Share in the top right corner. You can then select a link duration and click Create link. The generated link can then be copied and shared with others and will be viewable until the end of your selected duration.

Chapters
Attention: Chapters are only compatible with Moderated User Testing projects, the Unmoderated User Testing Question, and Imported Video & Audio projects.
Qtip: You must have the Automated Audio & Video Chapters permission enabled to use Chapters.
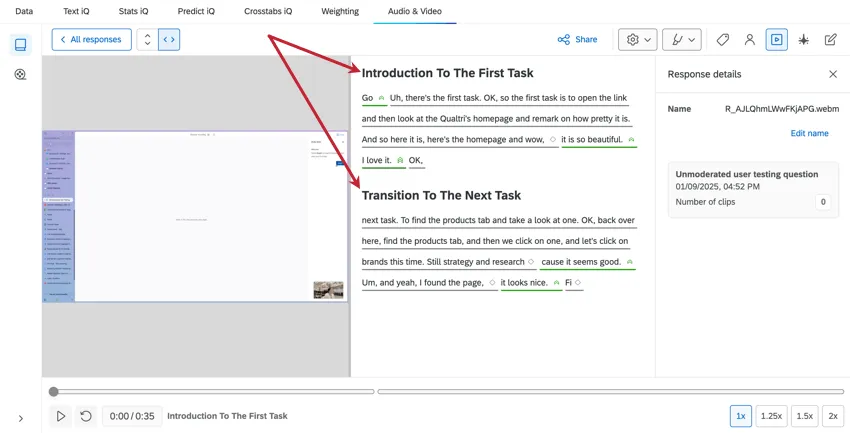
Chapters break up responses by AI-generated segments, allowing you to better analyze different concepts in your responses. You can see chapters when you view a response.
Qtip: To hide chapters, click the highlights dropdown in the upper-right corner.
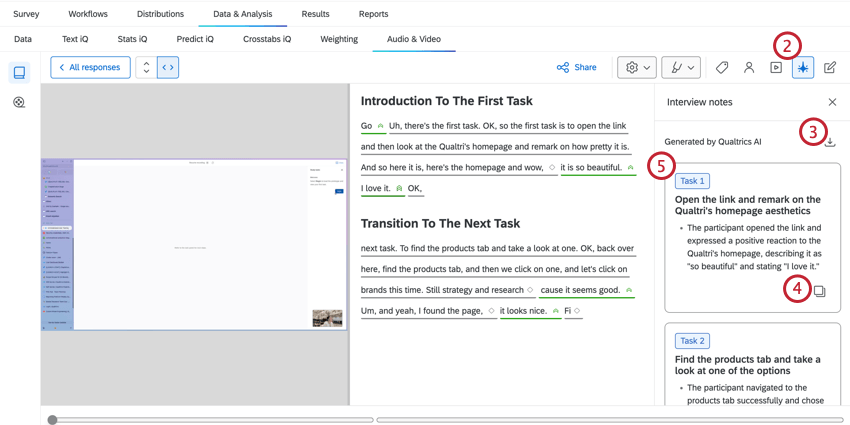
Interview Notes
Attention: Interview Notes are only compatible with Moderated User Testing projects and the Unmoderated User Testing Question.
Qtip: You must have the Automated Audio & Video Notes permission enabled to use Interview Notes.
The audio & video editor creates AI-generated notes based on the concepts in the response. These notes can be copied and exported, but they cannot be edited.
Video Topic Recommendations
If you’ve collected at least 10 video responses, the Topic recommendations toggle will automatically activate. When enabled, topics will be automatically applied to your recordings. These topics are generated based on the recording’s transcript. If you’d like to remove topics, disable this option.
Using Automated Summaries
Qtip: If you do not see the option to use automated summaries, contact your Brand Administrator. If you’re a Brand Admin looking to enable this feature, see our AI Administration page.
After you’ve collected at least 5 video responses, you can analyze your responses using automated summaries powered by advanced generative AI models. AI-powered summaries help you identify common themes across your videos and provide you with an overall summary about your video content.
Qtip: To facilitate a secure and confidential collaboration with third-party LLM vendors, we prioritize strict privacy and security standards to safeguard our customers’ data. If you’re interested in learning more, see our dedicated security and privacy guide for AI.
While we have guardrails in place and are continually refining our products, artificial intelligence may at times generate output that is inaccurate, incomplete, or outdated. Prior to using any output from Qualtrics’ AI features, you must review the output for accuracy and ensure that it is suitable for your use case. Output from Qualtrics’ AI features is not a substitute for human review or professional guidance.
While in the Audio and video library section, click AI summary.
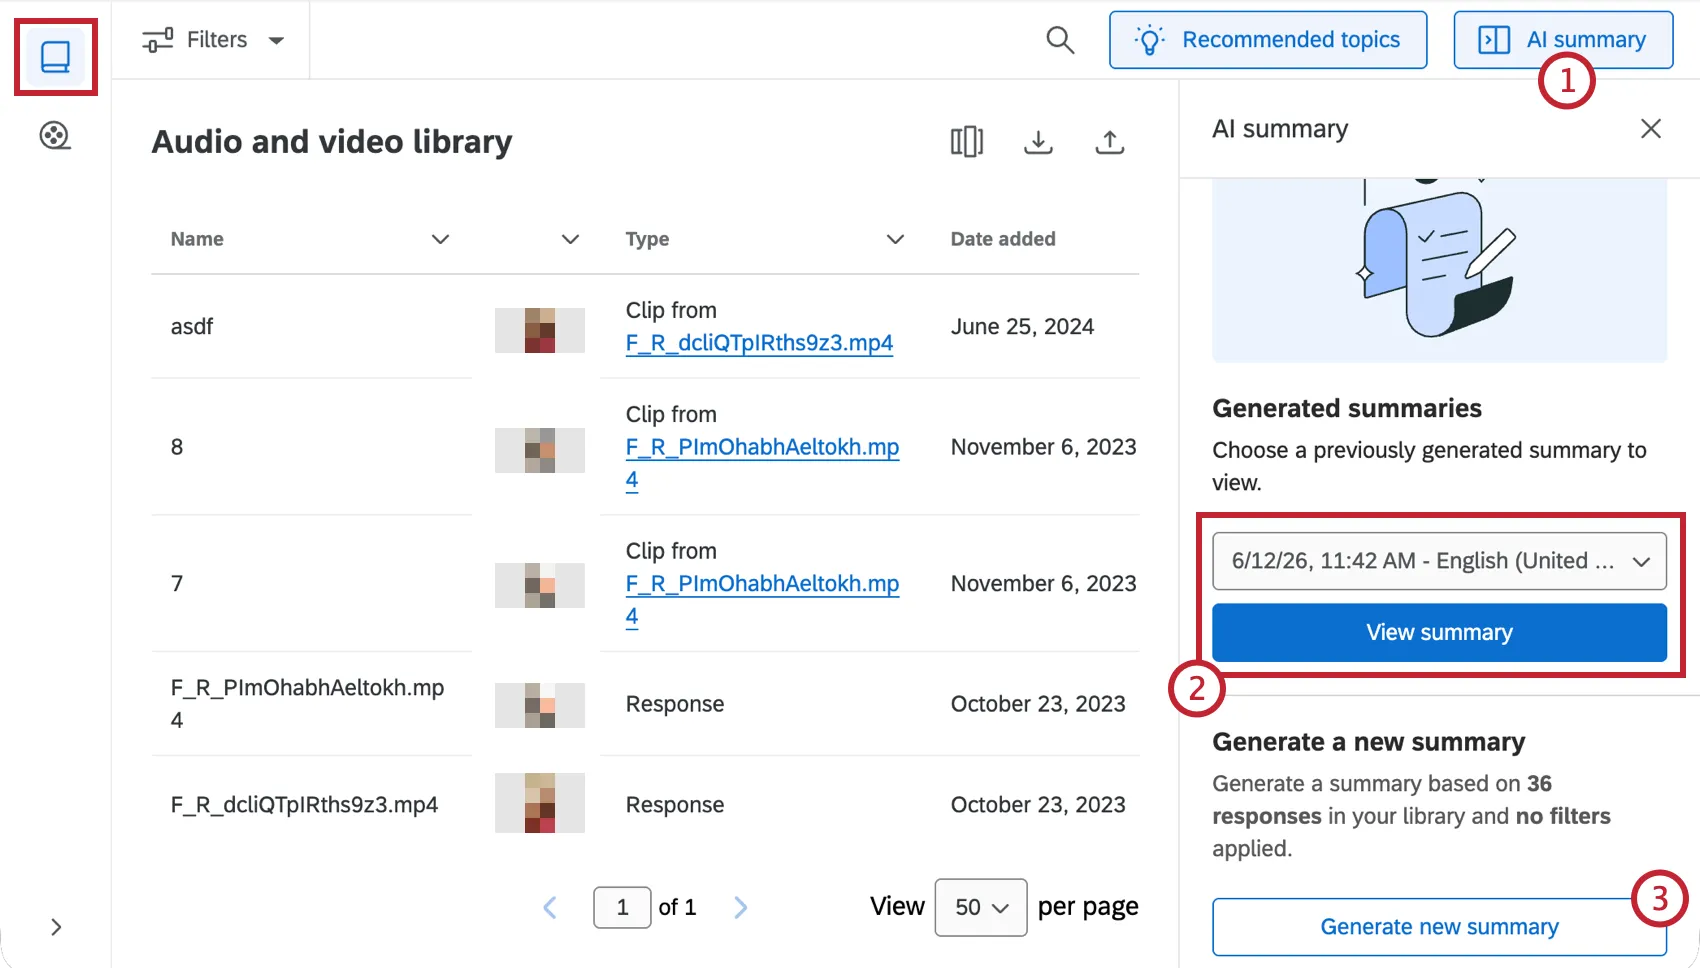
To view a previously generated summary, use the dropdown to select the summary you want to view and click View Summary.
To generate a new summary, click Generate new summary. Note that you can only summarize the same responses once per language. To generate additional summaries in the same language, you must collect new responses or modify your filters to generate another.
Select a language for your summary from the dropdown.
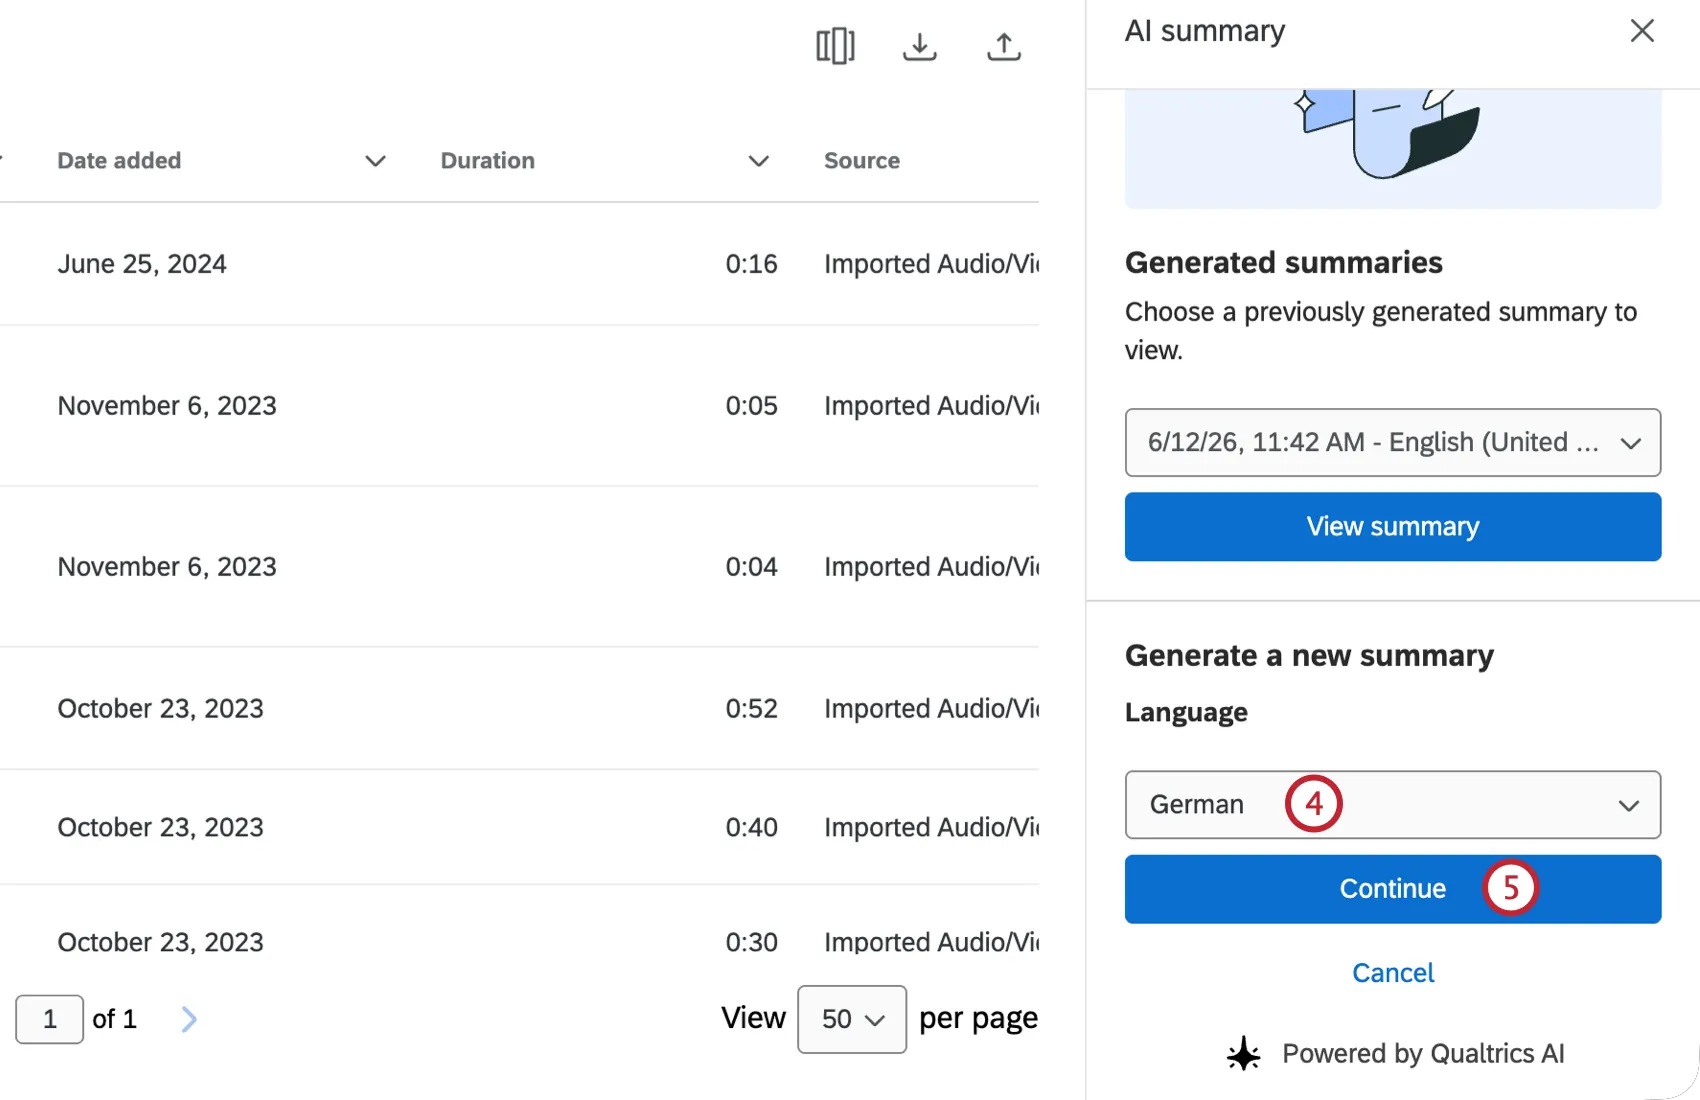
Qtip: You can only generate 1 summary for each language.
Click Continue.
The side panel contains study information, including details about your study, videos included in the summary, applied filters, demographic information.
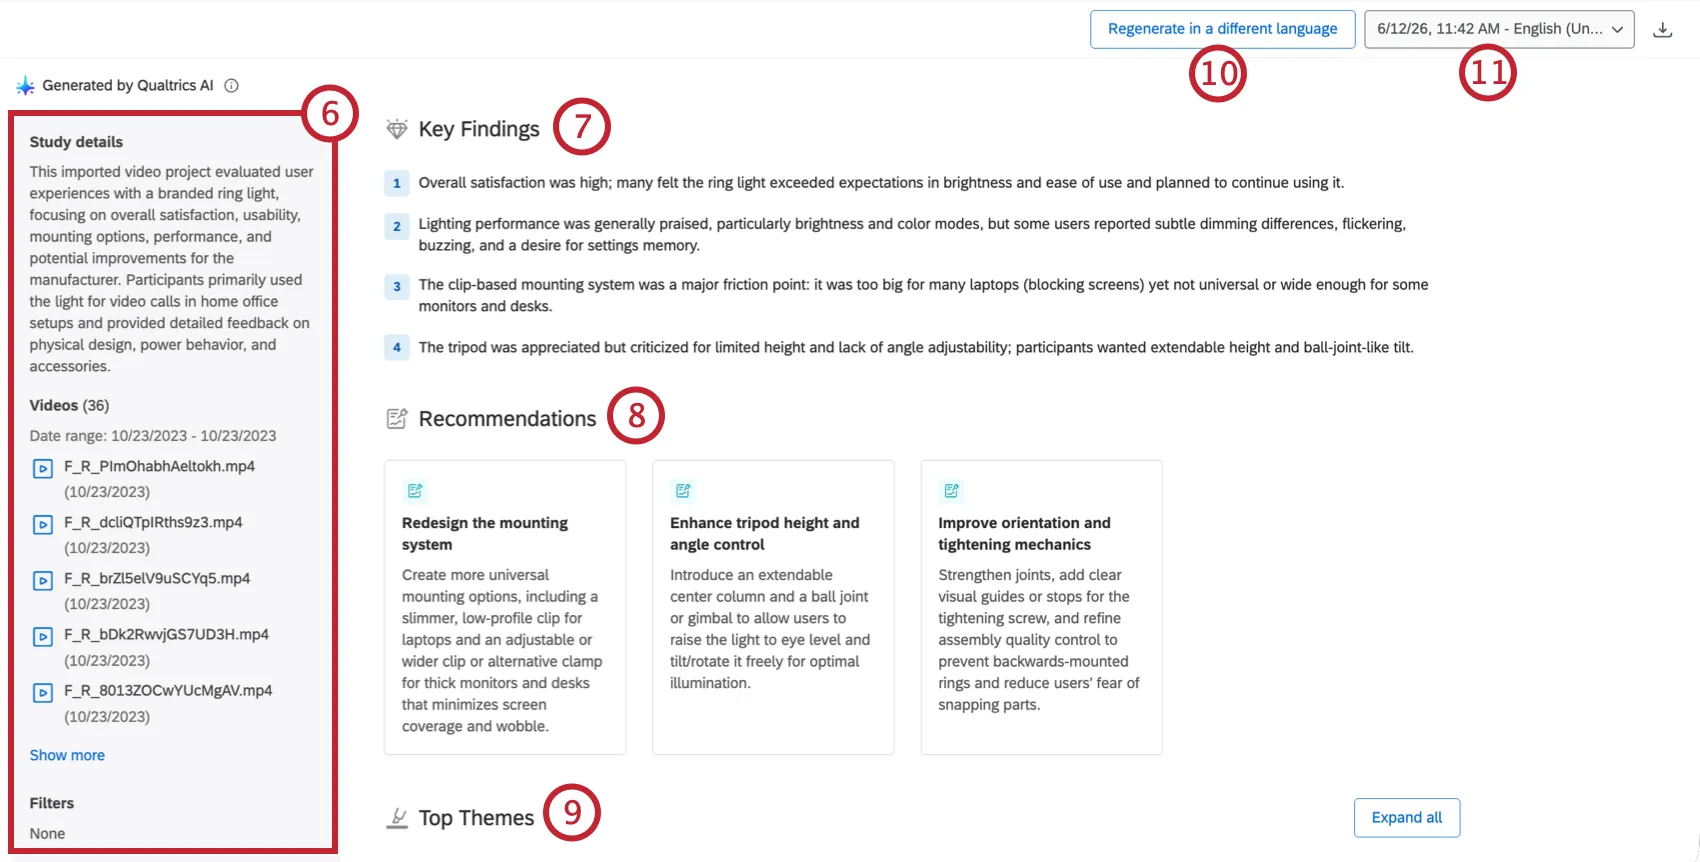
The Key Findings section contains key findings from the responses you received.
The Recommendations section displays recommendations based on the responses you received.
The Top Themes section displays themes that emerged from the responses. Click Play response underneath a quote to be brought to that quote in the video response.
Qtip: This opens the video in the clip editor with the quote pre-selected. Use this option to quickly create clips based on quotes surfaced by automated summaries.
Click Regenerate in a different language to generate the summary in a different language. You will not be able to select any languages you’ve already selected when generating a summary.
If you have generated multiple summaries, use the dropdown in the top-right to select a different summary to view.
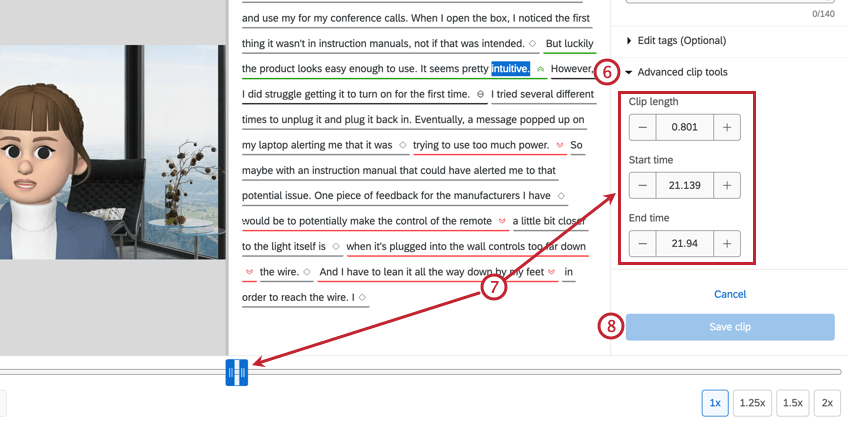
Creating a Video Clip
If you’ve found a moment from a recording you want to highlight or use in your dashboard, you can create a clip of it.
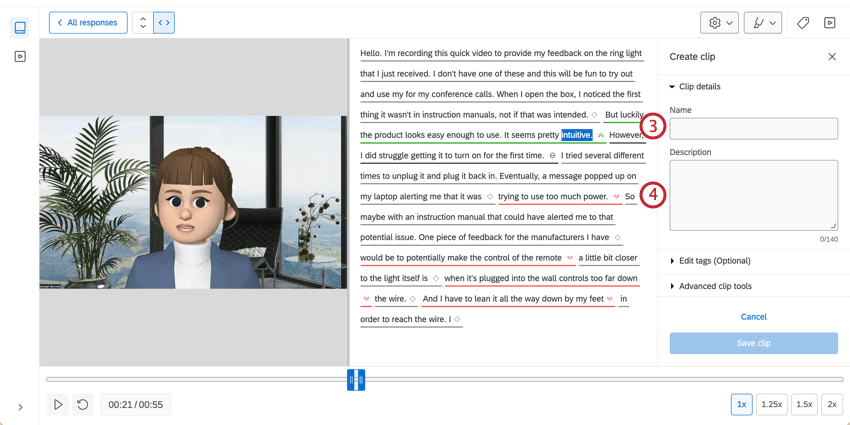
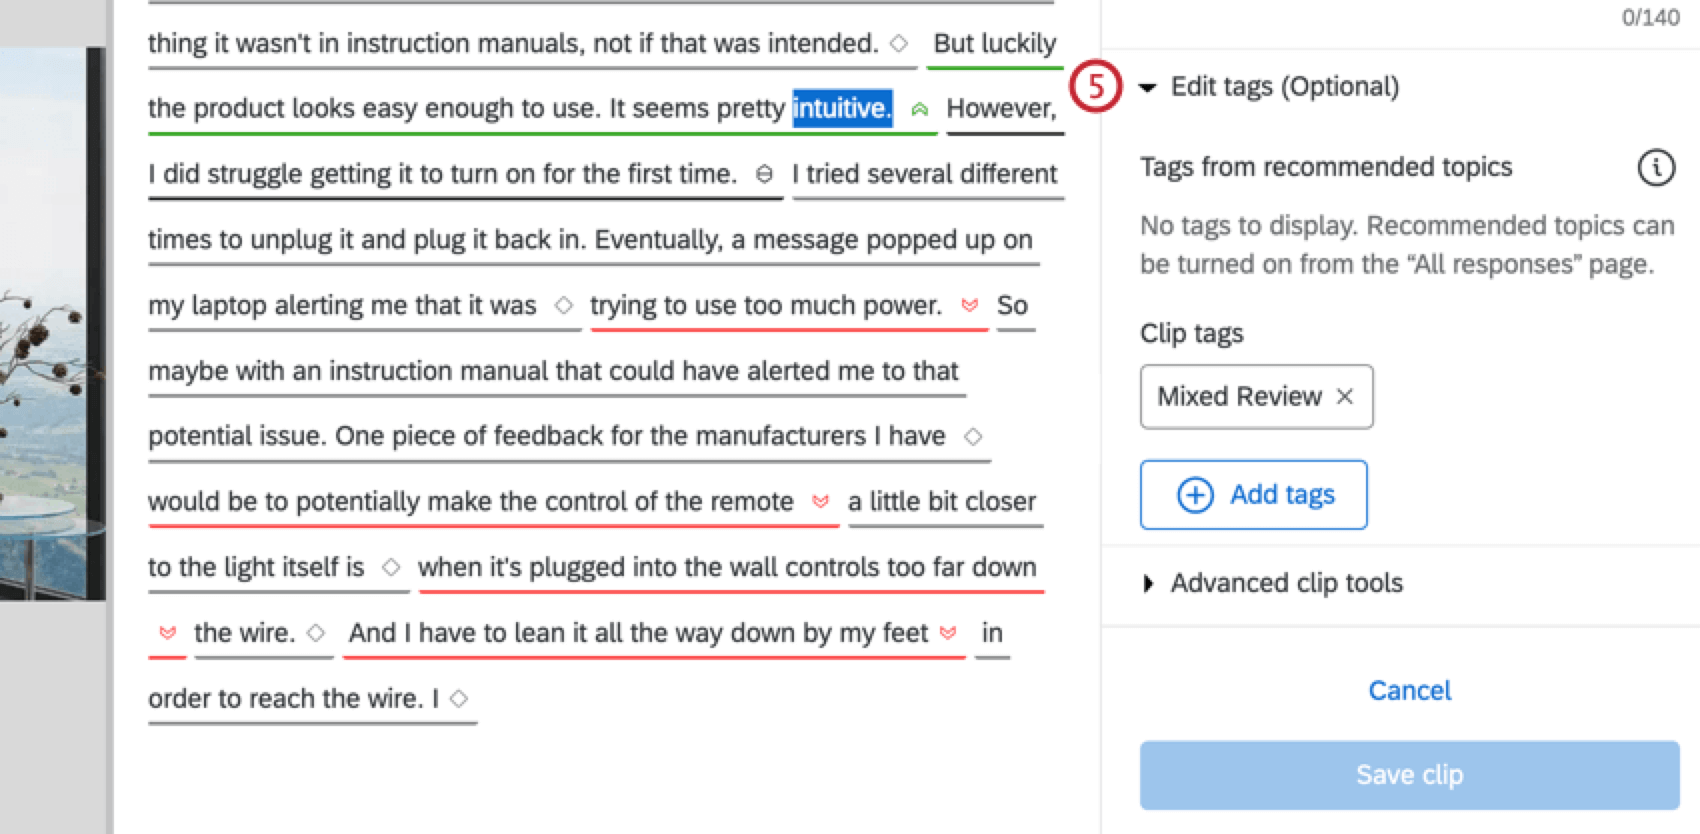
Qtip: To add more tags, click Add tagsthen enter your custom tags.
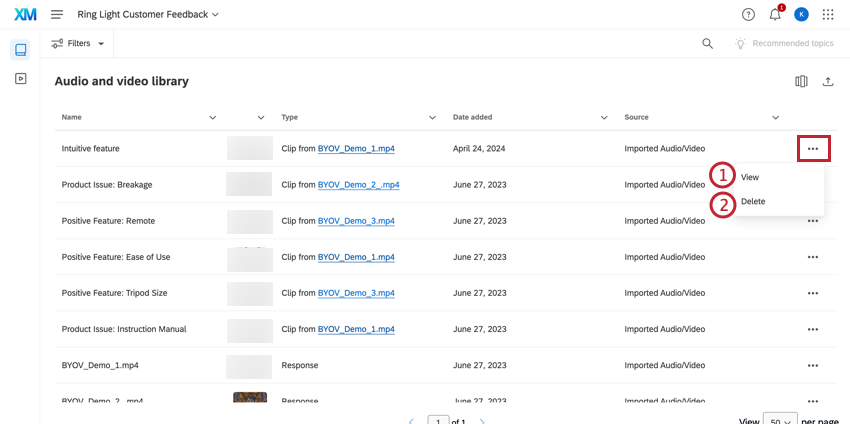
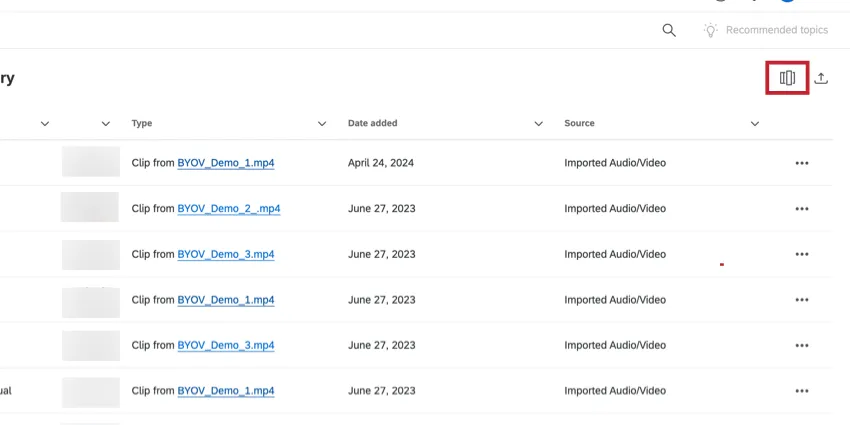
Managing Clips
Clips are saved as the Clip response type in the library. To manage clips, click the three-dot menu.
Qtip: While you can edit the details of the clip, you cannot change the length or timestamps of the clip. If you need to change the content in your clip, you will need to create a new one.
Qtip: If you do not see the Type column, make sure it is selected by clicking the column chooser in the upper left corner.
Languages Available for Analysis
You can analyze videos that have been recorded in a variety of languages.
Transcript, sentiment, and topic are all supported for each of the following languages:
- English (US)
- English (UK)
- English (AUS)
- Japanese
- German
- French
- Spanish (Latin America)
- Spanish (Spain)
- Brazilian Portuguese
- Portuguese (Portugal)
- Korean
- Italian
- Dutch
- Chinese (Traditional)
- Chinese (Simplified)
- Thai
- Finnish
- Danish
- Swedish
- Russian
- Bahasa Indonesia
- Bahasa Malaysia
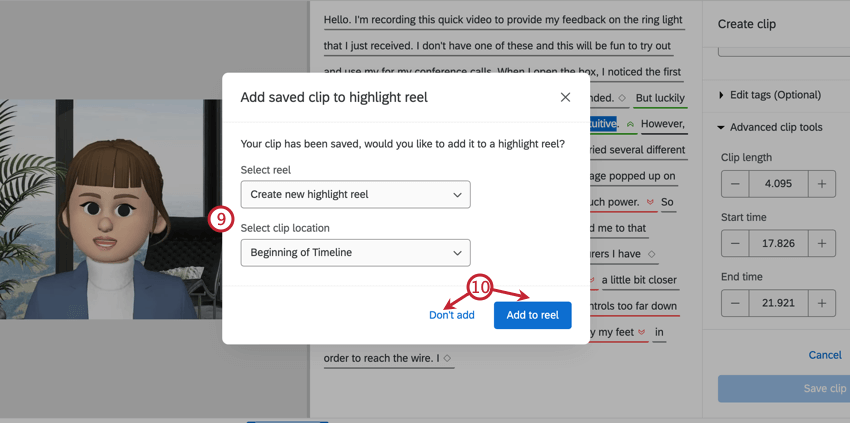
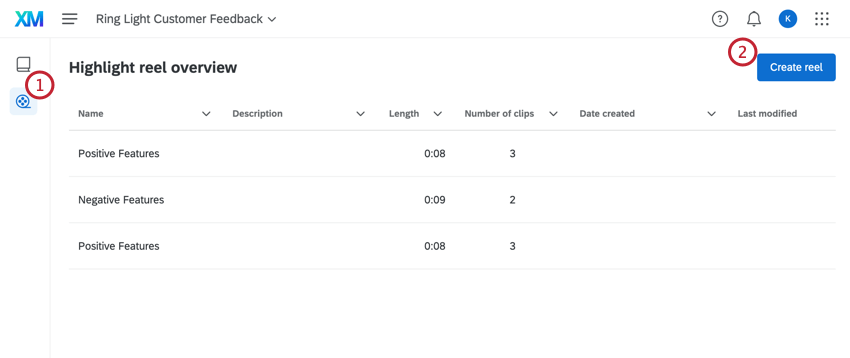
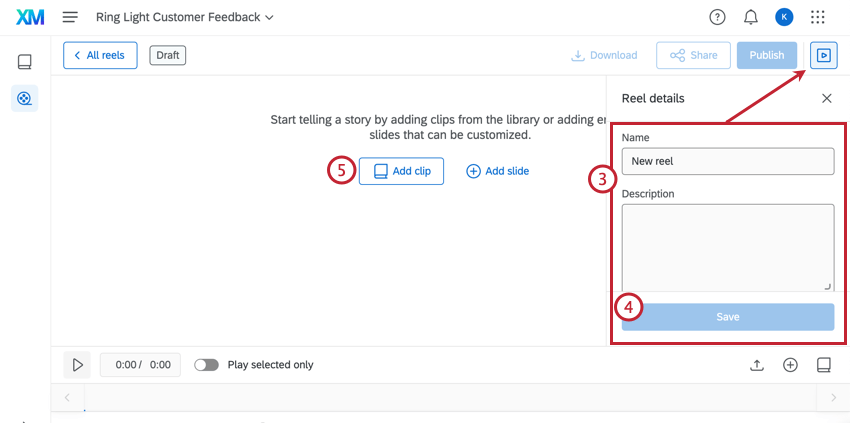
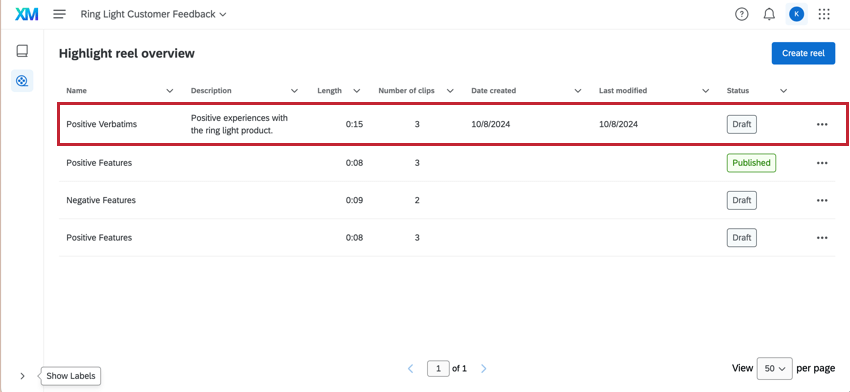
Creating a Highlight Reel
After creating clips from video responses, you can assemble your clips into highlight reels to display in a dashboard.
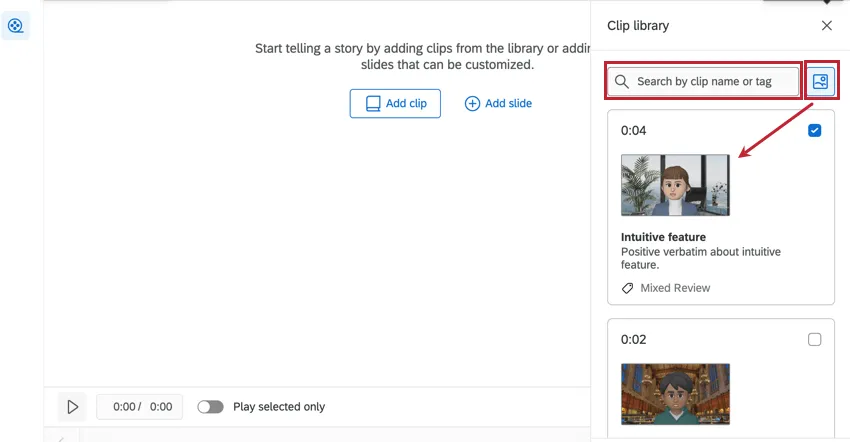
Qtip: Use the search bar to search for clips by their name or tags. Click the icon next to the search bar to view a picture of your reel.

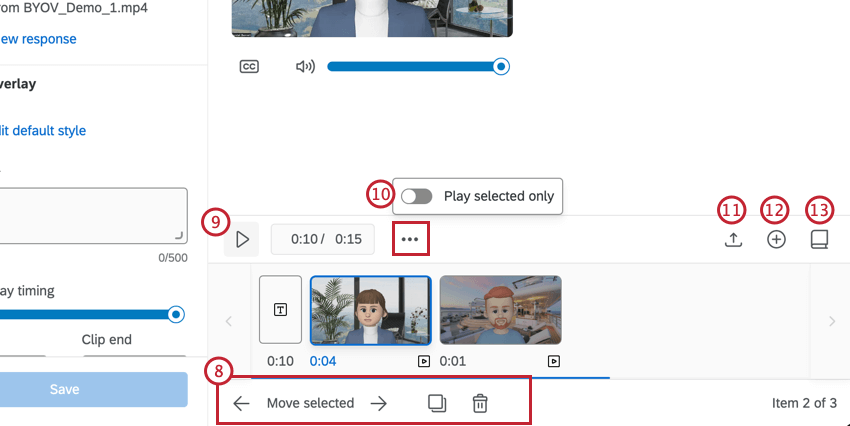
- To edit the position of a clip, select the clip and click on an arrow next to Move selected. Alternatively, click and drag the clip into a new position.
- To copy a clip in the reel, click the duplicate icon.
- To remove a clip from the reel, click the trash icon.
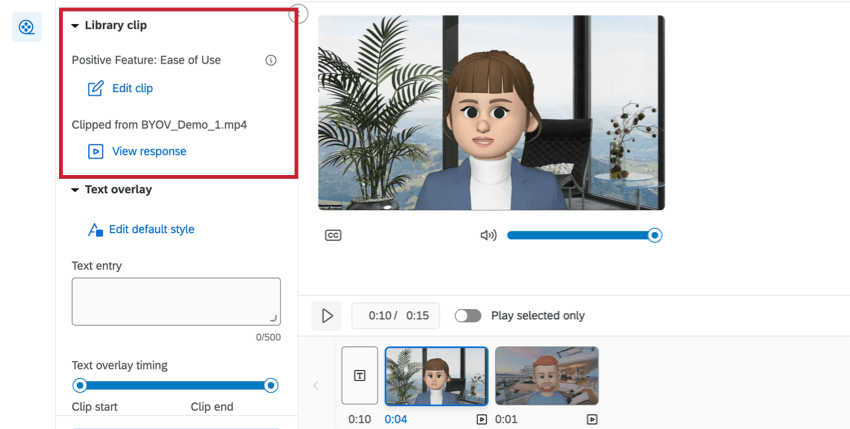
- Edit clip: Edit the video clip using the clip editor.
- View response: View the entire video response.
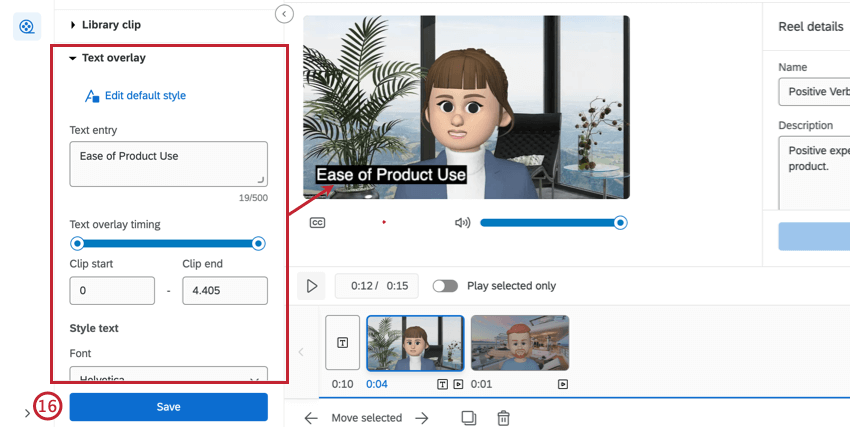
- Edit default style: Edit the design properties of the text that will be applied by default.
- Text entry: Enter the text you would like to add to the clip in this textbox.
- Text overlay timing: Enter how long, in seconds, the text should be displayed on the clip. To adjust the time frame, you can either enter the seconds into the Clip start and Clip end text boxes, or drag the ends of the bar to adjust.
- Style text: Edit the font, text size, color, alignment, positioning, and opacity.
- Add background color: Select a color for the text background, if you’d like.
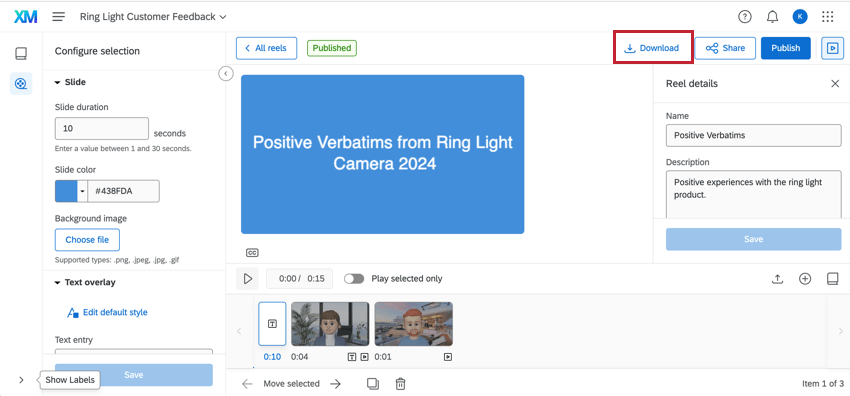
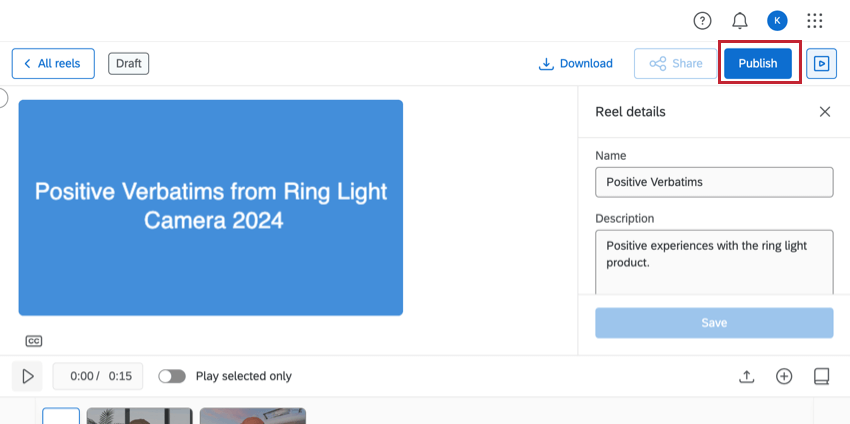
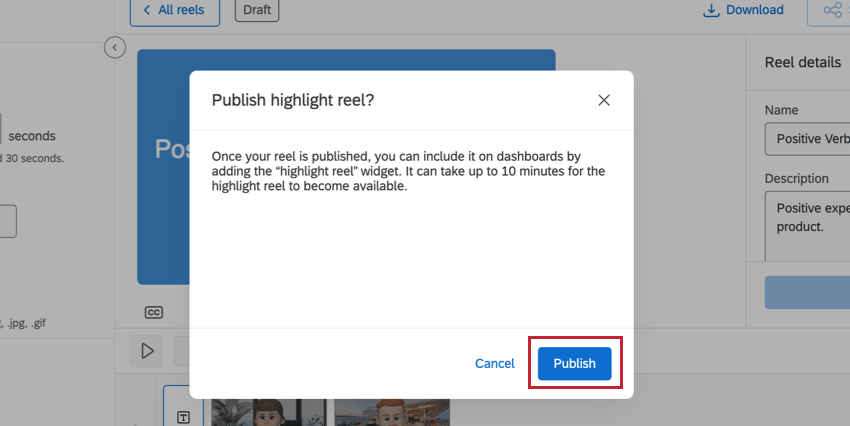
Sharing and Publishing a Highlight Reel
Your highlight reel must be published to be shared and to be used in the Highlight Reel Widget in your dashboards.
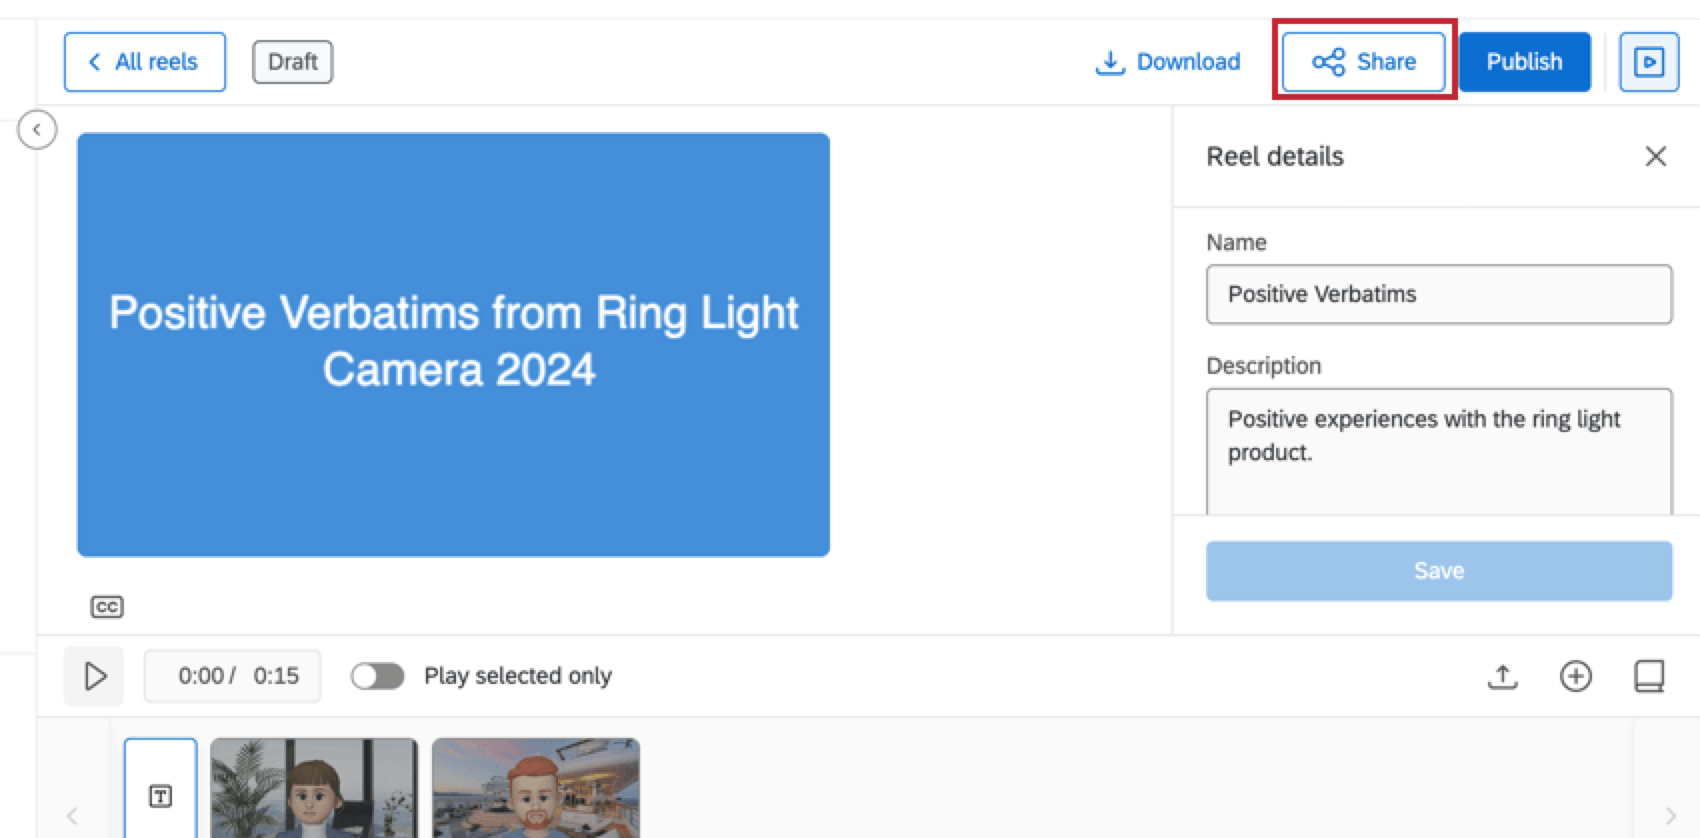
You can share your highlight reel by generating a unique web link. Your viewers do not need to have a Qualtrics account to view the highlight reel— they’ll just need the link you provide.
Attention: To share a highlight reel, you need the Create Public Audio & Video Links user permission enabled.
Video Responses in the Data Section
This section covers how to download a recording and how to view a transcript in the Data section of Data & Analysis.
Downloading Videos
You can download a .webm version of an individual video response.
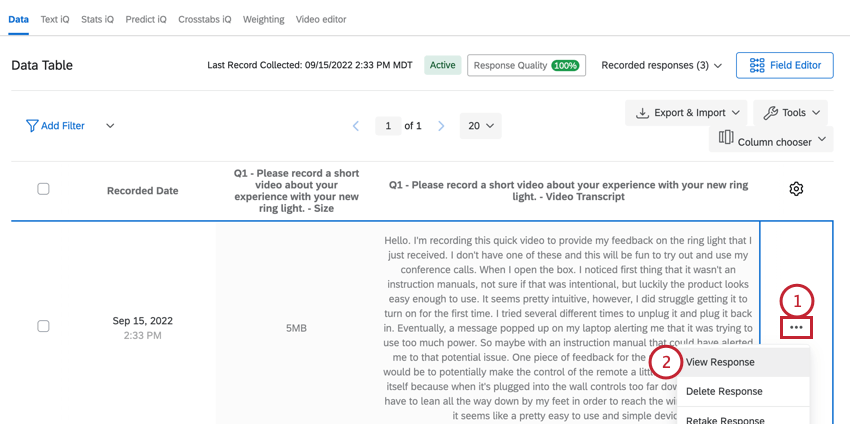

Viewing Transcripts
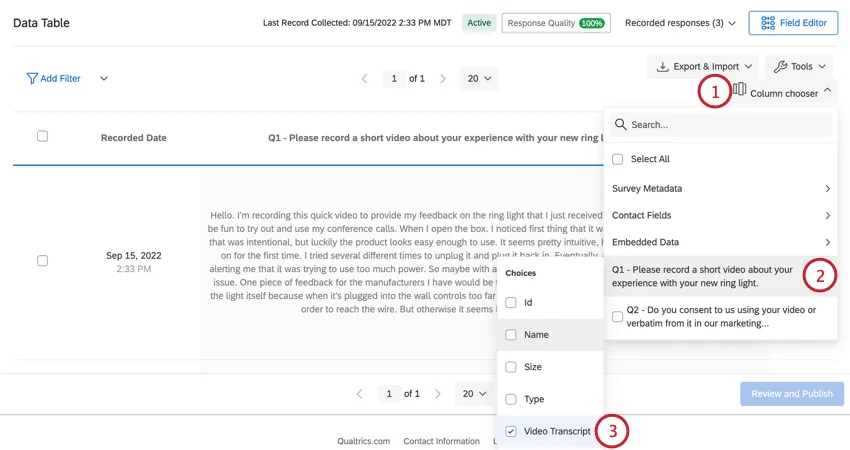
By default, the video transcript isn’t added to the data table view. However, you can add it in manually:
Note that this transcript does not have sentiment. If you’d like to view the sentiment for your video, head over to the video editor.
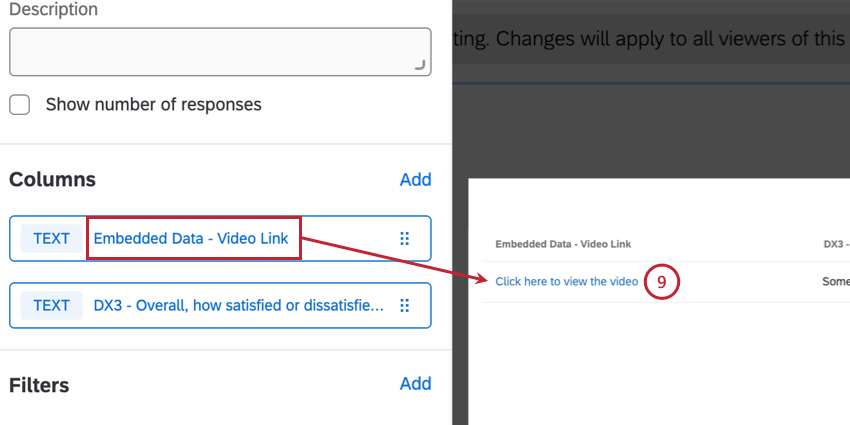
Generating Video Links
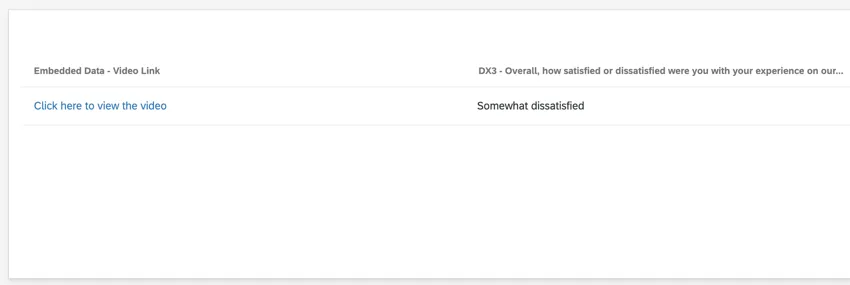
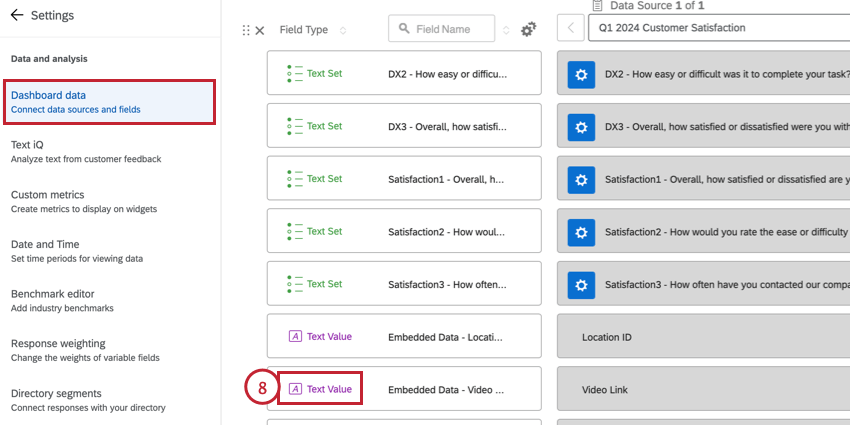
This section covers how to generate individual links for each submitted video. You can display these links in a CX dashboard, which a dashboard viewer can click to be brought to the video editor with that video selected.
Qtip: The dashboard viewer must have access to the project’s data for this link to work.
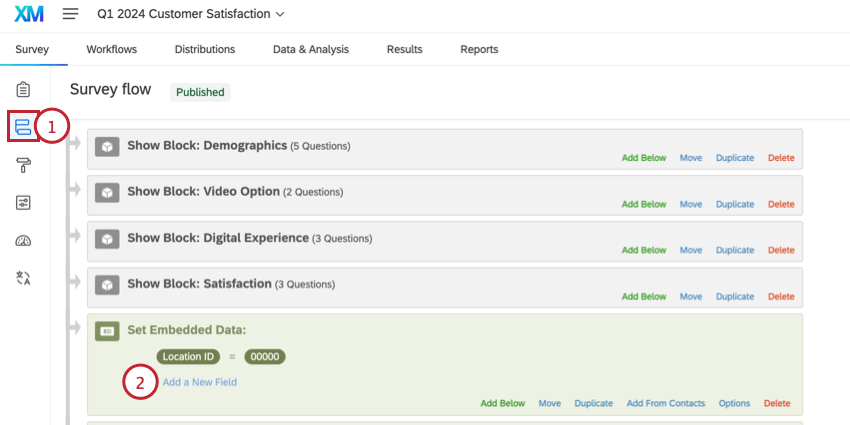
Qtip: Make sure the embedded data element appears after your video question(s).
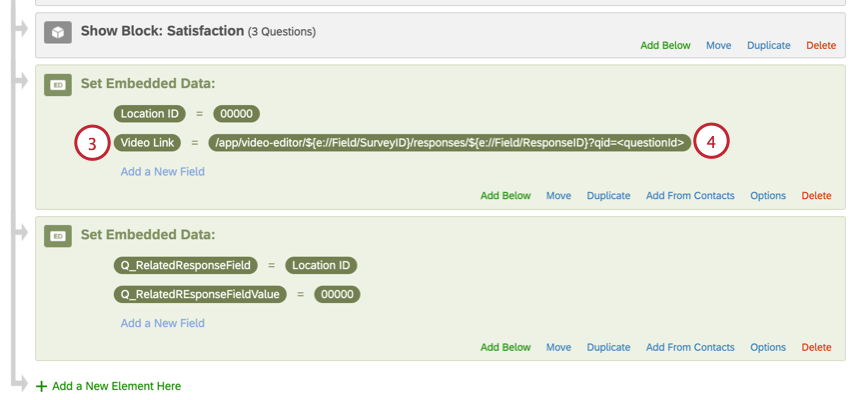
/app/video-editor/${e://Field/SurveyID}/responses/${e://Field/ResponseID}?qid=<questionId> Qtip: You can customize this link with HTML to make it open in a new tab or to change the text that is displayed to dashboard viewers. For example,<a href="/app/video-editor/${e://Field/SurveyID}/responses/${e://Field/ResponseID}?qid=QID1" target="_blank">Click here to view the video</a>.
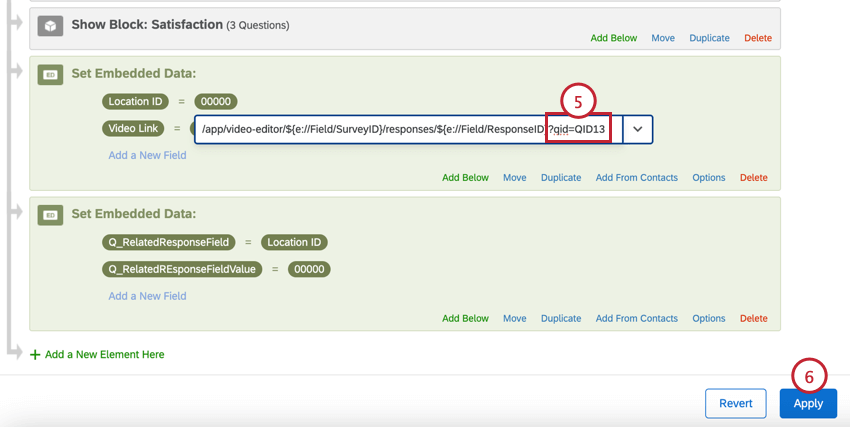
Qtip: You can find the question ID by exporting your dataset.
That's great! Thank you for your feedback!
Thank you for your feedback!