You can schedule a dashboard to periodically refresh or distribute a PDF snapshot via email. For information about refreshing report data, please see Refreshing Reports.
You can schedule a dashboard refresh to periodically rerun all of the dashboard’s reports in the background and cache their results. Cached reports will be served faster as long as the cache remains valid.
Sign in to Studio.
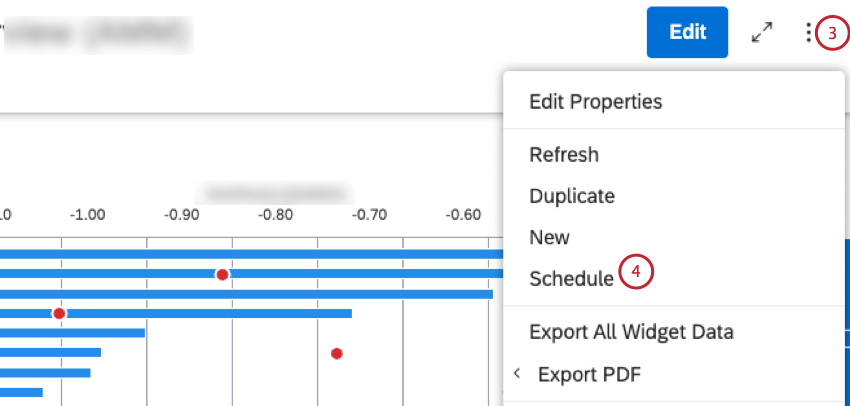
Open the dashboard.
Expand the options menu in the dashboard header.
Select Schedule.
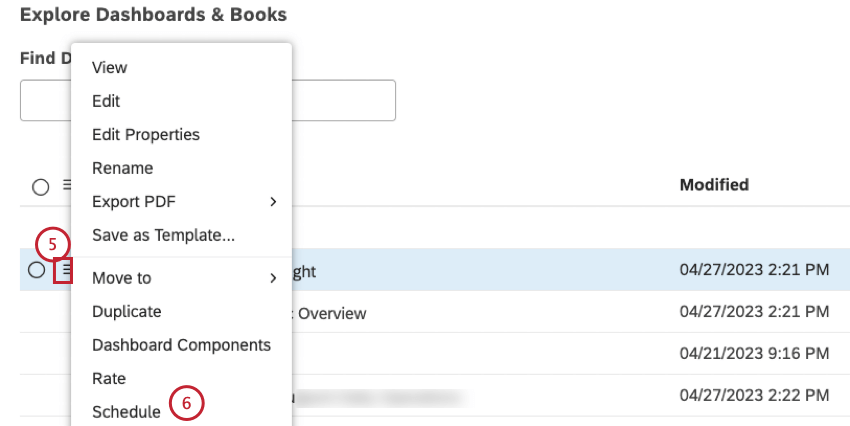
Alternatively, you can schedule actions from the Dashboard Explorer under the Explore Dashboards and Books section. Expand the actions menu next to your dashboard.
Select Schedule.
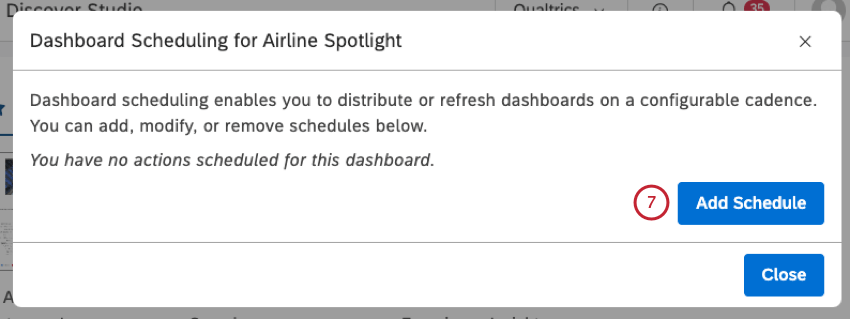
Click Add Schedule in the Dashboard Scheduling window.
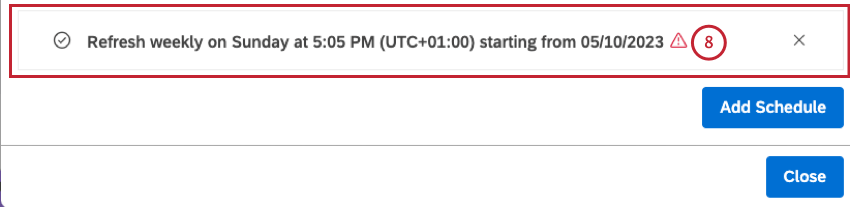
Click the new schedule that is added.
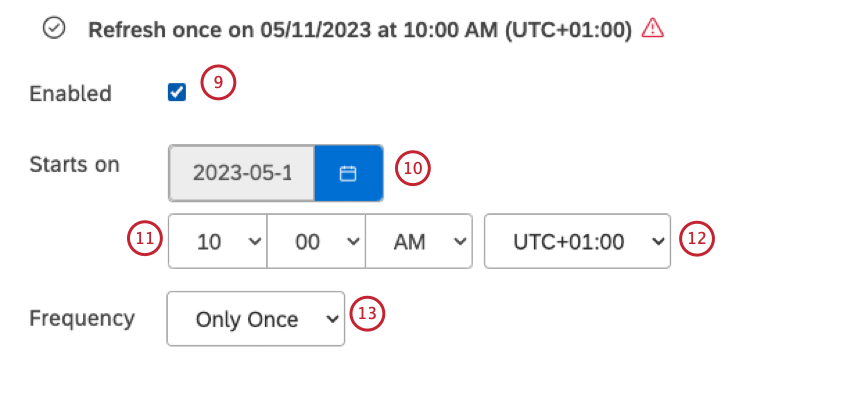
To define the schedule properties, first select the Enabled checkbox to enable the scheduled action. Deselect the Enabled checkbox to temporarily disable this action.
Starts on: Define the date and time when the action should be triggered first by clicking the calendar icon and selecting the month and the year.
Select the time when the action should be triggered using the time selector.
Select the timezone using the timezone selector.
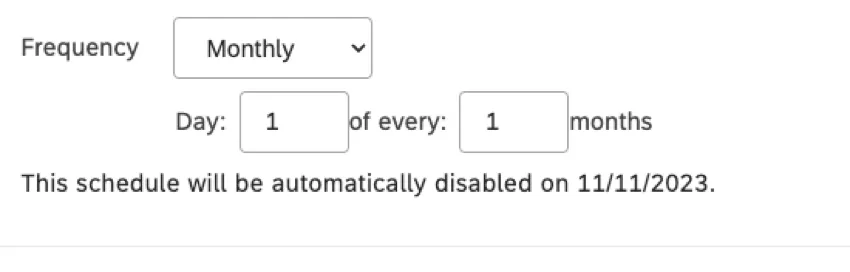
Qtip: Your schedule will be automatically disabled six months after the start date. You will be notified when it happens. You can renew it for another six months at any time by clicking the Renew link.
Define how often this action should be triggered by selecting one of the following options from the Frequency menu:
Only Once: Refresh a dashboard just once on the Starts on
Weekly: Refresh a dashboard on a weekly basis. Select one or more days of the week to refresh it on, up to 7 days if needed.
Qtip: Selected days are highlighted in blue.
Monthly: Refresh a dashboard on a monthly basis. Select the day of the month to run it on and the number of months between the runs.
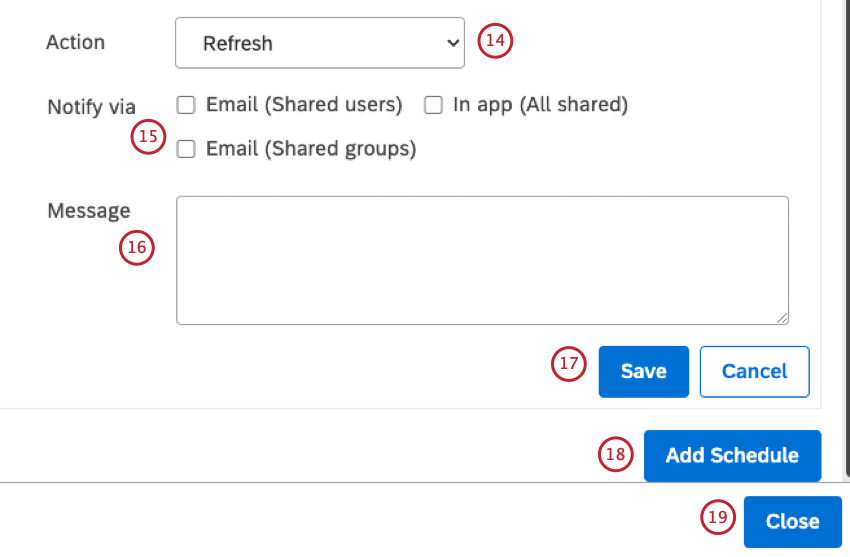
Select the Refresh option from the Action menu.
Notify via: Select one of the following checkboxes to choose how users who have access to the dashboard should be notified each time a scheduled refresh finishes from:
Email (Shared users)
Email (Shared groups)
In app (All shared)
Enter a custom message for the notification in the Message box.
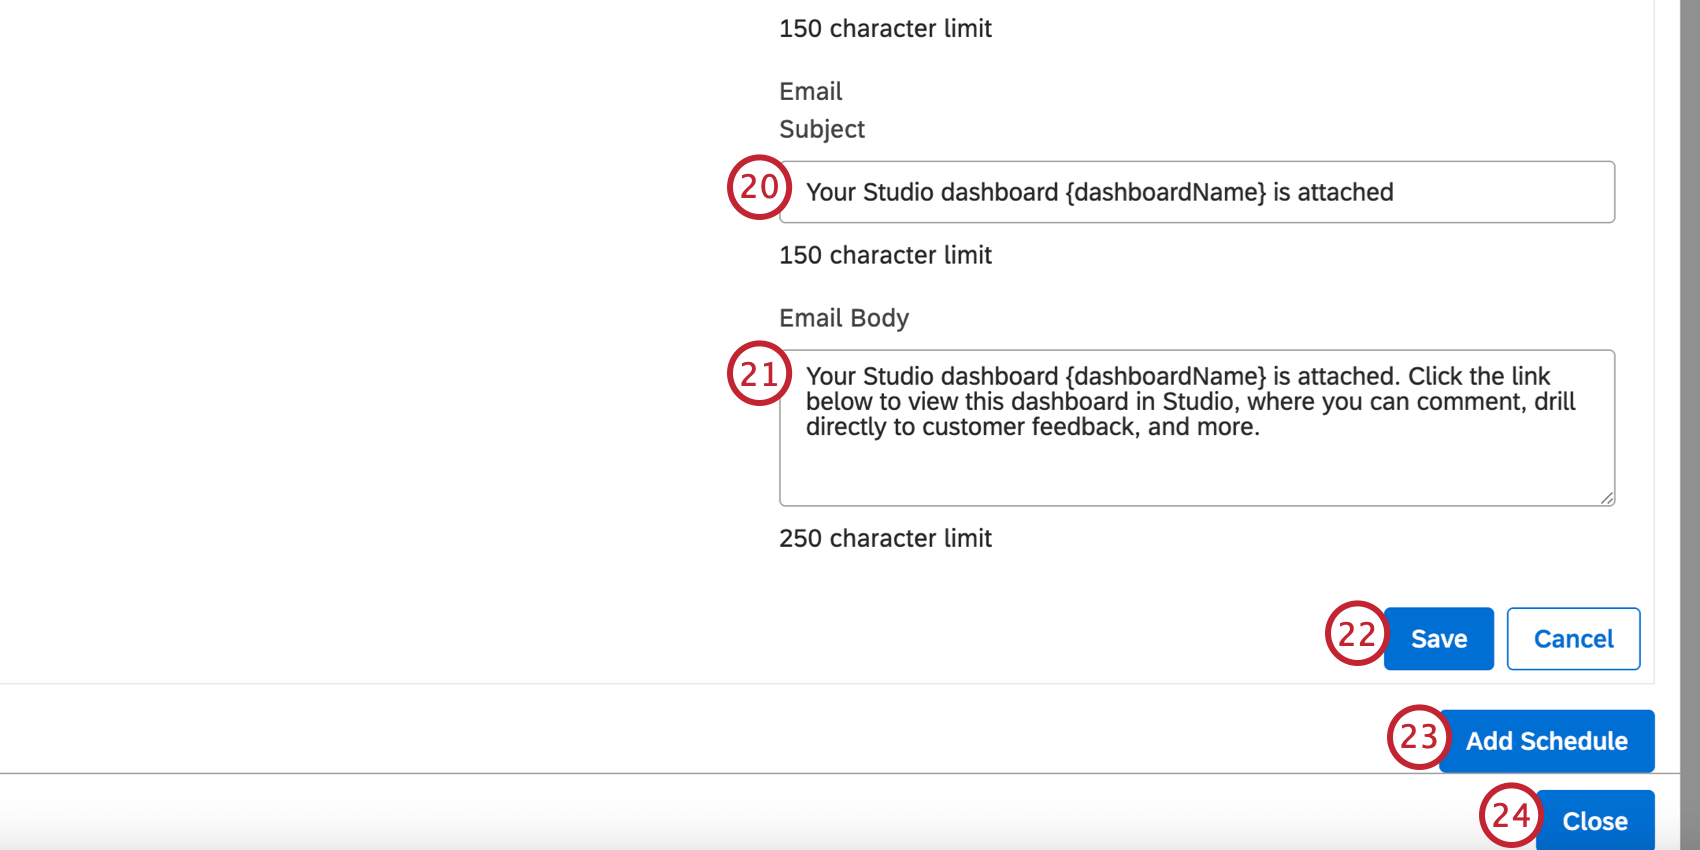
Click Save.
Qtip: Make sure that you save all schedules you added.
To schedule more actions, click Add Schedule. You can add up to 5 independent schedules per dashboard.
Click Close to exit the Dashboard Scheduling window.
You can schedule a periodic email distribution of a dashboard’s PDF snapshot to a selected group of recipients.
Email recipients do not have to log into Studio to view the updated dashboard; they can simply view the PDF. However, recipients have to be registered in Studio to be able to receive the emails.
Sign in to Studio.
Open the dashboard.
Expand the options menu in the dashboard header.
Select Schedule.
Alternatively, you can schedule actions from the Dashboard Explorer under the Explore Dashboards and Books section. Expand the actions menu next to your dashboard.
Select Schedule.
Click Add Schedule in the Dashboard Scheduling window.
Click the new schedule that is added.
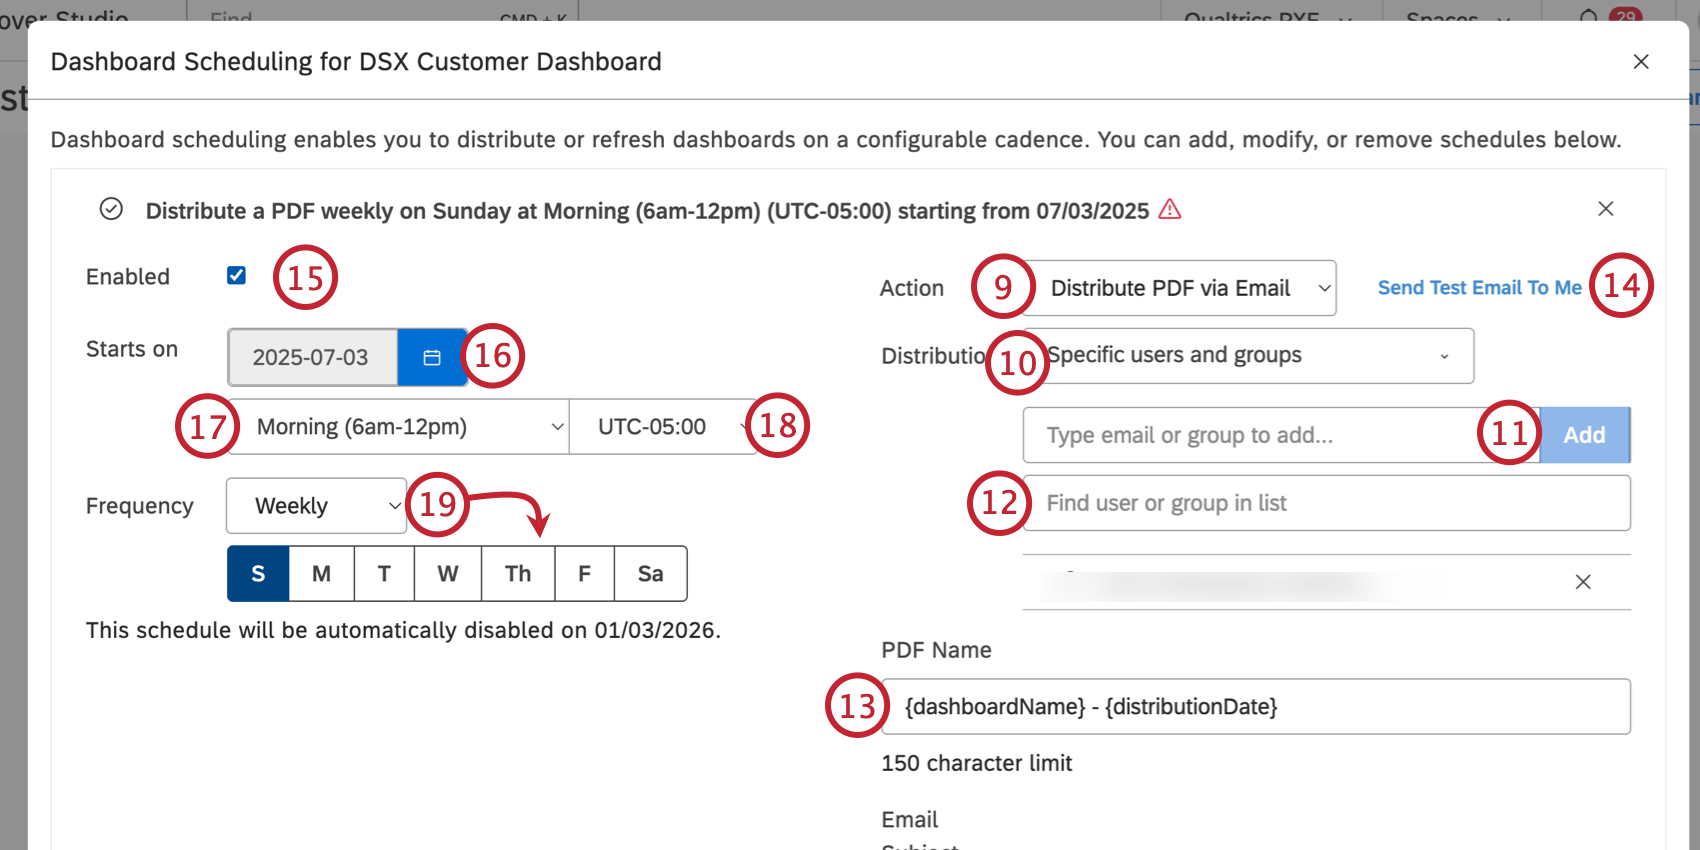
Select the Distribute the PDF via Email option from the Action menu.
Choose the distribution method by selecting 1 of the following options from the Distribution menu:
Specific users and groups option to add individual users and groups to the distribution list.
Select an organization hierarchy from the available organizational hierarchies listed under the header Organization Hierarchy to distribute the emails to hierarchy users. Every user will receive a personalized version of the dashboard for the highest hierarchy level available to them.
Qtip: For users who belong to multiple levels in an organization hierarchy, select the Consolidate Emails option to generate a single email with multiple PDF snapshots per level instead of multiple emails for each level.
Qtip: If your dashboard is personalized and the user you add to the distribution list is part of the organization hierarchy applied to the dashboard, the PDF will honor that user’s hierarchy level (regardless of the distribution method).
If you select Specific users and groups, enter the email address for the user or the group into the box and click Add.
You can enter the name of a user into the Find user or group in list box to find a specific user or group.
Enter a name for the PDF file in the PDF Name box.
Qtip: Type the curly bracket { to access a list of available placeholders you can use in the PDF Name, Email Subject, and Email Body fields.
You can click the Send test email to me link to receive a test email with current settings.
To define the schedule properties, first select the Enabled checkbox to enable the scheduled action. Deselect the Enabled checkbox to temporarily disable this action.
Starts on: Define the date and time when the action should be triggered first by clicking the calendar icon and selecting the month and the year.
Select the time of day when the email should send (e.g., “Morning 6am-12pm”).
Select the timezone.
Qtip: Your schedule will be automatically disabled six months after the start date. You will be notified when it happens. You can renew a schedule for another six months at any time by clicking the Renew link. For more information on renewing a schedule, please see Managing Scheduled Dashboard Events.
Define how often this action should be triggered by selecting one of the following options from the Frequency menu:
Only Once: Distribute the PDF just once on the Starts on
Weekly: Distribute the PDF on a weekly basis. Select one or more days of the week to refresh it on, up to 7 days if needed.
Qtip: Selected days are highlighted in blue.
Monthly: Distribute the PDF on a monthly basis. Select the day of the month to run it on and the number of months between the runs.
Enter a custom subject for the emails in the Email Subject box.
Enter a custom email message in the Email Body box.
Click Save.
Qtip: Make sure that you save all schedules you added.
To schedule more actions, click Add Schedule. You can add up to 5 independent schedules per dashboard.
Click Close once finished.
Viewing Scheduled Dashboard Events
Attention: A Manage Settings permission is required to access Dashboard Schedules.
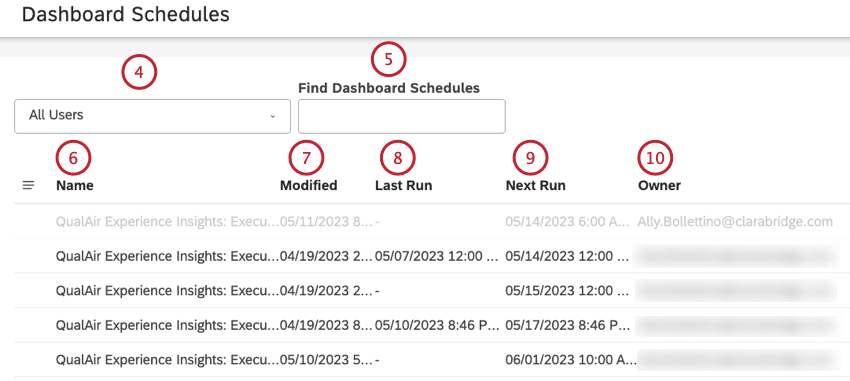
The Dashboard Schedules section lets you view and manage scheduled dashboard events. At least one event must be scheduled before you can access schedule management. If you scheduled at least one action, you can access all scheduled actions on the Dashboard Schedules page.
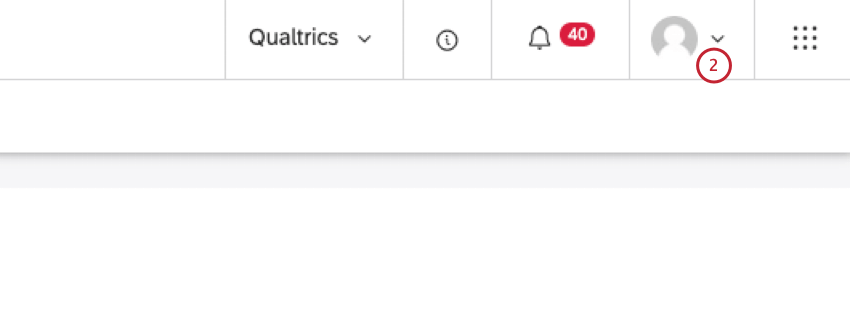
Expand the user avatar menu in the top navigation area.
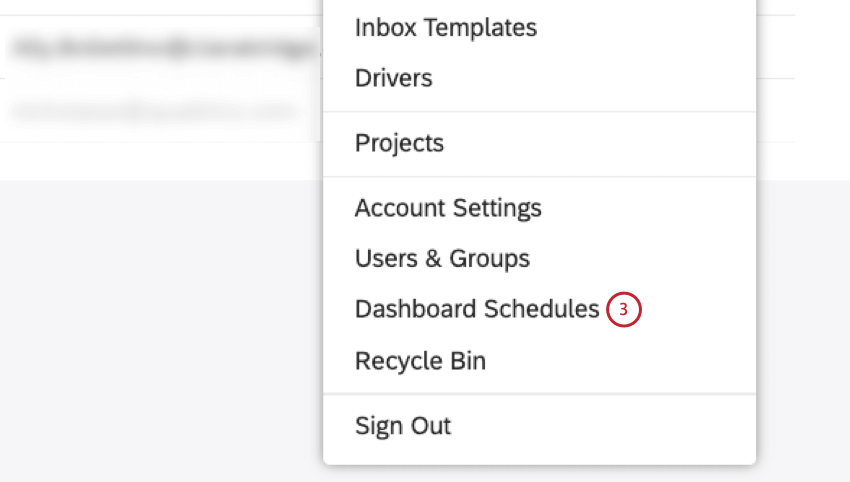
Select Dashboard Schedules.
On the Dashboard Schedules page, you can filter schedules by their respective dashboard owners.
Alternatively you can search for a dashboard schedule by entering the name of the dashboard into the Find Dashboard Schedules box.
You can click the name of a dashboard under the Name column to open the schedule settings window.
You can view the date when the schedule was added or last modified under the Modified column.
You can view the date of the last run under the Last Run column. A dash (–) is displayed if an event has no remaining runs (when frequency is set to “Only Once”).
You can view the date of the next run under the Next Run column.
You can view the owner of the scheduled dashboard under the Owner column.
Managing Scheduled Dashboard Events
Attention: A Manage Settings permission is required to access Dashboard Schedules.
The Dashboard Schedules section lets you view and manage scheduled dashboard events. At least one event must be scheduled before you can access schedule management. If you scheduled at least one scheduled action, you can access all scheduled actions in the Dashboard Schedules section.
Expand the user avatar menu in the top navigation area.
Select Dashboard Schedules.
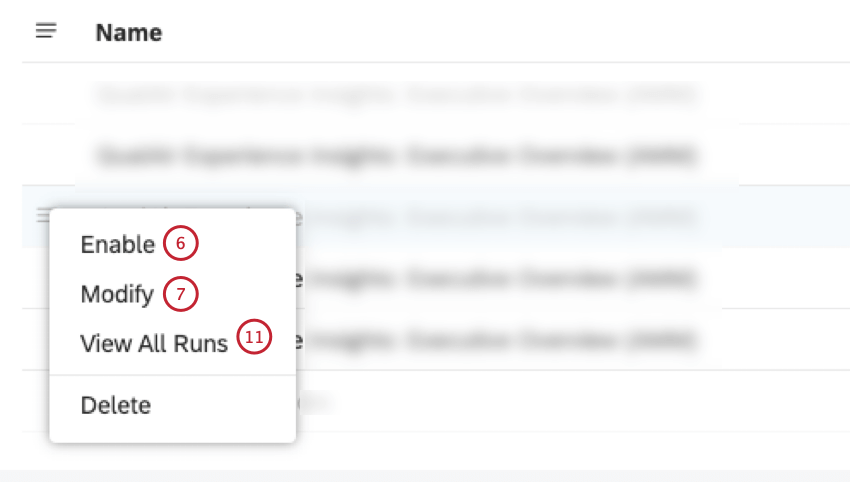
On the Dashboard Schedules page, click the actions menu next to a scheduled event to perform one of the following actions:
Cancel any scheduled runs and temporarily disable a schedule but keep the schedule in Studio.
Enable a disabled event to make it active again.
Modify schedule settings or add up to 5 schedules.
View all previous runs (time and status).
To cancel any scheduled runs, select Disable from the actions menu next to a scheduled event.
To enable a disabled event, select Enable from the actions menu next to a scheduled event.
To modify schedule settings or add up to 5 schedules, select Modify from the actions menu next to a scheduled event. You will be taken to the Dashboard Scheduling window where you can modify the schedule settings.
In the Dashboard Scheduling window, you have the option to deselect the Enabled checkbox to temporarily disable the action.
In the Dashboard Scheduling window, you have the option to click the x button in the header of the schedule in the Dashboard Scheduling window to permanently remove the schedule.
In the schedule settings window, you have the option to click Renew in the Dashboard Scheduling window to postpone the expiration of the schedule for six more months after the current date.
Qtip: By default all schedules are set to expire automatically six months after the start date.
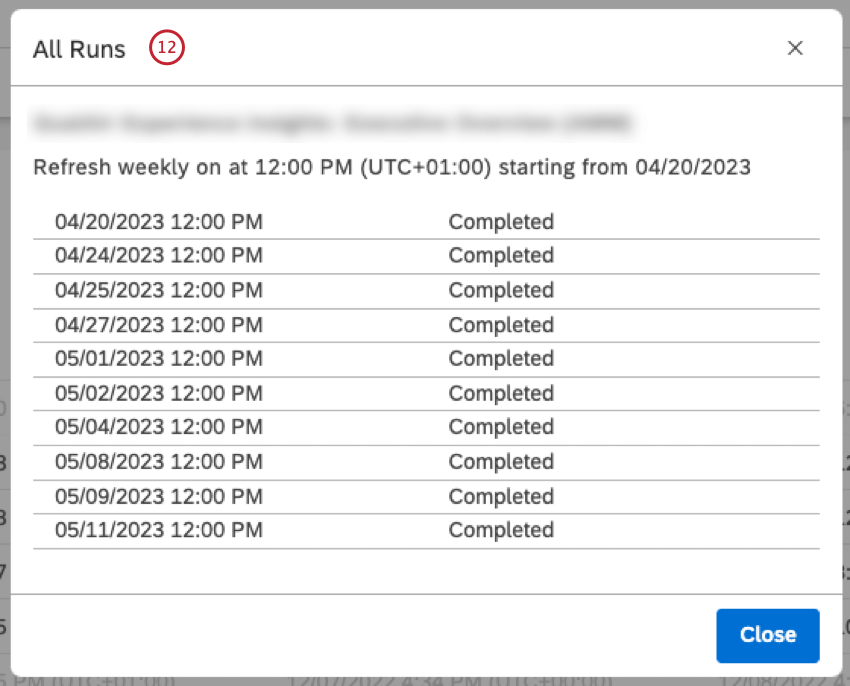
To view all previous runs (time and status), select View All Runs.
The All Runs window shows all the time and status of all previous runs.
Was this helpful?
The feedback you submit here is used only to help improve this page.


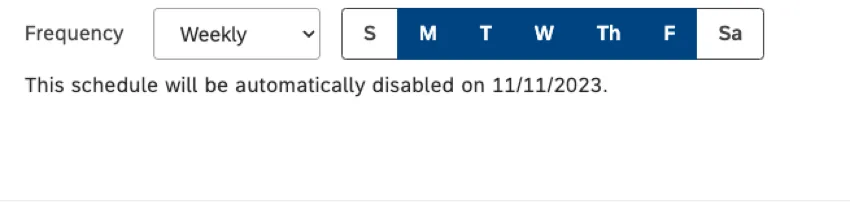 Qtip: Selected days are highlighted in blue.