Profile Manager
About the Profile Manager
The profile manager lets you customize features such as avatars, cover images, welcome messages, and automated replies for your different social profiles. The changes you make in the profile manager will be reflected on your various social profiles.
To open the profile manager:
- Click the profile icon.
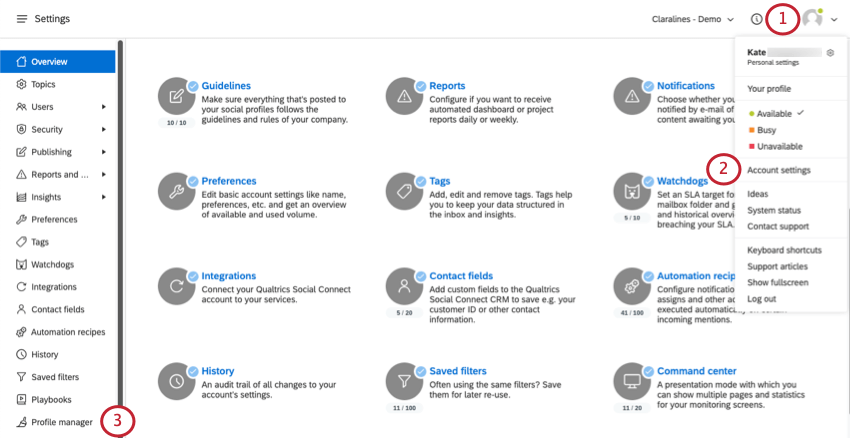
- Select Account settings.
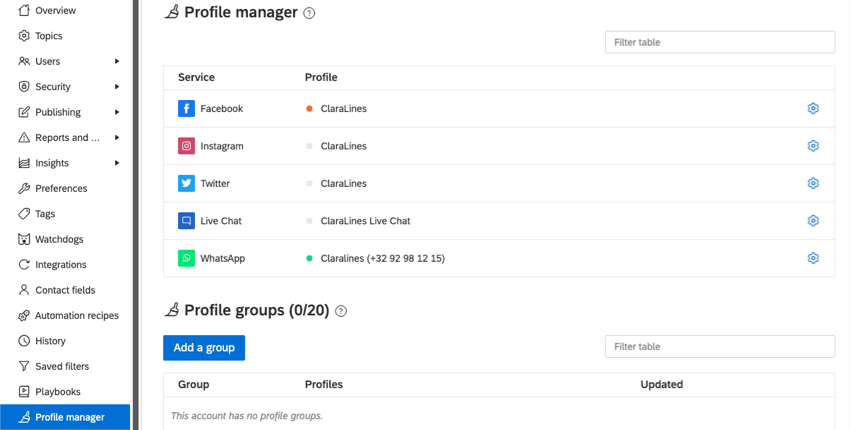
- Select Profile manager.
- Click the gear next to a profile to start making edits.
Twitter Profile
- In-App Profile Color: This color is only used in Social Connect. This color will be associated with this social profile when you select from the list of profiles to respond with in the inbox.
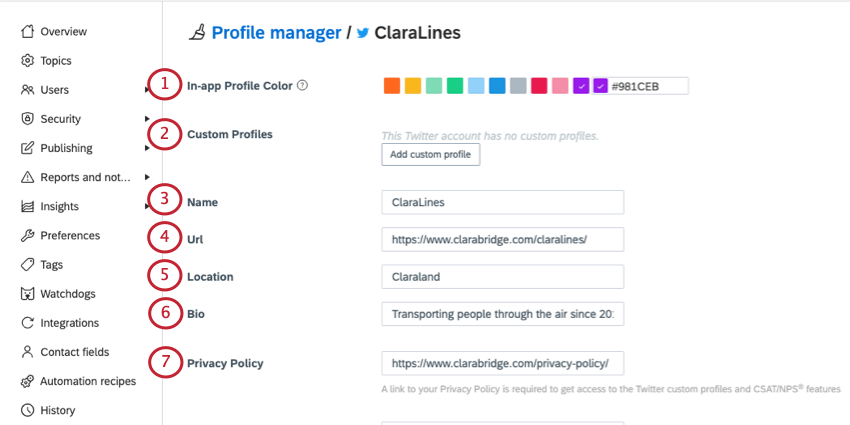
- Custom Profiles: Create individual profiles for your customer support team. See Custom Twitter Profiles.
- Name: Edit the name that appears in your Twitter profile.
- URL: Add a link to your website in your Twitter profile.
- Location: Change the location listed on your profile.
- Bio: Edit the Biography of your profile. This field is limited to 160 characters.
Qtip: Any URL added in your bio will automatically be shortened to t.co URLs by Twitter. This can change the total word count of your Twitter bio after you hit Save.
- Privacy Policy: In order to get access to the NPS®/CSAT features and Twitter Custom Profiles, Twitter requires you to share a link to your privacy policy. Add that URL here.
Example: https://www.qualtrics.com/privacy-statement/
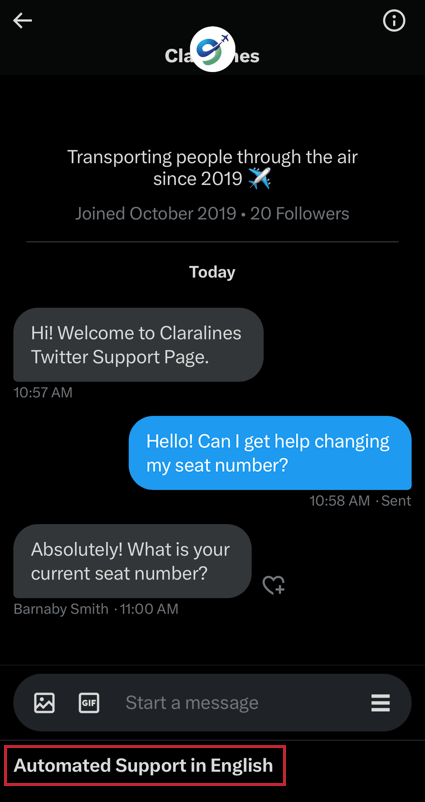
- Welcome Message: Customers will see your welcome message if they direct message your Twitter profile:
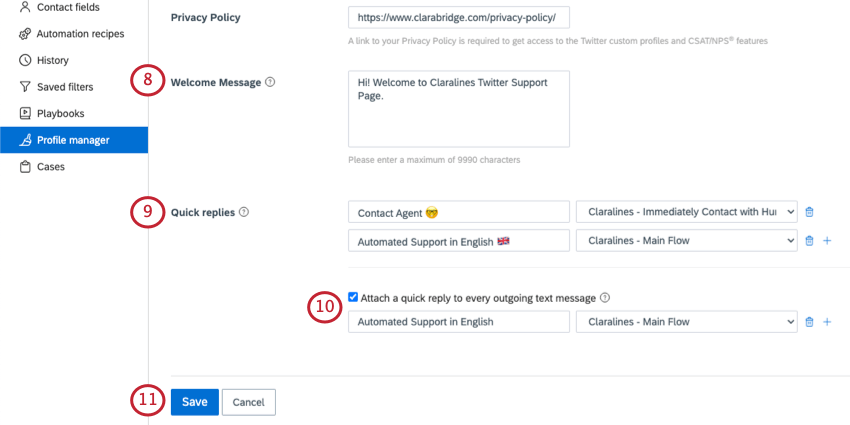
- For the first time.
- After leaving the conversation.
- After there has been no activity in the conversation for 7 days.
- Quick Replies: Quick replies are options your customers can click to get a quick, automatic response. Quick replies can be set up for your most frequently asked questions or concerns. Add up to 5 quick replies and choose their corresponding flows.
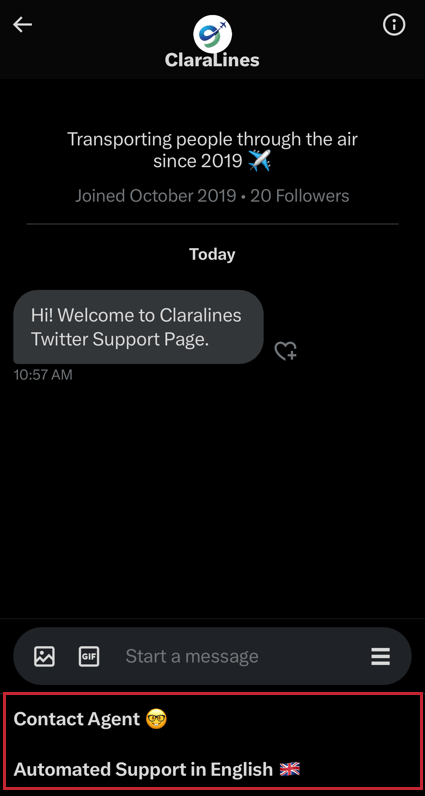 Example: Add a quick reply like “How do I get a refund?” to respond to the customer with information about your refund process.Attention: You need to create a welcome message before you can use quick replies.
 - Attach a quick reply to every outgoing message: This setting lets you add buttons for specific quick replies to every outgoing message. That means if a representative manually responds to the customer, the customer will still see quick reply buttons.
Example: At the end of every message, add a quick reply asking, “Was this answer helpful?” and let the customer fill out a satisfaction rating.
- Save: Save your changes when you’re finished.
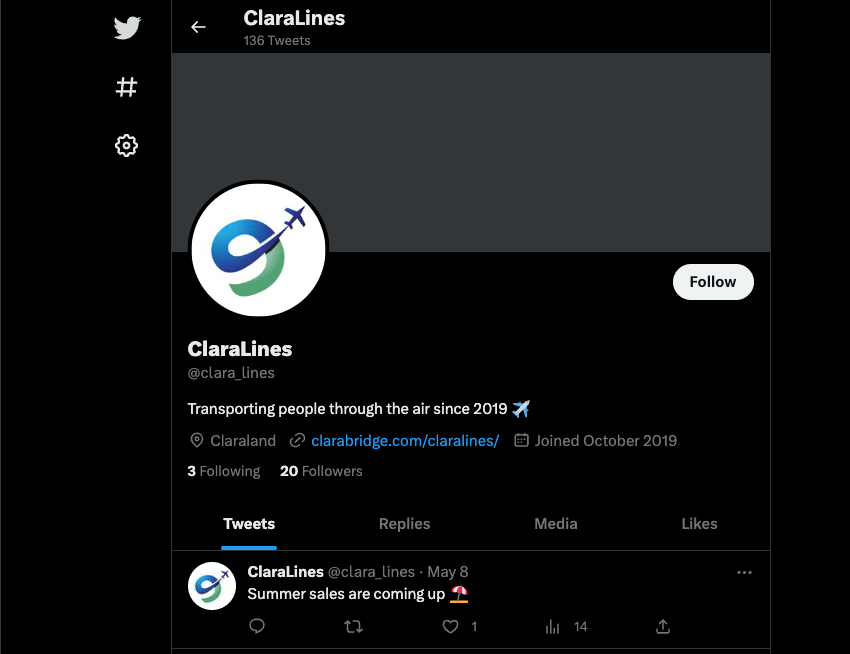
Example: This is what the name (ClaraLines), URL (clarabridge.com/claralines/), location (Claraland), and bio look like in a Twitter profile:
Quick Replies
In the left field, add a button name the customer will see. On the right, select the corresponding flow. To add more quick replies, click the plus sign ( + ).
Twitter Custom Profiles
Custom profiles let you add a human element in private conversations. Your customer support representatives can respond from the company Twitter account, but with their own name and avatar.
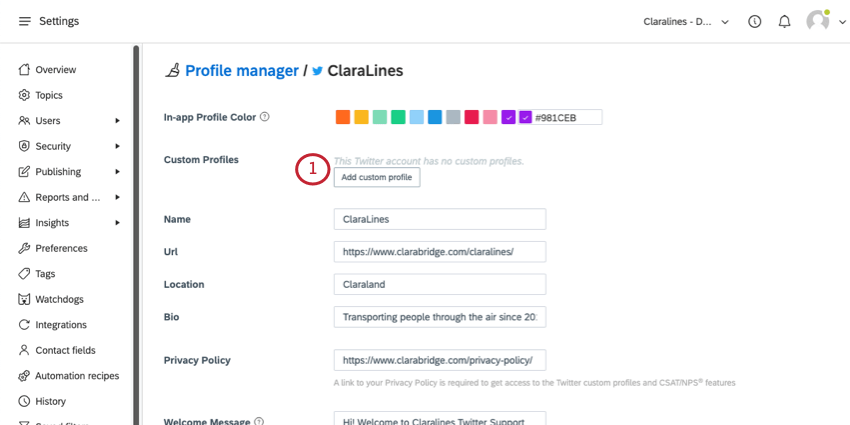
- Click Add custom profile.
- Read the Twitter automation rules.
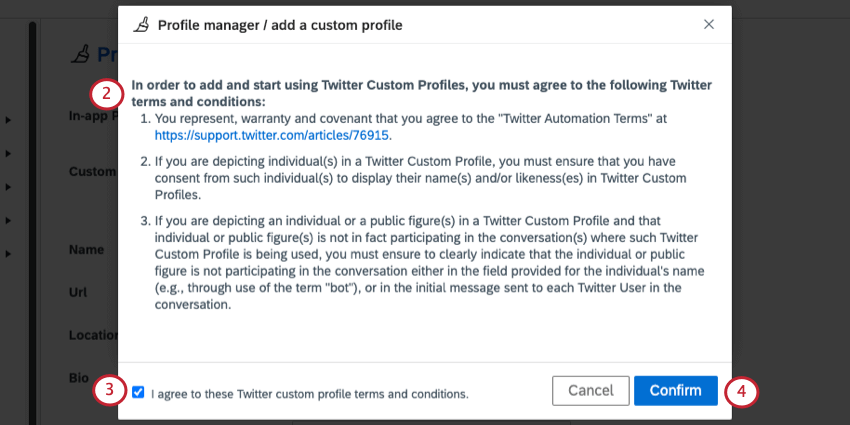
- Select I agree to these Twitter custom profile terms and conditions.
- Click Confirm.
- Add a name.
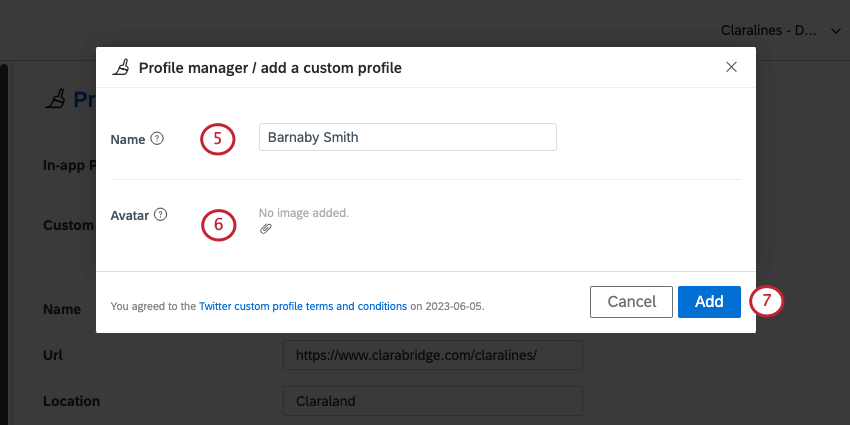
- Click No image added to upload an avatar.
- Click Add.
- Once custom profiles are created, they’ll be listed under Custom Profiles. Click the trash icon to delete the profile.
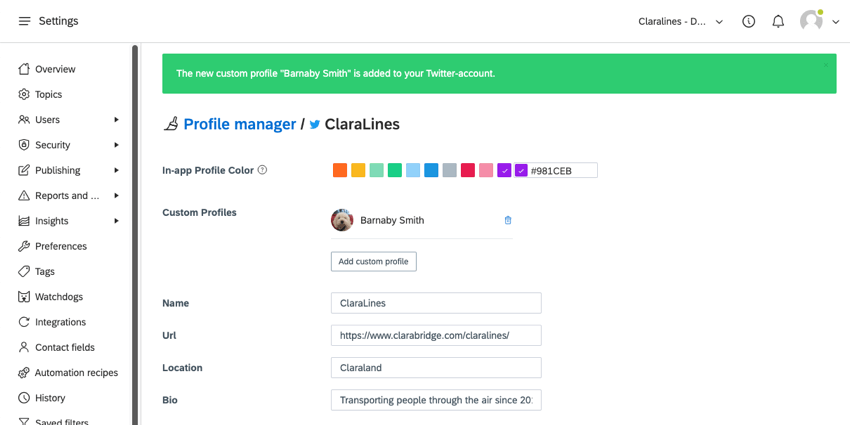
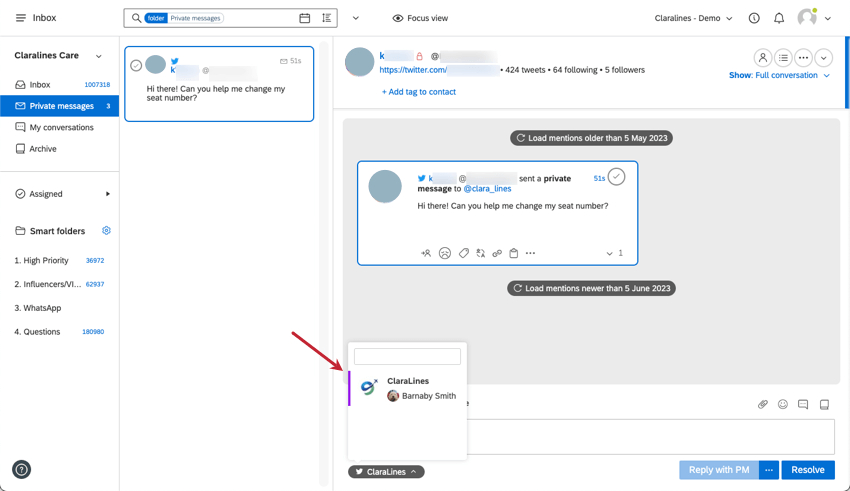
Representatives can use the profile from inside the inbox by clicking the dropdown below their message.
Facebook Profile
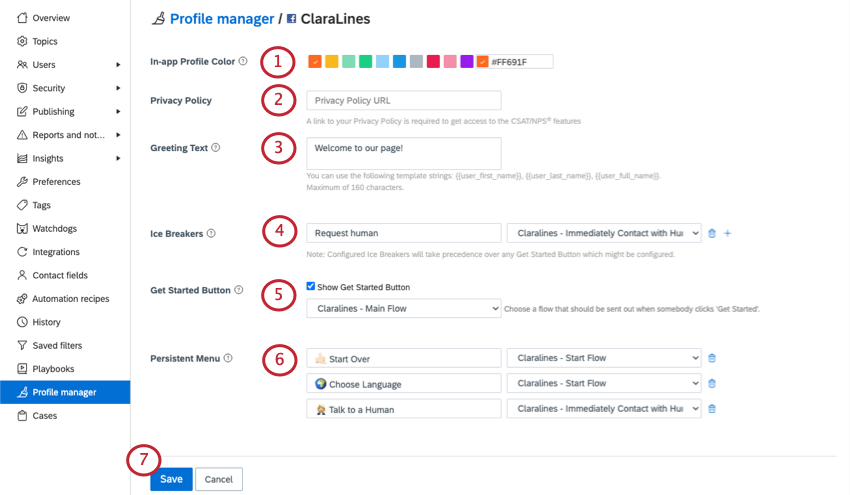
- In-App Profile Color: This color is only used in Social Connect. This color will be associated with this social profile when you select from the list of profiles to respond with in the inbox.
- Privacy Policy: In order to get access to the NPS®/CSAT features, you need to share a link to your privacy policy. Add that URL here.
Example: https://www.qualtrics.com/privacy-statement/
- Greeting Text: This is the text that greets customers when they message your Facebook page.
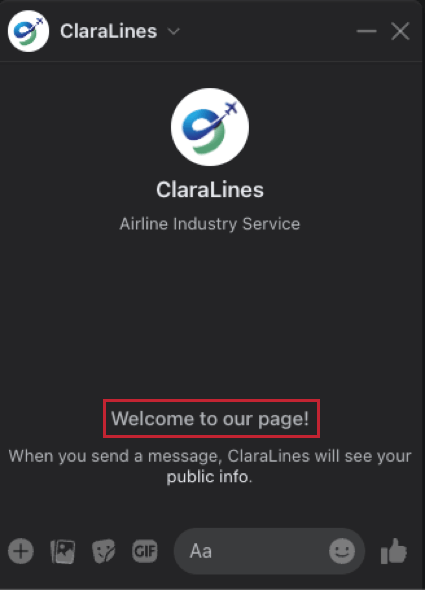
- Ice Breakers: This option lets customers start a conversation with your business using a list of frequently asked questions. You can automatically send a certain flow when the customer clicks on one of your ice breakers. You can configure up to 6 ice breakers for a Facebook profile.
Qtip: Ice Breakers will override any Get Started buttons you’ve made or any Facebook settings that might conflict.
- Show Get Started Button: This option adds a Get Started button to the Facebook Messenger welcome screen. When a customer clicks the button, it’ll start a flow of your choice. This button only appears the first time a customer contacts the page or if the customer deletes the previous conversation with the page and starts a new one.
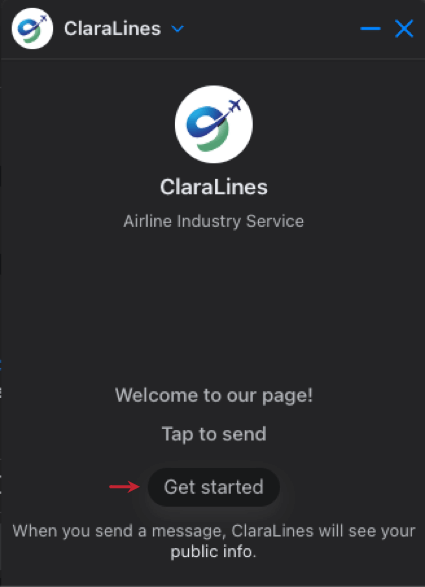
- Persistent Menu: This option lets you add a menu in Messenger conversations that never disappears. This menu should contain actions that customers can enact at any point.
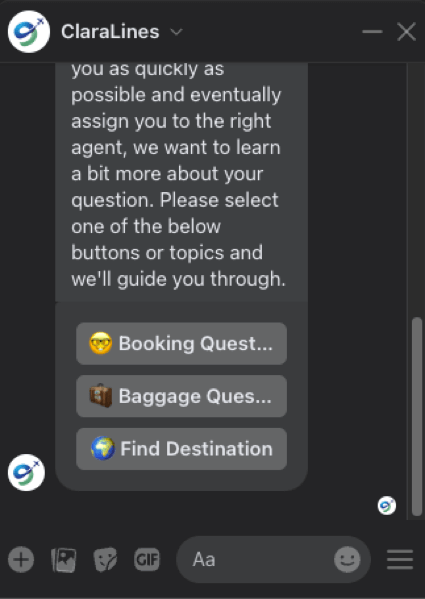 Qtip: You can add up to 3 buttons to your persistent menu. The name you type on the left will appear to the Facebook user as the button name.
 - Save: Save your changes when you’re finished.
Instagram Profile
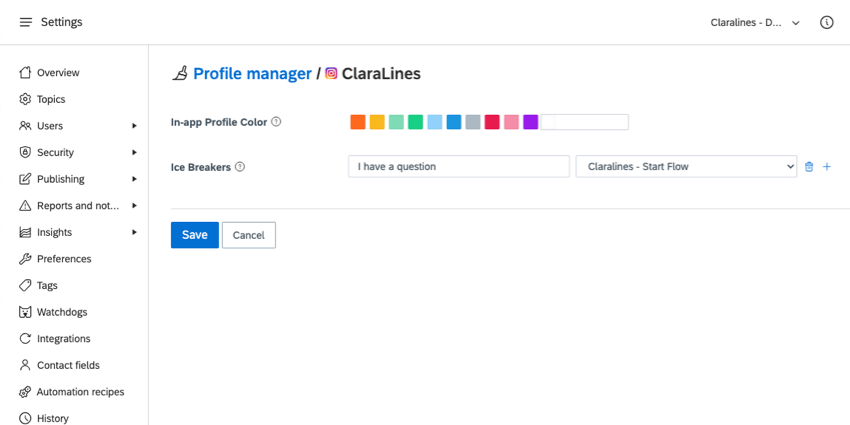
- In-App Profile Color: This color is only used in Social Connect. This color will be associated with this social profile when you select from the list of profiles to respond with in the inbox.
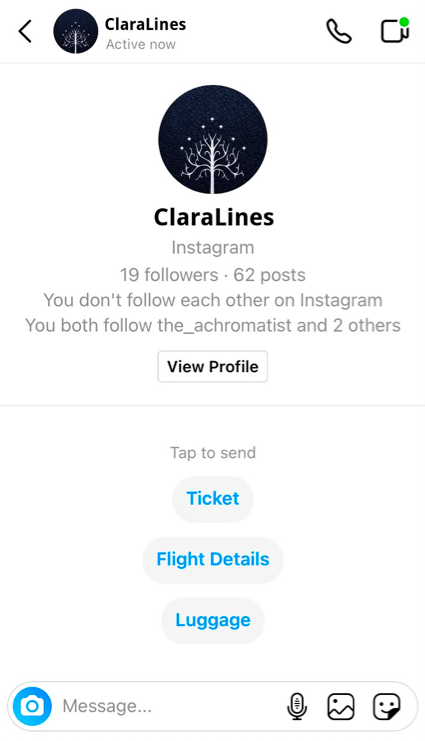
- Ice Breakers: This option lets customers start a conversation with your business using a list of frequently asked questions. You can choose to automatically send a certain flow when a contact clicks on one of your ice breakers. You can select up to 4 ice breakers.
Qtip: The name you type to the left of the flow will appear to the Instagram user.
- Save: Save your changes when you’re finished.
WhatsApp Profile
- In-App Profile Color: This color is only used in Social Connect. This color will be associated with this social profile when you select from the list of profiles to respond with in the inbox.
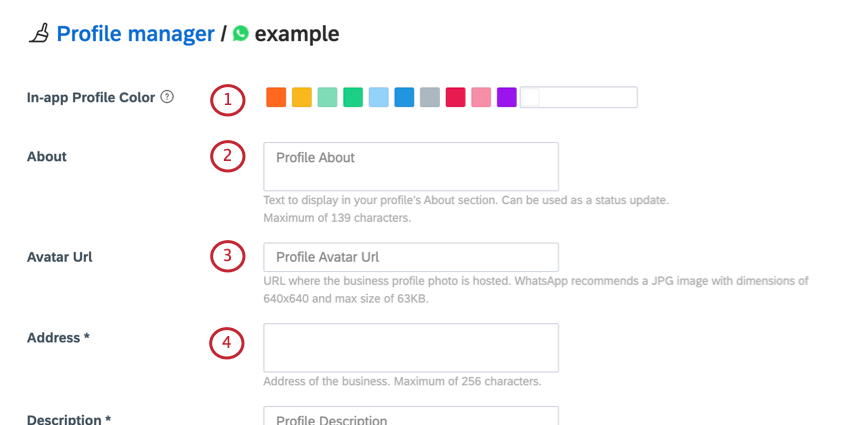
- About: Add a description that appears when a contact clicks to view your business’s WhatsApp profile.
- Avatar Url: Paste the URL for your avatar. WhatsApp recommends a JPG / JPEG that is 640×640 pixels with a maximum file size of 63KB.
- Address: Provide the address of your business. This field is required. You have a maximum of 256 characters.
- Description: Write a description to appear in your business’s WhatsApp profile. This field is required. You have a maximum of 256 characters.
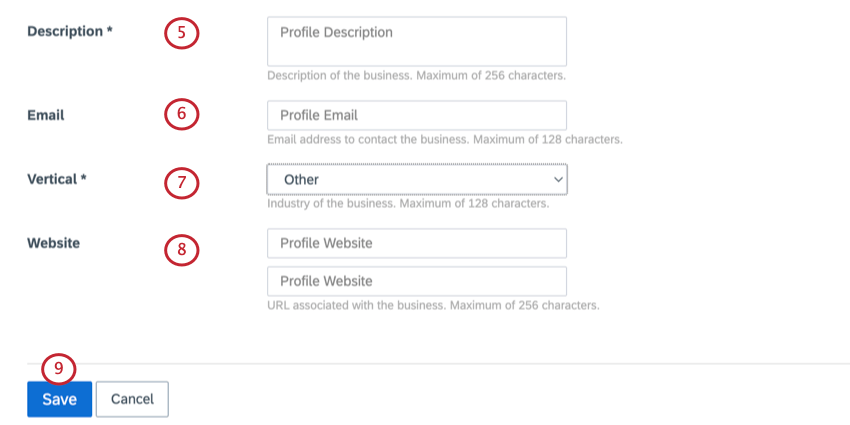
- Email: Provide an email address customers can contact. You have a maximum of 128 characters.
- Vertical: Choose the industry that best matches your business. This field is required.
- Website: Add up to 2 URLs for websites associated with your business. You have a maximum of 256 characters each.
- Save: Save your changes when you’re finished.
Live Chat Profile
- In-App Profile Color: This color is only used in Social Connect. This color will be associated with this social profile when you select from the list of profiles to respond with in the inbox.
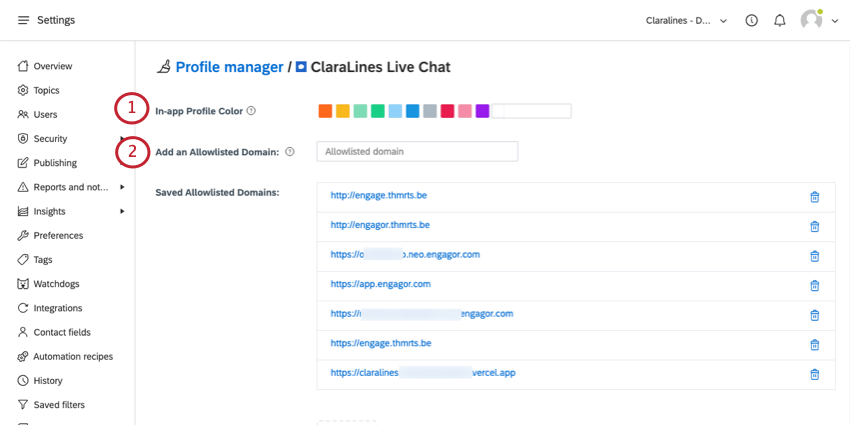
- Allowlisted Domains: By default, the Live Chat plugin can be initialized from any domain. To limit these domains, type a full URL and press Enter (or return on Mac).
- Avatar: Customers will see this avatar when chatting with one of your agents over live chat.
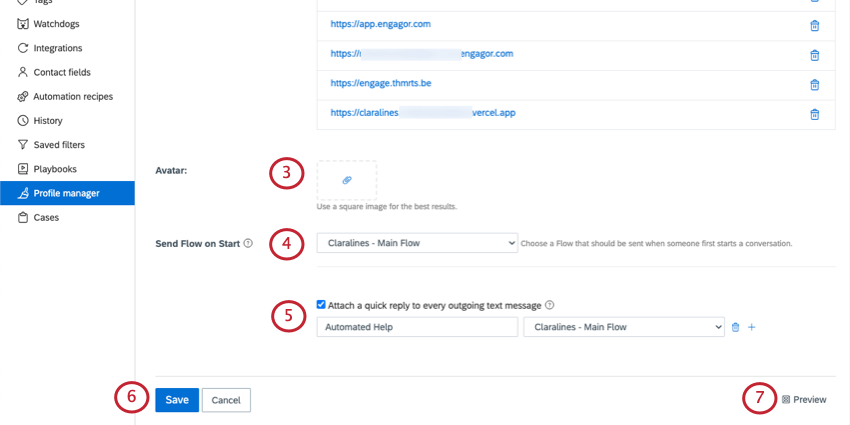
- Send Flow on Start: Choose a flow to automatically start when a user opens Live Chat.
- Attach a quick reply to every outgoing text message: Add quick replies to each outgoing message. You can add up to 3 quick replies. The name added in the field will appear to visitors.
- Save: Save your changes.
- Preview: Get the code needed to implement the Live Chat stream on your website.
Profile Groups
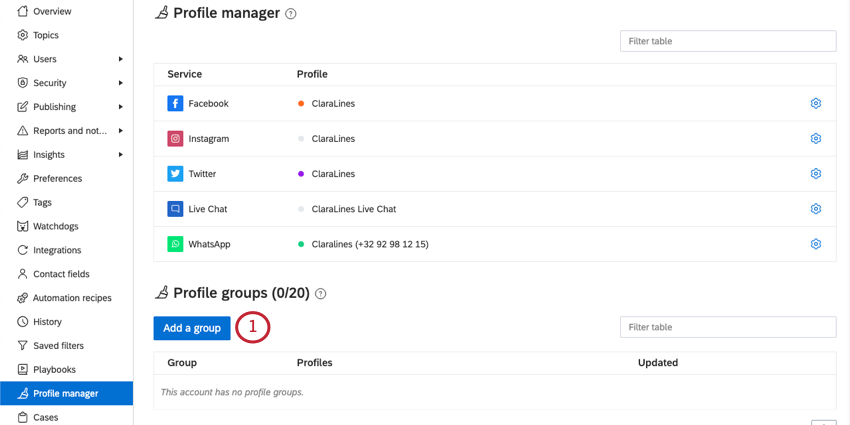
At the bottom of the profile manager, there’s a section named Profile Groups. In this section, you can group social profiles you frequently publish the same content on. Profile groups let you post the same content to multiple profiles at once with only 1 click.
You can only create 20 profile groups.
- Click Add a group.
- Name the group. This name is only visible to the Social Connect inbox.
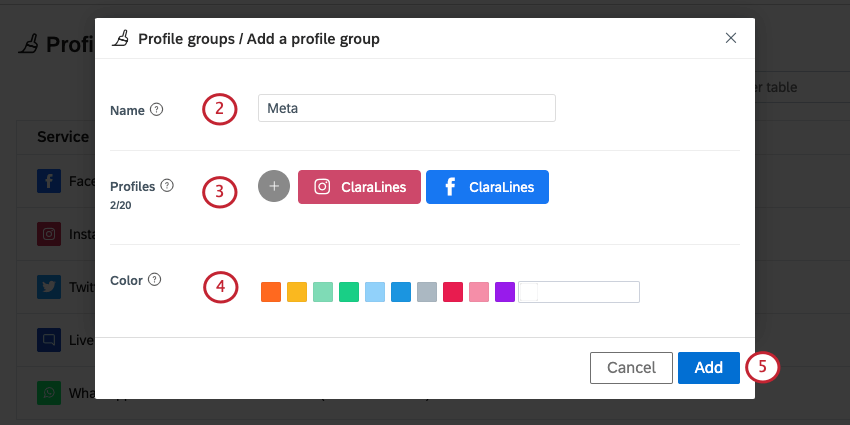
- Click the plus sign ( + ) to add profiles to this group.
Qtip: You can also add groups inside other groups.Qtip: You can add up to 20 items inside a group.
- Choose a color for the group. This will appear when representatives select a social profile in the inbox.
- Click Add.
Once groups are created, you can copy, edit, or delete them.
Exporting Profile Groups
You can export all of your groups to CSV or XLSX (Excel). On each row, you’ll see:
- An internal profile group ID
- The profile group name
- The individual profile
- An internal profile ID
- The display name of the profile
