-

Qualtrics Platform -

Customer Journey Optimizer -

XM Discover -

Qualtrics Social Connect
Integrating with Inbound and Outbound Connectors
About Integrating with Inbound and Outbound Connections
The first step to building a journey with the Customer Journey Optimizer is to connect to data sources and activation systems that interact with your customers. The Customer Journey Optimizer has pre-built integrations to different SaaS systems and to infrastructure systems such as webhooks, Amazon S3 and SFTP.
The Customer Journey Optimizer supports three types of industry-standard authentication methods: OAuth 2.0, username/password, and API key.
Setting Up a New Connection
- Navigate to Integrations.
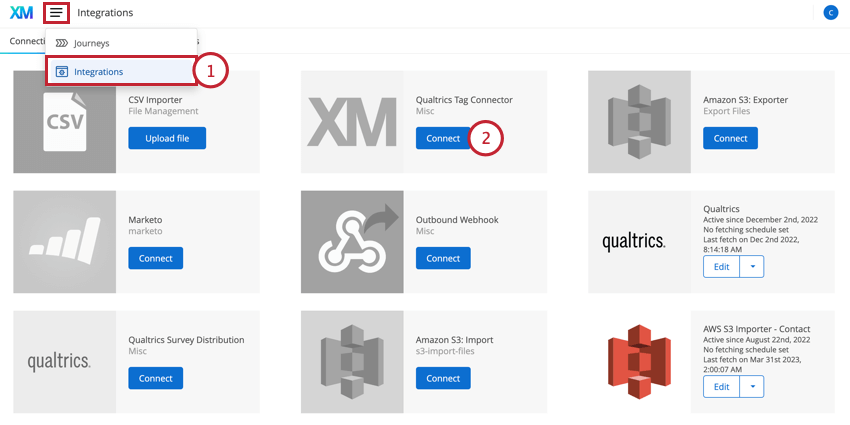
- Find the third-party system you’re interested in and click Connect.
- Enter the requested information for your integration. The information requested here varies by integration. See List of Integrations for more information about each integration.
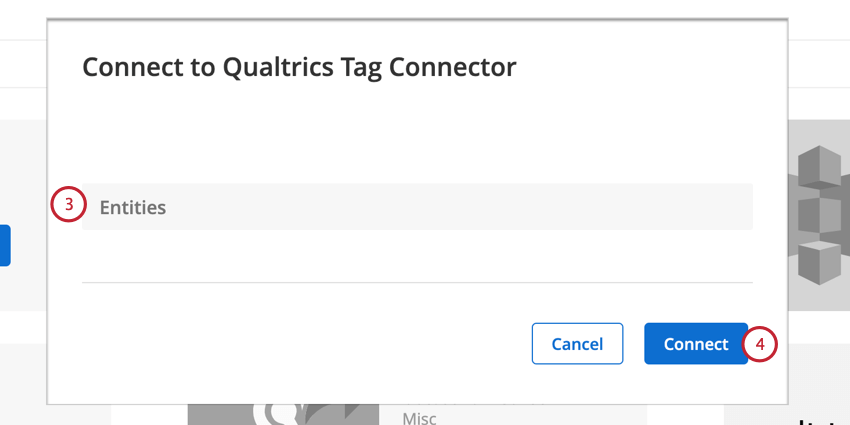
- When finished, click Connect.
- Click Edit next to your newly added integration.
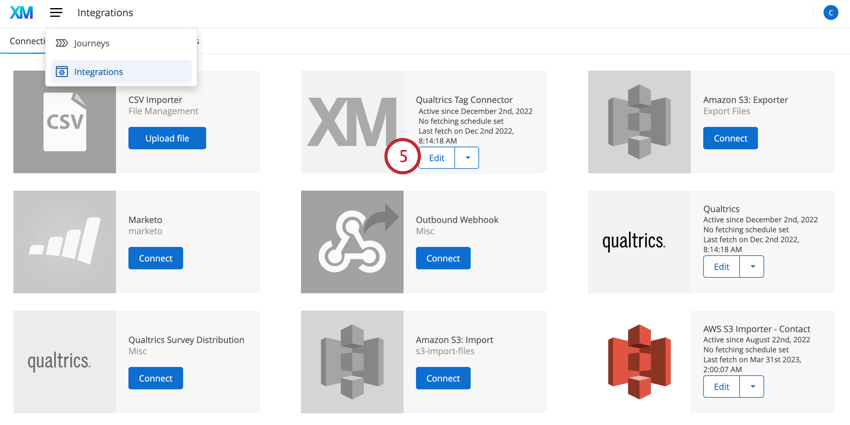 Qtip: Click the Edit button, not the arrow next to the button. The arrow opens the integration settings.
 - Choose the frequency for how often data should be fetched. You should choose a schedule that makes sense for the data source and how often you expect new records to be created. For example, if integrating with an SFTP that is updated daily with new customer information, you can choose “every 24 hours” for your fetching schedule.
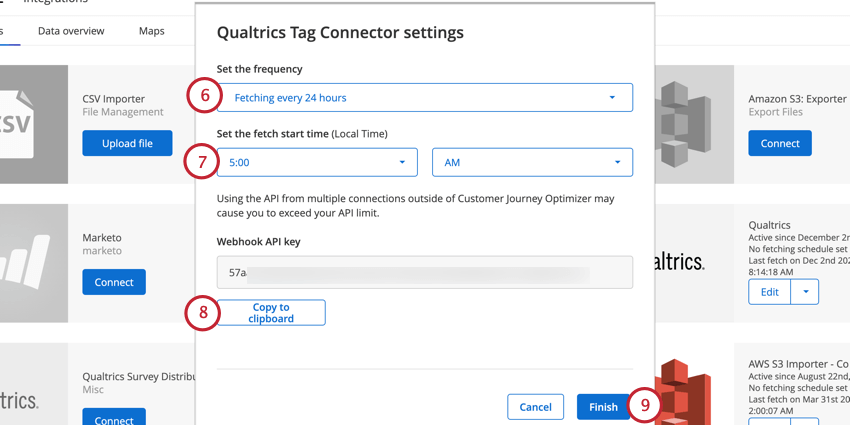
- If fetching data every 24 hours, choose the start time for when data should be fetched. The time zone for the start time is based on your organization’s local time.
Qtip: Your local time setting is configured by your Qualtrics Implementation representative when they set up your Customer Journey Optimizer instance. If you have questions about your organization’s time zone settings, contact your Implementation representative.Qtip: If using a different time period than 24 hours, the start time will be when you click the Finish button.
- Some connectors may have an associated webhook API key that you may need to provide to other systems. Click Copy to clipboard to copy the webhook key.
- When done, click Finish.
Integration Settings
There are a variety of settings available to you for managing your integrations. Click the arrow next to the Edit button inside a integration to view your options: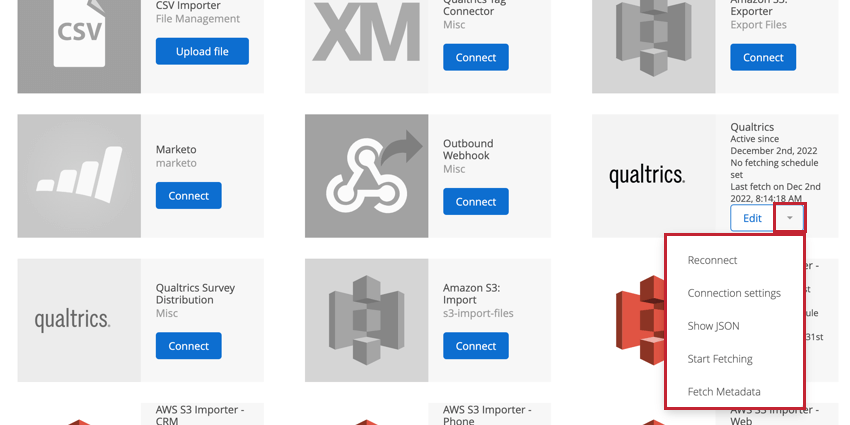
- Reconnect: Allows you to change the credentials used in the connection.
- Connection settings: Allows you to change the data fetching schedule and view the connection’s webhook key, if it exists. You can also access these settings by clicking the Edit button.
- Show JSON: Displays the JSON payload for the integration.
- Start Fetching: Begin processing data for this connection. This setting also fetches metadata before pulling data records.
- Fetch Metadata: Manually trigger a data pull to ingest the data definition for the connection without importing actual data records.
Viewing Connections
You can view your connected third-party systems and their data by navigating to the Data overview section of the Integrations tab. Click on the connection that you’re interested in.
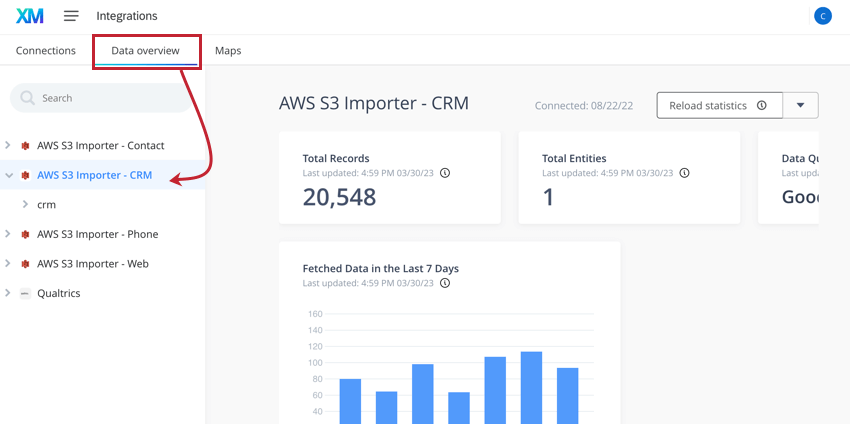
Here you can view information about your connections, including:
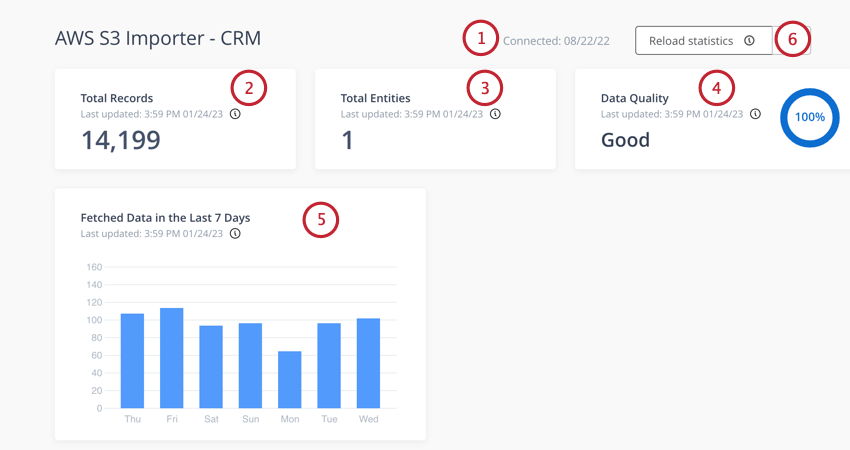
- Connected: When the connection was established.
- Total Records: The total number of rows of data that have been imported from this connection.
- Total Entities: The total number of objects, or entities, from this connection. See Viewing Entities for more information about viewing the entities associated with your connections.
Example: For example, if you import contact data from your CRM, the data is often stored in the “Contact” object. Therefore, your connection will have 1 entity. The entity can have multiple fields (called metadata) associated with it.
- Data Quality: Your data quality, which measures how complete and unique your data is overall. Data quality is calculated by finding the percentage of null values in your data set.
- Fetched Data in the Last 7 Days: A breakdown of the amount of data that has been fetched in the last seven days. This includes both new rows of data and updated rows of data.
- Reload statistics: If you’ve recently ingested new data, you can refresh the data displayed on this page by clicking Reload statistics. The page will refresh once the recalculation is complete.
Viewing Entities
You can view more information about the entities you have imported from a connection. Click the arrow next to a connection to expand it. Once a connection is expanded, you can select an entity from the list to see key information about the entity. 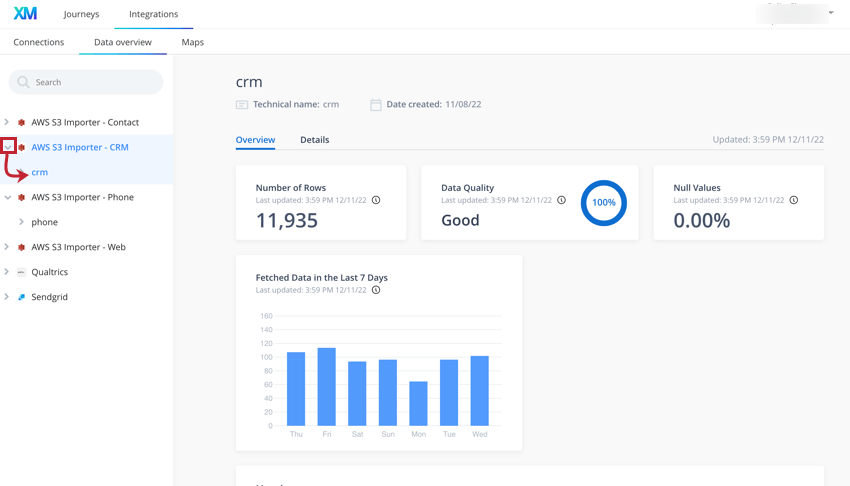
There are 2 tabs for viewing information about an entity: the Overview tab and the Details tab. This section will cover the information you find in each tab.
The Overview tab contains general information about the data that’s included in this entity.
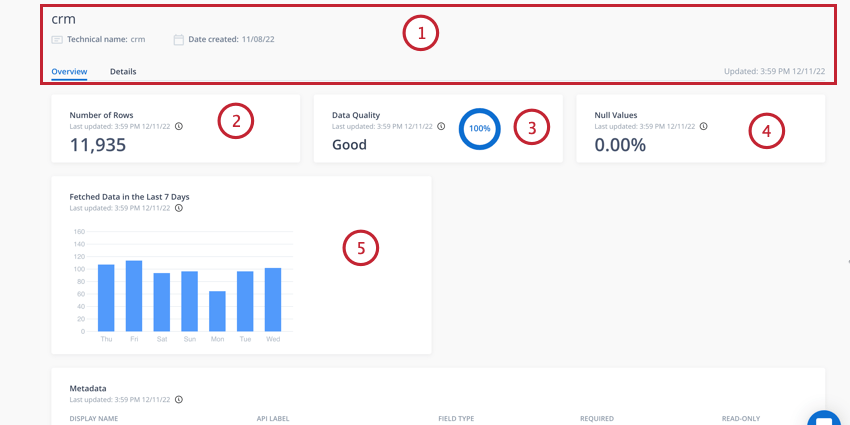
- At the top of the page, you will find the entity’s name, the date it was created, and when the entity’s data was last updated in the Customer Journey Optimizer.
- Number of Rows: The total number of rows of data that are contained within this entity.
- Data Quality: Your data quality, which measures how complete and unique your data is overall. Data quality is calculated by finding the percentage of empty and repeating values in your data set.
- Null Values: The percentage of data that contains empty values.
- Fetched Data in the Last 7 Days: A breakdown of the amount of data that has been fetched in the last seven days. This includes both new rows of data and updated rows of data.
- Metadata: The metadata table shows you key information about the data contained within this entity. The columns in this table include:

- Display name: The name of the field as it appears in the Customer Journey Optimizer.
- API label: The name of the field as it appears in its original data source.
- Field Type: The field’s field type.
- Required: Specifies if the field is required for a data record. Values include true (meaning it is required) or false (meaning it is not required).
- Read-only: Specifies if the field’s data can be changed in a record. Values include true (meaning that the field data cannot be changed) or false (meaning that it can be changed).
The Details tab contains a table with the most recently imported records for you to view.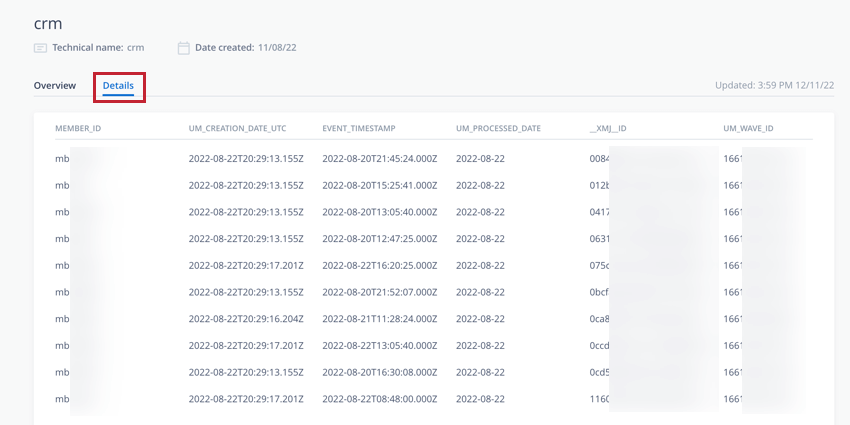
The fields included in this table are dependent on your selected entity. This table will list the fields that make up that entity.
Viewing Field Records
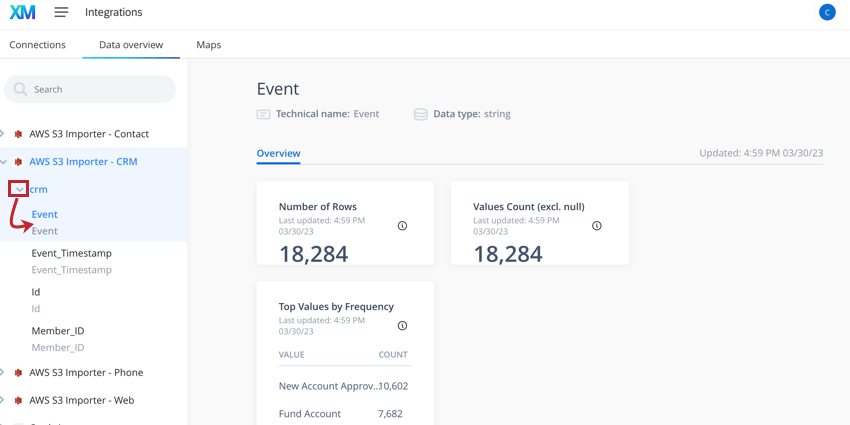
You can also view the different records and possible values for your imported fields. To view a field’s data, click the arrow next to the entity to expand it and then click your field of interest.
When viewing a field, the following information is available:
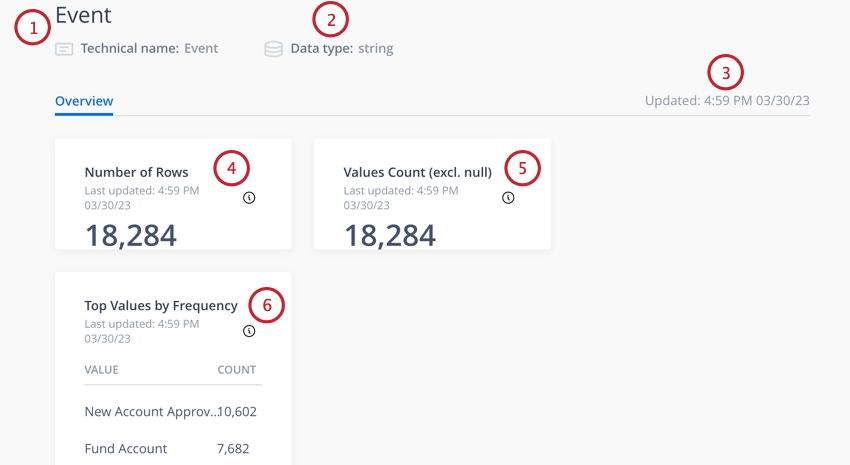
- Technical name: The field’s name.
- Data type: The field’s field type.
- Updated: The date and time that the data was last updated. You can update this by fetching metadata.
- Number of Rows: The total number of records of data that contain this field.
- Values Count: The total number of records of data that have a value for this field. This number excludes null (empty) values.
- Top Values by Frequency: Lists the values that appear most frequently in your dataset.
Qtip: You can use this information to help you build your journey milestones and rules by targeting the most common data values.
List of Integrations
This section lists the integrations available for both inbound and outbound connections.
Inbound Connections
The connections in this section are inbound connections. They are used for ingesting profile and event data into the Customer Journey Optimizer. These systems send the data that is used by travelers to move through a journey.
- SFTP: Import profile or event data from a file via an SFTP connection.
- Amazon S3 Importer: Import profile or event data using an Amazon S3 connection.
- Sentiment and topics: Ingest Qualtrics CX survey data to display in milestones.
- Web analytics: If using a Qualtrics website / app feedback project, use the DX JavaScript tag to send event data.
- Inbound Webhook: Ingest profile or event data from a webhook.
- Marketo: Ingest data from your Marketo programs, campaigns, and leads to use in your journey.
- SDK: Connect with a custom inbound connection using the Customer Journey Optimizer SDK.
Qtip: Contact your Implementations representative for more information about custom integrations.
Outbound Connections
The connections in this section are outbound connections. They are used for sending actions and data from the Customer Journey Optimizer to a third-party system. These systems send the actions and data which result from travelers moving through a journey.
- Amazon S3 Exporter: Export profile or event data using an Amazon S3 connection.
- Marketo: Send actions to Marketo, such as Add lead to campaign and Add lead to program.
- SFTP: Export profile or event data to a file using an SFTP connection.
- Survey distribution: Trigger a survey based on traveler activity.
- Outbound Webhook: Send profile or event data using a webhook.
- SDK: Connect with a custom outbound connection using the Customer Journey Optimizer SDK.
Qtip: Contact your Implementations representative for more information about custom integrations.