
Step 6: Sharing & Administering CX Dashboards
What's on this page
Dashboard Personas
Now that we’ve customized our dashboard, it’s time to share it with the appropriate stakeholders. Remember when we were planning the dashboard, and thought about the people who would be using it? It’s time to return to the table we made earlier.
Qtip: Be thoughtful about which users you give dashboard access. If some users need access to sensitive data, we recommend creating a separate dashboard for them, instead of creating a general dashboard with layers of restrictions for other users.
This time, let’s think about the kind of data these users should have access to, and whether or not they can edit the dashboard. Think in terms of the needs of their data collection and their roles.
| Role | Dashboard Objectives | Should they see all dashboard data? | What kind of dashboard permissions do they need? |
|---|---|---|---|
| CX Manager |
| Yes, so they can share high-level data with executives |
|
| Analyst |
| Only the data of their department |
|
| Operations Manager |
| Only certain pages of the dashboard, which are customized for them |
|
| Closed Loop Operator |
| Only ticket data |
|
| Executives |
| Yes |
|
Once you know what permissions would fit your personas best, we’ll be able to create roles for each persona.
Configuring Dashboard Users
You have to be both a Project Administrator (often the person who made the dashboard project) and a Brand Administrator to perform the actions described in this section. This means you have access to the User Admin tab.
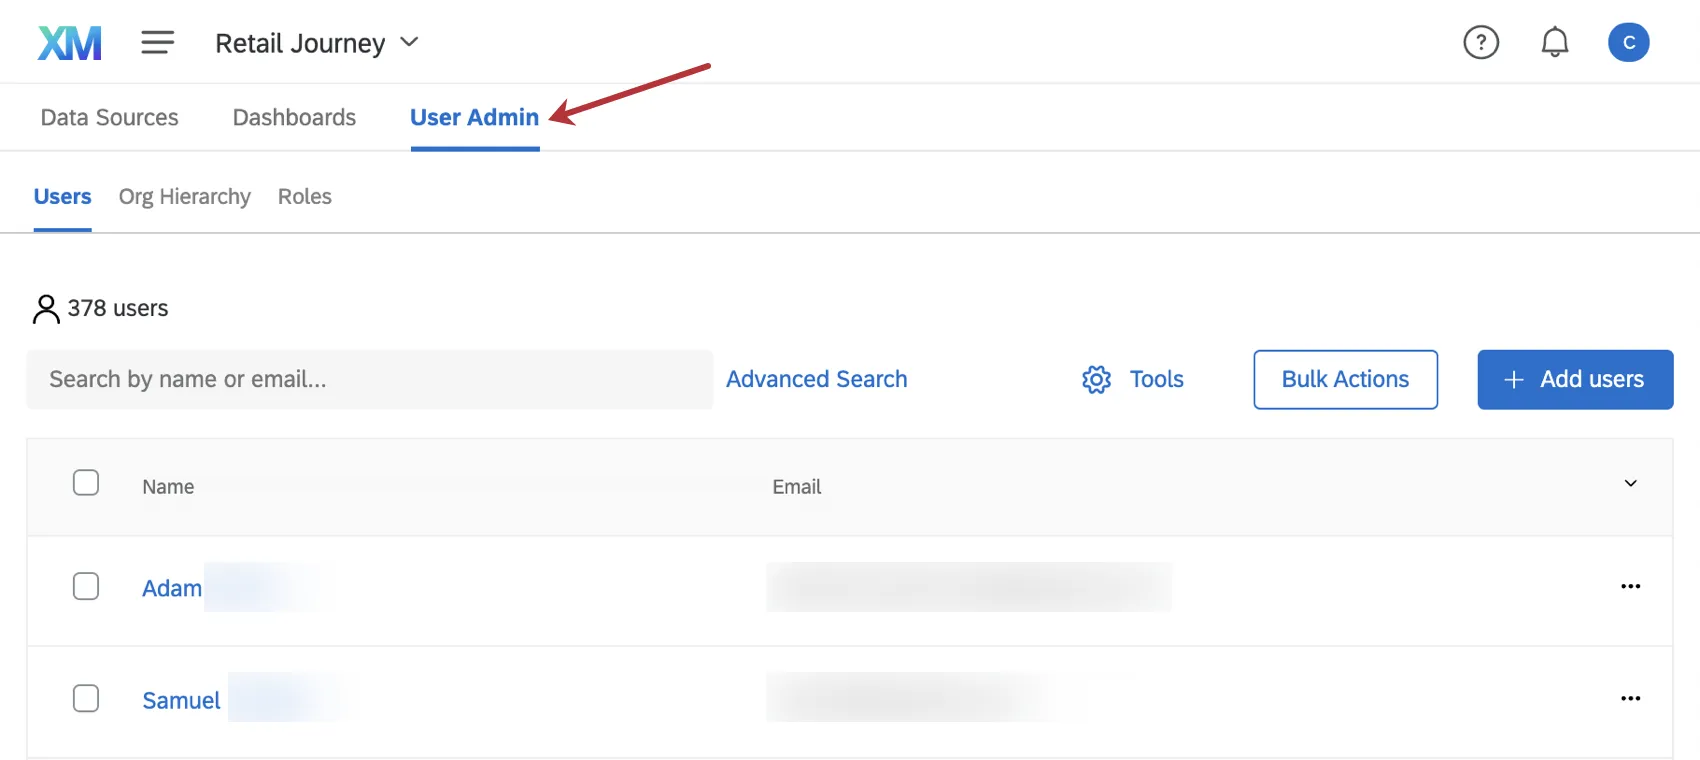
Adding Dashboard Users
It’s time to head back to the dashboard project to check out the User Admin tab. This is where we can add several dashboard users at a time.
You can manually add or upload a file of all the users who will be using your dashboard. As you’re compiling a list of users, keep in mind their respective personas. Certain information is required for every user you’ll upload – for example, first name, last name, email address and, if you have SSO, Username – but there’s additional information you can include that can help restrict their dashboard access.
User attributes, also called metadata, are additional columns of information that you include with your dashboard users. Here are some examples of user attributes you might want to include:
- Department
- Team
- Manager
- Team Lead
- Agent
Example: Barnaby’s in the Sales department. He’s on the Academic Sales team, the manager of which is Pepper. The leader of the Academic sales team is Goldie. Here’s what these three might look like in a user file.

Qtip: Looking to set up a more complex, hierarchy-style access to dashboards? See Drill Down Hierarchies in CX Dashboards.
If you want to use attributes to restrict user data, you need to make sure the survey responses (or CSV) acting as your dashboard data also contain these columns of information. Otherwise, the data won’t be correctly restricted when these users enter the dashboard.
Be extremely careful with how you write the names for these fields in the user file and in the dashboard data. Between the dashboard data and the user attributes, there should be absolutely no differences in spelling, additional characters, or spacing between words. If it’s “Team Lead” in the user file, you should never change it to “TeamLead” or “Team-Lead” in the dashboard data.

Qtip: These kinds of descriptive fields are generally mapped as Text Set.
Qtip: Once you’ve uploaded all your dashboard users, you can easily send many users or send everyone their login credentials.
Roles
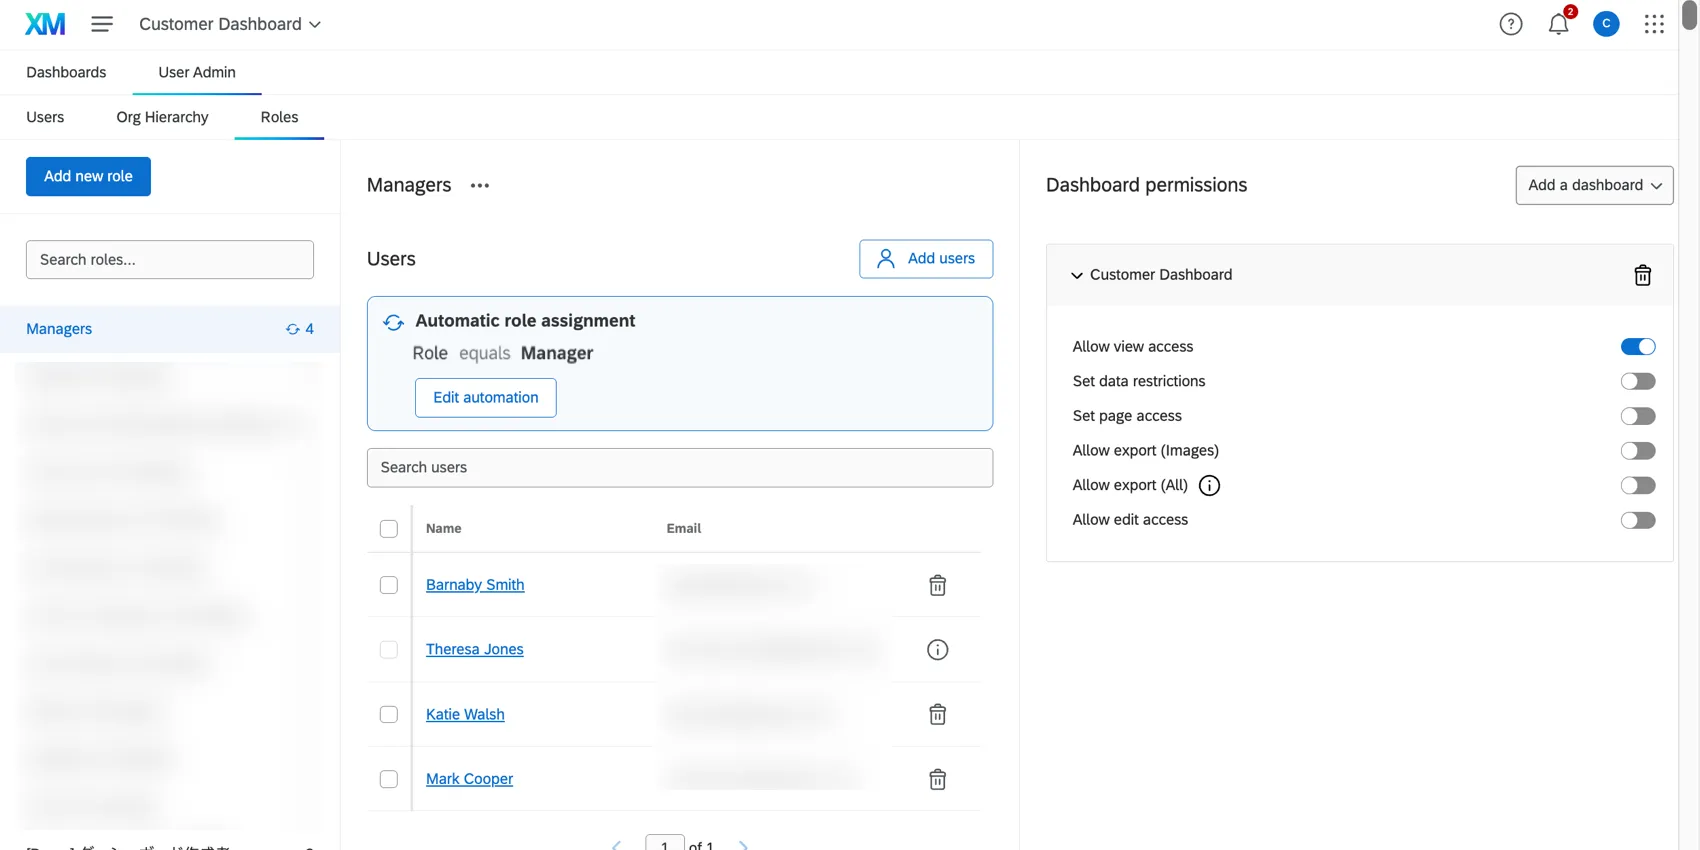
Create a role for each user persona you mapped out. Remember to add the appropriate dashboard and permissions to each role. Here are some highlights:
- Allow view access is the minimum permission every user needs.
- You can restrict access by data, or restrict access to specific pages.
- You can allow users to export just widgets, or the dashboard as a whole.
- Allow edit access allows the users to edit all aspects of the dashboard, from widgets to theming to settings. It’s just the one dashboard, though.
- You will need to add each dashboard you want a user to have access to.
Qtip: To give someone editing access to all the dashboards in a project and manage sharing permissions, add this person as a Project Administrator instead.
Qtip: When new users are imported or added, they are not sent login credentials automatically. This is to give you time to configure roles and data restrictions. When you are ready to send users their credentials, check out this page. You can send login information to all or many users at once.
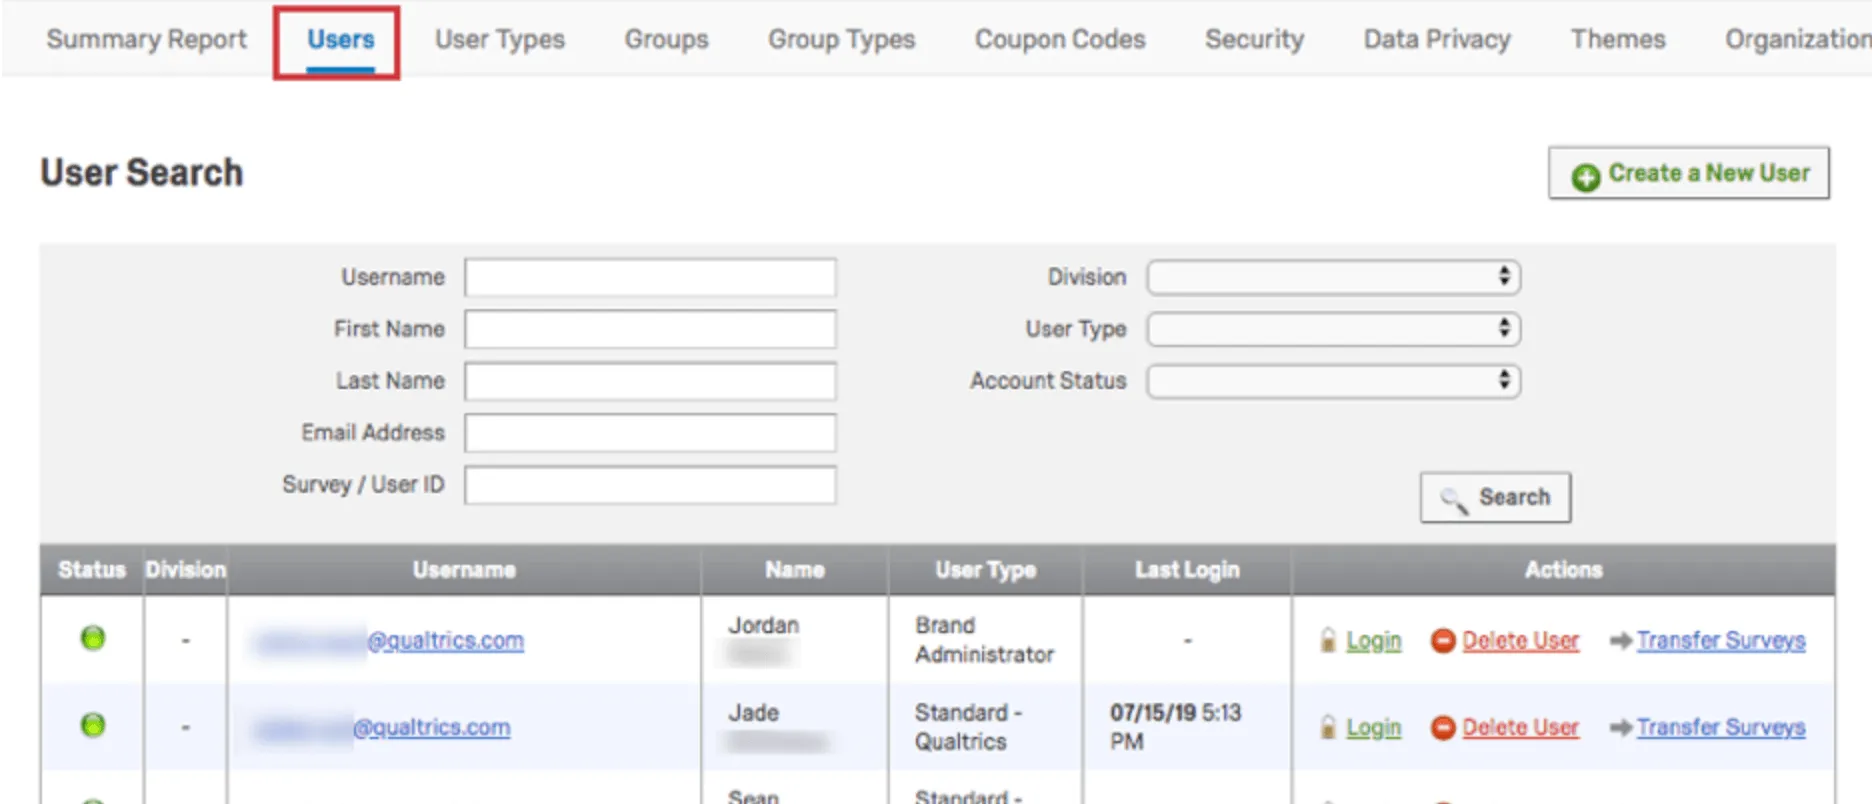
User Types
User types are managed in the global Admin page. They can also affect the access that users in your brand have to tickets and CX Dashboards.

- Vocalize User: Users assigned to this type are Dashboard Viewers who can use CX Dashboards, but not build surveys. These users also have the following:
- Can create and edit their own CX Dashboards projects, and the dashboards within those projects.
- Can use tickets.
- Cannot manage dashboard users and roles.
- Cannot map ticket data.
- Participant: Default user type when you add someone in the User Admin tab of a CX Dashboards project.
- Can only access dashboards shared with them, and whether they can edit or have data restrictions is dependent on their role.
- Cannot make their own CX Dashboards projects.
- Cannot access tickets.
You can edit an individual user’s type in the Users tab.
Qtip: Learn more about Global Administrative Permissions and making your own User Types.
Dashboard Viewer App
If you’re a Brand Administrator, there’s one more option you have for sharing dashboards with your users: the dashboard viewer app. With this app, you can simplify the experience for users who are supposed to only view dashboards, rather than the larger Qualtrics platform. This app gives users a custom login experience that brings them directly to their dashboards. The top navigation is simplified, showing a list of all dashboards the user has access to.
What’s more, the dashboard viewer is fairly easy to set up, coming with a lot of preset configurations you can choose to adjust to fit your brand.

To set up the dashboard viewer, first make sure you’ve already:
- Completed your dashboards.
- Created your users and roles.
From there, follow these steps to set up the dashboard viewer.
If your users have questions once they log in and see this app, check out the Using Dashboard Viewer page.
Qtip: If you’re ready to invite users to view the dashboard, it’s easy to send everyone their login steps. Check out this support page.
Quick Sharing from Inside the Dashboard
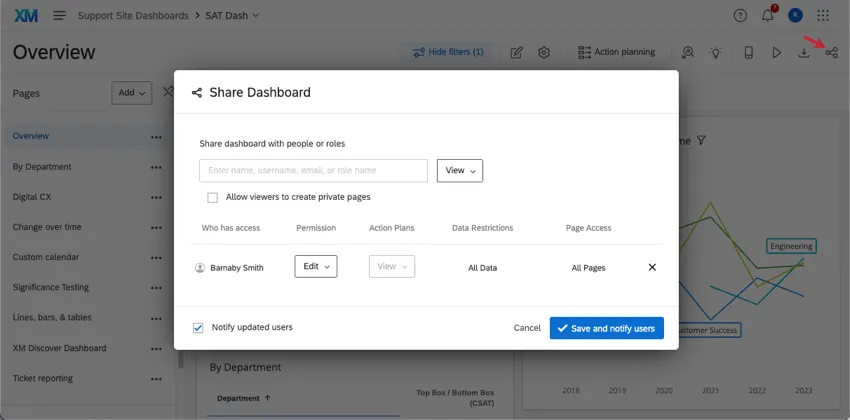
If you do not have access to the User Admin tab of a dashboard project, you can still share your dashboard with other users.
- Click on the Share icon.
Search for the user or role you want to share the dashboard with.

Qtip: A user who is both a Project and Brand Administrator can make roles for the dashboard, to make sharing faster and easier.
- Select the Type of Access the user should have.
Use survey data or user attributes to restrict the kind of data this user has access to.
Qtip: A user who is both a Project and Brand Administrator can set up user attributes.
- Restrict the pages of the dashboard that the user has access to.
Conclusions
You did it! You made your first dashboard and shared it with your colleagues. Remember that these steps are here if you ever want to start fresh with a new dashboard. Meanwhile, the rest of the support site has resources to help you dive deeper into more complex CX Dashboards questions and needs. Just use the search bar or the menu to the left to navigate CX Dashboards pages.
Qtip: Employee Experience Dashboards may seem similar, but they are fundamentally different from CX Dashboards. Make sure the support pages you use always explicitly mention CX Dashboards amongst the features supported.
FAQs
How can I stay up to date on new Qualtrics features?
How can I stay up to date on new Qualtrics features?
To access these release notes, you need an XM Community account. These accounts are free for any users with a Qualtrics account. This support page contains information for how to register an XM Community account.
Once you're logged into the XM Community, head over to the Weekly Product Updates Introduction Post. This post contains all the information you need to get started with subscribing to product updates!
What are CX Dashboards?
What are CX Dashboards?
Can Dashboards projects only be used for customer experience research?
Can Dashboards projects only be used for customer experience research?
That's great! Thank you for your feedback!
Thank you for your feedback!