
Tickets Task
What's on this page
About Tickets Tasks
Tickets are a way to assign ownership of a task to an individual or role so you can take quick action. Tickets tasks let you create tickets based on previous events. Once you create a ticket, you can manage your tickets through the Follow-up page.
Qtip: If you want to assign a ticket to a team of people instead of just one person, you’ll want to set up a team first!
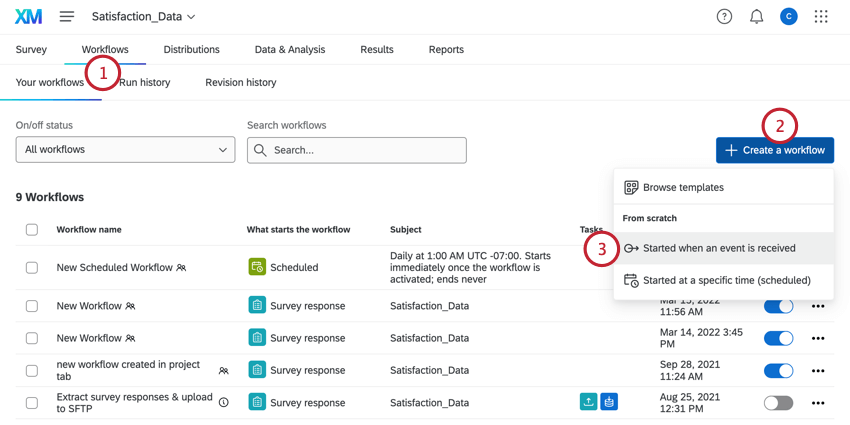
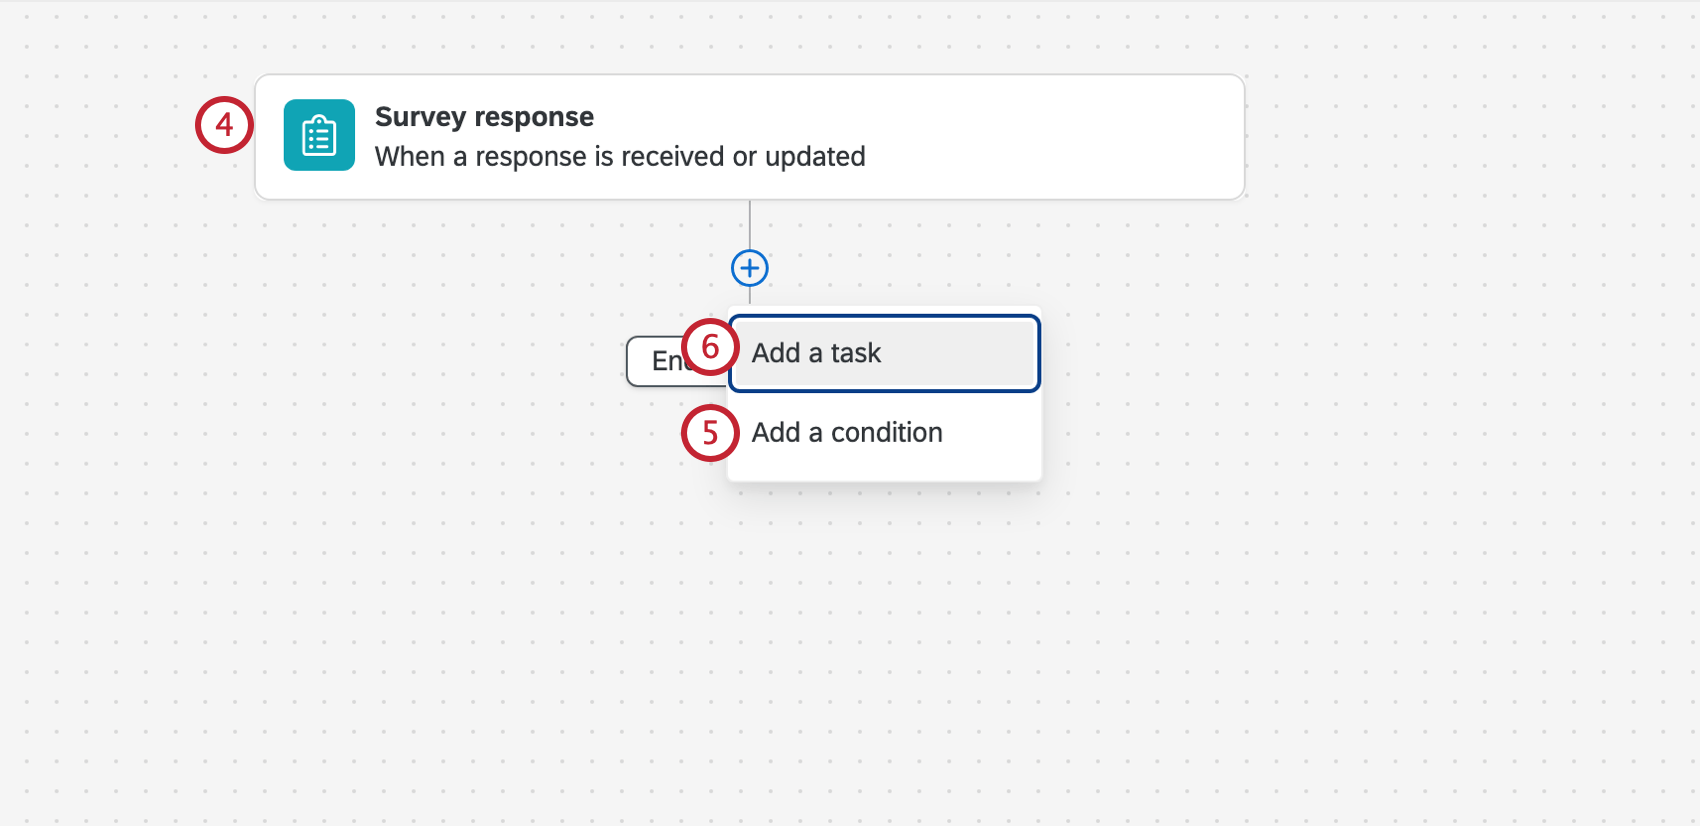
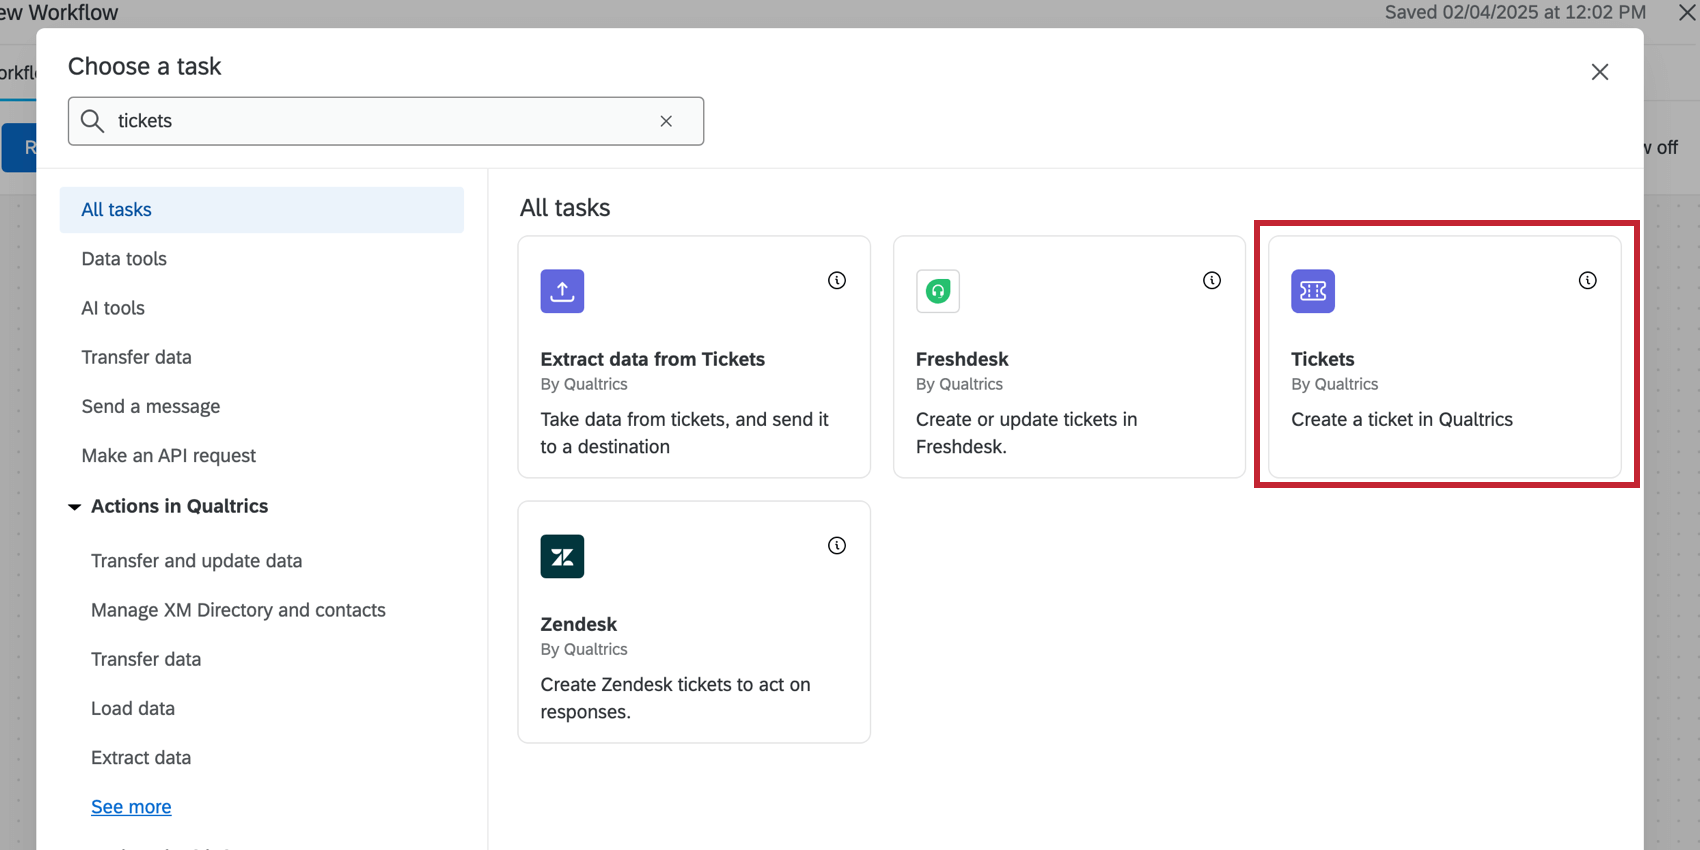
Setting Up the Tickets Task
Qtip: Want to save a template of your ticket task settings for reuse? Check out the Ticket Templates page.
Warning: When using a ticket task, your survey response event should only be connected to a survey project. Using another project type, like Employee Experience, can lead to unexpected behavior, such as certain data not getting pulled into the ticket.
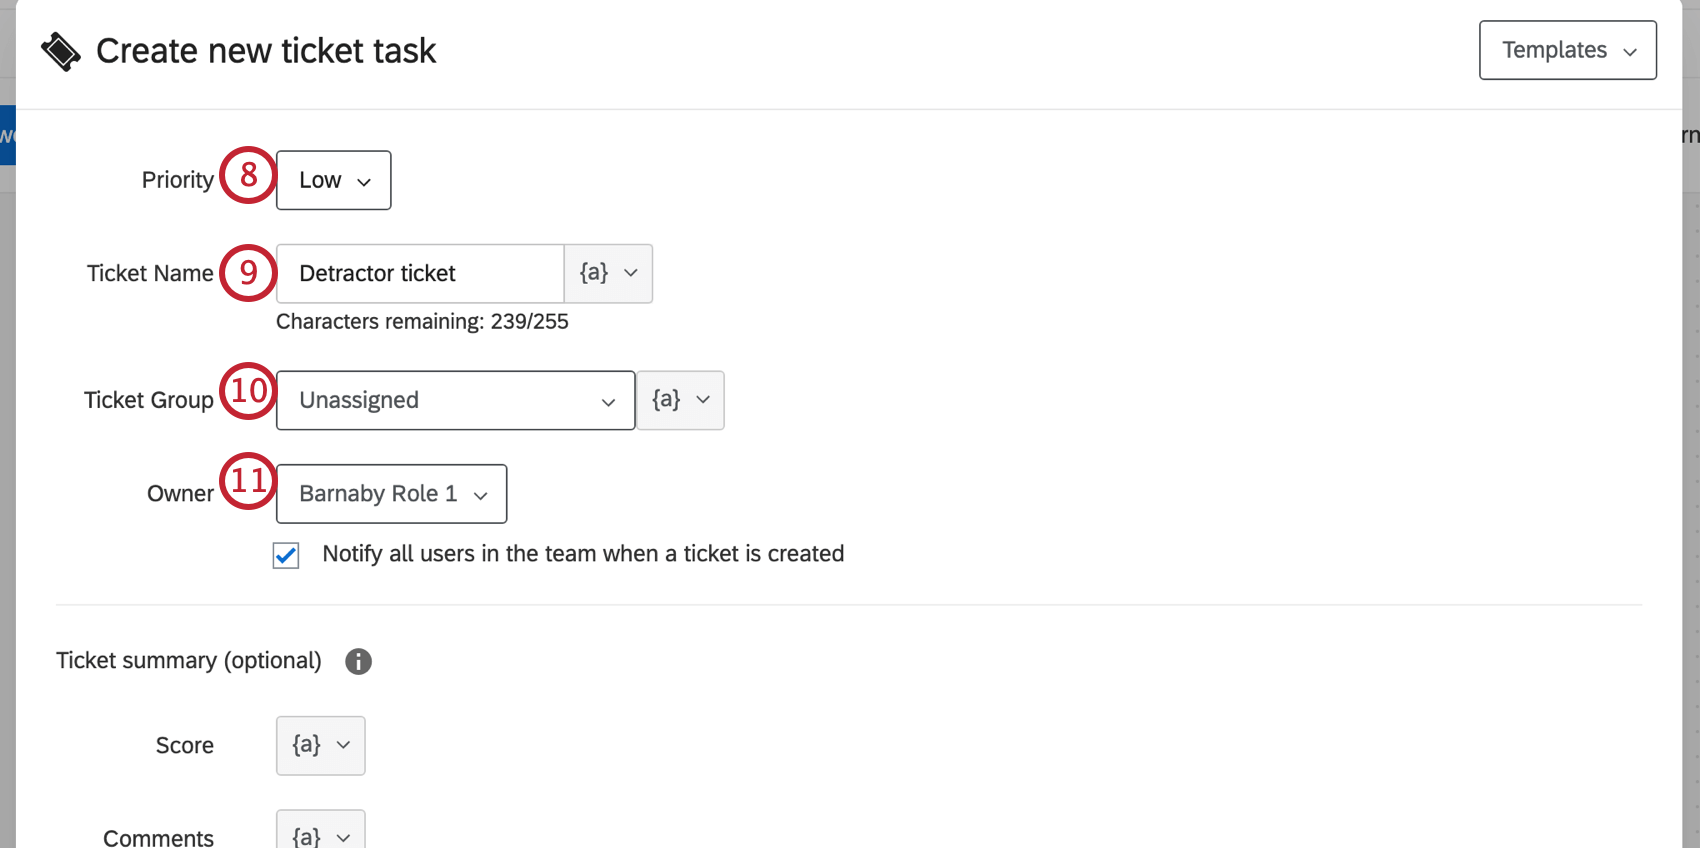
Qtip: Ticket names can be up to 255 characters long.
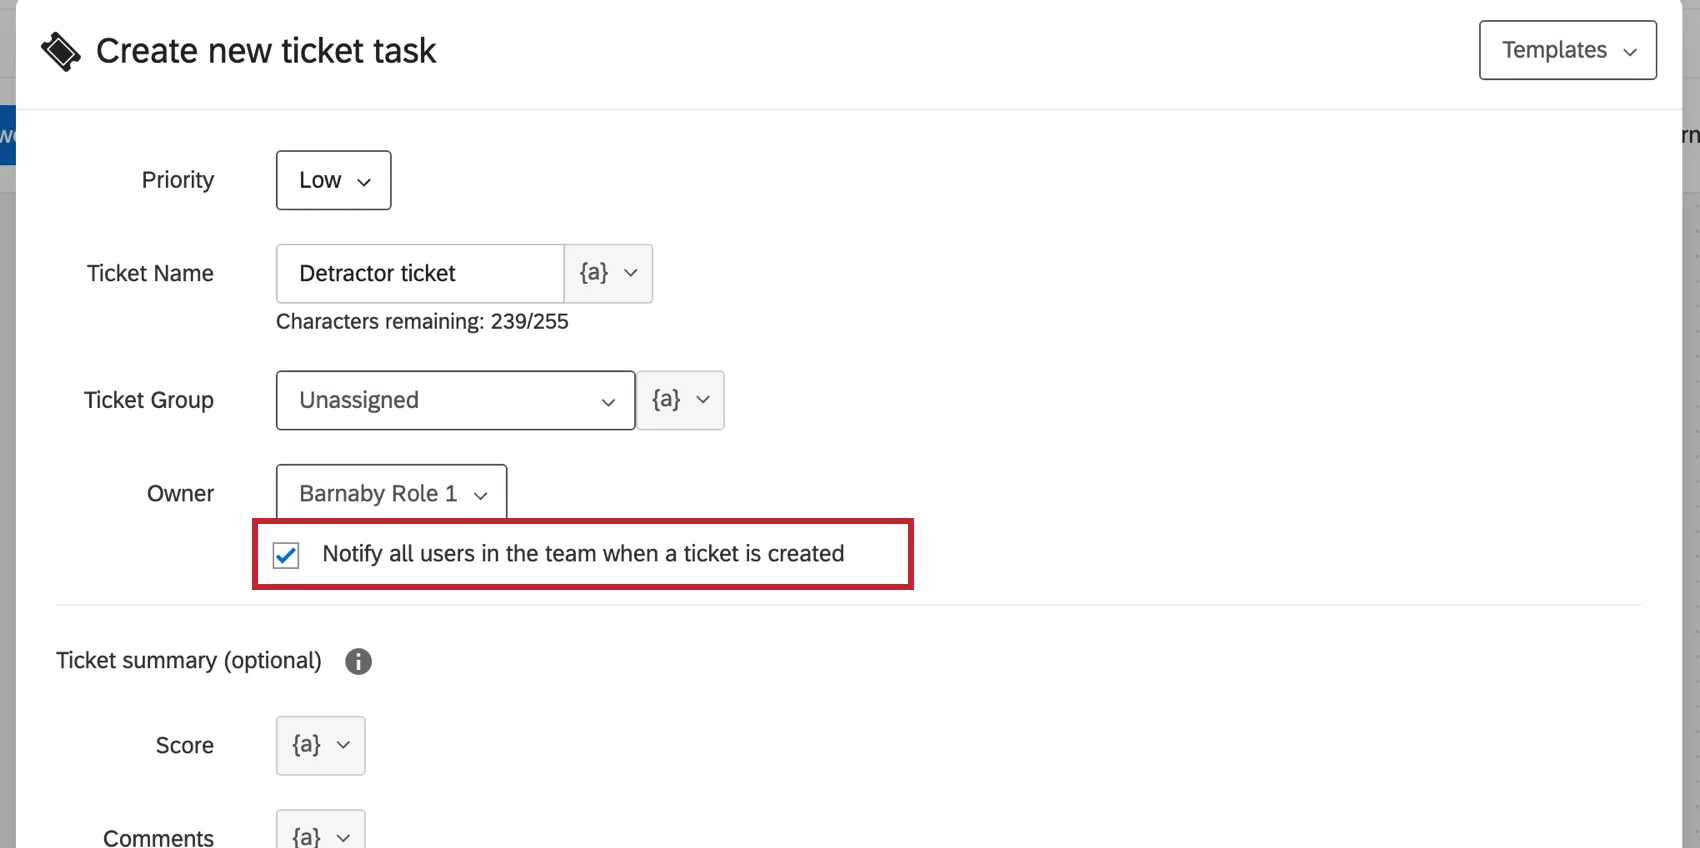
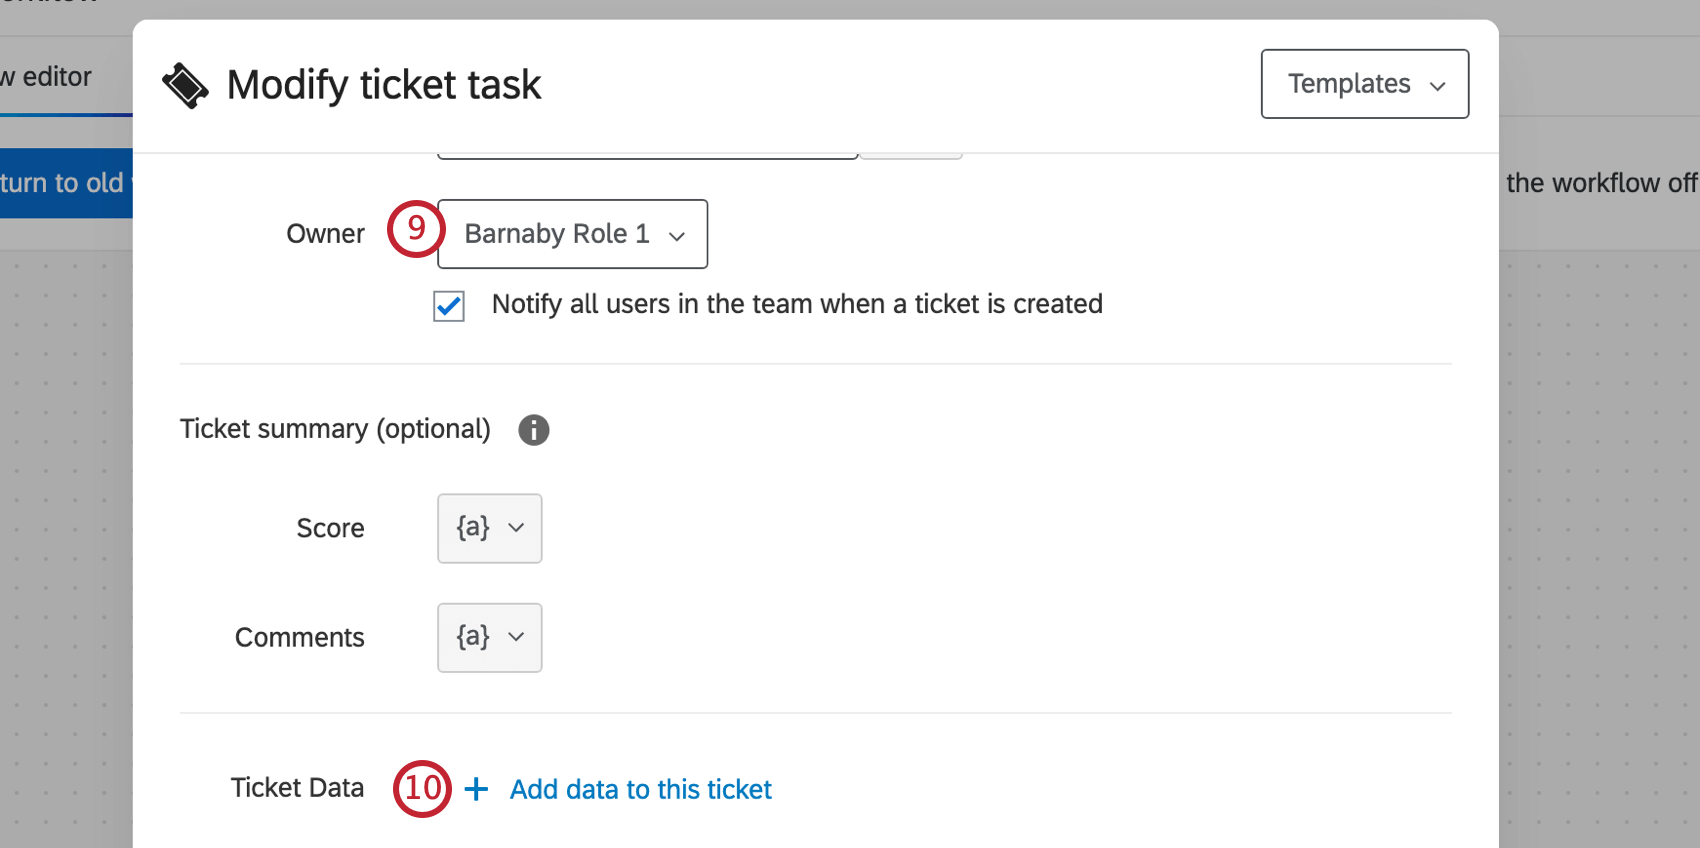
Qtip: After assigning a ticket owner, you will have the option to Notify this user or all users in the team via e-mail when a ticket is created. The link sent in the notification email will expire after 60 days.

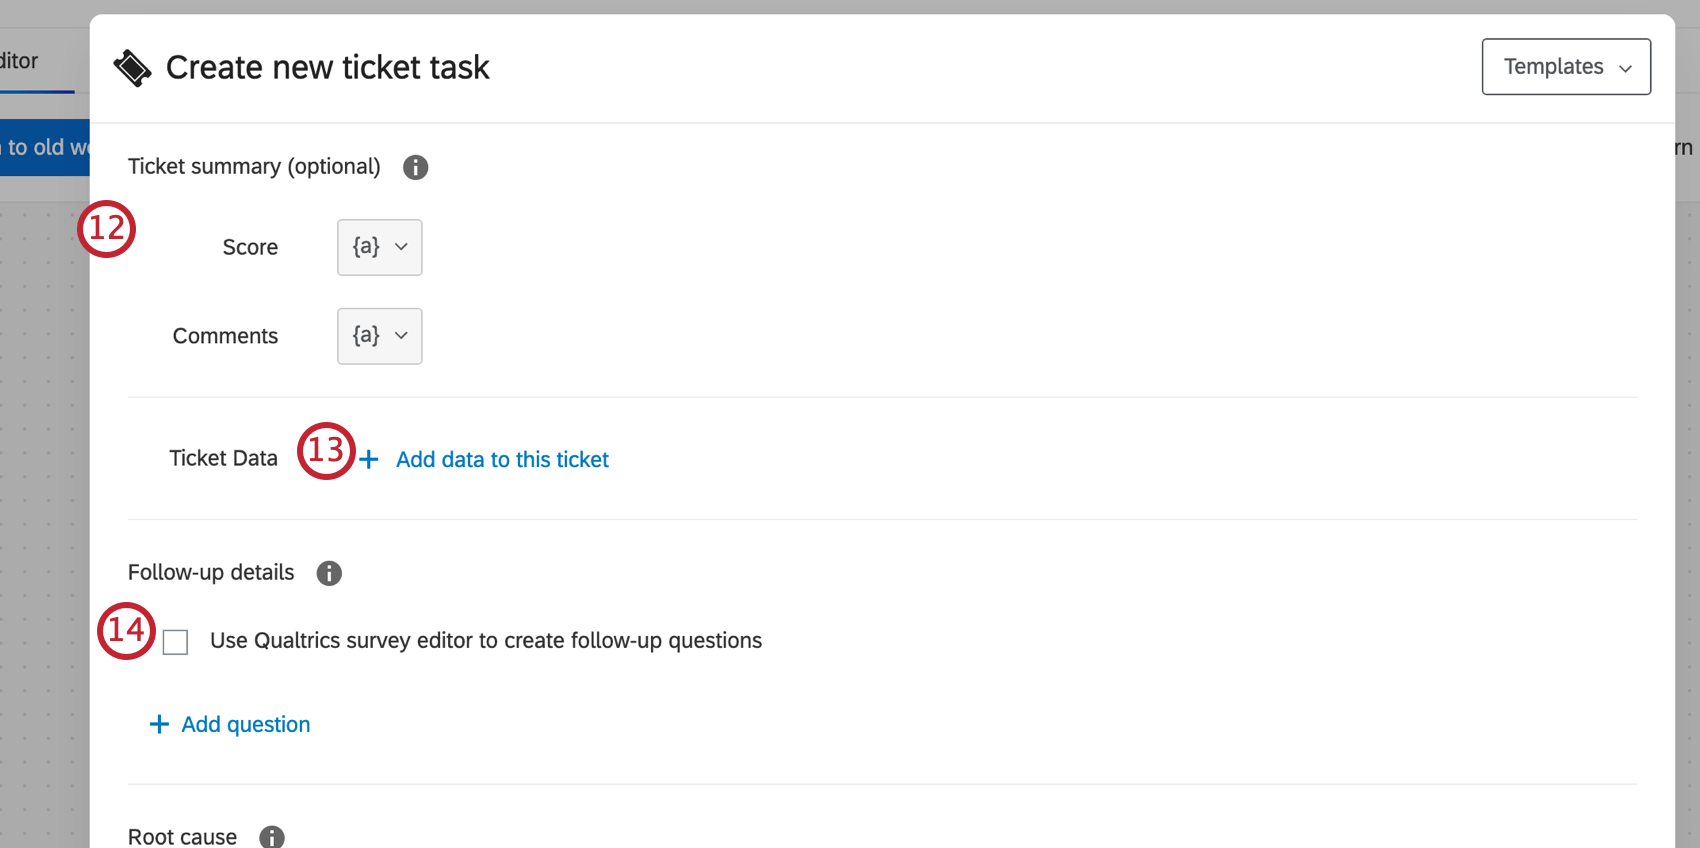
Qtip: These are highlights to help your ticket owners understand why the ticket needs to be actioned. For example, Score can be the CSAT a customer gave, and Comments can be the feedback they wrote.
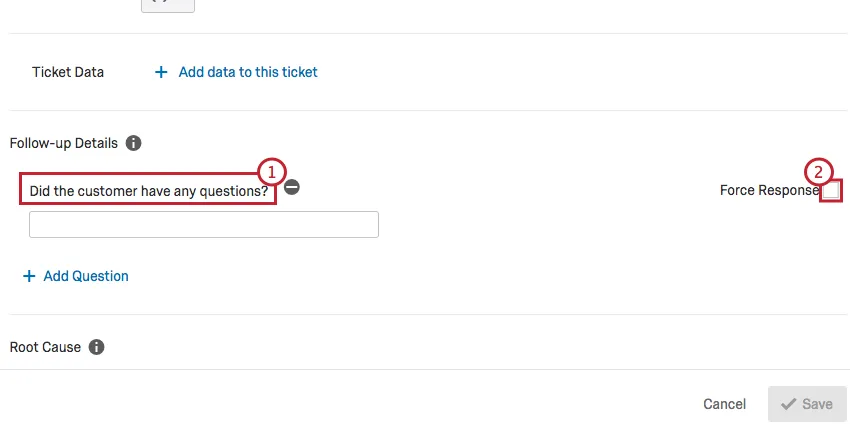
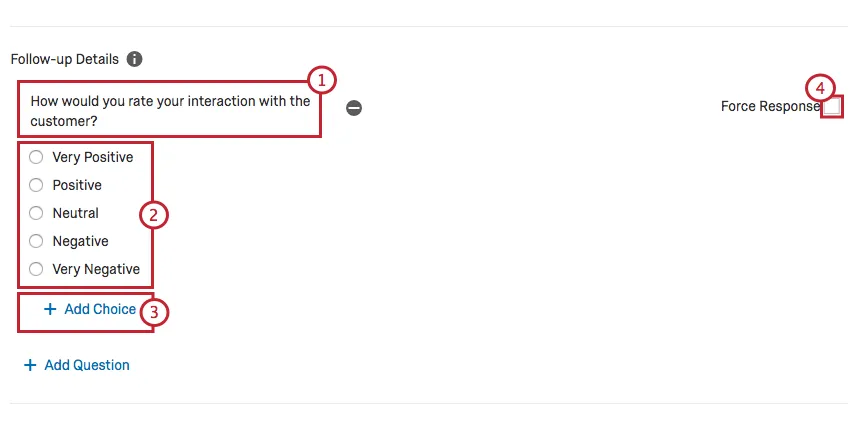
Qtip: Select Force response if ticket owners must answer this follow-up detail before closing out their ticket.
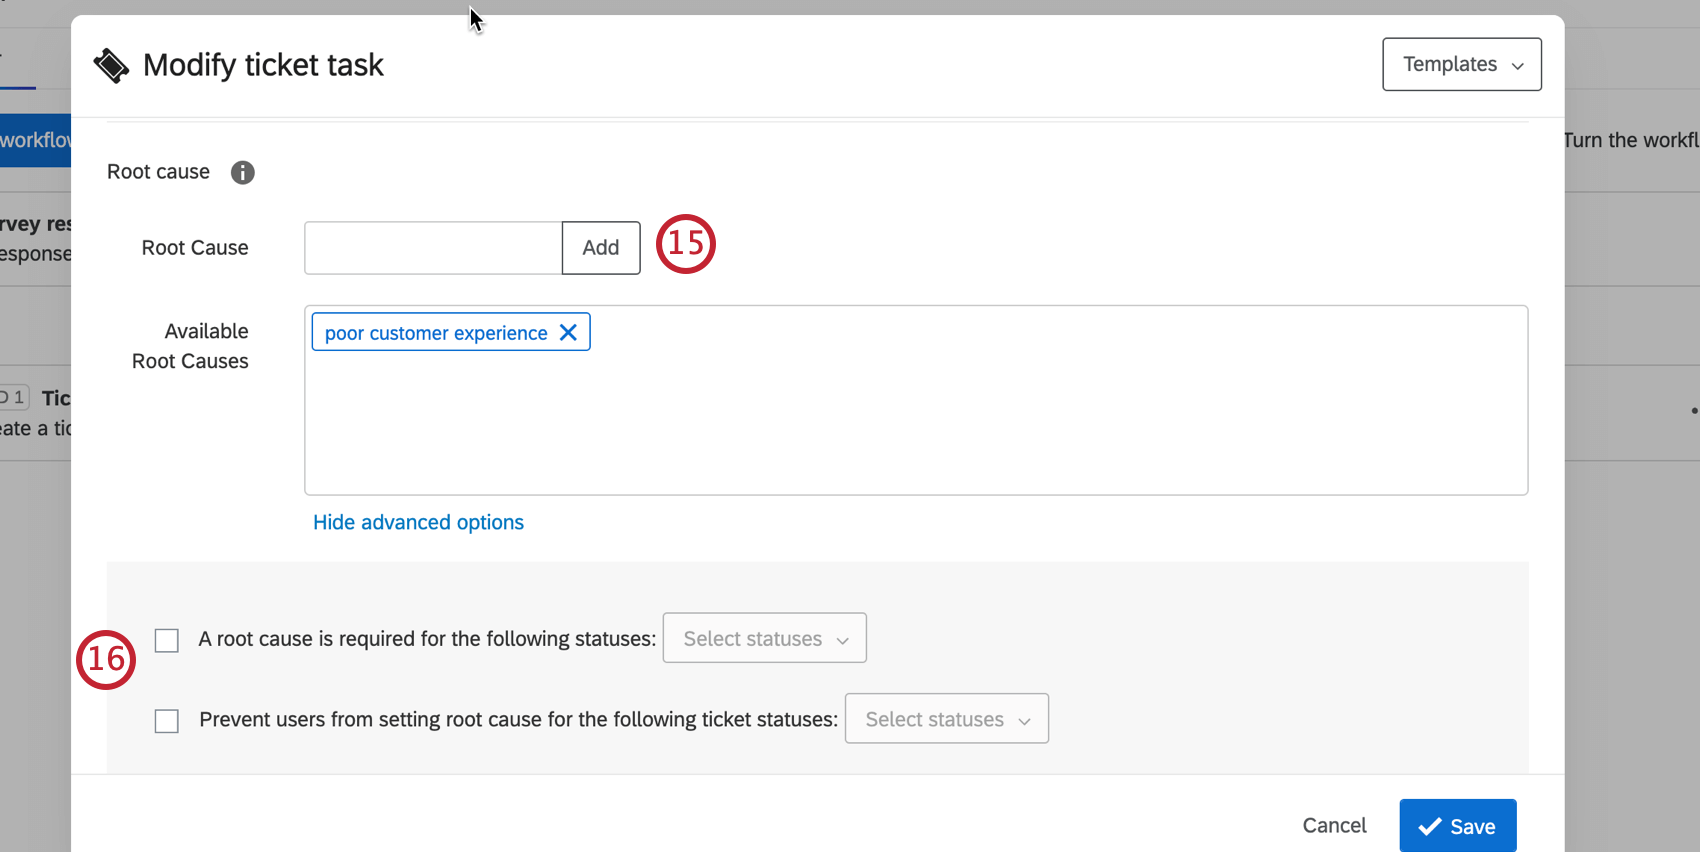
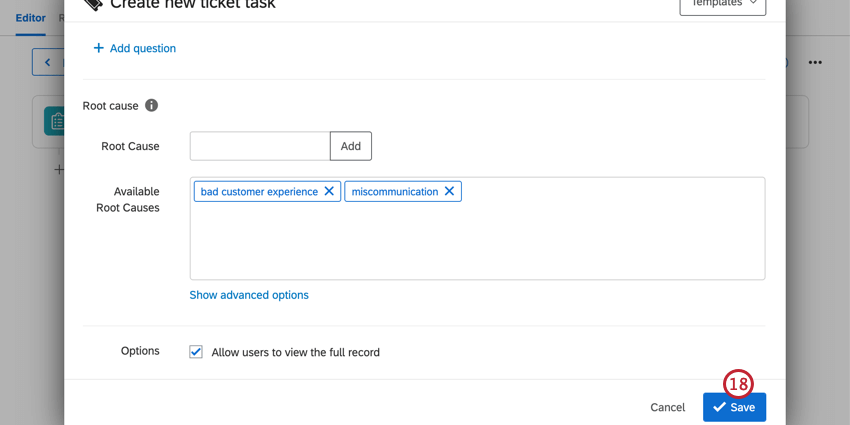
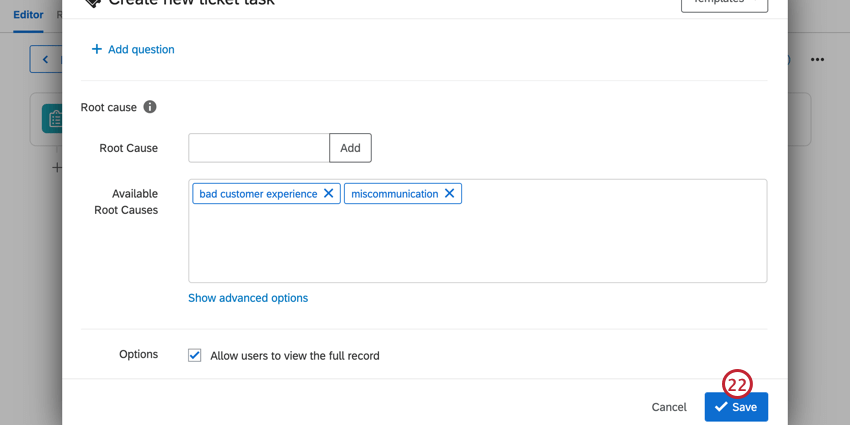
Qtip: Root causes are options for the ticket owner. Later, when following up with a ticket, the user will have the option to select one of these root causes.
Attention: You can provide up to 100 root causes. Any root causes created past this limit will not be visible until prior root causes are removed.
- A root cause is required for the following statuses: When configured, ticket owners will not be able to switch their tickets to the selected statuses unless they provide root causes. This can be especially helpful for statuses that track escalations or unresolved issues.
- Prevent users from setting root cause for the following ticket statuses: This prevents ticket owners from selecting a root cause in cases where it might not make sense. For example, in a ticket that’s still open, there might not be any insight into the root cause of the issue yet.
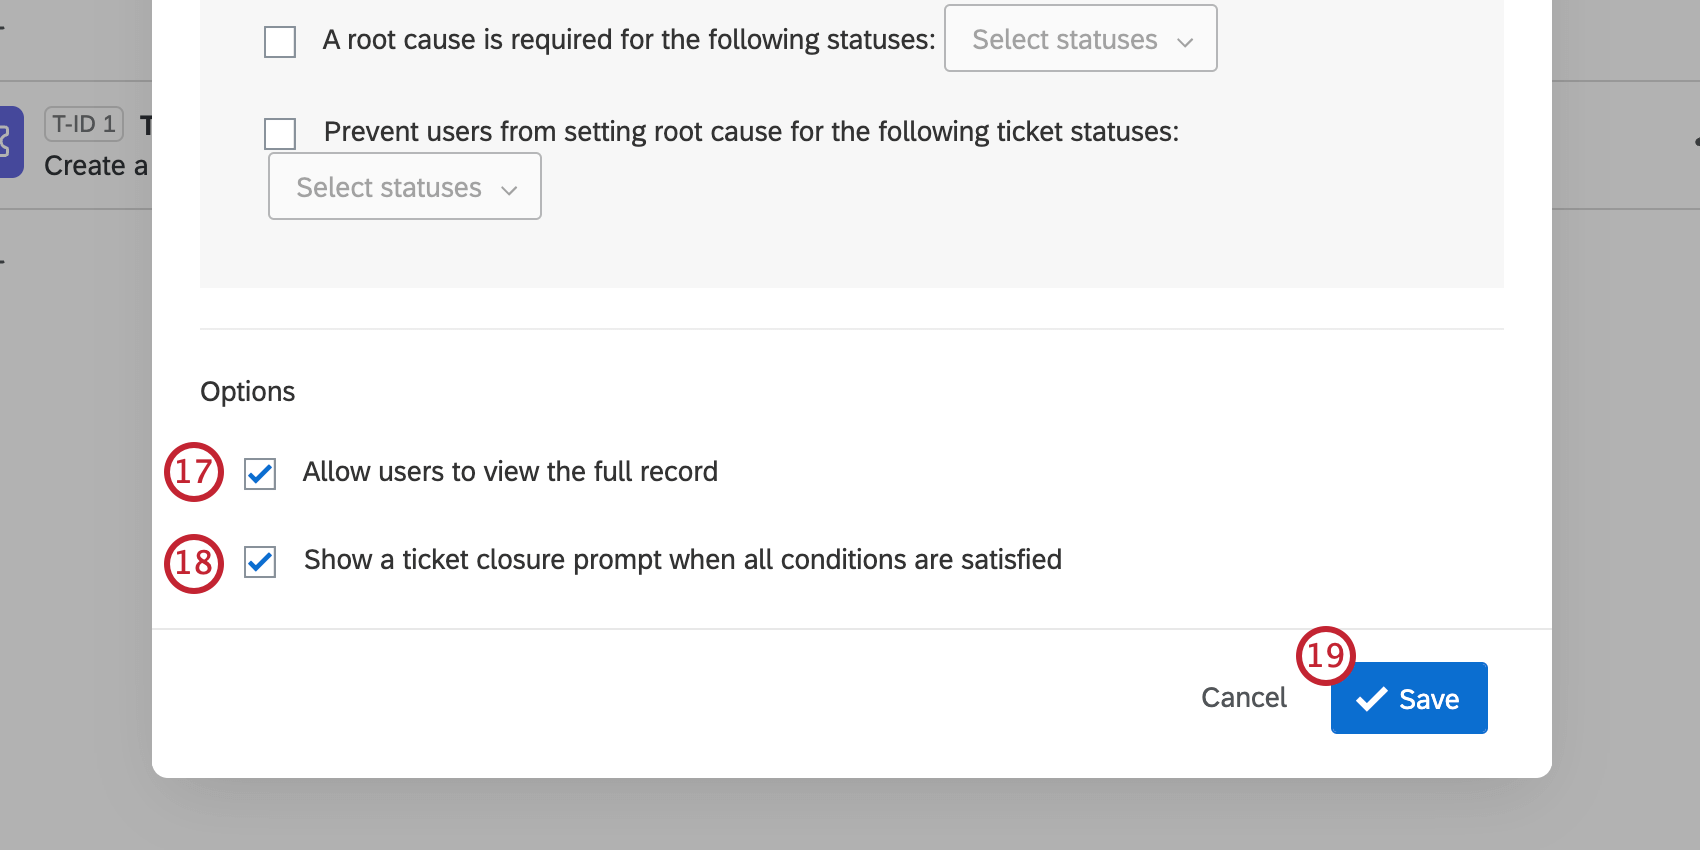
Attention: The survey must be either owned by or collaborated with you in order for you to view the full record or file uploads.
Qtip: To include a downloadable response report in your ticket data, add a ticket data field and set the value to Response Link.
Qtip: By default, ticket tasks do not create tickets for imported responses when paired with a survey response event. However, you can create a condition for your task to fire when the response Status is equal to Imported. See this page for more information.
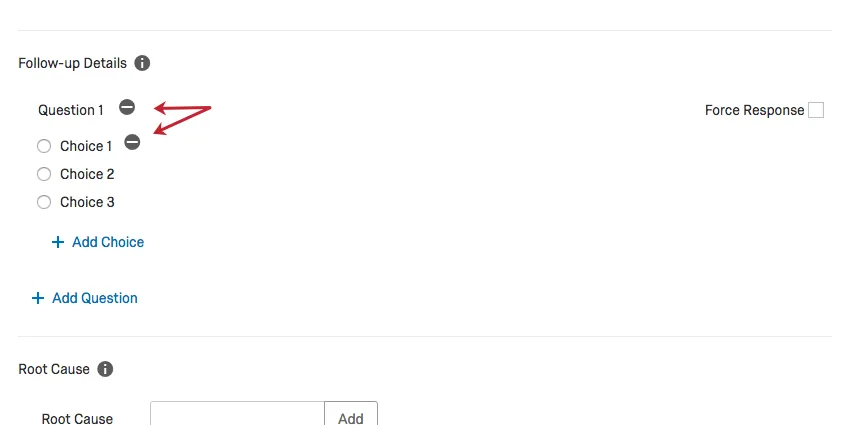
Follow-up Details
Attention: This feature is not included in every license. Please contact Account Services if you are interested in getting access to this feature.
Adding follow-up details to your ticket task allows ticket owners to answer additional questions on the ticket. You may add a ticket feedback survey, or add multiple choice or text entry questions in your follow-up details.
Attention: Ticket feedback surveys are a more advanced version of follow-up details that provide more flexibility in how you receive follow-up information. While existing ticket tasks with follow-up details cannot be updated to use ticket feedback surveys, they can be rebuilt. See ticket feedback surveys for more information.
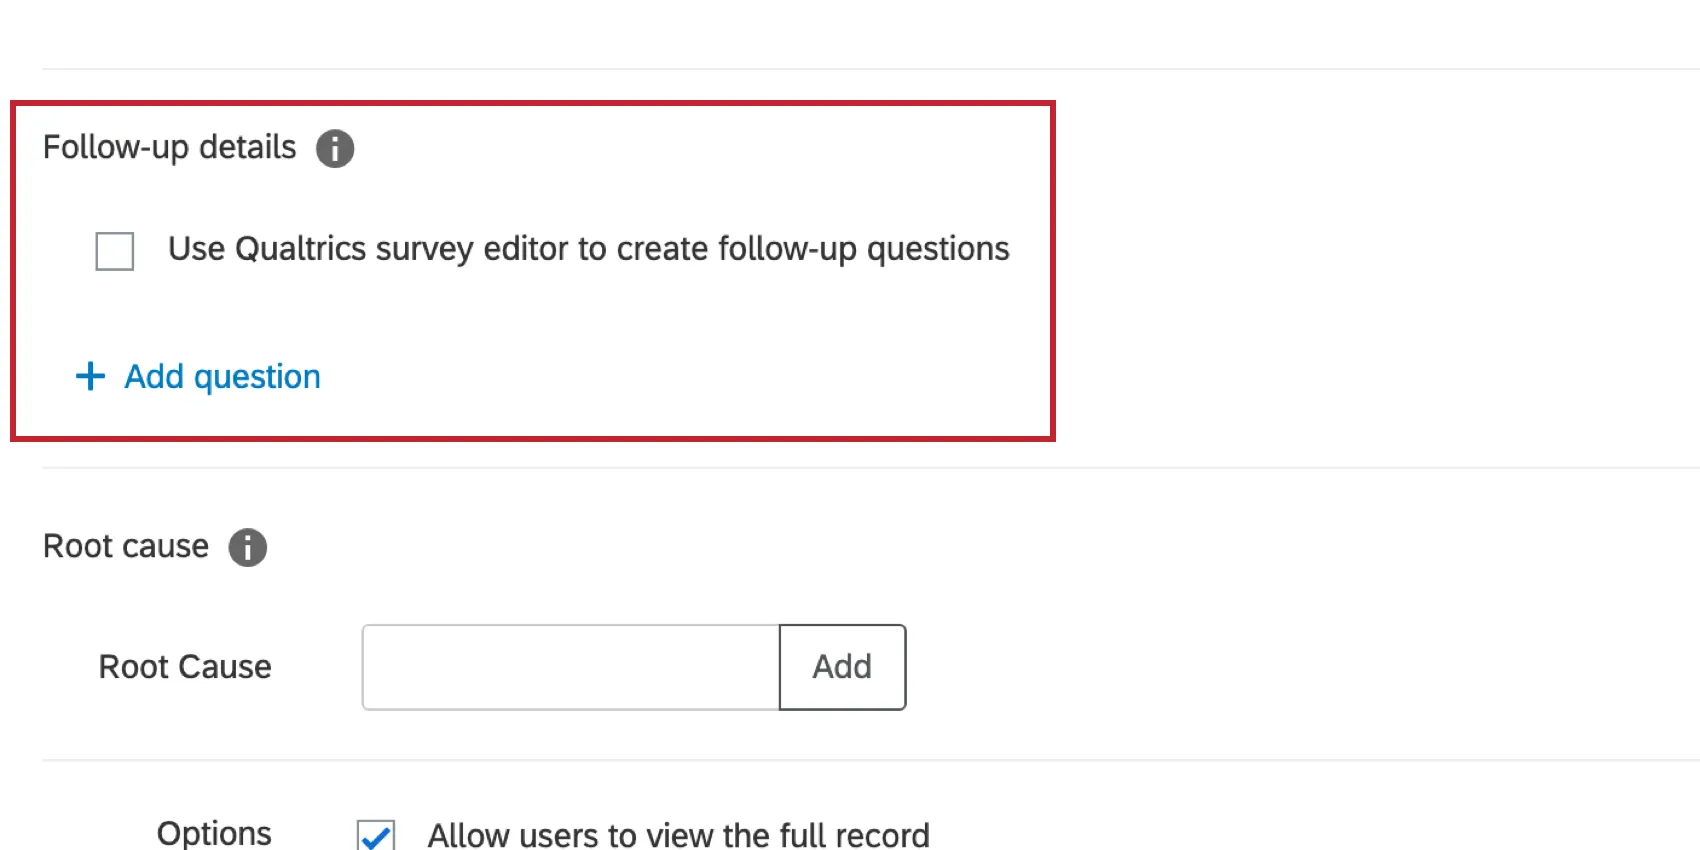
To add a follow-up questions, click Add Question in the Follow-up Details section and select which question type you’d like to use. The sections below explain how to manage each question type.
Qtip: While you can use the answers to follow-up questions as conditions in an update ticket task, ticket feedback surveys can not be used to create a Ticket Event. To update a ticket based on data from a ticket feedback survey, use workflows to create an Update Ticket task or Web Service task.
Attention: Edits should not be made to questions created in the Follow-up Details once they have been published.
Text Entry
Once a text entry question has been added to your follow-up details, you can edit the following fields. Note that these fields can be edited in any order.
Multiple Choice
Once a multiple choice question has been added to your follow-up details, you can edit the following fields. Note that these fields can be edited in any order.
Managing Follow-Up Details
When editing your follow-up details, you can delete a survey or question by clicking the minus ( – ) button next.
HOW FOLLOW-UP QUESTIONS EDITS AFFECT TICKET REPORTING
When you edit your ticket follow-up questions, you may impact your ticket reporting dataset. Continue reading about how different edits will impact your dataset.
Adding / Deleting Answer Choices
This change does not have negative implications for ticket reporting. None of the existing responses will be impacted. Responses after the addition / deletion will simply be in the new range of possible answers.
Editing Question Text
This change impacts your ticket reporting dataset. Rephrasing a follow-up question is the equivalent of creating a new one. None of the existing responses will be affected; however the new phrasing will need to be mapped as a new field in ticket reporting as it is considered a new field. All future responses to the new phrasing will appear in the newly mapped field, and none will go to the old field.
Deleting a Follow-Up Question
This does not have negative implications for ticket reporting. None of the existing responses will be impacted. After the deletion, no new responses can be collected for the old field.
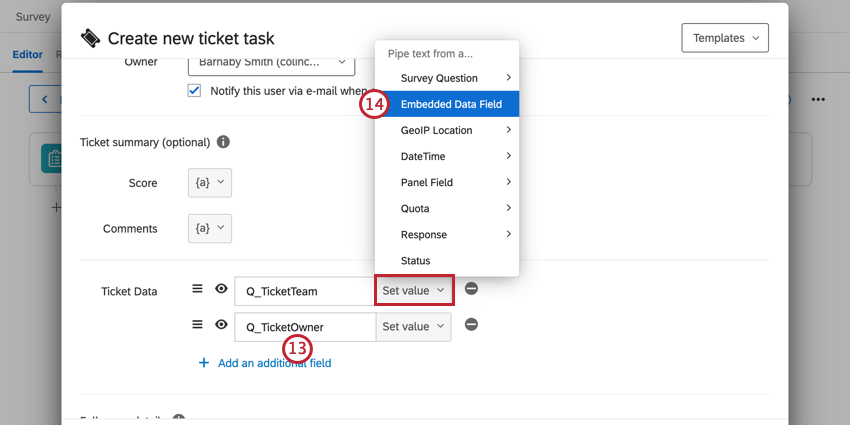
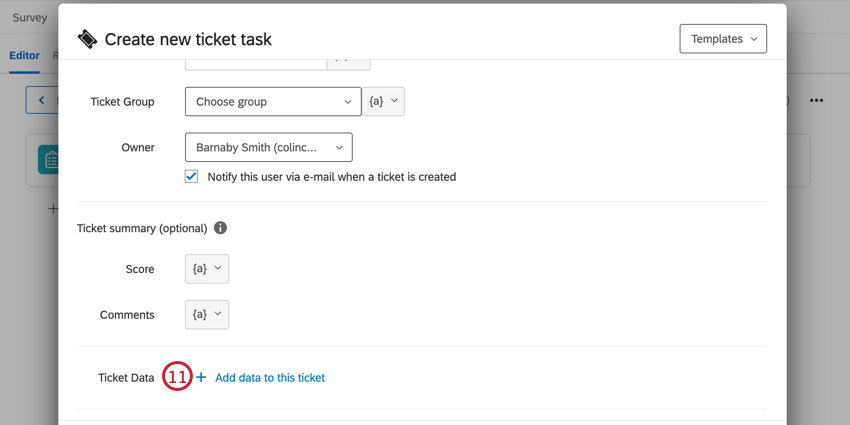
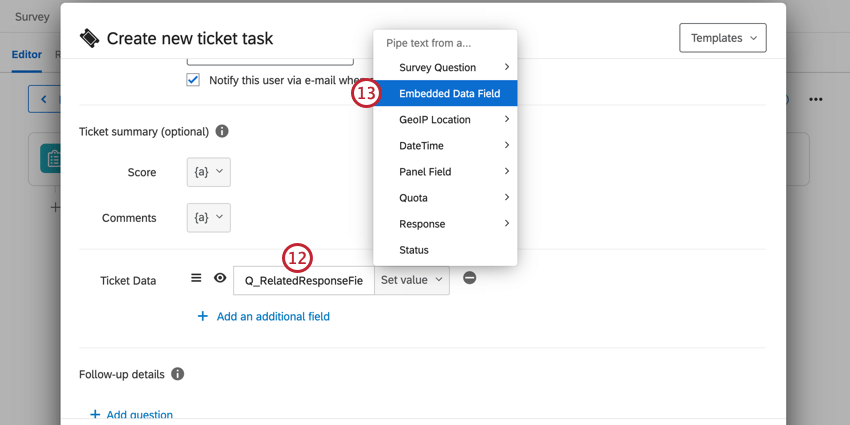
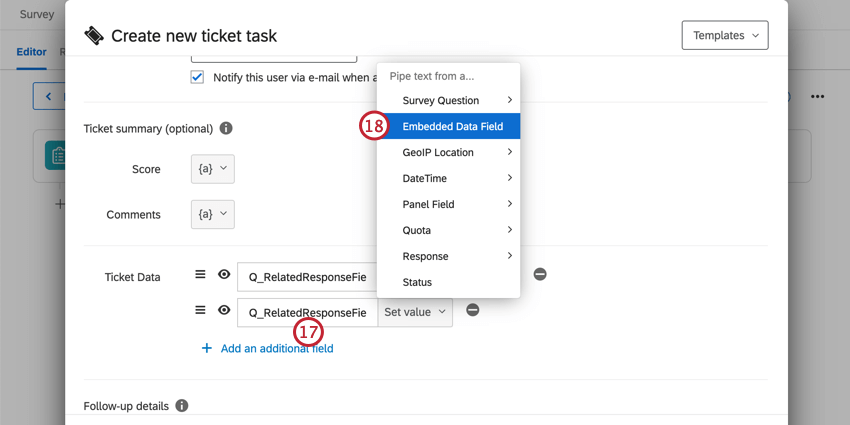
Using Ticket Data
When you are setting up a tickets task, you are allowed to add additional information to the ticket called ticket data. These fields can be customized however you like, pulling in survey responses, embedded data values, and much more.
However, this feature is not just for adding additional information to a ticket. You can also use ticket data to assign tickets simultaneously to an individual and a team (rather than just one or the other) and to link similar responses together for quick access on your tickets. You can also use the ticket data as conditions in an update ticket task.
Managing Ticket Data
After you create your ticket data, you can change the order that ticket data appears on a ticket, hide certain fields so they don’t appear to the ticket owner, or remove the ticket data altogether.
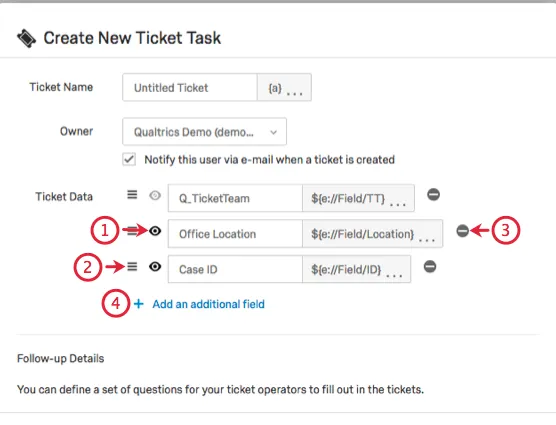
Reordering Ticket Data
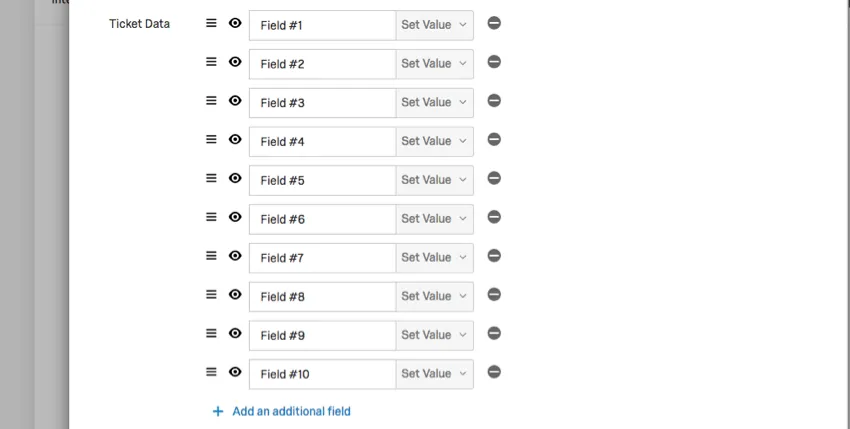
When a ticket is created, ticket data is displayed in two columns of data.

When you reorder ticket data during ticket creation, use this table to understand what it’ll look like on the final ticket:
| Field #1 | Data | Field #2 | Data |
|---|---|---|---|
| Field #3 | Data | Field #4 | Data |
| Field #5 | Data | Field #6 | Data |
| Field #7 | Data | Field #8 | Data |
| Field #9 | Data | Field #10 | Data |
Editing Ticket Data Fields
Attention: Ticket field names have a limit of 255 ASCII characters. Names longer than this limit will be trimmed.
You can change these details even after your tickets are created. Just go back to your Workflows tab and click the ticket task to edit your ticket data. However, be careful: certain edits to ticket data may have unexpected consequences for tickets. Below we walk through the different edits you can take on ticket data fields.
Renaming fields will remove all associated data for that field across all tickets created with that task. However, reverting the field name back to the old name or adding in a new field with the old name will restore the removed data.

Example: Let’s say you have a field called Client that’s mapped to a contact list field. If you change the field name to be Customer, all data for the field will disappear across all tickets that were generated from the ticket task. Renaming the field back to Client will restore the data.
Changing the mapped value for a ticket field will only affect future tickets. This change is not retroactive and will not change the values for tickets that have already been created.
Example: Let’s say you have a field called Phone that’s mapped to a contact list field. If you change the field so it is now mapped to a survey question, the data on your previously generated tickets will not change. Only newly created tickets after the change will have the updated value.
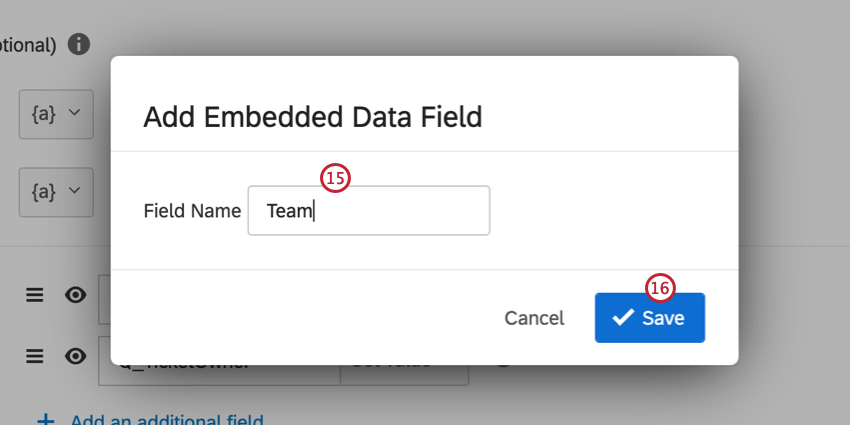
Dynamic Ticket Assignment
Tickets are usually assigned to just one user or team at a time. However, it is possible to assign tickets to users or teams based on embedded data that you set in the survey flow. This way, you can build a series of dynamic conditions in the survey flow to assign tickets.
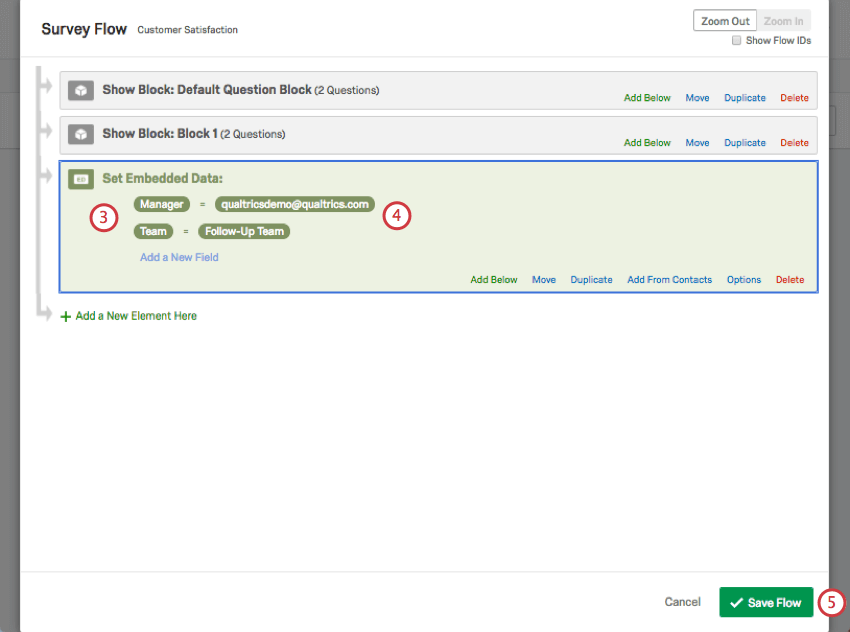
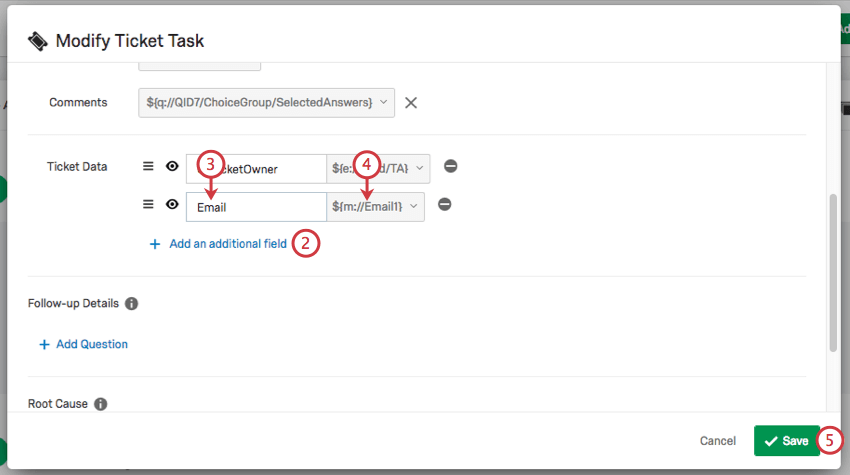
Qtip: This embedded data field will need to match the spelling, capitalization, and punctuation of the username or team exactly! Note that an individual’s username is notalways their email. Make sure you have the proper username.
Qtip: If there is no owner data, that field in the data source should be left empty rather than contain a placeholder value (e.g. “N/A” or “Null”). An empty owner field is replaced by the default owner assigned in step 9, whereas any placeholder data will attempt to assign a user for that value.
Qtip: If Ticket Assignment Email Notifications are enabled, the dynamic owner will receive the email notification, not the owner set in the Setting Up the Tickets Task.
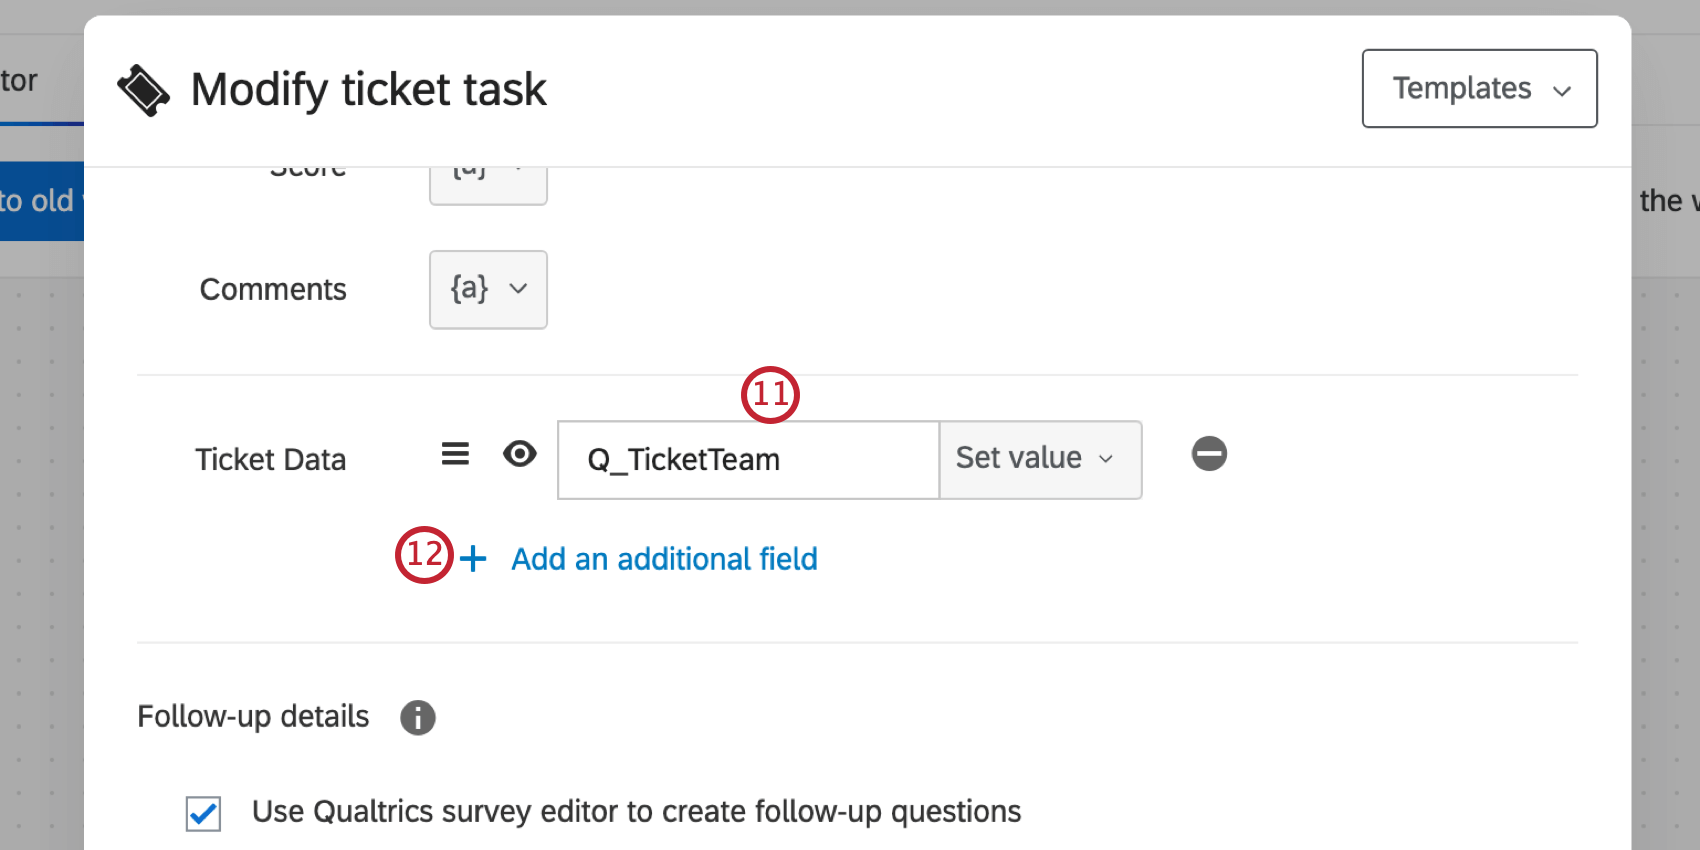
Qtip: The Q_TicketOwner field must be a username or userID. It cannot be an email.
Attention: If a ticket is dynamically assigned to a user without access to tickets, the ticket will be assigned to the default owner selected in step 9.
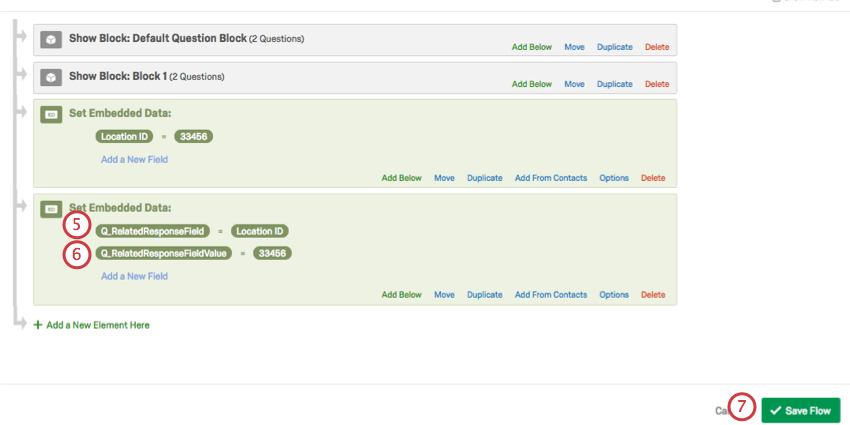
Dynamically Linking Responses
You can use ticket data to link related responses together. After more than one response triggers a ticket with the same Related Response Field and Value, you will be able to view these related responses on the follow-up page.
Attention: Dynamic linking will work with responses that have been recorded on the same survey. You cannot dynamically link across surveys.
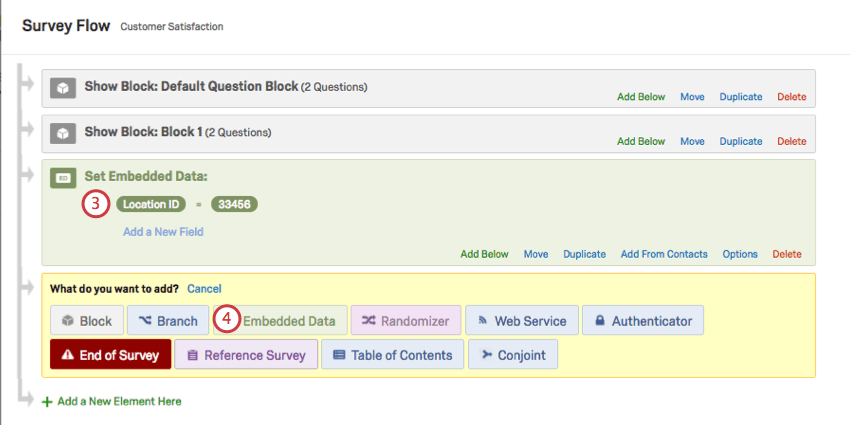
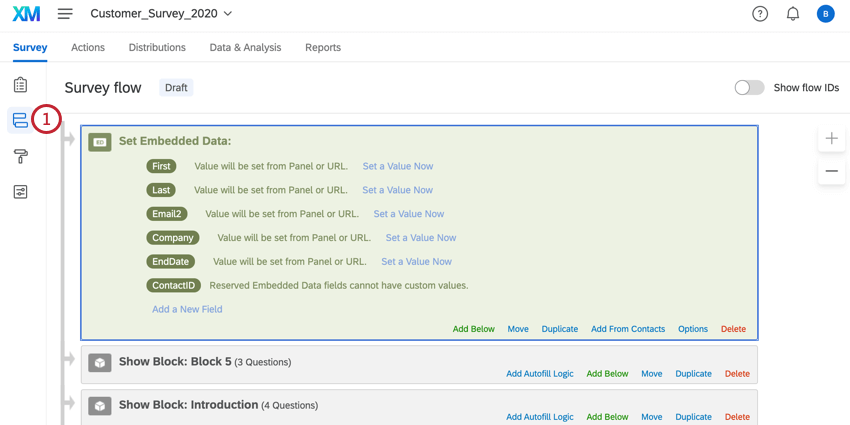
Qtip: You can use branch logic to create a dynamically changing value. For example, in the screenshot below, the way respondents answer a question changes the value of the Name field.
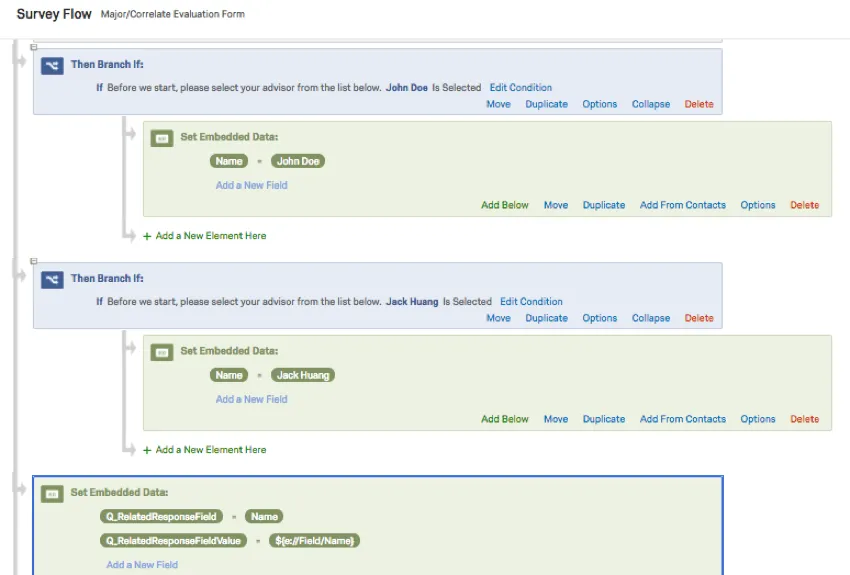


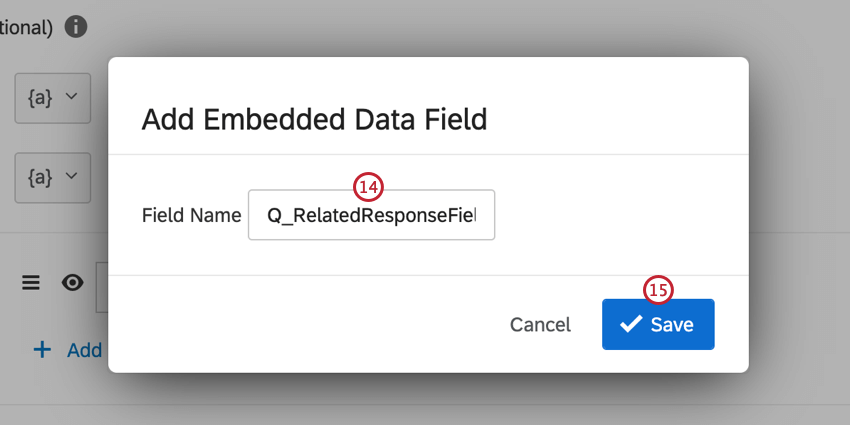


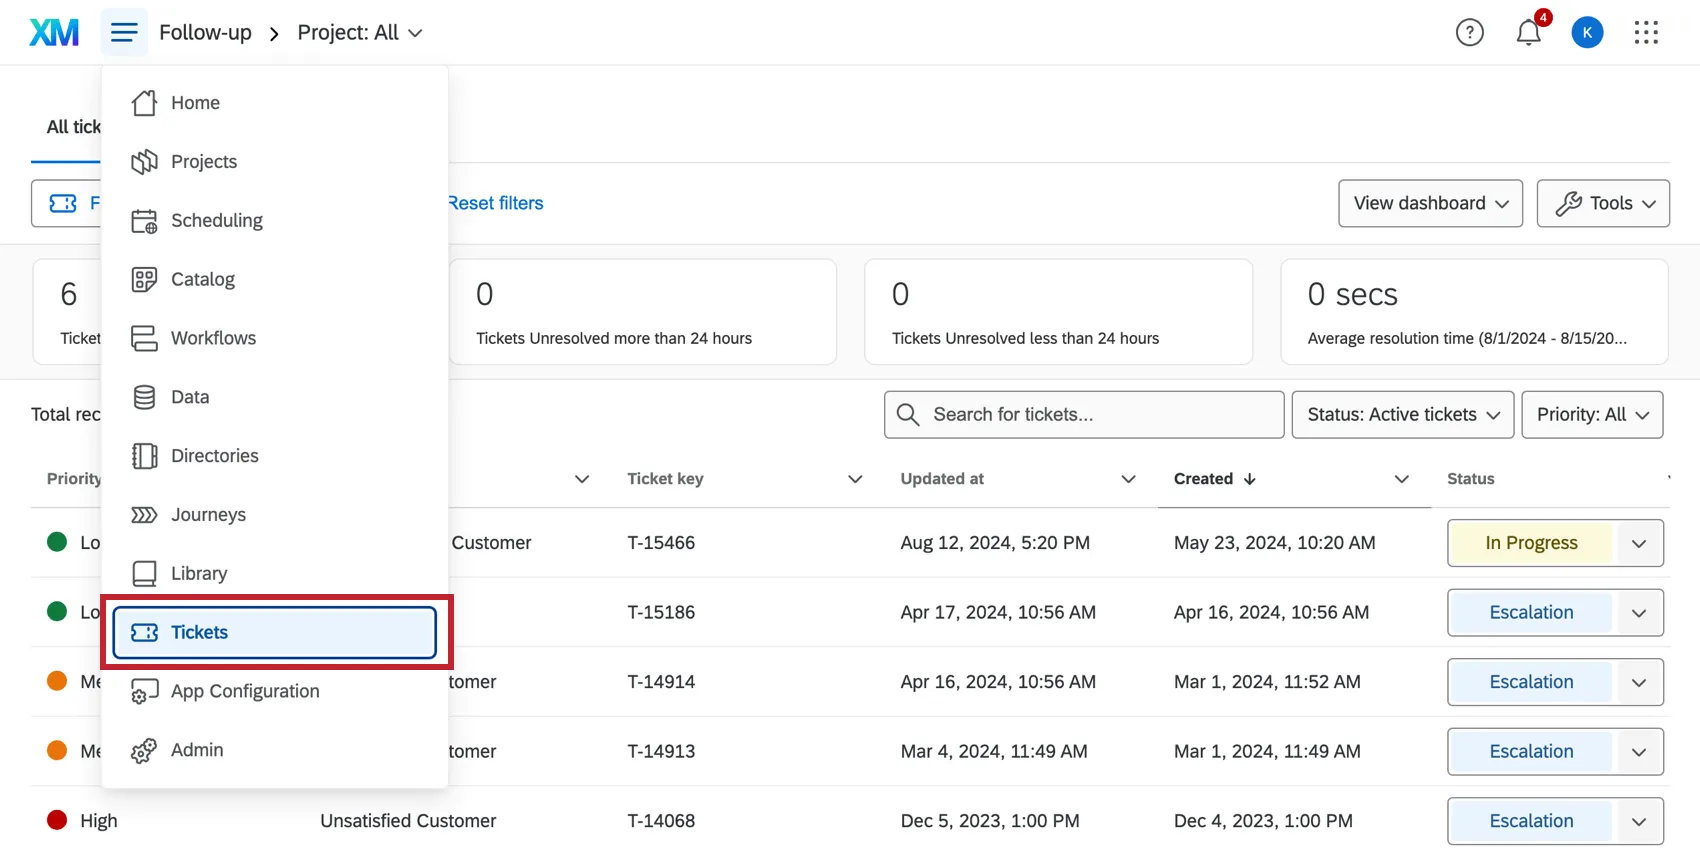
The tickets with matching Q_RelatedResponseField and Q_RelatedResponseFieldValue in the Ticket Data will be linked. To see this data, navigate to your follow-up page by clicking Tickets from the global navigation menu.
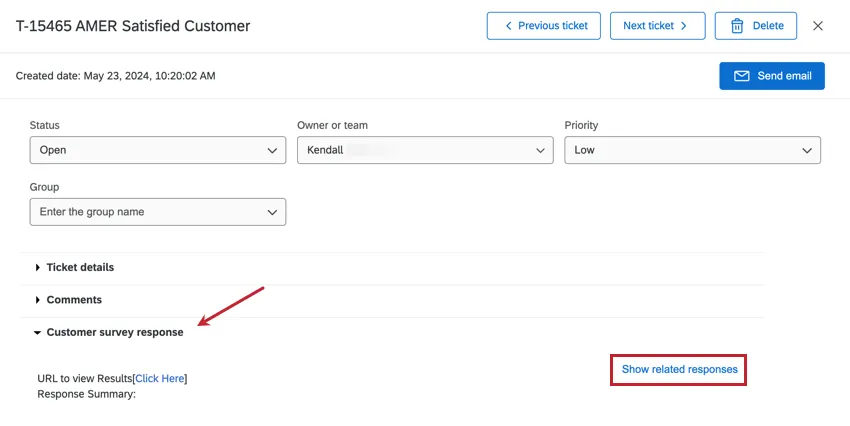
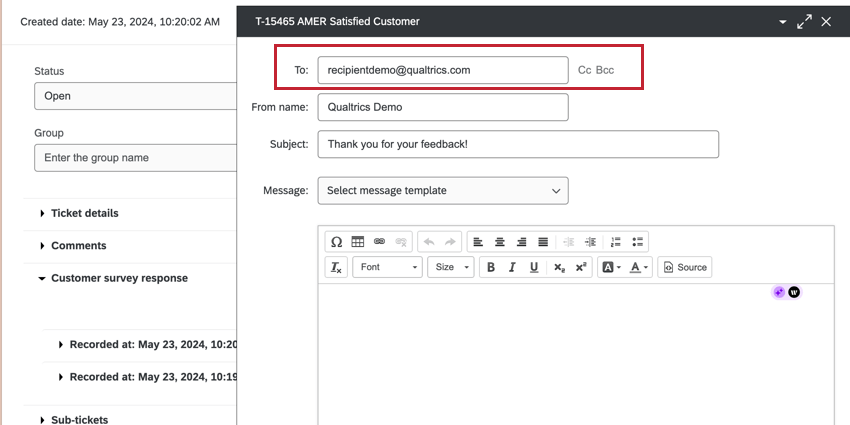
Click on a ticket to open it, then click Show related responses in the Customer survey response section.
All related responses will be listed below with the date on which they were recorded. Click on a response to expand it.
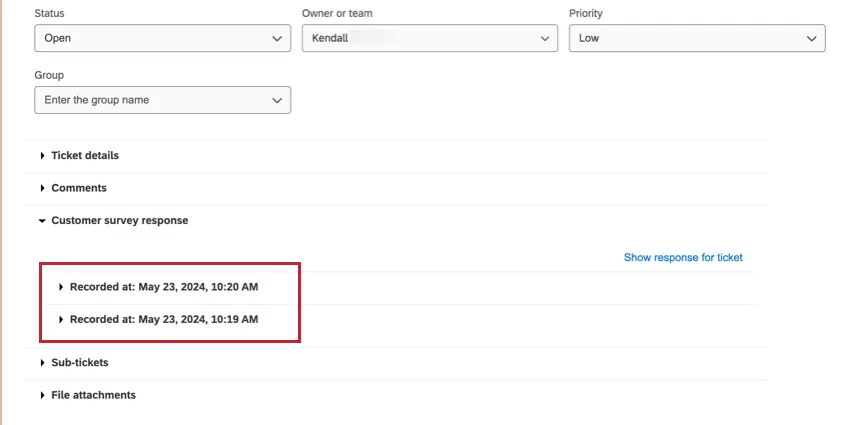
Qtip: Related responses can only be linked amongst active tickets. Any ticket that is closed will no longer show related responses. It is also important to note that, while tickets generated by test responses can be listed under Show Related Responses, a preview response or a real response must be recorded in the survey before a record of these responses will appear.
Default Follow-Up Email Address
You have the option to set a default email address to contact when you click Send Email on a ticket. You can even make this email address dynamic, changing based on what a respondent says in the survey.
- Use the dropdowns to set the value of the Ticket Data equal to the Panel Field called Recipient Email.
- Use the dropdowns to set the value of the Ticket Data equal to the Survey Question where you ask for the respondent’s email address.
Advanced Ticket Data Fields
When creating tickets from non-survey projects (imported data projects, Discover projects, and standalone workflows) or using loops, you may run into issues where tickets are duplicated or have the incorrect project source. There are several additional advanced ticket data fields that can be used to prevent this issue by controlling how tickets are identified and deduplicated.
This section walks through the fields available to you, when to use them, and how to use them in your tickets task. These fields work the same way that “Q_TicketOwner” and “Q_TicketTeam” used for dynamic ticket assignment. They are added as ticket data fields in the tickets task, and they are consumed during ticket creation (meaning they do not appear as visible ticket data on the ticket itself or in ticket reporting).
| Field name | What it controls | When to use it |
|---|---|---|
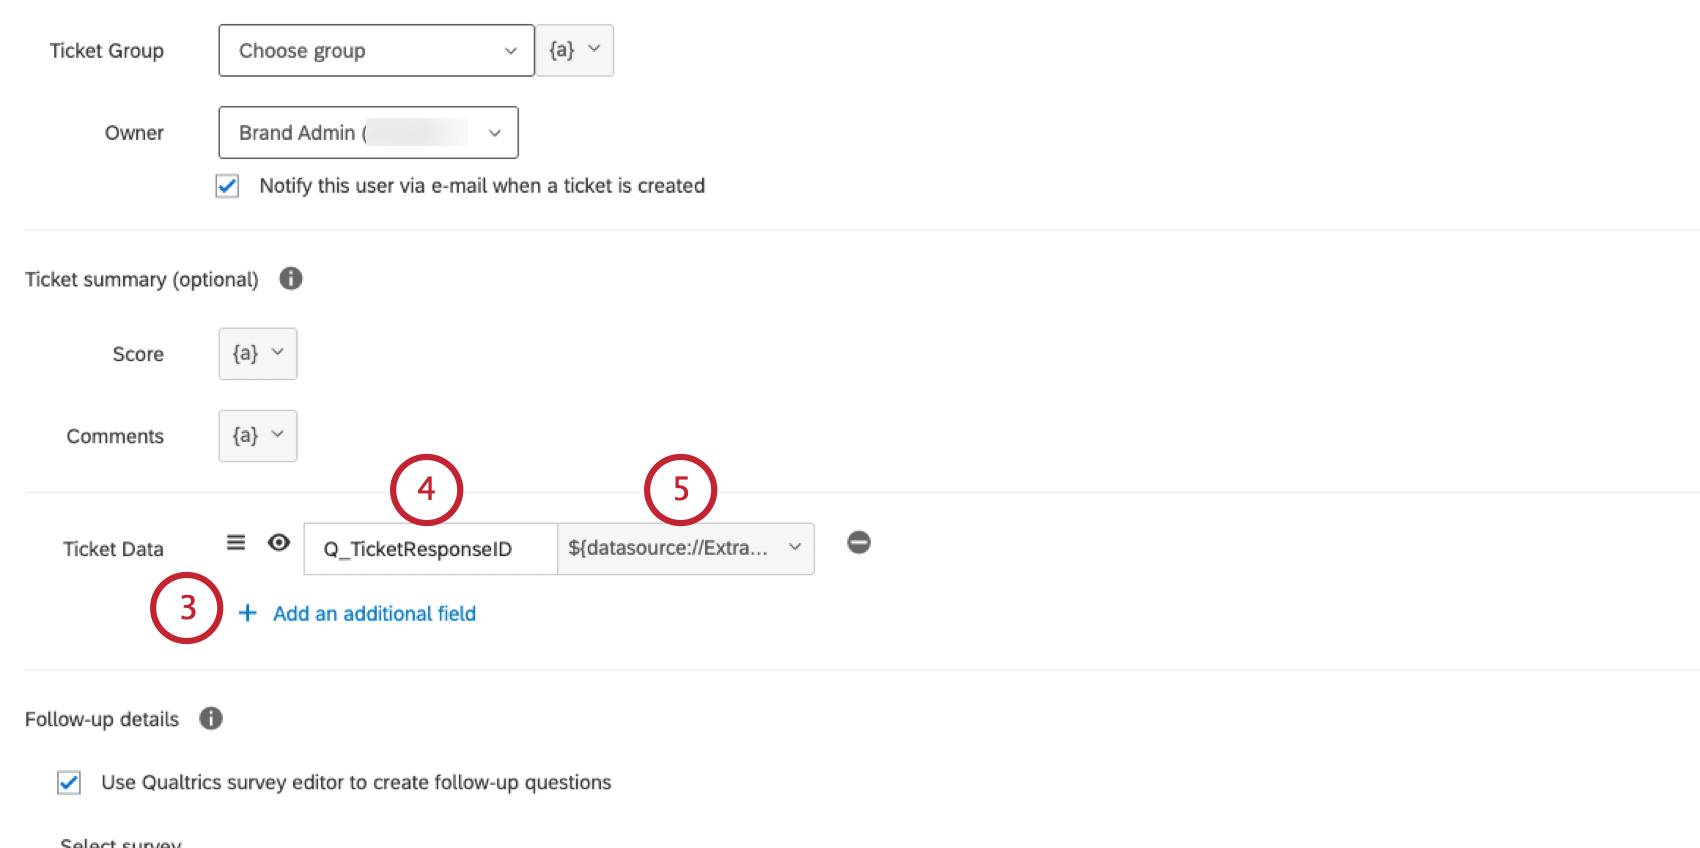
| Q_TicketResponseID | Sets the response identifier used for deduplication | If creating tickets in a loop and each iteration should produce a separate ticket; or if creating tickets from Discover / standalone workflows where default deduplication doesn’t work |
| Q_TicketSourceID | Sets the source project/survey identifier | If you need to override which project the ticket is associated with |
| Q_TicketSourceType | Sets the source type (Survey, IDP, ORM, Global) | If your project type is being incorrectly categorized |
Qtip: To use these fields for your ticketing workflows, they must be included in the event that triggers your workflow. For example, if your workflow is triggered by a JSON event, then you can include these fields in the JSON payload so they’re available as piped text when mapping your ticket data.
Why use Q_TicketResponseID?
When a ticket is created, Qualtrics uses the response identifier “responseId” together with the task identifier “actionId” to generate a unique ticket ID. If the same “responseId” and “actionId” are seen again (e.g. during a workflow loop), the system returns the existing ticket instead of creating a new ticket.
In certain workflow configurations, the default responseId introduces the following behavior:
- Loops (For Each): All iterations in a loop share the same workflow execution ID as their responseId. This means only the first iteration creates a ticket. All subsequent iterations return that same ticket instead of creating new ones.
- Discover projects and standalone workflows: The responseId is cleared during processing, which disables deduplication entirely. This can lead to duplicate tickets if the workflow is replayed or the event is processed more than once.
By setting “Q_TicketResponseID” to a value that is unique per intended ticket and consistent across retries, you can deduplicate your tickets.
Setting up Q_TicketResponseID
| Scenario | Recommended value | Why |
|---|---|---|
| Loop over IDP data source | ${lm://Field/UniqueIdentifier} | This is the unique record ID from the data source. Each loop iteration processes a different record, so the record’s unique ID distinguishes each ticket. |
| Loop over any list | ${lm://Field/…} | This could be any field that is unique per item in the list. This ensures each item in the list creates its own ticket. |
| Discover project | ${e://Field/EventId} | This is the event ID, or you can choose any equivalent unique event field. Each Discover event should produce one ticket; the event ID prevents duplicates on replay. |
| Standalone workflow | Any piped value that is unique per intended ticket execution | Selecting a field with unique values enables deduplication that is otherwise disabled for standalone workflows. |
Example: A common pattern is extracting data from an imported data project and creating a ticket for each record using a “for each” loop. Without Q_TicketResponseID, all loop iterations would return the same ticket. Instead, map Q_TicketResponseID to a field from your data source that uniquely identifies each record (e.g. a customer ID, case number, or row identifier) using piped text from the loop data source. Now, each iteration will create a separate ticket because each loop has a unique response identifier.
Qtip: If you intentionally want all loop iterations to update the same ticket (e.g. aggregating data), do not set Q_TicketResponseID. The default behavior will return the existing ticket, allowing you to update it with each loop.
Setting up Q_TicketSourceID and Q_TicketSourceType
These fields follow the same setup steps as Q_TicketResponseID:
Qtip: Most workflows do not need “Q_TicketSourceID” or “Q_TicketSourceType.” These are only needed if your project type or ID is incorrectly categorized.
New Ticket Highlights and Details
Qtip: You are about to read about an upcoming feature. Qualtrics may, in its sole discretion and without liability, change the timing of any product feature rollout, change the functionality for any in preview or in development product feature, or choose not to release a product feature or functionality for any reason or for no reason.
From June 22 to July 29, 2026, changes will be rolling out to tickets that let editors customize the information highlighted in tickets. First, there’s an improvement to the way ticket data is shown in Ticket Details. You can separate data fields into different sections with headers, organizing info by purpose. With the new Ticket Highlights section, you can surface the three most important metrics and comments. In both details and highlights, you can color code metrics based on scores, helping agents process key information faster.
Example: This is what ticket highlights and details can look like when an owner opens the ticket:

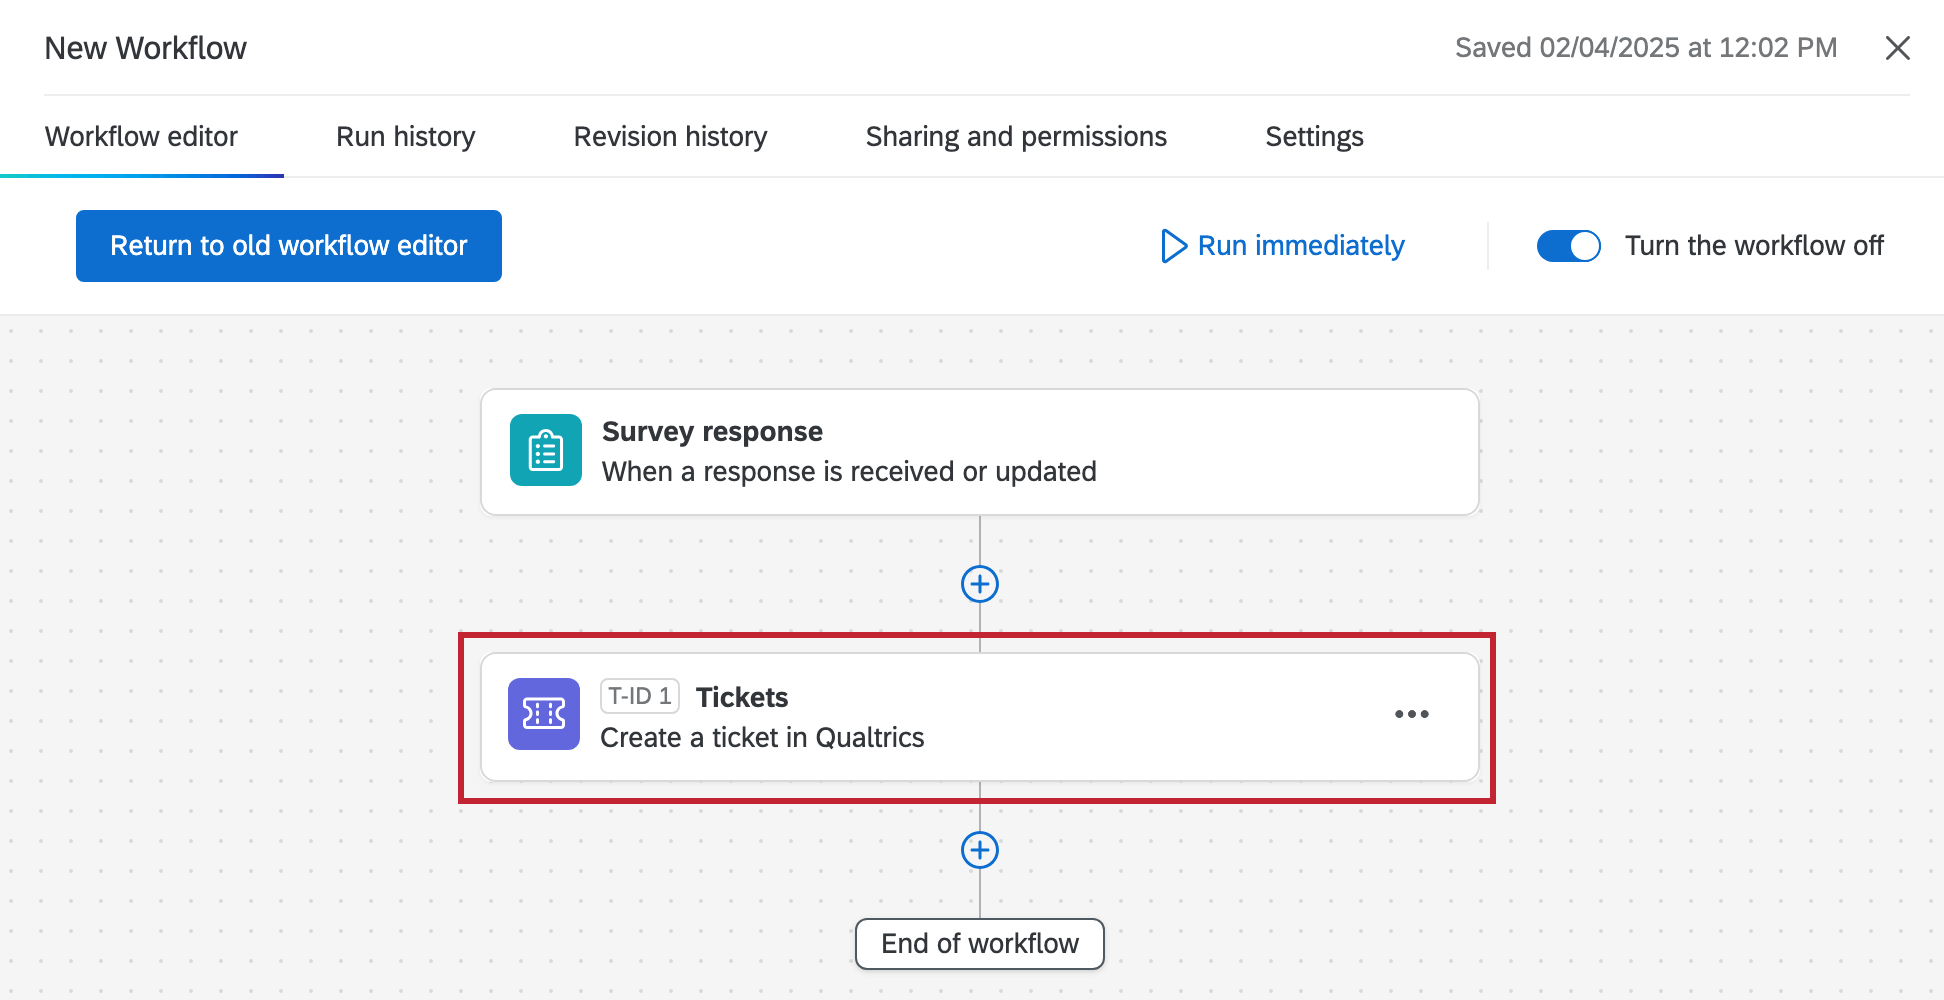
Open a workflow where tickets are created, or start a new one.
Qtip: Any edits you make to the layout for ticket details and highlights will be applied to all tickets created by a workflow, including existing historical tickets.
Edit the Tickets task.
Go to Ticket data.
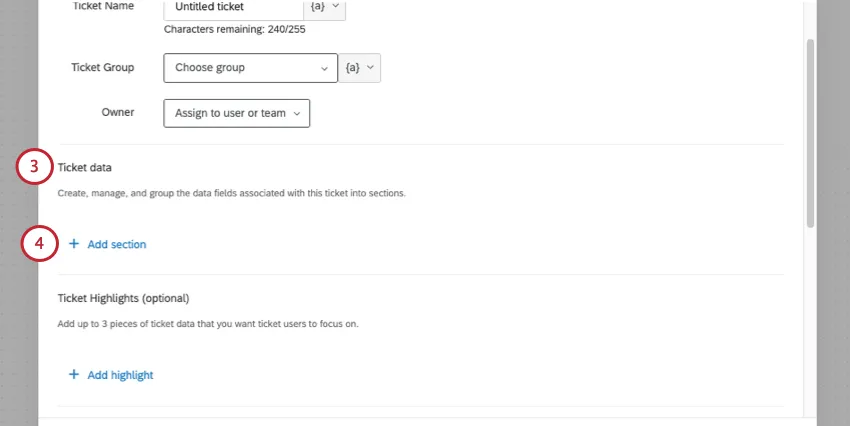
Click Add section to add a section of ticket data.
Name the section.
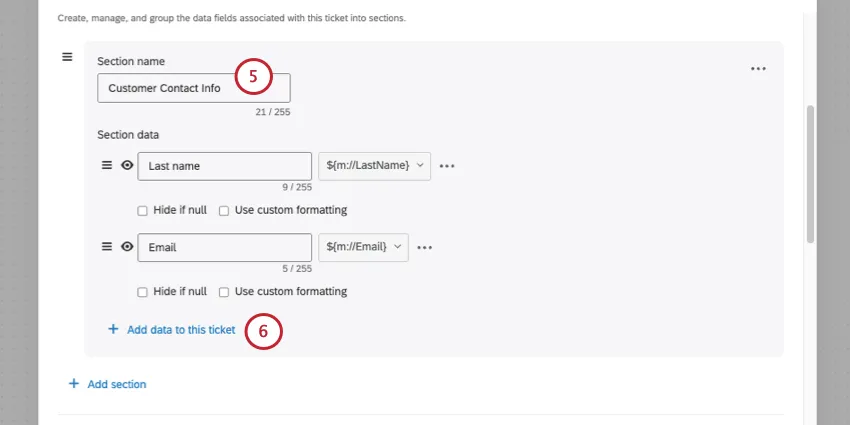
Click Add data to this ticket to add ticket data to this section.
Customization options include:
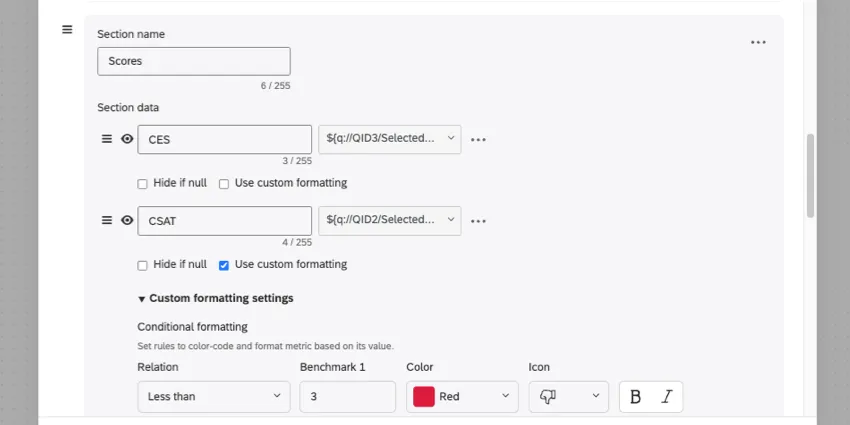
- Changing the order of sections.
- Changing the order of fields.
- Hiding fields if they’re null (empty).
Example: If a customer doesn’t provide a rating, hide it to keep the agent focused on the available information.
Qtip: Neither the ticket users nor the Ticket Admin will see fields hidden due to null values.
- Using custom formatting on fields.
- Hiding fields altogether (eye icon).
Qtip: Use the eye icon to hide fields. Once a field is hidden, ticket users won't see it. Only Ticket Admins will still see hidden fields.
Add sections and fields as needed.
Qtip: You must add information as ticket data before you can use it later in ticket highlights.
Go to Ticket Highlights.
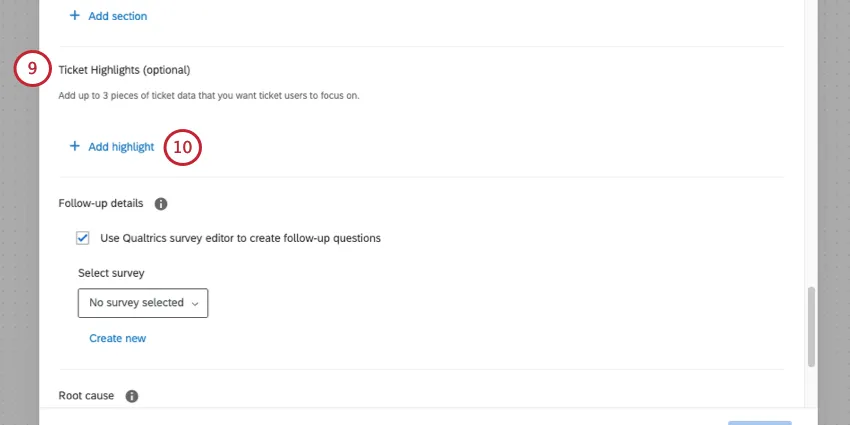
Click Add highlight.
Select one of the metrics you added to your ticket data.
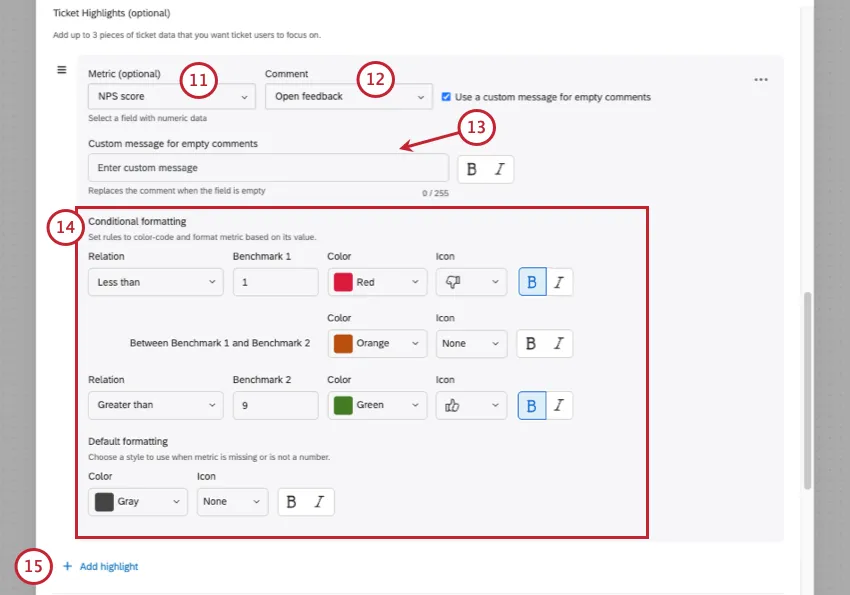
Select a comment (i.e., text entry feedback) to display alongside the metric for context.
Decide whether you’d like to write a placeholder message that appears if the respondent did not fill out a comment.
Add conditional formatting. This lets you specify how values in a certain range are formatted differently – for example, bolding results or changing their color once they fit within a certain numeric range.
Qtip: You can only set colors for 2 benchmarks and the range between them. You cannot add more ranges.
Example: Your NPS question is on a 0-10 scale. You set conditional formatting so that:
- Scores below 1 are red and bolded, with a thumbs down icon.
- Scores between 1 and 9 are orange, unbolded, with no icon.
- Scores above 9 are green and bolded, with a thumbs up.
- Default formatting for missing or non-numeric data is gray with no icon.
Add up to 3 highlights total.
Finish your tickets task and click Save.
Publish your workflow.
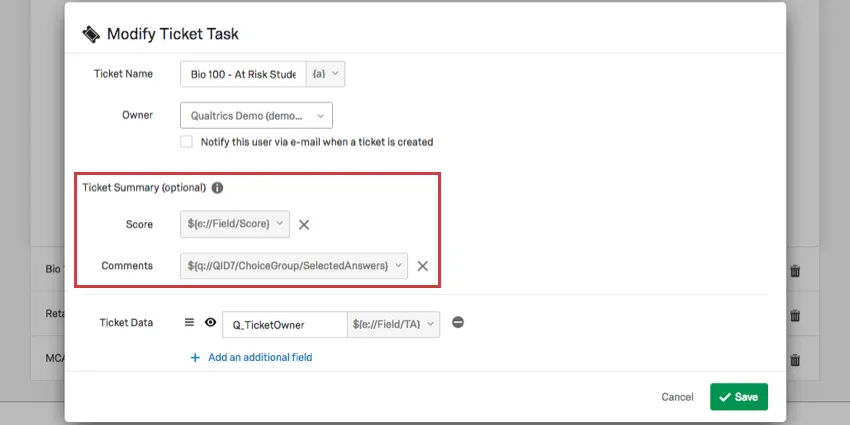
Qtip: The old ticket summary, with Ticket Score and Ticket Comments fields, are automatically migrated to the Ticket Highlights with default colors. You can customize this setup as needed using the steps above. Both existing and newly created tickets are affected by this change.
Qtip: When Ticket Details and Highlights is enabled for an organization, all existing ticket data is moved to a new, default ticket details section. No ticket data is removed from existing workflows.
FAQs
Do I have access to all extensions available through the Workflows templates?
Do I have access to all extensions available through the Workflows templates?
Is there a link to all Workflows events and tasks?
Is there a link to all Workflows events and tasks?
What are Workflows templates?
What are Workflows templates?
What are workflows? / Where are actions?
What are workflows? / Where are actions?
There are no changes to workflow functionality as part of this update.
That's great! Thank you for your feedback!
Thank you for your feedback!