
Ticket Feedback Surveys
What's on this page
Attention: This feature is not included in every license. Please contact Account Services if you are interested in getting access to this feature.
Attention: Ticket Feedback surveys aren’t compatible with the Qualtrics XM app.
About Ticket Feedback Surveys
When building your ticket task, including a follow-up survey allows ticket owners to provide additional information directly from the ticket. This feedback can help assess the root causes for poor CSAT and NPS scores. Once built, follow-up surveys can be reused across different ticket creation tasks.

Ticket feedback surveys are only available if you have the tickets feature in your organization. Ticket feedback surveys are compatible with the new survey taking experience.
Ticket feedback surveys do not count towards your license’s interaction limits.
Qtip: Ticket feedback surveys are a more advanced version of Follow-Up details that provide more flexibility in how you receive follow-up information. Existing ticket tasks with follow-up details cannot be updated in order to use ticket feedback surveys. To use ticket feedback surveys, rebuild ticket tasks with the ticket feedback survey enabled.
Attention: Ticket feedback surveys can not be used to create a Ticket Event. To update a ticket based on data from a ticket feedback survey, use workflows to create an Update Ticket task or Web Service task.
Qtip: With the release of Ticket Details and Highlights, you have more options to reorganize your ticket data. However, if you use the public API to pass ticket information into a ticket feedback survey as embedded data, and you want to reorder your ticket data fields, you need to change your setup. For example, you’ll want to follow the steps below if you use a web service in your survey flow to run API, which then returns a continuous block of ticket information in one output that has to be separated later. This is because the order information is passed is important to how that continuous string is separated.
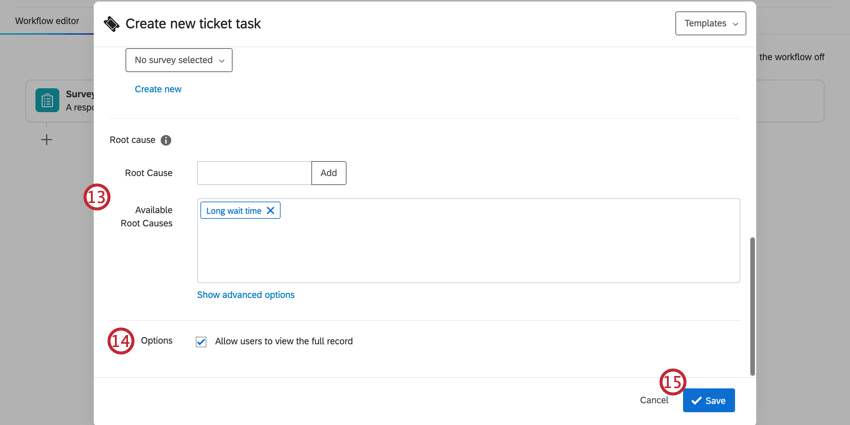
- Pause response collection on the survey with the workflow where you create tickets, OR your ticket feedback survey.
- Open the ticket creation workflow. Edit the ticket data, and make sure it’s in the order you prefer. Save changes.
- Navigate to the ticket feedback survey.
- In the survey flow, find the web service that is setting the ticket embedded data.
- Re-map your embedded data in the same order as the ticket data appears in the workflow.
- Resume response collection on the survey from step 1.
Qtip: To open the Distributions tab of a ticket feedback survey so you can pause or resume response collection, open the project, then remove ?resourceTypeForNavContext=TicketsFollowUpDetails from the URL in your browser.
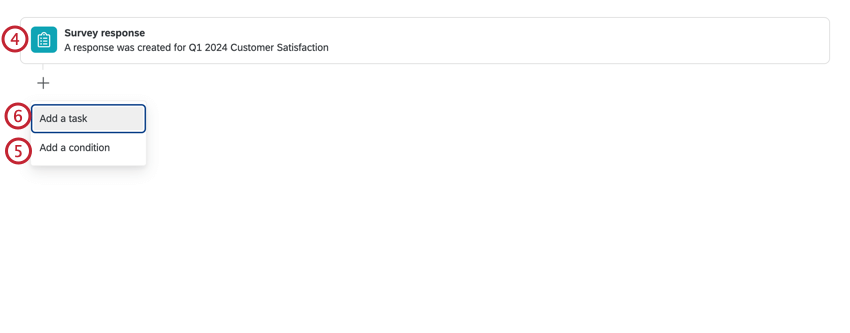
Creating a Ticket with a Ticket Feedback Survey
Qtip: For more information on creating and working with workflows, see Workflows Basic Overview.


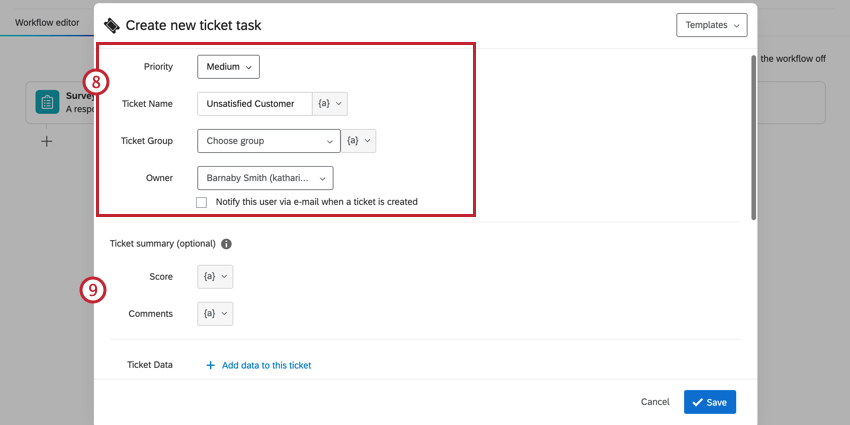
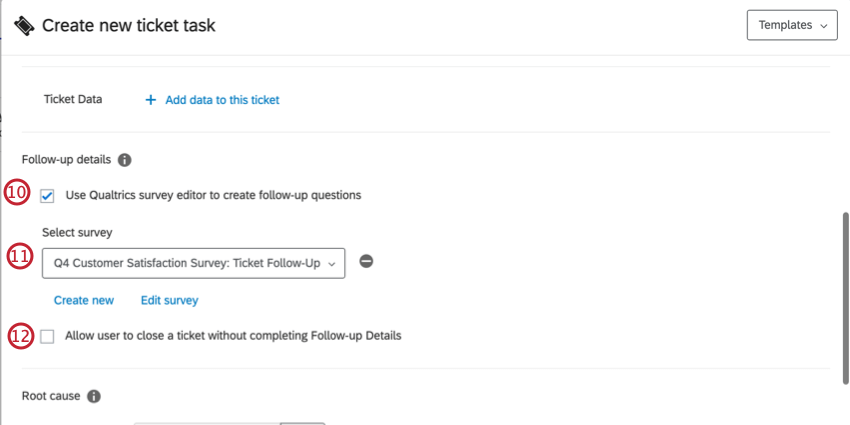
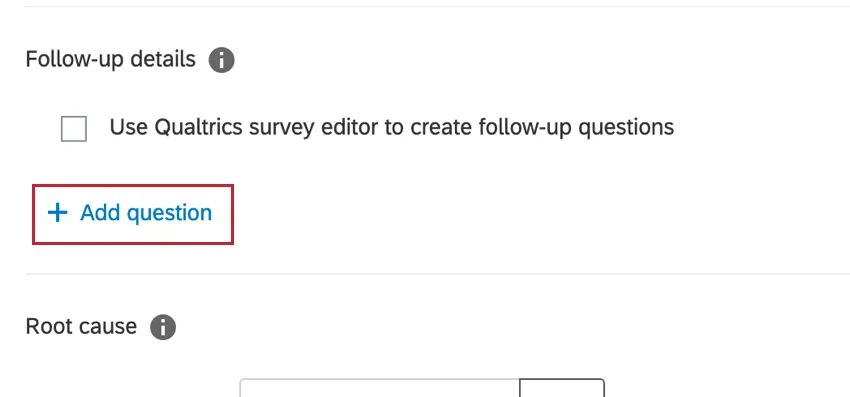
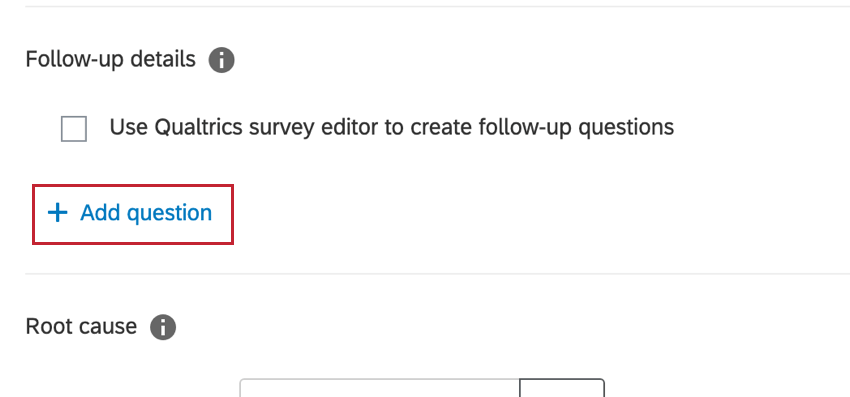
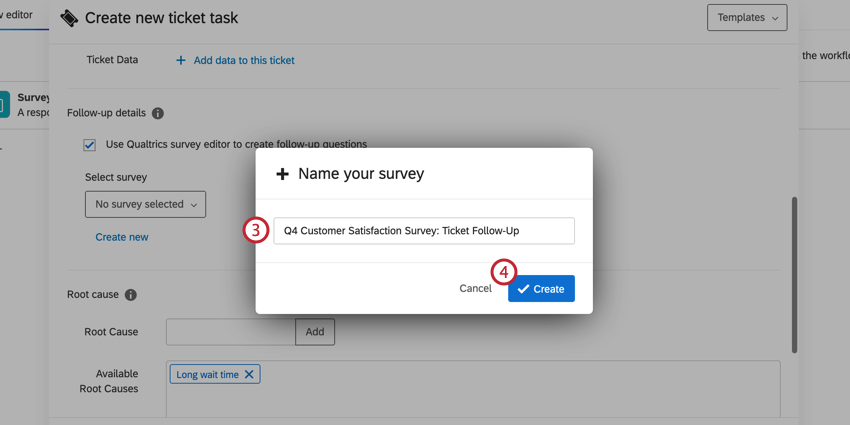
Qtip: If you would rather create follow-up questions directly in the ticket task, leave this box unchecked and select Add question. Once you add questions to the task, you cannot add a ticket feedback survey in the future. For more information, see Tickets Task.
Qtip: Surveys must have the “Ticket Feedback” project type and be published in order to be included in the dropdown.
Creating a Ticket Feedback Survey
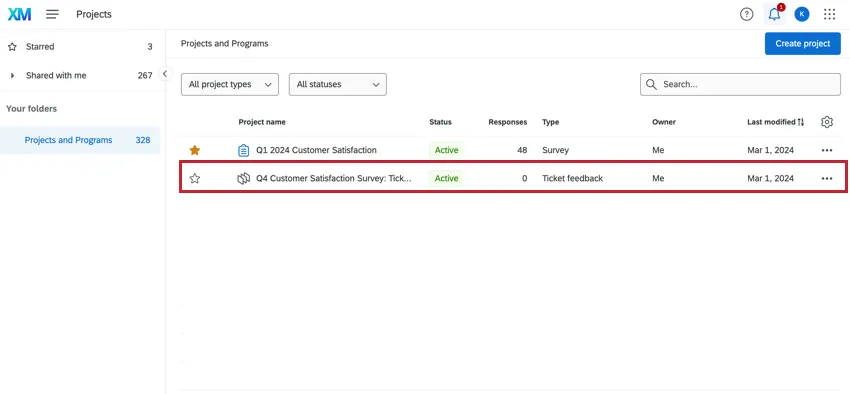
A follow-up survey works similarly to other survey projects except they have a different project type, which is Ticket Feedback. While these project types can be viewed, edited, and deleted in the projects tab, they must be created in the Ticket Task.

Qtip: Ticket feedback surveys only contain the Survey, Workflows, and Results tabs.
Qtip: Follow-up surveys must be published in order to be available in tickets.
Using Ticket Feedback Surveys
Once your ticket task workflow has been triggered, tickets will be created and assigned to the relevant ticket owner. The ticket owner can view their tickets in the Follow-Up page.
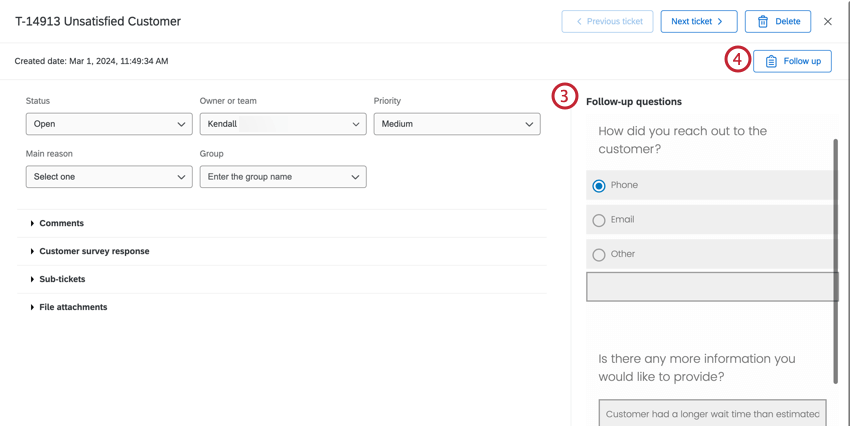
Qtip: Ticket owners can respond to a follow-up survey multiple times until the ticket is set to Closed. Once closed, the follow-up survey cannot be edited without re-opening the ticket. Taking the survey multiple times will generate new survey responses, it won’t update the original response.
Qtip: Since there is no Data & Analysis tab in the ticket survey, you cannot view or delete individual responses. Instead, the responses to the ticket survey can be used to create ticket datasets.
Using Ticket Feedback Survey Data
If you want, you can always report on ticket feedback surveys on their own. However, this data doesn’t by default include information about your tickets or the surveys that generated them. By default, ticket feedback surveys only contain responses to the follow up questions, plus 3 ticket data fields that can be passed in as embedded data (the ticket key, the ID of the source survey, and the response ID from the source survey). In order to bring in more enriching information for stakeholder reports, you’ll need to find ways to add this data in.
Below, we’ll show how to do one of the following:
- Combine your ticket feedback survey with more ticket data.
- Combine your ticket feedback survey with other survey data.
Regardless of your ultimate goal, you’ll first need to set up your survey flow.
Warning: For Ticket Follow-up reporting, the “Ticket Notes” fields in the Ticket Reporting dataset are being deprecated, and should not be used.
Survey Flow Setup
Warning: In order to use the ticket feedback survey in the data modeler, the following steps must be completed before the survey is distributed.
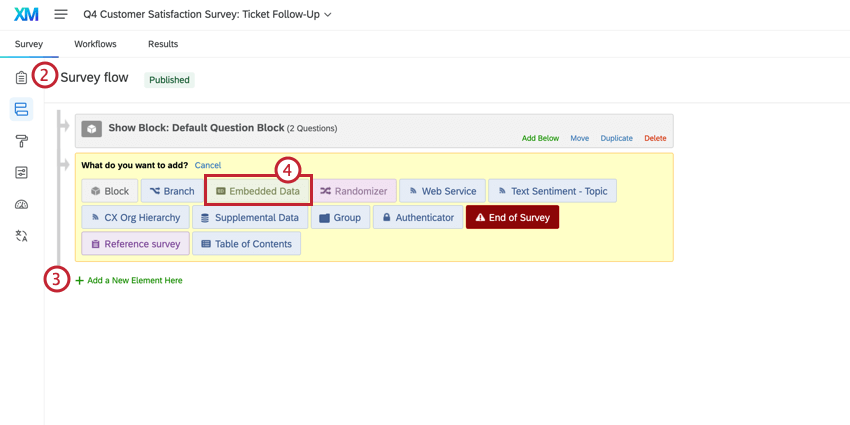
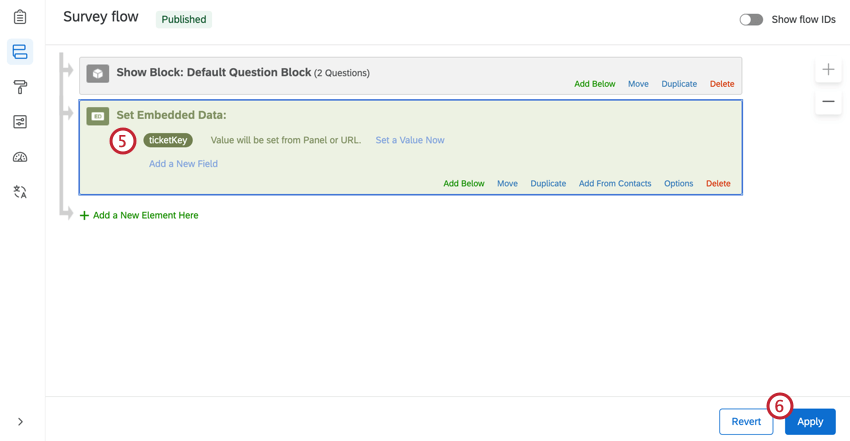
Pulling in Additional Ticket Data
By default, the ticket feedback survey only contains ticketKey, sourceSurveyId, and sourceResponseId. However, you can pull in other ticket data in 2 different ways: by creating a data model, or by using an API call in the survey flow.
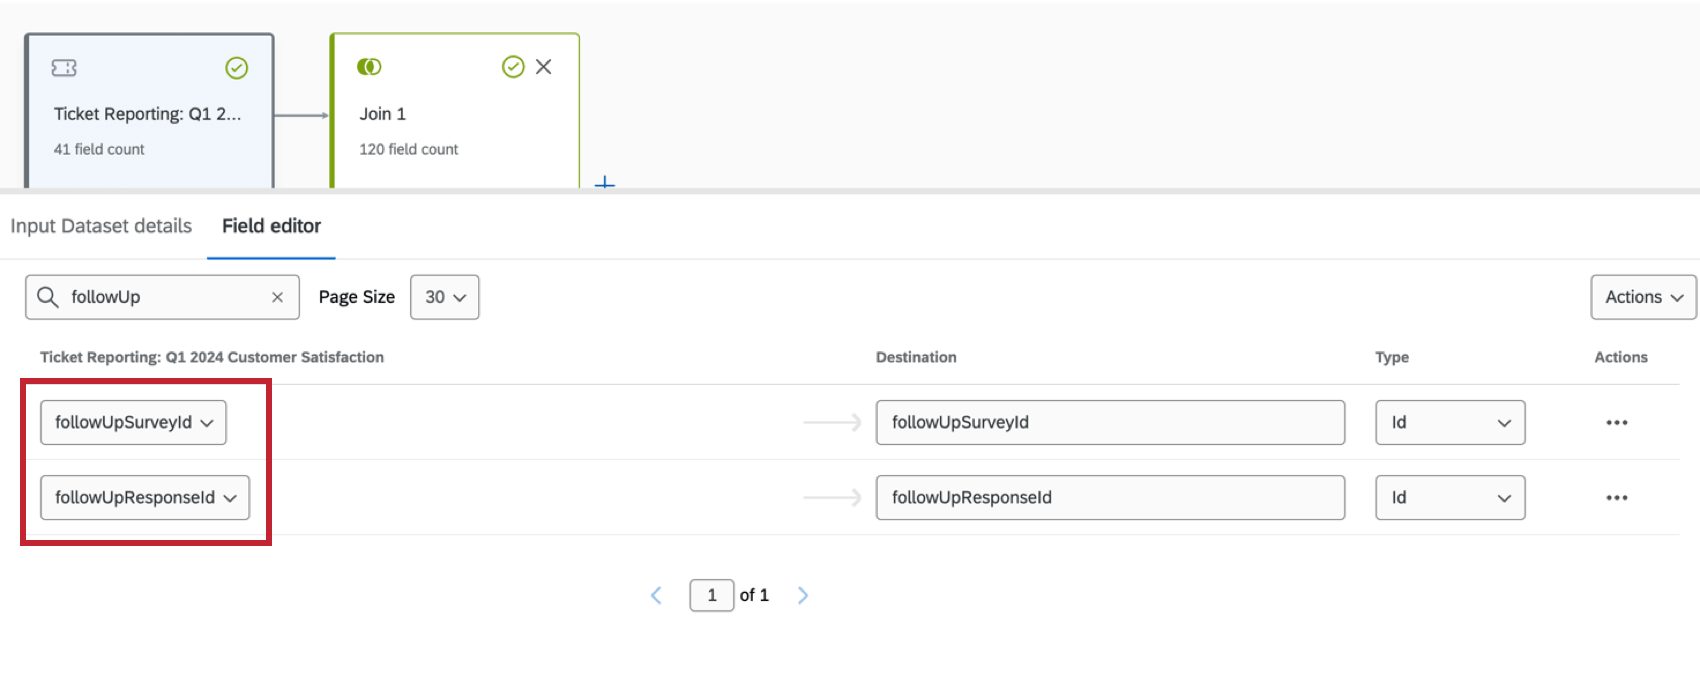
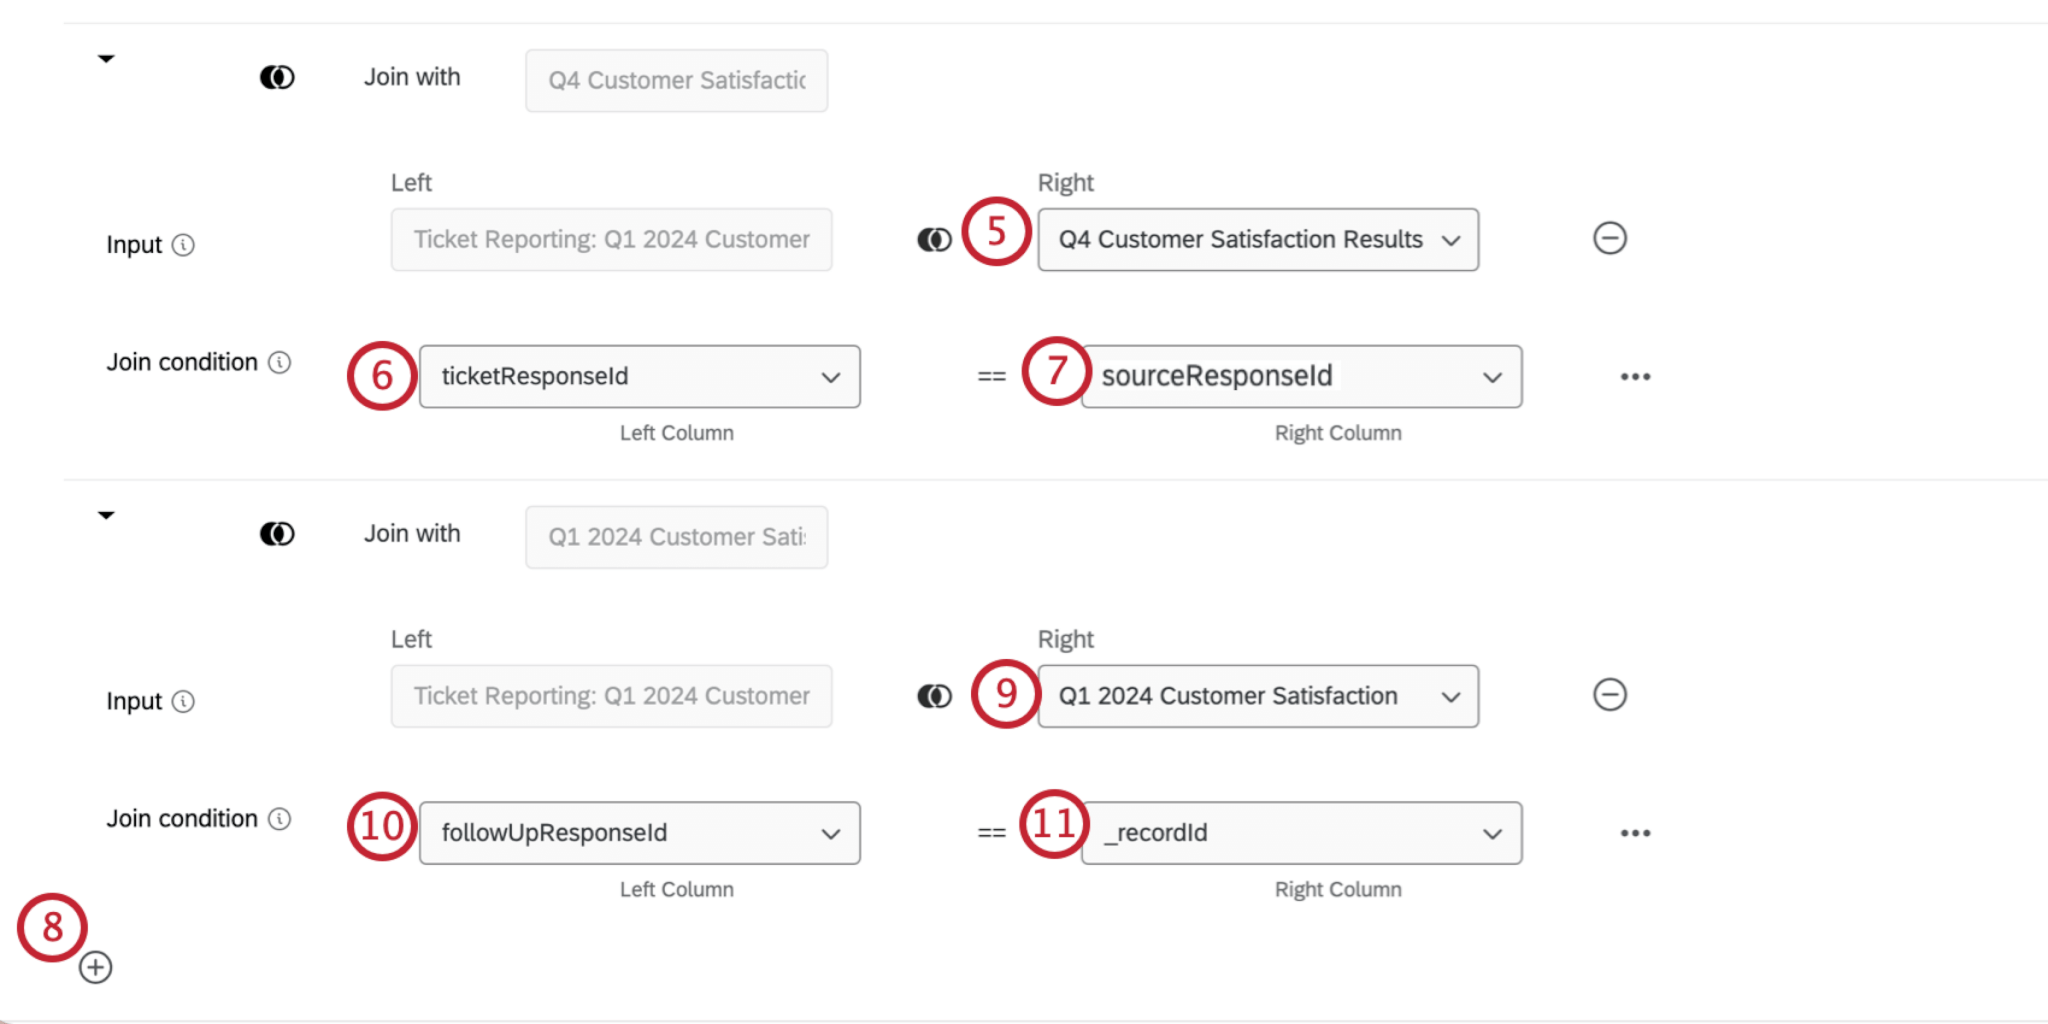
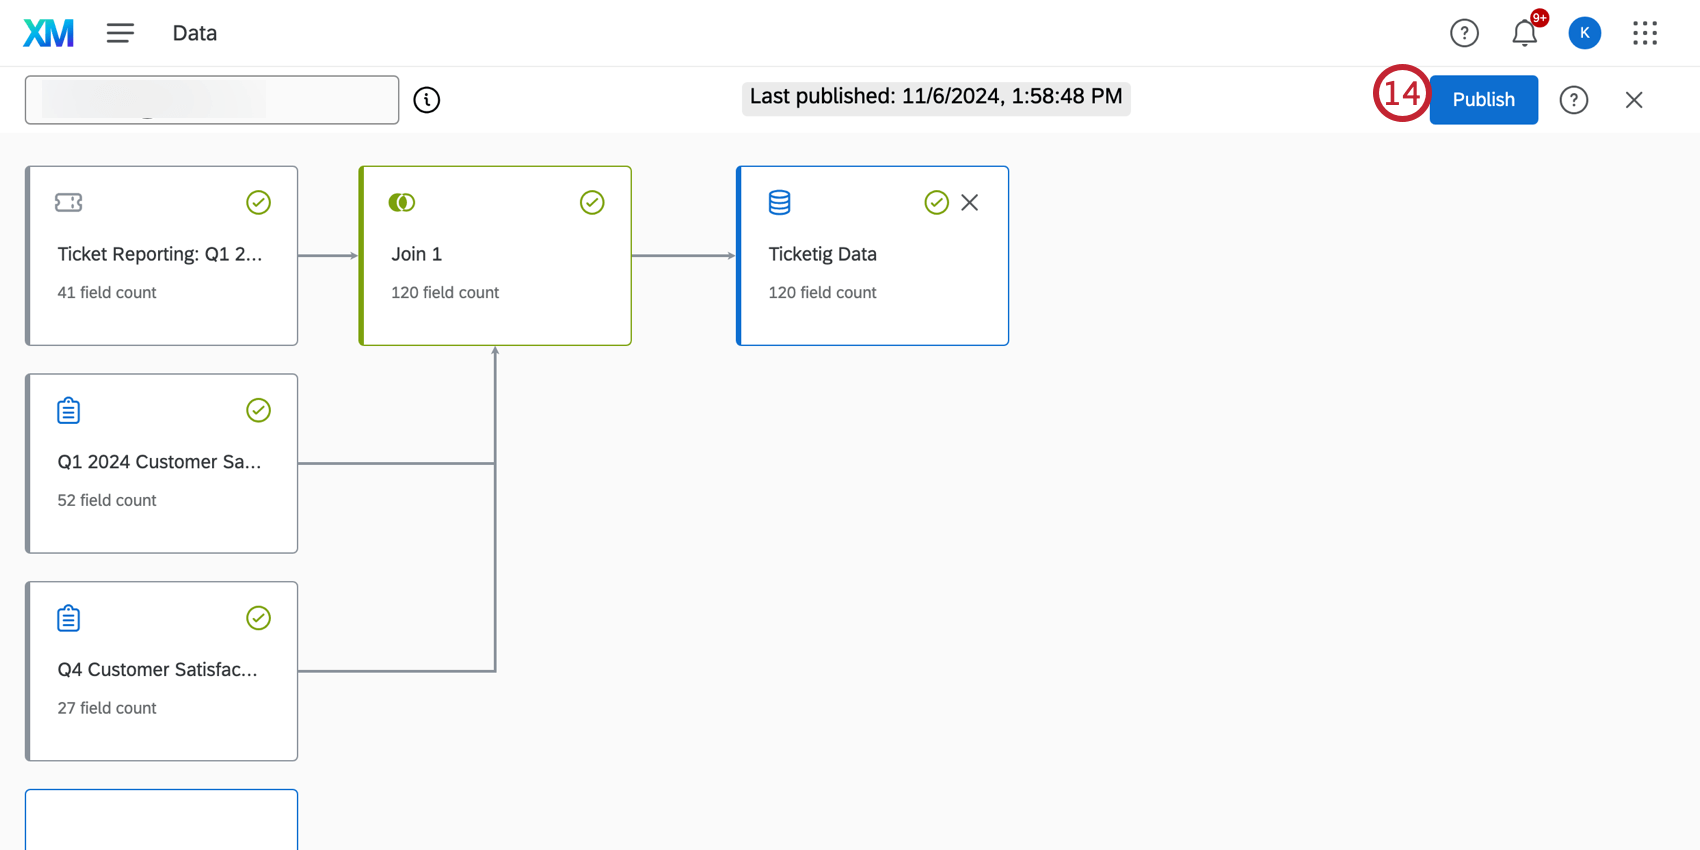
Creating a data model results in a dataset you can use in dashboards. Follow these steps to join ticket and survey data. In this case, you want to map the ticket feedback survey’s sourceResponseId and the ticket’s [Ticket Reporting: Survey Name]_ticketResponseId.
If you’re comfortable using API, you can embed a web service that pulls the ticket data into the survey. This makes data available in the ticket feedback surveys’ Workflows, Data, Reports, and Results tabs. It can also make it easier to combine the ticket feedback survey, ticket data, and primary survey all into one data model, if you choose to do so later on.
To pull in ticket data with API:
See the linked API documentation for details on how to use this call.
Joining Ticket Feedback Data with a Survey
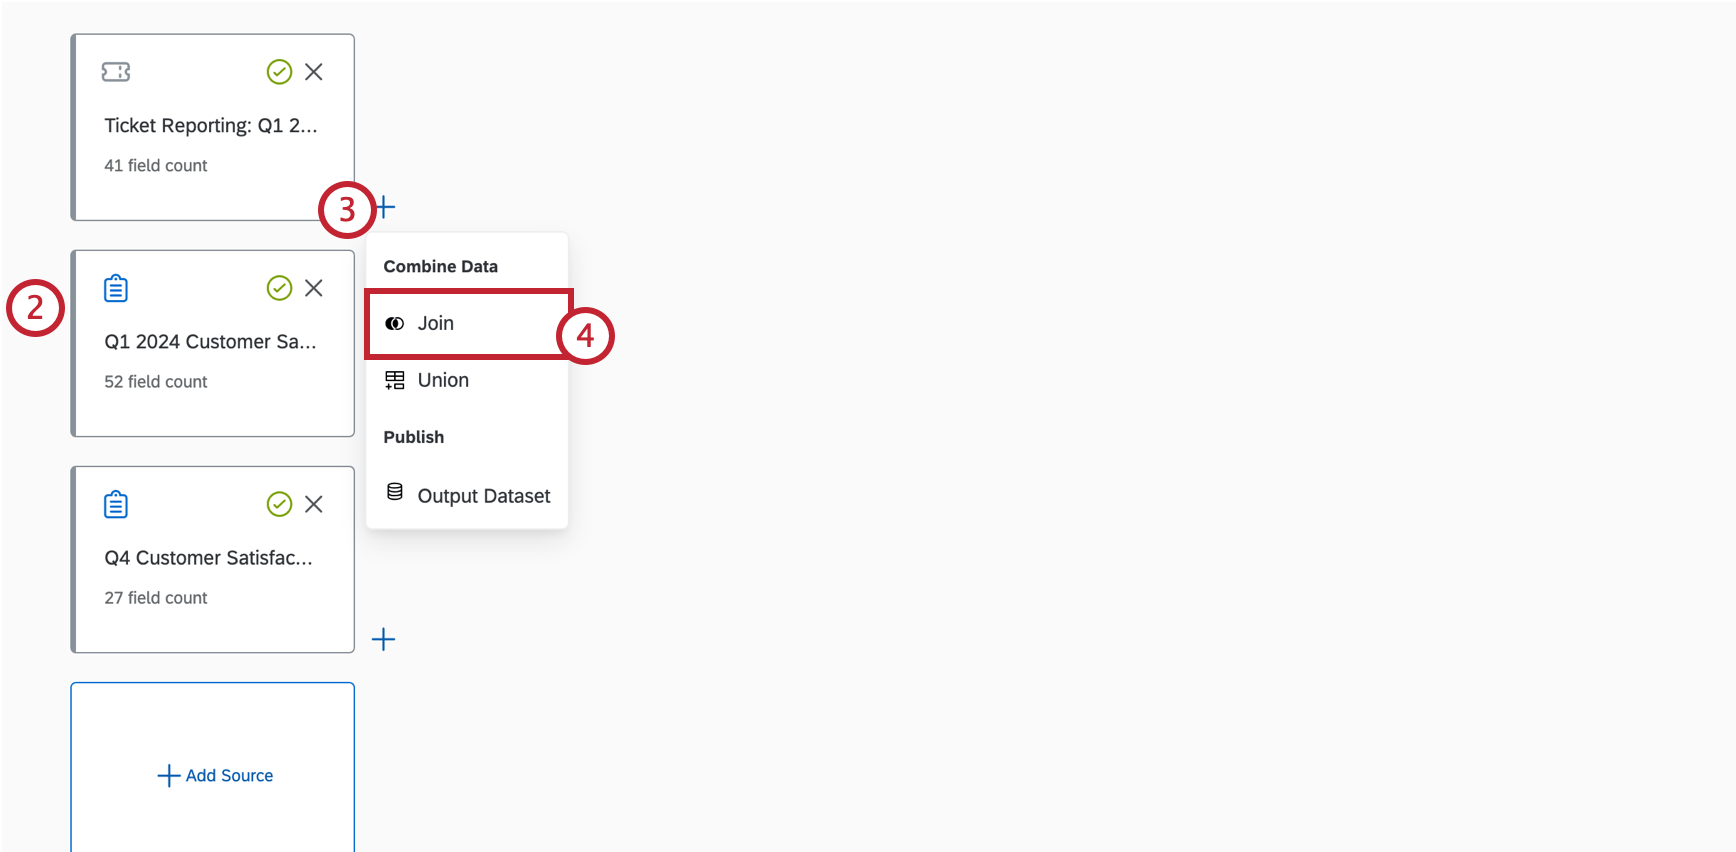
- Ticket reporting for the primary survey. Qtip: Ensure that the followUpSurveyId and followUpResponseId fields are mapped.


- Primary survey.
- Ticket feedback survey.
Qtip: Depending on your use-case, you might want to include survey responses that are not tied to a ticket. To achieve this, make the survey the first data source before creating joins. For more information, see Understanding Left Outer Joins.
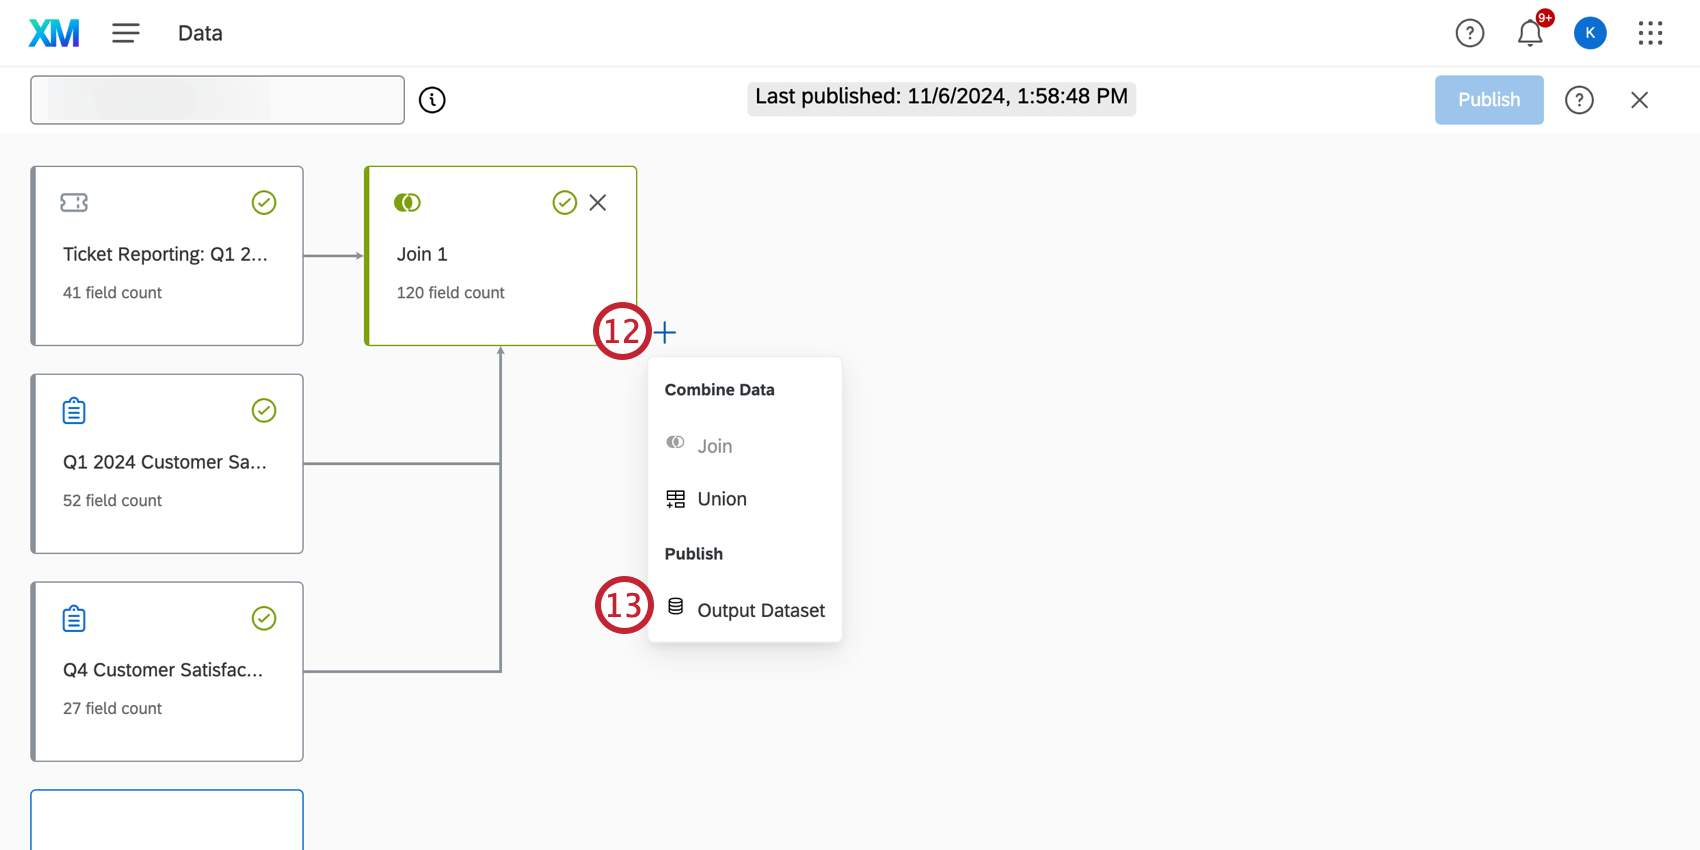
Qtip: You can use unions to combine different sets of ticket and survey data together in the data modeler before performing a join. For more information, see Unions (CX).
Qtip: For information on how to using your new dataset in CX Dashboards, see Combining Ticket & Survey Data in Dashboards (CX).
Editing a Ticket Feedback Survey
Follow-up surveys can be viewed, edited, and deleted in the projects tab. When you’re in the project list, remember that these surveys are the Ticket Feedback project type.
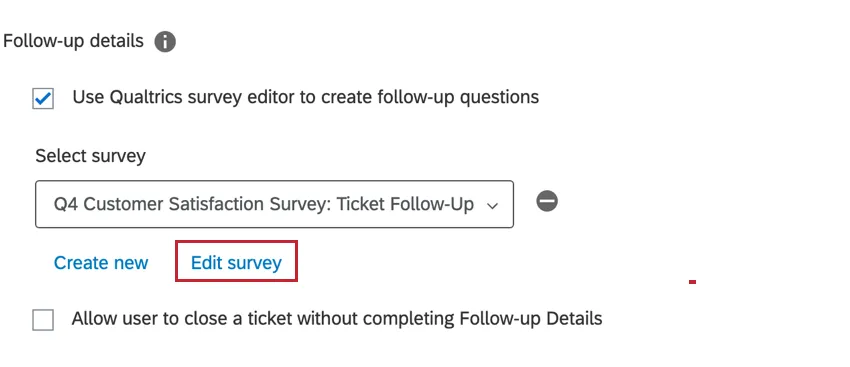
Alternatively, ticket feedback surveys can be edited while creating the ticket task. Click Edit survey after selecting the ticket feedback survey that you would like to update.
Exporting and Importing Ticket Feedback Surveys
Ticket feedback surveys can be exported as a QSF and imported into other accounts. Exporting to QSF is a useful tool to backup your ticket feedback survey or transfer a copy into another Qualtrics account. For more information, see Import & Export Surveys.
That's great! Thank you for your feedback!
Thank you for your feedback!