
Preparing Your Participant File for Import (EX)
What's on this page
Qtip: This first section of this page describes file requirements for uploading participants to Engagement, Lifecycle, Pulse, and Ad Hoc Employee Research projects. However, keep in mind that the rest of this page also talks about hierarchy-specific file requirements, which do not apply to Lifecycle or Ad Hoc Employee Research. For more details on each, see Types of Employee Experience Projects.
About Preparing Your Participant File
When importing participants into your Employee Experience project, there are a few important things to keep in mind. For example, every participant import requires the following columns, regardless of hierarchy type:
- First Name: The employee’s first name.
- Last Name: The employee’s last name.
Email: The employee’s email address. This detail is the most important. Email can act as username for each participant or as a way to remember which users already exist in the directory.

Attention: If the email field in your participant file is left blank, an artificial email will be generated using the format, UniqueID@BrandID.fake, as a placeholder to complete the person information. Since the email generated is artificial, EX distributions will not be sent to the participant until the email is updated to a valid address. However, if your organization has SSO, you must include valid email addresses when uploading participants to ensure the correct automatic username generation.
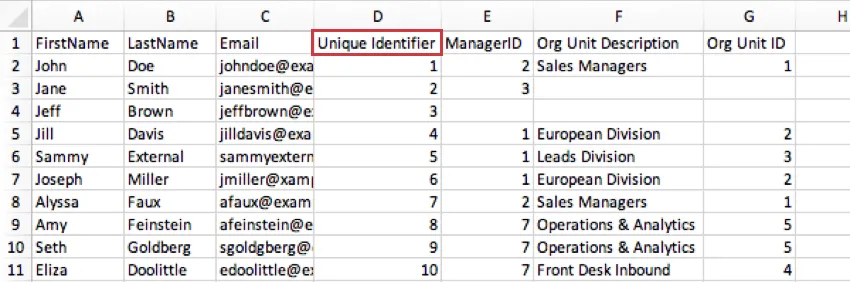
- UniqueIdentifier: Specify participants by whatever identifier your company prefers. You can use anything from internal numeric IDs to usernames, to a repeat of the EmployeeID column (but only if this is unique within the organization, and will not be shared with anyone in any other project). Check out the Unique Identifiers support page for more details.
Qtip: If your organization has SSO, make sure to upload participants to your directory with a column for UserName that matches their SSO username attribute before uploading participants to your projects.
Qtip: If you plan to distribute your EX survey using SMS, add a column named Phone number or Phone, and follow these formatting rules for phone numbers.
If you’re creating an Engagement project, you’ll want to make sure that you’ve chosen the right hierarchy for your project since this affects the metadata, or custom columns of participant data, that you’ll include in your CSV/TSV file. For example, the Parent-Child hierarchy file should include columns for Employee ID and Manager ID, whereas the Level-Based hierarchy file should have different Level columns. We go over the metadata you need to include for each hierarchy on this page.
Qtip: You may have multiple hierarchies in your project, but each metadata field can only be used to generate 1 hierarchy. For example, if you use “ManagerID” to build your first hierarchy, you cannot use that same field to build your second hierarchy.
If you forget to include the correct metadata to begin with, that’s ok! You can always update your participants’ metadata after the fact by following the steps at the linked section.
Qtip: Ready to upload the file, but not sure how? Once you’ve set up your hierarchy file according to the instructions on this page, head over to our Adding Participants support page.
Qtip: Not sure what type of hierarchy fits your HR data best? Check out a basic comparison of your options on the Hierarchies Basic Overview page.
Importing Participants for a Parent-Child Hierarchy
Parent-Child hierarchies are the most commonly used kind of hierarchy. They are the best option if your HR data is formatted so you have a list of employees’ IDs and the managers each employee reports up to.
Click here to access the Parent-Child hierarchy file template.
Required Metadata
There are two metadata columns you must include to create a Parent-Child hierarchy:
- EmployeeID: This is the employee identification of the participant. It is best to use the IDs your company’s HR department has internally assigned, rather than trying to make up new randomly generated IDs.
- ManagerID: This is the employee identification of the participant’s manager.
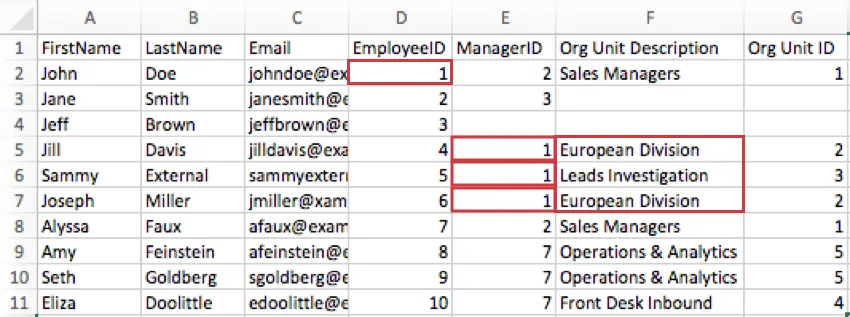
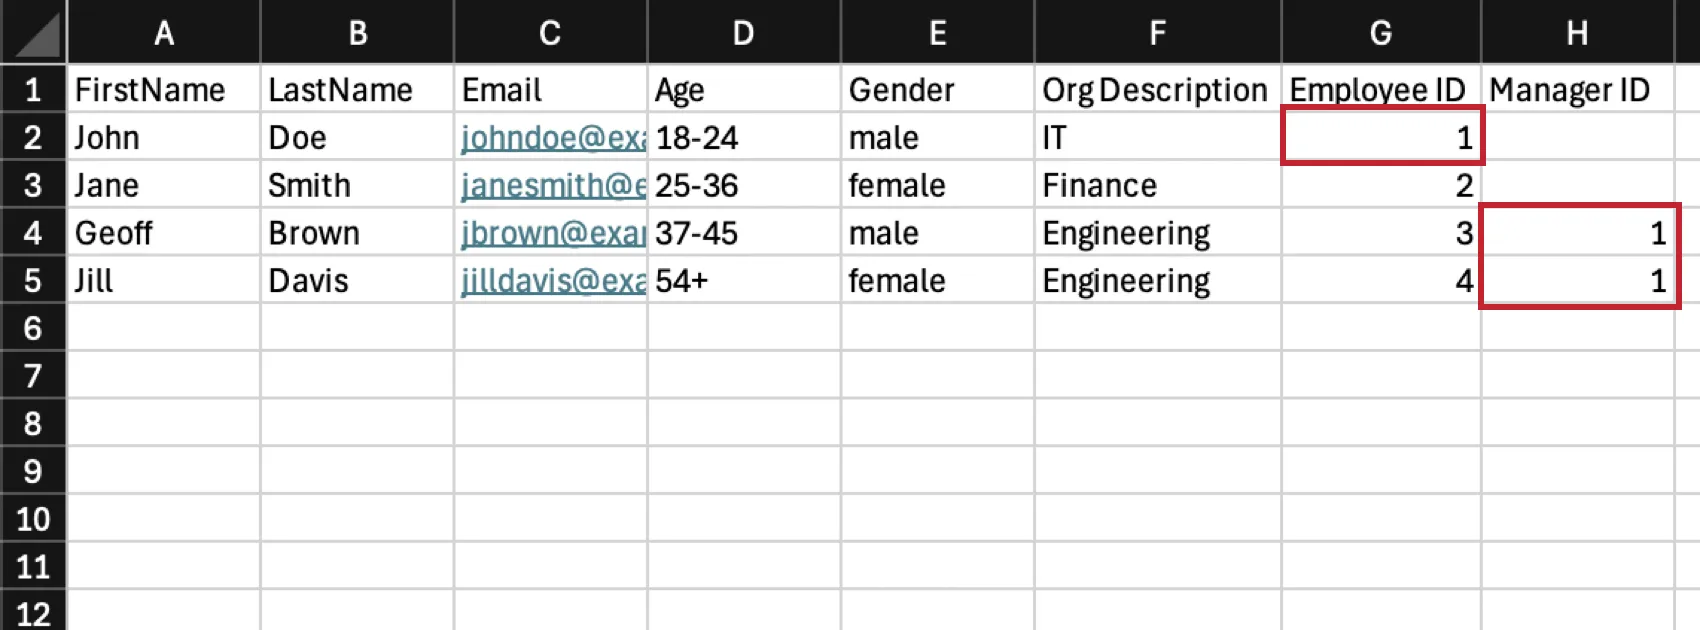
Example: In the image below, John Doe’s EmployeeID is 1, so his EmployeeID column says 1. Jill Davis, Sammy External, and Joseph Miller report directly to John Doe, so their ManagerID columns say 1.

Qtip: Technically, you can name the EmployeeID and ManagerID whatever you’d like. For example, if your organization prefers the term “employee number” or has a special term like “QID,” feel free to give your columns these names. What’s important is that you include these concepts and enter them into the correct fields when you generate your Parent-Child hierarchy.
When adding Employee and Manager IDs, there are a few important things to keep in mind:
The Unique Identifier column of your data can be used for your Employee ID field when generating a Parent-Child hierarchy. Here’s how the previous example would look in that circumstance:
- Every participant must also have a unique Employee ID. Multiple participants cannot share the same ID. This can be the same as the Unique Identifier.
- Every participant must have a manager. The only exception are the highest members of the company you include in your hierarchy (e.g., CEOs). Leave the manager column empty to show this person doesn’t report to anyone.
- An individual employee’s Employee ID and Manager ID columns should never be the same. Employees don’t report to themselves!
- Every Manager ID must link back to an employee. Any participant with a Manager ID that does not correspond to an existing Employee ID will be assigned to an Unknown Manager. Please note that once someone is assigned to an Unknown Manager, the members of the hierarchy below this person will also be broken. To fix this issue, you must manually fix the data and regenerate the hierarchy.
- Watch out for circular logic. If John Doe reports to Jane Smith, and Jane Smith reports to Joseph Miller, Joseph Miller cannot report to John Doe. You cannot manage your manager’s manager.
Optional Metadata
You can add any additional metadata that you wish when uploading your participant list. Anything from each employee’s birthday to their office locations can be included. However, there are two optional metadata that can help you format your Parent-Child hierarchy.
- Org Unit ID: Org Unit IDs help you identify the same team over time, even if the team’s name changes. It serves the same purpose as a unique employee ID, but for a unit instead of an employee. Including a stable Org Unit ID means you don’t have to manually map hierarchy data; the system will recognize the ID and map appropriately. Org Unit IDs are also useful if a manager is over multiple teams. This means that if my manager is John Doe, but John Doe is the manager of Team A and Team B, you can specify which team a direct report belongs to with the Unit ID field.
Org Unit Description: When creating your hierarchy, units will be automatically named for a manager. The Org Unit Description setting allows you to name your units based on names or descriptions of the units instead.

Qtip: Org Unit Descriptions are built based off of information from the direct report, not the manager.
The Org Unit Description acts as a name for a specific Org Unit ID, and will appear as the unit’s label in dashboards when filtering or breaking out by unit. For example, Org ID 2’s Org Unit Description may be European Division. There can only be one unit description for each unit ID, and vice versa. Likewise, if employees belong to the same org unit, their descriptions need to match.
Example: In the image below, John Doe manages 2 different teams: the European Division and Leads Investigation. The Org Unit Description column specifies which of these teams his 3 direct reports belong to. We see Jill Davis and Joseph Miller are in the European Division, but Sammy External is in Leads Investigation.
Example: In the image below, Jill and Joseph both belong to the “European Division,” which has an Org Unit ID of 2. Note how their Org Unit Description and Org Unit ID match accordingly.

Qtip: Technically, you can name the Org Unit ID and Org Unit Description fields whatever you’d like. For example, you can name your columns Unit Name, Team, or Department instead of Org Unit Description. What’s important is that you include these concepts, and enter them into the correct fields when you generate your Parent-Child hierarchy.
Importing Participants for a Level-Based Hierarchy
Level-Based hierarchies are a good option if your HR data includes each level the employee reports to, from the top of the hierarchy all the way down to where the employee sits. With Level-Based hierarchies, you don’t necessarily have to know who the employee’s manager is; you just need to know the chain of command for each employee you’re including in the project. This data format is often more common with companies that organize employee data by distinct levels, location, or functional breakout.
Click here to access the Level-Based hierarchy file template.
Example: Hierarchies can manage what data each participant can see on a dashboard. Let’s say you have stores in different locations competing for a company prize, and you want participants to be able to see their own engagement dashboards, but not each other’s. Building a hierarchy based on location allows you to restrict which location’s data each participant sees when you later build a dashboard role or set dashboard user permissions.
Required Metadata
You will need a separate column for each level of your organization you wish to define. The last level filled for a participant indicates their place in the hierarchy. For those higher up, this usually means the first Level column is filled, but the rest aren’t.
Example: Let’s say your company has locations across the United States. Level 1 might include all the states your offices are located in. Then Level 2 could be the city in which these offices are located. This means a participant in a Dallas, Texas office would have a Level 1 of Texas and a Level 2 of Dallas. Another participant with a Level 1 of Texas might have a Level 2 of Houston.

Qtip: Technically, you can give these metadata columns whatever names you’d like. For example, if your hierarchy is going to be based off of location, you can have columns named Country, State/Region, and City instead of Level 1, Level 2, and Level 3. What’s important is that you include these concepts, and enter them into the correct fields when you generate your Level-Based hierarchy.
Manager Metadata
If you’re interested in assigning managers to units in your Level-Based hierarchies, there are two different ways to do it.
Manager: This column indicates whether the participant is a manager. The participant will be assigned as the manager of the lowest level he or she has listed. Most users use “yes” to indicate a manager, but you can also use “1,” “manager,” or any format you’d like, so long as you have one value in the column that indicates that the participant is a manager.

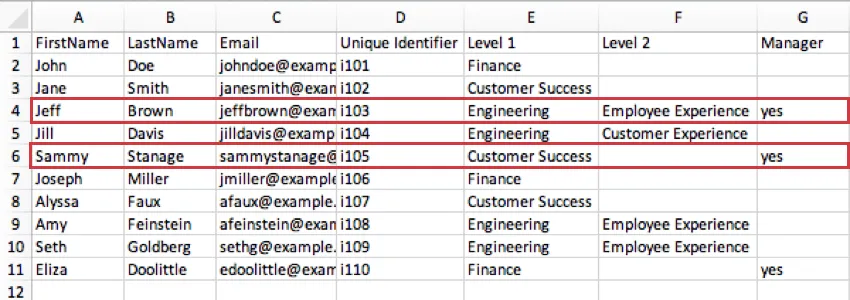
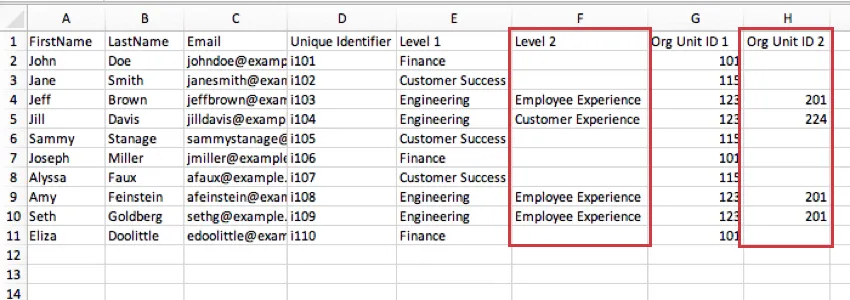
Example: In the image below, the lowest level defined for Sammy Stanage is Level 1, where he is in a Customer Success role. The “yes” in his Manager column indicates he is manager over all of Customer Success. Meanwhile, Jeff Brown’s last level defined is Employee Experience within Engineering. This means that within Engineering, he is head of the Employee Experience level.
Manager Level: Manager Level is a means of identifying managers by calling out the specific level they manage. In the previous example, the same value (“yes”) indicates whether or not a participant is a manager; for Manager Level, however, there are separate values for each level.
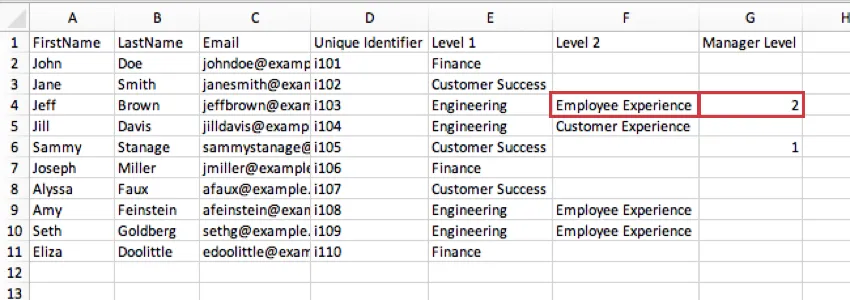
Example: : In the image below, Jeff Brown’s Manager Level is 2 to indicate he is manager of his Level 2 position in Employee Experience, not manager of his Level 1 position in Engineering.
Optional Metadata
Org Unit IDs: Org Unit IDs help you identify the same team over time, even if the team’s name changes. Including a stable Org Unit ID means you don’t have to manually map hierarchy data; the system will recognize the ID and map appropriately. It serves the same purpose as a unique employee ID, but for a unit instead of an employee. You need to include as many Org Unit IDs as you do levels, so you can provide an ID for each level.
There must be a unique Org Unit ID column for each level in the Level-Based hierarchy. For example, if your organization has two levels, “Level 1” and “Level 2”, then you will need two columns for Org Unit IDs: “Org Unit ID 1”, which contains the Org Unit ID for anyone in Level 1, and “Org Unit ID 2”, which contains the Org Unit ID for anyone in Level 2. You must also be careful not to reuse Org Unit field names, which is why we recommend numbering them.
Example: The units in Level 1 correspond to the column Org Unit ID 1. Finance is unit 101, Engineering is 123, and so on. If we uploaded a hierarchy next year and renamed Finance to The Penny Patrol, we’d give it the same ID, 101, so that we wouldn’t have to manually map hierarchy data in order to report on multiple years’ worth of engagement data in our dashboard.
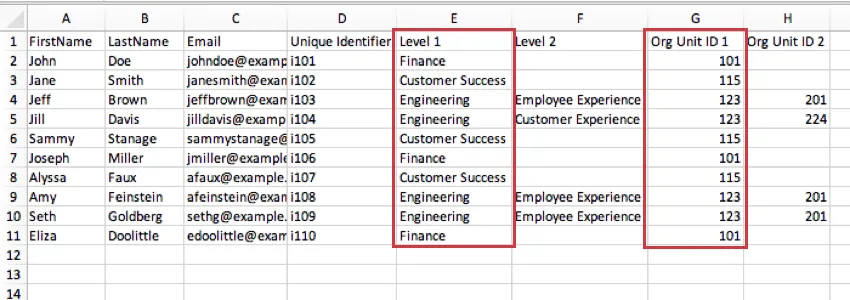
In the screenshot below, the units in Level 2 correspond to the column Org Unit ID 2. The Employee Experience engineering team is unit 201, and the Customer Experience engineering team is 224.
Importing Participants for a Skeleton Hierarchy
Skeleton hierarchies are used when you know the identity of your managers, but not their direct reports. Instead of organizing a hierarchy around a list of direct reports and the chain of command above them, you build out a list of managers and the units they roll up to.
Here is an example Skeleton hierarchy to get you started. Create a CSV/TSV and create a row with each manager on it. You must at least have manager information to build a Skeleton hierarchy.
For each manager, add a column for the manager’s First Name, Last Name, Email, and whatever additional metadata you’d like to include. Then, you must add the following metadata:
- Employee ID: The ID of the unit the employee manages.
- Manager ID: The ID of the unit directly above this unit. This is the unit the employee reports to.
- Org Description: This metadata is optional. It allows you to create a name for the unit the employee manages. This can be the name of the team, or even the manager’s name.
Example: In the below example, IT is a larger department that Engineering is nested underneath. John Doe is the manager of IT, so his Employee ID column says 1 to indicate IT’s unit ID is 1. Geoff Brown and Jill Davis are the managers of Engineering, so they both have a Manager ID of 1 to indicate that IT is the parent unit of Engineering.
Qtip: Is your participants file already imported? Head over to the Generating a Parent-Child Hierarchy support page for further instruction on generating the hierarchy.
Respondents vs. Non-Respondents
A respondent is a participant who can answer your survey. A non-respondent is a participant who can’t access the survey. It can be useful to make some participants non-respondents if you’d like them to be able to view the dashboard results or validate org hierarchies, but don’t want them to fill out a survey.
Qtip: Only respondents are counted in participation summary and response rate widgets.
You can determine whether the participant you’re adding is a respondent to the project by including a header called Respondent, then using one of the following values:
- 0 – Non-respondent
- 1 – Respondent
If you don’t include the Respondent column in your file, all of your new participants will be set as respondents by default. If someone is already in the project, their status will be updated only when specified.
Qtip: You can find your project’s respondents using search in the Participants section.
Qtip: You can adjust whether an individual participant is a respondent on the participant information window.
Maximum and Supported Characters
Warning: All metadata fields previously recognized spacing in the field names. For a vast majority of users, metadata field names now ignore spaces, meaning “Manager ID” and “ManagerID” would be treated as the same field when importing a participant file.
Warning: Do not name any of your metadata fields the same name as a reserved embedded data field. These fields are not case-sensitive.
Maximum characters for each field
- First Name: 50 characters for each first name.
- Last Name: 50 characters for each last name.
- Email: 100 characters for each email.
- UniqueIdentifier: 100 characaters for each unique identifier.
- All other metadata: Metadata names have a limit of 90 characters each, while values have a limit of 1000 characters each.
Partially supported characters
Attention: While the participant importer may allow you to import these characters, they might cause errors in different parts of the Qualtrics platform, so we recommend avoiding them if possible.
The following characters should not be used in any of your metadata names or values:
|\&;$%< >( ){ }*+,
You may use a forward slash ( / ) in values for fields such as dates, but you cannot use it in the metadata field name.
Restricted Metadata Field Names
If your participant file contains fields with these names or prefixes, these fields will not be imported and the data will be skipped.
The following metadata field names cannot be used:
finishedq_unitssidresponsesetidridthreesixtyidenddateauditablepersonid_cacheddateuserid_recordidfirstname_recordeddatelastname_enddateemail_startdateuserpassword_sourceidpassword_sourcemapidexternal_sourcetypeq_primaryunitsuniqueiduniqueidentifierloginname
The following prefixes cannot be used in metadata field names:
statement raw_statement _
FAQs
I've already uploaded my participant file and collected data, but I need to make a change to my hierarchy. How do I do this?
I've already uploaded my participant file and collected data, but I need to make a change to my hierarchy. How do I do this?
I want to set up my Parent-Child hierarchy to use unit names rather than assigning manager names to hierarchy units. How do I do this?
I want to set up my Parent-Child hierarchy to use unit names rather than assigning manager names to hierarchy units. How do I do this?
I uploaded my participant list and generated a Parent-Child hierarchy. I received an error message that reads “Circular Dependencies.” Why did I receive this message and how do I fix this?
I uploaded my participant list and generated a Parent-Child hierarchy. I received an error message that reads “Circular Dependencies.” Why did I receive this message and how do I fix this?
I uploaded my participant list and generated a Parent-Child hierarchy. Why do I see some units labeled “Unknown Manager” and how do I fix this?
I uploaded my participant list and generated a Parent-Child hierarchy. Why do I see some units labeled “Unknown Manager” and how do I fix this?
I'm uploading employees to my directory, and my organization has SSO. How do I format the UserName column?
I'm uploading employees to my directory, and my organization has SSO. How do I format the UserName column?
You should not include the SSO suffix (#brandID) in the participant usernames. Qualtrics will automatically add the suffix on all usernames. If you do include the SSO suffix, Qualtrics will add it a second time.
What's the maximum number of hierarchies I can have in my project?
What's the maximum number of hierarchies I can have in my project?
Can I use the same metadata field to build multiple org hierarchies in the same project?
Can I use the same metadata field to build multiple org hierarchies in the same project?
If you’d like to use the same field to build multiple hierarchies, you will need to duplicate the field and use the duplicate to build your additional hierarchies. For example, instead of only including the columns UniqueIdentifier and Manager ID with every participant, you can also include columns named EmployeeID2 and ManagerID2, which you'll use to build a second, separate hierarchy.
How do I make sure that leading zeroes are included in my CSV/TSV file?
How do I make sure that leading zeroes are included in my CSV/TSV file?
Thankfully, there are solutions to ensure your leading zeroes are not removed. If you add this formatting to your file, be careful not to re-open the CSV before importing it to Qualtrics, or you may lose your formatting.
Can you set whether someone is a respondent (or non-respondent) in the employee directory?
Can you set whether someone is a respondent (or non-respondent) in the employee directory?
That's great! Thank you for your feedback!
Thank you for your feedback!