
XM Discover Link Inbound Connector
What's on this page
About the XM Discover Link Inbound Connector
You can use the XM Discover Link Inbound Connector to push XM data into XM Discover via a REST API endpoint while leveraging all the capabilities offered by the Connectors framework, such as fields mapping, transformations, filters, job watching, and so on.
Qtip: We recommend using the XM Discover Link Inbound Connector over the general Import API.
Supported Data Formats
The following data types are supported in JSON format only:
Before setting up the connector, create a sample file that represents the fields you’d like to import into XM Discover. See the linked pages above for more information about the required fields and file formats.
There are also template files available to download within the connector for specific data formats:
- Chat
- Chat (default): Use for standard digital interactions data.
- Amazon Connect: Use for digital interactions specific to Amazon Connect Chat.
- Call
- Call (default): Use for standard call transcripts data.
- Verint: Use for call transcripts specific to Verint.
- Feedback
- Dynamics 365: Use for Microsoft Dynamics data.
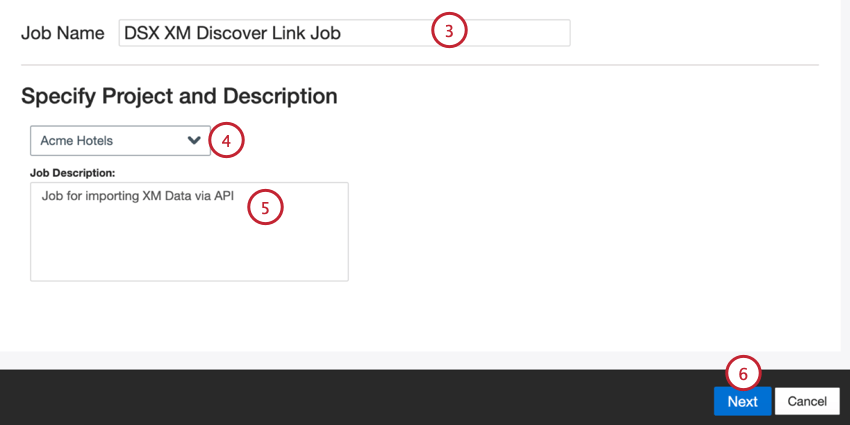
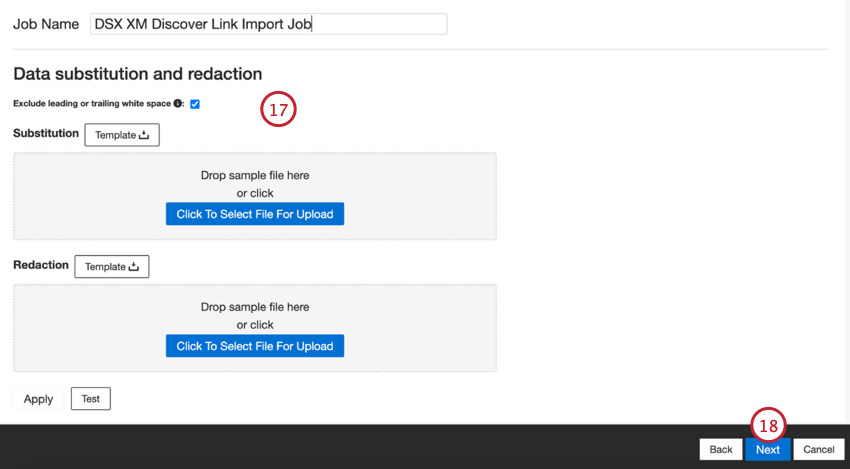
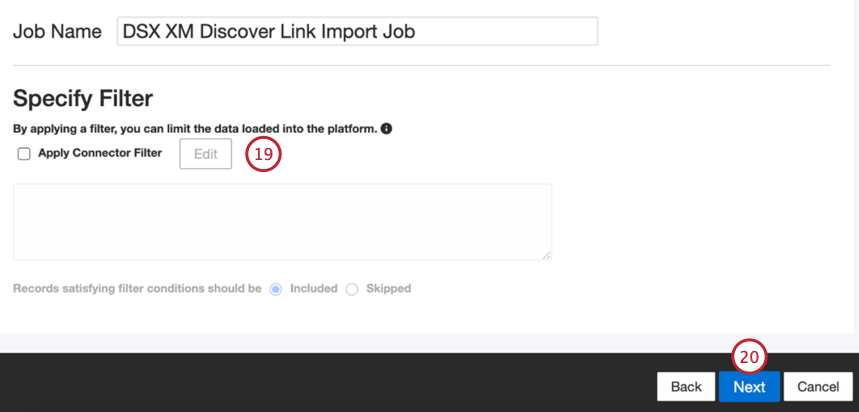
Creating an XM Discover Link Inbound Connector Job
Qtip: The “Manage Jobs” permission is required to use this feature.


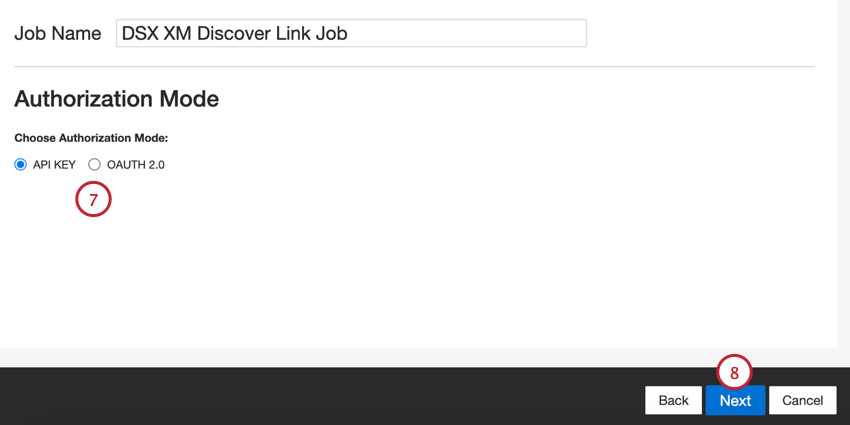
- API Key: Connect using an XM Discover API token.
- OAuth 2.0: Connect using a Client ID and Client Secret provided by the XM Discover authentication service. Contact your Discover Representative to request this method. Qtip: You can contact your Discover Representative directly by email. If you don’t have their contact information, you can contact the Discover Support Team instead.

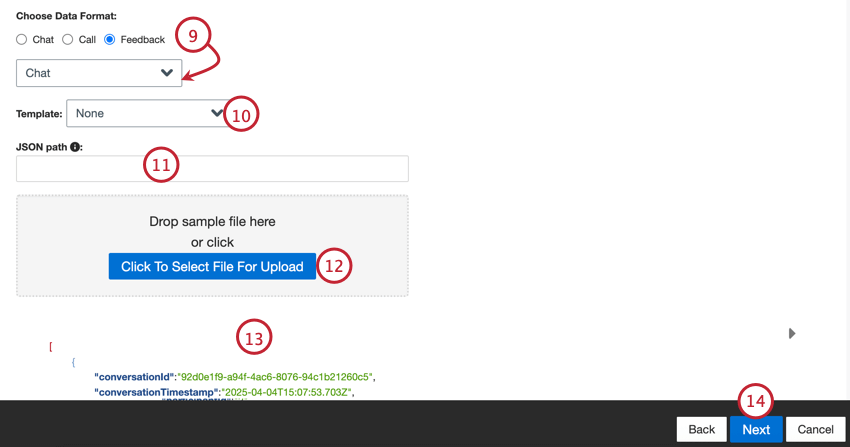
Qtip: If you selected “feedback,” then a second menu will appear for you to choose the type of interaction data included in the feedback. The options include call, chat, email, review, social, and survey.
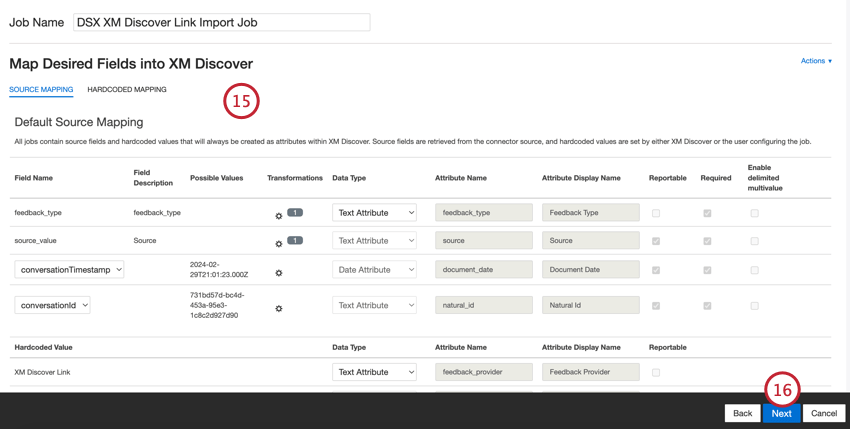

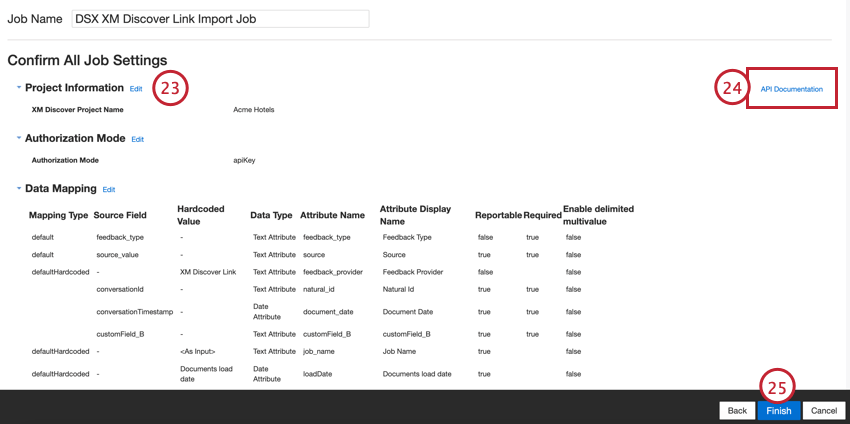
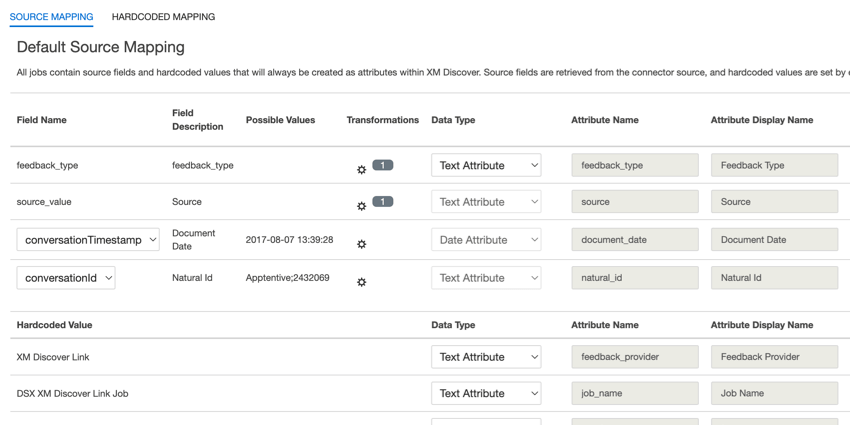
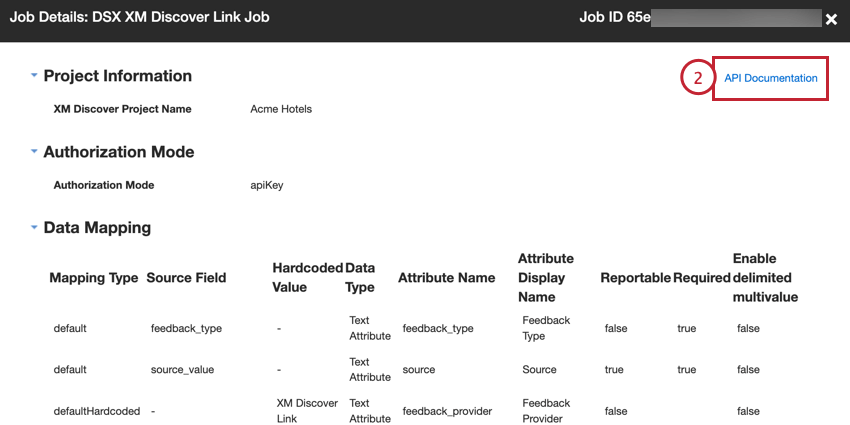
Default Data Mapping
This section contains information on the default fields for XM Discover Inbound Link jobs.
When mapping your fields, the following default fields are available:
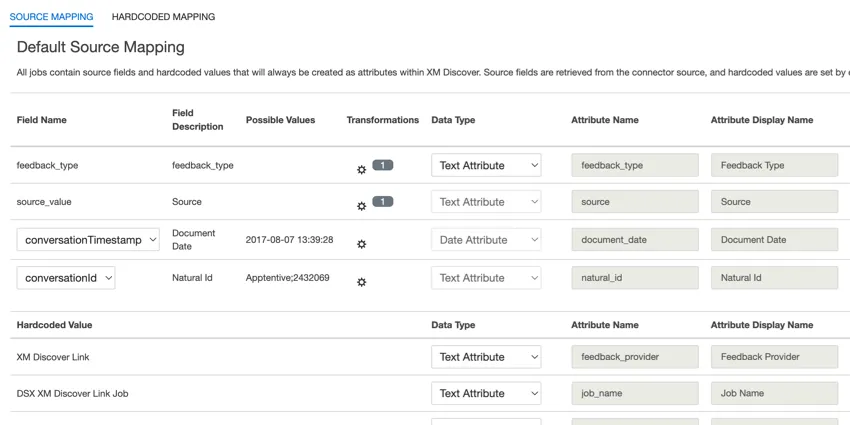
- feedback_type: Feedback type helps you to identify data based on its type. This is useful for reporting when your project contains different types of data (for example, surveys and social media feedback). This field is editable. By default, this attribute’s value is set to:
- “call” for call transcripts
- “chat” for digital interactions
- “feedback” for individual feedback
- You can use custom transformations to set a custom value.
- source: Source helps you to identify data obtained from a specific source. This can be anything that describes the origin of data, such as the name of a survey or a mobile marketing campaign. This field is editable. By default, this attribute’s value is set to “XM Discover Link.” You can use custom transformation to set a custom value.
- richVerbatim: This field is used for conversational data (such as call and chat transcripts) and is not editable. XM Discover uses a conversational verbatim format for the richVerbatim field. This format supports ingestion of dialogue-specific metadata required to unlock conversational visualization (speaker turns, silence, conversational events and so on) and enrichments (start time, duration and so on). This verbatim field includes “child” fields to track the client’s and representative’s side of the conversation:
- clientVerbatim tracks the client’s side of the conversation.
- agentVerbatim tracks the representative’s (agent’s) side of the conversation.
- unknown tracks the unknown side of the conversation.
- Qtip: Transformations are not supported for conversational verbatim fields. The same verbatim cannot be used for different types of conversational data. If you want your project to host several types of conversation, use separate pairs of conversational verbatims per conversation type.
- clientVerbatim: This field is used for conversational data and is editable. This field tracks the client’s side of the conversation in call and chat interactions. By default this field is mapped to:
- clientVerbatimChat for digital interactions.
- clientVerbatimCall for call interactions.
- agentVerbatim: This field is used for conversational data and is editable. This field tracks the representative’s side of the conversation in call and chat interactions. By default this field is mapped to:
- agentVerbatimChat for digital interactions.
- agentVerbatimCall for call interactions.
- unknown: This field is used for conversational data and is editable. This field tracks the unknown side of the conversation in call and chat interactions.By default this field is mapped to:
- unknownVerbatimChat for digital interactions.
- unknownVerbatimCall for call interactions.
- document_date: Document date is the primary date field associated with a document. This date is used in XM Discover reports, trends, alerts, and so on. For document date, choose one of the following options:
- conversationTimestamp (for conversational data): Date and time for the entire conversation.
- If source data contains other date fields, you can set one of them as document date by selecting it from the dropdown menu in the Field Name.
- You can also set a specific date by adding a custom field.
- natural_id: Natural ID serves as a unique identifier of a document and allows processing duplicates correctly. For natural ID, choose one of the following options:
- conversationId (for conversational data): A unique ID for the entire conversation.
- Select any text or numeric field from your data in the Field Name.
- Automatically generate IDs by adding a custom field.
- feedback_provider: Feedback provider helps you to identify data obtained from a specific provider. For XM Discover Link uploads, this attribute’s value is set to “XM Discover Link” and cannot be edited.
- job_name: Job name helps you to identify data based on the name of the job used to upload it. You can modify this attribute’s value in the Job Name box at the top of the page or using the job options menu.
- loadDate: Load date indicates when a document was uploaded into XM Discover. This field is set automatically and cannot be edited.
In addition to the above fields, you can also map any custom fields you’d like to import. See the Data Mapping support page for more information about custom fields.
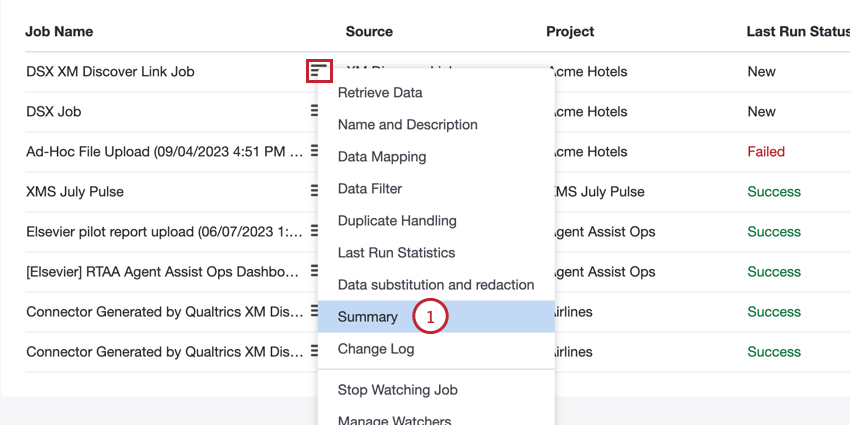
Accessing the API Endpoint
Attention: The API endpoint supports only 1 coversation per API call and should only include the fields in the example payload.
The API endpoint is used to upload data to XM Discover by sending the data through a REST API request in JSON format.
You can access the endpoint from the Jobs page:
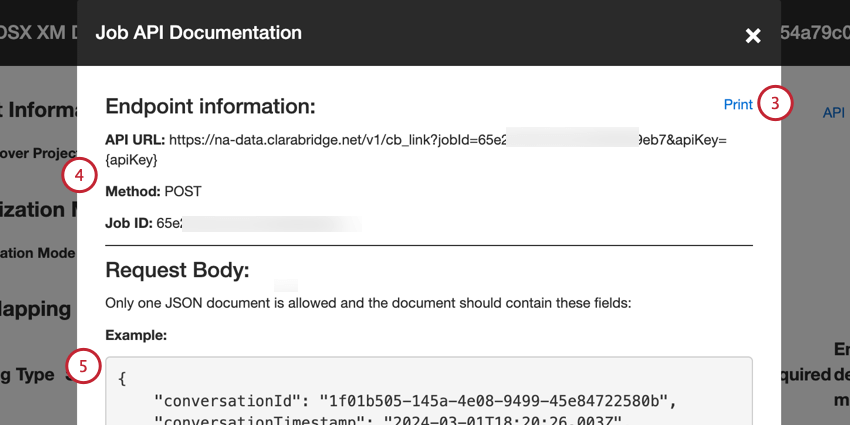
- API URL: The URL used for the API request.
- Method: Use the POST method to load data into XM Discover.
- Job ID: The ID of the currently selected job.
Monitoring an XM Discover Link Job via API
You can monitor the status of XM Discover Link jobs without logging into XM Discover by calling the status API endpoint. This allows you to get the latest job run status, metrics for a specific job run, or accumulated metrics for a specific time period.
Status Endpoint Information
To call the status endpoint, you’ll need the following:
- API URL: https://na-data.clarabridge.net/v1/public/job/status/<jobID>?apiKey=<apiKey>
- <jobId> is the ID of the XM Discover Link job you wish to monitor.
- <apiKey> is the API token.
- Type: Use the REST HTTP
- HTTP Method: Use the GET method to retrieve data.
Input Elements
The following optional input elements can be used to retrieve additional metrics about your job:
- historicalRunId: The ID of the specific upload session. If this element is omitted and no date range is provided, the API call returns the latest job run status. If this element is omitted and a date range is provided, the API call returns accumulated metrics for the specified time period.
- startDate: Define the starting date from which to return data.
- endDate: Define the end date to return data based on the last upload. If this element is omitted and startDate is provided, the endDate is automatically set to the current date.
Qtip: If historicalRunId is provided, data will be accumulated for the specified historicalRunId. If startDate and endDate are provided, data will be accumulated for a specified date range, otherwise metrics will be accumulated for the latest historicalRunId.
Output Elements
The following output elements will be returned, provided you entered the required input elements:
- job_status: The job’s status.
- job_failure_reason: If the job failed, the reason for the failure.
- run_metrics: Information about the documents processed by the job. The following metrics are included:
- SUCCESSFULLY_CREATED: The number of documents created successfully.
- SUCCESSFULLY_UPDATED: The number of documents updated successfully.
- SKIPPED_AS_DUPLICATES: The number of documents skipped as duplicates.
- FILTERED_OUT: The number of documents filtered out by either a source-specific filter or connector filter.
- BAD_RECORD: The number of digital interactions submitted for processing that did not match the Qualtrics conversational format.
- SKIPPED_NO_ACTION: The number of documents skipped as non-duplicates.
- FAILED_TO_LOAD: The number of documents that failed to load.
- TOTAL: The total number of documents processed during this job’s run.
Error Messages
The following error message are possible for the status API request:
- 401 Unauthorized: Authentication failed. Use a different API key.
- 404 Not Found: A job with the specified ID doesn’t exist. Use a different job ID.
Sample Request
Below is an example request to get the status for a job:
curl --location --request GET 'https://na-data.clarabridge.net/v1/public/job/status/62da736987c9788b830918e0?apiKey=02e7a0e26b592632dd50f623e974fff6'
Sample Response
Below is a sample response of a failed job:
{

"job_status": "Failed",

"job_failure_reason": "{\"problem\":[{\"requestId":"RQ-MOB-f339aa58-71b6-4a1d-a67c-12b8d3439321","severity":"ERROR","description":"Length limit of 900 characters for attribute supportexperienceresp has been exceeded, length is 1043\"}],\"status\":\"ERROR\"}",

"run_metrics": {

"successfully_created": 10,

"failed_to_load": 1,

"total": 11

}

}
Payload Examples
This section contains 1 example JSON payload for each supported type of structured data (feedback, chat, call).
Attention: The payloads in this section are for demonstration purposes only. The fields in your payload will depend on your specific setup.
That's great! Thank you for your feedback!
Thank you for your feedback!