Contact Import Automation
About Contact Import Automations
Users often wish to integrate their contact records with Qualtrics by uploading files to a Secure File Transfer Protocol (SFTP) server, or to an HTTPS file hosting service, so that Qualtrics can regularly import these records to their Qualtrics accounts. Users may wish to import these records as contacts, then schedule survey distributions for those contacts, all under the most safe and secure transfer methods.
With contact import automations, you can create, configure, update, test, and review your own automation jobs, which streamlines your contact management. When the automation is scheduled to run, it’ll process any designated files that have not been processed by the automation yet, including newly uploaded files.
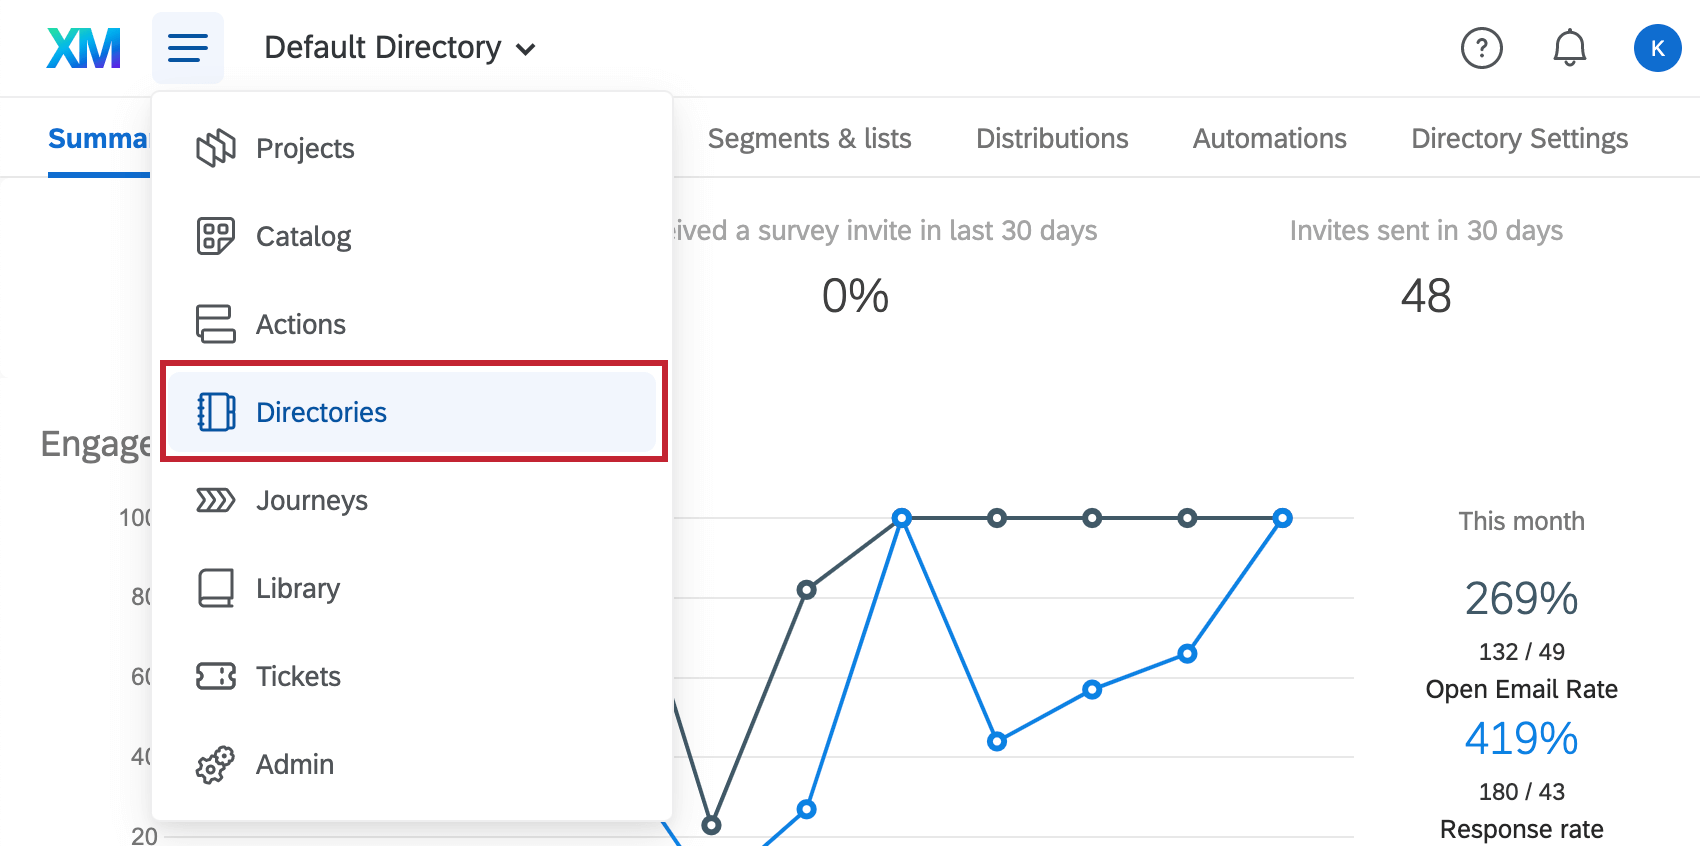
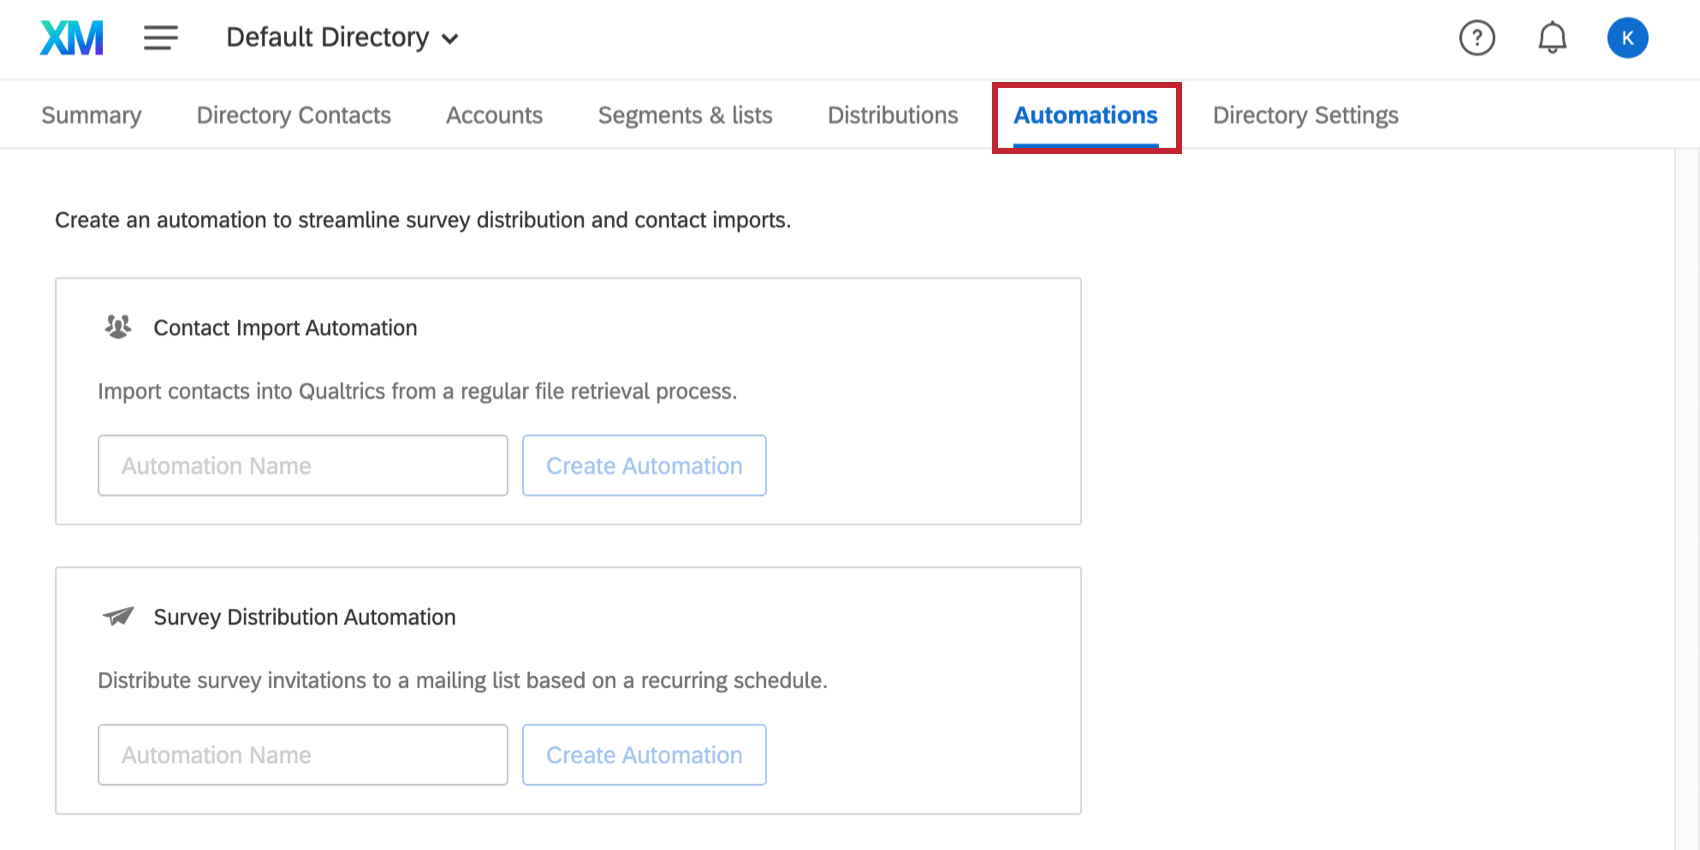
You can set these up in the Automations tab of the Directories page. These automations are only available for XM Directory.
Step 1: Starting and Scheduling the Automation
- Go to the Automations tab.
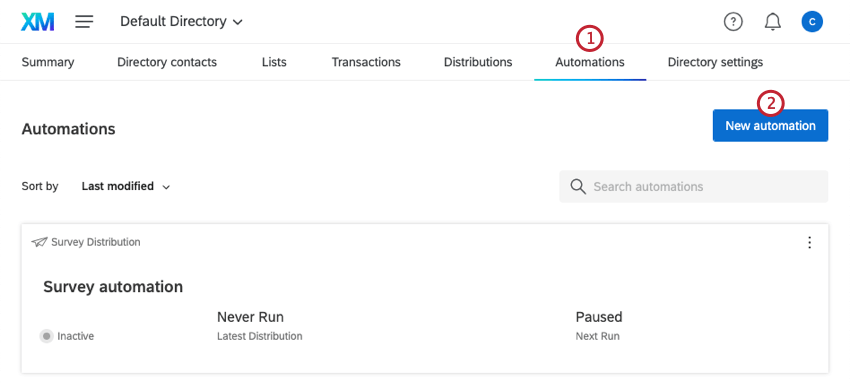
- Click New Automation.
- Name your automation.
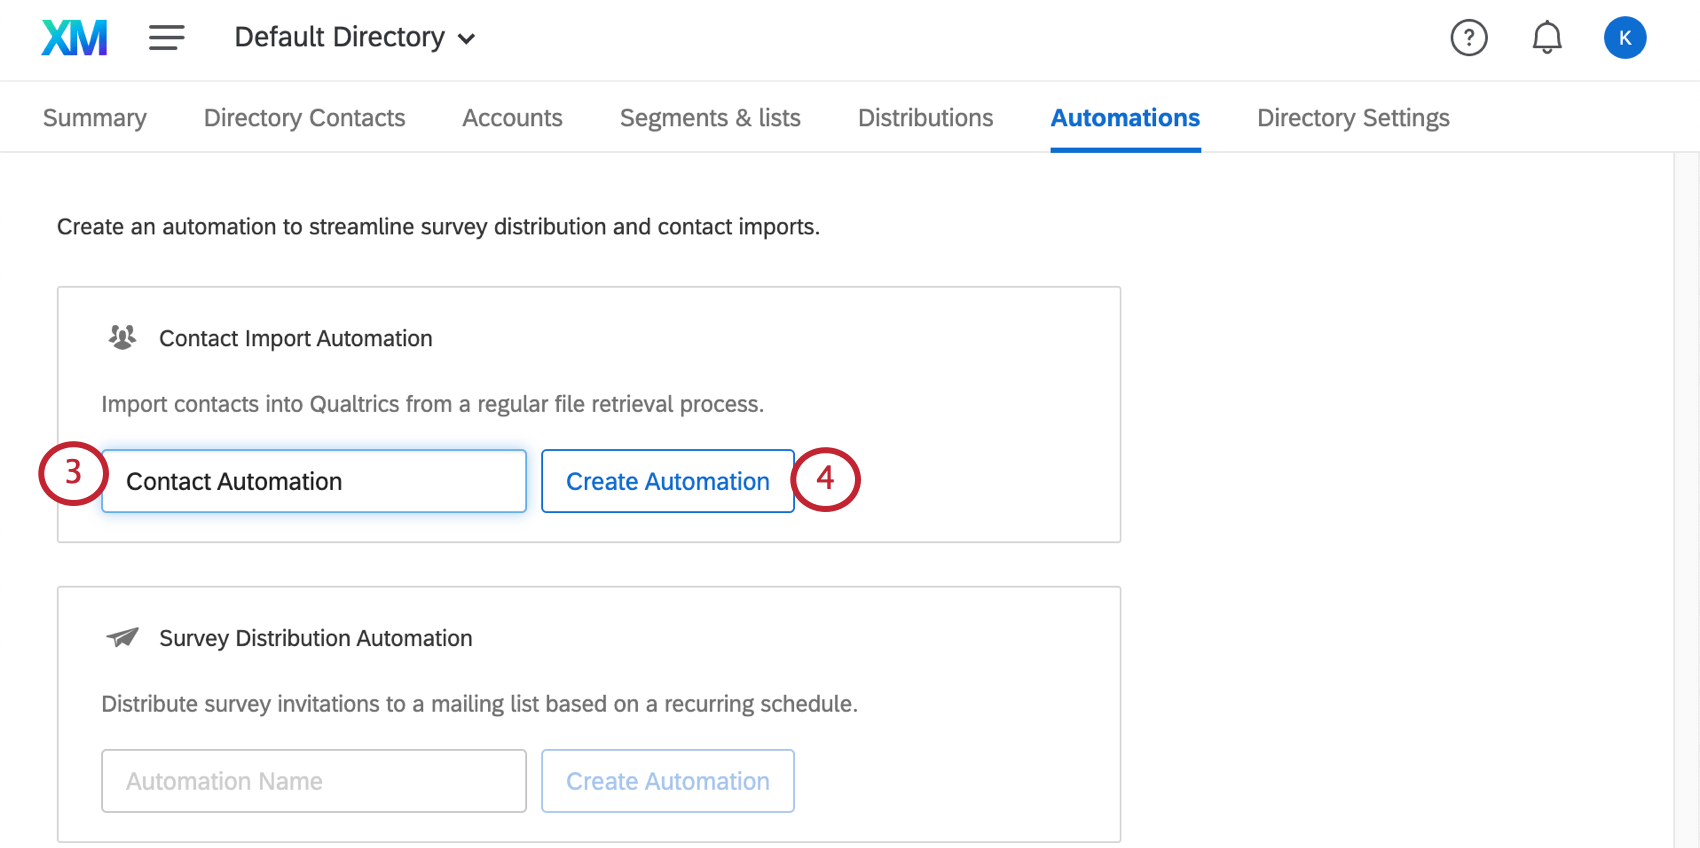
- Click Create Automation.
- Determine whether your automation should happen daily, weekly, monthly, or On-Demand. If you select On-Demand, the automation will check files every 15 minutes and process those eligible.
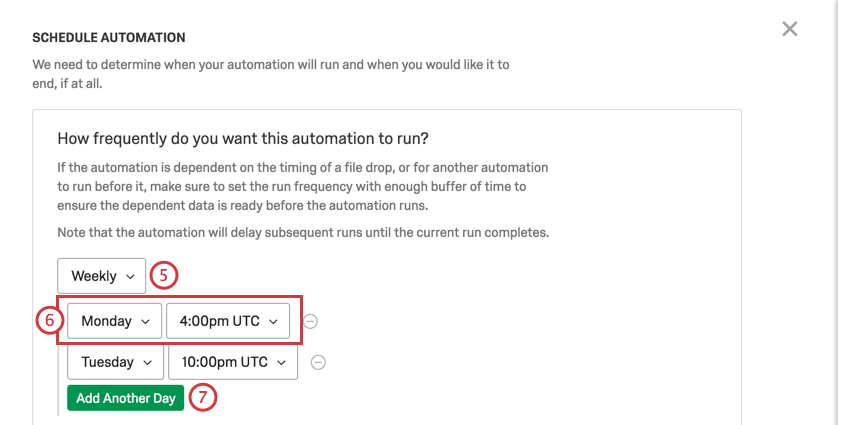
- Determine the time of day / day of the week it should take place. You can run on the hour, or 15, 30, or 45 minutes after the hour.
Qtip: All automations are scheduled based on UTC and therefore do not observe daylight savings time.
- Click Add Another Time to add another time of day / week / month this update should occur.
Qtip: There is a limit of 8 times daily, 20 times weekly, or 16 times monthly. While you can technically add the same time multiple times, this will result in the automation only being run once on that time.
- Determine the date you want the first automation to take place.
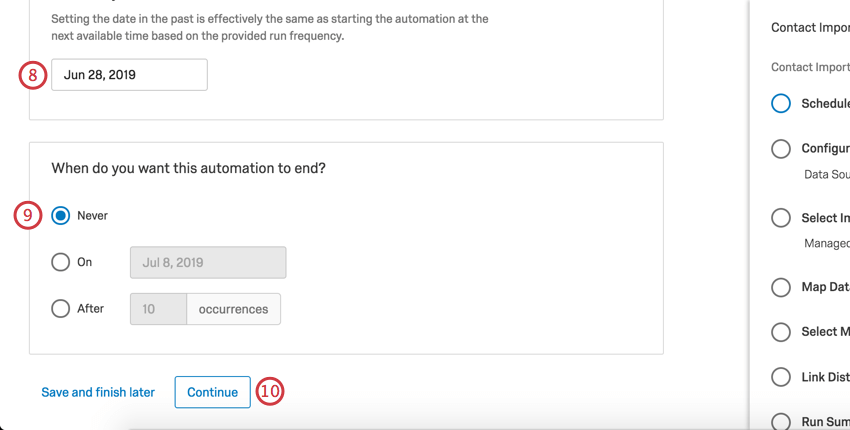 Qtip: If the date is set to today or in the past, the automation will run from now on.
 - Determine when you want the automation to stop importing contacts. You can always modify this later.
- Click Continue to enter the next step, Configuring an Import Source.
Step 2: Configuring an Import Source
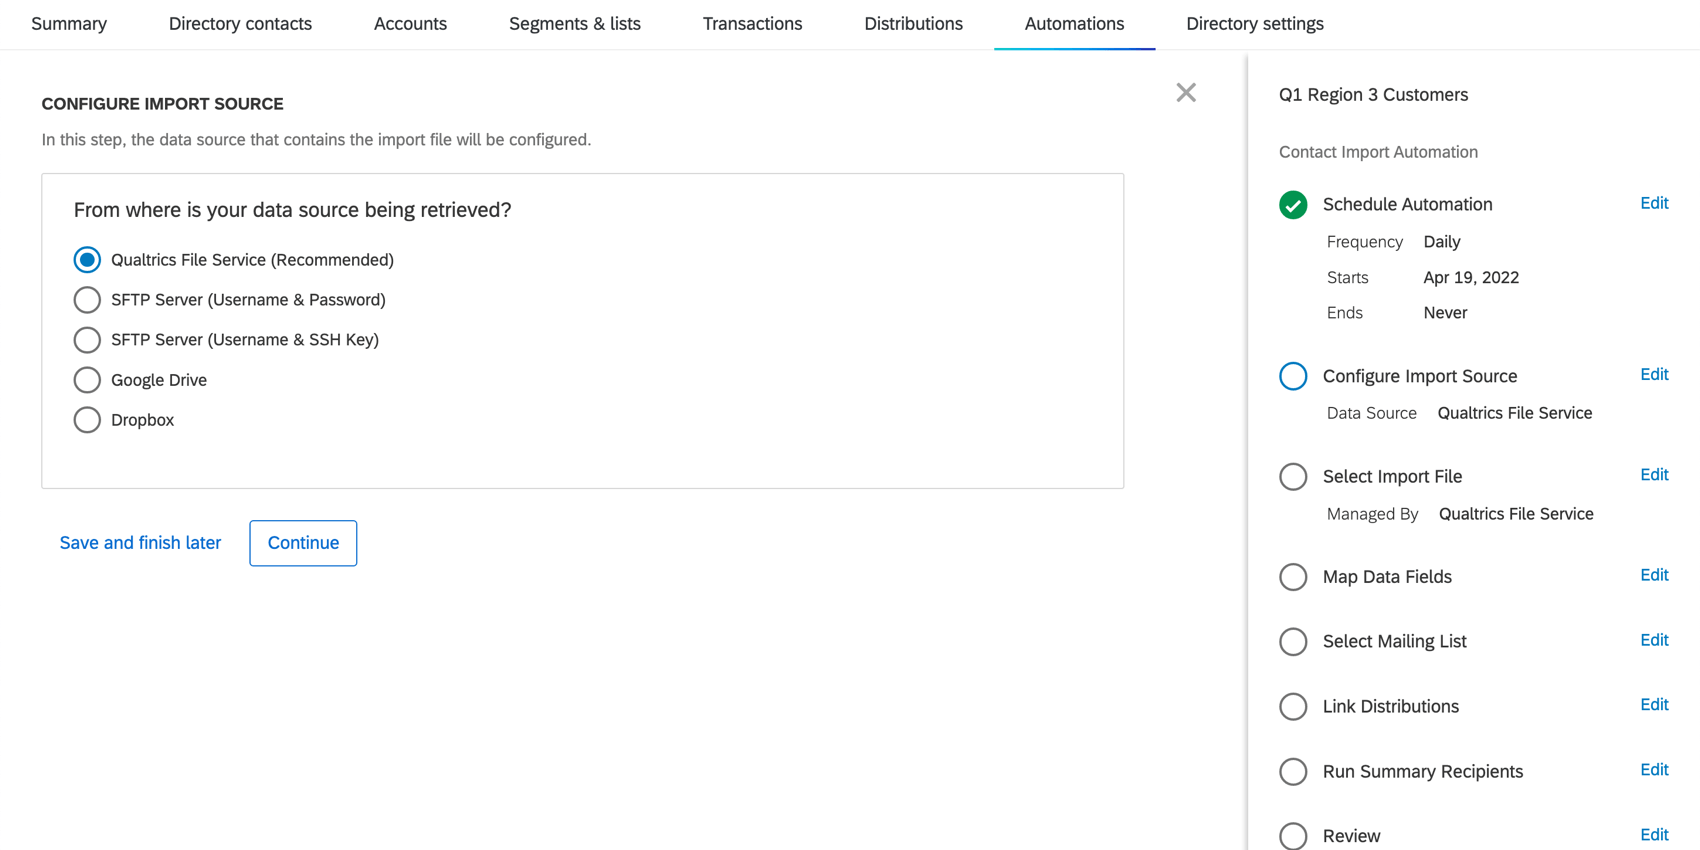
When you reach Configure Import Source in the contact import automation, you tell Qualtrics the location of the contact data you would like to import. You have a few options.
- Qualtrics File Service: Set up a file service with Qualtrics. This eliminates the task of setting up an SFTP server on your own side. When you select this option, you’ll be shown instructions on how to set this up.
- SFTP Server (Password or SSH Key): You have your own server where these files will be hosted. You must provide the username, password, host URL and port of the SFTP server for the automation to import the files. Alternatively, you can set up by providing the SSH key.
Qtip: If you have multiple SFTP connections, you can enter separate SFTP credentials for each individual import automation so they can each point to a different SFTP server.Qtip: When setting up an SFTP connection, we recommend your IT team Allowlist the Qualtrics IP Ranges. See Allowlist Qualtrics Servers.Qtip: If your account is within our FedRAMP environment, the IP addresses for allowlisting differ from those found on this page. To securely access your IP address information, please login to your FedRAMP Customer Success Hub.
- Google Drive or Dropbox: You have access to an Open Authorization (OAuth) file storage, such as Google Drive or Dropbox, where your import files will be hosted. You must login and give Qualtrics permission to manage your files on the OAuth file storage. The automation will only manage the files in a designated folder configured in the next step.
Step 3: PGP Encryption
PGP encryption is an optional step for contact import automations to encrypt the data you send to Qualtrics. See PGP Encryption for more information about using this feature.
- Select whether you’d like the file to be encrypted using PGP software.
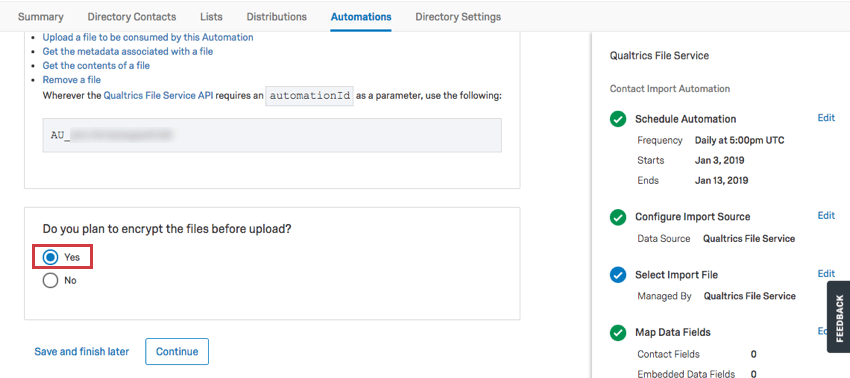 Qtip: This PGP encryption is available for automations using both SFTP servers and the Qualtrics File Service. If you did not encrypt a past automation but would like to, you can always edit the automation to add encryption.
 - Click Continue.
- Click Download our public key. Your IT team will need to use that public key to encrypt import files before uploading them to the SFTP server or the Qualtrics File Service.
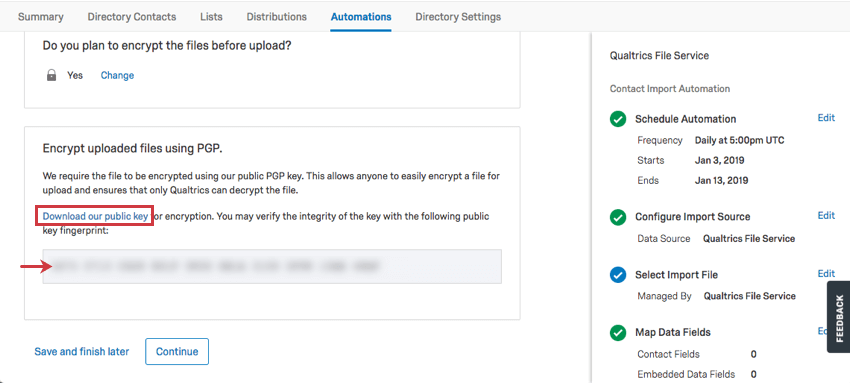 Qtip: If an automation is configured to use PGP encryption but receives an unencrypted file, it will fail and notify the email recipients, as per the notification preferences in the automation.
 - Click Continue.
- Now you will either define your SFTP folder paths, or go straight to Data Field Mapping.
Step 4: Selecting Folder Paths
After you decide the source of your contact data files, you need to specify the folders where these files are saved so the automation knows where to retrieve them from.
- Enter the name of the folder on the SFTP server, Google Drive, or Dropbox the file you want to import is located on. If the folder is inside another folder, be sure to specify the path, e.g., Central Folder/Contacts 2018.
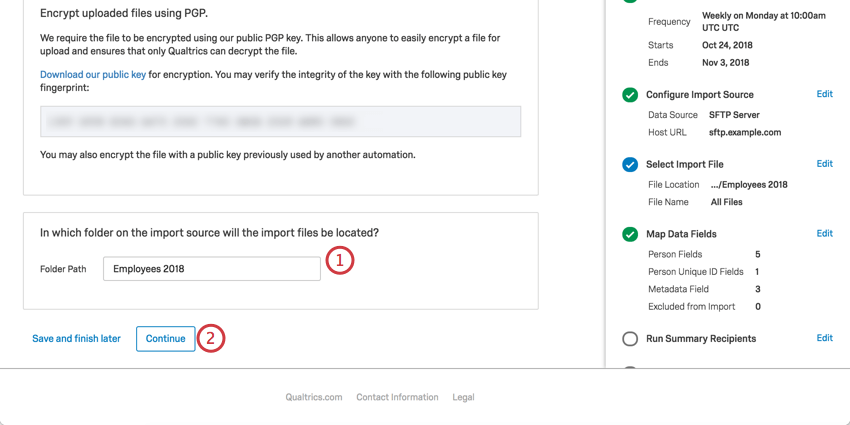 Qtip: If you’re using Google Drive, you do not have to specify the name of the drive – just put the name of the folder. For example, if your automations are in your drive in a folder called AutomationFiles, put AutomationFiles in the Folder Path field. If your AutomationFiles folder is inside another folder called QualtricsStuff, put QualtricsStuff/AutomationFiles.Qtip: This folder name is case sensitive. This must be an existing folder, or the automation will fail. The folder path should also be relative to the default directory of the SFTP, Google Drive, or Dropbox user provided to the automation. Qualtrics will not be able to access files if they’re in a higher level directory than the one specified in the folder path.
 - Click Continue.
- Select which files should be imported from this folder.
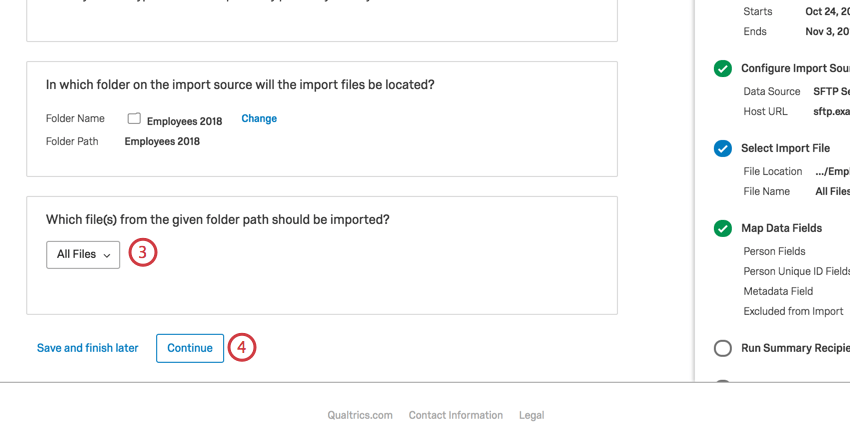 Your options are:
- All Files: All files in the folder.
- Files whose name contain a specific prefix: When selected, you can specify the prefix.
- Files whose name contain a specific suffix: When selected, you can specify the suffix. The file extension is included here.
Example: The file name is 1234-sample and it as a CSV. You want all files that end with -sample and are CSVs. Your suffix would be -sample.csv
- Files whose name contains specific text: When selected, you can specify the phrase the names must contain. This phrase can be anywhere in the file name.
Attention: The asterisk character ( * ) is not allowed to be present in the folder pattern specification for prefix, suffix, or specific text. - Click Continue.
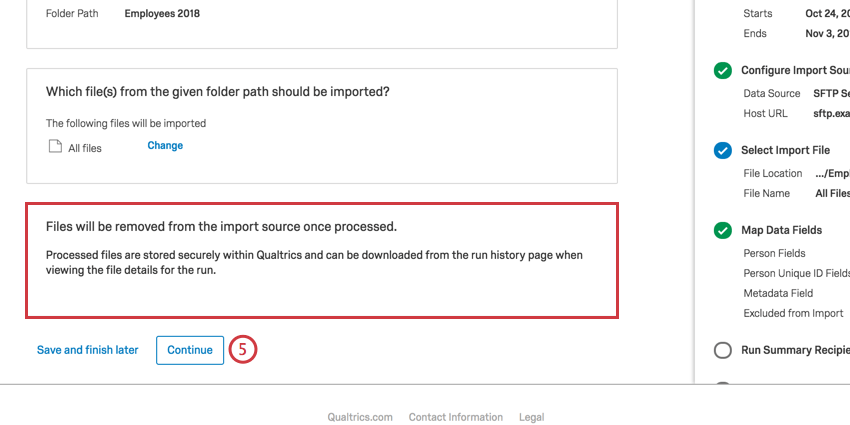
- Processed file will be stored on Qualtrics and can be viewed when managing past automations. Click Continue.
Step 5: Data Field Mapping and Mailing Lists
This section covers two parts of the contact import automation: Map Data Fields and Select Mailing List. This is where you decide what fields will be imported into Qualtrics from your contact files, how they are formatted, and what specific mailing list the imported contacts will be imported to.
- Click Download Example File. This will download a CSV to your computer that provides an example of a correct file template. You may also use your own template file, which can be a variety of file types. All files imported by this automation will need to match the formatting of the example file you upload.
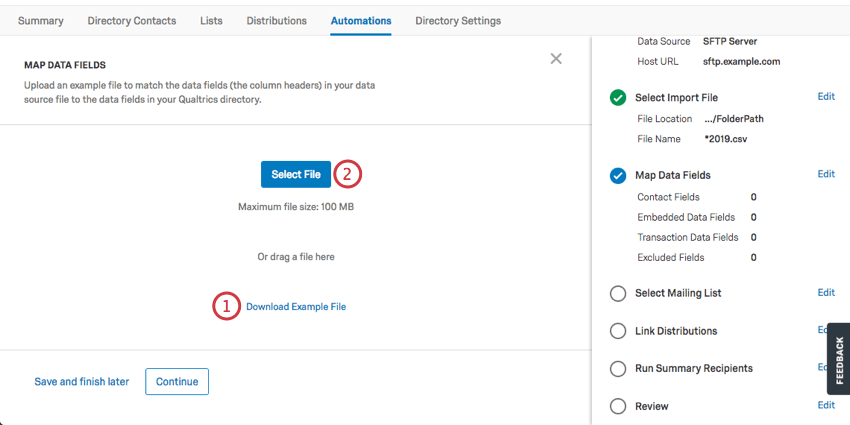
- When your file is ready, click Select File and upload your example file.
Attention: Sample file sizes cannot exceed 100MB.
- Choose a delimiter.
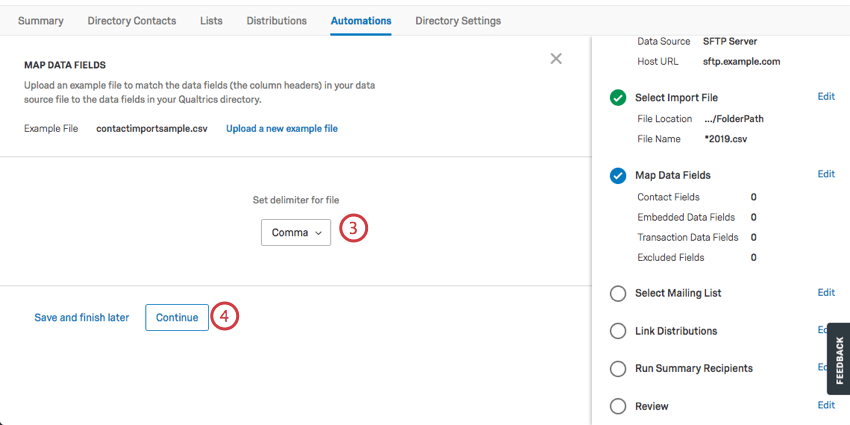
- Click Continue.
- Suggested column headers for Qualtrics field mappings will be provided; however, you can rename any column or map a column to an existing embedded data field by modifying the dropdowns in the Import as Field Name row. Note that if you’re naming a column after an embedded data field, it must be case-sensitive.
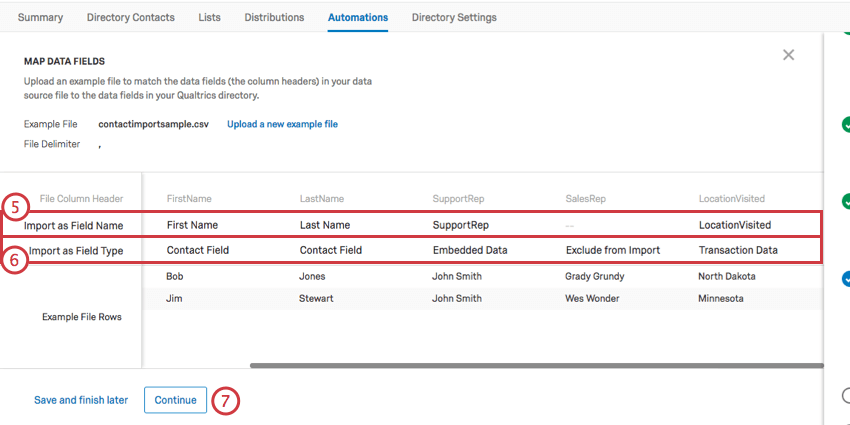
- Use the Import as Field Type row to determine if each field is a contact field, embedded data, transactional data, transaction date, or if it should be excluded from import.
Qtip: Transaction dates are the dates a transaction occurred. Dates will be assumed to be in UTC unless the time zone is explicitly included in the date value. If the date column is empty, the transaction date will be set to the current date. If the date is invalid, the row will be failed. Here’s a list of compatible time formats:
- ANSIC (Mon Jan _2 15:04:05 2006)
- UnixDate (Mon Jan _2 15:04:05 MST 2006)
- RFC822 (02 Jan 06 15:04 MST)
- RFC850 (Monday, 02-Jan-06 15:04:05 MST)
- RFC1123 (Mon, 02 Jan 2006 15:04:05 MST)
- RFC3339/ISO-8601 (2006-01-02T15:04:05+07:00)
Attention: If you import a file that contains 1 or more columns that are not mapped in the automation definition, the fields will be imported as transactional data. - Once you’ve reviewed your fields, click Continue.
Qtip: If you’d like to replace the file you uploaded, click Upload a new example file.
- Select the mailing list in your XM Directory where the contacts from your import source will be imported. When you click this dropdown, you may create a new mailing list, or search for a preexisting list by name.
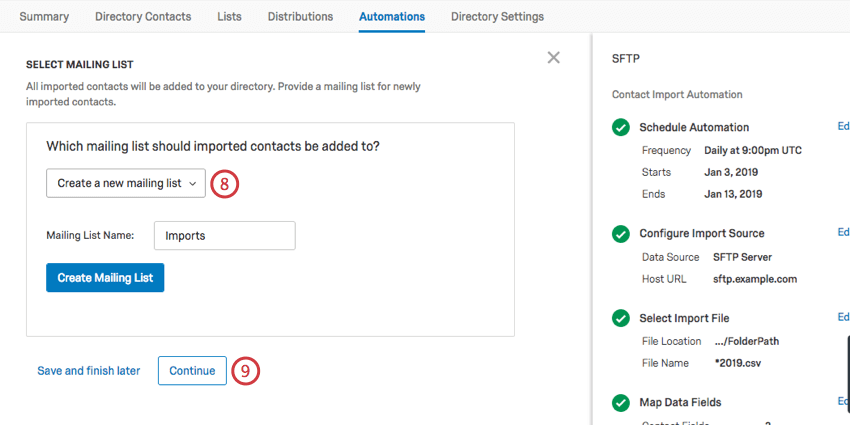
- Click Continue.
- Decide whether there should be no distribution or a distribution automation set up with this contact automation. You can link multiple distributions. See the Linking Distribution Automations section for more details. If you did not elect to link a distribution automation, finish setting up your automation.
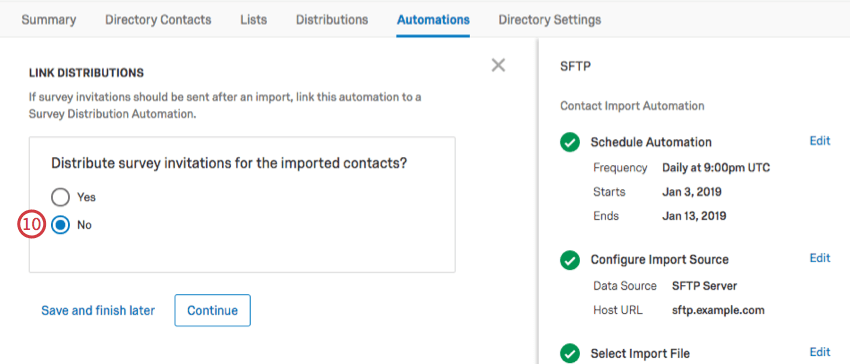 Qtip: Even if you do not set up a distribution automation now, you can come back and link an existing one later.
Step 6: Linking to Distribution Automations
Automations support the ability to send multiple distributions from a single contact import. This is accomplished by linking survey distribution automations to a contact import automation. Linked distribution automations will send survey invitations based on the distribution automation’s settings as soon as the contact import automation finishes.
You can link your contact import automation to any number of distribution automations as long as the total number of your automations does not exceed 100.
- Navigate to the Link Distributions section of the automation.
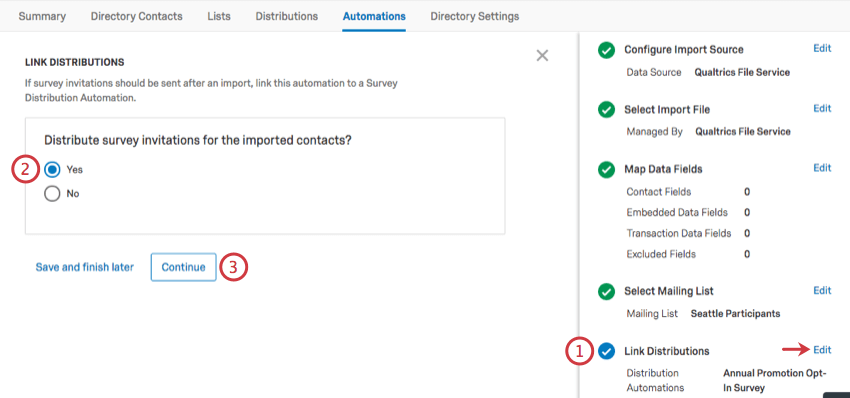
- Select Yes.
- Click Continue.
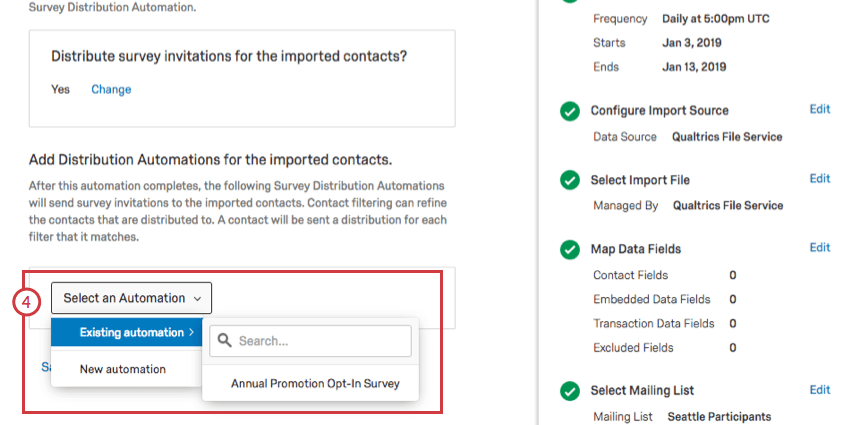
- Either select to create a new distribution automation, or select from existing automations.
- Once a distribution automation is added, you can choose to Navigate to Automation or Remove it.
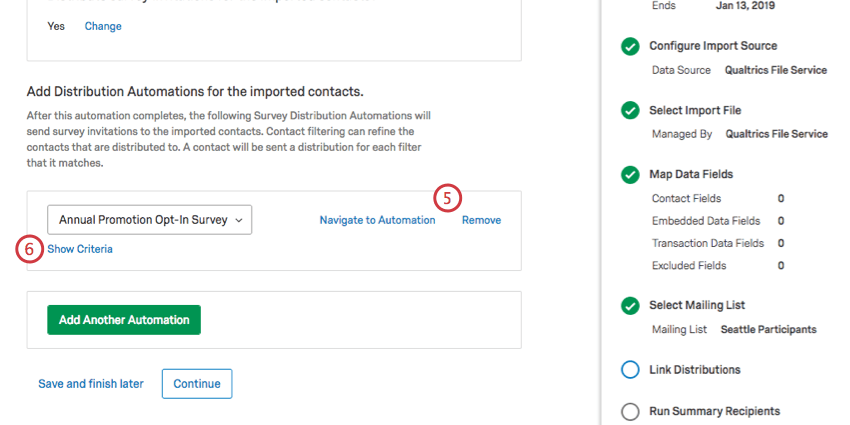
- Click Show Criteria to add the conditions under which contacts are added to this distribution.
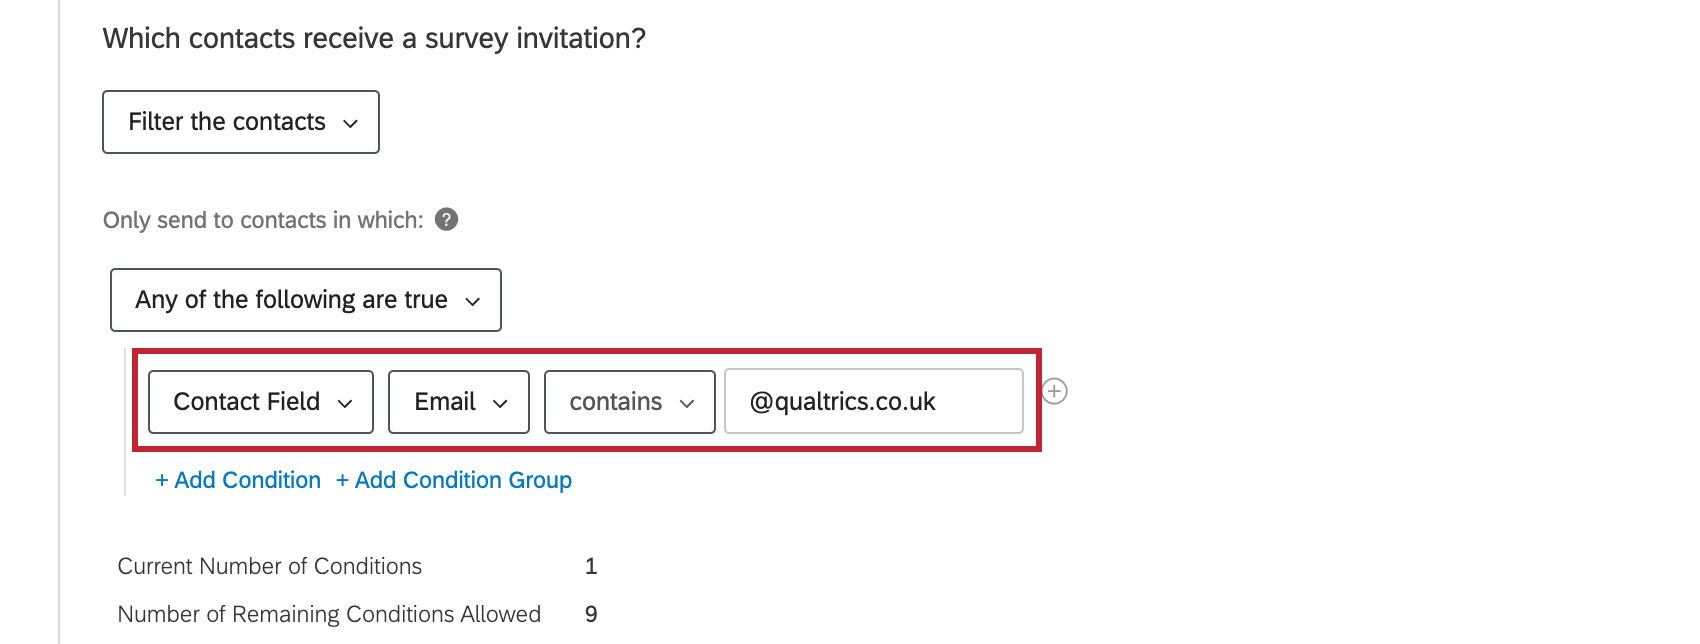
- To add conditions, select Filter the contacts.
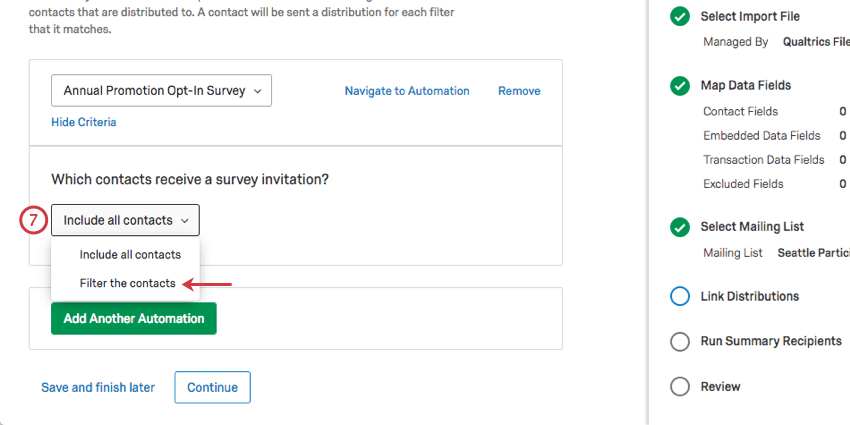
- Conditions are joined by “All” or “Any.” See Fields You Can Filter By. Conditions can be nested.
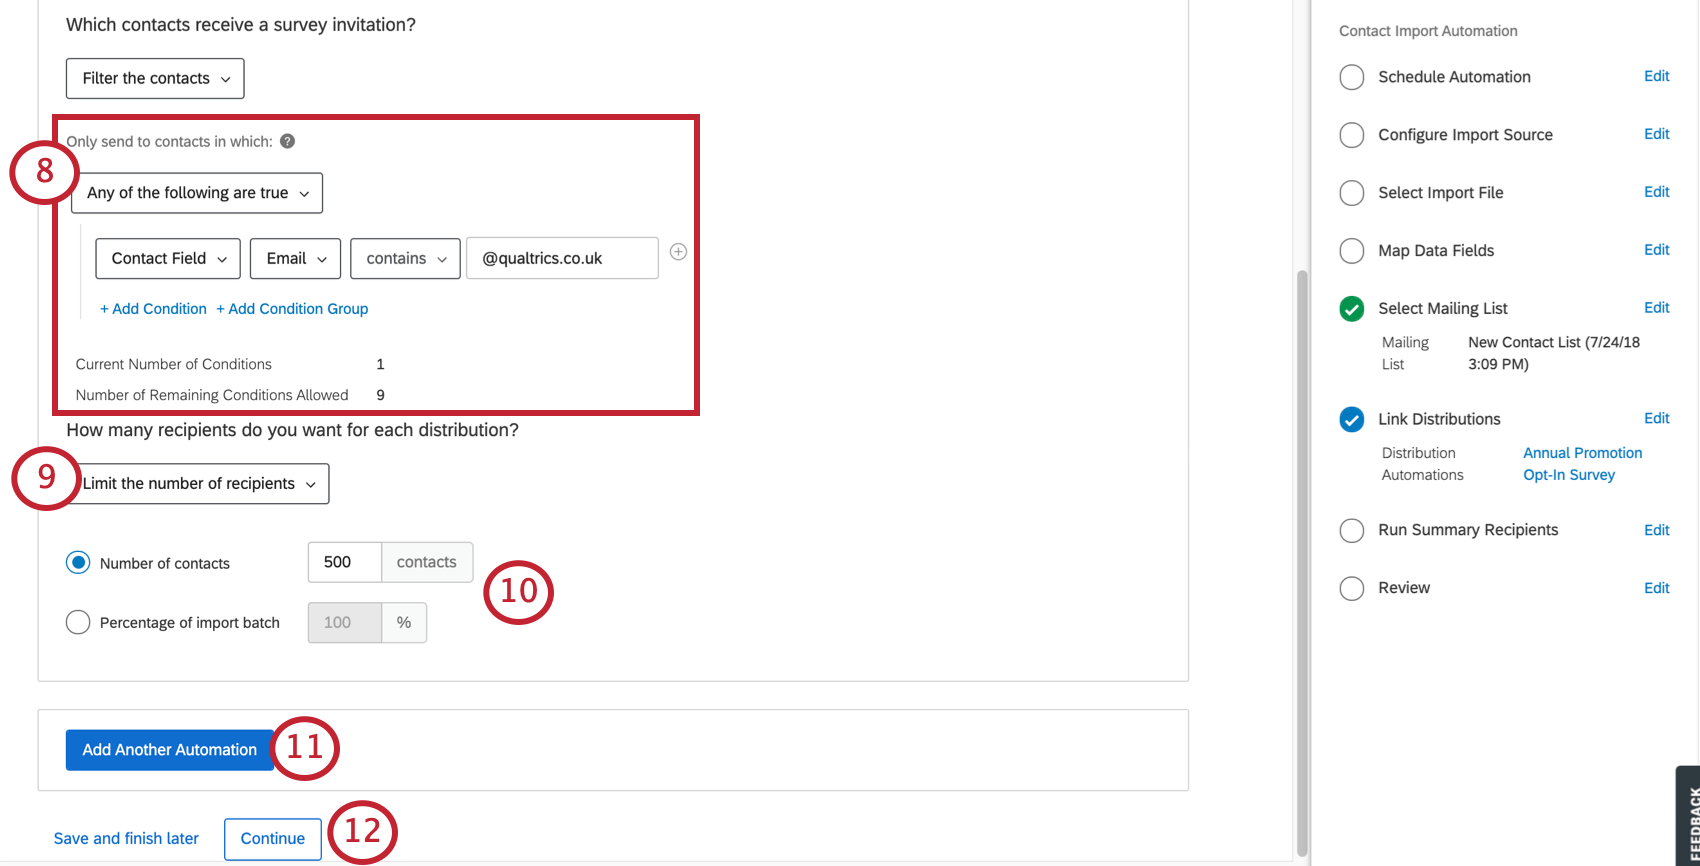 Qtip: You can only add up to 10 conditions. The user interface will tell you how many conditions you have left to add.
 - Choose whether you’d like to distribute to all contacts that meet your criteria, or if you’d like to sample a limited selection of them.
- If you chose to take a sample of contacts, select how you’d like to create the sample:
- Number of contacts: Enter the number of recipients you’d like to receive the survey. This number cannot exceed the number of contacts in your list.
Example: If you have a list of 1,000 contacts but only want to survey half of them, then enter 500.
- Percentage of source mailing list: Enter the percentage of recipients you’d like to receive the survey.
Example: If you have a list of 1,000 contacts and enter 75%, then 750 contacts will receive the survey.
- Number of contacts: Enter the number of recipients you’d like to receive the survey. This number cannot exceed the number of contacts in your list.
- To link this contact import automation to another distribution automation, click Add Another Automation and repeat Steps 4-10 as needed.
- When finished linking automations, click Continue to move onto the final steps of your automation.
Step 7: Sending Run Reports and Enabling the Automation
The final steps of a contact import automation include determining who is emailed when an automation runs, and then enabling the automation. This encompasses the Run Summary Recipients and Review portions of the automation.
- Determine who will be alerted with an email when the automation runs. Use the plus signs ( + ) or the Add Recipient Email button to add additional recipients.
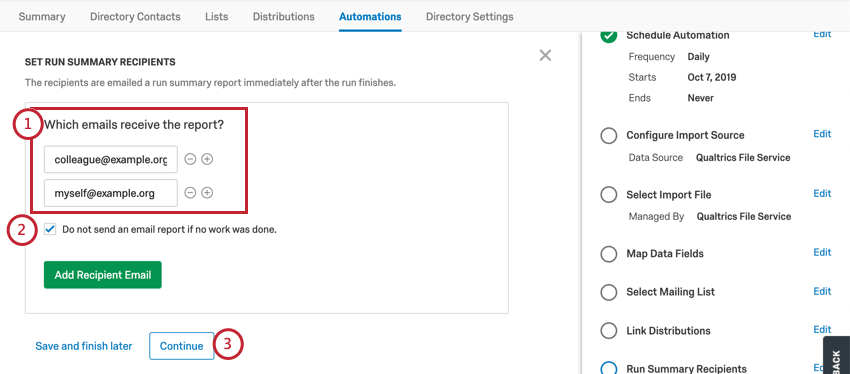
- If you do not want to email a report when there wasn’t any work done to report on, check the box.
- Click Continue.
- Click Edit next to go back to any section and make changes.
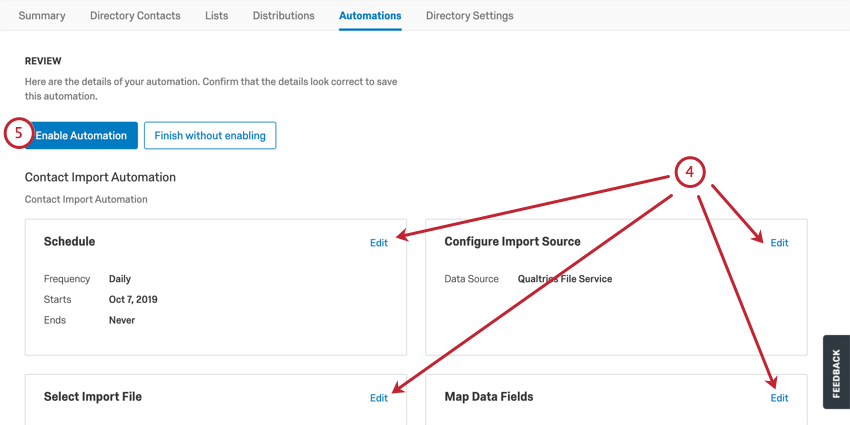
- Click Enable Automation to start your automation, or click Finish without enabling to save the automation but not start it.
Changing Data Fields Included in the Automation
There may be times that you want to modify the fields included in the contact import automation. For example, maybe you realized you forgot to include a patient address column in your contact imports, and now you want to save patient address information in future contact imports.
The example file that you upload in the Map Import Fields section determines the embedded data fields that will be uploaded to Qualtrics. This means you can exclude column headers to skip over them, or you can use the exact name and spelling of a field to include it in future imports.
To change the fields included in an import:
- Go to the desired automation and click the dropdown.
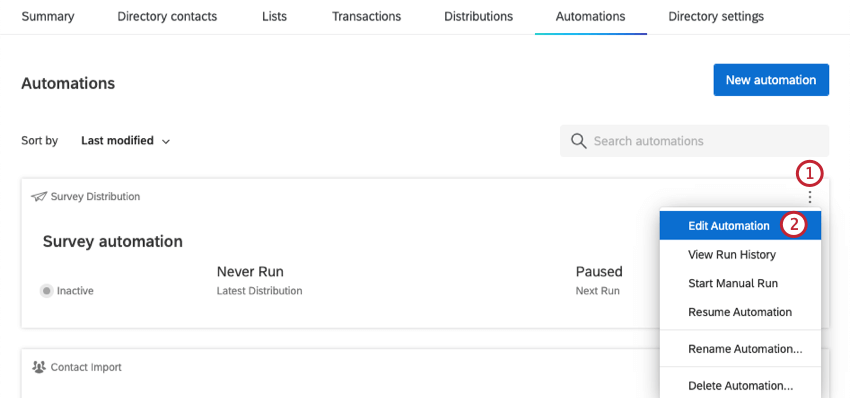
- Click Edit Automation.
- Click edit next to where it says Map Data Fields.
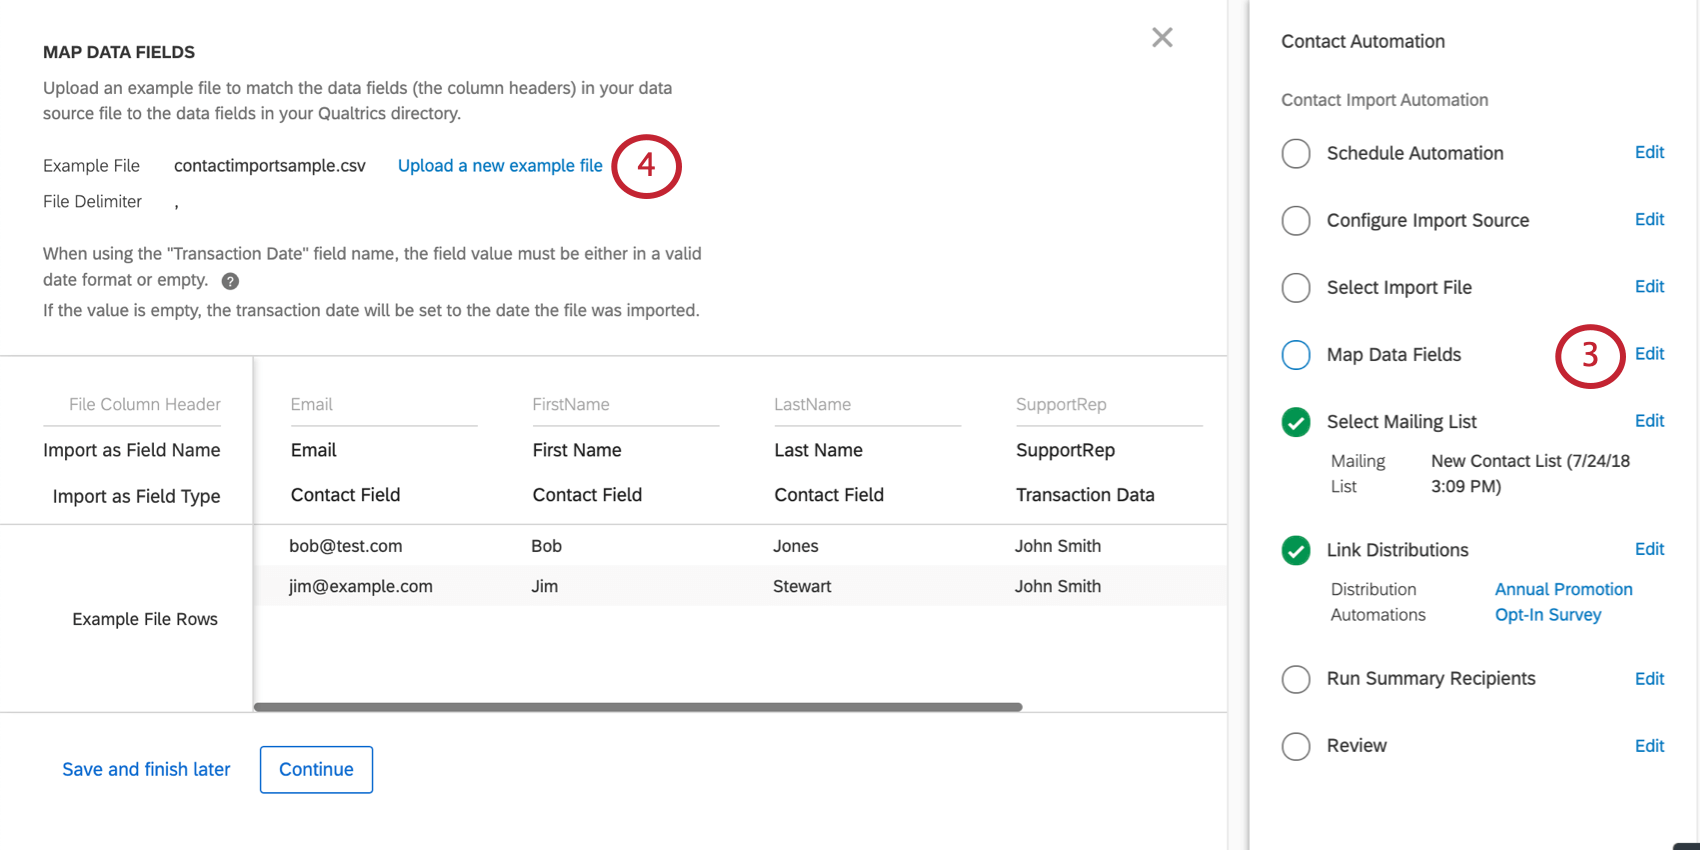
- Click Upload a new example file.
- Click Download Example File.
- Edit the file so it includes your desired headers. Make sure spelling and capitalization is the same.
Example: The files you keep in your source folder have a field called Address. In the example file, add a header called Address. Using a lowercase ‘a’ will not work.
- Click Select File. Upload your new file.
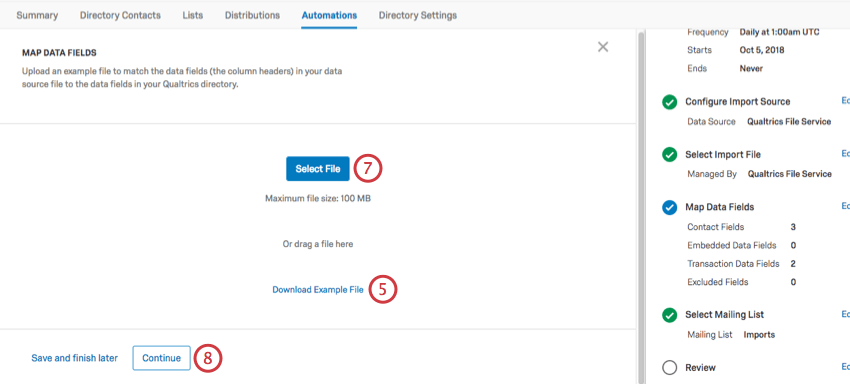
- Click Continue.
- Suggested column headers for Qualtrics field mappings will be provided; however, you can rename any column or map a column to an existing embedded data field by modifying the dropdowns in the Import as Field Name row. Note that if you’re naming a column after an embedded data field, it must be case-sensitive.
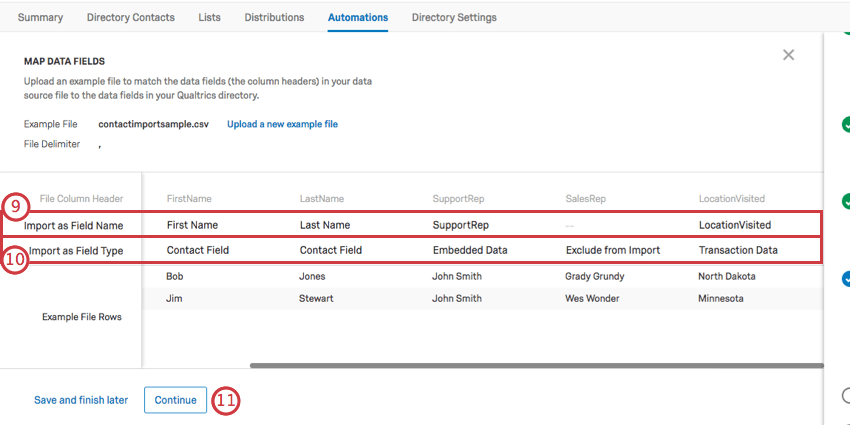
- Use the Import as Field Type row to determine if each field is a contact field, embedded data, transactional data, transaction date, or if it should be excluded from import.
- Once you’ve reviewed your fields, click Continue.
Qtip: Transaction dates are the dates a transaction occurred. Dates will be assumed to be in UTC unless the time zone is explicitly included in the date value. If the date column is empty, the transaction date will be set to the current date. If the date is invalid, the row will be failed. Here’s a list of compatible time formats:
- ANSIC (Mon Jan _2 15:04:05 2006)
- UnixDate (Mon Jan _2 15:04:05 MST 2006)
- RFC822 (02 Jan 06 15:04 MST)
- RFC850 (Monday, 02-Jan-06 15:04:05 MST)
- RFC1123 (Mon, 02 Jan 2006 15:04:05 MST)
- RFC3339/ISO-8601 (2006-01-02T15:04:05+07:00)
Creating Additional Automations
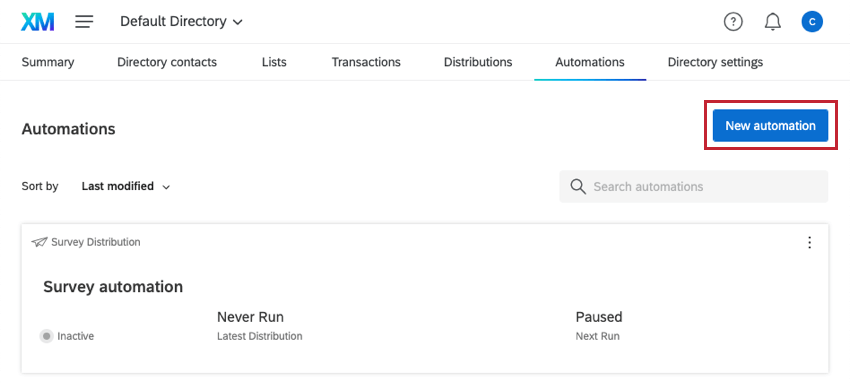
Once you have created automations, you can add more by clicking New Automation in the upper-right.
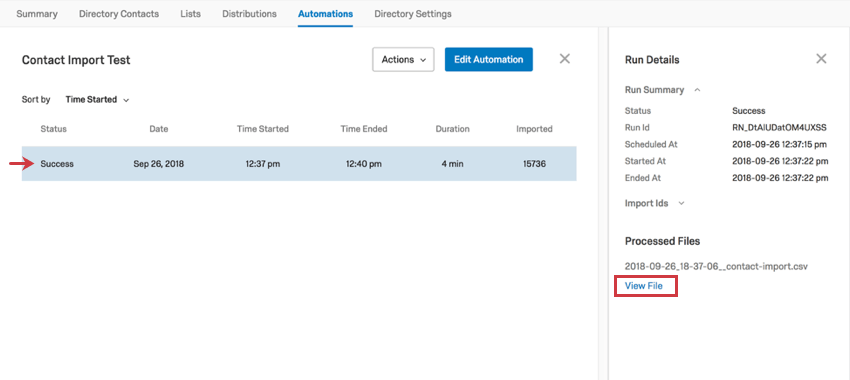
Qtip: When managing past automations, you can click the contact import automation and then click View File to see the files that were imported.
