
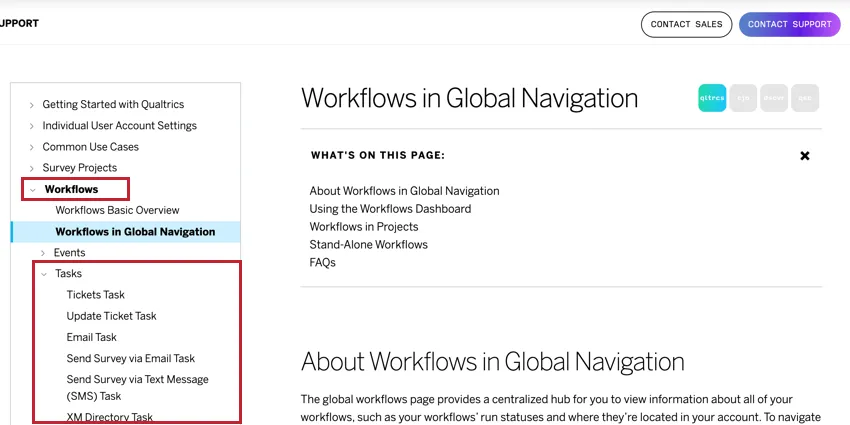
Building Workflows
What's on this page
About Building Workflows
Workflows are used to trigger tasks based on events or on a repeating schedule. This page covers how to use the workflow editor to build a workflow.
See Workflows Basic Overview for a broad overview of workflows, their use cases, and how to manage workflows after they’ve been built.
Qtip: There is a daily limit of 300,000 workflow executions. Learn more about how you’ll be able to troubleshoot blocked workflows.
Building a Workflow
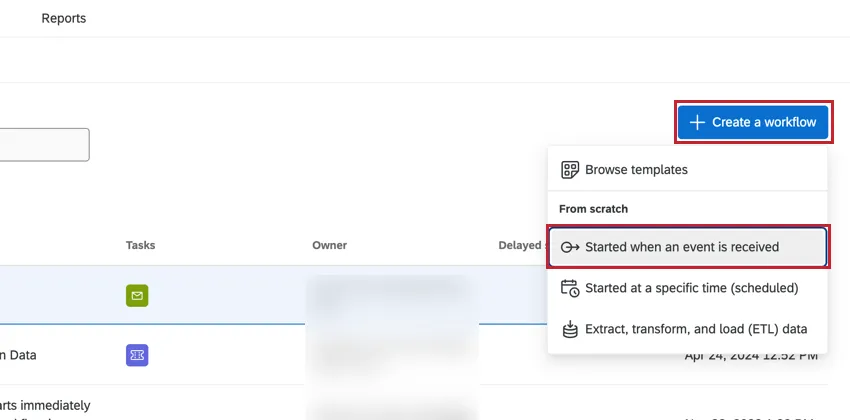
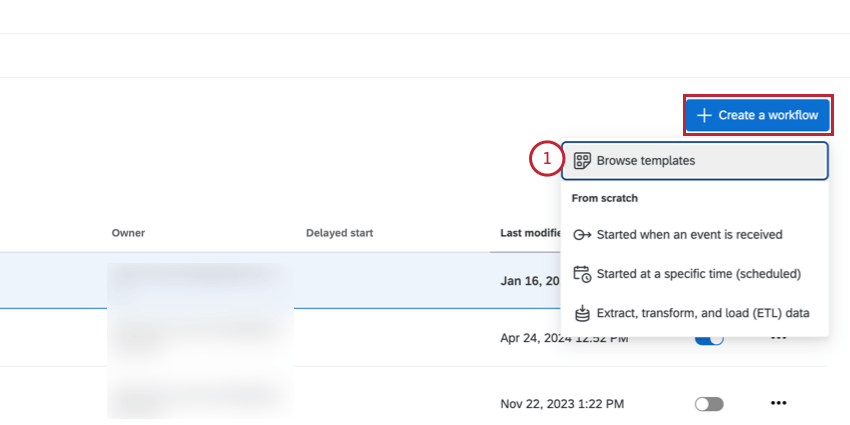
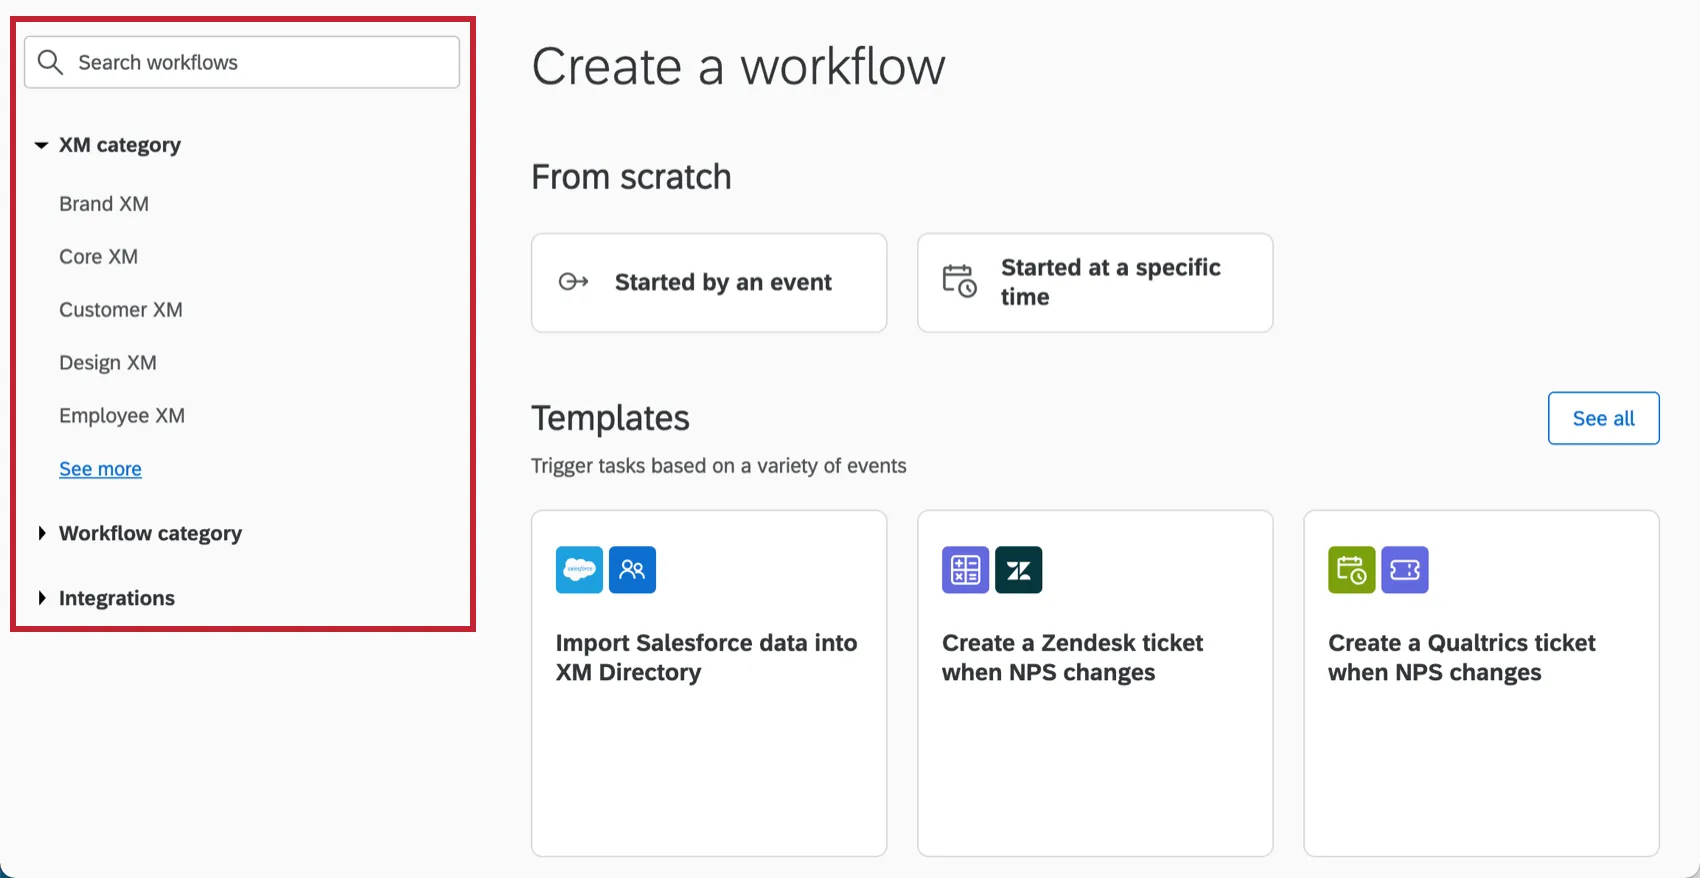
In either the Workflows tab of your project, or the stand-alone workflow page, click Create a workflow.
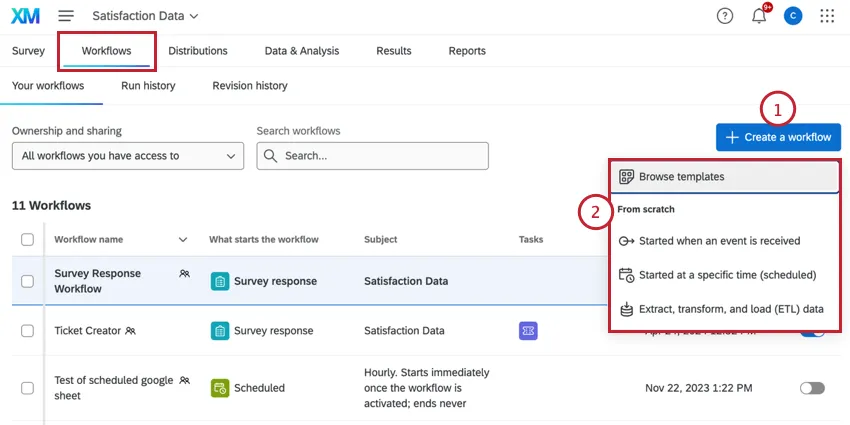
Choose how you’d like to build your workflow:
- Browse templates: Use a prebuilt workflow template. See Using Workflow Templates for more information.
- Started when an event is received: Build a workflow from scratch that is triggered when a specific event occurs (for example, when a survey response is received or when a ticket’s status is changed). See Choosing an Event for more information about available events.
- Started at a specific time (scheduled): Build a workflow from scratch that runs on a schedule that you set (for example, daily at 5:00 PM or on the first day of every month). See Setting a Workflow Schedule for help choosing a workflow schedule.
- Extract, transform, and load (ETL) data: Build a workflow from scratch that extracts data from one place, transforms it if needed, and loads it into another place. See Building an ETL Workflow for more information about these types of workflow.
Depending on your selected workflow type, either configure the workflow’s event or set the workflow’s schedule.
If desired, you can rename your workflow by typing a new name in the top left corner of the workflow editor.
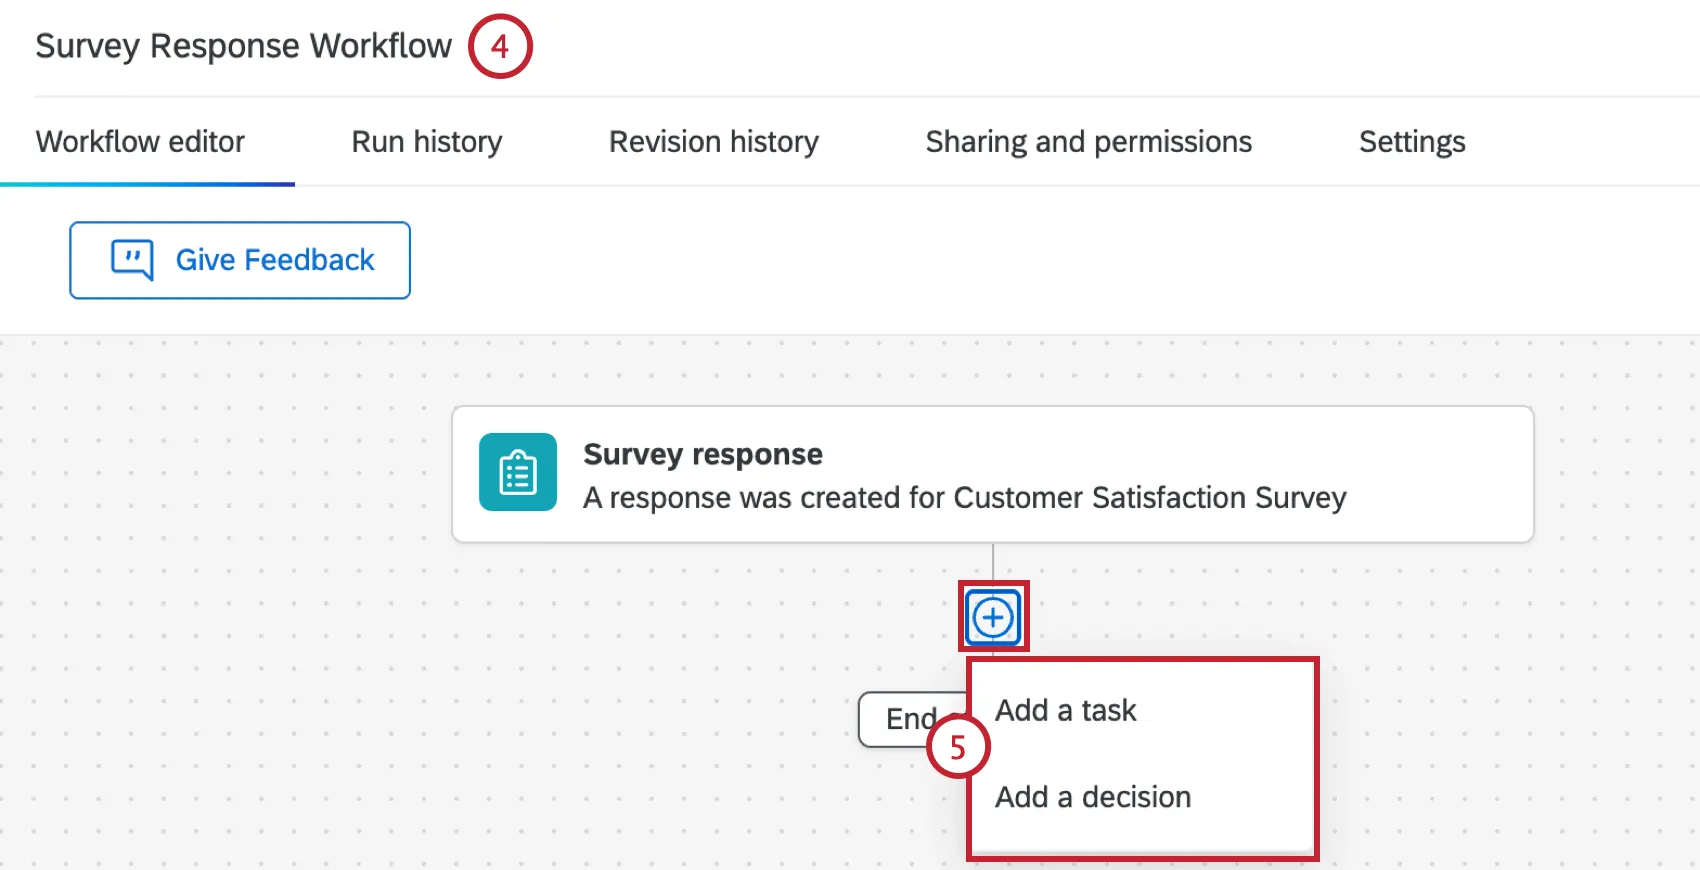
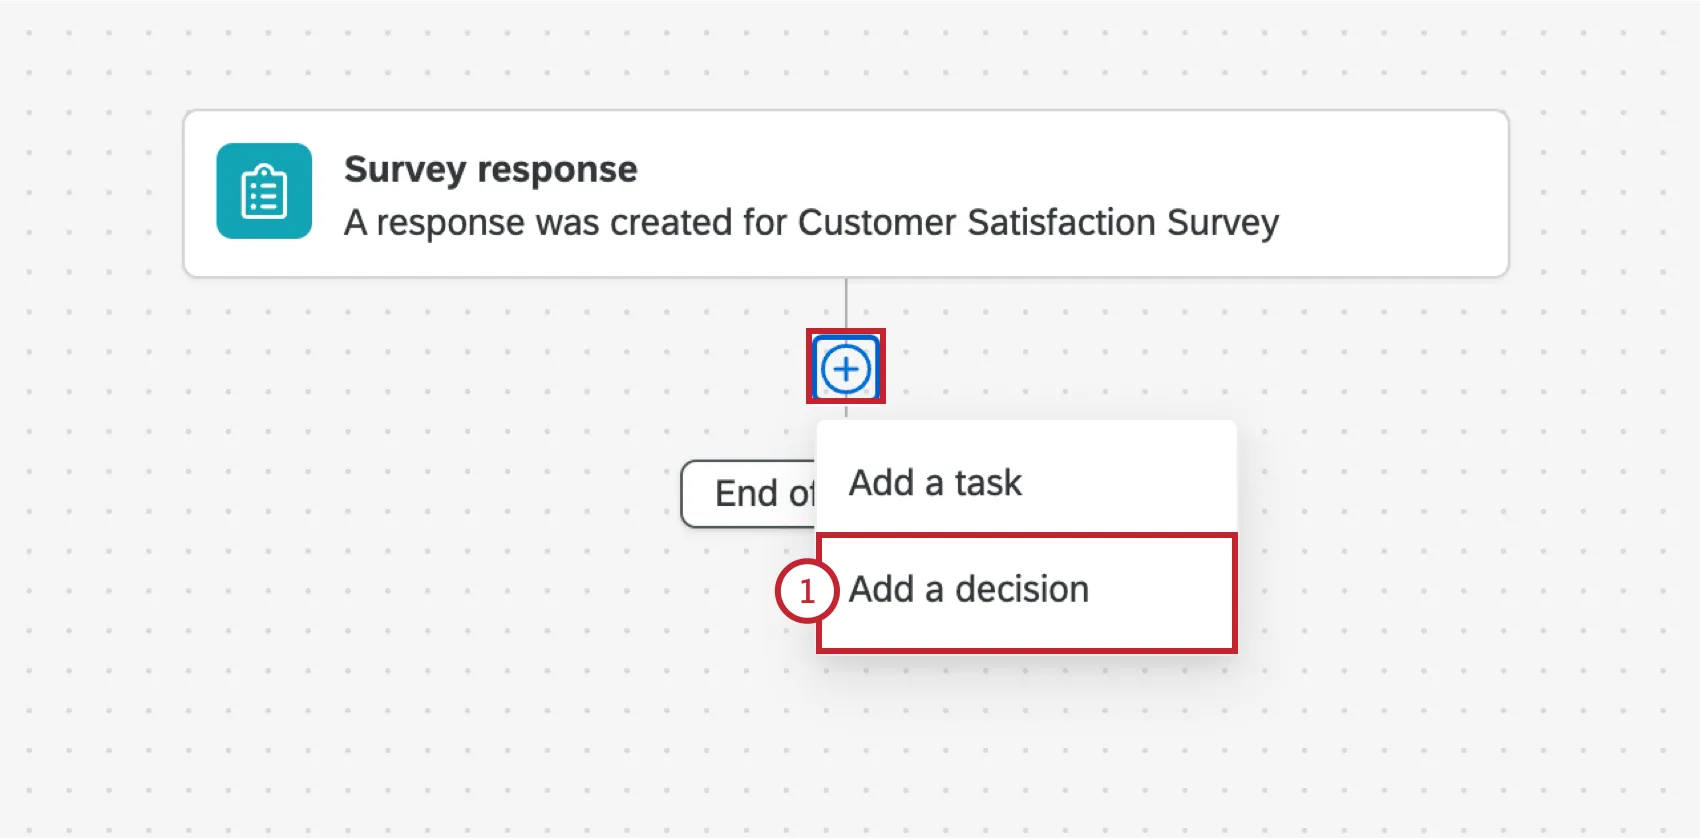
Below your workflow’s trigger, click the plus sign and choose the next component of the workflow:
- Add a task: Add a task to your workflow, which is what you want to happen as a result of the event meeting the conditions. For example, sending an email, creating a ticket, distributing a survey, and more. See Defining Tasks for a list of available tasks.
Add a decision: Add conditions to your workflow, which are rules that must be met before the events that follow can execute. See Creating Conditions for more information.

Qtip: It isn’t necessary to add conditions to every workflow. If there are no conditions, the workflow tasks will trigger as soon as the event takes place. For example, if your event is survey response creation, the workflow will fire every time a survey response is submitted.
You can add multiple conditions or tasks by repeating the previous step.
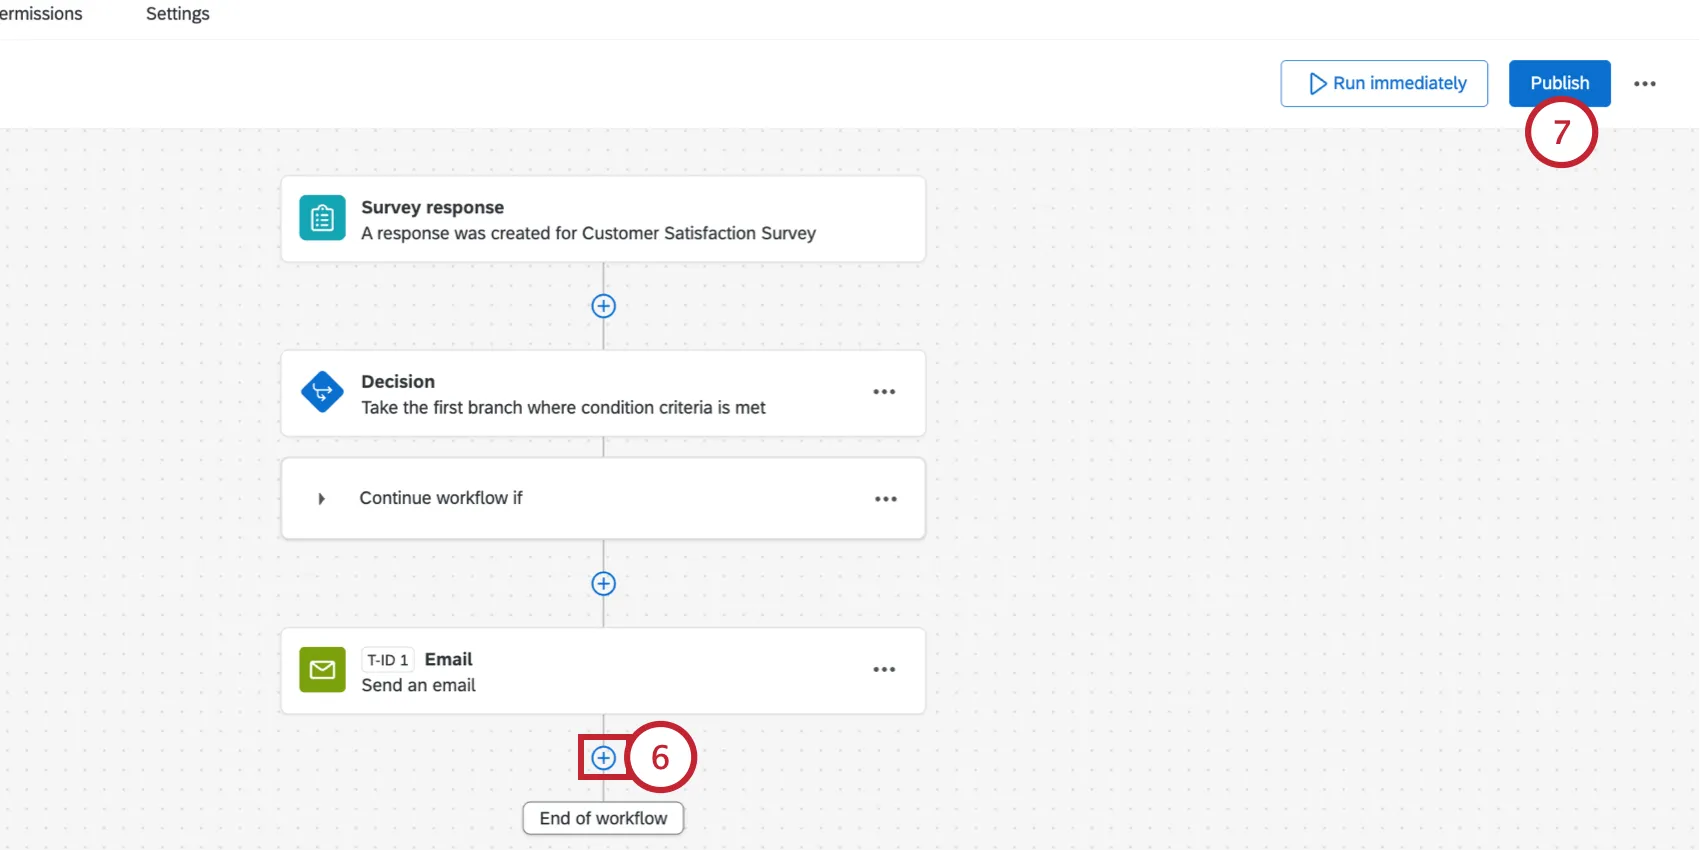
Once your workflow is finished, make sure to Publish it. This will activate the workflow and save your workflow as a new version.
Qtip: As soon as you publish a workflow, it will be live and active. Be careful when adding them to surveys that are actively collecting responses.
Qtip: Workflows are not instantaneous and may take several minutes to an hour to start or complete.
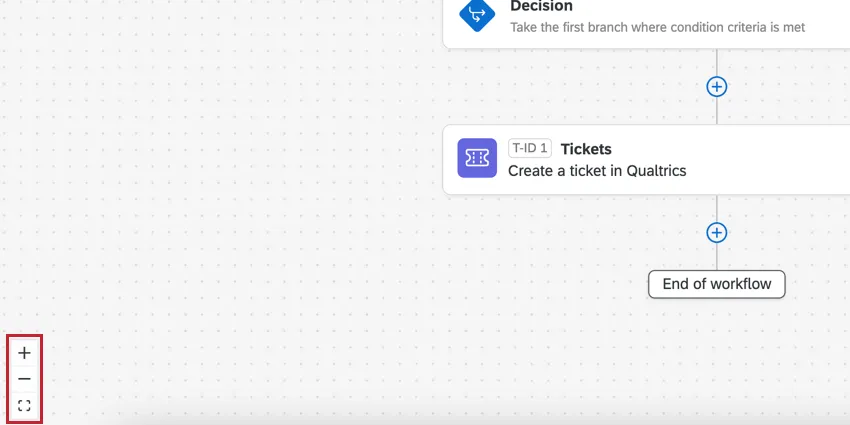
Qtip: You can use the controls in the bottom left corner of the editor or the scroll wheel on your mouse to zoom in and out. You can also click and drag the editor to pan around to visualize your workflow.
Choosing an Event
“Events” occur in Qualtrics or other systems and cause a workflow to start. To create an event-based workflow, click Create a workflow and select Started when an event is received.
Then, you can choose the event you want to start the workflow. The selected event will determine what kinds of conditions can be applied to the workflow. You can use the search bar at the top of the window to easily find available events. The events available to you will depend on your license, permissions, and project type. See below for a brief explanation of each event type and visit the linked pages for step-by-step instructions on how to set up each specific task.
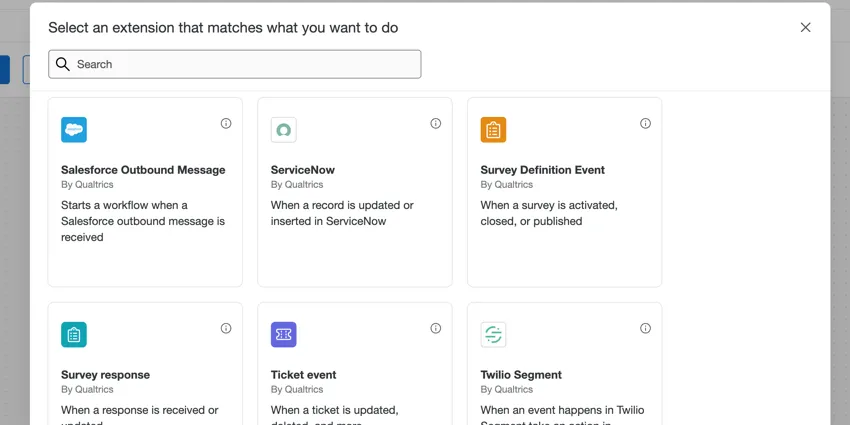
Events Available Everywhere
The events listed below are available to use in both the survey Workflows tab and the stand-alone Workflows page.
- Survey Response: Trigger the workflow based on how a respondent responds to your survey.
Salesforce Outbound Message: Trigger the workflow based on Salesforce outbound messages.
Qtip: This event is not available for EX projects.
- Ticket Event: Trigger the workflow based on ticket data
Qtip: This event is not available for EX projects.
- JSON Event: Trigger the workflow based on an API call.
- ServiceNow Event: Trigger the workflow based on an event in ServiceNow.
- Zendesk Event: Trigger the workflow based on an event in Zendesk.
- Twilio Segment Event: Begin a workflow based on data events in Twilio Segment, update contact information in XM Directory based on Twilio Segment, or add transaction to an XM Directory contact based on events in Twilio Segment.
- Jira Event: Trigger workflows based on changes to Jira issues, such as status updates.
- XM Discover Event: Trigger a workflow based on verbatim alerts or scorecard alerts sent in XM Discover
Events Only Available in Stand-alone Workflows
The following events are only available when setting up an event-based workflow through the stand-alone Workflows page.
- API Usage Threshold Event: Trigger the workflow based on your license’s API usage.
Survey Definition Event: Trigger the workflow based on a project’s status changing.
Qtip: The survey definition event cannot be used for EX project types.
- iQ Anomaly Event: Trigger the workflow based on spikes or drops in survey response counts.
- Experience iD Change Event: Trigger workflows based on contact data changes, subscription changes, or transaction data changes.
- Experience iD Segments Event: Trigger a workflow based on whether a contact has been added to or removed from a segment.
- Action Plan Event: Trigger the workflow based on changes to EX action plans.
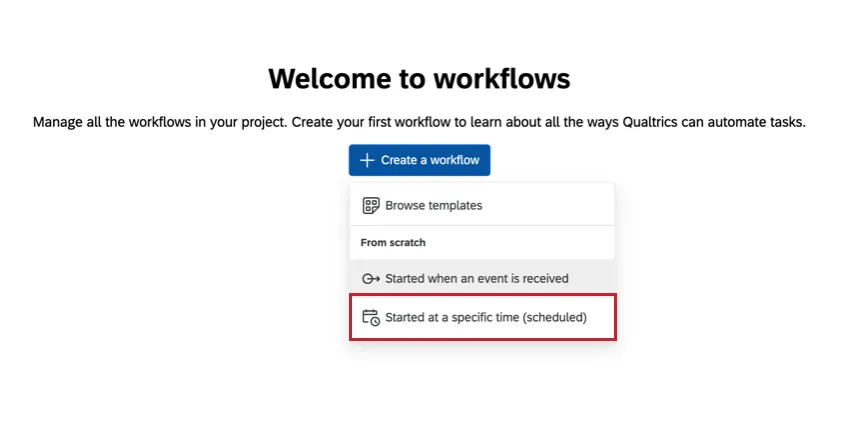
Setting a Workflow Schedule
Scheduled workflows allow you to create workflows that run at a specific time. You can set your workflow to run on a recurring basis, and you can choose when the workflow begins and ends.
To create a scheduled workflow, select Started at a specific time (scheduled) when creating your workflow.
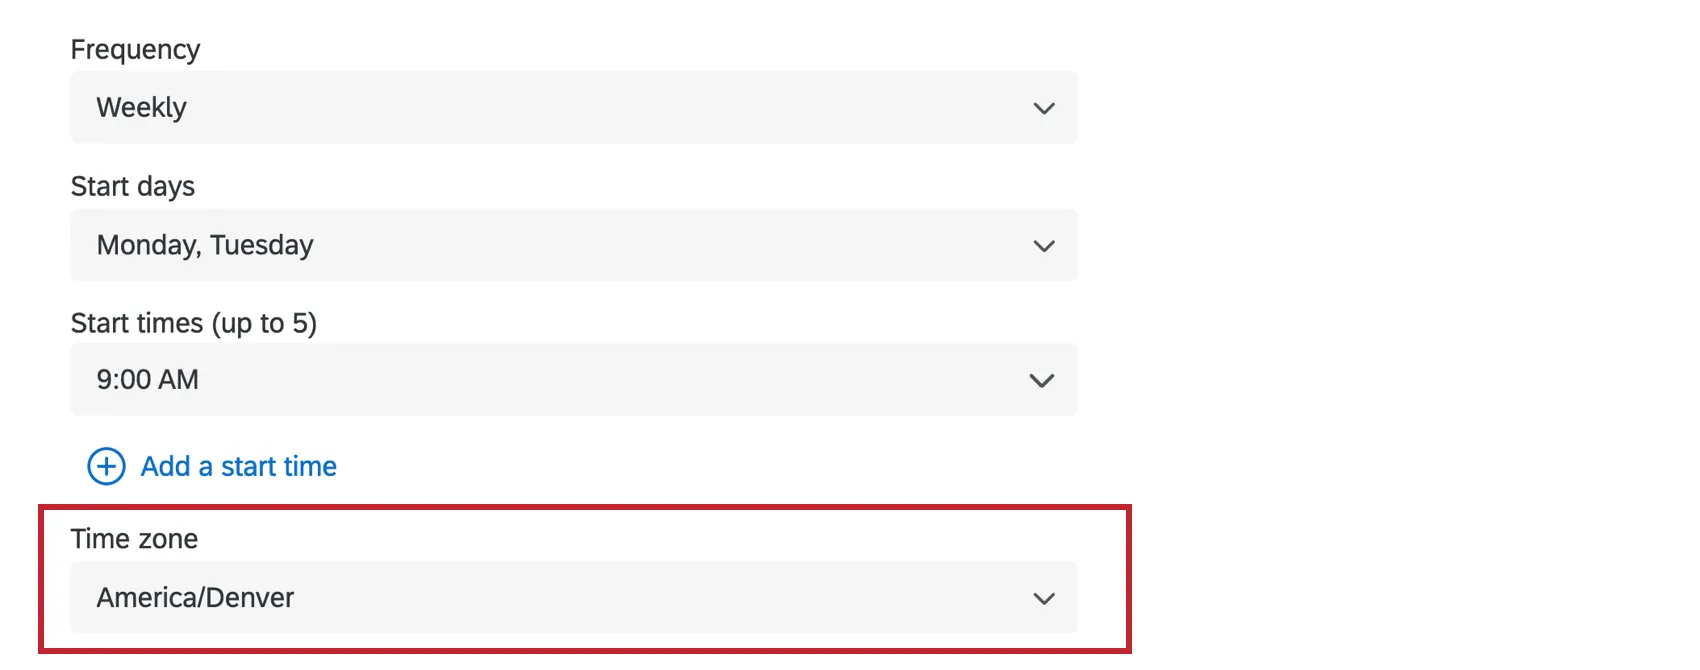
Then choose your desired schedule frequency. This can be hourly, daily, weekly, monthly, quarterly, annually, or a custom expression.
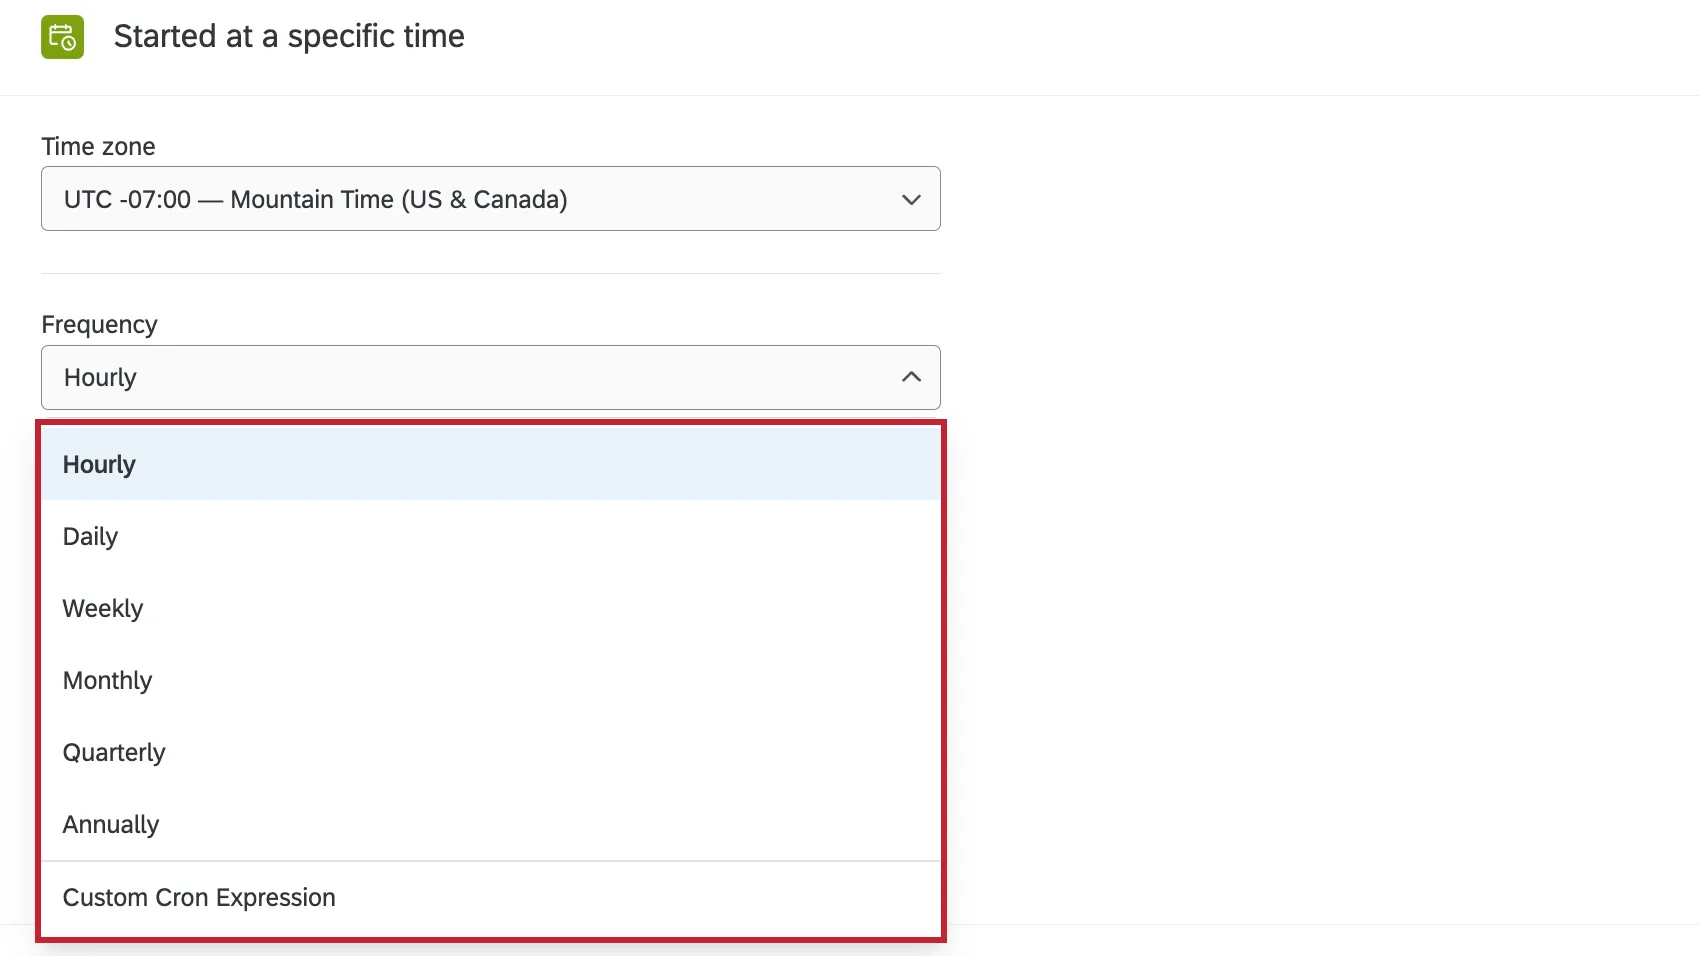
The next step will depend on your workflow’s frequency:
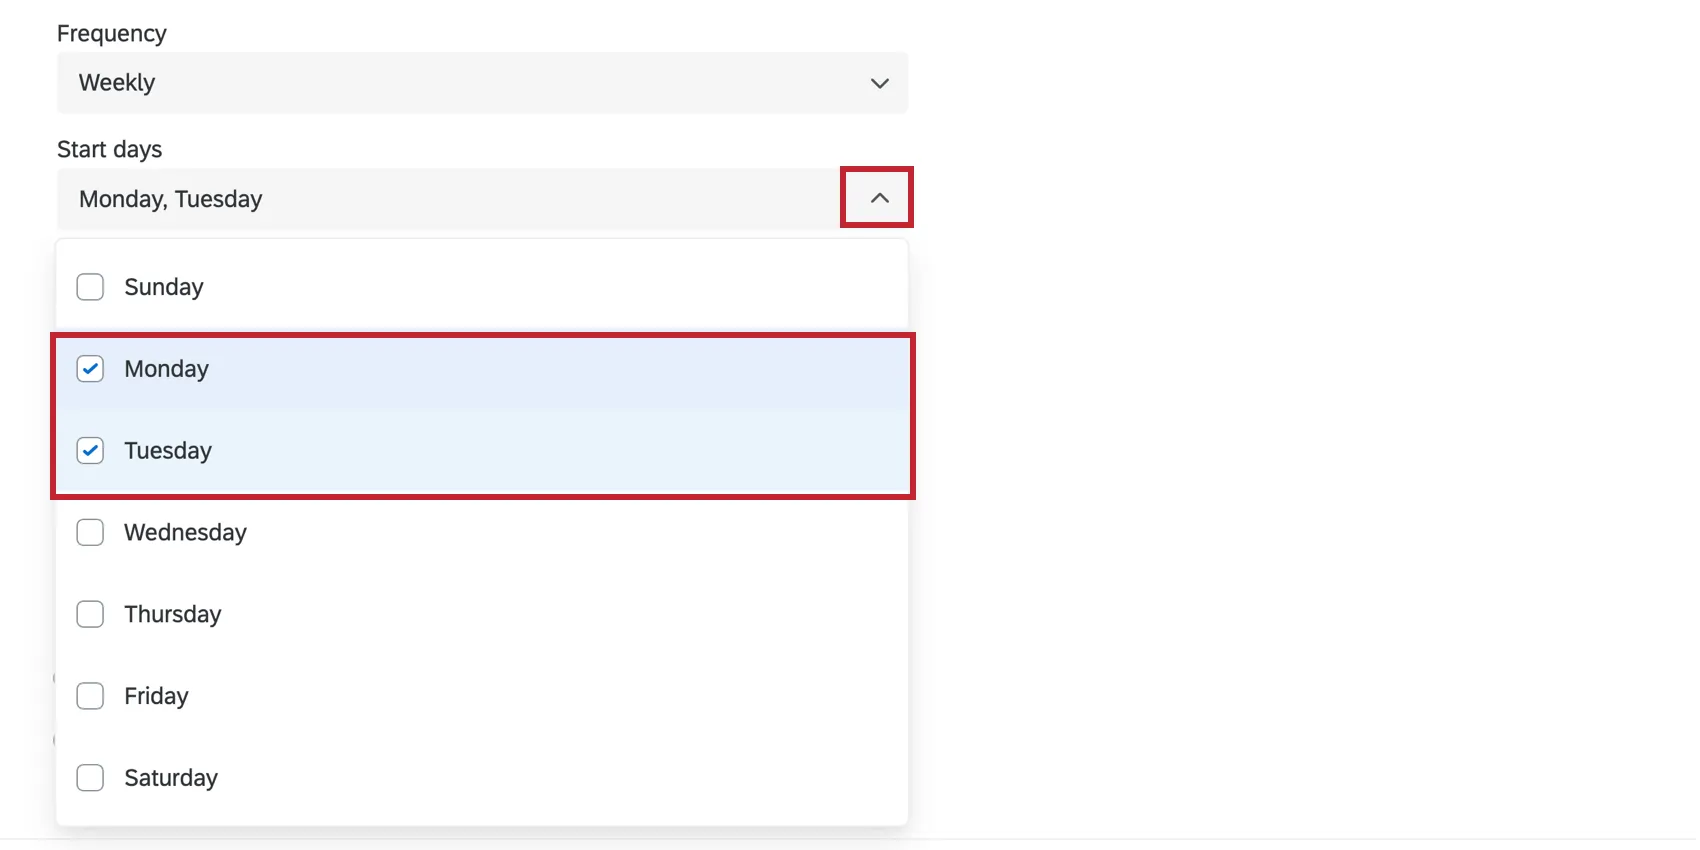
Weekly and Monthly: Choose which days you would like it to run by clicking the drop-down and selecting the checkboxes next to each day.
Qtip: If you choose a date that doesn’t exist in every month (ex: 29, 30, or 31), the workflow will not occur during those months.
Quarterly: Choose which month of the quarter and day of the month the workflow should run.
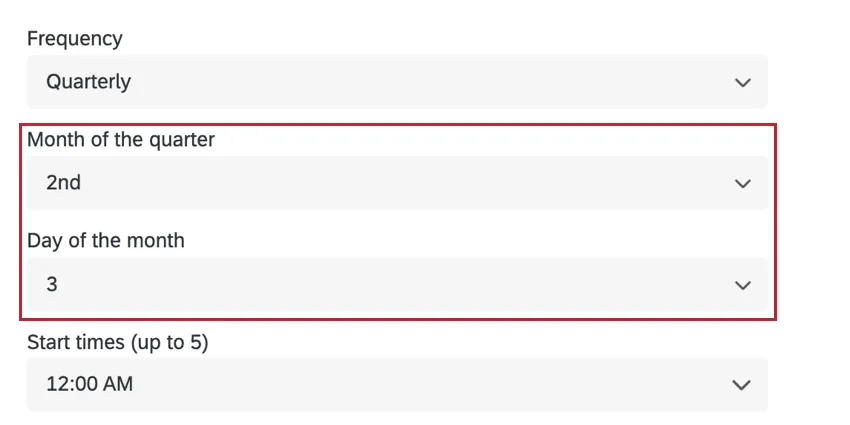
Qtip: If you want the workflow to run on the last day of the month, make sure to choose Last day.
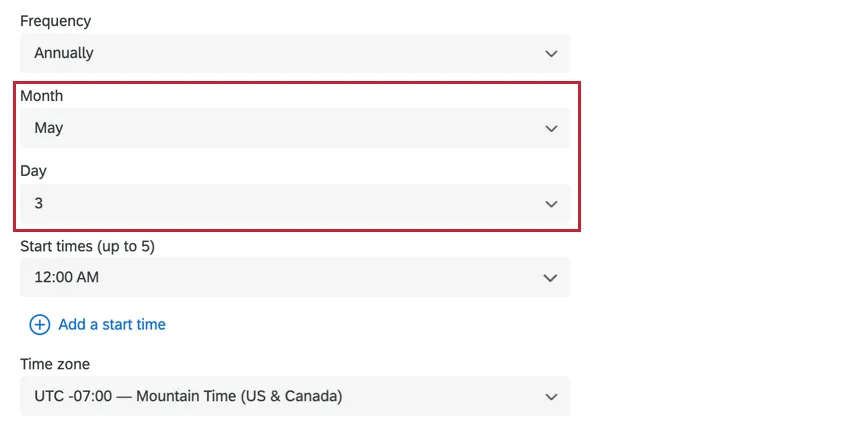
Annually: Choose the specific day of the year that the workflow should run.
Custom Cron Expression: Enter a cron expression that represents when the workflow should run. Click Show details to view how your cron expression is evaluated. See this website for help generating a Cron expression.
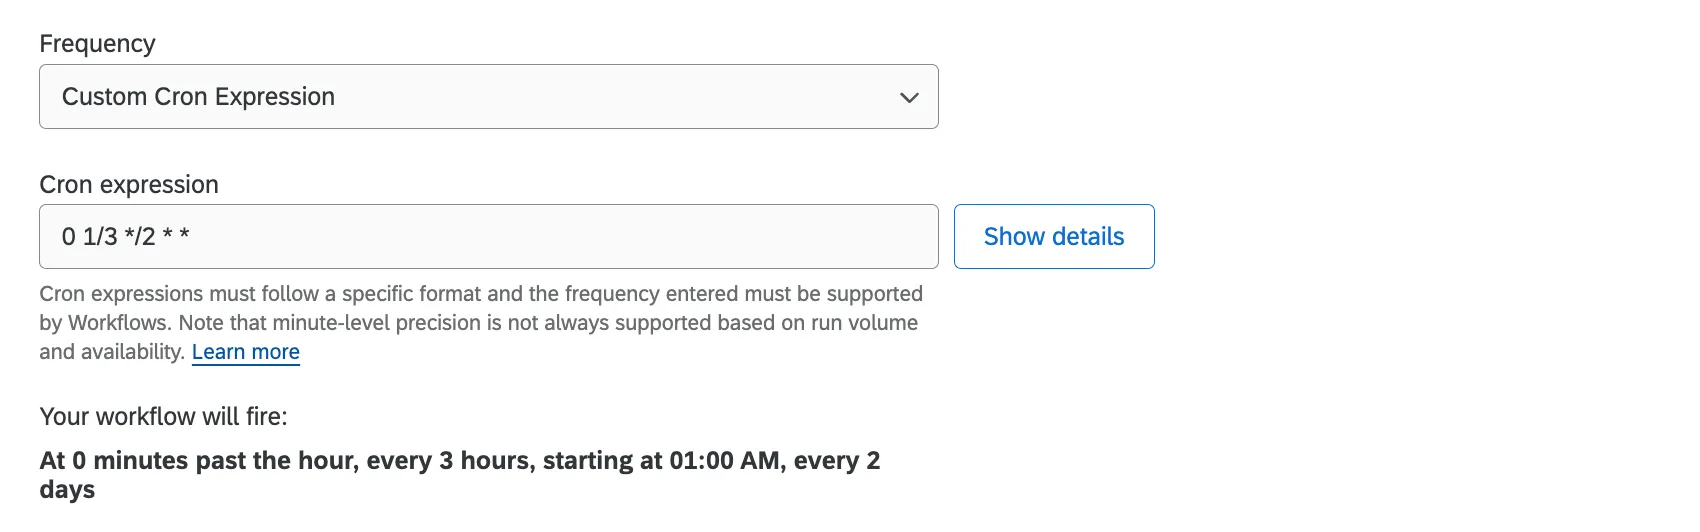
Qtip: Cron expressions can only have 5 parts and must contain valid characters. Intervals less than 1 hour are not allowed. See this guide to cron expressions for more information.

Example: In the above screenshot, the scheduled workflow will run on the hour every 3 hours, starting at 1:00 AM, every 2 days.
Next, type in or click the drop-down to select the start time for your workflow.
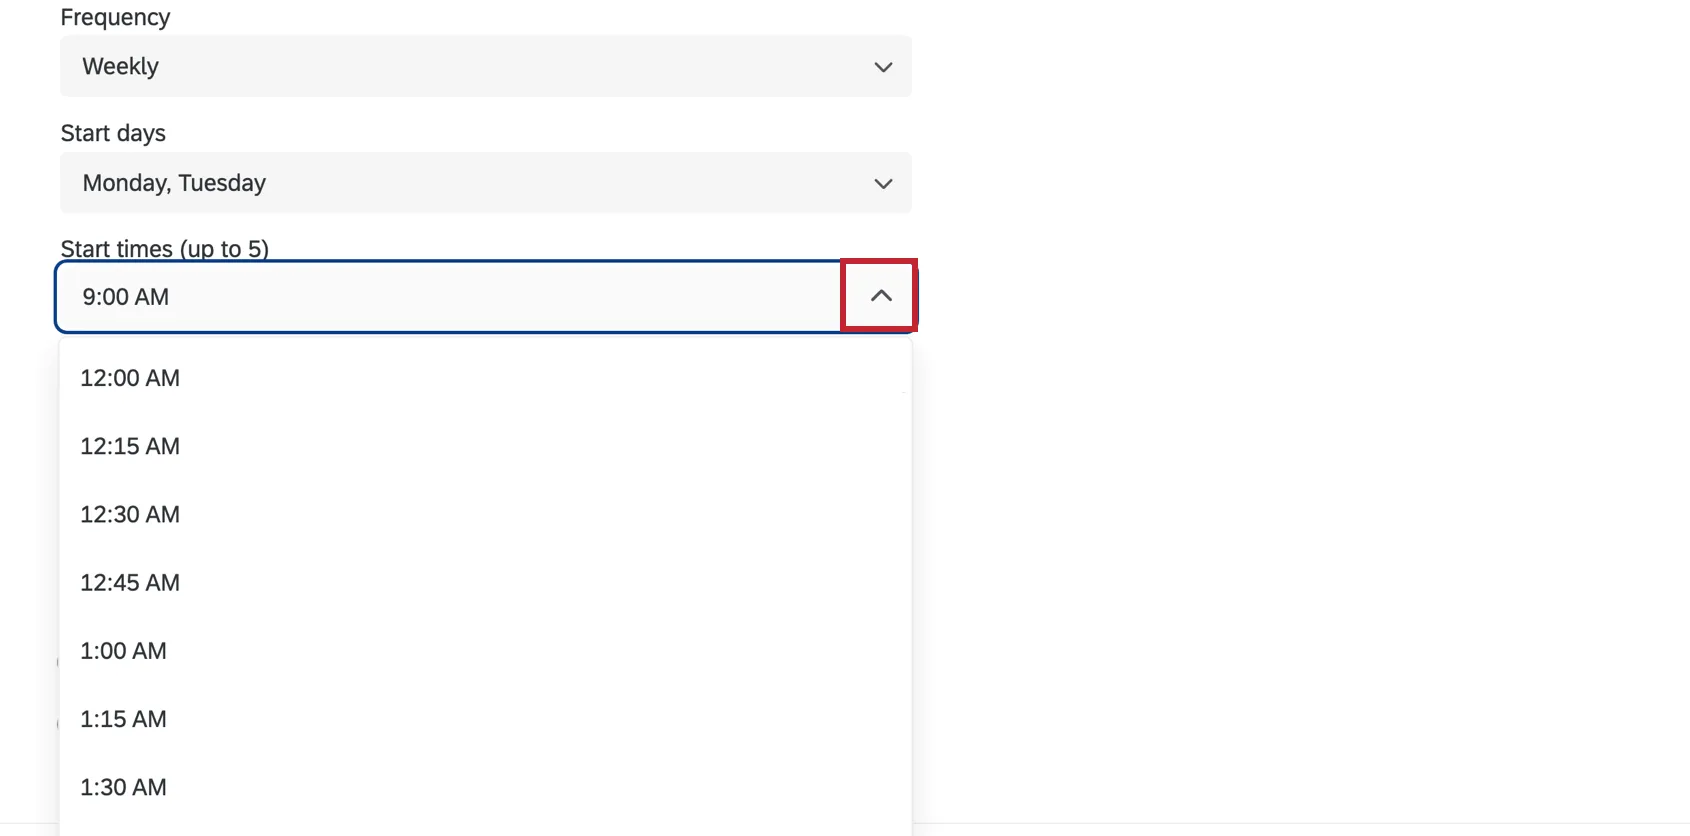
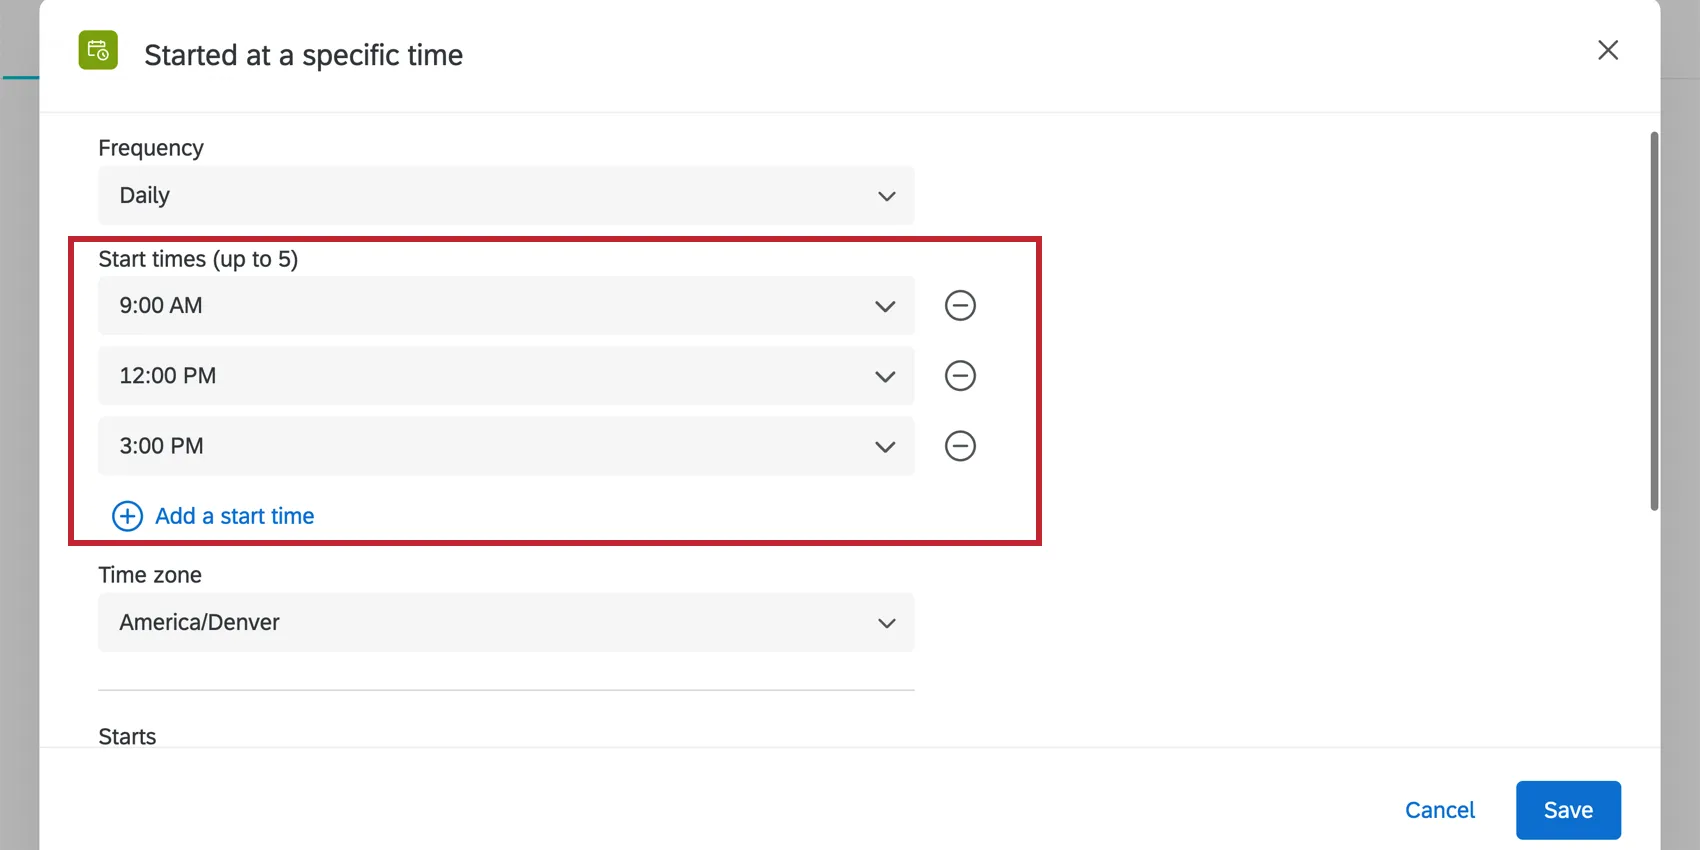
If you would like the workflow to run multiple times on the same day, click Add a start time.
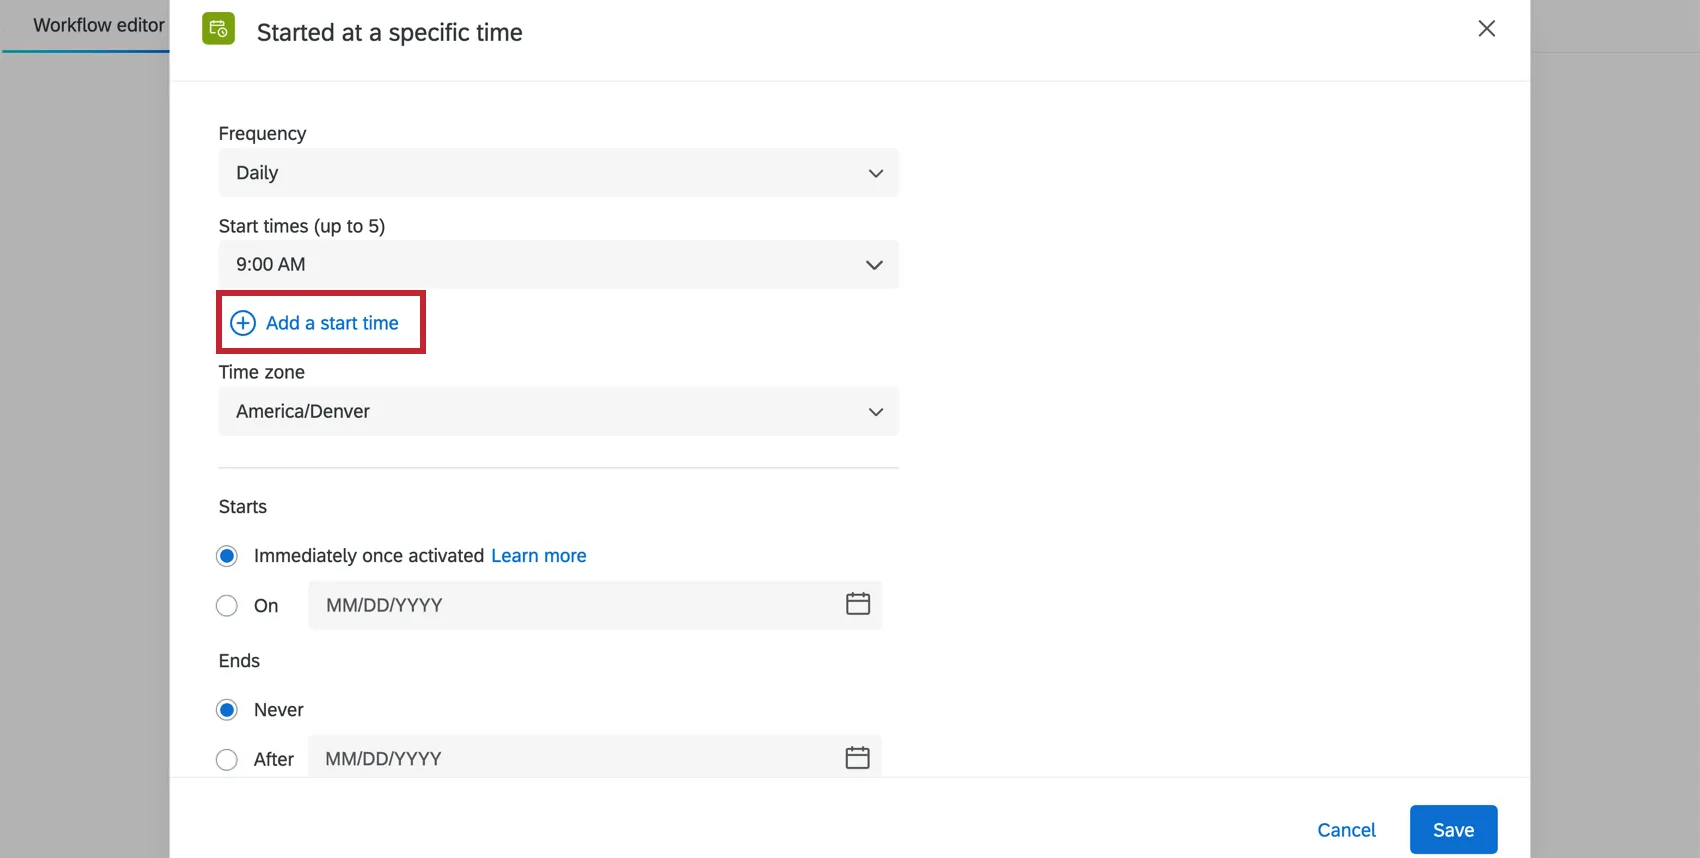
Example: Let’s say you want to execute your workflow 3 times per day. Set the frequency to daily, and add which 3 times in the day that you would like the workflow to run. This workflow will execute at 9AM, 12PM, and 3PM each day.
Attention: Certain tasks may take up to 15 minutes to complete, so we do not recommend scheduling tasks with longer run times in very close increments. The duration needed to execute a task can be found in that workflow’s run history.
Next, select which time zone you want the workflow to run on. By default, the account’s time zone will be selected.
Qtip: Pay close attention to the time zone you select. Scheduled workflows do adjust to Daylight Saving Time, if the selected time zone observes it. For example, the UTC±00:00 Dublin time zone does observe DST, while the UTC±00:00 Abidjan time zone does not.
Then, choose when you want the workflow to start and stop running. By default, scheduled workflows will start running immediately after being activated and only stop running when deactivated. However, you can choose a start date and end date for your scheduled workflow instead.
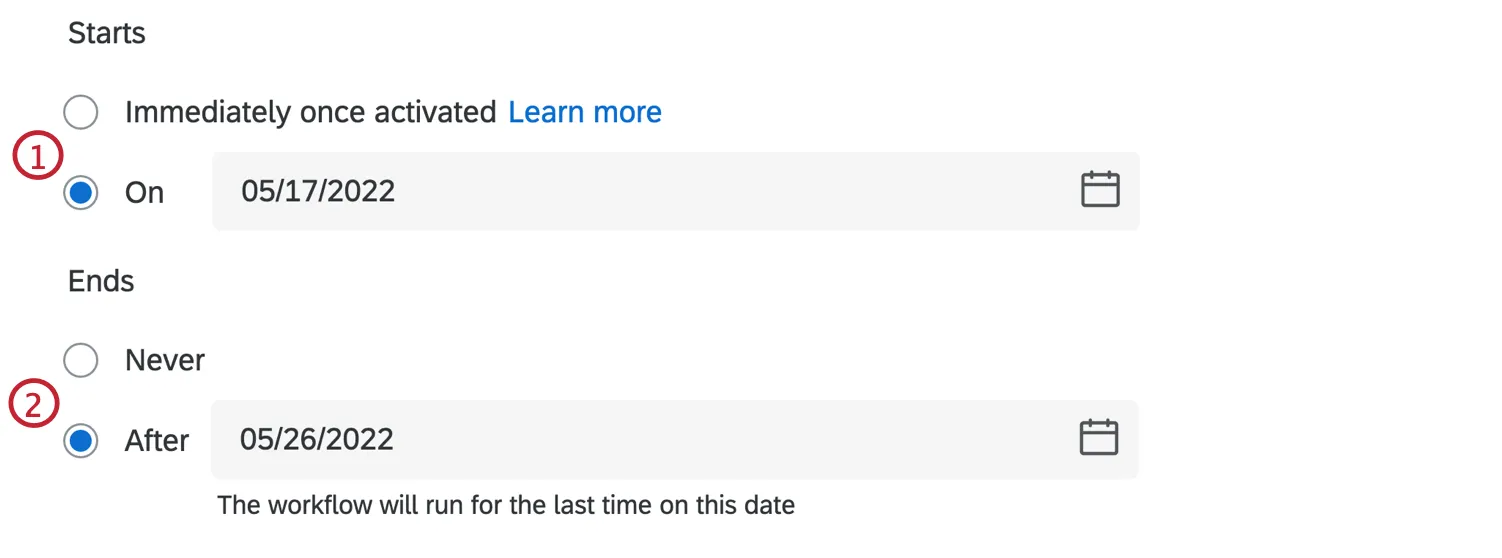
- Immediately once activated: The workflow will run according to its schedule once it is toggled on.
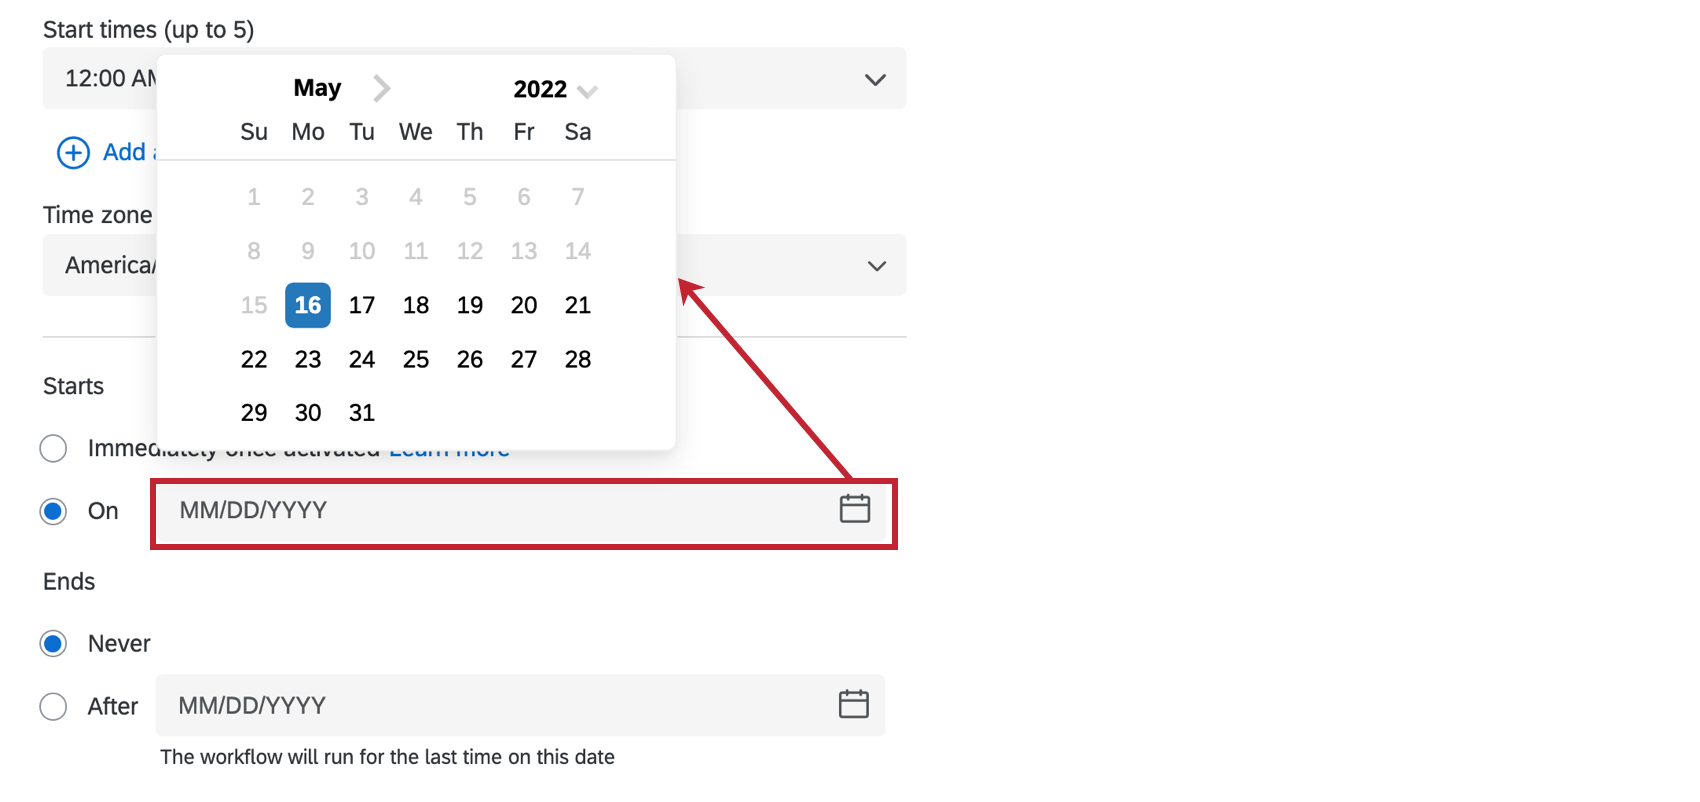
- On: The workflow will begin running on the chosen date. Either enter a date in MM/DD/YYYY format, or select a date from the calendar picker.

- Never: The workflow will run until toggled off.
- After: The workflow will begin running on the chosen date. Either enter a date in MM/DD/YYYY format, or select a date from the calendar picker.
Attention: Tasks created in scheduled workflows cannot use piped text. That’s because there’s no source to pipe information from, unlike in an event-based workflow.
Qtip: if you’re looking to email reports on a regular basis, see the options for sharing results, sharing reports, and sharing dashboards (if applicable).
Manually triggering scheduled workflows
Rather than waiting for a scheduled workflow to fire, you can trigger it with the click of a button. In the workflow editor, you can immediately cause a workflow to fire during the testing process.
Example: Let’s say that you would like to create a workflow that is scheduled to trigger every Monday at 6:00 am, but you’re building your workflow on a Wednesday. You’d like to test your workflow without waiting for it to trigger the following Monday. You can manually trigger your workflow immediately in order to test that it’s working the way you want it to.
Make sure your workflow is Active and double check which version is currently active. Your workflow will be activated when published for the first time. If your workflow is deactivated, you can activate it using the toggle.
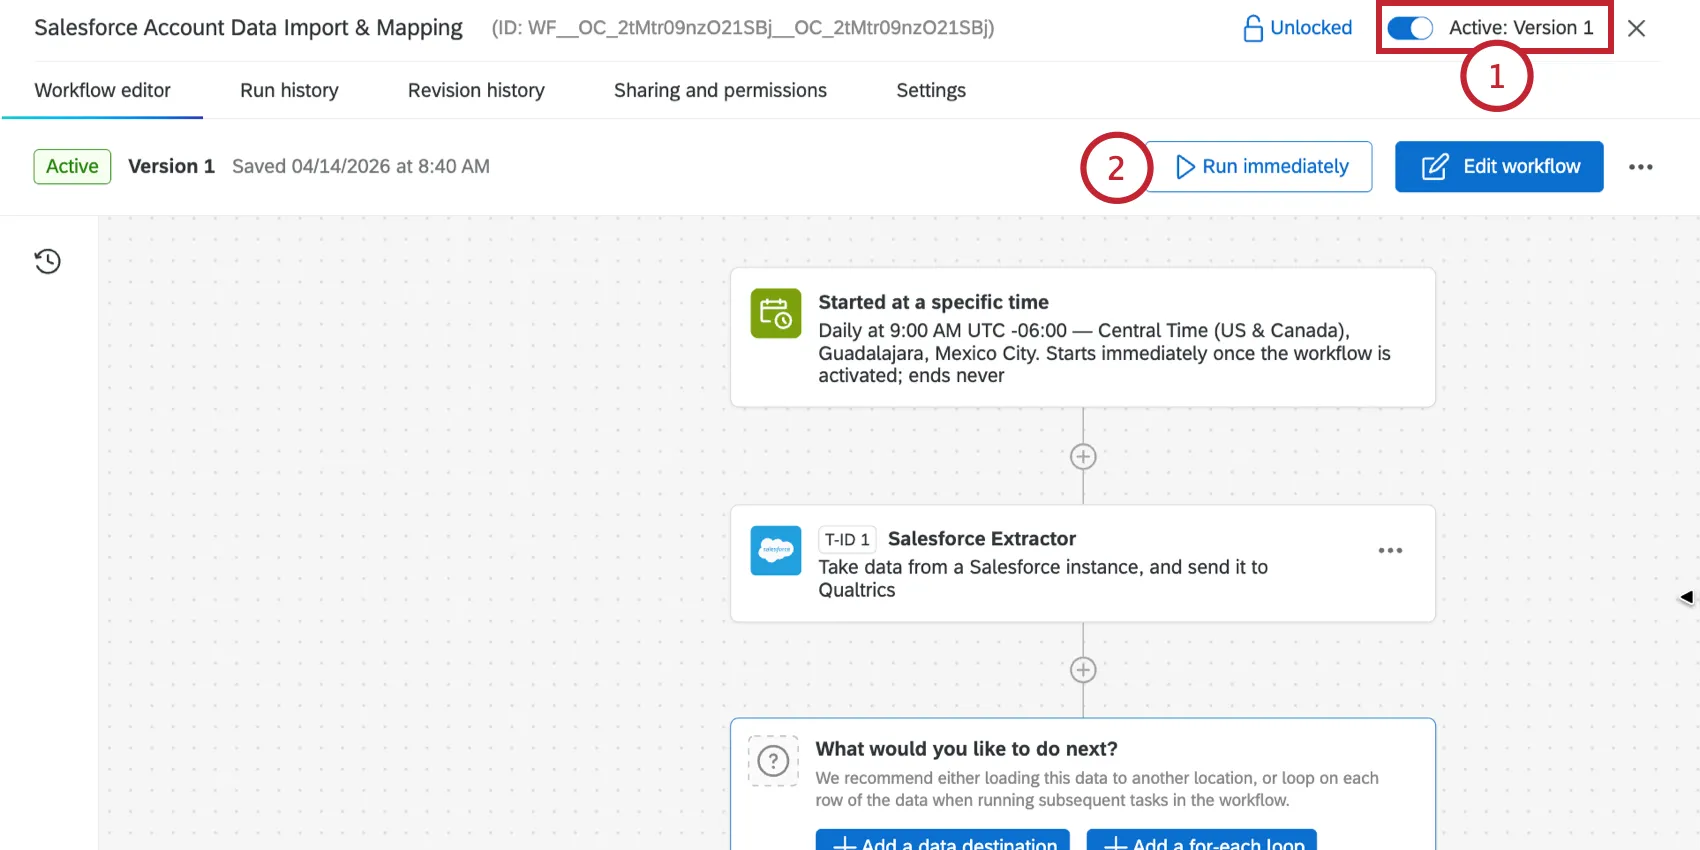
Qtip: If you can't activate the workflow, then you need to publish it first.
Click the Run immediately button to test the scheduled workflow.
Creating Conditions
Qtip: Conditions are not required on every workflow. Conditions are also called “decisions” in the workflow editor.
You can add conditions to your workflow so that they only run when certain criteria are met. Conditions can be added after an event in an event-based workflow, or after certain types of tasks. For example, you’re entering respondents into a raffle, but only if they opted-in to the raffle in your survey.
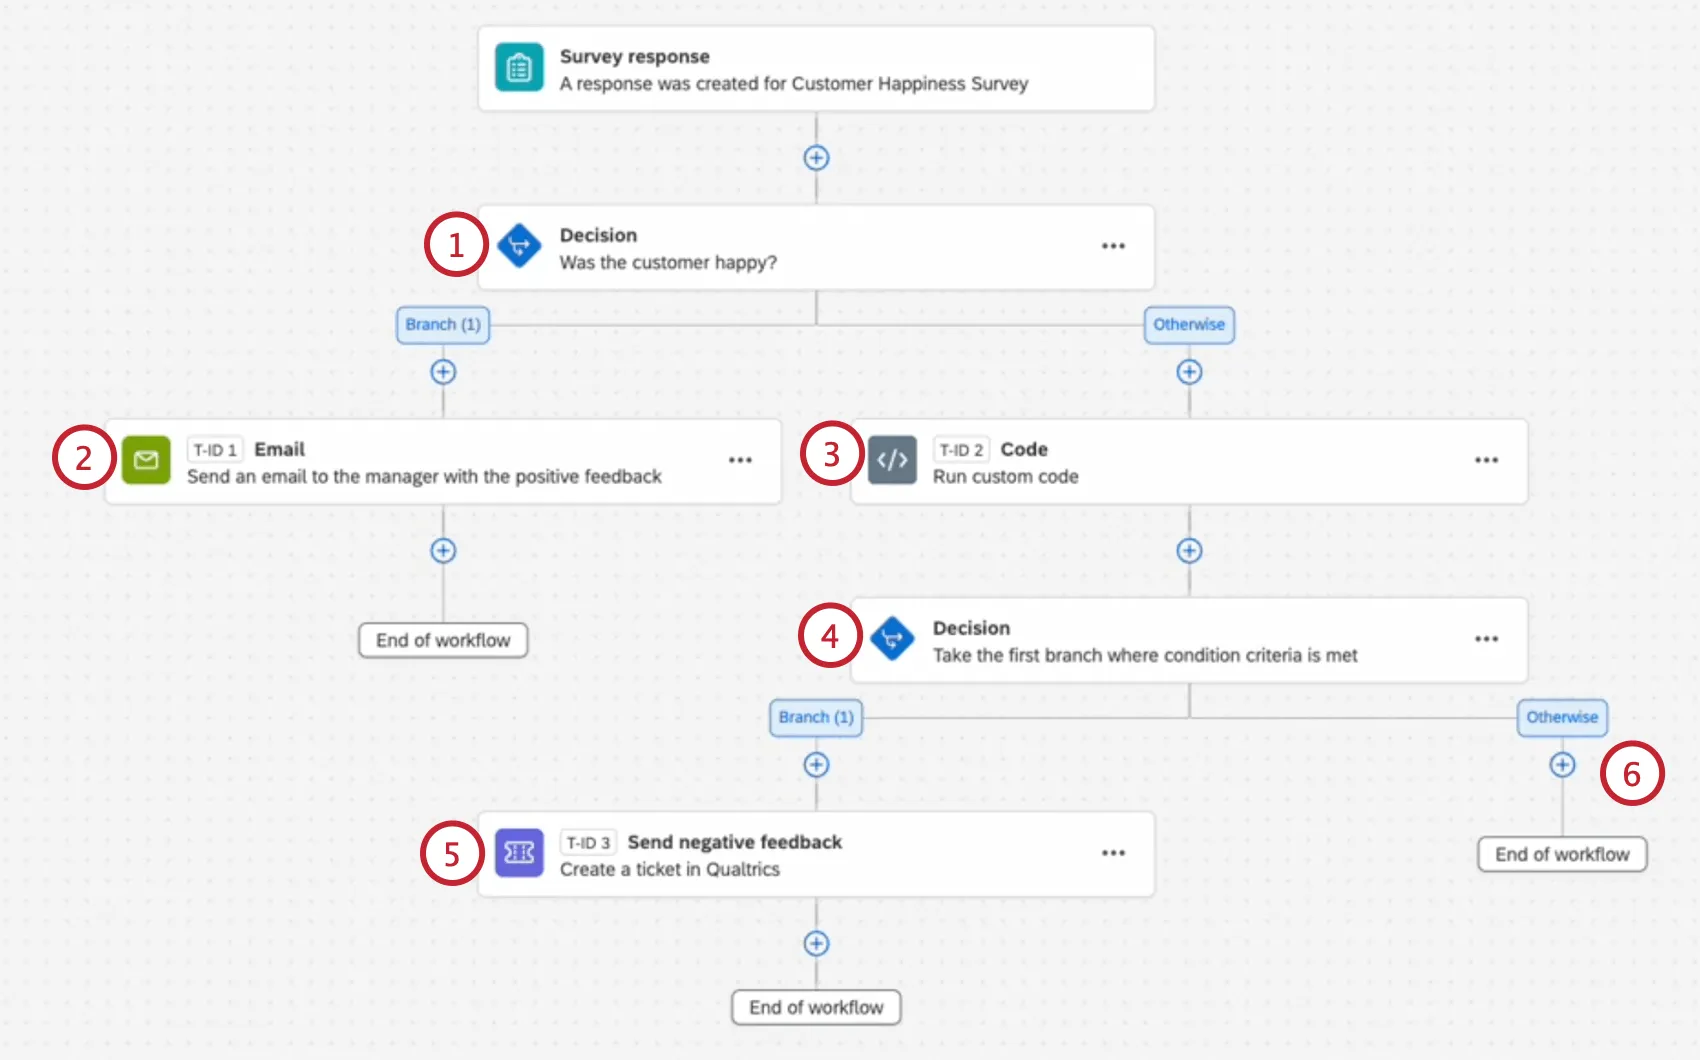
You can use conditions to create branching workflows that have different outputs based on how conditions are evaluated. For example, if you have a customer satisfaction survey, you could send the respondent a “thank you” email if they respond positively; however, if they respond negatively, you can send them a “we’ll do better” email and create a ticket to have a member of their account team follow-up with them later.
Conditions are built by creating logic statements that use information from the chosen event or task:
When building the workflow, click the plus sign (+) and select Add a decision.
If your condition has multiple statements, choose how these statements should be evaluated:
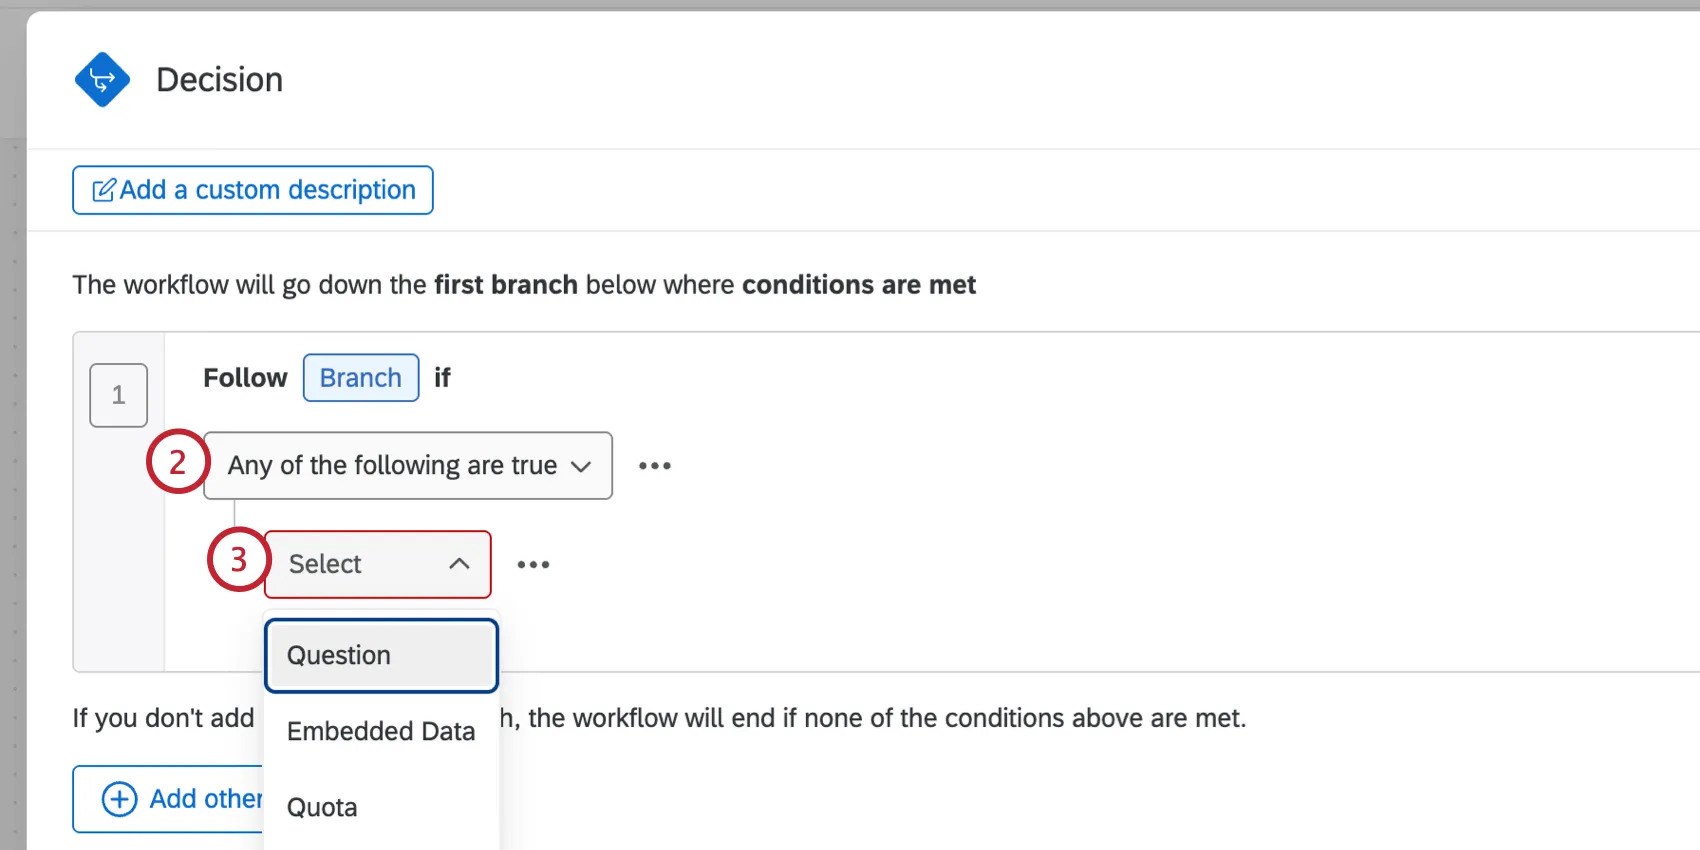
Use the dropdown to choose what the condition should be based on. The options available here will depend on the workflow’s event or any preceding tasks.
Example: If your workflow is based on survey responses, then your conditions can be based on question answers, embedded data, or quotas from that survey.
Qtip: Within EX projects, you cannot create conditions based on Org Hierarchies.
Select the field you’d like to use in the condition (e.g., Q1 – How would you rate the ease or difficulty of navigating this website?).
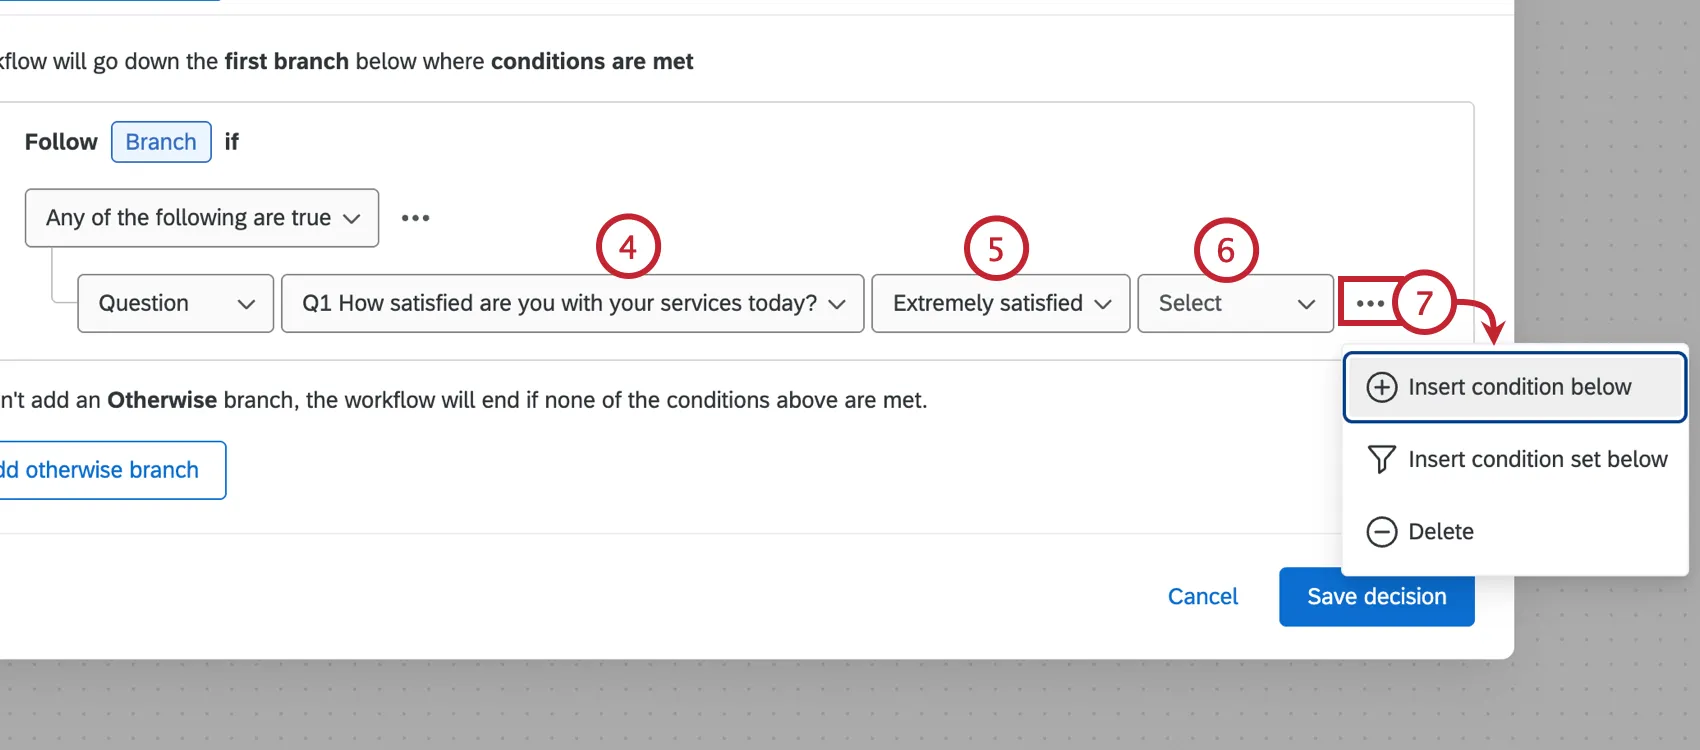
Choose the specific answer, response, value, etc. that you want to match (e.g., Extremely easy, Detractor, etc.).
Select the operator which determines how you want to match the value you choose (e.g., is selected / is not selected, is displayed / is not displayed, etc.).
Qtip: See List of Operators for more information on available operators. Note that this page is about filtering response data, but the information on conditions is the same for workflows.
You can add multiple conditions by clicking the three dot menu and selecting Insert condition Below. Choose the Insert condition set below option to add a condition set instead, which is a new grouping of conditions that can be controlled by their own “any” or “all” setting.
To add another branch with different conditions, click Add an else-if branch.
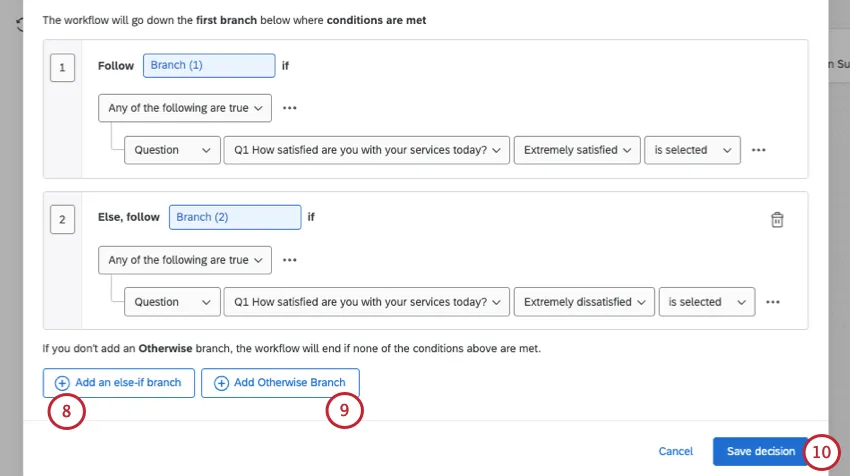
Qtip: You can have a maximum of 10 branches.
Qtip: You can rename your branches. For example, instead of branch 1 and branch 2, you can name branches for their purpose or conditions.
If desired, click Add otherwise branch. This allows you to create a branch in your workflow to trigger other tasks if the other branches' conditions are not met.
Qtip: You do not always need an otherwise branch; if there is no branch, then the workflow will end if the above conditions are not met.
Click Save decision to save your conditions.
Click the plus sign ( + ) under a branch to add tasks to it.
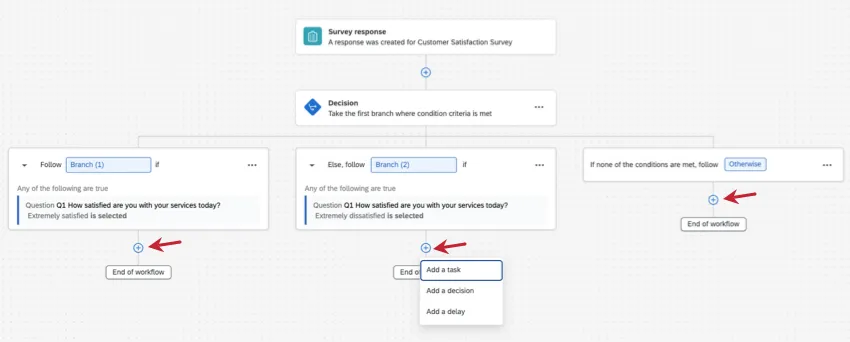
- Branches: Add tasks that you want to happen if that specific branch's conditions are met.
- Otherwise: Add tasks that you want to happen if none of the branches' conditions are met.
Qtip: Click the arrow next to a branch's name to see the conditions inside it.
You can include multiple condition blocks and branches in a workflow. When the workflow runs, the workflow conditions and tasks will be evaluated in the order they appear in the workflow editor, from top-to-bottom. The workflow will continue evaluating until it reaches one of the ends of the workflow branches.
Example: In this example, the workflow will trigger when these conditions are true:
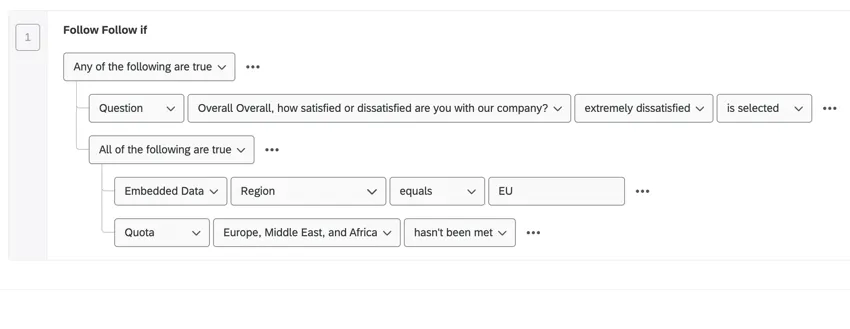
- If the respondent responds that they are “extremely dissatisfied” with the company.
OR- If the respondent is from the EU region AND the quota for Europe, Middle East, and Africa has not been met.
Qtip: See Basics of Building Conditions for more information on building conditions. Note that this page is about filtering response data, but the information on conditions is the same for workflows.
Example: In this example, we have a store satisfaction survey with multiple workflow branches depending on the customer’s response:
Defining Tasks
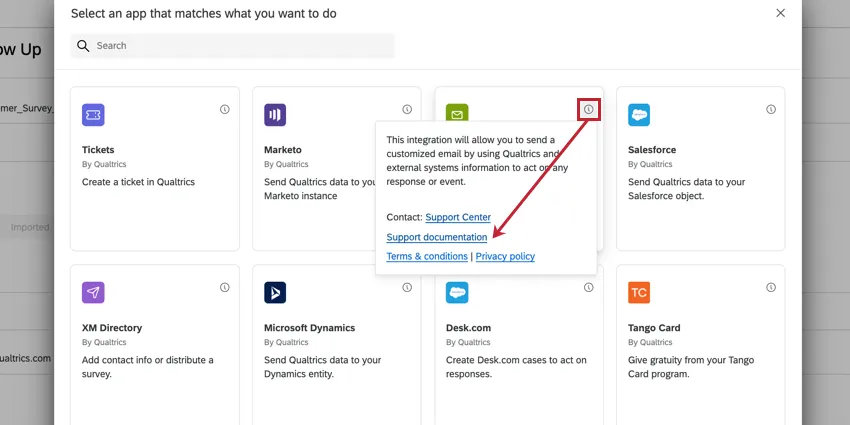
You can add up to 20 tasks and controls (conditions or loops) per workflow to follow-up on your research and survey responses. Each task type is capable of solving an array of problems. You can use the search bar at the top to of the task selector to search your available tasks. For a full list of tasks, check out the Tasks category in the Workflows section of the support site.
Qtip: Click the i icon on a task to get more information about the task. This window also includes a link to that specific task’s support page if you need guidance setting up the task.
General Workflows Tasks
Below is an example list of tasks can be used across the Qualtrics platform.
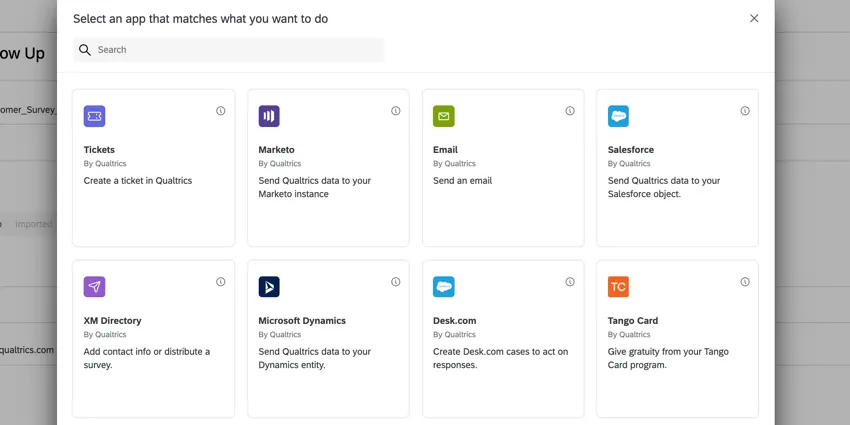
- Tickets Task: Create a ticket in Qualtrics that can be actioned by your Support Team.
- Email Task: Send an email.
- Web Service Task: Pass information using API calls.
- Send Survey via Email Task: Distribute a survey to contact information in your XM Directory.
- Update XM Directory Contacts Task: Create or update contact information.
- Code Task: Use custom JavaScript to manipulate data that is passed between tasks.
- Notifications Feed Task: Create a notification as a result of the workflow.
- Calculate Metric Task: Trigger a response based on changes in aggregate metrics in your dataset.
Add-On Extension Tasks
Qtip: The following tasks require the separate purchase of an extension. If you don’t already have access to one or more of these extensions and are interested, check out our XM Marketplace.
- Slack Task: Achievement metrics could trigger Slack channel messages.
- Salesforce Task: Use Salesforce tasks for response mapping or web-to-lead.
- Zendesk Task: The Zendesk extension allows you to create and update tickets in Zendesk based on responses collected with Qualtrics surveys.
- Freshdesk Task: The Freshdesk extension allows you to create tickets in Freshdesk based on workflows triggered in Qualtrics.
- Hubspot Task: The Hubspot extension allows you to create and update deals and contacts in Hubspot from collected survey responses.
- ServiceNow Task: The ServiceNow extension allows you to create and update incidents in ServiceNow as well as update customer contact information provided by survey responses.
- Microsoft Dynamics: The Microsoft Dynamics extension allows you link up your account to a Qualtrics survey for both Response Mapping and Web to Lead capabilities.
- Marketo Task: Send data to Marketo as a custom activity.
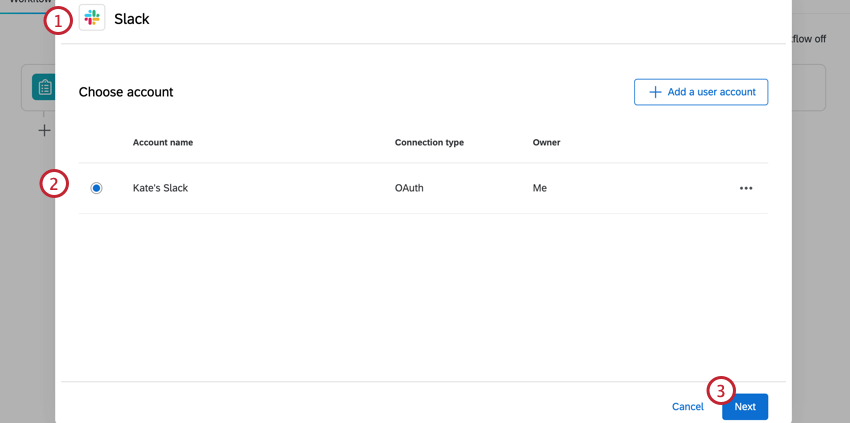
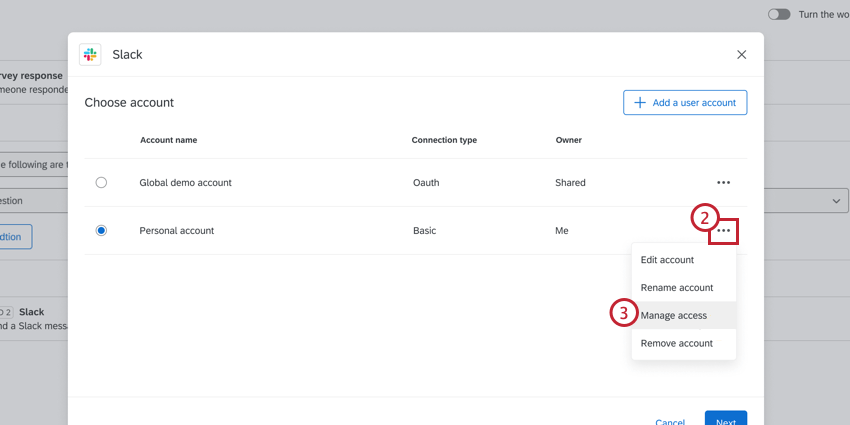
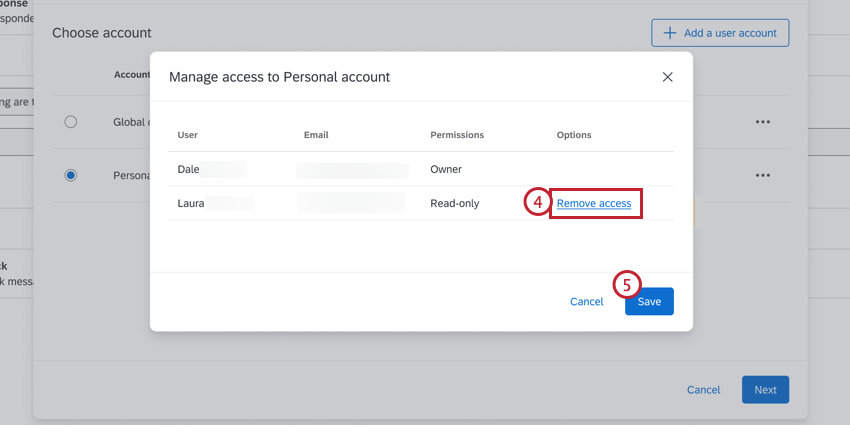
Sharing Credentials for Extension Tasks
If your task requires you to login with that extension’s credentials, the workflow owner must have at least read-only access to the account in order for the workflow to run successfully. Accounts set up by the Brand Administrator in the Extensions tab do not need to have their credentials shared.
Example: Let’s say a collaborator needs to edit a workflow to add a Slack notification every time the workflow runs. If the collaborator sets up the task with their personal login for Slack, they will need to grant access to the workflow owner.
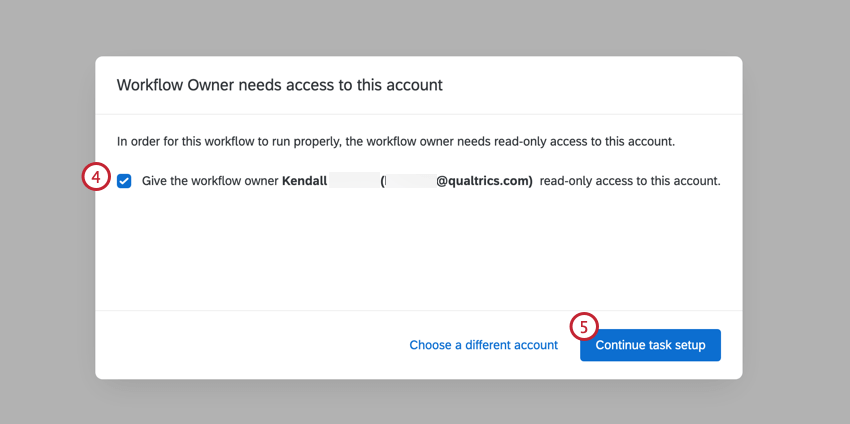
Attention: If you are using credentials that are shared with you, you will not be able to grant access. The workflow owner will need to be given access by the owner of the credentials.
To remove the workflow owner’s access to your credentials:
ETL Workflows
ETL Workflows use data extracting and loading tasks to import data from a third-party source and import into Qualtrics. ETL workflows require you to use certain tasks with each other to complete your workflow. See Using Workflows Tasks to Build ETL Workflows for more information.
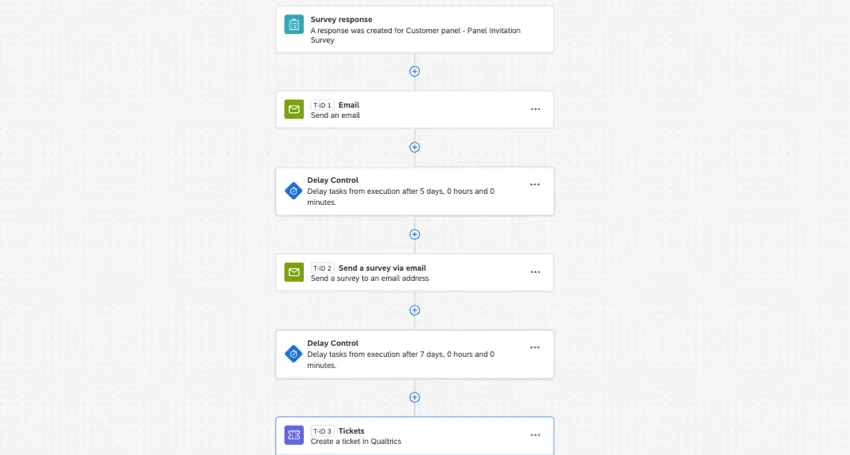
Adding Delays to Tasks
You can delay a task (or series of tasks) within a workflow. This gives you more control over how each resulting action should be executed. This can prevent you from having to create multiple workflows for related tasks.
Example: When welcoming a new customer, you don't want to overwhelm them with too many resources at once. A single workflow can handle the entire introductory journey, with different delays added as needed:
- Email welcoming them to the company: Execute immediately (no delay).
- Survey about feature adoption: Execute after 2 days.
Ticket assigned to a representative if there’s low adoption: Execute after 5 days.
Qtip: Task delays can be added to scheduled and event-based workflows. Task delays cannot be added between ETL tasks in a workflow, but task delays can be added to any tasks after the loader.
Adding a Delay to a Specific Task
Qtip: You can only add a maximum of 5 task delays in the same workflow.
Attention: All tasks below the delay will operate on the delay. If you have tasks you don’t want to be delayed, add them earlier in the workflow, or under a separate delay. See more on the order of tasks in a workflow.
Before a task, click the plus sign ( + ).
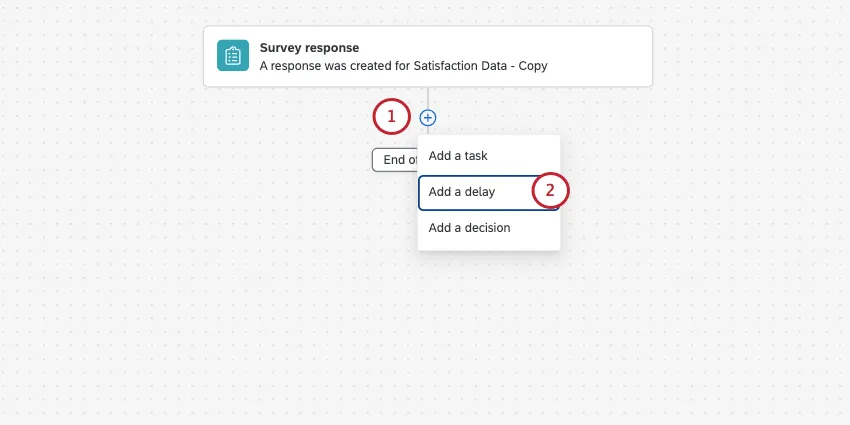
- Click Add a delay.
Add how many days, hours, and / or minutes you want the task to be delayed by.
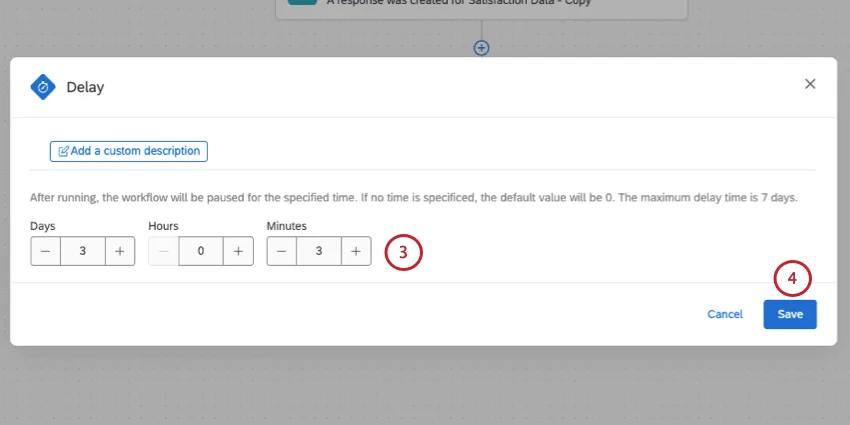
- Click Save.
Qtip: The minimum task delay is 1 minute, and the maximum is 7 days. All task delays in a single workflow can add up to a maximum of 7 days delay total.
For example, if you added a 7 day delay to a single task, you can't add any more delays. But if your task delay is only 5 days, you still have 2 days of delay left you can add to another task.
Each task delay is independent of all others in the workflow, not cumulative.
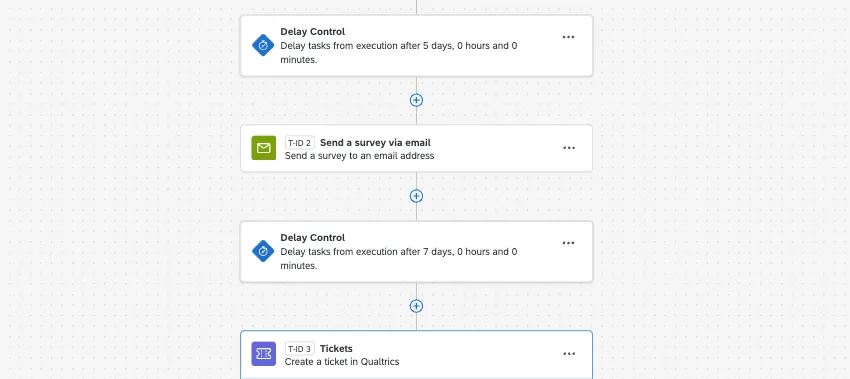
Example: Let’s refer back to the example in the introduction:
- You want to send a survey invite 2 days after the workflow first executes.
- You want to create a support ticket 5 days after the workflow first executes.
Therefore, your workflow has 2 delay controls in it: one delay for 2 days, and one delay for 5 days.
Reviewing Delay History
Delays will be shown in the workflow run history. When you click the delay, you’ll see if it ran successfully, when it started, when it ended, and the full length of the duration.
Interactions with Workflow Start Delays
In addition to delaying individual tasks, you can also delay when the entire workflow executes after the event or schedule is set. For these settings, see Delayed Start Workflows.
Task delays and workflow start delays can be used together. Both will be applied.
Example: You do not want to send CSAT emails the moment the ticket is closed. In addition to a CSAT survey to the customer, you’d like to send the customer an invitation to a focus group on how to better improve the support process, but you don’t want to send these two messages too close together.
- You delay the start of the workflow by 3 hours.
- The workflow starts with a ticket event, executing when a support ticket closes.
- You send a CSAT survey with no delay.
- You add a task delay of 3 days.
- You send a focus group invitation.
With this setup, the last task (focus group invitation) executes 3 days and 3 hours after the inciting workflow event (support ticket is closed).
Workflow Versioning
Have you ever made a change to your workflow that you’d like to roll back? Or have you wanted to make changes to your workflow without any downtime to your live program? Workflow versions allow this flexibility.
When editing a live workflow, your edits will be saved as a new draft version that does not impact the current live workflow. You can publish this draft as a new version, which captures every change made to the workflow since the last published version. If needed, you can view the old versions of your workflow and reactivate one of these versions to restore their behavior.
Qtip: Only the Active version of your workflow will be triggered when the workflow’s trigger criteria are met.
After making edits to your workflow, click Publish.
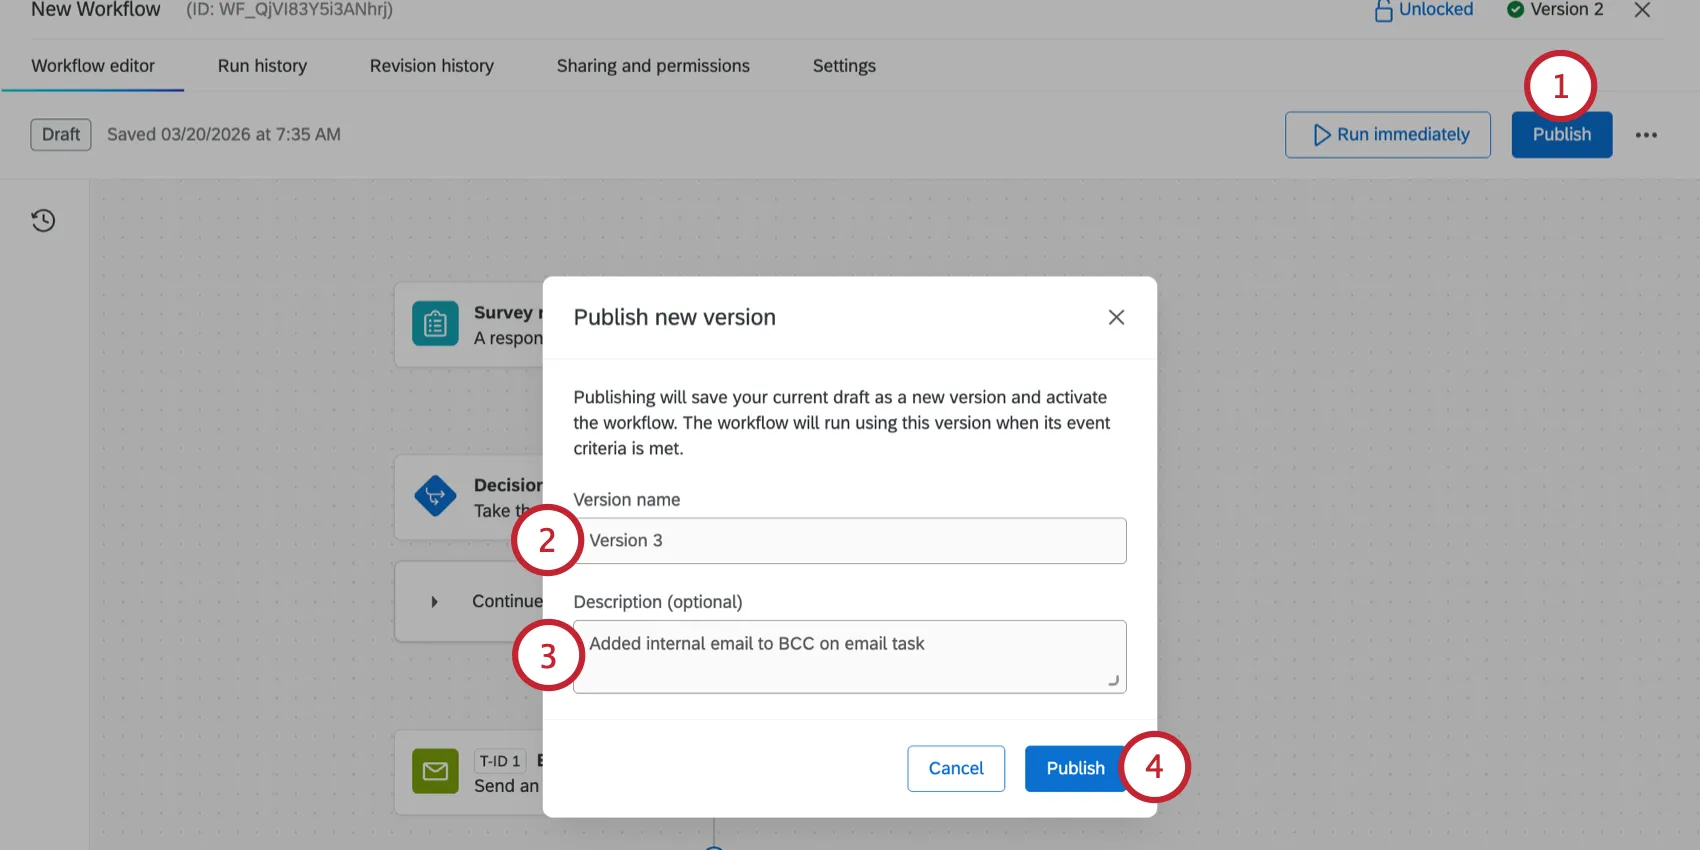
Enter a Version name for this version of the workflow.
Enter a description so you can easily identify what’s changed for this version of the workflow.
Click Publish.
Qtip: Publishing a workflow will save the current draft as a new workflow version and activate the workflow, meaning it will begin to run when the trigger criteria are met.
You can view all versions of your workflow using the Versions menu on the lefthand side of the workflow editor. The currently published version of your workflow will have an “Active” label. If you’ve made unsaved changes to your workflow, this version will be available as a “Draft” until published.
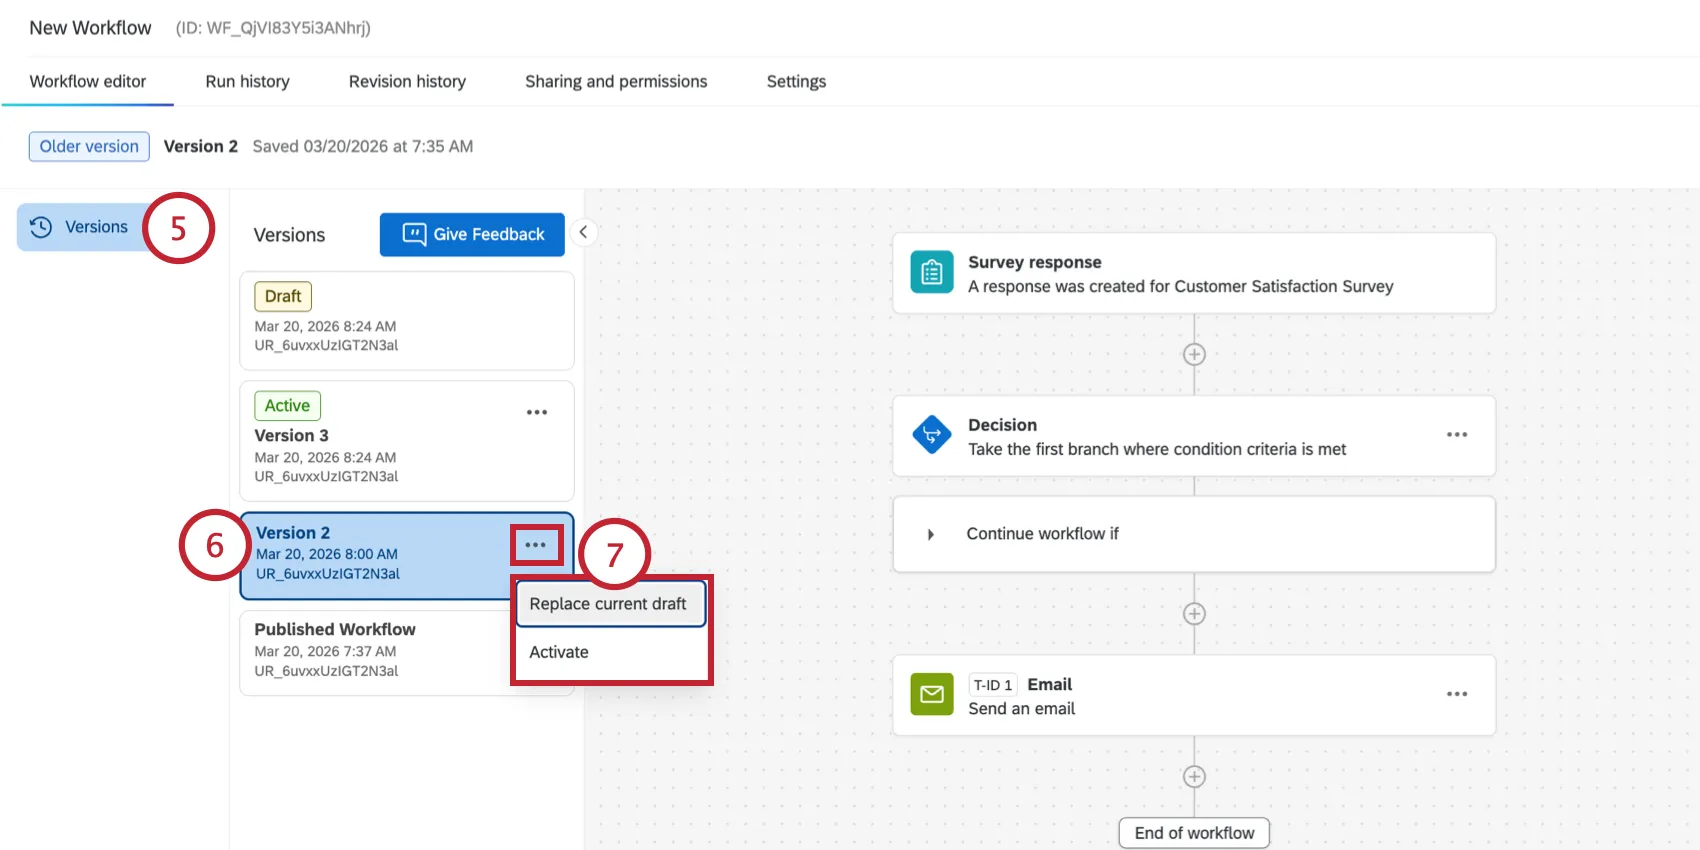
If desired, you can select a previous version of your workflow to load it in the workflow editor. This allows you to see the exact configuration of this version of the workflow.
Qtip: Clicking the Run Immediately button while viewing a workflow version will run the version of the workflow that you’re currently viewing.
If you’d like to reuse this old workflow version, there are 2 options available to you:
- Replace current draft: Loads the workflow version as the current workflow draft. If you already have a draft with any pending unpublished changes, they will be lost.
- Activate: Reactivates the old workflow version.
Unsupported Features
The following workflow features do not support versioning. Any changes to these workflow components will immediately go live in your workflow.
Qtip: You can disable your workflow to prevent edits to these tasks from impacting your workflow.
AI-Generated Workflows
You can leverage artificial intelligence (AI) to help build Qualtrics workflows. By simply describing your desired use case, generative AI can create the framework event, condition blocks, and tasks that make up your workflow.
AI-generated workflows are only available in English.
Attention: Generative AI is a starting point and all configurations must be manually verified before enabling the workflow. Output from Qualtrics’ AI features is not a substitute for human review or professional guidance. This feature creates a workflow skeleton and you must configure the individual components.
Qtip: To use this feature, the Enable AI Assistance in Configuring Workflows permission must be enabled on both the brand and individual user levels.
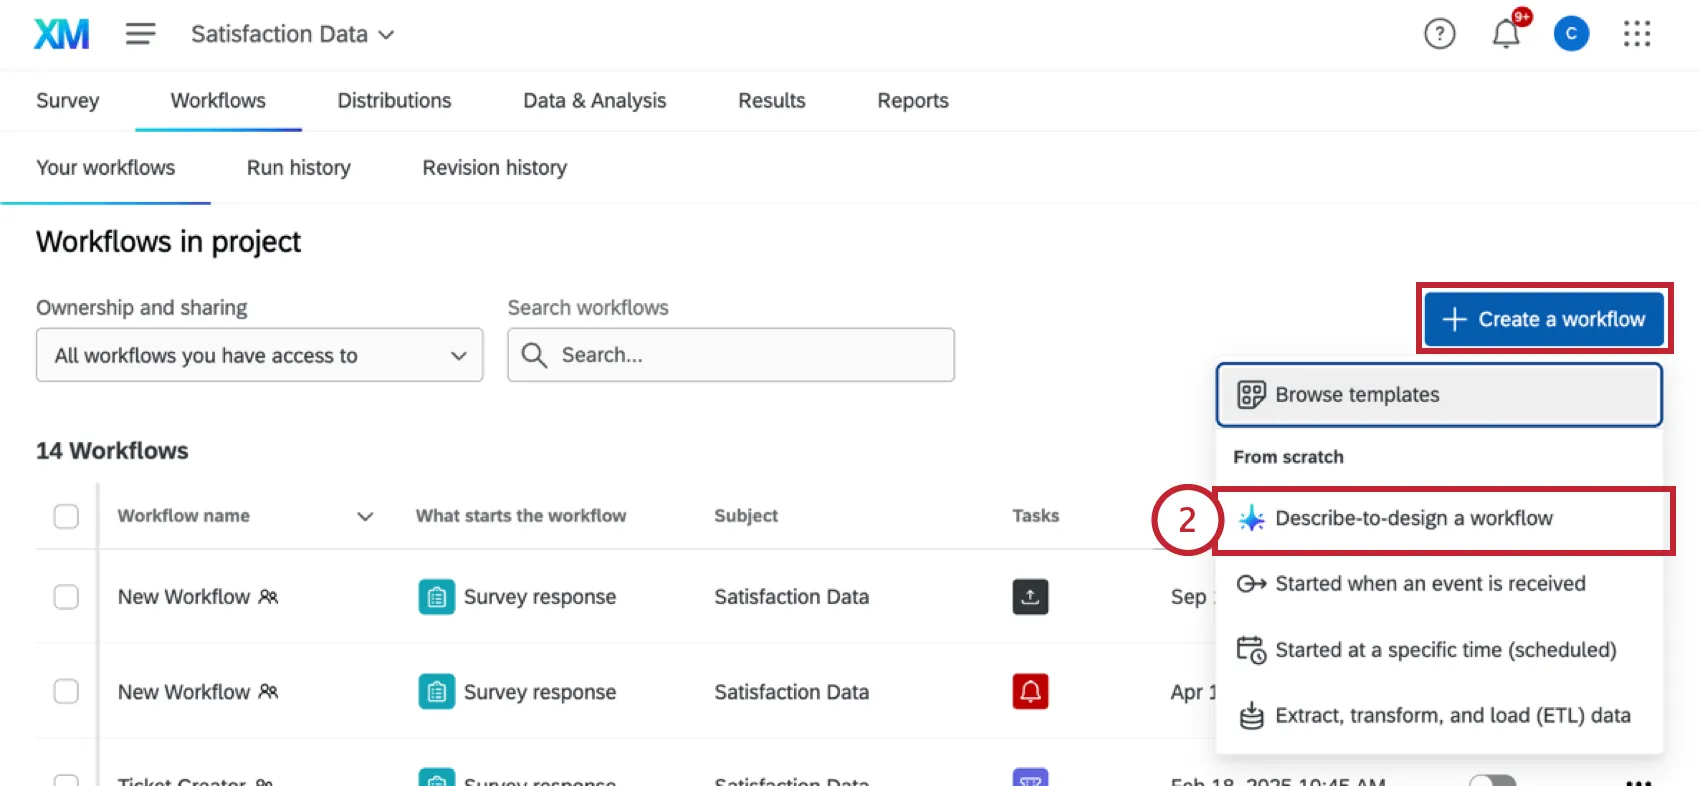
In the Workflows tab of your project, enter your use case in the Describe what you would like to automate box. This will act as the base prompt for generating the workflow with AI.
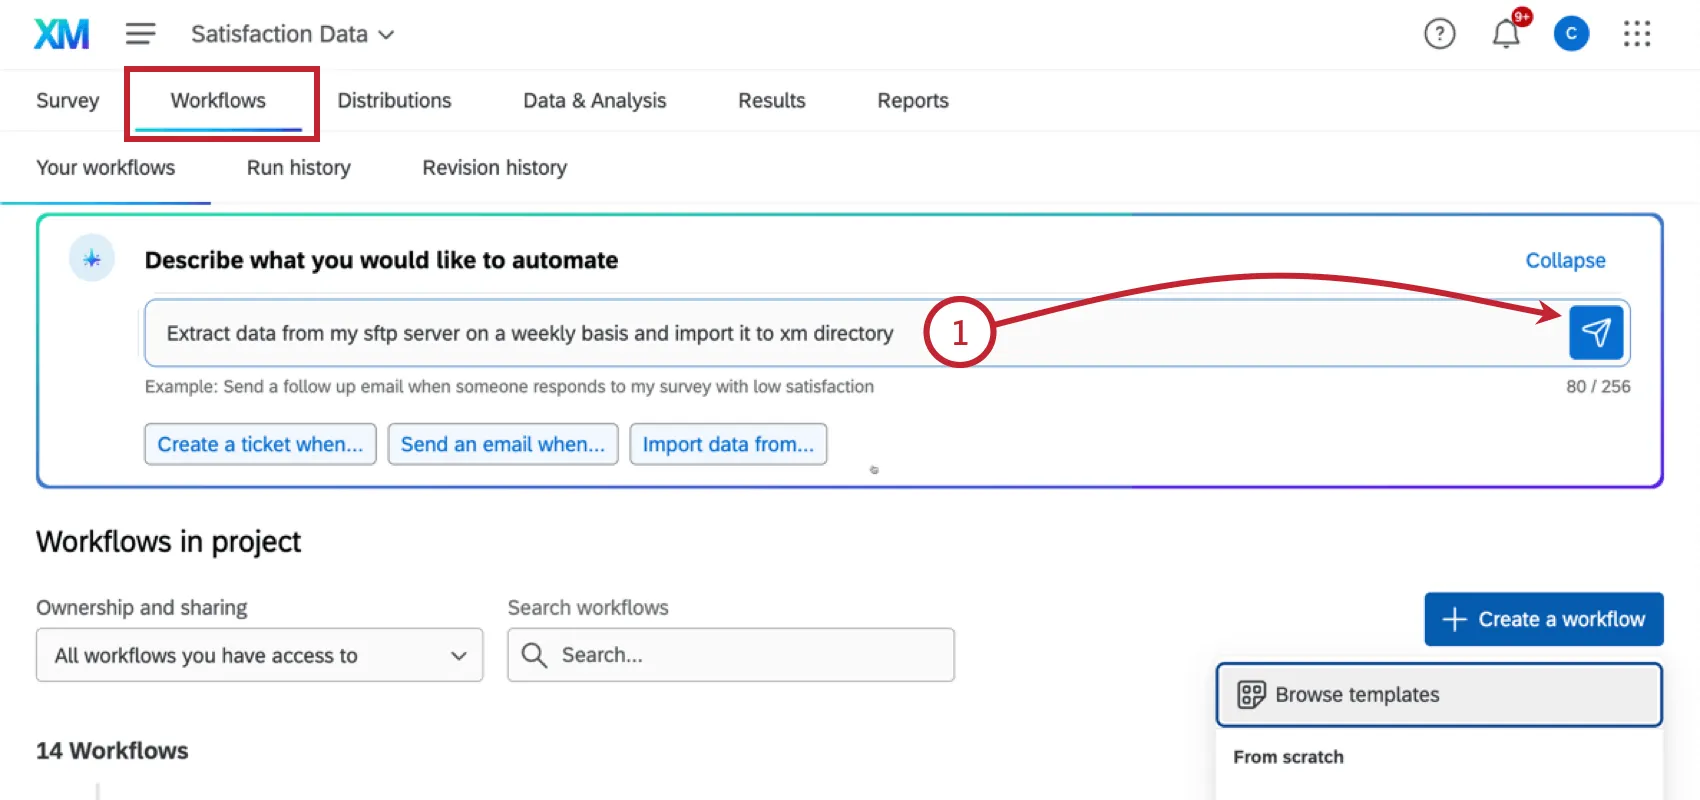
Alternatively, you can enter your prompt from either a project or the standalone workflow page by clicking the Create a workflow button and then selecting Describe-to-design a workflow.
You may need to refine your prompt by answering the questions displayed in the chat window.
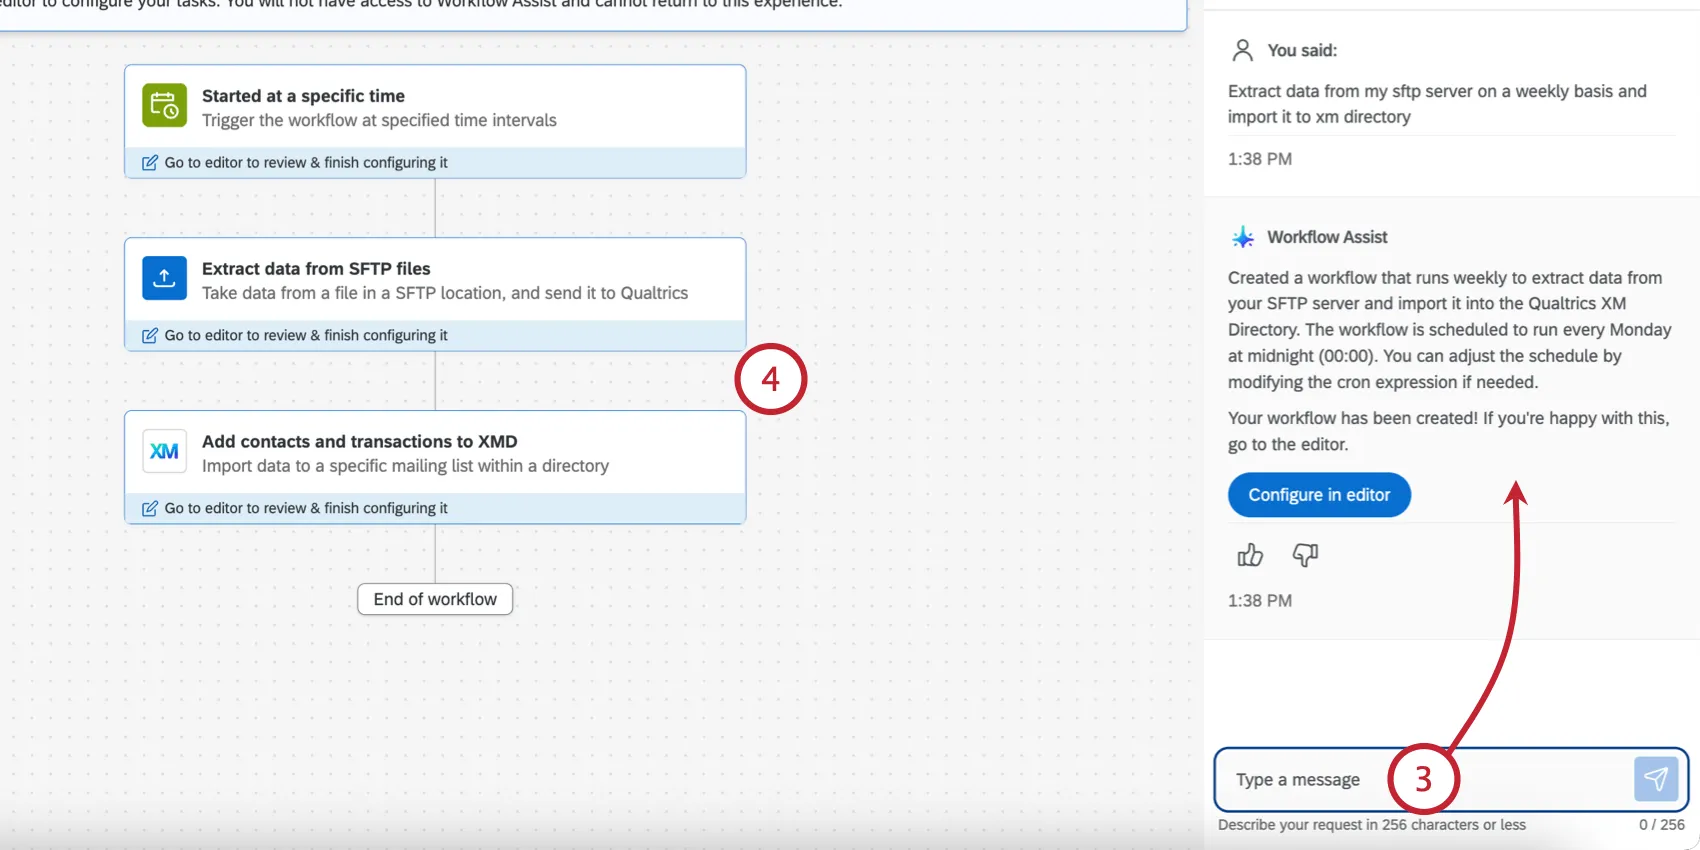
Workflow Assist will build your workflow directly in the editor. Review the components that have been added. If you’d like to make adjustments, continue chatting in the window until the workflow meets your use case.
Once you’re ready to configure the individual components, click Configure in editor.
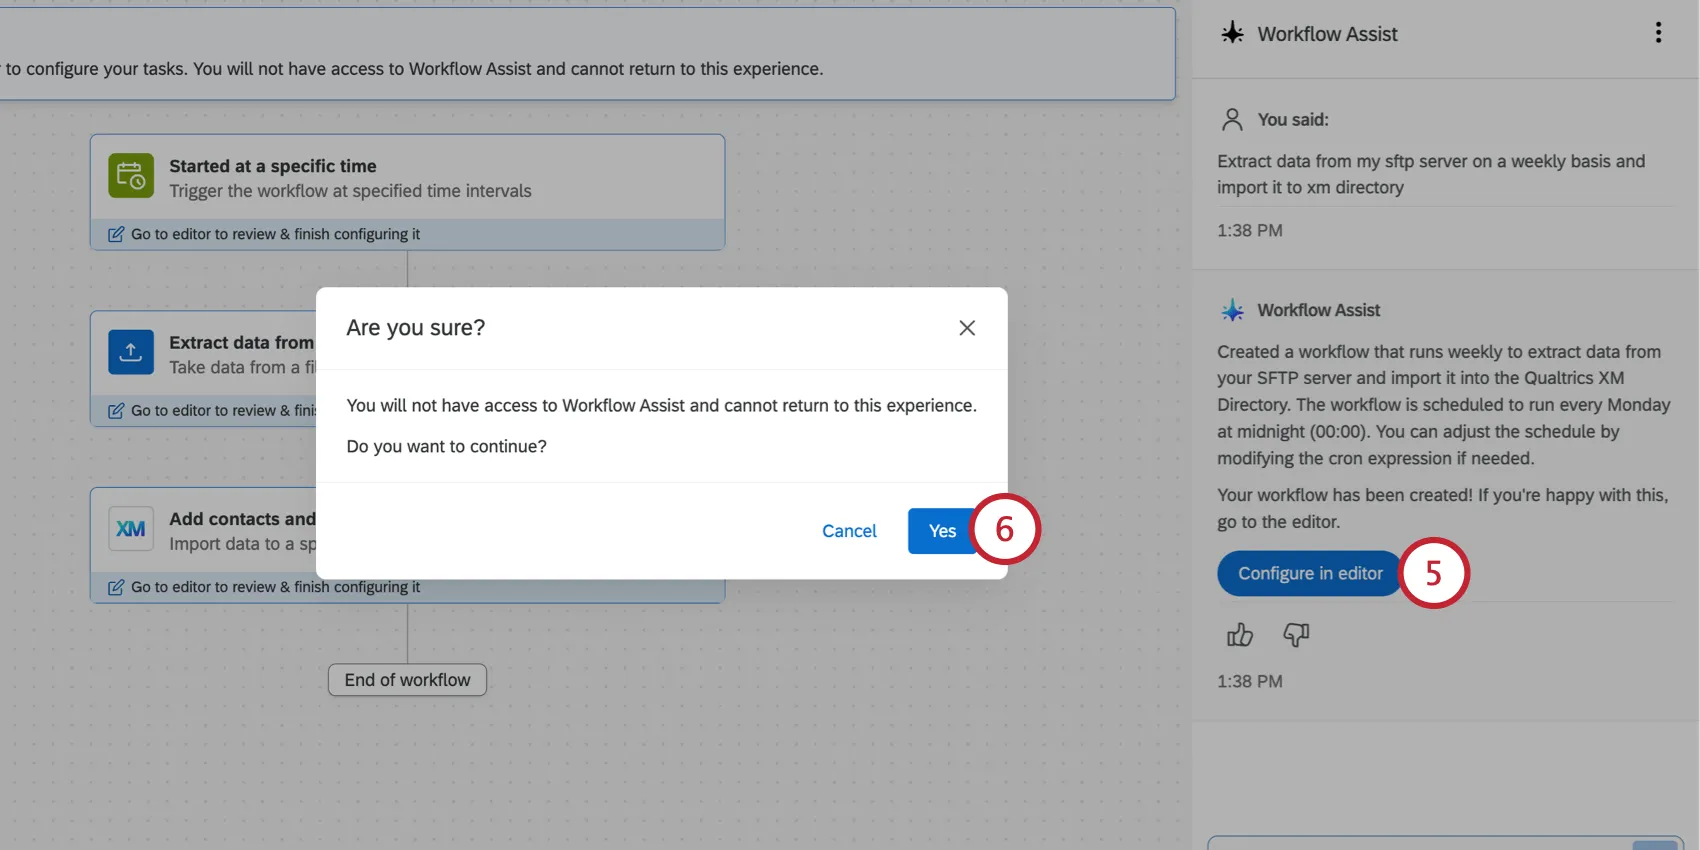
Click Yes.
Qtip: Once you continue past this point, you cannot re-access Workflow Assist (i.e., you cannot resume the same session with the AI assistant).
Configure each workflow component. Step-by-step instructions can be found on their respective support pages.
Check out the following pages to get started:
- Setting a Workflow Schedule
- List of Workflow Events
- Creating Workflow Conditions
Qtip: If you need help finding a page for a specific feature, try asking our site’s AI assistant by clicking the chat icon in the bottom right corner of any support page.
Publish your workflow once it's fully built.
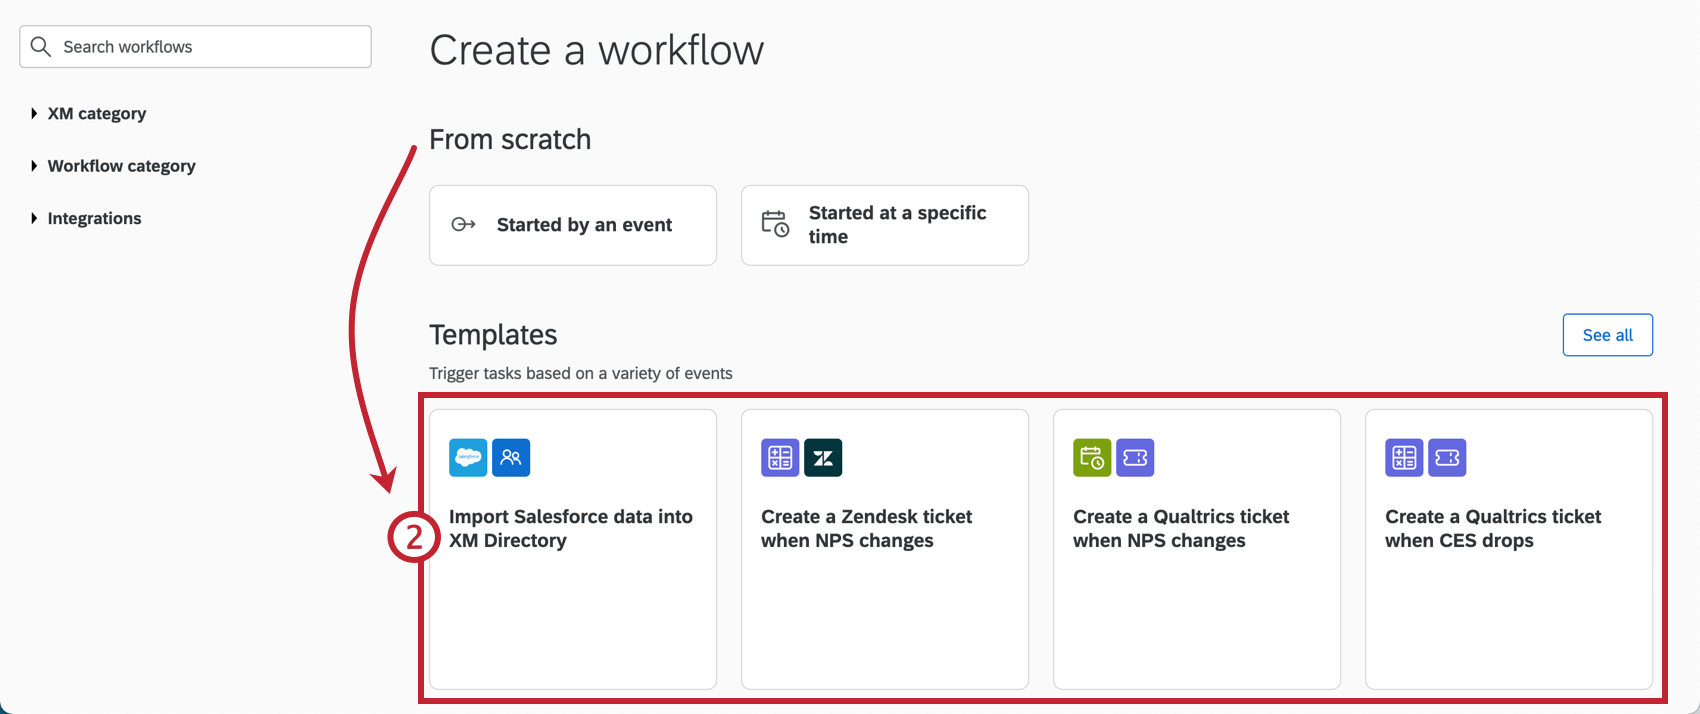
Using Workflow Templates
When creating a new workflow, you will have the option to use a Qualtrics template. These are pre-configured workflows designed to make setting up useful workflows easy. Workflow templates are created by our Qualtrics subject matter experts to leverage industry standards for workflow automations.
Using Templates

Qtip: Outstanding workflow steps will be highlighted.
Example Templates
Below are a few example templates. This is not an exhaustive list of available templates. Log into the platform to begin exploring all of the options available to you.
Qtip: Use the search at the top of the Catalog to find and search templates. You can search by keywords in the template. For example, search “ticket” to find all templates that use ticket tasks. You can also use the filter groups to display templates that meet certain criteria.
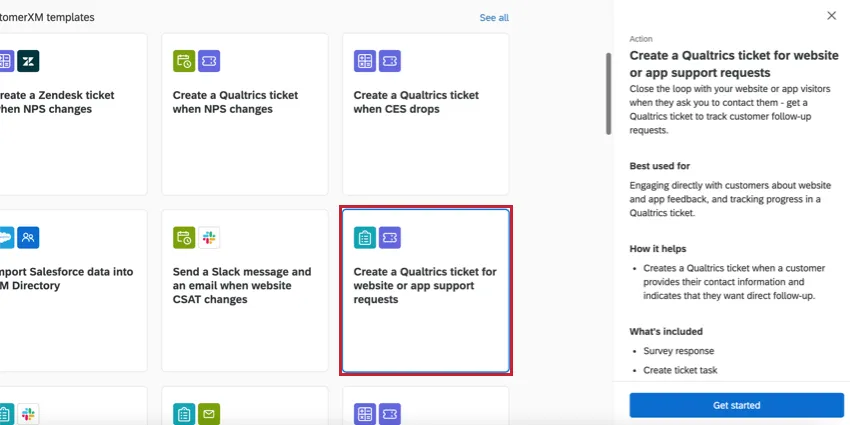
Create a Qualtrics ticket for website or app support requests: This template uses a tickets task to create a Qualtrics ticket when a new survey response for support comes in on a website or app intercept.
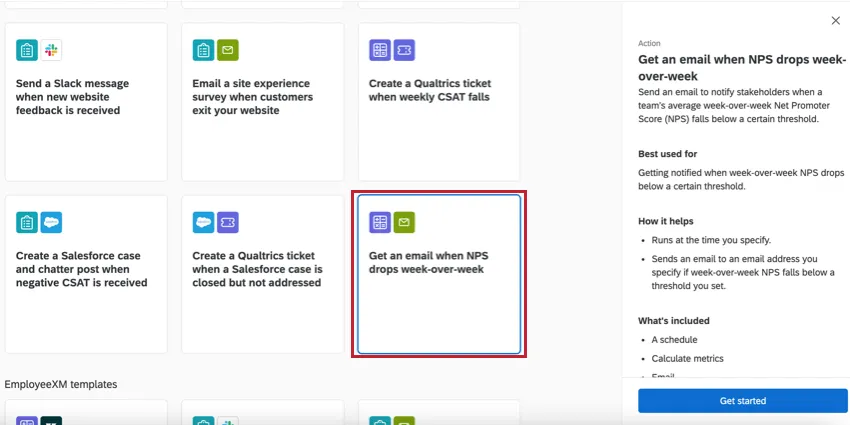
Get an email when NPS drops week-over-week: This template uses a calculate metric task to calculate your organization’s week-over-week NPS score, and sends an email if the score drops below a certain threshold you set.
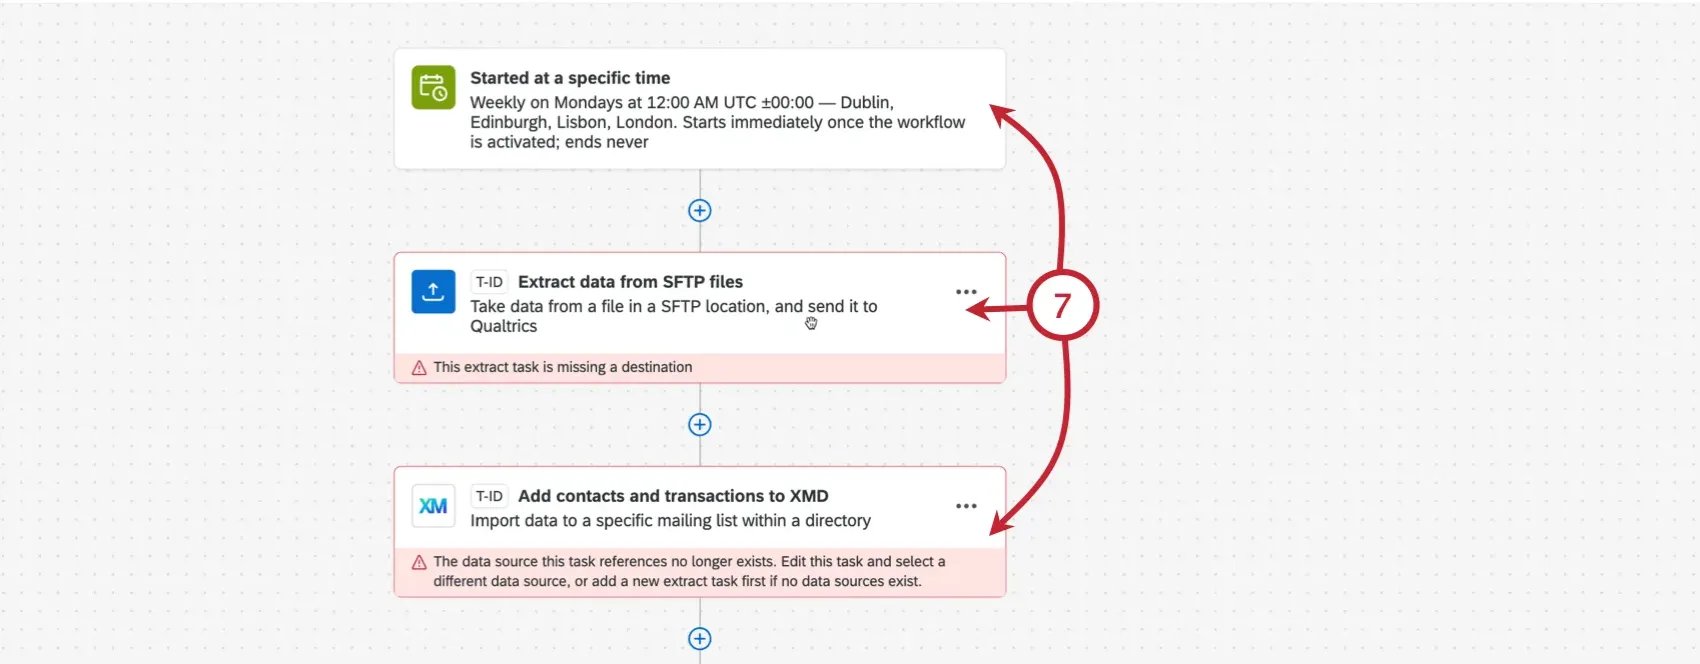
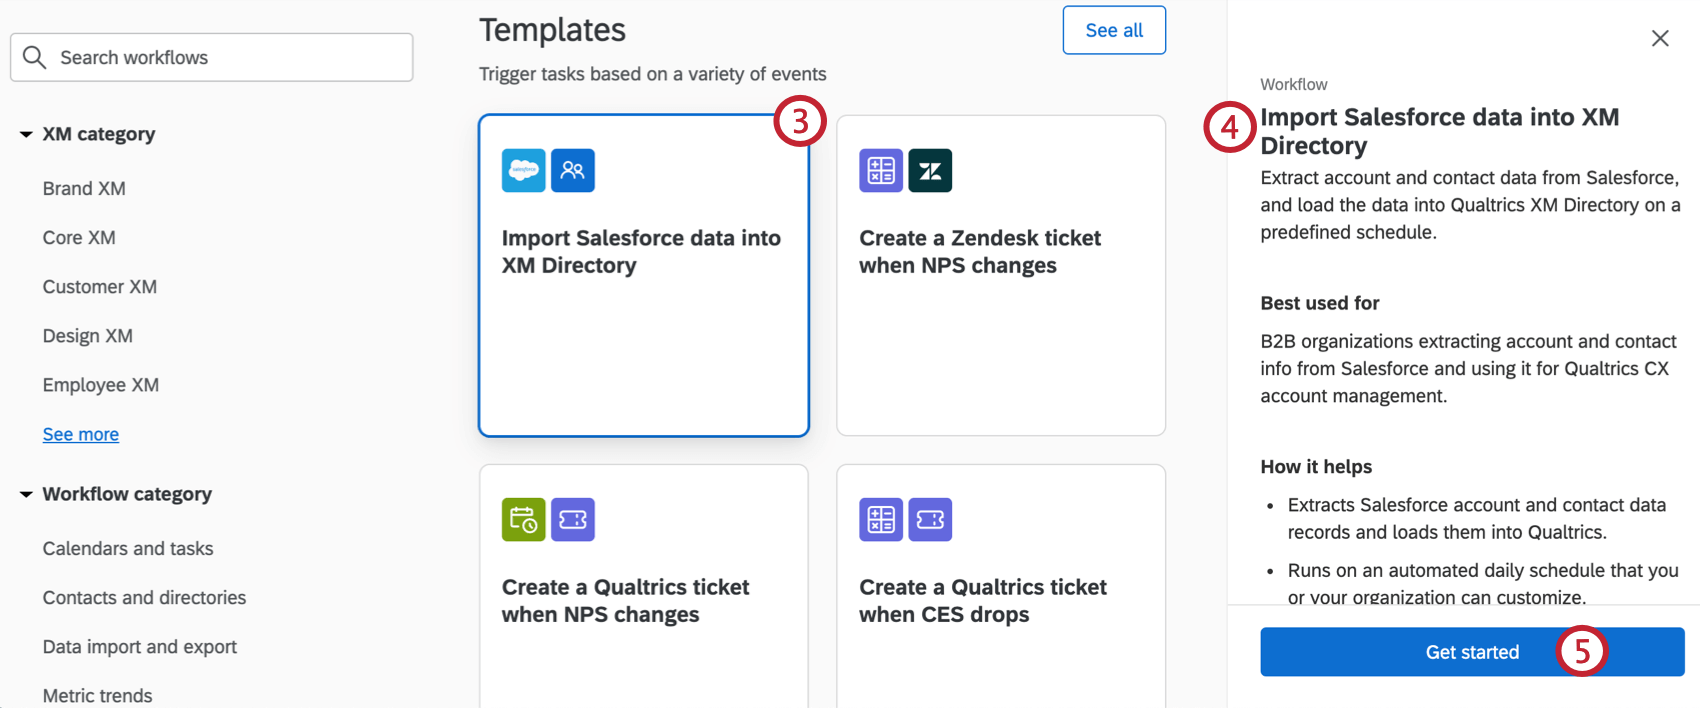
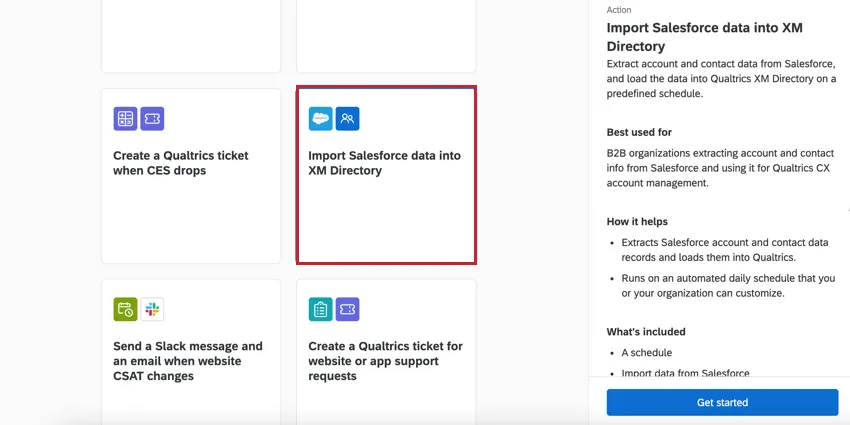
Import Salesforce data into XM Directory: This template combines an extract data from Salesforce task and an add contacts and transactions to XMD task in a guided setup to easily import data from Salesforce to save in your Qualtrics XM Directory.
FAQs
I don’t see a template that fits my business goals. Will more templates be coming in the future?
I don’t see a template that fits my business goals. Will more templates be coming in the future?
Yes! This is a growing library of workflow templates built by our in house subject matter experts. We will add new scenarios and use cases over time.
Do I have access to all extensions available through the Workflows templates?
Do I have access to all extensions available through the Workflows templates?
How do I use 3rd-party extensions within Workflows templates?
How do I use 3rd-party extensions within Workflows templates?
Can I request a template be built for my organization?
Can I request a template be built for my organization?
Is there a link to all Workflows events and tasks?
Is there a link to all Workflows events and tasks?
What are Workflows templates?
What are Workflows templates?
What are the different major types of Workflows templates?
What are the different major types of Workflows templates?
- Experience metric trend visibility and reporting
- Survey follow-up management
- Ticket management
- Team communication & collaboration
- Data management (ETL)
What are workflows? / Where are actions?
What are workflows? / Where are actions?
There are no changes to workflow functionality as part of this update.
How quickly can I expect workflows to run?
How quickly can I expect workflows to run?
Is there a maximum size workflows can be?
Is there a maximum size workflows can be?
This task is marked as “Preview.” What does that mean?
This task is marked as “Preview.” What does that mean?
If I have two workflows sent at the same time, in what order will they run?
If I have two workflows sent at the same time, in what order will they run?
What’s the difference between Delay Control in the workflow editor and Delayed Start in the workflow settings?
What’s the difference between Delay Control in the workflow editor and Delayed Start in the workflow settings?
- Task delays: Delay control is set up in the workflow editor. These delays only affect the individual tasks you see below the delay. The starting event/schedule and the tasks above the delay aren’t affected.
- Delayed start: Delayed start is set up in the workflow settings. The entire start of the workflow is delayed according to this setting. From there, tasks execute immediately unless there are task delays specified in the workflow editor.
That's great! Thank you for your feedback!
Thank you for your feedback!