
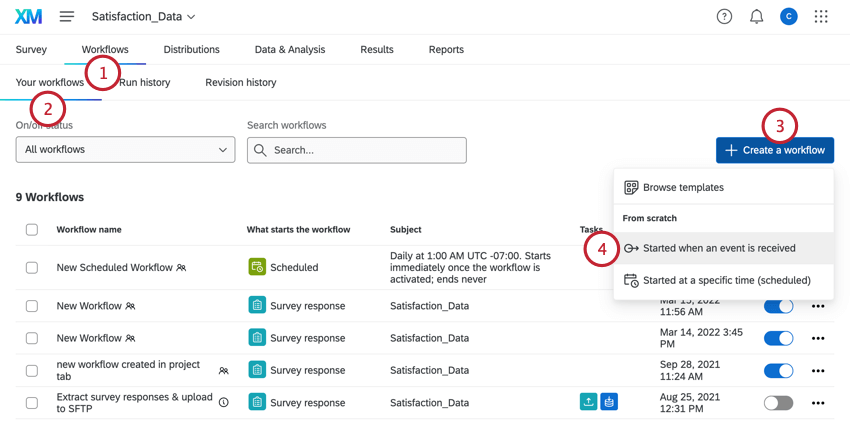
Web Service Task
What's on this page
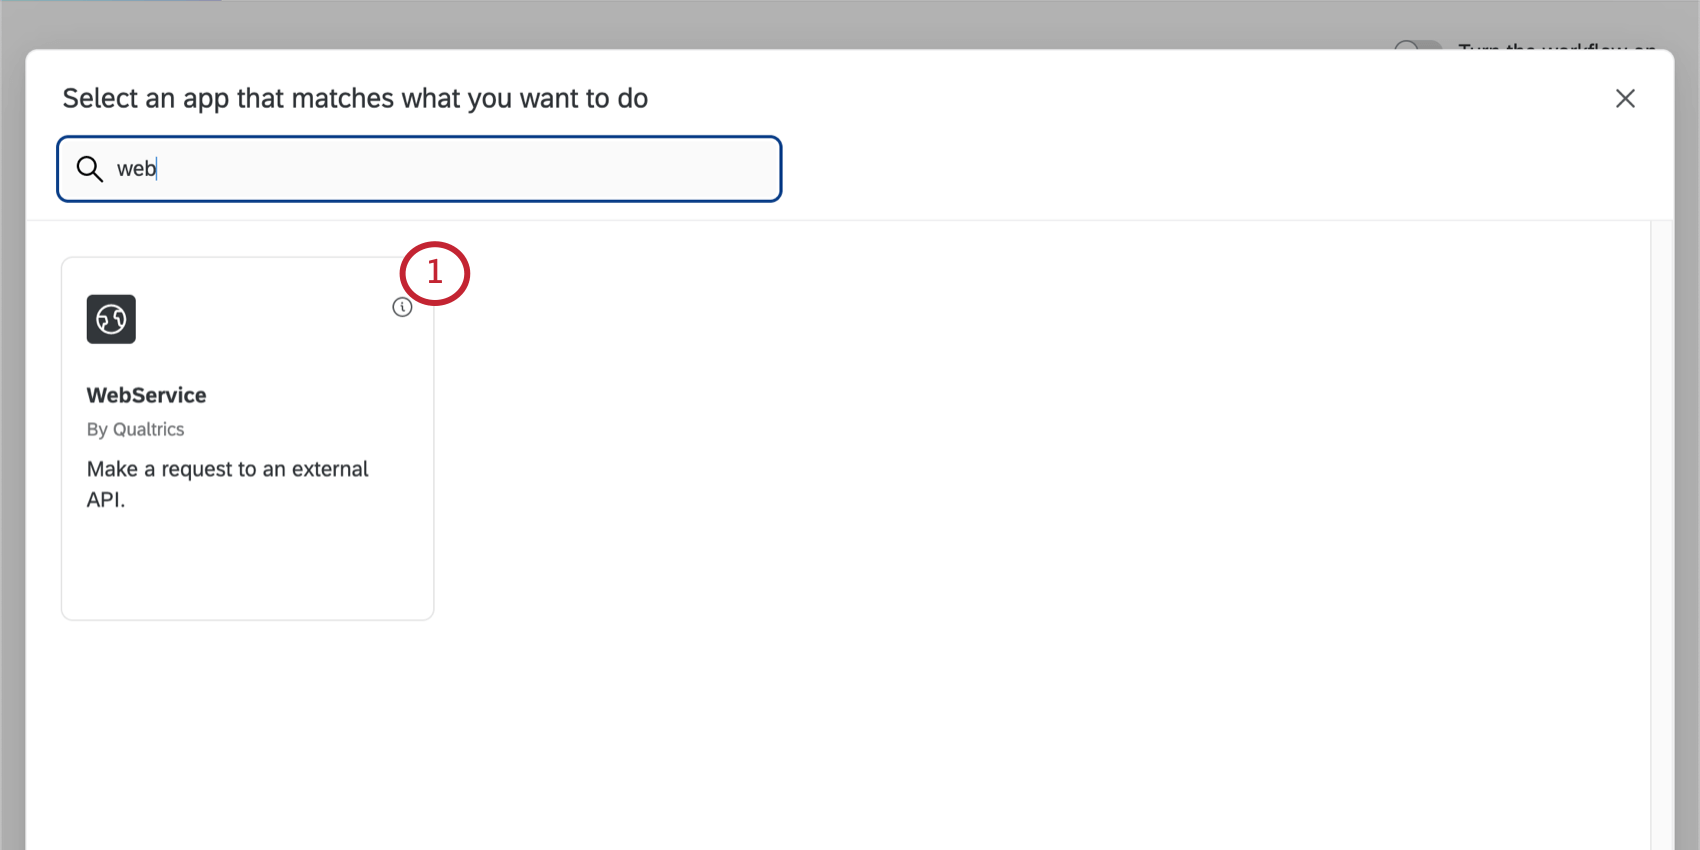
About the Web Service Task
The Web Service task is useful if you are experienced with API and would like to trigger different workflows within the Qualtrics software, or to an external web service, when the respondent finishes the survey. For example, if your survey collects the respondent’s contact information, then a web service task can use the create contact API call to add the respondent to a contact list.
We also recommend visiting these web service-related pages for more assistance and background:
- Qualtrics Developer Hub
- Web Service Methods
- API Documentation
- Passing Information via Query Strings
- Piped Text
Qtip: This page contains references to Qualtrics’ API, which is a feature that requires special permission to access. If you are interested in obtaining access to this feature, please reach out to your Brand Administrator for more information.
Attention: Setting up a web service often requires advanced programming knowledge. Although our support team is happy to help with the basics of putting information into the web service, we cannot provide support on the programming aspects.
Attention: Web Service tasks only support the following content types: URL-Encoded, XML, JSON, and Plain Text.
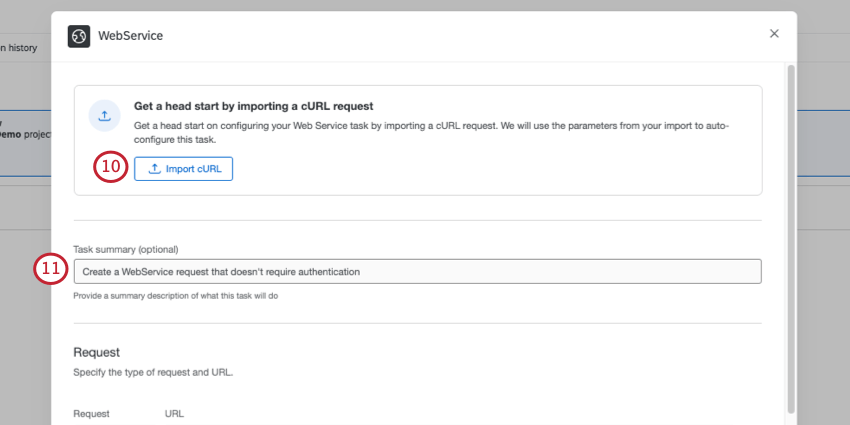
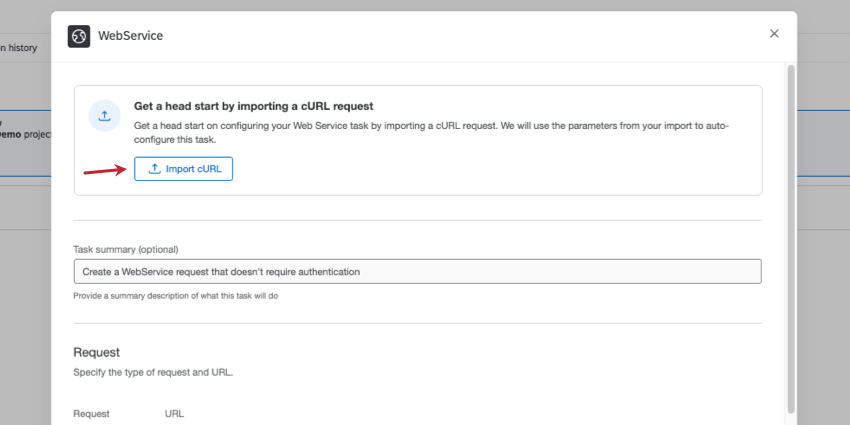
Qtip: Are you setting up your web service from an API doc? Your setup can be much faster if you import a curl command.
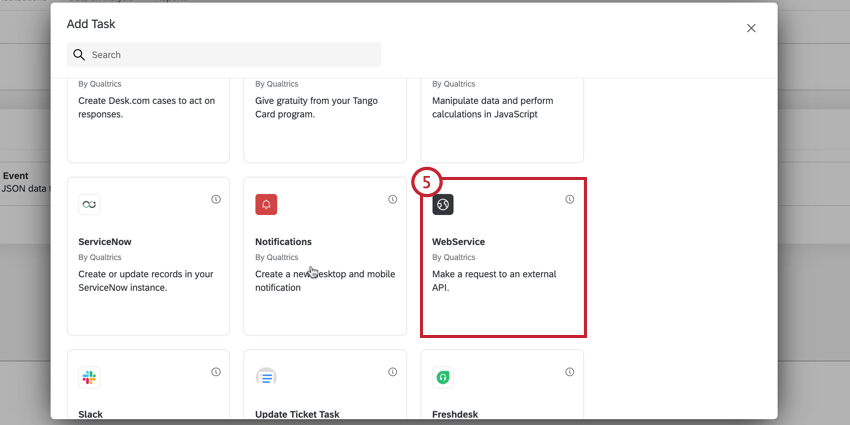
Setting Up a Web Service Task
Attention: The output from the call being made in your Web Service task has a limit of 1MB.
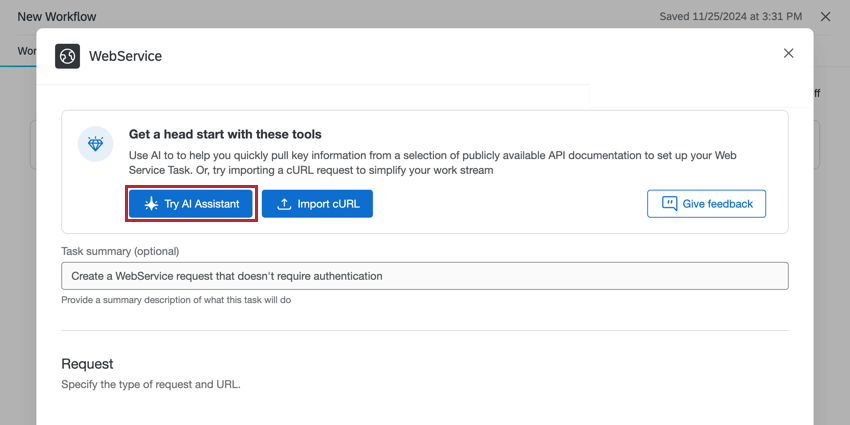
Qtip: You can use the AI Assistant to help set up the web service task. For more information, see Using AI Assist for Task Set Up.
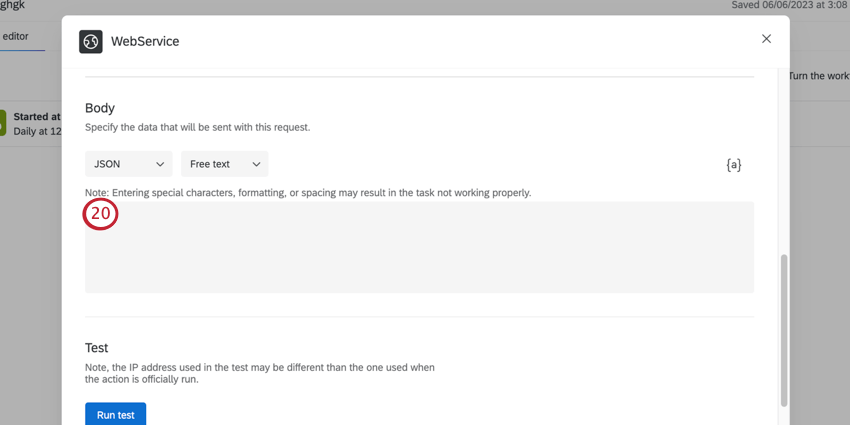
Depending on how you prefer to format your body parameters, the setup will slightly differ. If you are using JSON or XML format, enter your body in the Body section. If you’d prefer URL-Encoded, you can add parameters as a query string to the URL field.

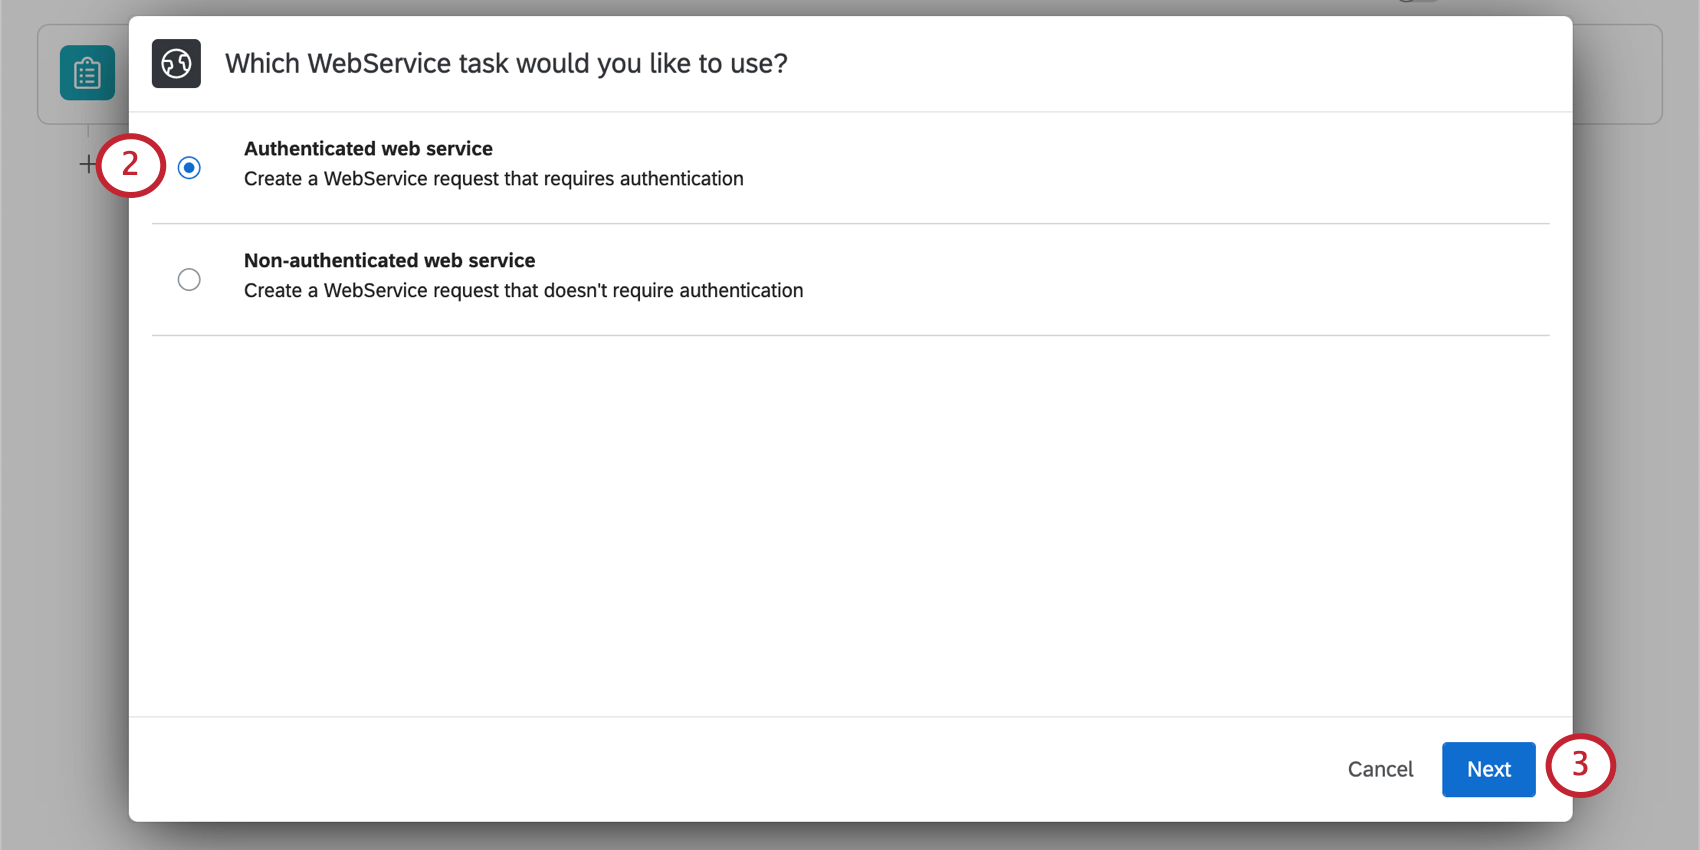
- Authenticated: Perform an authenticated web service request. Your authentication options include basic (with a password and username), API key, and OAuth.
- Non-authenticated: Perform a web service request without authentication.
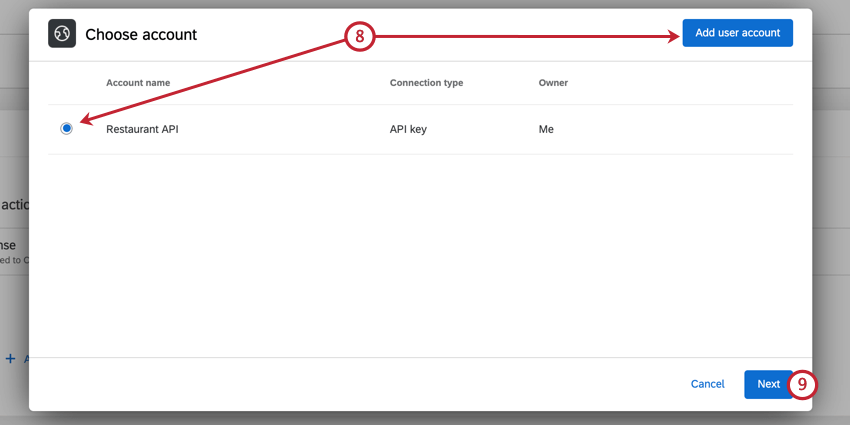
Qtip: You’ll be able to select any credentials you’ve previously added, or credentials added by a Brand Administrator in the Extensions tab.
Qtip: If you’re using the Qualtrics API, the documentation will tell you what type of request to use.
Attention: WebService tasks do not allow any URL redirects for non-GET requests. Only one redirect is allowed for GET requests.
Qtip: You can limit the domains that the web service task can connect to by specifying the domains in your extension domain settings.
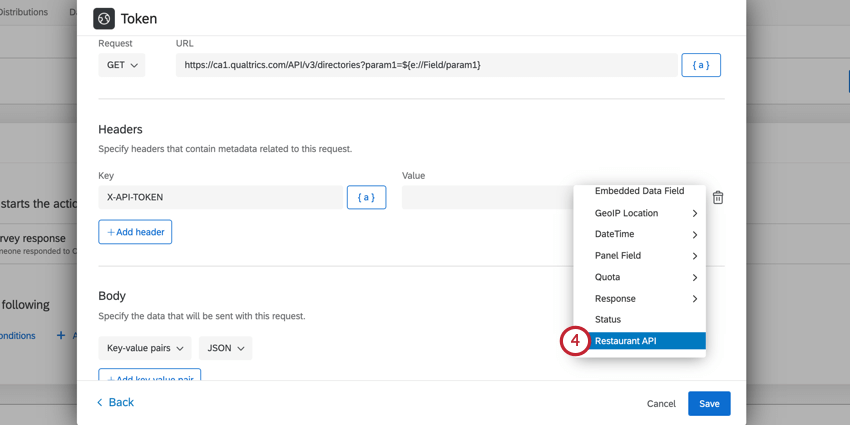
Qtip: Use the piped text icon, {a}, to insert piped text to pull in values from survey responses or previous tasks in the workflow.
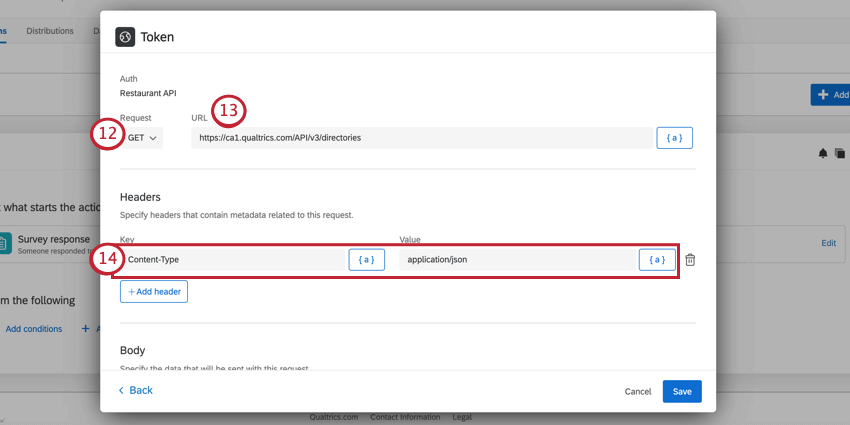
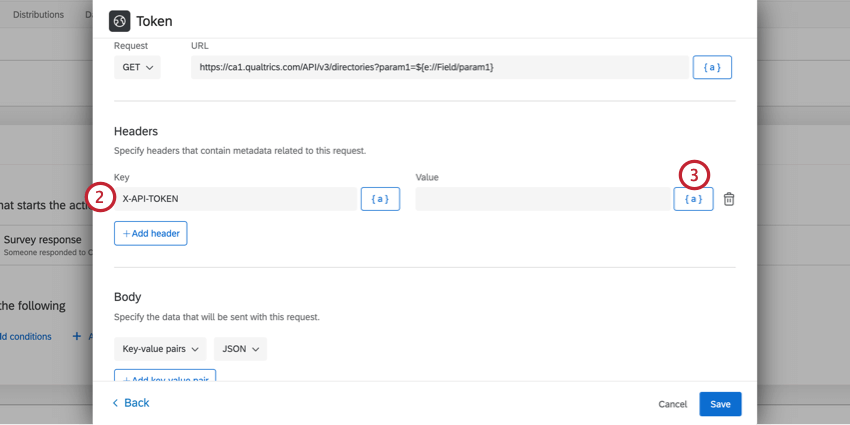
Attention: If using the Qualtrics API, you must include your API token through the header. See Adding a Header for Qualtrics API Requests for more information.

Qtip: The maximum character count for both key-value pairs and free text is 75,000.
Attention: For POST, PUT, and PATCH requests you must specify a data type for each key-value pair.
- Boolean: Select this data type if your data has one of two possible values.
- JSON: Select this data type if your data is in JSON format. Qtip: Make sure that the inputed data is a valid JSON. When using piped text, ensure that special characters are not included.

- Number: Select this data type if your data is numeric.
- String: Select this data type if your data is in text format.
- System Default: Select this data type if you want to use the native data type for your data. If a data type cannot be found this will default to the String type. Qtip: We recommend selecting one of the other data types to ensure your data is cast correctly.Attention: Key-value pairs that were configured before September 16, 2022 will have a data type of System Default.

Qtip: The Data type field is only available when you select JSON and Key-value pairs in steps 13-14.
- Do not cast a data type, and flag as an error: If the data type cannot be cast, no data type will be cast and the task will fail. This can be seen in the Run History tab.
- Cast the data type to system default: If the data type cannot be cast, the data type will be set to System Default.
Attention: You should not leave this field empty or have keys without values. Instead, either don’t include the field at all, or enter the term “null” to indicate empty values. We recommend excluding the field.
Qtip: If a web service task encounters an invalid JSON body, the task will not fail. Instead, the invalid JSON will be converted into a string and saved as a “text” property in a new JSON object. That way, you’ll be able to see the invalid text once the task finishes processing.
Attention: Web service tasks do not currently support comments.

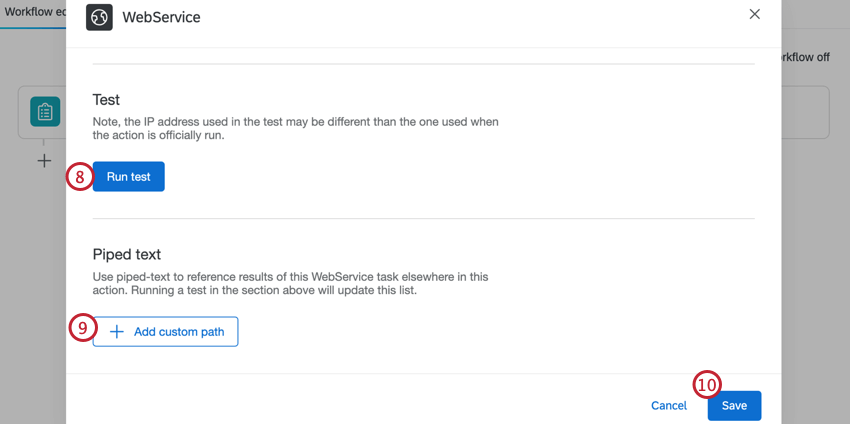
Qtip: After clicking Run test, the result of your request will appear, letting you know if it was successful or not, and the resulting JSON or XML, if it was successful.
Qtip: Click Add custom path to add additional paths, or click the trash can next to a path to delete it.
Attention: Data from a failed task cannot be piped into another task. The piped text will display as a null value.
Qtip: Web service tasks have a 16 second timeout. If a call to the web service takes longer than 10 seconds, the workflow will fail.
Using the AI Assistant for Task Set Up
Attention: You can only use auto-mapping if a Brand Administrator has enabled the AI Assistance in Configuring Workflows permission for your organization in the Admin tab.
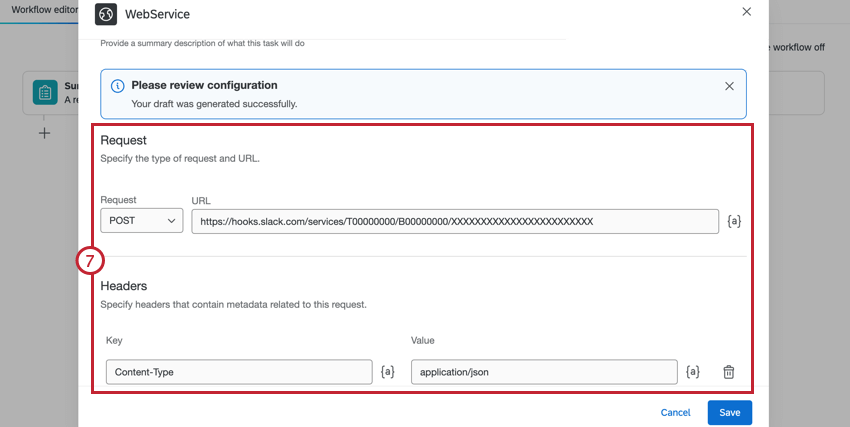
The AI Assistant can configure the API integration in web service tasks by reading publicly available API documentation and setting up the task automatically.
Qtip: If the AI Assistant is unable to generate a draft, edit the request and try again.
Qtip: While we have guardrails in place and are continually refining our products, artificial intelligence may at times generate output that is inaccurate, incomplete, or outdated. Prior to using any output from Qualtrics’ AI features, you must review the output for accuracy and ensure that it is suitable for your use case. Output from Qualtrics’ AI features is not a substitute for human review or professional guidance.
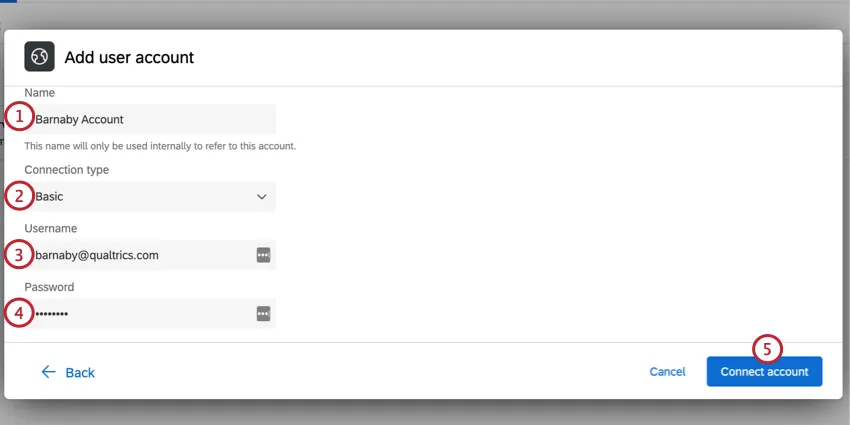
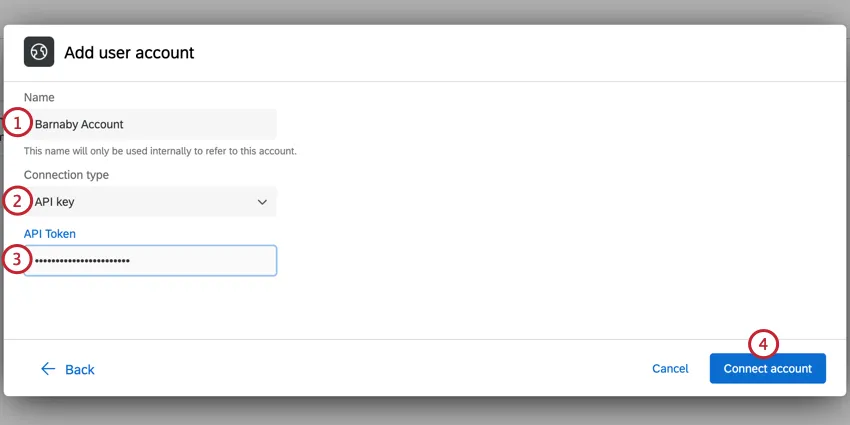
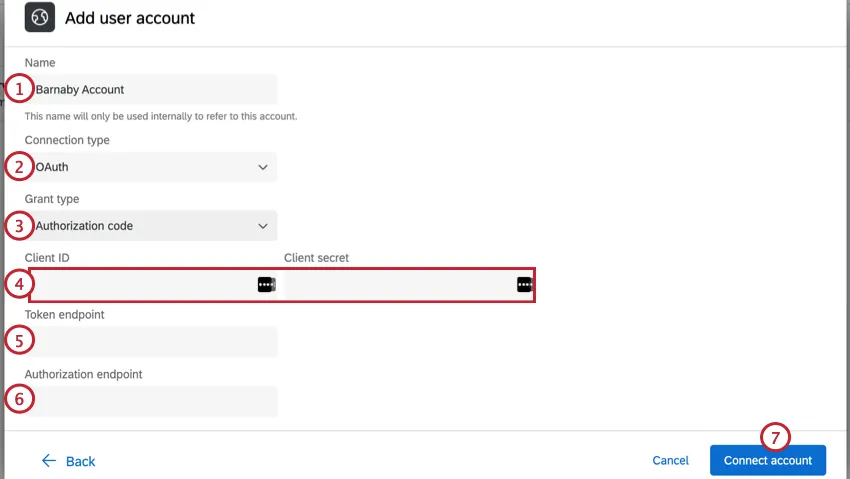
Adding Authorization Credentials
This section covers how to add authorization credentials for the web service task. You can add credentials using the Basic, API Key, or OAuth 2.0 method. To add credentials, click Add user account from the credential selection window.
Qtip: All connection types are compatible with mTLS. To learn more, see the Mutual TLS section.
Basic
Basic authentication requires you login with your account’s username and password.
API Key
API Key authentication allows you to authenticate using a static API token.
OAuth 2.0
OAuth2.0 authorization removes the need to use static API tokens or basic username and password to integrate with 3rd-party platforms. The web service task supports two different OAuth2.0 authorization types: authorization code and client credentials.
You can use OAuth 2.0 authorization to integrate seamlessly with many 3rd-party platforms. The Qualtrics web service implementation follows the official OAuth specification. However, some external systems may have slightly different configurations leading to incompatibilities with OAuth2.0 authorization in the web service task.
The following integrations are some examples that have been fully verified to work with OAuth2.0:
- Salesforce using the authorization code method.
- Jira using the authorization code method.
- Zoom using the authorization code method.
Qtip: When creating an OAuth connection, the redirect URL will be
https://{dataCenter}.qualtrics.com/oauth-client-service/redirect, where {dataCenter} represents the value associated with your account. See this page for more details on finding your account’s datacenter.
To authenticate using OAuth 2.0:
Qtip: For users setting up Google OAuth credentials, include the following parameter at the end of your Token Endpoint: ”?prompt=consent.” If you have existing query parameters, the question mark is not necessary.
Qtip: If you’re having trouble connecting with Snowflake, make sure the Qualtrics IP ranges are allowlisted.
Renaming & Removing Credentials
To edit your credential’s name, click the three dots next to the account. To remove credentials, click Remove account.
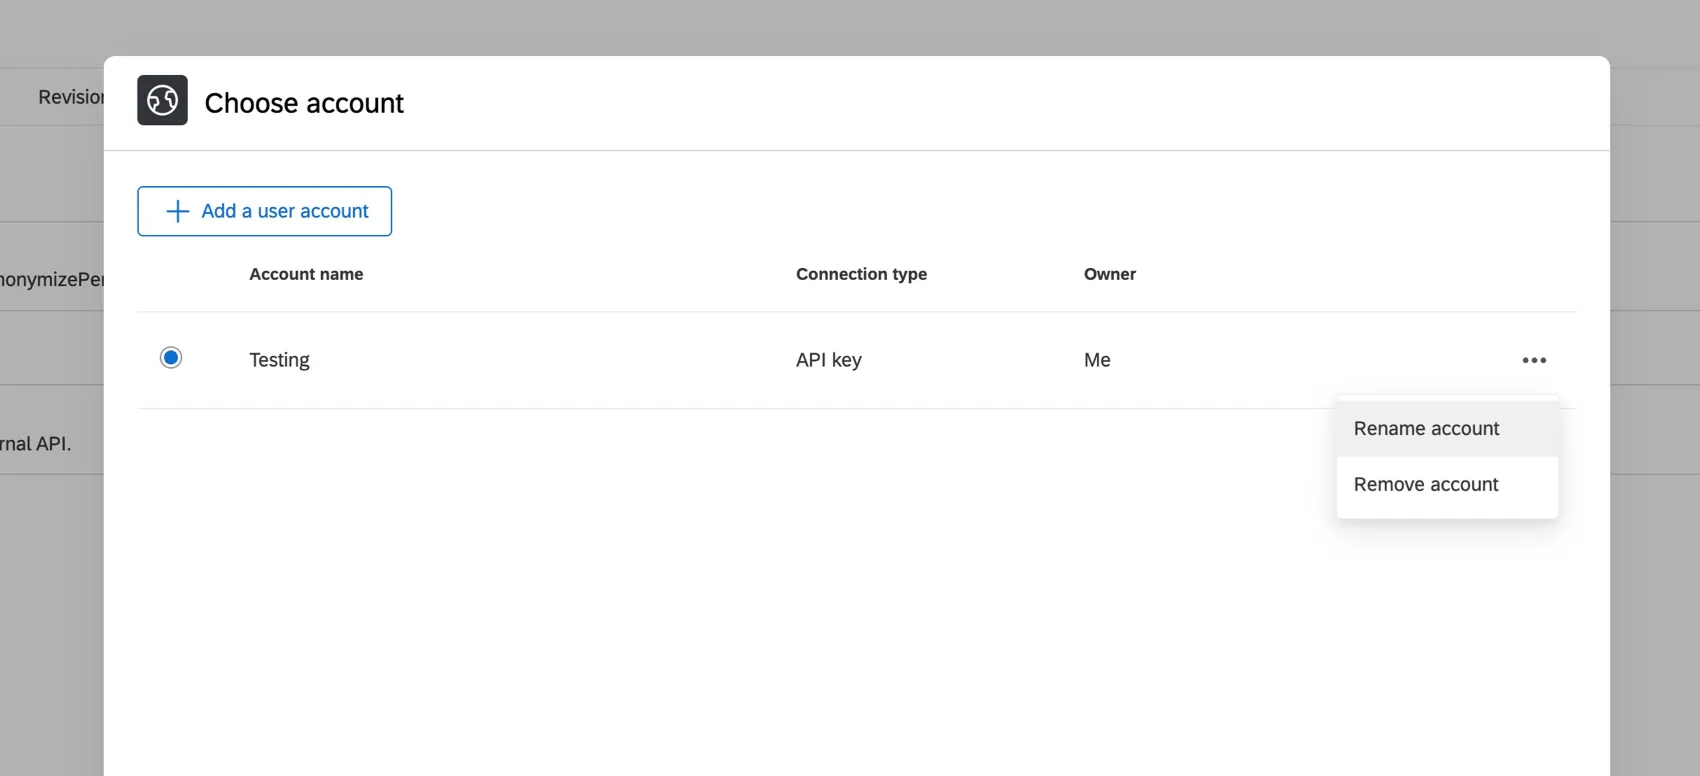
Qtip: You can only rename or remove credentials you’ve added yourself.
Warning: Be careful when deleting credentials! Any workflows that use the credentials will stop working when the credentials are deleted.
Adding a Header for Qualtrics API Requests
When using the Qualtrics API, you must include your API token as a header in your web service.
Mutual TLS
Mutual transport layer security (mTLS) is an additional, optional layer of security on top of standard API authentication mechanisms (such as API Token or OAuth). Mutual TLS ensures both the person connecting to an API / web service and the API / web service itself have secure, encrypted traffic in both directions. Once mTLS is enabled, all requests must present the correct client certificate for requests to succeed. If a caller makes a request using an invalid or missing client certificate, the API they are trying to call will block the request.
Requirements
Every service varies in whether it supports mTLS and what format(s) it provides key information in. We are only guaranteed to support mTLS for services whose match our requirements:
- Provide a private key
- Private key can be formatted into PKCS8
- Provide a certificate
- Certificate can be formatted into X.509
The Qualtrics public APIs support mTLS as described above.
mTLS is only supported for Authenticated web services created in workflows. All 3 authentication methods are supported (Basic, API key, and OAuth2.0).
Qtip: Some third-party services still require manually adding an Authorization header to the task. Use the piped text dropdown menu to pass your credentials as a header. This will be in the format ~{auth://id/CRED_[YourCredential]}.
Adding mTLS

Qtip: A Brand Administrator can connect to an account using the Extensions page.
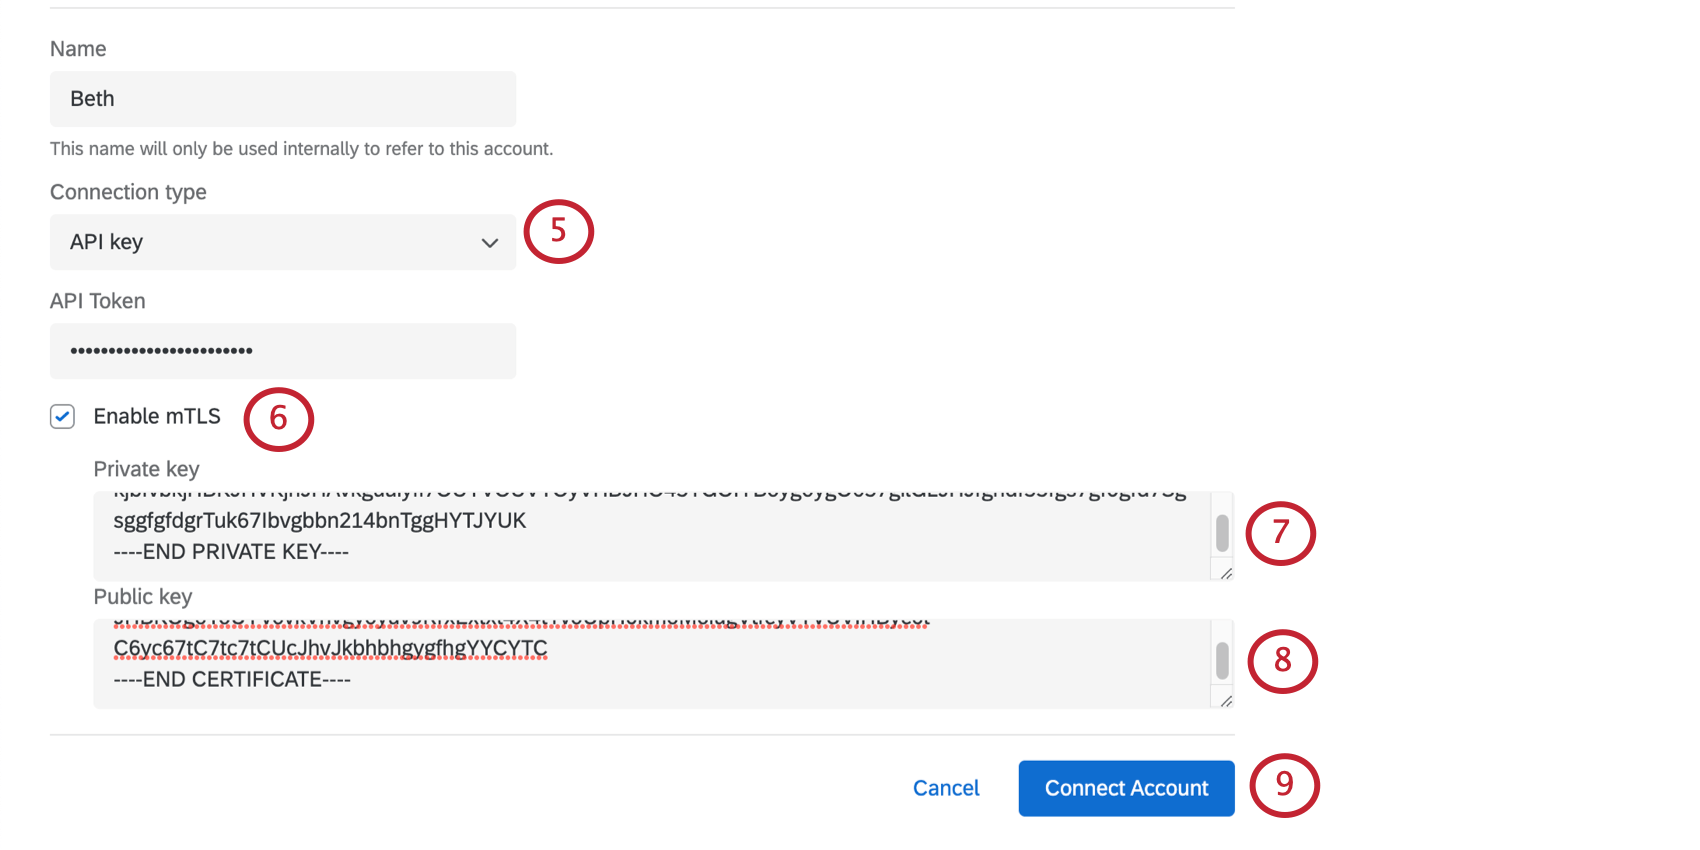
Qtip: If your key is in a different format, you can change use another program to change this format.
Qtip: If you’re planning to use the Qualtrics API with your web service, see our API Documentation on mTLS. This documentation will show you how to pull the private key. When you paste the value in Qualtrics, you will need to include dashes that say “begin private key” and “end private key.”
Qtip: If you’re planning to use the Qualtrics API with your web service, see our API Documentation on mTLS. This documentation will show you how to pull the certificate. When you paste the value in Qualtrics, you will need to include dashes that say “begin certificate” and “end certificate.”
Qtip: The validity of your mTLS keys cannot be tested until you run an API call through your web service, so you will not see an error message on this page if you entered your keys incorrectly. Try testing the web service before you make your workflow live.
Using Curl Commands
Curl commands are one of many ways you can make HTTP requests, and are a valuable tool in passing information back and forth through URLs. You can import a curl command while you’re setting up your task to auto-populate different web service configurations.
Many API docs often provide curl examples you can use. Being able to copy and import these commands can thus make web service setup much quicker and easier.
For some examples of curl requests, look at the right on each of these API docs:
For a GET request, the curl command can be as simple as curl https://api.example.com/parameters. For curl commands that aren’t as simple as this, we’ll provide some common parameters.
Qtip: If you’re editing an existing web service task, any curl commands you import will overwrite previous configurations.
Qtip: If you’re interested in learning more about curl than what we cover below, we recommend reading a resource outside Qualtrics Support, such as IBM’s documentation.
Supported Curl Command Parameters
Here are some of the curl parameters the Qualtrics web service task supports:
| Parameter | Description | Curl command | Example |
|---|---|---|---|
| URL | The endpoint or resource the web service should interact with. | Full URL. | https://datacenter.qualtrics.com/API/v3/directories/ |
| HTTP Method | Options like GET, POST, PUT, and so on. | --X <command> or --request <command> | Example 1: --X GET Example 2: --request PUT |
| Headers | Custom headers. | --H or --header | Example 1: --header 'Accept: application/json' Example 2: --header 'Content-Type: application/json' |
| Body | The body (or payload) for POST requests. | --d or --data | --data '{ “description”: “Lists all open bugs”, “jql”: “type = Bug and resolution is empty”, “name”: “All Open Bugs” }’ |
| JSON format | Replace having to specify JSON formatting in the header and data. | --json | This curl command replaces the following 3 tags: --data [arg] --header "Content-Type: application/json" --header "Accept: application/json" |
Common Header Parameters
Above, we mentioned you can use curl commands to define headers. Headers serve various purposes in HTTP communication, such as providing information about the request and controlling authentication. The specific headers you use depend on the requirements of the application or API you’re using.
Here are some examples of header parameters:
| Name | Description | Example |
|---|---|---|
| Accept | Specify the media formats for the response. | Accept: application/json |
| Content-type | In a request, content type specifies the media type of the resource sent to the server. In the response, the content type indicates the media type of the resource enclosed in the message body. | Content-Type: application/json |
| Authorization | Provide credentials for accessing a protected resource. | Authorization: Bearer token |
| ETag | Provide a unique identifier for a specific version of a resource. | ETag: "123456" |
| Content-length | Set the size of the entity-body in the message. | Content-Length: 1024 |
| Origin | Indicate the origin of the request. This can help with Cross-Origin Resource Sharing (CORS). | Origin: https://example.com |
Unsupported Parameters
Any curl parameters not listed above are not supported. Here are a few examples of curl command formats Qualtrics web service tasks do not support:
- --cookie to send cookies with the request.
- --L or --location for following redirects.
- --max-time for setting maximum request time.
- --o or --output for saving response to a file.
- --insecure to allow insecure connections.
- --A or --user-agent to specify user agent.
Qtip: If you try to import a curl command with unsupported parameters, an error message will appear listing the unsupported parameters you used. You’ll be given the option to continue importing your curl command with the unsupported parameters removed.
Importing Curl Commands
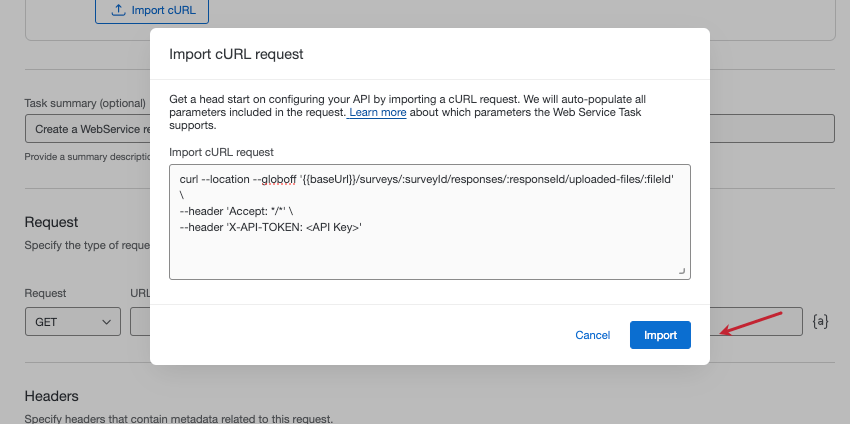
Attention: Make sure you include your HTTP method in your curl request, especially if you’re copying a curl command from another platform.
Qtip: Keep an eye out for parts of the request you need to fill out with your own information. For example, in the screenshot above, you’d replace “API Key” with your API token.
Qtip: You can add a command in one single string, or you can mark line breaks using the escape character ( \ ). We do not support other line escapes (for example, ^ ). Here’s an example of a curl command with supported escape characters:
curl https://www.google.com/accounts/test \
-d accountType=GOOGLE \
-d source=Google-cURL-Example \
-d service=lh2
Qtip: We recommend double-checking your fields before you activate your workflow.
FAQs
Do I have access to all extensions available through the Workflows templates?
Do I have access to all extensions available through the Workflows templates?
Is there a link to all Workflows events and tasks?
Is there a link to all Workflows events and tasks?
What are Workflows templates?
What are Workflows templates?
What are workflows? / Where are actions?
What are workflows? / Where are actions?
There are no changes to workflow functionality as part of this update.
How do I add or remove an extension from my Qualtrics account?
How do I add or remove an extension from my Qualtrics account?
That's great! Thank you for your feedback!
Thank you for your feedback!