
Unique Identifiers (CX)
What's on this page
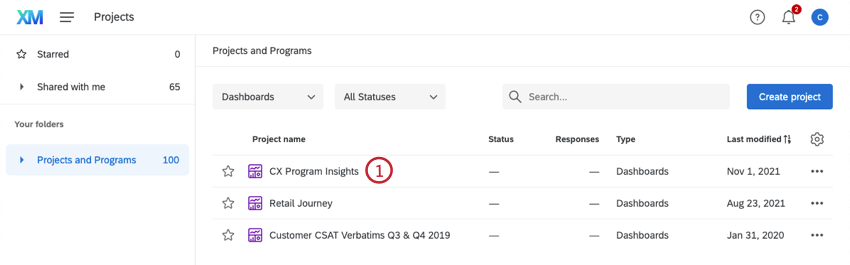
About Unique Identifiers
Email addresses can change for many different reasons, so they’re not always a reliable way for Qualtrics to identify CX dashboard users. Thankfully, there is a Unique Identifier column when you add users, which allows you to specify users by whatever identifier your company prefers. You can use anything from numeric IDs to usernames, and in the event you need to change dashboard users’ unique IDs, it’s an easy process.
You have to be both a Project Administrator (often the person who made the dashboard project) and a Brand Administrator to perform the actions described in this section. This means you have access to the User Admin tab.
Attention: Unique Identifiers are case-sensitive!
Qtip: When uploading users with Unique Identifiers enabled, you can add users with the same email address as long as you include another column titled UserName with different values for these users. Without the UserName column, the upload will fail due to duplicate entries.
Qtip: This page refers to Unique Identifiers in CX Dashboard projects only.
Identifying Whether Your Brand has Unique Identifiers
Unique identifiers are a feature in all CX licenses started after July 16, 2020.
Qtip: Older brands do not have this functionality. If you are on an existing brand and are interested in switching to unique IDs, you can reach out to Qualtrics Technical Support to learn more. Unique IDs are not a required feature for many CX licenses, although we recommend it if you’d like to host both CX and EX projects on the same brand. Once you’ve switched, see the Migrating from Email to Unique Identifiers section.
If you’re unsure when your brand was created and whether you have access to this feature already, then no worries – simply follow these steps to see if you have access to unique identifiers:
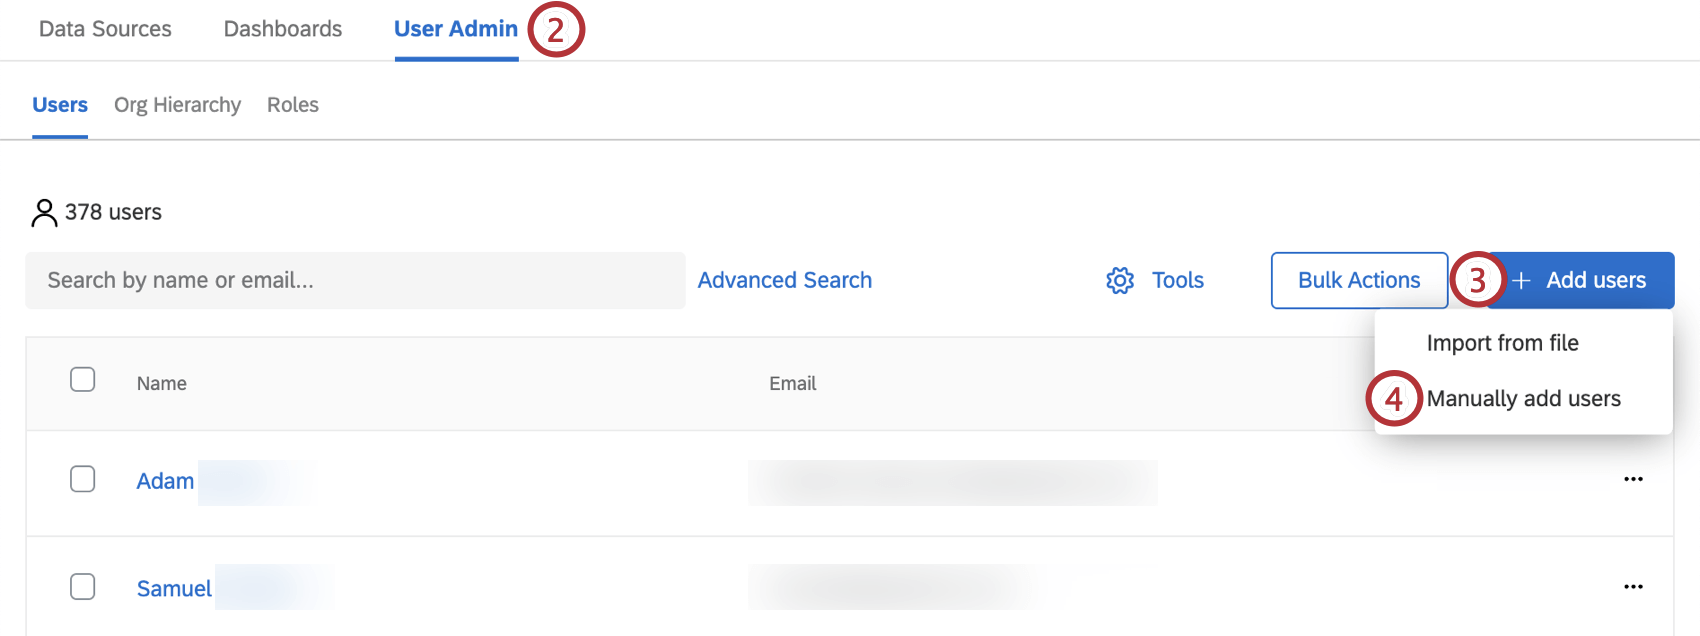
Manually Adding Users with Unique Identifiers
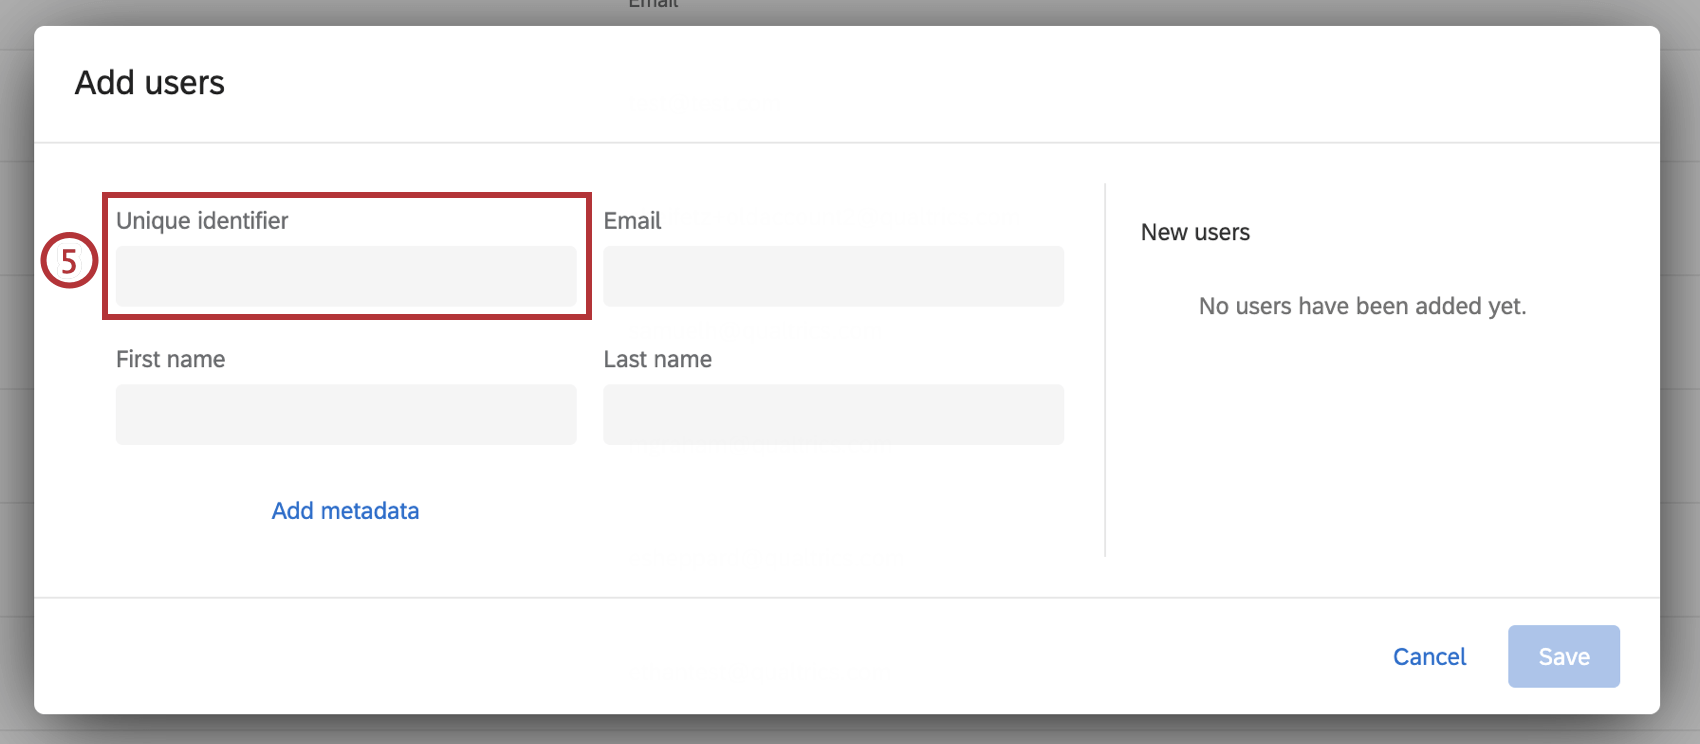
When manually adding users, you can add unique IDs in the Unique Identifier column.

Enter whatever identifier your company prefers to use in this column.
Attention: You cannot leave the Unique Identifier field blank! Qualtrics will not generate Unique Identifiers for you.
Unique Identifiers can be made of letters, numbers, and/or the at symbol ( @ ), periods ( . ), and underscores ( _ ). The maximum is 100 characters. There is a maximum of 5000 rows.
Qtip: If you upload more than one person with the same Unique Identifier, only the first person with that Unique Identifier in the list will be added. If you add someone with the same Unique Identifier as an existing user, that user’s information will be updated. Any user attribute updates are immediately reflected in dashboard data restrictions.
Importing Users with Unique Identifiers
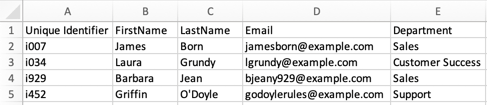
When Importing CX Users, download the Example Document. This will contain a UniqueIdentifier column. Do not modify this column name to UniqueID or anything else, or it will not be recognized.
Enter whatever identifier your company prefers to use in this column.

Attention: You cannot leave the UniqueIdentifier field blank! Qualtrics is no longer generating Unique Identifiers.
Unique Identifiers can be made of letters, numbers, and/or the at symbol ( @ ), periods ( . ), and underscores ( _ ). The maximum is 100 characters. You have a limit of 200 columns in your import file. There is a maximum of 5000 rows.
Qtip: If you upload more than one person with the same Unique Identifier, only the first person with that Unique Identifier in the list will be added. If you add someone with the same Unique Identifier as an existing user, that user’s information will be updated. Any user attribute updates are immediately reflected in dashboard data restrictions.
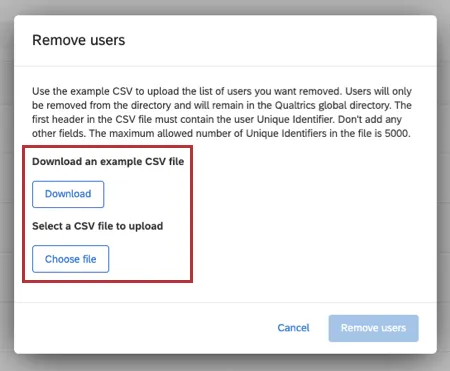
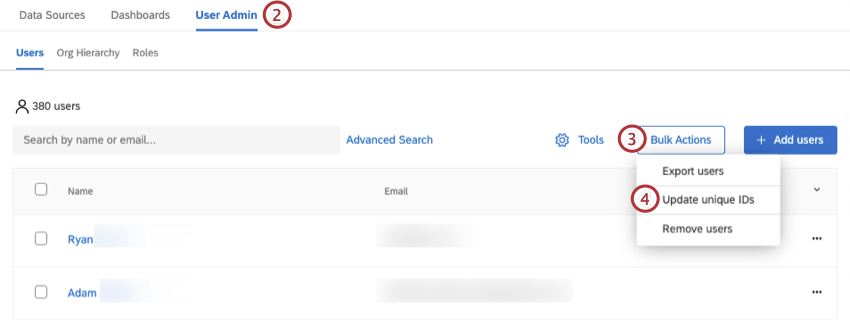
Updating Multiple Users’ Unique Identifiers
You can update Unique Identifiers for many CX users in your brand by using the User Admin tab in any dashboard project.

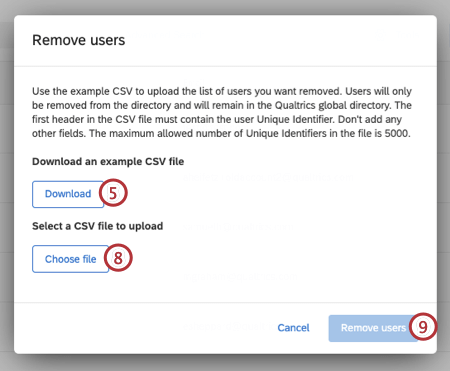
Qtip: If you are having trouble uploading your CSV, see the CSV/TSV Upload Issues page.
Updating One User’s Unique Identifier
If you only need to update one user’s Unique Identifier, you can do this by finding them in the Users section of the User Admin tab, and then clicking their name or email.
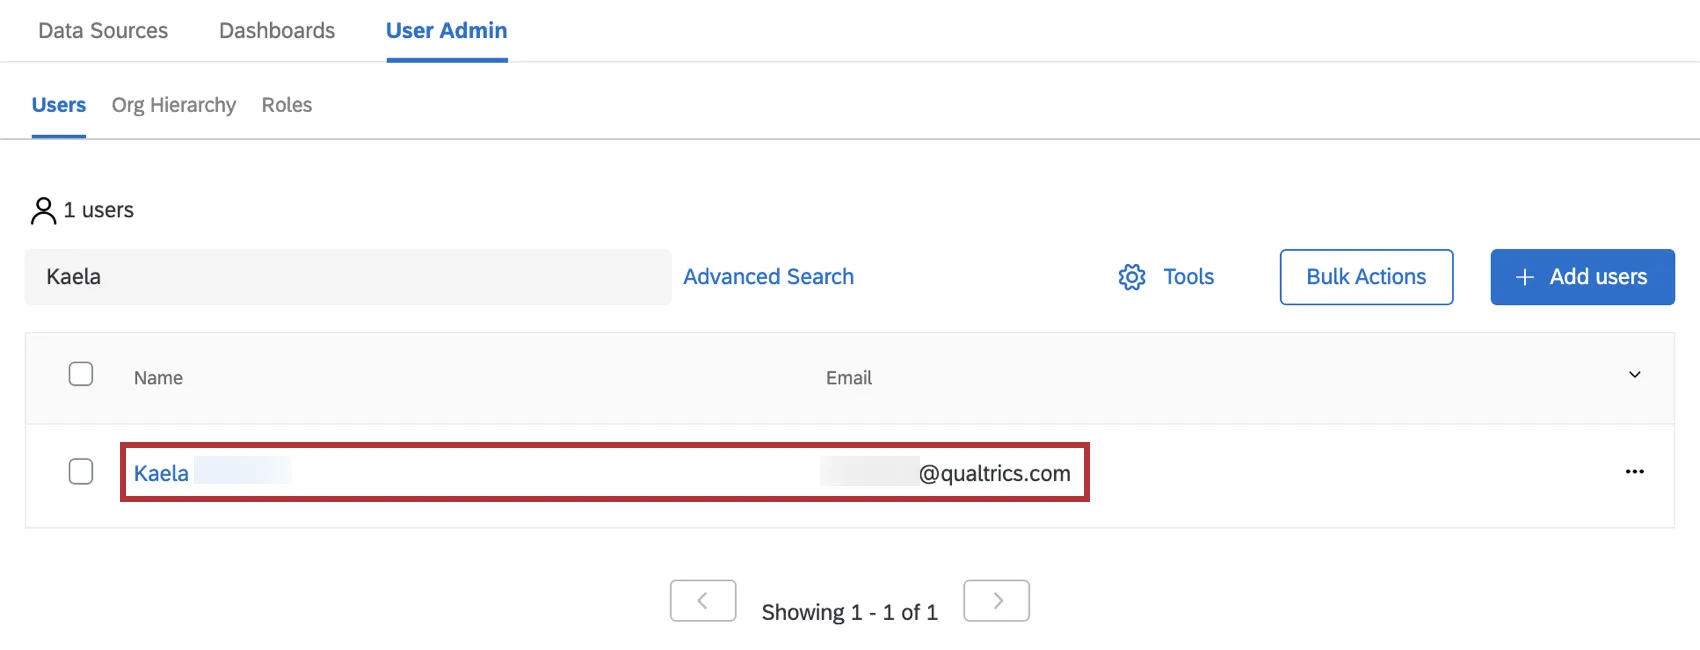
Click their name. On the left, click into the Unique Identifier’s value and change it as desired.

Unique Identifiers and SSO Self-Enrollment
If you have Unique Identifiers enabled and your company is using SSO with Qualtrics, you have the option to assign Unique Identifiers upon self-enrollment via SSO.
Attention: Qualtrics cannot help your company’s SSO. If you are interested in enabling Unique Identifiers, we recommend working with your IT team.
To configure Unique Identifiers for your brand, work with your IT team to create an attribute to assign a Unique Identifier, You’ll need to add this attribute to your SSO configuration as the Unique ID field in the Dashboard Attributes section of your SSO configuration. Just In Time provisioning must be enabled.
The configured Unique Identifier will be assigned to a new user during self enrollment. If SSO Unique Identifier is not configured, a system-generated identifier will be assigned. Note this configuration does not impact the Unique Identifiers for the existing users.
Qtip:If you are provisioning users with a mix of self-enrollment (aka Just in Time Provisioning) and manual file upload, we recommend keeping the Unique ID value consistent. If you use two different fields such as Employee ID in the file upload and email address in the SSO settings, users may have a mix of Unique IDs.
Migrating from Emails to Unique Identifiers
This section is for existing licenses who voluntarily chose to switch from emails to unique identifiers. If you have been using CustomerXM for a while, chances are you are used to the CX user’s email address as the means of identifying them, and have never used a Unique Identifier column. This section will go over the easy process of switching from using emails to unique IDs.
- CX Licenses with EX: Follow the steps on the Employee Experience Unique Identifiers support page.
- CX License without EX:
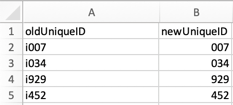
- First, export a list of all your CX Dashboard users, so you can grab the auto-generated unique IDs associated with each user. These will be listed in the Unique ID column of your export.
- Next, determine what unique IDs you’d like to use for these users. (E.g., Company employee IDs.) Compile a list of your CX users’ unique IDs.
- Finally, follow the steps in Updating Multiple Users’ Unique Identifiers.
FAQs
What happens to existing CX brands not on unique ID?
What happens to existing CX brands not on unique ID?
When could switching to unique ID be beneficial to a CX license?
When could switching to unique ID be beneficial to a CX license?
How does the User Admin tab in a dashboard compare to the Admin page? What special considerations should I make as a CX brand?
How does the User Admin tab in a dashboard compare to the Admin page? What special considerations should I make as a CX brand?
This is different from how it works in CX brands that are not using unique IDs; in CX brands without unique IDs, creating a Vocalize User in the Admin page will add them to the CX directory.
That's great! Thank you for your feedback!
Thank you for your feedback!