
Adobe Analytics Extension
What's on this page
About Adobe Analytics
Adobe Analytics is a powerful tool that reports on web visitor data such as page views, time spent on a page, user’s tracking history, and more. The extension between Qualtrics and Adobe Analytics provides the ability to augment data you have stored for website visitors with data collected through a Qualtrics survey – for example, by passing satisfaction data collected in Qualtrics over to Adobe, you can create reports on the difference in web behavior between deeply satisfied and not-so-satisfied customers. Additionally, you are able to integrate Website Insights with Adobe Analytics to base visitor-targeting logic on your Adobe Analytics variables and pass variable values over to Qualtrics datasets.
Once this data has been passed over to Qualtrics, you can use it with many other XM features you may have purchased access to, such as dashboards and statistical analysis.
Qtip: While Qualtrics Support can help troubleshoot Website Insights and make sure your data is coming in correctly, they are especially trained in the Qualtrics platform. If you need help with setup in the Adobe Analytics product, we recommend reaching out to the Adobe Analytics technical support team.
Attention: The Adobe Analytics extension requires access to Web / App Insights, and may be an add-on to your license. Please contact your Account Executive if have questions about what is included in your license or you are interested in getting access to this feature.
Attention: At this time, the Adobe Experience Platform Web SDK is not natively supported by the Qualtrics Adobe Analytics Extension. However, you can still pass data to Qualtrics by following the instructions in Using Adobe Web SDK (AEP) with Qualtrics.
Using Adobe Analytics Variables in Visitor-Targeting Logic
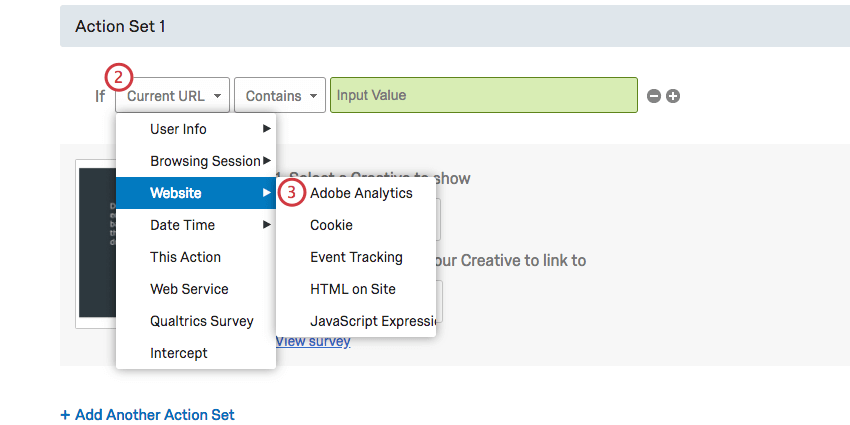
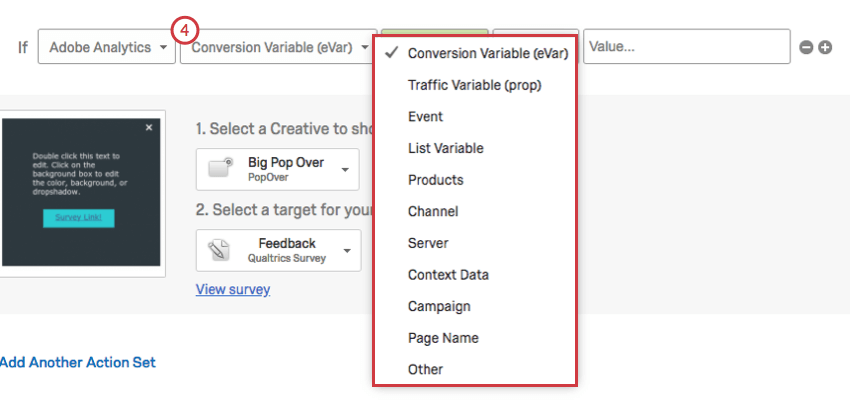
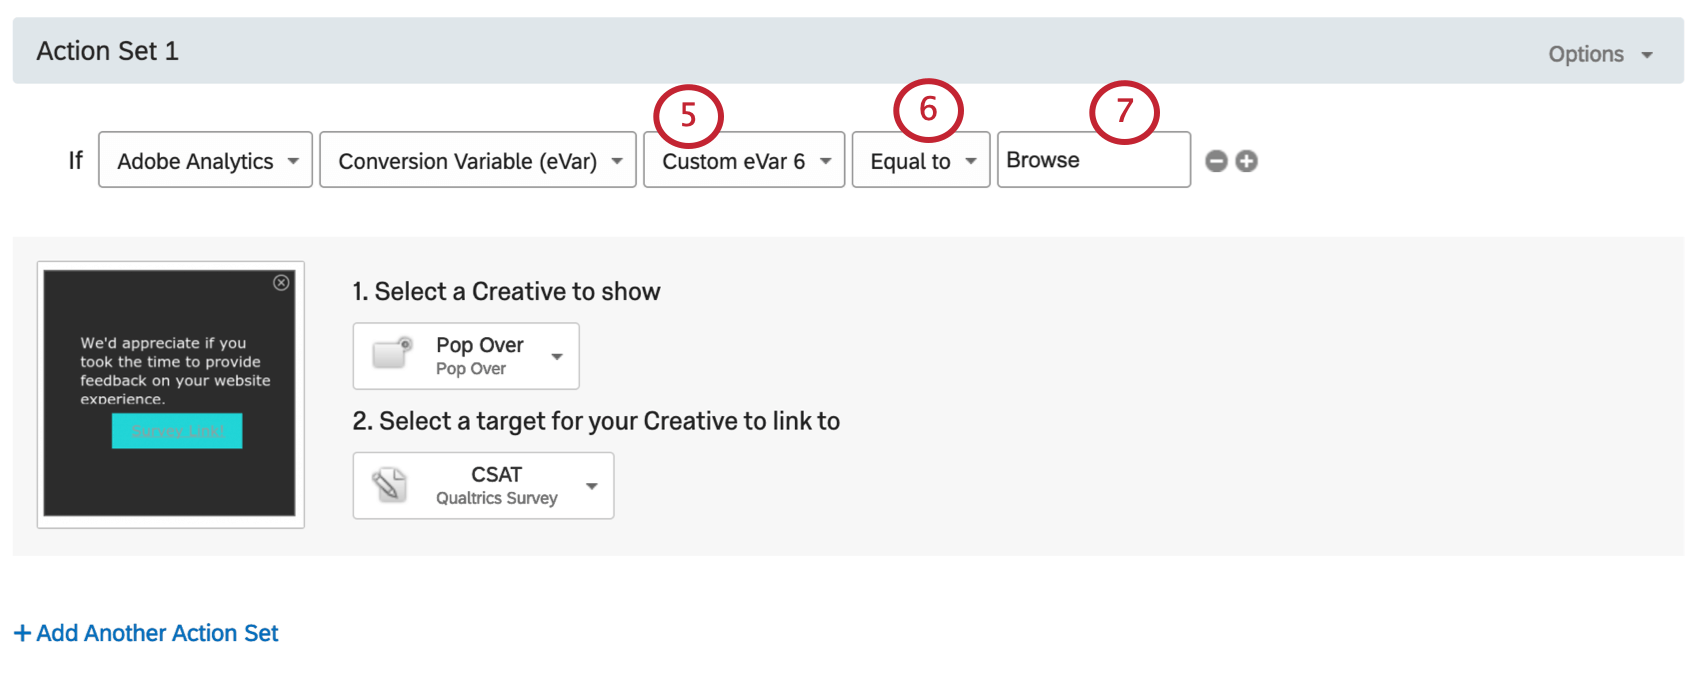
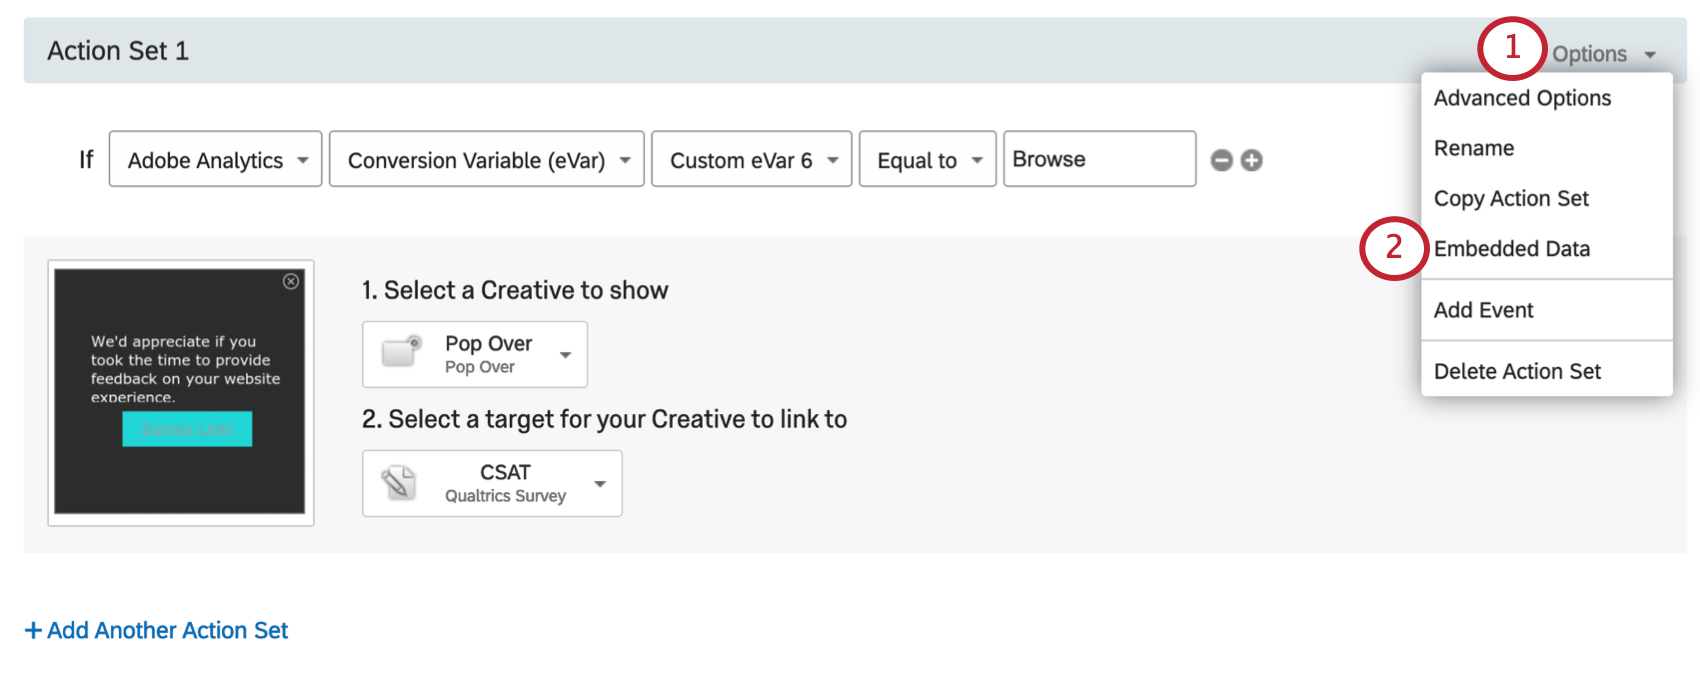
Use Adobe Analytics data to determine when you present certain creatives to your website visitors. This section shows how to create action set logic and intercept logic based on Adobe Analytics variables.
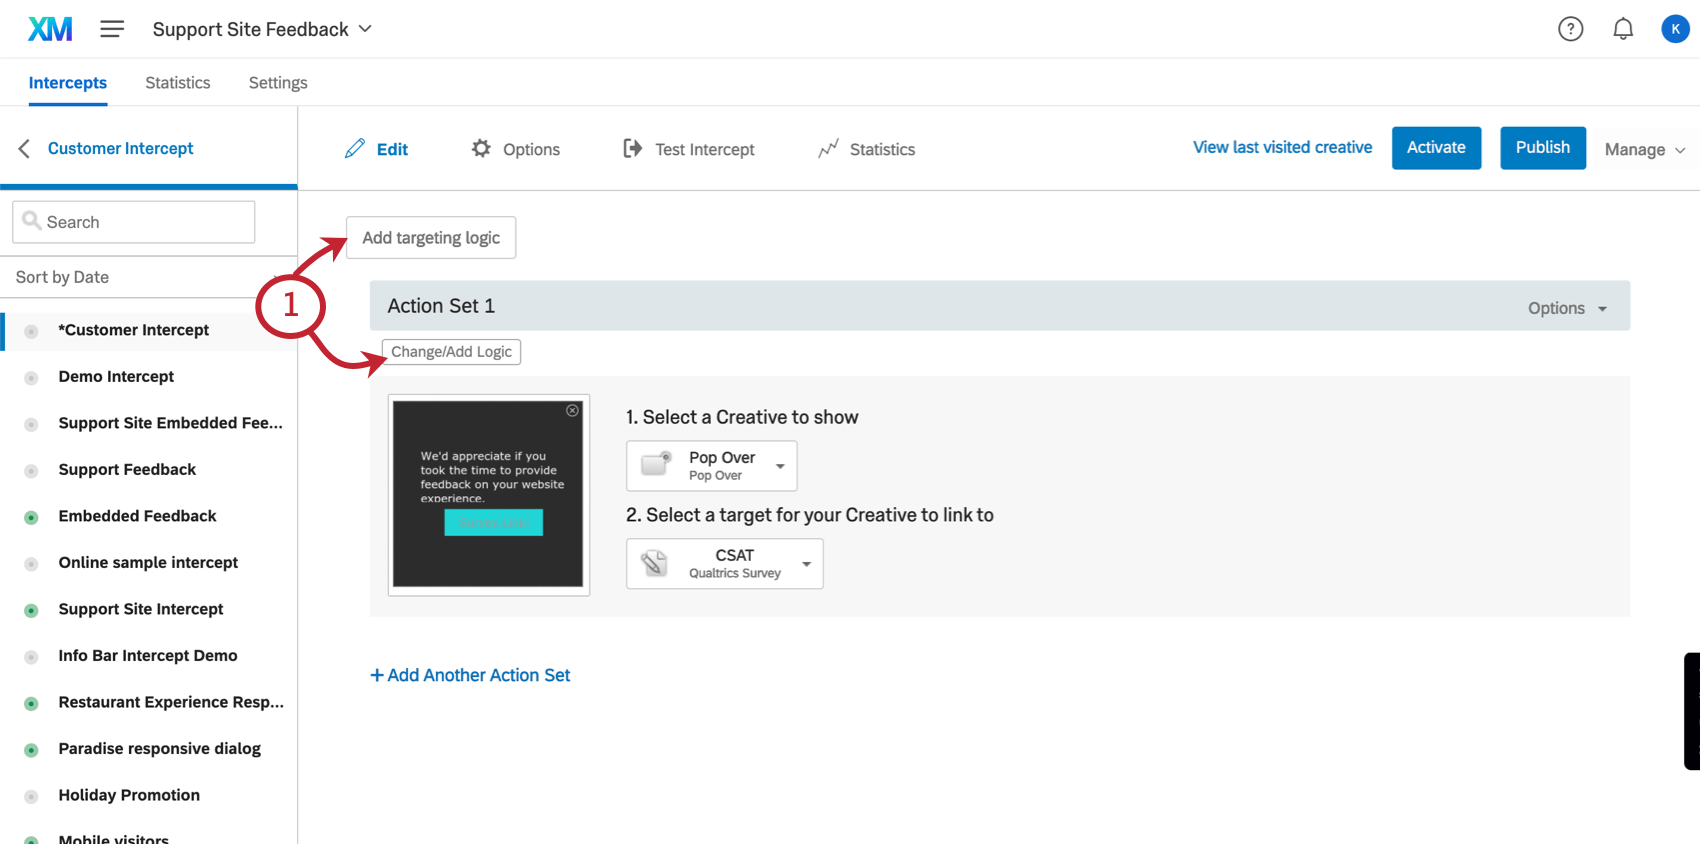
Qtip: Clicking Add Intercept Display Logic adds the logic to the entire Intercept, so you don’t have to add the logic to each individual action set.
Qtip: For a guide on Adobe Analytics’ variables, see the following documentation:
- Variables Overview
- eVars
- Configuration Variables (Some of the most common analytic variables)
Qtip: Is this dropdown missing? You probably don’t have the Adobe Analytics permission turned on. Contact your Brand Administrator to get it enabled.
Qtip: The way we set up the logic in the screenshots shown above will only allow this intercept to appear to visitors who are on the page set in Adobe Analytics as the Homepage.
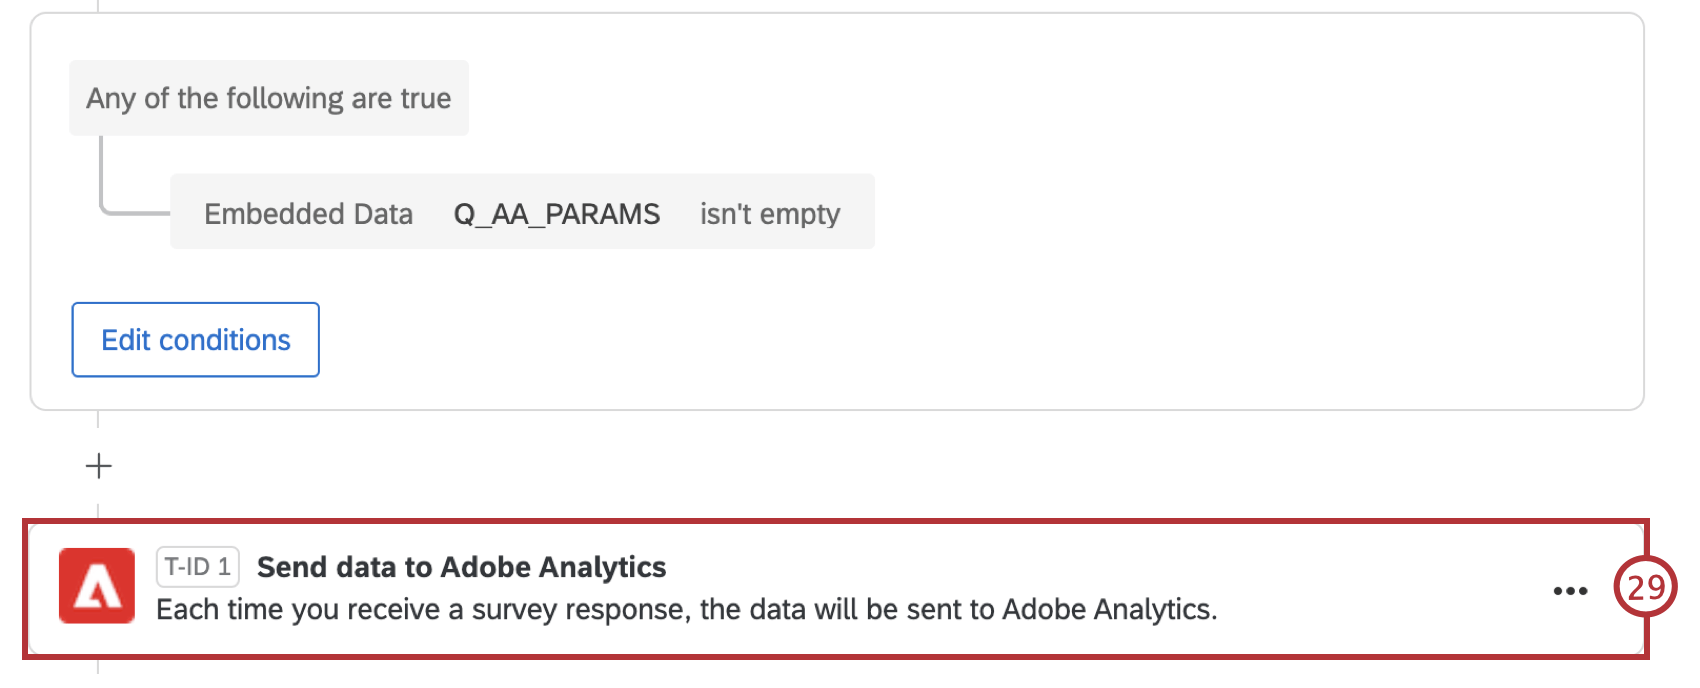
Passing Adobe Analytics Variables to Qualtrics
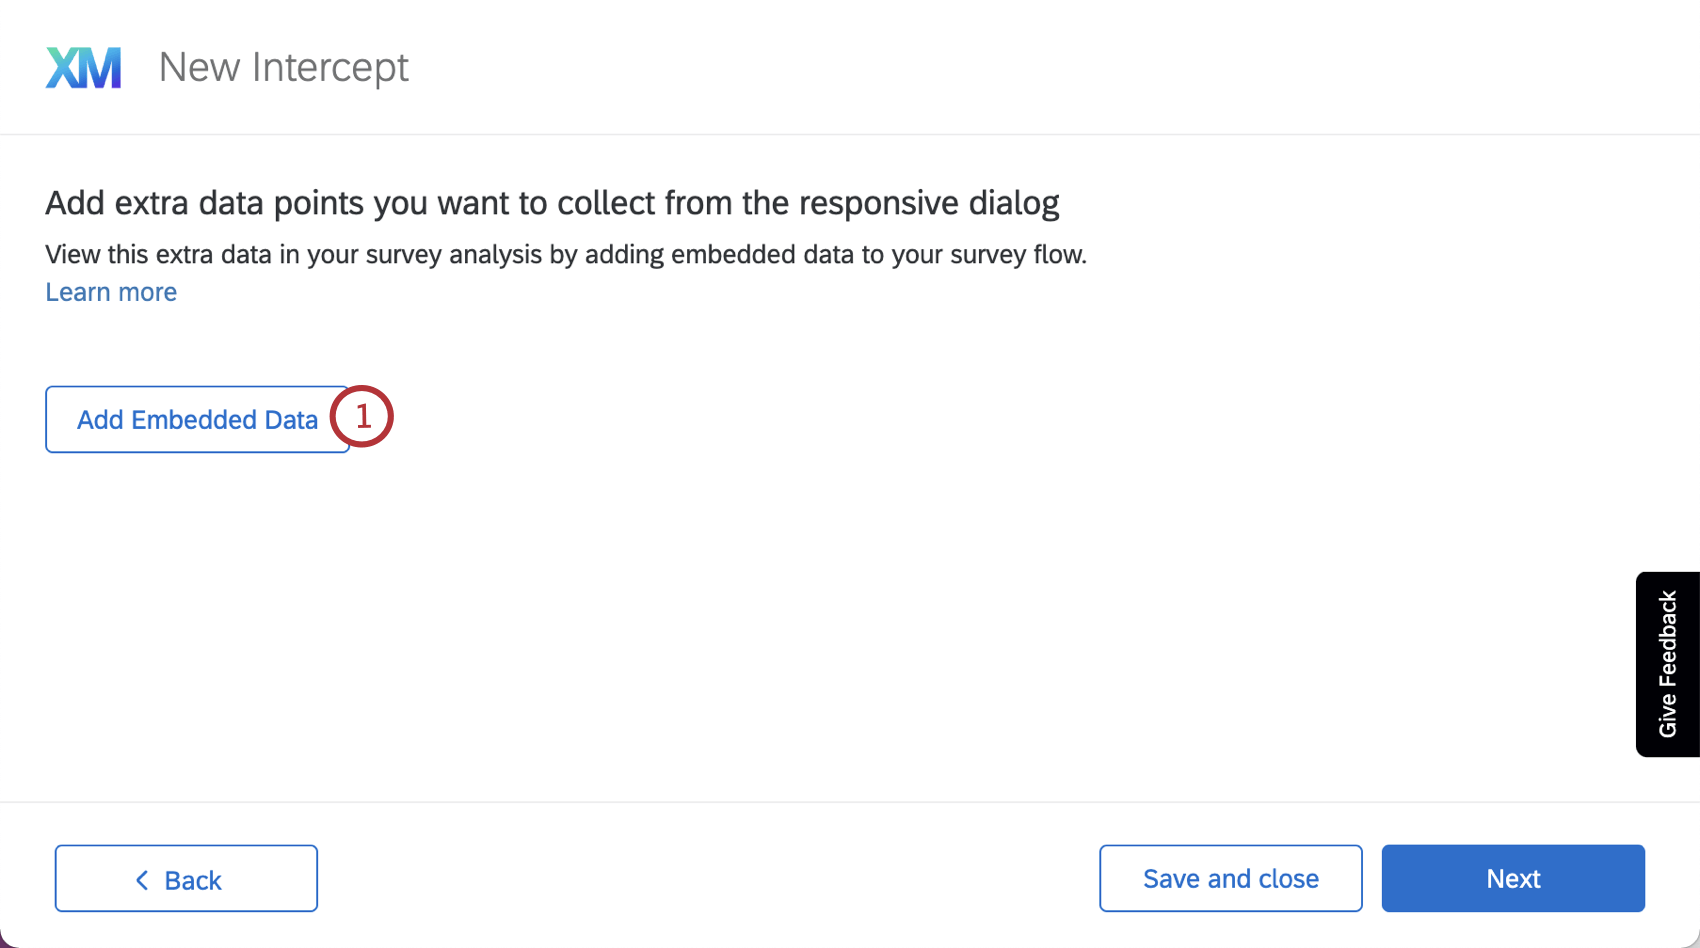
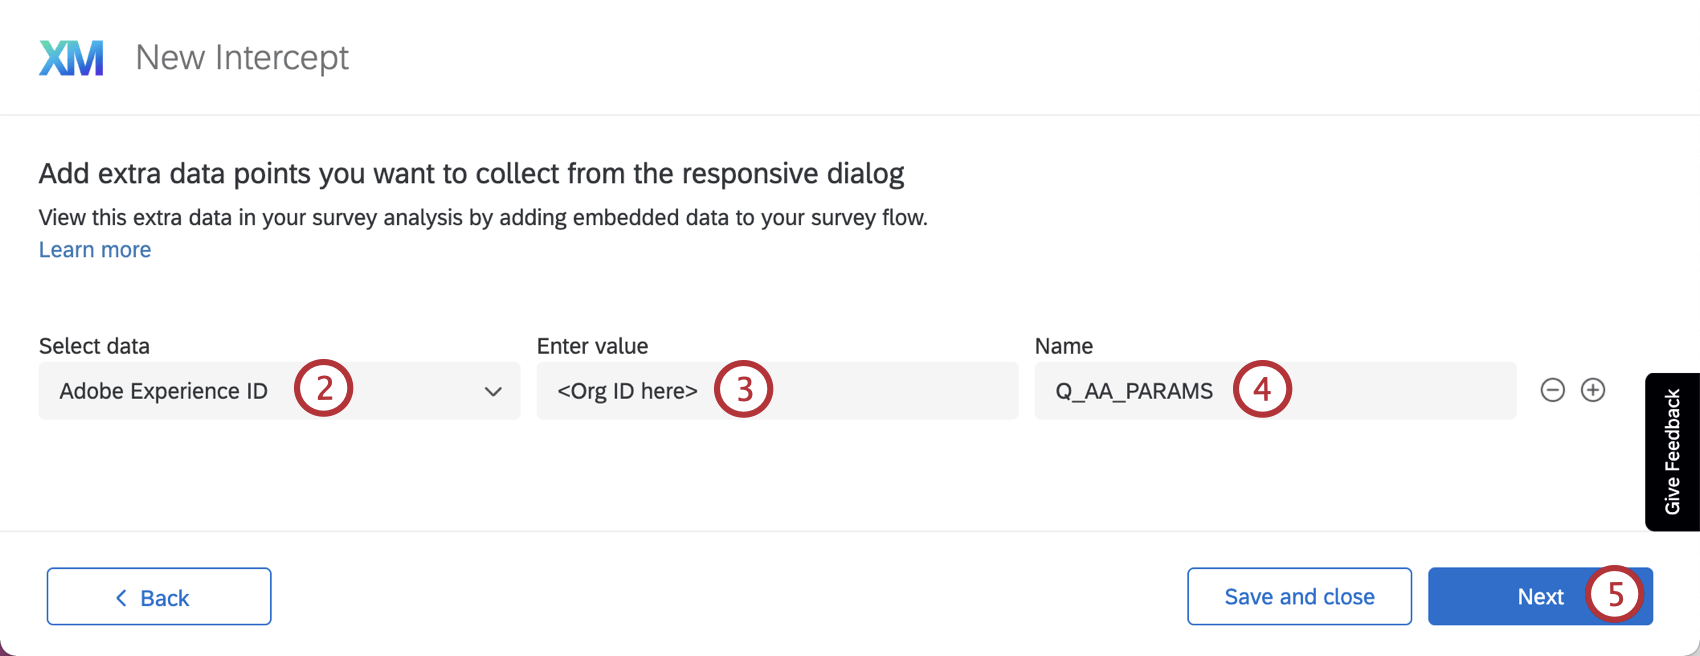
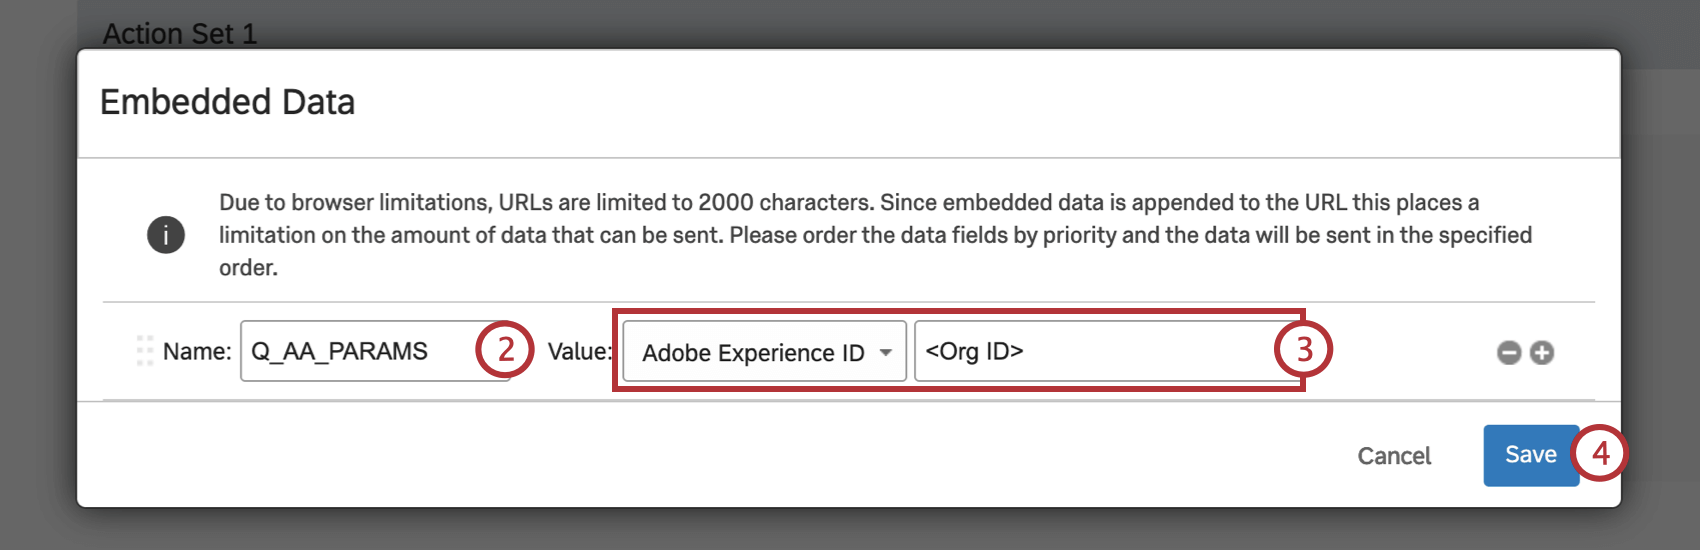
Embedded data can capture the values of Adobe Analytics variables from your site and add them to your Qualtrics dataset.
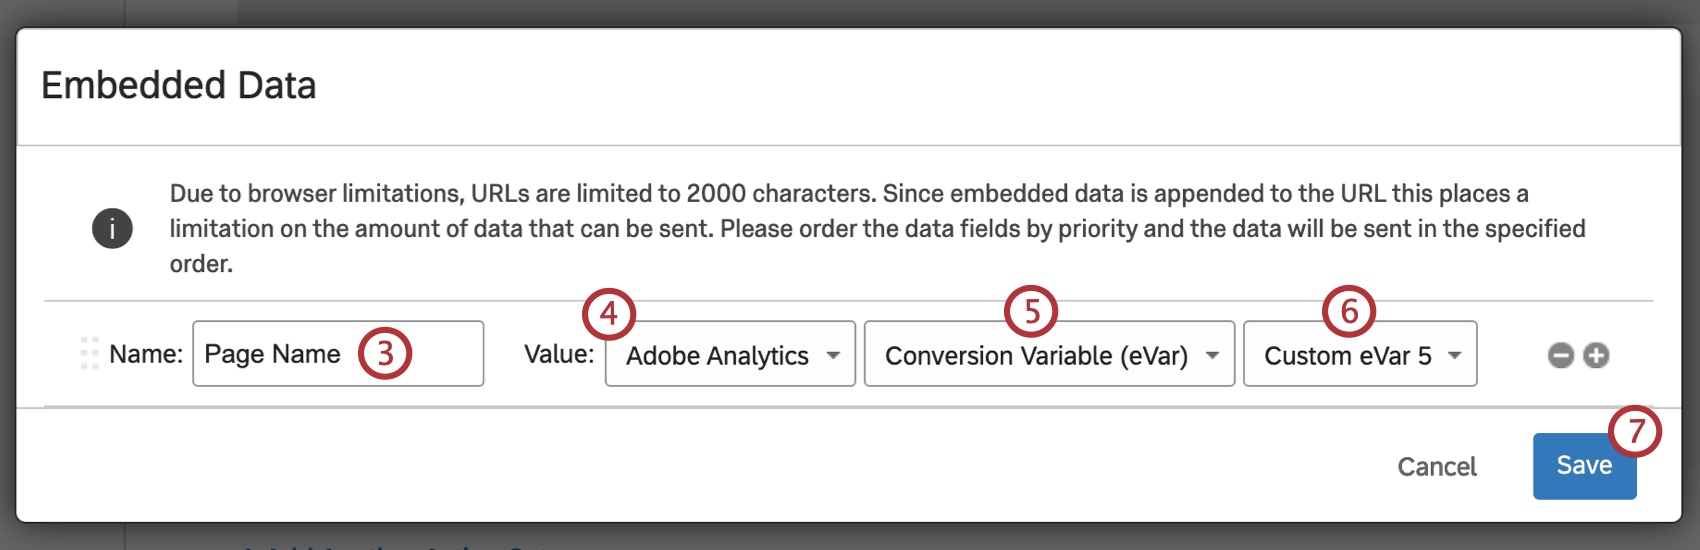
Qtip: If you have already added embedded data values, click the plus sign ( + ) to add another value.
Qtip: If you’re unsure what to choose, see Adobe Analytics’ documentation on variables.
Qtip: Qualtrics can only pull up Custom eVar values up to 75. To go higher, set the value to Adobe Analytics Variable – Other – then type Custom eVar with the number of choice.
Once this is set up, you will have a field in your survey data that stores the information captured from the Intercept. You can use this field when reporting within Qualtrics and it will be present when you export your survey’s data.
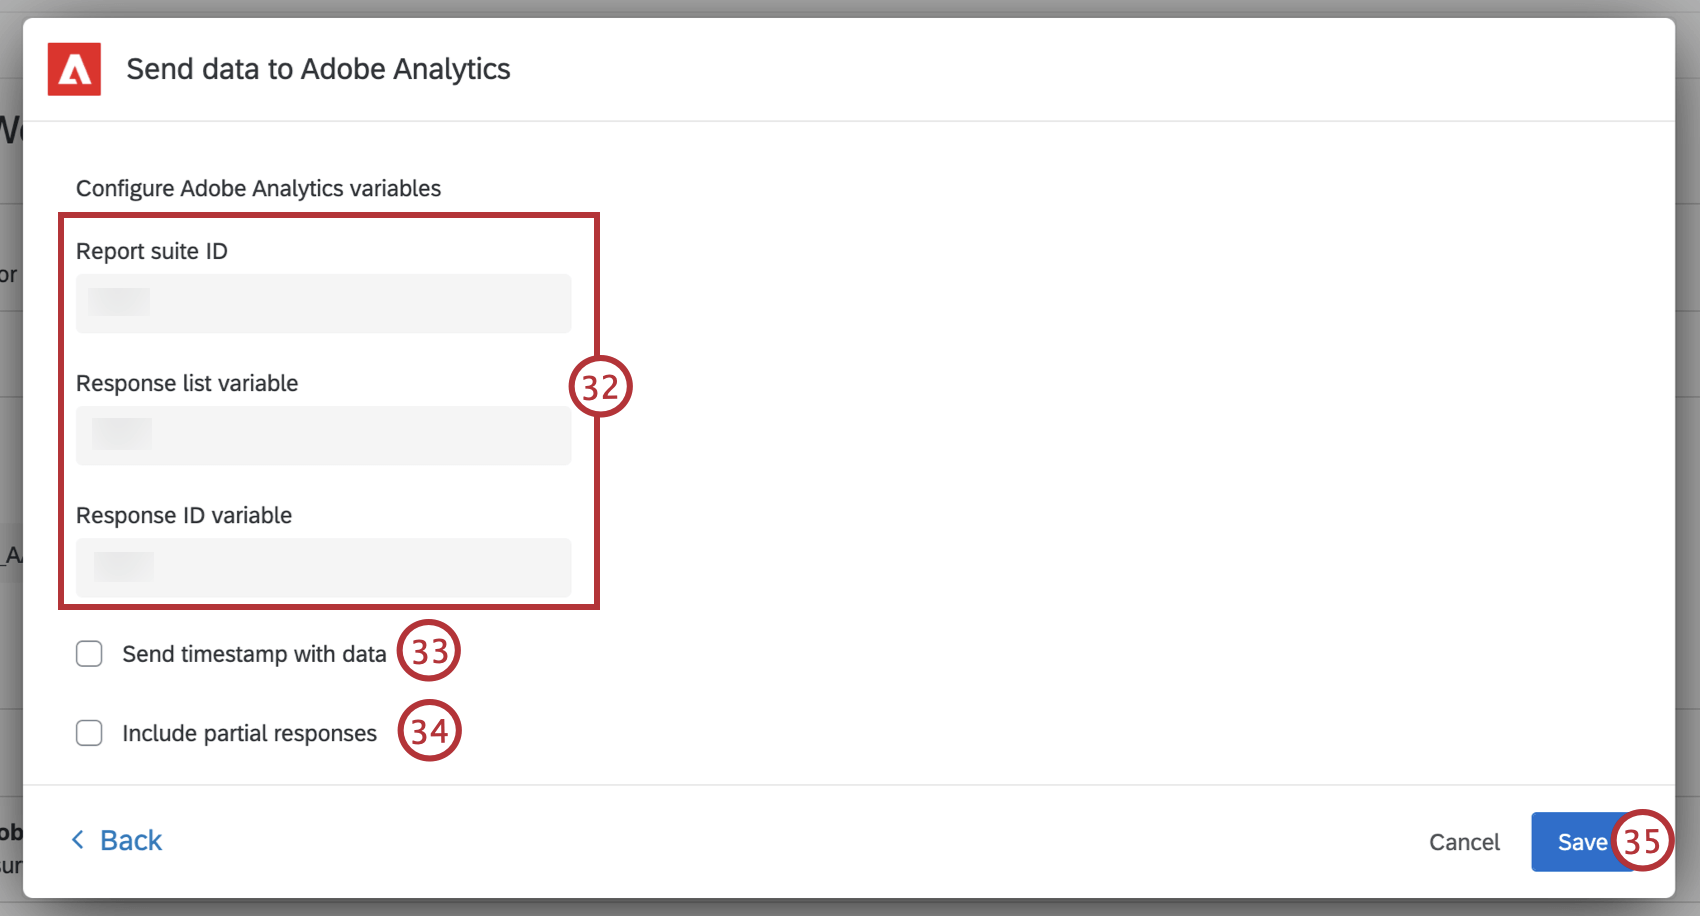
Passing Qualtrics Data to Adobe Analytics
The extension between Adobe Analytics and the Qualtrics Survey Platform allows the ability to pass survey data collected by Qualtrics directly to your Adobe Analytics instance.
PREREQUISITES
- Must have Adobe Analytics permission enabled in Qualtrics.
- Must have access to an Adobe Analytics “Product” admin user account.
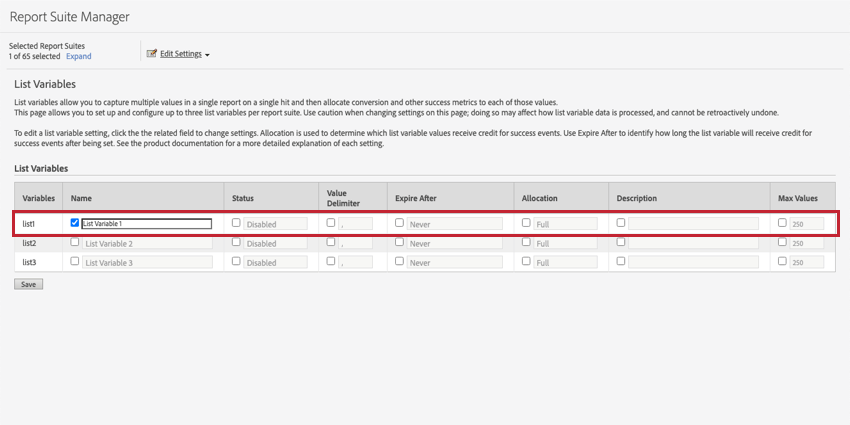
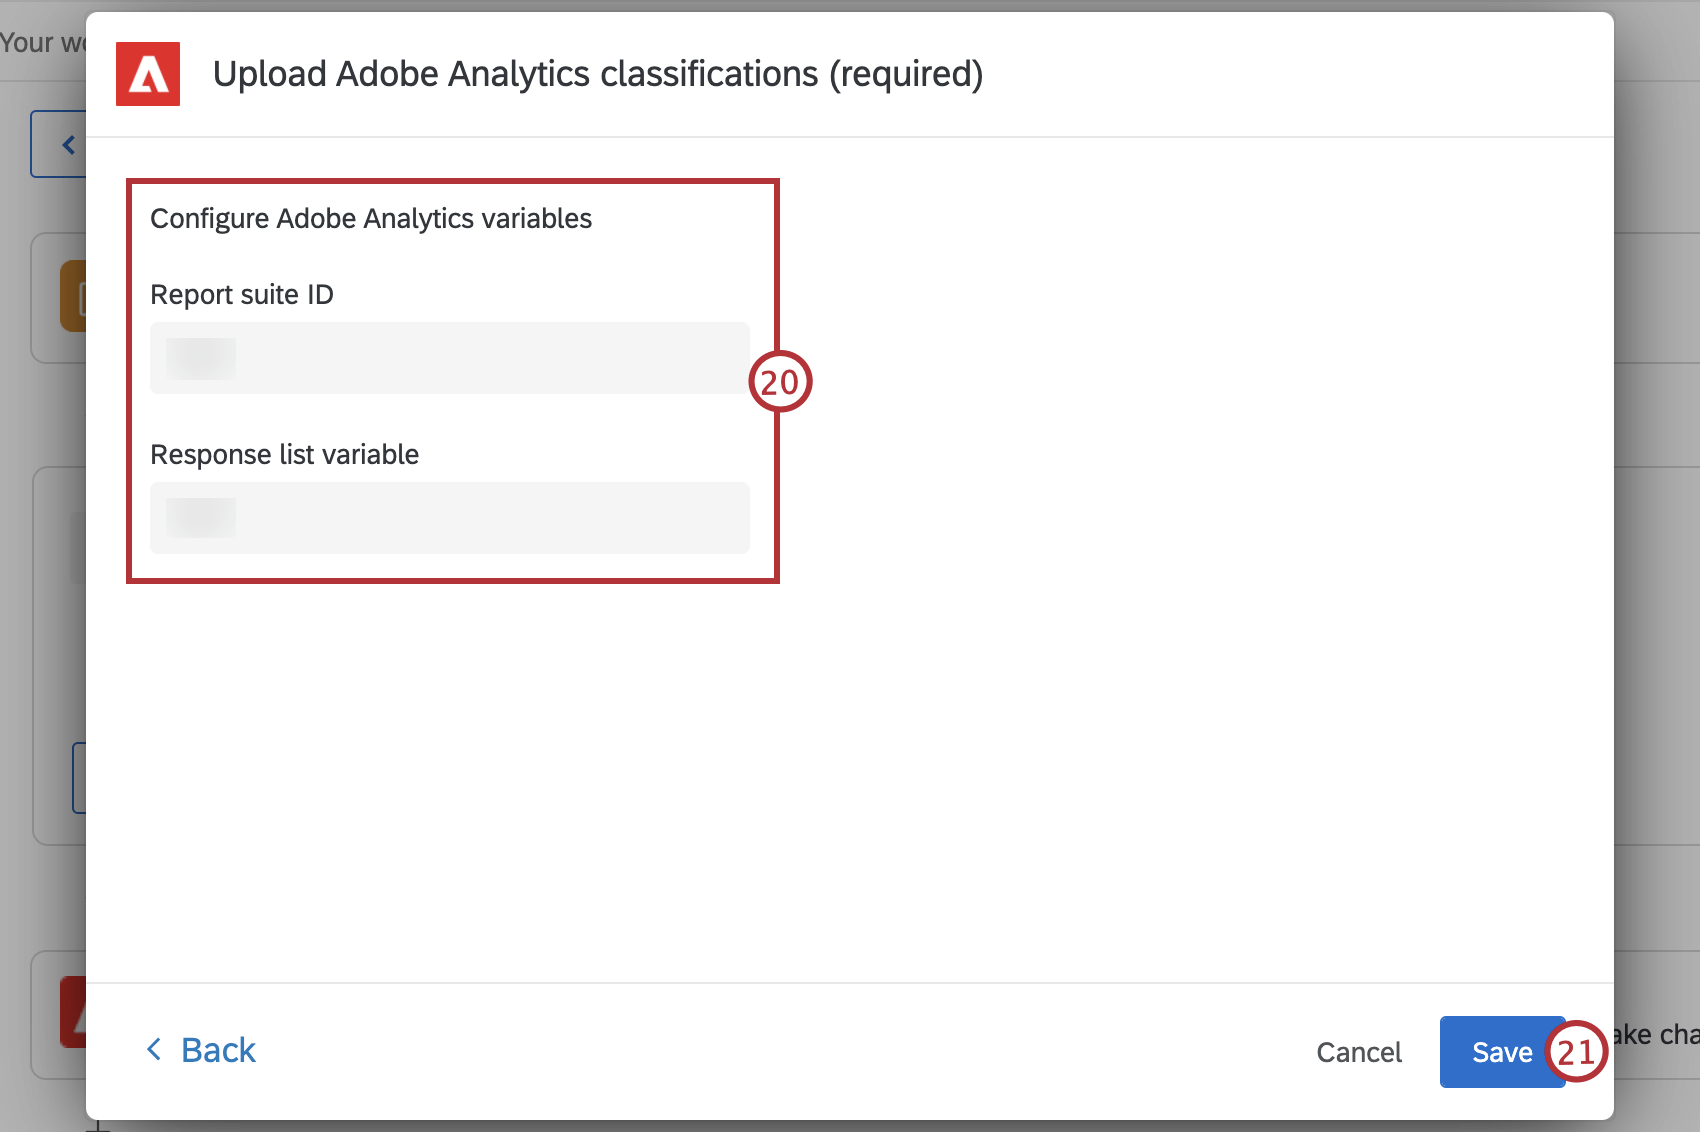
- Must have 1 eVar variable and 1 List Variable to use.
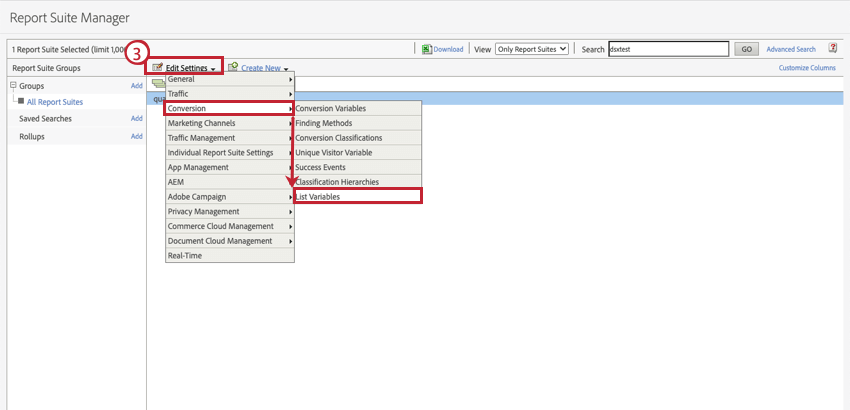
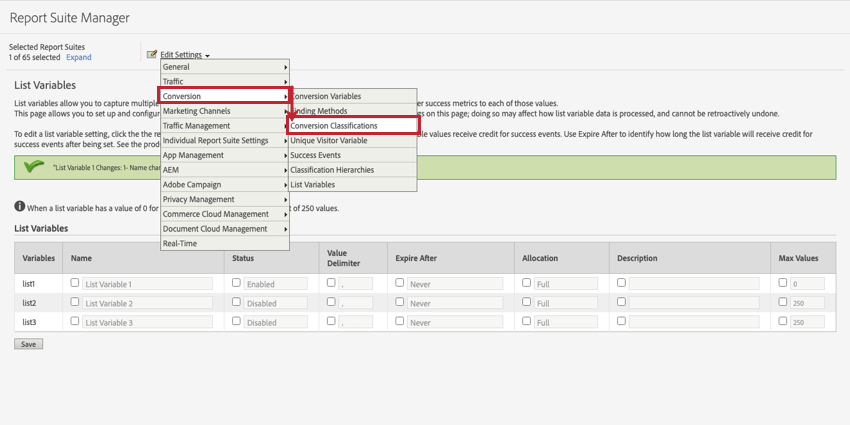
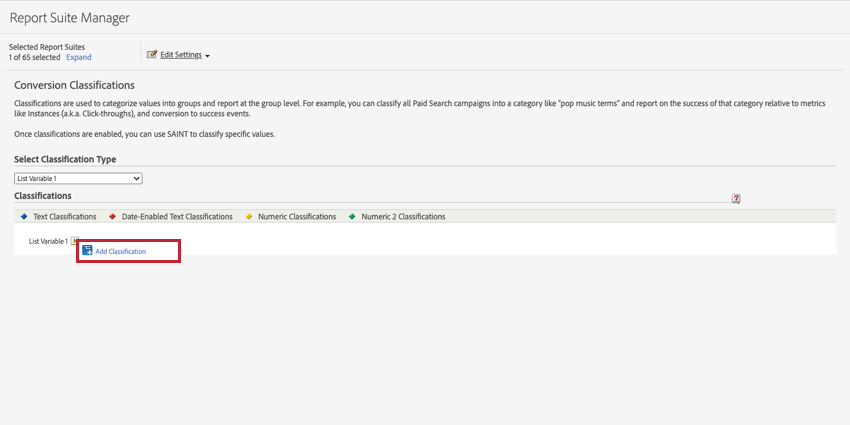
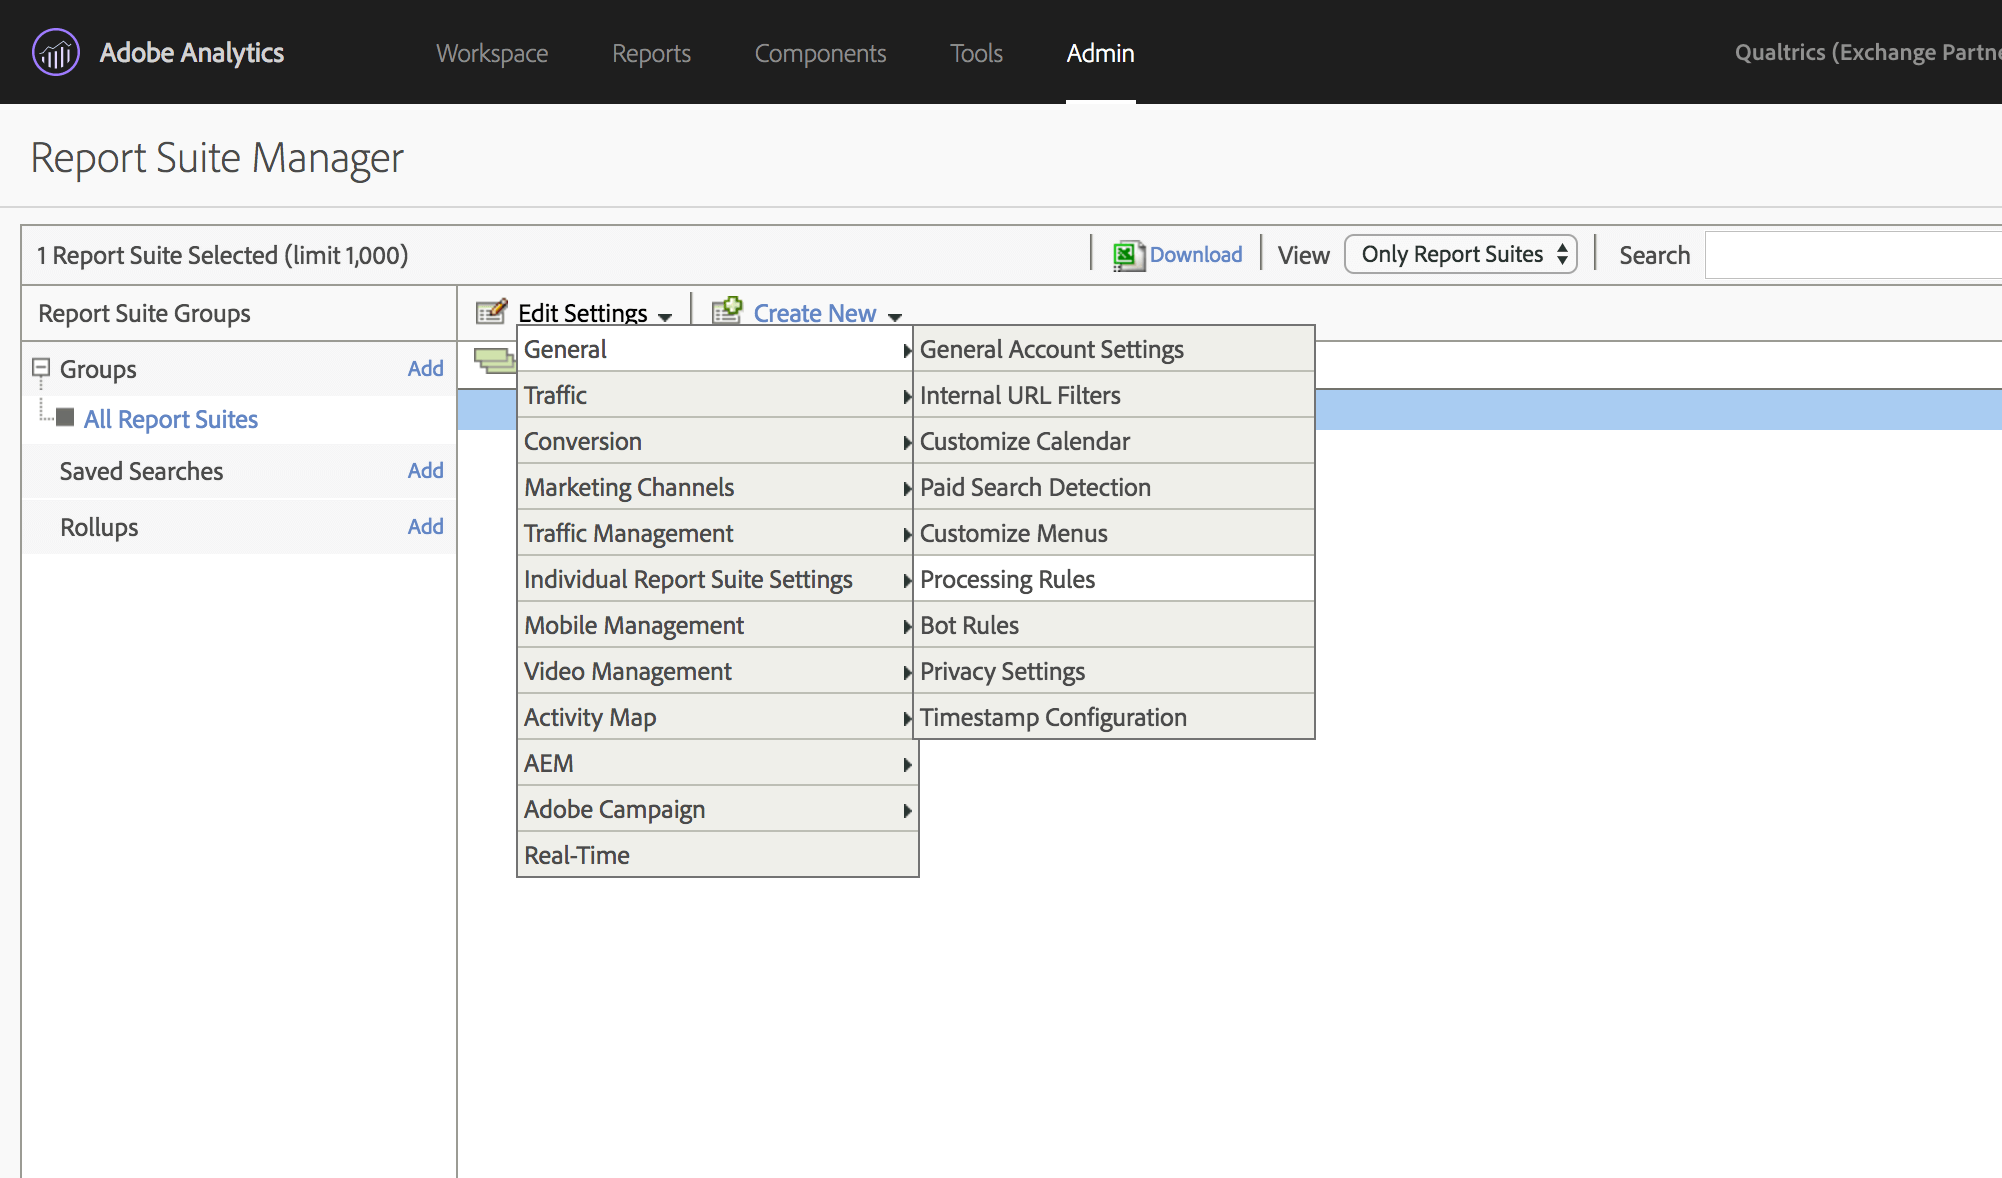
ADDING CONVERSION CLASSIFICATIONS TO ADOBE REPORT SUITE
You will need to add conversion classifications to your list variable in your Adobe report suite in order to correctly pull in Qualtrics response data.
Qtip: If you are using a pre-existing report suite that has a data connector already, you can skip this section.
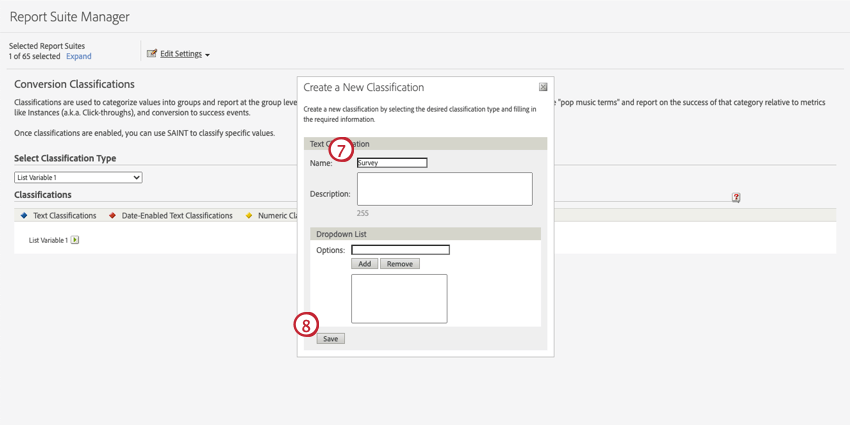
“Question“
“Response“
“Survey > Question > Response”
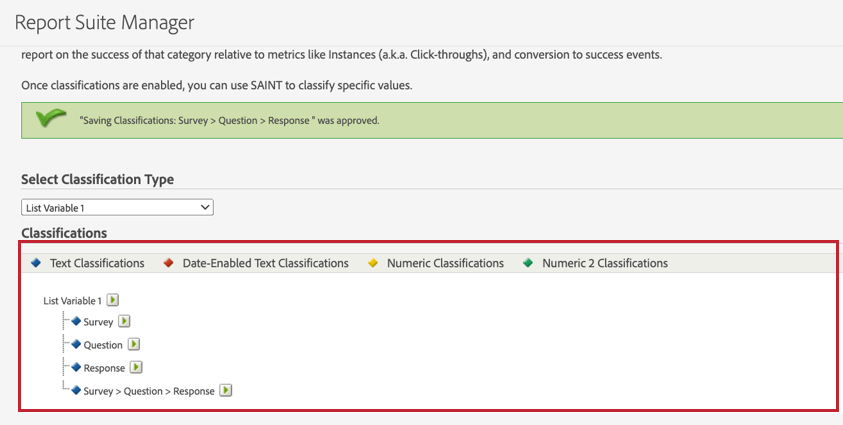
Attention: You must use the exact classification names specified in Step 9 in order for Qualtrics survey response data to show up correctly within Adobe Analytics.
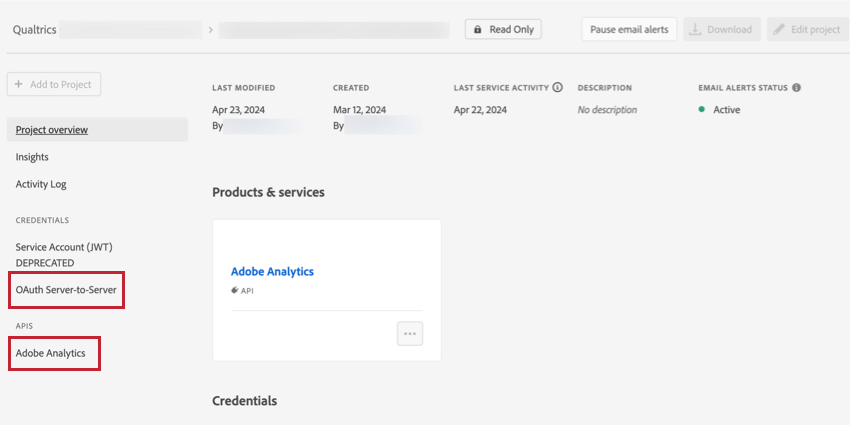
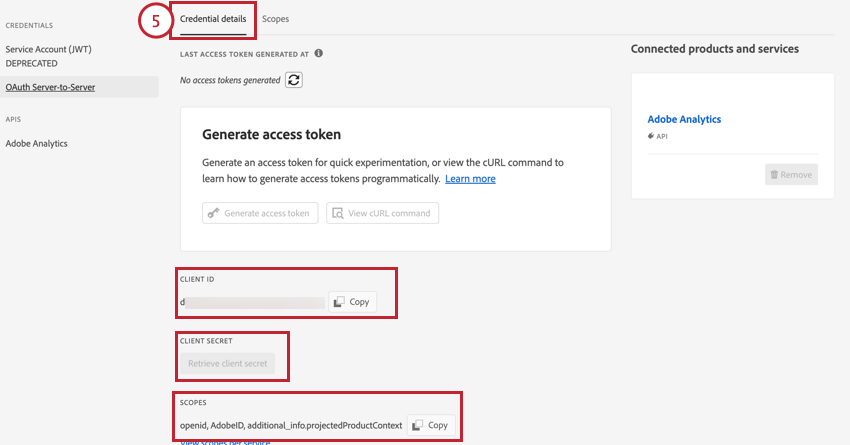
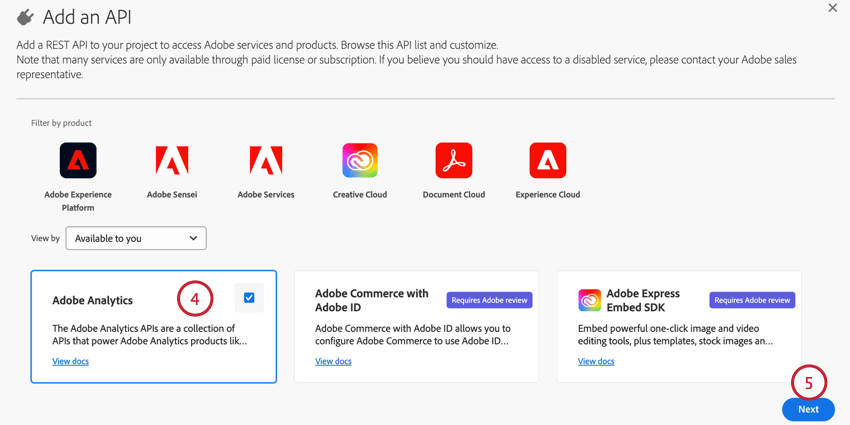
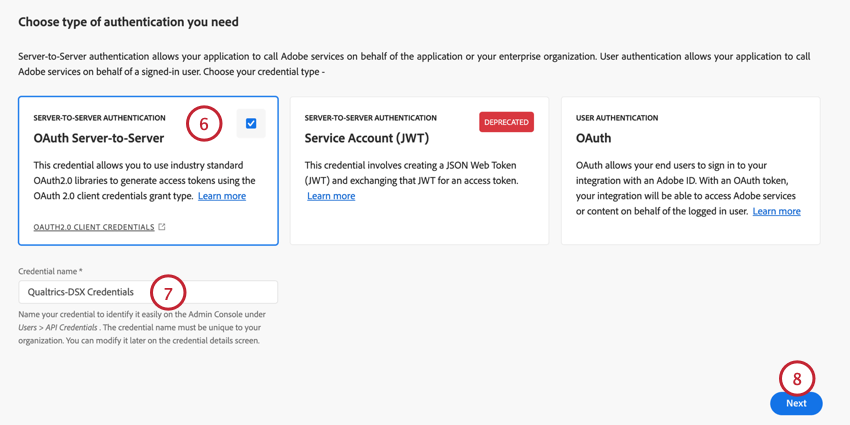
GETTING ADOBE AUTHENTICATION SECRETS
You will need to provide the following credentials to allow Qualtrics to authenticate to Adobe Analytics report suite. These credentials will be used within Qualtrics when you set up your Adobe workflows and connect an account to interact with Adobe Analytics.
- Client ID: The Client ID provided in the Adobe console as part of the Credential details.
- Client Secret: The Client Secret provided in the Adobe console as part of the Credential details.
- Scopes (optional): Scopes can be used to limit the level of access.
Qtip: If you don’t already have Adobe authentication secrets, you will need to create them within your Adobe account by following the instructions in the next section.
To obtain the credentials, follow these steps in Adobe Analytics:
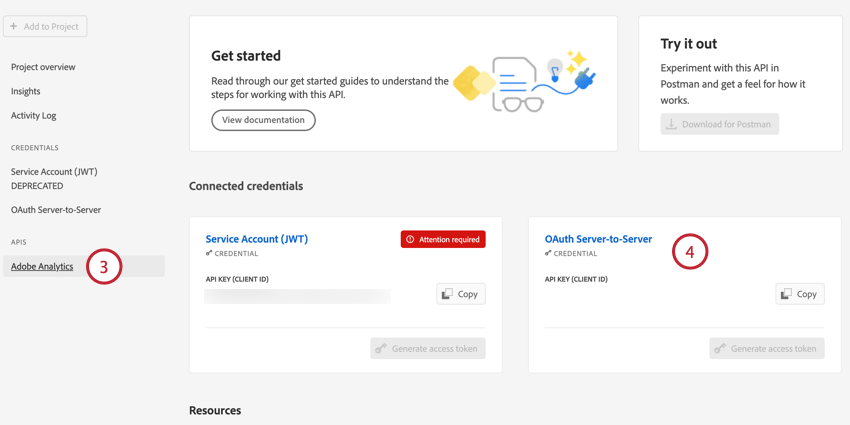
- Client ID
- Client secret
- Scopes
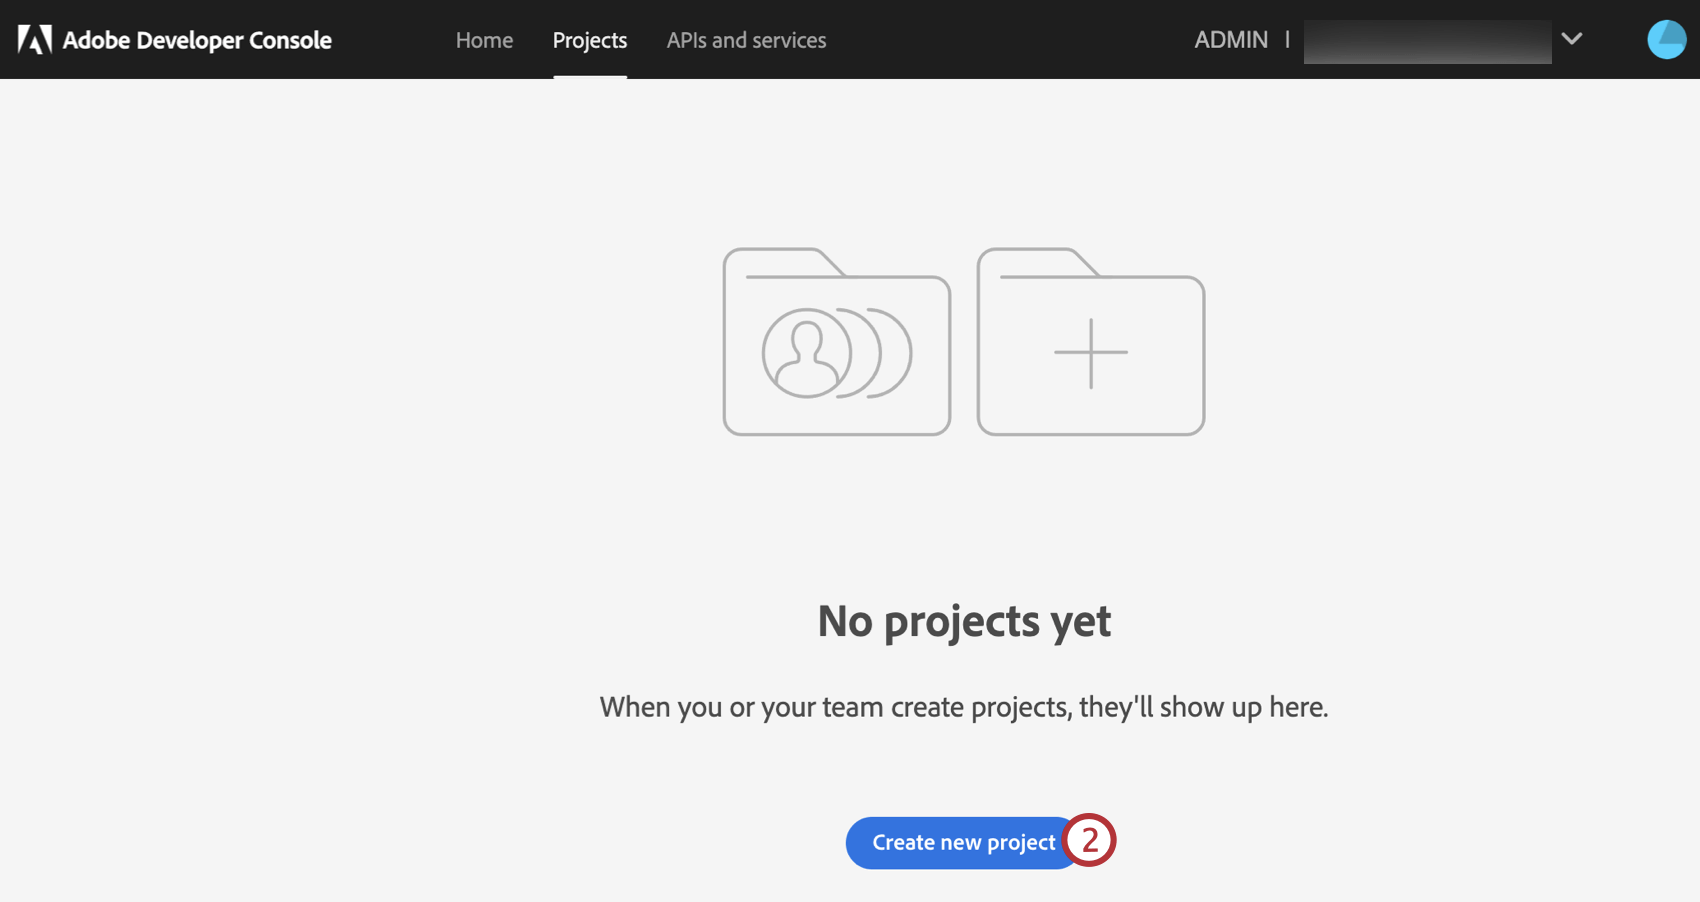
CREATING ADOBE AUTHENTICATION SECRETS
If you don’t already have authentication secrets, follow these steps to create them. Visit Adobe’s support documentation for more information.
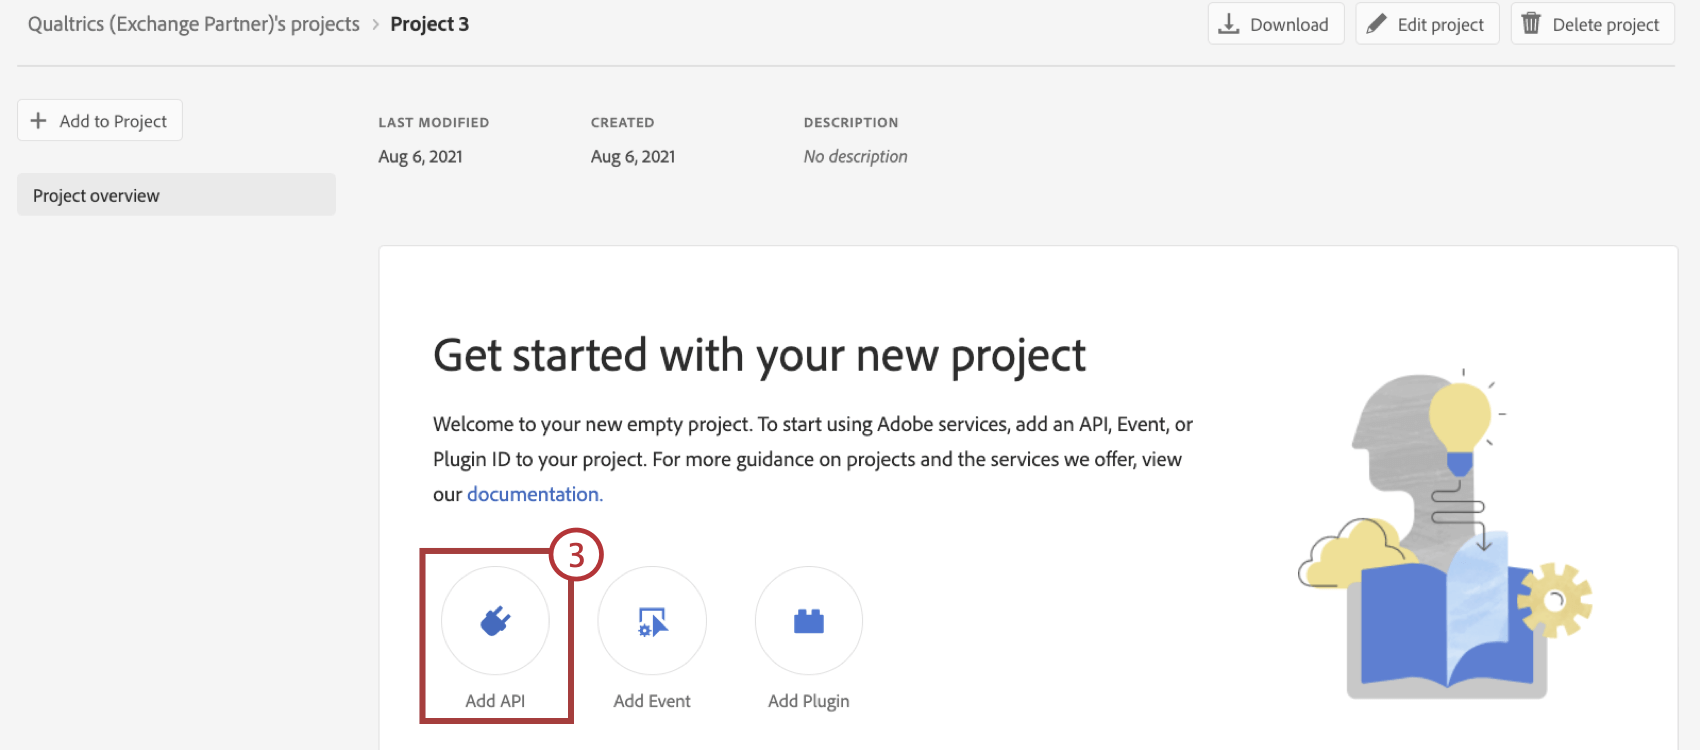
- Analytics Tools:
- Web Services
- Analysis Workspace Access or Reports & Analytics Access.
- Report Suite Tools:
- Classifications.
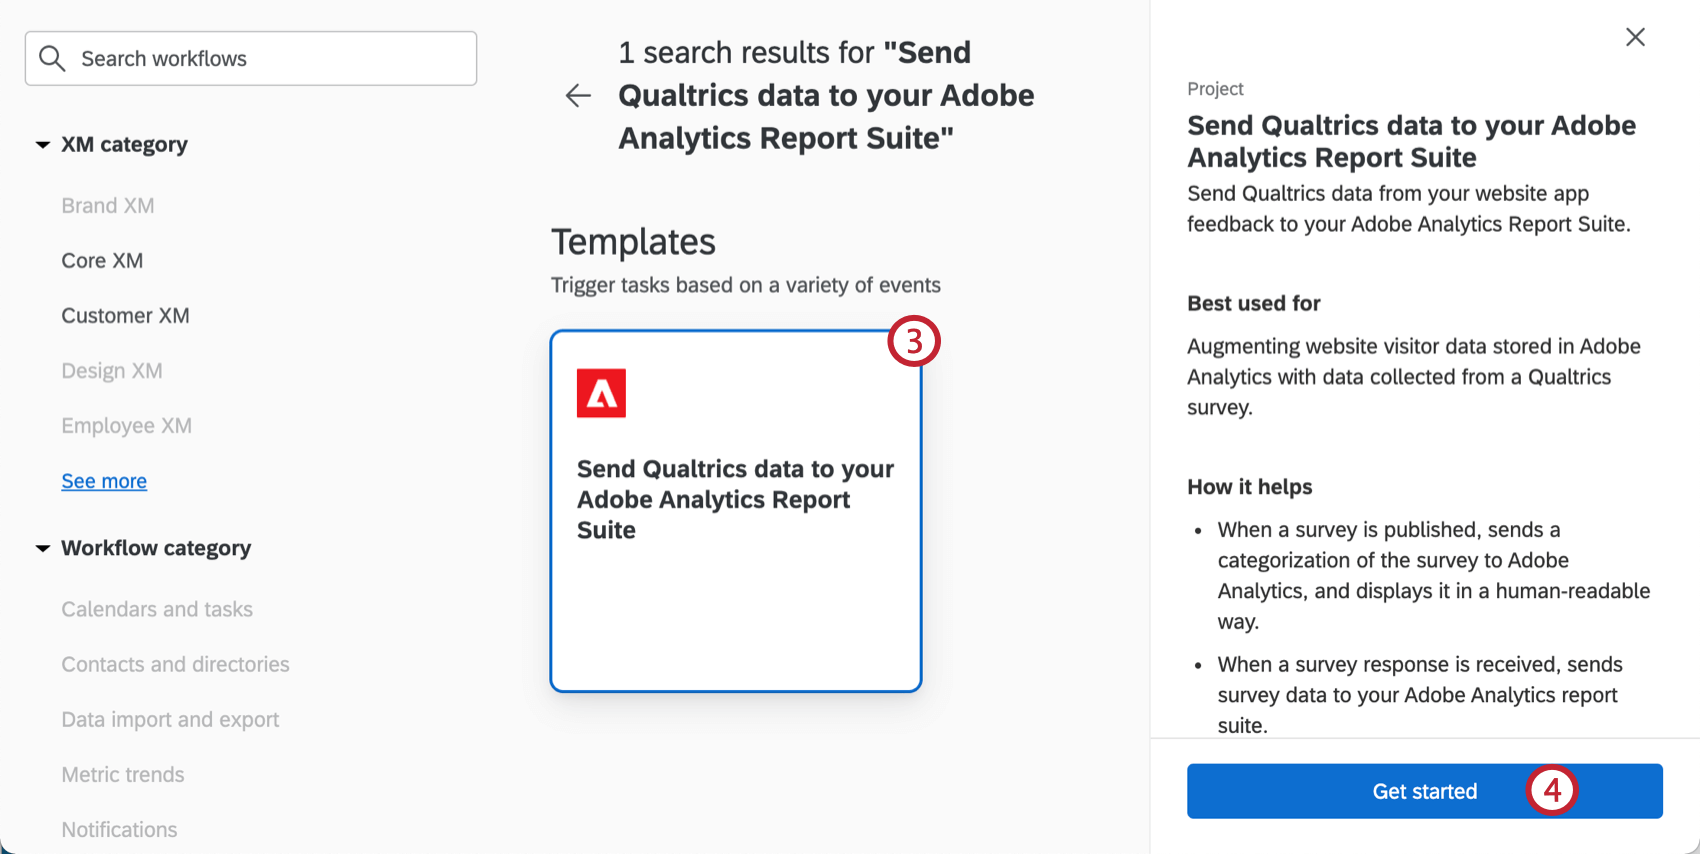
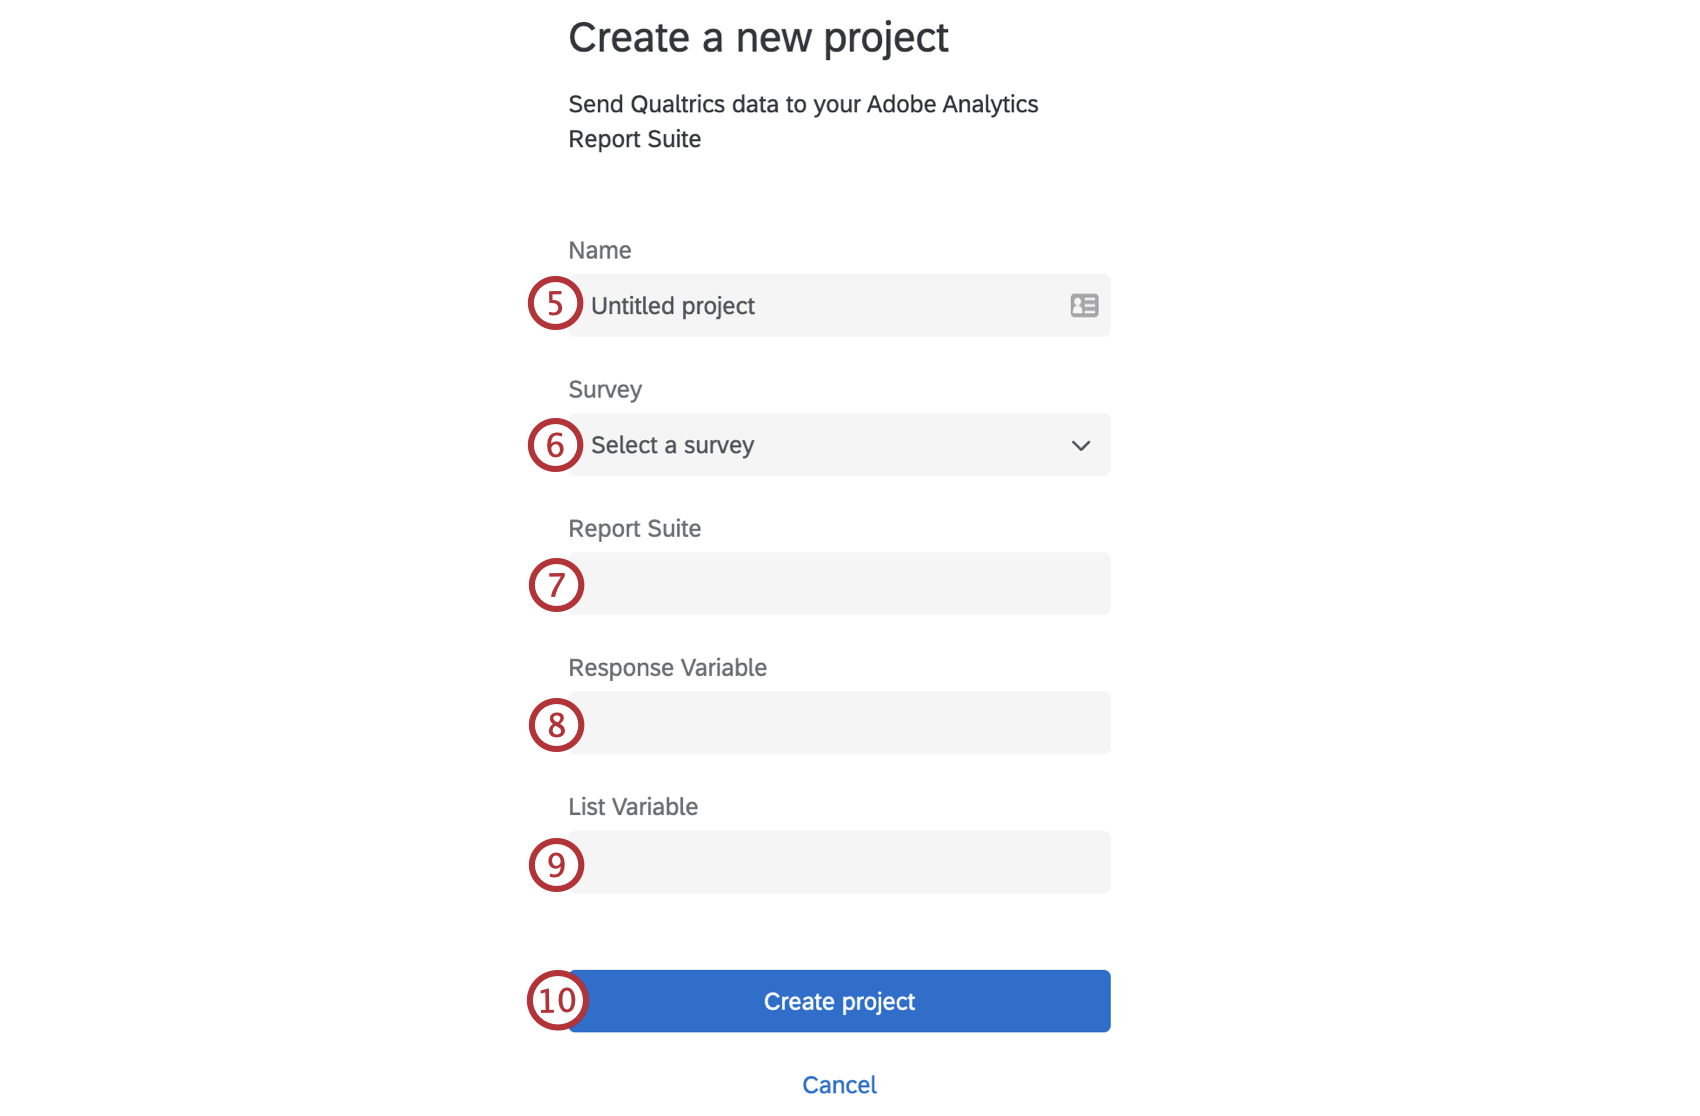
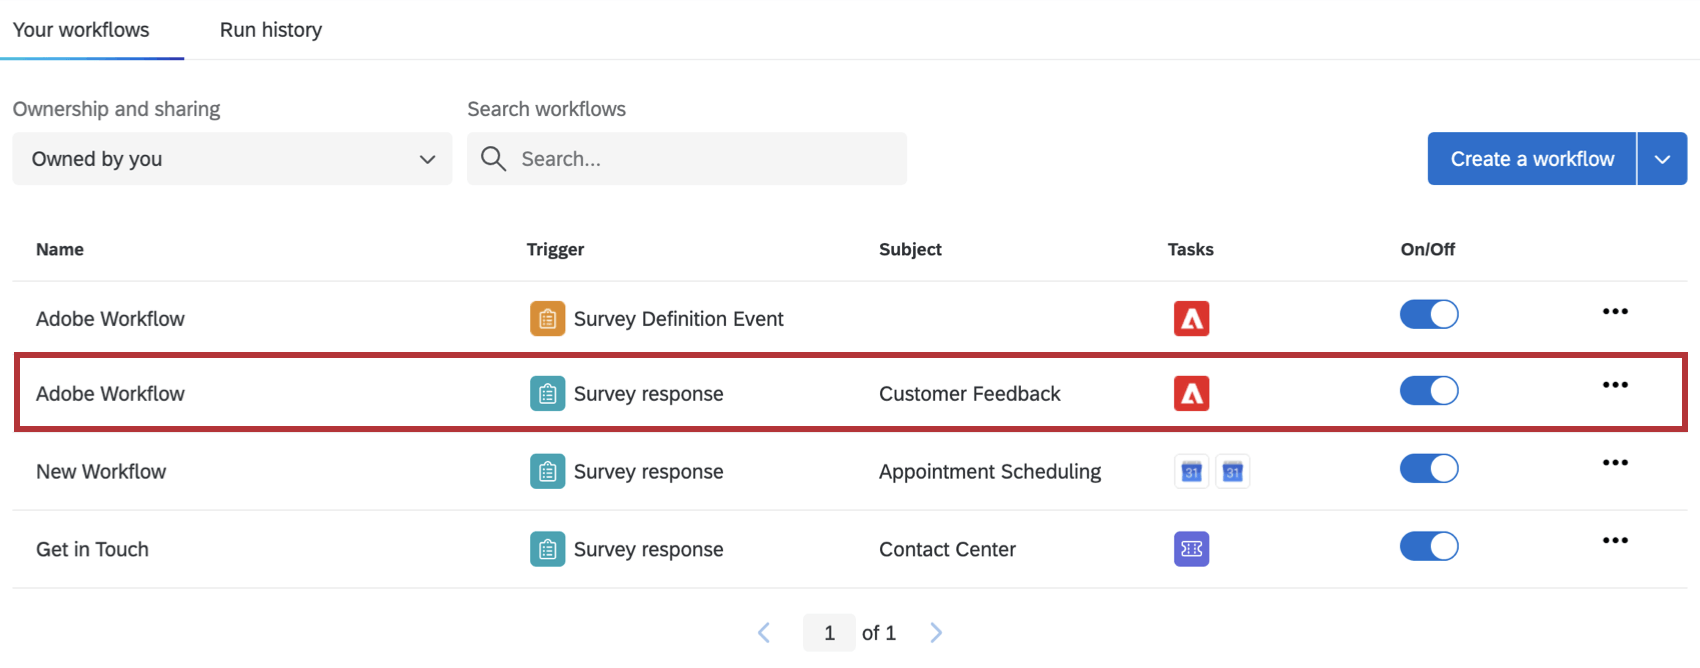
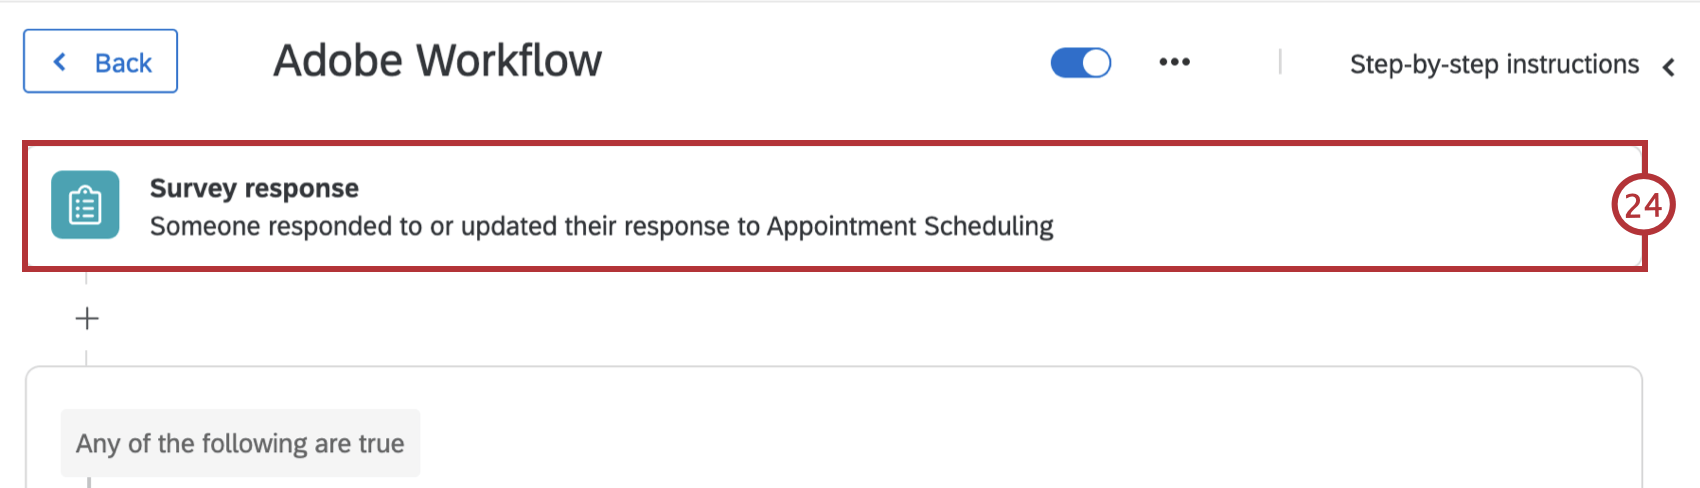
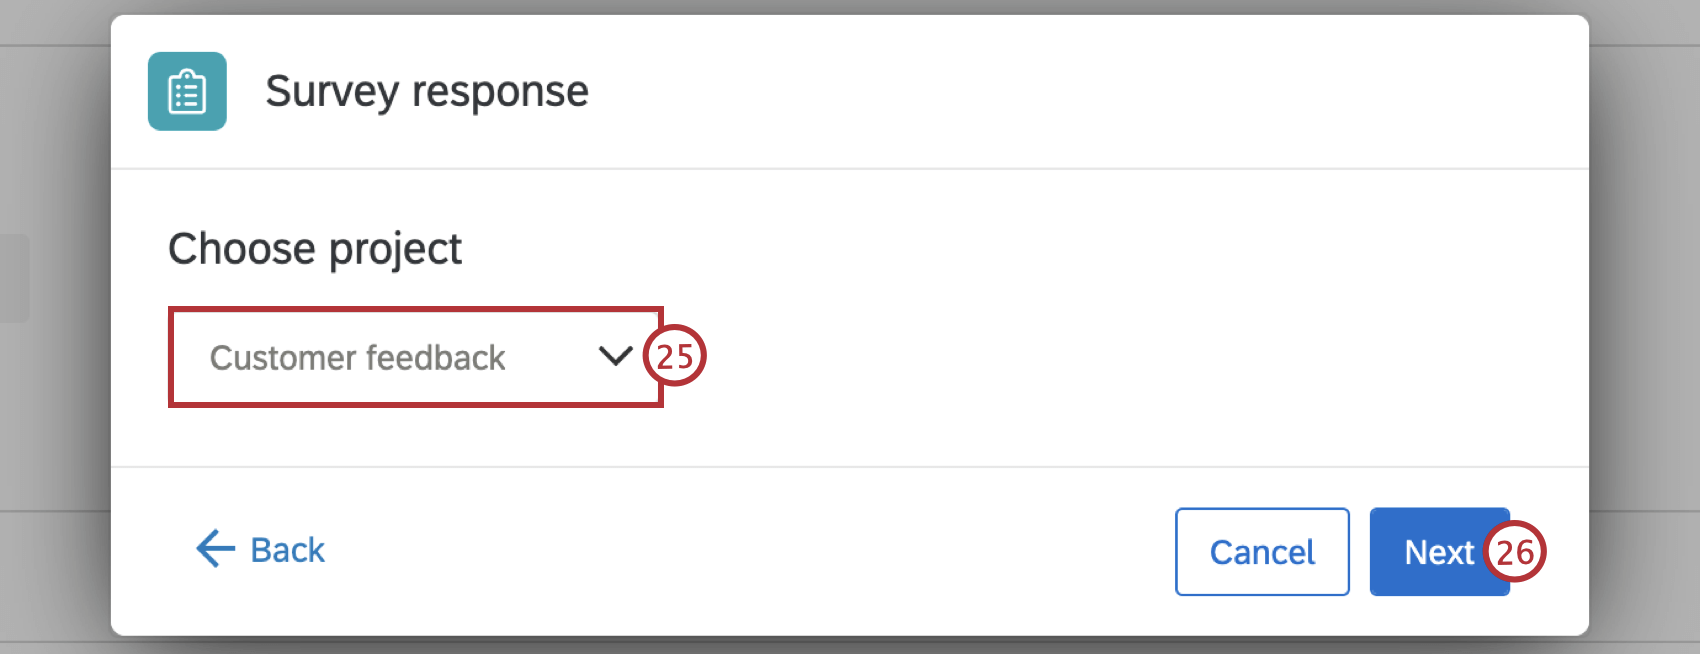
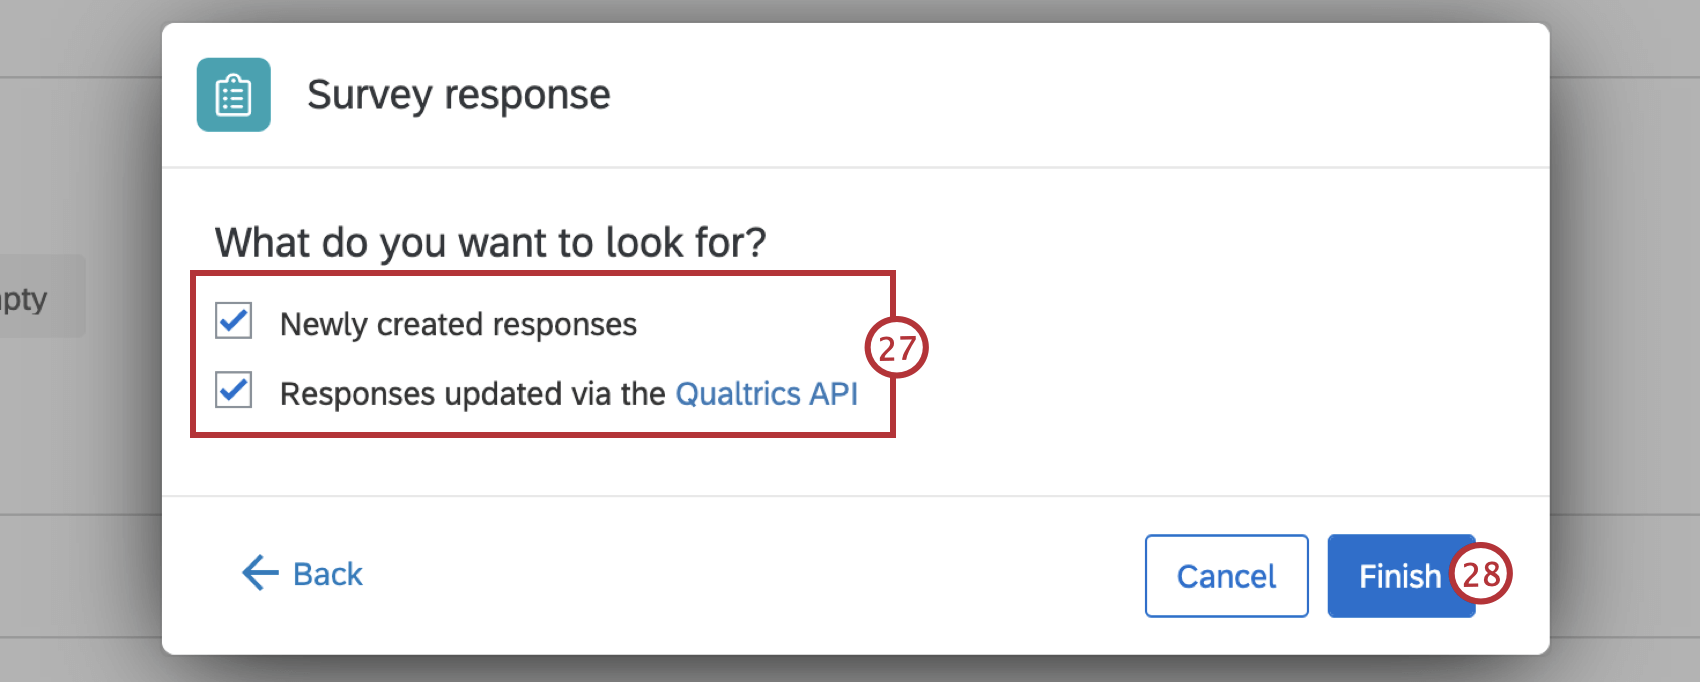
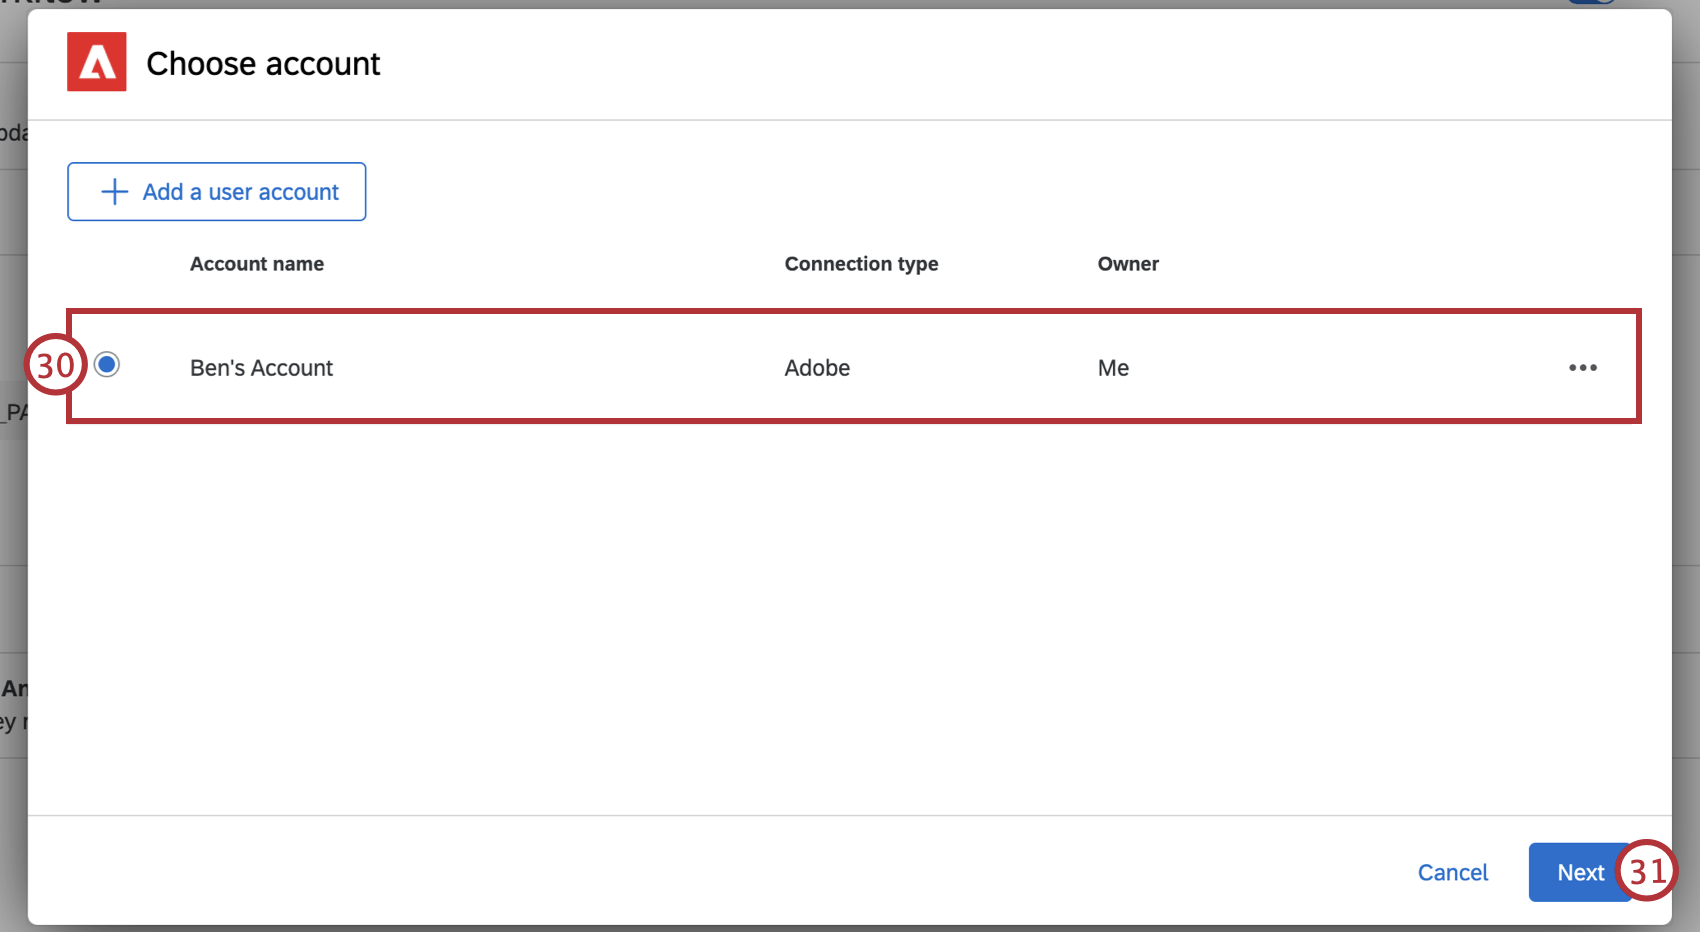
SETTING UP THE ADOBE ANALYTICS WORKFLOW IN QUALTRICS
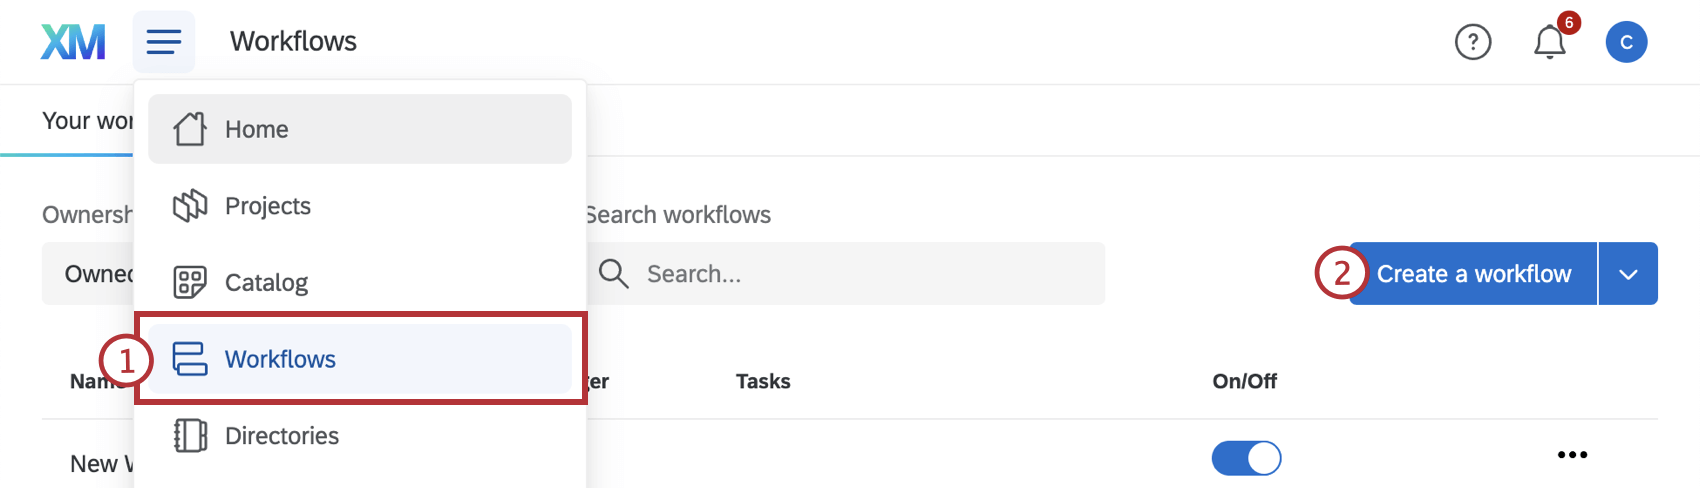
Qtip: This can be found under the “Strategic Research” or “CustomerXM” sections, or you can use the search bar to search for Adobe Analytics.
Qtip: Click Step-by-step instructions in the top-right corner to view these instructions while creating your workflow.
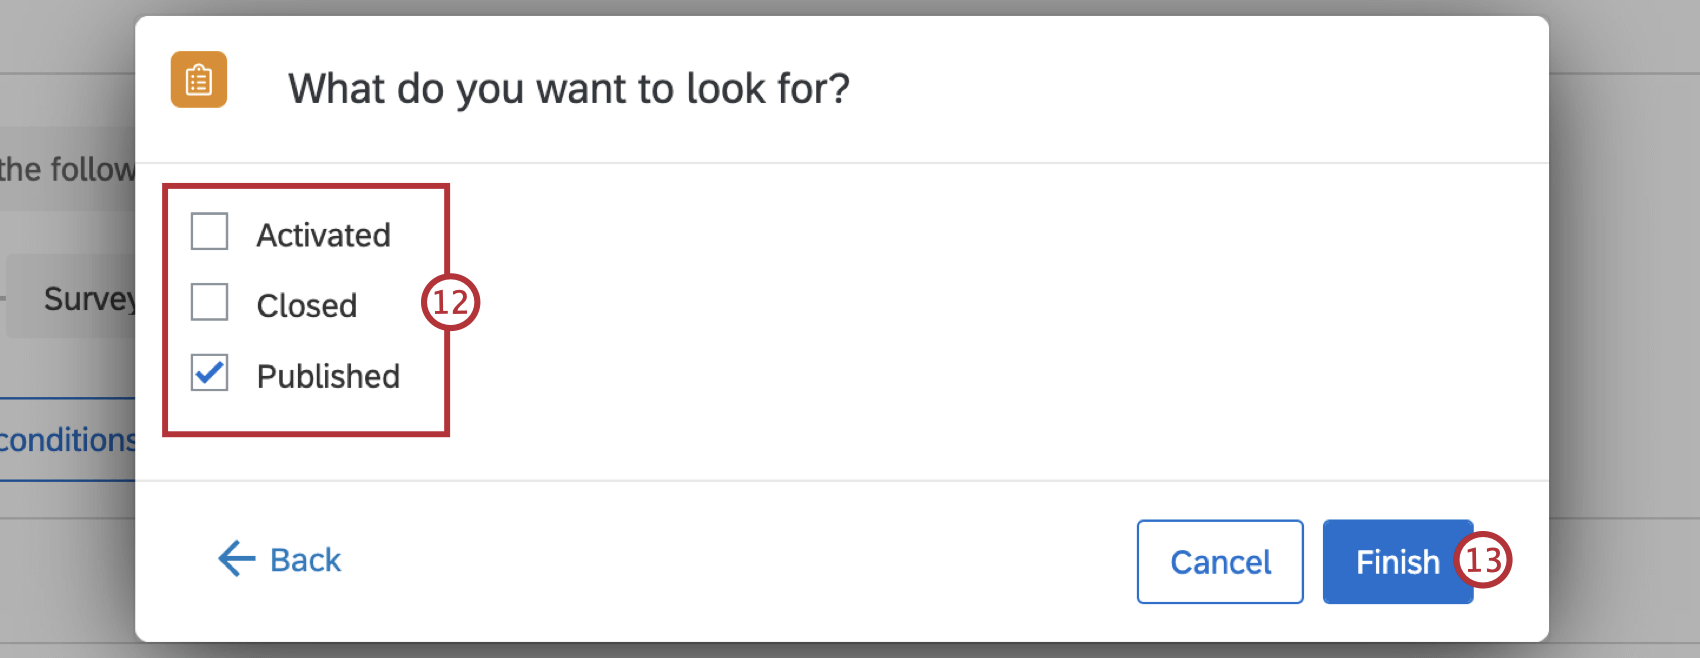
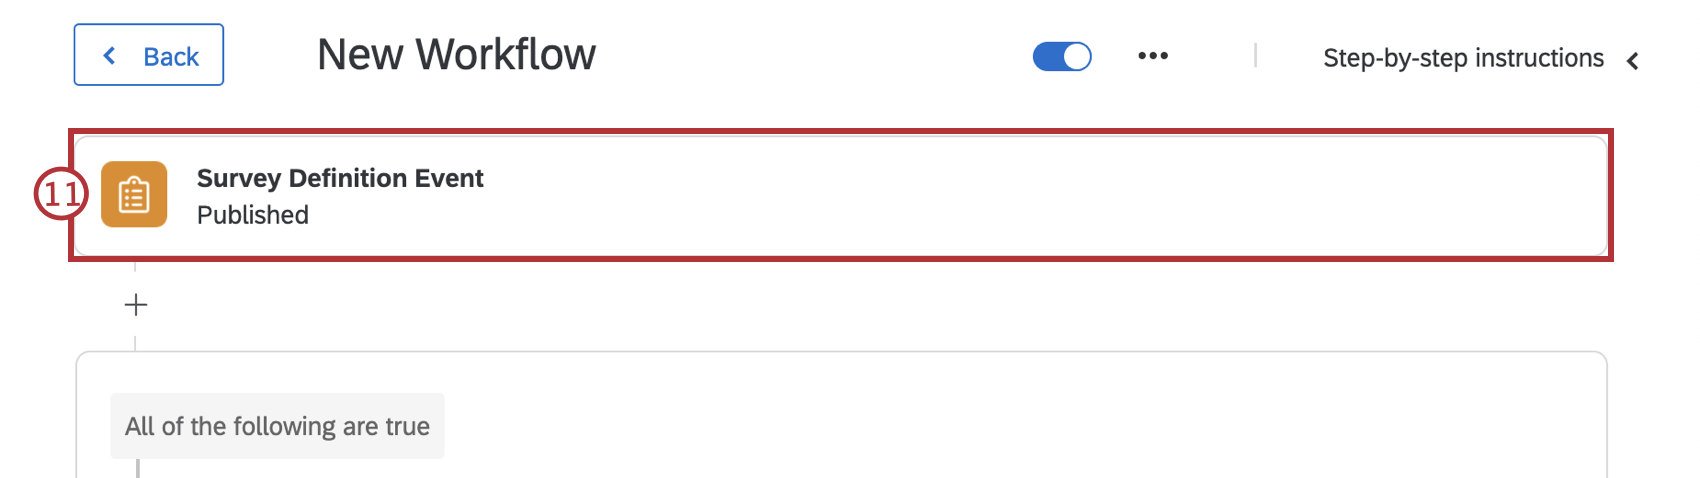
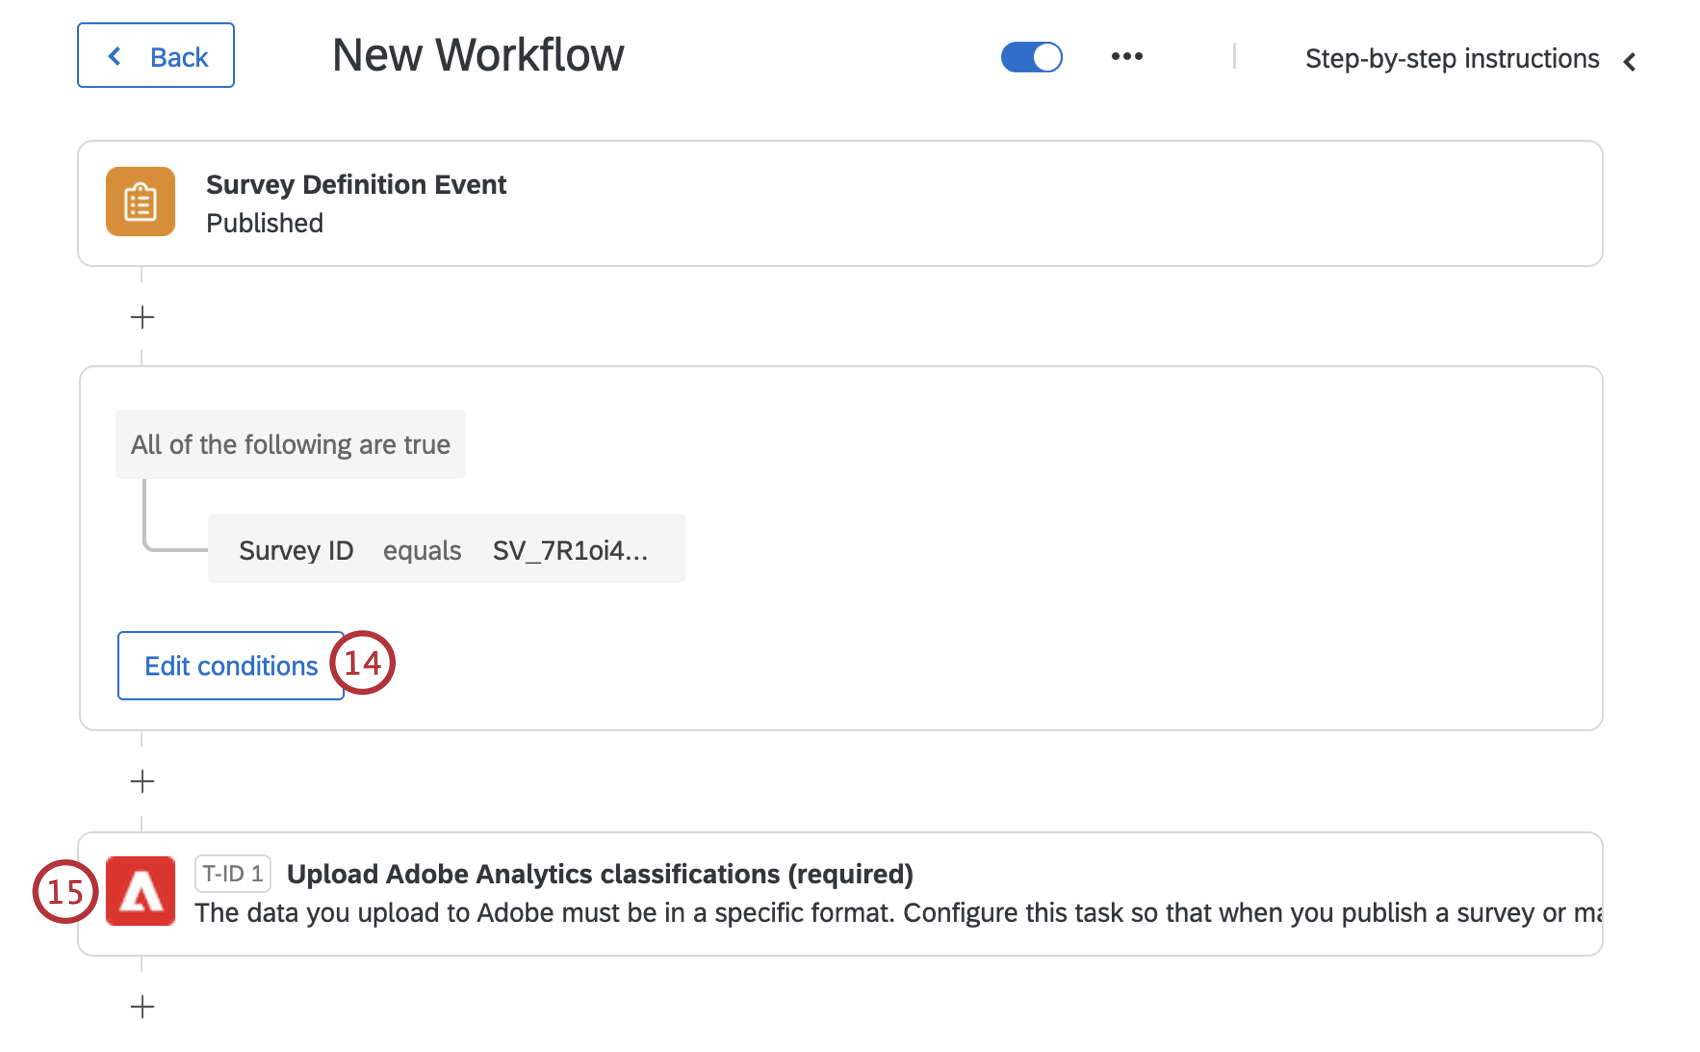
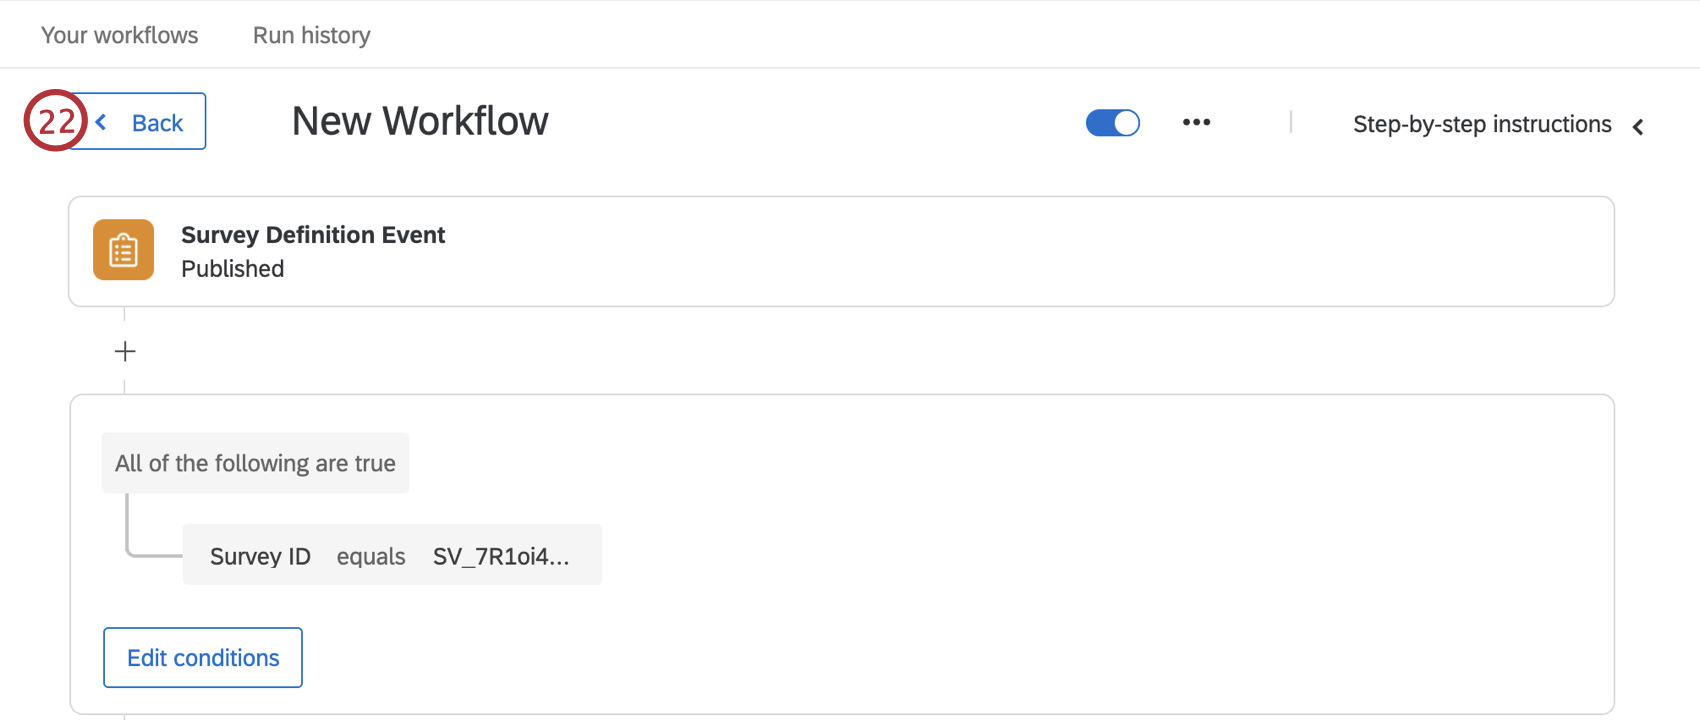
Qtip: Qualtrics recommends starting this workflow only when the survey is published.
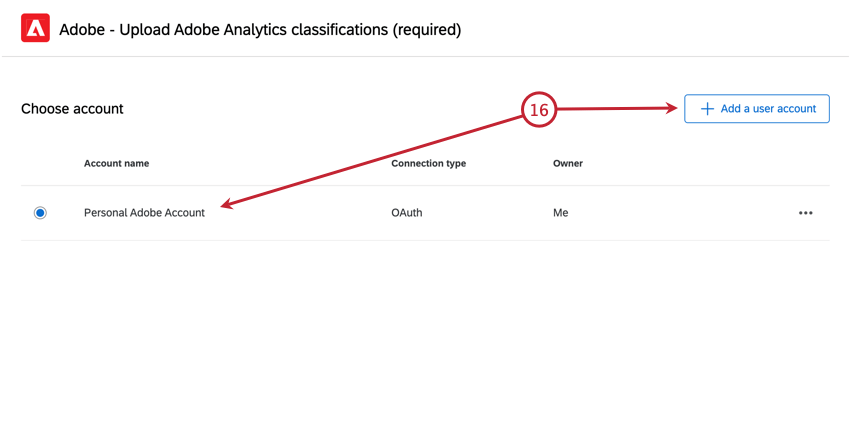
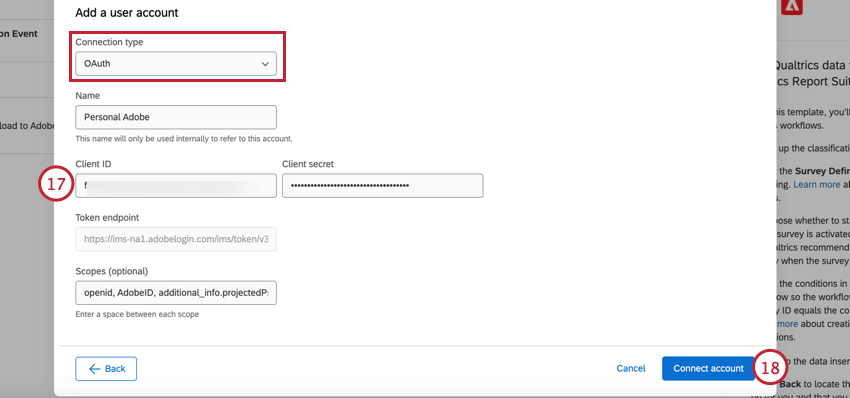
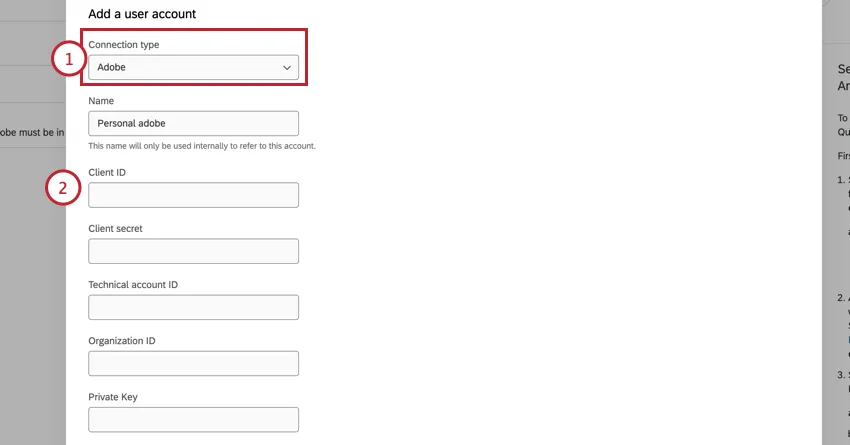
- Name: Give the account an identifiable name.
- Client ID: The client ID from Adobe.
- Client secret: The client secret from Adobe.
- Token endpoint: The authentication endpoint. This will be automatically filled and cannot be edited.
- Scopes (optional): You can use scopes to limit the level of access. While scopes are optional, if they are included in your Adobe setup, then you must also include them here. Attention: Service Account (JWT) credentials are being deprecated by Adobe. See Legacy JWT Credentials for more information about this authentication type.


Qtip: If your timestamp settings are mismatched (i.e., if it is enabled on the Qualtrics side but disabled on the Adobe side, or vice versa), then data will not appear in the Adobe report suite. In the above example, the data would be successfully sent from Qualtrics but be excluded before it appears in Adobe due to mismatched timestamp settings. Please check your timestamp settings to ensure your data appears in Adobe.

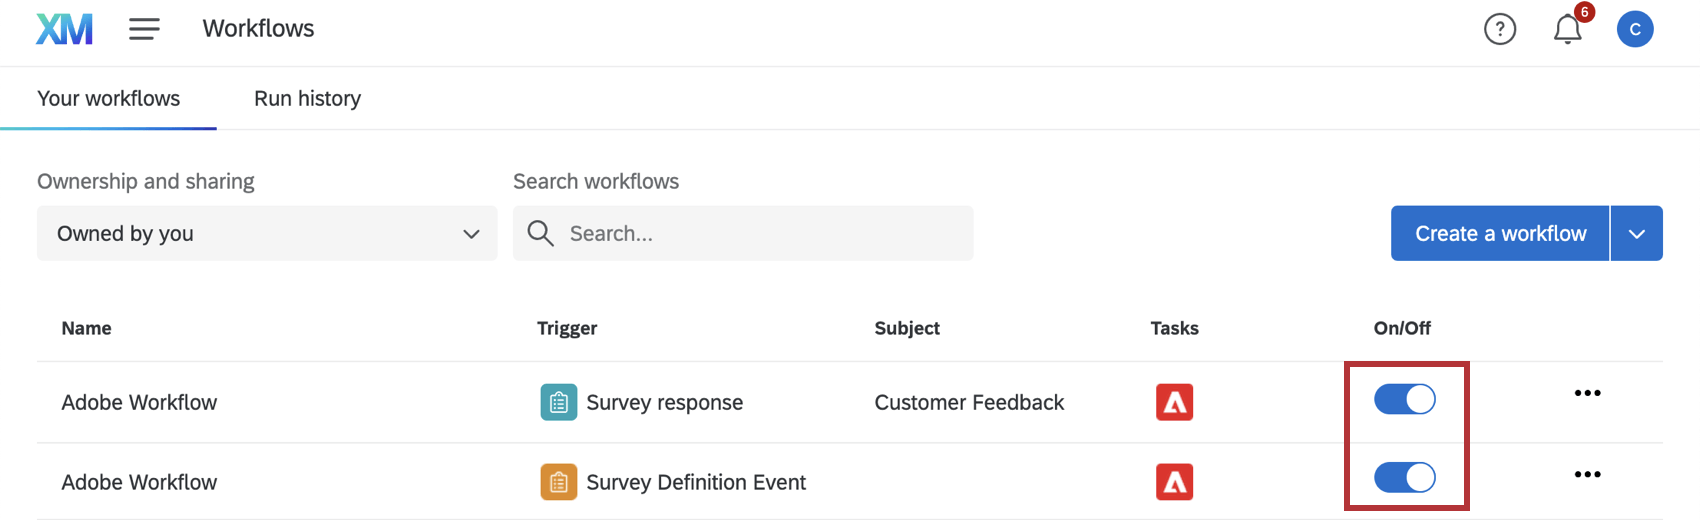
Attention: Make sure your survey is published after setting up and switching on both of your Adobe Analytics workflows. Even if your survey has previously been published, you will need to re-publish the survey after your workflows have been switched on. If your survey is not published, your workflows will not run and your data will not show up in Adobe.
Qtip: While Qualtrics uploads data immediately, it may take a few hours for Adobe Analytics to process and classify survey responses.
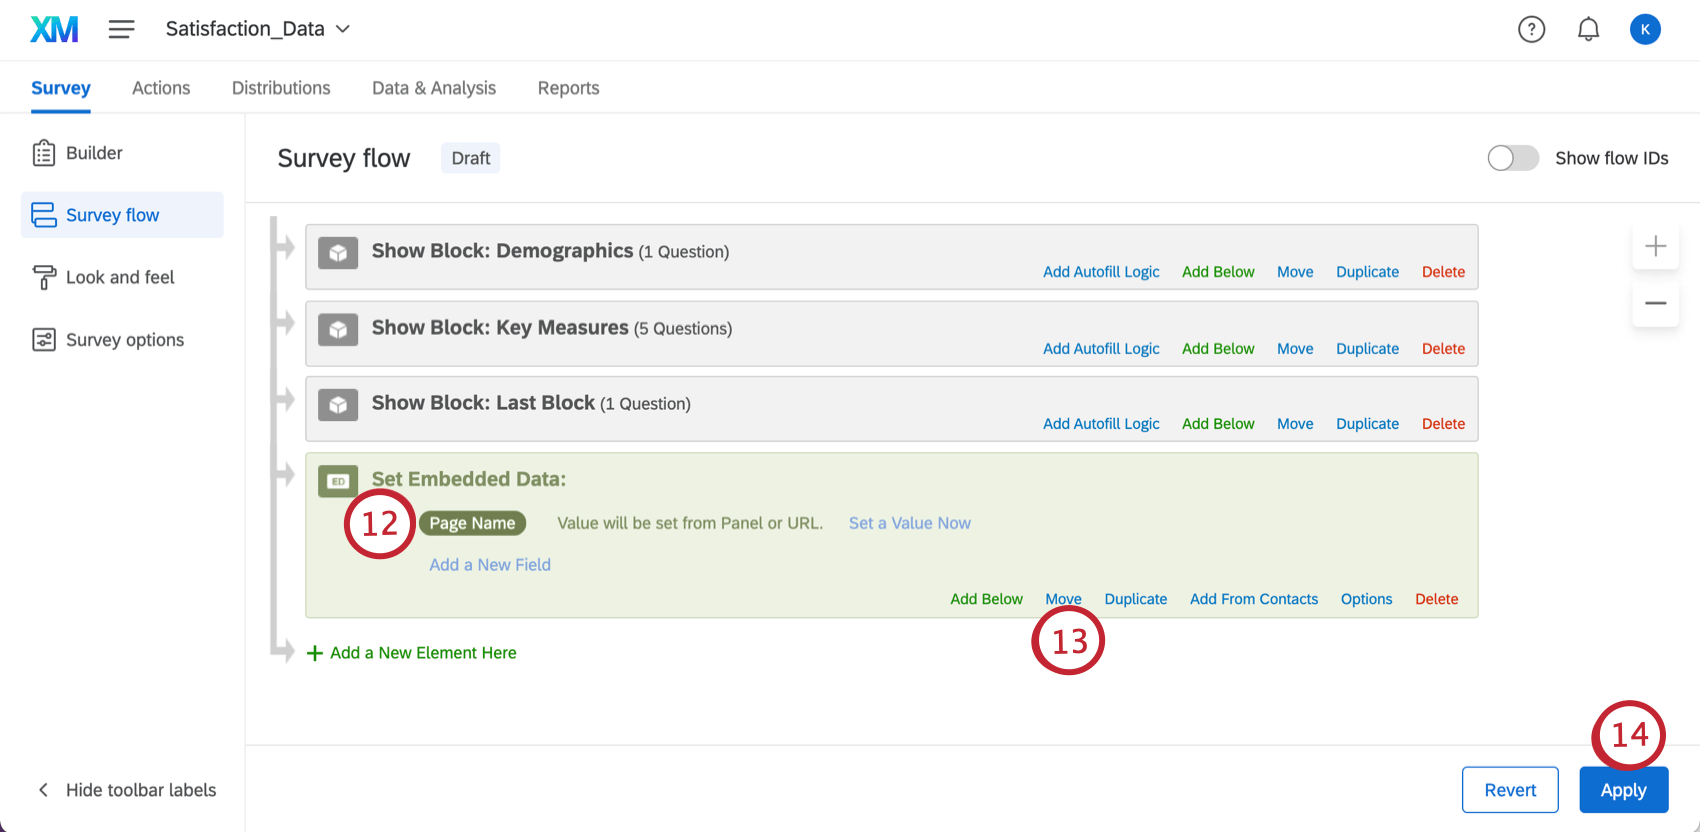
ADDING EMBEDDED DATA
If you are creating a new survey and intercept to pass data to Adobe, you will need to add embedded data to both your survey and the intercept. Once this embedded data is added, you should be able to successfully set up Adobe workflows using the survey you made.
If you are creating an intercept using a guided setup:
If you are creating an intercept using a non-guided setup:
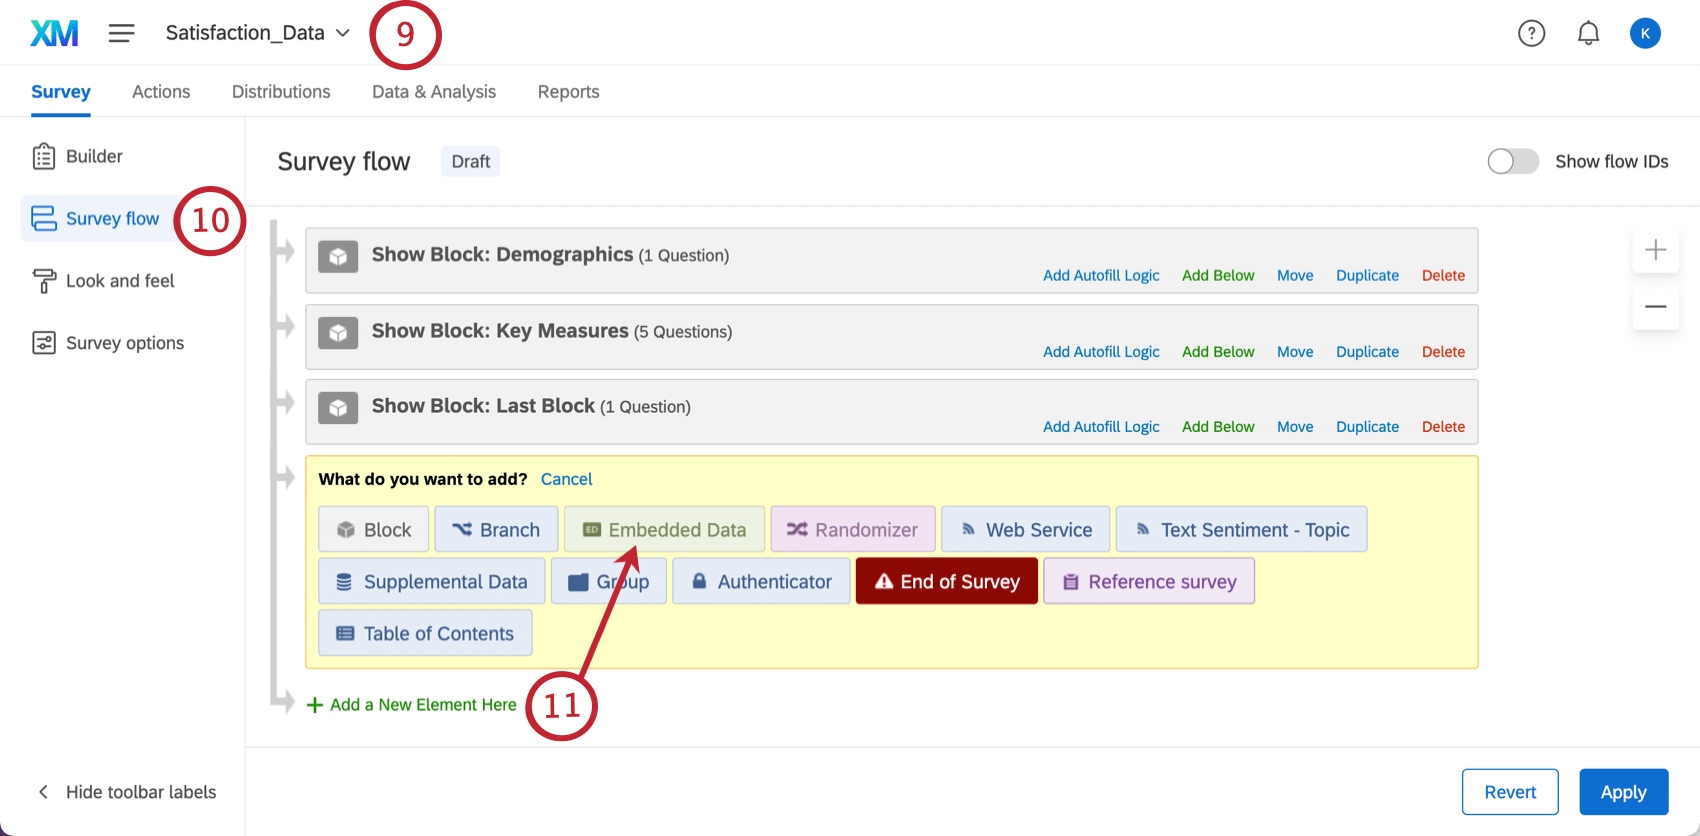
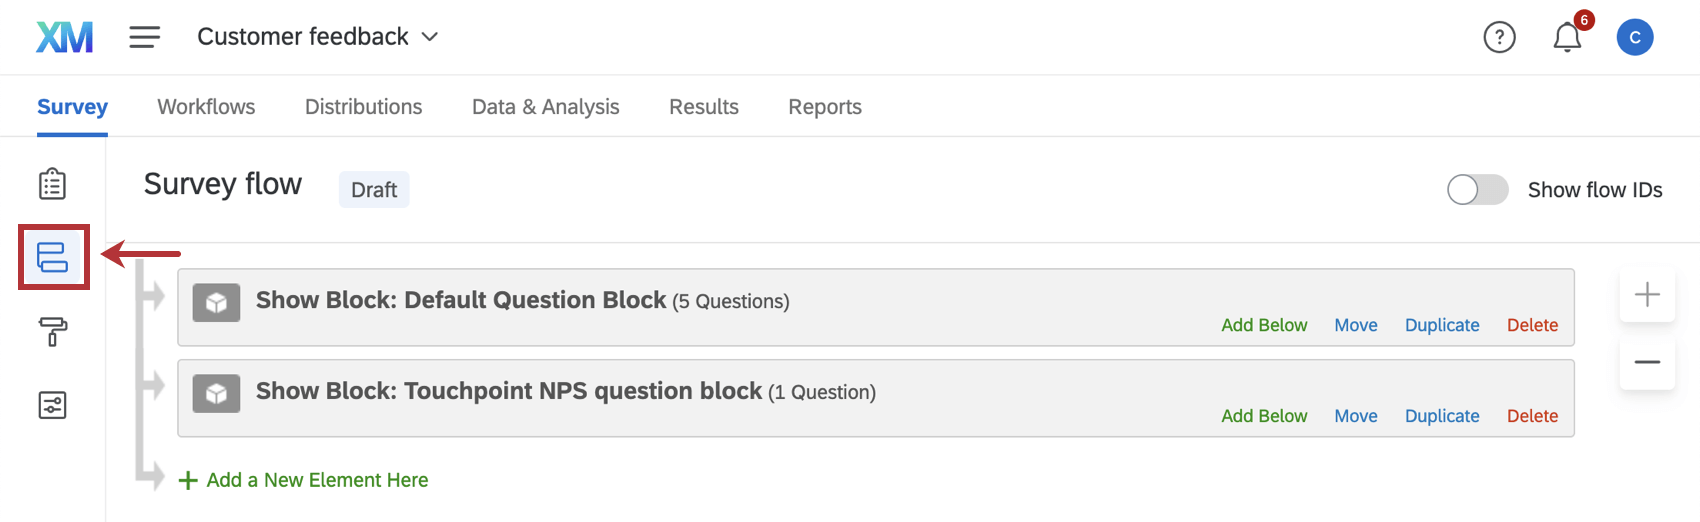
Once embedded data has been set up in your intercept, follow these steps to add it to your survey:
Using Adobe Web SDK (AEP) with Qualtrics
While the Qualtrics Adobe Analytics Extension does not natively support the Web SDK, you can still pass data to Qualtrics by using a Global JavaScript Object as a bridge. This is the most reliable method if you have migrated to the Web SDK JavaScript library (alloy.js) library.
Attention: Custom coding features are provided as-is and require programming knowledge to implement. Qualtrics Support does not offer assistance or consultation on custom coding. You can always try asking our community of dedicated users instead. If you'd like to know more about our custom coding services, please contact your Qualtrics Account Executive.
Step 1: Create a "Bridge" Variable in Adobe Tags
In your Adobe Tags (Launch) property, create a rule that fires on every page.
Qtip: Ensure this rule fires before the Qualtrics snippet loads. We recommend setting this rule to fire at Library Loaded or Page Top to help make sure the data is available when the Intercept triggers.
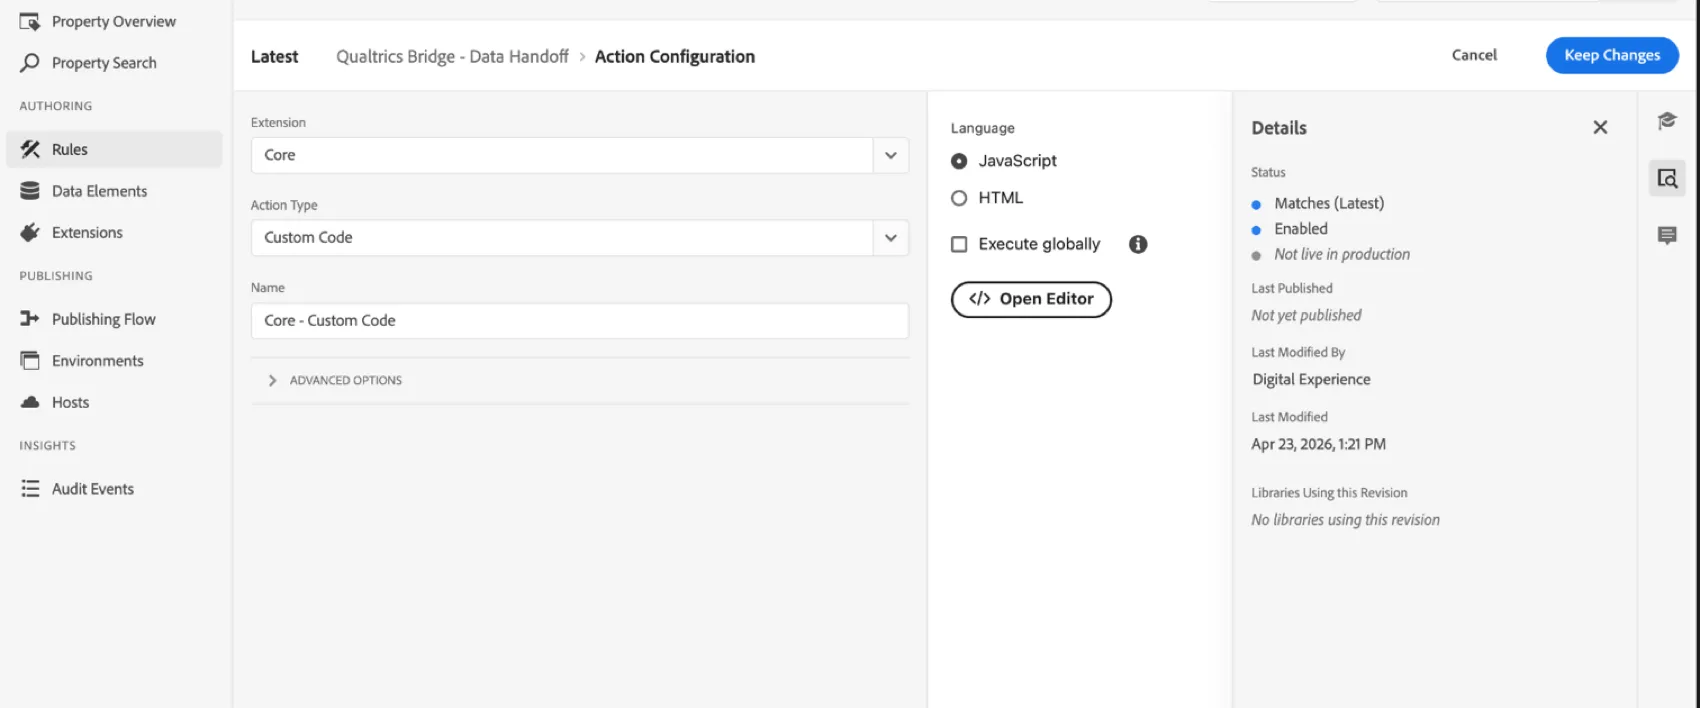
Then, add a Custom Code action to map your Adobe Data Elements to a simple window object. If using an XDM Object, use dot notation (e.g., _satellite.getVar("XDM Object").web.webPageDetails.name).
Example: Below is an example to pass Page Name, Adobe Experience Cloud ID, and Loyalty Tier.
 window.qualtricsBridge = {
 pageName: _satellite.getVar("Page Name"),
 ecid: _satellite.getVar("Adobe Experience Cloud ID"),
 userStatus: _satellite.getVar("Loyalty Tier")
};
Step 2: Map the Data in Qualtrics Website Feedback
Instead of selecting "Adobe Analytics" as the data source in your Intercept, use Value from Javascript.
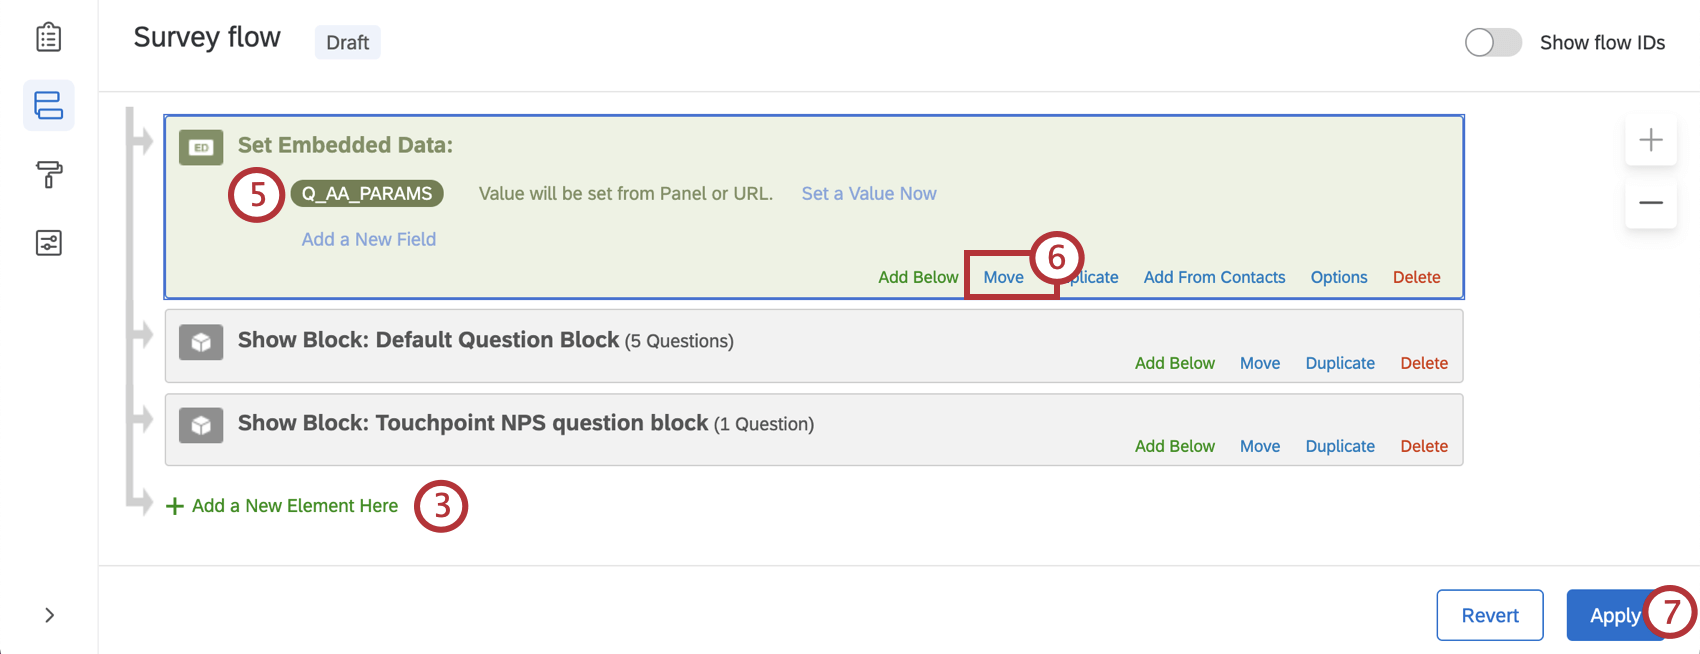
Open your intercept and click Options.

- Click Embedded Data.
For the Name, type the field name as you want it to appear in Qualtrics (e.g., Page Name).
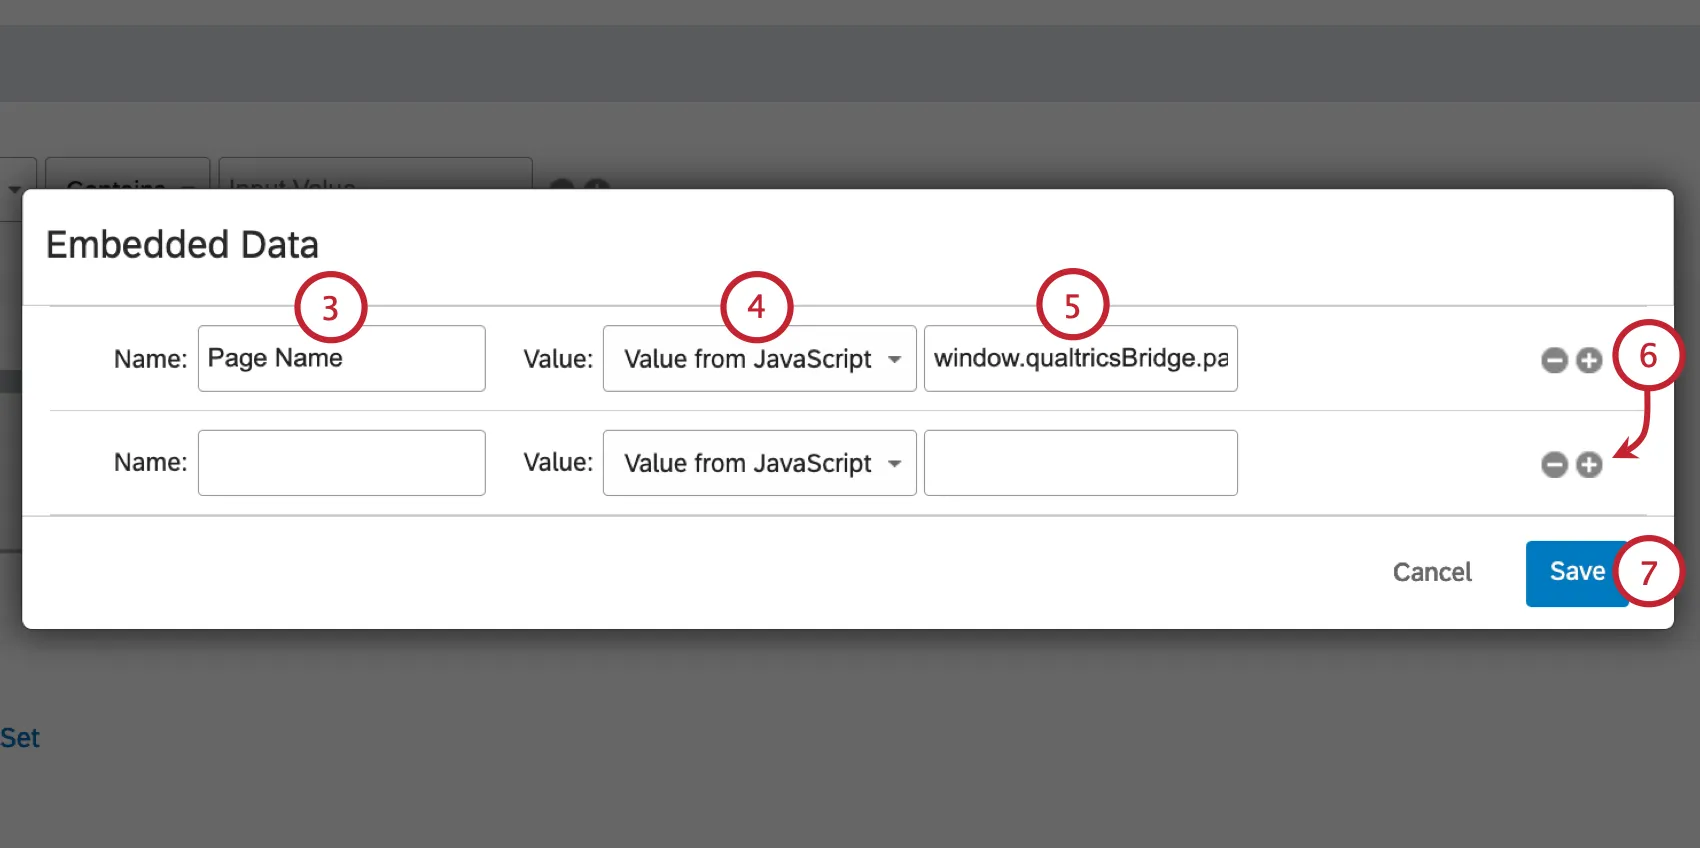
- For the Value, select Value from Javascript
- Enter the path to your bridge variable (e.g., window.qualtricsBridge.pageName).
- Click the plus sign ( + ) to add more variables and repeat steps 3-5 for each additional variable. (e.g., window.qualtricsBridge.ecid).
- Click Save.
Troubleshooting Passing Qualtrics Data to Adobe Analytics
There are a couple of common errors that can take place with the Qualtrics-Adobe Analytics extension. Consider the below tips if you run into an issue.
DELAYS IN DATA CONSUMPTION
In general, it takes about 24 hours for data to appear in the Adobe Analytics platform. This means that even if you have turned on the extension for one of your surveys, you will not see any results populated in the Adobe Analytics platform for at least a day. The survey results you have collected with Qualtrics will appear within the Qualtrics interface immediately.
Certain Data Not Appearing in Adobe Analytics
The Qualtrics-Adobe Analytics extension passes survey response information over to Adobe Analytics in the form of a list variable. However, only specific kinds of data are passed:
- Any data that can be expressed as a recode value or embedded data value will be passed through the Data Connector, but no other data can be.
- Responses to survey questions like multiple choice questions and likert matrix tables will be included.
- Constant sum, slider, rank order, and heat map questions behave differently. Responses to these questions are passed to Adobe Analytics with the value of "[numeric response]" rather than the actual value.
- Open text will not be included. This includes responses to text entry questions or any other question type with text entry enabled on it. These fields are passed to Adobe Analytics with "[open text]" as the value.
Only the first 60 embedded data fields can be passed as “context data” to Adobe Analytics. You will then need to use Adobe’s “Processing Rules” to map that context data to an Adobe Analytics variable. Once you go through these steps, you can create graphs and reports based on the embedded data passed to Adobe Analytics.

Qtip: If you try to send over 60 fields at any time, only the top 60 fields from the survey flow will be sent over to Adobe.
- Embedded data fields must always start with a letter. Supported characters within the embedded data field names include numbers, letters, hyphens, and underscores.
Follow the below steps to test your integration and review the embedded data fields being passed into Adobe:
Qtip: You can only pass 60 embedded data fields to Adobe Analytics. In addition, embedded data keys and values will be “truncated” at 255 characters due to an Adobe Analytics limitation.
Qtip: Preview Survey does not send results to Adobe Analytics.
Legacy JWT Credentials
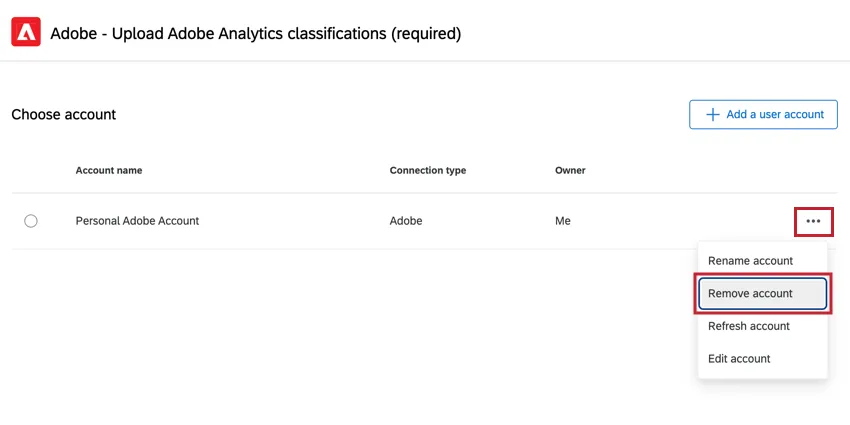
Attention: Adobe has decided to end support for JWT credentials. Please migrate your setup to use OAuth credentials by the end of 2024. You can migrate your credentials by following the instructions to add a new OAuth credential. Once you’ve added new credentials and you’ve tested them to confirm they’re working, you can remove old credentials by clicking the menu next to them and choosing Remove account.
To add or update JWT credentials:
Qtip: You can find your account information by navigating to the Service Account credentials in your project.

That's great! Thank you for your feedback!
Thank you for your feedback!