
Formatting Answer Choices
What's on this page
About Formatting Answer Choices
Once you’ve created a question and formatted it the way you want, it’s time to add choices for your respondents to pick from. This page covers all the ways you can add, remove, and customize the answer choices to your questions.
Adding Answer Choices
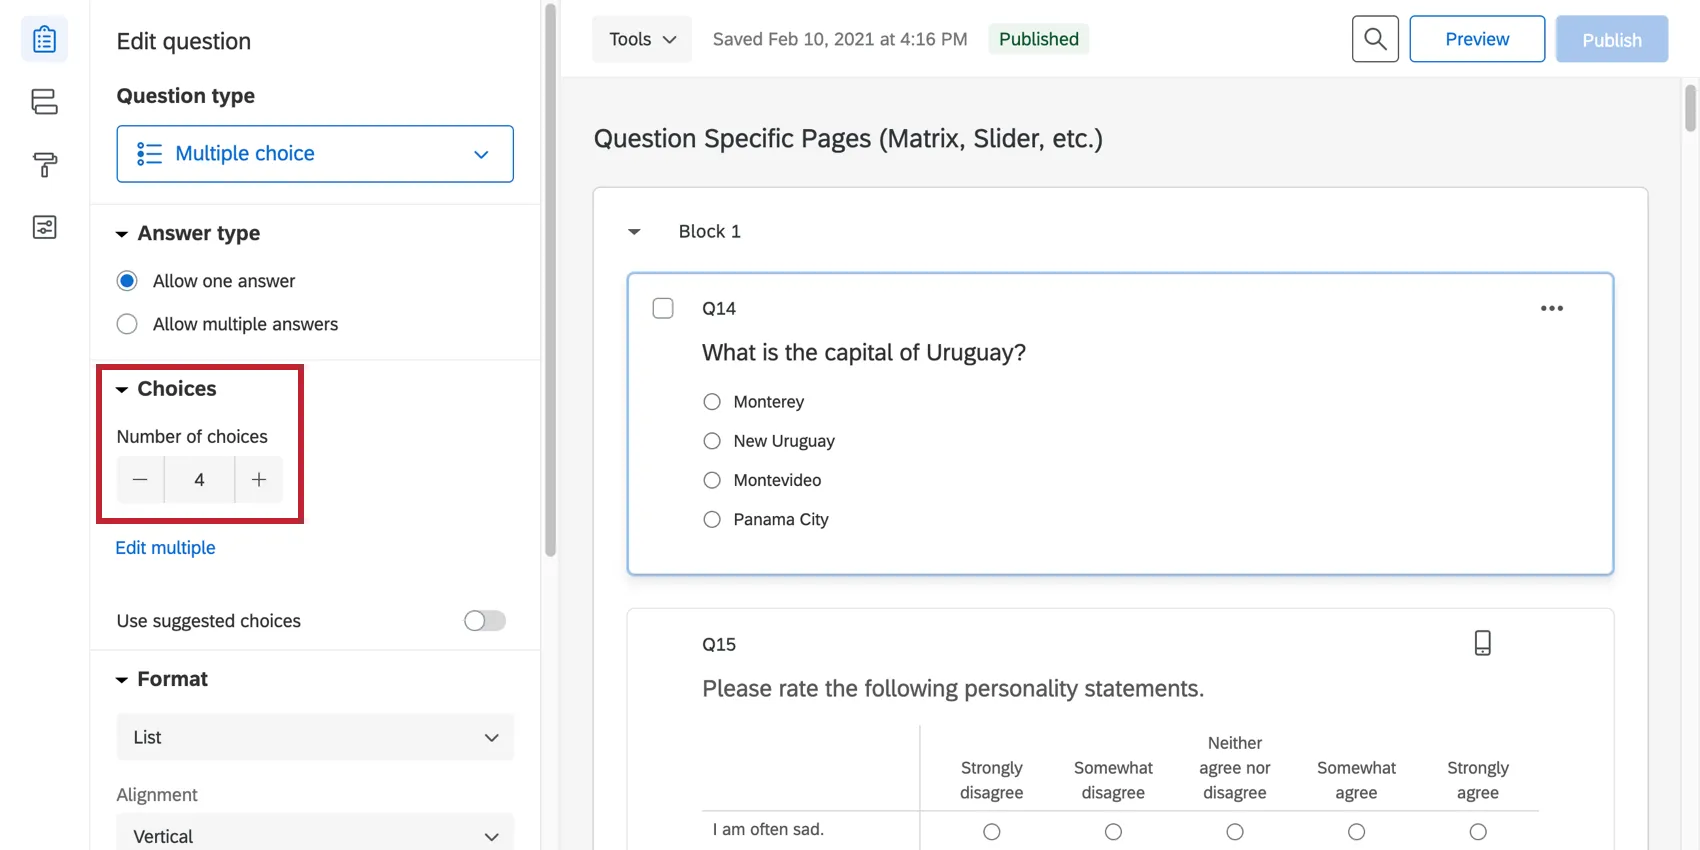
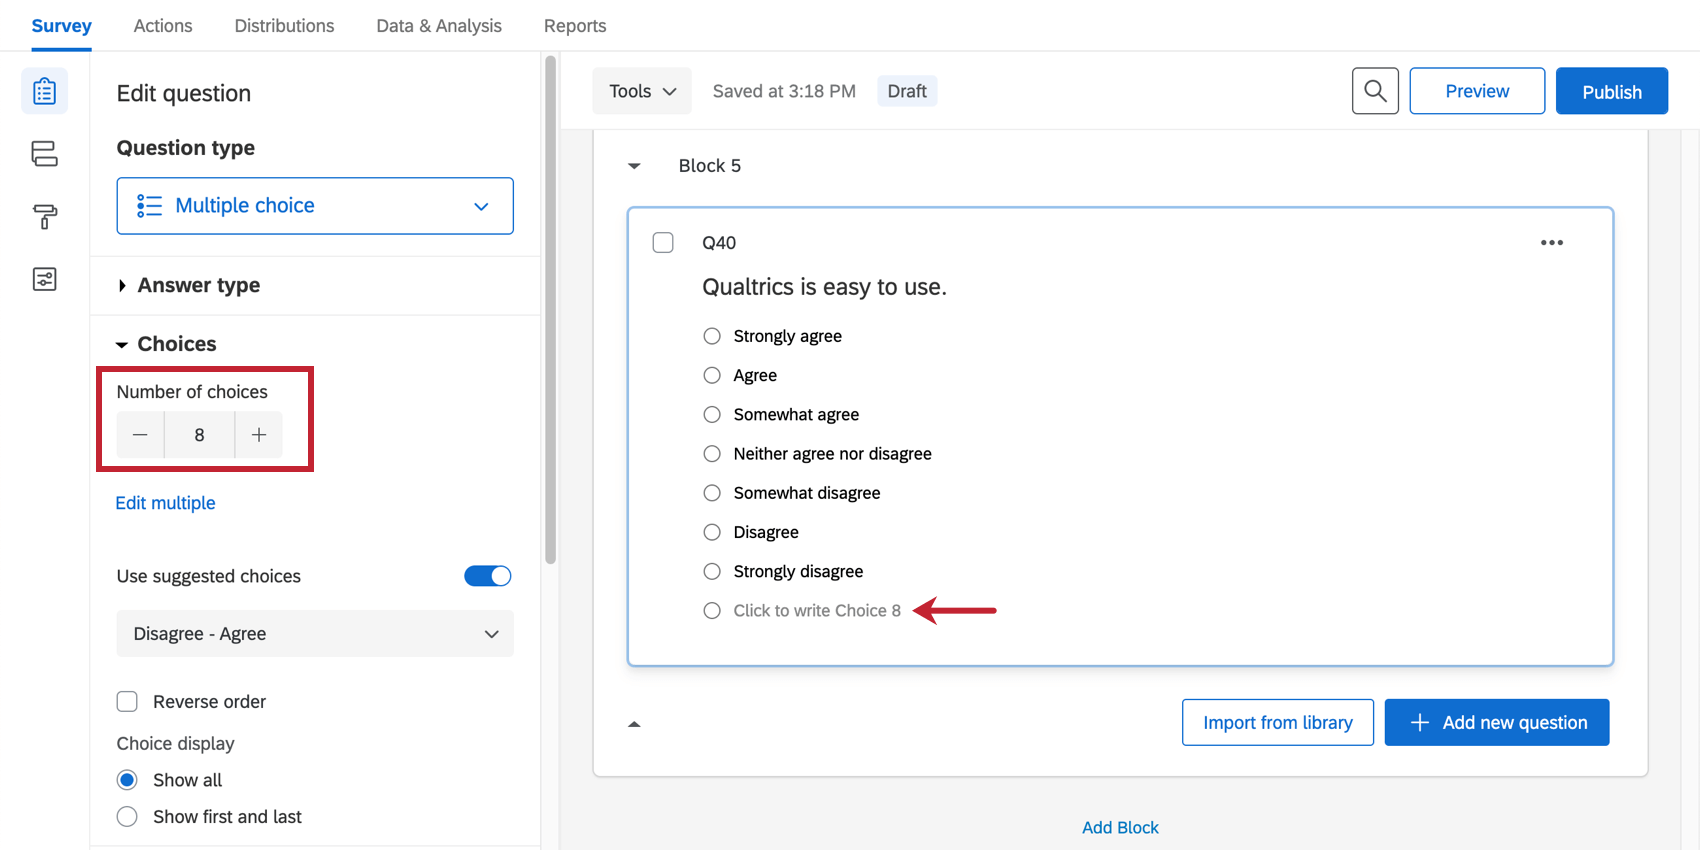
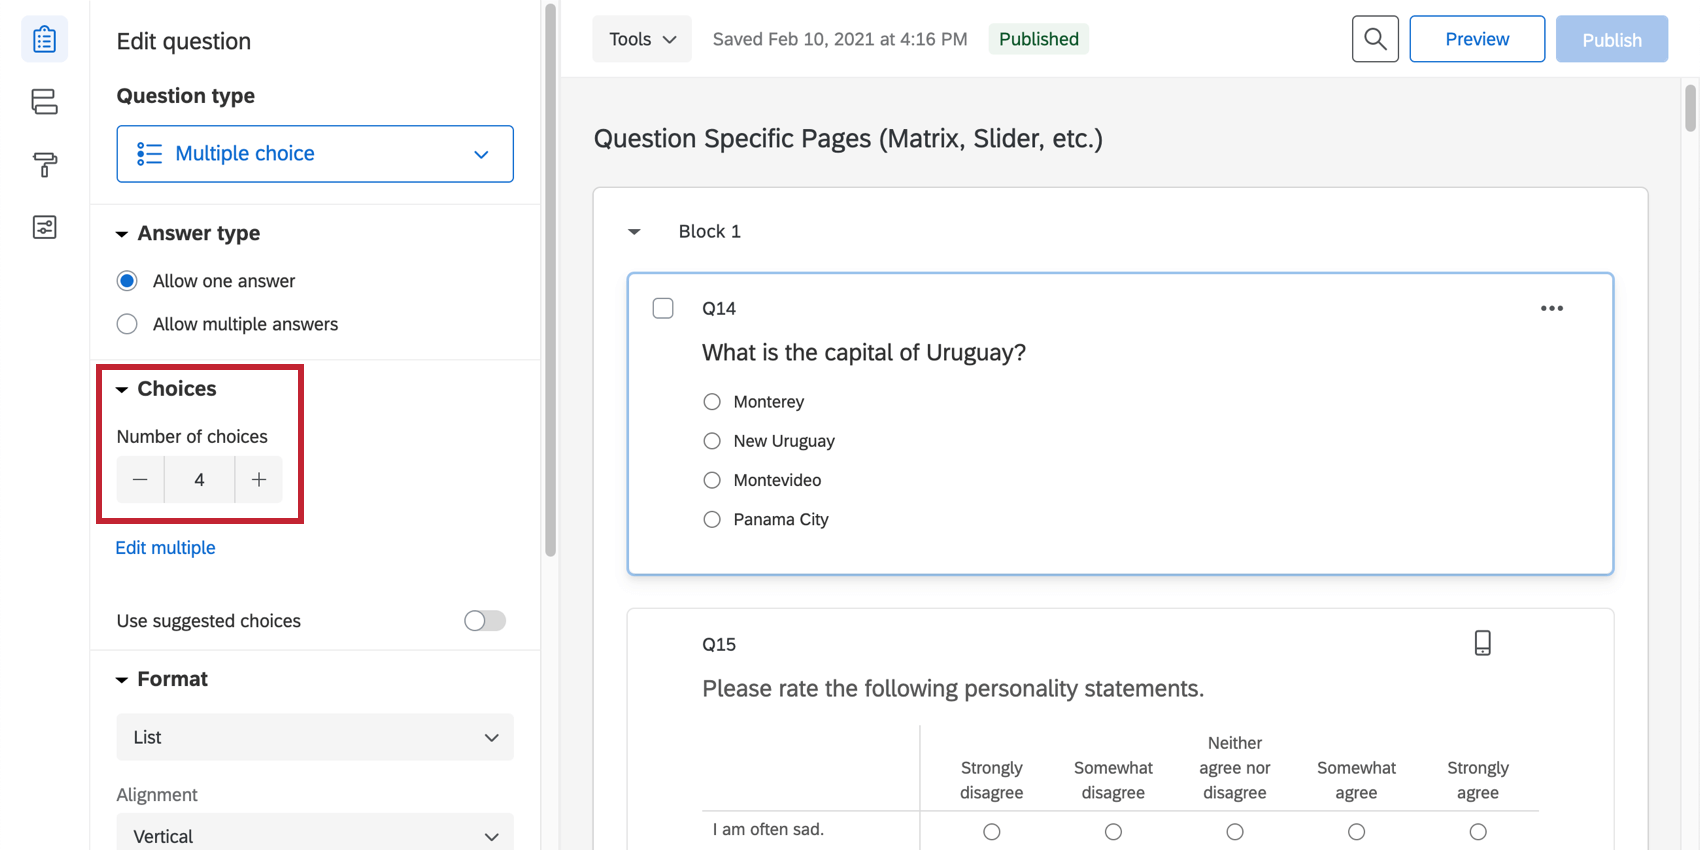
To add answer choices, select the question and then click the plus or minus sign beneath Choices on the editing pane to choose how many choices you want your question to have. You can also click directly on the number of choices and type the number of choices you want.
Editing Answer Choices
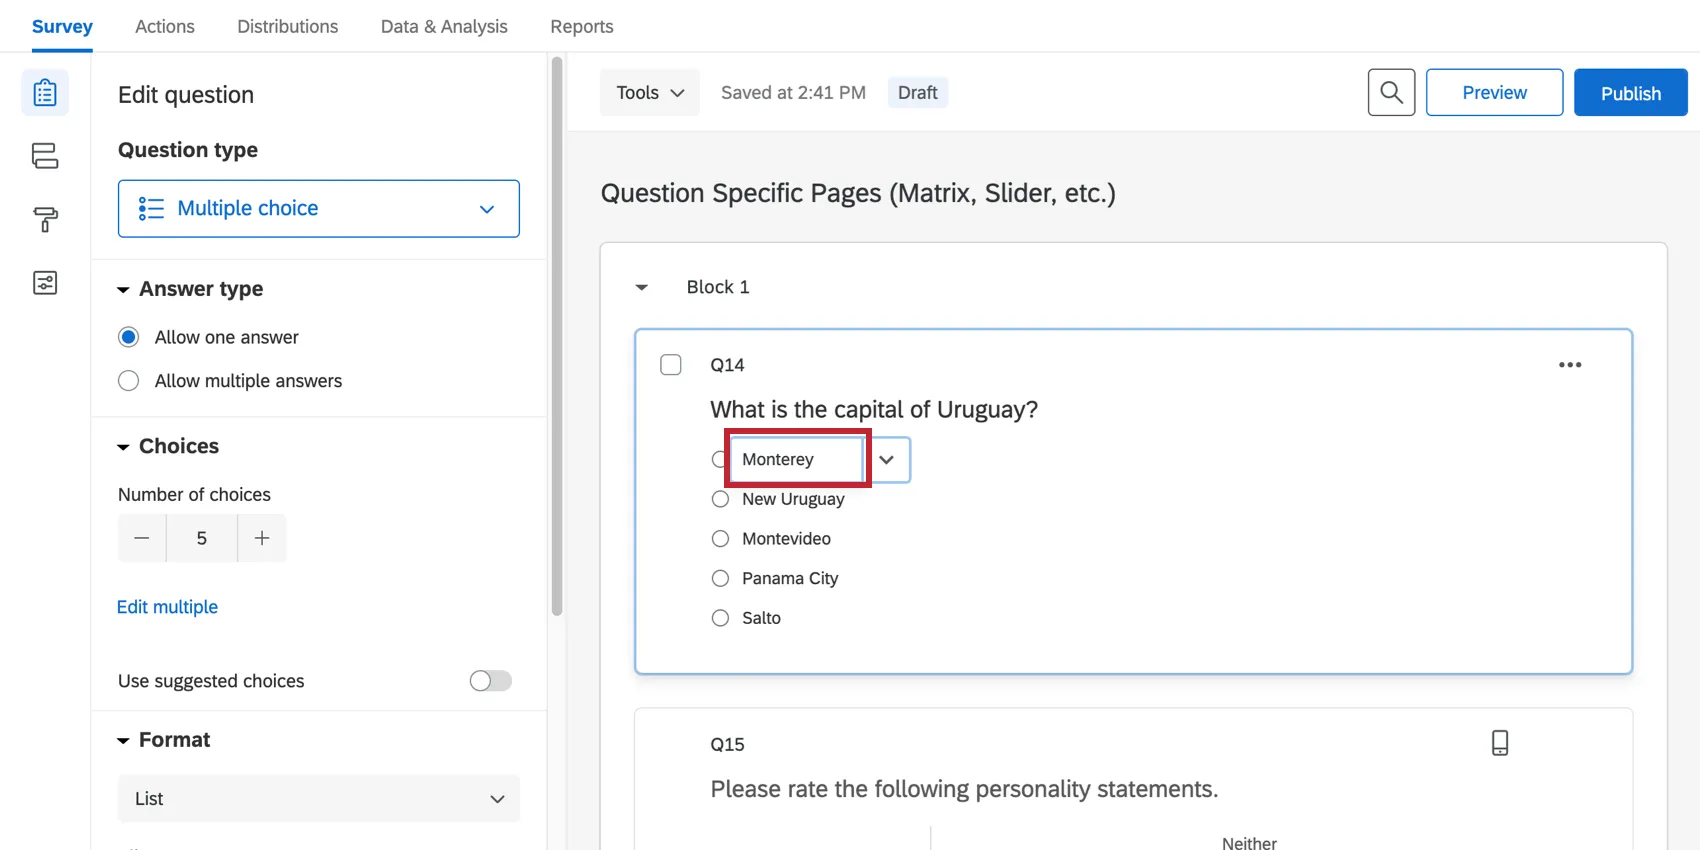
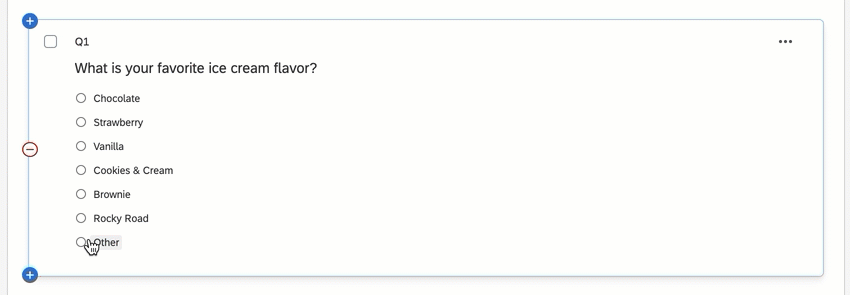
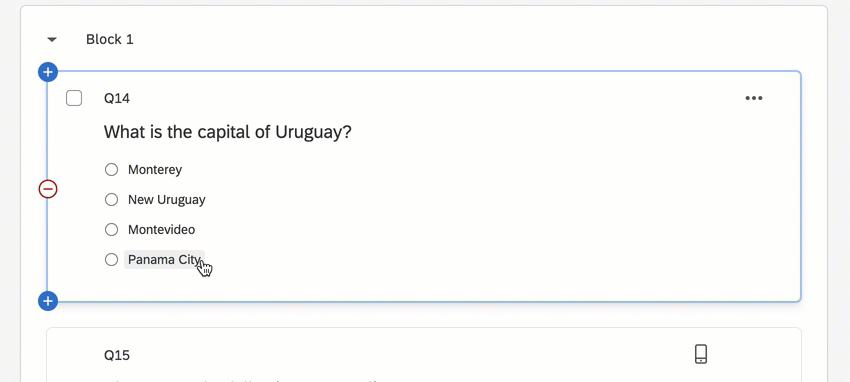
To edit an answer choice, simply click directly on the text of an answer choice within the survey editor and type the choice into the text box.
You can start editing the next answer choice below it (or add a new choice if you’re at the end of the list) if you hit the return or Enter key while editing an answer choice, as seen below.

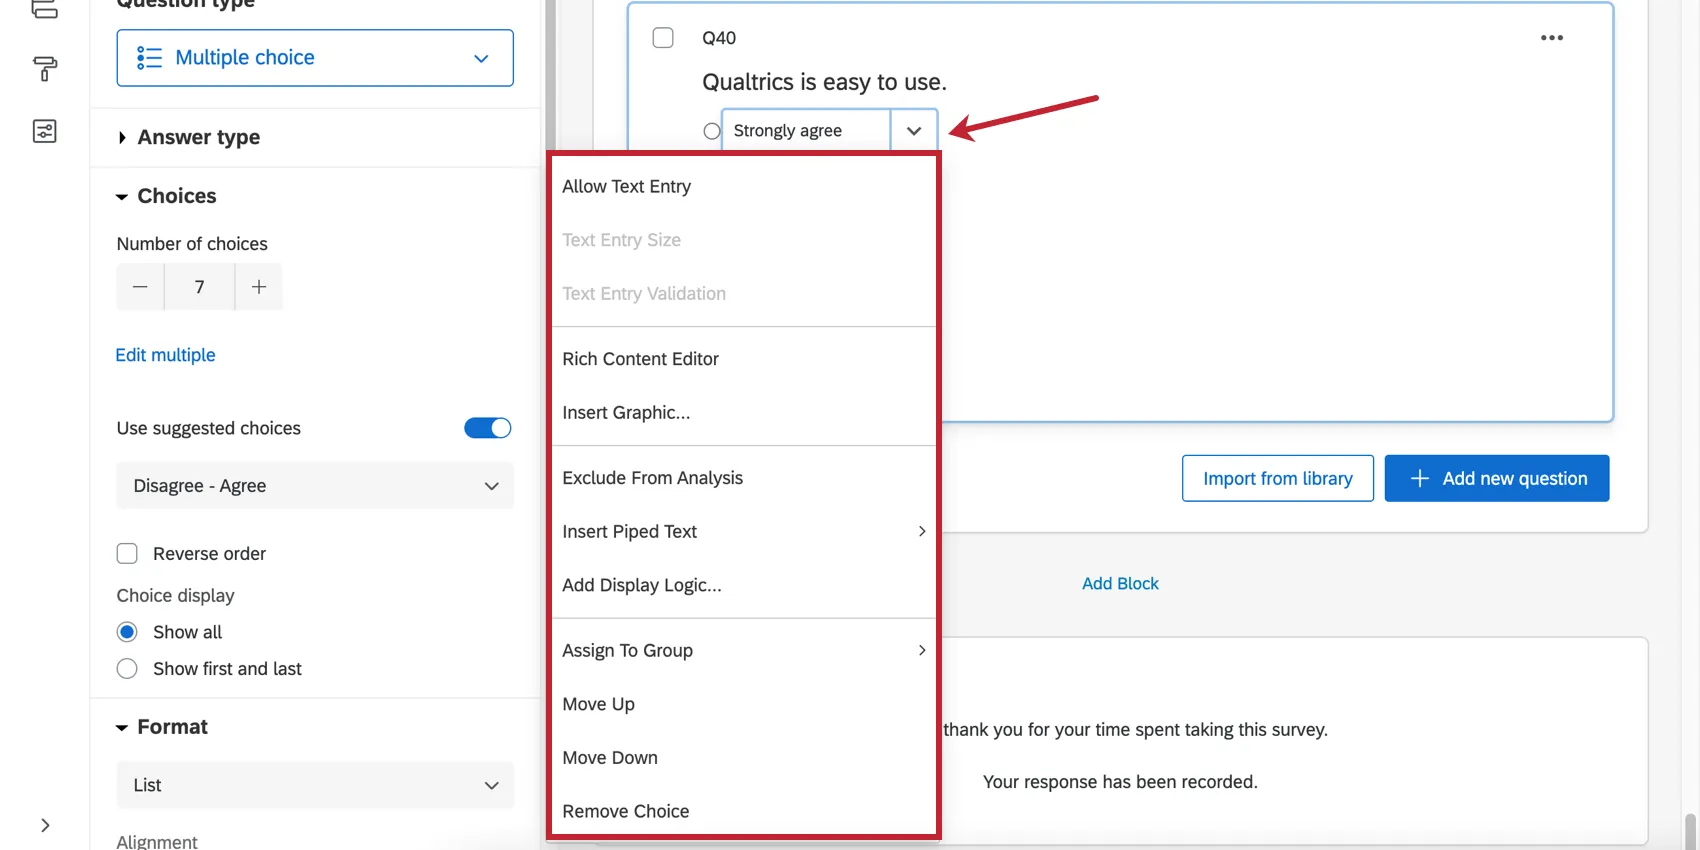
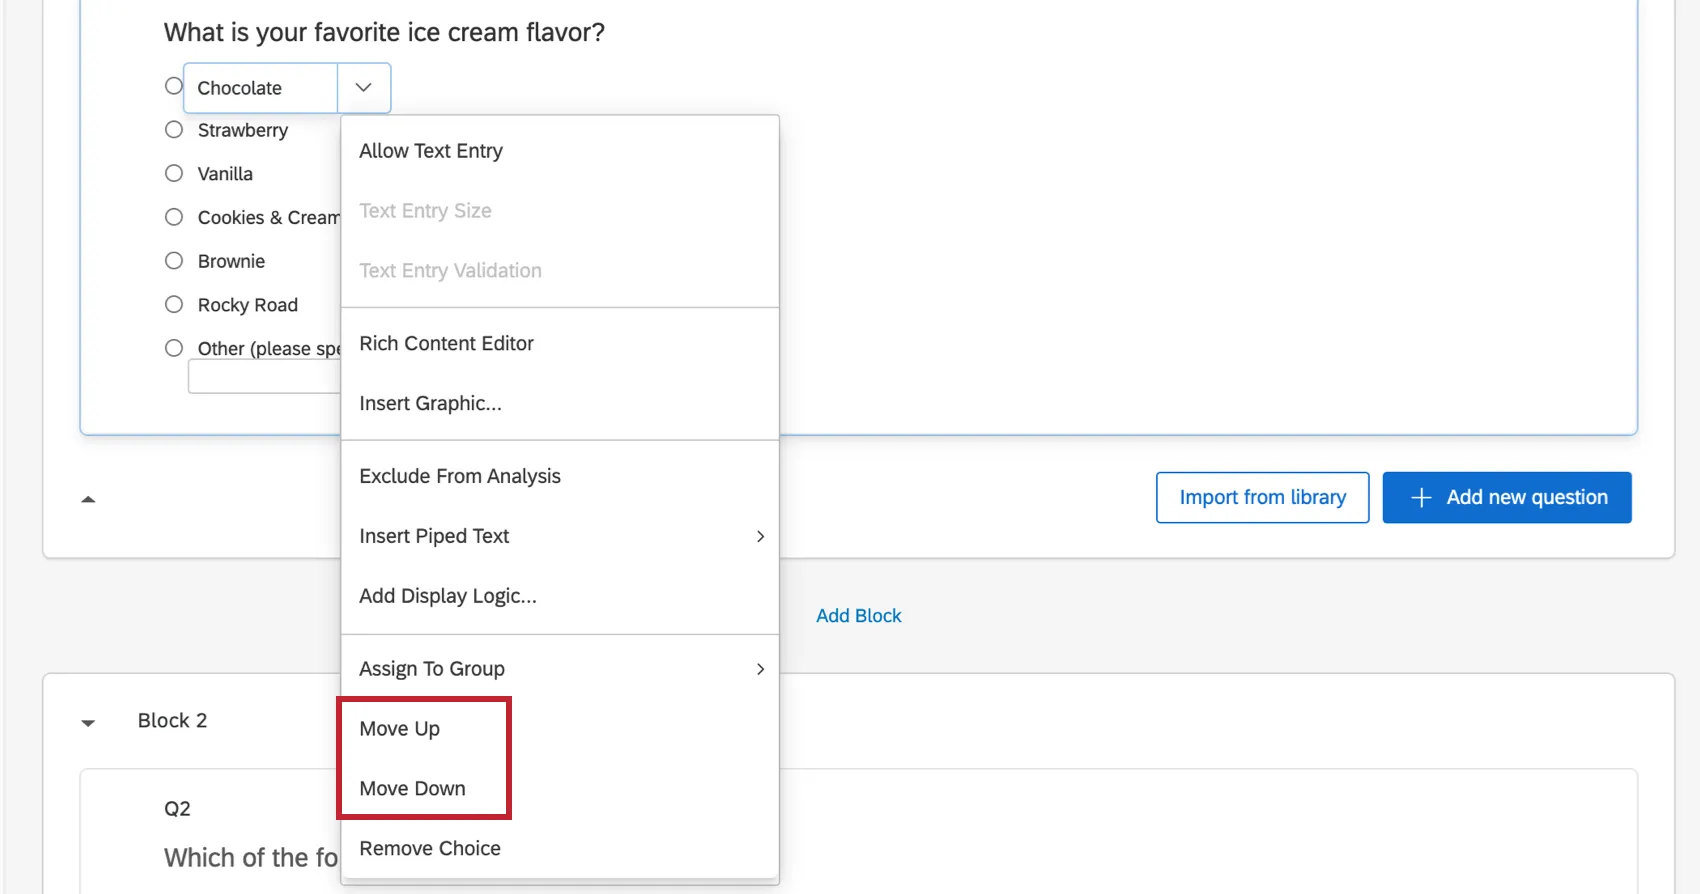
Qtip: Click the arrow next to your answer choice for more answer choice customization options, such as adding answer choice display logic or changing the choice’s font. See Additional Dropdown Options for more information.
Attention: If you’ve already collected data, be careful when editing answer choices, as it may invalidate your data! See Editing an Active Survey for more information about what edits are OK.
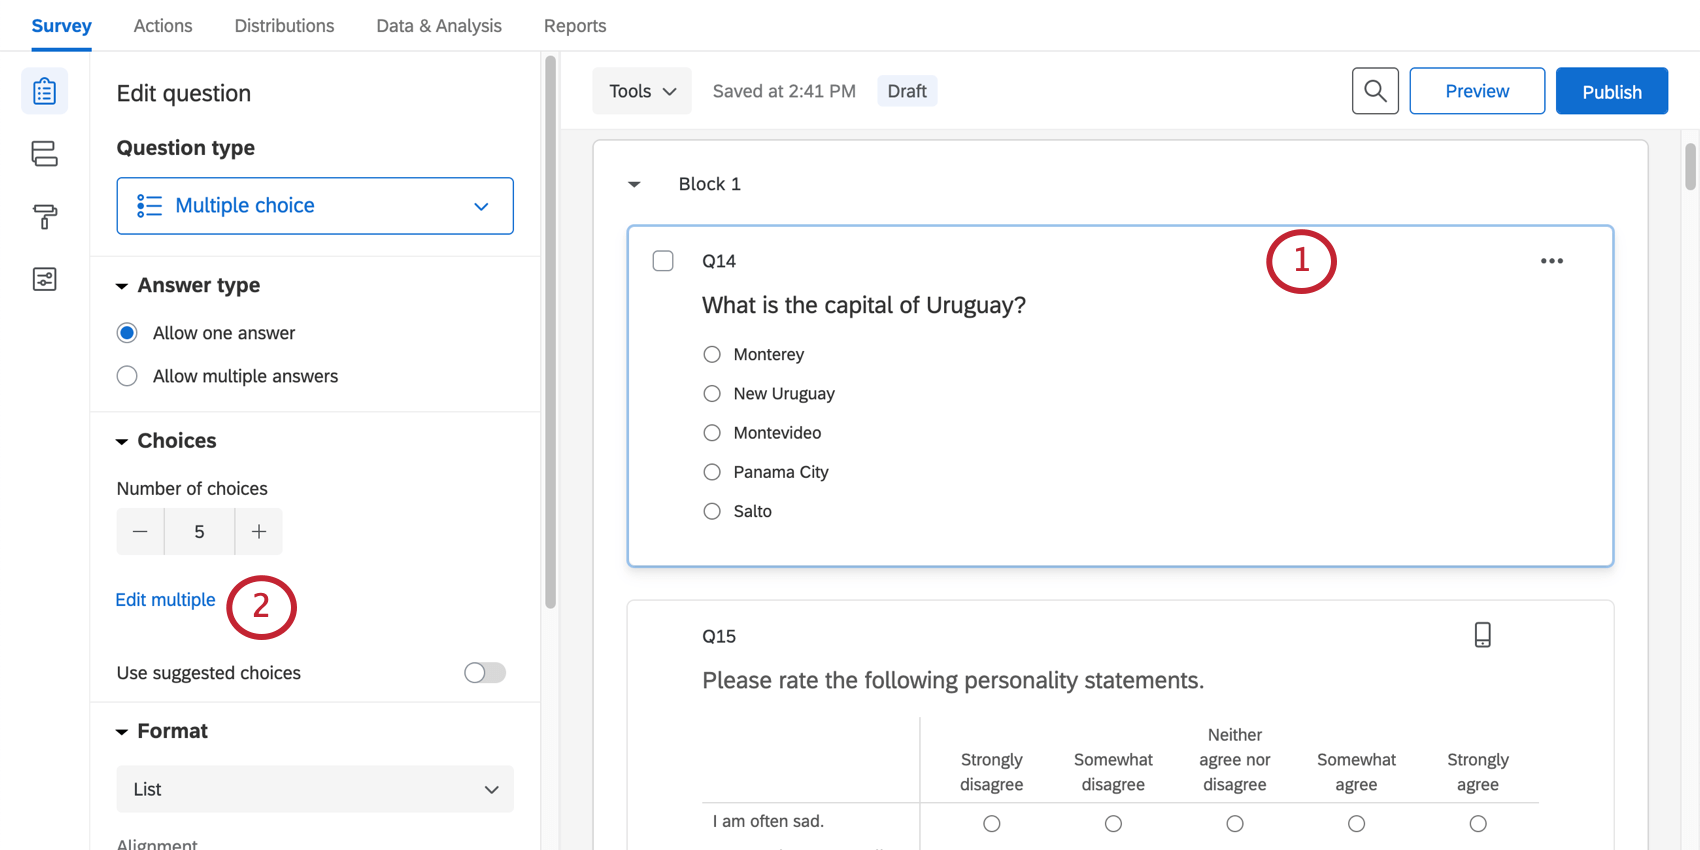
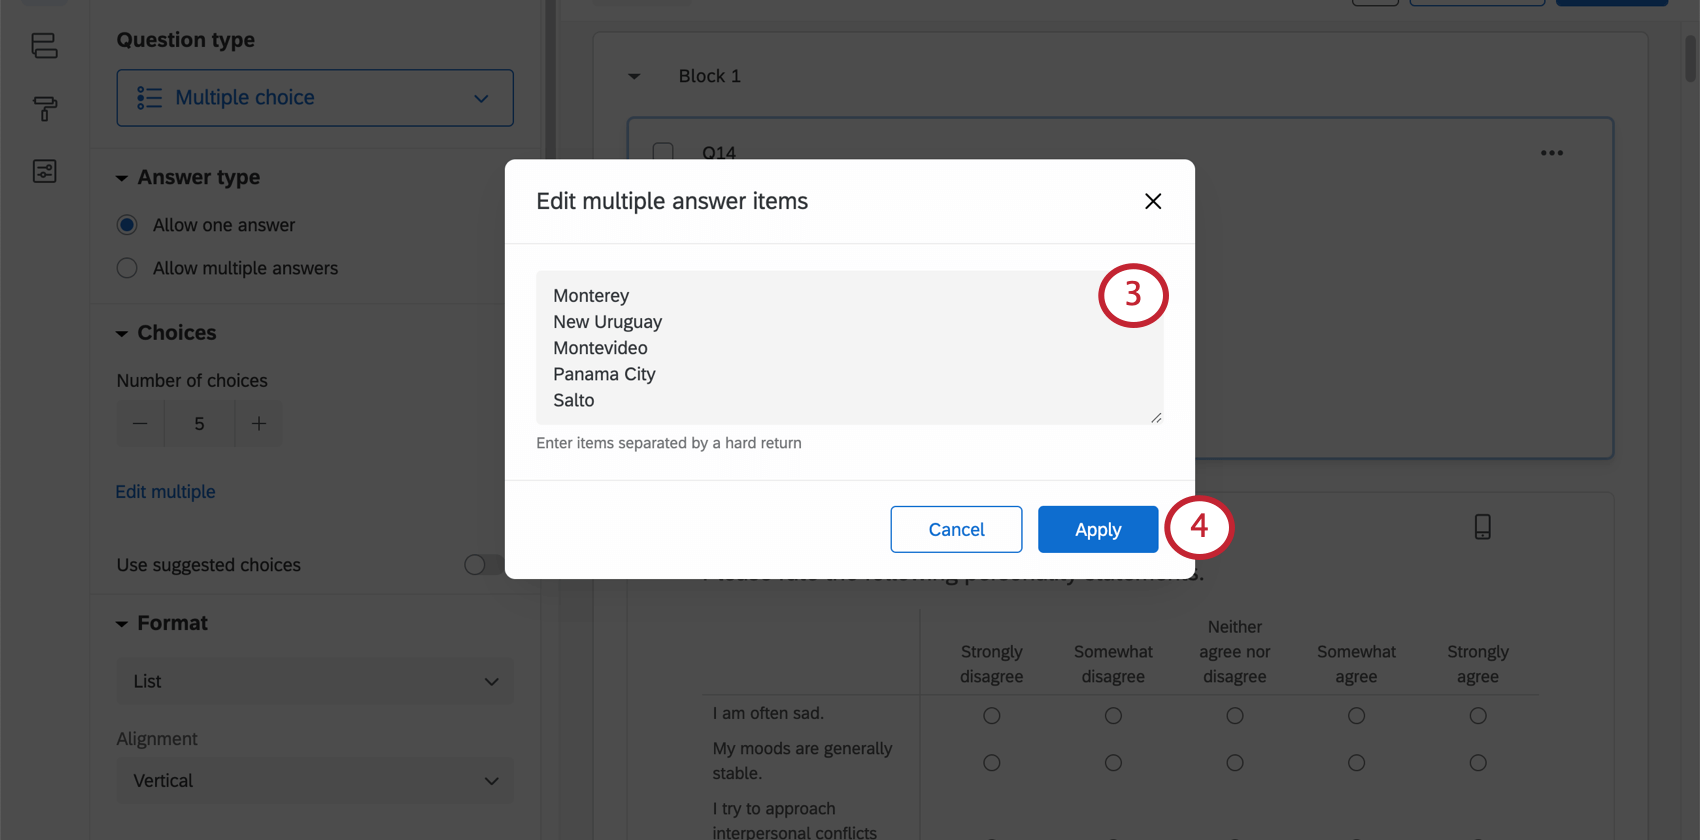
Edit Multiple
You can edit all of your answer choices at once with the Edit multiple feature.
Attention: The Edit multiple feature is disabled as soon as you collect data on your survey. This is to prevent invalidation of your data. If you copy a survey where this feature has been disabled, the copy will also not contain the Edit multiple feature.
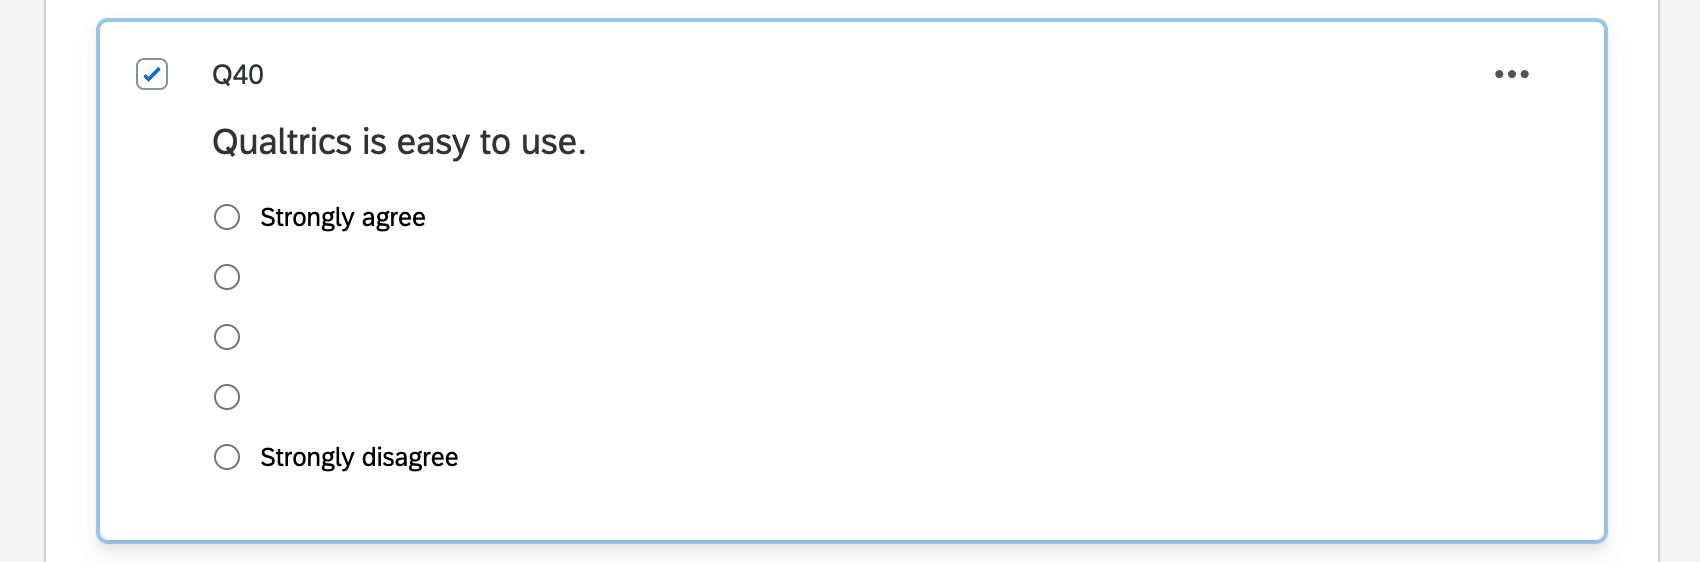
Suggested Choices
Qualtrics has suggested choices that can help you build questions. These contain answer choices for common survey questions, such as demographics or asking satisfaction on a standardized scale. To add suggested choices:
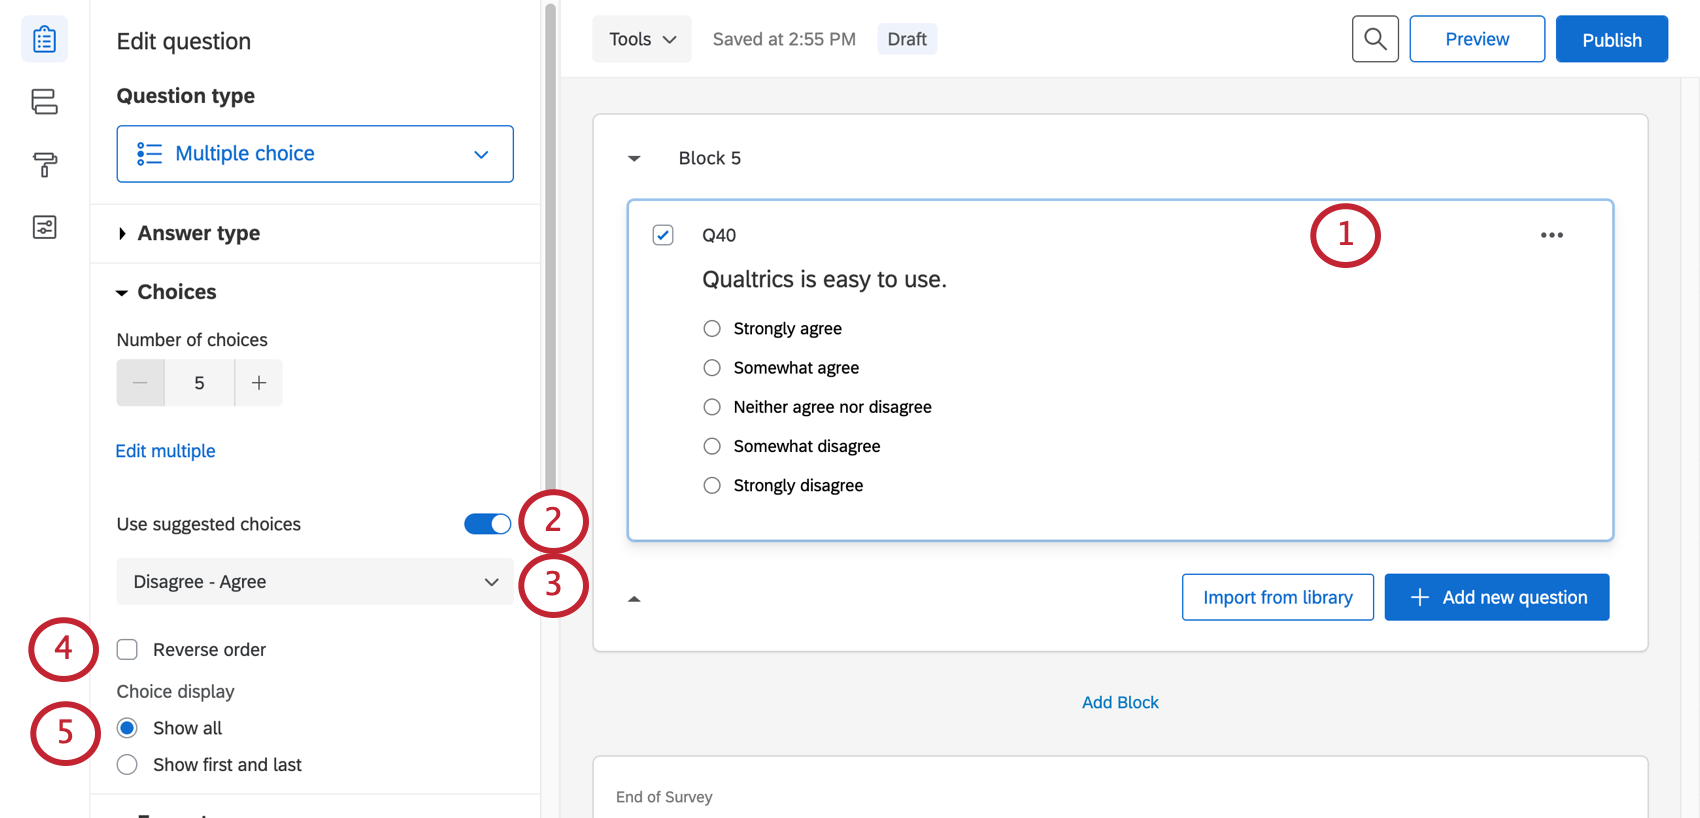
- Show all: Select this option to add the suggested choices and give each scale point its own choice text. Example: In this example, we added suggested choices for “agree” to “disagree,” so each answer choice has text.

- Show first and last: Select this option to insert the suggested choices but only give the first and last scale points their own choice text. Example: In this example, we added suggested choices for “agree” to “disagree,” so only the first and last answer choices have text.

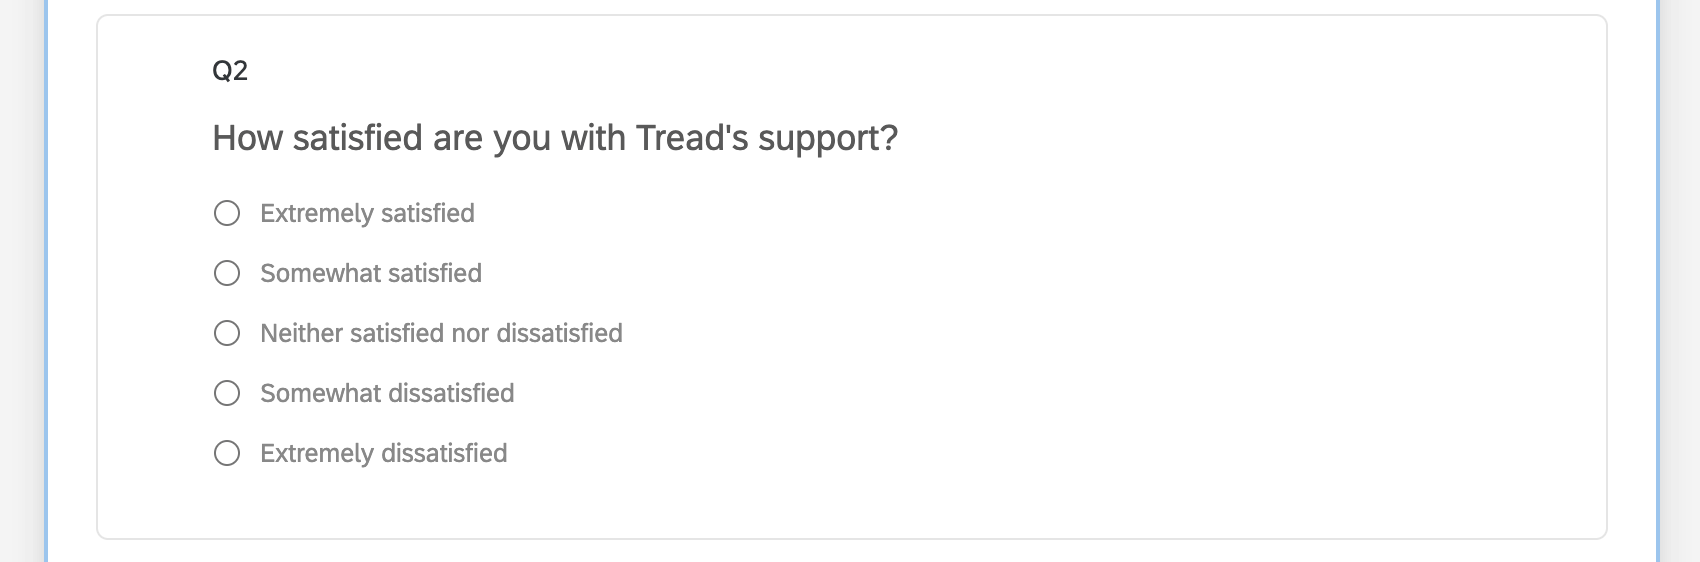
Qtip: Suggested choices may appear on your question automatically. The software looks for key terms and builds out answer choices for you. For example, in the screenshot below, the software recognized the phrase “How satisfied” and built out a Likert scale accordingly. Disable this by deselecting the Suggested choices checkbox for the question, or click the drop-down menu to select a different choice list.

Attention: Suggested choices are disabled as soon as you collect data on your survey. This is to prevent invalidation of your data. If you copy a survey where this feature has been disabled, the copy will also not contain the suggested choices feature.
Additional Dropdown Options
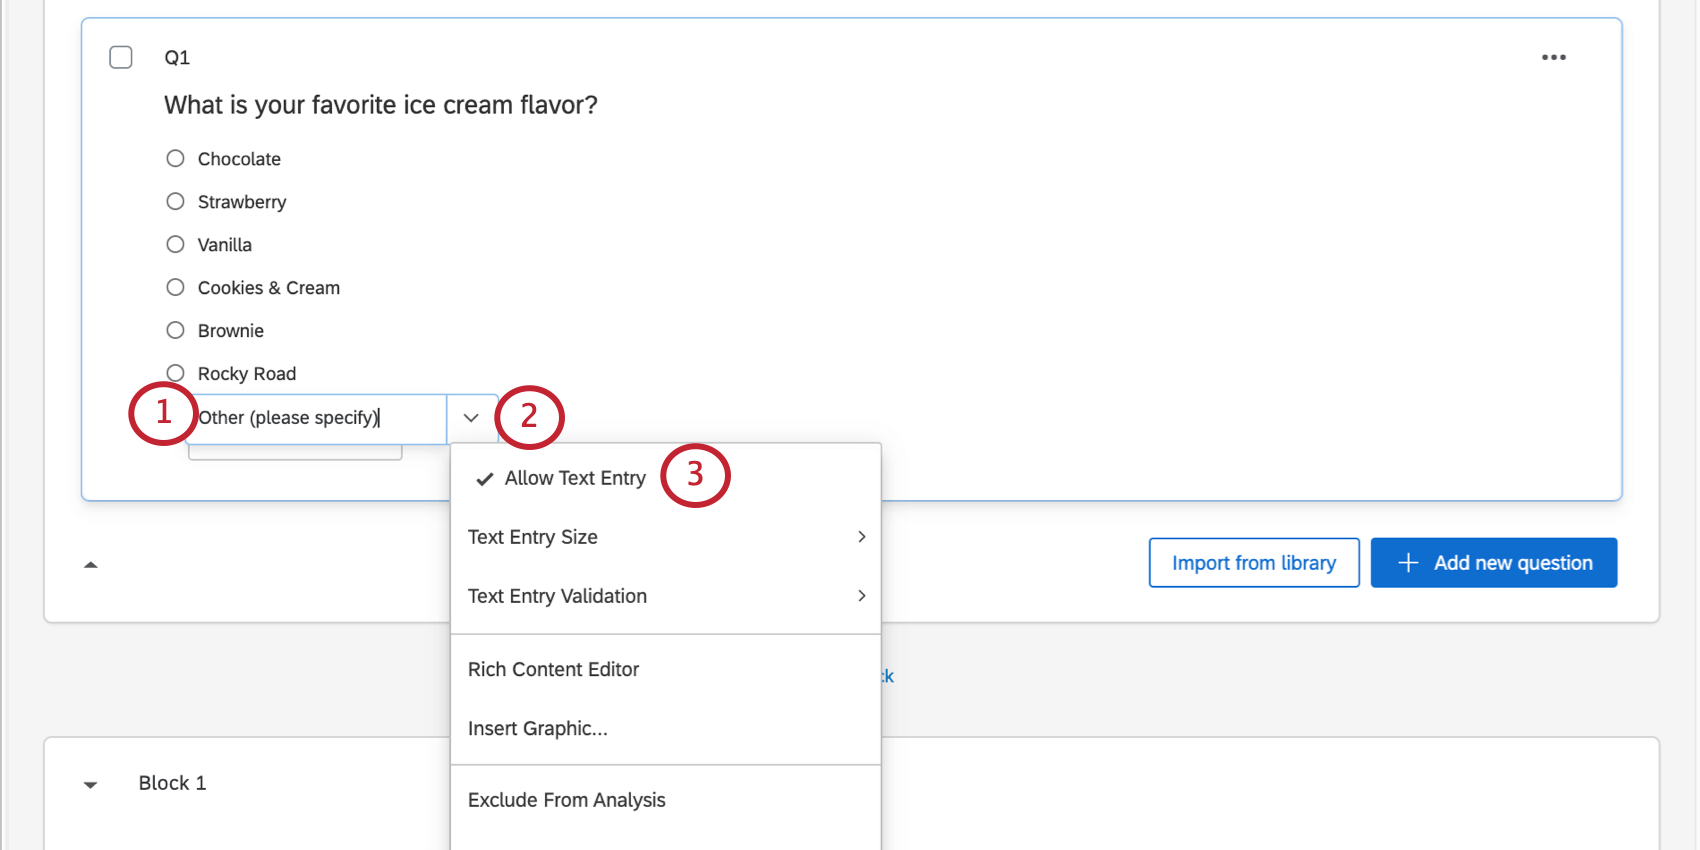
When you click to edit an answer choice, there’s a dropdown with lots of useful settings that can enhance your choices. For example, if your list of choices includes “Other,” you can add a text box to this choice so the respondent can elaborate; you can add display logic to a choice, so that respondents don’t see choices that are irrelevant to them; you can open the rich content editor, and change the font color and size of your answer choice; and much, much more.
Qtip: Some of these options will vary depending on the question type and format you are working with.
- Allow Text Entry, Text Entry Size, and Text Entry Validation: Enables text entry on the answer choice (e.g., an “other” text box) while also allowing you to choose the text box size and any specific requirements for the text entry answer.
- Rich Content Editor: Allows you to edit the formatting of your answer choice by adding bolding and font effects, inserting images, and more.
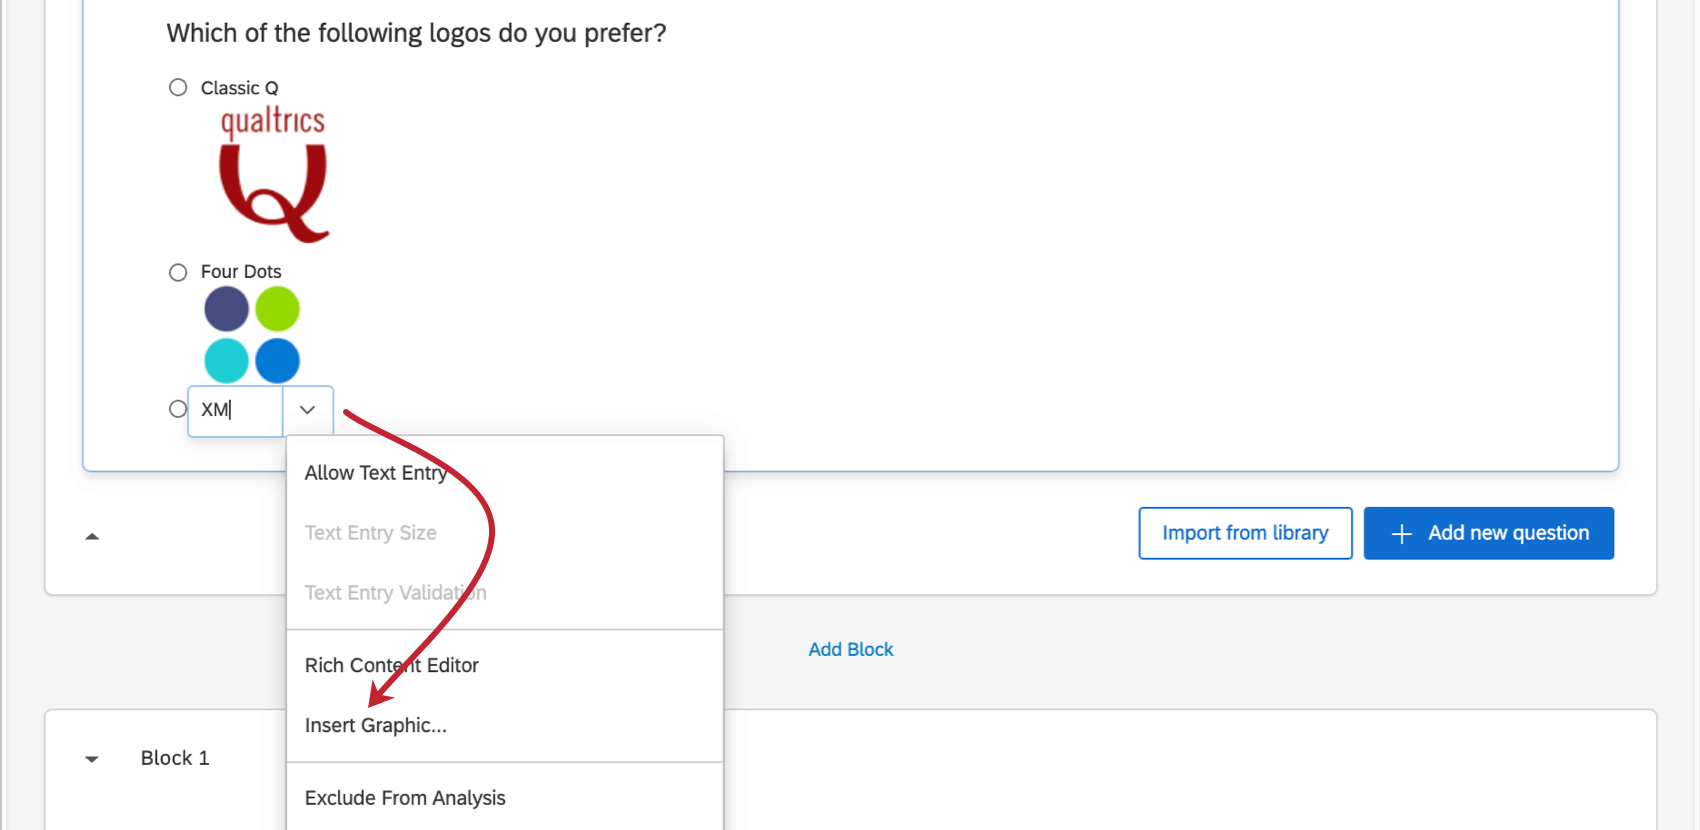
- Insert Graphic: Allows you to insert an image as part of the answer choice.
- Exclude From Analysis: Excludes the data for this answer choice from data analytics and reporting. The data for answers marked as Exclude From Analysis is still recorded; it is only ignored in analyzing the data. Qtip: Sometimes, you may change your mind about excluding an answer choice from your response data. If you deselect Exclude From Analysis after your survey is live, you’ll be able to see the answer choice in your Data & Analysis tab.

- Insert Piped Text: Inserts piped text, which dynamically displays your desired text based on the respondent.
- Add Display Logic: Allows you to add display logic to answer choices, so you can hide or show certain answer choices when conditions are met.
- Assign to Group: Allows you to group answer choices together.
- Move Up & Move Down: Allows you to move your answer choices up and down in the list.
- Remove Choice: Deletes your choice from the question.
Allow Text Entry
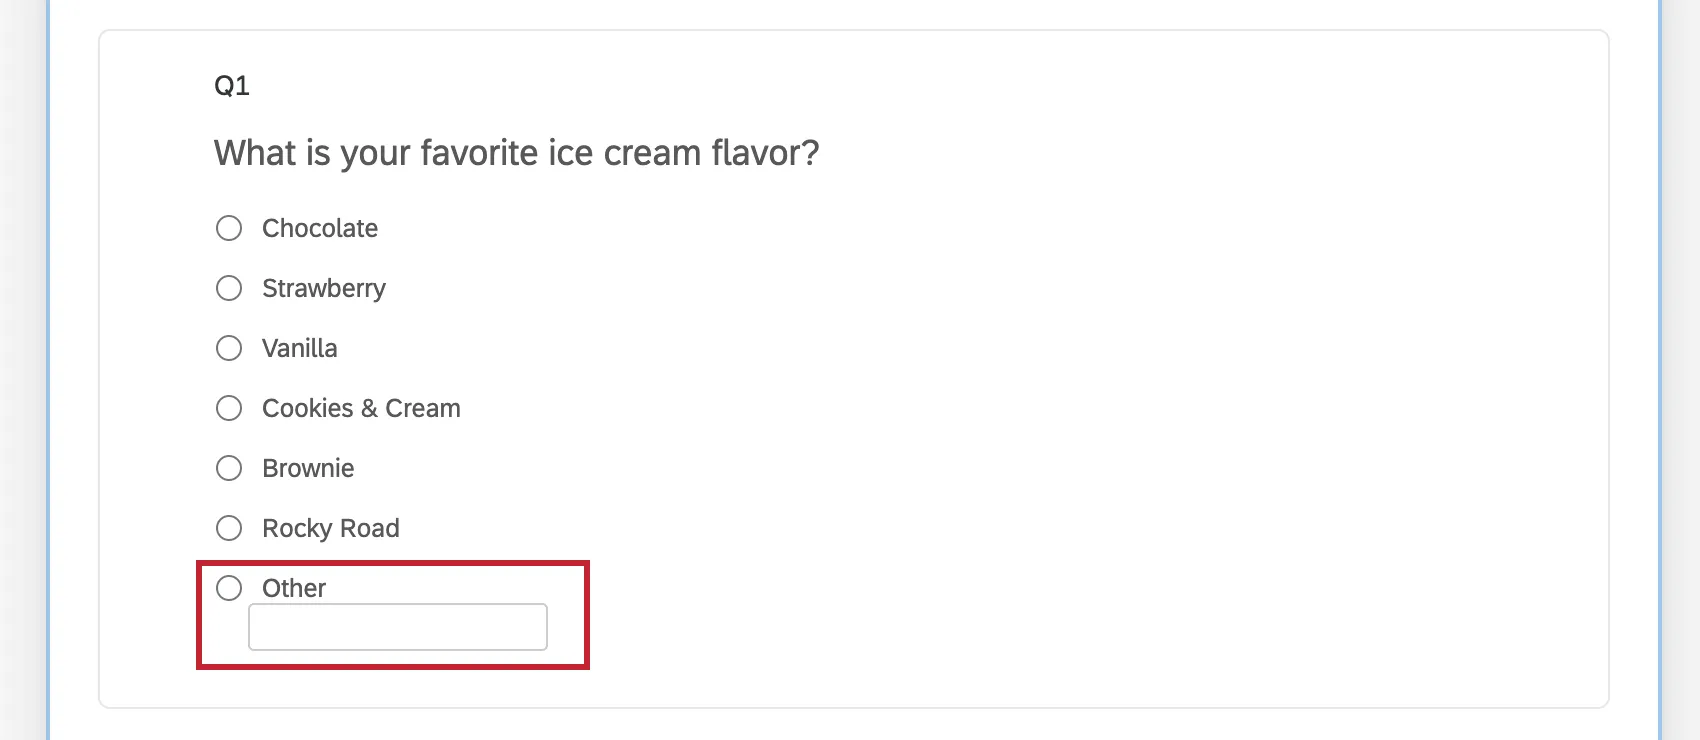
Sometimes you may need to give respondents an option outside of your list of answer choices. Allow Text Entry lets you add a text box to your answer choice, allowing respondents to enter their own answer choice.
Example: Let’s say you ask respondents to pick their favorite ice cream flavors from a list. If their favorite isn’t listed, you can create an “other” option for the respondent to specify their favorite flavor.
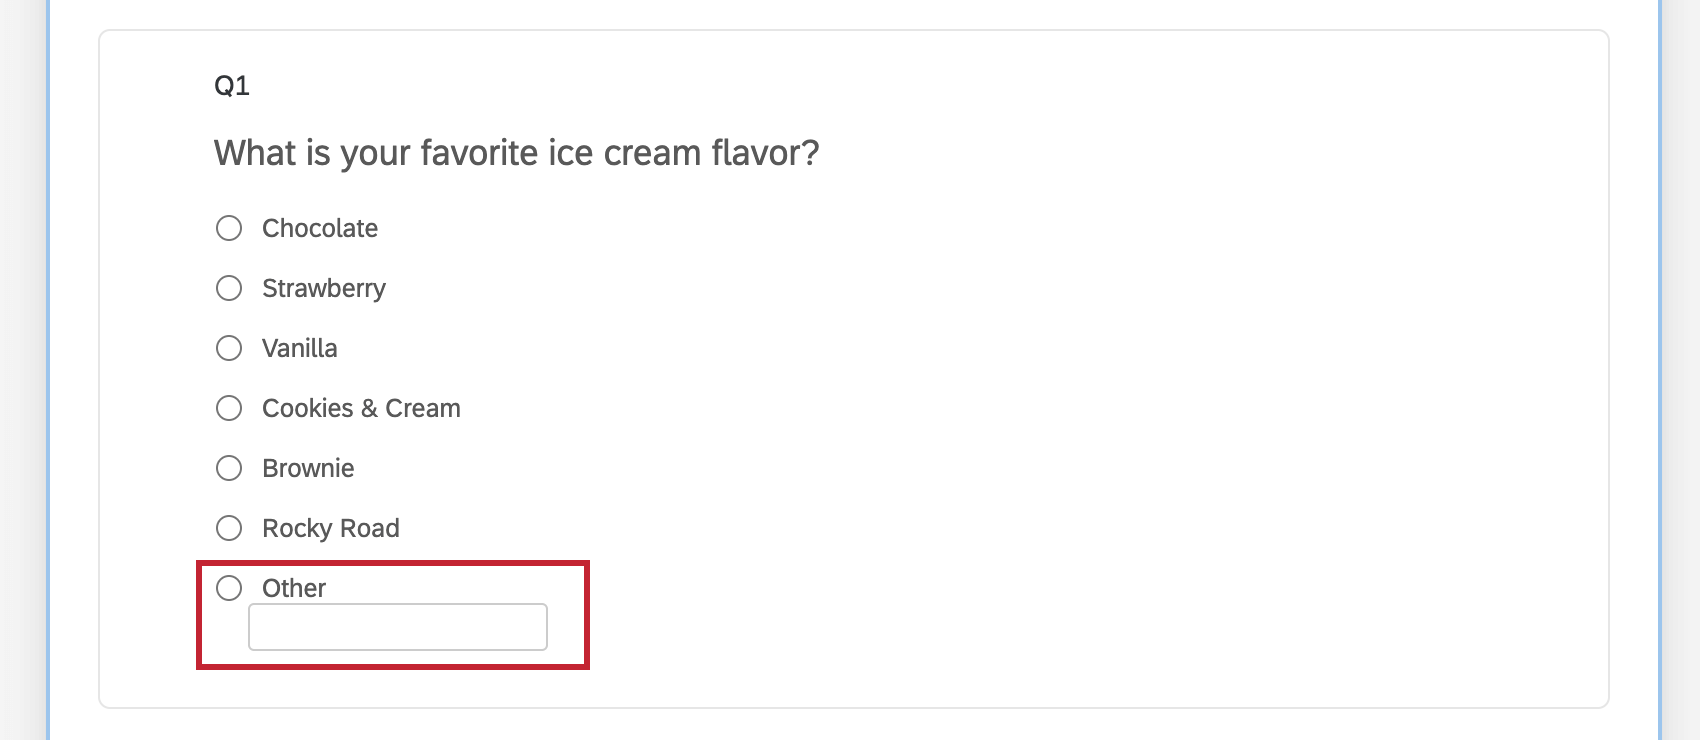
Attention: Allow Text Entry is not compatible with dropdown multiple choice questions.
Adding & Removing Text Entry on Answer Choices
To remove text entry from a question, follow the same steps above.
Text Entry Size
Once you’ve allowed text entry on your answer choice, you can choose the size of the text entry box.
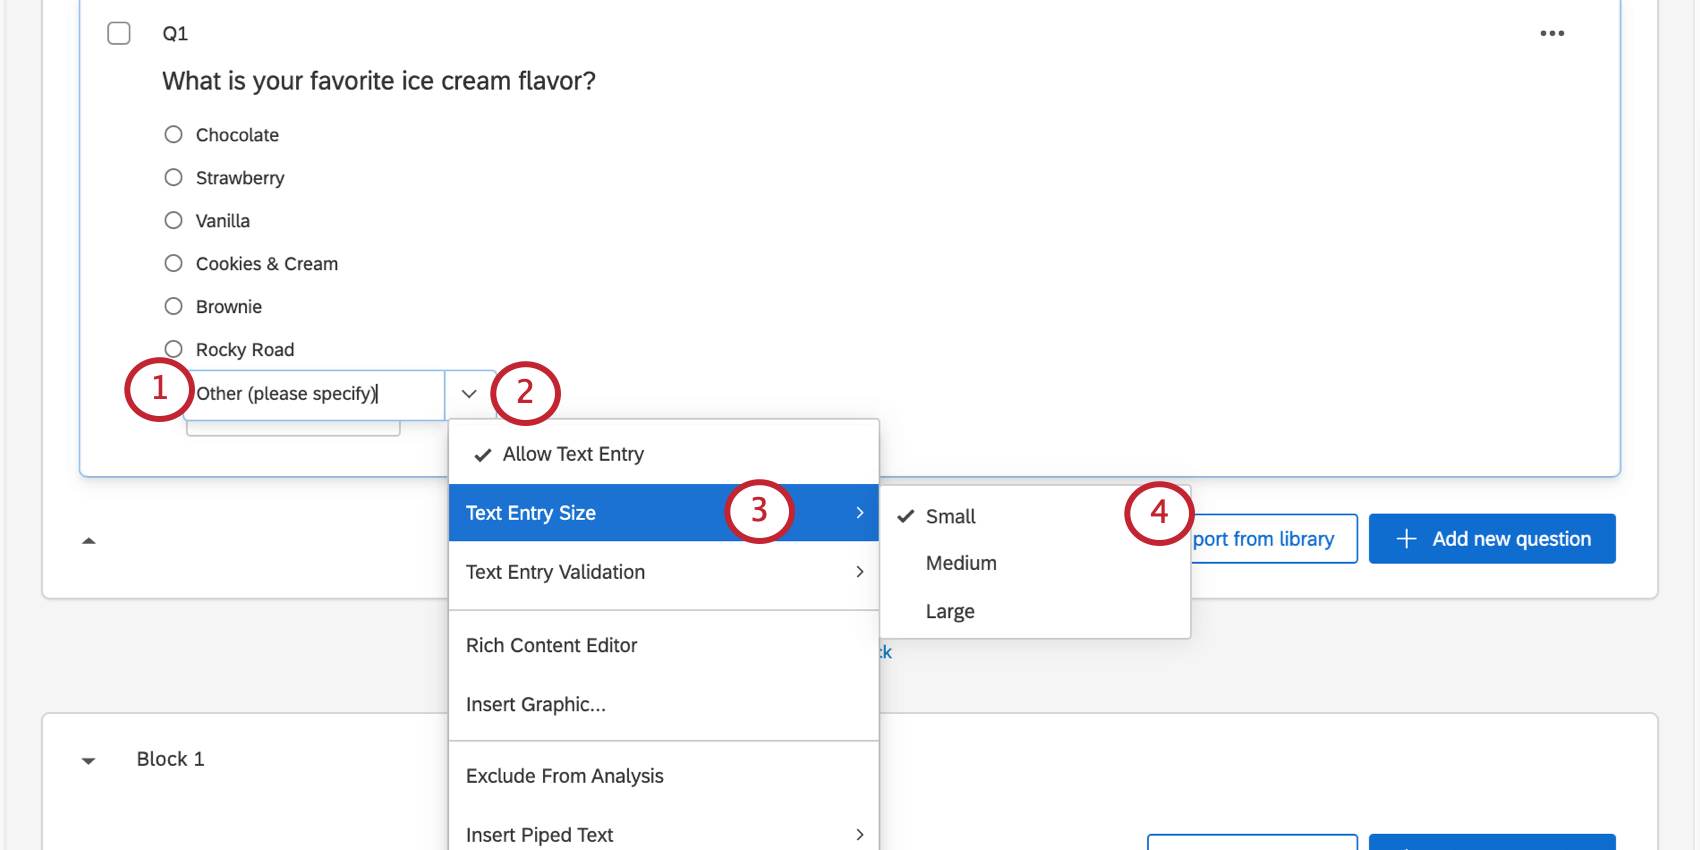
- Small
- Medium
- Large Qtip: Preview your survey to make sure you like the size of your text entry box!
Text Entry Validation
For answer choices that have Allow Text Entry enabled, you can force participants to input only a certain type of text response. For example, you might be looking specifically for a response that includes only numbers.
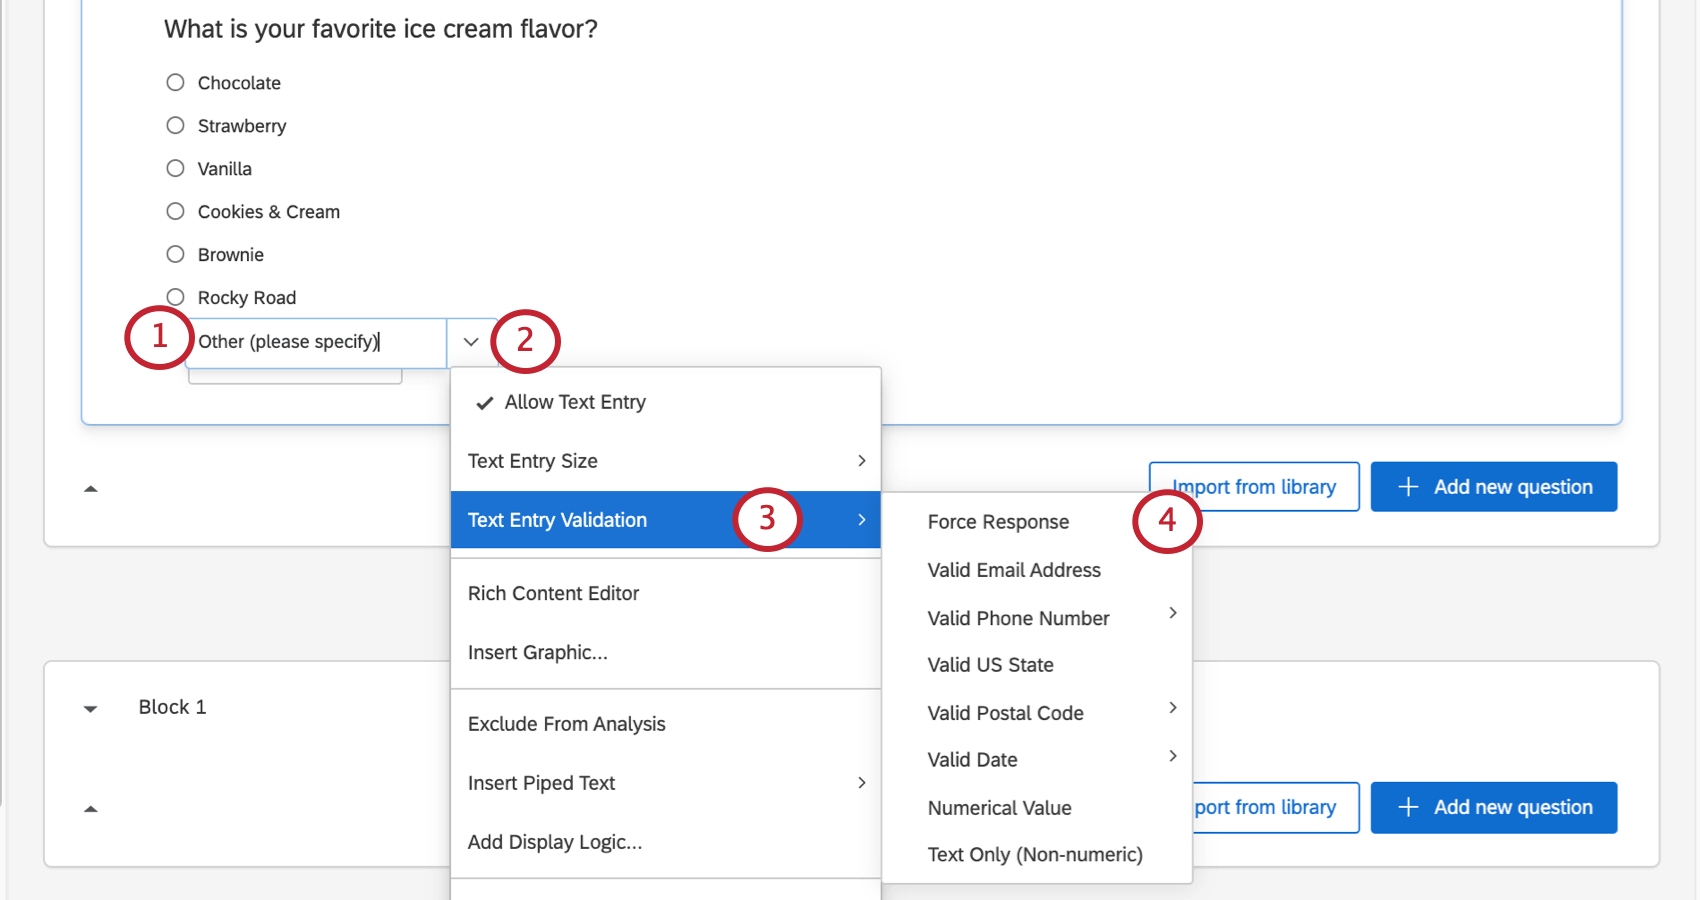
- Force Response Qtip: If the respondent chose the option with text entry on it, they have to fill out the text box. For example, if you chose “Other,” you can’t submit the question without specifying your choice.
- Valid Email Address
- Valid Phone Number (You can choose the country)
- Valid US State
- Valid Postal Code (You can choose the country)
- Valid Date (You can choose what format)
- Numerical Value Qtip: This validation allows respondents to use periods (.) and commas (,) as part of their numerical value.
- Text Only (Non-numeric)
Insert Graphic
Insert an image into the answer choice. See Inserting Graphics into Answer Choices for a full guide on using images in answer choices.
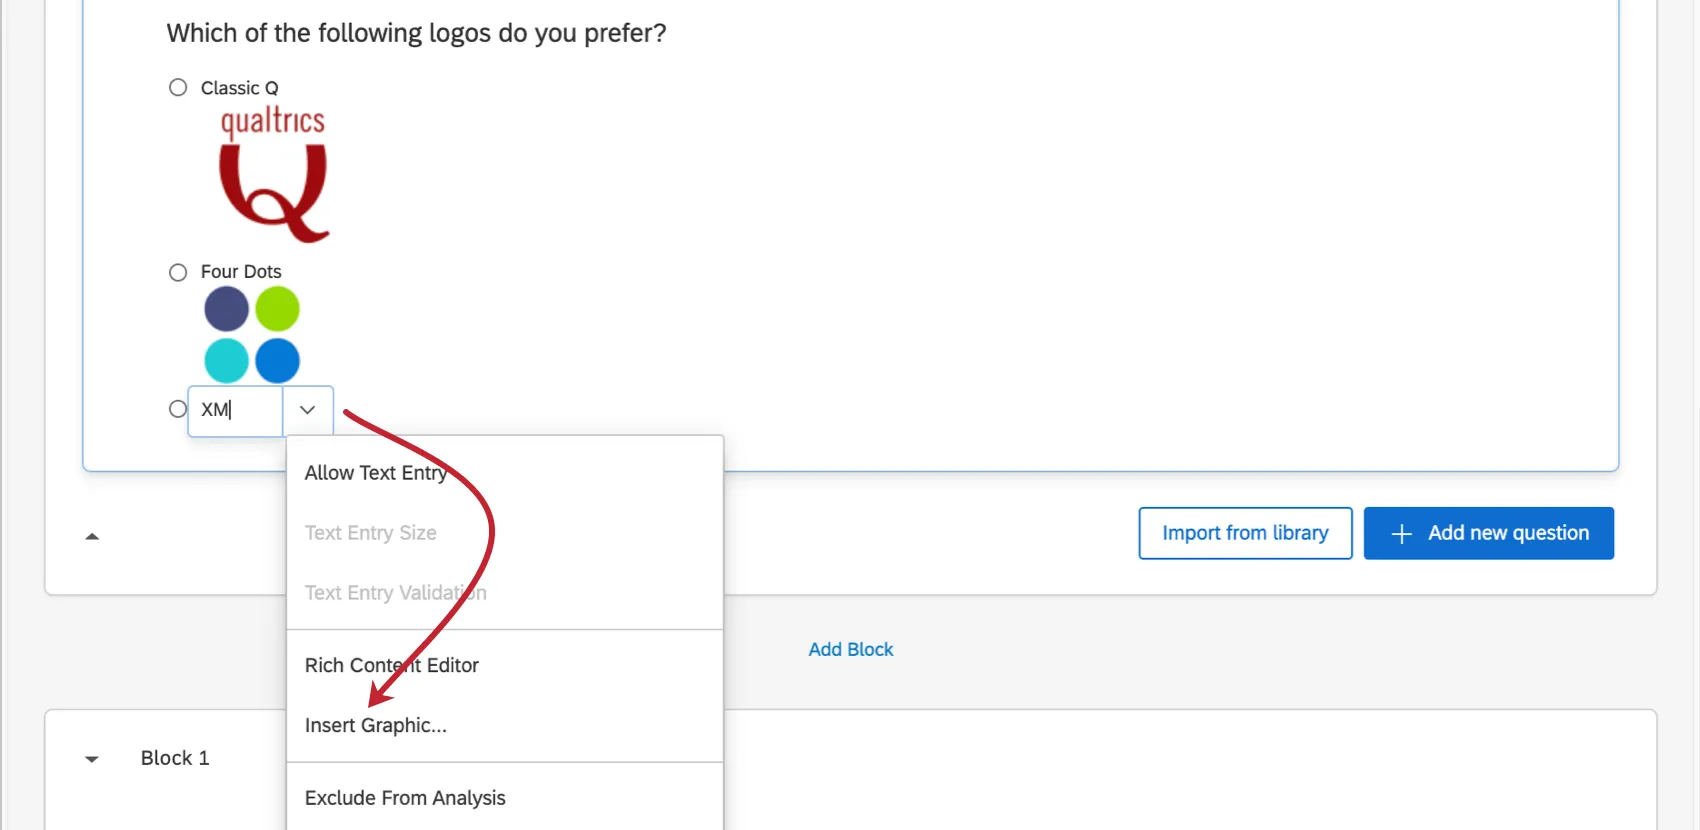
Qtip: You can also insert images into an answer choice using the Rich Content Editor.
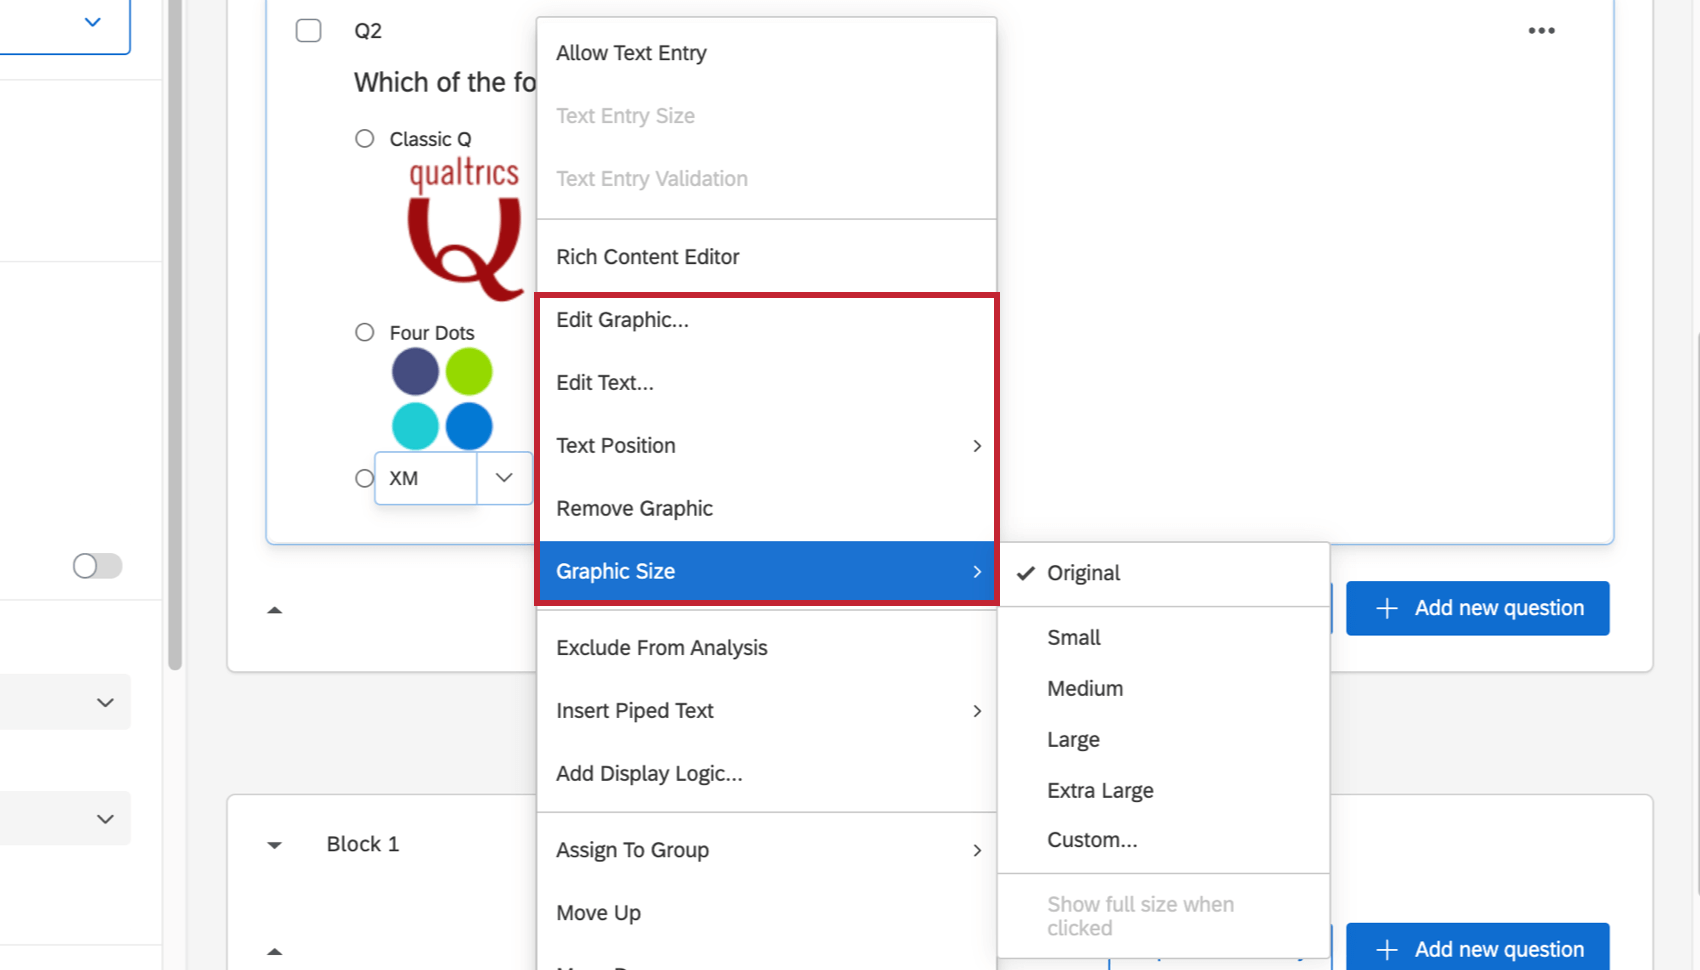
Additional Graphic Options
Once you’ve used the Insert Graphic option, additional settings will appear in the dropdown.
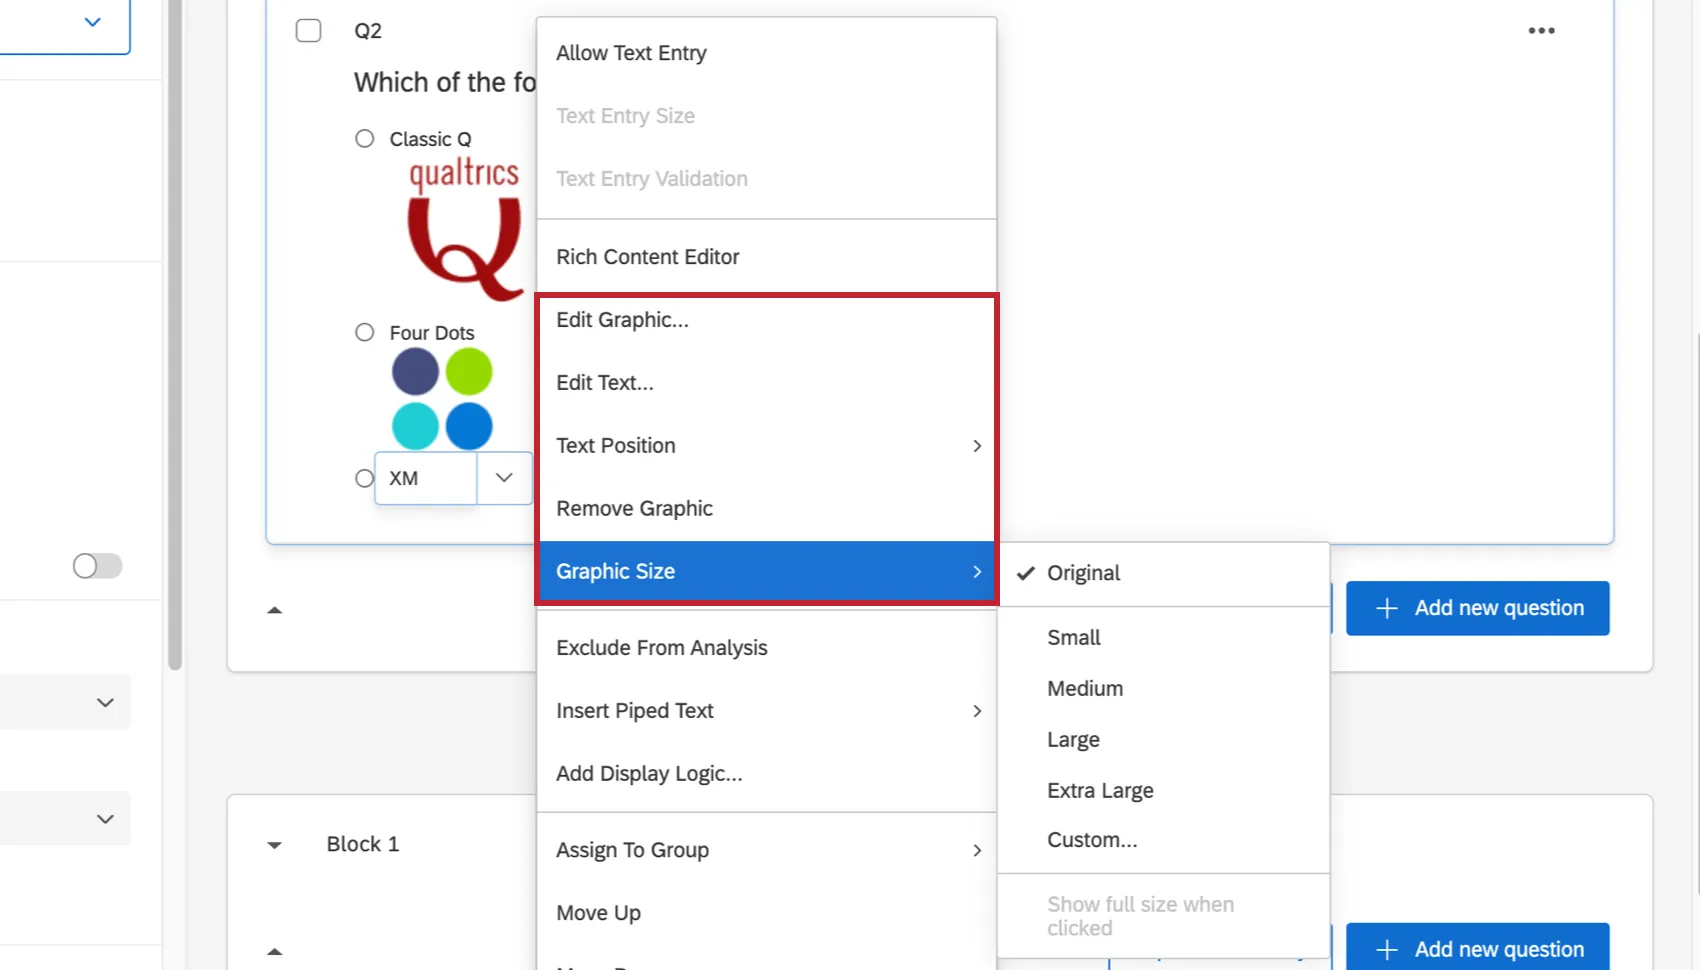
- Edit Graphic: Choose the graphic to insert into the answer choice. This can be from your library, or you can upload a new image to your library.
- Edit Text: Text for the choice that displays with the graphic.
- Text Position: Make the text display to the top, bottom, left, or right of the graphic.
- Remove Graphic: Remove the graphic from answer choice.
- Graphic Size: Change the size of the graphic. You can choose from preset dimensions, or choose Custom to adjust the size manually. If you’ve resized the image, you have the option to select Show full size when clicked. This means the image will change back to its original size when the respondent clicks it.
Exclude from Analysis
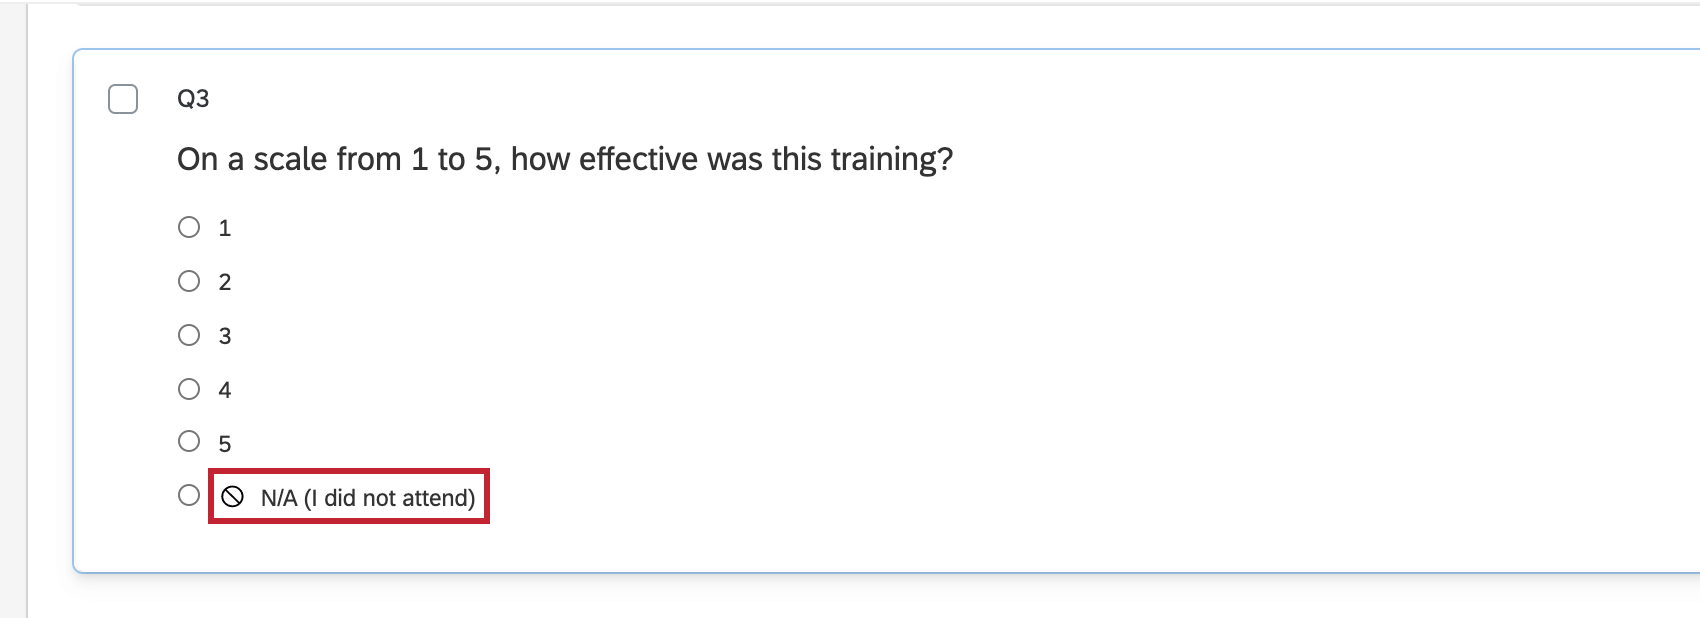
When an answer is excluded from analysis, this means the data is hidden from data and reports (not deleted). The excluded value won’t be used to calculate averages, sums, or other aggregate metrics; won’t appear in filters or data exports; will be automatically excluded in Stats iQ; and will be hidden in recorded responses, Results-Reports, Advanced-Reports, and Results Dashboards.
Example: Let’s say you’re collecting feedback from students about a training you ran, and you ask your respondents to rate the training on a scale from 1-10. You include a “N/A” option for respondents who may have missed the training. You can mark the “N/A” option as Exclude From Analysis so it doesn’t influence your data analytics, such as calculating the average score of the training.
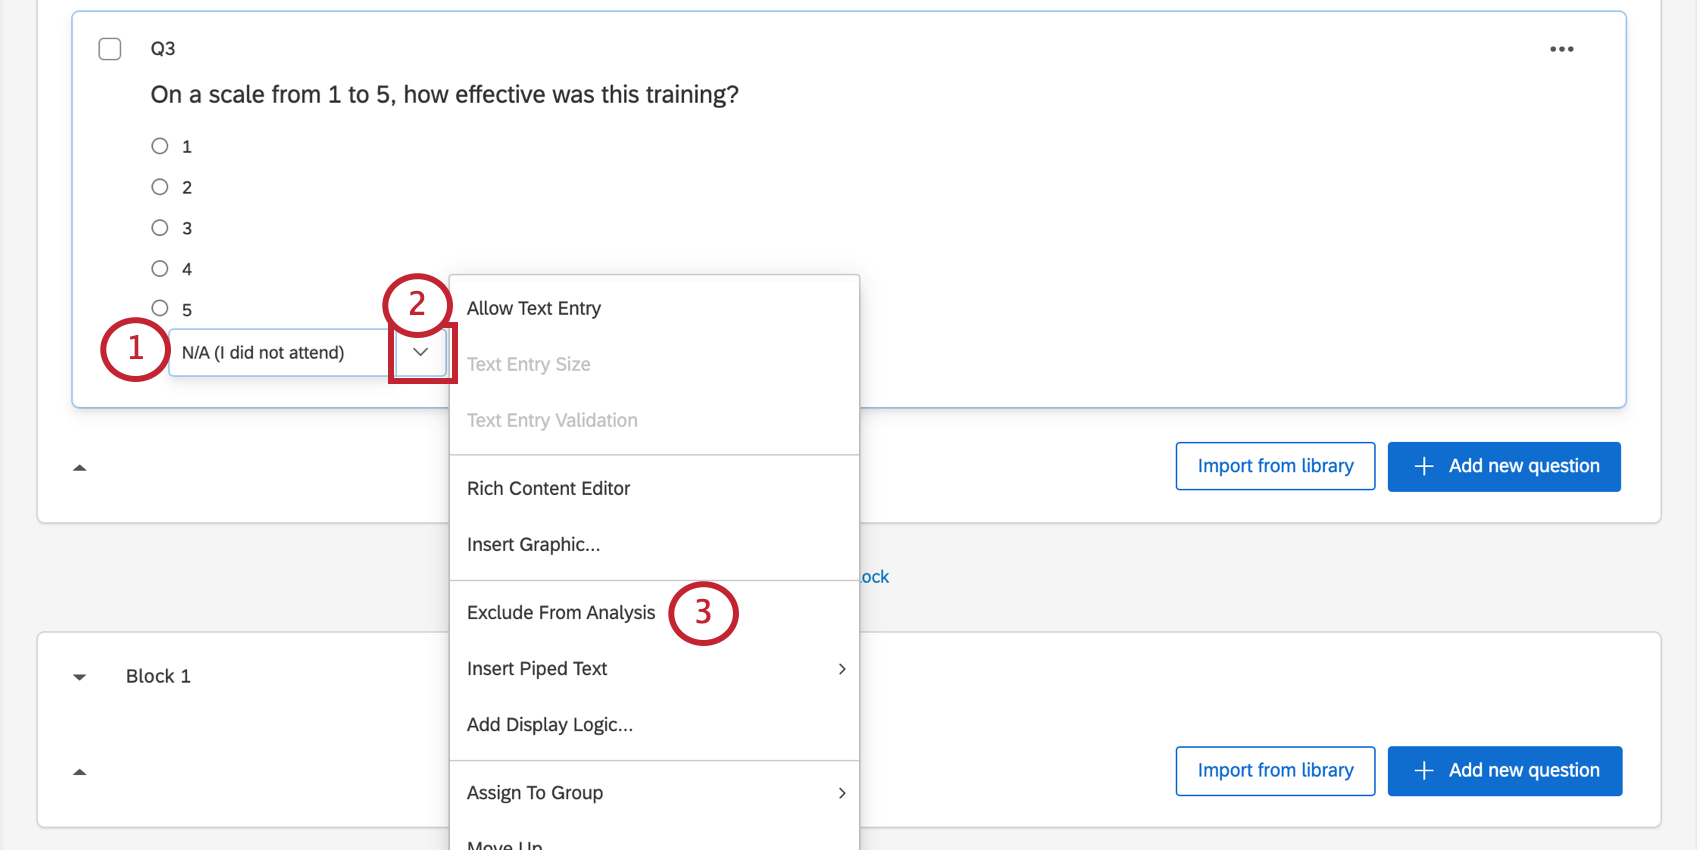
Once enabled, the choice will be marked with a symbol. You can change this setting at any time without deleting your data; this option merely hides the data.

The following text isn’t case-sensitive and will automatically turn this setting on:
- None of the Above
- NA
- N/A
- Not Applicable
- I Don’t Know
- Don’t Know
Make Answer Exclusive
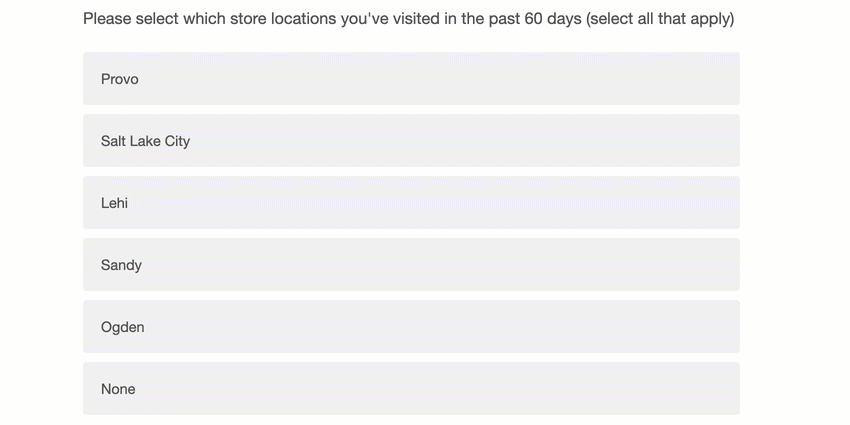
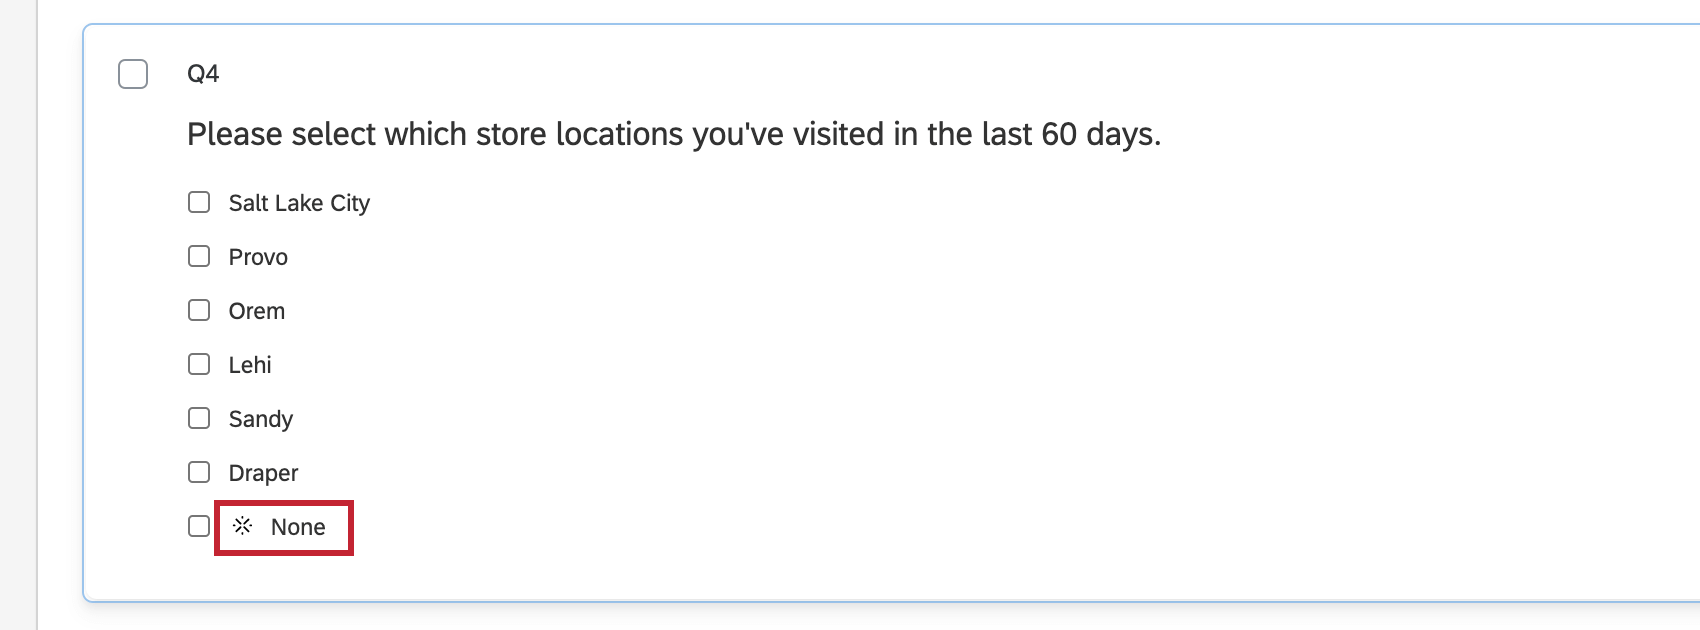
Some questions let respondents select multiple choices at a time. However, sometimes a choice like “None of the above” is provided which doesn’t make sense to pair with any other choices. Make Answer Exclusive ensures a specific answer can only be selected by itself.
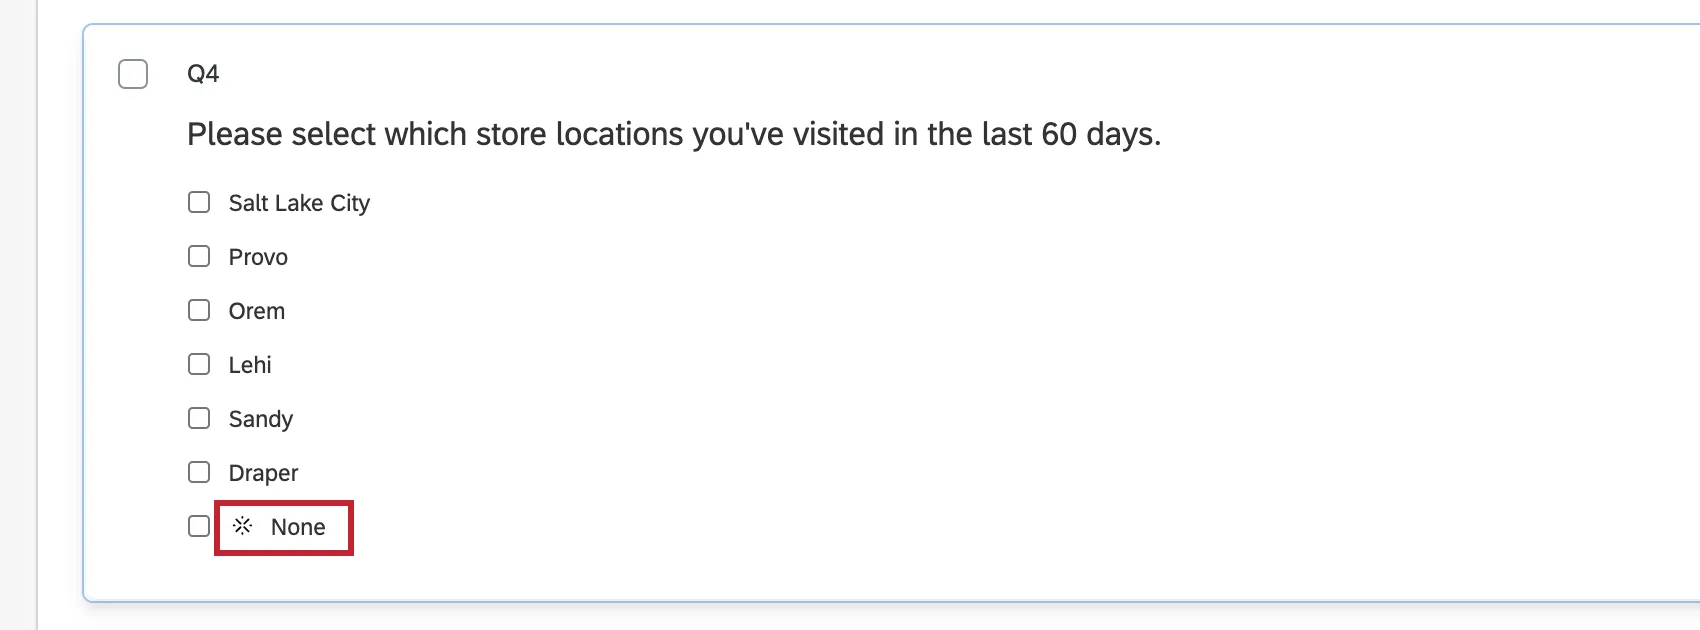
Example: Let’s say you ask respondents to select which store locations they’ve recently visited. You include “None” as an option for respondents who haven’t visited your stores. You can then mark “None” as Make Answer Exclusive so respondents can’t select that option with other choices. In the below example, we can see the other selected answer choices are automatically deselected when the respondent selects an exclusive answer choice.

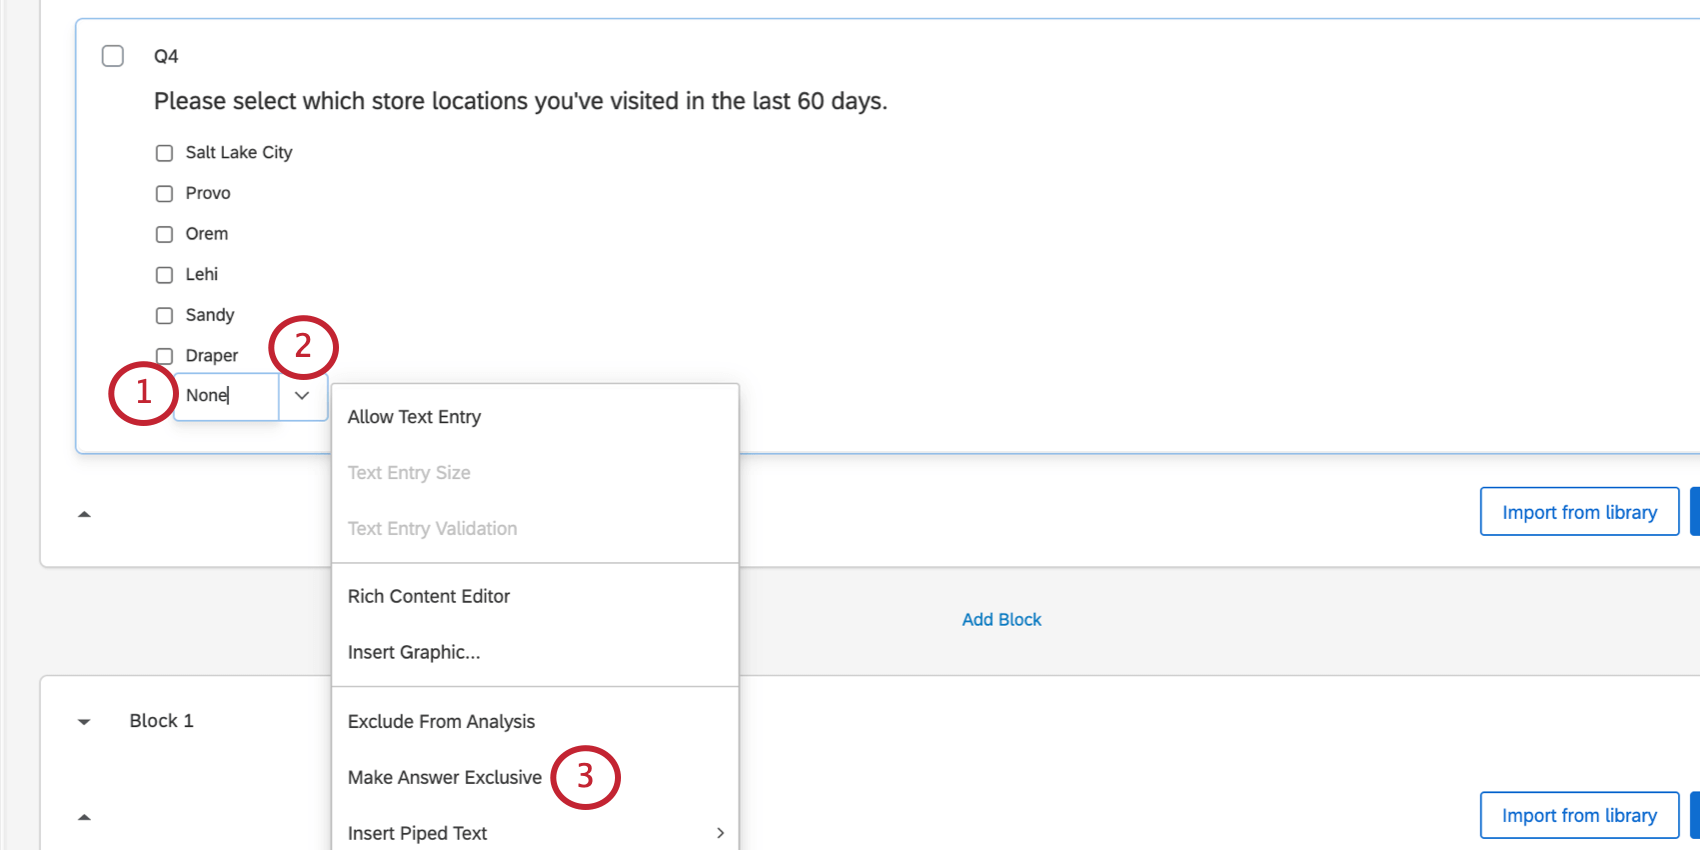
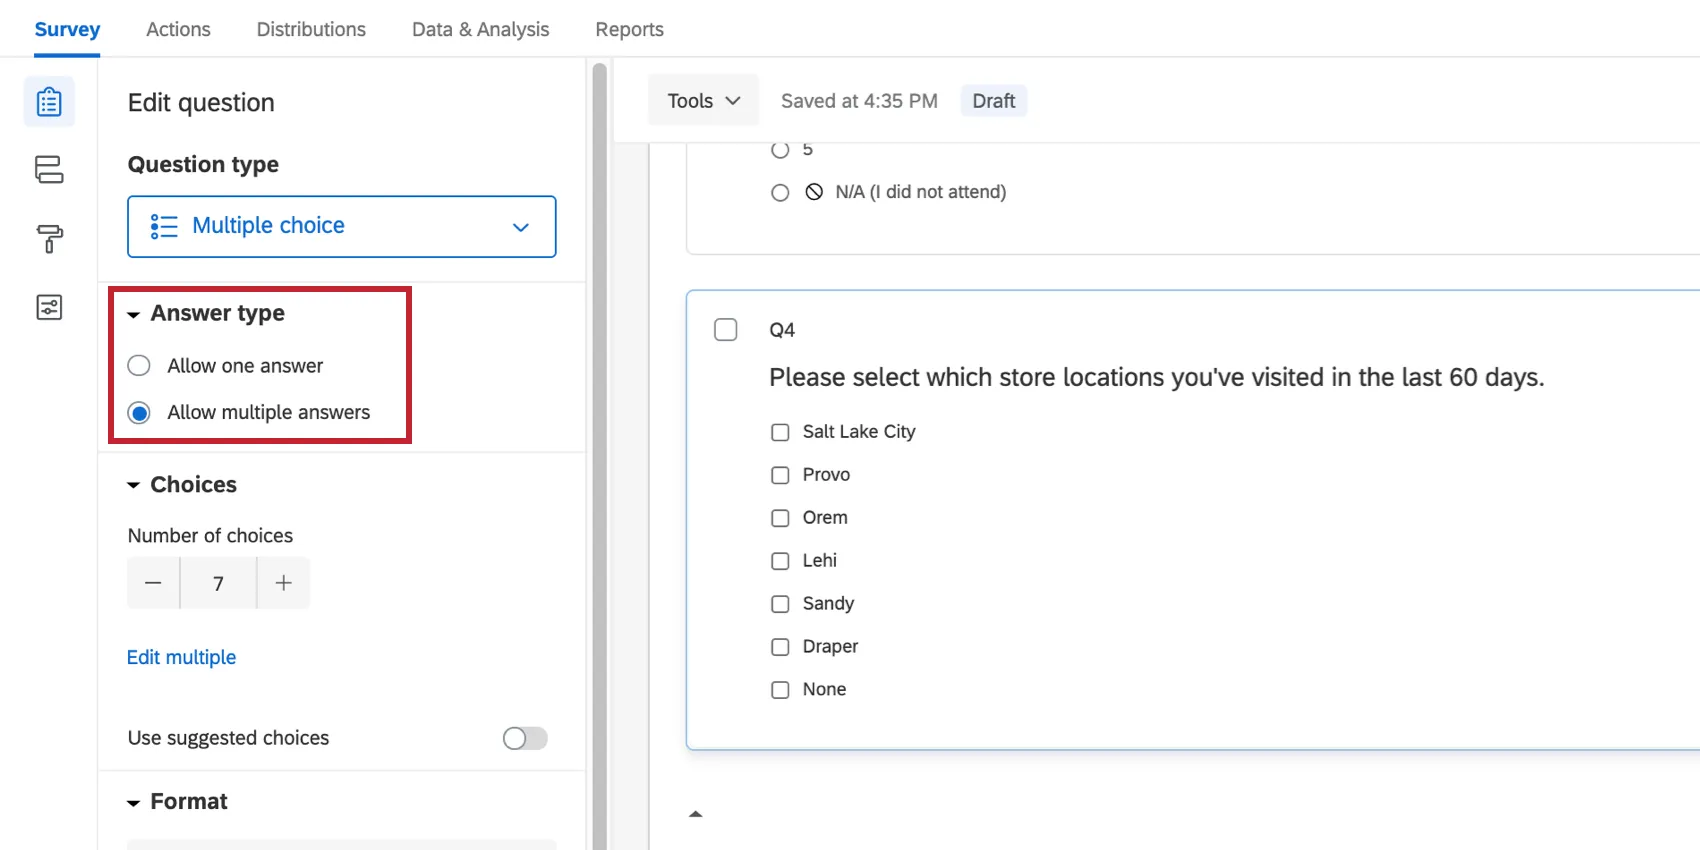
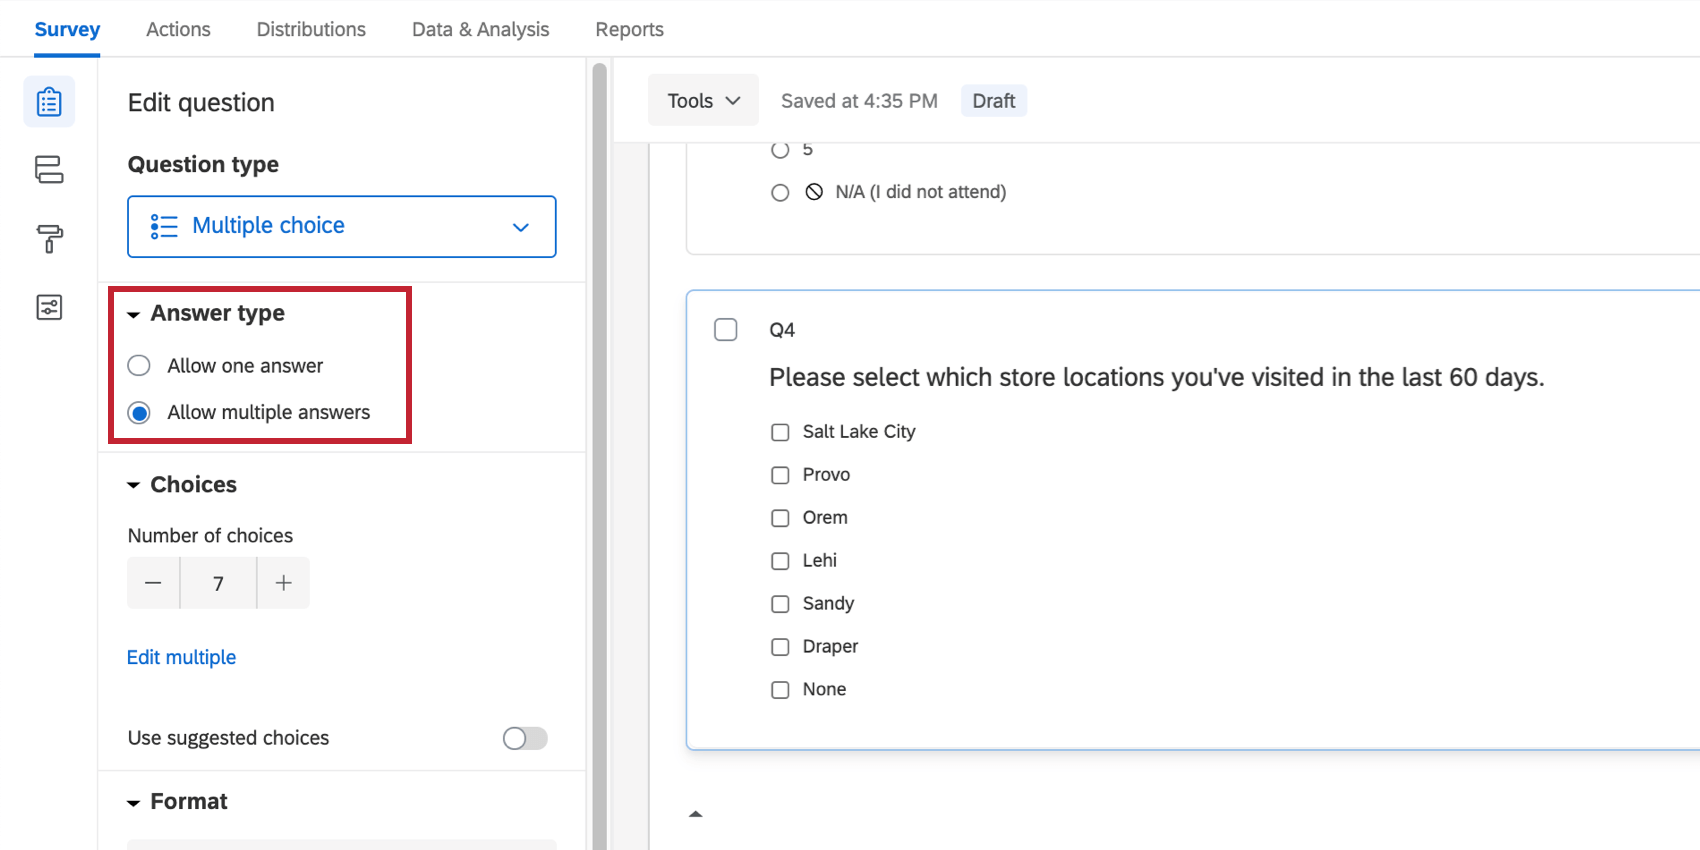
Qtip: If you don’t see this option, that means your question doesn’t allow multiple answers.
Once this option is enabled, that particular answer choice will be marked with a symbol, and it can’t be selected with other answer choices.
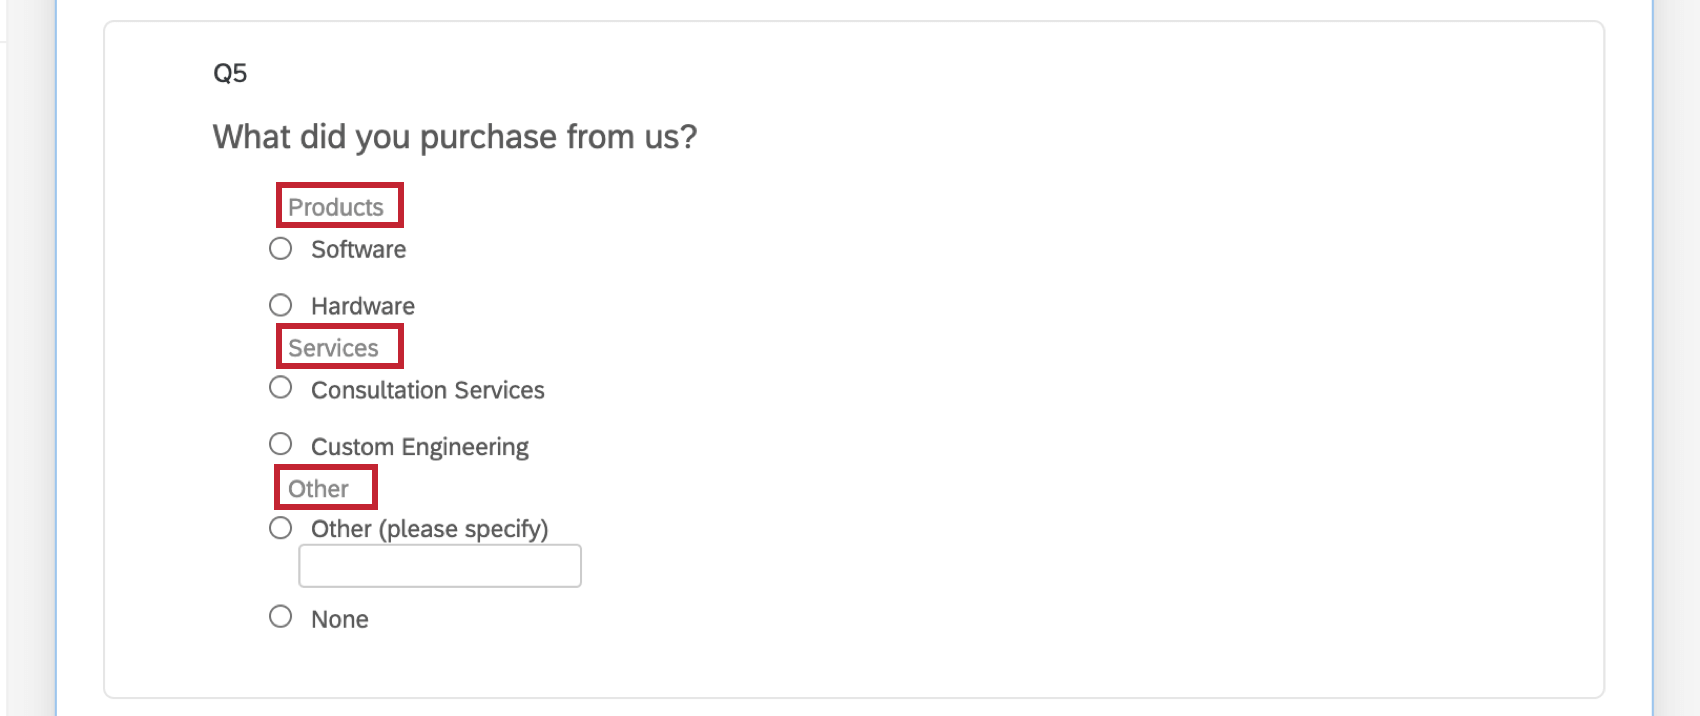
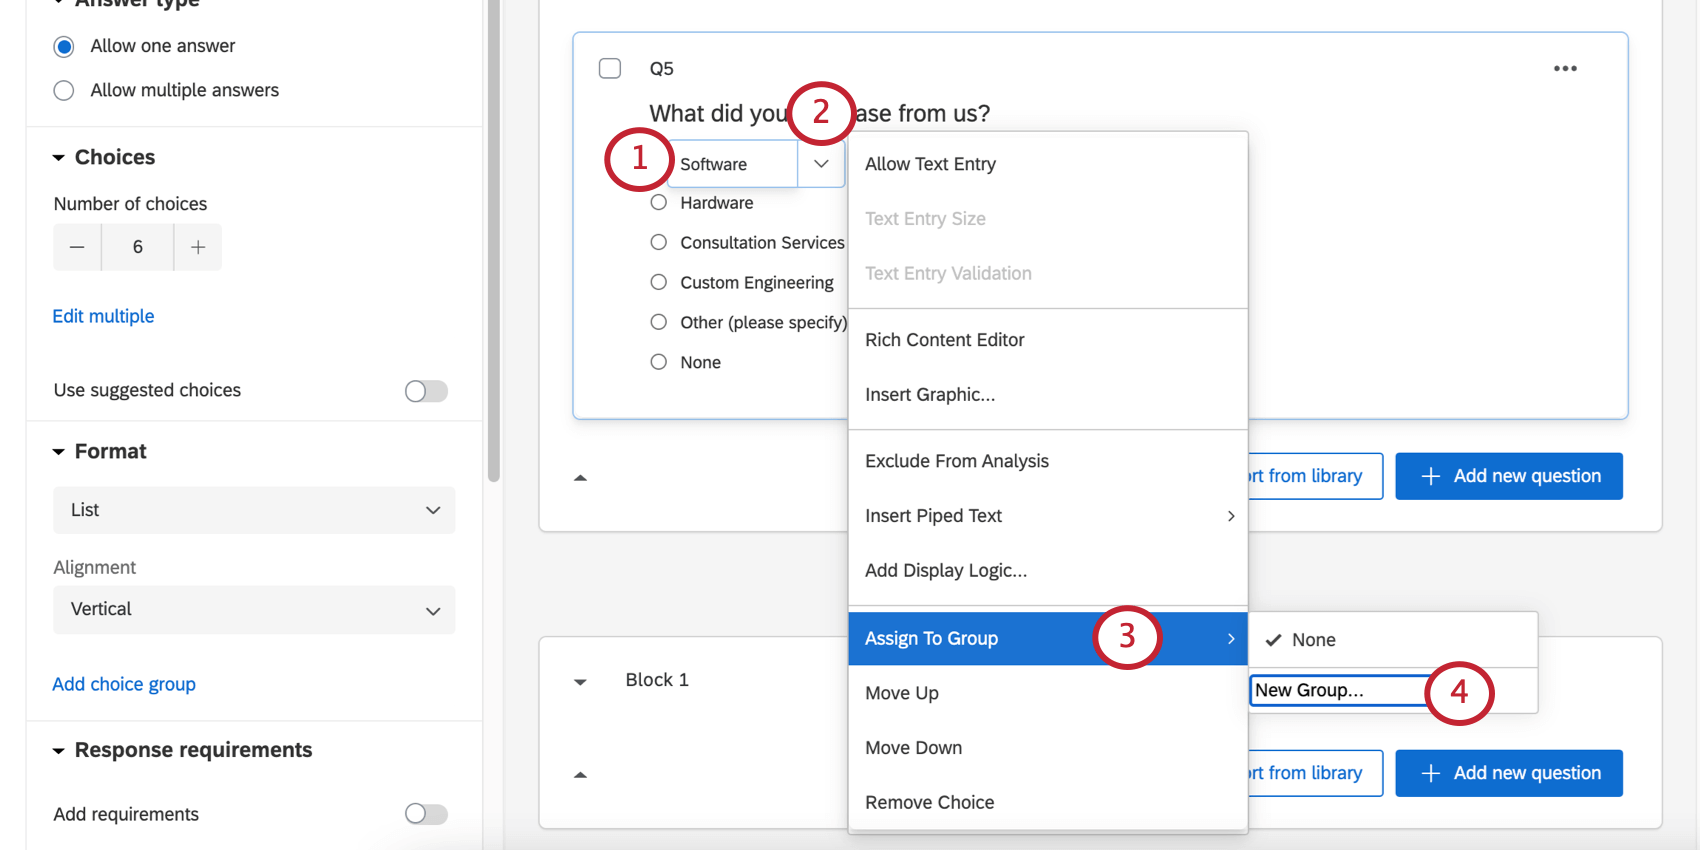
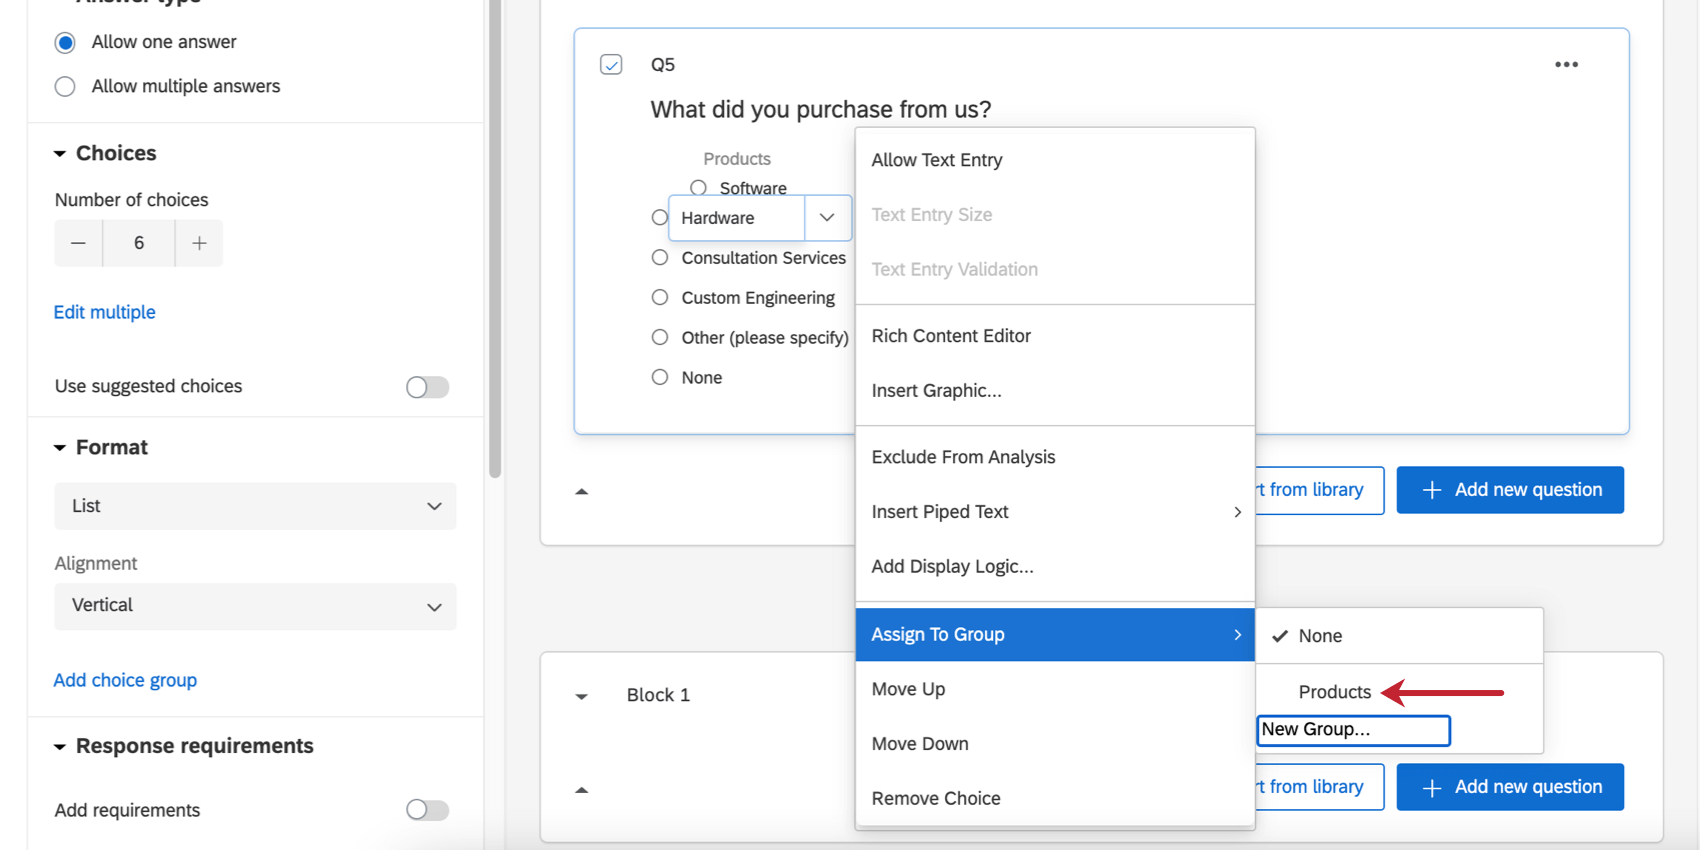
Assign to Group
You can group your answer choices together to help keep yourself and your respondents organized. This is especially useful for long lists of answer choices.
Qtip: The Assign to Group option isn’t available for all question types and formats. If you want to use choice groups but don’t see the option available for you, try changing the question’s formatting.
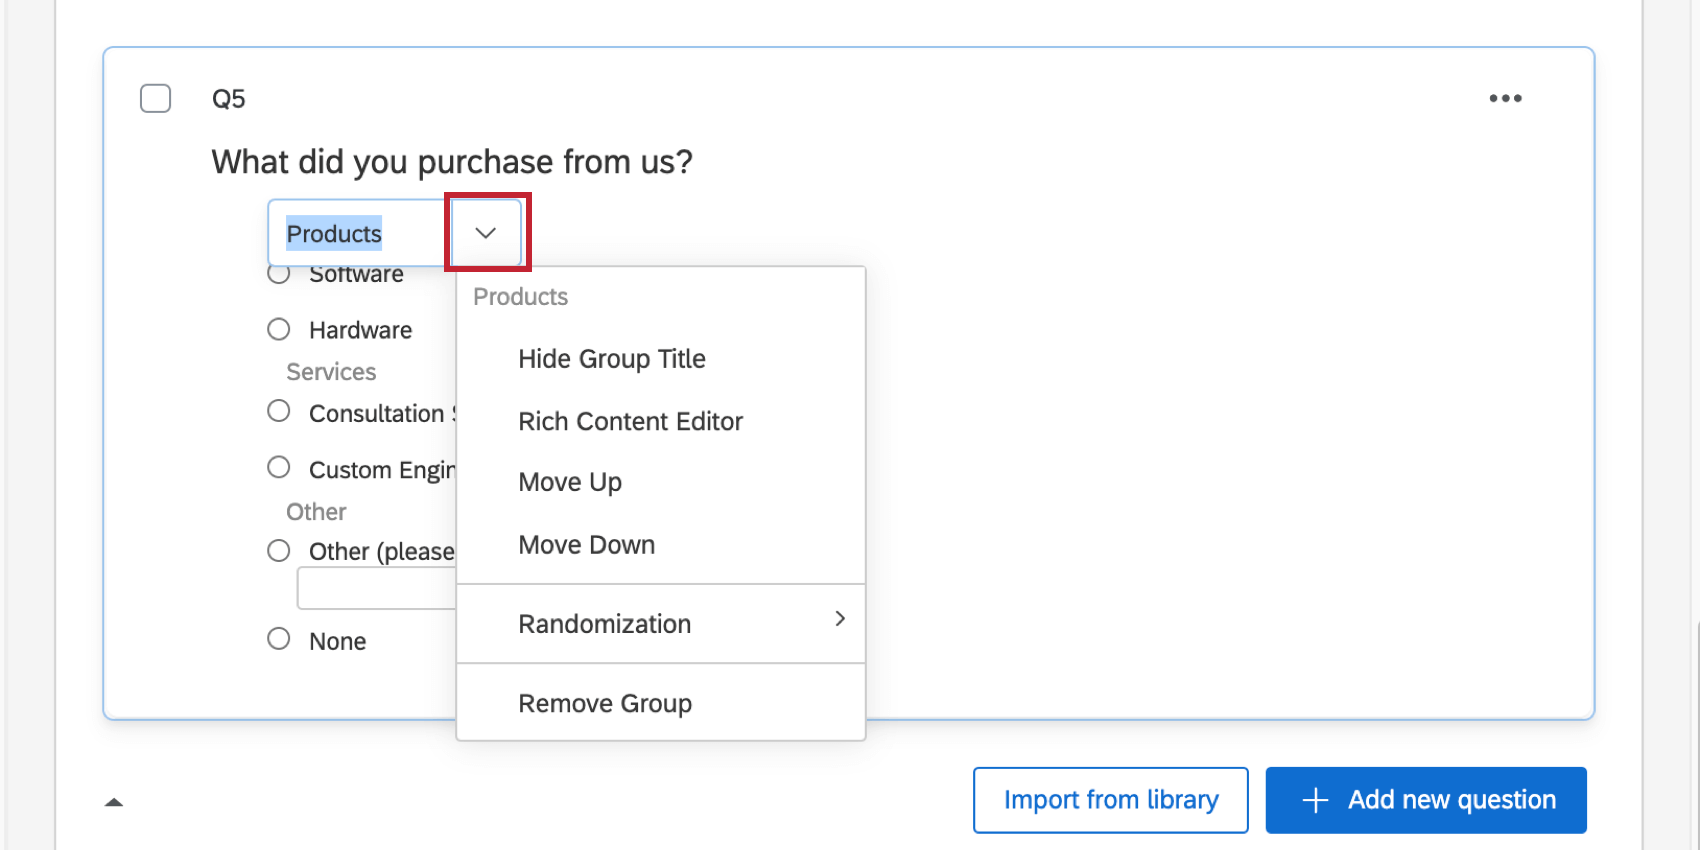
Example: In this example, we ask respondents to select what products and services they’ve purchased. We group together similar items to make organization easier.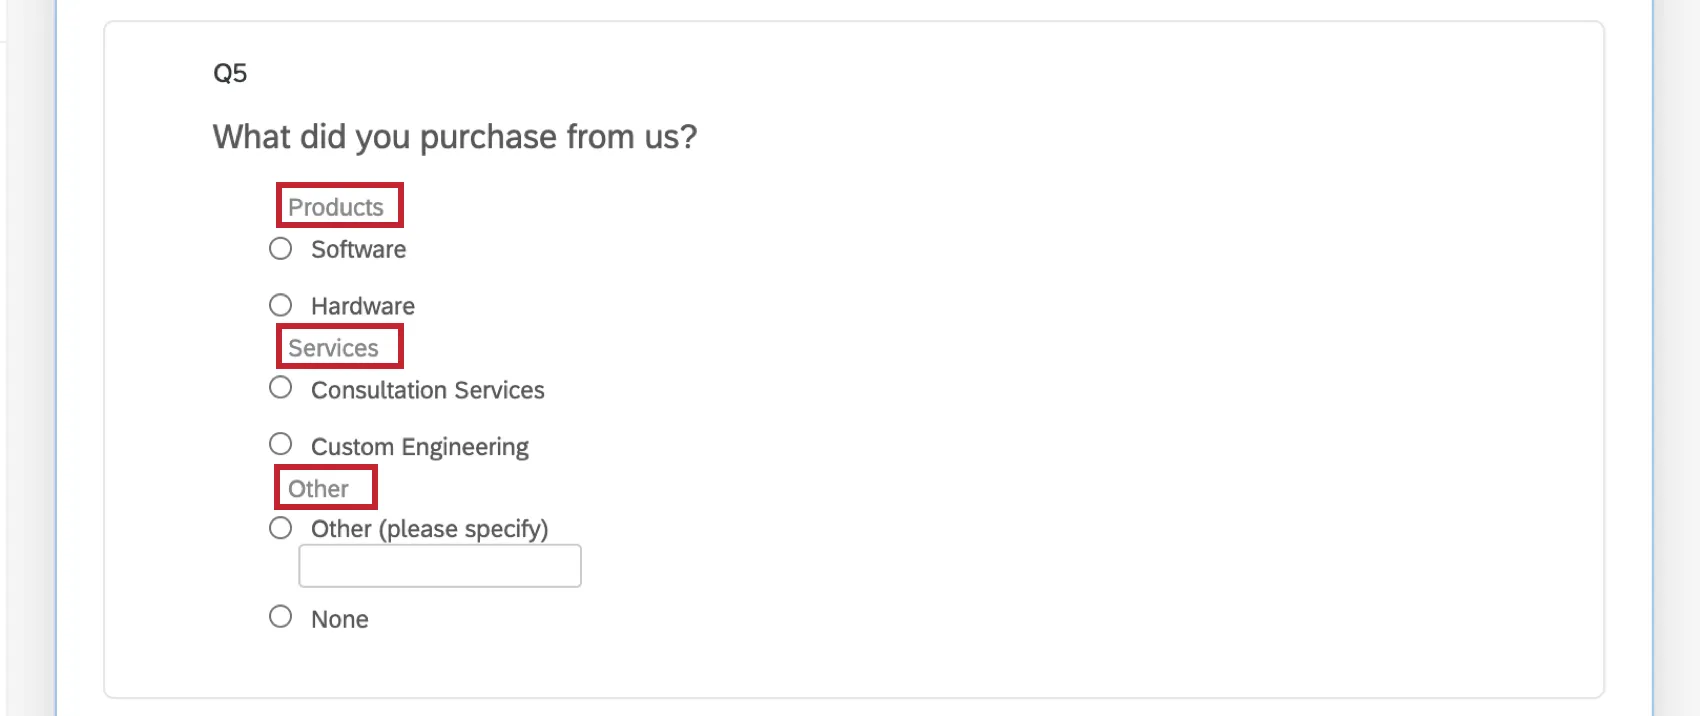
Assigning Choices to Groups
Qtip: You can add display logic to answers in a group. If all answers are hidden, the group title won’t appear.
Customizing Groups
Click into a group’s name and click the dropdown to view additional options for customization. For example, you can make some groups single-select and another multi-select.

- Hide Group Title: Hide the group title in the survey editor and when taking the survey. By default, this option isn’t enabled and respondents will be able to see your group titles.
- Rich Content Editor: Edit the name of the group and any corresponding images or font effects using the Rich Content Editor.
- Move Up / Move Down: Move the entire group up or down the question.
- Selection:
- Single Answer Within Question: When you choose an answer from the group, this is the only answer you can provide for the whole question.
- Single Answer Within Group: When you choose an answer from the group, this is the only answer you can provide for the whole group. You can still select answers from other groups.
- Multiple Answer Within Question: You can choose any number of answers across the question, regardless of group.
- Randomization:
- Use Question Randomization: Use the question’s choice randomization settings. This also means that if you have no randomization settings, none will be applied.
- No Randomization: Do not randomize the answer choices.
- Randomize the order of all choices: Randomize the choices within the group.
- Remove Group: Delete the group. When this happens, all choices in the group are saved, but no longer belong to a group.
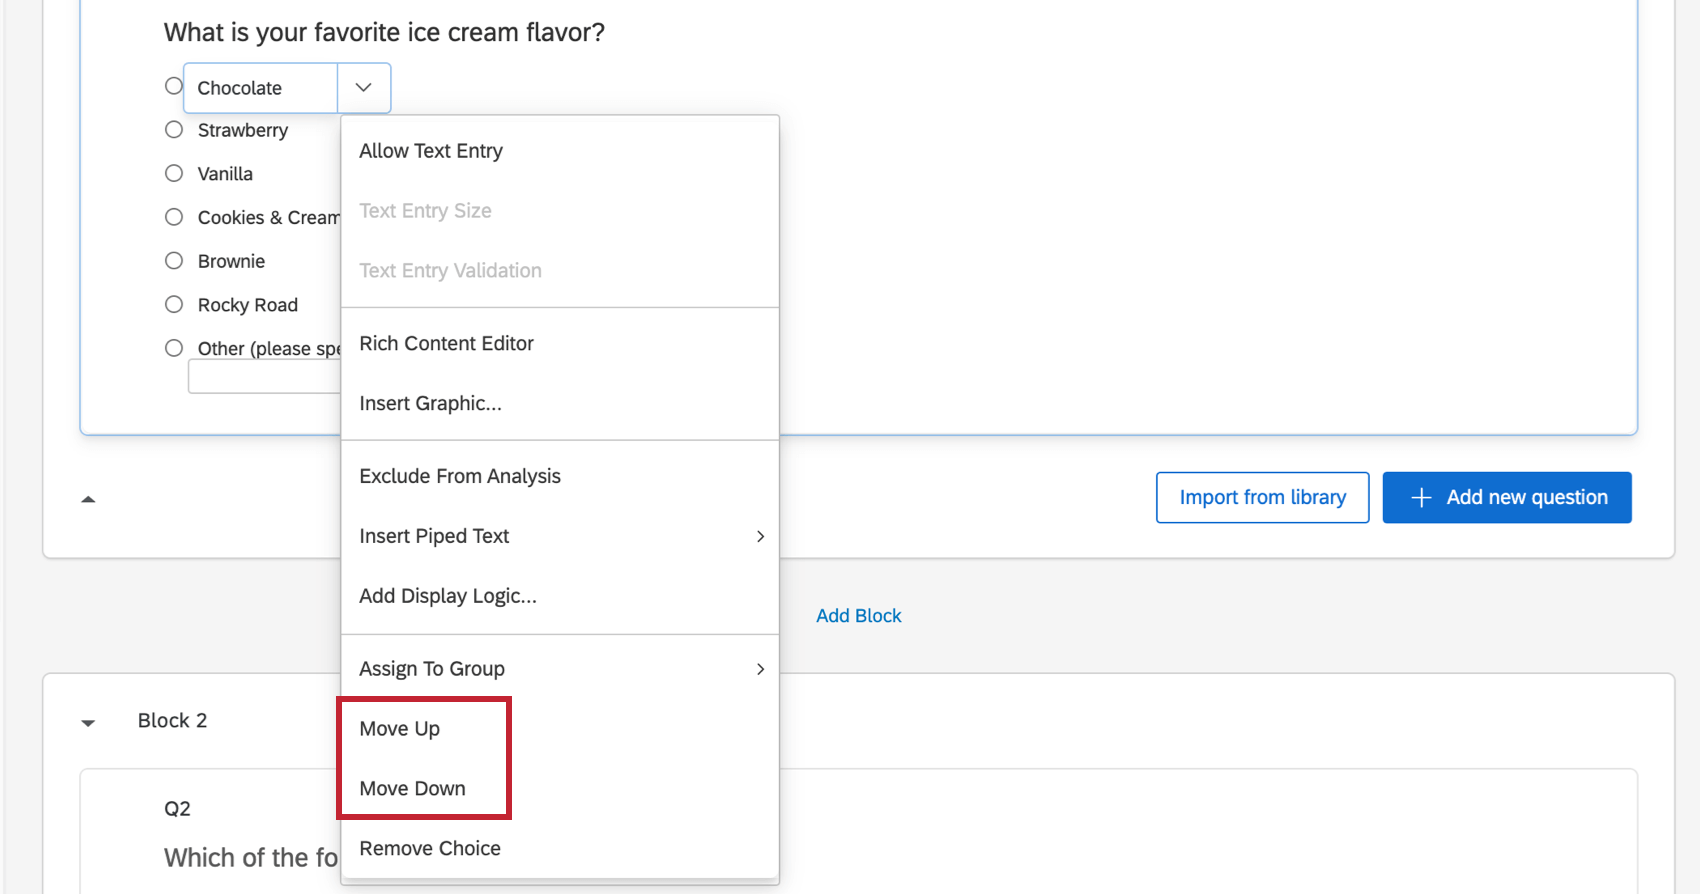
Move Choice Up & Down
Move the choice up by 1 or down by 1 by clicking the dropdown and selecting Move Up or Move Down. This doesn’t affect your data, but merely rearranges your answer choices in the question.
Qtip: These options come in handy if you are adding new choices to a survey that’s already collected data. See Testing / Editing Active Surveys for more details.
Removing Choices
Delete the answer choice by selecting Remove Choice from the dropdown.

You can also use the keyboard to delete a choice by clicking inside the text box of the answer choice and pressing the Backspace or Delete key until the text is gone and the text box turns red.
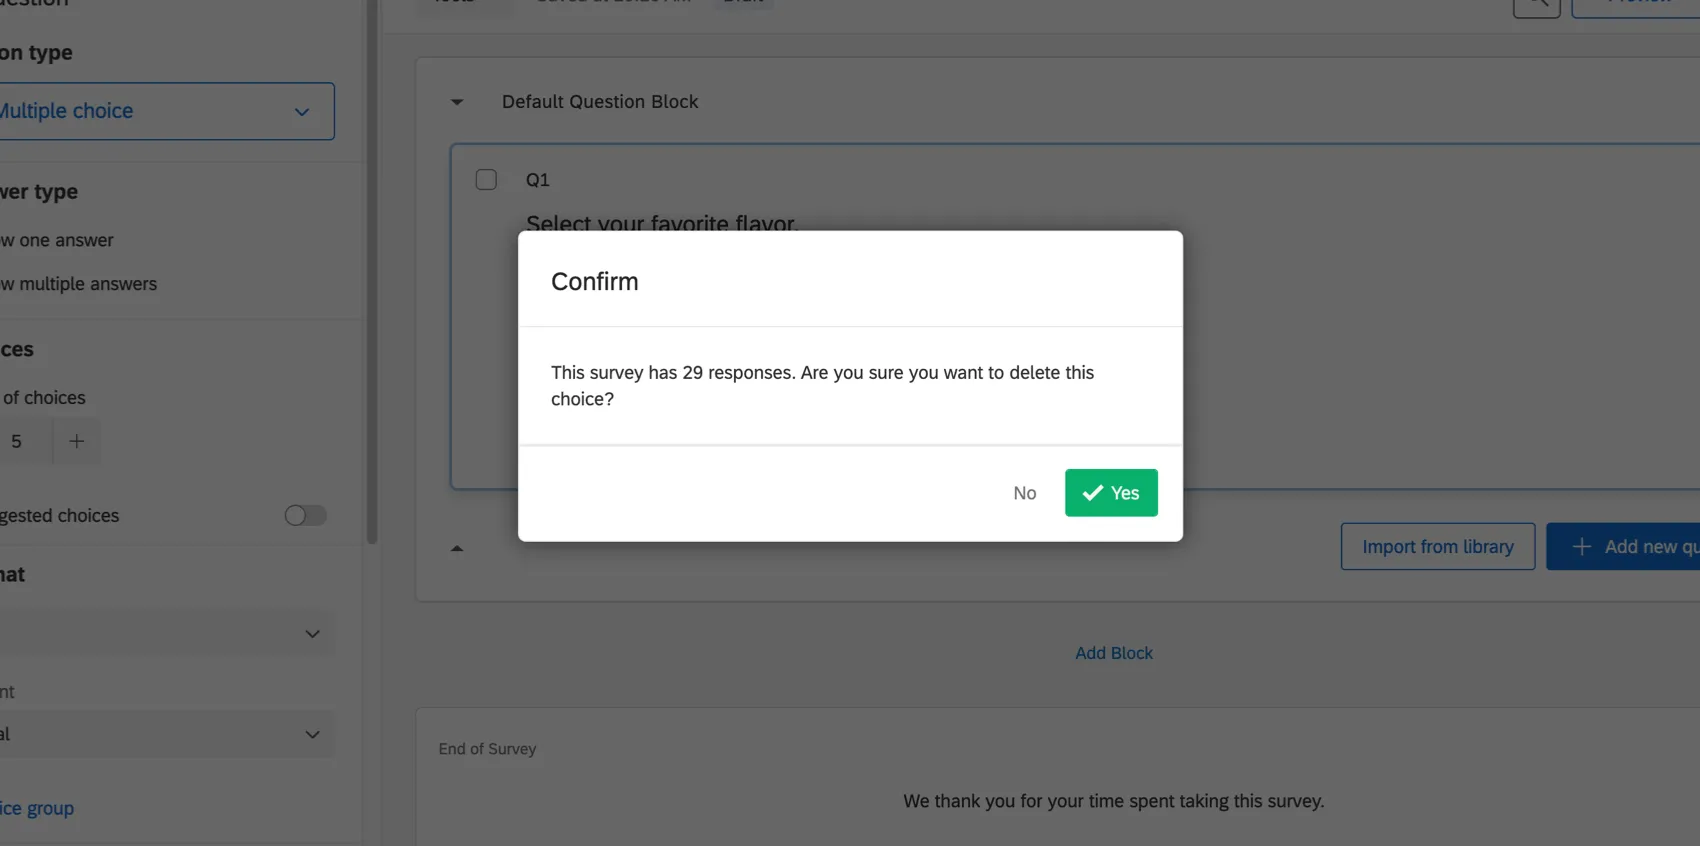
Qtip: If you try to delete an answer choice that has data associated with it (i.e., you have already gathered responses), you’ll be warned that deleting the choice could invalidate the results. See Editing an Active Survey for more information about what edits are OK to make.

Formatting Answers in Different Project Types
The options described on this page are available in just about every type of project where you customize a survey. This includes:
- Survey projects
- XM Solutions
- Engagement
- Lifecycle
- Ad Hoc Employee Research
- Pulse
- 360 Qtip: For details on customizing 360 surveys, see Creating & Editing Questions (360).
- Conjoint
- MaxDiff
Qtip: For details on customizing MaxDiff and Conjoint surveys, see this page.
That's great! Thank you for your feedback!
Thank you for your feedback!