
Configuring Organization SSO Settings
What's on this page
About Configuring Organization SSO Settings
As a Brand Administrator, you have the ability to create and manage your SAML and OAuth 2.0 Single Sign-On (SSO) connections. You’ll be able to add new connections, update certificates on existing connections, modify settings such as Just In Time provisioning, and more. These connections can be used to manage how users in your organization log into their Qualtrics accounts and what survey authentication options are available. To get started:
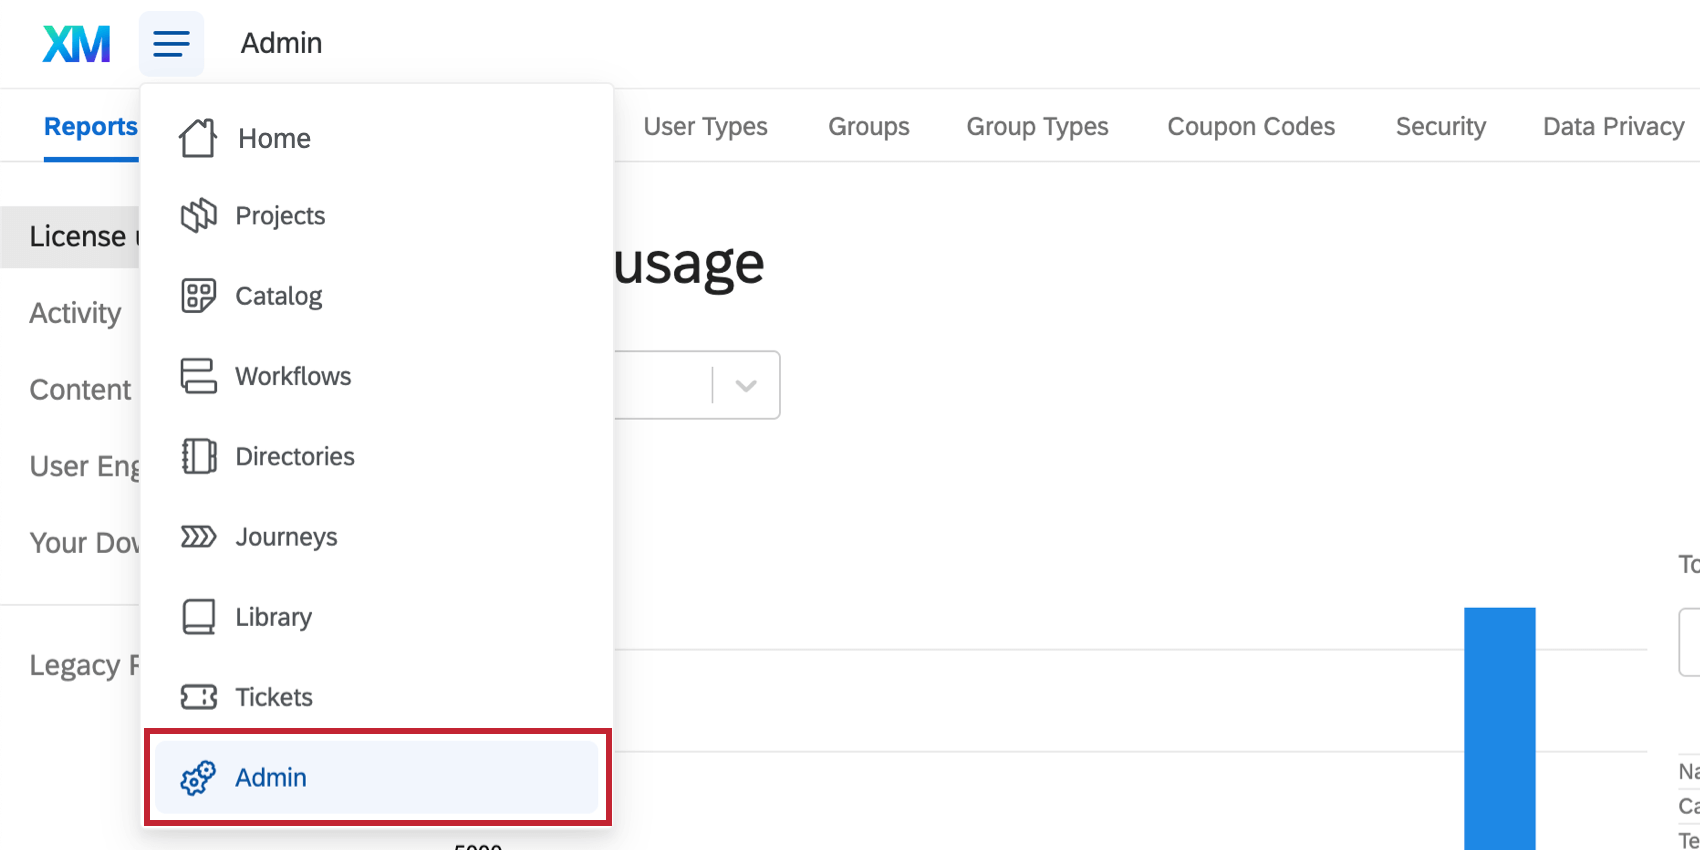
Qtip: SSO settings have moved to the Authentication section of organization settings.
Qtip: If you are setting up SAML or OAuth 2.0 SSO for the first time, you have the option of implementing through the self-serve portal on your own, or you can purchase the help of an experienced consultant. If you’re interested in working with an implementation consultant, contact your Account Executive.
Qtip: In this case, Qualtrics acts as the SP (service provider), but you will need to configure your IdP (identity provider) with your IT team.
Adding a Connection
For a detailed description of all the steps and settings, see Adding an SSO Connection for an Organization.
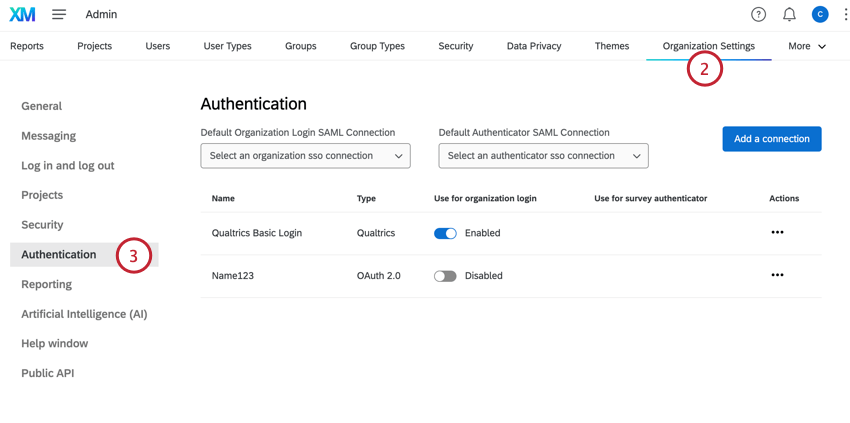
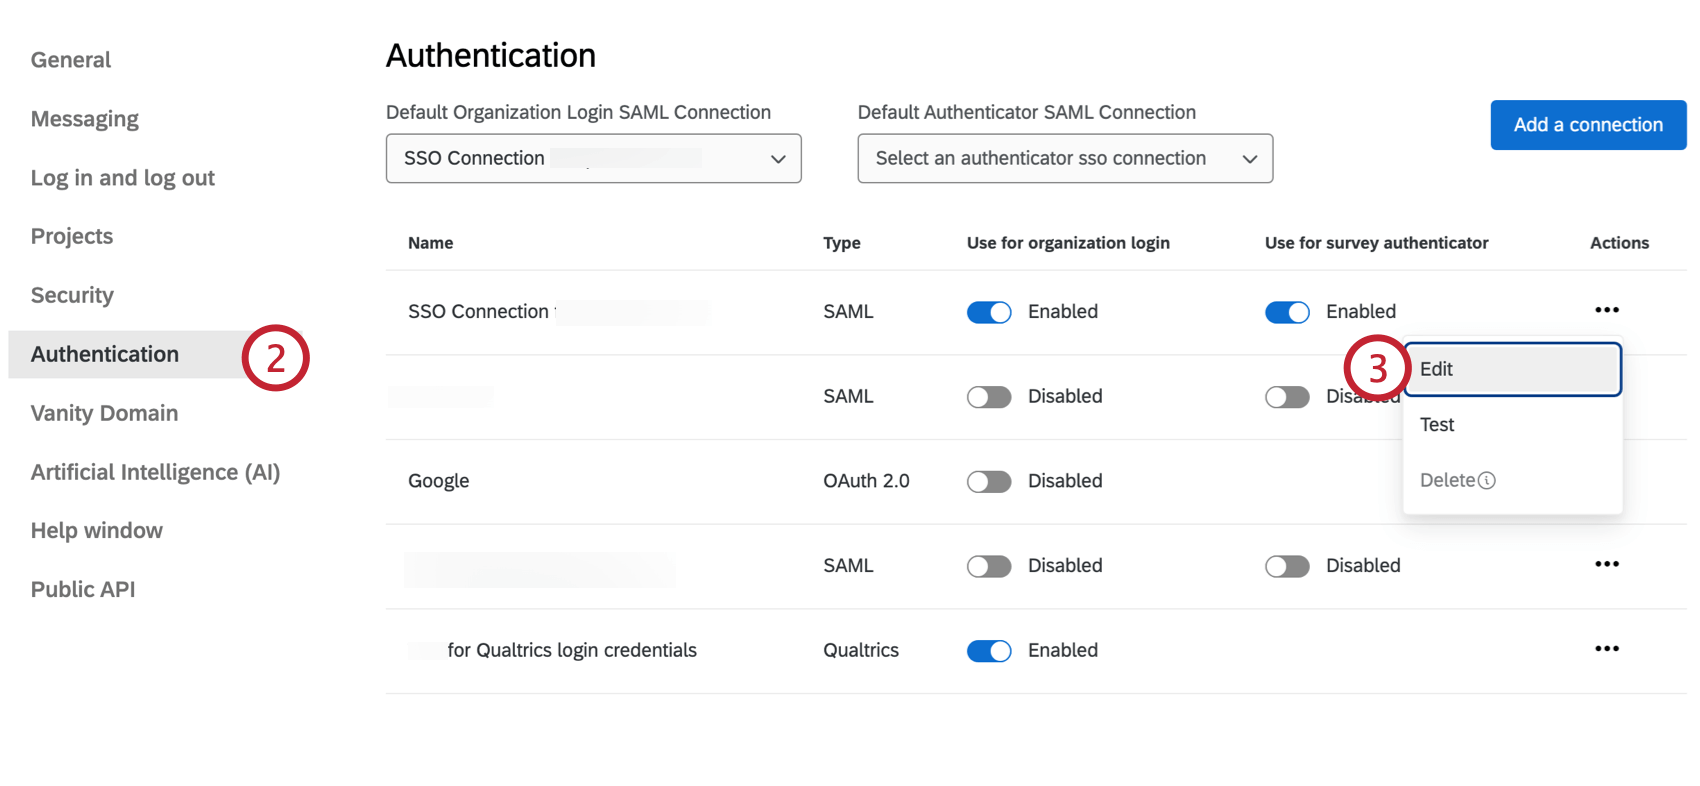
Managing SSO Connections for Organization Login
This section explains how to enable and disable SSO connections in order to control the organization’s user login experience.

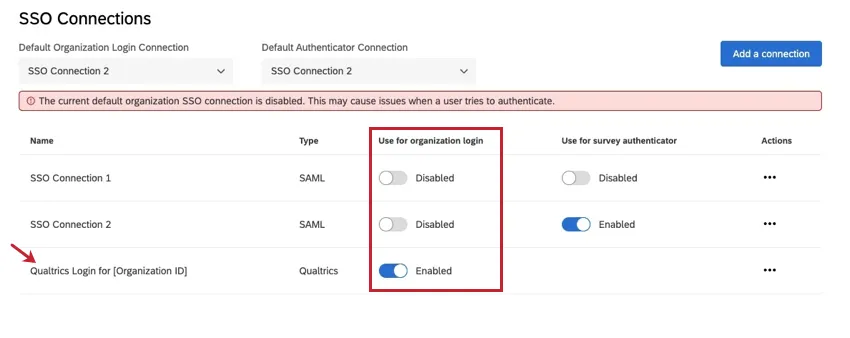
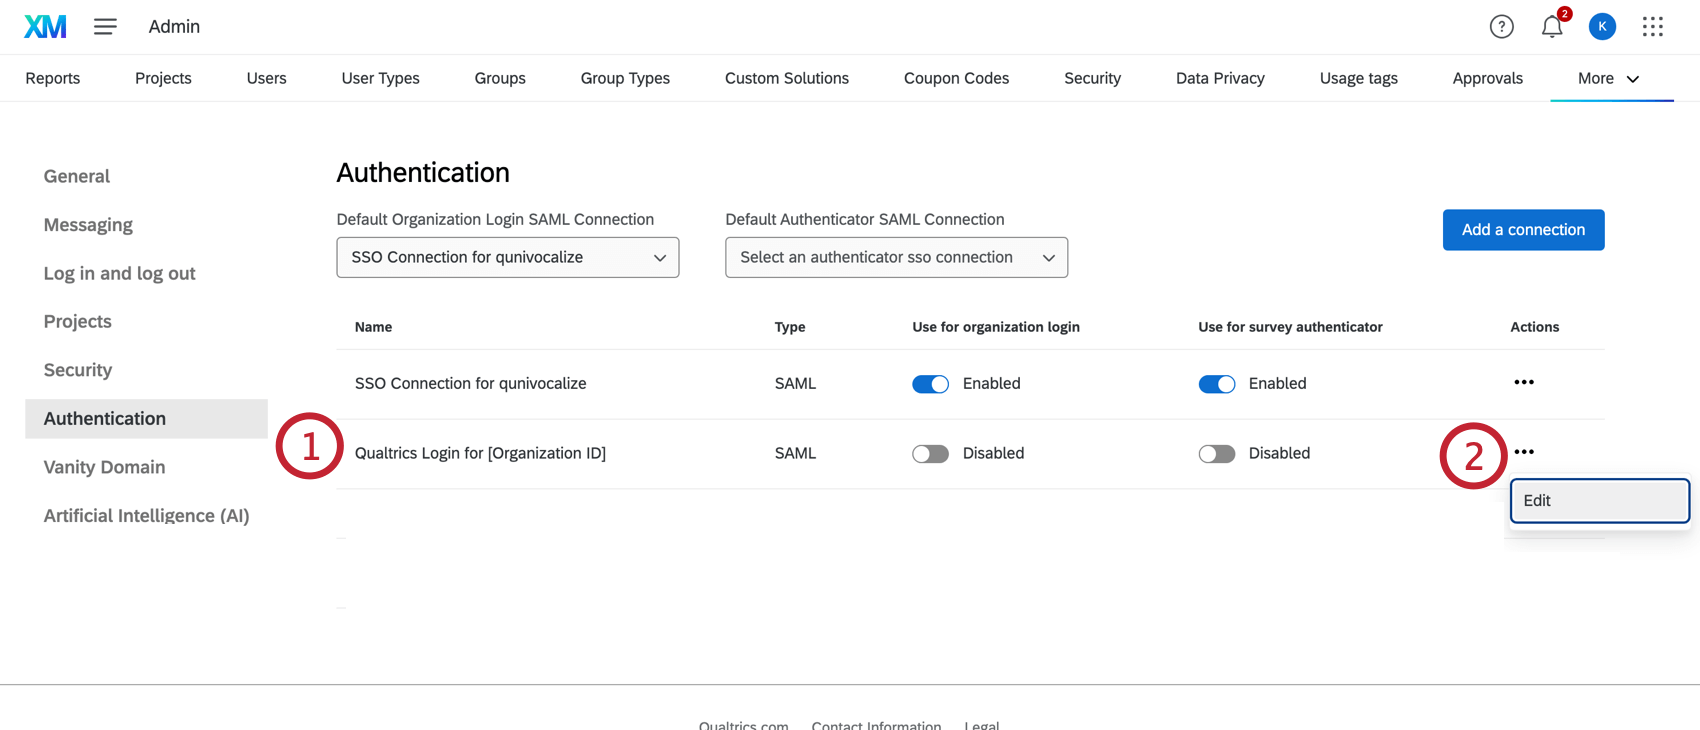
You will see a connection labeled Qualtrics Login for [Your Organization ID]. Disabling this connection will require all users to login through SSO and remove the option for users to login with their Qualtrics username and password.
Qtip: If you are working with an external consultant who does not have SSO credentials at your organization, you will most likely need to enable this option.
Warning: Disabling a connection will disable the login for your entire user base. Once the SSO connection is disabled, users will need to login using a separate Qualtrics username and password. When disabling or enabling a connection, please keep in mind how it will impact your user base.
When you first add a connection, it will default to a status of disabled under the ‘Use for organization login’ column. Enabling a SSO connection for organization login indicates that the SSO login is now live on your license for your entire user base.
Warning: Before you enable a connection, make sure you have completed implementing the connection and tested the login.
Qtip: You can add and enable up to 20 connections at a time.
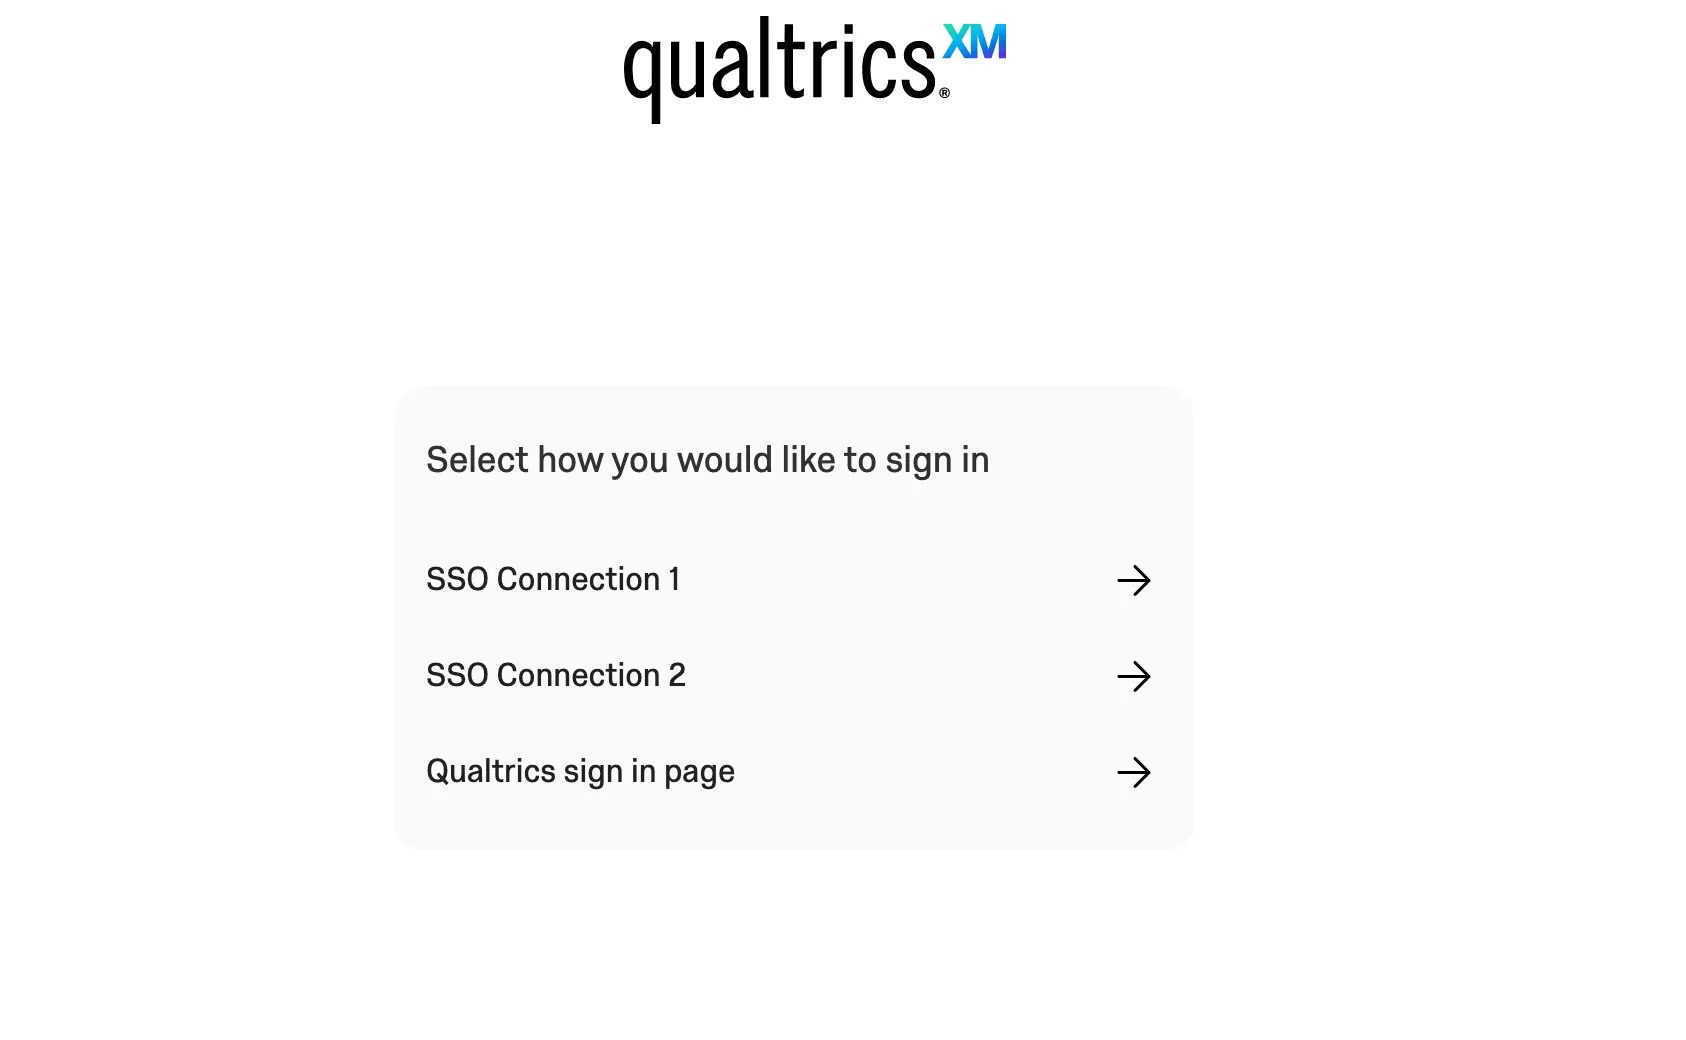
After enabling and disabling the desired connections, the user experience at your organizational URL (https://OrganizationID.qualtrics.com) will be one of the following scenarios:
USER EXPERIENCE WHEN ONLY THE QUALTRICS LOGIN IS ENABLED
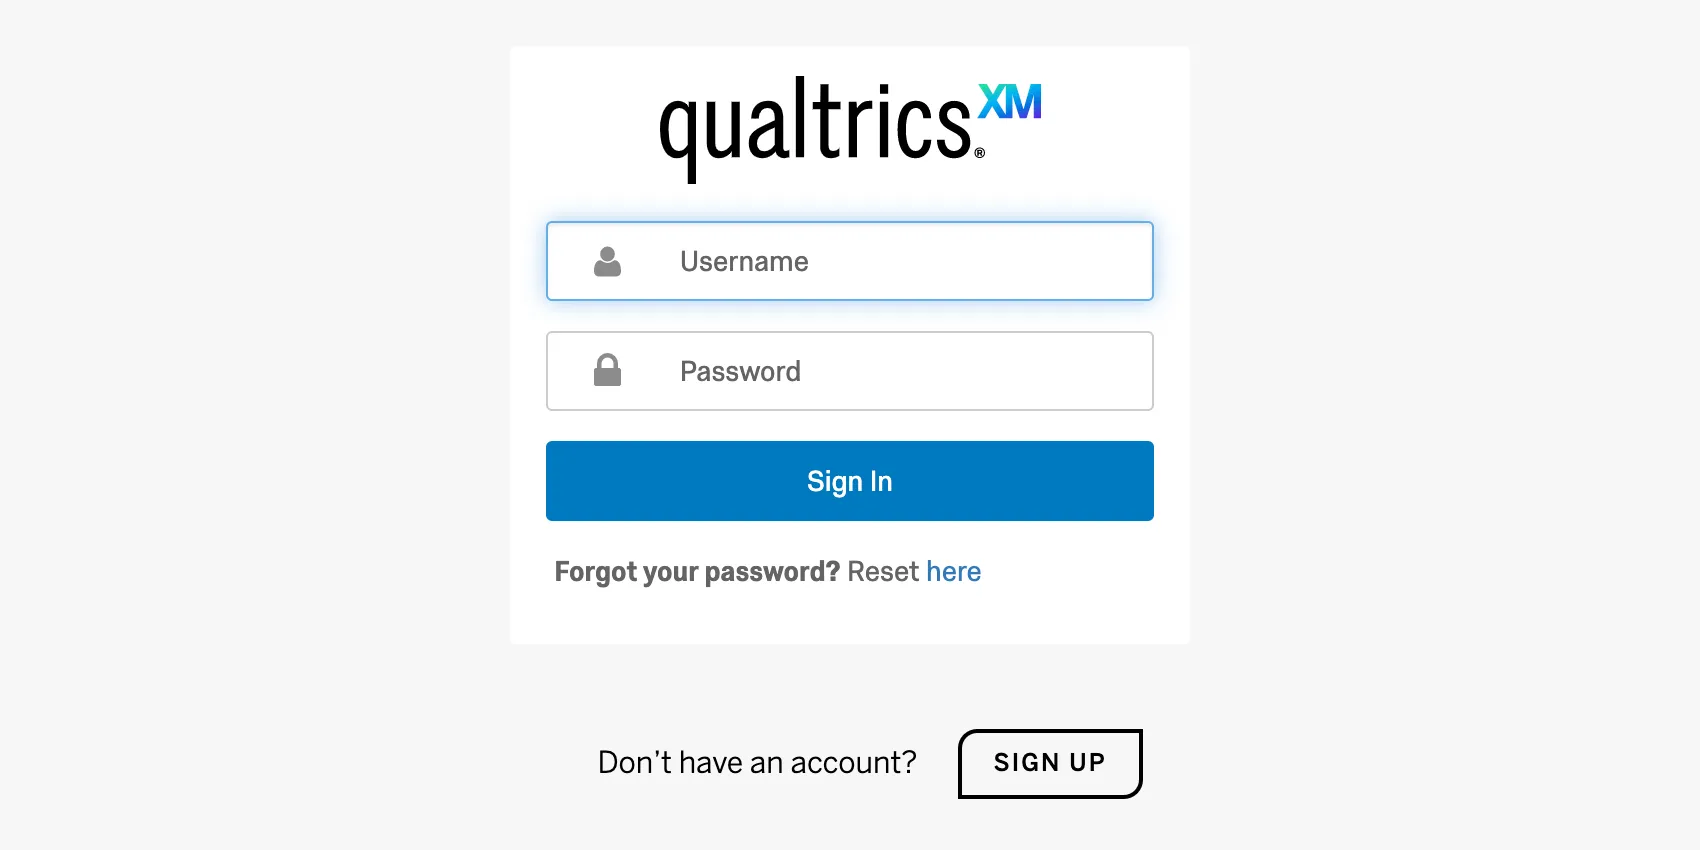
When the only organization login connection that is enabled is “Qualtrics Login for [Your Organization ID],” your organizational URL (https://OrganizationID.qualtrics.com) will direct to our standard Qualtrics login screen and all users will authenticate with their Qualtrics username and password.
USER EXPERIENCE WHEN ONLY ONE SSO CONNECTION IS ENABLED
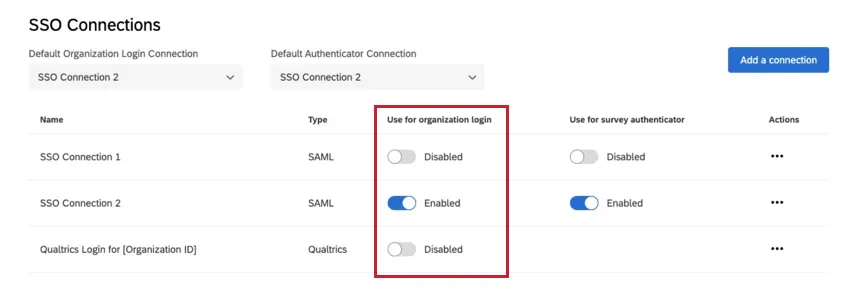
When the “Qualtrics Login for [Your Organization ID]” connection is disabled and only one SSO connection is enabled for organization login, the user will go to their organizational URL and automatically be redirected through your SSO authentication flow. All users will be required to login via SSO.
Qtip: The user will see your SSO login page if they do not have an active SSO session. The user may be automatically logged into the platform if they currently have an active SSO session.
USER EXPERIENCE WHEN MORE THAN ONE SSO CONNECTION IS ENABLED
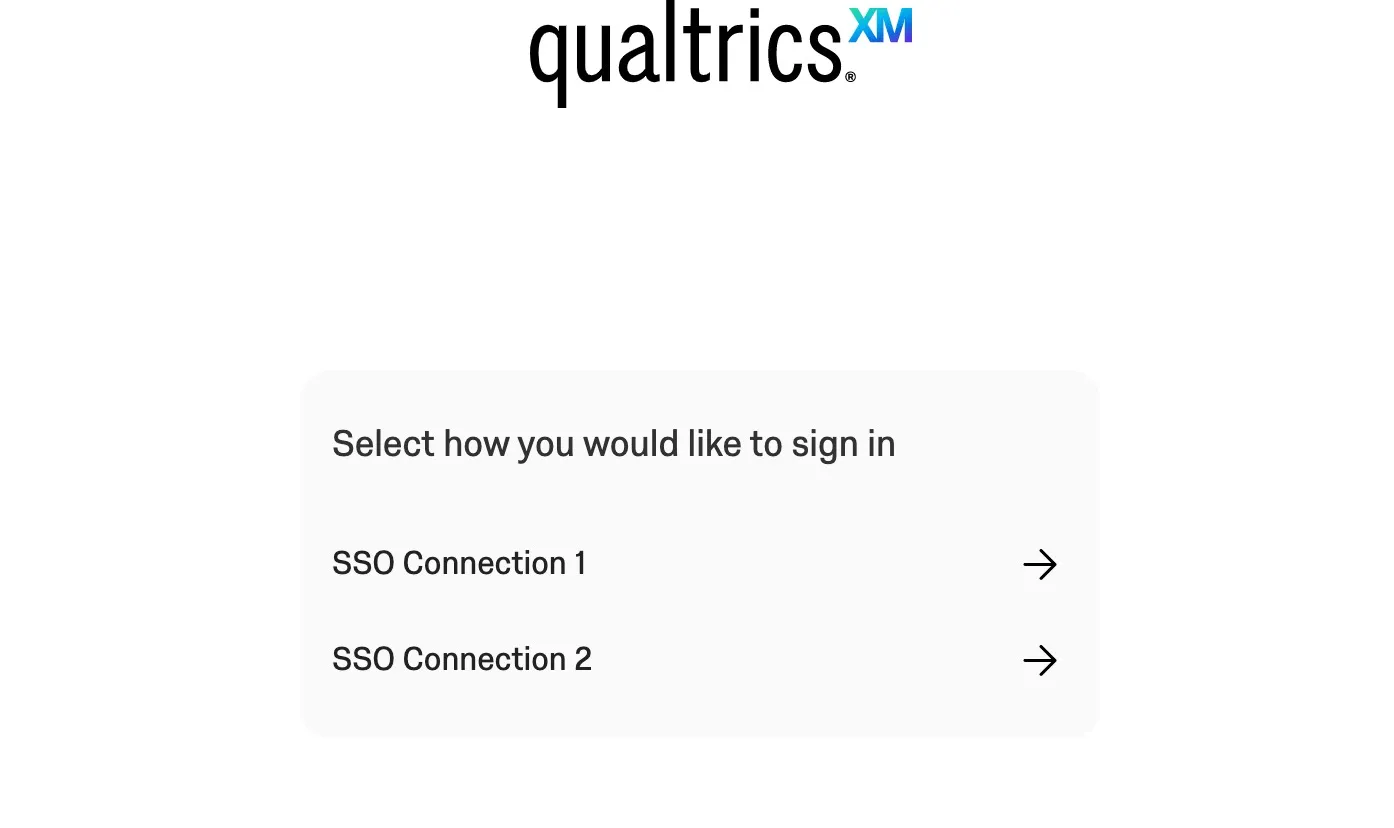
When the “Qualtrics Login for [Your Organization ID]” connection is disabled and more than one SSO connection is enabled for organization login, the user will go to their organizational URL and see a list of all enabled SSO connections. The user will have to choose which SSO connection they want to authenticate with.
USER EXPERIENCE WHEN AN SSO CONNECTION IS ENABLED AND THE QUALTRICS LOGIN IS ENABLED
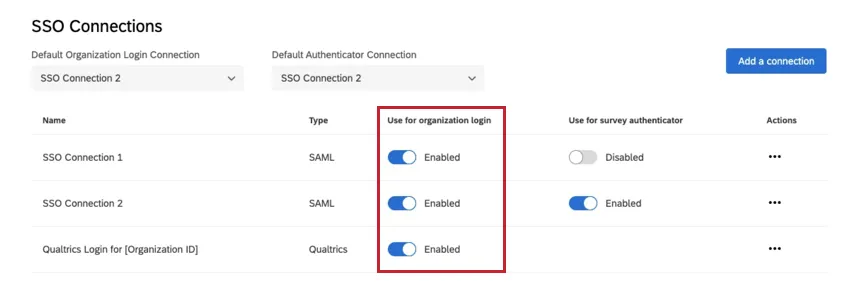
When the “Qualtrics Login for [Your Organization ID]” connection is enabled and more than one SSO connection is enabled for organization login, you will have the option to redirect the user to a landing page with all available options. When this option is enabled, the user will go to their organizational URL and see a list of all enabled SSO connections as well as the Qualtrics Login option. The user will have to choose which authentication method they prefer.
In order to activate this landing page:

If you do not select this option, your organizational URL will redirect to your SSO authentication flow. Users who would like to login without SSO can use one of the following links:
- For FedRAMP users: https://gov1.qualtrics.com
- For all other users: https://qualtrics.com/login
Qtip: If you have a Vanity URL set up for your organization, the Vanity URL will replace your branded URL.
Managing SSO Connections for Survey Authentication
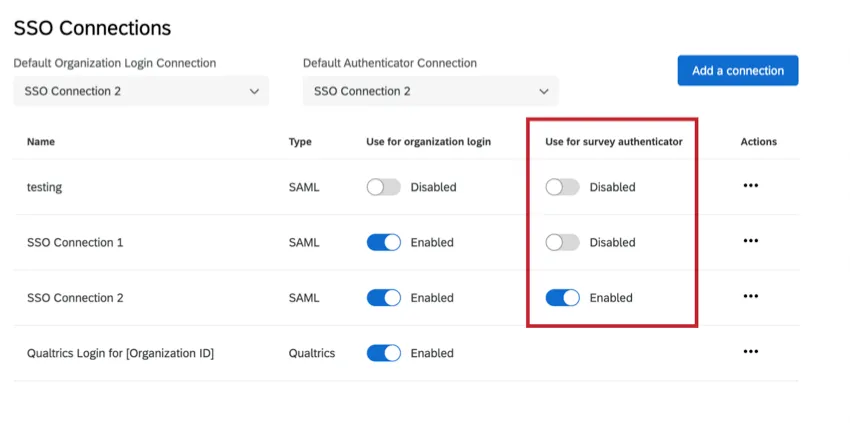
When you first add a connection, it will default to a status of disabled under the Use for survey authenticator column. Enabling a SSO connection for a survey authenticator indicates that the SSO login is available as an option for survey authenticators.
Qtip: You can add and enable up to 20 connections for survey authenticators at a time.
Warning: Before you enable a connection, please make sure you have completely implemented the connection and tested the login.
Warning: If you disable an SSO connection for survey authenticators when there is a project currently using that SSO connection, survey takers will be directed to an error page.
Default SAML SSO Connections
The default SAML connection will be used whenever Qualtrics receives a request that doesn’t specify which particular SAML connection to use. This is particularly important for IdP initiated login requests.
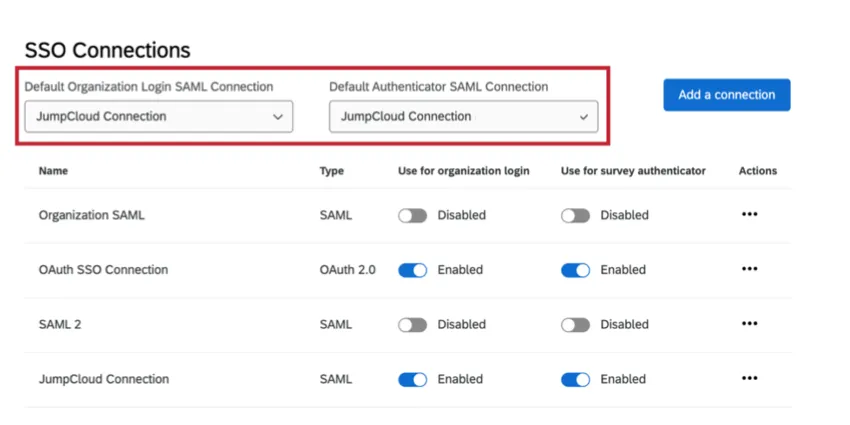
- Default Organization Login SAML Connection: The default organization login connection will be used in the idp-initiated SAML flow when the SAML response from the identity provider does not use the new relay state format and uses the old format.
- Default Authenticator SAML Connection: This default is required in order to support surveys set up with SSO authenticators before December 1, 2021. Surveys created before this update will be associated with the default authenticator connection.
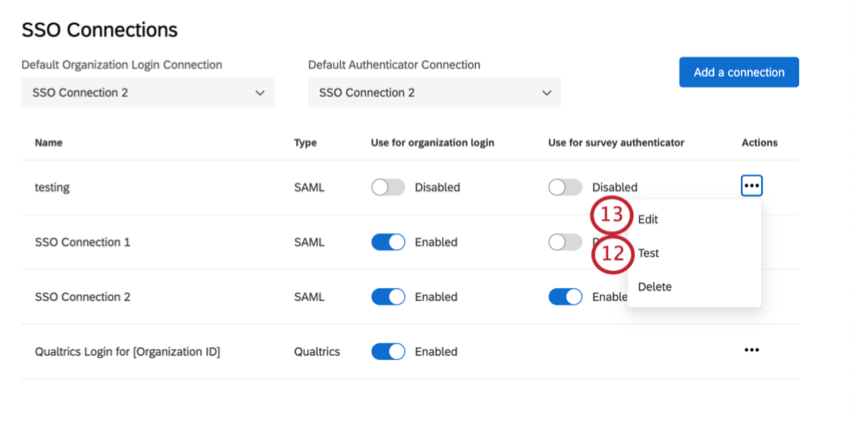
Managing Existing Connections
In the SSO section of the Organization Settings tab, you will see a summary of all the connections set up in your license. You will be able to add new connections, delete or disable connections, edit existing connections, and test connections during setup.
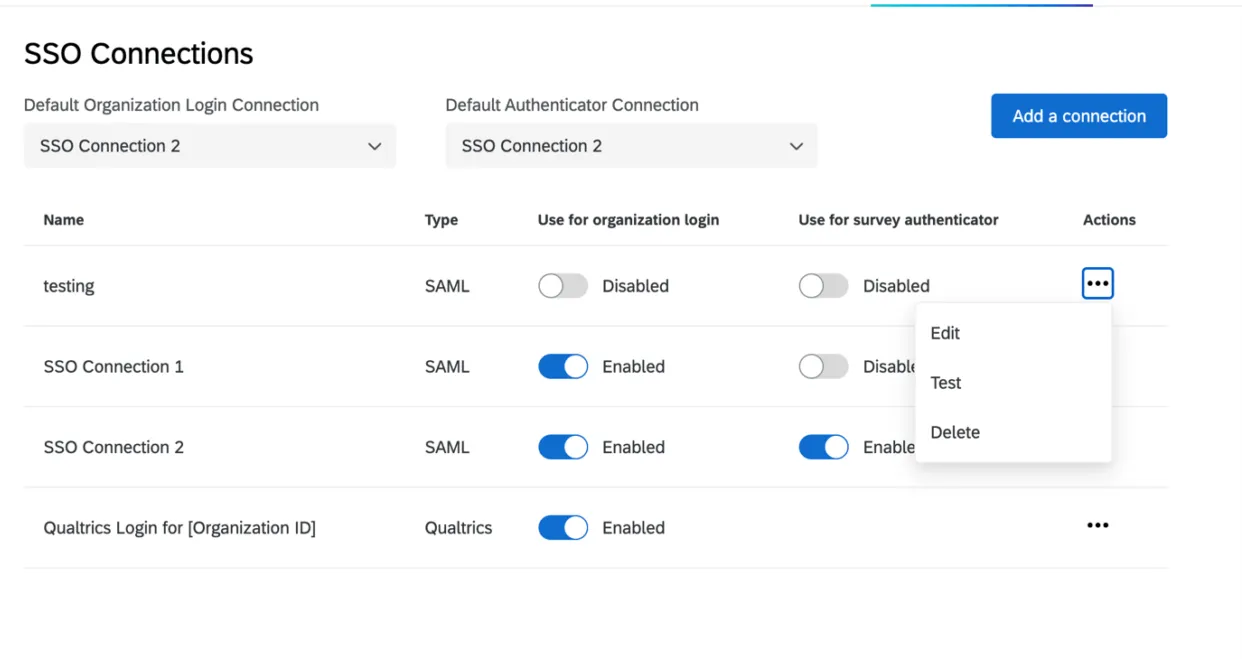
Enable or Disable a Connection
Under Use for organization login, you can switch the connection between disabled and enabled. Please see Managing SSO Connections for Organization Login for relevant details and warnings.
Under Use for survey authenticator, you can switch the connection between disabled and enabled. Please see Managing SSO Connections for Survey Authentication for relevant details and warnings.
Editing, Testing, & Deleting Connections
When clicking on the three dots under the Actions column, you’ll see the options to delete, edit, or test a connection.
Edit: Modify any of the settings in the connection. This option is particularly useful for certificate rotations.

Attention: When editing an enabled connection, be careful editing fields that may disrupt logins for your user base.
- Test: Test the connection to make sure it works as intended. See more at the linked section.
Delete: Clicking Delete will permanently delete the connection. When the button is clicked, a modal will open up with a warning message. You will need to click Delete on this modal to confirm the action.
Warning: When deleting a connection, please keep in mind how it will impact your user base. Once a connection is deleted, this cannot be undone.

Qtip: You cannot delete a connection until its status has been switched to the Disabled. Do not delete a connection until you’ve verified that your users will be unaffected by the change.
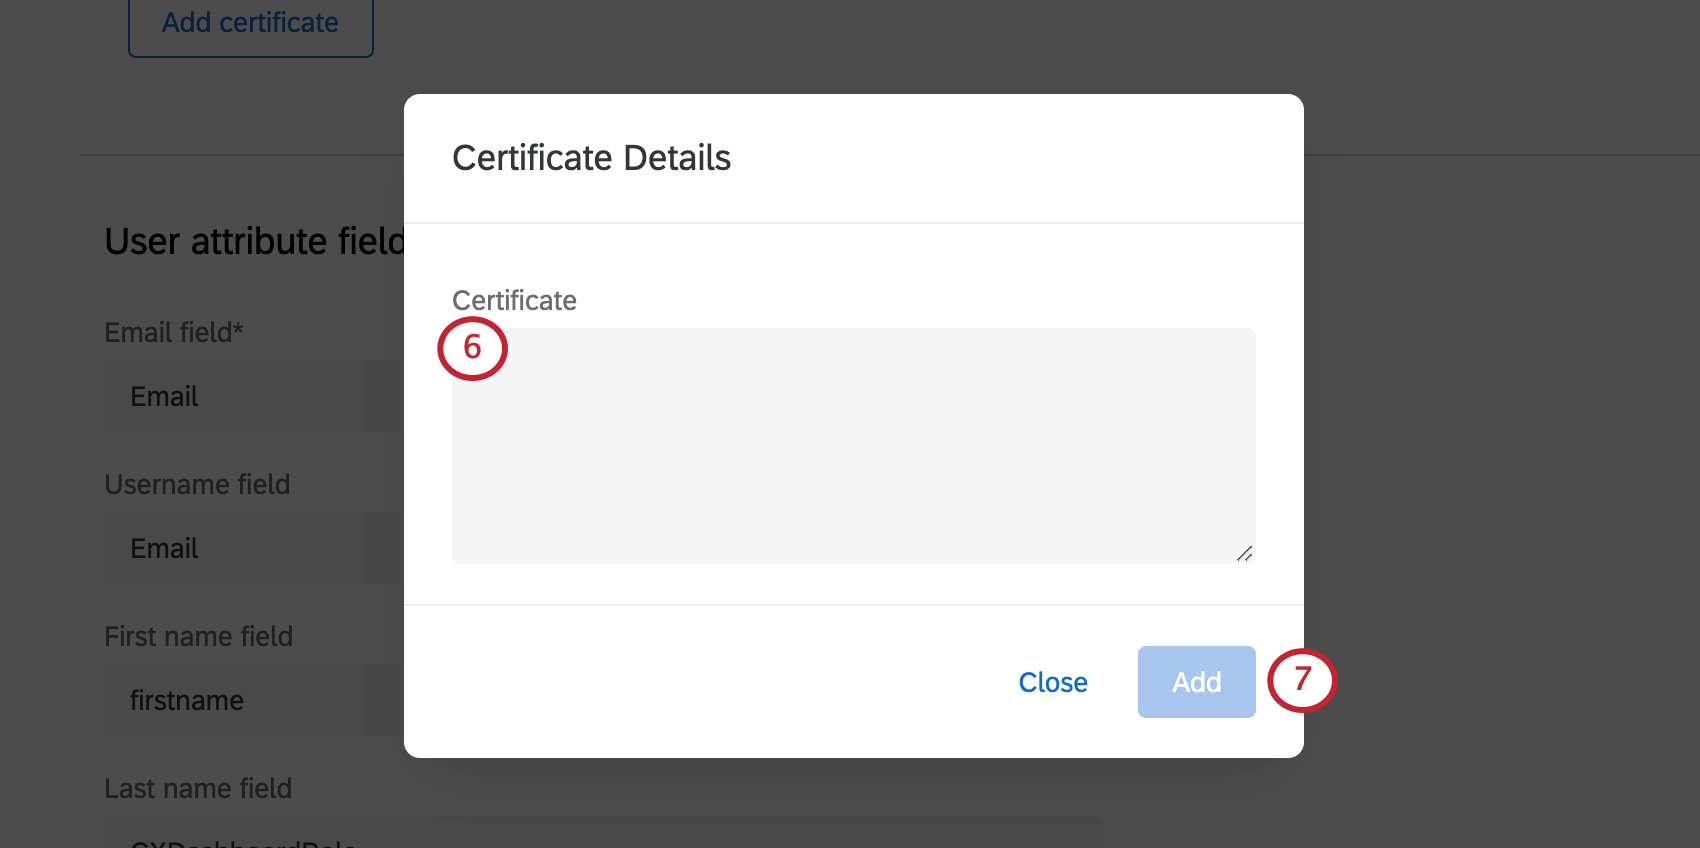
Rotating IdP Certificates
Certificates expire every so often, so you’ll want to contact your IT team to make sure that the certificates used for Qualtrics logins are updated. You can work with your IT team to add a new certificate before the old certificate expires, and test the connection to ensure that the update goes through successfully.
Qtip: If you have an encryption certificate, you should not follow the steps described below in the “Certificates” section, even if you also have a signing certificate. Instead, you will upload a full copy of your new IdP metadata, and reselect a binding.
If you only have a signing certificate, follow these steps:

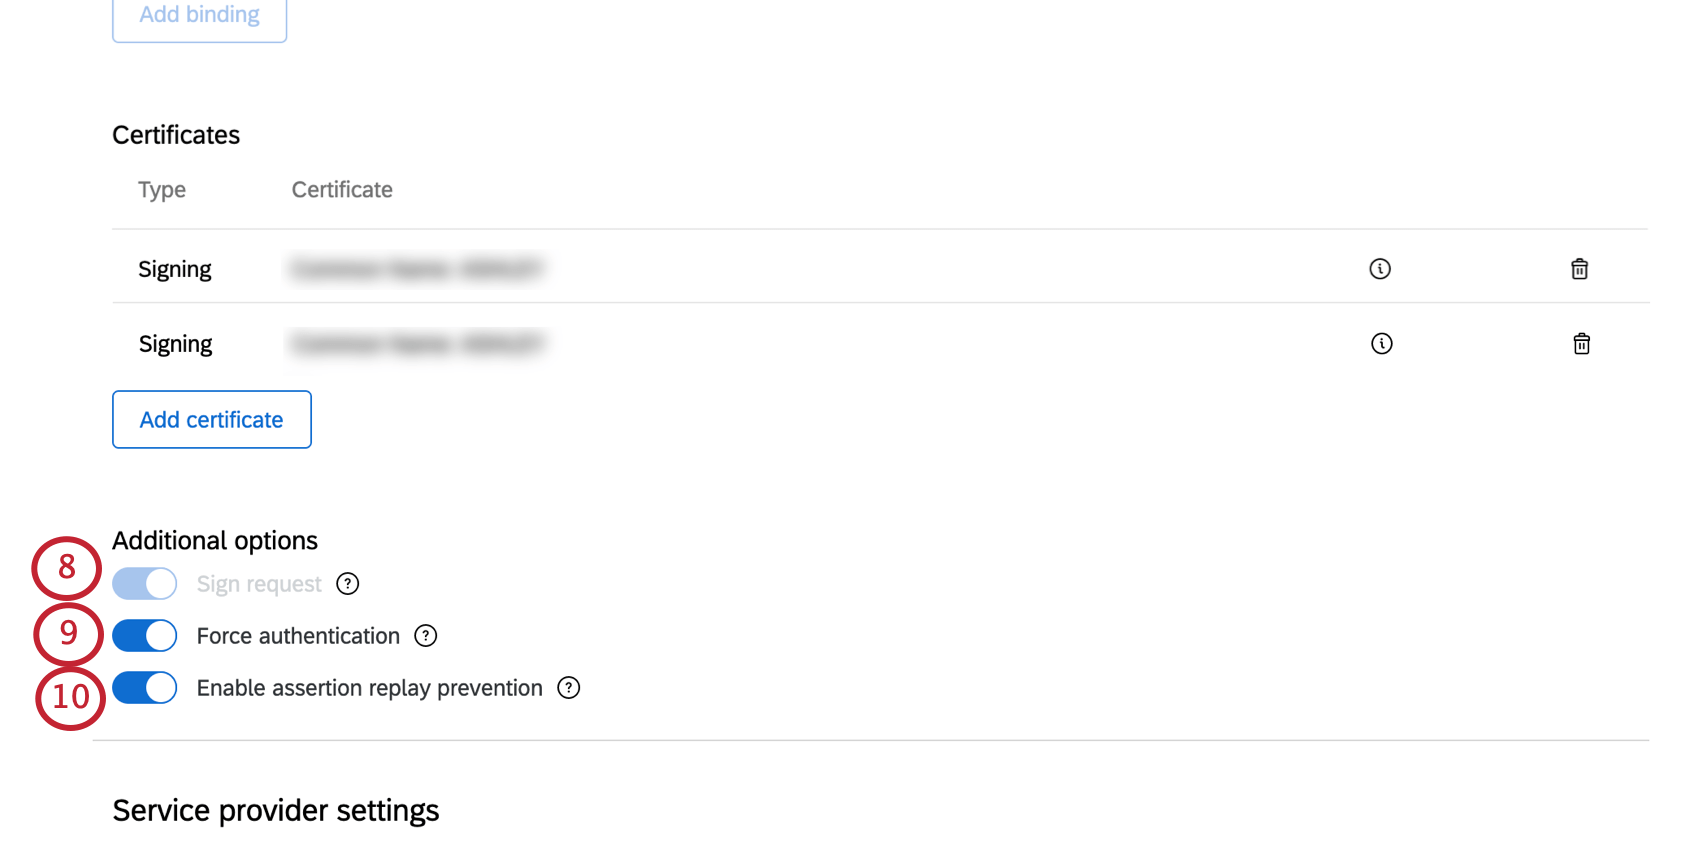
Qtip: If you turn this option on, to guarantee that the request came from Qualtrics and not someone who might have intercepted the message, we’ll sign the request sent to the identity provider. This is always enabled if you have selected an HTTP Post Single sign-on service binding.
Qtip: If you turn this option on, and if your identity provider supports it, we’ll have the identity provider force users to authenticate, even if users are already logged in.
Qtip: If you turn this option on, Qualtrics won’t reuse an assertion we’ve already seen. It’s one way to prevent SAML replay attacks.

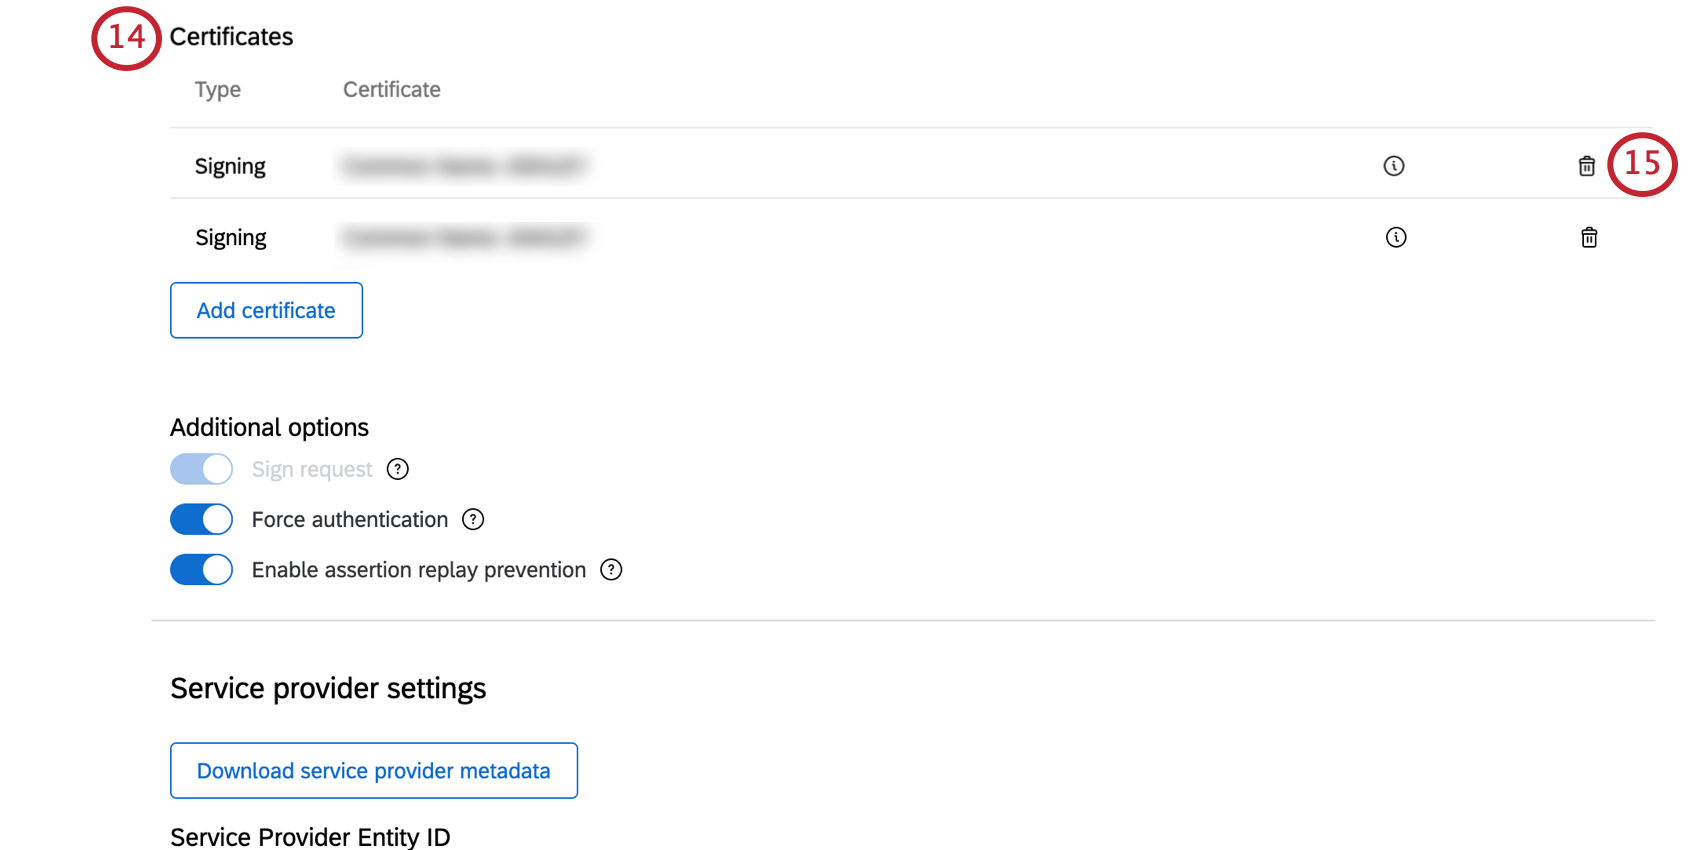
Qtip: If your test failed earlier, then delete your newly added certificate instead and double check it is correct before repeating the steps above to re-add it.
Test a Connection
After you set up an SSO connection, you can test it out to make sure it’s working the way you intended. Click Test on a connection to start.

A new tab will open in your browser and you will be redirected to your IdP to authenticate. After a successful login, you will be redirected to a page displaying the attributes and values we successfully captured from your IdP in the SSO exchange.
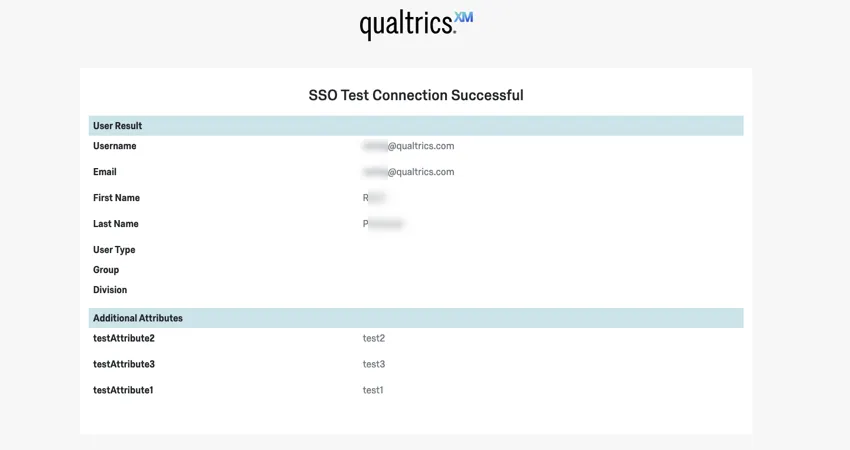
If the login failed, you will receive an error message. Take a look at the Troubleshooting section for some basic steps to take.
Qtip: You can test both enabled and disabled connections. We advise testing every connection before enabling it.
Troubleshooting Error Codes
If you see an error message while testing a connection, please click on the code or check out the list below to find out more about that error and possible causes.
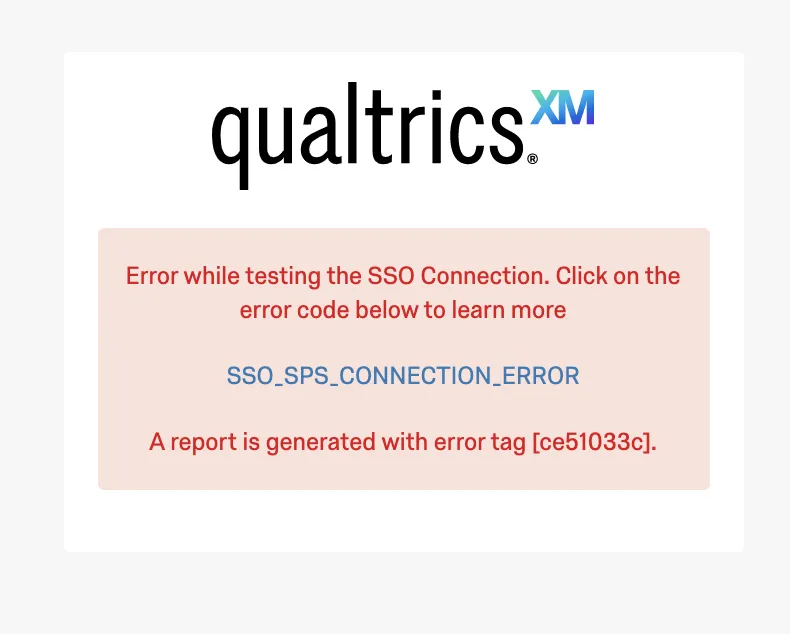
If the issue is unable to be resolved, please log into your Customer Success Hub for assistance. Our SSO team will require the error code.
General SSO Error Codes
- SSO_UNKNOWN_ERROR: An unknown error occurred. Please try logging in again, or contact support and provide the generated error code.
- SSO_SPS_CONNECTION_ERROR: An error occurred. Please try clearing your cookies and cache and logging in again.
SAML Errors
SSO_MISSING_USERNAME: A value for the username or email attribute was not found in the SSO response from your server. Since this attribute is required, please make sure the Attribute Statement section of your SAML response contains an attribute matching the Username field in your SSO Connection settings.
Qtip: For example, this can happen because the user trying to login does not have an email that matches the valid email domains under User Provisioning Options.
- SSO_SAML_MISSING_SSO_BINDING: A single sign on binding URL was not found in your SAML settings. Since this value is required for SP-initiated logins, please check your SSO connection settings and try again.
- SSO_SAML_INVALID_DECRYPTION_CERT: There was an error while decrypting the SAML response. Please check whether the encryption certificate in your Identity Provider matches the encryption certificate in the Service Provider metadata file generated for your SSO connection.
- SSO_SAML_INVALID_AUDIENCE_RESTRICTION: There was an error in the audience restriction in the SAML response. Please verify whether the correct value is set in your identity provider. This is expected to match the Assertion Consumer Service Location provided in the Service Provider metadata file generated for your SSO connection.
- SSO_SAML_INVALID_RECIPIENT: There was an error in the Recipient URL in the SAML response. Please verify whether the correct value is set in your identity provider. This is expected to match the Assertion Consumer Service Location provided in the Service Provider metadata file generated for your SSO connection.
- SSO_SAML_VALIDATION_ERROR: There was an error while validating the SAML response. Please verify the settings in your identity provider and in your Qualtrics SSO connection configuration and try again.
OAuth 2.0 Errors
For the meaning of assorted terms, see Creating an OAuth 2.0 Connection.
- SSO_OAUTH_INVALID_ID_TOKEN: There was an error while validating the ID Token. Please check the Public Keys Endpoint, Token Issuer, and Algorithm(s) used for signing ID Token fields and try again.
- SSO_OAUTH_INVALID_OR_MISSING_EMAIL_DOMAIN: The user trying to log in does not have an email that matches the valid email domains. Please check the Valid Email Domains field under User Provisioning Options and try again.
- SSO_OAUTH_USER_INFO_ERROR: Error with fetching user info with token. Please check the User Information Endpoint and Authenticated Request Type Binding Type fields and try again.
- SSO_OAUTH_ACCESS_TOKEN_ERROR: Error with fetching access token. Please check the Client Secret, Token Endpoint, and Token Endpoint Authorization Methods fields and try again.
- SSO_OAUTH_AUTHORIZATION_URI_ERROR: Failed to generate OAuth Client Request. Please check the Client ID, Authorization Endpoint, and Scope fields and try again.
General SSO Connection Troubleshooting
Whether you’re setting up OAuth 2.0 for the first time, or if you’re switching from a staging to a production environment, you may encounter issues successfully connecting. Here are some troubleshooting steps that your organization’s IT team can try.
Example: You’ve generated a HAR file and discovered a 403 error. This means your server is refusing to grant access to this connection. The steps below could help determine why.
That's great! Thank you for your feedback!
Thank you for your feedback!