
Interview Setup Tab (Moderated User Testing)
What's on this page
Attention: This feature is only available to users on the new simplified pricing and packaging plans or customers who actively participated in the Preview Program for this feature. For more information, see Qualtrics Public Preview. If you have questions about your Qualtrics pricing and packaging plan, reach out to Account Services.
About the Interview Setup Tab
After creating a Moderated User Testing project, you will be taken to the Interview Setup tab. Here you can set up interview details and add your availability so respondents can start booking interviews. Filling out the information in this tab is important, as without configuring interview details or adding availability, respondents won’t be able to schedule interviews.
You can create multiple interview setups for use in your project. After creating them, you must select one within the Interview Selector question for respondents to be able to schedule interviews.
Attention: Interviews can be up to 120 minutes in length.
Qtip: In addition to Moderated User Testing, the XM Solution In-Depth Interviews has an Interview Setup Tab as described on this page.
General Details
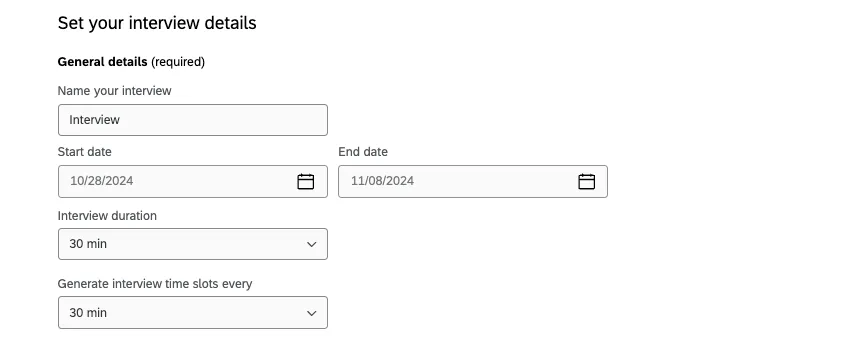
The details in the general details section are required. You must configure the following information before respondents can begin scheduling interviews:
- Name: Name of the interview.
- Start date: Start date for the interview.
- End date: End date for the interview.
- Interview duration: Duration of each interview.
- Time slot interval: How often time slots are generated.
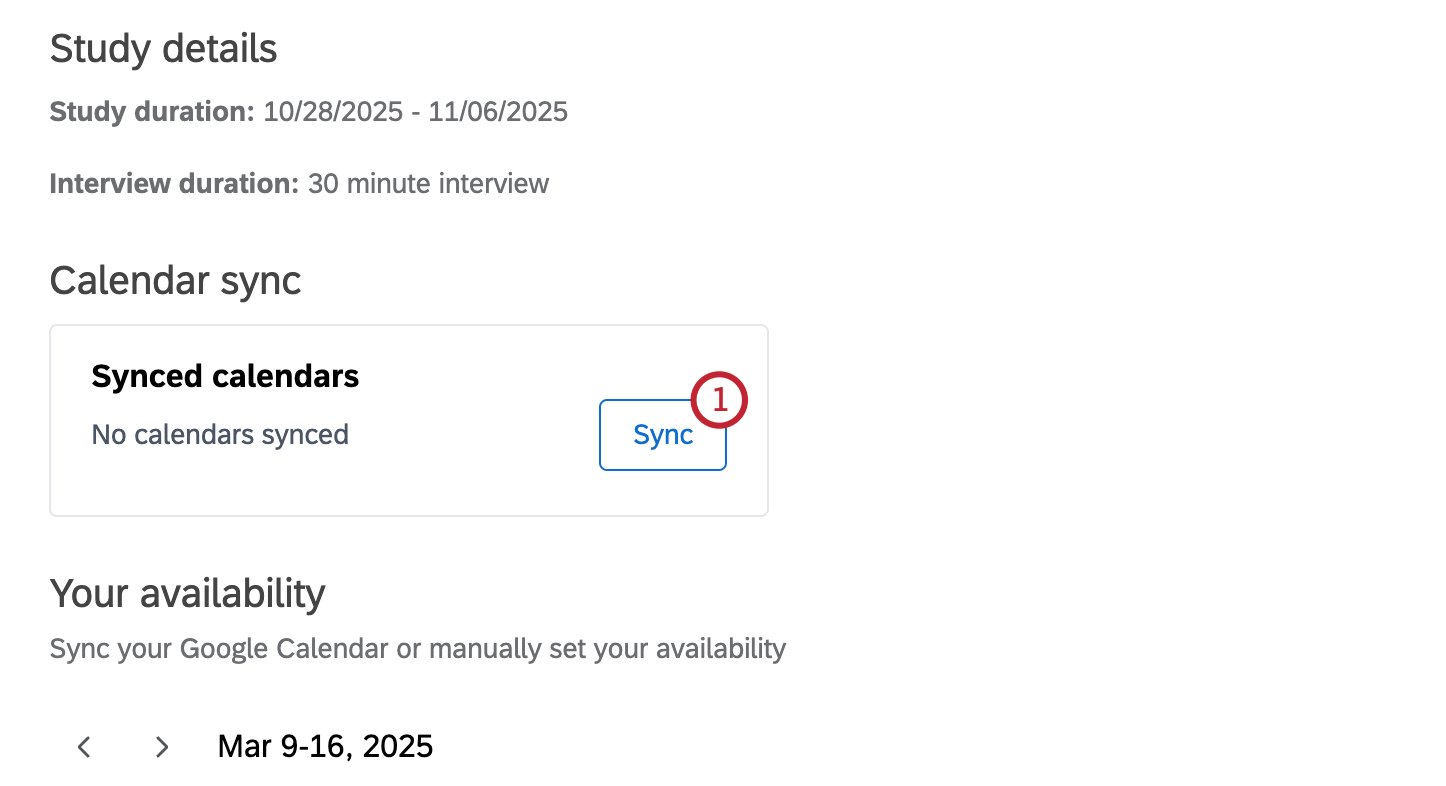
Interview Availability
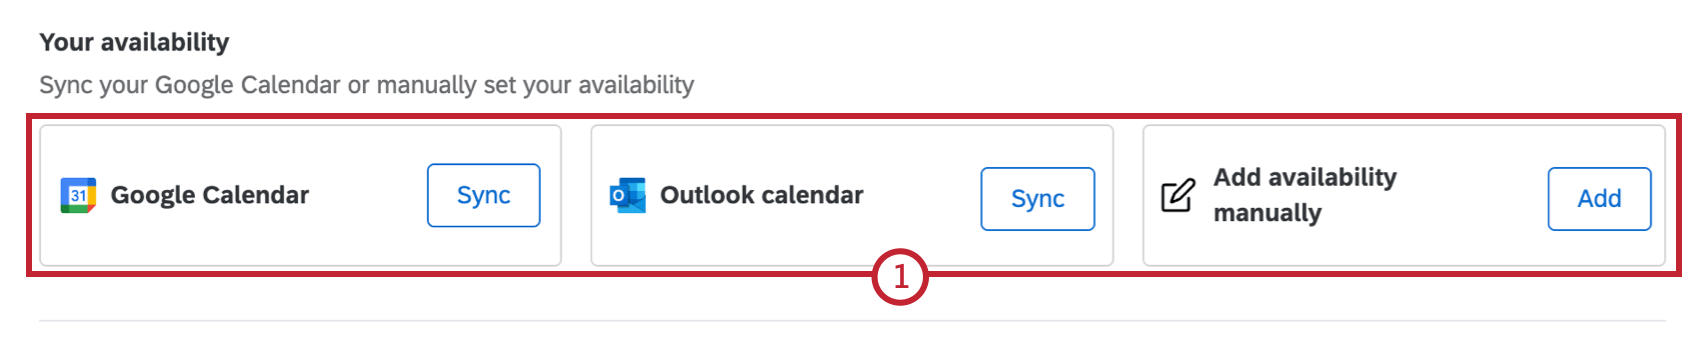
Attention: If you don’t add any availability, no booking slots will be generated in the survey, and survey takers will not be able to book interviews.
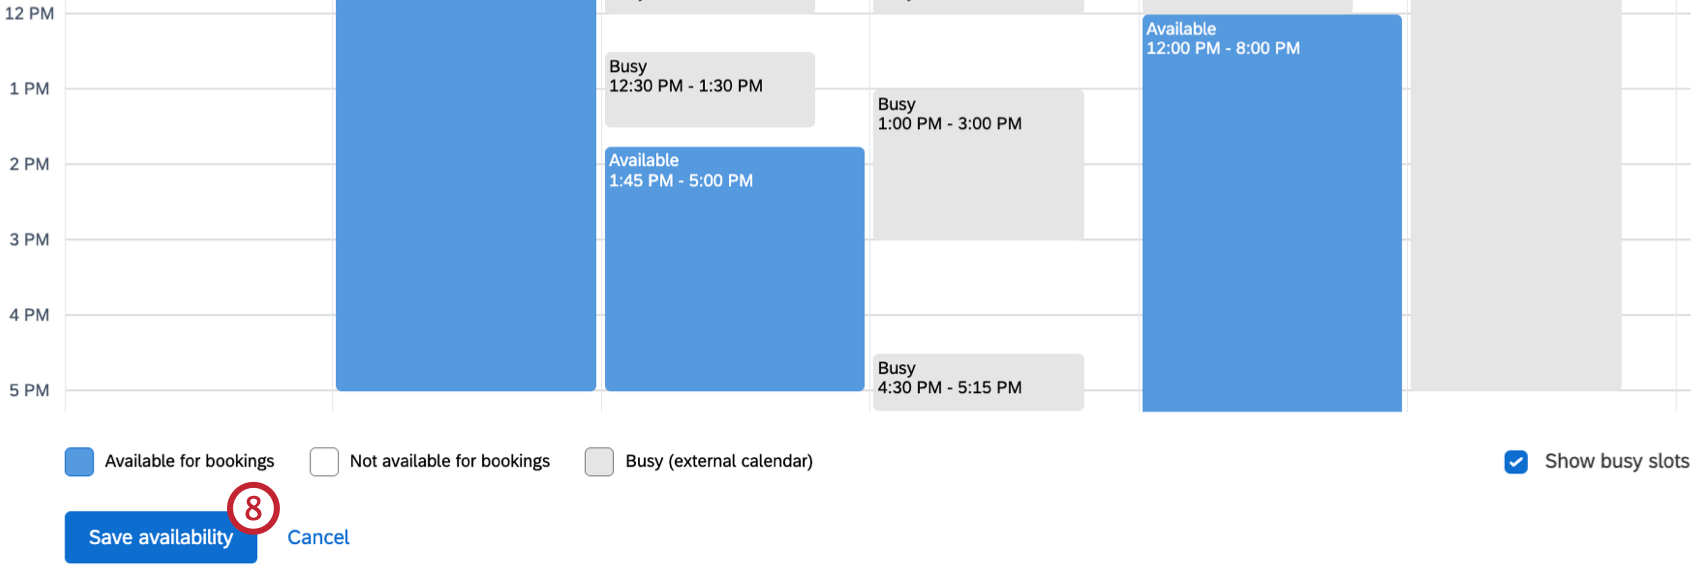
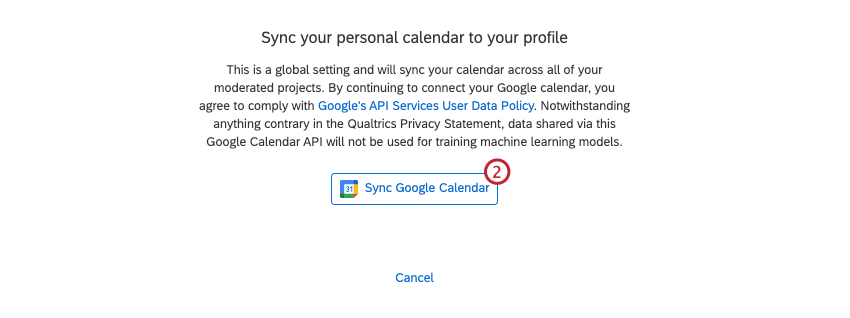
You can set your interview availability by syncing your Google or Outlook calendar or by adding availability manually.
Adding Availability
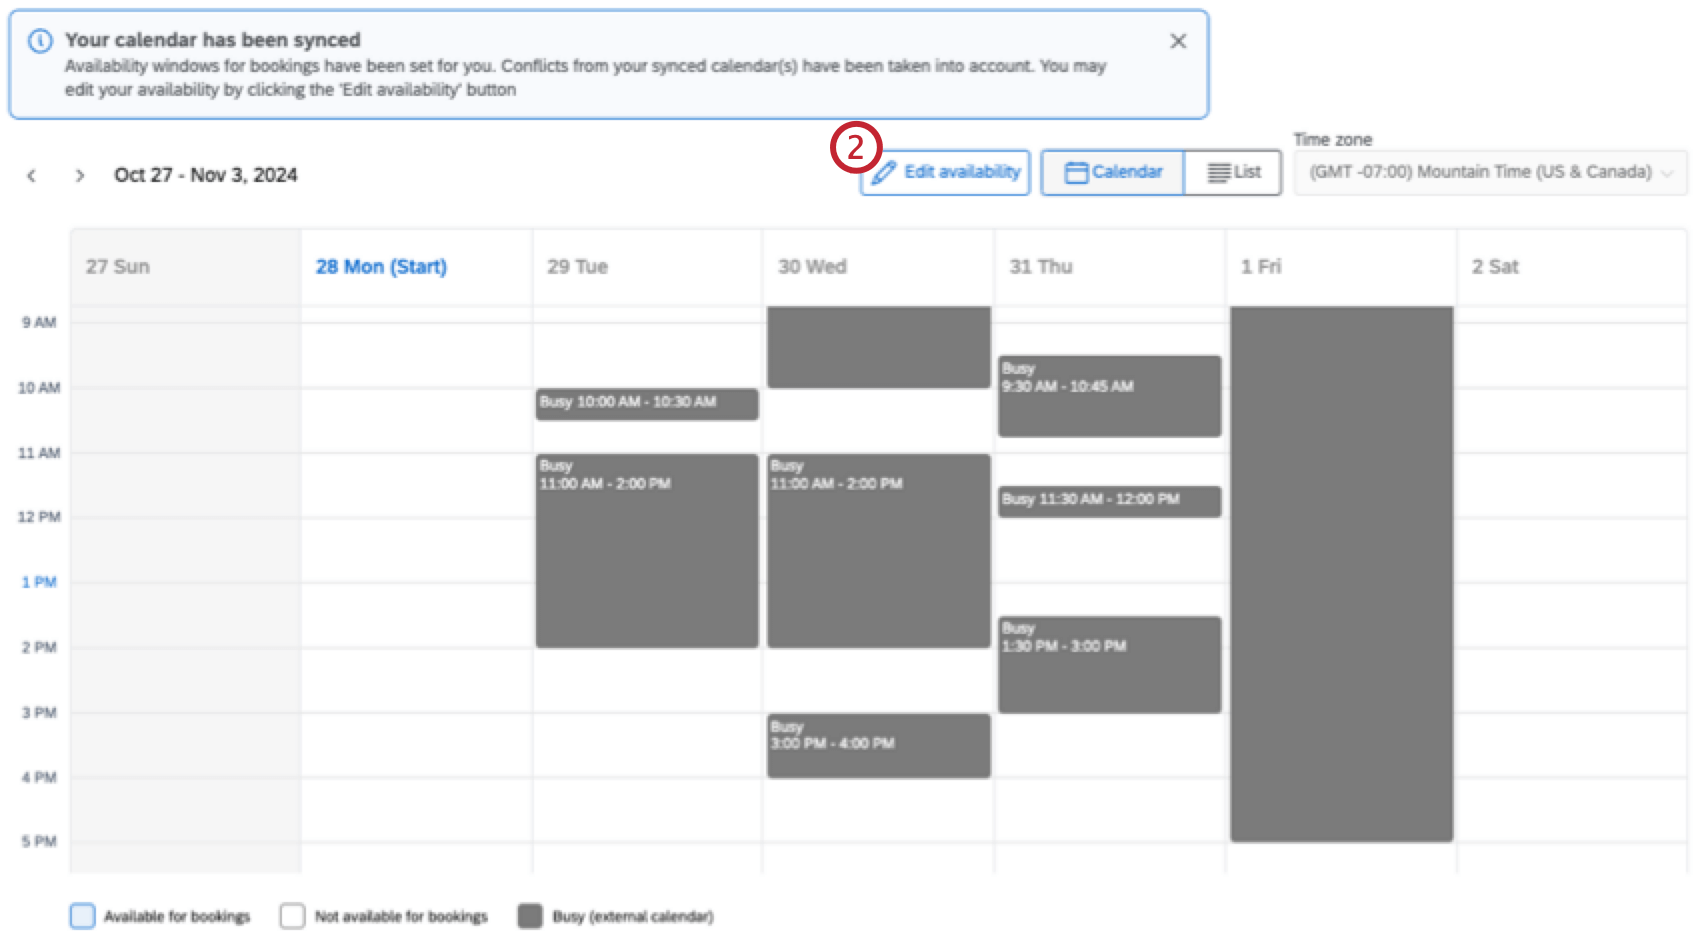
Qtip: If you’re entering your availability manually, the calendar will be blank. If you did an external calendar sync, your availability will be set to M-F, 9-5 PM.
Qtip: If you’ve chosen to sync your external Calendar and selected Check for conflicts, existing meetings will automatically be added as conflicts. These conflicts can’t be edited in Qualtrics; if changes are needed, they must be made in your external Calendar.
Qtip: If you start adding availability manually, you can still add your external Calendar by clicking Sync.
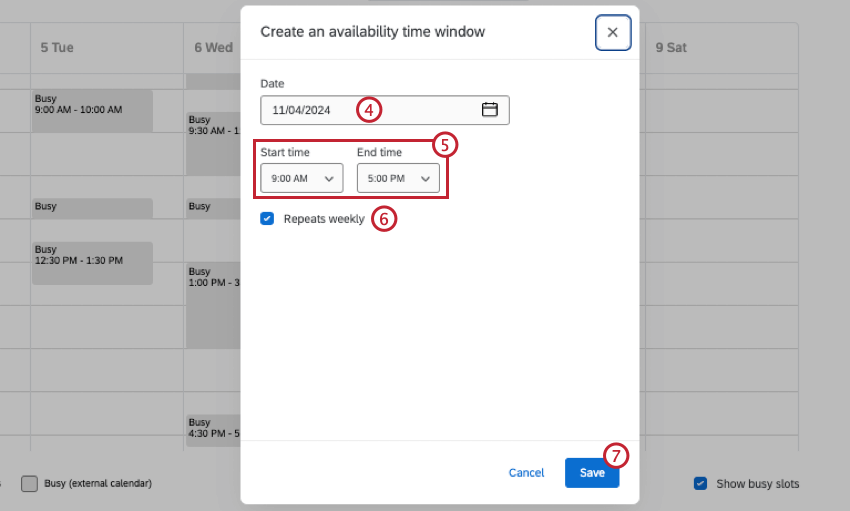
Qtip: When in editing mode, you can use the time zone dropdown to select a different time zone for your calendar.
List View
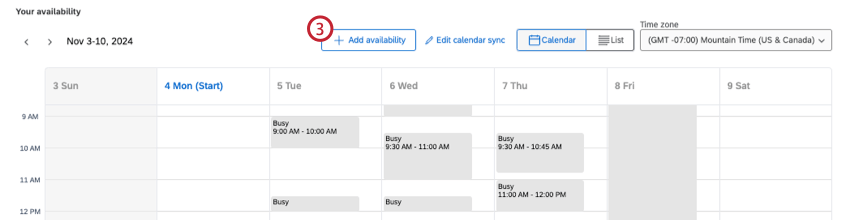
By default, your availability will be displayed in a calendar view. Click List to instead view and add availability in a list view.
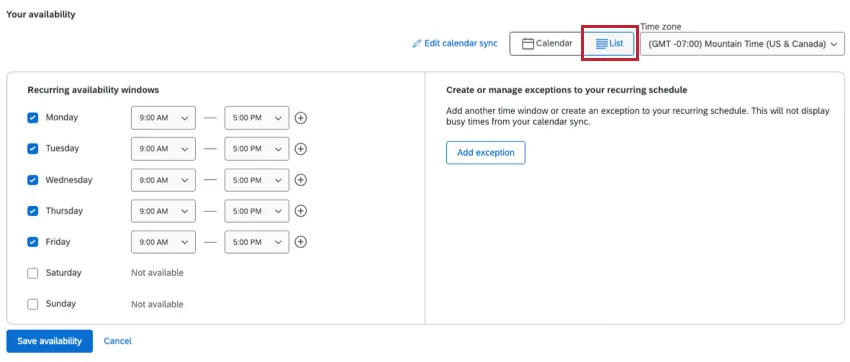
Within the recurring availability section, you can add consistent time slots you are free during each day of the week. Click the checkbox next to a day to add an available window. If a day is not checked, you will be marked not available for that day. Use the dropdowns to add a specific start and end time. Click the plus sign to add additional windows.
On the right, you can add exceptions to your recurring schedule by clicking Add exception. After selecting a date, you will be automatically marked as not available for that day. To add a time slot(s) that you will be available on that date, select Add availability on this day.
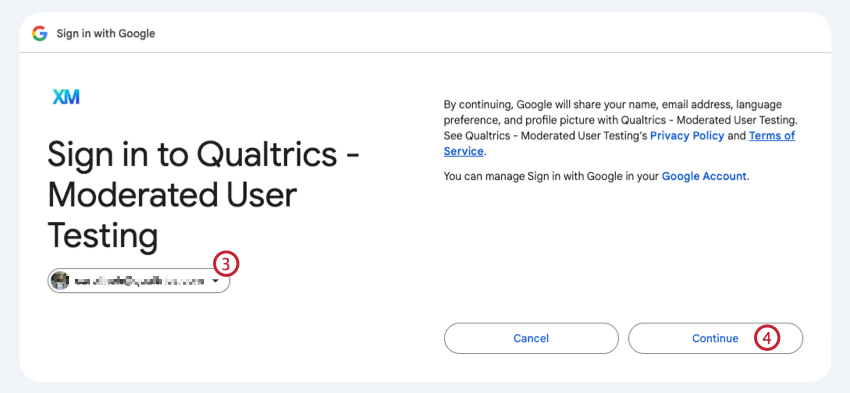
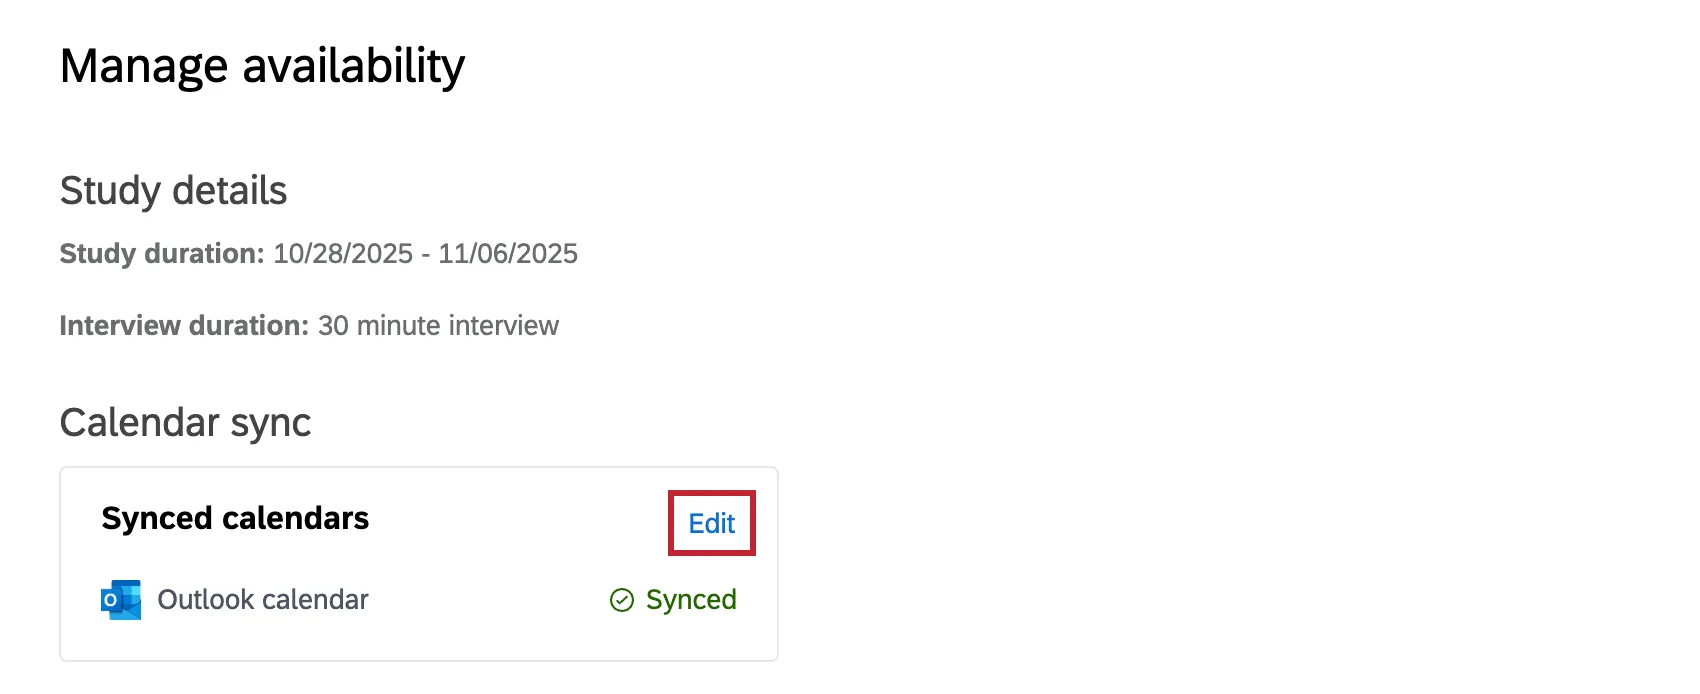
Syncing an External Calendar
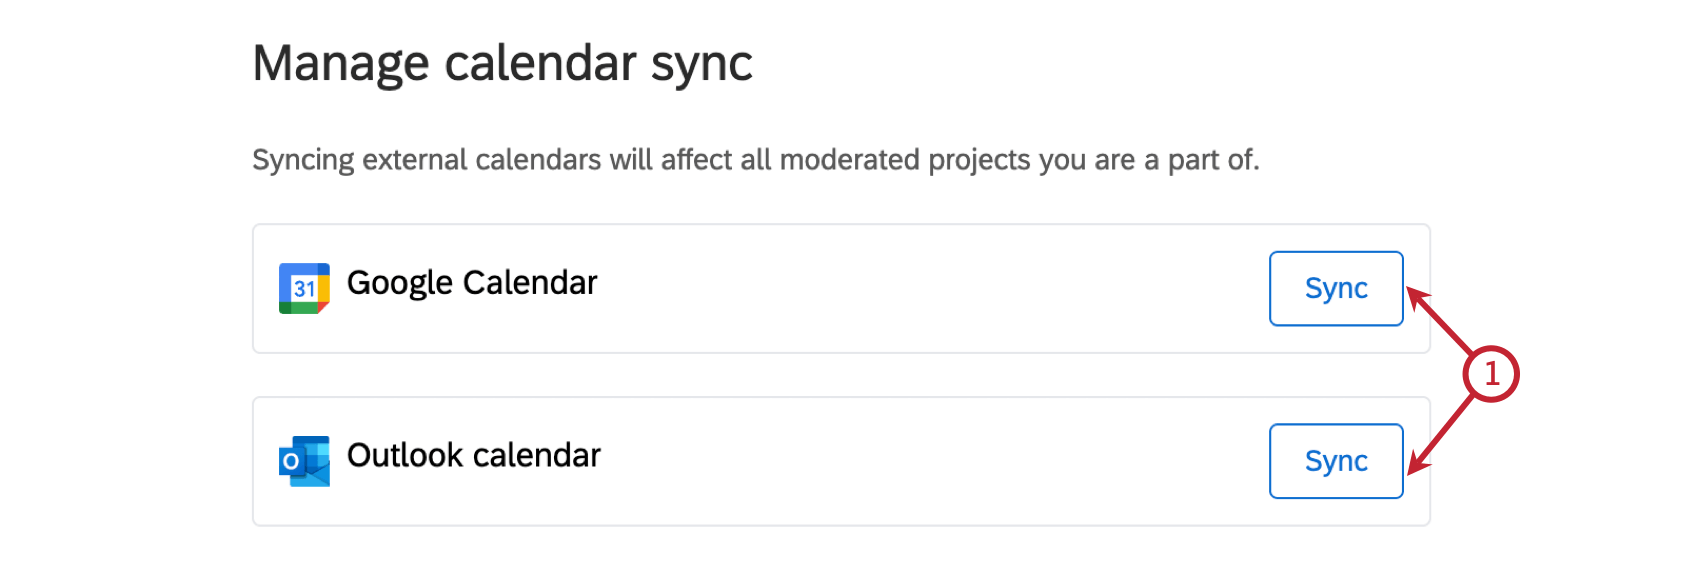
Qtip: If you’ve already added availability, click Sync to sync a calendar.
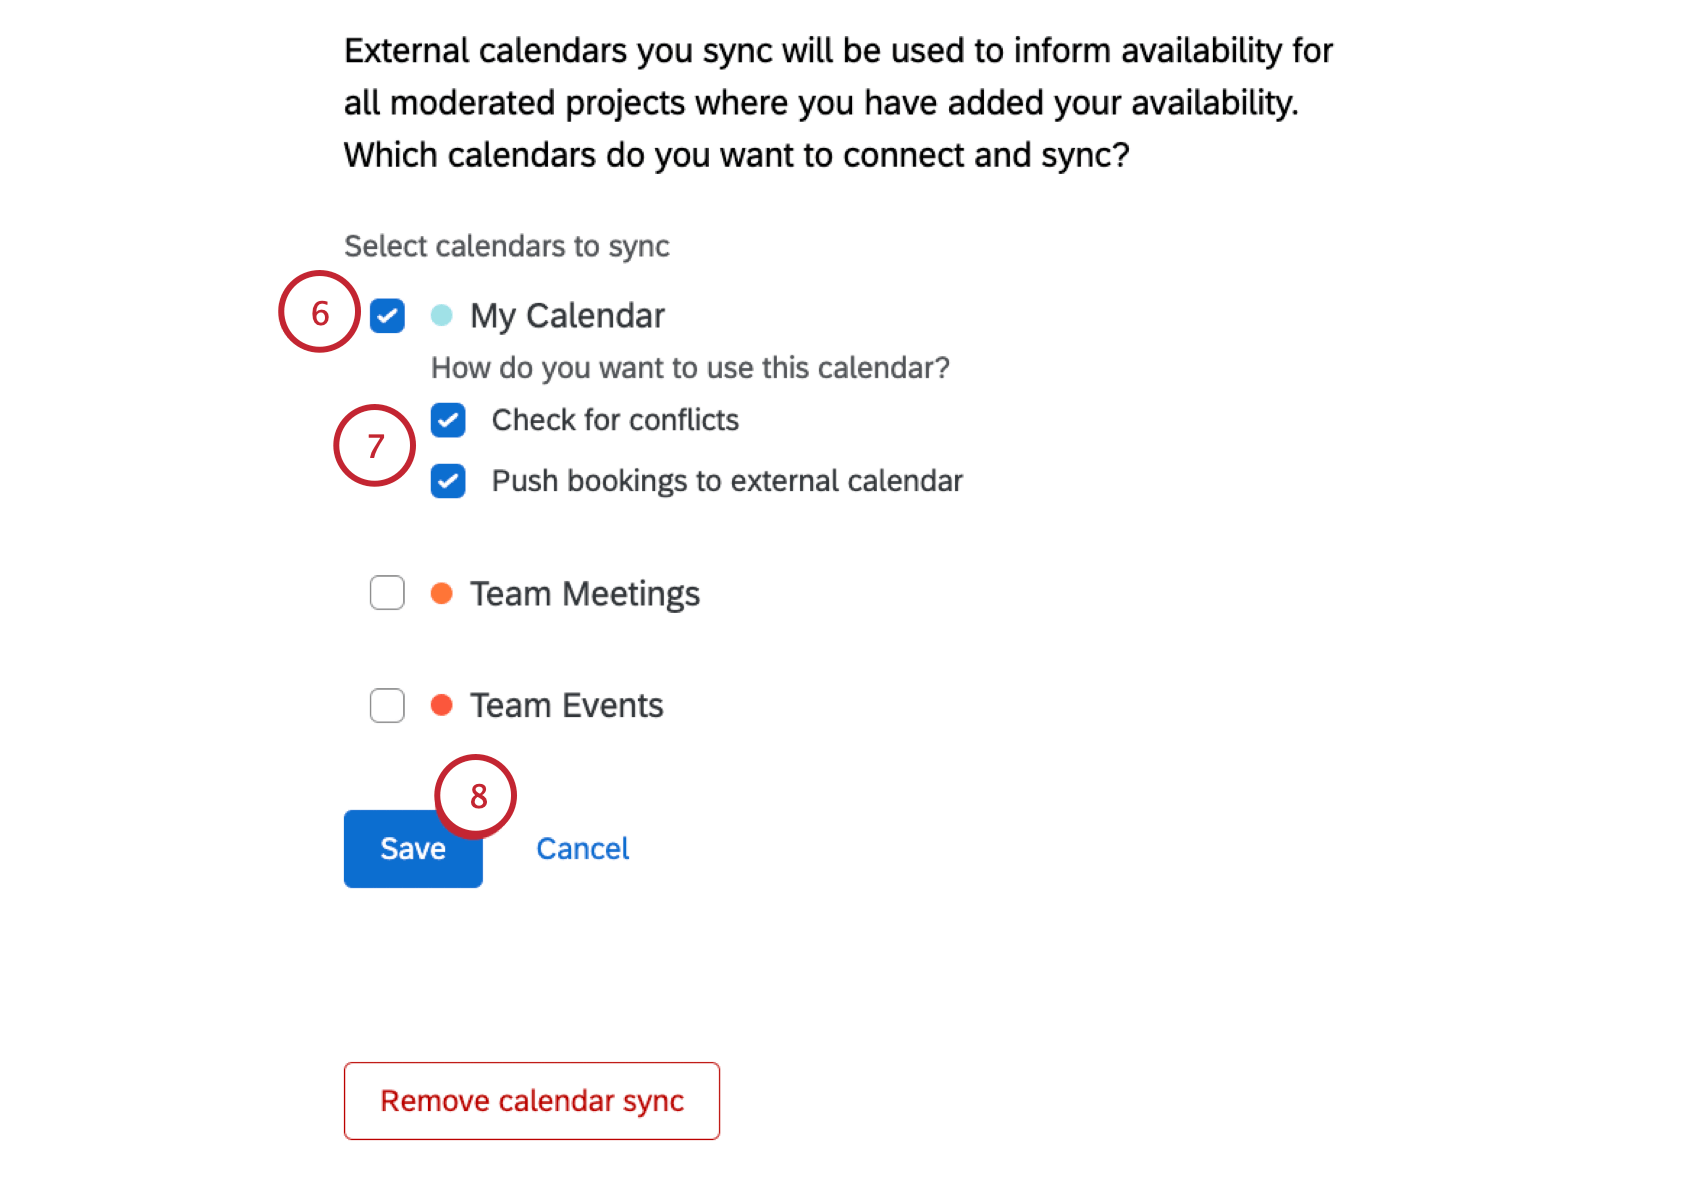
- Check for conflicts: Any existing meetings in your Google calendar will be added to your calendar as conflicts.
- Push bookings to external calendar: When a respondent books an interview with you, it will automatically be added as an event to your synced Google calendar.

After you’ve synced your calendar, click Edit next to your synced calendar to change which calendars your project has access to, remove a sync, or sync an additional calendar.
Scheduling Settings
If desired, you can configure additional scheduling settings.

Notification Settings
The Notification settings section allows you to set up email reminders or a shared calendar event to remind moderators and participants of their interviews.
When you first set up your project you can choose between Shared calendar event and Email notifications only. Click Select next to the type of notification you want to set up for your project. Note that both notification types have the same email notifications available; the only difference is the shared calendar event.
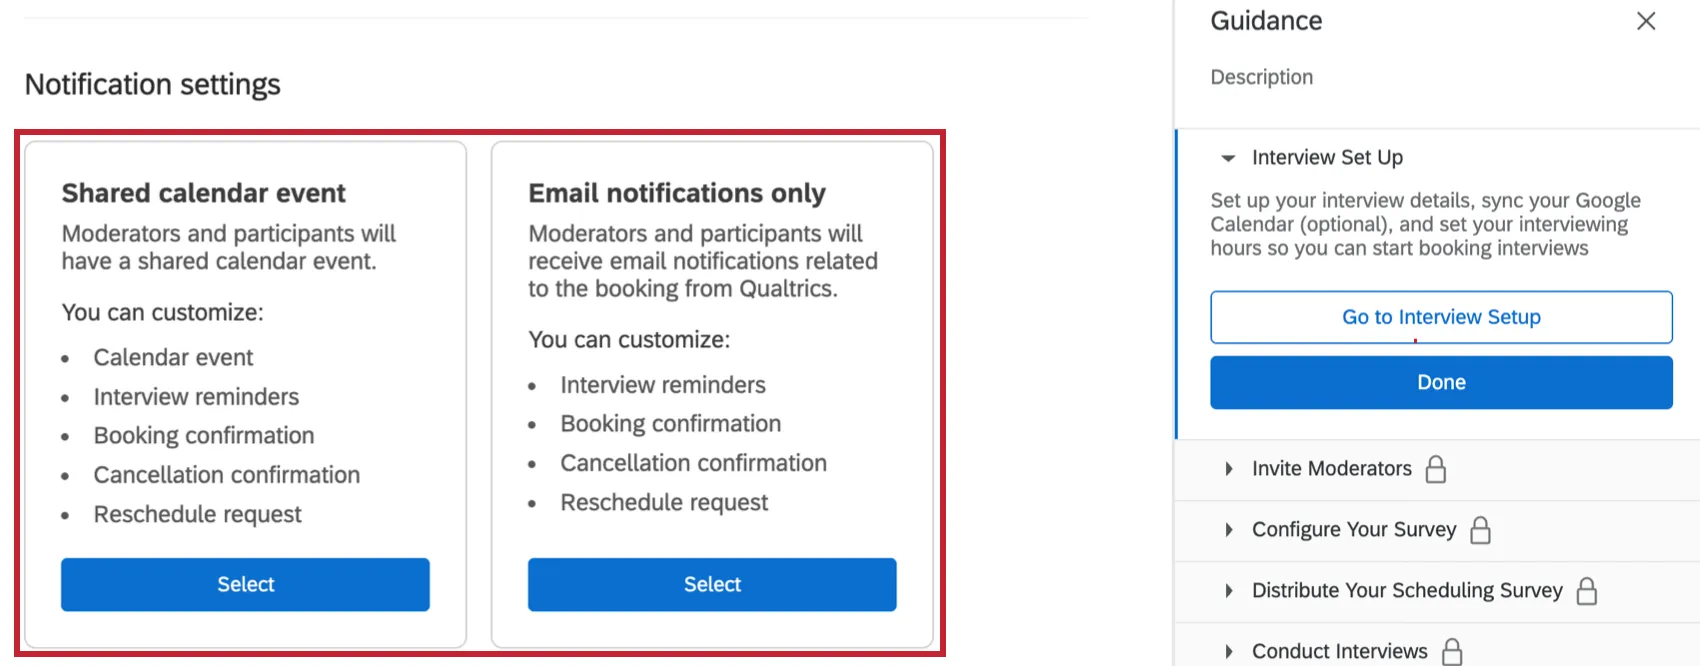
Qtip: If you want to change the notification type after you’ve selected one, click Change notification settings.

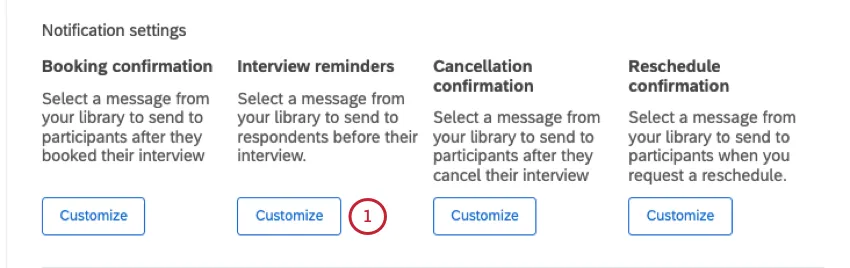
The following email notification types are available to customize. Click Customize next to the notification type you’d like to set up.
- Interview reminders: A message from your library will be sent to participants and moderators before their interview.
- Booking confirmation: A message from your library will be sent to moderators after an interview is booked.
- Cancellation confirmation: A message from your library will be sent to moderators after an interview is cancelled.
- Reschedule request: A message from your library will be sent to moderators when a reschedule is requested.
Qtip: For Interview reminders, you will have to configure a separate email for participants and moderators.
To customize an email notification, follow these steps:
This option is only available for Interview reminders. Click Add notification to determine the frequency of your reminder email.
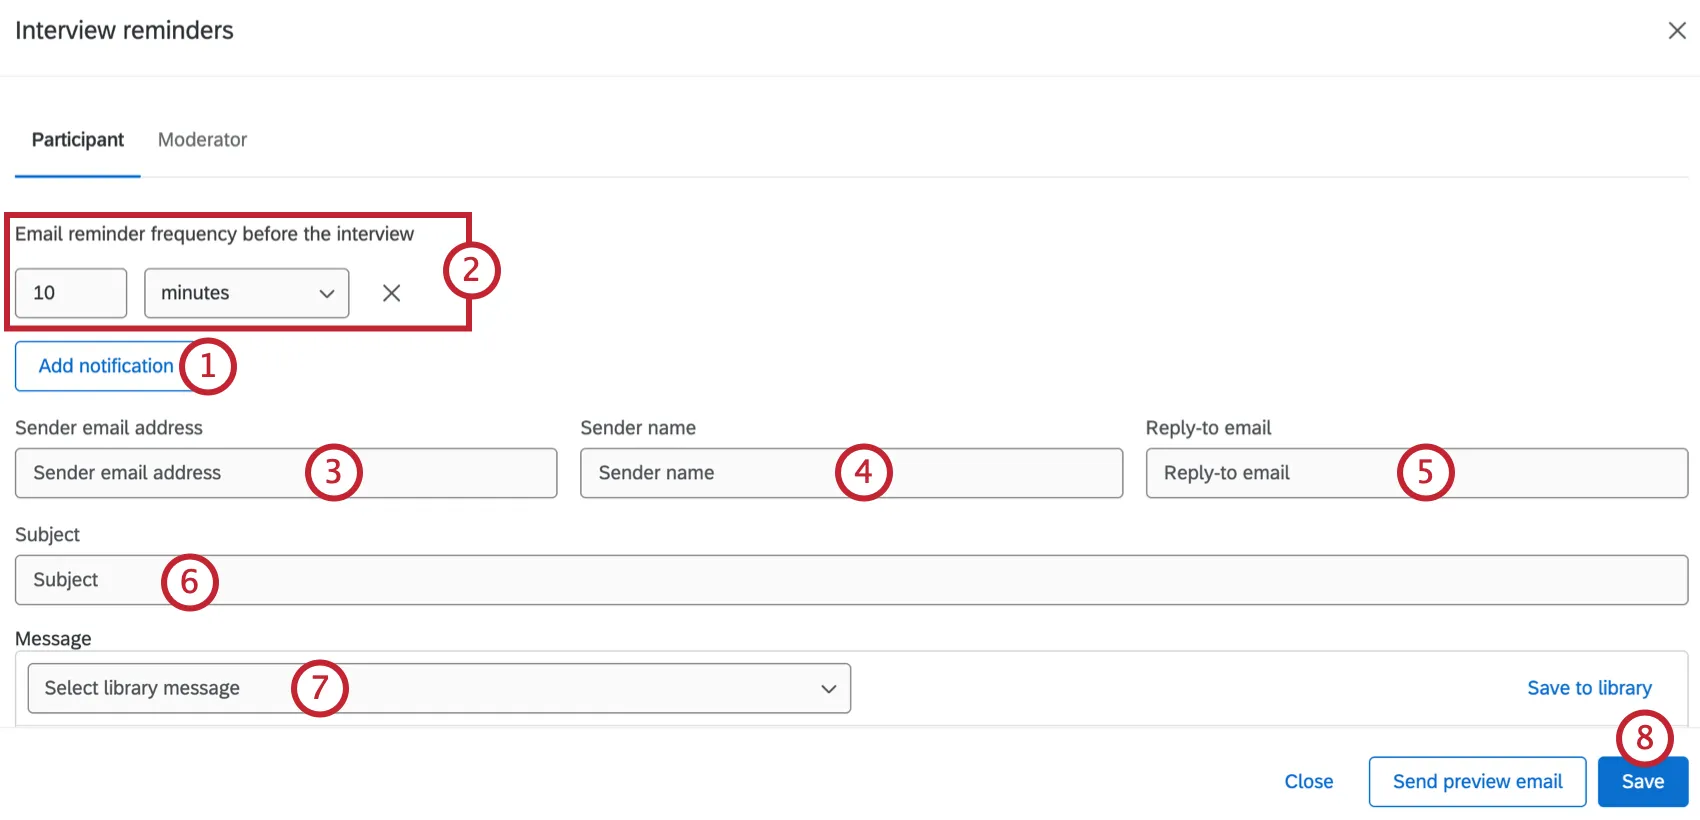
Choose when the participant should be notified. You can notify them minutes, hours, days, or weeks in advance of the interview. You can create up to 5 different reminders for your project.
Enter the email address the notification will be sent from.
Enter the name the notification will be sent from.
Enter a reply-to email for the notification.
Enter an email subject.
Select the email message. You can either use the dropdown to select a message from your library, or enter a new message and click Save to library.
Click Save.
Shared Calendar Event
Before setting up a shared calendar for participants, you have to sync your calendar in your project. You can do this in the availability section. See Interview Availability for more information and instructions.
Shared calendar events allow both moderators and participants to see who has accepted the interview, giving more visibility than an email notification alone. When you select Shared calendar event as the notification type you will also have access to the email notifications listed above, as well as the following calendar event option:
- Shared calendar event: Moderators and participants will have a shared calendar event for their interview.
To customize a calendar event, follow these steps:
Enter the Event name in the text box.
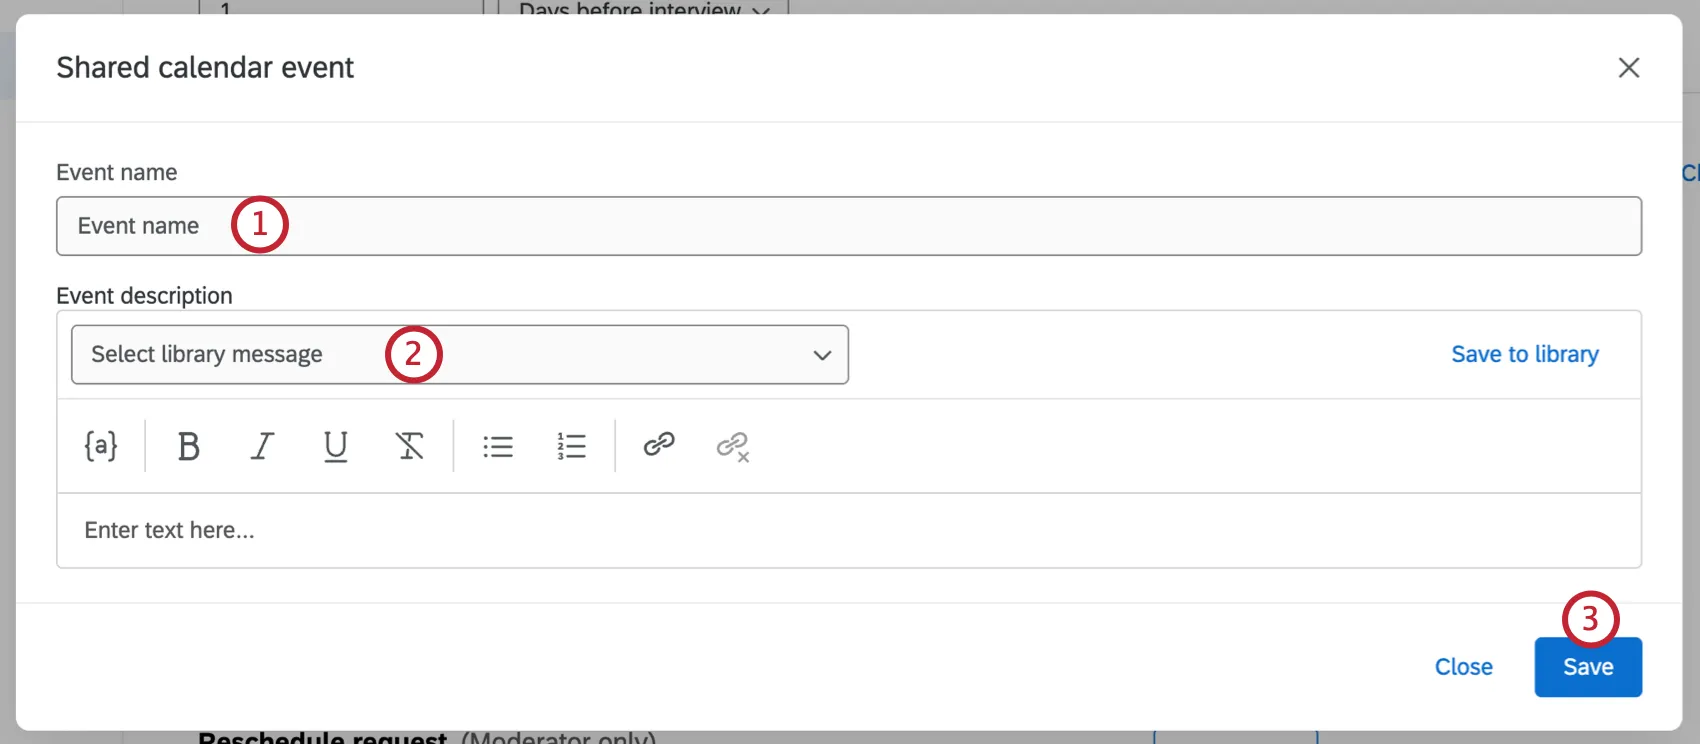
Add the Event description. You can either use the dropdown to select a message from your library, or enter a new message and click Save to library.
Qtip: If you are using an existing message, it must be the Email Invite message type.
Click Save.
Once you are done customizing your event details, a calendar invite will be sent when participants schedule an interview for your project.
Customizing Interview Emails
In the Notification Settings section, you can customize the emails that will automatically go out to your participants and moderators at different points in the study. You can write emails from scratch, or use messages already saved to your library.
Qtip: Messages written in your library should be saved as the email invite or email reminder message type.
Types of Email Messages
- Booking confirmation: A message sent to participants after they book their interview.
- Interview reminders: A message sent to participants before their interview.
- Cancellation confirmation: A message sent to participants after they cancel their interview.
Reschedule confirmation: A message sent to participants when a reschedule is requested.
Customizing a Message
Under the message you want to write, click Customize.
Select if the recipient should be the Participant being interviewed or the Moderator. You can write a template for each.
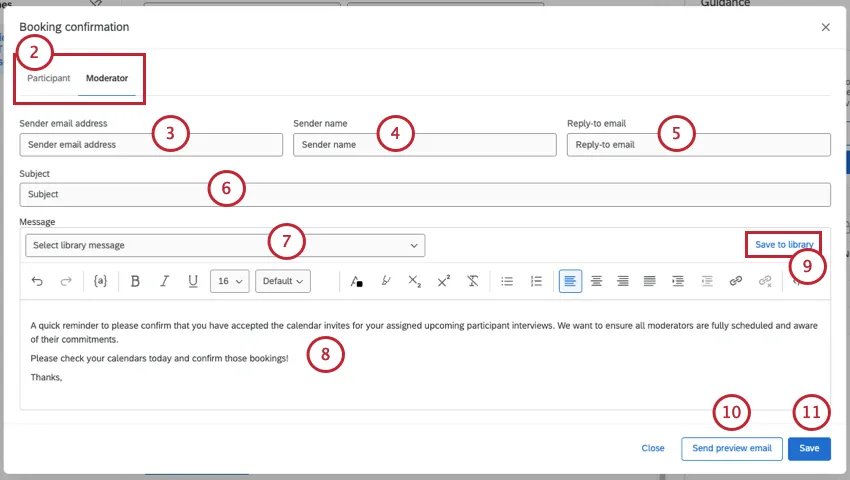
Add a Sender email address.
Attention: You can change the sender email to another standard Qualtrics email address. Depending on your license, you may also be able to use a custom From Address. For more information on changing these, visit our Using a Custom From Address support page.
Add a sender name.
Add a reply-to email address. If recipients reply to your email, this is the email address that will receive them.
Add a subject to your message.
If you want, you can select an email message saved to your library.
Write your message. See more on Rich Text Editors.
Qtip: To ensure your emails will have the best deliverability possible, read the Avoid Being Marked as Spam page before sending your email.
If you want, save the message you write to your library.
If you want, you can send a test email to a recipient of your choice.
Click Save.
Additional Moderators
If desired, you can add additional moderators to your project. Additional moderators will also be able to conduct interviews, but they won’t be scheduled for any interviews until they’ve added their availability.

Additional moderators will be able to add their own availability, and won’t see other moderators’ schedules. To add someone as a moderator, start typing their name in the textbox and select them. You can only add other users on your brand.
Once you’ve added additional moderators, you can decide how you want interviews to be scheduled.
- All moderators per interview: All moderators are added to each interview.
- One rotating moderator per interview: 1 moderator is added to each interview, and moderators are chosen randomly based on each moderators’ availability.
Qtip: Click Remove yourself from interviews to prevent any future interviews being scheduled with you.This option is not available until you’ve added another moderator and they’ve added their availability. Removing yourself won’t affect current bookings.
Attention: Additional moderators won’t receive interviews until they have entered their availability in the project.
Saving Your Setup
Click Save interview setup to save your configuration. This will save the interview details, availability, and additional settings you’ve set up. If you navigate away from the page before saving, you’ll have to redo your interview setup.
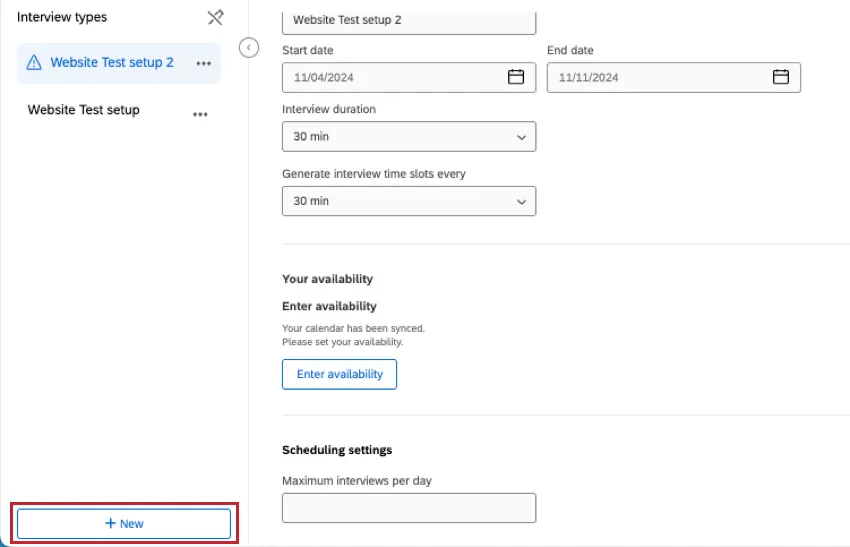
Creating Additional Interview Types
Creating multiple interview types gives you flexibility, and allows you to change the interview settings to fit different scenarios. You can offer interviews with different durations, or provide different availability for different types of interviews.
For example, some respondents, such as managers, may need longer interviews than other respondents, such as non-managers. You also may have respondents who speak different languages, and want to create one interview type to assign English-speaking respondents to English-speaking moderators, and another to assign Spanish-speaking respondents to Spanish-speaking moderators.
Once you’ve saved your first interview type, click New to add an additional interview type.
That's great! Thank you for your feedback!
Thank you for your feedback!