Loading...
Skip to article
  • Qualtrics Platform
    Qualtrics Platform
  • Customer Journey Optimizer
    Customer Journey Optimizer
  • XM Discover
    XM Discover
  • Qualtrics Social Connect
    Qualtrics Social Connect

Organization Hierarchy Inbound Connector


Was this helpful?


This site is protected by reCAPTCHA and the Google Privacy Policy and Terms of Service apply.

The feedback you submit here is used only to help improve this page.

That’s great! Thank you for your feedback!

Thank you for your feedback!


About the Organization Hierarchy Inbound Connector

Attention: To use this feature, your organization will need its own SFTP server. Qualtrics offers SFTP servers for customer use through our Professional Services team. There is a cost associated with this service; however, we guarantee that these servers are compatible with Qualtrics. For more information, please contact our Professional Services team.

You can use the Organization Hierarchy inbound connector to upload and update organization hierarchies via files stored on a Secure File Transfer Protocol (SFTP) server into XM Discover. This inbound connector enables you to do the following:

  • Upload and schedule updates to organization hierarchies.
  • Extract files from a Zip or Gzip archive before processing.
  • Decrypt files before processing.
  • Configure advanced notifications.
  • Apply transformations.
    Qtip: Organization hierarchies work the same regardless of where (Studio or Connectors) they are created or maintained.

Organization Hierarchy File Formats

Before you configure a job using the Organization Hierarchy inbound connector, make sure you have the relevant organization hierarchy file prepared in 1 of the following supported file formats:

  • Excel files (XLS, XLSX)
  • Delimited text files (CSV)

Organization Hierarchy in Excel Format Requirements

The Organization Hierarchy inbound connector enables you to define all aspects of an organization via a single MS Excel spreadsheet.

  • You can save your organization hierarchy as an MS Excel spreadsheet with an XLS or XLSX extension.
  • We recommend that you put all organization hierarchy data on the first sheet of the Excel file.
  • Make sure that the first row of your spreadsheet contains column names. These names will be used to map columns to organization parameters.
  • The spreadsheet columns can be in any order.
  • Each column is assigned to a particular organization hierarchy parameter during the mapping step.
Example: Here is an example of an organization hierarchy defined in Excel format:
Here is an example of an organization hierarchy defined in Excel format
Example: Here is an example of how to map the columns from the organization hierarchy files during the mapping step:
Here is an example of how to map the columns from the organization hierarchy files during the mapping step

Organization Hierarchy in CSV Format Requirements

The Organization Hierarchy inbound connector enables you to define all aspects of an organization via a single CSV file.

  • Save your organization hierarchy as a CSV file.
  • Separate columns using a comma.
  • All rows should have the same number of columns, in the same order.
  • Make sure that the first row of your CSV file contains column names. These names will be used to map columns to organization hierarchy parameters.
  • The order of columns doesn’t matter.
  • Each column is assigned to a particular organization hierarchy parameter during the mapping step hierarchy is defined in a CSV file.
Example: Here is an example of how an organization hierarchy is defined in a CSV file. Different managers are assigned to different hierarchy levels and the “Target Sentiment” enrichment is defined for each level.
Here is an example of how an organization hierarchy is defined in a CSV file.
Example: Here is an example of how the columns from the organization hierarchy files should be mapped during the mapping step:
Here is an example of how the columns from the organization hierarchy files should be mapped during the mapping step

For examples and troubleshooting tips for organization hierarchies in XM Discover, please see Best Practices for Organization Hierarchies (Studio).

Setting Up the Connection

Qtip: The Manage Jobs permission is required to use this feature. For more information about Connectors user permissions, please see Permissions.
  1. Sign in to Connectors.
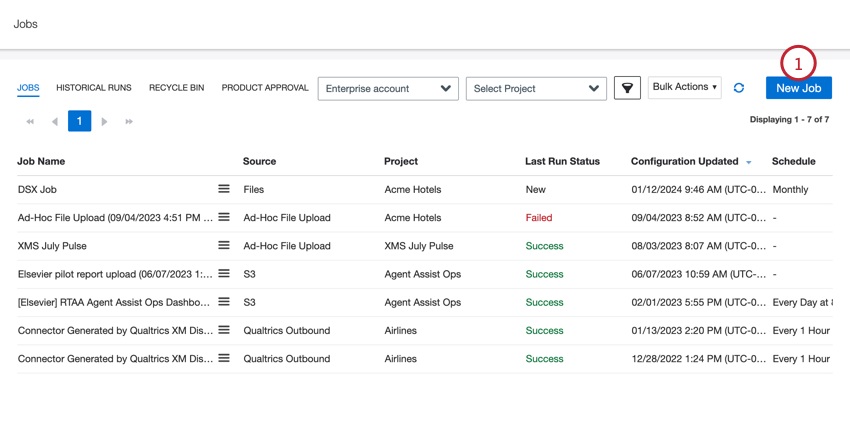
  2. Click the New Job button in the upper-right corner of the Jobs page.
    Click the New Job button
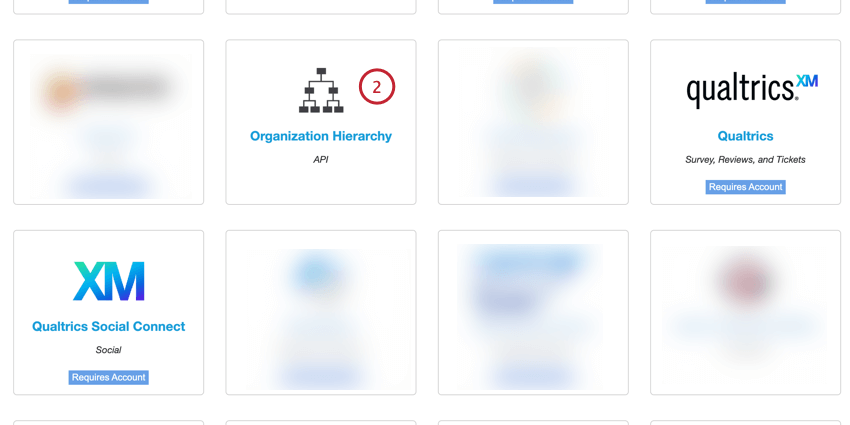
  3. On the Connectors page, go to the SELECT A SOURCE section.
    On the Connectors page, go to the SELECT A SOURCE section.
  4. Click the Organization Hierarchy button.
    Click the Organization Hierarchy button.

Creating an Organization Hierarchy Inbound Connector Job

Qtip: The setup steps must be completed in 1 sitting.

After you’ve set up the connection, follow these steps to create an Organization Hierarchy inbound connector job and configure the data that is sent to XM Discover:

  • Step 1: Provide Job Name
  • Step 2: Specify Project and Description
  • Step 3: Provide Credentials for a Qualtrics SFTP Folder
  • Step 4: Hierarchy API Token
  • Step 5: Organization Hierarchy Settings
  • Step 6: Provide Files Configuration
  • Step 7: Map Desired Fields Into XM Discover
  • Step 8: Notification Configuration (Optional)
  • Step 9: Set Up Additional Options for Job
  • Step 10: Confirm All Job Settings
Qtip: Click the Back and Next buttons to navigate between pages, or use the arrow keys: LEFT to go back, RIGHT to go next. If you would like to cancel the setup, click the Cancel button.
Click the Back and Next buttons to navigate between pages, or use the arrow keys: LEFT to go back, RIGHT to go next. If you would like to cancel the setup, click the Cancel button.

Step 1: Provide Job Name

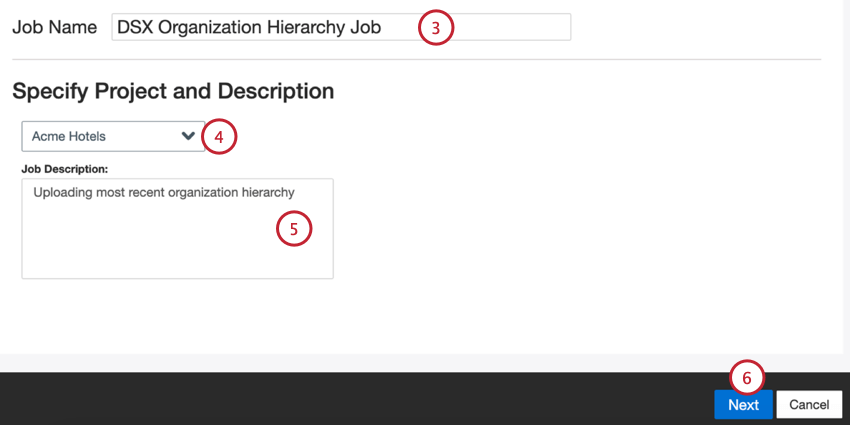
Enter a recognizable job name in the Job Name box in the upper-left of the page.
Enter a recognizable job name in the Job Name box

Qtip: You can modify the job name during the set up via the Job Name field that is displayed at the top of each page during the set up.

Step 2: Specify Project and Description

  1. On the Specify Project and Description page, select the project into which data is to be loaded from the projects dropdown menu.
    On the Specify Project and Description page, select the project into which data is to be loaded from the projects dropdown menu.

    Qtip: You have the option to enter a note about the job in the Job Description box. The job description that you enter in the Job Description box is only accessible in the Connectors list and is not uploaded as part of the data for a job.
  2. Click Next.

Step 3: Provide Credentials for a Qualtrics SFTP Folder

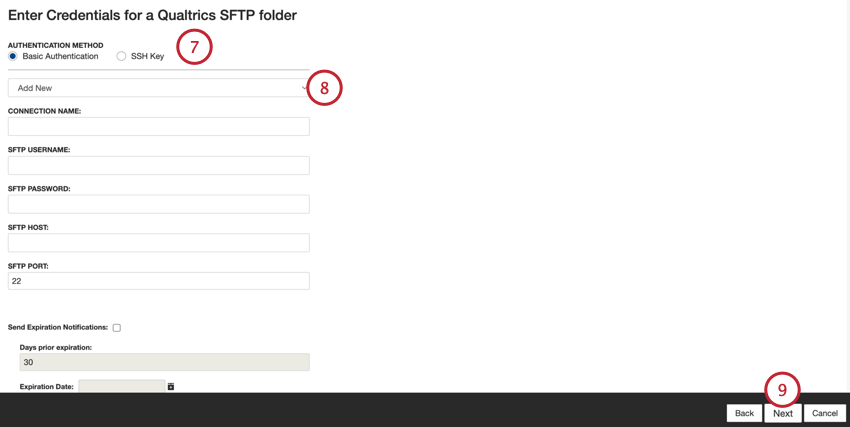
  1. On the Provide Credentials for a Qualtrics SFTP folder page, you can select an existing set of SFTP server credentials from the dropdown menu.
    On the Provide Credentials for a Qualtrics SFTP folder page, you can select an existing set of SFTP server credentials from the dropdown menu.

    Qtip: You can add a new set of SFTP credentials by following the steps in thee Adding New SFTP Credentials section.
  2. Click Next.

Step 4: Hierarchy API Token

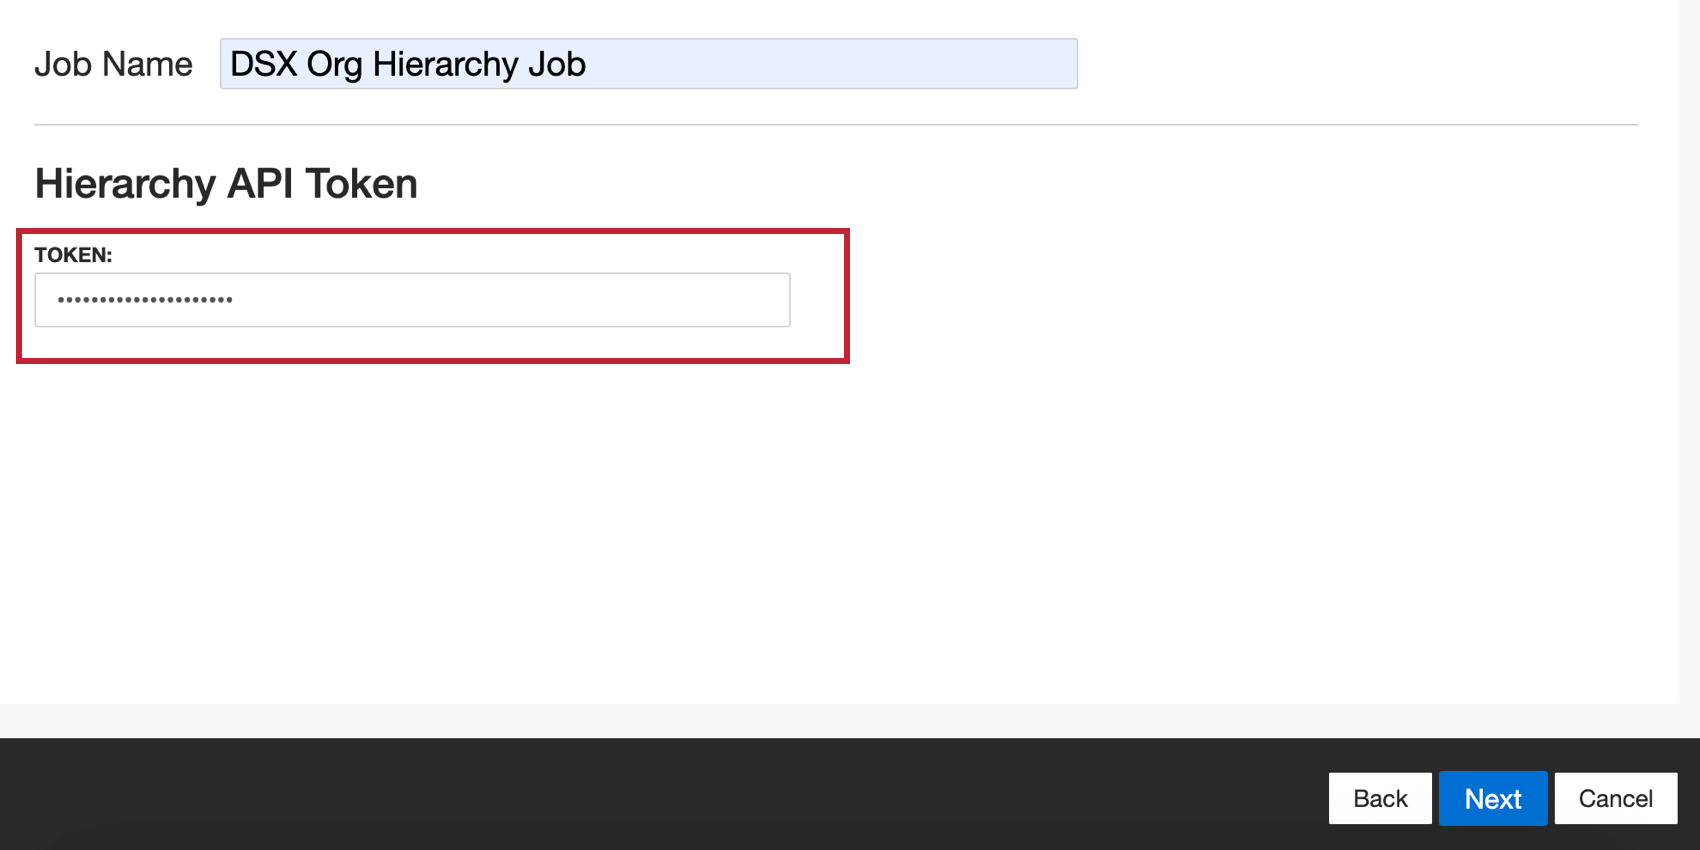
  1. On the Hierarchy API Token page, provide your hierarchy authentication token in the Hierarchy API Token box.
    On the Hierarchy API Token page, provide your hierarchy authentication token in the Hierarchy API Token box. Click Next.

    Qtip: For more information about generating a hierarchy authentication token and updating a hierarchy authentication token after a job is created, please see Hierarchy API.
  2. Click Next.

Step 5: Organization Hierarchy Settings

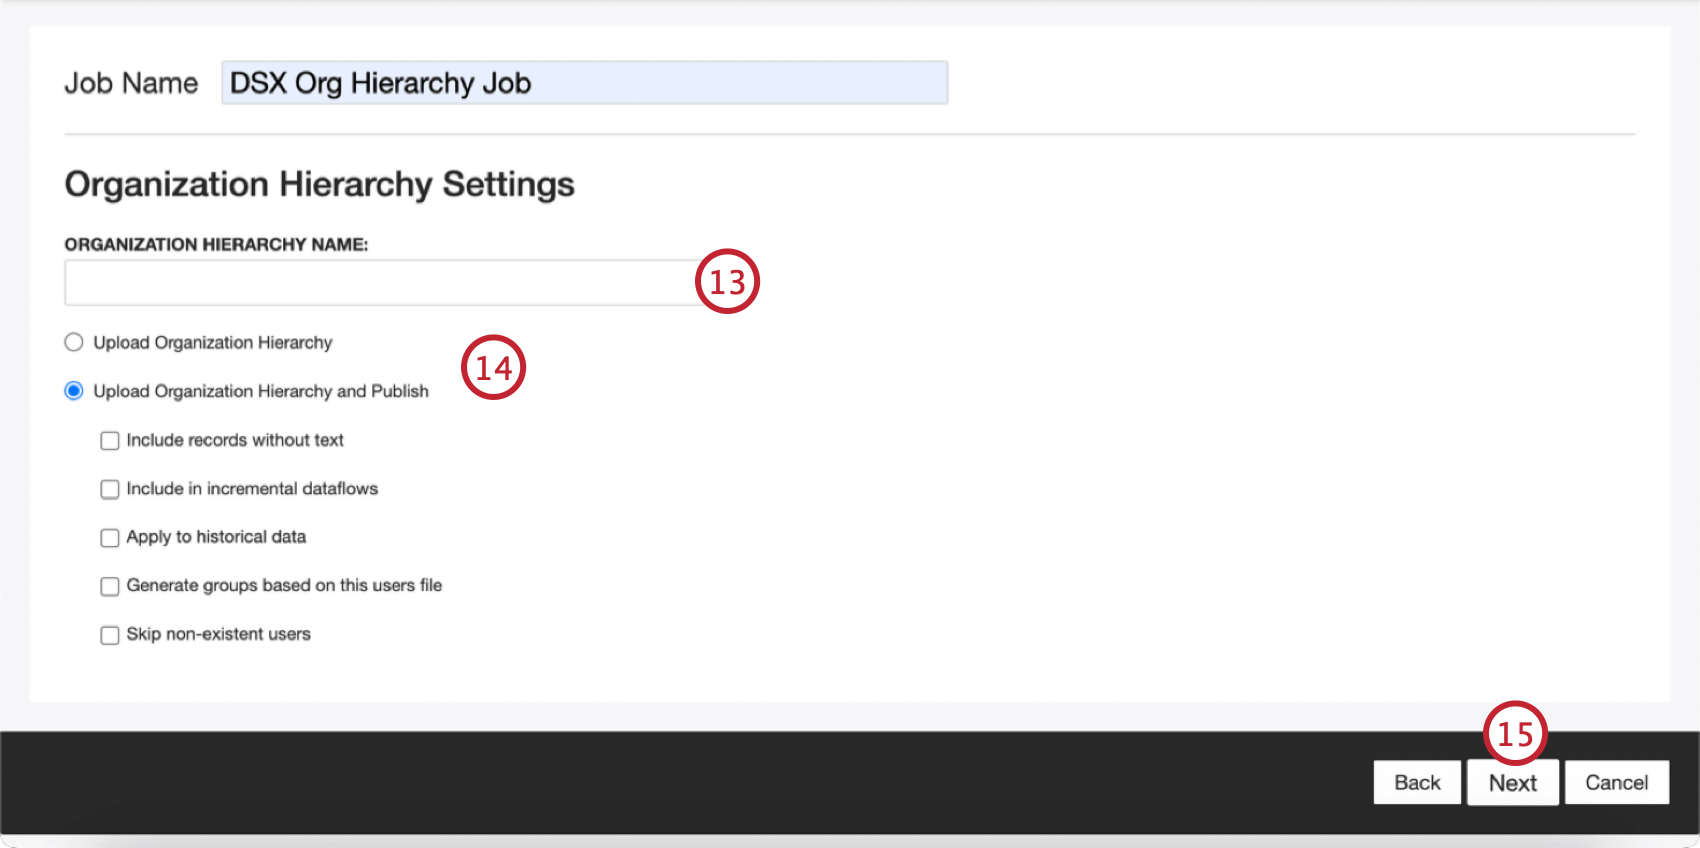
  1. On the Organization Hierarchy Settings page, provide the name for your organization hierarchy in the NAME box.
    On the Organization Hierarchy Settings page, provide the name for your organization hierarchy in the NAME box. Select 1 of the upload mode options to specify how the system should handle organization hierarchies. Click Next.
  2. Select 1 of the following upload mode options to specify how the system should handle organization hierarchies.
  1. Click Next.

Step 6: Provide Files Configuration

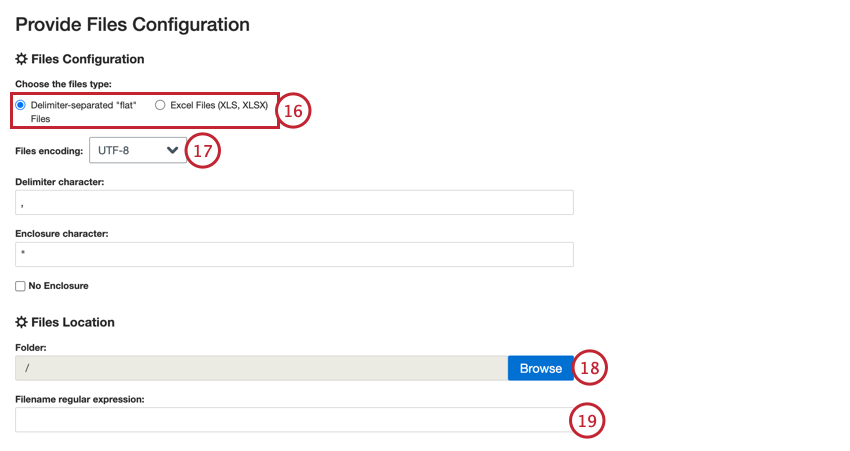
  1. On the Provide Files Configuration page, select 1 of the following checkboxes to choose the file type that contains the data that is to be uploaded:
  • Delimited text files (CSV)
  • Excel files (XLS, XLSX)
    On the Provide Files Configuration page, select 1 of the checkboxes to choose the file type that contains the data that is to be uploaded
  1. Apply the settings options for the selected file type:
  1. Click Browse in the Files Location section to point to the folder where the files are stored on the SFTP server.
    Click Browse in the Files Location section
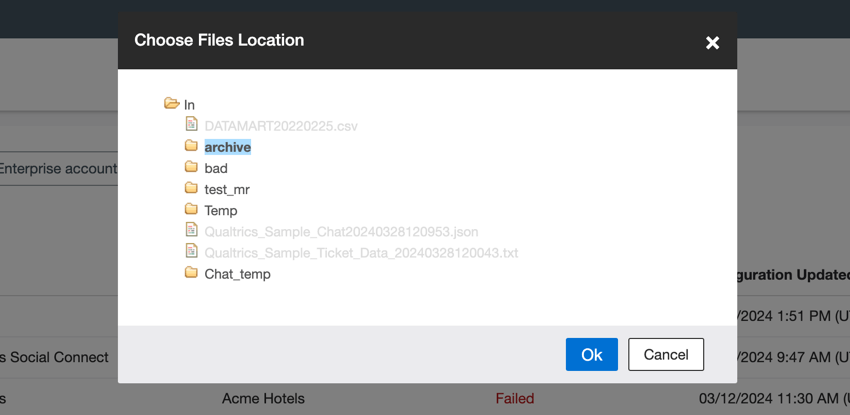
  2. In the Choose Files Location window, select the folder where the files are stored.
    In the Choose Files Location window, select the folder where the files are stored.

    Qtip: Click the name of the folder to select it. Click the folder icon to open the folder.
  3. Once the folder where the files are stored is selected, click Ok.
    Once the folder where the files are stored is selected, click Ok.

    Attention: Only the files in the selected folder are processed; sub-folders need to be processed separately.
  4. Enter a regular expression to only process files with matching names into the Filename regular expression box.
    Enter a regular expression to only process files with matching names into the Filename regular expression box.

    Qtip: You can update files location settings after a job is created.
    Attention: Custom coding features are provided as-is and require programming knowledge to implement. Qualtrics Support does not offer assistance or consultation on custom coding. You can always try asking our community of dedicated users instead. If you’d like to know more about our custom coding services, please contact your Qualtrics Account Executive.
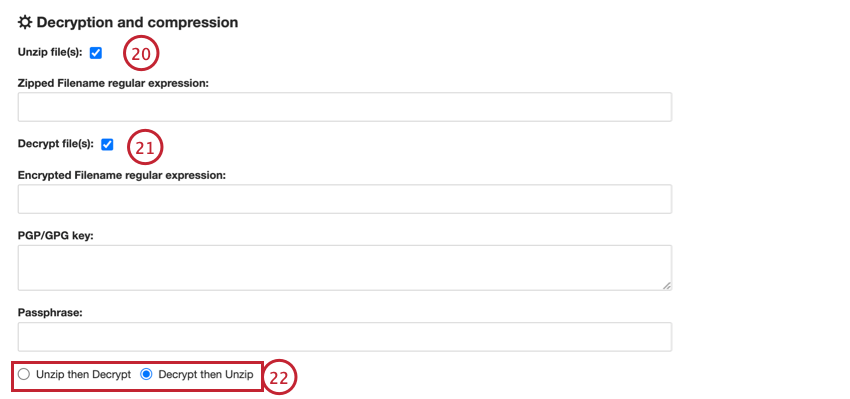
  5. On the Provide Files Configuration page, go to the Decryption and compression section (optional).
    On the Provide Files Configuration page, go to the Decryption and compression section (optional).
  6. If the files are stored in a Zip or Gzip archive, select the Unzip files checkbox.
  7. Enter a regular expression to only unzip files with matching names into the Zipped Filename regular expression box.
    Attention: Custom coding features are provided as-is and require programming knowledge to implement. Qualtrics Support does not offer assistance or consultation on custom coding. You can always try asking our community of dedicated users instead. If you’d like to know more about our custom coding services, please contact your Qualtrics Account Executive.
  8. If the files are encrypted, select the Decrypt file(s) checkbox.
    If the files are encrypted, select the Decrypt file(s) checkbox. Enter a regular expression to only decrypt files with matching names into the Encrypted Filename regular expression box. Enter a PGP/GPG key for decryption into the PGP/GPG key box. Enter a passphrase for decryption into the Passphrase box. If a non-encrypted archive contains encrypted files, select the Unzip then Decrypt option.
  9. Enter a regular expression to only decrypt files with matching names into the Encrypted Filename regular expression box.
    Attention: Custom coding features are provided as-is and require programming knowledge to implement. Qualtrics Support does not offer assistance or consultation on custom coding. You can always try asking our community of dedicated users instead. If you’d like to know more about our custom coding services, please contact your Qualtrics Account Executive.
  10. Enter a PGP/GPG key for decryption into the PGP/GPG key box.
  11. Enter a passphrase for decryption into the Passphrase box.
  12. If a non-encrypted archive contains encrypted files, select the Unzip then Decrypt Alternatively, if an encrypted archive contains non-encrypted files, select the Decrypt then Unzip option.
    Qtip: These options are only available if both the Unzip file(s) and the Decrypt file(s) options are selected.
    Attention: Encrypted archives with encrypted files are not supported.
    Qtip: You can update decryption and compression settings after the job is created.
  13. To provide a sample file for field mappings, you can choose 1 of the following options:
  1. Click Next.
    Click Next

Step 7: Map Desired Fields into XM Discover

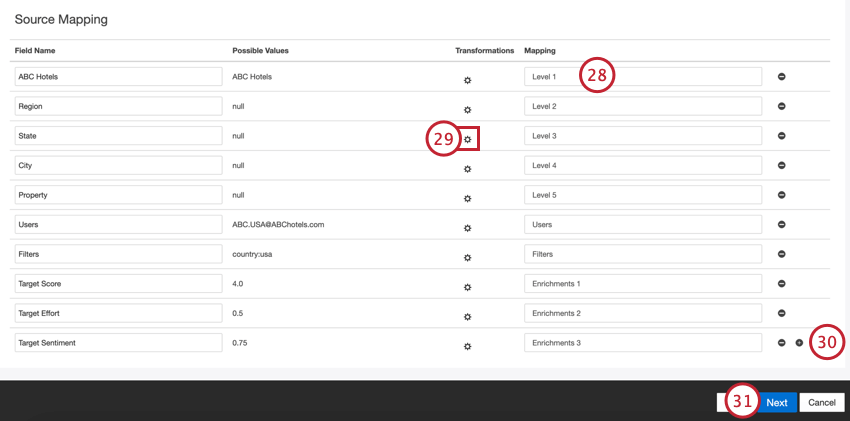
  1. On the Map Desired Fields Into XM Discover page, define the organization hierarchy by mapping the fields to the appropriate hierarchy parameters in the SOURCE MAPPING tab:
  • Field Name: The name of the field from the file.
    On the Map Desired Fields Into XM Discover page, define the organization hierarchy by mapping the fields to the appropriate hierarchy parameters in the SOURCE MAPPING tab
  • Possible Values: Examples of possible values.
  • Transformations: Use this option to transform your data. For more information, please see Applying Transformations.
  • Mapping: Select the organization hierarchy aspect to map the fields to. Possible values:
    • Level 1 to Level 10. Define the structure of your hierarchy. Organization structure levels are defined by columns in the Excel or CSV file.
      Qtip:
      The maximum number of hierarchy levels is 10.
    • Users: Map the users to your hierarchy.
    • Filters: Define the filters for your hierarchy.
    • Enrichments: Create enrichment parameters for your hierarchy.|
      Qtip: The maximum number of enrichments is 6.
      Qtip: Click the plus ( + ) icon on the right to add new custom data fields; click the minus ( ) icon to remove fields.
  1. Click Next.
    Click Next

Step 8: Notification Configuration (Optional)

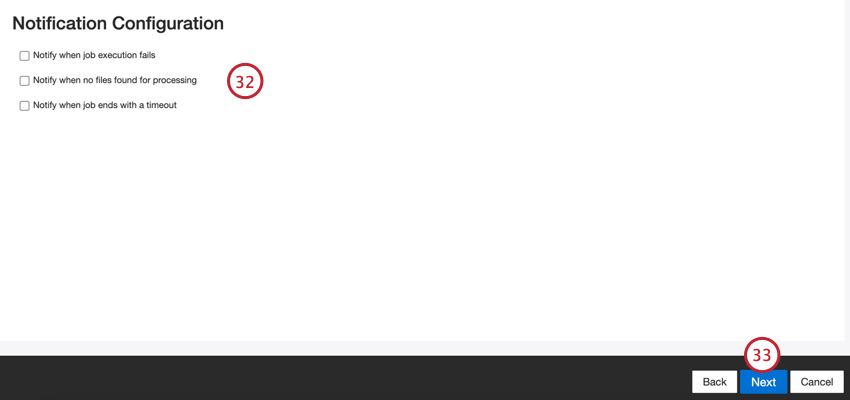
  1. On the Notification Configuration page, you can select the notifications that the watchers of a job should receive if any of the events listed below occurs.
  • Notify when job execution fails
  • Notify when no files found for processing
  • Notify when job ends with a timeout
    On the Notification Configuration page, you can select the notifications that the watchers of a job should receive if any of the events listed occurs.
Qtip: You can select any combination of notifications, or decide not to choose any notifications. In this case, the watchers of a job don’t receive any notifications.
Qtip: You can update notification configuration settings for existing jobs.
Qtip: For more information about notification configuration settings, please see Job Notifications.
  1. Click Next.
    Click Next.

Step 9: Set Up Additional Options for Job

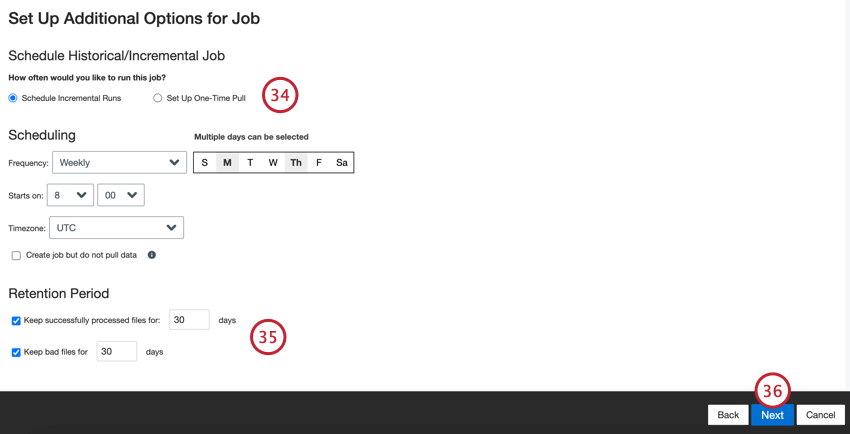
  1. On the Set Up Additional Options for Job page, in the Schedule Historical/Incremental Job section, choose 1 of the following options:
  1. On the Set Up Additional Options for Job page, in the Retention Period section, you can specify the retention period to archive files per job for a defined period of time.
    On the Set Up Additional Options for Job page, in the Retention Period section, you can specify the retention period to archive files per job for a defined period of time.

    Qtip: For more information about retention settings, please see Updating Retention Settings.
  2. Click Next.
    Click Next.

Step 10: Confirm All Job Settings

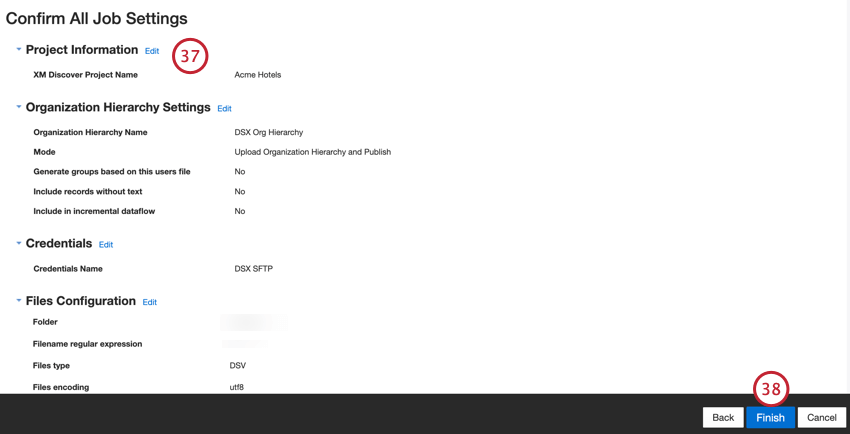
  1. On the Confirm All Job Settings page, you can view a summary of all the settings for a job and edit the settings, if necessary, before running the data upload.
    On the Confirm All Job Settings page, you can view a summary of all the settings for a job and edit the settings, if necessary, before running the data upload
  2. To run the data upload, click the Finish button when you are ready to run the data upload.
    To run the data upload, click the Finish button when you are ready to run the data upload
    A confirmation message will display confirming that the job was successfully submitted. When you click Finish, the following happens:
  • One-time pulls are run immediately.
  • Unless you enabled the “Create job but do not pull data” option, scheduled pulls are run immediately, then set to run according to the schedule you defined.
    For more information about monitoring jobs, please see Jobs Page Overview.

Adding New SFTP Credentials

On the Provide Credentials for a Qualtrics SFTP folder page, you can add new SFTP credentials.

  1. To add a new set of SFTP credentials, select Add New from the credentials dropdown menu.
    To add a new set of SFTP credentials, select Add New from the credentials dropdown menu.
  2. Enter the name of the new set of credentials into the CONNECTION NAME box.
    Enter the name of the new set of credentials into the CONNECTION NAME box. Enter the SFTP username into the SFTP USERNAME box. Provide the SFTP password into the SFTP PASSWORD box. Enter the SFTP server address into the SFTP HOST box. Provide the SFTP port into the SFTP PORT box.
  3. Enter the SFTP username into the SFTP USERNAME box.
  4. Provide the SFTP password into the SFTP PASSWORD box.
  5. Enter the SFTP server address into the SFTP HOST box.
  6. Provide the SFTP port into the SFTP PORT box.
    Qtip: The default port is 22.
  7. You can set your SFTP credentials to expire after a certain time period (optional). To define an expiration date for this set of credentials and set a reminder for all job watchers, select the Send Expiration Notifications checkbox. This enables the Days prior expiration box.
    You can set your SFTP credentials to expire after a certain time period (optional)
  8. Enter a value into the Days prior expiration box to set how many days before the expiration the notifications should start. Possible values range from 1 to 100 days.
    Qtip: This reminder triggers every time the job runs once the expiration date is less than the number of days set in the Days prior expiration box.
  9. Select the Expiration Date from the calendar date picker. The expiration date will then be added to the Expiration Date box.

Downloading a Sample File From SFTP Server

  1. Select Download Sample from File Storage.
    Select Download Sample from File Storage. Click the Select Sample File button in the Browse File Storage box.
  2. Click the Select Sample File button in the Browse File Storage box.
  3. In the Choose Sample File window, open the folder where the sample file is stored.
    In the Choose Sample File window, open the folder where the sample file is stored.
  4. Select the sample file.
    Select the sample file. Click Ok.
  5. Click Ok.
  6. Wait until XM Discover uploads the sample file and shows a preview.
    Wait until XM Discover uploads the sample file and shows a preview.

    Qtip: For information about possible validation errors, please see Sample File Errors.

Uploading a Sample File From Your Computer

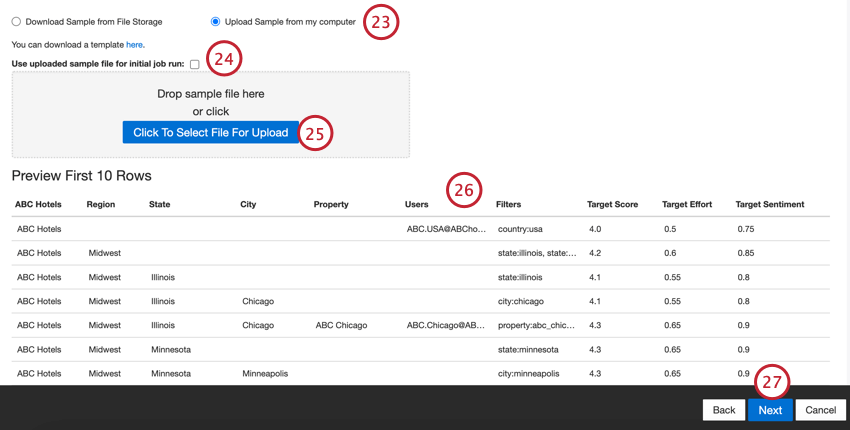
  1. Select Upload Sample from my computer.
    Select Upload Sample from my computer. Click the Click To Select File For Upload button and point to the data file or drop your file onto the gray canvas.
  2. Click the Click To Select File For Upload button and point to the data file or drop your file onto the gray canvas.
  3. Wait until XM Discover uploads the sample file and shows a preview.
    Wait until XM Discover uploads the sample file and shows a preview.

    Qtip: For information about possible validation errors, please see Sample File Errors.
    Qtip: You can update field mappings by updating file headers configuration via a sample file after a job is created.

Delimited Text Files (CSV) Settings

You can apply the settings options for delimited text files (CSV) on the Select File page.

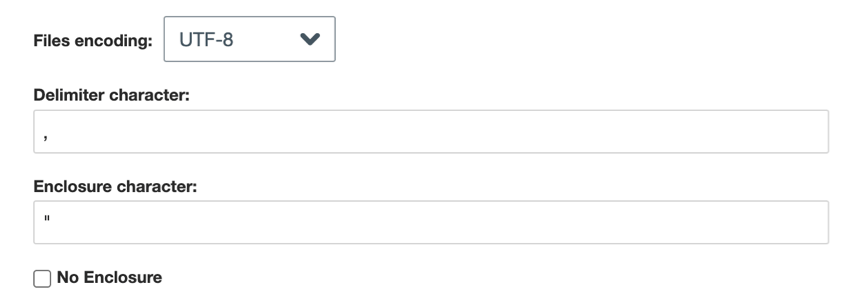
  1. Select the encoding system used in the file from the menu.
    Select the encoding system used in the file from the menu.
  2. Enter the character used to delimit data entries in the file into the Delimiter character box.
    Enter the character used to delimit data entries in the file into the Delimiter character box.

    Qtip: Enter 1 character only.
    Qtip: The default delimiter is a comma, which can be used for CSV files.
  3. Enter the character used to enclose each data field in the file into the Enclosure character box.
    Qtip: Enter 2 characters only.
    Qtip: Select the Enclosure character checkbox if enclosure characters are optional.
  4. You can click the here link to download and use a default template with a predefined structure, filters, users, and enrichments stored in a single file as a starting point to build your own organization hierarchy.
    You can click the here link to download and use a default template with a predefined structure, filters, users, and enrichments stored in a single file as a starting point to build your own organization hierarchy.
    The CSV template file for the organization structure will be saved to the default location for downloads on your computer. After you download the template, modify it to match your organization structure.

Microsoft Excel Files Settings

You can apply the settings options for Microsoft Excel files on the Select File page. You can click the here link to download and use a default template with a predefined structure, filters, users, and enrichments stored in a single file as a starting point to build your own organization hierarchy.
You can click the here link to download and use a default template with a predefined structure, filters, users, and enrichments stored in a single file as a starting point to build your own organization hierarchy.
The Excel template file for the organization structure will be saved to the default location for downloads on your computer. After you download the template, modify it to match your organization structure.

Qtip: If your sample Excel file contains several worksheets, you can select from the Select Sheet drop-down list which worksheet the system should process.


Updating Organization Hierarchy Inbound Connector Jobs Settings

You can update settings for Organization Hierarchy inbound connector jobs to specify how the system should handle organization hierarchies after a job is created. These are primarily under-the-hood updates. For every incremental run of the Organization Hierarchy connector the following takes place:

  1. A version of the original organization hierarchy is created.
  2. The created version is edited with new files.
  3. If the structure or filters are updated, the version is published. The version isn’t published if only users and enrichments are updated.
  4. The original organization hierarchy is replaced with a new version.
  5. The temporary version is deleted.
  6. The organization hierarchy is activated if it isn’t active.

How to Update Organization Hierarchy Inbound Connector Jobs Settings

  1. Sign in to Connectors.
  2. Make sure that the JOBS tab is selected.
    Make sure that the JOBS tab is selected. Find the job that you wish to update using filters or search. Expand the actions menu next to the job. Select Update Organization Hierarchy Settings.
  3. Find the job that you wish to update using filters or search.
  4. Expand the actions menu next to the job.
  5. Select Update Organization Hierarchy Settings.
  6. In the Update Organization Hierarchy Settings window, you can select 1 of the following upload mode options to specify how the system should handle organization hierarchies:
  • Upload Organization Hierarchy (default): Create and activate an organization hierarchy. For more information, see the Upload Organization Hierarchy section.
    Qtip: By default, the activated organization hierarchy is unpublished and will only enable dashboard personalization.
  • Upload Organization Hierarchy and Publish: Create, activate, and publish an organization hierarchy. For more information, see the Upload Organization Hierarchy and Publish section.
    Qtip: Publishing an organization hierarchy enables you to group data by its levels. This is a prerequisite for peer and parent reporting, as well as target and variance reporting. For more information, please see Peer and Parent Reporting and Target and Variance Reporting.
    In the Update Organization Hierarchy Settings window, you can select 1 of the upload mode options to specify how the system should handle organization hierarchies
  1. Click Save.
    This updates the job and applies the new settings.

Upload Organization Hierarchy

If you select the Upload Organization Hierarchy upload mode option, you can select the Generate groups based on this users file checkbox to create groups with your organization hierarchy.

Qtip: One “root” is created with each organization hierarchy. Organization hierarchy derived groups can be removed at any time. Groups can be kept following the organization hierarchy removal.

Upload Organization Hierarchy and Publish

If you select the Upload Organization Hierarchy and Publish upload mode option, you can do the following:

  • Select Generate groups based on this users file to create groups with your organization hierarchy.
  • Select Include records without text to include records with empty verbatim into your organization hierarchy.
  • Deselect Include records without text to exclude records with empty verbatim from your organization hierarchy.
  • Select Include in incremental dataflows to include the organization hierarchy model in incremental runs.
  • Deselect Include in incremental dataflows to exclude the organization hierarchy model from incremental runs. If you expect that publishing an organization hierarchy will conflict with other Realtime Downstream dataflows, we recommend deselecting this option. The model that gets created and subsequently classified will not block other dataflows if this option is not selected.
    If you select the Upload Organization Hierarchy and Publish upload mode option, you can select Generate groups based on this users file to create groups with your organization hierarchy, select Include records without text to include records with empty verbatim into your organization hierarchy, deselect Include records without text to exclude records with empty verbatim from your organization hierarchy, select Include in incremental dataflows to include the organization hierarchy model in incremental runs, deselect Include in incremental dataflows to exclude the organization hierarchy model from incremental runs.

    Qtip: Publishing an organization hierarchy creates a hidden corresponding category model to support additional use cases. The created category model will mirror the structure and filters of the organization hierarchy and behave like a model where applicable.