
Creating Segments in XM Directory
What's on this page
Qtip: Segmentation is not available to all licenses. If you are a Brand Administrator who is interested in this feature and you do not see a Segments tab in your directory, reach out to Account Services.
About Creating Segments
Segmentation is the process of dividing the contacts in your XM Directory into different groups, based on demographics, needs, priorities, common interests, and other criteria. Once a segment is created, the members of your directory are automatically added and removed based on whether they match its criteria, meaning less maintenance required of your team, and more time to focus on insights.
Qtip: Segments can only be created and edited by users who have the permission Manage Directories enabled. Any user with Access XM Directory enabled can distribute to existing segments.
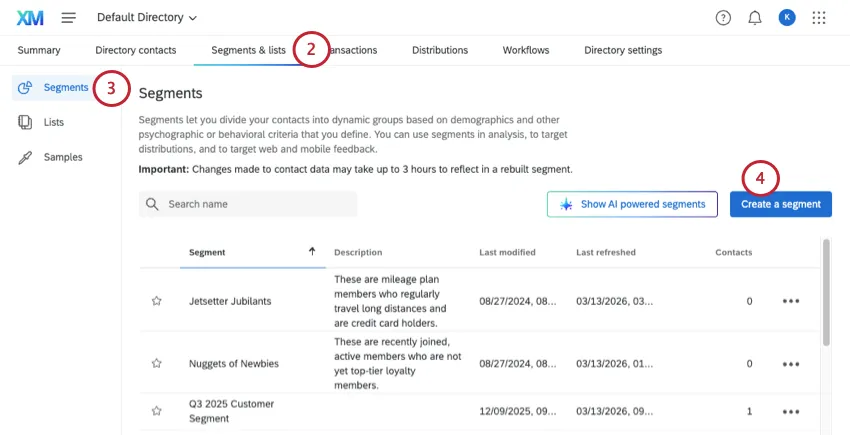
As segments are created, you and other directory managers will be able to see them in the Segments tab of the directory. Once a segment is created, all contacts in your directory that meet the conditions will be added to the segment.
Qtip: There is a limit of 10 million contacts per segment, and you can create up to 20 segments per individual directory. If you'd like to increase to 50 segments per directory, please reach out to Support.
Creating Your First Segment
Segments are created in your directory by going to Segments & lists and staying in the Segments section.
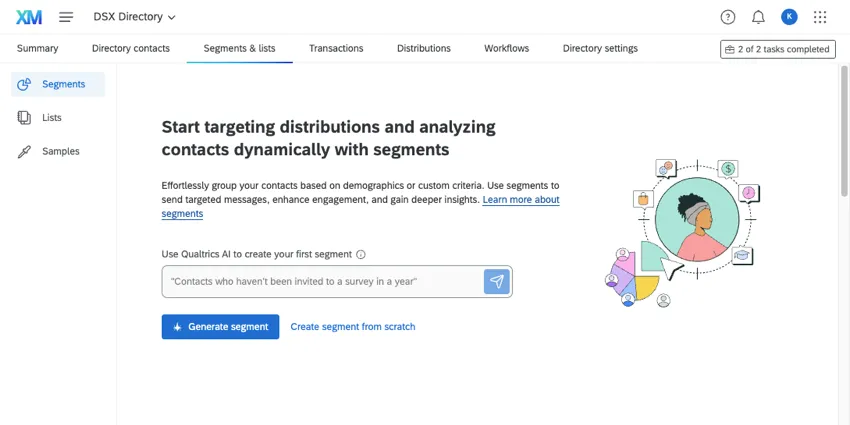
If you haven’t made a segment yet, you’ll see two options:
- Generate a segment with AI: Start with a prompt explaining the kind of contacts you want to include in your segment. Then hit the button to create that segment!
Qtip: You’ll get a chance to review the criteria before the segment is officially created. See Generating Segments with AI Prompts.
- Create segment from scratch: If you’d prefer to build a segment from scratch manually, select this option. You’ll choose from information available in your directory to build interacting criteria contacts need to meet to join the segment. For steps, see Creating Segments Manually.
If you aren’t sure whether segments are the correct option, or if you’d like to try a mailing list or a sample, scroll down for a helpful table comparing the 3. To learn more, see our content on Getting Started with XM Directory Contacts.
Generating Segments with AI Prompts
Attention: To use this feature, it must be enabled by a Brand Administrator. See AI Administration.
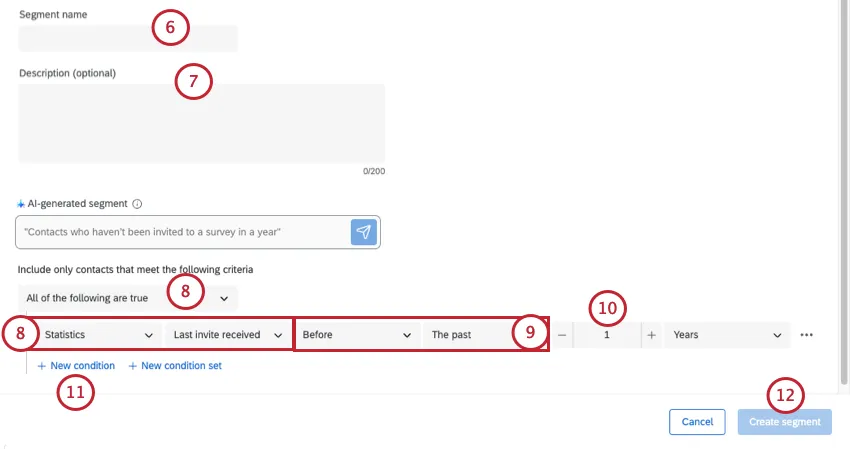
You can create a segment very quickly by writing a description of what you want, and letting AI take care of the rest. AI-generated segments let you determine the criteria you want in your segment, without you having to set up all of the conditions yourself.
Qtip: Please note that our search AI's performance may vary in languages other than English.
Go to the Segments & lists tab.
Make sure you have Segments selected to the left. (This is the default page you will land on.)
Click Create a segment.
Name your segment.
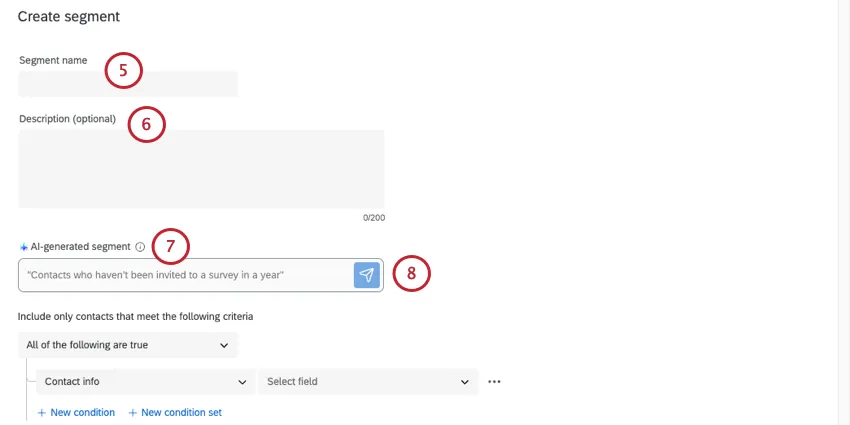
If desired, add a description for the segment.
In AI-generated segment, type a description of a segment you’d like to make.
Example: “Contacts who haven’t been invited to a survey in a year.”
Qtip: This AI is trained to search for contact info, statistics, and embedded data fields.
Click the button, or hit Enter on your keyboard.
Criteria will be generated for you. You can edit this criteria as needed.

Once you’re ready to make a segment, click Create segment.
Using AI-Recommended Segments
Attention: This feature is only available to users on the new simplified pricing and packaging plans. If you have questions about your Qualtrics pricing and packaging plan, reach out to your Account Executive.
Attention: To use this feature, it must be enabled by a Brand Administrator. See AI Administration.
AI recommended segments use artificial intelligence to evaluate data within your directory and propose industry-specific segments. The AI model will look into the embedded data that exists within your directory, such as demographics and common interests, as well as your industry, helping you discover valuable segments that may be overlooked with manual segment creation.
Attention: Segment recommendations are available in English, Spanish, Japanese, German and French. If you have directory fields in other languages, you may see unreliable recommendations.
Qtip: It may take some time to generate new segment recommendations.
To use an AI-generated segment, follow these steps.
Go to the Segments & lists tab.
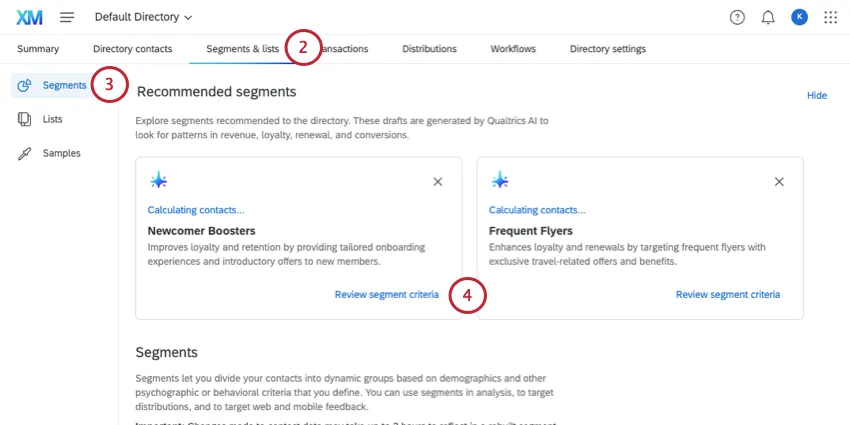
Make sure you have Segments selected to the left. (This is the default page you will land on.)
Click Review segment criteria next to the AI recommendation you want to use.
Review the criteria and make any changes you want.
To create the segment, click Create segment.
The segment will automatically search through existing directory contacts to see which ones match the generated segment criteria. This may take some time, especially if your directory has many contacts, so you can safely leave the page while the segment is being built.
2 segments at a time will be visible within the segments tab. When you create or dismiss a segment, new recommendations will be shown.
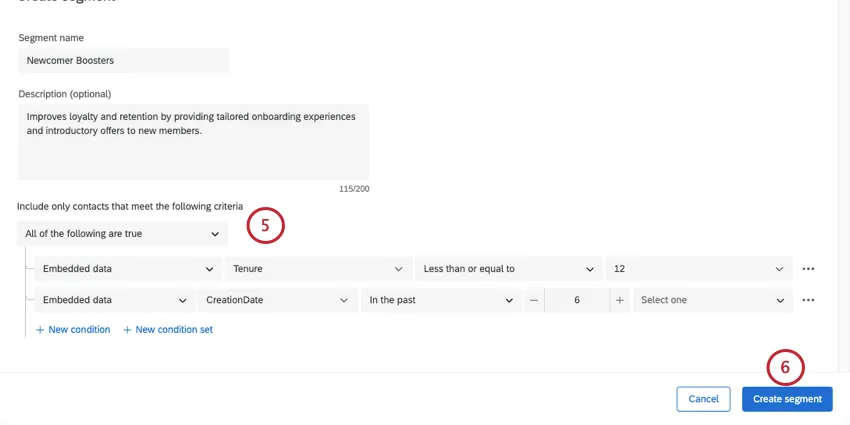
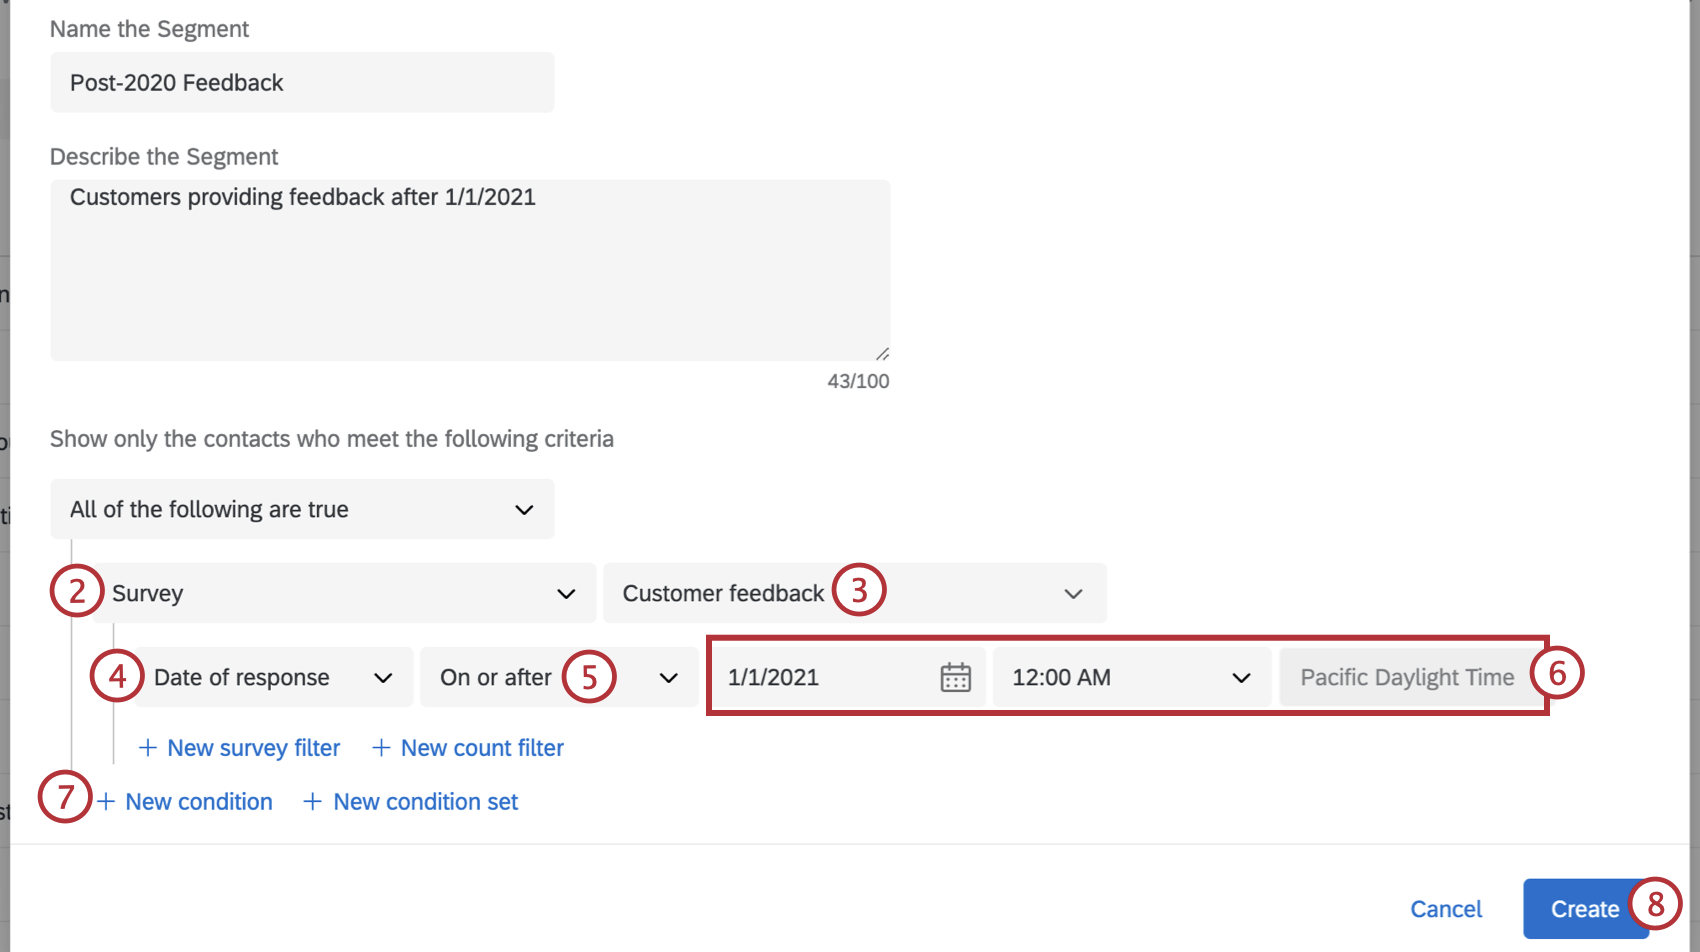
Creating Segments Manually
Go to the Segments & lists tab.
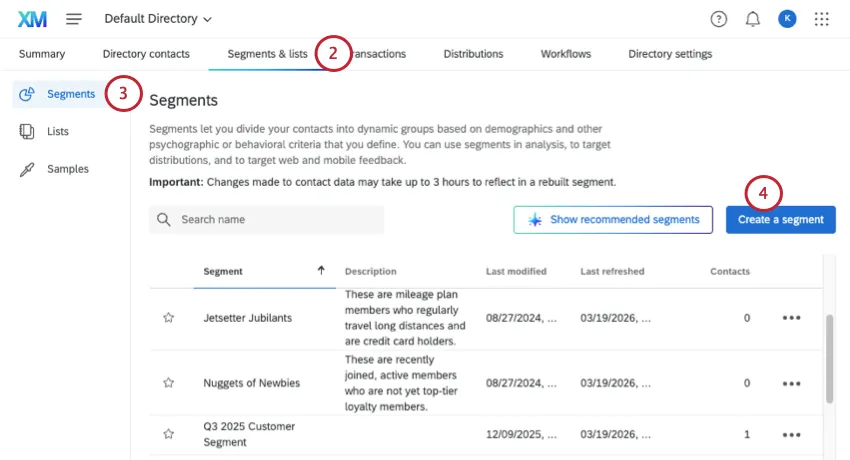
Make sure you have Segments selected to the left. (This is the default page you will land on.)
Click Create a segment.
Name your segment.
If desired, add a description for the segment.
Decide if all the conditions must be met for a contact to be added to a segment, or if it can be any condition.
Select the information you’ll use to create a segment. See a full list of segment criteria you can choose from.

Qtip: You can see about each of these types of criteria by clicking the links. More often than not, you will probably be using embedded data or transactional data from your directory.
Specify how you will define the value.
Qtip: Is it an exact match? Choose Equal To. Is it a phrase or term that may be present in the value? Choose Contains. You can also specify whether a value is empty or not, or set numeric fields based on relative values, such as Greater than or equal to.
Enter the value, or select an existing one from the dropdown.
Add more conditions or condition sets as needed.
Click Create Segment.
The segment will search through existing directory contacts to build the segment. This may take some time, especially if your directory has many contacts, so you can safely leave the page while the segment is being generated.
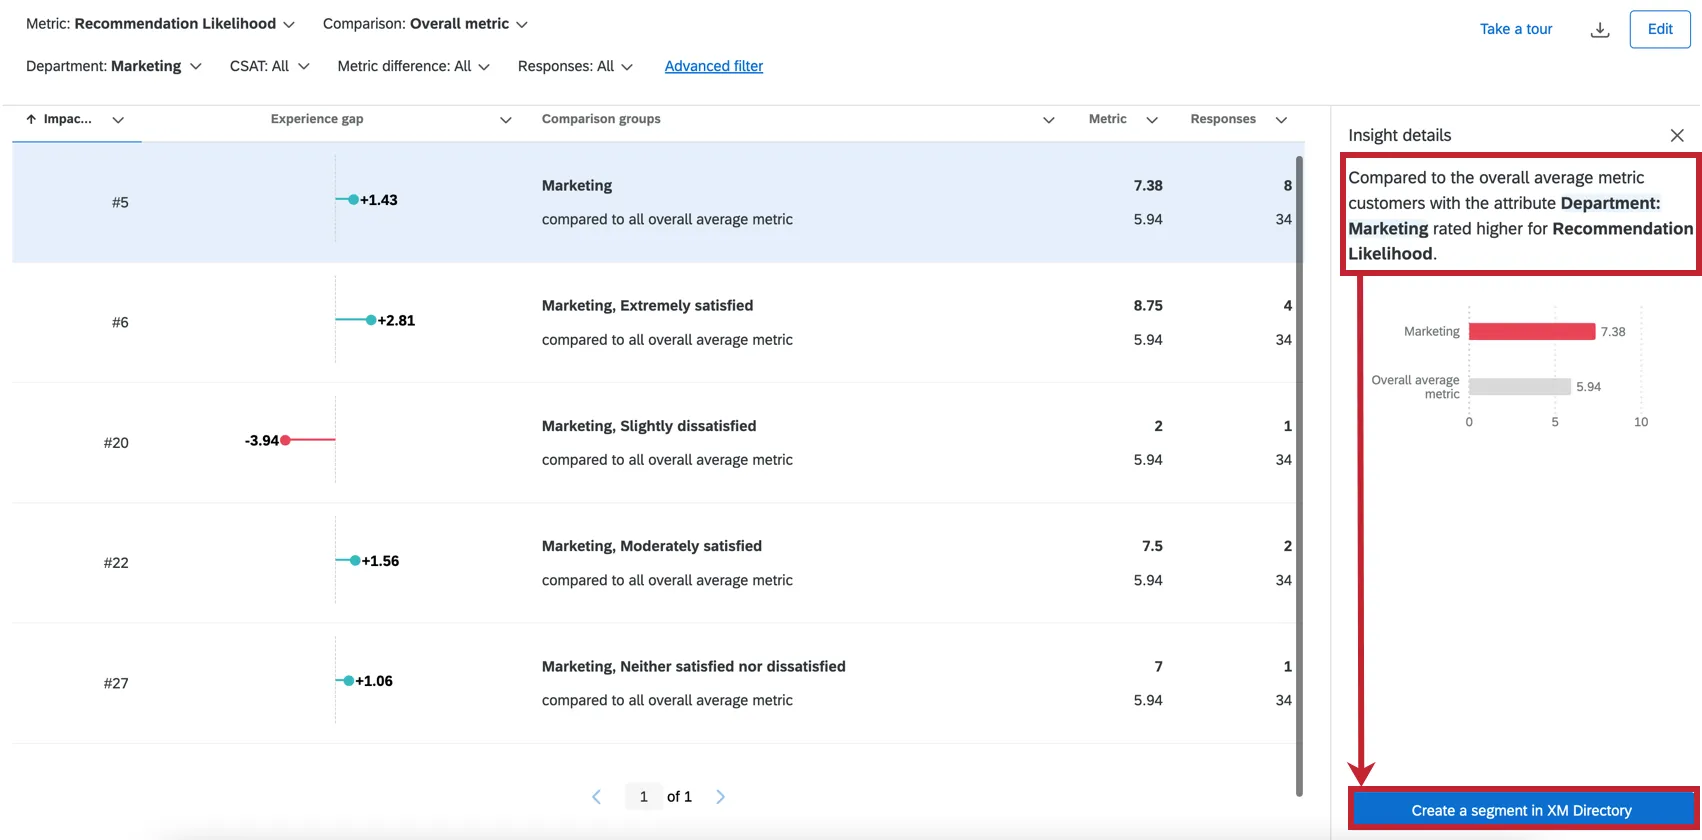
Creating Segments Using Spotlight Insights (CX)
You can create segments directly from your CX dashboards through spotlight insights. For more information on how to use CX spotlight insights, visit the Spotlight Insights (CX) page.
Setting Segment Criteria
Setting the criteria for a segment is similar to building filters in XM Directory. You can set criteria for your segment based on XM Directory information and survey responses. You can learn more about the available XM Directory fields and how to build condition sets at the links below.
List of criteria you can use:
- Contact info
- Contact activity
- Dates
- Digital behavior
- Embedded data
- Opt-out status
- Mailing list
- Number of lists
- Statistics
- Survey response
- Survey status
- Transaction
How to combine criteria:
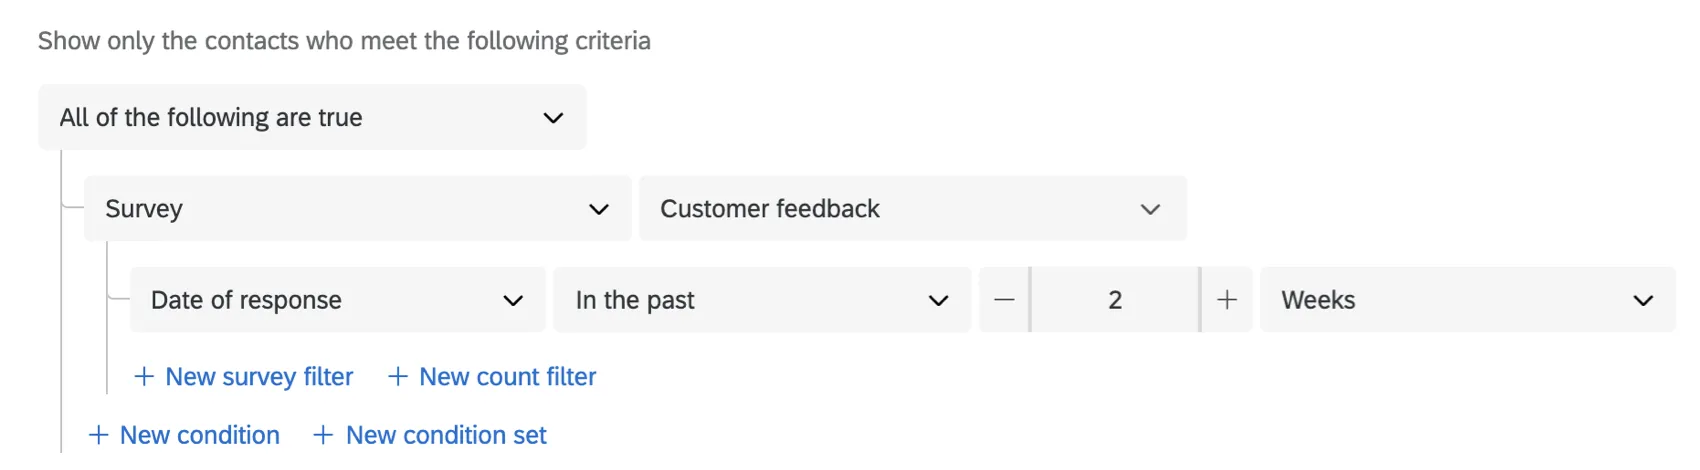
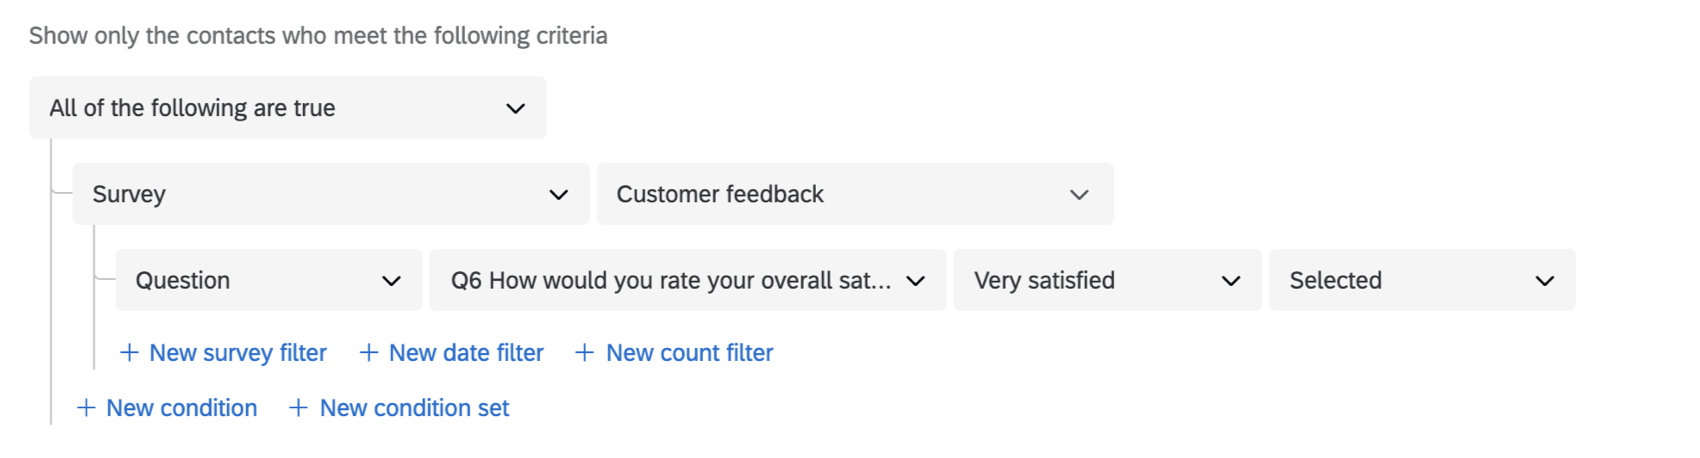
Creating Segments Based on Survey Responses
In addition to creating segments based on XM Directory information, you can create segments based on survey responses. This allows you to segment your contacts based on their responses to your surveys. Follow the steps below to use survey criteria in your segments.
- Question: Build your segment based on how your contacts answered a specific question from the survey.
- Date of response: Build your segment based on when your contacts finished the survey.
- Number of responses: Build your segment based on the number of times each contact completed the survey.
- Select New survey filter to add a condition based on a contact’s response to a survey question. You can add up to 10 question filters per segment.

- Select New count filter to add a condition based on the number of times a contact responded to the survey. You can add one count filter per segment.

- Select New date filter to add a condition based on when a contact responded to the survey. You can add one date filter per segment.
 Qtip: The maximum number of filters you can have on a segment is 10 per block. You can have a maximum of 10 blocks per segments, which means you can add 100 filters total per segment!


The segment will search through existing directory contacts to build the segment. This may take some time, especially if your directory has many contacts, so you can safely leave the page while the segment is being generated.
Managing XM Directory Segments
Segmentation is the process of dividing the contacts in your XM Directory into different groups, based on demographics, needs, priorities, common interests, and other criteria. Once a segment is created, the members of your directory are automatically added and removed based on whether they match its criteria, meaning less maintenance required of your team, and more time to focus on insights.
To learn more, see Managing XM Directory Segments.
Projects That Can Use Segments
Qtip: The features discussed in this section are not necessarily included with every license. If you’re interested in getting access, please reach out to your Account Executive.
You can use XM Directory to create segments you can then use to distribute to several types of Qualtrics projects. However, not every Qualtrics project type is compatible with XM Directory.
XM Directory segments can be used in the following:
In contrast, XM Directory cannot be used to distribute any Employee Experience (EX) projects. That means that no EX projects can be used with XM Directory, including Engagement, Pulse, 360, and more.
XM Directory contact data is completely separate from the employee / participant information saved in the Employee Directory. That means that data edited in one directory will never affect the other, and employee directory information cannot be used to build segments.
That's great! Thank you for your feedback!
Thank you for your feedback!