
Participant Import Automation
What's on this page
About Participant Import Automation
With Employee Lifecycle and Pulse projects, you can automatically add participants or dashboard users to the project from the Global Employee Directory on a schedule. This is helpful when you are running an ongoing program. For example, while onboarding, you can upload new employees to the directory and expect that they will be uploaded to your onboarding Lifecycle project right away.
Adding Participants Automatically on a Schedule
Qtip: This section describes functionality available to Lifecycle and Pulse projects, but not Engagement or Ad Hoc Employee Research projects. For more details on each, see Types of Employee Experience Projects.
This option allows you to automatically add participants from the Global Employee Directory to your project on a chosen schedule. Limit the participants that are added to your project by metadata.
Example: You want to survey employees whenever they leave the company to ask about their experience. So long as there’s metadata such as End Date attached to each employee in the directory, you could filter your participant automation to only include employees with upcoming end dates.
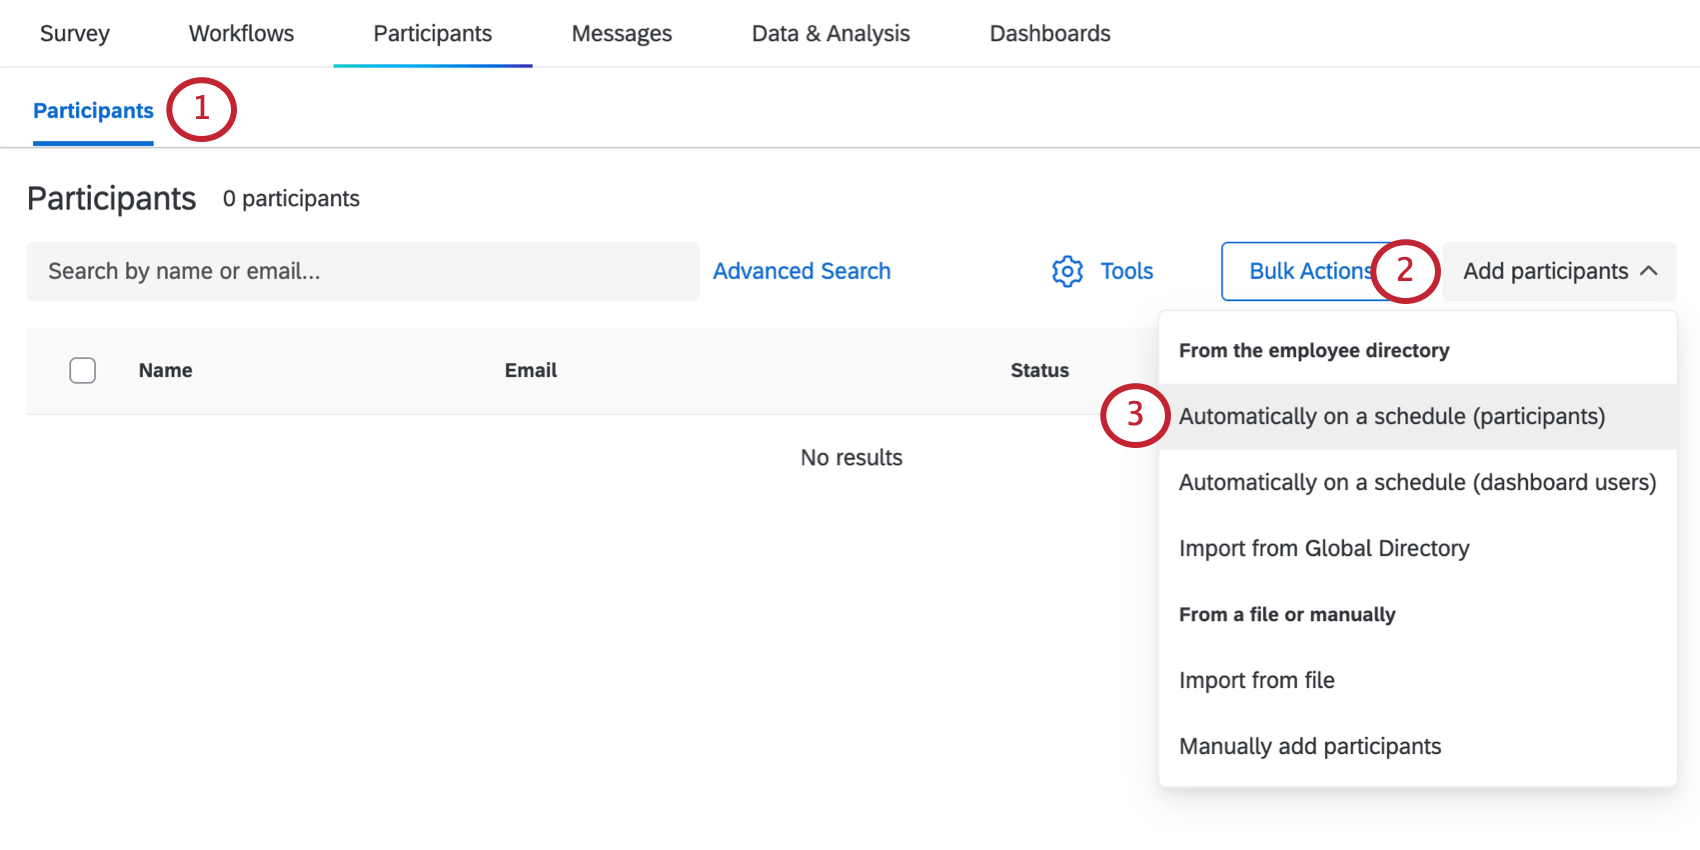
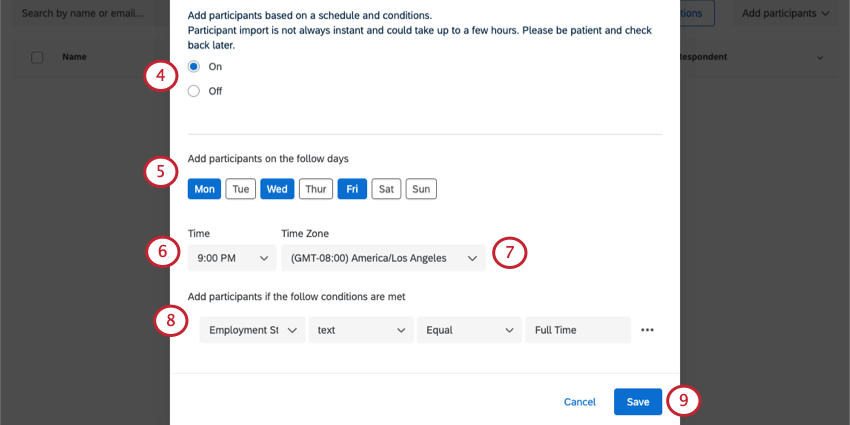
Qtip: You must add at least one condition.
Qtip: See the Setting Participant Automation Conditions section below for more information.
Adding Dashboard Users Automatically on a Schedule
Qtip: This section describes functionality available to Lifecycle projects, but not Engagement, Ad Hoc Employee Research, or Pulse projects. For more details on each, see Types of Employee Experience Projects.
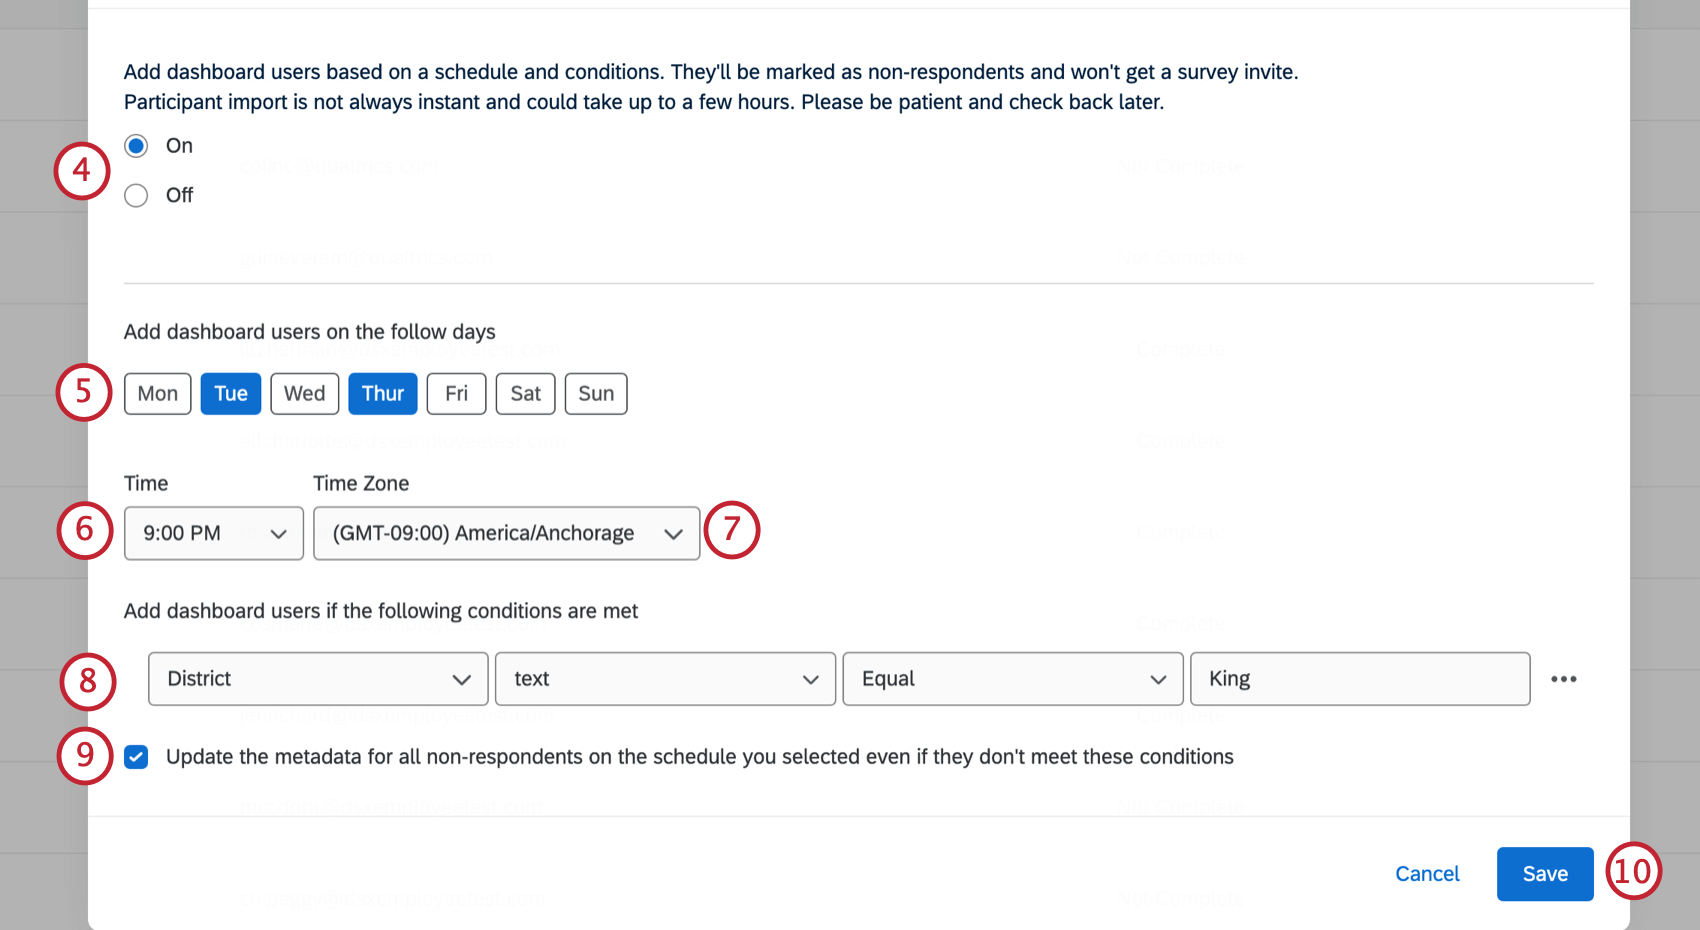
This option lets you add dashboard users from the Global Employee Directory to your project on a chosen schedule. Dashboard users don’t participate in the Lifecycle survey. Instead, they only access the results on the dashboard.
A dashboard user automation is especially useful when it’s paired with automatic role assignment. Using both features at once allows you to give permissions to your lifecycle dashboards automatically based on changes in your organization.
Example: All Human Resource Business Partners (HRBPs) in your organization see onboarding dashboards. You can set up the dashboard participant automation to pull in HRBPs from your employee directory based on a metadata field, such as Role = HRBP. You can then setup an automatic role assignment to pull in all HRBPs into a dashboard role, based on Role = HRBP. When new HRBPs come into your organization, they will automatically be pulled into the lifecycle project and be assigned a dashboard role, which gives them access to the onboarding dashboard.
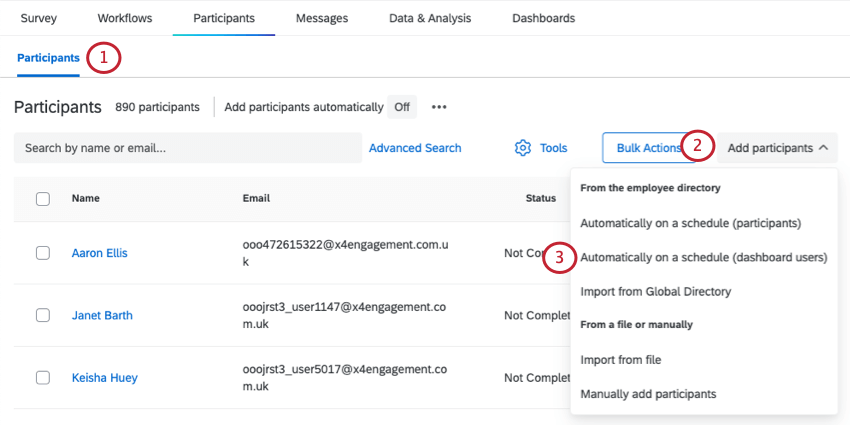
Qtip: You must add at least one condition.
Qtip: See the Setting Participant Automation Conditions section below for more information.
Qtip: This applies both to participants who were previously imported and those who were manually added as non-respondent participants.
Qtip: If a participant is marked as a respondent and they meet the criteria for the dashboard user import automation, they will not be changed from a respondent to non-respondent. Once a participant is marked as a respondent, they will stay that way unless manually changed to a non-respondent. Please be aware that updating a participant from respondent to non-respondent will impact the numbers reflected in the response rate in the dashboard.
Setting Participant Import Conditions
In the previous section, you set the conditions under which participants are added to the project from the directory. Depending on the field type of the metadata you use in your conditions, you can set conditions based on different operators.
You can add more than one condition participants must meet by clicking the plus sign ( + ) next to a condition. Click the minus sign ( – ) next to a condition to remove it. These conditions are evaluated cumulatively, meaning they are always joined by an implied “and.” (E.g., Condition one AND condition two must be met for a directory member to be uploaded to the participant list.) You can have up to 20 conditions for one participant automation.
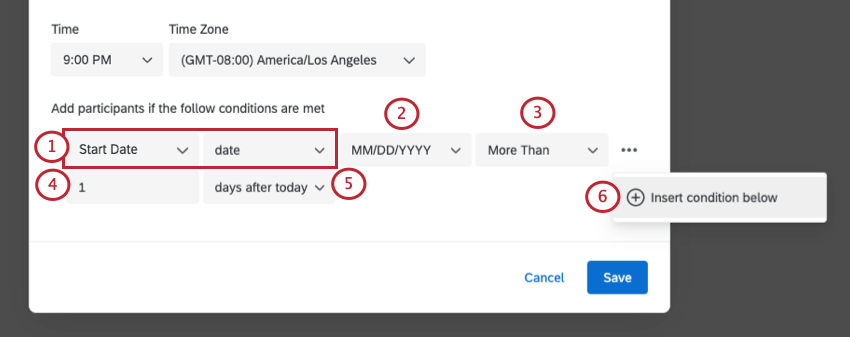
Date fields
For date fields, you can choose to import people whose date metadata value falls More Than, Less Than, or Exactly X amount of days before or after today. To import participants within a specific time window, you’ll need to use 2 condition sets to “sandwich” the time frame you want to import. Here we’ll walk you through setting up those conditions.
- MM/DD/YYYY
- MM-DD-YYYY
- DD/MM/YYYY
- DD-MM-YYYY
- YYYY-MM-DD
- YYYY/MM/DD
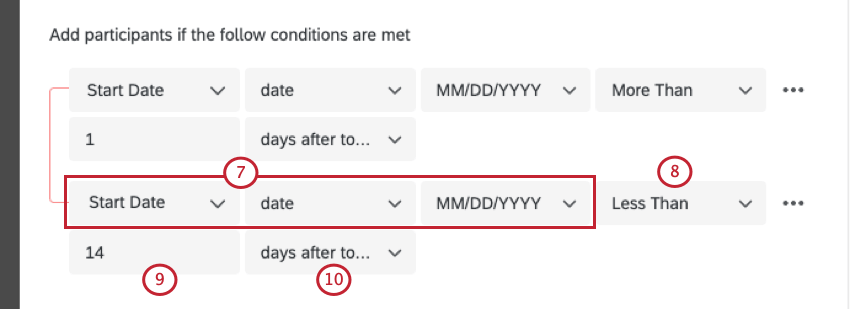
Example: Since we used More Than in our first condition, we’ll use Less Than for the second condition.
Example: Let’s say you want to import all participants from your Employee Directory who started working at your company within the last two weeks (the past 0-14 days). For your automation, you will have two conditions. The first condition is to import all participants with a StartDate that is Less Than 14 days before today. This will capture employees that started 14 days ago or sooner. The second is to import all participants with a StartDate Less Than 1 day after today. This will capture employees that started today or sooner. These two conditions create the upper and lower bounds of our import conditions, meaning that only employees with a StartDate within the last two weeks will be imported.
Number fields
Choose values that are Greater than or Less than criteria.
Text fields
Choose values that are Equal to, Not Equal to, In, and Not In criteria.
“Equal to” only includes participants with an exact value match. “Not Equal to” will exclude anything with that exact text.
Example: You only want to include employees whose “Department” is equal to “Engineering.” Only employees whose Department is equal to Engineering will be included. Not only would Sales and Marketing be excluded, but if you have a separate department named “Sales Engineering,” that would be excluded, too, because it’s not an exact match.
Qtip: If Not Equal to is used as a criteria, participants who have no value for the specified field will be included. For example, if criteria is set to import participants based on the metadata field “Manager” is Not Equal to “Yes,” participants with no value for the “Manager” metadata field as well as participants for which “Manager” does not equal “Yes” will be imported.
“In” and “Not in” can be useful when you’d like to include multiple metadata values in your criteria. Make sure these values are comma-separated, with no conjunction like “and” joining them.
Example: Let’s say you set criteria to match the “Department text in Sales, Marketing, Engineering.” If Barnaby’s Department is “Sales,” he’d be included in this automation. So would anyone with the Department “Marketing” or “Engineering.” Thus, “In” allows you to list several terms, decreasing the number of conditions you have to add.
 Qtip: “In” conditions search for the participant’s metadata value inside the criteria string, so it’s important to avoid criteria that might contain characters that unintentionally match metadata values. For example, if the criteria were “Department text in Sales, Marketing, Engineering” and the participant’s metadata was “T”, that person would meet the criteria because “T” exists in the string “Sales, Marketing, Engineering”.
Managing Existing Participant Automations
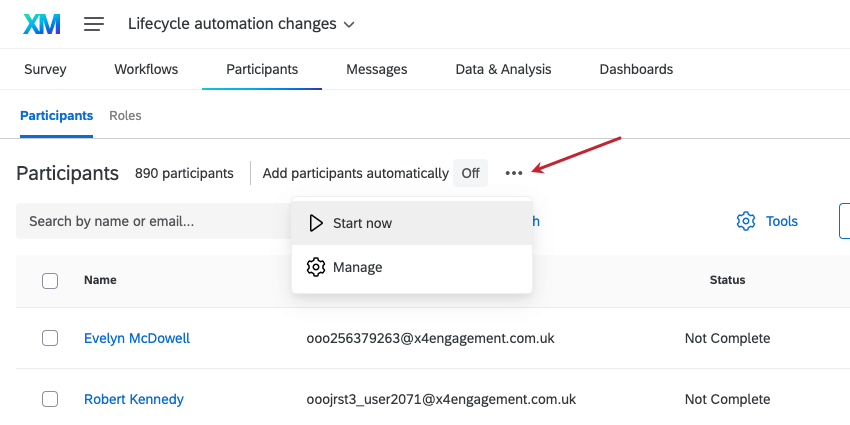
Existing participant automations will be listed at the top of the Participants section of the Participants tab. Here, you can see whether the automation is currently on or off. You can also click the menu next to the automation in order to choose from a couple options.
- Start now: Run the automation.
- Manage: Edit the automation. This lets you turn the automation on or off, edit the conditions, and change the timeframe.
That's great! Thank you for your feedback!
Thank you for your feedback!