
Closing the Loop
What's on this page
Setting up a “Close the Loop” Program in Qualtrics
Put simply, “closed loop” customer experience is when you are able to respond directly to customer feedback. Whether you run a call center, a customer feedback program, or an IT team, Qualtrics has resources available to create all kinds of closed loop programs. But with so many features at your disposal in XM, it can be hard to decide where to start. This support page will help you set up users, tickets, and connected surveys and dashboards for your closed loop program in Qualtrics.
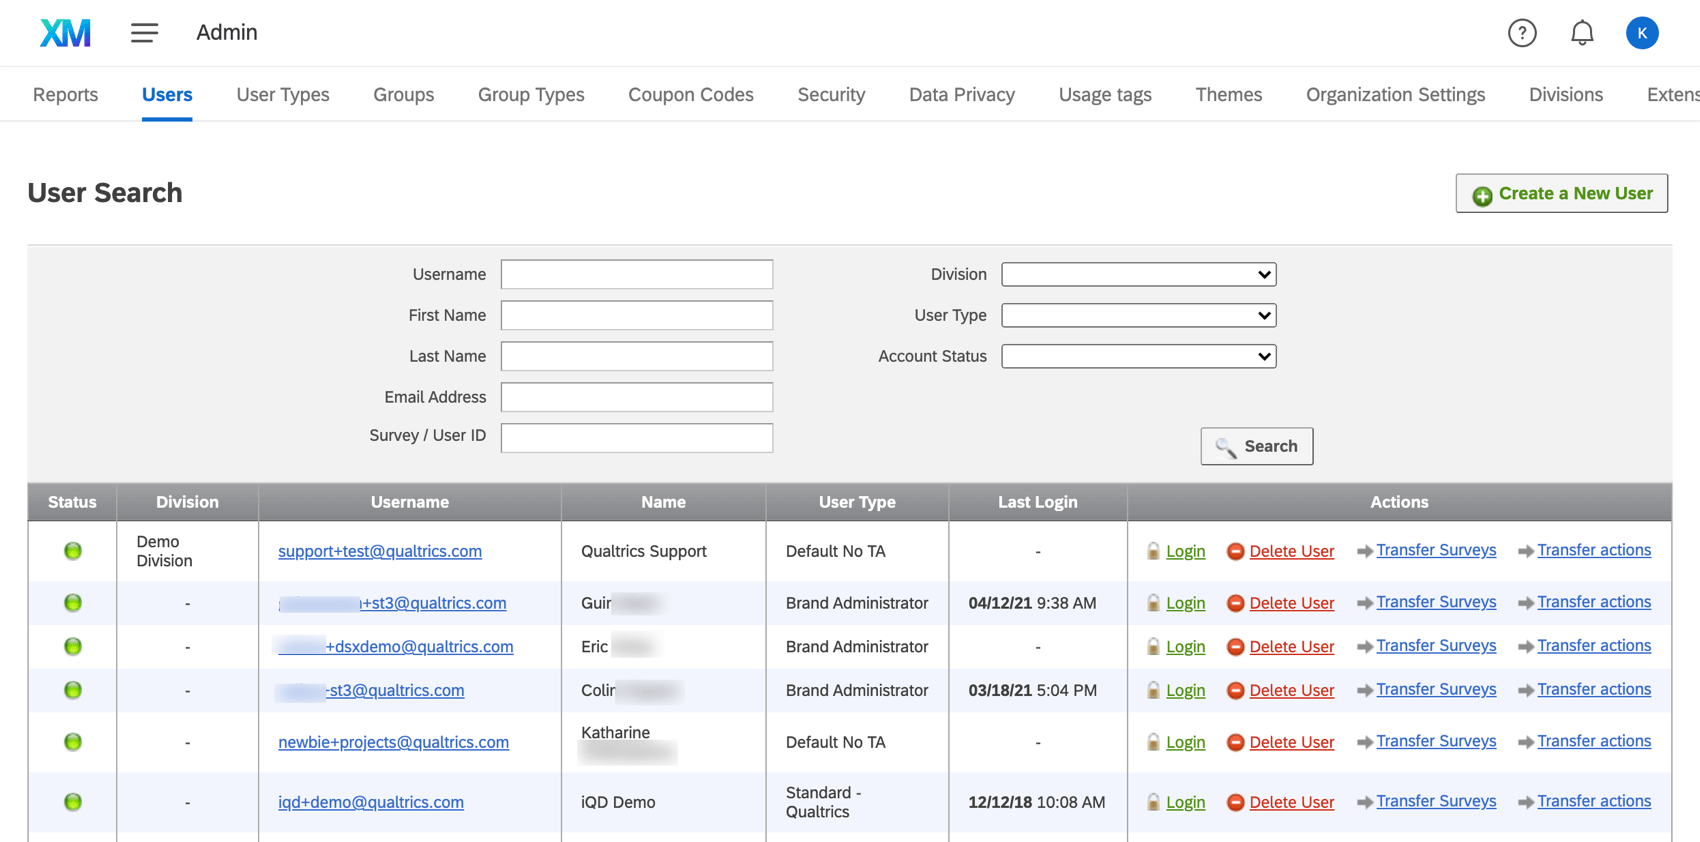
Initial Admin Setup and User Permissions
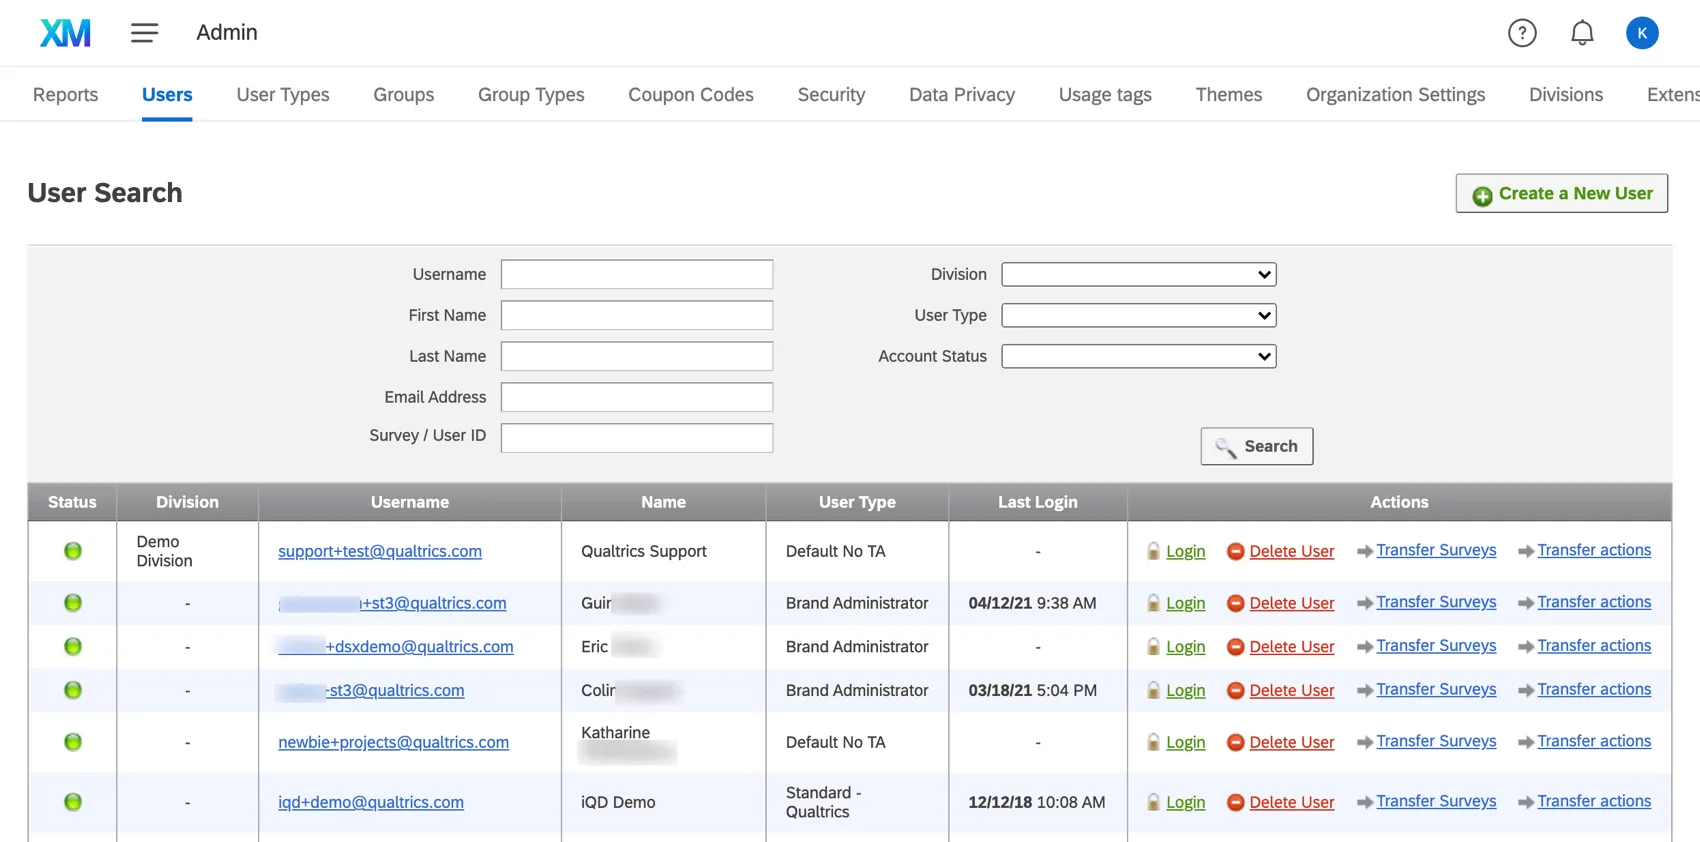
Creating a closed loop system requires you to set up the right users in your Qualtrics license. When creating (or editing) users, you’ll need to assign them the right permissions and / or user types. It can help by first thinking of all the kinds of users your program will need.
Qtip: A Brand Administrator will be needed to edit users, permissions, and user types in your brand.
- Users taking tickets: These are the representatives who will be taking and resolving tickets. Each of these employees needs a Qualtrics account. These users should at minimum have the Use Qualtrics Tickets permission enabled. Qtip: If you’re okay with these users also making their own surveys and distributing them, the Standard Account / Qualtrics – Standard user type can suit them. Otherwise, you may want to create a user type where “Use Qualtrics Tickets” is enabled, but all Survey Platform permissions as well as “Create CX Projects” are turned off.

- Someone to set up the intake survey and tickets settings: This person will need to be able to edit Qualtrics surveys and access to tickets. If building your own user type or customizing an individual user, then at minimum, they should have the following permissions enabled:
- Use Qualtrics Tickets
- Qualtrics Tickets Admin
- All Survey Platform permissions Qtip: If you are using the Standard Account / Qualtrics – Standard premade user type, you’ll still need to enable the Qualtrics Ticket Admin permission, since it is not included in that user type.
- Someone to set up the dashboards: These are users who create and edit dashboards for distribution to other stakeholders. We recommend giving these users the Vocalize User type, if they’ll just be making and distributing dashboards, or the CX Administrator type, if they should also have dominion over ticket settings. See Existing User Types for a more detailed description of these two types.
- Users who can view dashboards but not edit them: Stakeholders who view data, but don’t necessarily set it up themselves. The user who has been chosen to set up and distribute dashboards should see Sharing & Administering CX Dashboards at the end of the Getting Started with CX Dashboards
Closed Loop Surveys
How many surveys you include in your closed loop system will vary based on the needs of your program. We’ll go over some common examples in this section, but here are some general survey-building pages that can get you started:
Qtip: And remember, when you’re completely done editing your survey, be sure to publish those changes.
Intake Survey

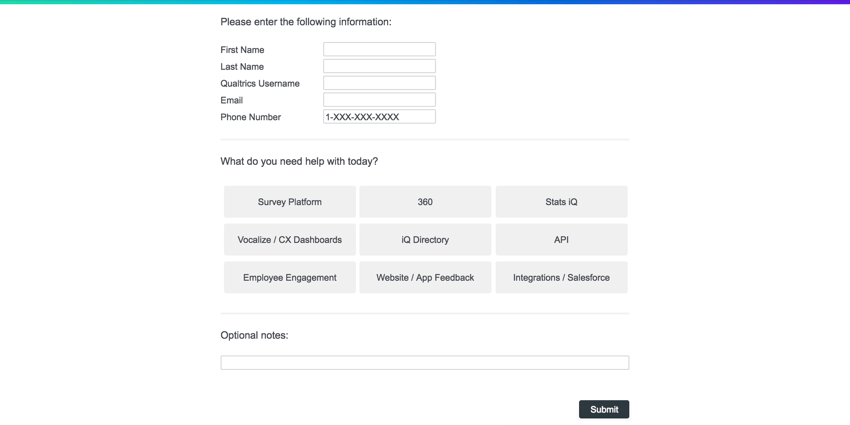
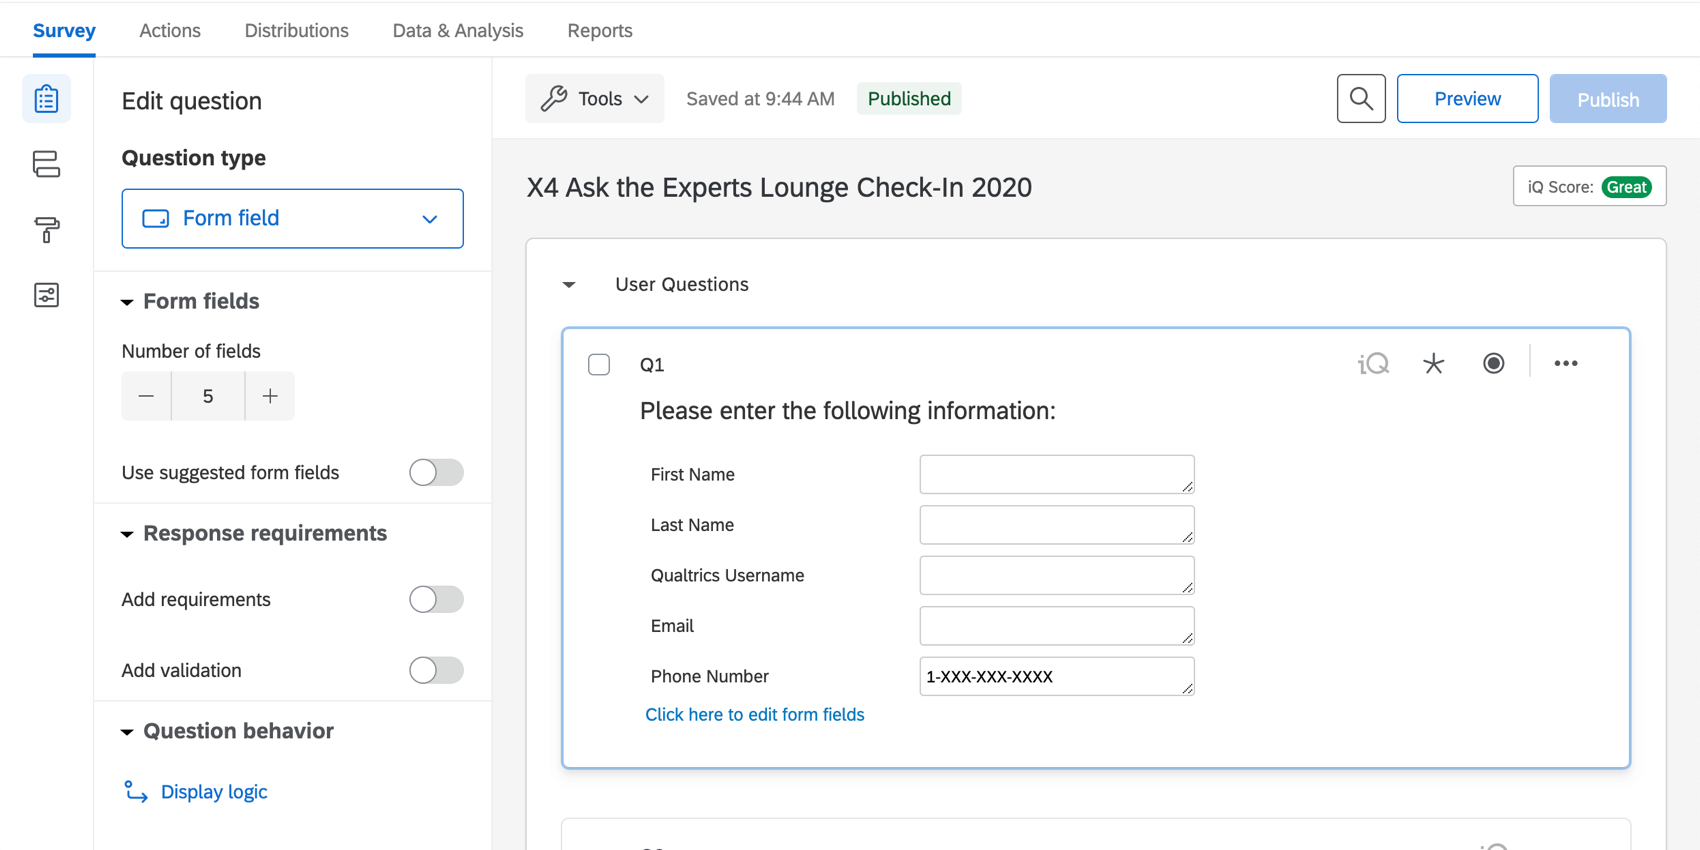
Chances are your program will need a place where everything starts. Where do customers submit support issues or product complaints? Where do employees or students request IT help or new equipment? Making an intake survey is the first step.
When adding questions to your intake survey, consider the following:
- Contact Information: Ask that the person submitting a survey response include their name, email, and phone number. Split out contact information as needed (e.g., work vs. home phone). Qtip: In Qualtrics, we advise splitting first and last name into separate fields, in case you want to create contact lists based on survey responses.
- Ticket Teams: What are the possible teams that will be addressing these issues? Think in terms of specialties, and include a question that helps to determine the team the request should be sent to. Example: Qualtrics splits support teams by the different software the representatives are specialized in: Surveys, CX Dashboards, Engagement projects, 360, and so on. That’s why we ask what software you’re working with when you submit a support request – so we can get you in contact with the right specialists.

- Vital Information: What information does your team need to help resolve the issues that come through this survey? Eventually, the representative will need to reach out to the customer and request more details, but are there questions you can ask that will help your team either get started troubleshooting or immediately resolve the request? Qtip: If you need to, you can use display logic to show certain questions only to relevant respondents. For example, you may ask whether the respondent needs help with hardware or software, and if they choose hardware, will provide a list of equipment, and if they choose software, provide a separate list of programs.
- Question Types: Keep question types simple: stick to multiple choice and text entry where possible. Furthermore, text entry should be reserved for asking respondents to describe their issues and soliciting open feedback or contact information. If you think you’ll need to visualize data in a graph, it should probably be presented as a multiple choice question. Example: Don’t ask for someone’s department in an open-ended format, or you’ll get a million versions of the same response. (Support, product support, Support Team, etc.) Instead, provide a list of departments to choose from.
- Question Validation: There might be a few optional questions in your intake survey, but overall, there are probably a lot of fields that should never be left blank. After all, how do you follow up with a customer if you don’t know their email address or have a basic description of the issue? Consider adding Force Response or other validation to many if not all of your questions.
- Indicating Progress: This step is optional, but can help make a survey look less intimidating to respondents. Give respondents an idea of where they are in the survey by displaying a progress bar or question numbers, or have a submit button on the last page to indicate when the survey is complete.
- Confirmation Emails: Use an email task to give your customer a receipt or confirmation that their request has been submitted. Qtip: You can also generate a random ID and send this to the customer in the receipt so they can track the issue if needed. Make sure to follow the directions on the linked support page to save this ID as embedded data so it’s saved with the response. Make sure you also include this random ID as ticket data.Qtip: Make sure the event of this workflow is survey response creation and that you pipe in the respondent’s email address in the “to” field.
For an example of an intake survey, check out your Customer Success Hub in Qualtrics, or look at the check-in survey we built for our Ask the Experts setup at X4.
Other Surveys
Some other surveys to consider in your closed loop system:
- Soliciting Feedback: Some sort of follow-up survey triggered when a ticket has been resolved, such as a CSAT or NPS survey. See an example of how we created a survey soliciting feedback for our Ask the Experts setup at X4.
- Updating Tickets: An internal survey that representatives take to submit ticket updates or escalations. Make sure when you build your survey, you ask respondents for a ticket key and create questions (most likely text entry) for the fields you’ll allow representatives to edit in their tickets.
The Teams Taking Tickets
In Closed Loop Surveys, we mentioned that it’s important to think about the people who will be taking and resolving the tickets in your closed loop program. These are your representatives, the people who fulfill the requests described in the tickets.
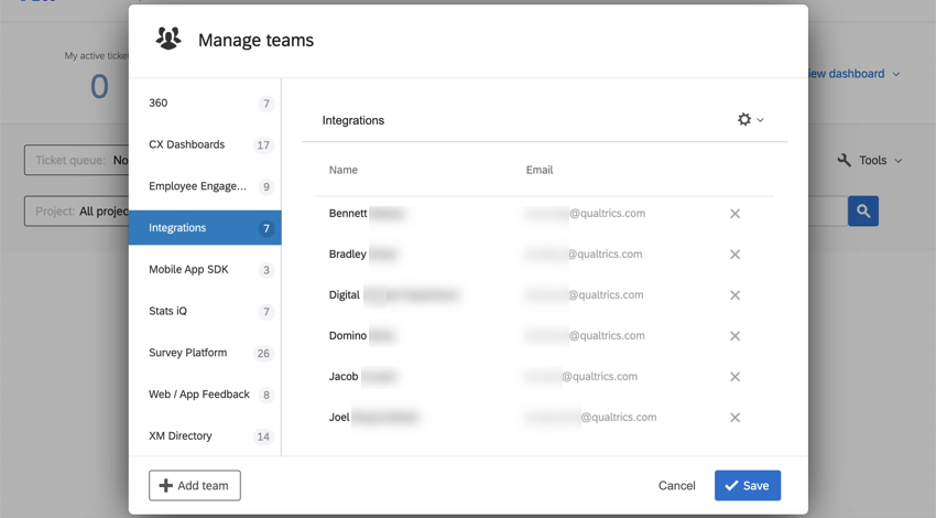
What are the possible teams, or groups, that will be addressing these issues? Think in terms of the types of issues your specialists are trained to resolve. You may have three teams taking IT tickets, but is there a difference in the type of issue each team can help with? Are they specialized in different products your company offers? Is there a team that can help with hardware equipment vs. one that troubleshoots software setup?
Example: Qualtrics splits support teams by the different software the representatives are specialized in: Surveys, CX Dashboards, Engagement projects, 360, and so on. That’s why we ask what software you’re working with when you submit a support request – so we can get you in contact with the right specialists.
General Setup
Example: A multiple choice question that asks, “Which of the following relates to your support request?” and then displays a list of possibilities they can choose from.
Qtip: Assigning a team doesn’t have to be as simplistic as an answer to a single survey item – just make sure you know what questions or embedded data you will use to determine ticket assignment.
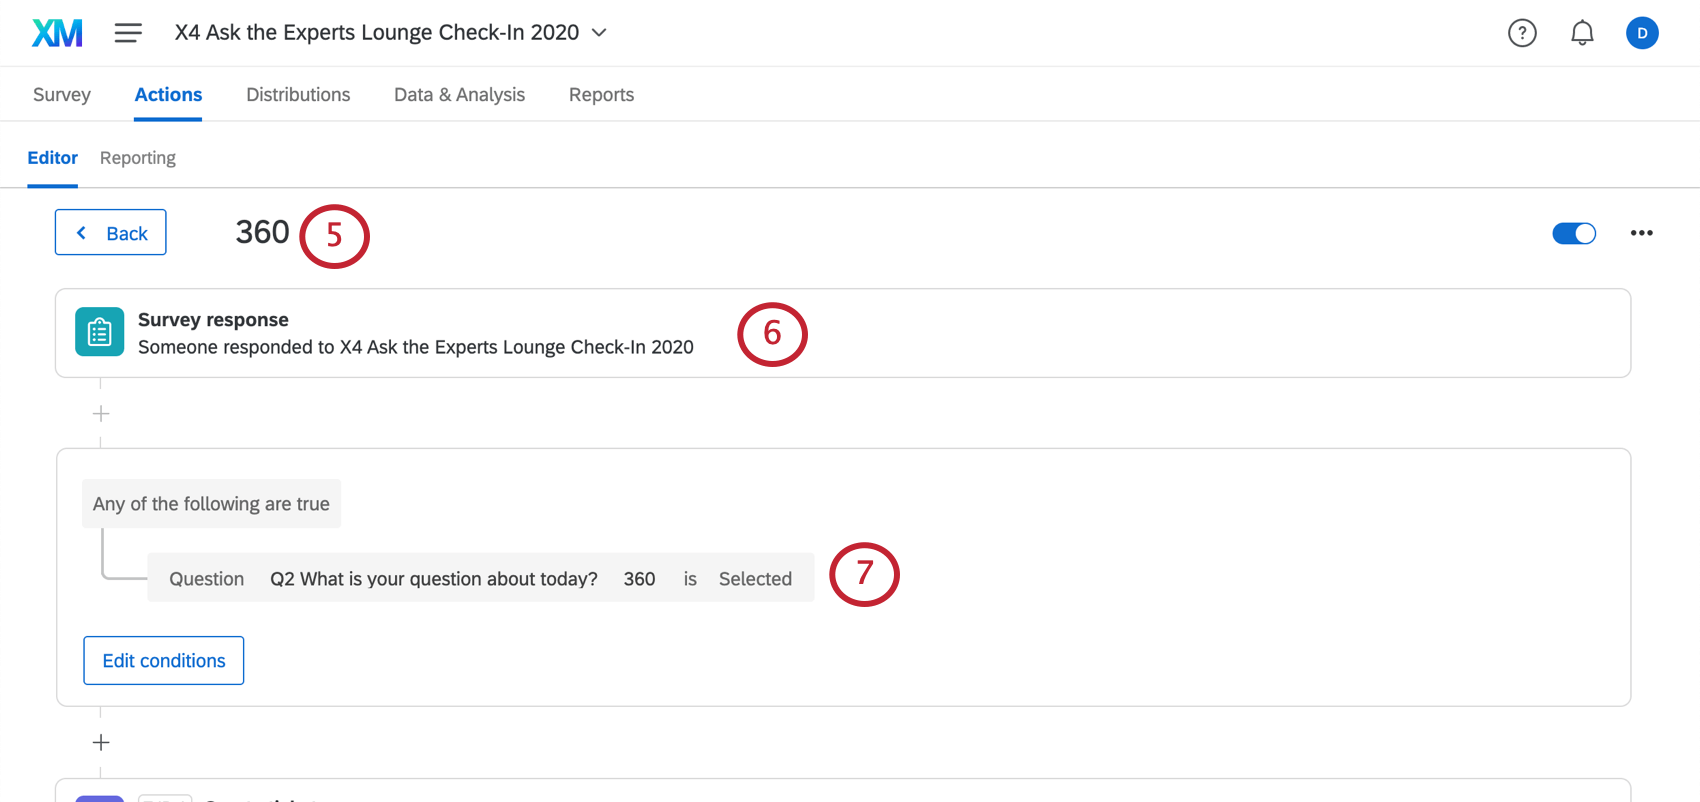
Example: If respondents select “360” in response to Q2, “What is your question about today?”
Qtip: You may need to type a team’s name and press Enter on your keyboard before it appears in the dropdown.
Qtip: We also have some additional advice on ticket setup on our Ask the Experts page.
Considerations when Building a Tickets System
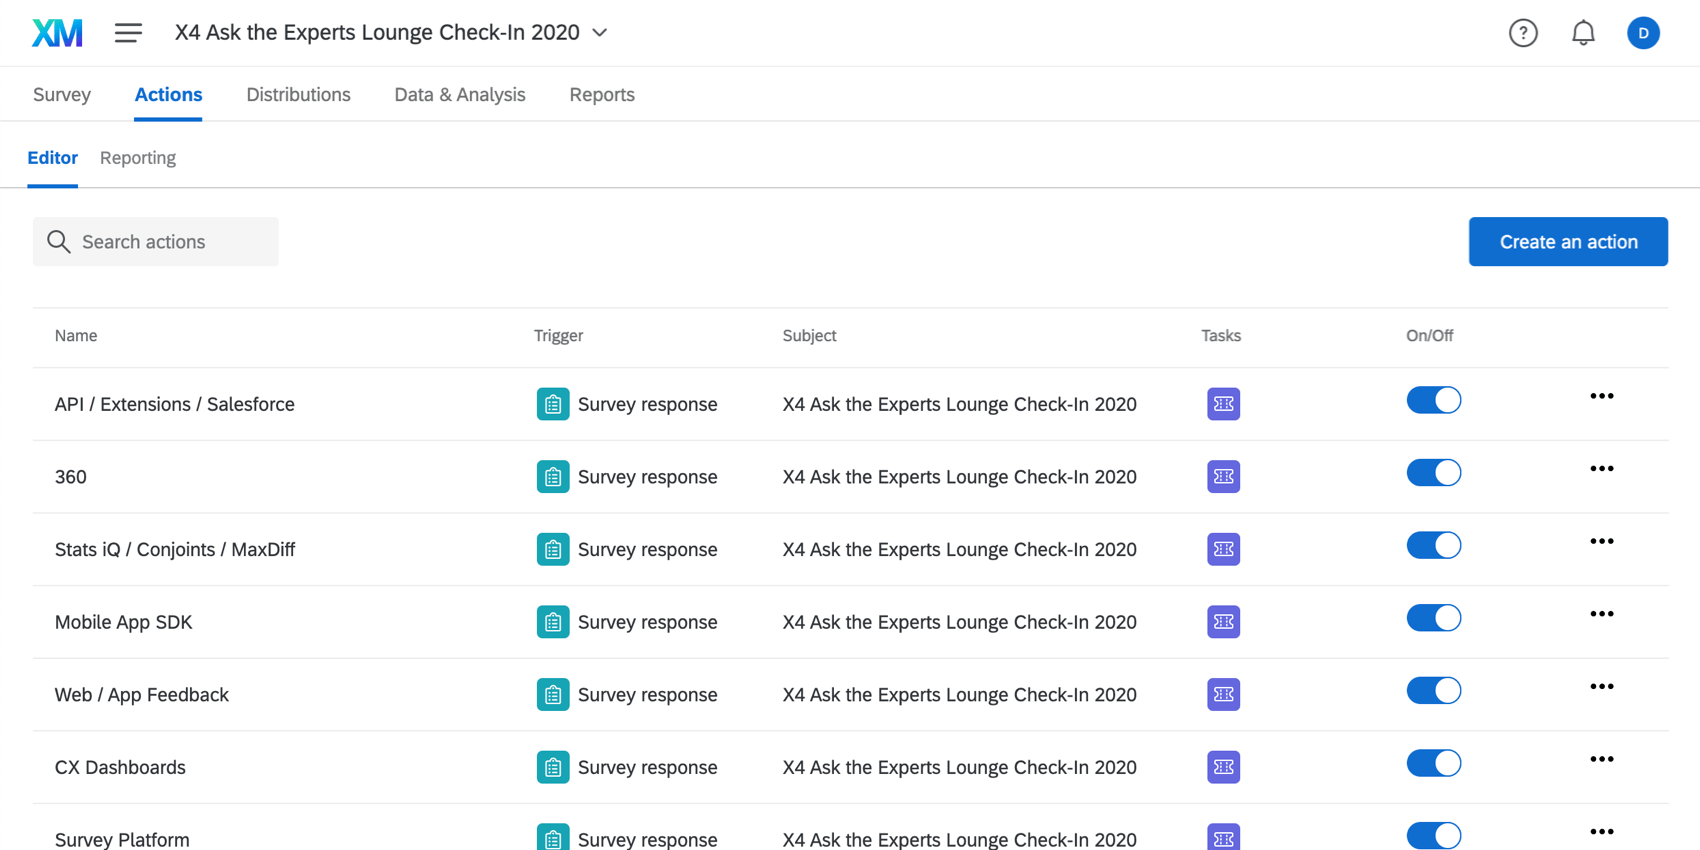
Tickets in Qualtrics have a ton of different capabilities. In this section, we go over how some of these features can benefit you and your ticket-taking teams. We split features up by the kind of user who can implement them.
Additional Ticket Setup

This section covers changes the person editing the intake survey will have to consider, especially during ticket setup.
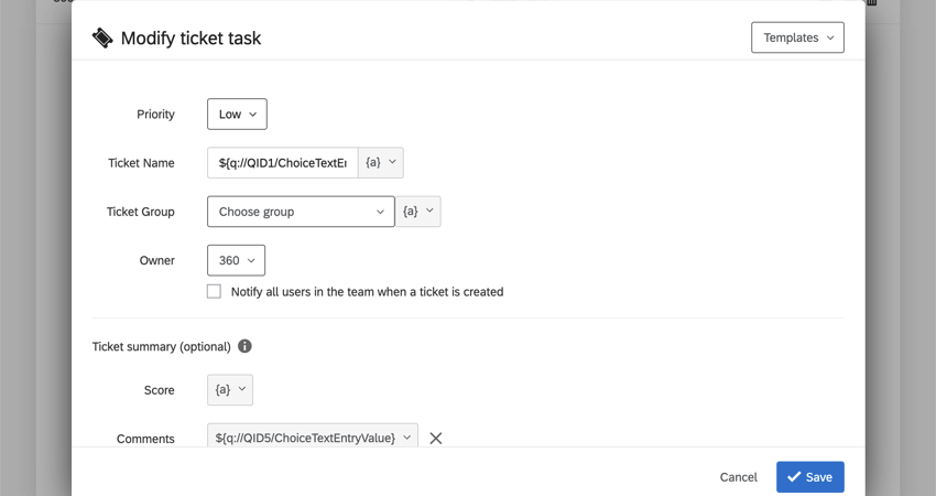
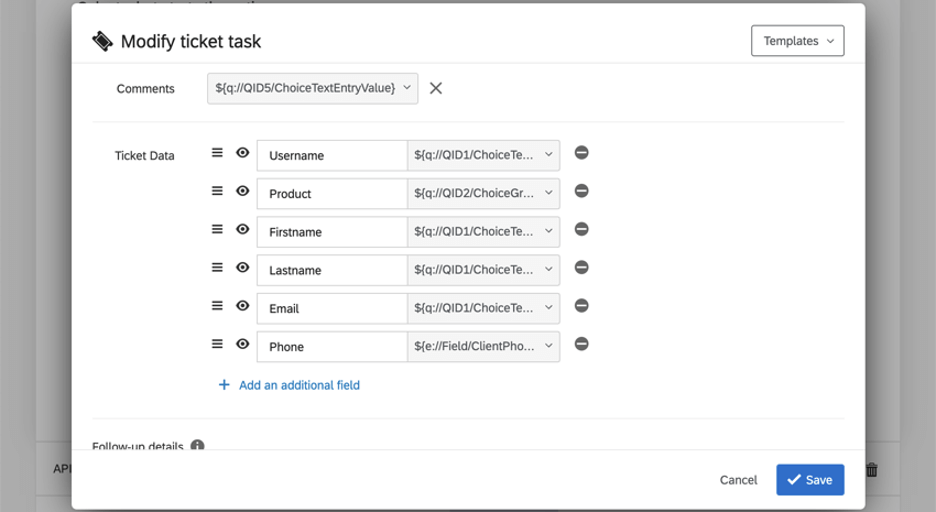
- Carrying specific fields from the survey: How much information do your teams need before they can resolve a ticket? You’ll want to carry information respondents submitted to the intake survey into the tickets created. For individual fields, consider including ticket data. This allows you to pull over values from the survey, such as the name and contact information the client provided, their username or ID, what they need help with, and more. Ticket data can also be reported on in dashboards. Qtip: Ticket data also affects some of the options an admin would implement to improve the tickets experience, such as ticket queues and workflows.
- Making entire survey responses available: To make an entire survey intake response available to your team, you may want to try dynamically linking responses instead of adding a ton of ticket data. This requires more detailed survey setup, but can be valuable to your respondents if they need a lot of information. Qtip: Fields that you want to be able to connect to tickets for reporting purposes should always be added as ticket data. For example, if you want to show a table of tickets with client usernames attached, or be able to search issue descriptions by ticket priority. For fields you don’t need to be directly tied to ticket-specific information, you can separately report on survey data in the dashboards, meaning no ticket data is required.
- Setting a recipient’s email on the ticket: Will your ticket takers be emailing back and forth with clients right inside the ticket? This can be a great way to log client interaction in one place. You will want to use ticket data to set a default follow-up for ticket email interactions. Follow the steps at the link. Qtip: Ticket, Brand, and CX Admins can enable this ticket emailing feature in ticket settings.
- Additional alerts based on ticket changes:
- Use ticket events to send emails or SMS to customers when their ticket has been assigned. Here’s an example of how we implemented this at X4’s Ask the Experts.
- Use ticket events to send follow-up emails, such as NPS or CSAT, to customers after a ticket has been resolved. Here’s an example of how we implemented this at X4’s Ask the Experts.
Ticket Admin Considerations
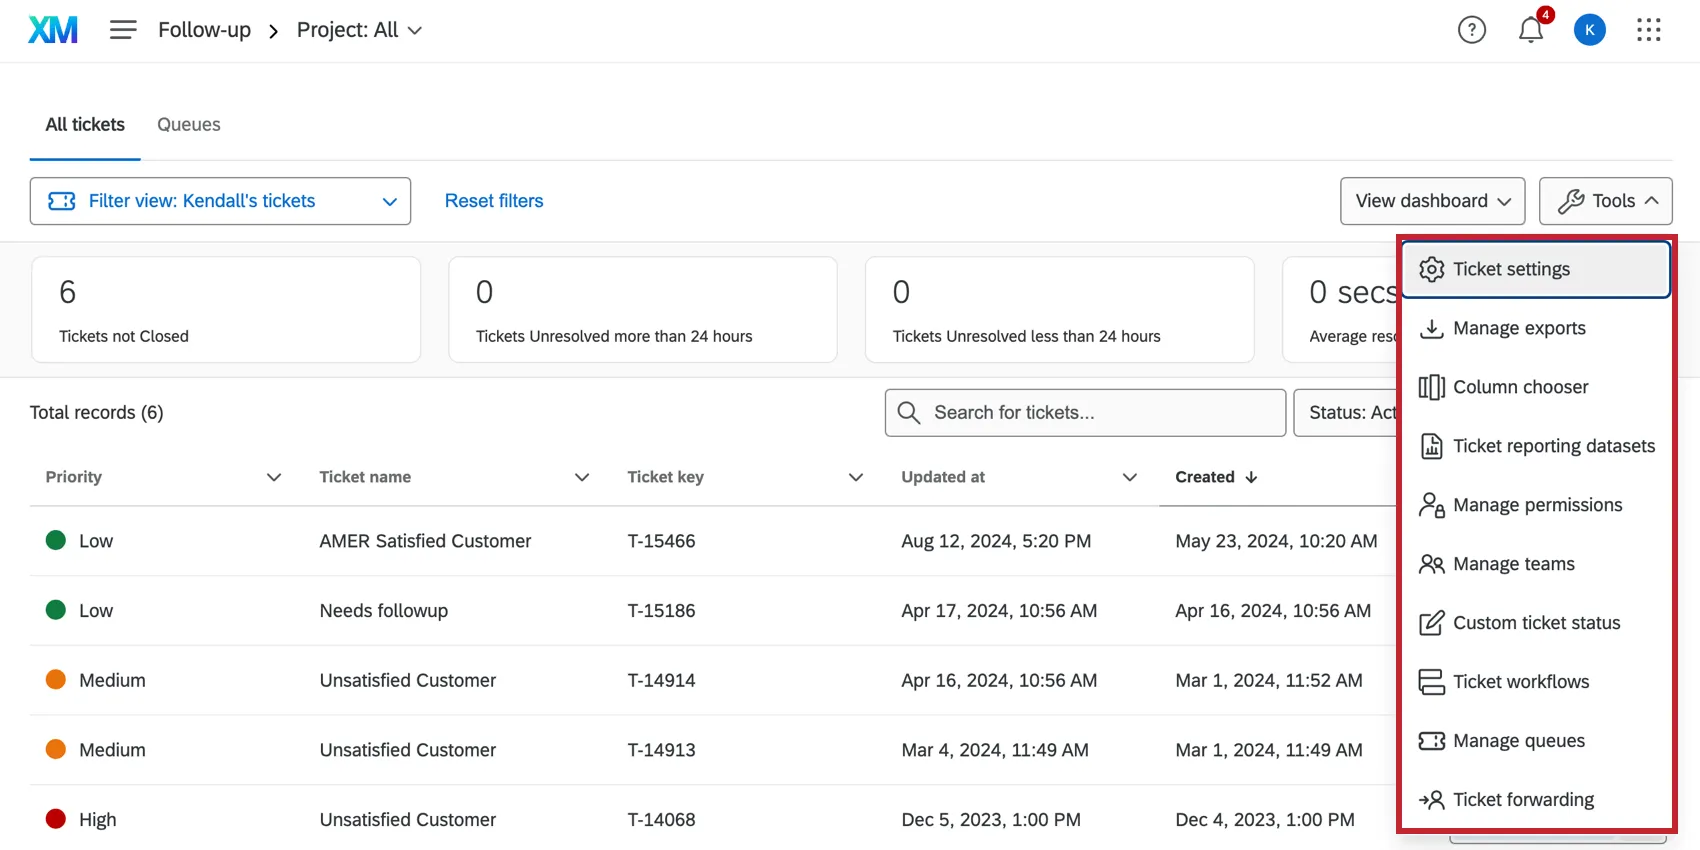
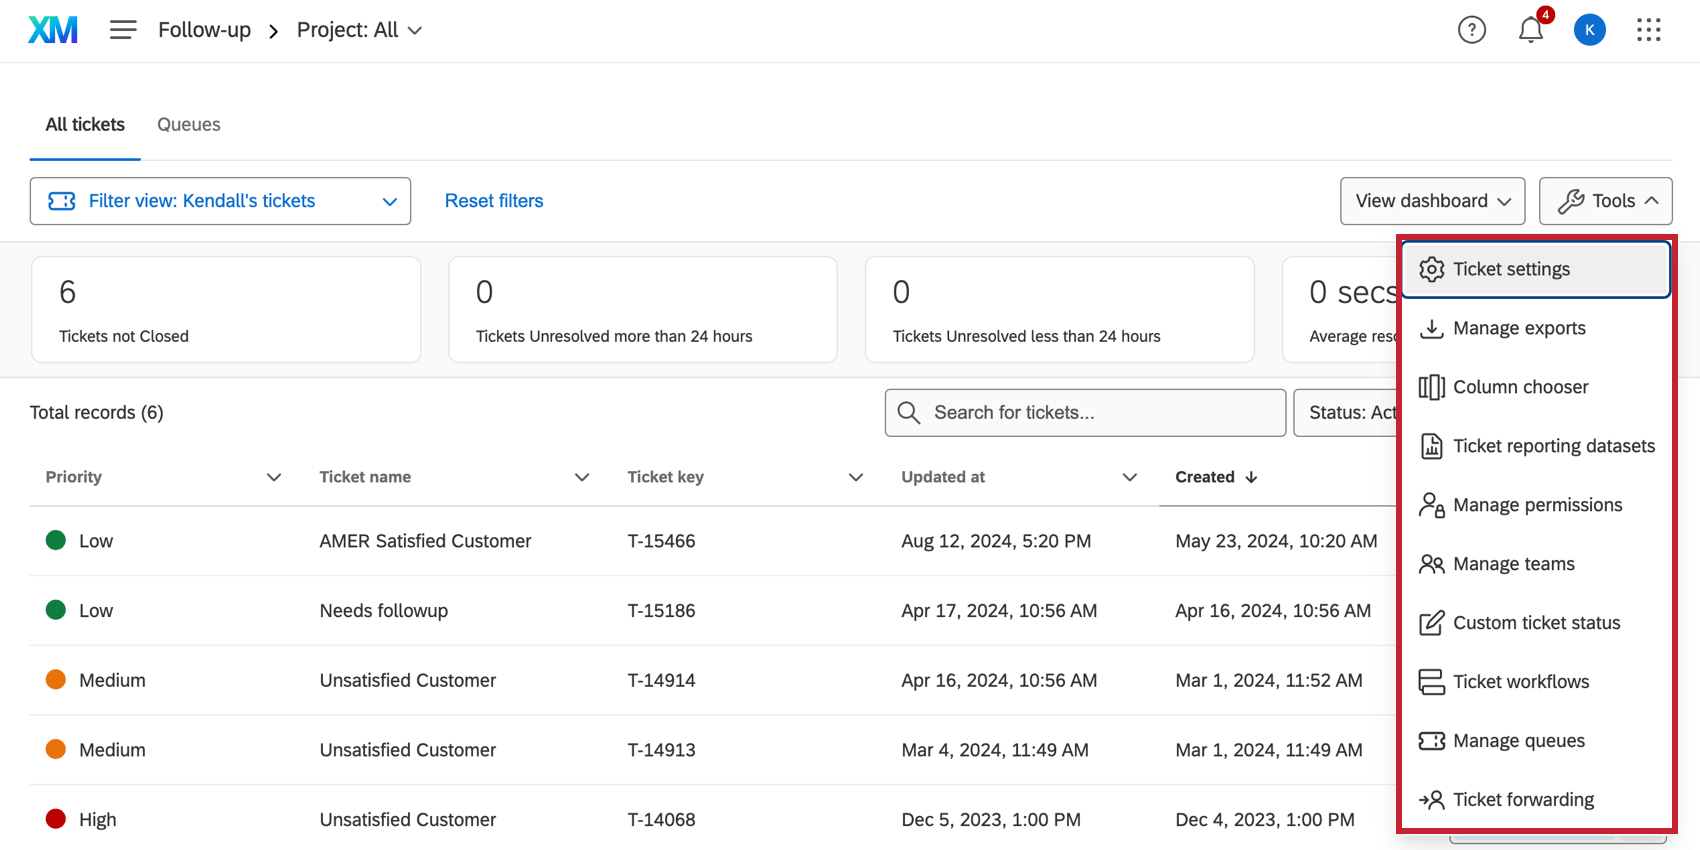
These are changes that will improve your ticket takers’ experience, and must be implemented by a Ticket Admin, CX Administrator, or a Brand Administrator.
- Custom Statuses: To start with, every closed loop program in Qualtrics has the basic open, closed, and in progress statuses. But you can add new statuses as needed and create rules around how they can be changed on a ticket. Qtip: Custom statuses can impact your workflow and forwarding setup, described in the bullets below.
- Ticket Queues: If you have several teams taking tickets, or have different categories of requests that tickets can fall into, you probably want to use ticket queues. Once set up, this feature makes it easy for users to take tickets associated with certain teams or types of requests.
- Ticket Workflows: Ticket workflows are a great tool for keeping your team tied to an SLA, ensuring tickets don’t go unresolved for long periods of time. Reassign a ticket to a different team or person, change the ticket’s status, or send an email reminder after X amount of time has passed. You can also modify the conditions of these workflows using additional information, such as the team, ticket priority, survey of origin, ticket data, and so on. Qtip: Workflows may also affect your ticket setup – for example, if you want to use ticket data to limit when workflows happen, you need to make sure that data is included in your ticket setup and thus available on tickets.
- Ticket Forwarding: Make sure your ticket takers or shift-schedulers know who their ticket admin is, because when employees are out of office, you can set up forwarding. If someone tries to give the employee tickets while they’re gone, the tickets will be assigned to someone else. Qtip: Tickets picked up before going out of office are not reassigned. For these tickets, consider custom statuses or time-based workflows.
- Ticket Settings: Ticket settings have a ton of cool features that can benefit your users, and so it’s important to be sure to review them all. Some highlights include:
- Letting users send emails from a ticket, so email conversations with the client are recorded on the ticket.
- Making tickets available for export. (Note: This export includes all tickets in your Qualtrics license.)
Reporting on Tickets and Other Program Data

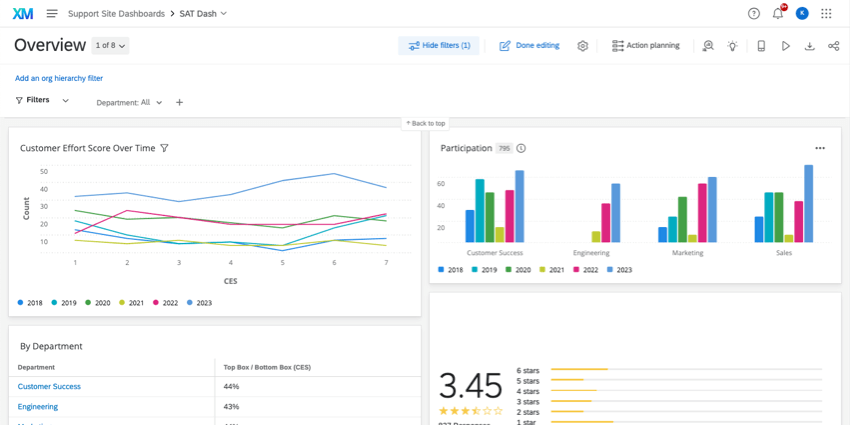
The most effective way to report on tickets is with CX Dashboards. For a guide to ticket reporting in dashboards, complete with example widgets, see the Ticket Reporting support page.
To report on the data from an intake survey or feedback survey, you can also use CX Dashboards. Check out these introductory pages to get started.
FAQs
How can I change the background/theme of my survey?
How can I change the background/theme of my survey?
How do I test my survey before sending it out?
How do I test my survey before sending it out?
To learn more, visit our page on Testing and Editing an Active Survey.
Are there any fields I cannot report on with Ticket Reporting in my CX Dashboards?
Are there any fields I cannot report on with Ticket Reporting in my CX Dashboards?
Why can't I see data in the widgets on my Ticket Reporting CX Dashboards page?
Why can't I see data in the widgets on my Ticket Reporting CX Dashboards page?
When I click the link, I see an old version of my survey! Are my changes not being saved?
When I click the link, I see an old version of my survey! Are my changes not being saved?
Next, check whether you have Allow Respondents to Finish Later turned on in your Survey Options. If you've been testing out your survey on the Anonymous Link while you make edits, then you're seeing an old version of the survey because a cookie was placed on your browser to save your progress. Open your Anonymous Link in an Incognito Window or a Private Window. If this window has your changes, then Save and Continue is just saving your place, and you don't have to worry about brand new respondents seeing an old version of the survey.
(Note: We recommend testing your survey using your preview link instead of your anonymous link for this reason.)
How do I require a respondent answer a question?
How do I require a respondent answer a question?
That's great! Thank you for your feedback!
Thank you for your feedback!