-

Qualtrics Platform -

Customer Journey Optimizer -

XM Discover -

Qualtrics Social Connect
Building Journeys
About Building Journeys
A journey represents a customer’s engagement workflow with your organization. In other words, journeys describe the end-to-end experience that your customers (or other people of interest) have when interacting with your company. The journey can be a single step, a sequence of ordered steps, or a web of interlocked steps that respond dynamically to the customer’s activity to ensure the best outcome at each touchpoint.
Journeys are made up of individual milestones. A milestone is an important touchpoint in the customer journey (e.g., when the customer creates an account, or when the customer contacts your support team) as they attempt to reach an outcome. Movement along a journey is not necessarily linear. Customers can move forward and backward along the journey as they meet the different milestone criteria.
Planning Your Journey
It’s important to plan your journey’s purpose before building it in Qualtrics. While planning your journey, ask yourself the following:
- Which data systems have the information I need to build my journey?
- Which fields from my data systems are important for this journey?
- What actions should result from this journey?
Example: Let’s take a look at an example journey and how we’d answer the above questions:
- Customer Journey: When a customer completes onboarding, the account manager should be notified and the customer should be automatically added to the new customer marketing campaign.
- Which data systems have the information I need to build my journey? My company uses a SQL database to store customer information about how they use the product. We use Salesforce to manage our accounts, so we’ll need to connect to Salesforce to pull in the account manager information. We’ll also need to connect to Marketo since we use that to manage our marketing campaigns.
- Which fields from my data systems are important for this journey? We need onboarding data from our SQL base, which is stored as a true/false event indicating if onboarding has been completed. We also need the Account Owner field from Salesforce to notify the account owner. To add the customer to the Marketo campaign, we’ll need the Campaign field from Marketo.
- What actions should result from this journey? The account owner from Salesforce should receive a notification, and the customer should be added to a campaign in Marketo.
Overview of Building a Journey
This section contains a high-level overview of the steps needed to launch a successful journey. Visit the linked sections and pages for more information:
- Create the journey.
- Add entry criteria.
- Add global rules.
- Build journey milestones.
- Preview your journey results.
- Test using shadow mode.
- Publish the journey live.
This page focuses on the building the main components of your journey:
- Journey entry criteria are rules that determine if the traveler can enter the journey.
- Global rules are rules that are applied to all travelers who pass the entry criteria. You can use these to generate an action to any traveler who enters your journey.
- Milestones are the individual touchpoints along a journey. Each milestone can have its own set of entry criteria and rules.
Creating a Journey
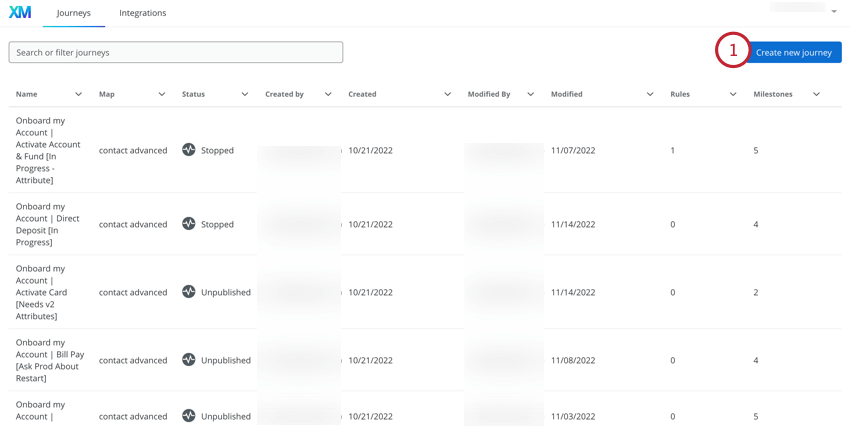
- In the Journeys tab, click Create new journey.
- Give your journey a unique, identifiable name.
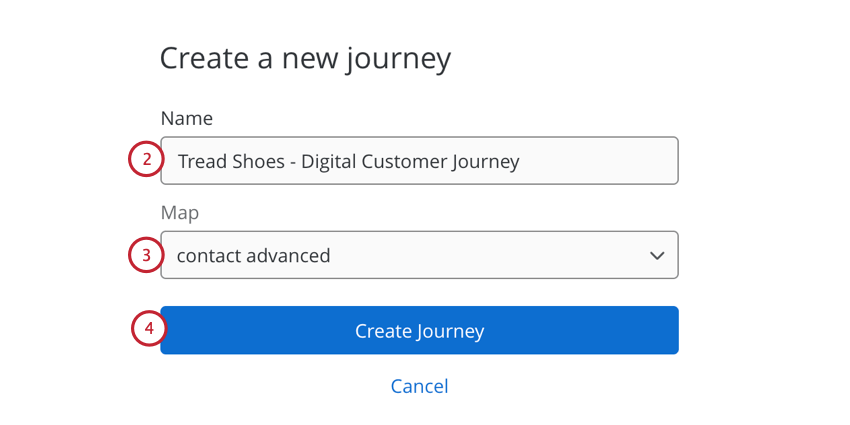
- Select the Map that contains data to be used in the journey. See Creating Maps for more information about maps.
- Click Create Journey.
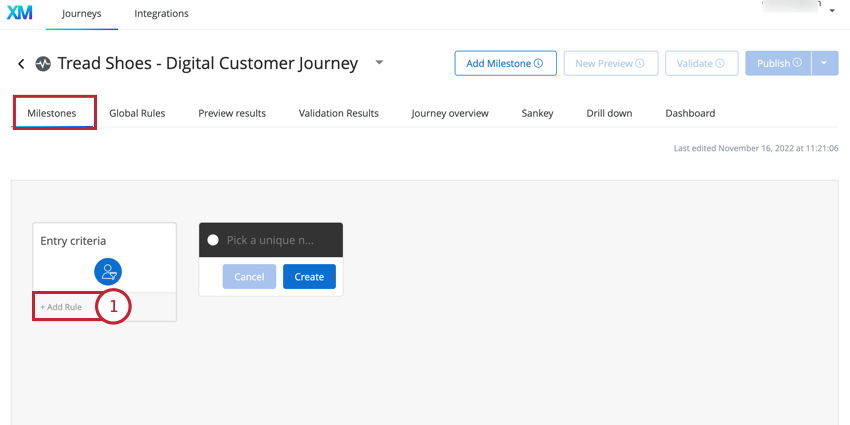
After creating your journey, you’ll be brought to the Milestones page to build your journey’s entry criteria and milestones.
Journey Entry Criteria
Journey entry criteria are rules that determine which travelers and event data can enter the journey. While entry criteria are optional, it’s recommended you add entry criteria to your journey to limit the number of travelers that enter the journey, decreasing the amount of time it takes to process new travelers. You should use journey entry criteria to pull in only the event data and travelers that are relevant for the customer journey you are targeting.
Journey entry criteria should include the conditions that are common across all milestones. Rather than repeating these conditions within each individual milestone, these conditions can be included in entry criteria, simplifying the rules in your milestones.
- In the Milestones section of your journey, click Add Rule in the Entry criteria box.
- Give your set of rules a name.
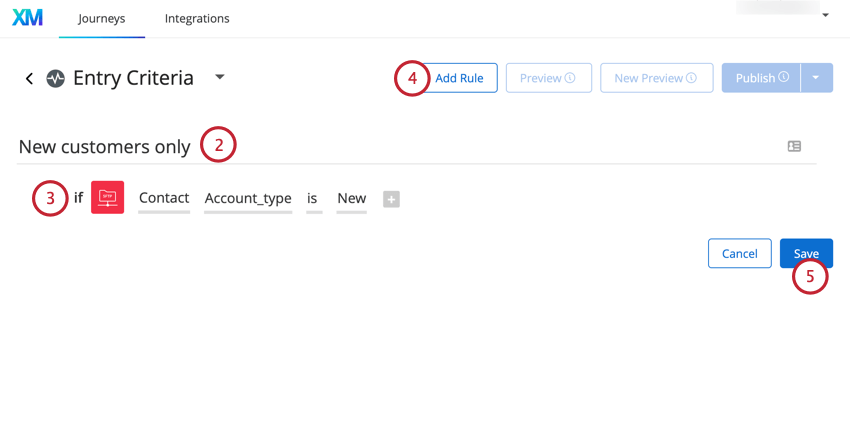
- Start building your rules. See Customer Journey Optimizer Rules Overview for an in-depth guide on building rules.
- To add another rule, click Add Rule.
- When finished, click Save.
Global Rules
Global rules are rules that apply to all travelers who enter your journey. In other words, these rules apply to all travelers who meet your entry criteria. To build your global rules, go to the Global Rules section of your journey.
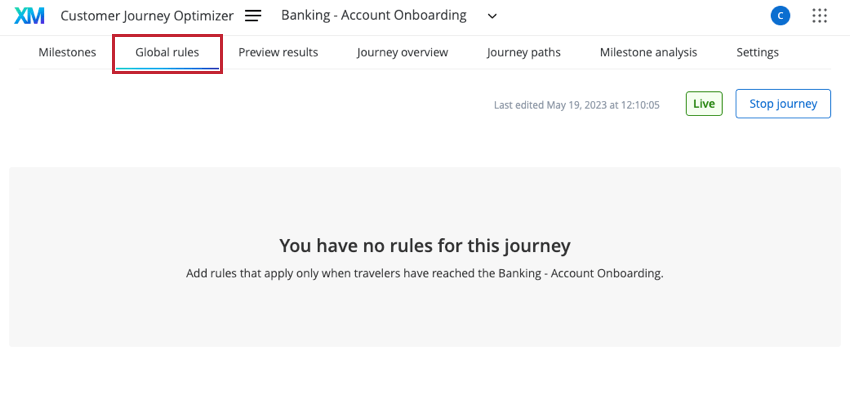
Building a global rule functions the same way as building a rule in a milestone, except that you do not define entry criteria for global rules. Instead, the entry criteria for your global rule is the entry criteria for the journey. See Building Rules for step-by-step instructions on creating rules.
Building Journey Milestones
Milestones represent the multiple touchpoints throughout the journey and rules determine how customers move between journey milestones.
When a traveler enters a journey, the journey milestones are evaluated from right to left. As a best practice, you should configure the milestone with the most exclusive rules to be the right-most milestone in your journey.
To build your journey:
- Navigate to the Milestones tab of your journey.
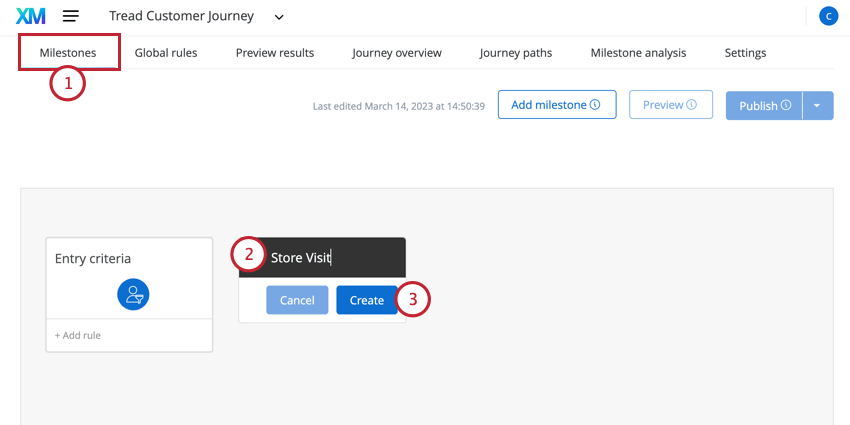
- The first milestone will be automatically added to your journey. Click on it and begin typing to name your milestone.
- Click Create.
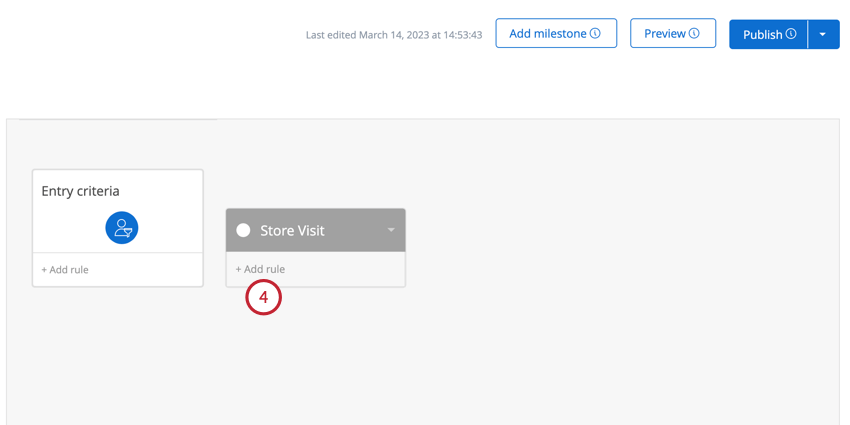
- Underneath your newly added milestone, click Add rule.
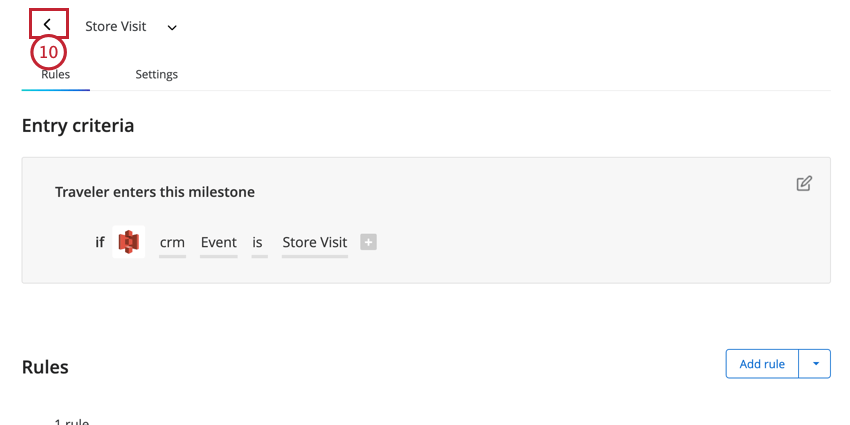
- In the Entry criteria section, create the entry criteria rules for your milestone. These rules must be true for a traveler to enter the milestone. When building your entry criteria, you can use the most recent event data or traveler session variables. See Building Rules for more information.
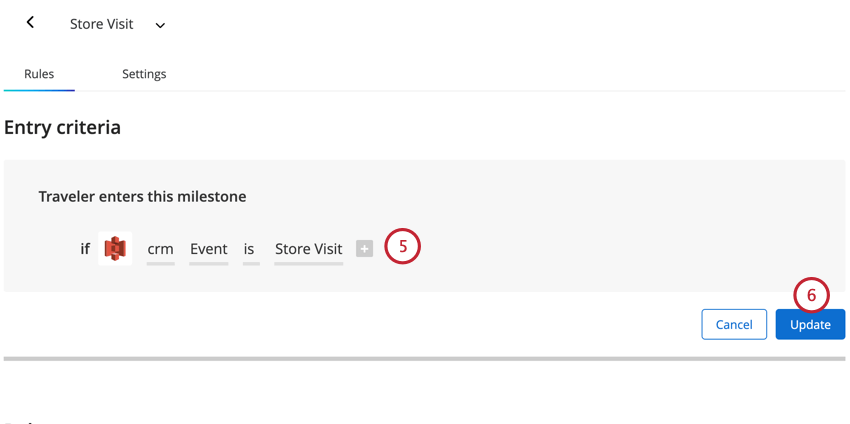
- When finished building entry criteria, click Update.
- In the Rules section, create the rules for your milestone. Often, this contains the action you want to take as a result of the traveler entering the milestone (e.g. sending an email or updating Traveler data). See Building Rules for more information.
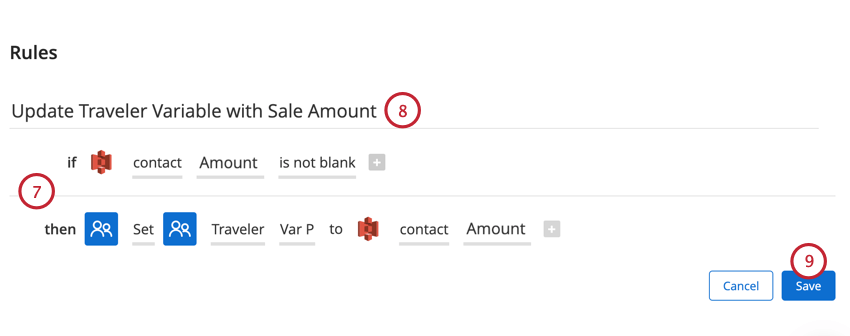 Qtip: You can add up to 40 rules in your milestone, however most milestones need only 1 or 2.
 - Give your rule a name so you know what it does.
- When finished building your rules, click Save.
- Click the arrow next to your milestone’s name in the top-left corner.
- Click Add milestone to add additional milestones. You can add up to 20 milestones in a journey.
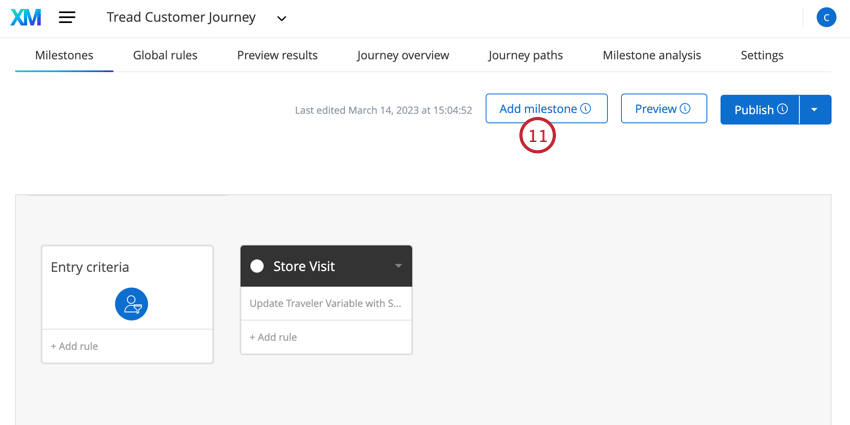 Qtip: While you can add up to 20 milestones to a journey, it’s best practice to have between 3 to 5 milestones in a journey.
Milestone Customization
This section covers the different customization options available when building journey milestones.
Milestone Options
On the Milestones page, click the arrow in the top right corner of a milestone to view a list of options: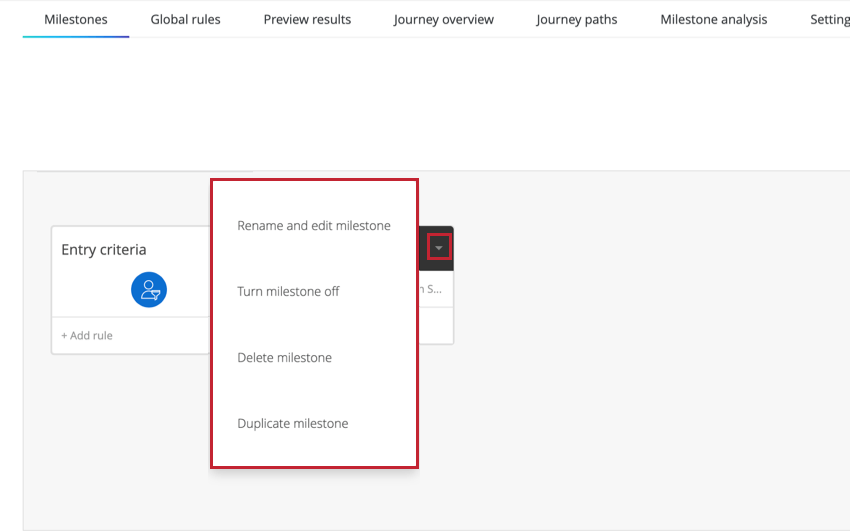
- Rename and edit milestone: Change your milestone’s name and edit its entry criteria and rules. While editing your milestone, hover over its name and click the pencil icon to change the milestone’s name.
- Turn milestone off: Disables the milestone in your journey. Milestones that have been turned off will be grayed out on your journey.
- Delete milestone: Removes the milestone from your journey.
- Duplicate milestone: Copies the milestone. This option is useful for reusing complicated rules so that you do not have to rebuild them.
Milestone Settings
While editing your milestone, go to the Settings tab to manage your milestone’s behavior: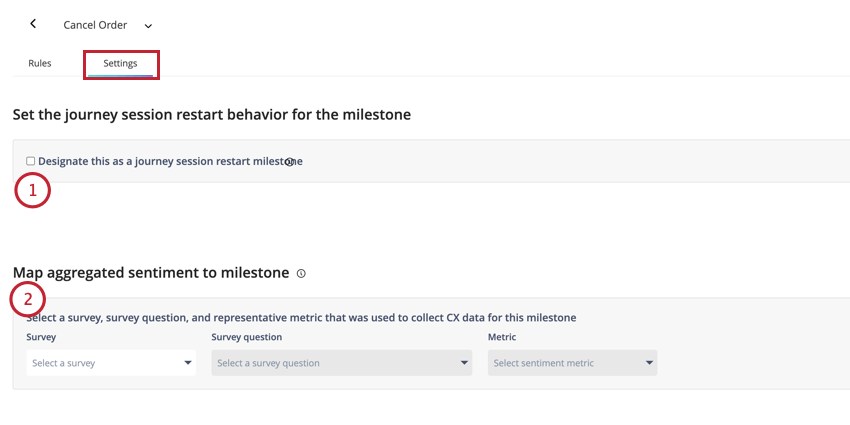
- Designate this journey as a session restart milestone: This option is disabled by default. When enabled, if a traveler re-enters this milestone (i.e., leaves the milestone and then comes back to it) once their journey has already begun, then their journey session will end and a new one will begin. When their session restarts, their previous journey session is set to “Incomplete.”
Qtip: This option is useful if you expect travelers may end up back at the beginning of your journey. One common example is the journey a customer makes when they call your live support team. If they call once and then call again about the same issue, you can capture that by restarting their journey session when they call your support team a second time.
- Map aggregated sentiment to milestone: This option allows you to display a CX metric along with your milestone data. See Milestone Analysis for more information.