
Action Planning Basic Overview (EX)
What's on this page
Qtip: This page describes functionality available to Engagement, Pulse, and Lifecycle projects. For more details on each, see Types of Employee Experience Projects.
About Action Planning
Action Plans are initiatives you can create based off your lowest areas of engagement. They allow you to assign tasks and plan resolutions to some of your company’s biggest issues with employee experience. For example, if employees disagreed that they were adequately trained, a larger-scale action plan could be to implement a new training program.
However, there are several steps to action planning, when you take into account who is involved and what reports to build. In general, you will need to complete the following steps:
- Enable action planning in your dashboard settings. Here, you also:
- Customize the fields on your action plans and other such settings (optional).
- Add guidance to action planning, so steps will be clearer once users get started.
- Leverage generative AI to help provide personalized action plan recommendations to users.
- Make sure the right people have permission to create action plans.
- Create an action planning page so you can report on the organization's action plan progress.
When you've finished setting up, action planning users can read Creating Action Plans to learn how to view, create, and update action plans.
Action Plan Dashboard Settings
Before you can use action planning, you need to enable it in your dashboard. This can be done in the Action Plans page of your dashboard settings.
From this page, you can also adjust other options, like adding guidance to action plans and creating custom fields that will appear on each plan. For information, visit the Action Plans Dashboard Settings (EX) page.
AI-Powered Action Plan Recommendations
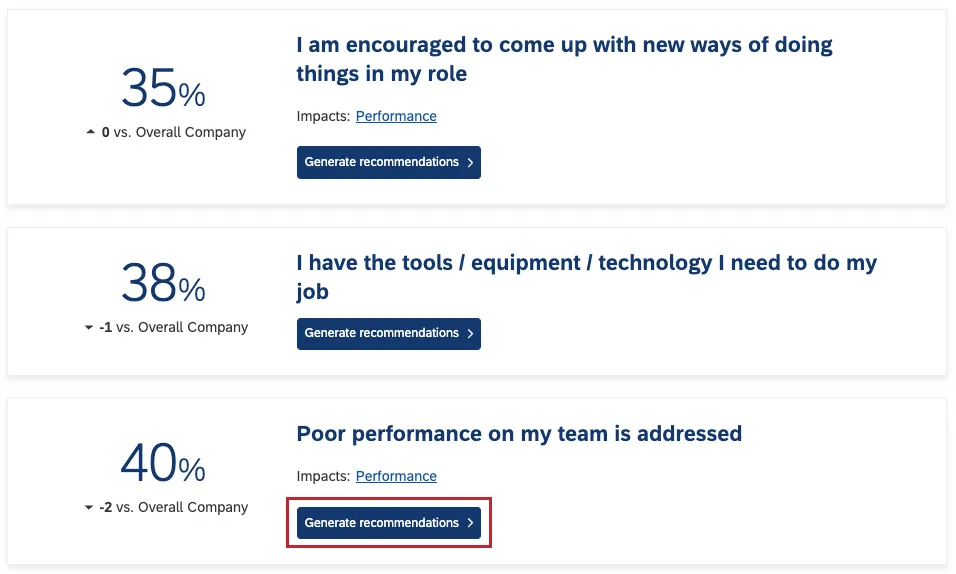
Personalized action recommendations use AI to help managers and leaders identify areas of improvement, take action, and understand the impact on their team. This is accomplished by analyzing survey scores, open-text comments, and profile information to deliver data-driven suggestions specific to each team’s context.
To learn more about how to set this feature up, see Personalized Action Recommendations.
Action Plan Permissions
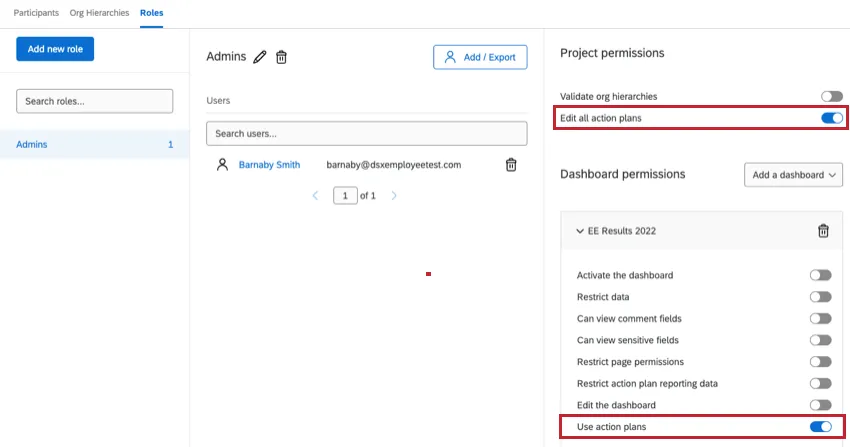
Before your team can create their own action plans, you need to make sure the right participants are able to edit action plans by changing their permissions. Permissions can be directly applied to a participant, or to an entire role. Roles are very useful when you need a large group of people to have the same permissions.
Attention: Only Brand Administrators have access to action planning by default. All other users must be assigned a dashboard role and given action planning permissions, even if they are the dashboard owner.
Attention: In projects with org hierarchies, action planning will only work for participants with direct reports.
Global Permissions
Under the Permissions header are the following options.
- Project Permissions:
- Edit all action plans: Gives the participant administration/editing rights to action plans in the project. You can limit which action plans the participant has access to with the “Restrict action plan reporting data” permission, outlined below. If there are no restrictions, then the participant will have access to all action plans in the project.
- Dashboard Permissions:
- Use action plans: Allows the participant to use action plans in the individual dashboard. This permission allows the participant to edit any Action Plans they’ve created or are the owner for. The participant will also be able to view, but not edit, any Action Plans accessible to them by their org hierarchy data restrictions. This is assigned dashboard-by-dashboard, allowing you to give access to some dashboards’ action plans without having to give access to them all.
To further restrict which action plans participants can edit and use, modify the dashboard data restrictions.
Action Plan Reporting Permissions
These permissions do not refer to editing action plans, but to reports created on action planning pages. Enabling Restrict action plan reporting data allows you to restrict data by the participant’s place in the org hierarchy or by specific org hierarchy units. Disabling this permission allows the participant to see all action planning data for an individual dashboard. This permission is a dashboard-specific permission.
Attention: Lifecycle has action planning, but no hierarchies or hierarchy-based data restrictions. That means that when reporting on action plans in a Lifecycle project, this data is not restricted by place in the hierarchy, and so every user with access to action planning will see this data. As such, be careful who you give access to action planning.
Org Hierarchy Restriction
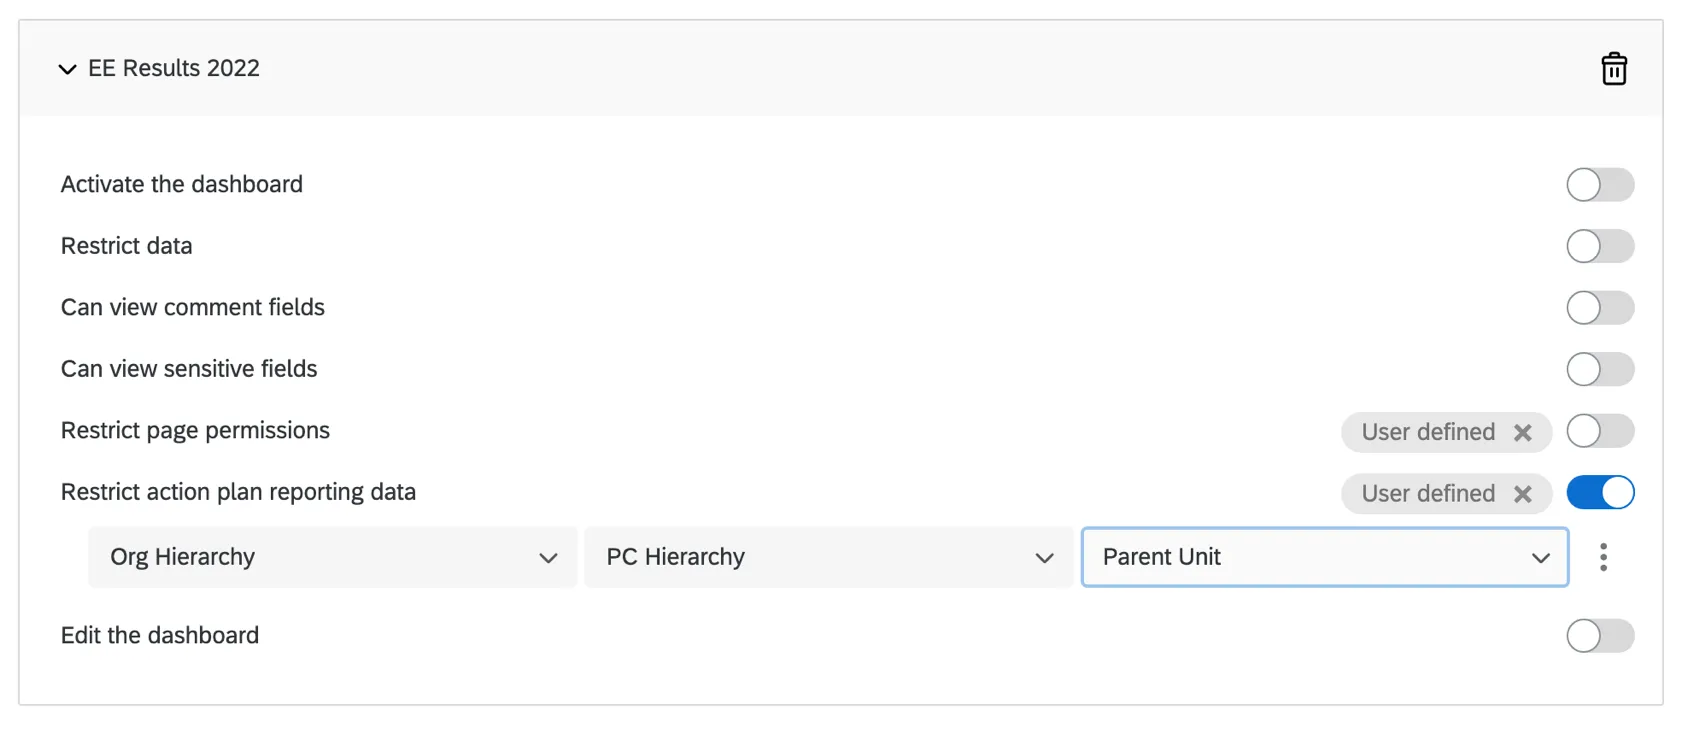
The Current Unit is the specific unit the dashboard user belongs to.
Let’s say the user belongs to the Web Design team of the Digital Marketing Department – the current unit would be Web Design. If you don’t want your teams to know the action plan data for the unit above them, use current unit.
The Parent Unit is the unit above the dashboard user. To use the same example, this would be all of Digital Marketing.
Parent unit is useful if you have smaller teams within departments with unique action plans, but want all the data readily visible. Parent unit is also a useful option if you want a larger unit of people to work towards a common goal – for example, you’re not worried about action plans for just Web Design or the Email Marketing teams, but the whole of Digital Marketing.
Org hierarchy restrictions are perfect for widely defined roles that are not department or hierarchy specific.
Org Hierarchy Units Restriction
Attention: Lifecycle has action planning, but no hierarchies or hierarchy-based data restrictions. That means that when reporting on action plans in a Lifecycle project, this data is not restricted by place in the hierarchy, and so every user with access to action planning will see this data. As such, be careful who you give access to action planning.
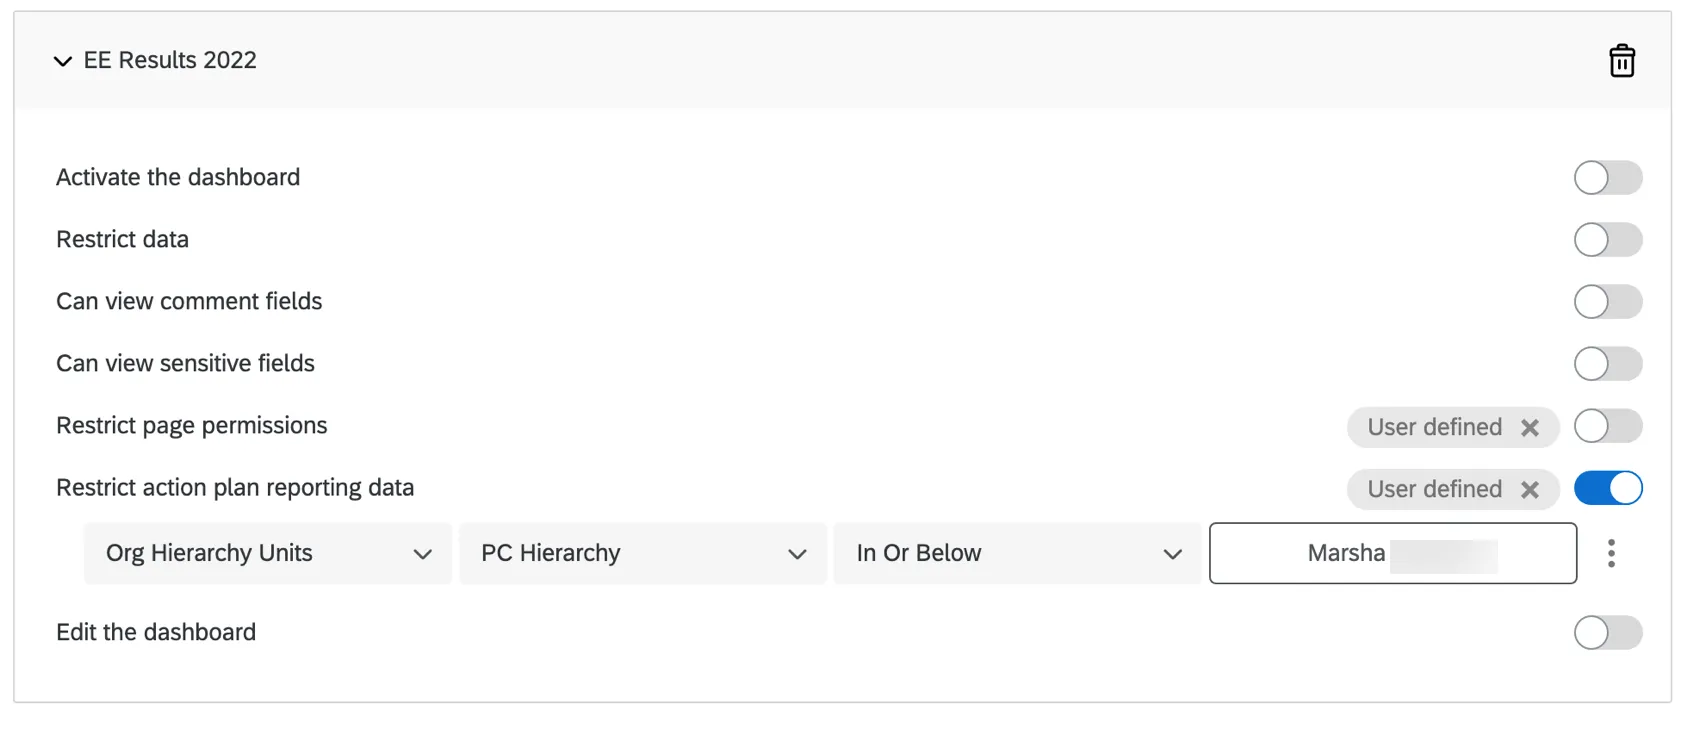
When limiting action plan access by org hierarchy units, you can choose a specific unit of the hierarchy. Then you can decide if you want the dashboard user to view plans in a selected unit, or in and below it.
Org hierarchy unit restrictions are best when applying permissions to specific participants or when making roles that pertain to specific parts of your org hierarchy (e.g., not a hierarchy-wide “Manager” role, but maybe a “Digital Marketing Manager” role).
Optional Widgets for Action Planning
Some dashboard widgets let you create action plans directly from the widget. While these widgets are optional, they can be a great way to make action planning more convenient for users.
Example: Instead of users having to remember what they want to focus on while they move from the dashboard to the action planning page, they can create a plan as soon as they see a result they want to improve on.
The following widgets allow action planning:
- Question List: See linked page for instructions on how to allow action plan creation with this widget.
- Scorecard: See linked page for instructions on how to allow action plan creation with this widget.
- Focus Areas: See linked page for instructions on how to allow action plan creation with this widget.
- Engagement Headlines: As soon as action planning is enabled in the dashboard, it's available in this widget.
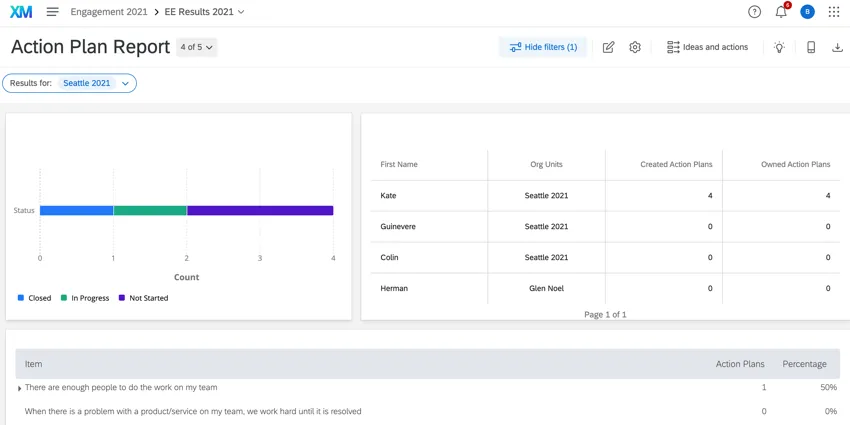
Reporting on Action Plans
Once you have used guided action planning to make action plans, you can start reporting on action plans. For example, you can create a chart that breaks out according to the roles of people assigned action plans, or a table that shows the statuses of all action plans.
Attention: Lifecycle has action planning, but no hierarchies or hierarchy-based data restrictions. That means that when reporting on action plans in a Lifecycle project, this data is not restricted by place in the hierarchy, and so every user with access to action planning will see this data. As such, be careful who you give access to action planning.
Creating an Action Planning Page
Before you can start reporting on your action plans, you will need to make an action planning page on your dashboard.
Qtip: Action planning pages do not copy over page filters created on other pages.
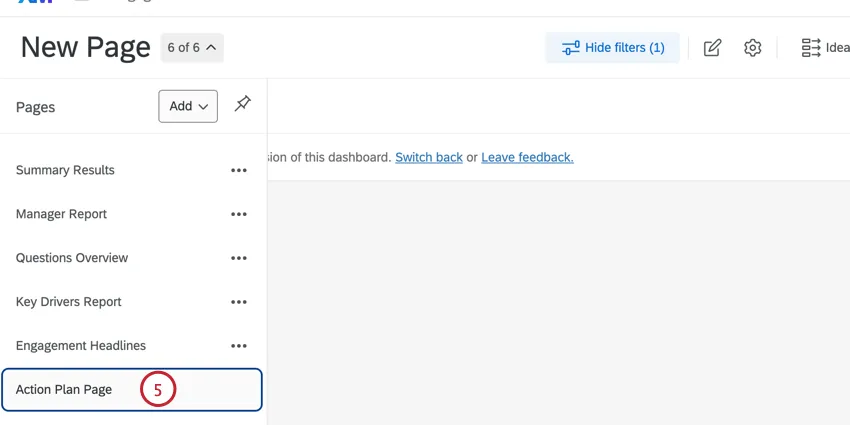
In the Pages menu, click Add.
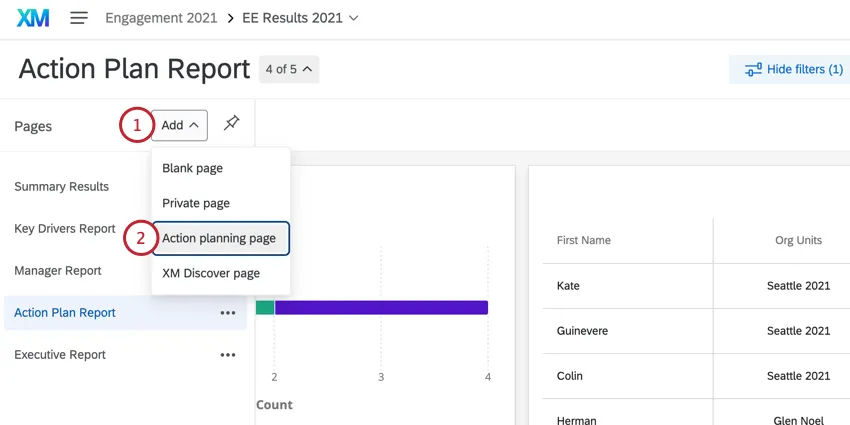
Select Action planning page.
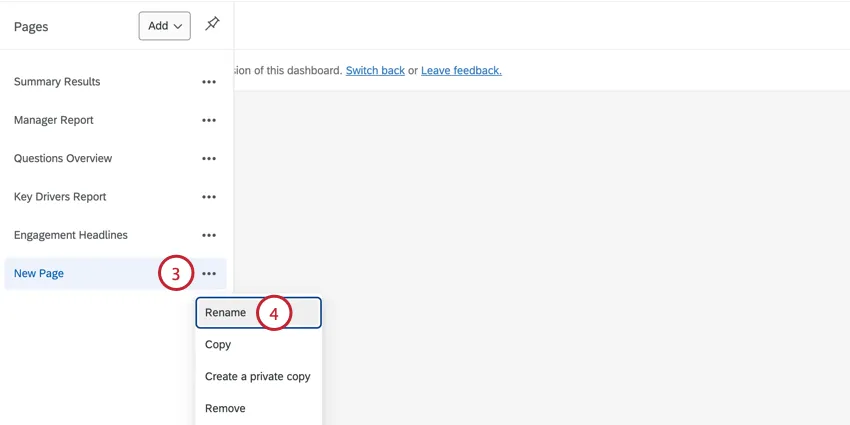
Click the page options menu next to your newly added page.
Qtip: Steps 3-6 aren’t required, but explain how to rename your page so you can easily find which one is for action planning.
Select Rename.
Type a new name for the page.
Press the Enter key on your keyboard.
Qtip: If you add an org hierarchy filter to your action planning page and filter for a specific unit, then you will only see action plans for that unit.
Widgets Available
You’ll notice that when you click Add Widget on your action planning page, there are fewer widgets than you’d find on a regular page. This is to optimize the page for action plan reporting.
- Gauge chart widget
- Number chart widget
- Line & bar chart widgets
- Table widget
- Record table widget
- Action plan item summary widget
- Action plan users widget
- Action planning usage rate widget
- Image widget
- Rich text editor widget
- Simple table widget
- Simple chart widget
- Pie chart widget

Qtip: The record grid widget is exclusive to action planning pages.
- Focus areas widget
Qtip: The purpose of the action planning is described on the guided action planning page.
Qtip: Rich text editor and image widgets are not for reporting, but to help you customize your page with instructions, logos, and any other details you feel will clarify your data or make it aesthetically pleasing.
Action Planning Fields
When you start to customize widgets on your action planning page, you will notice that action plan-specific fields will appear in the list instead of the contents of your dashboard data.
Since Action Planning fields are not included in your dashboard data, they are automatically assigned field types for optimum reporting. Below, each field is listed by its type. For more on what field types mean and the widgets they are compatible with, see the Field Types support page.
Open Text:
- Comments: This refers to comments left on action plans in guided action planning.
Text Set / Multi-Answer Text Set:
- Owner IDs: Owner IDs are internal Qualtrics IDs assigned to the owners of action plans.
- Status: The status of the action plan. These are assigned using guided action planning. Statuses include not started, on hold, in progress, closed, and canceled.
- Survey Item Names: The exact text of the survey item this action plan was created for.
- Survey Items: An ID for the survey item this action plan was created for.
Number Set:
- Approved: This field always has a value of 0 or 1.
- Progress: This is the exact percentage that the action plan is completed.
Date:
- Creation Date: The date the action plan was created.
- Due Date: This is the due date given the action plan in guided action planning.
- Last Modified: The date someone last edited the action plan. This includes status and percentage changes, but not the addition of comments.
Misc. Field Types:
- Owner Metadata: You will be able to select from a list of metadata for the people the action plans have been assigned to. For example, let’s say the metadata you uploaded with your participants is Department, Start Date, and Office Location. You would see the options Owner: Department, Owner: Start Date, and Owner: Office Location.
- Creator Metadata: You will be able to select from a list of metadata for the creator of the action plan. For example, let’s say the metadata you uploaded with your participants is Department, Start Date, and Office Location. You would see the options Creator: Department, Creator: Start Date, and Creator: Office Location.
Field type of the metadata depends on how the original is mapped in the dashboard data.

Example: If Department is mapped as a Multi-Answer Text Set, then Owner: Department and Creator: Department will also be Multi-Answer Text Sets.
- Action Plan Fields: The fields you set in your action plan settings will also be available for reporting. For example, let’s say you create a field called “Responsible Departments” referring to departments who will need to be involved to resolve this action plan. You’d be able to report on this data by selecting “Responsible Departments” from the list of fields.
- Text fields are Open Text
- Dropdowns are Text Set, unless set to Multi-Answer Text Sets
- Checkboxes are Text Set, unless set to Multi-Answer Text Set
- Dates are Date
FAQs
How is action planning affected by confidentiality settings?
How is action planning affected by confidentiality settings?
Action planning-specific fields, including the default ones listed here and any custom fields you create, cannot be marked sensitive.
You can create action plans based on any items you'd like on the action planning page. However, if confidentiality settings are hiding items from a widget, like a question list widget, you won't be able to create action plans for those items from the widget itself.
How do I translate my EX action plan reporting pages?
How do I translate my EX action plan reporting pages?
If you want to translate the action planning dataset in an Employee Experience dashboard, see these steps.
That's great! Thank you for your feedback!
Thank you for your feedback!