
Ticket Follow-Up Page Options
What's on this page
Attention: You are reading about a feature that is not currently available for all clients. If you’d like to get access to the updated ticket page, talk to your Account Executive.
About Follow Up Page Options
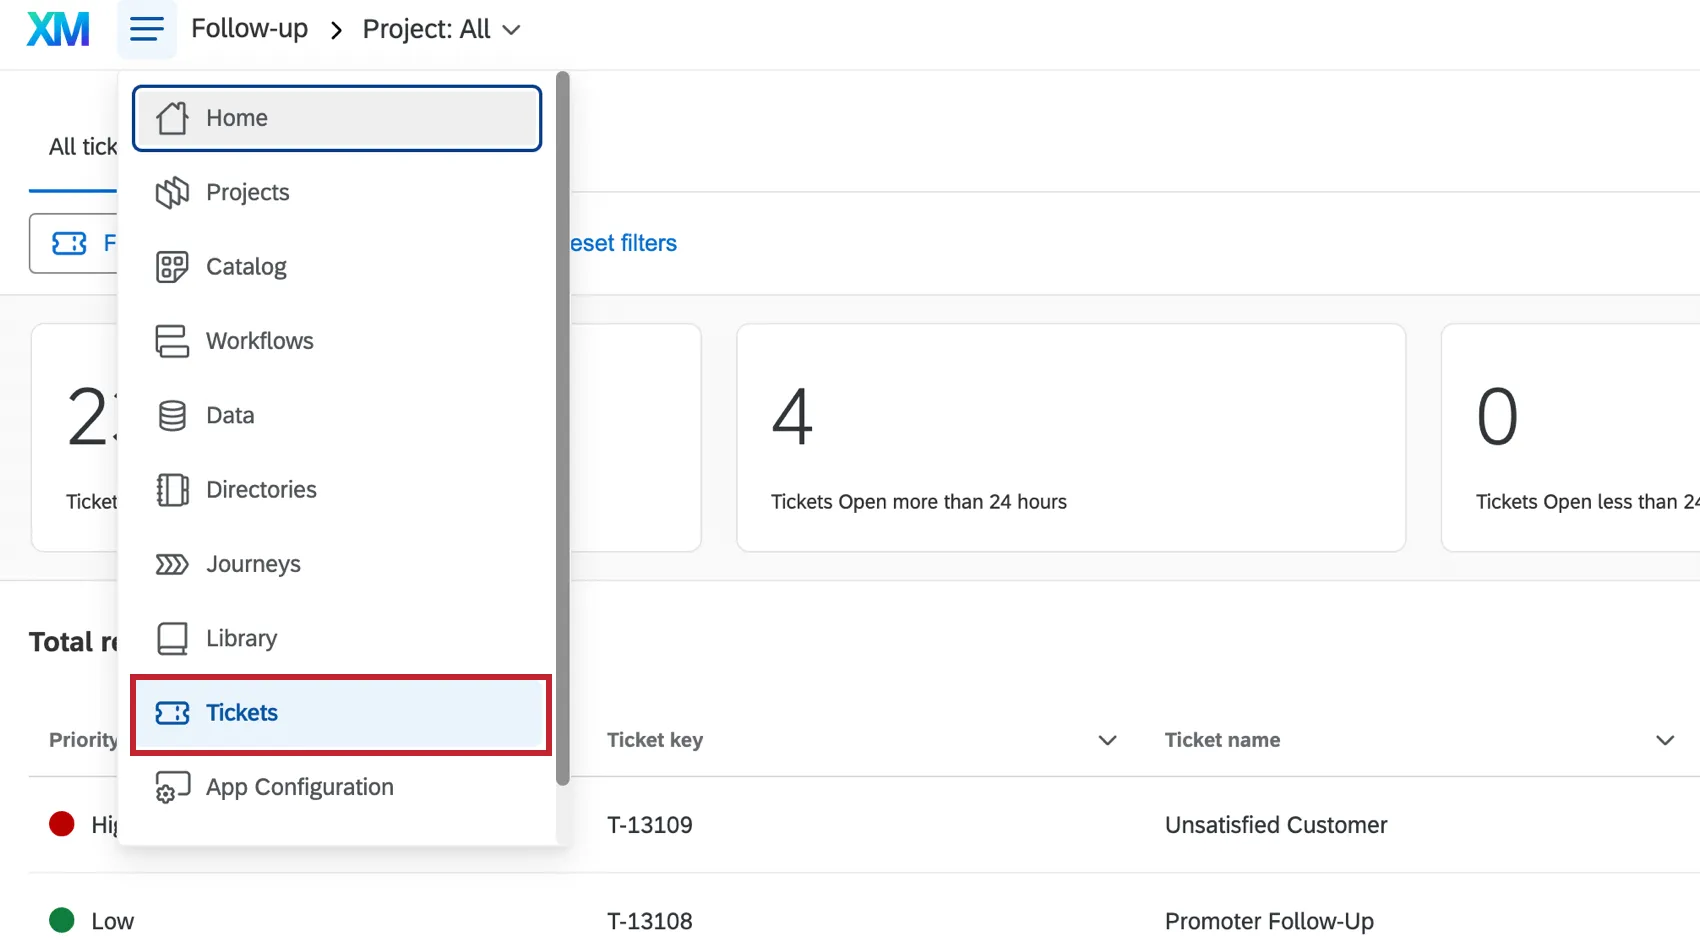
The Follow Up page contains all the tickets assigned to you and any team you belong to. You can access it by selecting Tickets from the navigation menu.
In addition to allowing you to follow up on tickets, the Follow Up page also contains options for searching tickets, exporting them, changing the format in which they display, and much more.
Ticket Metrics
On the top of the Follow up page, you will see a header with a series of metrics.
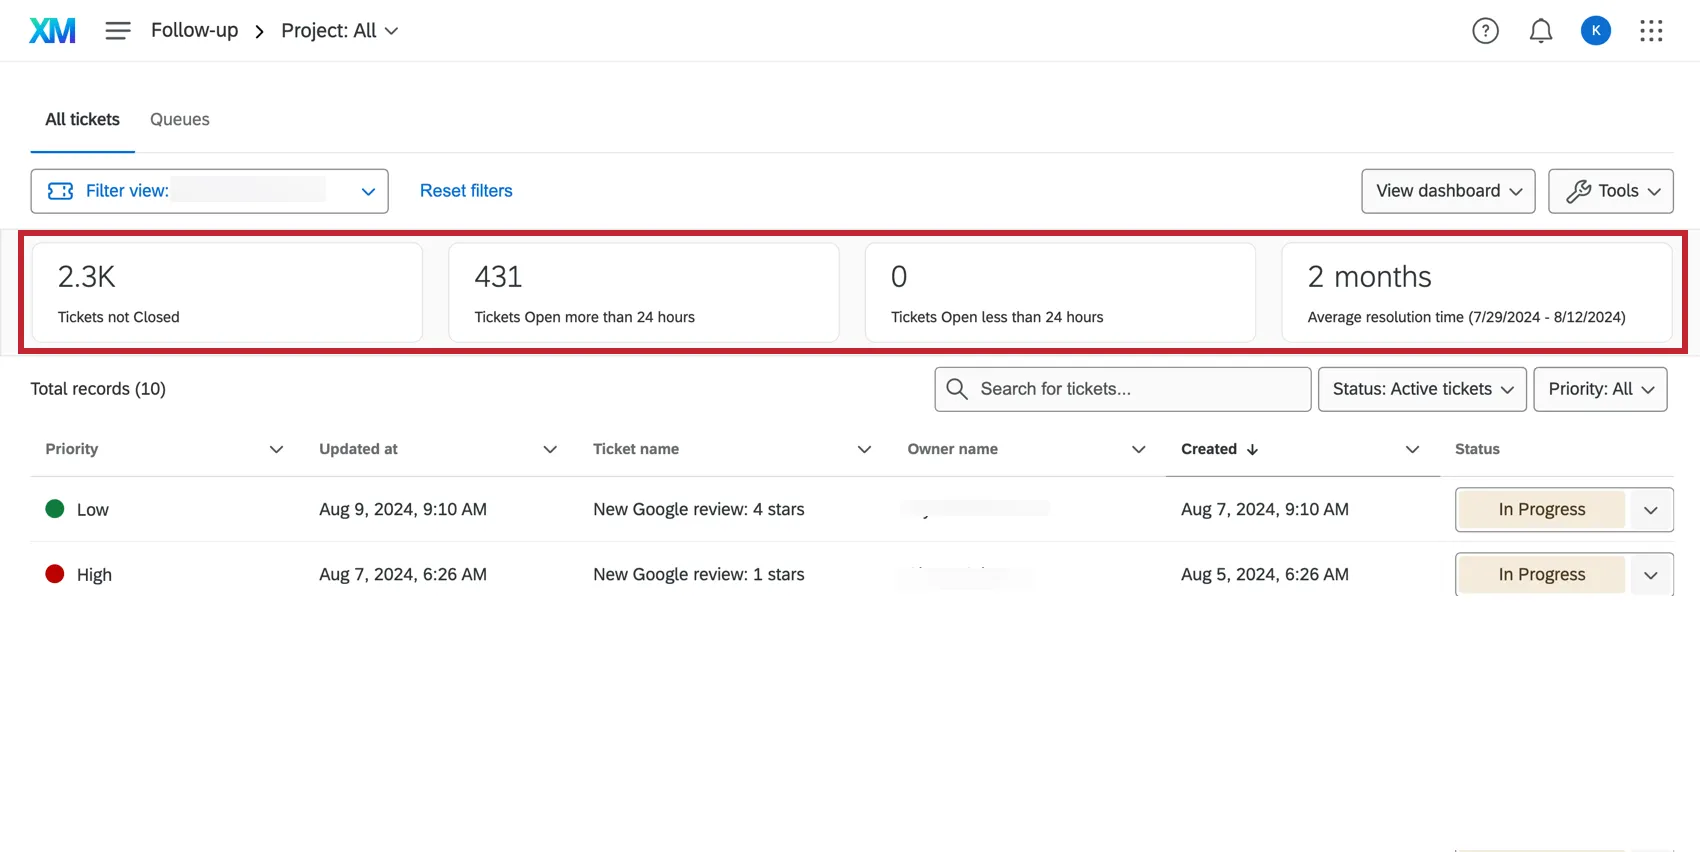
- Tickets not Closed: Tickets that have been marked as a status other than “Closed”.
- Tickets Open more than 24 hours: Tickets that have been marked as a status other than “Closed” for more than 24 hours.
- Tickets Open less than 24 hours: Tickets that have been marked as a status other than “Closed” for less than 24 hours.
Average resolution time: The average time it takes to resolve a ticket.

Qtip: Average resolution time only takes into account tickets closed within the past two weeks, not all closed tickets.
Attention: All of the above metrics only include tickets personally assigned to you. Even tickets assigned a team you belong to do not count in these metrics.
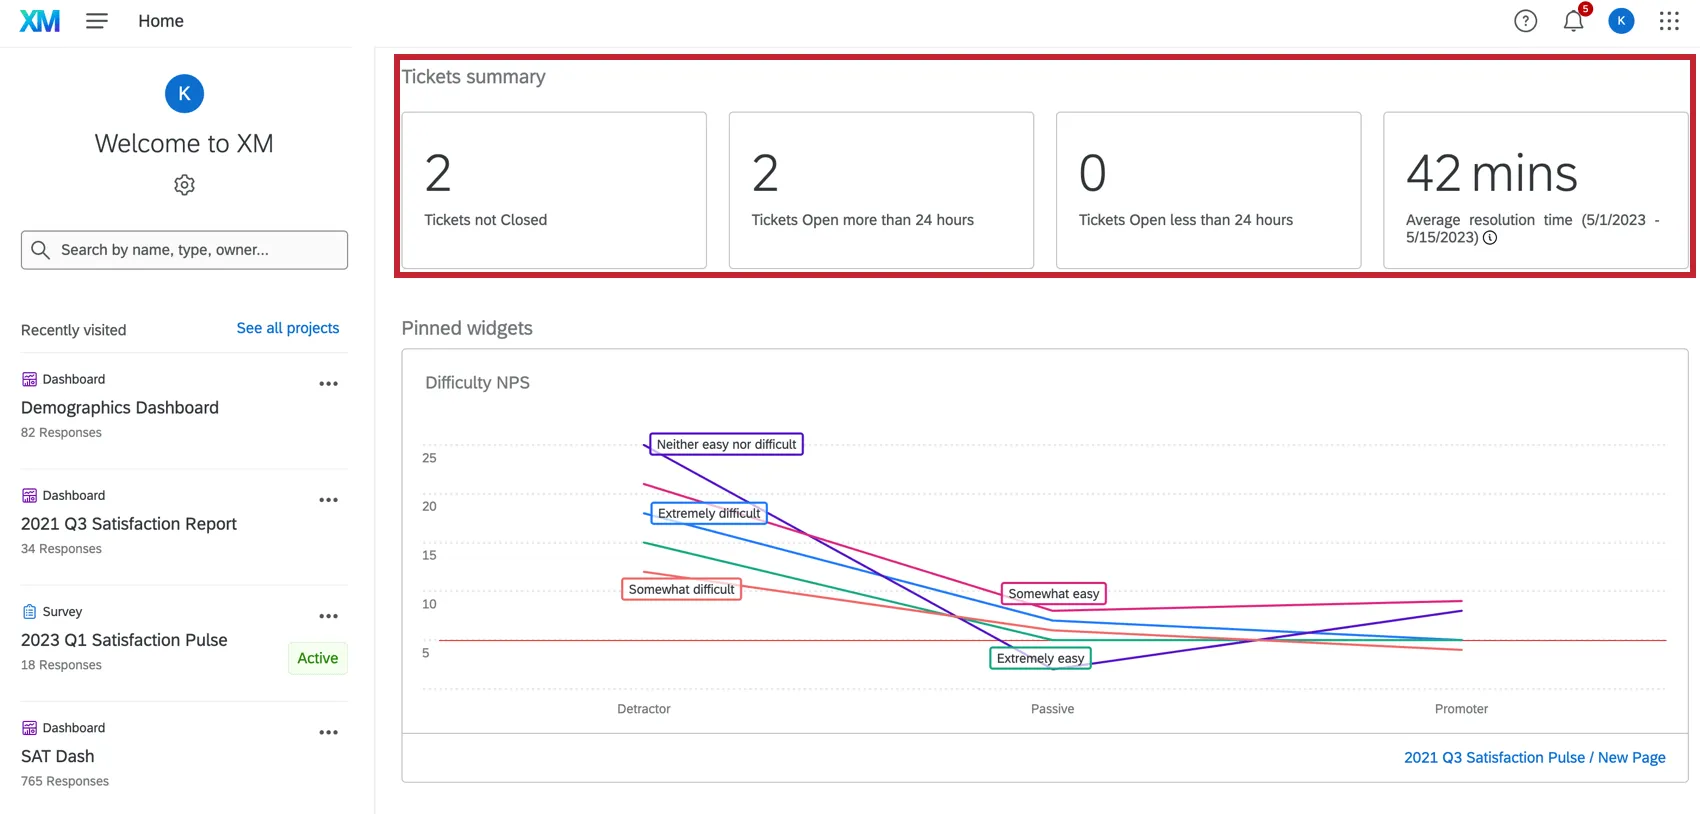
Homepage Metrics
To add ticket metrics to the homepage, see the Homepage Basic Overview page.
Managing and Following Up on Tickets
On the Follow Up page, tickets are listed below the metrics. From this section, you can perform a number of actions on each ticket, including changing the status of the ticket, adding sub-tickets, and more. For more information, see Following Up On Tickets.
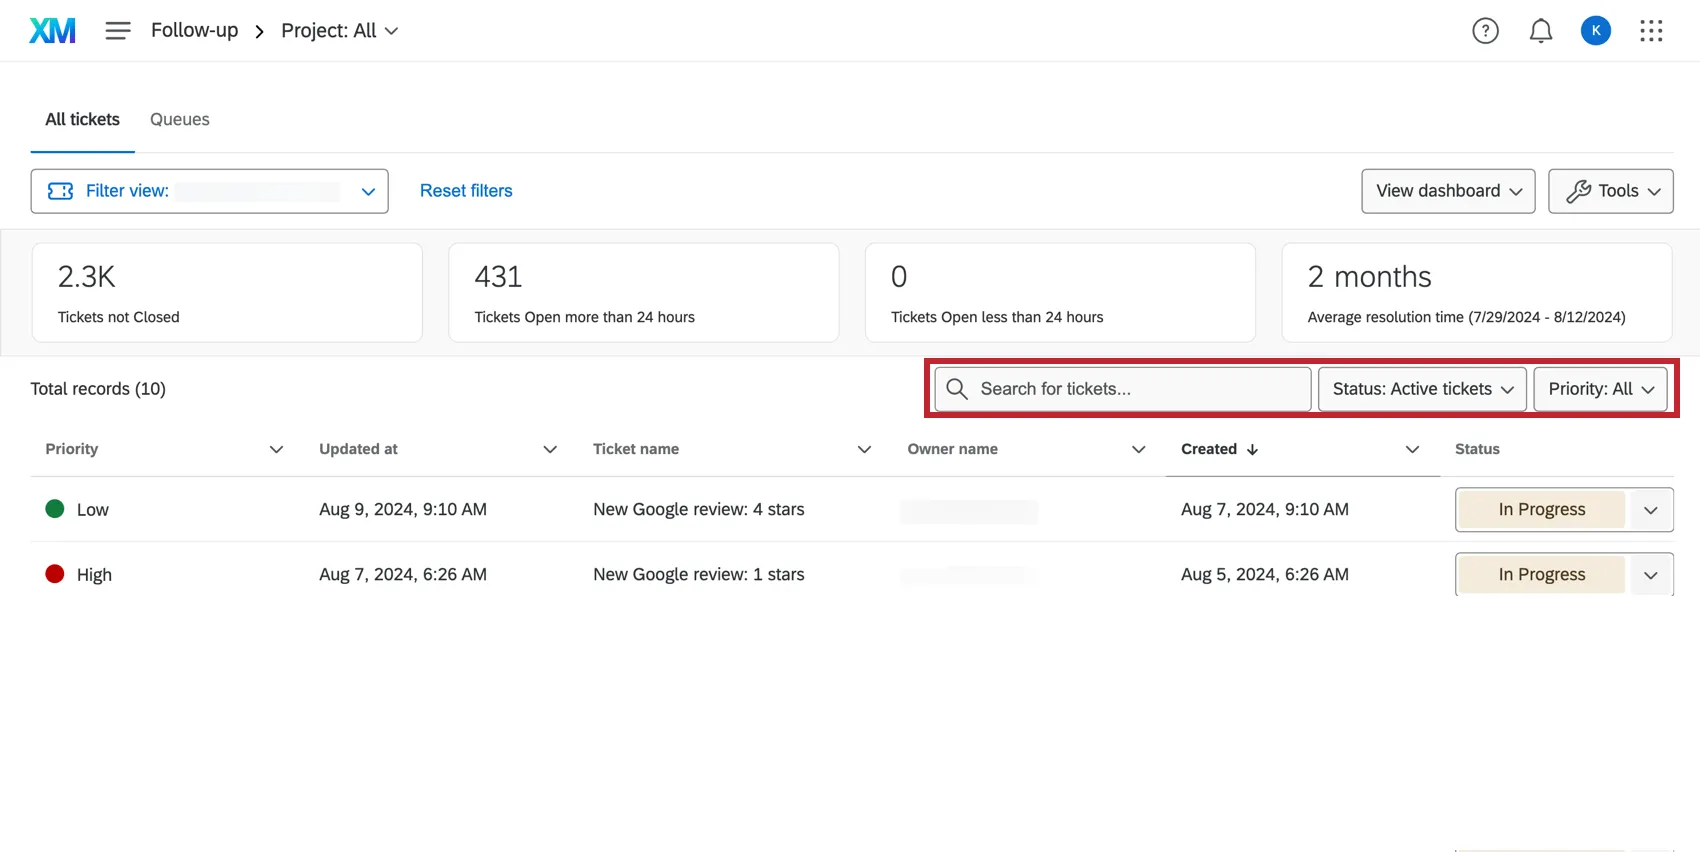
Searching Tickets
To search for a certain ticket, type key terms into the Search bar. The Search bar picks up on all ticket content, meaning you can type anything from the owner’s name to the ticket ID.
Attention: When searching tickets, if your ticket data is larger than 30718 bytes, only the first 30718 are searchable through the search bar.
Filtering Tickets
You can filter the tickets that appear on your follow-up page. For a list of filters and steps to use them, see Filtering the Follow-Up Page.
Ticket Settings
Ticket Settings are only accessible to Brand Administrators. Here, you can do a number of things, including:
- Disabling the “Send Email” button on tickets
- Determine how tickets should be forwarded when their owner is out of office
- Turn on email notifications for every time a ticket is assigned to someone
- Change the status of tickets when emails come in
- Send email notifications when an email comes into the ticket
Learn more on the Ticket Settings support page.
Exporting Tickets to CSV or TSV
Attention: This function exports all tickets in the brand (with no limit), although the export can be filtered by the specific project the tickets come from.
Qtip: Administrators can make these ticket exports available to all non-admin users by enabling certain Ticket Settings.
Go to the Tickets page.
Click Tools.
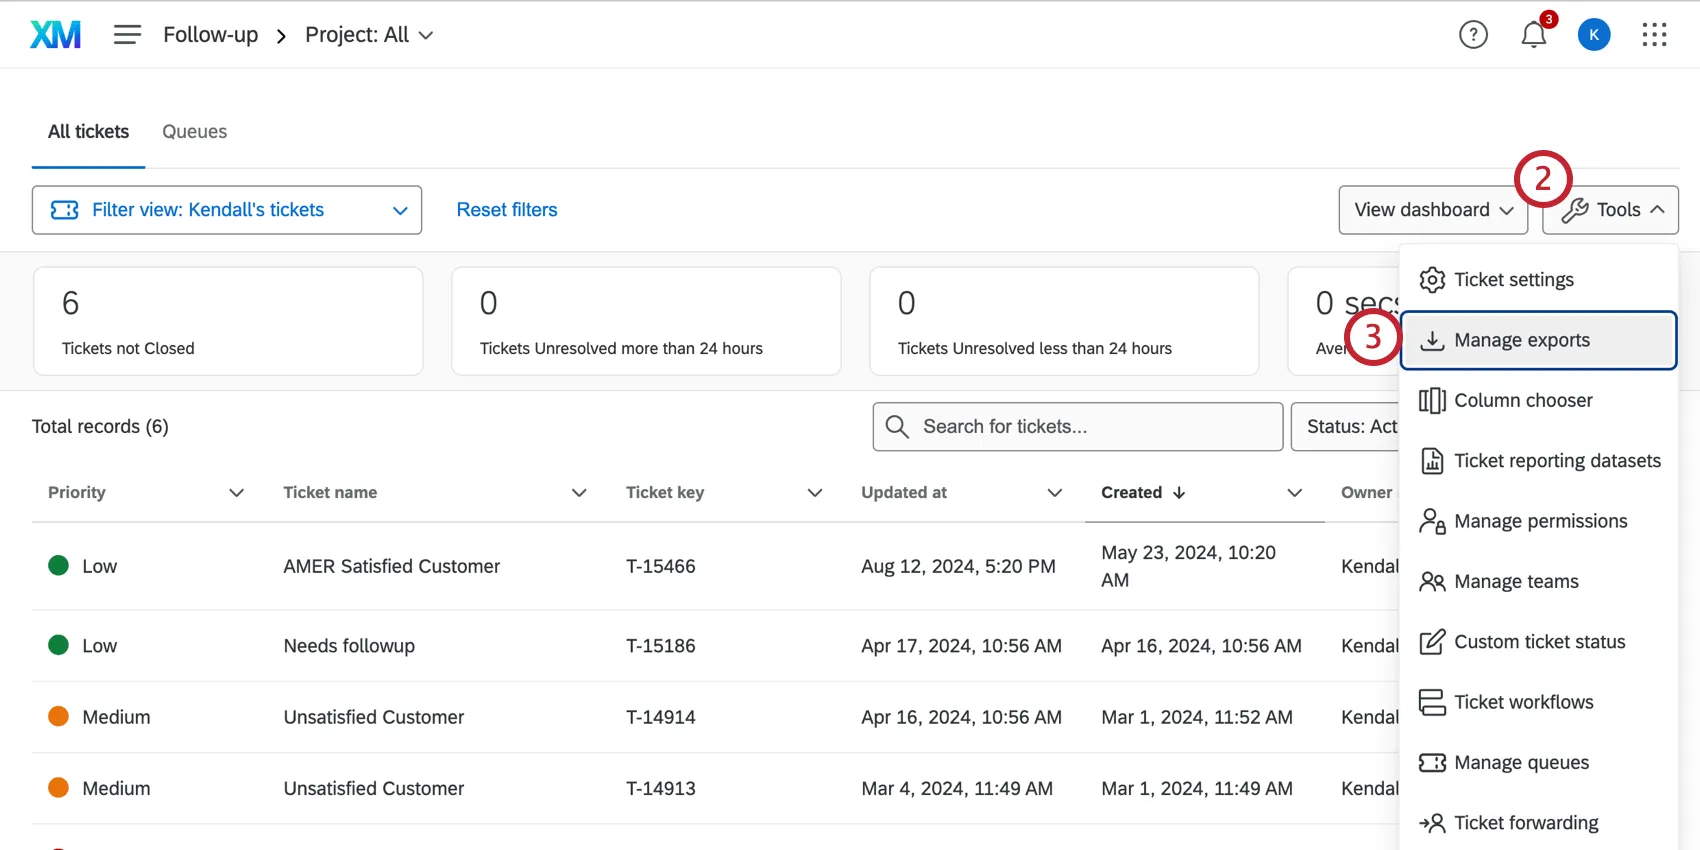
Select Manage exports.
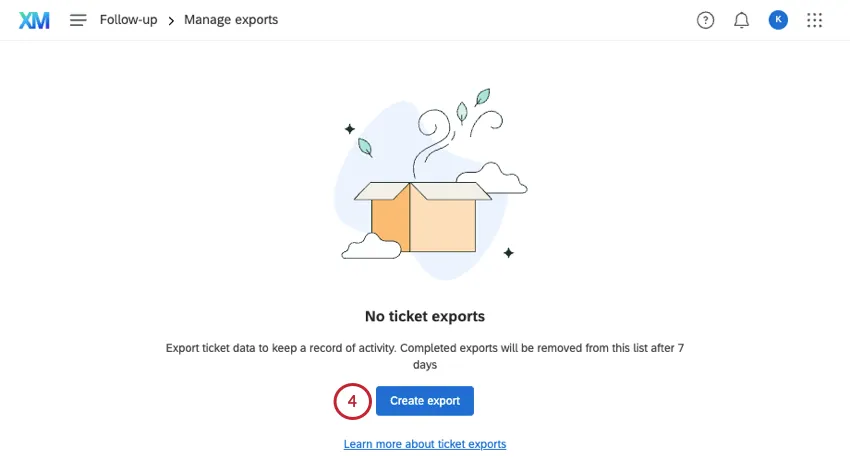
Click Create export.
If desired, specify a file name.
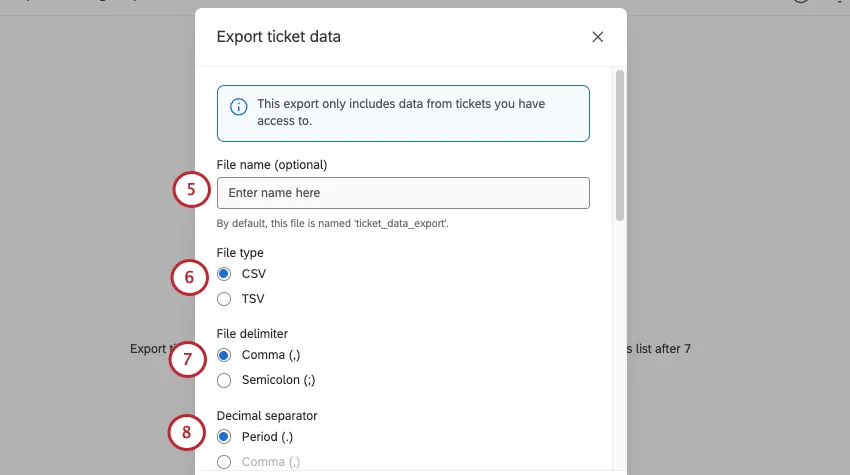
Choose a file type.
- CSV: Comma-separated values.
- TSV: Tab-separated values. We recommend this format if your ticket data or assignees involve characters other than numbers and the English alphabet.
If you chose CSV, choose between the following delimiters:
- Comma ( , ): The standard format.
- Semicolon ( ; ): We recommend this if your ticket data may contain commas.
Choose how to separate decimal values in your file. You can choose between period (e.g., 23.45) or comma (e.g., 23,45).
Select the survey project the tickets were created from. You can select all projects, or a single survey.
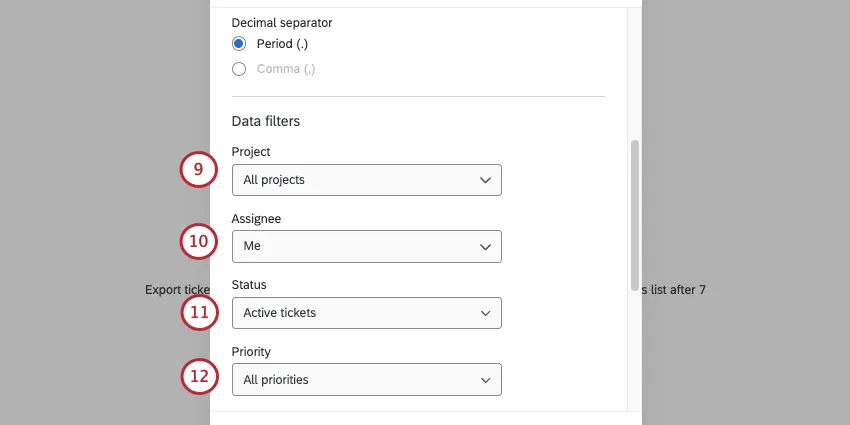
Filter the assignee (owner) of the tickets you’re exporting. The owner can be you, or anyone in the brand. This is the case regardless of whether the user exporting data is a ticket admin or not.
Select the status of tickets you want to export. You can select multiple.
Select the priority of tickets you want to export. You can select multiple.
Filter the ticket group of the data you’re exporting. You can select one group or all groups.
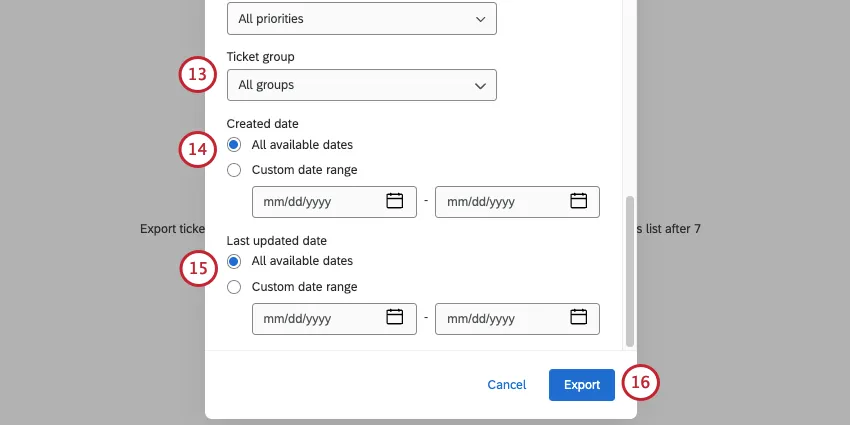
Filter the date the tickets were created.
Filter the date the tickets were last updated.
Click Export.
The file may take some time to prepare. The status of the export, file name, date it was completed, and filters applied to the data will be listed in the table.
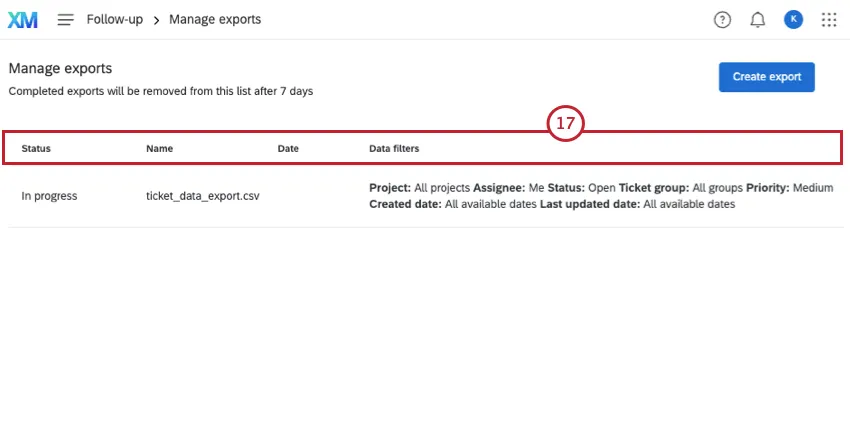
Qtip: Completed exports will be removed from the list after 7 days.
Once the file is ready, click Completed to download it.
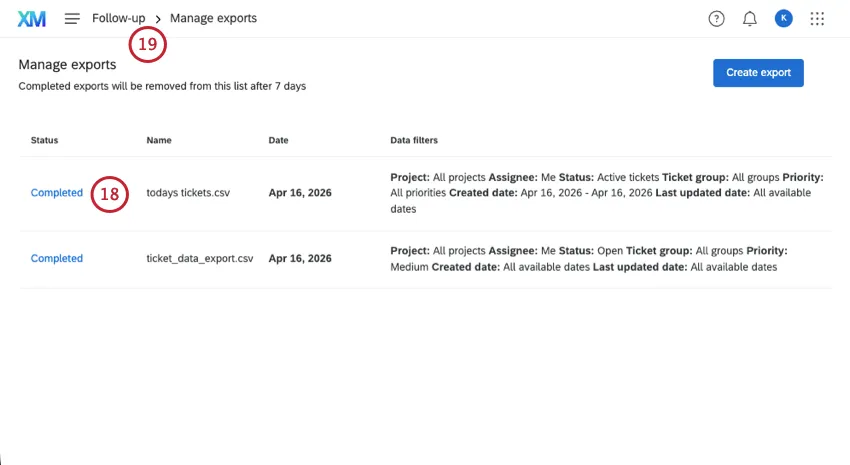
Click Follow-up to return to the ticket follow-up page.
File columns
All date columns correspond to the time zone you set on your account and are in a (YYYY-MM-DD HH:MM:SS) format.
- Ticket Number: The ID of the ticket. For example, T-345.
- Ticket Name: The name of the ticket.
- Priority: Whether the ticket is Low, Medium, or High priority.
Status: The ticket status.
Qtip: Brand Administrators can create custom ticket statuses.
- Created Date: The date the ticket was created.
- Updated Date: The date the ticket was last updated. For example, the last time a user commented on the ticket, or the status was changed.
- Closed Date: The date the ticket was moved to the closed status. The name of this status may differ, based on your custom status settings.
- Timezone: This is the time zone you set on your account.
- Resolution Time: The minutes it took for the ticket to be marked resolved. By default, this status is called “closed,” but this may differ based on your custom status settings.
- Team Name: The team assigned to a ticket.
- Owner Name: The user assigned to a ticket.
- Response ID: A Response ID is the ID internally generated by Qualtrics for a survey response. It can be used to search on Recorded Responses or in a data export.
- Ticket Source ID: If the ticket is linked to a survey, the survey ID. This is an internal Qualtrics ID you can search on your projects page.
- Ticket Source Type: The source of the ticket. Generally, this is a survey, but the value will be blank if the ticket is created through an external API.
- Root Cause: If there are root causes that can be selected on your ticket task, the ones selected for the ticket will appear here.
- Follow-Up Details: If there are follow-up details included on your ticket task, each one will get its own column, and display the selected answer.
- Link: A direct link to the ticket.
- Ticket Data: Any ticket data added will appear in separate columns.
Activity History: Summary of all activity on a ticket. Each event name starts with [Activity], has a date, and contains the name of the person who performed the activity. Entries are separated by the pipe character ( | ).

Example:
[Activity] Barnaby Smith changed status to In Progress (Wed Jul 01 2020 18:31:59 GMT+0000 (Coordinated Universal Time))|[Activity] Jane Doe reassigned this ticket to Team 2 (Tue Jul 07 2020 17:27:53 GMT+0000 (Coordinated Universal Time))Qtip: The Activity History column includes the full content of emails sent by agents from the ticket, including the agent name, recipient address, send time, and email body. Inbound customer email replies are not included in the export.
In addition, for each ticket status, there will be a first time entered, first time exited, most recent time entered, and most recent time exited.
Qtip: These are the same fields that can be used to report time between ticket statuses on your dashboard.
First time entered: The first time a ticket was set to this status.
Example: Your organization allows ticket owners to re-open old tickets if a customer calls back about the same issue. This means a ticket can have a status of Open multiple times in its existence. However, there are times where you are probably only interested in knowing the first time a ticket was opened. Then you would use the First time entered: Open
First time exited: The first time a ticket that previously had this status was switched to another status.
Example: Your organization has a custom status called “Escalation.” You want to keep track of when tickets are de-escalated, meaning when they are switched away from the status of “Escalation.” However, tickets can be escalated multiple times, and you are only interested in how long it takes for them to be de-escalated for the first time. You could look to the First time exited: Escalation field to identify this.
Most recent time entered: The most recent time this status was applied.
Example: Unlike in previous examples, “most recent” fields will ignore if a status has been applied multiple times, and instead focuses on the most recent data. So a ticket may be “Open” when it’s first created and then later reopened; Most recent time entered: Open would reflect the second time this ticket was opened.
- Most recent time exited: The most recent time this status was removed from a ticket.
Attention: Only changes made after June 14, 2019 are recorded.
Column Chooser
To customize the displayed ticket fields on the Ticket Follow Up page, select Column chooser from the Tools dropdown.

Attention: If you are a Brand Administrator or Tickets Admin, changes to the chosen columns will apply to all users in your brand. If you are a standard tickets user, any column edits you make only apply to your own view.
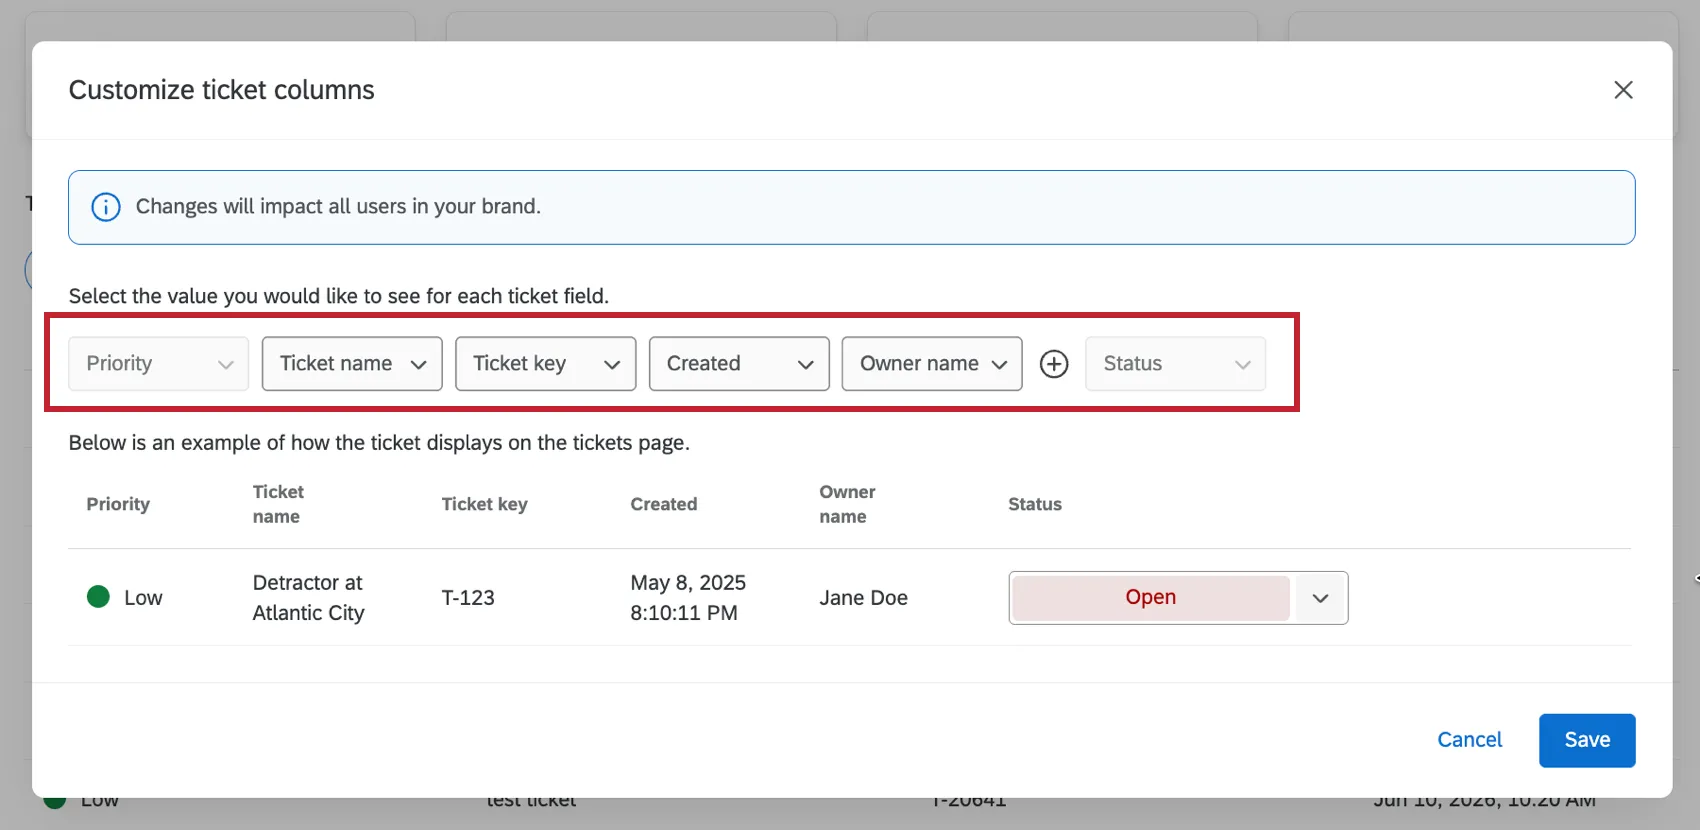
You can select up to 12 column headers to see on tickets. Select the plus (+) icon or select the new fields from the menus, including ticket data. The Priority and Status fields cannot be removed or reordered and are included in the 12 limit.
A preview below the fields lets you see how the tickets will appear. Click Save to apply your changes.
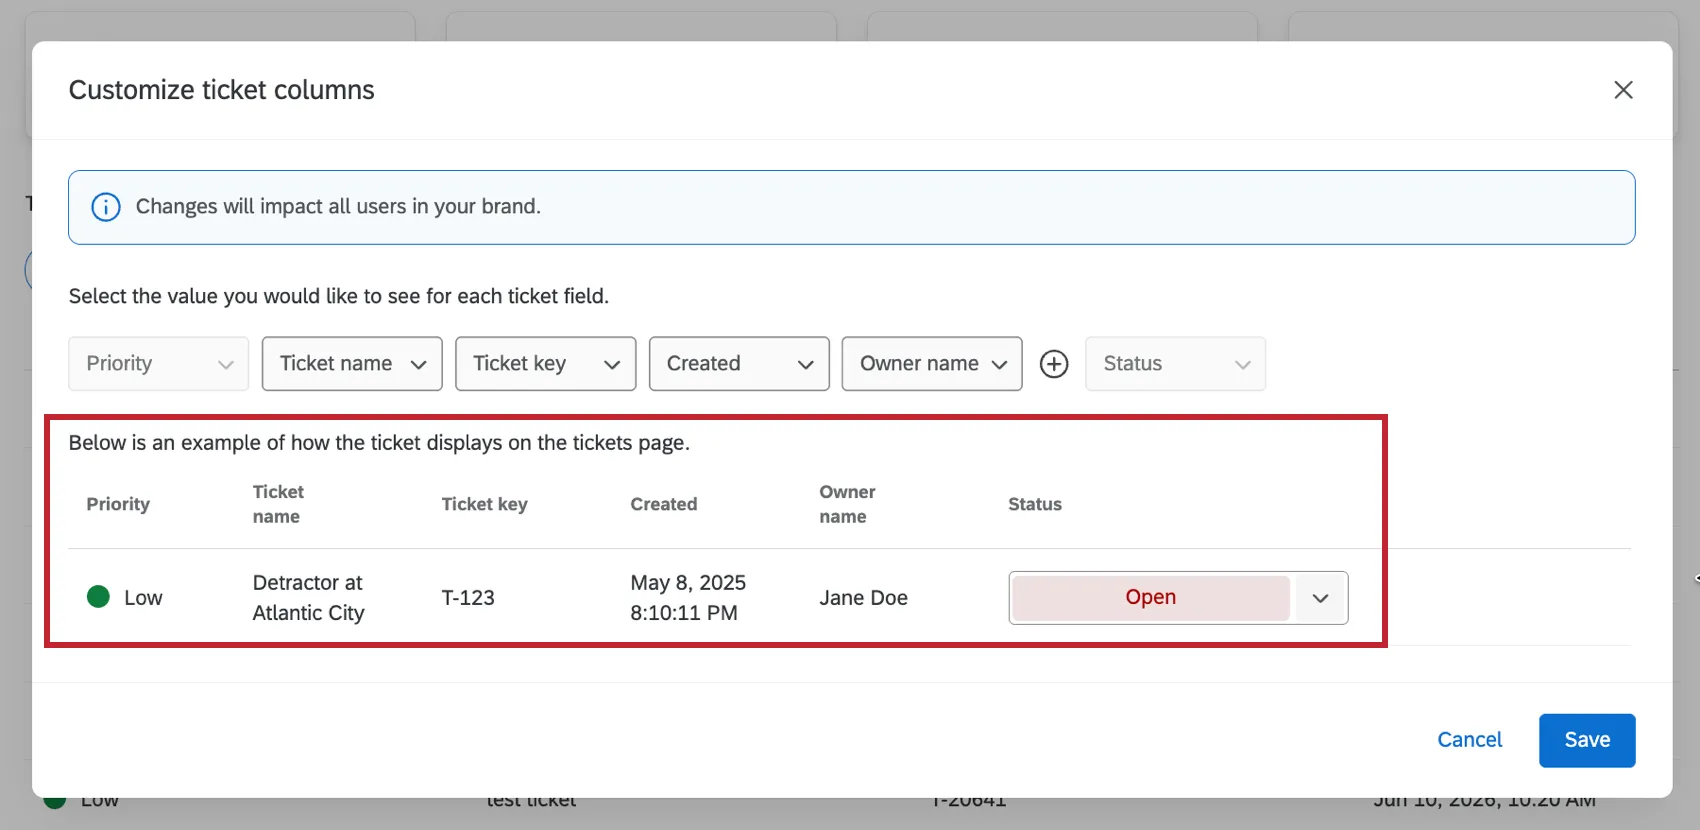
Click Save to apply your changes.
Manage Teams
Available to Brand Administrators only, Manage Teams allows you to add or remove a team, as well as add and remove users from those teams. For more information about this option, visit the Teams & Ticket Assignment.
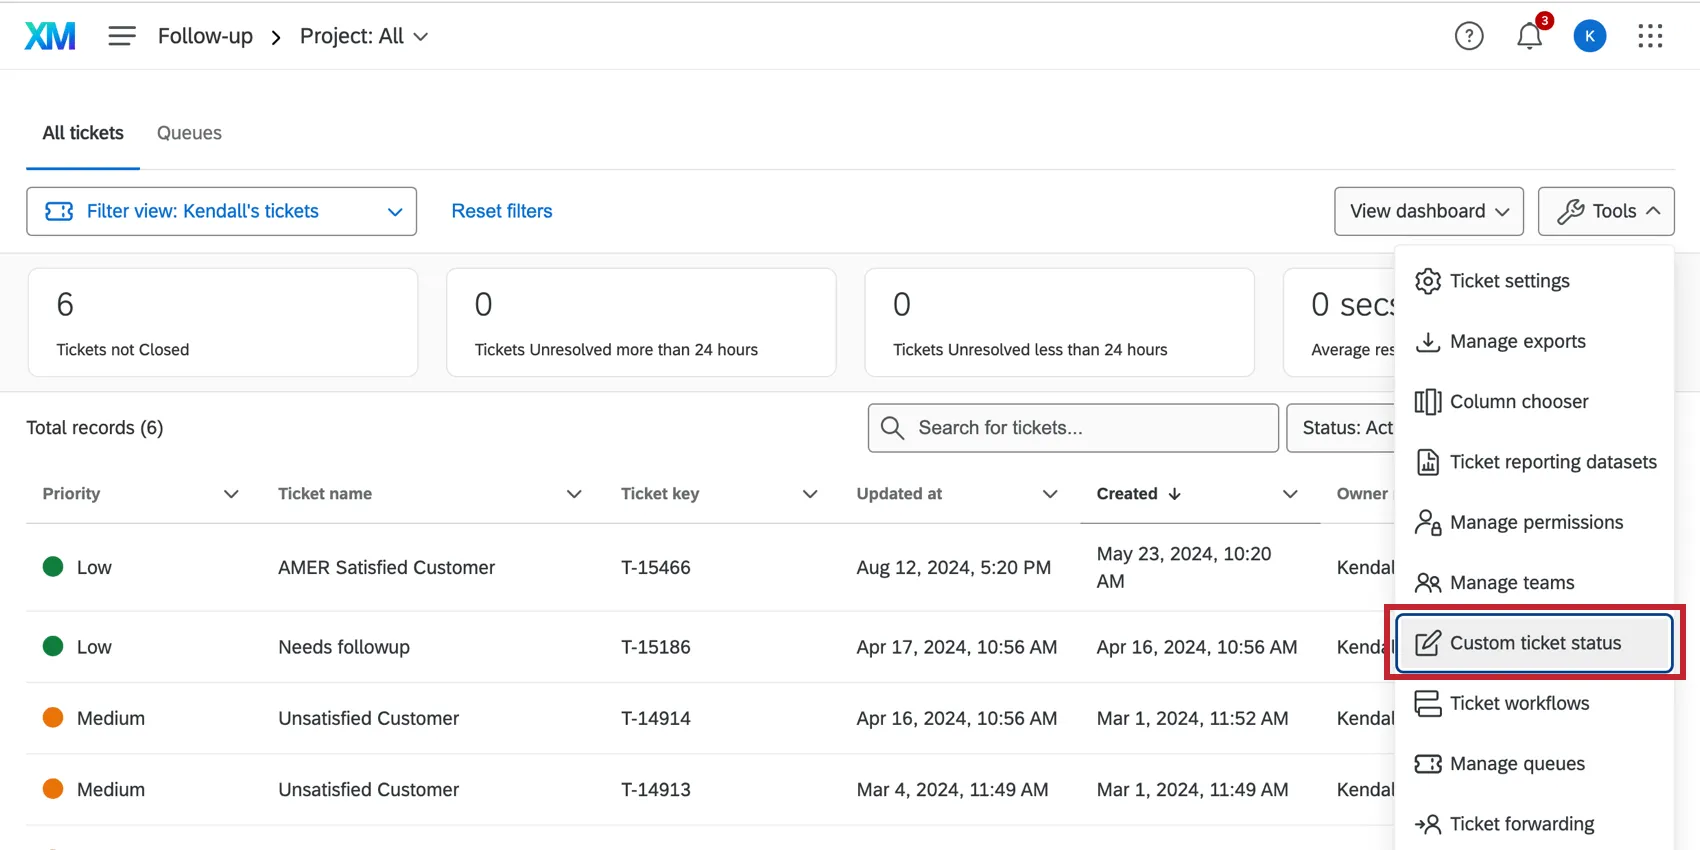
Custom Ticket Status
Custom Ticket Status is an option that’s only available to Brand Administrators and users with the Ticket Admin user permission. You create custom ticket statuses, determine what statuses each can switch to, and rename and edit available statuses. To access, click Custom Ticket Status under the Options dropdown.
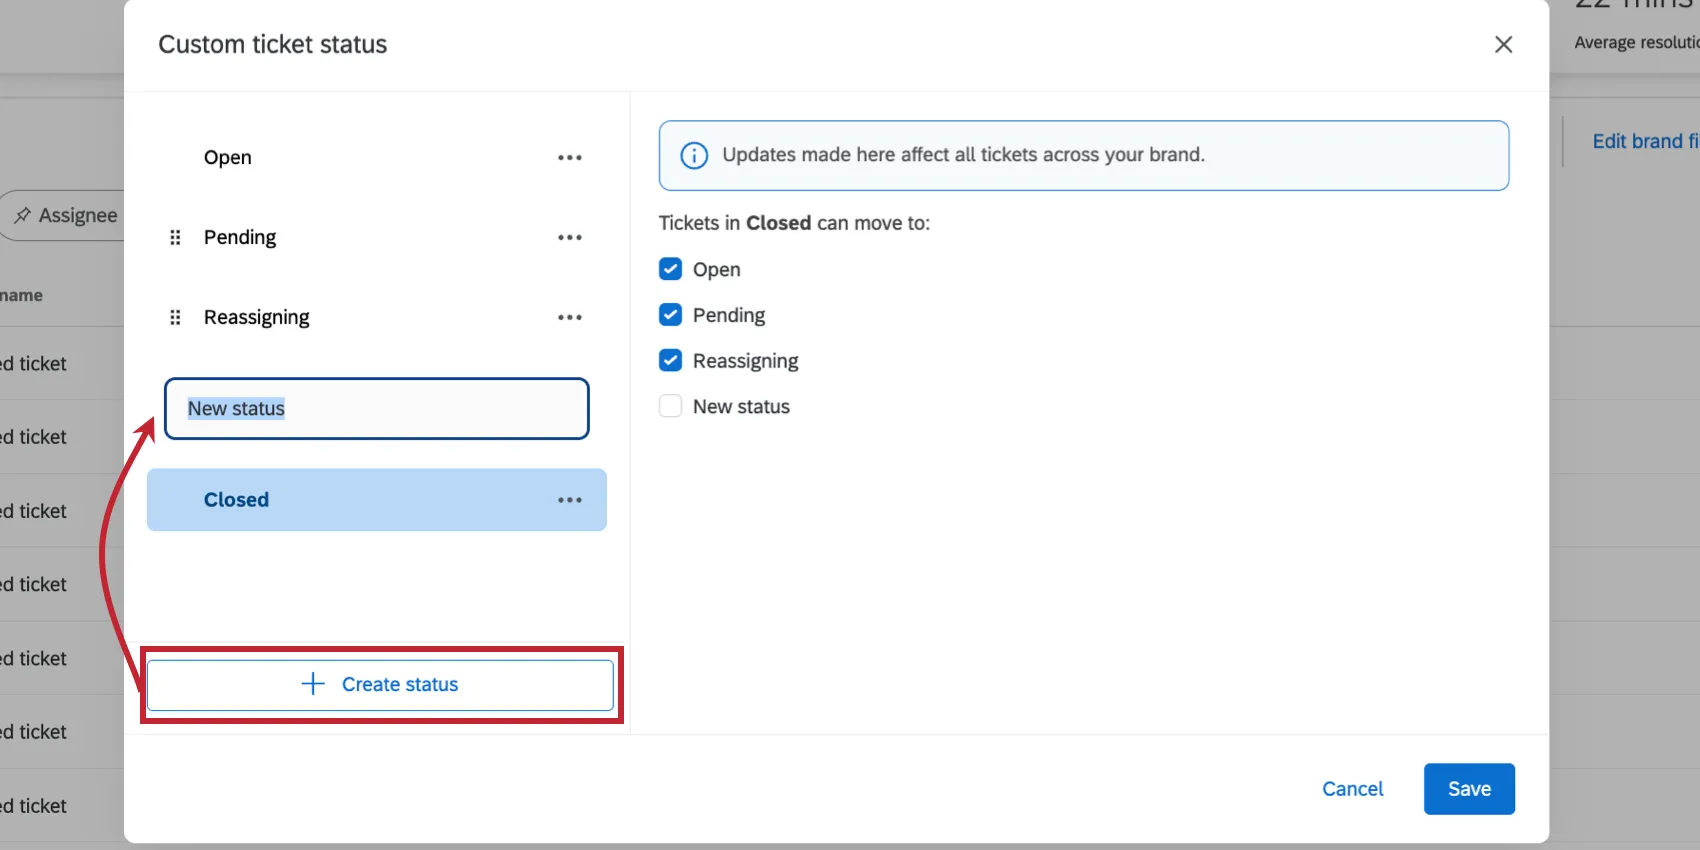
Adding a New Ticket Status
To create a new ticket status, click Create status. A new one named New status will appear in the left menu above the Closed (or equivalent) status.
Status Transitions
You can customize how tickets transition from one status to another.
Example: Once a ticket is closed, you never want it to be changed back to Open or In Progress. Instead, you have a custom status called Reopened to specially indicate tickets that were once closed and had to be worked on again. If you have a status like Reopened, you also probably don’t want any ticket that hasn’t ever been marked Closed to be able to switch to this status.
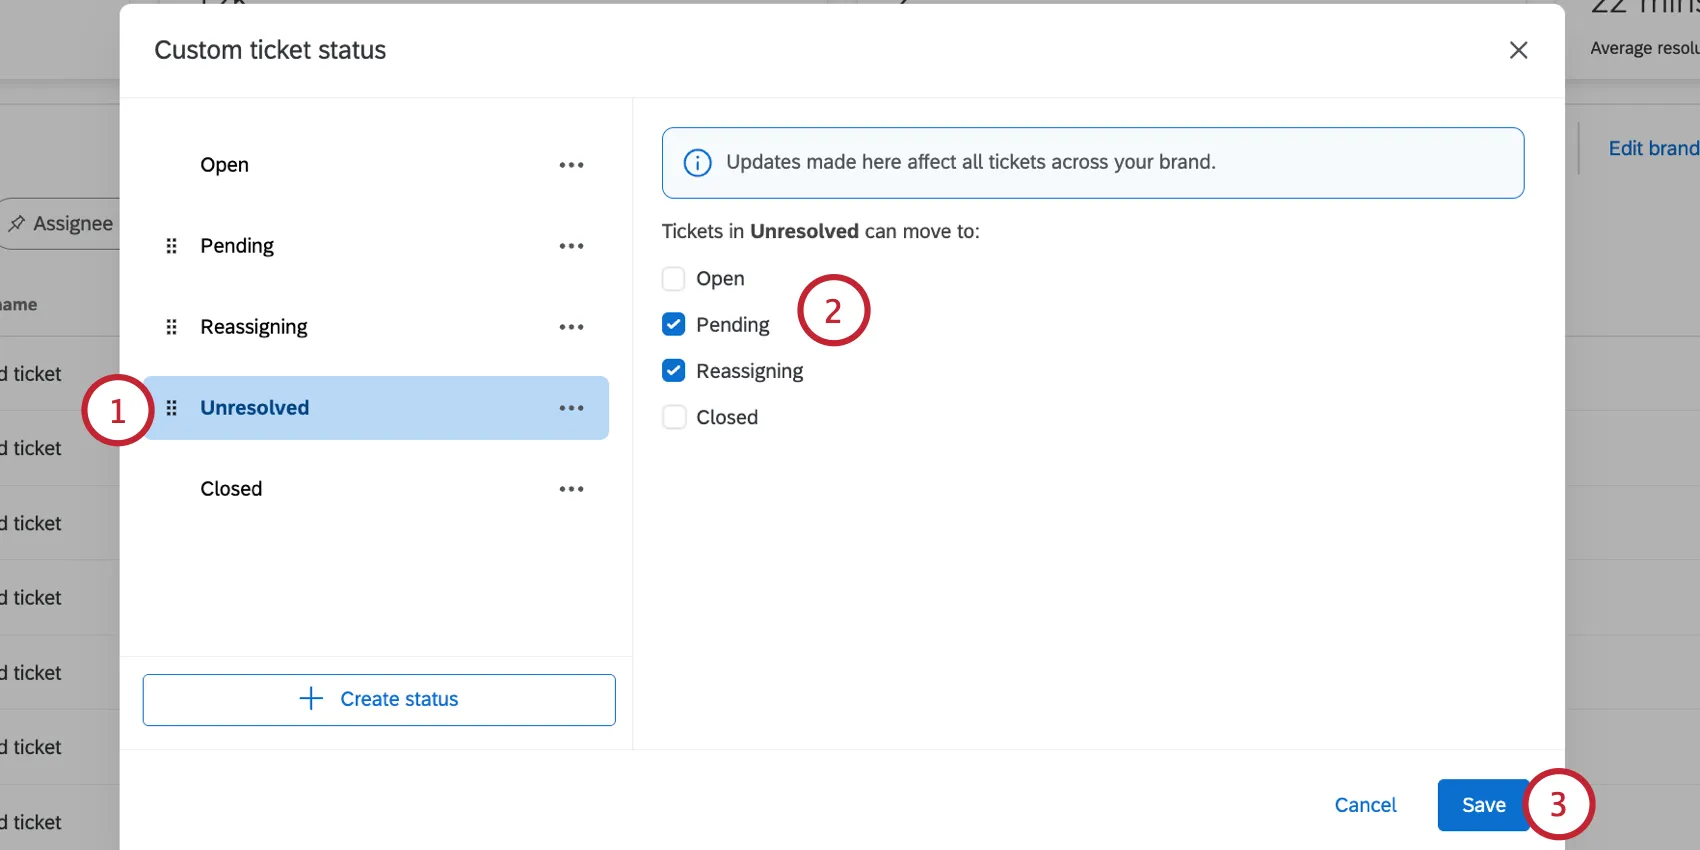
In the screenshot above, a ticket marked Unresolved cannot be changed to Open or Closed. That does not mean, however, that Open or Closed tickets cannot be marked Unresolved. You would need to edit the transitions for Open and Closed to set this behavior.
Qtip: These rules do not apply to Brand Administrators or Ticket Administrators. Brand Administrators and Ticket Administrators can change a ticket from any one status to another.
Renaming, Reordering, and Deleting Statuses
Qtip: You cannot reorder or delete the Open and Closed statuses, but you can rename them. That is because these are your “Open” status for brand new tickets and your “Closed” status for inactive tickets.
Warning: The default “Closed” status will always function as a closed status. Do not rename it to any other function, and instead stick to similar concepts, like “Resolved,” “Completed,” or “Done.” Closed tickets do not appear on default page filters and aren’t assigned from queues, so it’s important to keep this status name accurate.
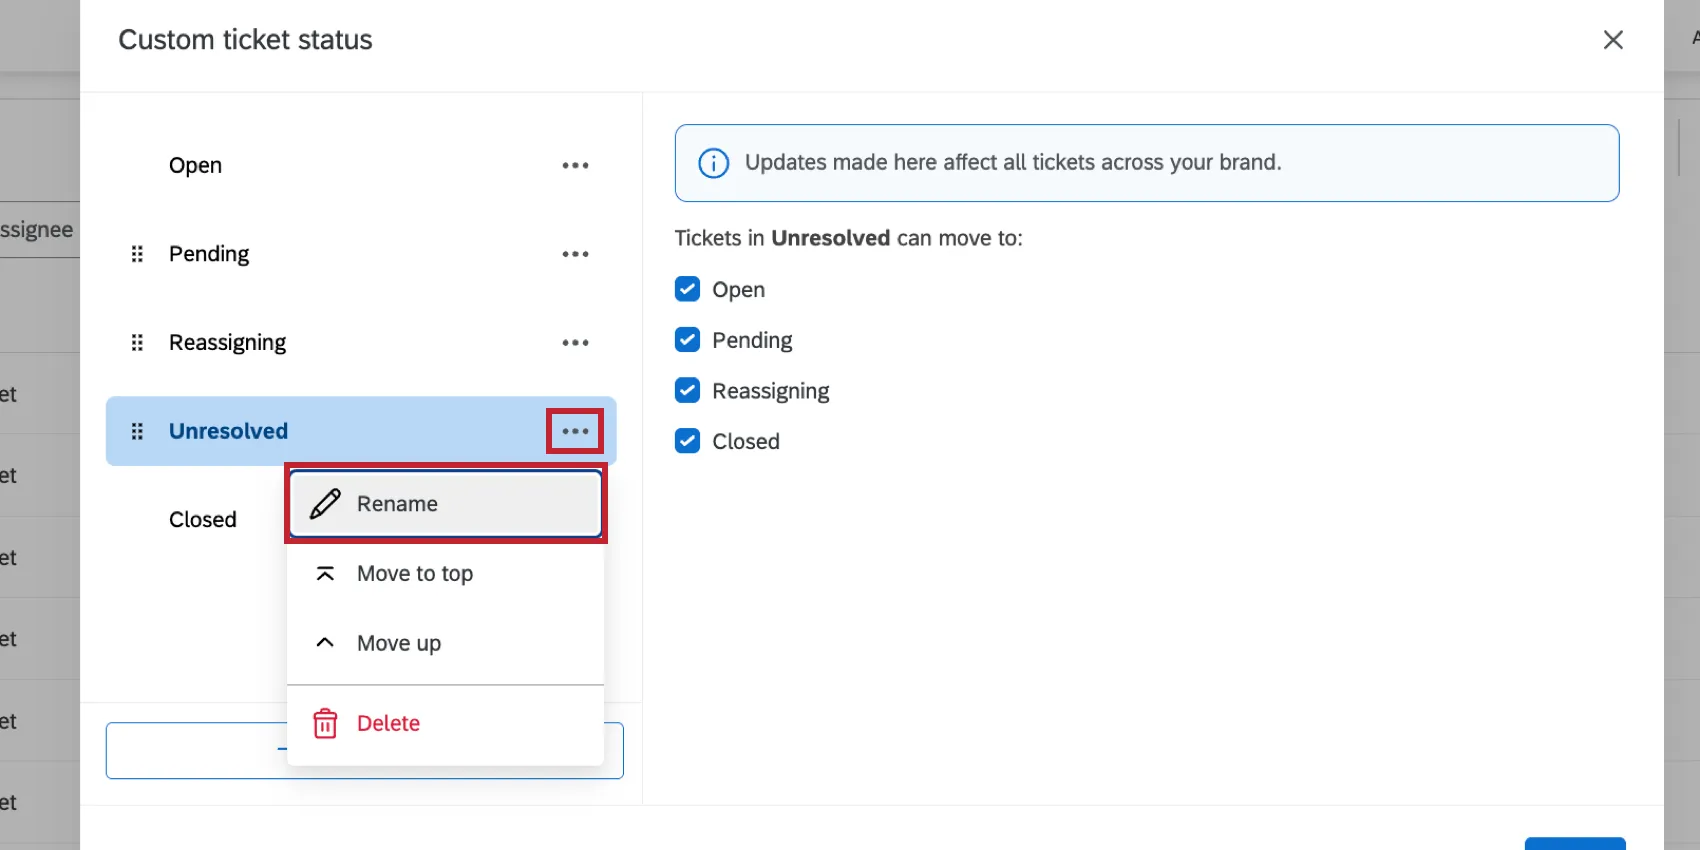
Click the options menu next to a status and select Rename to edit its name.
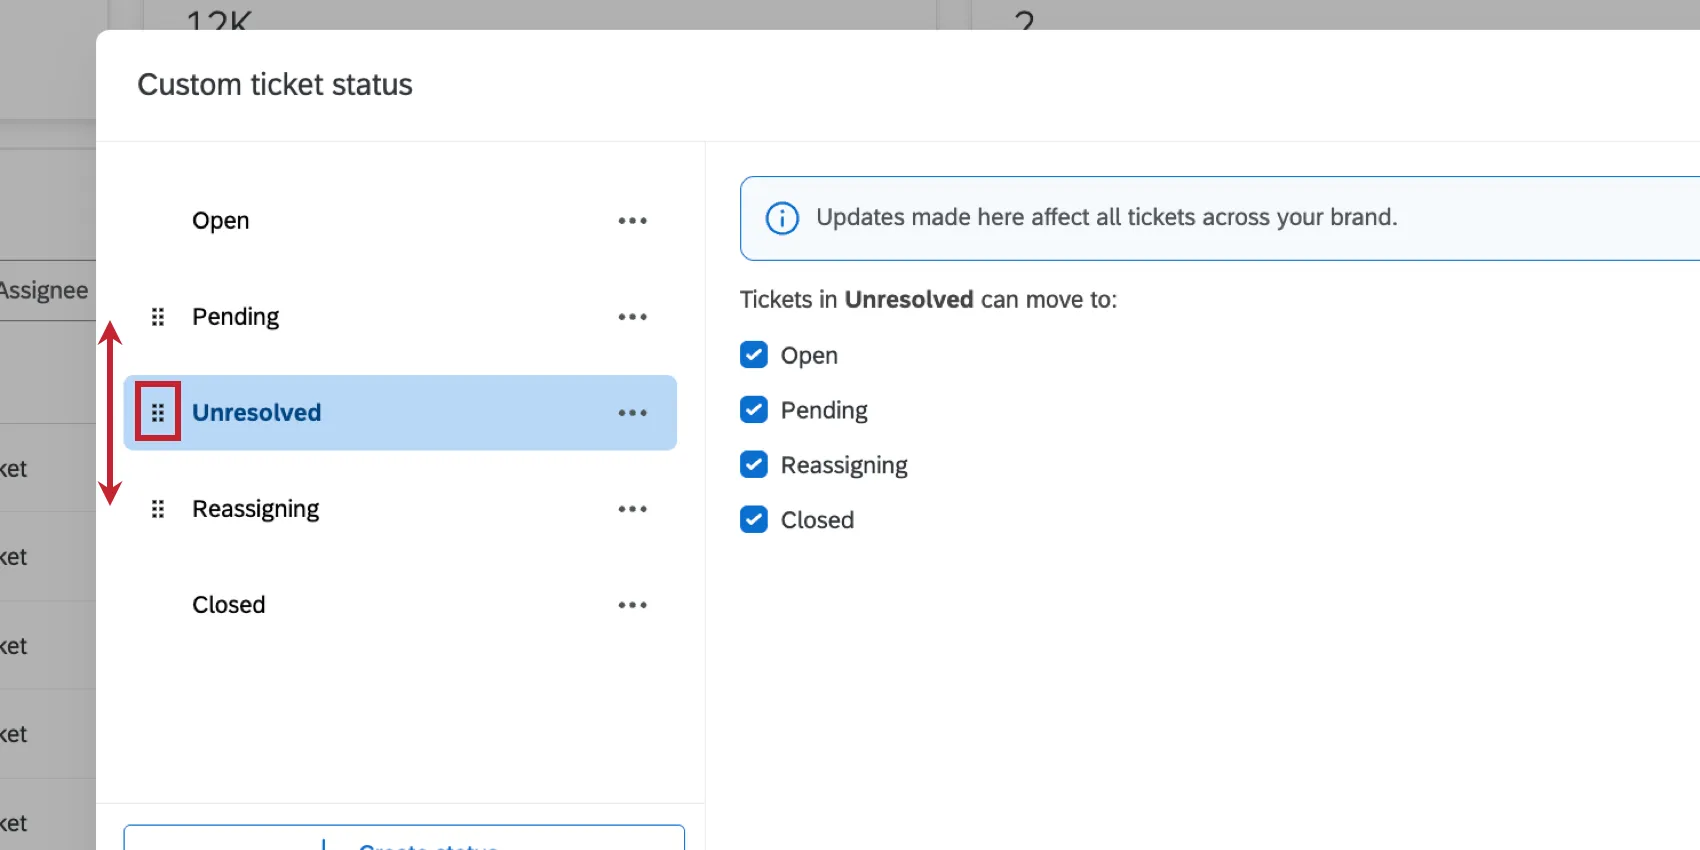
Click the move icon to the left of a status to drag and drop it into place. This changes the order that ticket statuses appear when users change the status.
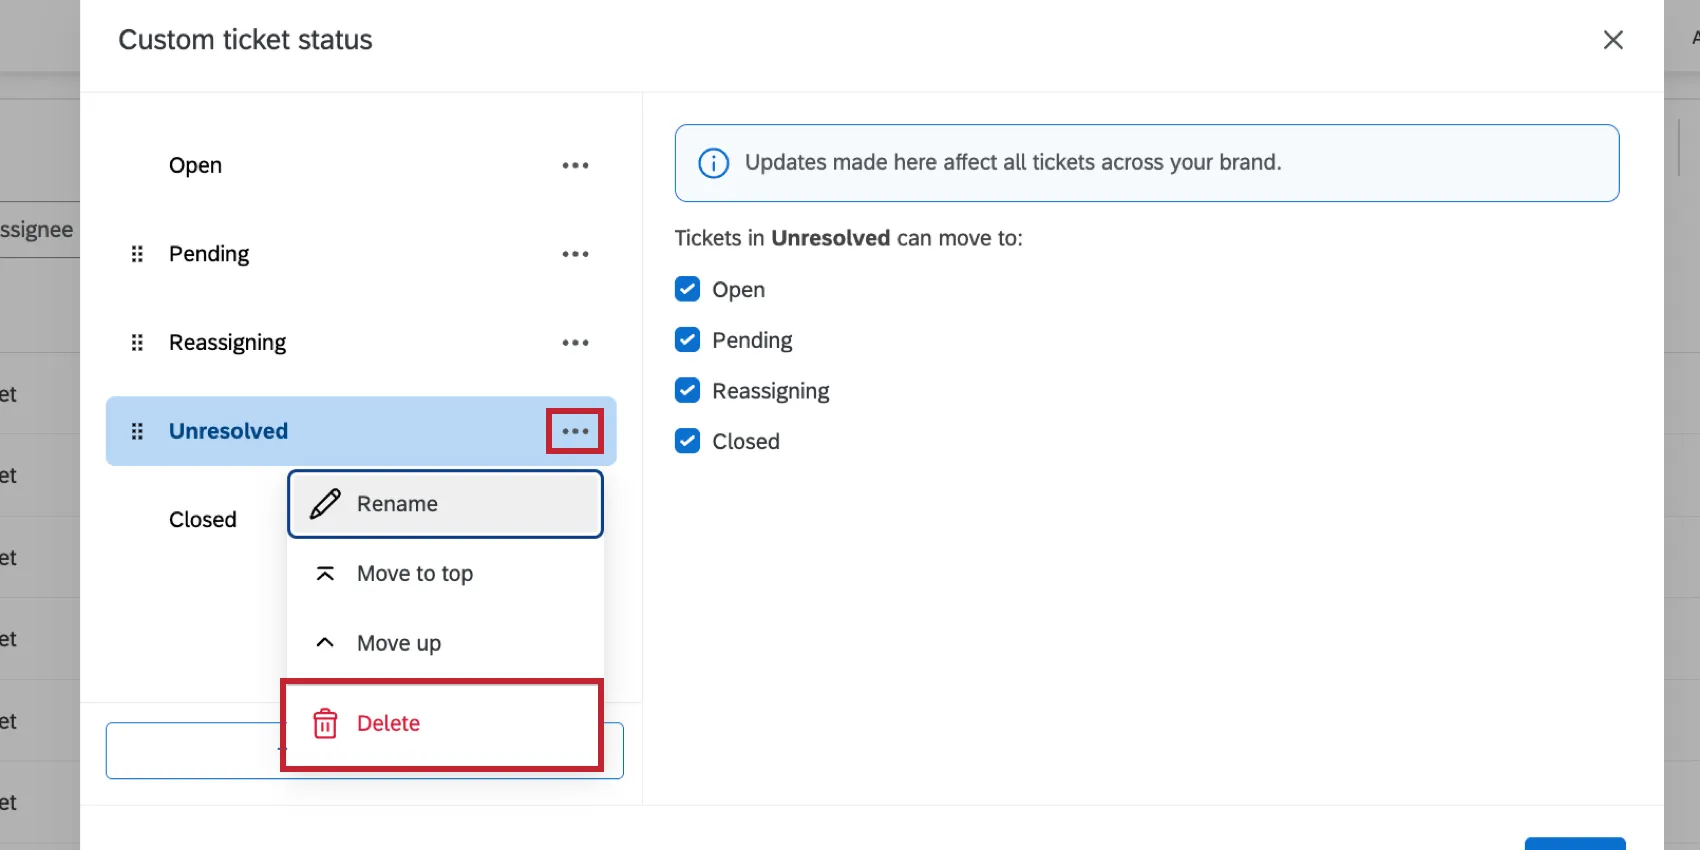
Click the options menu next to a status and select Delete to delete the status.
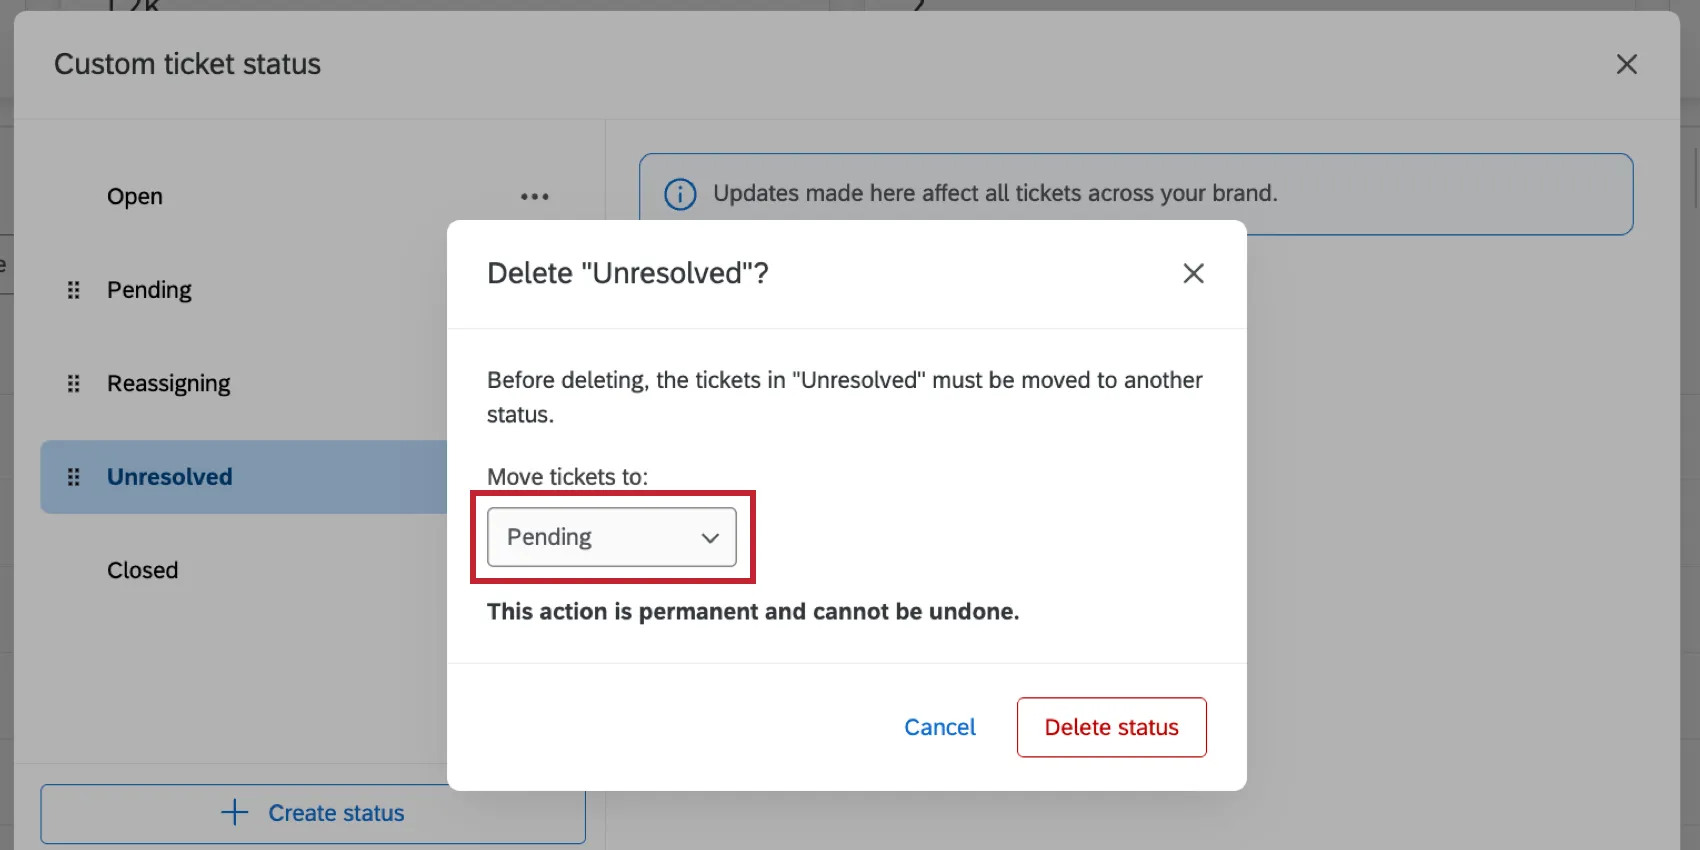
When deleting a status, you'll be prompted to move the tickets from the status you are deleting to a different status.
Ticket Workflows
The Ticket Workflows option allows you to create Ticket Workflows. That means you can escalate tickets in a timely manner by reassigning them, changing the status of the ticket, or sending out a ticket reminder.
Manage Queues
The Manage Queues option allows you to create ticket queues. These allow your employees to pull tickets relevant at random, eliminating the chance people will grab the same ticket.
Ticket Forwarding
The Ticket Forwarding option lets you automatically reassign new tickets being assigned to one person to another user when the first person is out of office.
That's great! Thank you for your feedback!
Thank you for your feedback!