
Ticket Group Permissions
What's on this page
About Ticket Group Permissions
Ticket group permissions allow for a more granular control of who has view and editing access over certain tickets. When specifying groups of users with access to certain tickets, you can add users manually or set up an automatic enrollment to make ongoing user changes easy to incorporate into your tickets framework.
Example: Ticket groups control what actions users can take on tickets owned by their group members. For example, you may want all employees at a store to be able to view, but not edit, all tickets owned by their coworkers. However, you want the store manager to be able to edit tickets as needed, even if they’re not the owner of those tickets.
Qtip: Ticket groups are a great alternative to ticket teams. With ticket groups, each member of a group owns their individual tickets, but other members of the group will be able to view and edit the tickets depending on their permissions. This is different from ticket teams, in which users are placed into teams and then ticket ownership is assigned to the entire team. Unlike in ticket teams, however, users will not be notified when they are added to a ticket group or if a ticket is assigned to a group they belong to.
Creating Ticket Groups
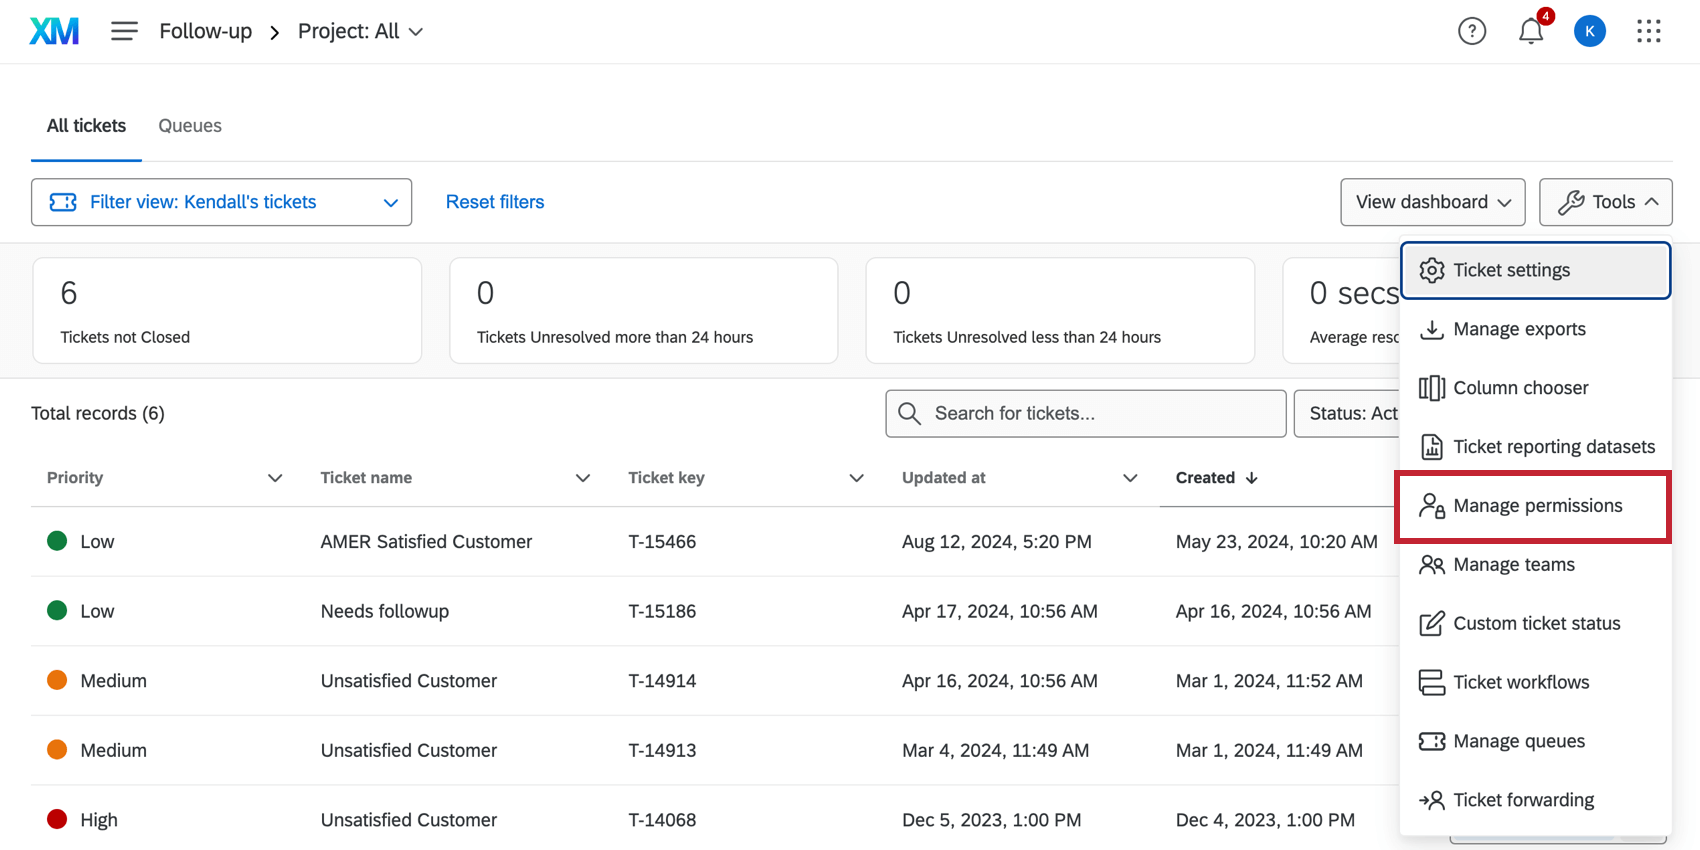
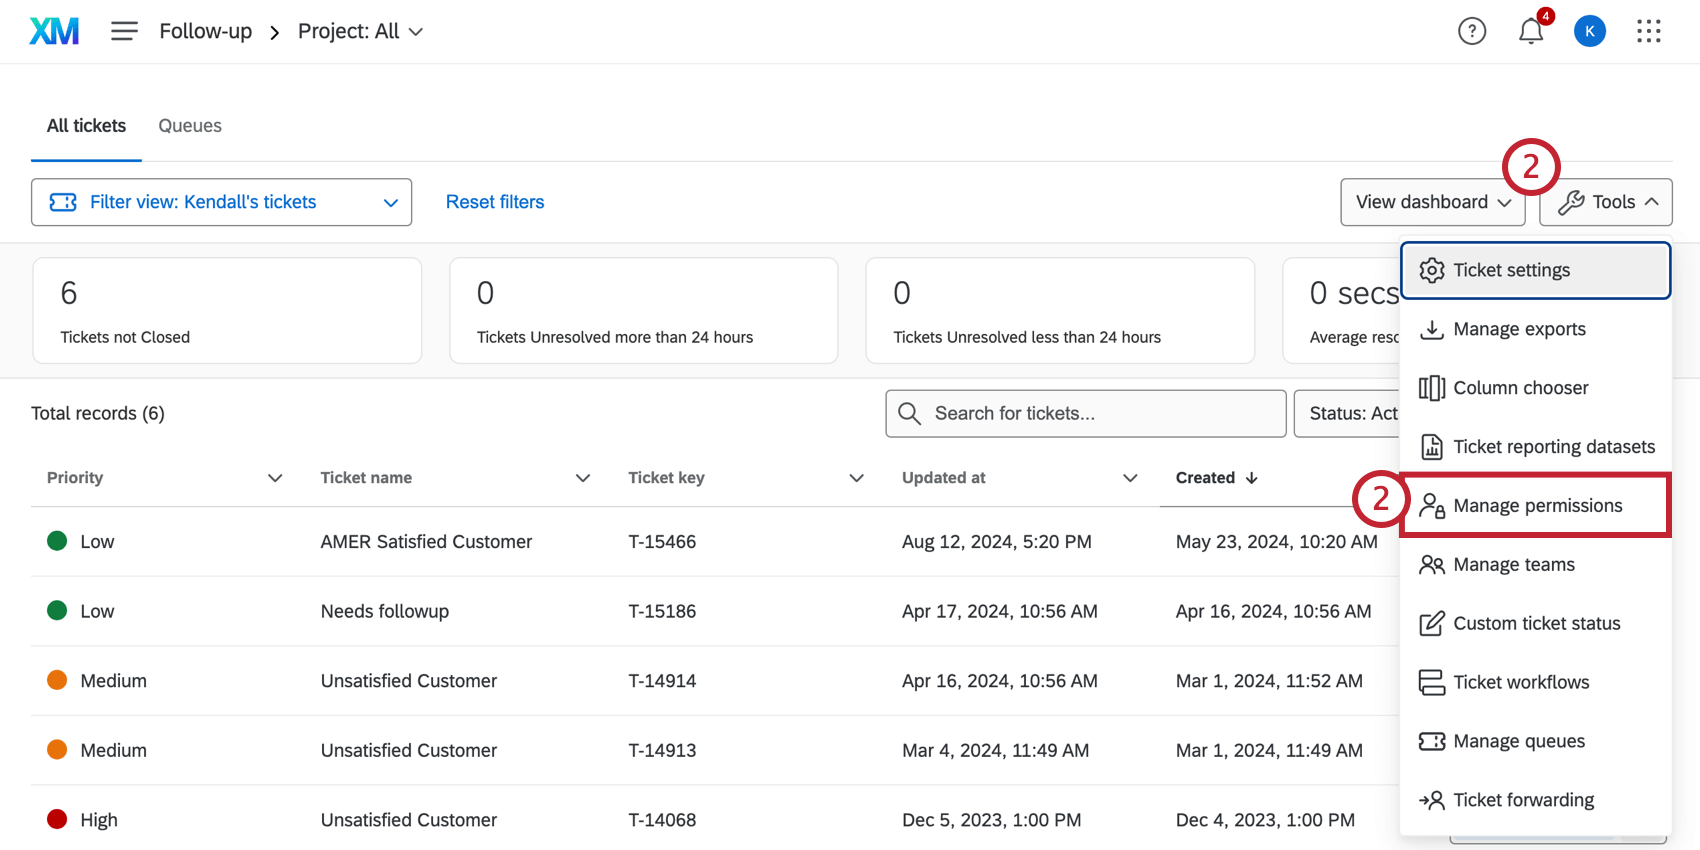
Qtip: Only Brand Administrators, CX Administrators, and any user with the Manage CX Users or Ticket Admin user admin permission enabled can create and edit these groups.


Qtip: We’re naming our ticket groups after all the store locations where the tickets could have been raised.
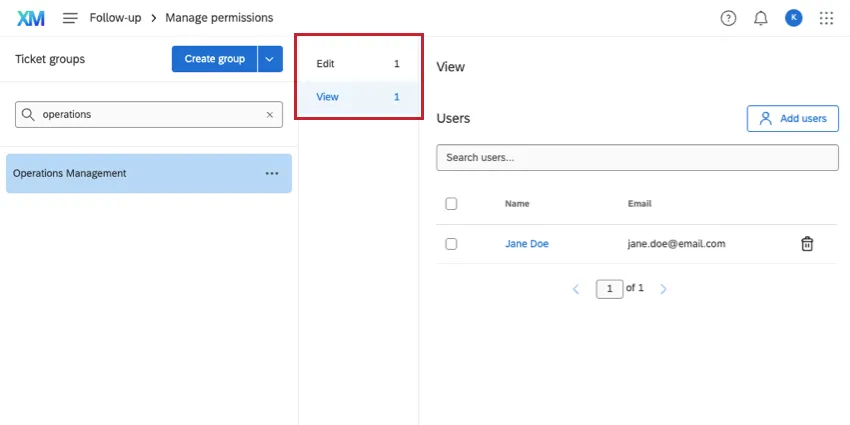
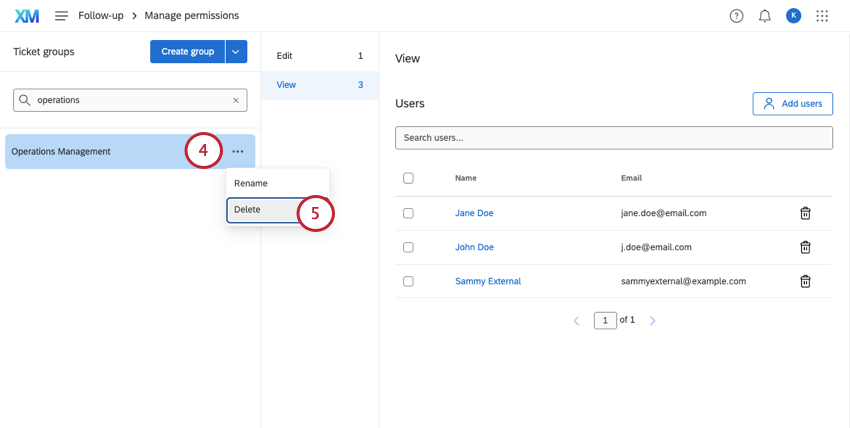
Adding Users to Ticket Groups
Qtip: You may not be taken to your new group immediately after its creation. Use the search or scroll to find the group, then click on it.
Once you’ve created your ticket groups, it’s time to add users to them. You can manually add users, or you can set up automatic enrollment so that as users who fit a certain condition are uploaded, they are automatically added to groups.
Creating Ticket Groups in Bulk via File Upload
You can create your ticket groups by uploading a CSV or TSV file with the names of the groups you want to create and their metadata. While uploading the file, you can use automatic group enrollment to automatically grant the relevant ticket permissions to the desired users in your license.
Qtip: You can also use this feature to update existing groups. Just make sure that the Name column in your file contains the names of the groups you want to update.
Preparing a file for upload
Qtip: You can download a sample file to use as a reference in the next steps, once you enter the ticket group upload screen.
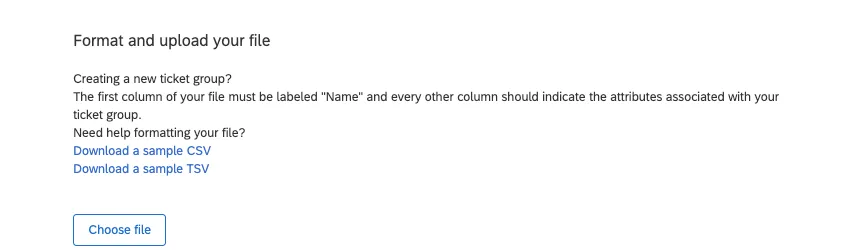
Before creating your ticket groups, you need to create the file you will upload into Qualtrics. Your file should include the following:
- Ticket group names: The first column of your file should be called Name and contain the names of your ticket groups. If your account language is not English, then you should enter the translated word for “Name” as the column header (e.g., for Spanish, you’d enter “Nombre”). If you download the sample CSV file available in the upload window, the sample file will contain the correct column header. You cannot have multiple ticket groups with the same name.
- Additional metadata: You may then add additional columns containing additional information for the groups, if desired. If you include metadata columns, every group in the file must have a value for the metadata. These metadata are used to automatically assign users to ticket groups based on their metadata.
- File format: After creating your file, save it as either a UTF-8 encoded CSV, or a TSV.
Qtip: You may have up to 50 groups and 10 metadata in one file upload.
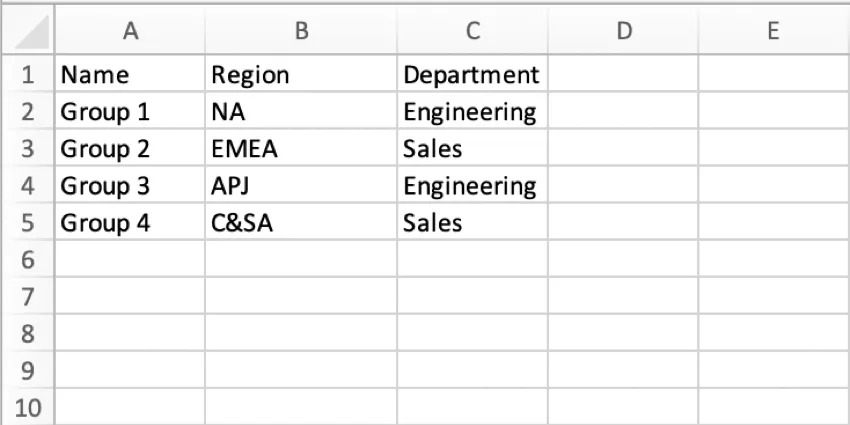
Example: Below is an example CSV file. We have four different groups and two different meatadata (Department and Region) for the groups.
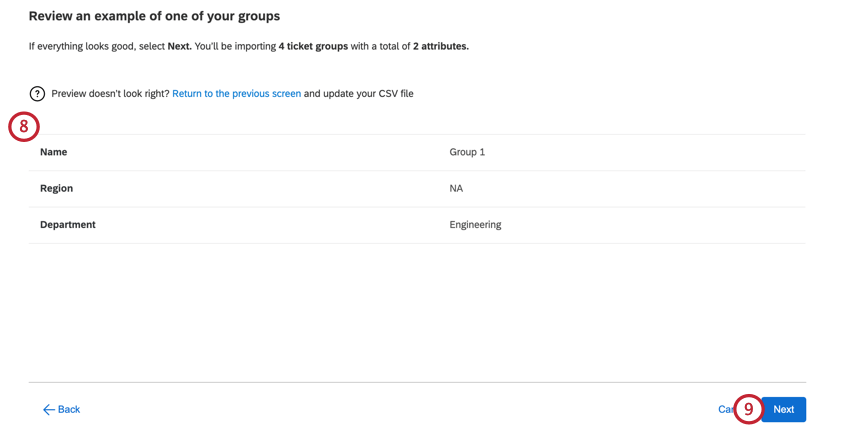
Creating Ticket Groups via CSV/TSV upload.


Qtip: If you need help formatting your file, click Download a sample CSV or Download a sample TSV to download an example file format. If you are running into trouble uploading your file, see CSV/TSV Upload Issues.
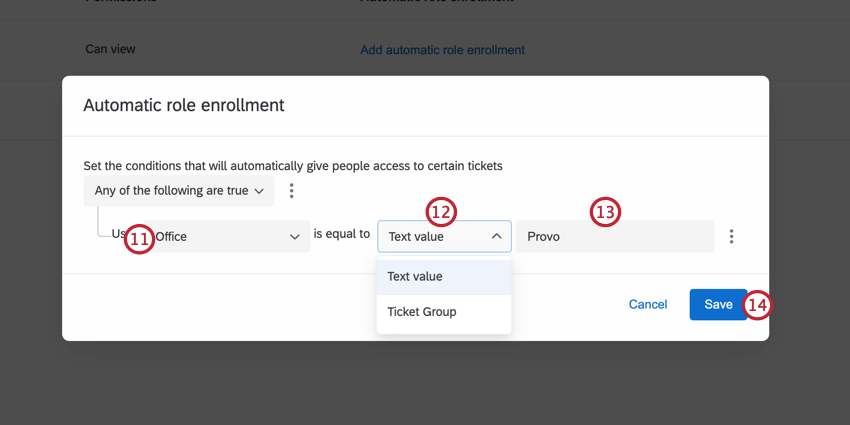
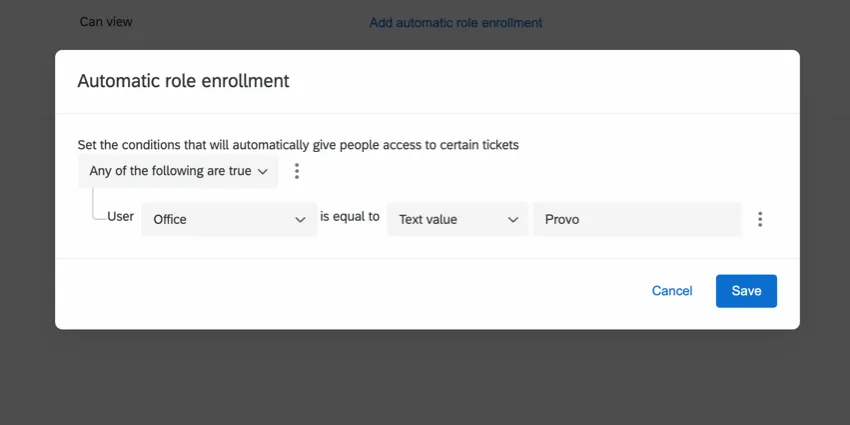
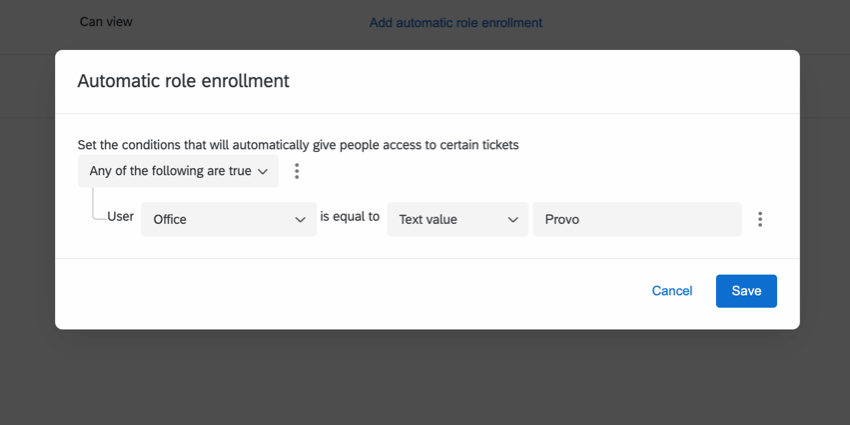
- Text value: Type the desired value for the metadata. Example: In this example, we want to enroll users who have the metadata Office equal to Provo.

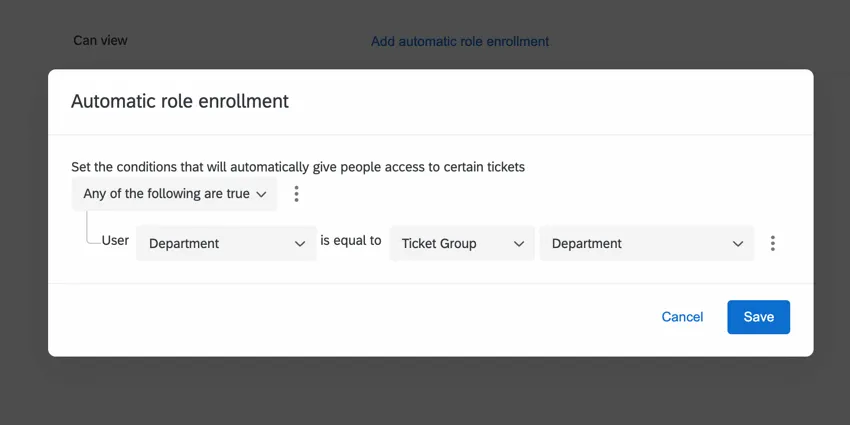
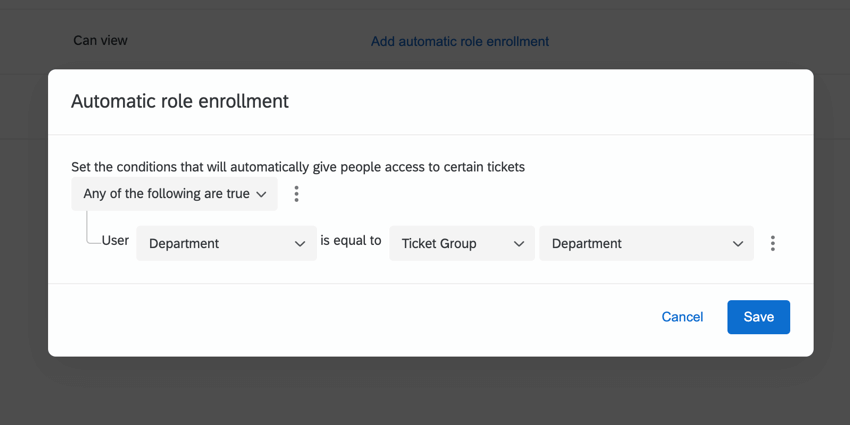
- Ticket Group: Choose a ticket group metadata that should match the user’s metadata value. Example: In this example, we want to enroll users who have the metadata Department equal to the ticket group’s Department. In our example upload file, Group 1 had a Department value equal to Engineering, so users with that as their Department metadata would be assigned this role in Group 1.
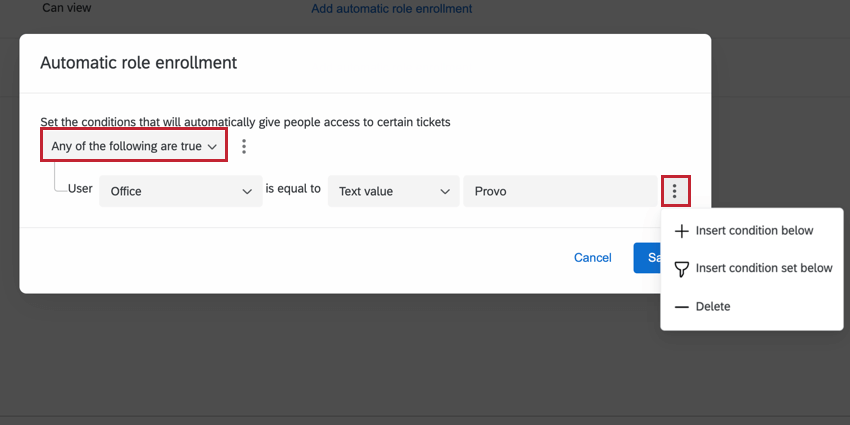
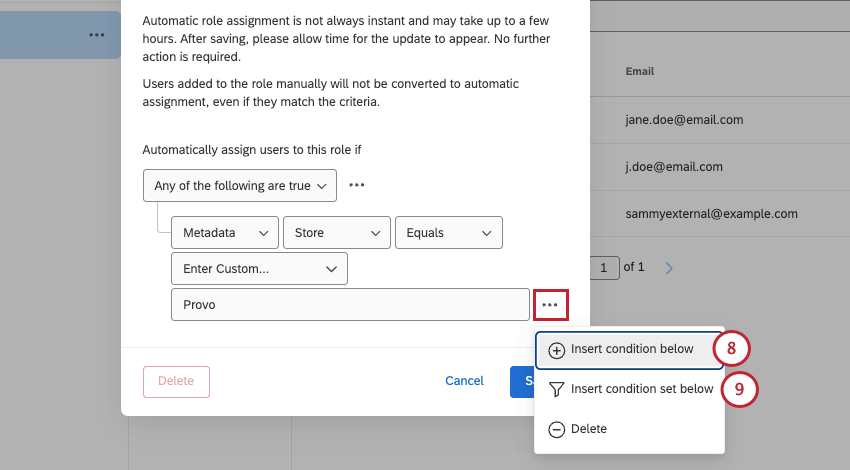
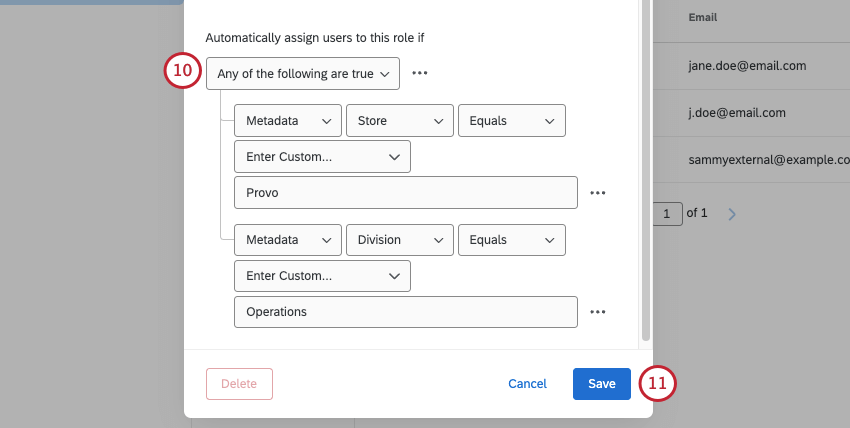
Qtip: Use the any/all filter to determine how conditions are evaluated. You can add extra conditions and condition sets for more complex logic by clicking the three dots next to an existing condition. Visit the linked pages for more information on building complex logic.

Qtip: Your groups will be created after uploading your file. The total time to create the groups may vary depending on the number of groups and users being auto-enrolled. You will receive an email when the upload is complete. If you try to upload another file while your current file is being processed, you’ll receive the error message shown below.

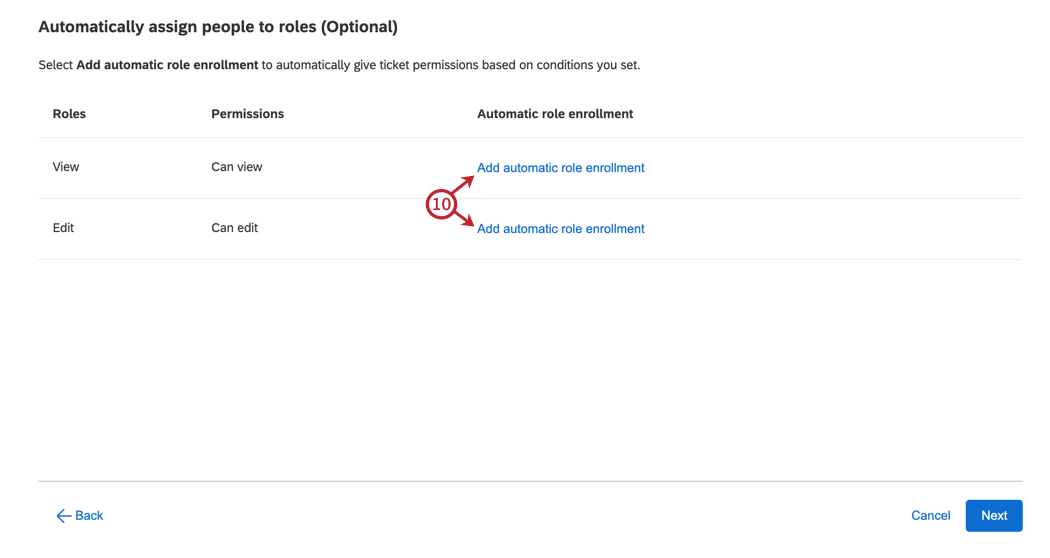
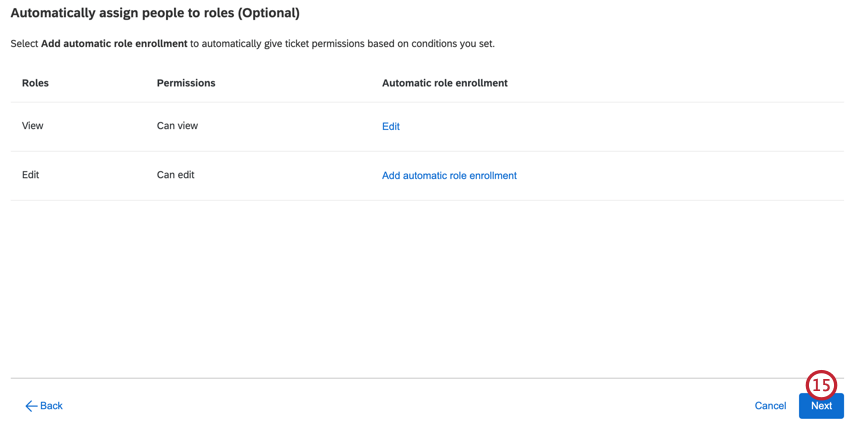
Types of Ticket Permissions
For every ticket group you create, there’s 2 levels of access, or “roles,” users can be a part of:
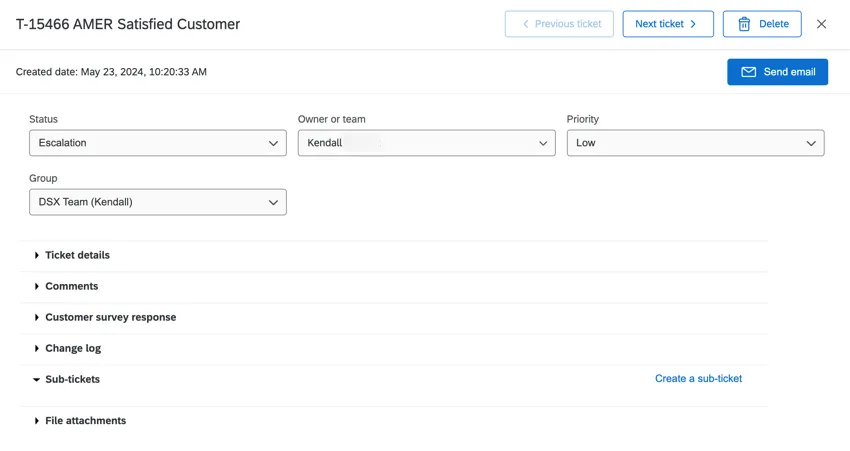
Edit: Edit all tickets in the group. This includes changing assignments, status, ticket group, and priority; adding comments and sub-tickets; sending emails; and performing other actions on the ticket that the ticket owner can perform.

Qtip: Only Brand Administrators, CX Administrators, and any user with the Manage CX Users or Ticket Admin user admin permission enabled can delete tickets.
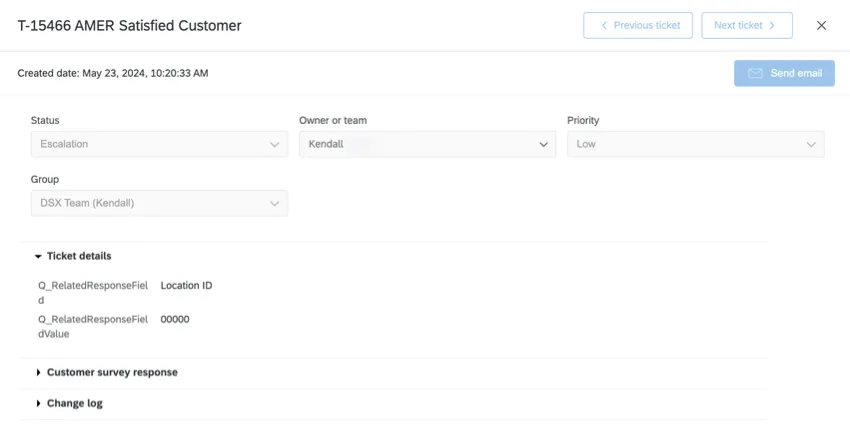
View: The user can view all information on the ticket, but they cannot make any changes. That means they cannot change the ticket assignment, status, group, or priority; add comments or sub-tickets; send emails; nor perform any other actions the ticket owner can perform.
Example: Each of the employees at the Dublin store should have visibility into each other’s tickets, but should not be able to re-assign or change the priority of tickets that do not belong to them; we’d give these team members View access to the Dublin ticket group. However, the manager and team lead in the Dublin store definitely need to be able to re-assign or add comments to tickets; we’d give them Edit access to the Dublin group.
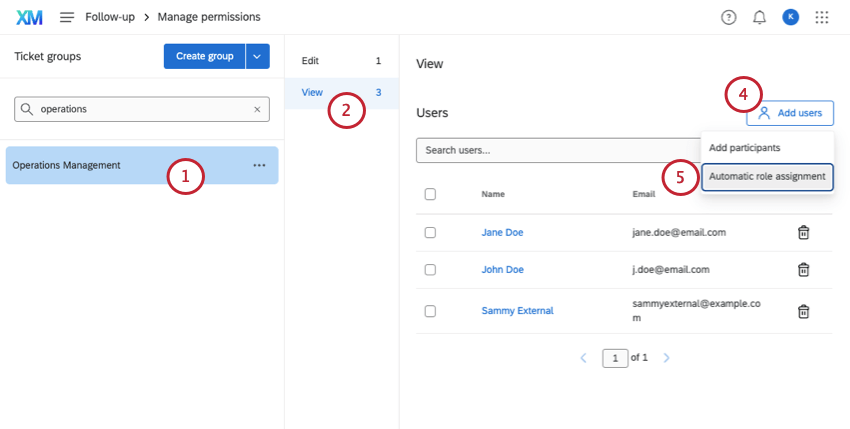
Adding Users to Groups Manually


Automatic Group Enrollment
Whenever CX users are added with the User Admin tab of any Dashboards project in the brand, you can include user metadata. These are additional columns of information that can be used to refine user data and permissions. In this case, metadata can be used to assign users to ticket groups so it’s faster and easier to add users in bulk. Once you’ve added metadata to your CX users, you can begin using automatic group enrollment.
Automatic group enrollment adds current users to ticket groups at the time that you set up the enrollment. Newly created users will be automatically added to your ticket groups within a few minutes after their accounts are created.
Qtip: This feature also supports assigning users who have multiple values for a single metadata. Multiple values must be separated by a double colon (::). See Editing Individual Metadata Values for more information about using multiple values for a single metadata.
Attention: In order for automatic group enrollment to recognize metadata, make sure that your metadata do not include any spaces (e.g., The metadata “Dublin Office” will not be eligible for automatic group enrollment, whereas “DUB” will be successful).
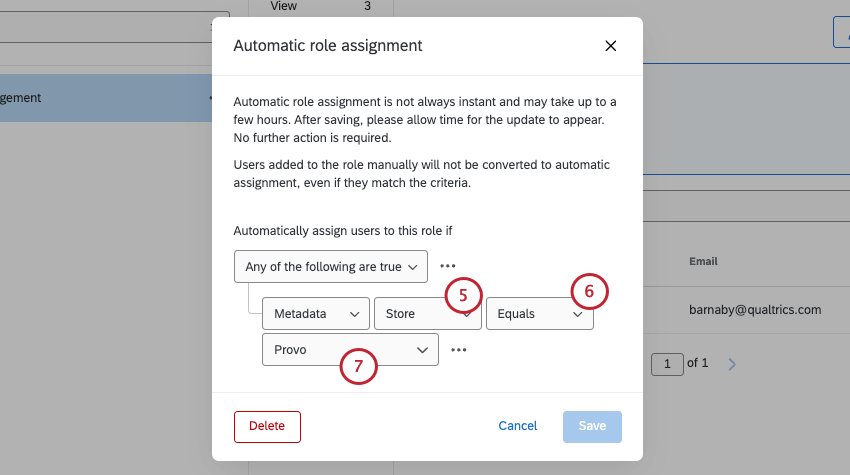
- Equals: This is what you should choose most of the time. This ensures an exact match. Make sure values are case sensitive.
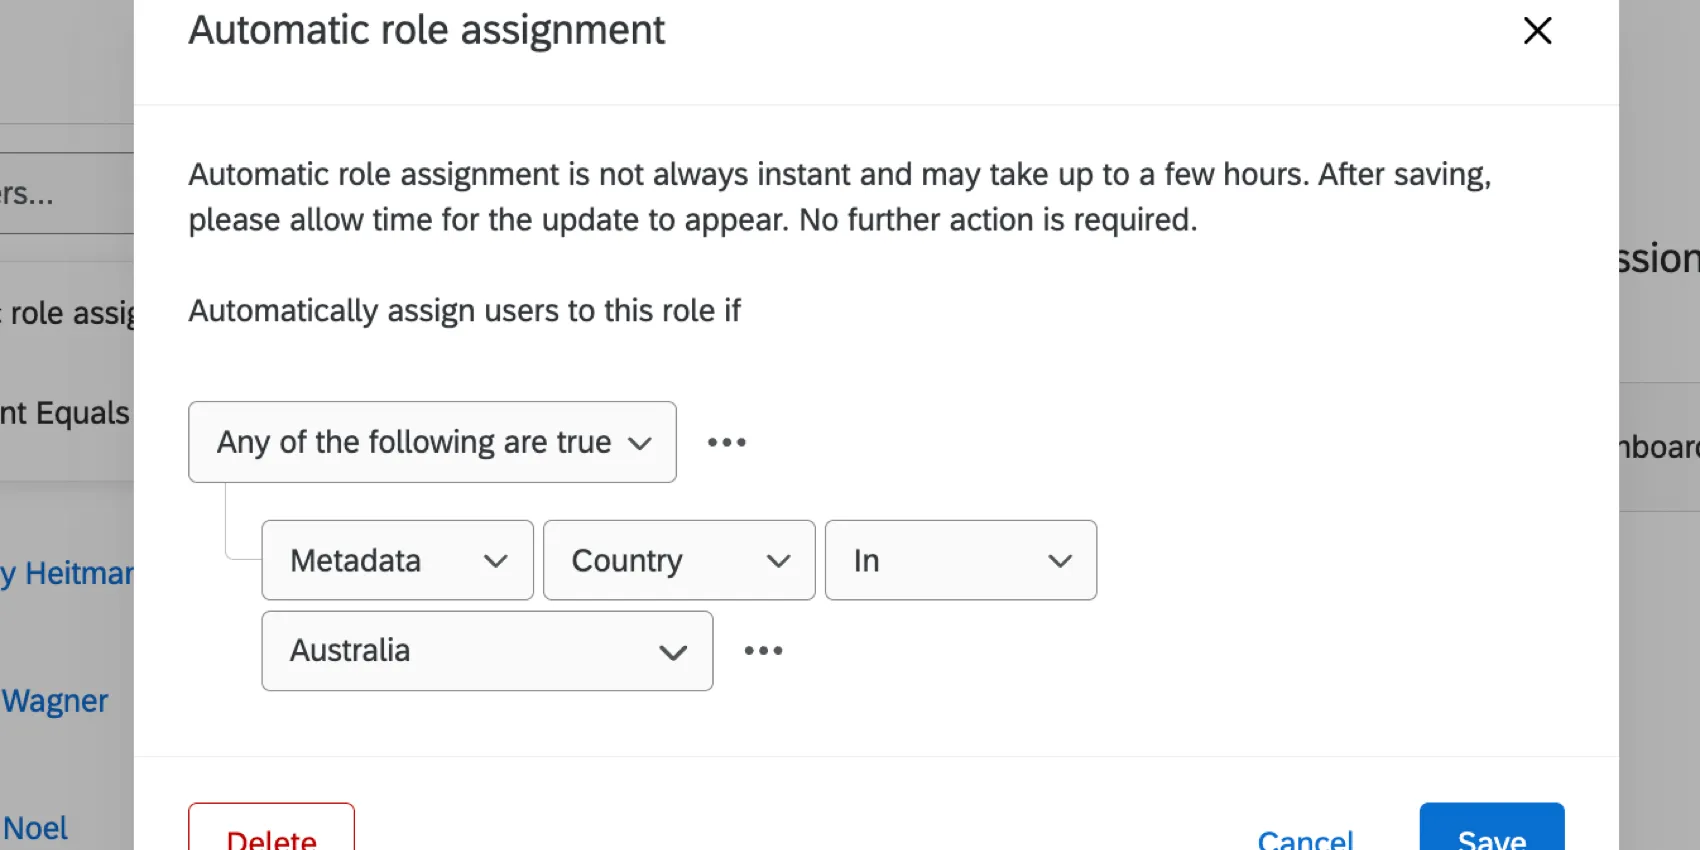
- In: This option is ideal if your metadata has multiple values, such as those separated by colons (e.g., Seattle::Provo). “In” lets you account for these colon-separated values. Example: Below, “Country in Australia” ensures that even users whose Country metadata is something like “Australia::USA” would be included in the role.

Example: You are creating a role called Seattle Team. You want all users with an Office of Seattle to be put into this role.
Qtip: You can type to search values in this field.
Qtip: You can click Delete to delete the automatic role assignment rules for a role. Any ticket users who were added via the rules will be removed from the group.
Editing Automatic role assignment
Ticket groups that already use automatic role assignment will highlight it above the user list. This banner will show the current rule for group assignment.
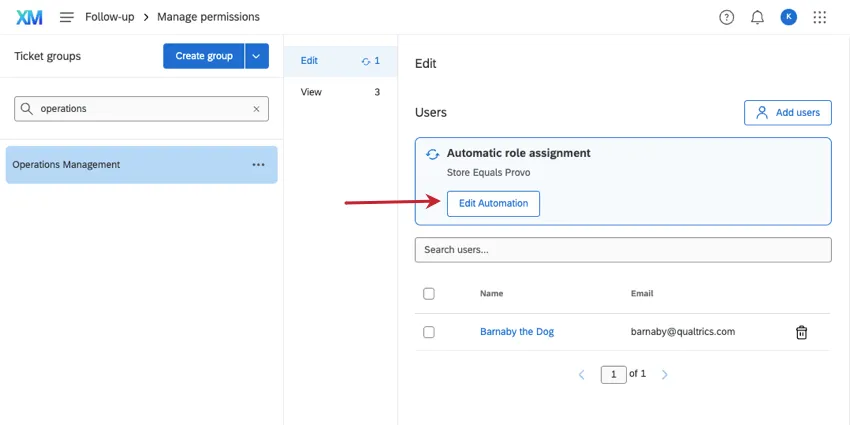
To edit this rule, click Edit Automation.
How automatic role assignment works when the metadata for a single user has multiple values
Some metadata (CX | EX) have multiple values. For example, your Customer Experience team may operate out of several offices. If a metadata attribute has multiple values, it changes how it works with automatic role assignment.
Example: Let’s say you wanted the users listed below to appear in the same ticket group:
- User 1: Country = Australia
- User 2: Country = USA
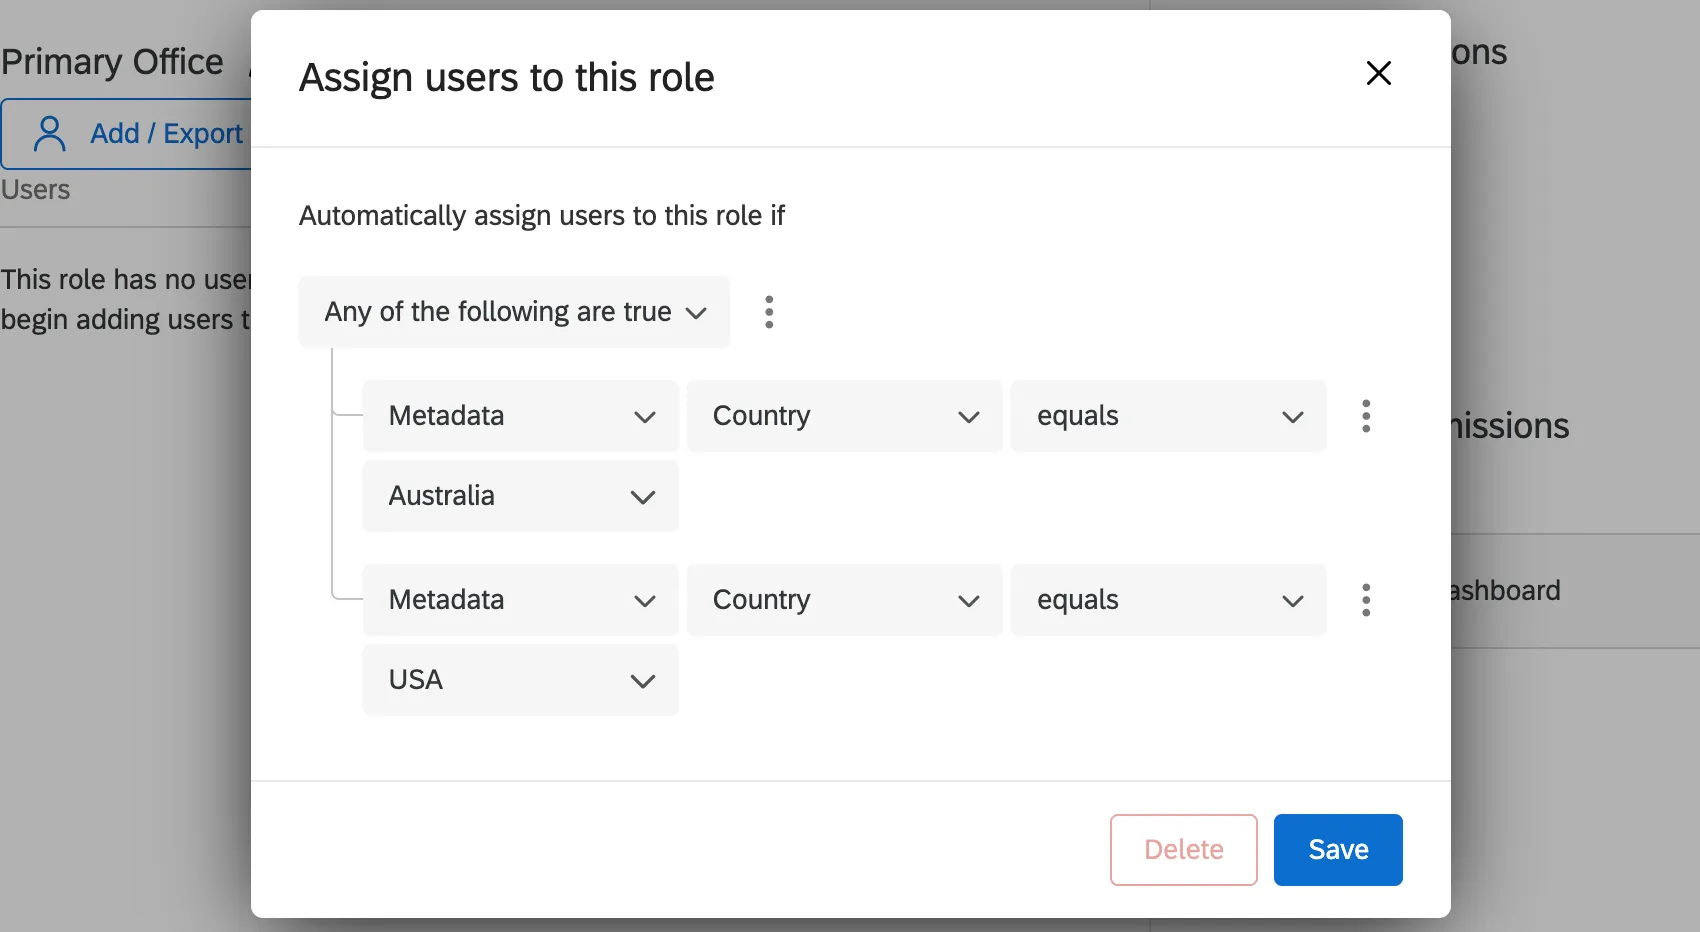
You can add 2 conditions to your ticket group joined by “Any” to add these users to the same group.
You can also create multiple ticket groups, so that a user with multiple values is assigned a different ticket group for each value. In this case, you would create an Australia ticket group and a USA ticket group.
Let’s say your users are:
- User 1: Country = Australia::USA
User 2: Country = Australia

If you created an Australia ticket group, you would use in instead of "equals" to make sure both users are included. On the other hand, if you made the ticket group’s condition “Country equals Australia,” then User 1 would not be added to the ticket group because their Country value is “Australia::USA,” not just Australia.
Automatic Enrollment with SSO
If your organization has Single Sign-On (SSO) set up, you can use it to automatically assign users to ticket groups.
- Setup with your IT Team: Your IT team is responsible for establishing your company’s SSO. On your end, you and your team need to create metadata you’ll use to assign roles. For ease of use, you might call this metadata “ticket group.” For each user, you could set the value of this metadata equal to the name of the group they should be assigned to. So if your colleague is supposed to be able to edit tickets for the Dublin office, his ticket group metadata should be equal to “Edit Dublin.” A colleague who is supposed to only view Dublin tickets would have a ticket group metadata equal to “View Dublin.”
- Ticket Group Setup: Once you’ve passed your SSO attribute as a CX user metadata, you can make the necessary changes in the ticket groups rules to complete the automatic enrollment.
Assigning Groups During Ticket Creation
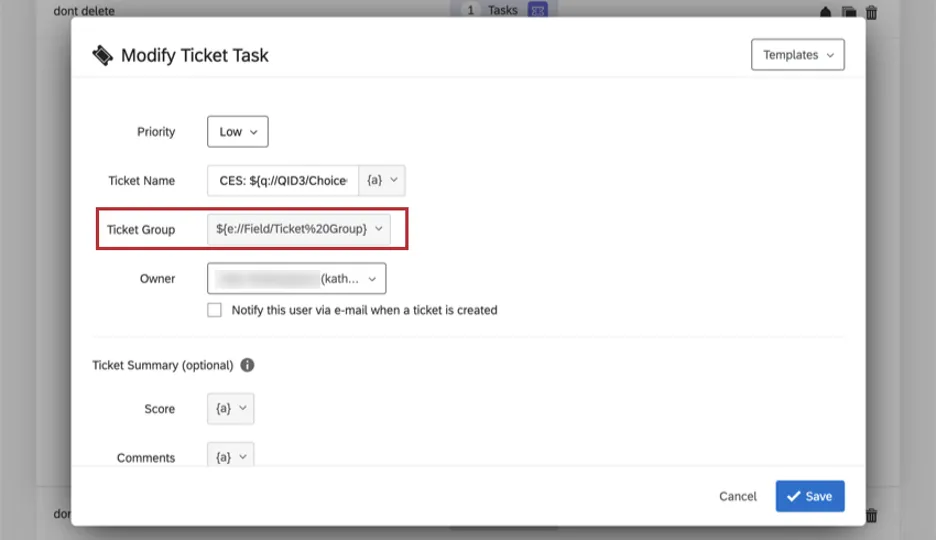
When creating tickets in Workflows, make sure to specify the group the ticket should be added to.
Qtip: If no group is selected, or if the group is invalid (e.g., a misspelled value), the ticket will be moved to the unassigned group.
When assigning ticket group, you can choose from a list of ticket groups, or you can pipe the value from a survey question, embedded data field, or contact information. The value of any field you pipe in must exactly match the name of the ticket group you want to add your tickets to.
Deleting Ticket Groups
You can delete a ticket group and move all tickets in that group to a different group.
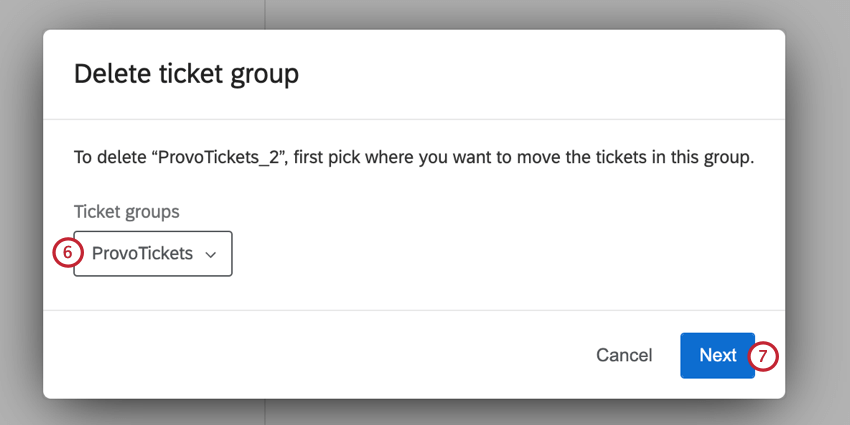
Qtip: Tickets must be moved to another group. They cannot be deleted, or moved to the “Unassigned” group.
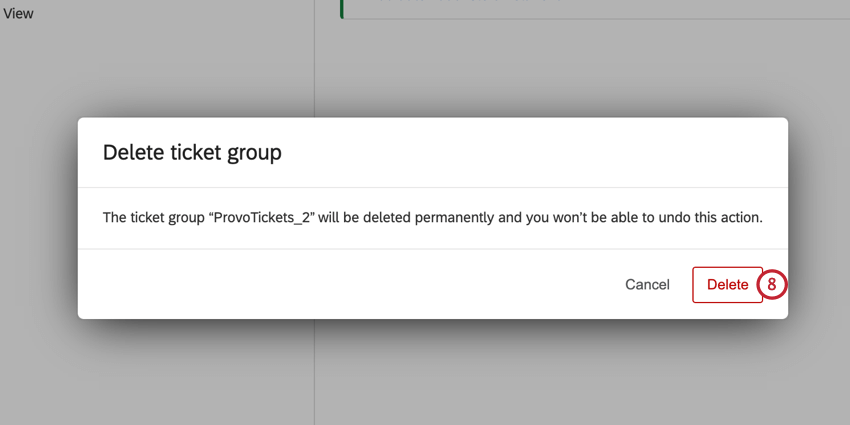
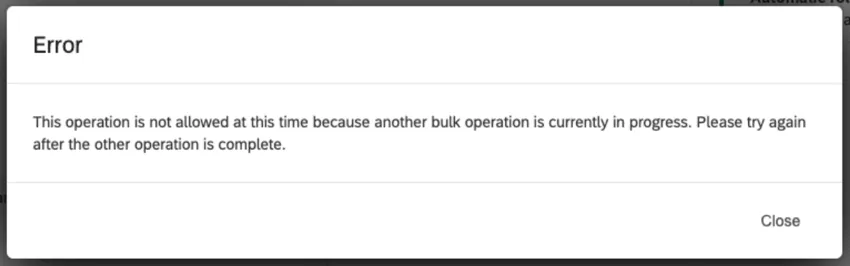
Qtip: Your group will be deleted and the tickets reassigned after clicking delete. The total time to delete groups may vary depending on the number of tickets. You will receive an email when the deletion is complete. If you try to delete another group while your current one is being deleted, you will receive the below error message.
Sorting Existing Tickets into Groups
Existing tickets can be manually assigned to a group using the Ticket Group dropdown.
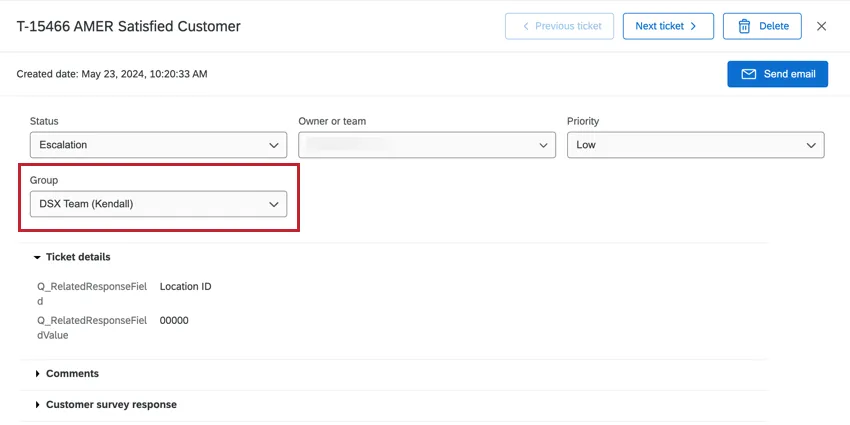
On the follow-up page, you can filter by ticket group for easier sorting.

Qtip: If tickets are in the unassigned category, and you do not have the ability to change their group, reach out to a Brand Administrator or a CX Administrator to get them sorted.
How Users View Tickets from Groups
Regardless of whether they are assigned to you, you can find tickets from groups you belong to in the Group tickets section of the Filter view dropdown. Additionally, you can find them by selecting the All tickets view.
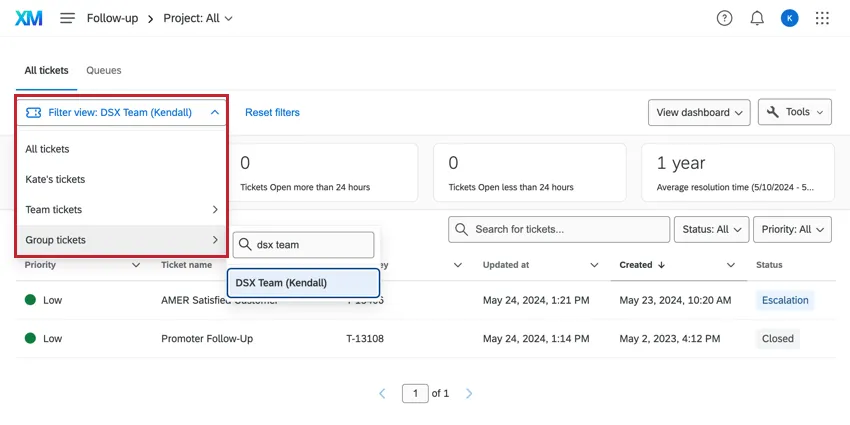
Qtip: Only groups you belong to will appear in the dropdown. The exceptions are users who are Brand Administrators, CX Administrators, and anyone with the Manage CX Users or Ticket Admin user admin permission, who will be able to view and edit all ticket groups.
FAQs
How do I determine who has access to certain tickets?
How do I determine who has access to certain tickets?
Brand Administrators, CX Administrators, and any user with the Manage CX Users or Ticket Admin user admin permissions can edit and access all tickets.
Can I use ticket groups with my ticketing queues?
Can I use ticket groups with my ticketing queues?
That's great! Thank you for your feedback!
Thank you for your feedback!