

Detractor Alert Workflow
What's on this page
About the Detractor Alert Workflow
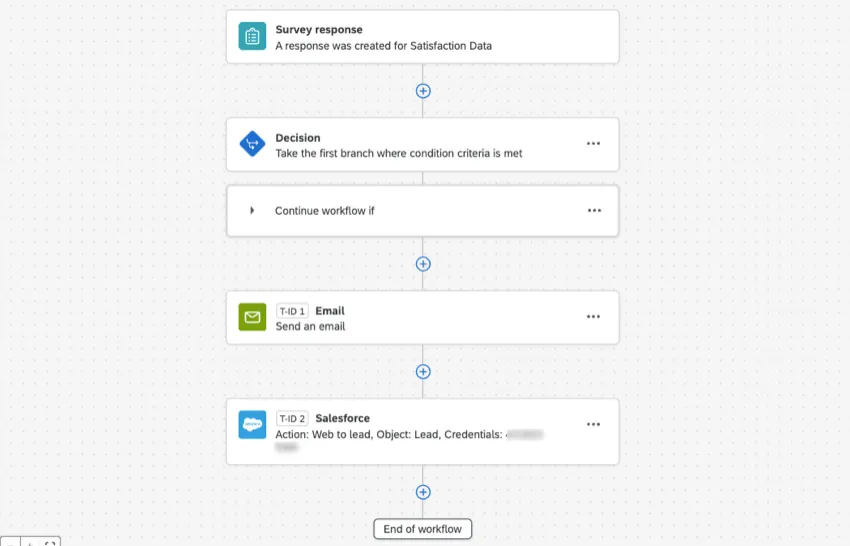
Among the many benefits of workflows are how they automate alerts and notifications to keep you updated on how your customers are feeling. By creating a workflow that runs whenever detractors are detected, you can potentially prevent customer churn.
In the example we cover on this page, if a customer scores 0-6 on NPS (or 1-2 on CSAT):
- The workflow instantly emails the Account Manager with the score and comments.
Simultaneously, the account will be flagged as an "At-Risk Customer" in your CRM, prompting timely outreach.
Qtip: Net Promoter Score® is an industry standard for identifying which customers are loyal, which are generally satisfied, and which are unhappy enough to diminish your brand’s staying power. Learn more about how Net Promoter Score® (NPS) works.

Before You Start
Before you can create a detractor alert workflow, you need to already be running a survey where you collect NPS (or CSAT). For example:
- Any survey with an NPS question.
- Any survey with a multiple choice CSAT, recoded.
- A relationship survey.
Transactional surveys, such as post-support or post-purchase surveys.
The step where you flag an account as “at-risk” in your chosen CRM (Customer Relationship Manager) is optional. If you want to complete this step, it’s important to know what your CRM is. For example, Salesforce, ServiceNow, or Microsoft Dynamics 365.
Qtip: You might need the help of your organization’s IT team for the CRM step.
Step 1: Event and Conditions
Open your survey and go to the Workflows tab.
Choose the Survey response event.

Select your feedback survey.
Base the condition on your CSAT or NPS question.
Make sure the workflow only triggers for low scores, for example:
0-6 on NPS (or select Detractor)
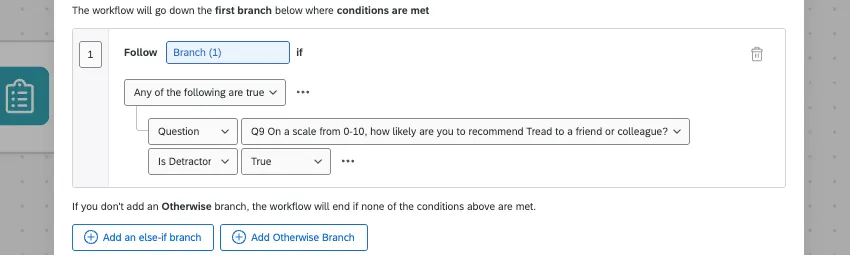
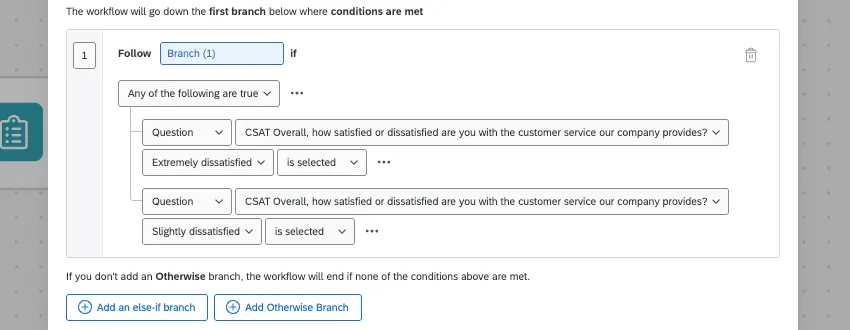
- 1-2 on CSAT
Example: 1 is extremely dissatisfied, and 2 is slightly dissatisfied. You could build a condition that says if any of those 2 options is selected, the workflow triggers.

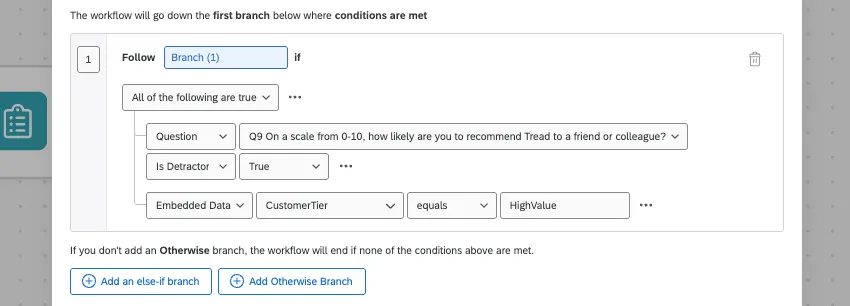
Add more conditions as needed.
Example: You only want to flag detractors from high value accounts. If you have this information saved to contacts, you can base the condition on the embedded data “Customer Tier” is “High Value.” Notice how "All of the following must be true," so both the NPS score and customer tier must be met before a workflow triggers.
Qtip: For help on combining multiple conditions, see Creating Conditions.
Save your condition.
Step 2: Account Manager Email
Under your decision, add a task.
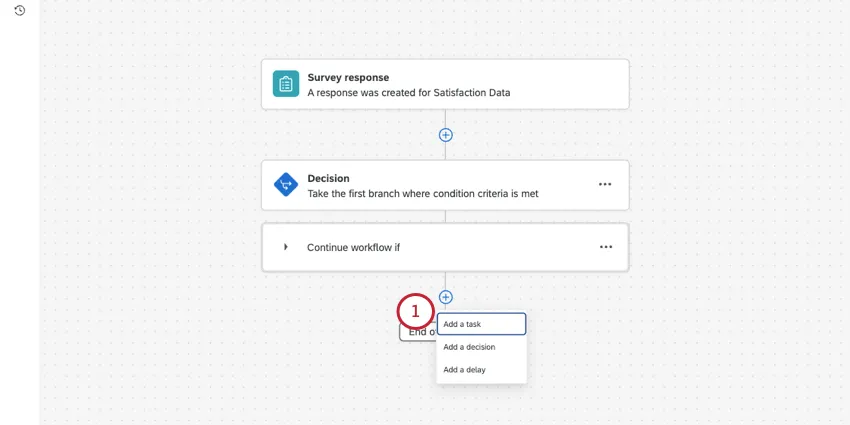
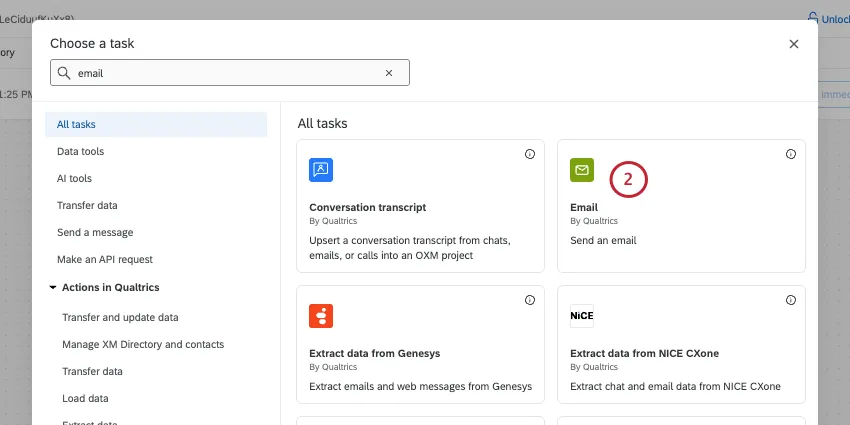
Select Email.
Make sure the recipient is the Account Manager’s email address.
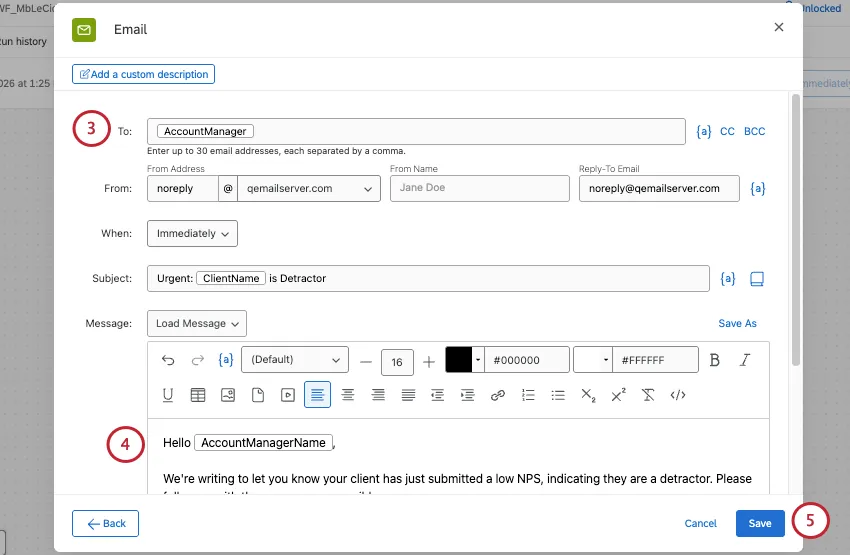
Example: If a specific Account Manager is saved to each customer’s contact information, you can use piped text ( {a} ) as the recipient instead of a specific email address.
Enter the email message.
Example: You can use piped text ( {a} ) to insert key information for the Account Manager, like the customer’s name, the exact rating they provided, and their feedback.
Click Save.
To learn more, see Setting Up an Email Task.
Step 3: CRM Escalation
The exact next steps are going to vary based on your chosen CRM, but here are the basics:
Add another task to the workflow.
Choose your case creation software. Here are a few examples:
Qtip: Try searching the name of your CRM on our support site. If there’s not a prebuilt integration, your IT team can always use APIs or webhooks with a web service task.
Create a new case.
Make sure to carry over important customer info, as well as their feedback response.
Attention: Once you’re finished, don’t forget to Publish your workflow!


Score Changes Over Time
In the workflow you just created, an email and CRM update will be triggered pretty much every time a low score is submitted on a survey. This method can urgently resolve threats to customer churn. However, there are other ways you can identify when an account needs intervention. For example, you could instead track a score over time, and then take action accordingly.
There are workflow templates where the major tasks and settings are already selected, so you only have to enter your specific program’s information.
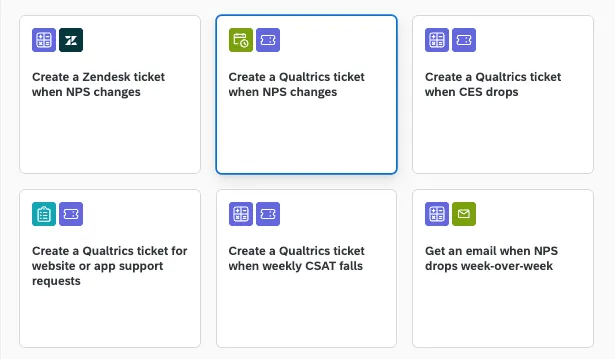
You can adjust any of these templates (including which CRMs are connected) as you see fit. Examples include:
- Create a Zendesk ticket when NPS changes.
- Create a Qualtrics ticket when NPS changes.
- Create a Qualtrics ticket when CES drops.
- Create a Qualtrics ticket when weekly CSAT falls.
Get an email when NPS drops week-over-week.
Many of these templates are powered by the Calculate Metric Task.
FAQs
How quickly can I expect workflows to run?
How quickly can I expect workflows to run?
Is there a maximum size workflows can be?
Is there a maximum size workflows can be?
An individual workflow can only be up to 1 MB in size before it starts to fail. You can only export up to 1 MB of details when exporting data from a workflow task. If you try to export more than that, you will see the error message "The execution has surpassed the platform limit" in the reporting page.
How can I change my "From" address for email distributions?
How can I change my "From" address for email distributions?
How can I avoid my emails being marked as spam?
How can I avoid my emails being marked as spam?
The survey response dates in this workflow aren't displaying in my time zone. Is that intended?
The survey response dates in this workflow aren't displaying in my time zone. Is that intended?
To capture the date in your time zone, you can always set an embedded data equal to today's date.
That's great! Thank you for your feedback!
Thank you for your feedback!