
Participants Basic Overview (360)
What's on this page
Qtip: This page shows user interface and naming changes that we intend to gradually release starting July 1, 2026, through July 22, 2026. Qualtrics may, in its sole discretion and without liability, change the timing of any product feature rollout, change the functionality for any in preview or in development product feature, or choose not to release a product feature or functionality for any reason or for no reason.
About the Participants Tab
You can manage the people taking your 360 survey by navigating to the Participants section of the Participants tab. In addition to accessing a number of tools, you can search and edit participants in this section.
Qtip: Want to learn how to upload participants? Visit our Adding Feedback Givers, Recipients, & Managers (360) support page.
Types of 360 Participants
There are 3 types of 360 participants, each with their own section: Feedback recipients, Feedback givers, and Managers.

Each of these sections only displays participants who belong to the category of the same name. When you search participants in one of these 3 sections, you are only searching for ones that fit that description.
Qtip: A participant may show up in multiple sections. For example, if Jane Doe has a self-reflection to complete, she is giving herself feedback and receiving that feedback, and will appear on both the Feedback recipients and Feedback givers sections.
For more information on the differences between these kinds of participants, and for instruction on how to upload them, see the page on Adding Feedback Givers, Recipients, & Managers (360).
Advanced Search
You can search for a desired participant by typing a name or email address into the Search bar, or you can make use of the Advanced Search feature.
Navigate to the Participants tab.

Choose whether to search Feedback recipients, Feedback givers, or Managers.
Click Advanced Search.
Choose from a list of criteria to filter by.
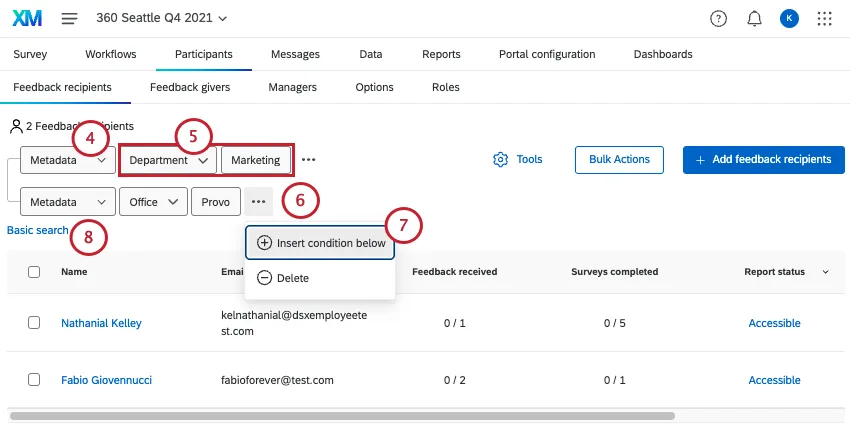
Fill out your remaining fields.
Click the 3 dots next to a condition.
Insert another condition below, or delete the condition you’ve created.
Qtip: Participants must meet all conditions to appear in advanced search.
Click Basic search to exit advanced search.
Once you’ve found the participants you’re interested in, click their names to open their Participation Information Window. Here, you can manage their metadata, manage their permissions, and perform other actions.
Search Criteria
The available criteria are as follows:
- Name or Email, Last Name, First Name, and Email: Search by a participant’s name or email address.
- Has Relationship: Filter by participants of a certain relationship. This does not filter by who they share the relationship with; only if it’s been assigned to them at all.
- Metadata: Search by metadata fields you uploaded with your participants.
- Nomination Requirements: Filter by whether the participant completed their nomination requirements or not.
- Self reflection: Filter by whether the participant completed their self reflection or not.
- Surveys completed: Filter by whether all their surveys have been completed.
- Feedback received: Filter by the number of feedback assessments the participant has received.
- Tasks: Filter by whether all tasks have been completed, or if the participant has viewed their own report. Tasks include feedback, nominations, and viewing the report. In addition, managers may have the following special tasks: approving nominations, approving reports, and viewing their direct reports’ reports.
- Manager Tasks: Filter by whether a manager has approved all nominations or reports.
- External feedback givers: Search by whether a feedback giver is “external” or not. An external feedback giver (or external evaluator) gives but does not receive feedback. Often they are invited by the nomination process, but administrators can add them, too.
Role: Filter participants by their dashboard role.
Participant Dropdown Options
When you hover over a participant and click the dropdown, the participant dropdown menu appears to the far right.
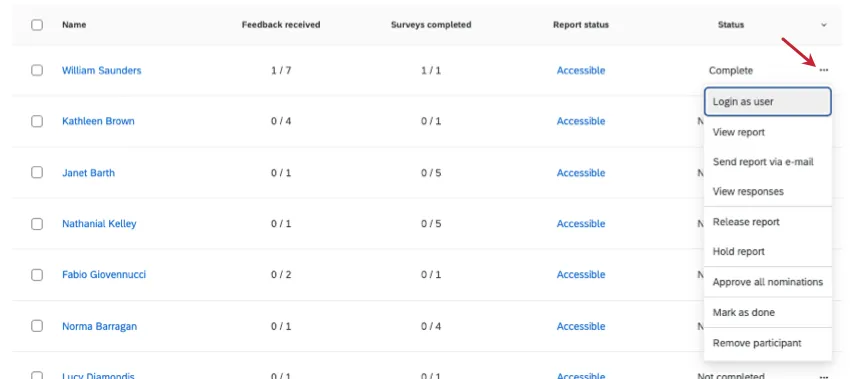
Options for a Feedback Recipient (Subject)
Login as user: Log into the feedback recipient’s Participant Portal.
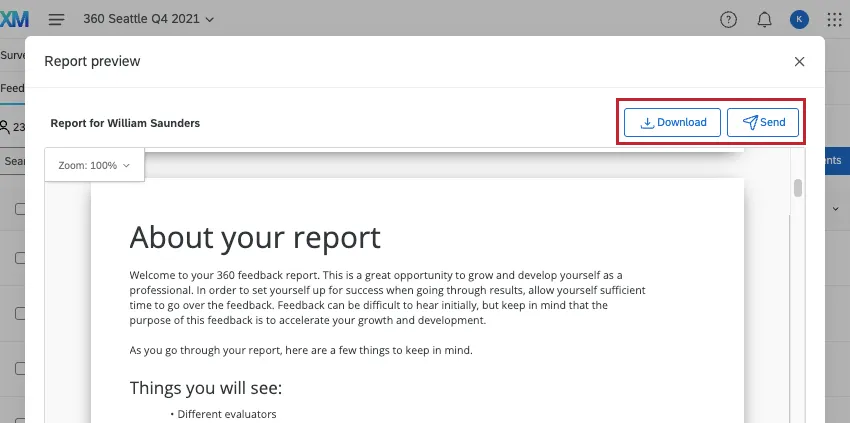
View Report: View the feedback recipient’s report. Click Download to download a PDF of the report. If you click Send, you can email the report to yourself. (The message will be sent to the email address attached to your account.)
- Send report via email: Email the report to yourself. (The message will be sent to the email address attached to your account.)
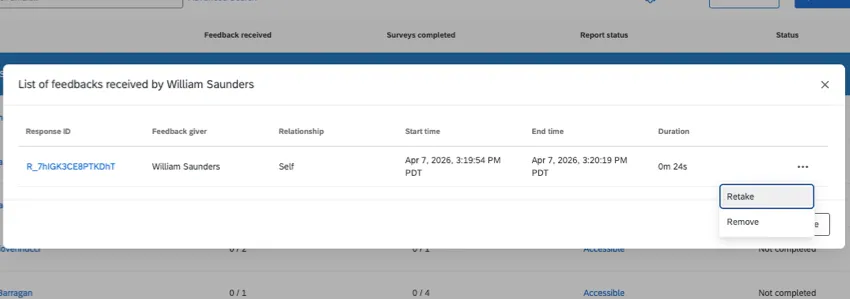
View Responses: See who has given the recipient feedback. You will be able to click a Response ID to view the specific assessment. Click the 3 dots on the right to Remove or Retake the response.
- Approve Report: This option will not appear unless you have Manager/Administrator approves reports turned on in your Report Options. When these settings are turned on, feedback recipients cannot see their reports until they are approved. Here is where you select to approve a report so it’s released to the feedback recipient.
- Remove Report Approval: If you approved a report and need it to be hidden again, click Remove Report Approval.
- Release Report: For reports with release requirements that haven’t been met yet, you can release a report early.
- Hold Report: For reports with release requirements, you can prevent the report from being released when it’s ready.
- Remove Report Hold/Release: If you chose to hold or release a report despite the release requirements, this option reverses that selection.
- Mark as Done: Prevents further feedback being completed for this recipient, and prevents more emails from being sent to the feedback givers.
Qtip: Using the “Mark as Done” option will prevent the feedback recipient’s feedback givers from completing more assessments for them. This option will also stop the reminder emails from being sent to the feedback givers. However, if the feedback recipient still has assessments that they themselves need to complete for others, they will continue to get those feedback giver emails.
- Unmark as Done: Remove the “Done” status from the feedback recipient, allowing emails to be sent to the feedback givers again.
- Remove participant: Remove this participant from the project. After selecting this option, you’ll see a pop-up confirming that you’d like to remove the participant. Any responses from this participant – both as a feedback giver and receiver – will be deleted.
Warning: Once you remove a participant and delete their response, the response data is lost. If you want the participant to redo their response, send them a retake survey link instead of removing them and re-adding them.
If you’d like to remove a feedback recipient’s assessment but still keep them in the project, then you can mark them as an external feedback giver.
Options for an External Feedback Giver (External Evaluator)
Login as user: Log into the feedback recipient’s Participant Portal.
Remove participant: Remove this participant from the project. After selecting this option, you’ll see a pop-up confirming that you’d like to remove the participant. Any feedback from this participant will be deleted.

Warning: Once you remove a participant and delete their response, the response data is lost. If you want the participant to redo their response, send them a retake survey link instead of removing them and re-adding them.
Managing Multiple Participants
You can also select multiple participants at a time, then use the Bulk Actions menu to act on them all at once.
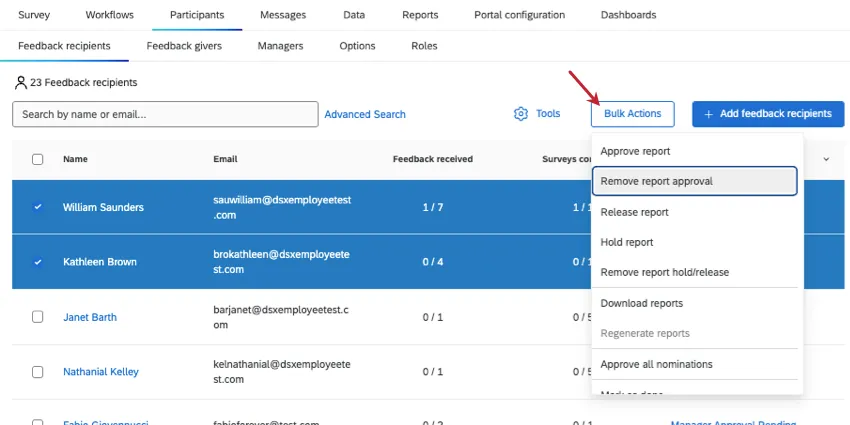
Options for Multiple Feedback Receivers (Subjects)
- Approve Report: This option will not appear unless you have Manager/Administrator approves reports turned on in your Report Options. When these settings are turned on, subjects cannot see their reports until they are approved. Here is where you select to approve a report so it’s released to the subject.
- Remove Report Approval: If you approved a report and need it to be hidden again, click Remove Report Approval.
- Release Report: For reports with release requirements that haven’t been met yet, you can release a report early.
- Hold Report: For reports with release requirements, you can prevent the report from being released when it’s ready.
- Remove Report Hold/Release: If you chose to hold or release a report despite the release requirements, this option reverses that selection.
- Download Reports: Download PDFs of the reports for every selected feedback recipient.
- Regenerate Reports: Regenerate individual feedback recipient reports.
- Mark as Done: Prevents further assessments being completed and emails from being sent to the feedback givers.
Qtip: Using the “Mark as Done” option will prevent the feedback recipient’s feedback givers from completing more assessments for them. This option will also stop the reminder emails from being sent to the feedback givers. However, if the feedback recipient still has assessments that they themselves need to complete for others, they will continue to get those feedback giver emails.
- Unmark as Done: Remove the “Done” status from the feedback recipients, allowing emails to be sent to the feedback giver again.
- Remove selected participants: Remove these participants from the project. After selecting this option, you’ll see a pop-up confirming that you’d like to remove the participants. Any external assessments they have submitted will be deleted.
Warning: Removing the participants from the project deletes any response they’ve provided. If you want the participant to redo their response, send them a retake survey link instead of removing them and re-adding them.
Options for Multiple External Feedback Givers (External Evaluators)
If you have multiple external feedback givers selected, the only option you will see in the dropdown is the option to remove the selected participants from the project.
Warning: Removing the participant from the project deletes any response they’ve provided. If you want the participant to redo their response, send them a retake survey link instead of removing them and re-adding them.
Qtip: Looking to edit participant information? Click a participant’s name to open the Participant Information Window.
Adjusting Columns
Use the dropdown in the header to show and hide columns, such as name, email, status, report status, and whether or not someone is a respondent.
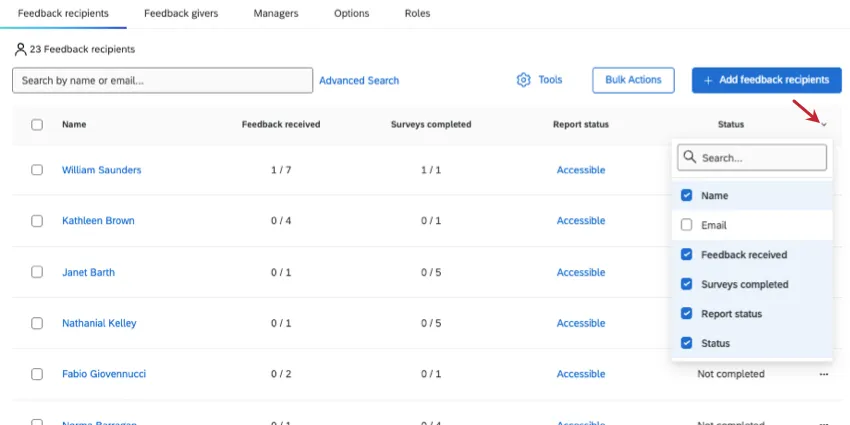
If a report is ready, you can click Accessible to see it.
Qtip: In the Participants tab of an EX project, the Status column shows whether all feedback has been completed for this participant. In order to view this column, you need both of the following user permissions enabled:
- Can Access Participant Personal Data
- Can Access Project Data
FAQs
Who assigns relationships in a 360?
Who assigns relationships in a 360?
Depending upon the Participants Options enabled for the 360 project, a subject and/or manager can assign relationships to evaluators.
Managers can assign relationships if Managers may choose evaluators is turned enabled.
Subjects can only assign relationships if Subjects nominates evaluators and the sub option "Allow subjects to select relationships" are both enabled.
Please note that the relationships selected when nominating evaluators are only used to categorize the response and do not provide the evaluator with additional project permissions. Evaluators that are selected with a "manager" relationship will not be assigned into the manager role automatically and will not be able to perform manager-related tasks. Only a project administrator can define managers for users added to the 360 project.
Administrators (e.g., those with project-creation capabilities) can always assign relationships. Administrators can change relationships even after evaluations have been submitted. This is done by clicking on the name of the subject in the Subject subsection, viewing the Evaluators list for that subject, clicking on the relationship for a particular evaluator, and selecting the new relationship from the dropdown list.
How do you mass upload all of your subjects or evaluators into a 360 project?
How do you mass upload all of your subjects or evaluators into a 360 project?
Does order of the metadata matter when organizing your 360 participant file?
Does order of the metadata matter when organizing your 360 participant file?
How can you assign a manager to subjects without the manager being also assigned as an evaluator?
How can you assign a manager to subjects without the manager being also assigned as an evaluator?
I am the evaluator and I cannot access my 360 login page. Where do I need to go?
I am the evaluator and I cannot access my 360 login page. Where do I need to go?
I need to retake my 360 evaluation. How can I do that?
I need to retake my 360 evaluation. How can I do that?
I don't have the tab described on this page! What do I do?
I don't have the tab described on this page! What do I do?
That's great! Thank you for your feedback!
Thank you for your feedback!