
Email Survey Invitations
What's on this page
About Survey Invitations
Qualtrics provides an easy and convenient way to distribute your survey to large groups of people via email. By using the Qualtrics mailer, you can send customized email invitations to your participants and track their progress.
Emailing a Survey Invitation
Qtip: Although you have the option to enter email addresses manually during this process, we recommend uploading a contact list of recipients ahead of time. Information on how to create a contact list may be found in our Contact List Creation support page.
Qtip: You can test out your email by clicking Send Preview Email in the email message editor. Be careful to not forward the preview email on to your participants as it contains the preview survey link instead of the individual link. Preview survey links will always be active, regardless of whether or not a survey is closed. Responses completed on a preview link do not count towards your license total. For more information about these link types, visit the Preview Survey page. Please note that piped text will not populate for Preview Emails. You cannot see past preview emails you’ve sent on the Distributions page. Unsubscribe and opt out links within the preview email will also not function.

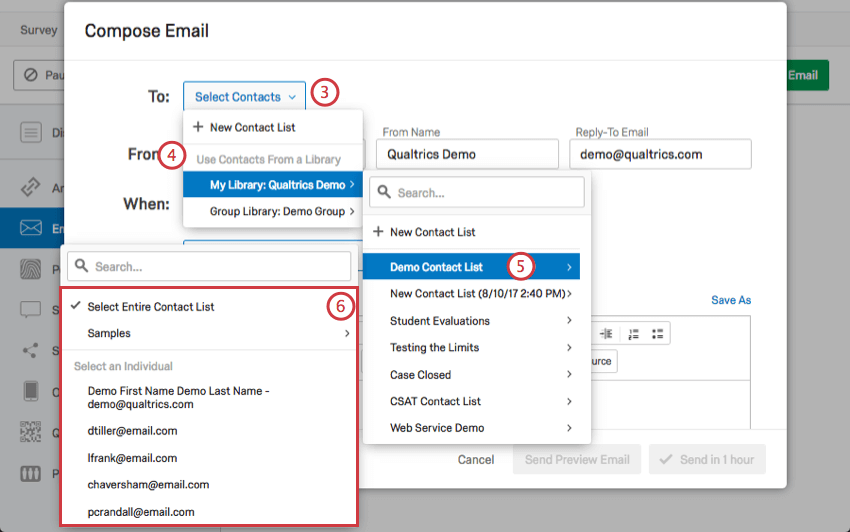
Qtip: Alternatively, you can click New Contact List within your chosen library and add individuals manually.
Qtip: Users with XM Directory can also distribute to segments.
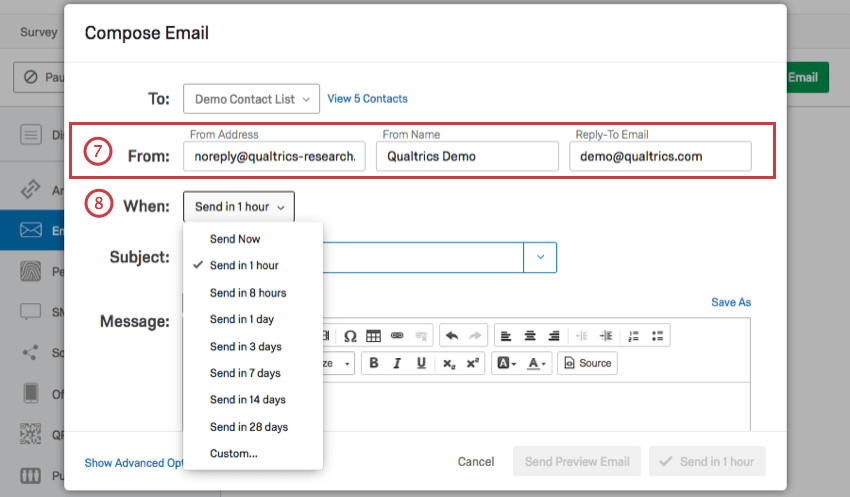
Qtip: Generally, the reply-to email can only be the email connected to your Qualtrics account. However, often a brand has a series of custom FROM domains that a brand administrator and your organization’s IT team will set up. These valid domains allow you to use any email address with a valid domain as your reply-to. For example, if you’re a student at Qualtrics University, you may be able to use any email address ending in @qualtricsuniversity.edu. If you’re having trouble setting your reply-to email, reach out to your brand administrator.
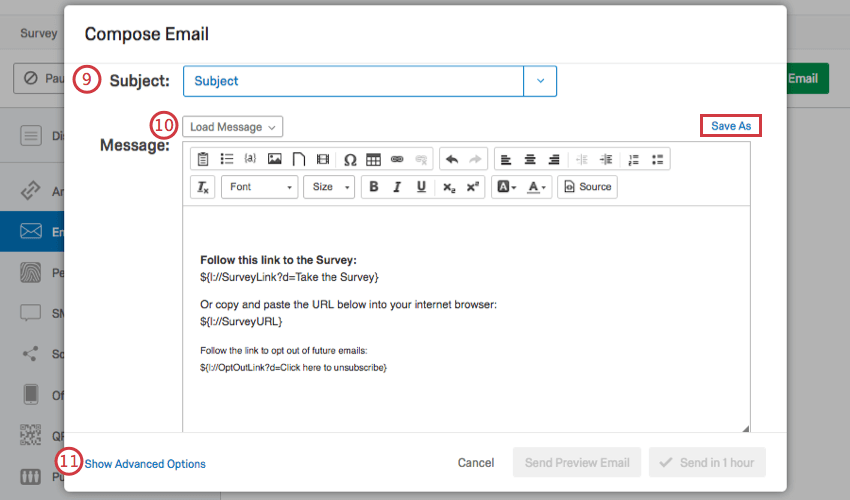
Qtip: You can load a saved subject line from your library by selecting the dropdown arrow on the subject line box. This is especially useful if you need to translate your subject line since you can do that in your library.
Qtip: For simple distributions, leave the default survey link content in the message editor and add your own message above. For a more custom message, see Customizing Your Email With Piped Text and Inline Email Questions. To ensure your emails will have the best deliverability possible, read the Avoid Being Marked as Spam page before sending your email.
Attention: Email invitations cannot include media files, such as an embedded video or an iframe HTML element. Due to security reasons, many email clients will automatically prevent video iframes from displaying.
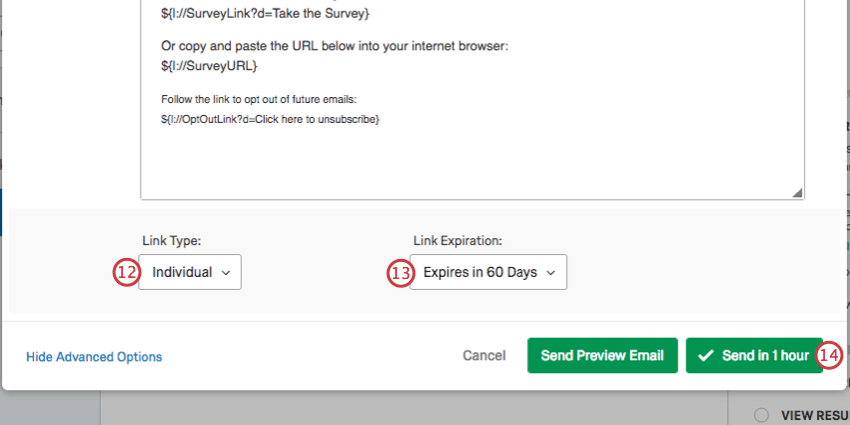
Qtip: Link expirations cannot be changed or undone. Note that this is separate from the survey availability (which can always be changed or undone) or incomplete survey response settings (which cannot be changed or undone). See Distribution and Survey Availability for a more detailed comparison of the 3.
Qtip: For help with any error messages that occur when trying to send the email, check out our Email Distribution Errors page.
Qtip: Now that you’ve sent your email distribution, you’re probably interested in tracking email statuses and other similar information. See Email Distribution Management and Distribution Statuses.
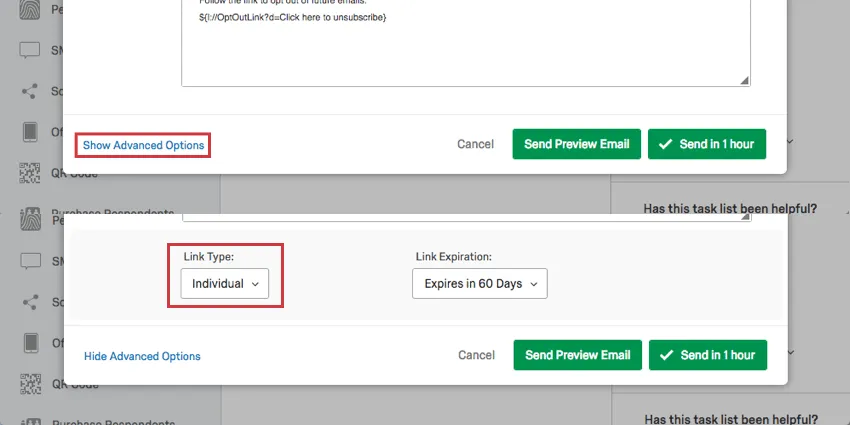
Survey Link Types
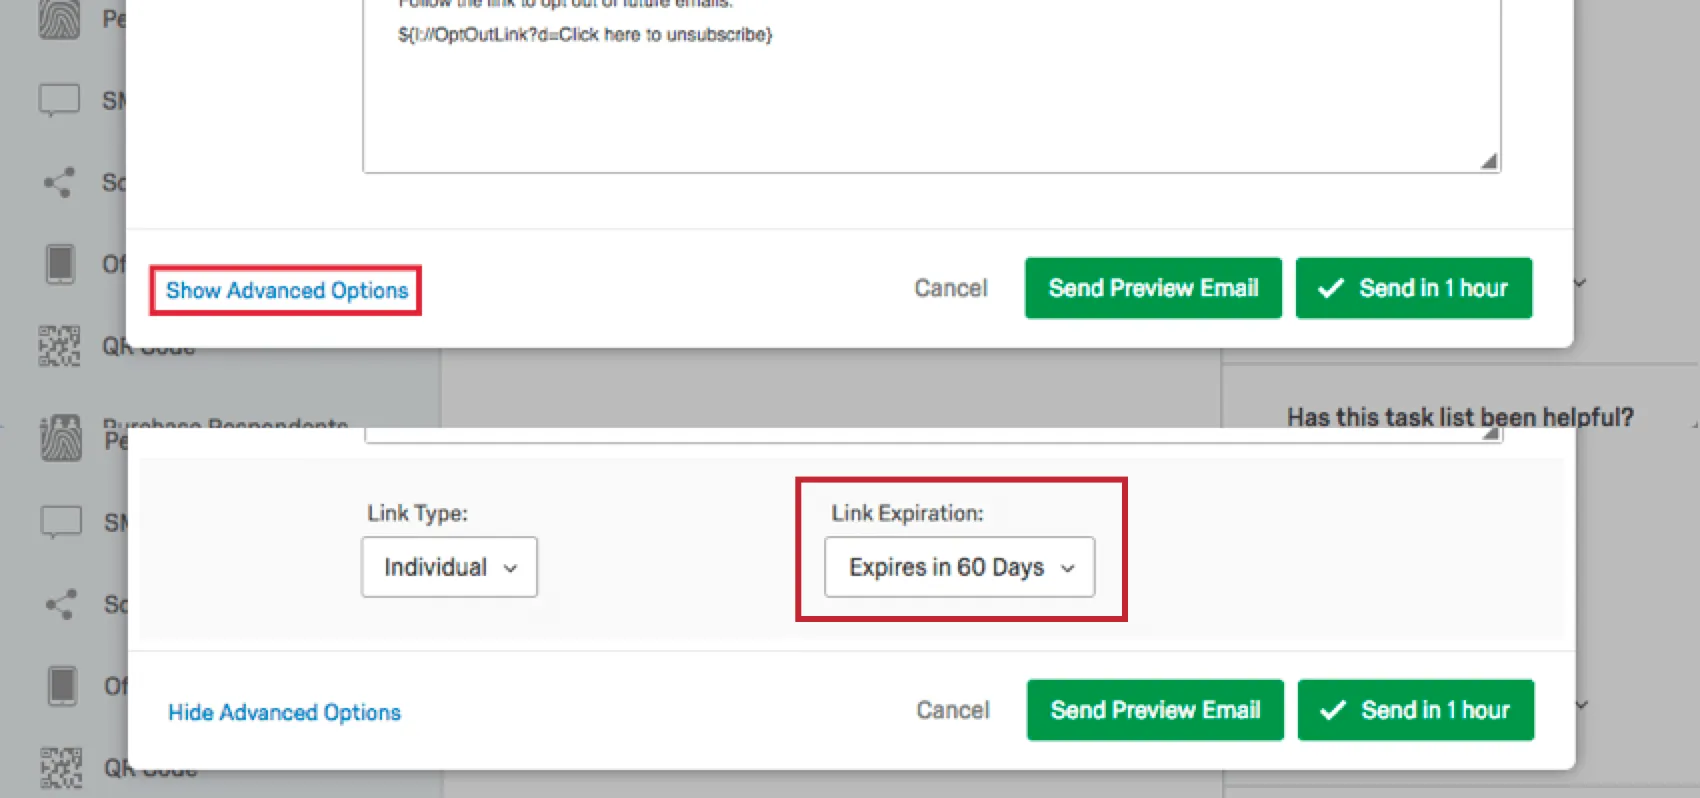
The Qualtrics mailer allows you to choose the type of survey link you use, which in turn determines how many times a respondent can use the link and whether or not you can track who gave each response. The following link types are available by clicking Show Advanced Options at the bottom of the Compose Email window:
- Individual Link: This is the default link type. Each participant receives a personalized link that can only be used once. The respondent’s name, email, and other information from the contact list is automatically saved with their survey data. This means you can track responses in progress and send out reminder and thank you messages to your participants. In addition, this link automatically saves the respondents’ data as they progress through the survey. If they need to leave the survey before finishing, they can return to it on any device, regardless of the Survey Options you have set. Qtip: Sometimes respondents will view a link, decide not to fill out the survey right away, and then leave the survey alone for some time. Your incomplete survey response settings determine how long they have to come back to this link until their session’s expired. See Incomplete Survey Responses for how to change this setting, and Distribution and Survey Availability for more on expirations that can affect your survey links.
 Qtip: The individual link can only be used once, even if the Prevent Multiple Submissions option is disabled. If you would like to allow respondents to use the survey link multiple times, we recommend using a Multiple Completes Link with the Prevent Multiple Submissions option disabled instead.Qtip: Do you want to know who responded to your survey, while keeping the responses anonymous? Use individual links with the anonymize responses survey option. Please read the attached page and heed the associated warnings before turning on this setting.
 - Multiple Completes Link: Each participant receives a personal link that can be used multiple times. Each time this link is used, a new response is added to your results and the same contact list information is recorded. Note that reminder and thank you emails are not compatible with this link. Additionally, the Survey Options Prevent Multiple Submissions and By Invitation Only should be disabled when using multiple complete links because respondents will receive an error message that they can’t complete the survey. Multiple completes links do not expire, and the expiration date shown in the distribution history is not considered. Qtip: Multiple completes links will not save respondents’ progress by default. To allow your respondents to exit the survey and resume from where they left off, you will need to enable Allow respondents to finish later in your Survey Options.Qtip: Multiple completes links do not track survey respondent statuses for when they’ve started or completed the survey.
- Anonymous Link: Each participant receives the anonymous link. This link cannot track the identity of the respondent except for certain GeoIP details that can be disabled. See linked page for more details. Note that reminder and thank you emails are not compatible with this link. The anonymous link does not expire.
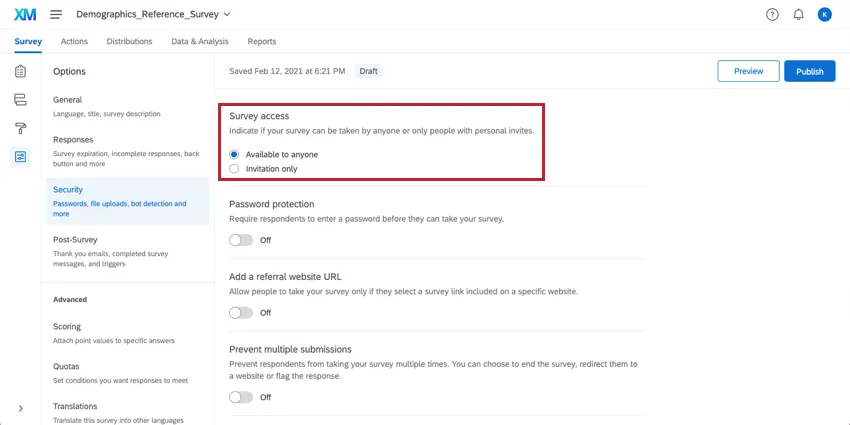
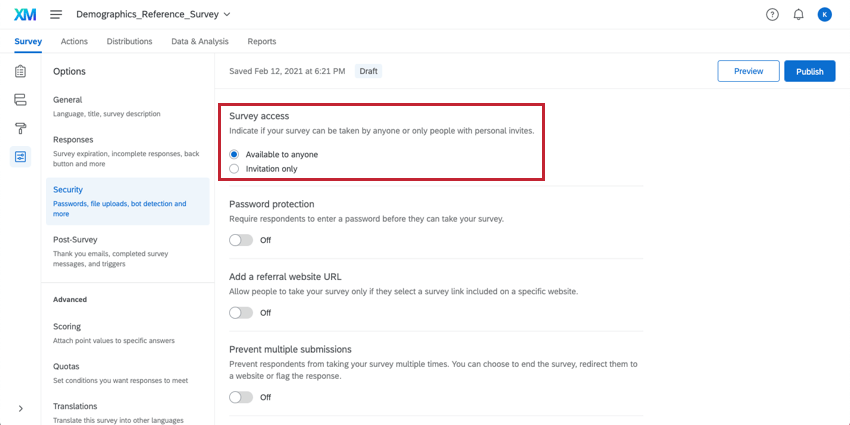
Qtip: If the anonymous link and multiple completes link do not appear under the link type dropdown menu you will need to change the setting from Invitation Only to Available to anyone in the Security section of your Survey Options.
Customizing Your Email with Piped Text
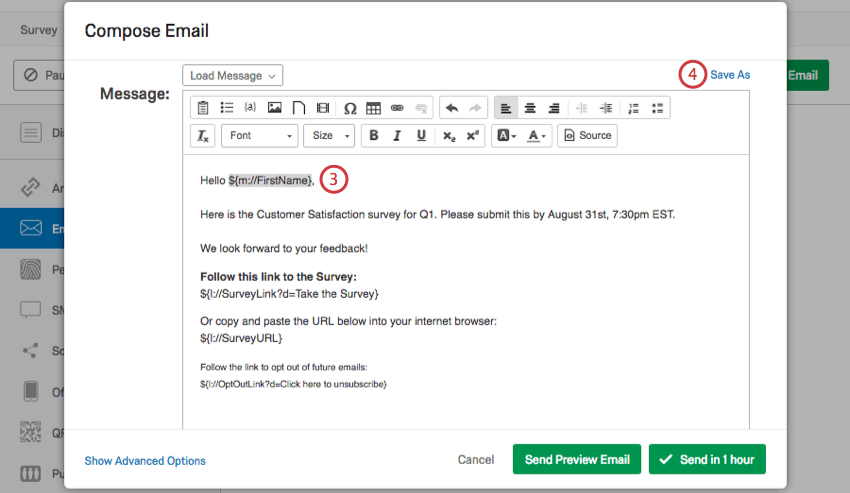
Beyond typing a generic message, email invitations can be customized with the participant’s contact list information. This information can be inserted into your message by using the piped text feature.
Default Piped Text
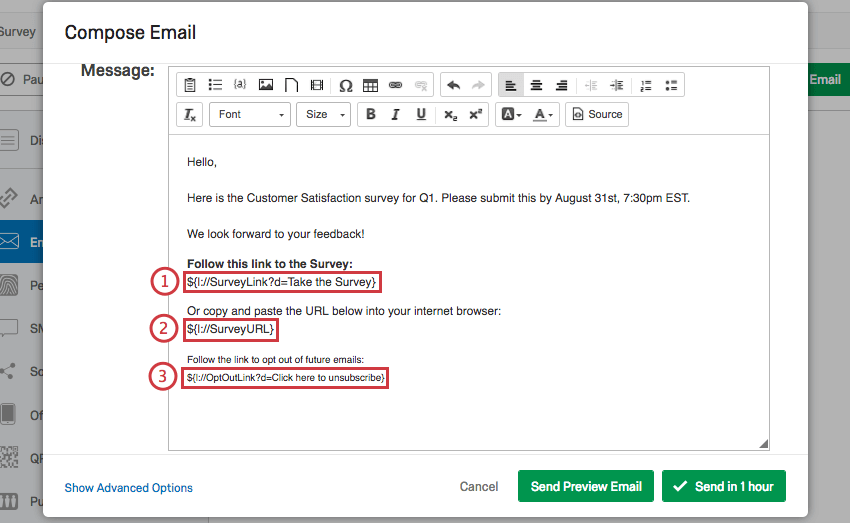
By default, all survey invitation messages include 3 pieces of piped text:
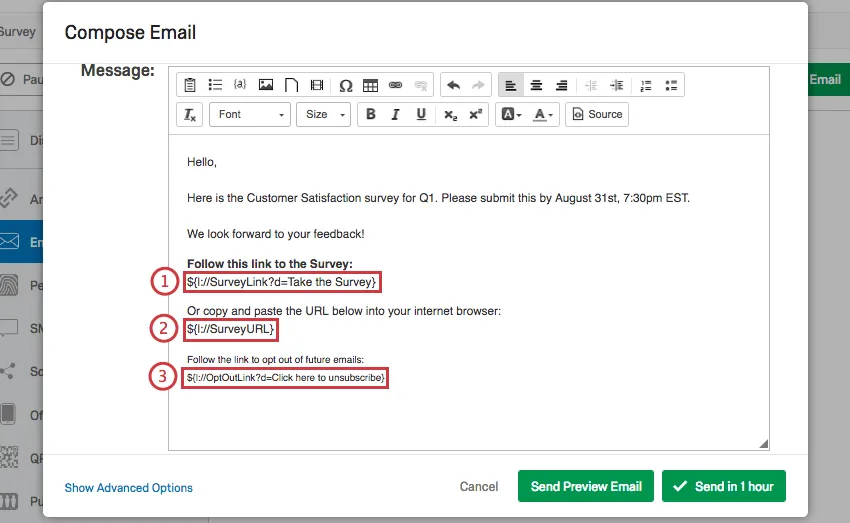
Qtip: Are you interested in inserting a button that links to your survey instead of a text link? Upload an image to the Message to act as your button. Next, highlight or select the image in order to add a hyperlink. In the link editing window, use the survey URL piped text as your URL!
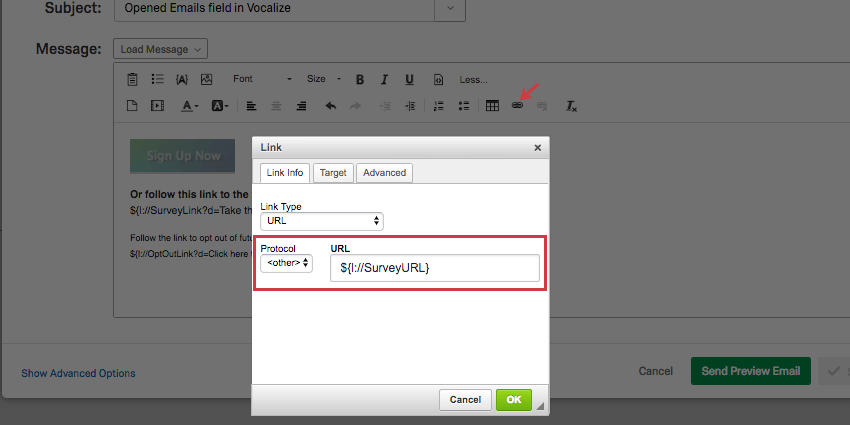
Qtip: Although any of these links can be removed, you will need to include a survey link in order to send out your survey. The opt-out link is also required to comply with best emailing practices.
Qtip: You can style a piped text opt-out link to your liking by clicking the HTML source view icon and adding custom code. To be compatible with the custom code, you’ll need to change the piped text to read ${l://OptOutURL} instead of ${l://OptOutLink}.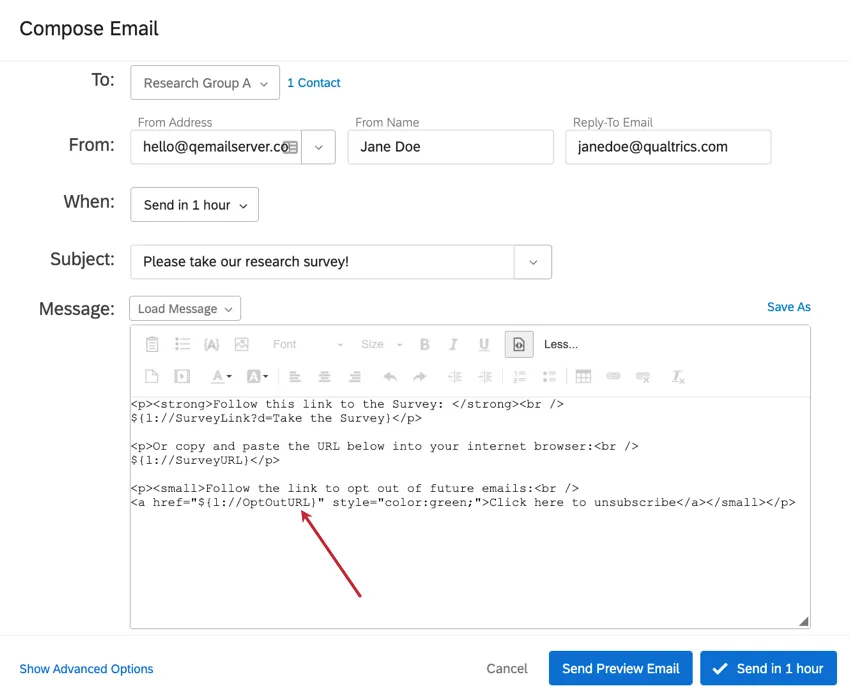
To insert other Piped Text into your email
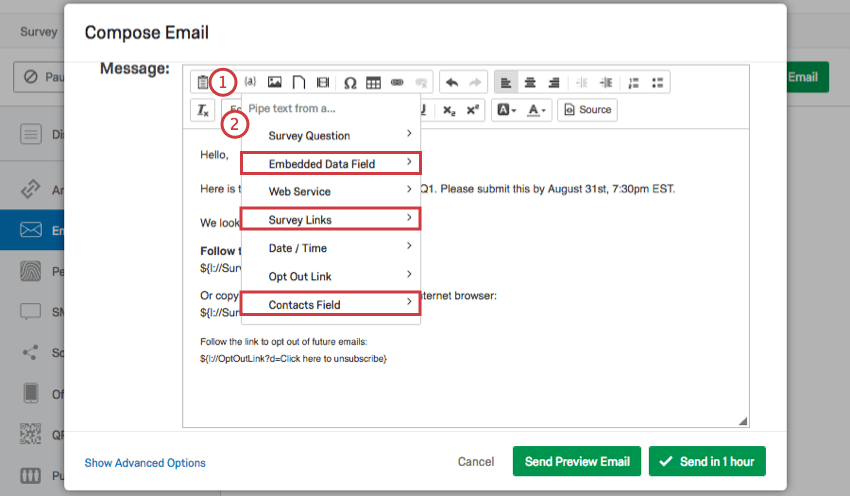
Qtip: Although many options are available, 3 categories are particularly useful for invitation messages: Embedded Data Field, Survey Links, and Contacts Field.
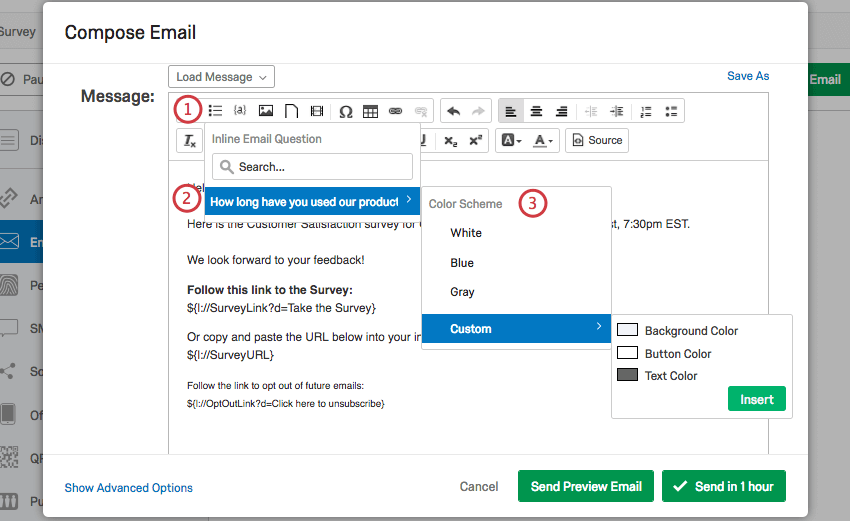
Inline Email Questions
Including a survey question in your email message can enhance your survey invitation. It’s more engaging and interactive, effectively increasing your response rate. When your participants receive the email, they’ll be able to click an answer to your inline question right from the body of the email. Clicking on an answer will immediately launch the survey in another tab, with their chosen answer already selected for them.
Attention: If a respondent answers your inline email question but does not progress further in your survey, their response will still be recorded. This is true even if the response is at 0% progress.
Qtip: Only 1 answer multiple choice (excluding the column variation) and NPS® question types are available for use as inline email questions. Questions with skip logic, question display logic, or custom validation will also not be included. Additionally, you cannot use the response from an inline email question for setting in-page display logic since the respondent answers the question before they access the page.
To insert an Inline Email Question
Qtip: Best practices are to create inline email questions from the Distributions tab within a project.
Qtip: Inline email questions are not available for most Employee Experience project types. You can use inline email questions for Lifecycle emails.
Warning: If your 1 answer multiple choice question has images as answer choices, you will need to make sure the images were added through the rich content editor. Adding images through the rich content editor will ensure the proper HTML code has been applied for the image to pull through in your email.
Qtip: Are you running a 1-question survey? Do you want your inline email question to almost instantly submit the recipient’s response? See our Survey Tips & Tricks support page.
Attention: Some email providers may test links contained in emails, causing your inline email question to be answered before your respondent sees it. For more information about this, see the Security Software and Qualtrics Interactions section.
Using the Opt-Out Link
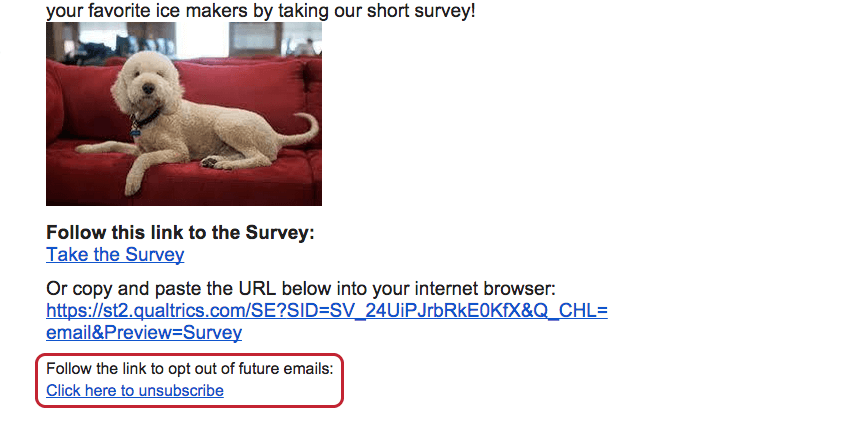
When you send a survey through the Qualtrics mailer, an opt-out link is included by default.
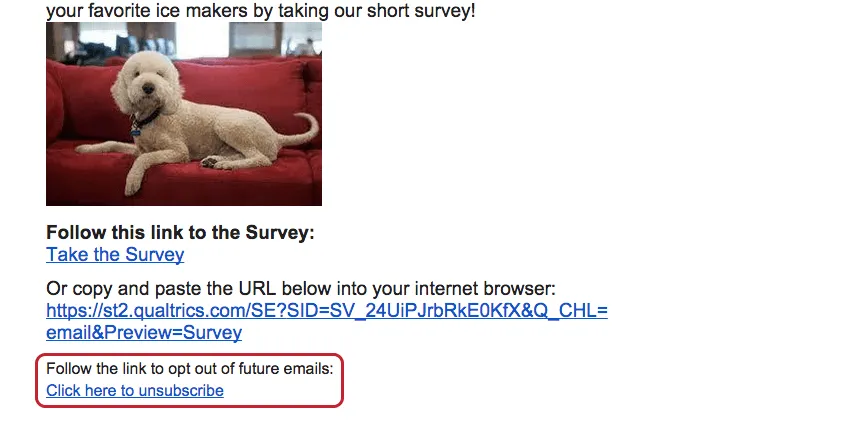
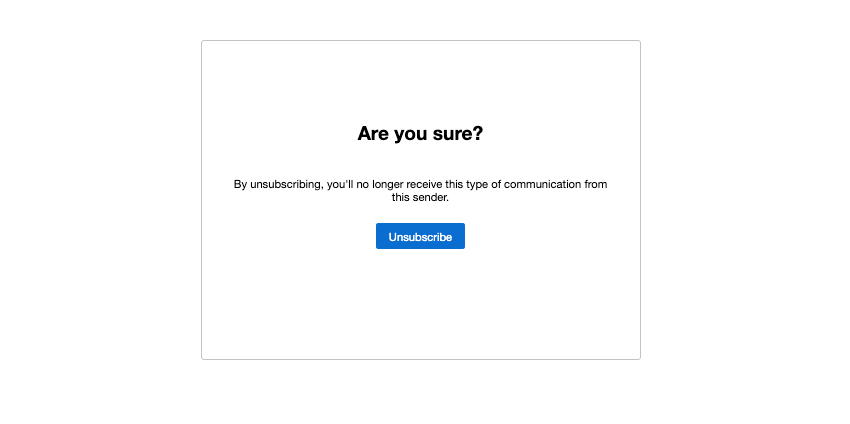
When a contact clicks this link, they’ll be directed to a page where they can confirm they want to unsubscribe from the mailing list.

When they click Unsubscribe, they’ll be directed to a page that confirms they’ve been removed from the contact list, and they’ll no longer receive emails sent to that contact list.

Qtip: “Unsubscribe from all communications from this sender” (or an equivalent link) will only appear if your license uses XM Directory. This button unsubscribes the recipient from the entire directory the list comes from.
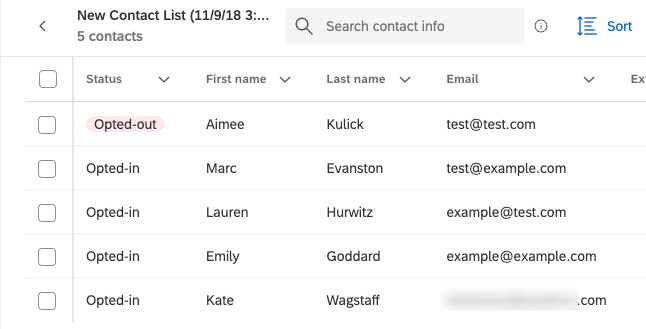
Those who choose to opt out will remain in your contact list, but they’ll be flagged as “Opted Out.”

While contacts are unsubscribed, they’ll receive no email invitations, reminders, or thank-you messages. In addition to the contact being able to subscribe or unsubscribe, you can also manually change a contact’s status as needed; see Opting Respondents Out of Emails.
Qtip: The opt-out link will only unsubscribe the contact from that specific contact list. That email address will remain opted in for all other contact lists that contact may be in.
Qtip: Did you accidentally delete your opt-out link, and now the distribution won’t send? See the No Opt-Out Link page for instructions on adding the opt-out link back.
Qtip: Opt-out links only work in messages made for survey invitations, reminders, thank you emails, and distributions sent from XM Directory. They won’t work with email tasks or preview links.
Distributing in Multiple Languages
Through the Qualtrics mailer, you can send an email invitation that is automatically translated into the participant’s preferred language.
To send your email invitation in multiple languages
Qtip: Make sure your message type is set correctly! It should be Invite Emails for survey invites, Reminder Emails for reminders, and so on.
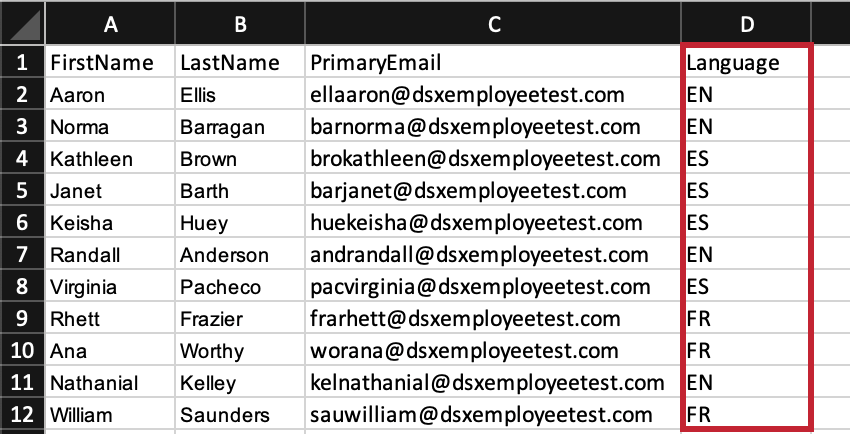
With a translated message and the language set in your contact list, you are ready to send out your email invitation. When the survey invitation is sent out, each participant will receive the email in the language specified for them in the contact list.
Distribution and Survey Expirations
There are 3 different types of survey expirations that can be set. Each has its own use, and we recommend checking these before sending out your survey:
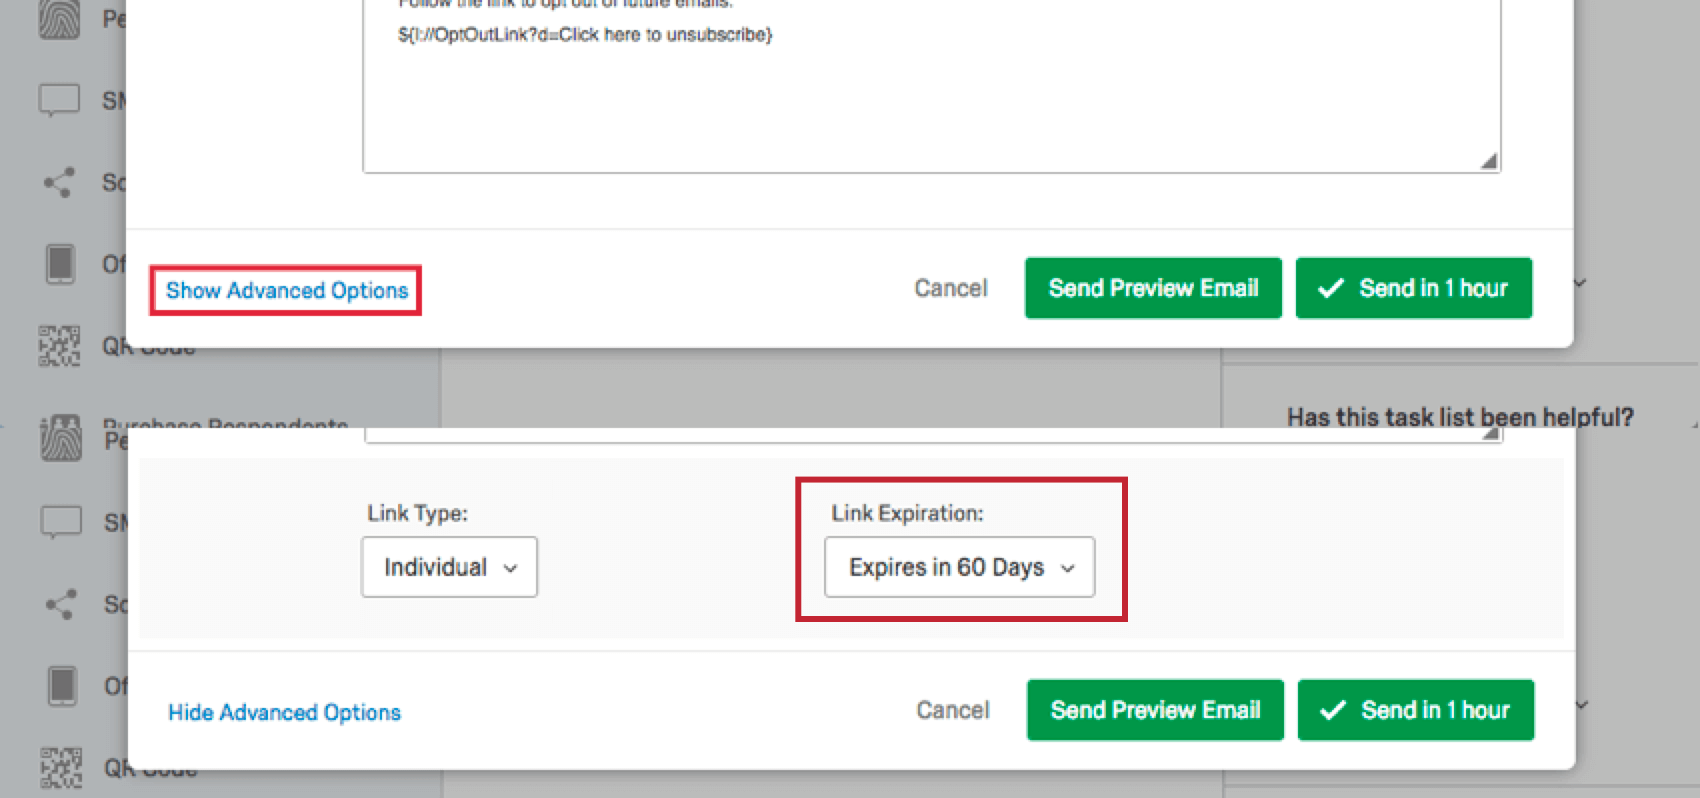
- Link Expiration: By default, individual survey links distributed through the Qualtrics mailer are valid for 60 days. This timeframe is sufficient for most studies, but if you’d like to extend the expiration, click Show Advanced Options beneath the email message editor in the compose email window and select a new timeframe from the Link Expiration dropdown. The link expiration date cannot be changed for a mailing once the survey links have been sent. If a respondent attempts to initiate the survey session after the link has expired, they will not be able to take the survey. If, however, the respondent logged an incomplete survey response before the link expired, they will be able to finish the survey after the link has expired per the incomplete survey response settings.
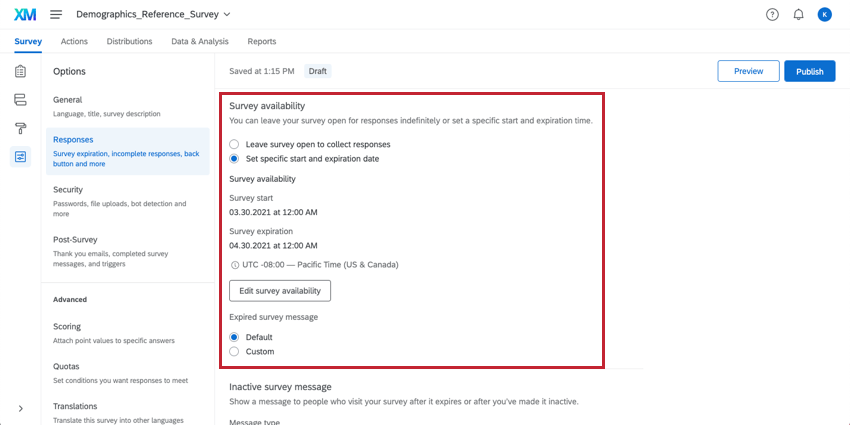
- Survey availability: In the Responses section of the Survey Options, you have the option to specify a date range for when the survey is accessible for new respondents to begin. Once the range passes, this setting does not automatically close respondents who are in the middle of completing the survey, but instead prevents new survey sessions from being created. This date range can be changed at any point before or after the survey is distributed.
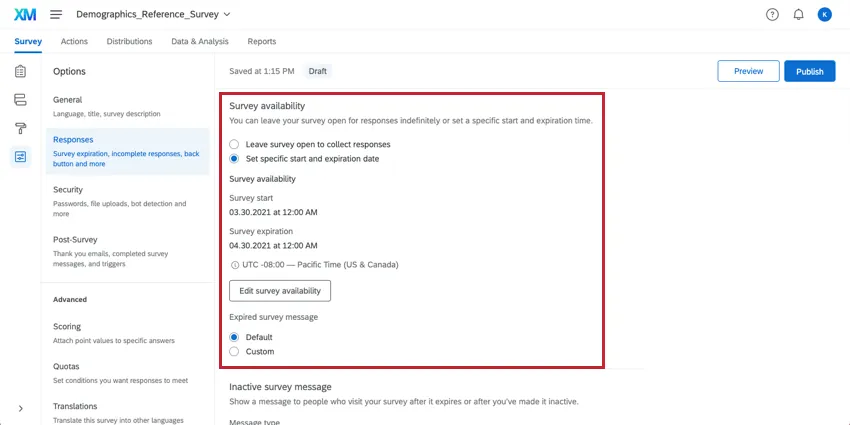
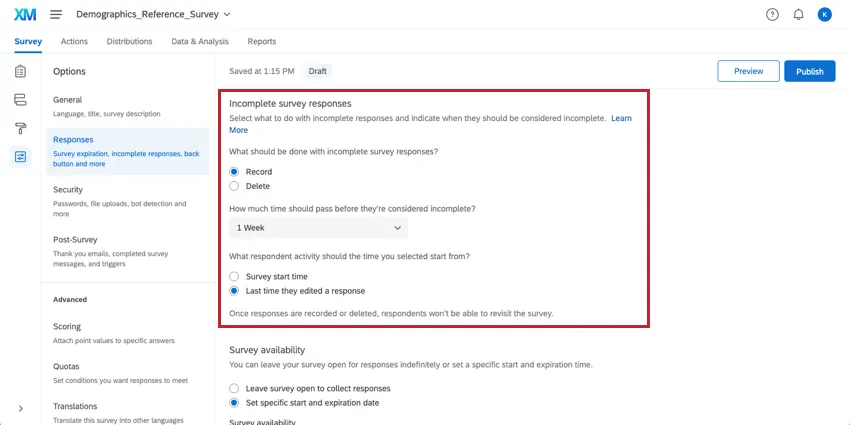
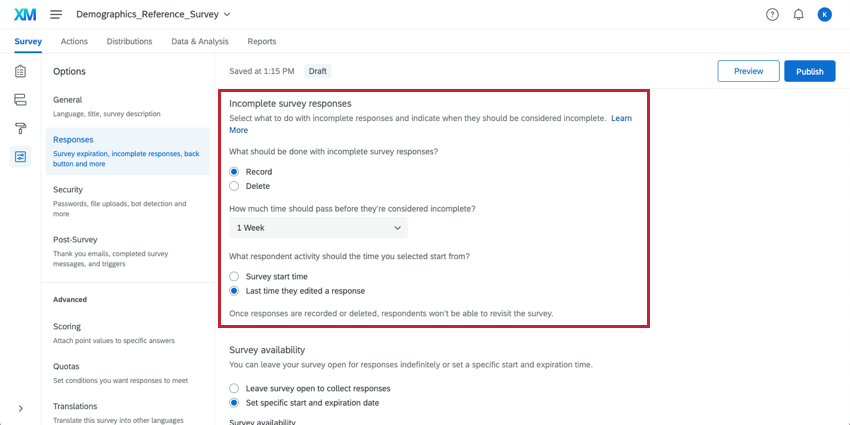
- Incomplete survey responses: By default, those who don’t finish the survey in 1 sitting will be given 1 week to return and finish. If not completed in that timeframe, the response will be recorded as-is. This timeframe can be changed in the Incomplete survey responses section of Survey Options. Changing this setting only affects respondents who have not yet started the survey.
Security Software and Qualtrics Interactions
Sometimes, your recipients’ email server may use security software to test links contained in emails. These software programs open links contained in emails before delivering the email to the recipient to check for malicious content. This can cause unexpected behavior when sending email invitations. The below issues are commonly caused by security software testing links in emails:
- “You have either already completed the survey or your session has expired”: If your respondents see this message the first time they click their survey link, it’s possible their email server opened the link before delivering the email invite. When the link is opened by the recipient’s server, their survey session begins and will close based on the survey’s incomplete survey response deadline. Extending your incomplete survey response deadline will make your survey sessions less likely to expire.
- “Your session was outdated, but we have updated you to your most recent response”: This message usually occurs when your recipient’s email server opens their survey invite, but does not close out of the session after testing the link. This causes the survey session to be open in multiple places at once.
- If your email invitation contains inline email questions, you may notice responses in your dataset in which respondents only answered the inline question but no other questions. Usually, the first option of the inline question is selected in this situation. This is caused by the recipient’s email server testing the link in the inline email question by selecting the first choice and then the response closed due to the incomplete survey response deadline.
If your license has Fraud Detection, the security scan monitor feature can prevent this behavior.
If you do not have the Email Scan Roadblock feature available to you, you should contact your recipients and have them reach out to their IT team about Allowlisting Qualtrics mail servers or creating an exception for links containing the qualtrics.com domain.
Types of Projects With Email Invites
Attention: Not all of the features described in this section are included in every license. Please contact Account Services if you are interested in getting access to any of these features.
Email invites work as described on this support page in several types of projects, including:
- Survey projects
- XM Solutions
- Conjoint and MaxDiff projects
If your license includes XM Directory, many of the distribution options described on this page are also available right inside the directory. See Send Emails in XM Directory for more details.
Types of Projects That Are Not Supported
While you can email invites for other projects, their distributions don’t necessarily match what you see on this support page, and there are many important differences to keep in mind.
- For Pulse, see more on scheduling email invites.
- For Engagement and Ad Hoc Employee Research, see Email Messages (EX).
- For Lifecycle, see Email Messages (EX).
- For 360 projects, see Email Messages (360).
FAQs
How do I import a mailing list?
How do I import a mailing list?
Can I add information to a contact list after I have sent out my survey?
Can I add information to a contact list after I have sent out my survey?
- If you change the recipient email address, a new email is not sent, but all future emails (new invitations, reminders, etc.) will go to the updated address.
- If the respondent has already opened their survey, their survey and collected data will not update with the new information. They will have to be sent a new link.
- If the respondent has not yet opened their survey, their survey will update with the new information.
If I accidentally added the same person in my contact list twice, will they get two emails?
If I accidentally added the same person in my contact list twice, will they get two emails?
If someone unsubscribes from one of my contact lists, will they automatically be unsubscribed from all my other contact lists?
If someone unsubscribes from one of my contact lists, will they automatically be unsubscribed from all my other contact lists?
I am trying to email my survey, but I keep getting an error message that says my from address/reply-to address is "invalid." What does this mean?
I am trying to email my survey, but I keep getting an error message that says my from address/reply-to address is "invalid." What does this mean?
If you are a Brand Administrator, you can find solutions on Using a Custom From Address.
My participants are telling me that their survey link is not working. What could be causing this?
My participants are telling me that their survey link is not working. What could be causing this?
- Prevent Multiple Submissions: The participant may be attempting to take a survey on the same computer and browser with the Prevent Multiple Submissions feature enabled in the Survey Options. Prevent Multiple Submissions places a cookie on the participants browser that will prevent another survey session from being started from that device. The participant will need to clear their browser cache.
- Used Individual Links: The participant may be trying to access the survey through a used or expired Individual Link. Individual Links are created automatically for every person in your contact list when you send the survey out through the Qualtrics mailer or create Personal Links. This kind of survey link can be used only once and then becomes invalid. We recommend not forwarding any Individual Link to avoid this situation. In addition, if your respondent clicks onto the link, decides not to fill anything out, and leaves the survey for a long time (one week by default), this can also cause the link to close, because the incomplete survey response timeframe has passed. In both of these scenarios, the participant will need to receive another survey link (either through a new email distribution, Personal Link, or the Anonymous Link) in order to access the survey.
- Expiration: The participant may be trying to access a survey that is expired. In the Survey Options, there is an option to set an Expiration Date (after which participants can no longer start new surveys). Turn off the expiration to allow them access to the survey. (Please note that copying a project will copy over all survey settings, including the Expiration Date.)
What are the differences between the Anonymous Link and an Individual Link?
What are the differences between the Anonymous Link and an Individual Link?
How can I make sure the participant only takes the survey once?
How can I make sure the participant only takes the survey once?
If you are distributing your survey through the Anonymous Link, there are 2 options to prevent participants from retaking the survey:
- Prevent Multiple Submissions: You can enable Prevent Multiple Submissions in your Survey Options. This option will place a cookie in the participant’s browser that will restrict them from retaking the survey on that browser. However, the participant could still clear their cookie cache, use a different browser, or use a different computer in order to take the survey again.
- Authentication: You can use the Authenticator element in the Survey Flow. This option will require the participant to be a member of a contact list you have previously set up within your account. The Authenticator options will allow you to prevent contacts from retaking the survey by using the contact list as an authentication database.
How can I avoid my emails being marked as spam?
How can I avoid my emails being marked as spam?
How can I insert values from my contact list into the body of my email (First Name, Last Name, etc.)?
How can I insert values from my contact list into the body of my email (First Name, Last Name, etc.)?
How can I embed a survey question directly into the body of my email?
How can I embed a survey question directly into the body of my email?
How can I see who has received an email or who has finished the survey?
How can I see who has received an email or who has finished the survey?
How do I increase my weekly email limit?
How do I increase my weekly email limit?
- The email limit being requested.
- A description of the project(s).
- A general description of who is being surveyed (student body, small business owners in Iowa, purchased panel, etc.).
- How long the limit needs to be in place (one time or multiple times per year).
When should I use the Advanced Options for Emails?
When should I use the Advanced Options for Emails?
How can I make Individual Links but not use the Qualtrics mailer?
How can I make Individual Links but not use the Qualtrics mailer?
How do I see which emails were sent, failed, and bounced after I send my survey via email?
How do I see which emails were sent, failed, and bounced after I send my survey via email?
How can I change my "From" address for email distributions?
How can I change my "From" address for email distributions?
Some of my respondents say that their survey session has expired. Why is this happening?
Some of my respondents say that their survey session has expired. Why is this happening?
Can I email anonymous links through the Qualtrics Mailer?
Can I email anonymous links through the Qualtrics Mailer?
How do I change the link expiration when I email my survey using the Qualtrics Mailer?
How do I change the link expiration when I email my survey using the Qualtrics Mailer?
If you would like to change the expiration for your entire survey and not just a few links, see Survey Availability. This availability can be changed at any time.
Why do the options for Anonymous and Multiple Completes links not show up when I try to change the Link Type in my email I am sending?
Why do the options for Anonymous and Multiple Completes links not show up when I try to change the Link Type in my email I am sending?
Navigate to the Survey tab and select Survey Options. In the Survey Protection section you can change your survey to be Open Access which will allow you to choose Anonymous or Multiple Completes links when sending your survey.
Does a survey expire? Under what circumstances?
Does a survey expire? Under what circumstances?
- Incomplete Survey Responses: After someone begins a survey session, they will have 7 days to complete the survey before it closes (meaning the data is recorded and they can no longer edit their response). You can adjust this setting in the Survey Options in the Survey tab. Once changed, the change only applies to new respondents going forward.
- Link Expiration: When you send an email distribution or create personal links, your respondents will have 60 days to open the survey link before it expires. After they begin the survey, they will be subject to the Incomplete Survey Responses rule mentioned above. Once this expiration is set, it can’t be edited.
- Survey Expiration Date: You can set this in the Survey Options for a specified date and time. Any respondent that attempts to start the survey after the set expiration date will not be able to enter. However, those respondents who have already started a survey will still be able to access it. You can turn this expiration on or off at any time.
How do I opt someone out of a contact list? I don't want them to receive emails from this list anymore.
How do I opt someone out of a contact list? I don't want them to receive emails from this list anymore.
You can also change a contact's subscription status in the product. See this page.
I’m trying to send an email, but there’s an error! What does it mean?
I’m trying to send an email, but there’s an error! What does it mean?
How does Qualtrics handle sending large distributions?
How does Qualtrics handle sending large distributions?
I’m having trouble making my email message look right. What do I do to make sure it’s formatted properly?
I’m having trouble making my email message look right. What do I do to make sure it’s formatted properly?
It’s important to test your emails before sending your official distribution. Use the Send Preview Email button to send samples to yourself and your colleagues. Alternatively, you may want to consider paring your message down, since too much customization can make your message seem like spam. Check out Avoiding Being Marked as Spam for more details.
In addition, be careful if you wrote your email in Microsoft Word or another rich text editor before pasting it into Qualtrics. Sometimes the text will carry over formatting in unintended ways. Try to paste using the option “unformatted text” or “paste and match style;” you can also paste plain text directly into the Source tab of the email editor. Remember to keep your survey link Piped Text in your new message.
Can I edit multiple scheduled distributions at the same time?
Can I edit multiple scheduled distributions at the same time?
That's great! Thank you for your feedback!
Thank you for your feedback!