
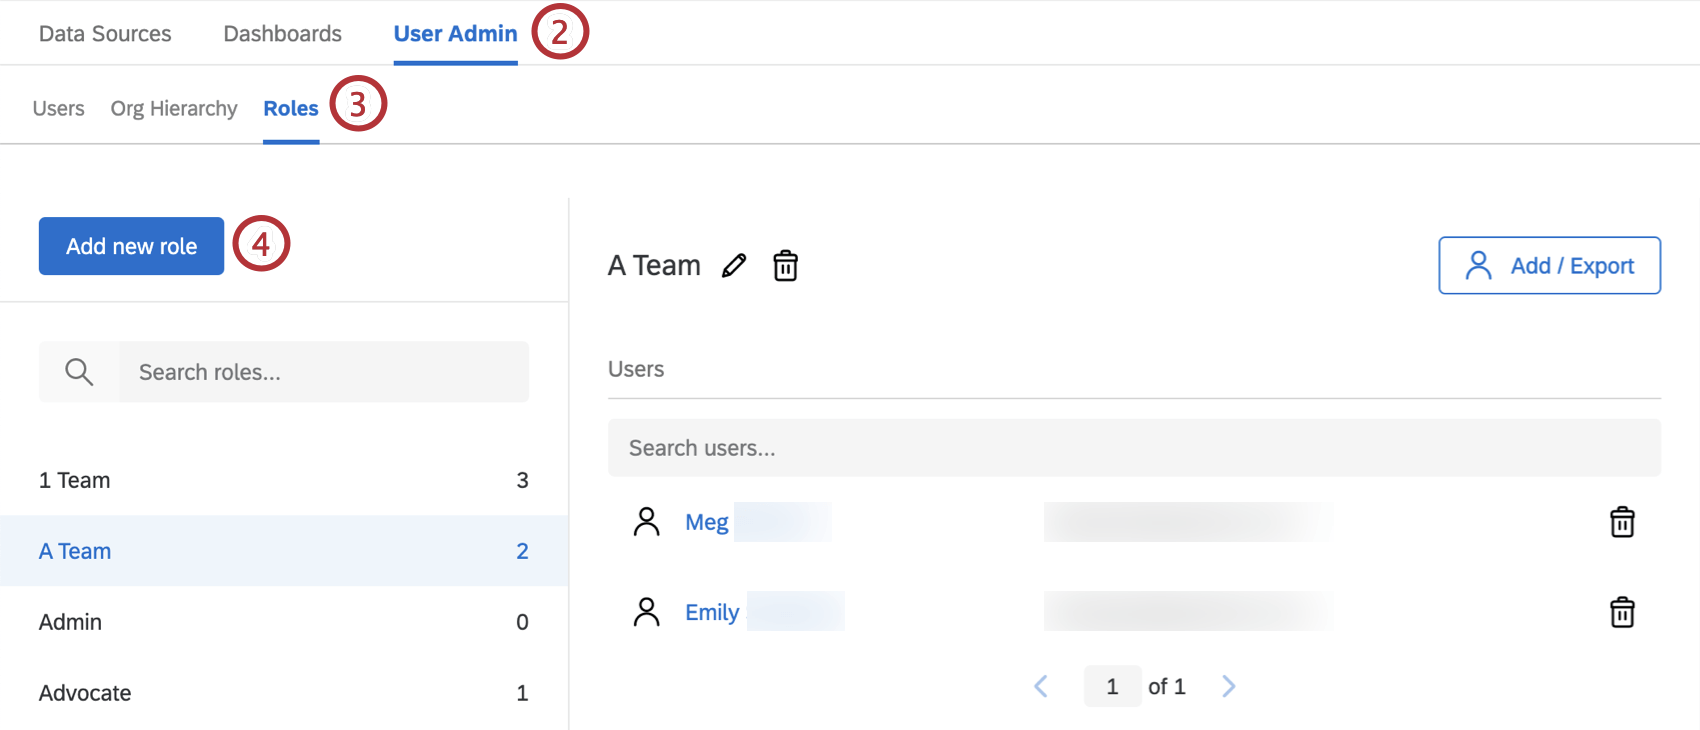
CX Dashboards Roles
What's on this page
About CX Dashboards Roles
Roles are how you determine which users have access to which dashboards. They are also the same as ticket teams, which determine what tickets users are assigned to and can also manage what ticket queues those teams have access to.
Roles are the best way to manage permissions for large groups of users. Set up a role and assign multiple users to it to save time by not assigning permissions one by one.
Qtip: If a user is assigned to multiple roles, dashboard access will be based on the role with their most permissive permissions. For example, if one role gives access to all data and the other restricts data to just the user’s division in the company, the user will have access to all data. Role assignment behaves like OR logic, rather than AND logic. Roles with “Allow rollup data” checked on fields could behave differently depending on how the roles and dashboard filter is set up.
Attention: Only users with certain permissions have access to User Admin. See Getting Access to the User Admin for more details.
Qtip: We call Dashboards projects “CX Dashboards” to help differentiate them from the many other types of dashboards we offer at Qualtrics. However, CX Dashboards are versatile, and can also help with IT, academic, or even healthcare use cases. If you’re looking for Strategy and Research dashboards, this support page includes your use case. This page does not cover Employee Experience (EX) Dashboards or Results Dashboards.
Creating Roles
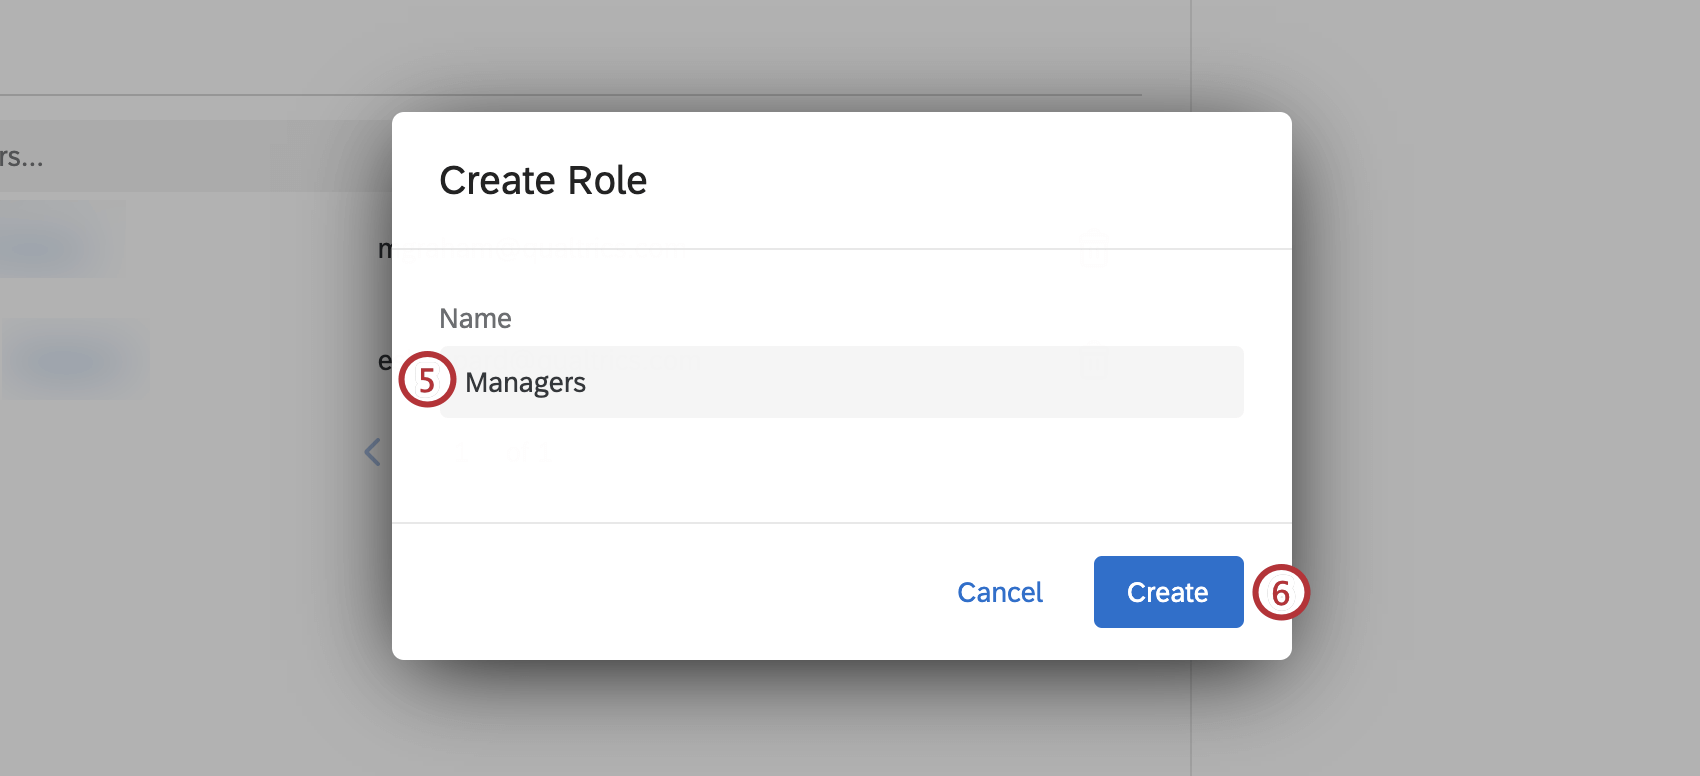
Attention: The following characters cannot be used when creating new role names:
{}<>"'=
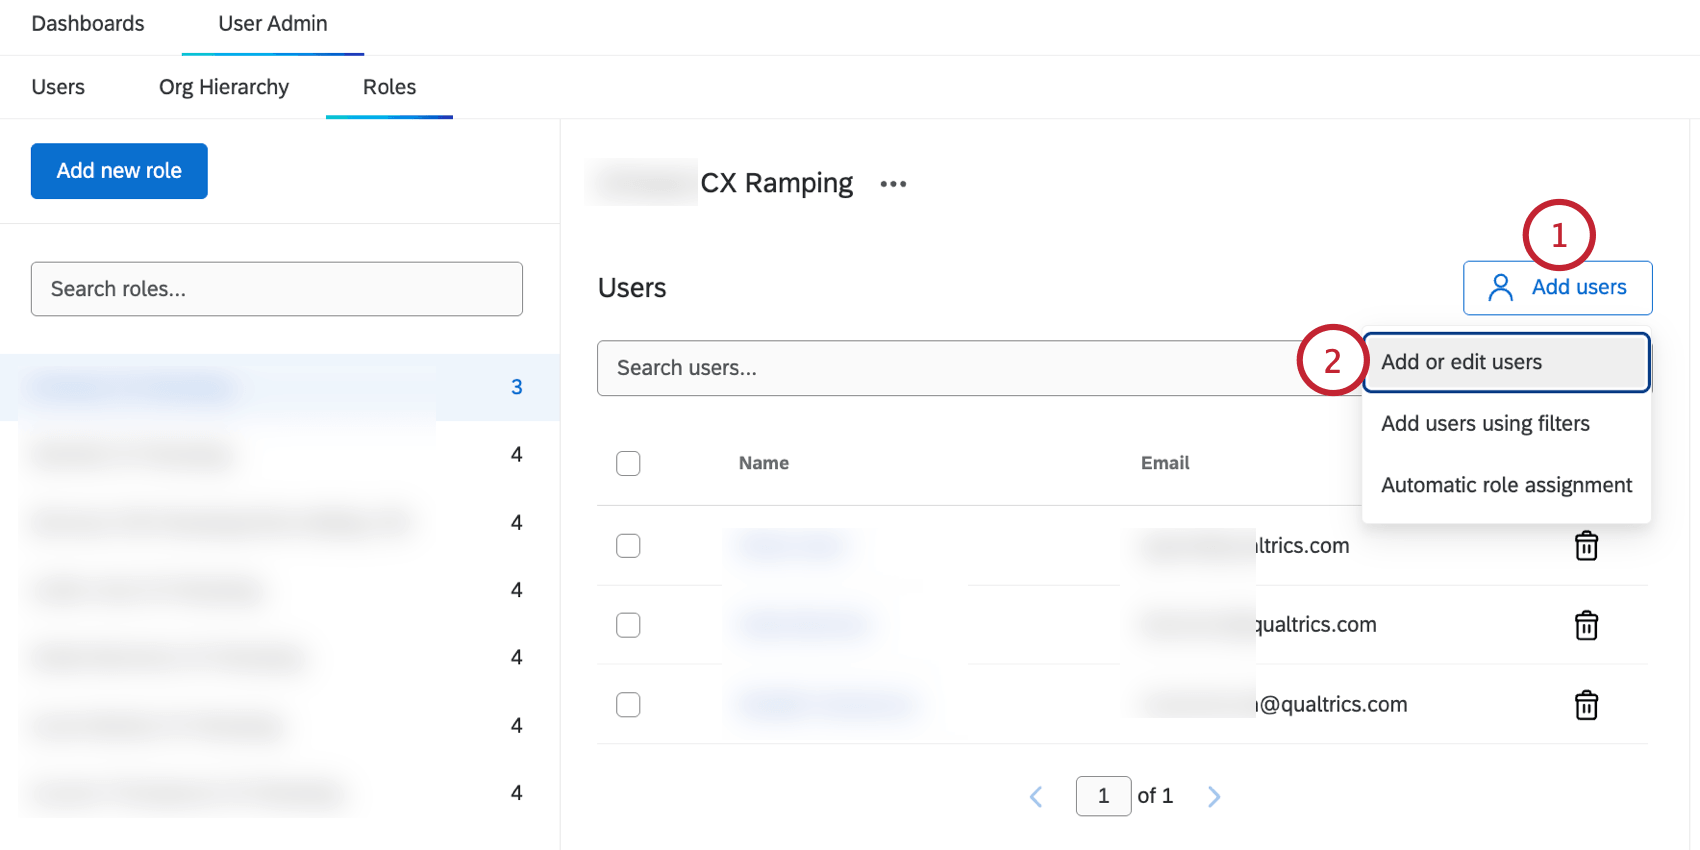
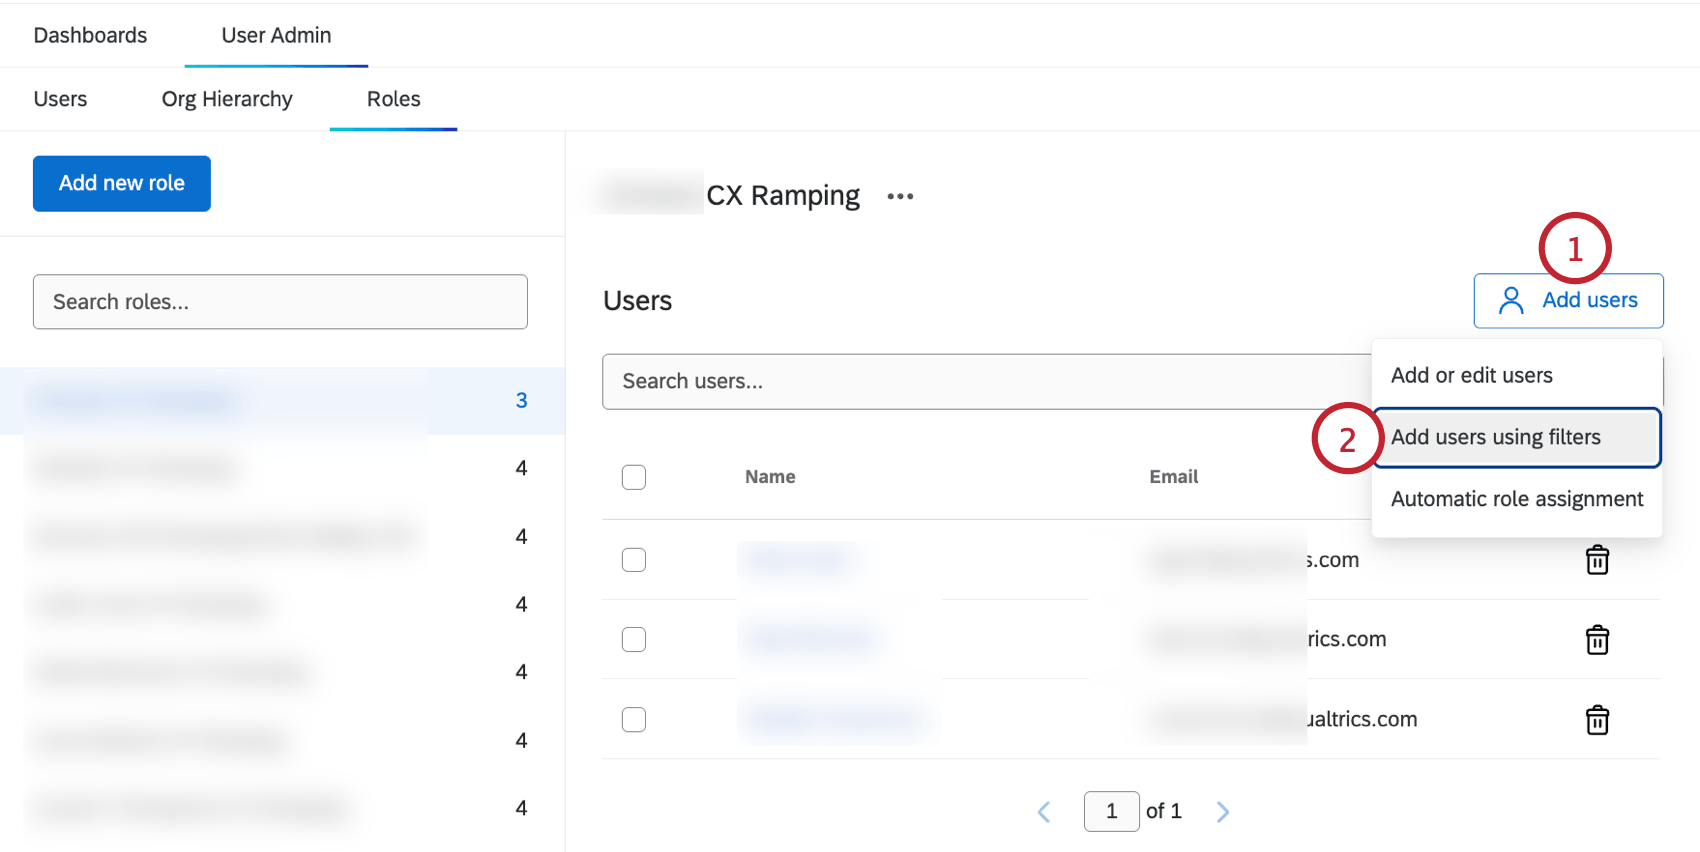
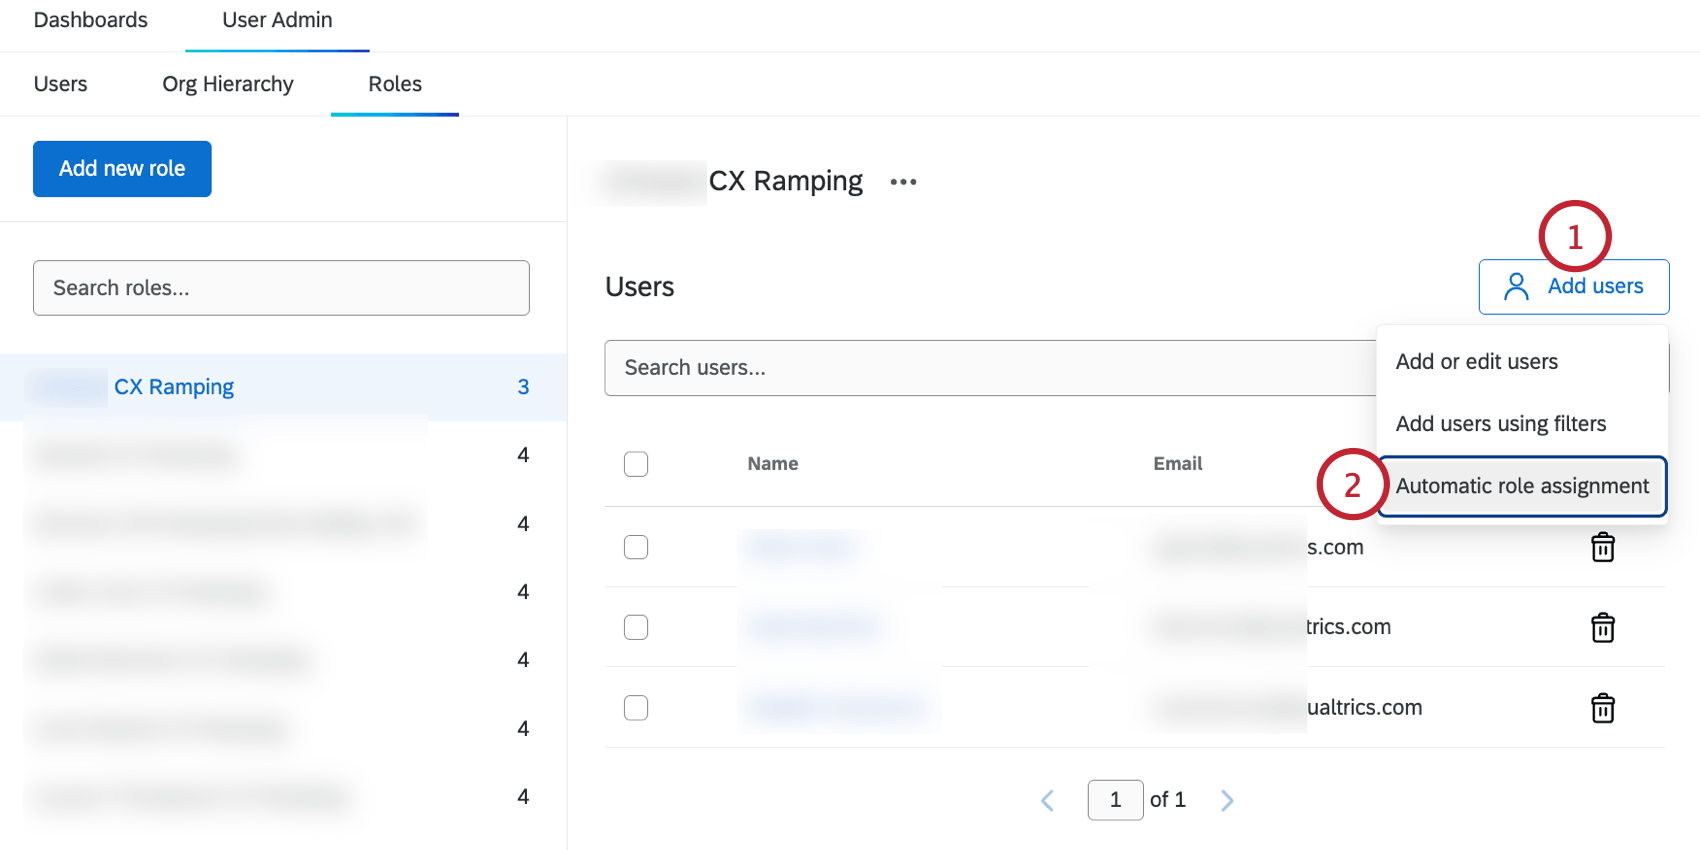
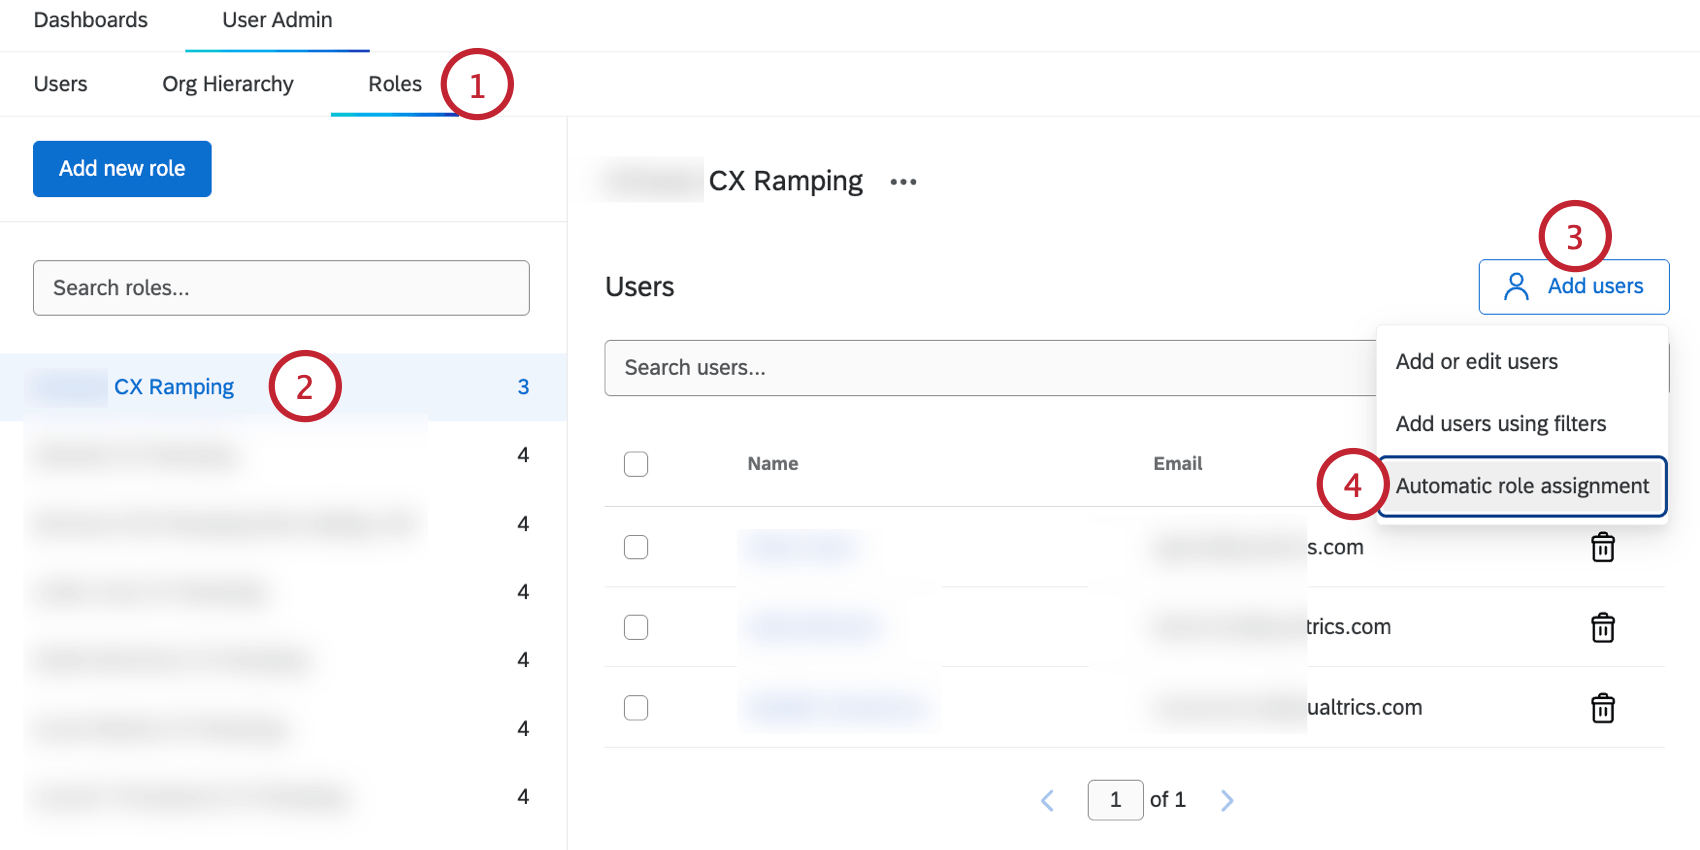
Adding Users to Roles
Attention: Users that were manually added to a role will not be removed if their metadata changes. Users will only be automatically removed from a role if they were added with automatic role assignment.
Adding Users Manually
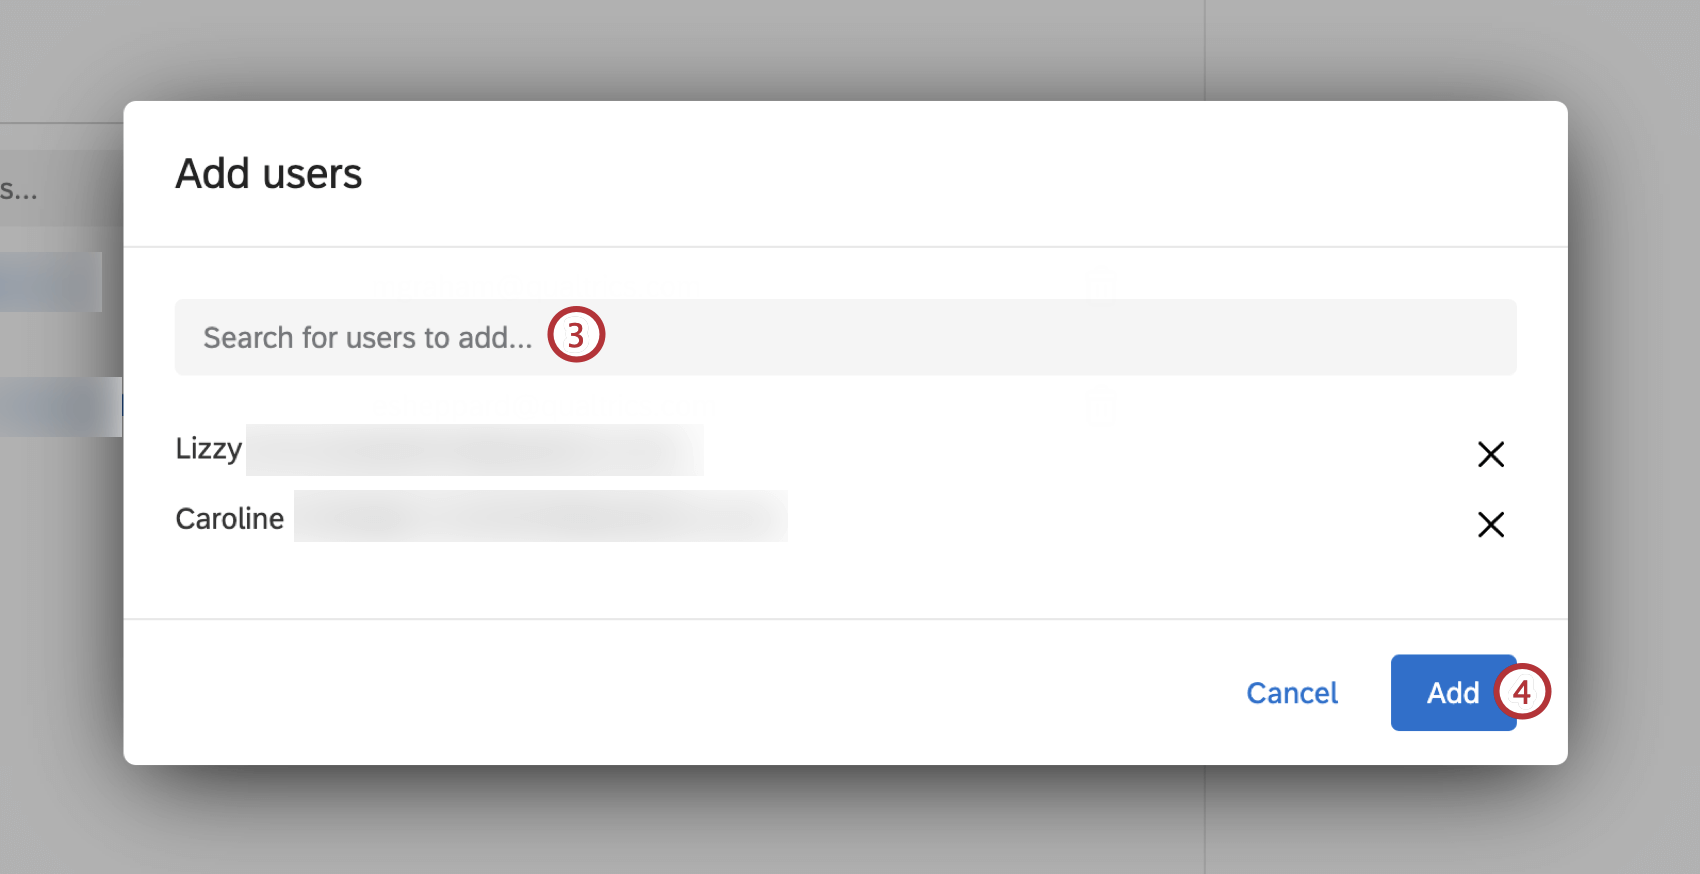
Qtip: Click the X to remove that user from the list.
Adding Users with Filters
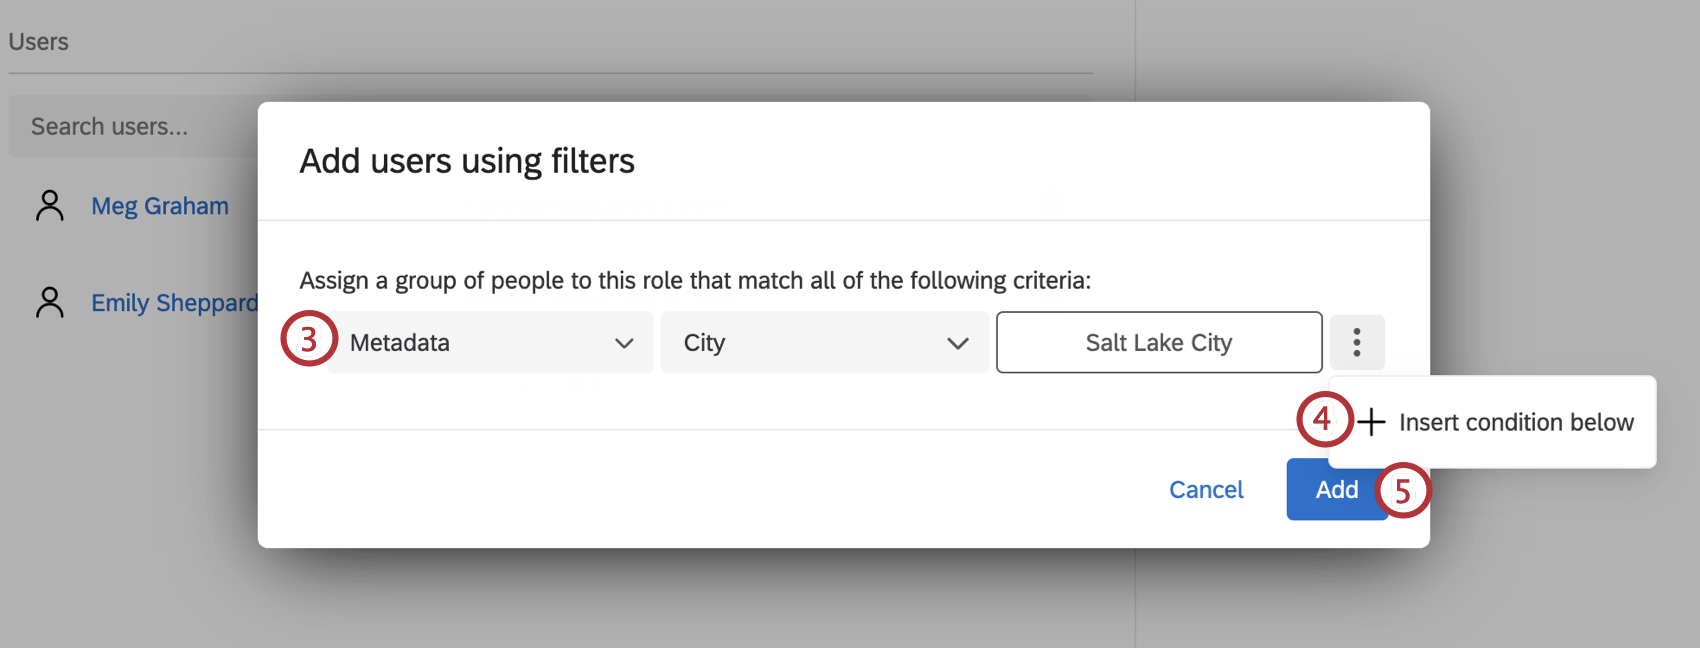
Qtip: For users added manually or with a filter, you can remove them from the role by clicking the trash can icon to the right of the participant. You can select multiple users to remove at once by using the checkbox next to the user’s name. Please note that any users added via automatic role assignment cannot be removed manually.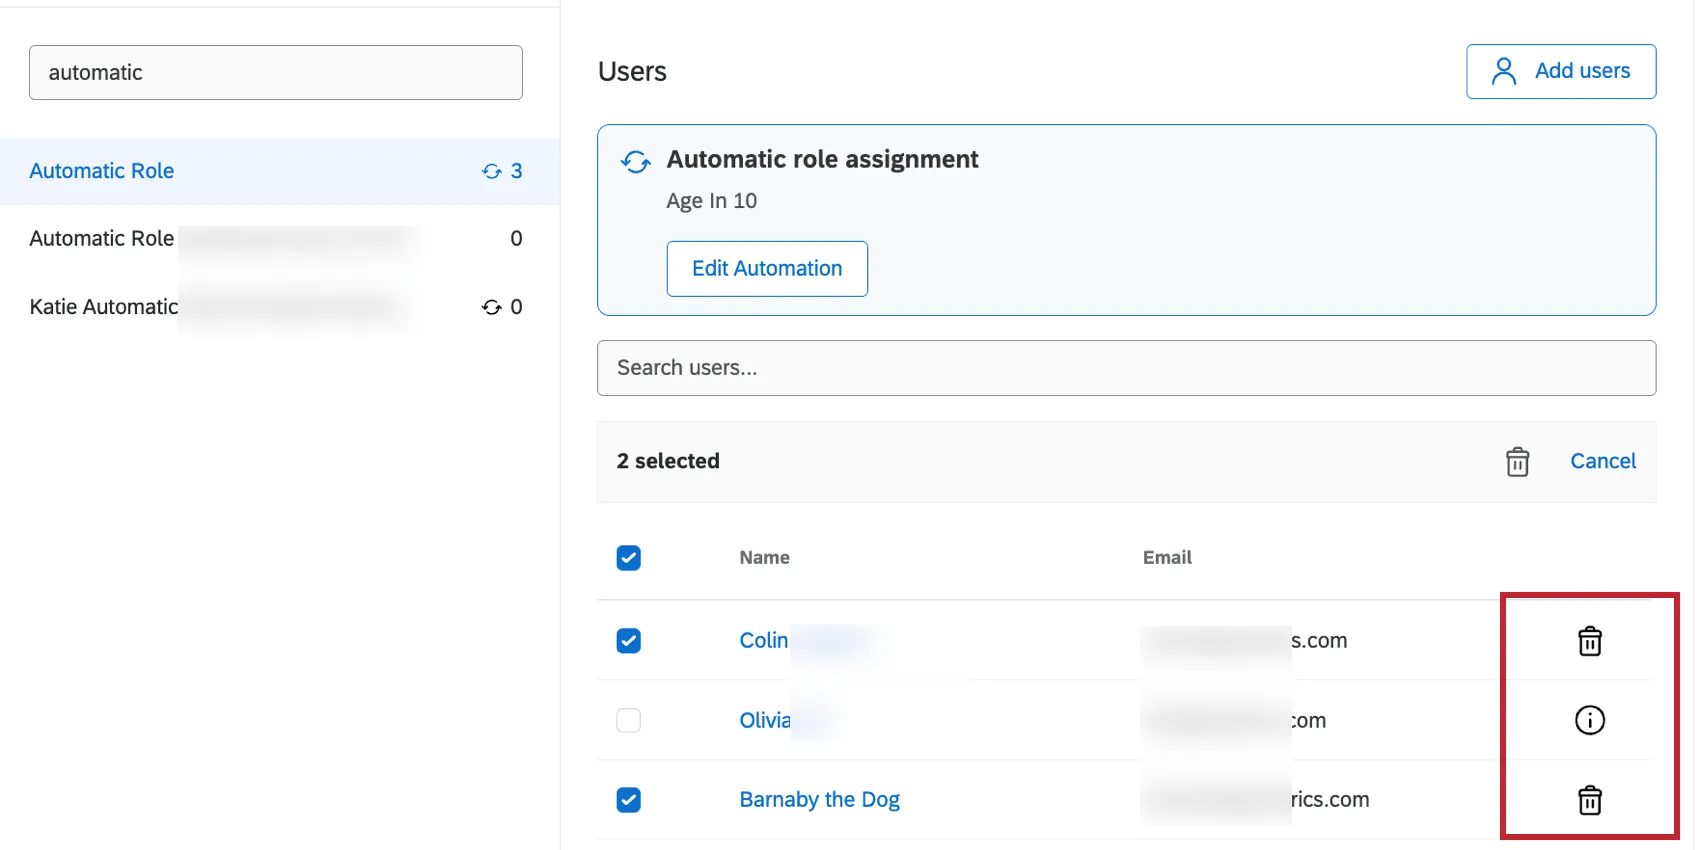
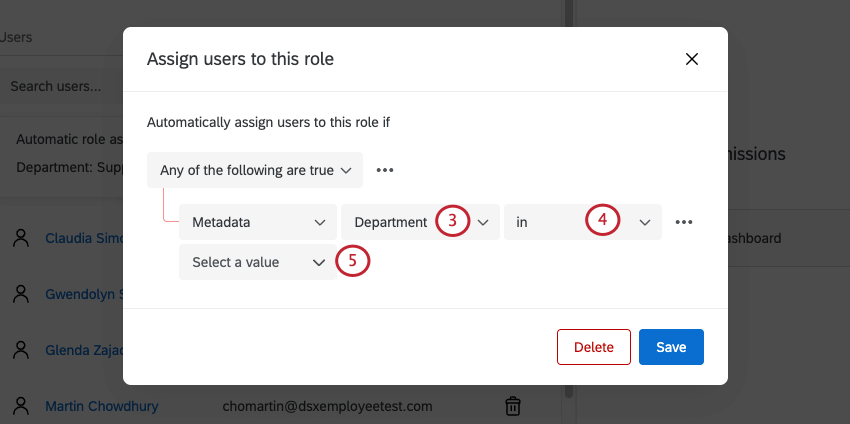
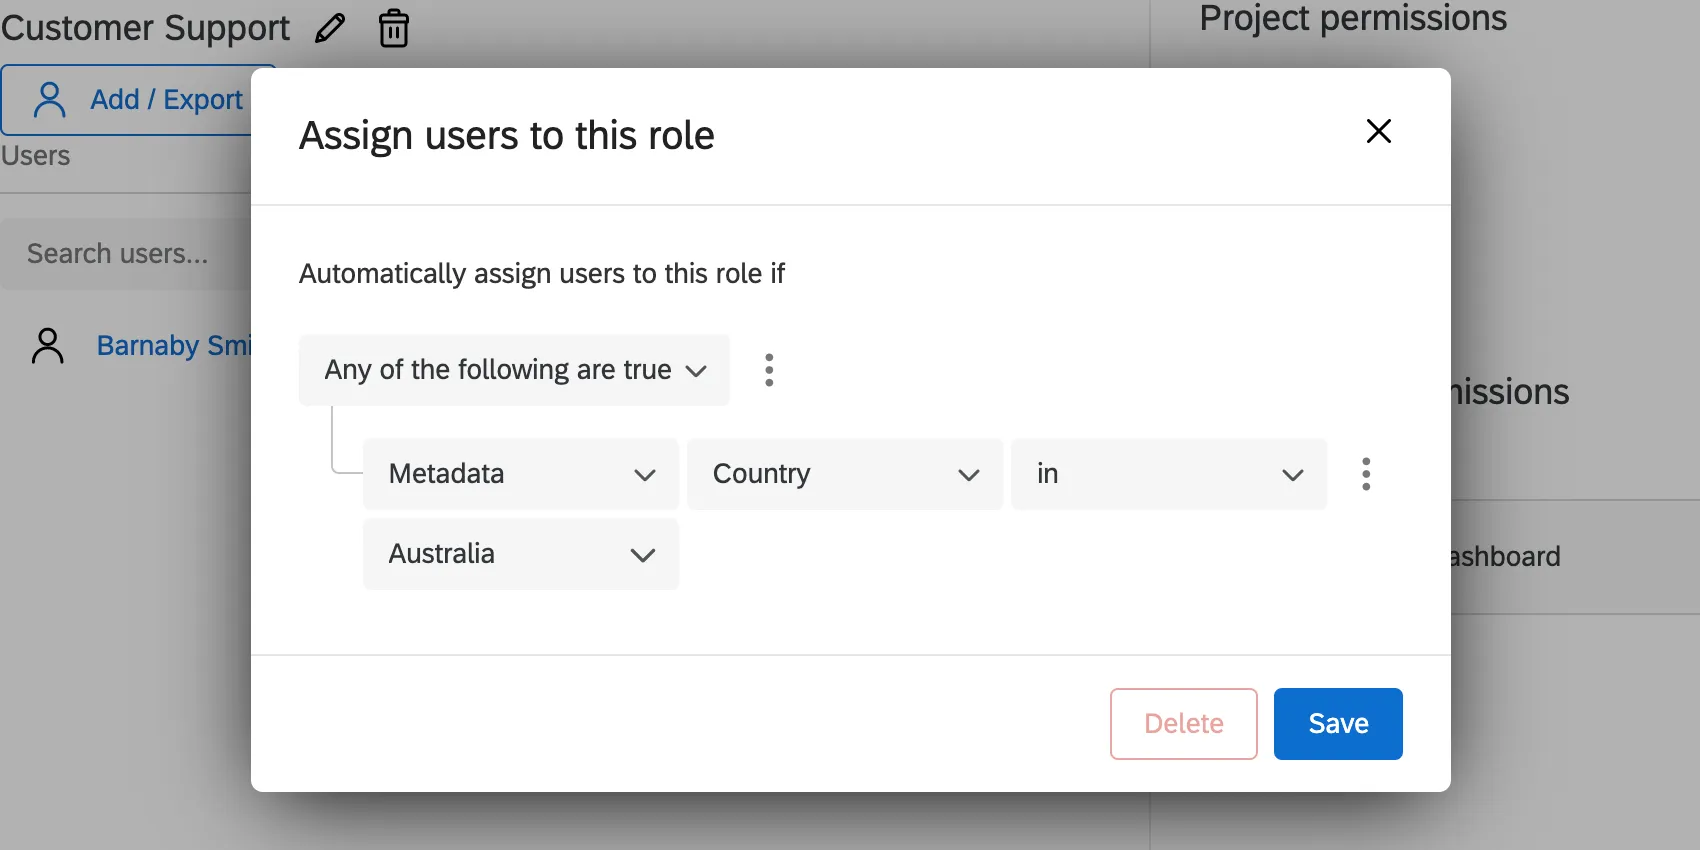
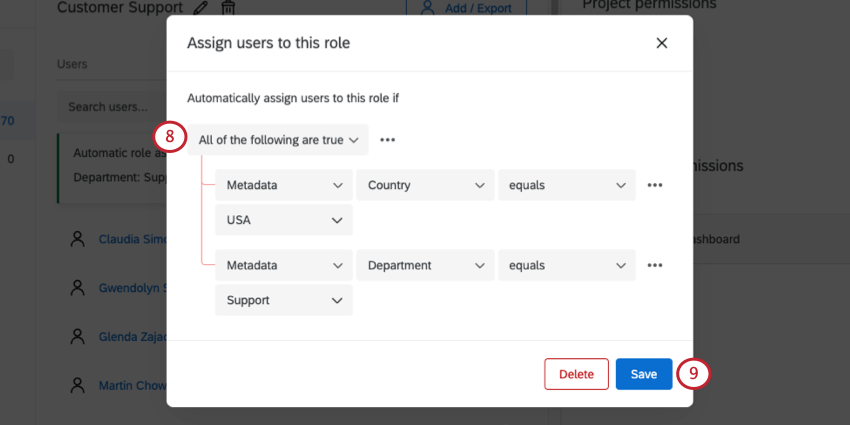
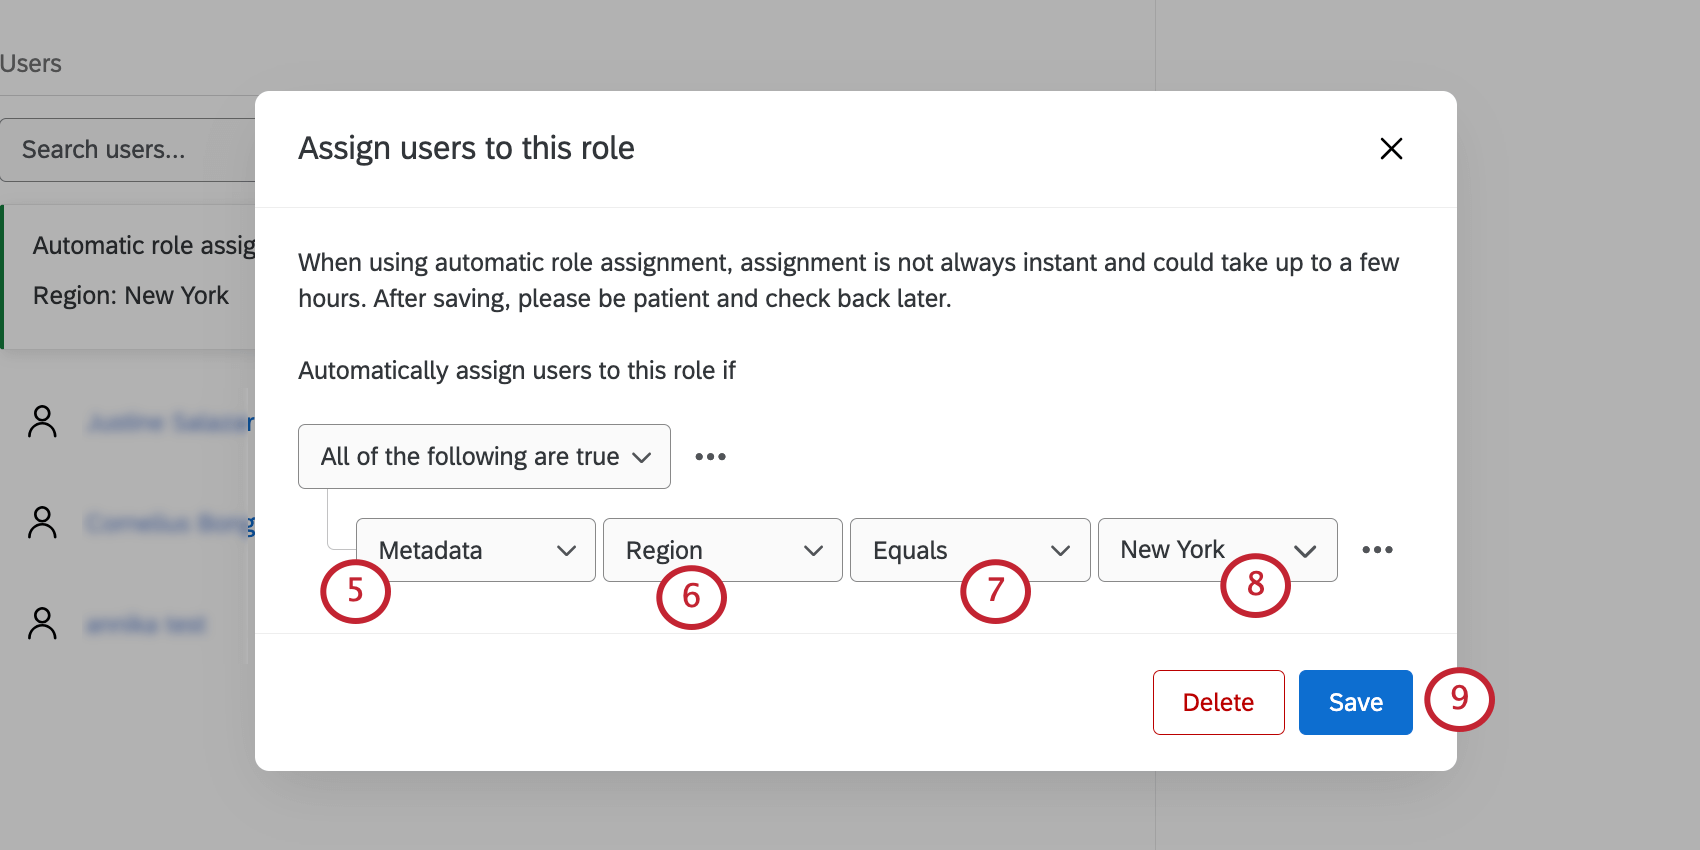
Automatic Role Assignment
Qtip: If a user’s metadata changes and they no longer meet automatic role assignment conditions, they’ll be automatically removed from a role.
Warning: If you edit automatic role assignment conditions, and existing role users no longer meet the condition, then they will be removed from the role. You cannot manually remove these users once the condition has been removed, so be careful editing conditions.
Qtip: The list of available metadata fields is based on the metadata of dashboard users. You will only be able to select fields that exist for current dashboard users. If you’d like to create automatic role assignment before uploading your dashboard users, you will need to add test users that contain the metadata fields you want to use in the automation.
- Equals: This is what you should choose most of the time. This ensures an exact match. Metadata fields are case-sensitive.
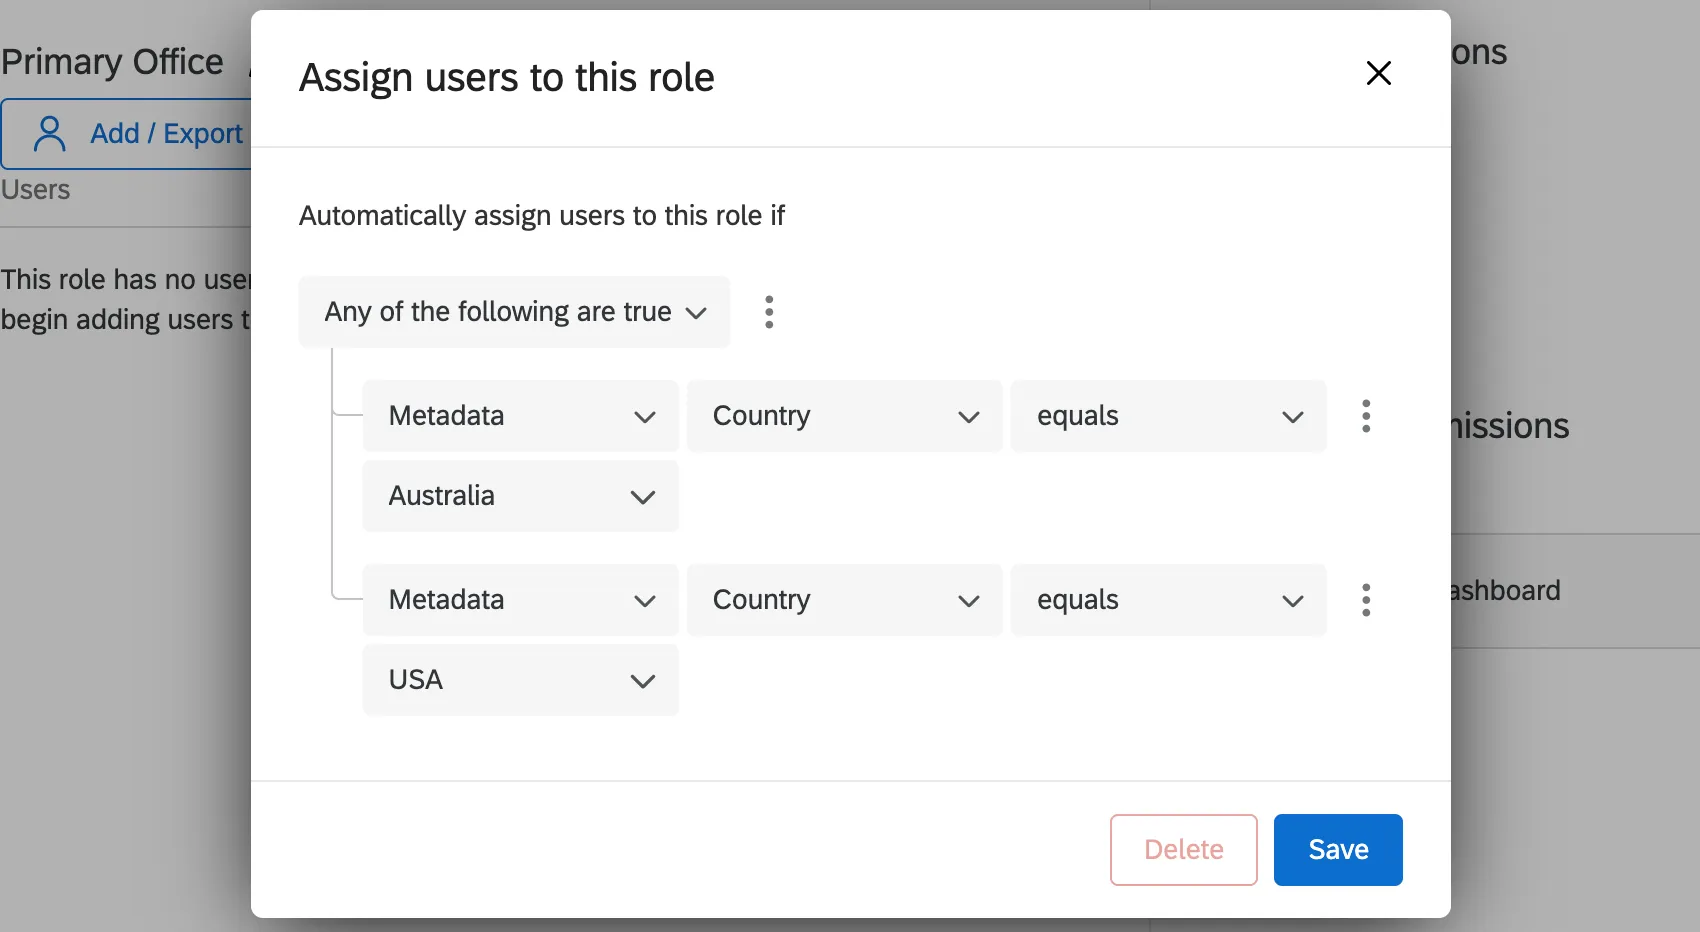
- In: This option is ideal if your metadata has multiple values, such as those separated by colons (e.g., Seattle::Provo). “In” lets you account for these colon-separated values. Example: Below, “Country in Australia” ensures that even users whose Country metadata is something like “Australia::USA” would be included in the role.


Example: You are creating a role called Seattle Team. You want all users with an Office of Seattle to be put into this role.
Qtip: You can type to search values in this field.
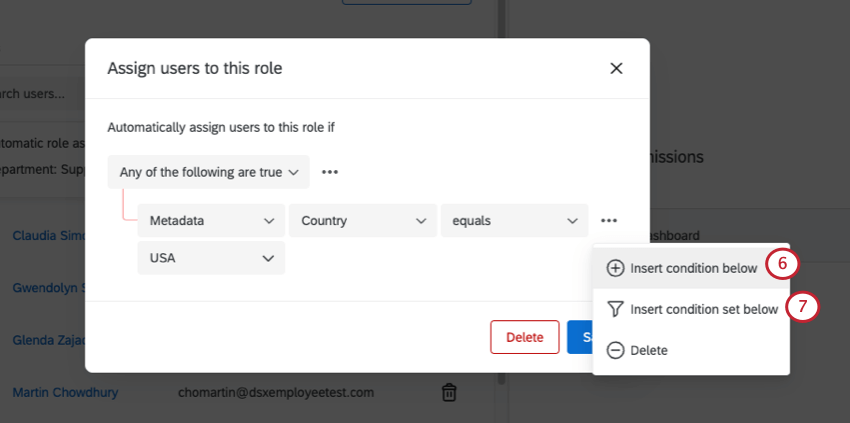
Attention: There is a limit of 2,000 rules across all automatic role assignment groups in your brand. A rule refers to all conditional statements for a role. You can have multiple conditional statements in an automatic role assignment group. For example, there are 2 conditions in the step-by-step instruction above, which is considered 1 rule. If you exceed this limit, you will see the error message “You reached the maximum number of rules on the given assignment definition.” Please contact Account Services with your business context if you need this limit raised.
How automatic role assignment works when the metadata for a single user has multiple values
Some metadata have multiple values. For example, your Customer Experience team may operate out of several offices. If a metadata attribute has multiple values, it changes how it works with automatic role assignment.
Example: Let’s say you wanted the users listed below to appear in the same role:
User 1: Country = Australia
User 2: City = Provo
You can add two conditions to your role joined by “Any.”
You can also have multiple roles, so that a user with multiple values is assigned an additional role for each value. In this case, you would create an Australia role and a USA role.
Example: Let’s say your users are:
User 1: Country = Australia::USA
User 2: Country = Australia
If you created an Australia role, you would use in instead of equals to make sure both users were included.

On the other hand, if you made the role’s condition “Country equals Australia,” User 1 would not be added to the role, because their Country value is “Australia::USA,” not just Australia.
Additional resources for creating automatic enrollment conditions
For more information on how to create and combine conditions, see the following resources:
Automatic Role Assignment with SSO
If your organization has Single Sign-On (SSO) set up, you can use it to automatically assign roles to your CX Dashboards users.
Setup on your end
Your IT team is responsible for establishing your company’s SSO. On your end, you and your team need to create an attribute you’ll use to assign roles.
For ease of use, you might call this attribute CX Dashboard Role. For each user, you could set the value of this attribute equal to the name of the role they should be assigned to. So if your colleague is supposed to be assigned to the Sales role, his CX Dashboard Role attribute should be equal to Sales.
Information for Qualtrics
Once this attribute is established on your end, take the following action depending on your SSO setup type:
- If your organization uses SAML or OAuth 2.0 SSO, you can pass the attribute to Qualtrics by following the instructions in the dashboard attributes section on the linked page.
- If your organization uses CAS or LDAP SSO, then send the name of the attribute to Qualtrics Support. Be sure to mention it’s for the SSO team! You don’t need to include the possible values, just the exact spelling of the attribute’s name.
CX Dashboards Setup
Once Qualtrics has this information, you can make the necessary changes in CX Dashboards that will ensure the automatic role assignment.
Qtip: This attribute will not be available unless at least one user in the brand with this attribute has logged into Qualtrics. If you’re having trouble finding the right attribute, try adding the user attribute to yourself.
Dashboard Permissions
Qtip: Be thoughtful about which dashboards you add to each role. Roles are often used to group users with a specific dashboard-viewing need, so any dashboards you add to the role should fit that need and only include the data essential to their success.
You can add dashboards to a role to determine what dashboards every user in the role has access to.

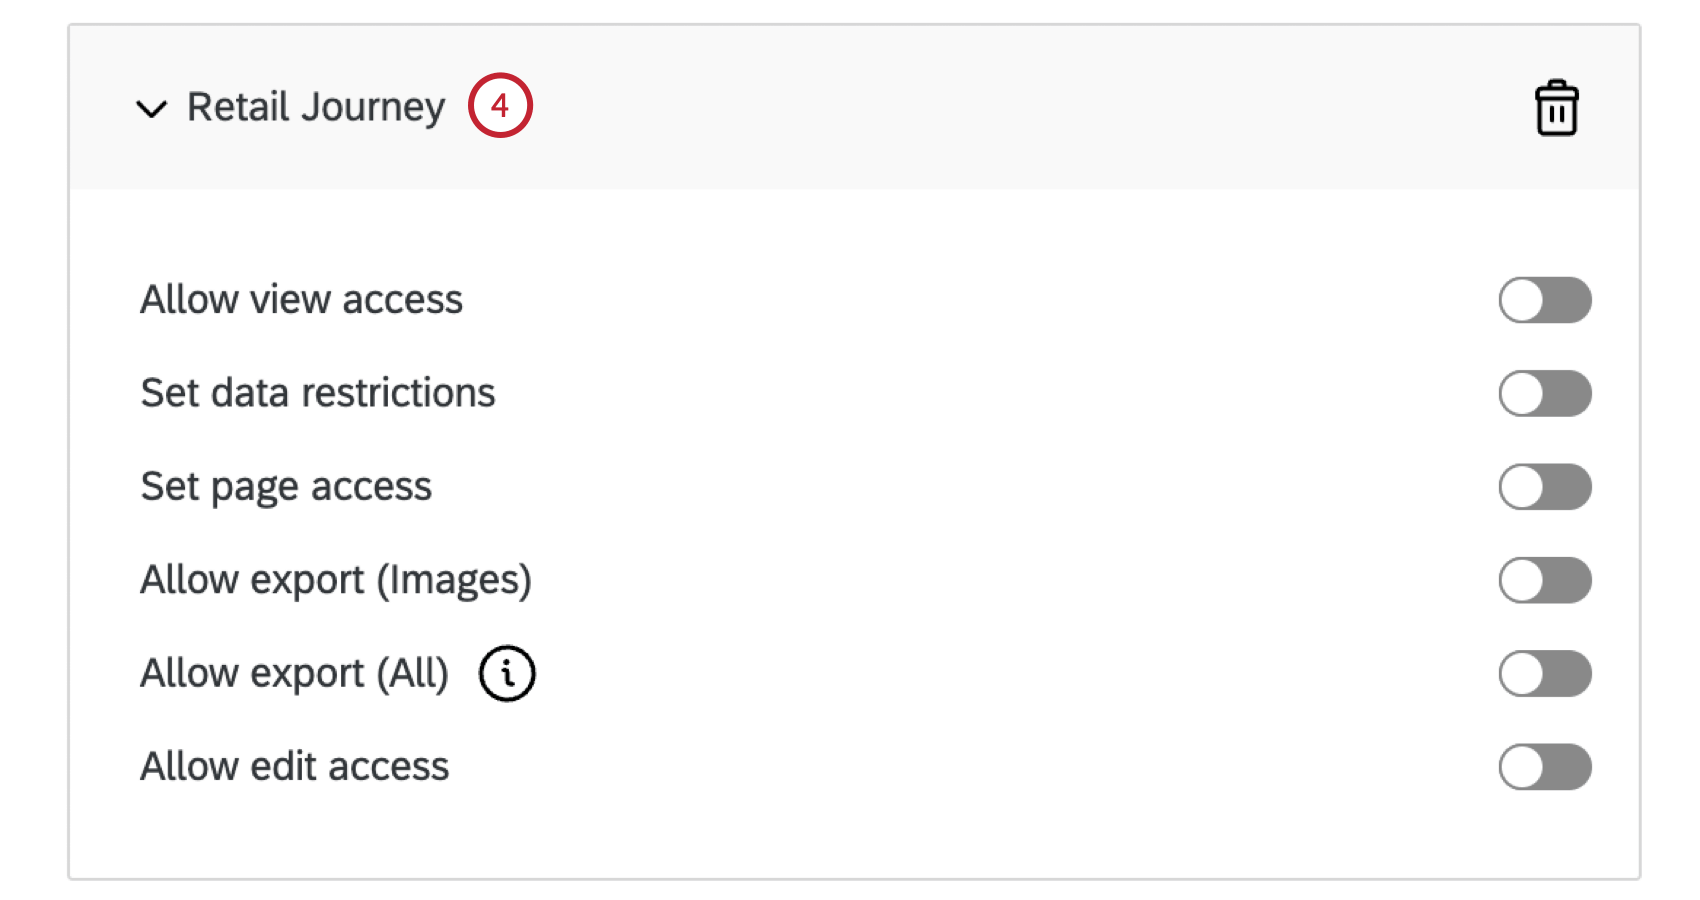
You can add as many dashboards to a role as you need.
Dashboard Permissions
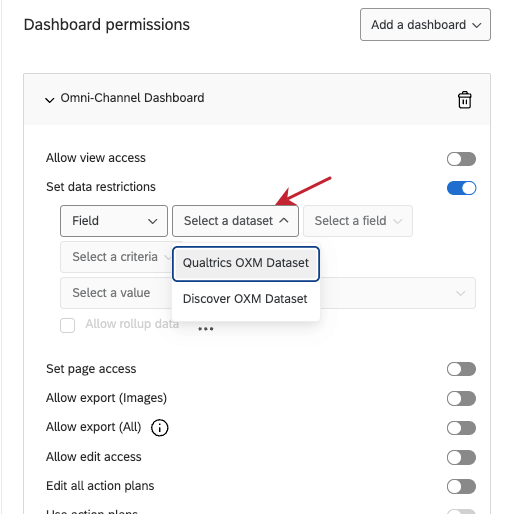
- Field: Allows you to restrict data access by metadata or survey questions. Qtip: You can add and remove additional restriction conditions by selecting the plus (+) and minus (–) signs next to each condition. You can only add up to 10 conditions at this point in time.

- Is equal to / Is the same as dashboard user’s: Choose to make your field equal to a certain value, or same as a dashboard user’s metadata field.
- Allow rollup data: “Allow rollup data” allows users to view all of the aggregate data of that field but it restricts data filtering to the specified value or values. For example, a data restriction for “Region is West” with “Allow rollup data” checked would allow a user to see the aggregate data across all sales regions, but the user would only be able to filter to the “West” region.
Qtip: Only text set or multi-answer text set fields can be used to restrict data in dashboard permissions.Qtip: If you have multiple datasets mapped to your dashboard, you’ll need to pick a dataset before a dashboard. For more information on how linked fields function in roles, see Controlling Dataset Access.

- The following options are only for brands with CX Hierarchies.
- Org Hierarchy: Allows you to restrict data access to the participant’s Parent Unit (includes the participant’s manager and that manager’s direct reports), All Results Below Them (includes data rolling up to the unit for which they are a manager), Direct Report Results Only (includes only the participant’s direct reports), or People at Same Level Only (includes responses from the same level of indentation in the hierarchy as the participant).
- Org Hierarchy Units: Allows you to restrict data access to responses In or In Or Below a specific unit. If a participant is given multiple restrictions based on org hierarchy units, then the participant’s dashboard will default to the unit closest to the “root” of the hierarchy. For example, in a parent-child hierarchy, the CEO is the “root” of the hierarchy; in a level-based hierarchy, the “root” is the top-most level.
- Org Hierarchy Metadata: Allows you to restrict data access by metadata that was included as Org Hierarchy Metadata when generating a level-based hierarchy. This often correlates to the participant’s department within various levels of the organization.
Qtip: There are also additional CSV, TSV, and XLSX settings you can add; see Dashboard Themes for more details.
Qtip: There are also additional CSV, TSV, and XLSX settings you can add; see Dashboard Themes for more details.
Qtip: If you share a project with another user, this will not automatically give the user dashboard editing access. To give another user this access, add them as a user in the project and enable the Edit Dashboardpermission in the user information window. If you would like to hide Text iQ from a dashboard user, you will want to ensure that you have placed data restrictions on the user. Text iQ is not available for users with any data restrictions.
To take away a user’s access to a dashboard, select Remove Dashboard.
Qtip: Be careful when you invite other users to edit the dashboard. While many users can access the dashboard at once, it’s best practice to only have one person making edits at a time. The more people who are making edits at once, the more likely they are to overwrite each other’s changes. If you need to edit a dashboard, make sure your colleagues are not still making changes to it.
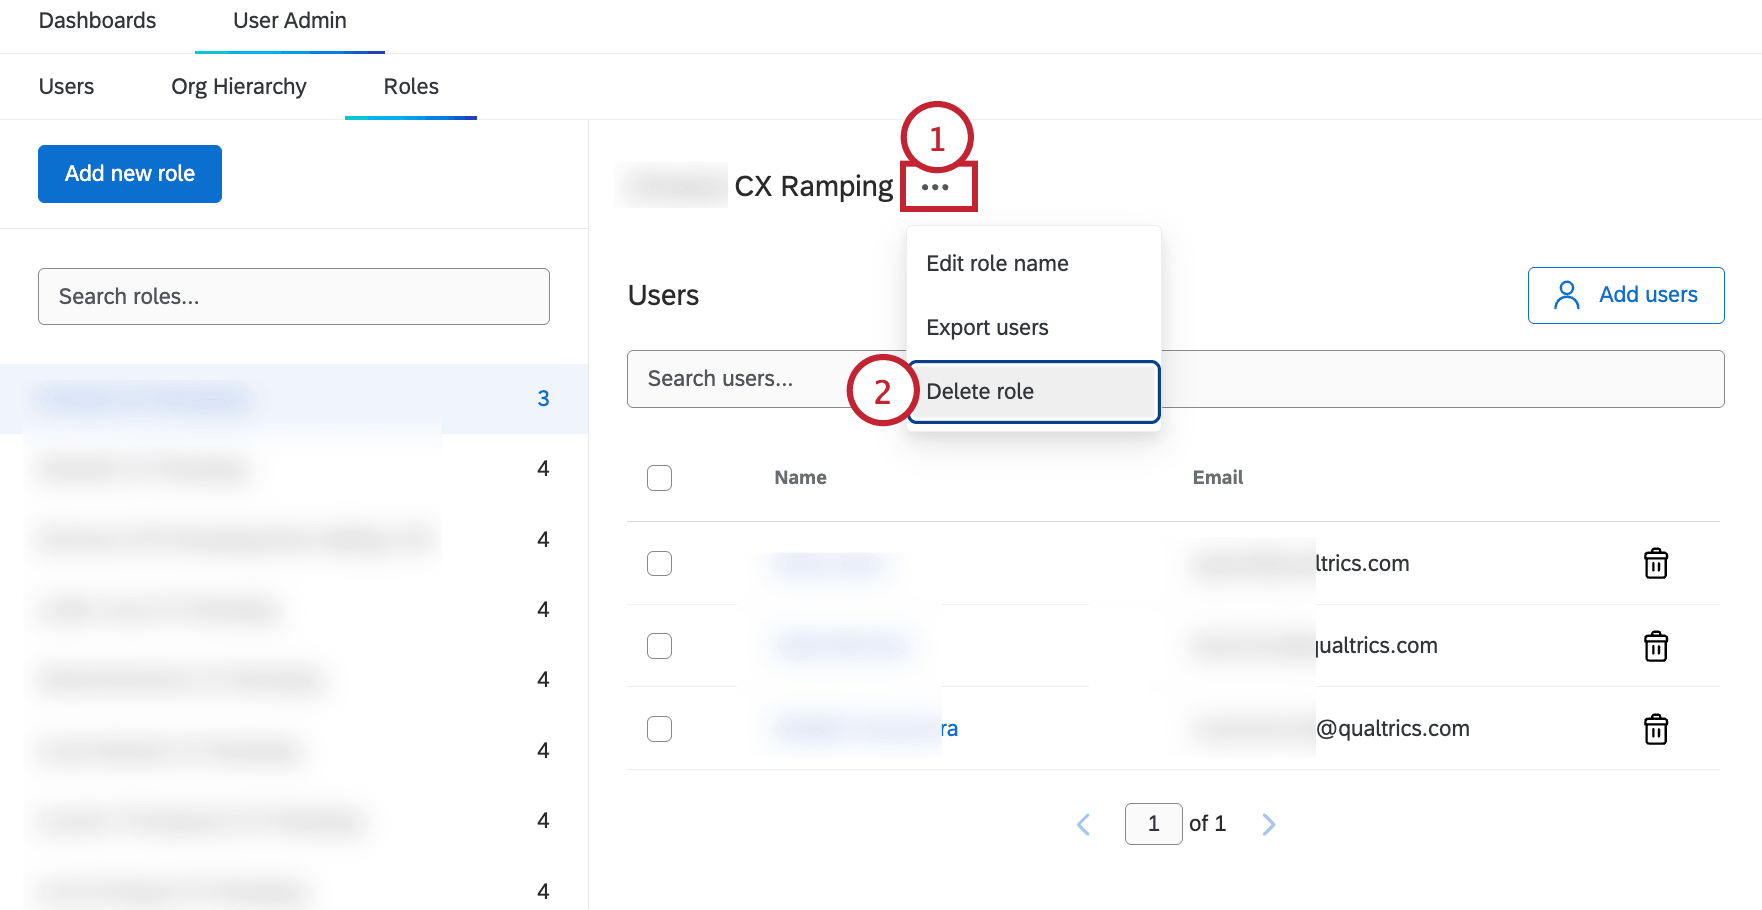
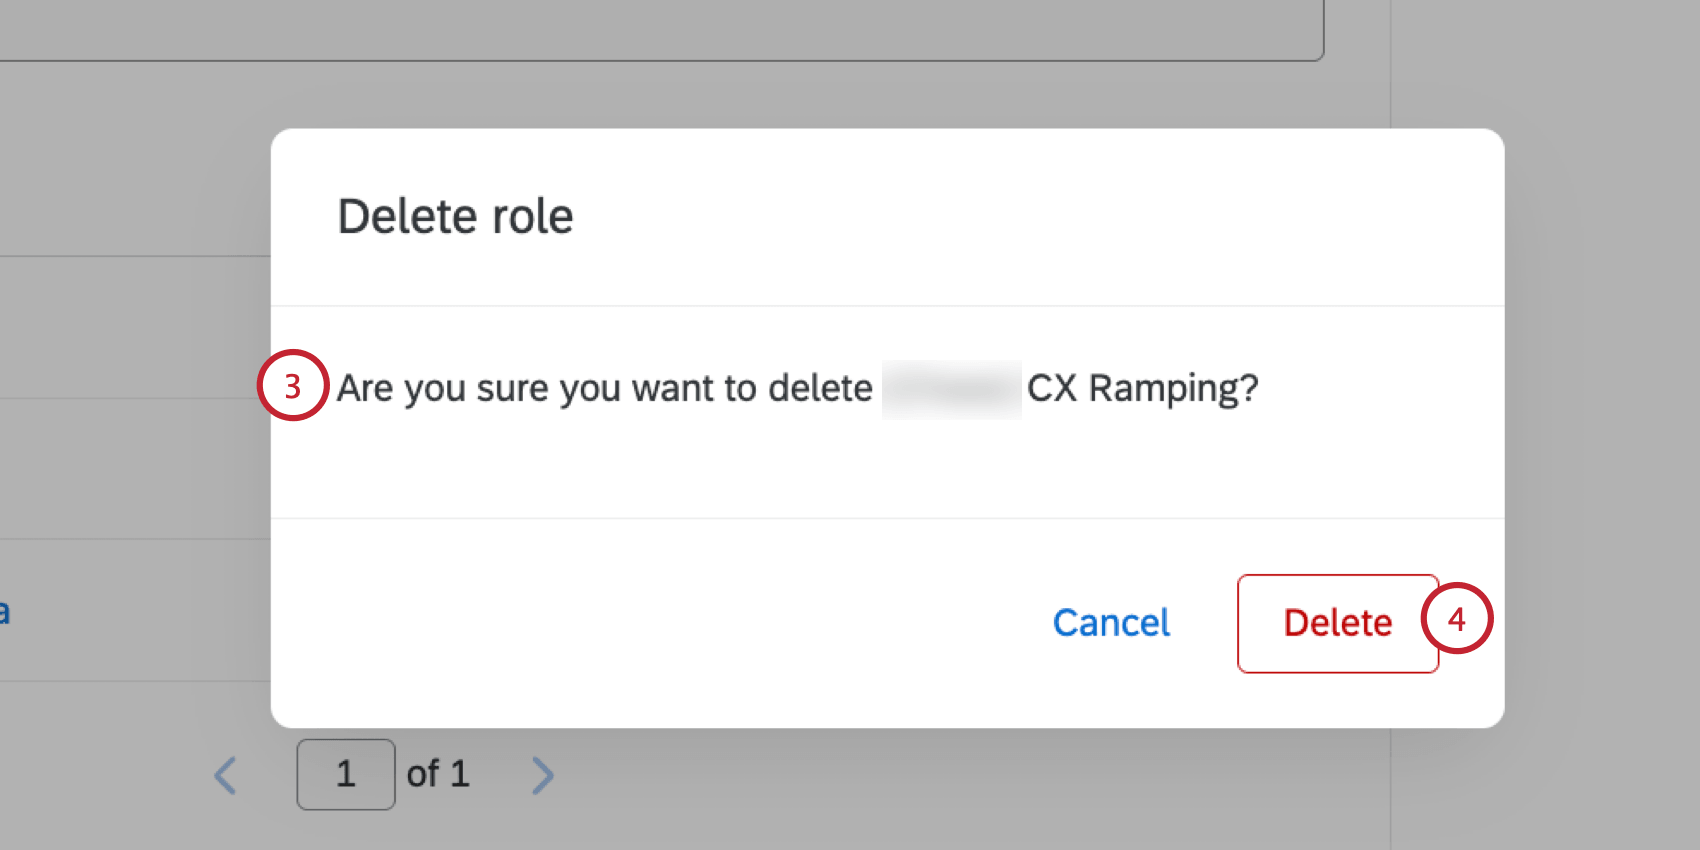
Delete Role
Warning: When deleted, roles are irretrievable. Do not ever delete a role unless you are absolutely sure you want to!
Export Role
You can export a CSV file containing the FirstName, LastName, Email, and UniqueID of every user in the role.
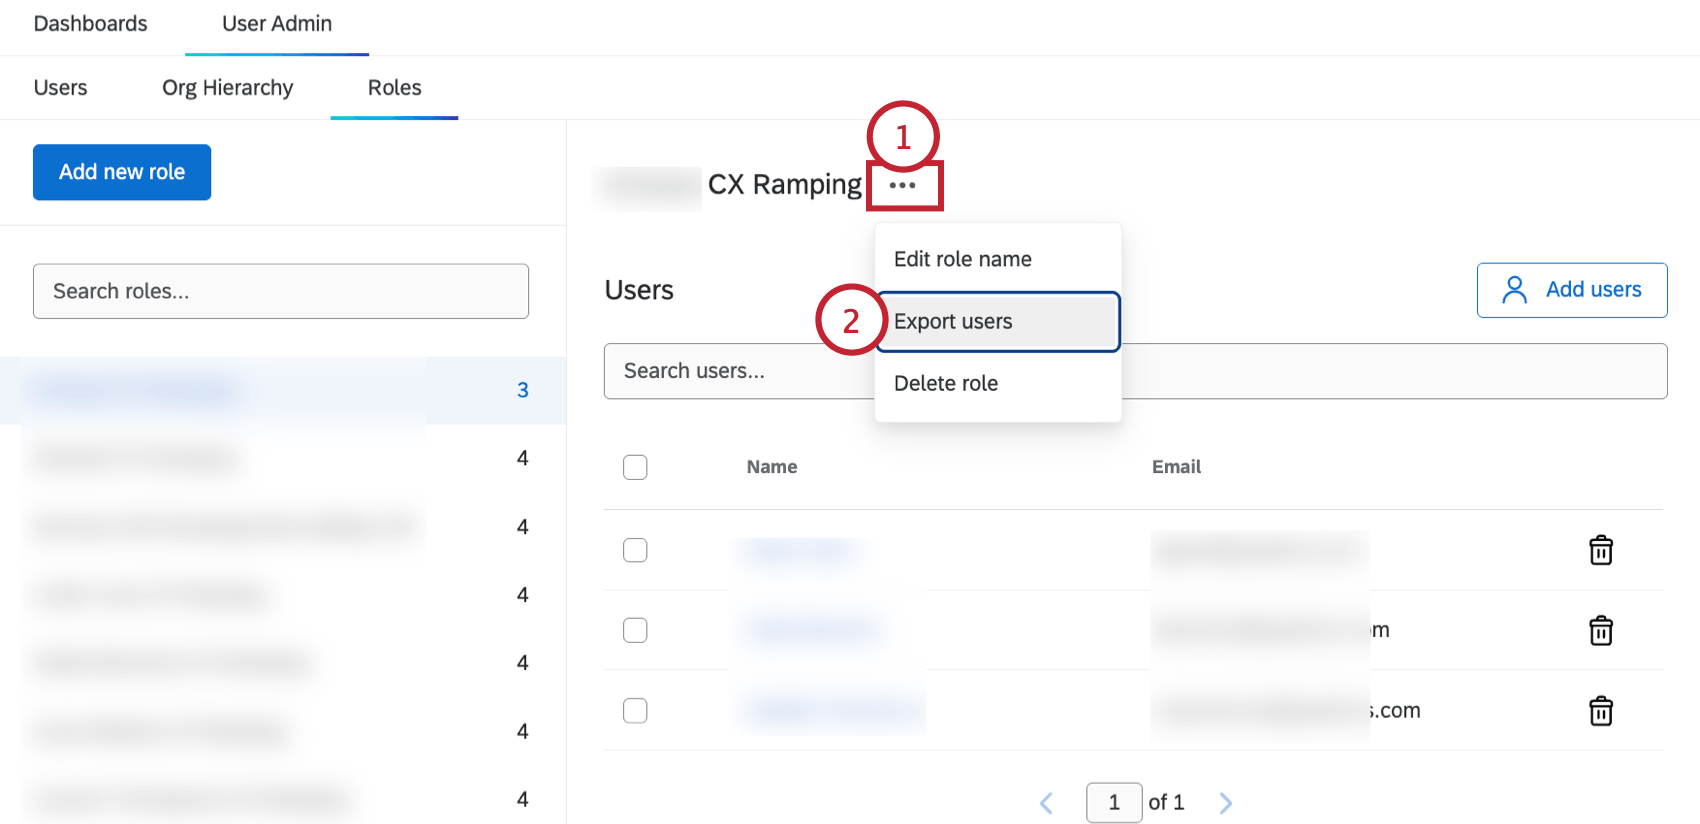
Qtip: This feature is helpful for creating contact lists of your role members.
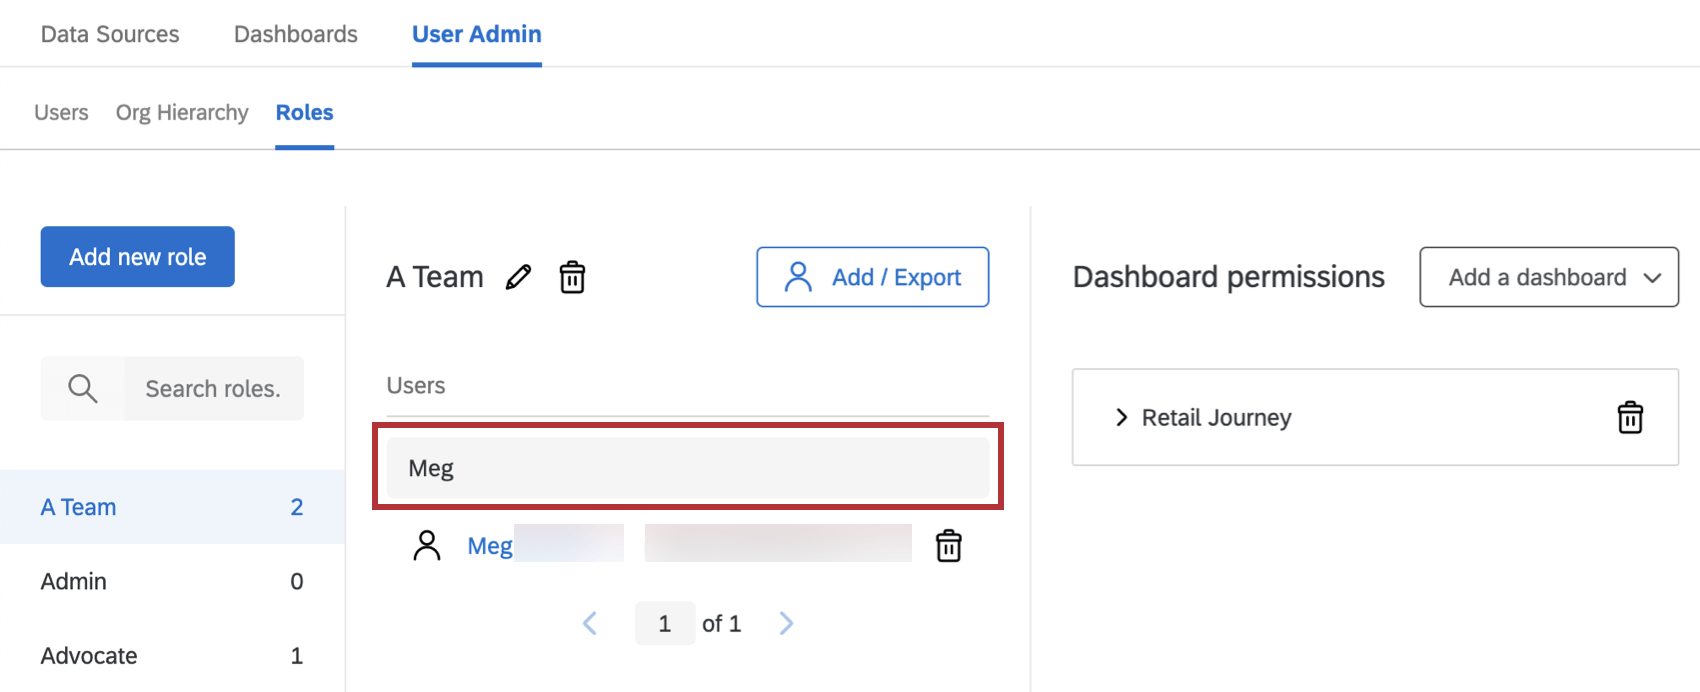
Searching a Role
If your role contains many users, you can use the Search bar above a role to search for a user within the role. You will only be able to search by the user’s name or email.

FAQs
When are Roles automatically assigned to users?
When are Roles automatically assigned to users?
Is the role updated with the correct users when the Automatic Role Enrollment conditions change?
Is the role updated with the correct users when the Automatic Role Enrollment conditions change?
When you upload users in bulk, are they automatically added to a role based on the criteria they meet?
When you upload users in bulk, are they automatically added to a role based on the criteria they meet?
Are Roles updated on a user after their metadata changes?
Are Roles updated on a user after their metadata changes?
If I change a role name, will it update the corresponding metadata values on my users?
If I change a role name, will it update the corresponding metadata values on my users?
How do I give my dashboard users the ability to use action planning?
How do I give my dashboard users the ability to use action planning?
Can Dashboards projects only be used for customer experience research?
Can Dashboards projects only be used for customer experience research?
That's great! Thank you for your feedback!
Thank you for your feedback!