
File Upload Question
What's on this page
About File Upload Questions
Qtip: File upload is an add-on feature not included in the standard Qualtrics license. Please contact your Qualtrics Account Executive if you are interested in getting access.
The file upload question type allows respondents to upload a file along with their survey response. File uploads allow you to collect data that may not be available through standard survey questions.

You can have as many file upload questions in your survey as you would like, however each question can accept only 1 uploaded file. Uploaded files can be up to 50MB. For security reasons, executable files (such as those ending in .exe) aren’t permitted.
Qtip: Respondents can upload multiple files through a single file upload question if the files are compressed into a ZIP file before uploading.
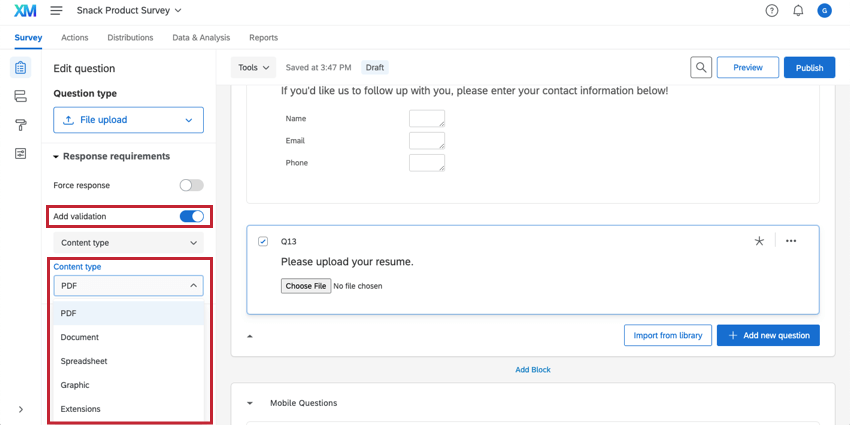
File Upload Options
File upload questions are fairly straightforward, with the option to restrict the type of file respondents upload. For example, if you are asking for a photo, you may want to restrict respondents from uploading spreadsheets.
To set this requirement, select Add validation in the question editing pane and choose the appropriate content type.
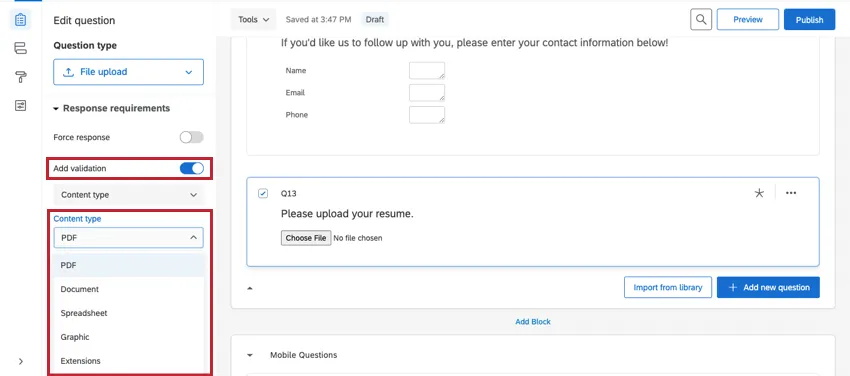
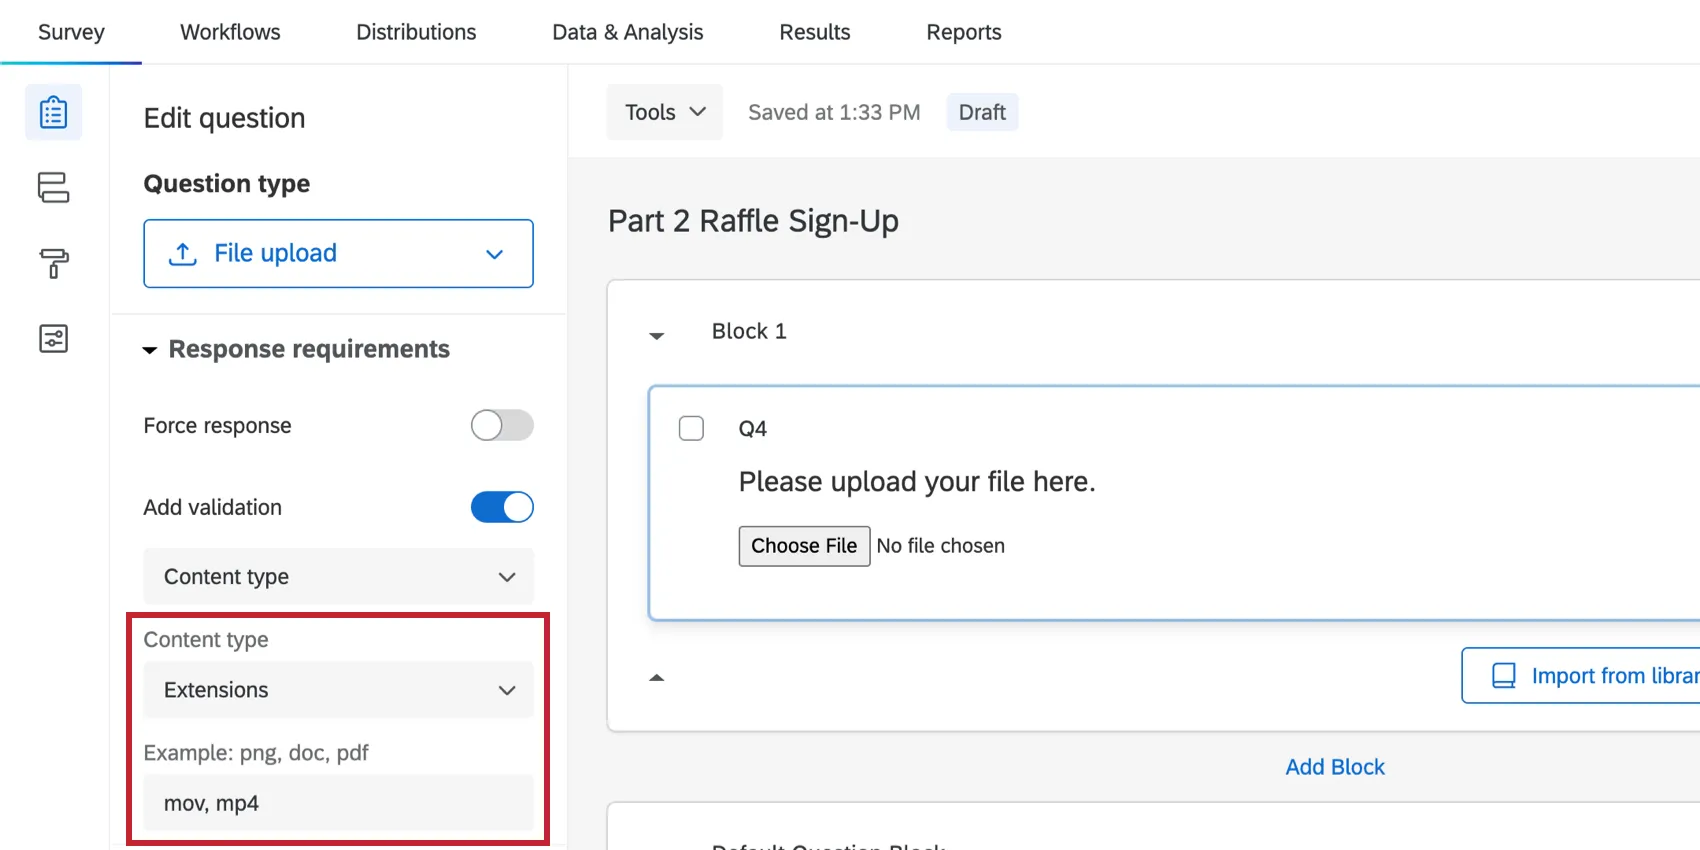
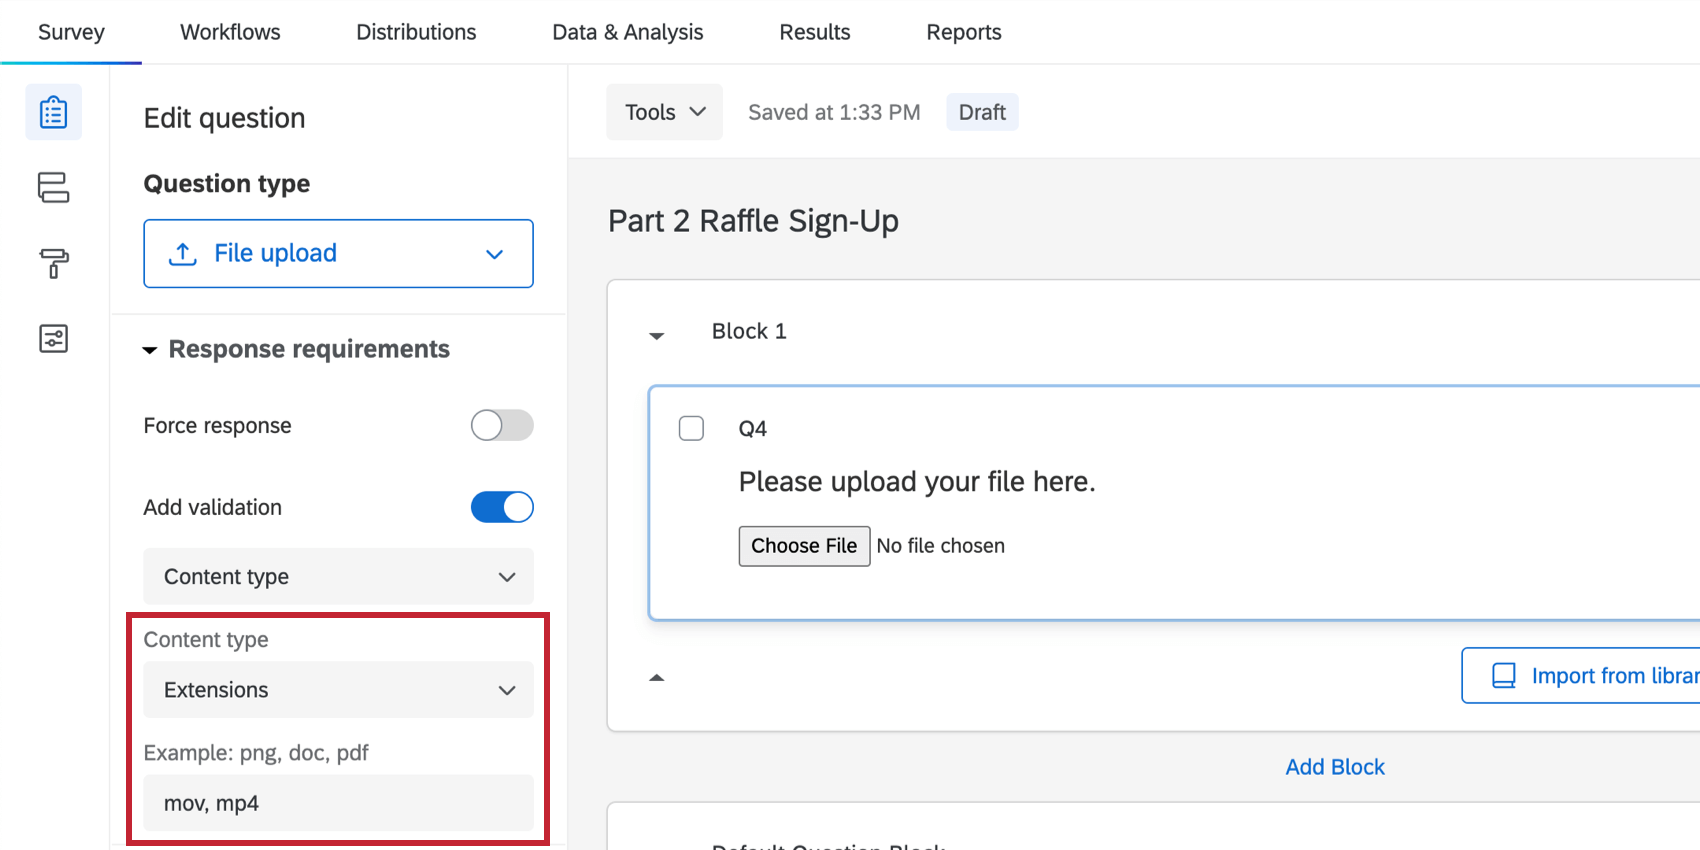
Content options are PDF, Document (DOC, DOCX, TXT, ODT), Spreadsheet (CSV, XLS, XLSX, ODS), or Graphic (JPG, PNG, GIF). You can also choose Extensions and type in your own custom allowed file extensions. Custom file extensions should not include the period before the file name and need to be separated by a space or a comma.
Example: To limit uploads to video files, you could type “mov, mp4” into the extensions field. These file types aren’t case-sensitive, so “MOV, MP4” would also work.
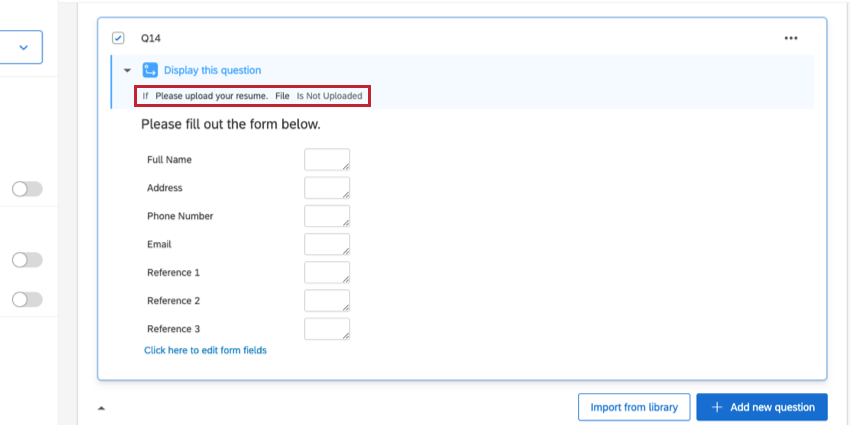
File Upload Logic
When using the file upload question, you can add special logic conditions related to the upload in display logic, skip logic, branch logic, custom validation, and other areas. You can add logic based on the following:
- File: Logic based on whether a file was uploaded or not.
- File Size: Logic based on the number of bytes the uploaded file contains.
- File Type: Logic based on the type of file that was uploaded (PDF, Document, Spreadsheet, Graphic, Custom Extensions).
Example: In the image below, display logic has been applied so that the form only appears if someone didn’t upload a resume in the previous question.

Attention: Once a file is uploaded, it can only be removed by a respondent if the survey uses the New Survey Taking Experience. Otherwise, the respondent won’t be able to remove the file. Regardless of the layout you use, a respondent can always replace the file with a different file.


Data Analysis
Warning: If you delete a response that contains an uploaded file, the file will be permanently deleted and unrecoverable after 30 days. The file will no longer be available even if the response has been imported into the dataset of a different survey.
Qualtrics offers various ways you can analyze your response data once your responses have been collected. From the Reports tab, you can view aggregate data in pre-made reports as well as create your own reports from scratch. From the Data & Analysis tab, you can view and manage individual respondents’ data.
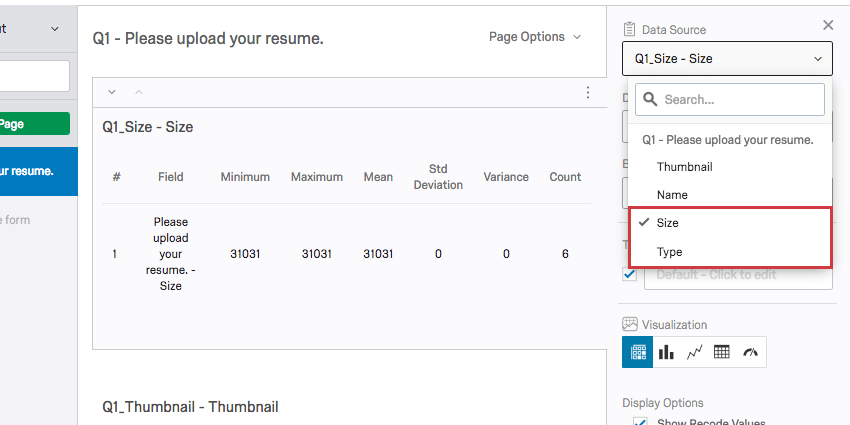
Results Visualizations
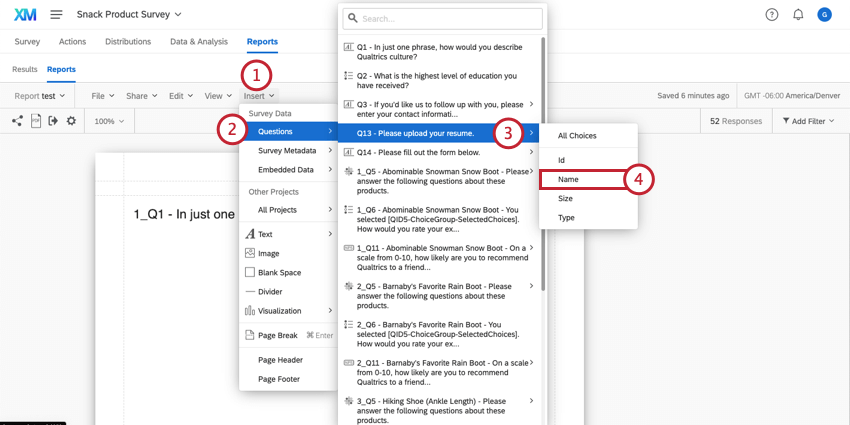
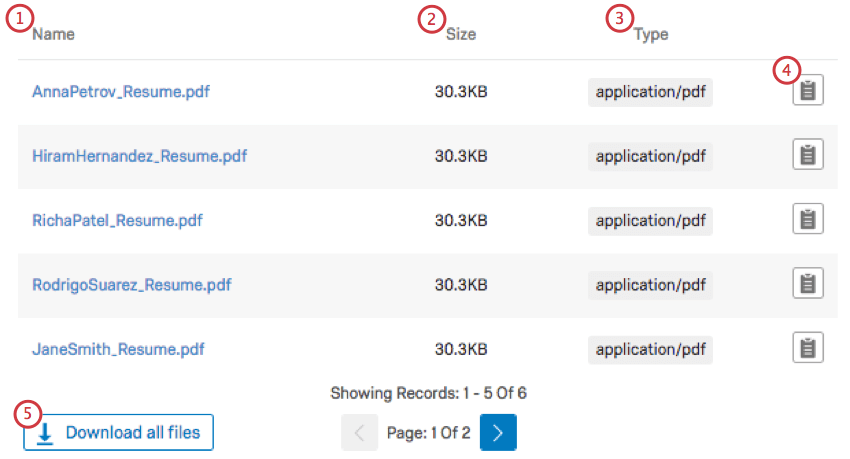
In the Results section of the Reports tab, the default table for a file upload is the paginated table. This table contains the following:
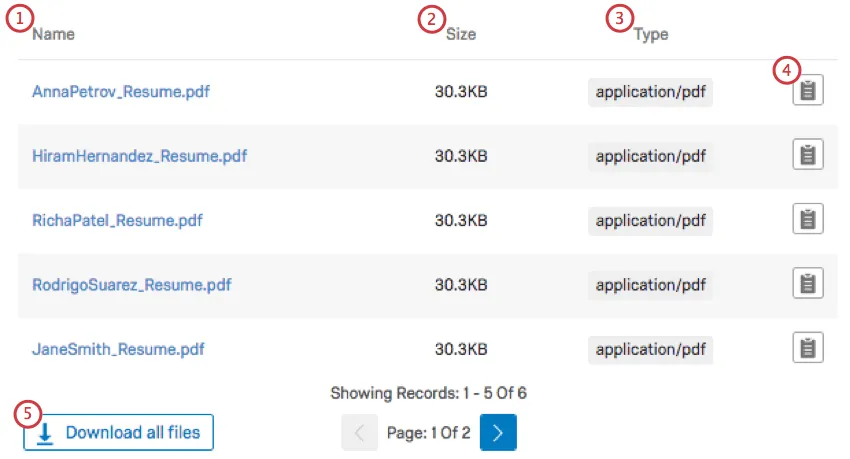
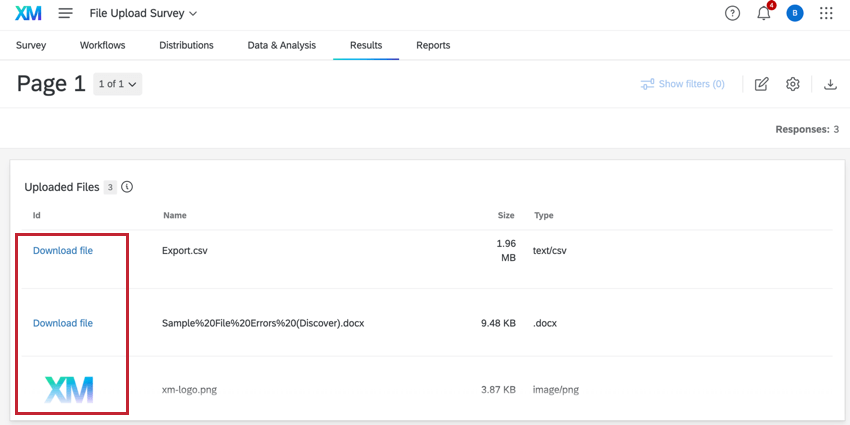
- Name: The name of the file. Click the name to preview the file.
- Size: The size of the file.
- Type: The type of the file.
- File icon: Click the icon to export the individual respondent’s answers to the other questions in the survey.
- Download button: Click Download all files to download all uploaded files.
Qtip: If you create a public report and post it online, you can decide if you want people to just view the file information, or be able to download it themselves. Under the Security tab in Survey Options, deselect Require permission to view uploaded files to create download links on the report. Keep Require permission to view uploaded files selected to prevent report viewers from downloading these files.
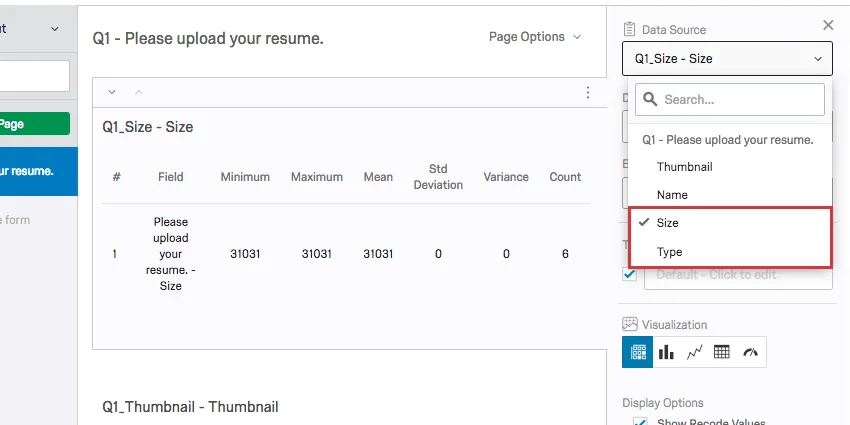
If you select a data source other than (the file’s) Name or Thumbnail for your visualization, you can use other visualization types, but you won’t be able to link to the uploaded files.
Reports Visualizations
In the Reports section of the Reports tab, you can’t create links to your file upload questions. However, you can still create a Results table that displays the different information for the file upload (size, type, etc.) altogether.
Qtip: Although this table is called a results table, it is a Reports table and can’t be found under the Results section.
For more information on editing a Results Table, please visit the linked support page.
Downloaded Data Format
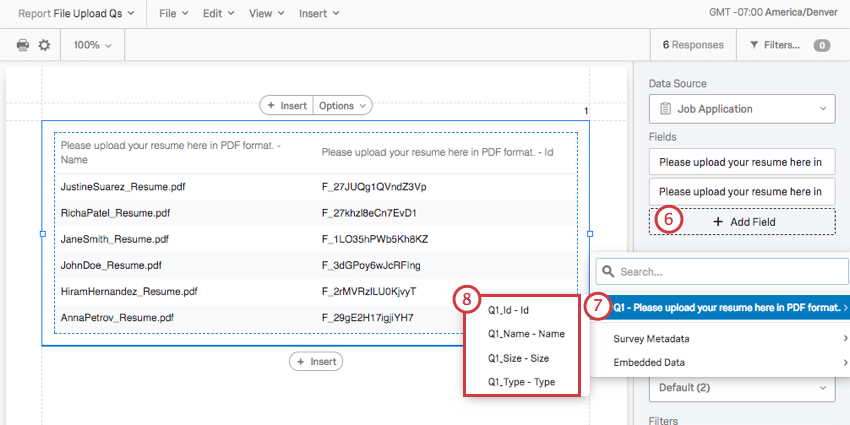
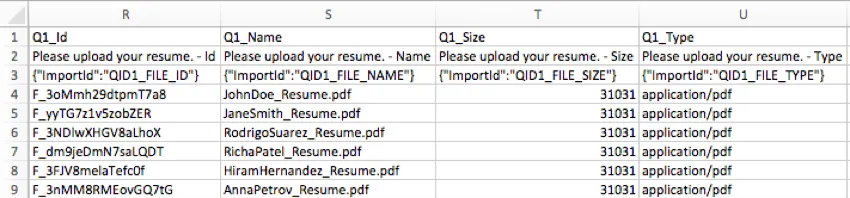
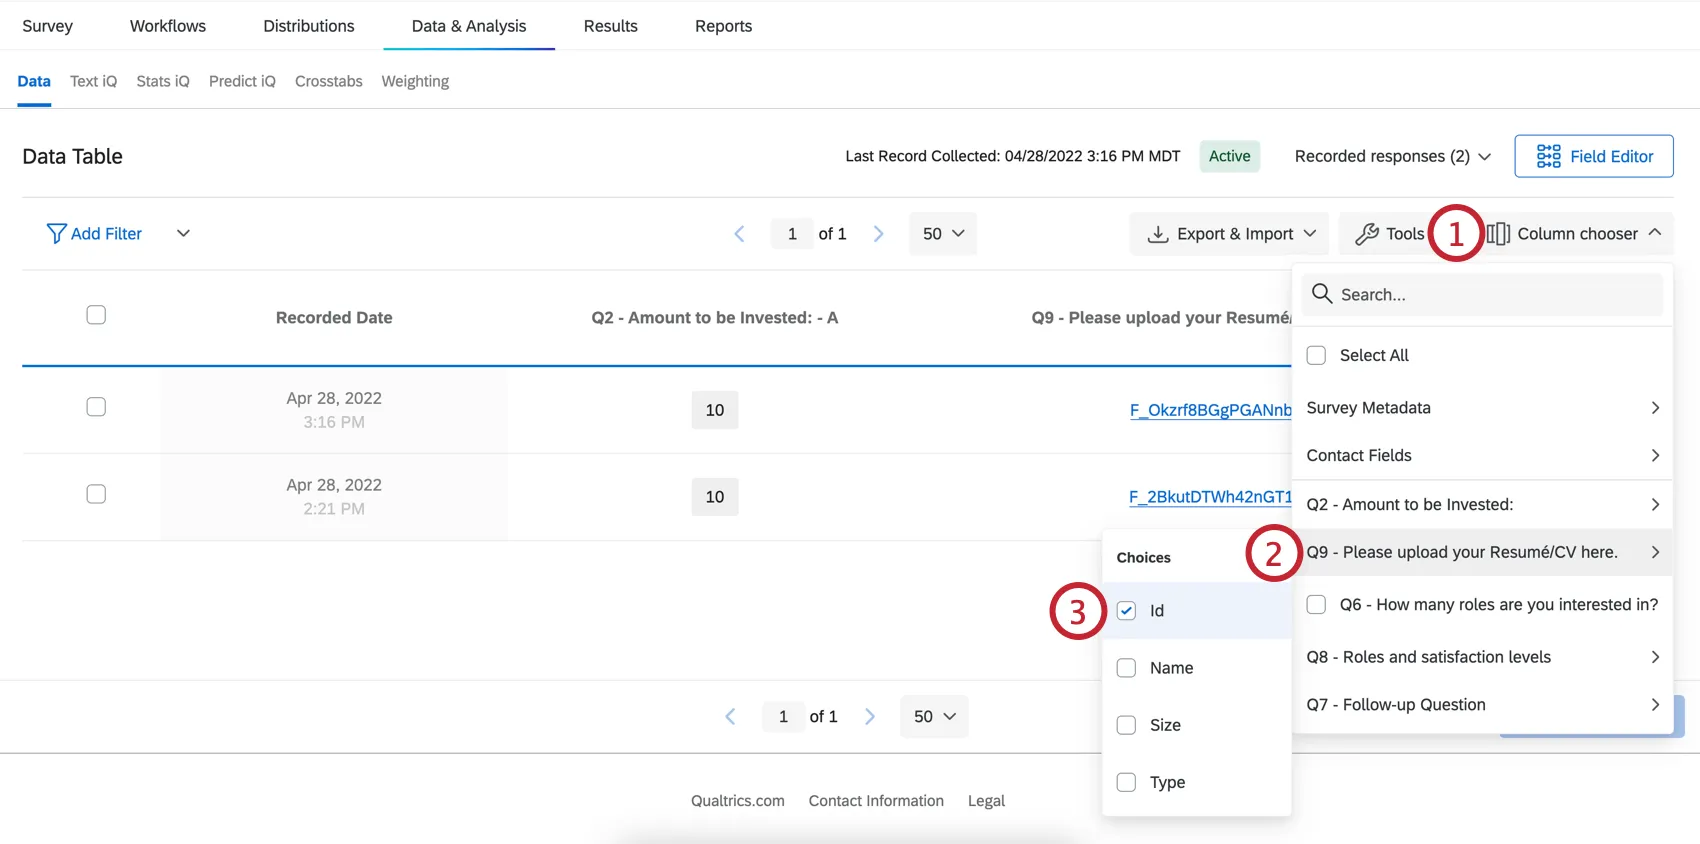
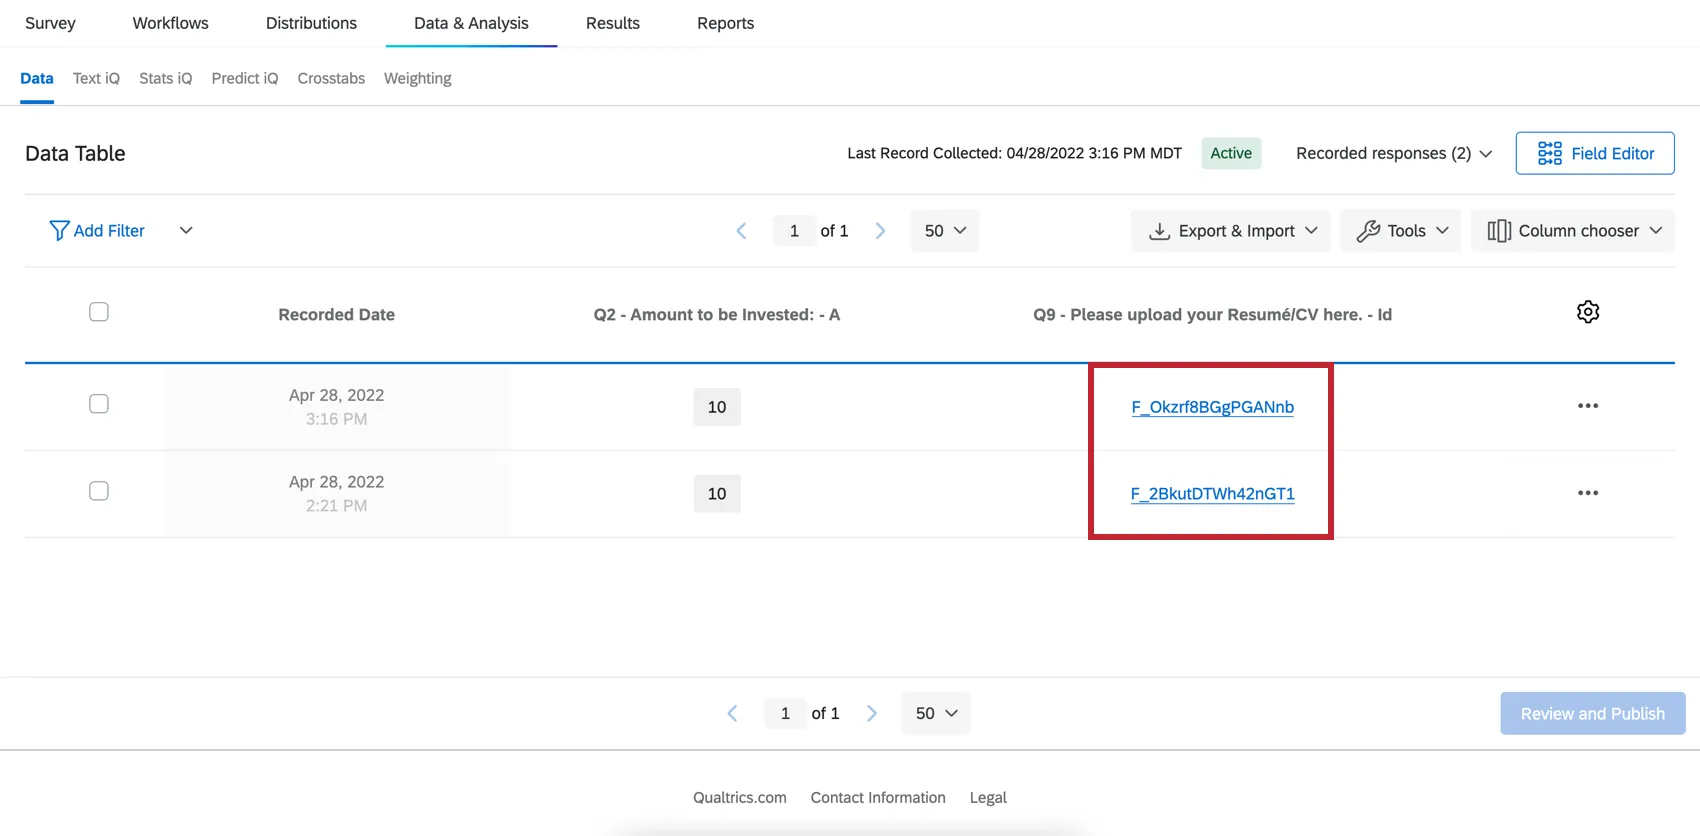
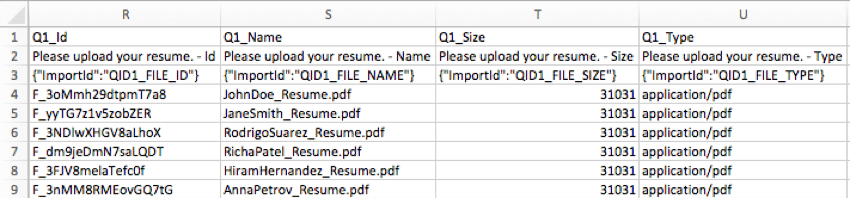
In the Data and Analysis tab, you can export a spreadsheet containing each respondent’s answers.
For file upload questions, there are 4 columns: the Id, Name, Size, and Type of file.
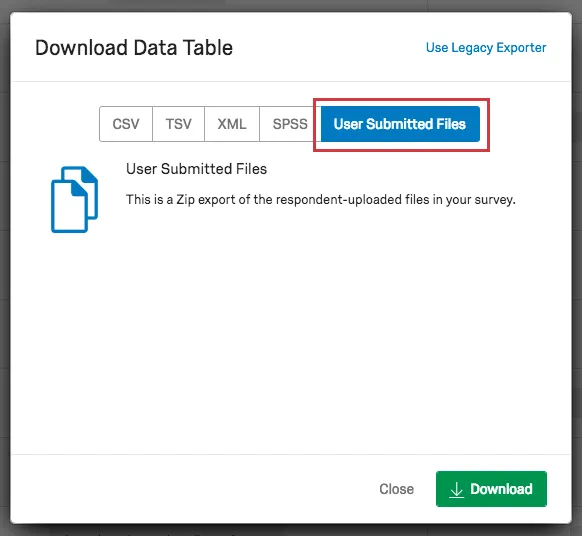
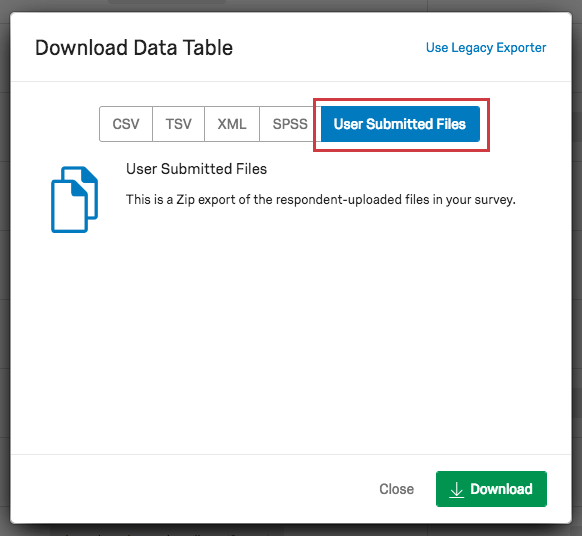
ZIP Download
Rather than downloading your uploaded files in spreadsheet form, you can download a ZIP file with all the files uploaded by your respondents. When exporting your data in Responses, just choose the User Submitted Files format.
Qtip: Depending on the number of files that have been uploaded, this ZIP file may be quite large and could take a while to download. If your file is too large to download or takes too long to download, try filtering your responses by recorded date to divide your dataset into smaller batches. When you export your data with the filter applied, only the filtered responses will attempt to export.
Data Section
You and any collaborators with access to the data can easily download uploaded files in the Data section.
Previewing Uploaded Files in Results Dashboards
Qtip: The functionality described in this section is only set up automatically in results dashboards. For other types of dashboards, you can add this widget, but will have to follow a few steps to set it up.
If you have a survey with a file upload question, your automatically generated results dashboard will contain a record table widget. This widget displays information about the uploaded files, and allows you to view and download the files.
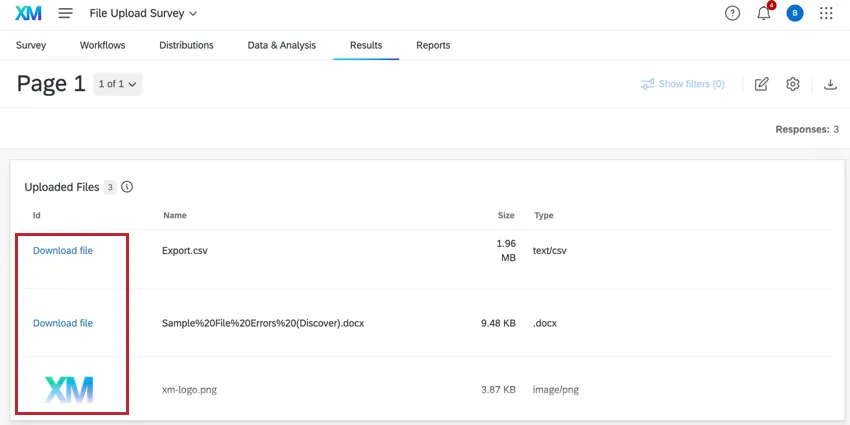
Images are visible directly within the widget, and can be opened in a new browser tab by clicking on the image. Other uploaded files (documents, spreadsheets, etc.) can be downloaded to your computer by clicking the Download file link.
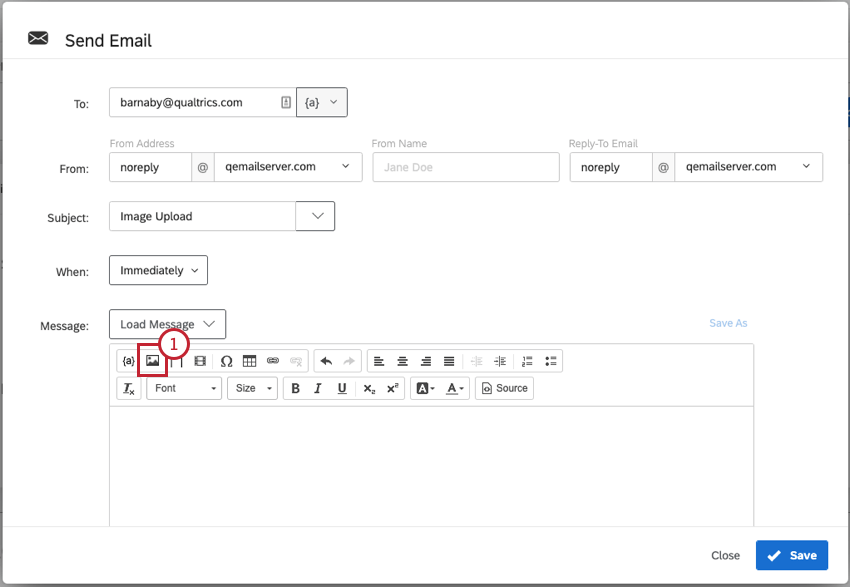
Inserting Uploaded Image Files into an Email Task
It’s possible to include uploaded image files in an email task by modifying the email HTML. This will require a bit of coding, but can be accomplished by following the below steps.
Qtip: It is only possible to insert uploaded image files. Other file types aren’t supported using this method.
Attention: To insert uploaded images into your email tasks, you must disable Require permission to view uploaded files in your Security Survey Options.
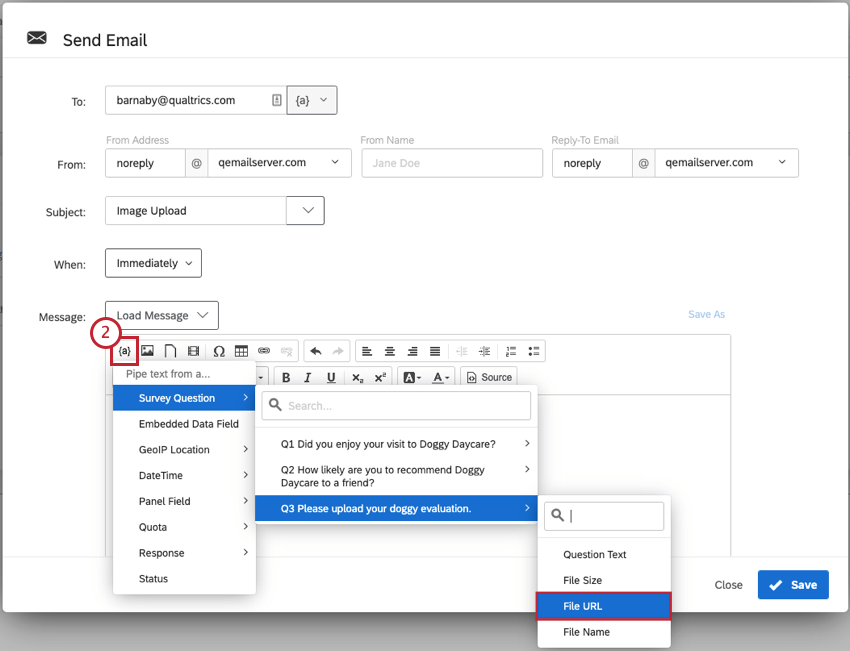
Qtip: Always generate piped text for your file URL from the workflow, as shown above. Be careful not to copy file URL piped text from the survey editor into an email, since this URL is temporary and will not work the same way.

Screen Capture
Attention: Screen Capture is available in Website / App Insights projects. These are a separate product from the Survey Platform. To use the screen capture feature, Website / App Insights projects must be enabled/purchased for your account.
Screen capture allows respondents to attach a screenshot of the site they are viewing when taking a survey through a Website / App Insights project. This question type is only available to users that have purchased access to Website / App Insights projects. The screen capture question type allows respondents to illustrate where on the site they are referring to and highlight and blackout certain parts of their image. This makes it possible to see exactly what your website visitors are seeing when they give feedback on the site.
For more information, please visit the Screen Capture support page.
FAQs
What kind of project can I use this type of question in?
What kind of project can I use this type of question in?
That's great! Thank you for your feedback!
Thank you for your feedback!